1
Installation Guide
Introduction
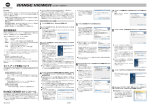
RANGE VIEWER is 3D scanning software for Windows 7, Windows Vista
or Windows XP. It has the following features.
• Controls Konica Minolta’s RANGE7/5 noncontact digitizer to scan works in 3D.
• Imports and processes 3D shapes of scanned works as 3D data.
• Reproduces 3D images by scanning works multiple times from different
angles.
• Converts data to formats used by 3D processing software of other
companies.
•
When “User Account Control – Windows needs permission to continue”
dialog box appears, click the [Continue] button to install the software.
• When Windows XP is used, “The software has not passed Windows Logo
testing…” message will appear. Click the [Continue] button to install the
software.
If RANGE VIEWER is already installed on the computer and it is desired
to install a different language of the same version of the software, please
uninstall the existing RANGE VIEWER and then install the desired
language of RANGE VIEWER.
RANGE VIEWER Installation Procedure
Operating Environment
To gain full use of RANGE VIEWER, it must be installed in the below
computer environment.
• Computer (Including display, mouse and keyboard)
CPU
: Intel Core2 Duo, Xeon or faster
Memory : 4GB or more
HDD
: 20MB or more space required for installation
Graphics: OpenGL graphic board capable of displaying 16-bit colors in
1280 x 1024 resolution or better
Display : 1280 x 1024 or higher resolution *1
Other
: Optical drive x 1 *2 (Required for installation)
USB 2.0 port x 1
*1
RANGE VIEWER cannot fully display works on low resolution
displays.
*2 By “optical drive”, it is meant CD-ROM media drives such as DVD±R
drives, DVD-ROM drives and CD-ROM drives.
• Support OS
Windows 7 Professional (64bit)
Windows Vista Business SP2 (64bit)
Windows XP Professional x64 Edition SP2 (64bit)
The screen shots in this Installation Guide are sample displays when
Windows Vista is used.
Setup
The setup procedure for RANGE VIEWER is as follows.
RANGE VIEWER Installation
1
2
3
Start up RANGE VIEWER and communicate with the RANGE7/5.
RANGE VIEWER Installation
Install RANGE VIEWER in a computer as follows. With computers that
support Autorun, the installation program starts up automatically when
the installation CD of this software is loaded into the optical drive.
•
Installation begins and the Install Shield Wizard dialog box
appears.
Read it and click the [Install]
button.
8
During installation, progress is shown in a progress bar.
When Windows XP is used,
“Found New Hardware Wizard”
dialog box appears. Select [No,
not this time] and click the [Next]
button.
In the next dialog box, select [Install from a list or specific location] and click
the [Next] button.
In the next dialog box, select [Search for the best driver in these locations.]
and [Search removable media (floppy, CD-ROM…)], and then click the
[Next] button.
The installation program does not run automatically in computers without
Autorun support or if Autorun is turned off, therefore start up the installation
program manually as explained in step 4.
4
The License Agreement dialog box appears.
A w indow c o nc er ning t he
license agreement appears.
Read it carefully and, if you
agree to the terms, select “I
accept the terms in the license
agre e m e nt ” an d c li c k t h e
[Next] button to proceed with
installation.
To cancel installation, click the [Cancel] button. A confirmation message
appears asking whether to cancel
installation or not. To cancel installation, click the [Yes] button. To continue
installation, click the [No] button.
If you do not agree with the terms,
select “I do not accept the terms in the
license agreement” and click the [Cancel] button.
If the installation program does not start up automatically,
select the installation program file and start it up manually
as explained in steps (1) ~ (3) below.
These steps are not necessary if the installation program starts up automatically from Autorun. In such case, proceed to step 5 and continue with
installation as instructed by the windows.
1) Select [All Programs] – [Accessories] – [Run] from the Start menu in
Windows.
2) The “Run” dialog box appears, therefore click the [Browse] button to the
“Browse” dialog box. Select the installation program of this software and
click the [Open] button.
To install the software, log in with administrator privileges.
9222-A0V8-78
3) Click the [OK] button to execute
the installation program. Proceed with installation as instructed by the windows in step 5 and
beyond.
Click the [Next] button and
proceed with installation as
instructed by the windows in
step 5 and beyond.
Connections
RANGE VIEWER Startup
A dialog box appears explaining that preparations for installation have been completed.
Example: For optical drive D
[D: \Setup.exe]
5
When “RANGE VIEWER Setup” dialog box appears, select
[English] from the [Language]
list box and click the [OK] button.
Autorun to start up automatically.
RANGE7/5 driver.
Load the installation CD of this software into the optical
drive of the computer.
• You may also directly input the
path (drive number of the optical
drive, folder name and program
file name) to the installation program in the [Open] box of the
dialog box.
7
The installation program starts up automatically from Autorun of Windows.
Install RANGE VIEWER in a computer. The installation program uses
Connect the RANGE7/5, computer and cables. Also, install the
Turn ON power to the computer and start up Windows.
• The installation program of this software is in the Setup.exe file on the
installation CD.
BAIAKK
The confirmation message asking
whether to cancel installation or not.
Therefore, if you do not agree with the
terms, click the [Yes] button to stop the
installation program.
You agree to the terms of the license agreement by continuing with the
installation of this software.
6
A dialog box appears for selecting the destination folder
where to install this software.
If installation is interrupted, a dialog
appears explaining that and the installation program quits.
Click the [Finish] button to close the
dialog box.
9
A dialog box appears explaining that installation has completed.
Click the [Finish] button to quit
the installation program.
After confirming the destination
folder, click the [Next] button.
• At the default settings, the
destination folder is created
in the Program files folder of
the C drive where the OS is
installed, and this software is
installed there.
• To specify a destination folder,
click the [Change] button, which
opens the Change Current
Destination Folder dialog box,
and select a folder for installing
the software.
• The destination folder can also
be newly created from this
same dialog box.
10
Check that the software was installed in the selected destination folder using Windows Explorer, etc.
The PDF files of the instruction manuals
(Reference Manual and User's Guide)
will also have been installed. If you
want to view the instruction manuals
while using the software, select Help –
Instruction Manuals from the menu bar.
Connections
Connect the RANGE7/5 to the computer. Use a USB cable for the
connection.
SAFETY PRECAUTION
Before use, carefully read the user manuals of the RANGE7/5 and
computer in order to use equipment safely. Improper handling can
lead to fire and electric shock.
• The first time that the RANGE7/5 is connected to the computer, the driver
must be installed, therefore log in with administrator privileges and install
the driver.
Step 1 Connect the RANGE7/5 to the computer.
1
4
Click “Next” at the bottom of the dialog box to proceed
with installation.
When driver installation has
been completed, a dialog box
appears explaining that.
5
• When properly installed, the
RANGE7/5 driver can be used
as the interface for communicating with the RANGE7/5.
Directly connect the USB cable to a USB port
on the computer. Do not go through a USB
hub, etc.
RANGE7/5 supports hot plug connections.
Before connecting to it, power to the computer does not have to be OFF.
Step 2 Install the driver.
• When “User Account Control – Windows needs permission to continue”
dialog box appears, click the [Continue] button to install the driver.
• When Windows XP is used, “The software has not passed Windows Logo
testing…” message will appear. Click the [Continue] button to install the
software.
1
The RANGE7/5 is detected. Select the driver installation
method.
Click “Locate and install driver
software (recommended)”.
RANGE VIEWER Uninstallation
This is software is uninstalled using the standard Windows procedure.
• To uninstall the software, log in with administrator privileges.
• When this software is uninstalled, the destination folder and shortcut
icons created on the desktop and in the Programs menu are deleted.
There is no need to worry about deleting data saved in the destination
folder or data folders even when the software is uninstalled.
RANGE VIEWER Uninstallation Procedure
1
2
Select the method for finding the driver.
Select [Control Panel] from the Start menu in Windows.
The Control panel window
appears.
3
2
Turn ON power to the computer and start up Windows.
Click “Uninstall a program” in the Control Panel window.
The Uninstall or change
a program window appears
with a list of currently installed
programs.
6
When the “User Account Control – Windows needs permission to continue” dialog box appears, click “Allow” to
proceed with uninstallation.
7
During uninstallation, progress is shown in a progress
bar.
8
After RANGE VIEWER has been deleted, the “Uninstall or
change a program” window reappears.
• Check that RANGE VIEWER has been deleted from the program list.
Insert the RANGE VIEWER
installation CD into the CD/
DVD drive of the computer.
Click [Browse…] but ton to
specify the “Driver” folder (ex.
D:\Driver) on the installation
CD.
5
Click “Device Manager” amongst the window tasks.
6
Activate the Universal Serial Bus Control (click [+] next to
the icon to show [-]) in the Device Manager list, and select
the KONICA MINOLTA RANGE7 driver.
7
With the KONICA MINOLTA RANGE7 driver selected, rightclick the mouse to open a pop-up menu and select “Uninstall” there.
T h e sy s t e m m a i nt e n a n c e
window appears.
When the “ User Account
Control – Windows needs
permission to continue” dialog
box appears, click “Continue”.
The Device Manager dialog
box appears.
The USB driver for Konica Minolta’s RANGE7/5 does not have to be deleted
when uninstalling this software, but to uninstall it, do so as follows.
• To uninstall the driver, log in with administrator privileges.
Driver Uninstallation Procedure
1
Turn ON power to the computer and start up Windows.
2
Connect the RANGE7/5 to the computer.
• Connect the open end of the USB cable
that is connected to the RANGE7/5 to a
USB port on the computer.
Directly connect the USB cable to a USB
port on the computer. Do not go through a
USB hub, etc.
•The “Confirm Device Uninstall”
dialog box appears, therefore
place a checkmark in the “Delete the driver software for this
device” checkbox, and click the
[OK] button.
RANGE7/5 supports hot plug connections. Before connecting to it,
power to the computer does not have to be OFF.
4
Specify the driver search location.
Click “System and Maintenance”.
Driver Uninstallation
Click “Browse my computer for
driver software (advanced)”.
3
4
Click the [No] button to cancel uninstallation and return to the “Uninstall
or change a program” window.
Connect the included USB cable to the RANGE7/5.
Connect the other end of the USB cable to a USB port on
the computer.
Click the [Uninstall] button.
A confirmation message
appears asking, “Are you sure
you want to uninstall RANGE
VIEWER? ” Click the [ Yes]
button to start uninstallation.
Click the [Close] button to quit the detection wizard.
• For connection procedures, see the RANGE7/5 user’s manual.
2
5
Select “RANGE VIEWER” from the program list.
When the program you want
to delete is selec ted, the
[Uninstall] button is activated.
3
Select [Control Panel] from the Start menu in Windows.
The Control panel window appears.
8
After uninstallation has been completed, check that the
KONICA MINOLTA RANGE7 driver in the USB Controller
has been deleted from the Device Manager list.
•Close the Device Manager
dialog box to quit the device
manager.
• When “User Account Control – Windows needs permission to
continue” dialog box appears, click the [Continue] button to install
the driver.