1
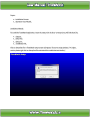
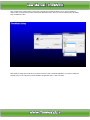
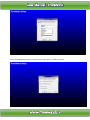
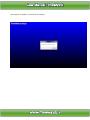
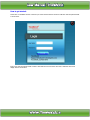
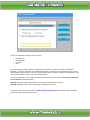
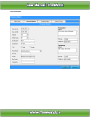
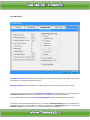
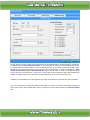
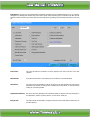
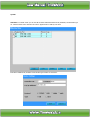
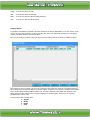
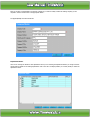
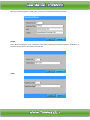
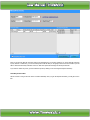
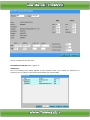
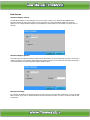
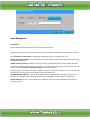
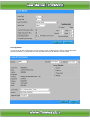
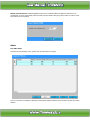
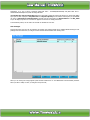
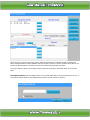
Powered By: Topics: Installation Process Operation User Manual Installation Manual: To install the TimeWatch application, insert the setup cd in cd drive. In setup cd you will find these file. Support Setup.Exe Setup.Lst TimeWatch.Cab Click on Setup.Exe file. A TimeWatch setup screen will appear. (If you are using windows 7 or higher version please right click on Setup.Exe file and select Run as Administrator button). Click on OK button to continue setup. In next screen setup will ask to change the directory. If you want to change the directory click on change directory button and select the desired directory in which you want to install the setup. By default setup is installed in D drive. After clicking on change drive it will ask for programs in which you want to install the application. If you want to change the program group you can change else it will be installed in Program File section. Click on Continue. During the installation setup will ask for some file version conflict. Click on yes button every time. After completion of installation a successful screen will appear. To use the Time Watch application go to the directory in which you have installed the TimeWatch application (Default Location (D:/TimeWatch) and Run TimeWatch.Exe file. A reader and path selection box will be displayed. Select reader, database type and license type. MSDE: Micro Soft SQL Server Desktop Engine (Preferred for Windows XP) MSDE 2005: Micro Soft SQL Server 2005 (Preferred for Windows 7, Vista and Above) SQL Server: If SQL server is already installed in system and SA password is not “sss” MS Access: MS Access Database Client: If you are using multi user software and want to make this system as client. Serial: Software License type (Default type) Dongle: If you are using Dongle key After selecting these information’s software and a login screen will appear. It will ask for user name and password. Enter the user name and password and start using application. S. NO. TOPIC 1. Introduction 2. How to get Started 3. Menus 3.1 System 3.1.1 Exit 3.1.2 Password 3.1.3 Communication 3.1.4 Monitor User Log 4. Main Window (Masters) 4.1 Controller 4.2 Company 4.3 Department 4.4 Section 4.5 Grade/Group 4.6 Category 4.7 Shift 4.8 Employee 4.8.1 Official Detail 4.8.2 Personal Detail 4.8.3 Time Office Policy 4.8.4 Shift/Weekly Off Policy 5. Transaction 5.1 Manual Punch Entry 5.2 Overstay to Overtime 5.3 Data Maintenance Window 5.4 Holiday Entry 6. Data Process 6.1 Attendance register creation 6.2 Attendance register updation 6.3 Back day processing 7. Leave Application 7.1 Leave Master 7.2 Leave Application 7.3 Leave Accrual 7.3 Auto Leave Accrual 7.4 Monthly Leave Increment 8. Admin 8.1 Time Office Setup 8.2 User Privilege 8.3 Verification 8.4 Reader Configuration 8.5 Finger Setup 8.6 New Employee Upload PAGE NO 9. S. NO. TOPIC Reports 9.1 Daily 9.1.1 Late Arrival 9.1.2 Absenteeism 9.1.3 Attendance 9.1.4 Department Summary 9.1.5 Early Arrival 9.1.6 Shift Wise Presence 9.1.7 Machine Raw Punch 9.1.8 Manual Punch Audit 9.1.9 Daily Performance 9.1.10 Early Departure 9.1.11 Time Loss 9.1.12 Over Time Register 9.1.13 Over Time Summary 9.1.14 Shift Change Statement 9.1.15 Out Work 9.1.16 Missing And Re-verification 9.1.17 Continuous Late Arrival 9.1.18 Continuous Early Departure 9.1.19 Continuous Absenteeism 9.1.20 Present Report 9.1.21 Access Control Report 9.2 Monthly 9.2.1 Performance Register 9.2.2 Employee Wise Attendance 9.2.3 Department Wise Attendance 9.2.4 Shift Wise Attendance 9.2.5 Muster Roll 9.2.6 Form No-12 9.2.7 Over Time Register 9.2.8 Over Time Summary 9.2.9 Shift schedule Analysis 9.2.10 Employee Wise 9.2.11 Department Wise 9.2.12 Regularity Chart Loss Reports 9.2.13 Early Departure 9.2.14 Time Loss And Over Stay 9.2.15 Late and Over Stay Leave 9.2.16 Leave Card 9.2.17 Sanctioned Leaves 9.2.18 Consumed Leaves 9.2.19 Balance Leave 9.2.20 Leave Register PAGE NO S. NO. TOPIC 9.3 Yearly 9.3.1 Form 14 9.3.2 Yearly Attendance Detail 9.4 Leave 9.4.1 Sanctioned Leave 9.4.2 Leave Card 9.4.3 Accrued Leave 9.4.4 Consumed Leave 9.4.5 Balance Leave 9.4.6 Leave Register 9.5 Master 9.5.1 Declared Holiday 9.5.2 Company 9.5.3 Department 9.5.4 Category 9.5.5 Shift 9.5.6 Employee Setup Info 9.5.7 Employee General Info 9.5.8 Leave 9.5.9 Employee Joining Info 9.5.10 Employee Leaving Info PAGE NO Introduction - Time Office Management System: TimeWatch “Time Office” is a ‘time & attendance’ management software solution for all types of organization larger or smaller. It delivers the functionality and flexibility to support the demanding and complex time management requirements of your organization. Going far beyond traditional time and attendance systems, the TimeWatch Time Office software can significantly improve the efficiency of your business, eliminating unneeded effort and simplifying the daily time management activities for all of the members of your workforce. Our time and attendance solution is designed specifically to support the complex requirements of enterprise-class implementations. The TimeWatch “Time & Attendance” software is designed for every need of any modern Time Office. With several reports beautifully designed and accurately generated it fulfils the needs of all the departments of any industry or business establishments. All the repetitive, manual, time consuming work is made simpler and the reports are generated in time. This includes even some of the statutory reports required by Government. Huge Number of reports is generated through our System, which has been highly appreciated not only by the Time Office, but also by the Personnel Department, Accounts Department, EDP Department and the General Management of every organization. TimeWatch “Time Office” software can work even in an environment where the employees can record the attendance (by dropping the card to register ‘IN’ and ‘OUT’ timings) from any of several systems that could be working at a location and the attendance recording will be done automatically in the correct way. This software is designed not only to cater to the needs of all kind of possible users e.g., factories, offices etc. To cater to the needs of the factories where an employee needs to sit beyond the normal limits of 12 the software takes two days data together for proper computation of attendance. In the Offices the sales service, account, personnel, administration on personnel needs to go out for sales calls, service calls, bank work, Labor Courts etc. The software provides the facility of calculating the outwork of such employees and also calculate the outwork as the employee’s working hours. Advantages of having this type of system are: It is convenient for the employees, to utilize any of the machines installed in the premises, which is freer. As they can record ‘IN’ and ‘OUT’ from any of the TimeWatch systems which are there, it has an automatic reducing effect on the length of the queue. However because of any reason if dedicated machines are required for ‘IN’ and ‘OUT’, the same can also be done without any problem. TimeWatch has this provision. Duplicate checking of entries Many times an employee (mainly workers) drop/punch his card more than once in quick succession just to ensure and reassure himself that his attendance is marked. However, second punch is normally treated as ‘OUT’ punch. To circumvent such situation and ignore all the repeated punches received within a specified time. Say, 5 minutes or 10 minutes etc., a provision exists so that the repeat punches of the same employee received within this period will not be treated as ‘OUT’ punch. Night Shift Operation TimeWatch software works even for night shift operation i.e., person entering during night hours of one day can leave the next day morning or afternoon. How to get started: Double click on TimeWatch shortcut it will show you License window and then ask for the valid user name and password that is shown below. Enter a user name and password that is valid for Time Office then click ok button when this is valid then main screen display which is shown below. On home screen a dashboard will be appear. Following buttons will be displayed on dashboard Download Logs Data Maintenance Employee Details Daily Report Monthly Report Exit Application. Download Logs: To download the punch data from device you have to select this button. By clicking on this button a data download window will appear like this . In device communication window you will see 4 buttons. Set Date/ Time Read Date/Time Download Close Before downloading the punches data from device please insure that device should be connected with TimeWatch application. To check the connectivity click on Read Date/Time button. If the device is connected Date and Time of device will be displayed. If date and time is correct you may download the data from device by clicking on Download button. If you want to set date and time of device, click on Set Date/Time button. If you have multiple device and you want to download the punch data from all device click on Check to Download Data From all device and download the data. New Log: TimeWatch software will download only new logs (From last download) from device. Old Logs: TimeWatch software will download all logs (from starting) from device. If you want to delete logs from device click on Check to delete logs from device and download the data. TimeWatch software will delete the punch data from device. Data Maintenance: From data maintenance window user can view monthly attendance record of an employee as well as maintain the attendance record of any employee. Data maintenance window will be look like this. Enter the paycode of the employee for which you want to update the attendance details or view the attendance. After entering the paycode select the month and press tab button. A attendance record window will be appear. Double click on date for which you want to update the attendance record. An Attendance details window will appear. From attendance details window user may update attendance like shift change, manual punch and leave application. Employee Details: From Employee Details window user may add, edit and delete employee record. On clicking on employee details button an Employee Details screen will appear. Above screen show the Employee master from has 5 buttons 1. 2. 3. 4. 5. Append Modify Delete Find Close To To To To To add new record modify existing record delete existing record locate any employee detail through Name close the current window The entire employee personal details like name, address, shift details like weekly off day, shift pattern etc. is entered through this option. Because of data intensity this form is arranged into four racks. By selecting the tabs you can shift from rack to rack. The first and second screens contain the personnel details of an employee. The third contains the time office policies applicable for that employee and the fourth contains the shift information relating to that employee. Official Detail: The first field Active decides whether the employee is on roll or not. System will not do processing or run duty roster for the non-active employees. The Paycode and card no should be unique. You can assign the respective company, department and category to each employee, which he/she belongs to. Personal Details: Time Office Policy: Permissible late arrival decides the duration an employee can come late without marking as late. Same way permissible early departure is the allowed early departure duration. Maximum working hours in a day decides, up to what time system should look for out punch, after the In punch. If the employee can work round the clock, the Round The Clock Work field should be selected. If you are deselecting the Consider Time Loss field, system will not calculate time loss (including late arrival and early departure). If hours worked duration is lesser than the Present Marking Duration system will mark that employee as absent. If you want to enable automatic half day assignment, you can select the Half Day Marking field. If you are selecting it you are required to give two more information to complete the calculations i.e. maximum absent hours for half day and Minimum absent hours for half day. Here you are giving the limits for half-day assignment. Overtime and Overstay will be calculated only if the respective fields are selected. Punching Patterns: Following are the different types of punching patterns that can be assigned to any employee in the Company: Single Punch: If desired, It is possible to do away with the ‘OUT’ punching for employees leaving at the shift end time only. In this case employees will have to record ‘IN’ time only. ‘OUT’ will be automatically assumed to be the shift end time. However, persons leaving early or staying overtime are expected to punch ‘OUT’ time also and such recordings will be accounted. Double Punch: Four Punch: In addition to the two punches recorded while coming ‘IN’ and going ‘OUT’ you can also record ‘LUNCH IN’ and ‘LUNCH OUT’ timings. Multiple Punch: Both ‘IN’ and ‘OUT’ timing are recorded. Maximum 20 punches are allowed. For Directors, Senior Executives it may not be mandatory to record attendance daily. However, for the sake of proper records, and at the same time keeping in view their busy schedules, a feature has been provided by which it automatically posts ‘IN/OUT’ timings, without actually punching. If they do punch, the same will be recorded or otherwise it will be inserted automatically as per their shift timings. For specific employees who are often doing outside work like Peons, Purchase Personnel, Account Personnel requiring to go to Bank etc., the punching can be multiple i.e. the personnel are required to punch the card when going out and when coming in. The time the person spends inside the office and outside for official purposes can be monitored. Owing to carious practical reason this facility is only for the day shift operations and is meant only for the white-collar employees who come in the general shift of the offices / factories. This facility will not be extended at present to night shift operation or for workers. More over in night shifts, such requirement hardly exists. The forth and the last screen contains the auto-shift and duty roster related information. The first field asks for the shift type. Possible shift types are Fixed, Rotational & Ignore. In case of fixed shift the employee’s shift will be fixed for all the time. E.g. General shift will be there for Officers. In case of rotational shift type, you can specify the pattern of the shift in which the shifts for that employee rotates. Here you are required to enter two more fields to complete the shift pattern i.e. Shift change after how many days and Shift remaining days. The former field is clear, i.e. it will be 7 if weekly shift change is there. Duty roster is created from the 1 st day of year or from the date of joining whichever is earlier. Shift remaining days specifies the number of days that are remaining in the first allocated shift i.e. the first shift in the duty roster. In addition to the shift details you are also required to give weekly off information to complete the duty roster information. If you are not interested in entering each employee's shift details, the system can be used for automatically changing the shifts. For this purpose all the possible shifts in which an employee can come should be entered in the Authorized Shifts field. Daily Report: This report can be generated after transferring the data from the TimeWatch machine into your computer. Management for making quick decisions may require these reports. All the following reports can be taken just after the shift start time. Please ensure that you transfer data of previous days before generating reports like Daily Performance, Over Time etc. Late Arrival: This report provides the information of all the employees who have come late on the date specified. Absenteeism: It provides the information of the employees who are absent on the date specified. Attendance: This report shows the attendance of all the employees on the date specified. This report shows department wise analysis: showing number of employees present, absent, on leave and having weekly off on the date specified. Department Summary: This report shows the department wise attendance details of employees like total employees in the department, number of presents, absent, on leave and on weekly off. Early Arrival: This report shows the information of employees who have come earlier than the shift in time on the date specified. Shift Wise Presence: This report shows the attendance details of employee’s shift wise. It shows the number of days present, absent, weekly off, leave, OT and OT amount. Machine Raw Punch: This report shows all the punches of that day including the manual punches (suffixed by the character "M" which distinguishes it from the machine punch). Manual Punch Audit: This report can only be generated if authorized personnel do any manual punch on that day. Daily Performance: This report shows the performance of all the employees on the selected date. The information’s includes Employees name, shift of the employee, shift start time, details of all the punches, total hours worked, OT, OT amount etc. Early Departure: This report shows total loss hours for the company, employee wise, on account of their early departure. It also shows the no of days the employee has left early. Time Loss: If an employee comes after the permissible late arrival time or takes excess time for lunch than the allowed lunch duration time or goes before the permissible early departure time then the case is considered as a time loss. Details of such employees are obtained through this kind of report. Over Time Register: Generated for Employees who work more than the working hours; the excess working hours is considered as over time (if allowed in Employee Master) and reflected in this report. Over Time Summary: This report shows the department wise over time status of employees on that day. Shift Change Statement: In case an employee is allowed to work in a shift other than his/her usual shift (through the authorized shift assignment of the Employee Master) the automatic shift change checks the arrival time of the employee and allocates the shift nearest to it. This change is notified through the shift change statement as it indicates the actual shift and changed shift of that employee. Out Work: In case the software is set to calculate two punches, this report shows the punches in between the in punch and out punch, as out work of the employees on that day. Missing and Re-verification: This report shows the details of employees who’s in or out punch is missing and of the employees who have worked more than the permissible maximum working hours etc. Our Software brings to your notice the abnormalities for correction. Continuous Late Arrival: This report shows the name of the employee who is coming continuous late (after permissible late arrival time) by more than the specified days. Continuous Early Departure: This report shows the information of employees who are leaving before the permissible early departure time continuously. Continuous Absenteeism: This report shows the information of employees who have been absent continuously for specified number of day(s) till the current date. Monthly Report: In TimeWatch application user can generate report monthly. Performance: This report shows the Monthly performance of an employee. Employee Wise Attendance: This report shows the attendance details of employees like total present, absent, leave, weekly off, OT and OT amount for a month. Department Wise Attendance: This report shows the department wise attendance details of employees like total employees in the department, number of presents, absents, leaves and weekly off. Shift Wise Attendance: This report shows the attendance details of employee’s shift wise. It shows the number of days present, absent, weekly off, leave, OT and OT amount. Muster Roll: This report shows the entire month’s attendance details of all the employees in a single chart. This report can be generated on 80 columns or 132-column stationery. This specimen is for 80 column. The same report in a better manner can be generated in 132 column. Form No-12: This report provides information of attendance of each and every employee date wise divided into two parts. This report also shows the total working hours, over time hours and details of all deductions. Over Time Register: Employees who work more than the working hours; the excess working hours is considered as over time (if allowed in Employee Master) and reflected in this report. Over Time Summary: This report shows the department wise over time status of employees on that day. Shift schedule: This report shows the shift chart of the employees of a month. This report can be generated for all shifts (fixed, rotational, ignorable) / rotational shifts only / fixed shifts only. This chart shows shift pattern, weekly off (First and second) and the shift of each day employee wise. Analysis Employee Wise: This report shows the attendance details of employees like total present, absent, leave, weekly off, OT and OT amount for a month. Department Wise: This report shows the department wise attendance details of employees like total employees in the department, number of presents, absents, leaves and weekly off. Regularity Chart: This report shows the regularity chard of the employee. Loss Reports Early Departure: This report shows total loss hours for the company, employee wise, on account of their early departure before permissible time limit. It also shows the no of days the employee has left early. Time Loss and Over Stay: Only those employees name will be shown in this report who have come after the permissible late arrival time and worked more than the working hours. This report consists of the total late hours, number of days late and total over stay employee wise. Late and Over Stay: This report shows the information of all the employees who have come late on the date specified. You can take this report any time after the shift start time. Menu Details The TimeWatch Time Office s/w has a number of menus and sub-menus that contains various modules and functions or tasks that can be performed as a part of Time & Attendance system. Following is the list of menus and the sub-menus available in the TimeWatch Time Office application: System Exit Password Communication Monitor User Log Main Controller Company Department Section Grade Category Shift Employee Transaction Punch Entry For Attendance Over Stay To Over Time Data Maintenance Window Holiday Entry Data Process Attendance Register Creation Attendance Register Updation Back Date Processing Leave Management Leave Master Leave Application Leave Accrual Auto Leave Accrual Monthly Leave Increment Admin Time Office Setup User Privilege Verification Finger Setup New Employee Upload Reports Daily Monthly Yearly Leave Master 1). System Password: To Change password this option can used. User have to enter existing password and new password and new password confirmation to set new password. Communication: To download the data from device this option is used. Please refer to page no 13. 2). Main Controller: In controller section you can enter all the device related information like ID, IP Address, Communication type etc. Machine master screen will be like this. Click on Append button to add any new device Enter all the details like ID, IP address communication type and click on save button. TCP/IP: To connect the device over LAN. USB: To connect the device with USB cable. GPRS: To connect the device the data from GPRS (SIM Card) Wi-Fi: To connect the device with Wi-Fi network. Company Master: It is possible to have different companies in the same premises for the sakes of administration or any other reasons. In this case you can use a single computer to do all the time office jobs, and you can differentiate the employees by declaring a company and adding company code to each employee. When you are opening the company master you will get a browse window contain all the details of available companies. Each company has unique company code. This code is required to enter against each employee in the Master (Employee) and in various reports to assign the employee for specific company. However it is not required to remember all the company codes. The Time Office software facilitates company code. This code is required to enter against each employee in the Master (Employee) and in various reports to assign the employee for specific company. However it is not required to remember all the company codes. This screen shows four-command button. 1. 2. 3. 4. Append Modify Delete Close Now you can click on Append button to add new company. If you want to modify or delete an existing company you are required to select it first and click on the appropriate button. The Append/Modify form will look like this. Department Master: Here we are entering the details of each department. When you are selecting the department master you will get a browse window with the details of the existing departments. Like in the case of Company Master you can add, modify or delete the department entries. When you are selecting Append or modify option, it will give you a Department Master Entry form like, Section: This is utilizes for defining the record of employees. This should be created before starting the transaction. Modification can be done at any time and the effect will start from that date. Grade: Category: Here we are entering all the category details. You can categories the employees in different ways. Designation wise, Grade wise is examples. When you are selecting the category master the following form will open with the heads to be entered. It is not possible to edit the category code while you are modifying. If you really want to change the category code you can delete that entry and recreate it by adding a new category. Shift Master: Through this option we declare all the possible shifts in the company along with the details. Shift code: Insert the new shift code. Shift Start Time: This is the shift starting time. Shift End Time: This is the shift end time. Shift Hours: This is the time period that the shift contains, if this is wrong, it is sure that yours overtime and overstay will be wrong. Lunch Start Time: This is the starting time of lunch. Lunch Duration: This is the duration of lunch. Lunch End Time: This is the end time of lunch. Lunch deduction: This is the time period that will be deducted from the working hours. Overtime deduct after: This is the limit period after which the OT won’t be considered e.g. If OT deduct after is initialized as 3.00 hrs and employee having OT 5.00 hrs. Then it would consider 3.00 hrs. Only. Overtime start after: This is the minimum time period for OT consideration e.g. If OT start after is initialized as 15 minutes the OT will be calculated for only those employees, the time for which is more than 15 minutes. Overtime deduction: This is the time period that will deduct from the overtime hours. Shift Position: Three types of shift Night: That means last three punches of the next date only. Day: That means first three punches of the same date only. Half: This is the half-day shift for half day weekly off. Transaction: Transactions are used to make modifications in the table data. It can be a Punch Entry for Attendance to manually do the punching, or it can be a Leave Application to post the leaves etc. Punch Entry For Attendance: This option is used to add or delete the punches. When you are selecting this from the main menu, you will get an entry form like, Now you can give the Paycode in the first text box. If that employee is a non-RTC employee, you can do manual punch day by only. But if it is a RTC case, you can do manual punch from the date you are giving in the Process from column up to the date in which the End of Day Clearance is done. In that case system will rearrange the whole punches also. If you want to delete one punch, you first select that punch by clicking on the second grid and press Delete key. Over Stay To Over Time: OS-OT Voucher is using to enter the value of overtime manually. Once you give the Paycode and Date, you will get a screen like Here you can simply enter the value of OT. Data Maintenance Window: Refer to page no 14. Holiday Entry: Here you are declaring all the holidays applicable for whole employees. When you are selecting the Holiday from the Transaction menu you will get a browse window with the details of the entered holidays. When you are declaring a new holiday, an add holiday form will come up like, On holidays OT Amount will be OT * overtime Rate * OT Factor. If you are declaring holiday against some weekly off (normally against Sunday) you can specify that date in the adjusted against field, so that the system will transfer the entire shift assigned for the holiday to the week off i.e. the adjusted against day. Do not forget to select Company and Department selection to declare Holiday. When you are adding or deleting any holiday system will perform an automatic processing to make effect of holiday declaration, so there is no need for any sort of explicit processing. Data Process Attendance Register Creation: The Attendance Register is to be prepared for each year. It creates a yearly record. Selecting option All will create Attendance Register for each & every employee of the organization. For creating Attendance Register of a particular employee or for creating Attendance Register of selected date of a particular month to the last day of the same month of that year. Attendance Register Updation: If the shift policies of a particular employee changes which will be affective for the remaining year this option is used. First of all make the changes in the employee master followed by selecting the date, month and the year from which this change is to be made effective; through the Attendance Register Updation option. Back Date Processing: For processing an already processed date this option is used or process the punches taken in USB drive. To process the USB data, brows the log file, click on capture data button and select the date from which you want to process the data and click on OK button. Leave Management Leave Master: All the possible leaves an employee can take are entered through this option. Maximum of twenty types of leave can be entered to the system. For adding or modifying a record the following form occurs. Here Leave field and Leave Code are unique names. Possible value range of Leave field is L01 to L20. Weekly Off include (Yes/No) If yes then the weekly off coming between the leaves will be considered as leave else it will be considered as weekly off. Holiday Include (Yes/No) the calculation of the leave is done in the same fashion as in the case of Weekly Off include. If you want to specify the opening balance of the leave i.e. accrued leave you are required to select the Leave Accruable (Yes/No). Leaves like On Duty or Leave without Pay, should not be entered here. In the leave type you can specify either Leave or Present or absent. E.g. It will be Leave in case of CL or SL or EL and it will be Present in case of On duty and it will be Absent in case of Leave without pay. Sanction limit (Min & Max)- here one can set the sanction limit for a particular leave for example if Min value is 2 in that case you can’t apply less than 2 leave ,if Max value is 20 you can’t apply more than 20 leave in a single stretch. Carried and Fixed- This option can be used for carry forward leave in next year. This will calculate the leave based on formula you have set. Leave Application: You can use this to enter any type leaves or tours for single or group of employees for a single or multiple days. Before using this Transaction, you should make sure that, all possible leave types are defined in the leave master. Once you give the paycode (single or range) and date you can select the leave, you want to enter. For the ease of work, system will select the first leave in the leave master as the default leave. If you want change the leave type, simply click on it. And you will get a list, which will show even the balance also. Accrual Leave: As we specified in the Leave Master here we are specifying how much leave an employee can avail in the current year. When you are selecting the Accrued leave master from the main menu. Leave credited to each employee’s account will be entered through this option. You will be asked to enter employee’s code range (Paycode from and Paycode to) according to your requirement you have to enter. The screen will be seen as follows: Auto Leave Accrual: This Option is used to automatic calculation of Leave of previous year and set as opening balance for current year. Monthly Leave Increment: TimeWatch application allow user to credit leave balance in employee’s leave account on monthly basis. To do this select Monthly Leave Increment from leave master. Select the month for which you want to credit leave and click on proceed button. Admin Time Office Setup: It includes the general details / rules / policies which are followed by the company. There is no provision for modifying or deleting the existing setup master information. This is intended to prevent the possible mistakes. Three columns are there in this form. We can give any value to the Setup Register No. Field. But the entries with the highest Setup ID value will be taken as the default system parameters. Late arrival upto Permissible Late Arrival duration (in minutes) will not be considered as late arrival. If the duration between two punches is less than the Duplicate check minutes system will ignore the second punch. The next three parameters define the equation for the Missing and re-verification report, i.e. If the hours worked is greater than Maximum working minutes to verify or late arrival is greater than Max. Late arrival duration or early departure is greater than Max. Early departure duration or status is MIS then that record will come in the Missing and re-verification report. The next five parameters define the automatic half-day assignment rules. If Half-day marking option is selected then the system will check the following conditions to assign half day and short leave. If Absenteeism hours between Minimum Absent hours for half day and Maximum absent hours for half day and Half day marking is selected, then status will be HLF i.e. Half Day. If Absenteeism hours less than Minimum Absent hours for half day And > 0 And Half day marking & Short leave marking both checked, then the status will be SRT i.e. Short Leave. If Hours worked < Present Marking Duration then the status will be A i.e. Absent. Over time will be calculated only if over time allowed is selected. Same way over stay will be calculated only if over stay allowed is selected. If Over stay allowed is selected then we can select or deselect the Over stay minus option also. Normally the Overstay is calculated using the following formulae. Overstay = Hours Worked – Shift Hours It can be a minus figure also; say when the employee works less than the shift hours. In this case if Over stay minus is deselected system will convert the overstay to zero. MaxWrkDuration defines the duration after which the system can accept the following punches after the first punch. In punch will be accepted upto the value of End time for In punch of next day. If the employee is a non-RTC case system will ignore these two parameters. If the Auto shift allowed is selected then we can set the boundaries for automatic shift assignment. I.e. if the in punch is between (Shift Start Time – PermisEarlyMinAutoShift) and (Shift Start Time + PermisLateMinAutoShift) then system will assign that shift. Cut off start time and Cut off end time defines the time width in which the system can search for In punch while taking spot report for RTC employees. Out pass hours and out pass frequency are the duration and frequency for permissible out going. If is Present on week off present is selected, then the system will count Present Value as 1 and Wo_Value as 0; if an employee punches on a week off. It applies to be Present on Holiday present also. In the Overtime policies, we can select one formulae to calculate the over time. User Privileges: Through this option new users can be created or the existing users and their rights can be modified. While selecting the user privileges from the main menu you will get a browse window with the details of the existing users. When you are running the setup program system will add a default user i.e. the Administrator with the default password. When you add or modify one user you will get an entry form like, Here you change the password, you can alter the rights i.e. what all options a user can access. Verification: Before taking any general report you have to run this option. It will mark absent on weekly off / Holiday if the employee is absent before and after the weekly off / Holiday. Finger Setup: TimeWatch software allow you to transfer finger data from once device to another device. If user has enrolled finger data on one device he can transfer the data from software. A Finger Management Data form will look like this. Select the device in which user are enrolled. Click on Check the Download all user Template and click on Download FP button. All finger data will be saved in database. Select another device in which you want to upload the data, select the user and click on upload FP button. From delete user button user can delete the finger data from device. If user has enrolled any admin in device and he forgot the password, by clicking on Clear Admin button he can reset the admin. New Employee Upload: From new employee option user can upload master data for newly joined employee in one go. To do this fill the employee details in a pre-defined format. Select the excel file and click on Ok button.