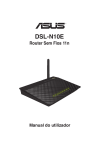
1
FLEXLAN
IEEE802.11n/a/b/g Wireless LAN
Access Point Board
FXE2000-G
User’s Manual
CONTEC CO.,LTD.
Check Your Package
Thank you for purchasing the CONTEC product.
The product consists of the items listed below.
Check, with the following list, that your package is complete. If you discover damaged or missing items,
contact your retailer.
Packing List
- Main unit (FXE2000-G)...1
- This User’s Manual …1
* You are free to download the manual of this product from the Contec’s website (http://www.contec.com/).
FXA2000-G
FXE2000-G
User's Manual
i
Copyright
Copyright 2012 CONTEC CO., LTD.
ALL RIGHTS RESERVED.
No part of this document may be copied or reproduced in any form by any means without prior written
consent of CONTEC CO., LTD.
CONTEC CO., LTD. makes no commitment to update or keep current the information contained in this
document.
The information in this document is subject to change without notice.
All relevant issues have been considered in the preparation of this document. Should you notice an
omission or any questionable item in this document, please feel free to notify CONTEC CO., LTD.
Regardless of the foregoing statement, CONTEC assumes no responsibility for any errors that may appear
in this document or for results obtained by the user as a result of using this product.
Trademarks
FLEXLAN is a registered trademark or trademark of CONTEC CO., LTD.
MS, Microsoft, Windows, Windows NT, and MS-DOS are registered trademarks or trademarks of
Microsoft Corporation in the U.S.A. and other countries.
Other names of companies and products used in this document trademarks or registered trademarks of the
related companies. This document does not use the symbols ™, ®, © etc.
Terminology/Abbreviations
The following terms and abbreviations are used in this manual for convenience.
Full term
Term used in this manual
Access point
AP
Station
ST/Wireless terminal
Personal computer
PC
About the speed mark
The link speed shown for the transmission rate in this manual, the setup screens, and elsewhere is the
theoretical maximum value based on the wireless LAN standard and does not represent the actual data
transfer rate.
ii
FXE2000-G
Table of Contents
Check Your Package .................................................................................................................................... i
Copyright ...................................................................................................................................................... ii
Trademarks ................................................................................................................................................... ii
About the speed mark........................................................................................................................... ii
Table of Contents ........................................................................................................................................ iii
1.
INTRODUCTION
1
About the FXE2000-G ................................................................................................................................ 1
Features ................................................................................................................................................. 1
Customer Support ........................................................................................................................................ 2
Web Site ................................................................................................................................................ 2
Limited One-Year Warranty ....................................................................................................................... 2
How to Obtain Service ................................................................................................................................ 2
Liability ........................................................................................................................................................ 2
Safety Precautions ....................................................................................................................................... 3
Safety Information................................................................................................................................ 3
Precaution on use.................................................................................................................................. 3
Usage limitation.................................................................................................................................... 3
Precautions Related to Service ............................................................................................................ 3
Notes on Radio Interface ..................................................................................................................... 4
Security Precautions ............................................................................................................................. 4
Federal Communications Commission ............................................................................................... 5
Handling Precautions ........................................................................................................................... 6
Environment ......................................................................................................................................... 7
Inspection .............................................................................................................................................. 7
Storage .................................................................................................................................................. 7
Disposal................................................................................................................................................. 7
2.
SETUP
9
Component Locations .................................................................................................................................. 9
LED display .......................................................................................................................................... 9
DIP switches ......................................................................................................................................... 9
INIT connector ..................................................................................................................................... 9
Pin heder (JP2).................................................................................................................................... 10
LAN connector ................................................................................................................................... 10
Checking the Network Addresses ............................................................................................................. 10
Power Supply ............................................................................................................................................. 11
Power Supply ...................................................................................................................................... 11
Installation .......................................................................................................................................... 12
Connecting the external antenna ....................................................................................................... 12
FXE2000-G
iii
3.
CONNECTION TO DEVICES AND SETUP METHODS
13
Preparation before Setup ........................................................................................................................... 13
Setup Using a Web Browser ..................................................................................................................... 15
Setting the Browser ............................................................................................................................ 15
Connecting to This Product Using Web Browser ............................................................................ 18
4.
SETUP AND STATUS DISPLAY
19
Basic settings ............................................................................................................................................. 19
System ................................................................................................................................................. 19
Radio ................................................................................................................................................... 20
VAP ..................................................................................................................................................... 22
Advanced Settings ..................................................................................................................................... 26
System ................................................................................................................................................. 26
Ethernet ............................................................................................................................................... 27
VAP ..................................................................................................................................................... 29
SNMP .................................................................................................................................................. 34
Network Time ..................................................................................................................................... 36
VLAN ................................................................................................................................................. 37
Log ...................................................................................................................................................... 39
Status .......................................................................................................................................................... 40
System ................................................................................................................................................. 40
WLAN................................................................................................................................................. 41
MAC Address Table .......................................................................................................................... 45
Log ...................................................................................................................................................... 46
Maintenance........................................................................................................................................ 49
5.
WIRELESS LINK MODE AND WIRELESS LAN FUNCTION
53
Wireless Link Mode .................................................................................................................................. 53
Standard Infrastructure Mode ............................................................................................................ 53
Compatible Infrastructure Mode ....................................................................................................... 54
Advanced Infrastructure Mode .......................................................................................................... 55
Installation in a Network ........................................................................................................................... 56
Features of the Wireless Network ..................................................................................................... 56
Operating Environment and Radio Waves ....................................................................................... 57
Constructing a Network ..................................................................................................................... 59
6.
MAINTENANCE
63
Maintenance Tool ...................................................................................................................................... 63
Log File Collection .................................................................................................................................... 63
Using FTP to Get the Log File .......................................................................................................... 63
Saving the Settings File ............................................................................................................................. 65
Using FTP to Backup the Settings File ............................................................................................. 65
iv
FXE2000-G
Restoring the Software Settings ................................................................................................................ 66
Using FTP to Restore the Settings .................................................................................................... 66
Upgrading the Firmware ........................................................................................................................... 67
Performing an Upgrade Using FTP ................................................................................................... 67
Initialization ............................................................................................................................................... 68
Using a Web Browser ........................................................................................................................ 68
Using the DIP Switch of the Main Unit ............................................................................................ 68
7.
TROUBLESHOOTING
69
When Communication Fails...................................................................................................................... 69
Setup Screen Unavailable on Web Browser ............................................................................................ 70
When the AP Will Not Start ..................................................................................................................... 70
8.
APPENDIX
71
Factory Default Settings List .................................................................................................................... 71
9.
SPECIFICATIONS
87
Environmental Specifications ............................................................................................................ 87
External Dimensions.................................................................................................................................. 88
I/O Interface ............................................................................................................................................... 89
FXE2000-G
v
vi
FXE2000-G
1. Introduction
1. Introduction
This chapter provides information you should know before using the product.
About the FXE2000-G
The FXE2000-G is a wireless LAN board that conforms to IEEE 802.11n/a/b/g standards of various
countries and features a wide input power supply (5 to 30 VDC) and can be configured either as an access
point or station.
Just connecting this product to a LAN port of an LAN-compliant equipment, then the equipment will
features the latest standards-compatible higher security, stable communication and easy maintenance
without its OS or CPU.
Features
- Compatible with 4 standards, IEEE802.11n/a/b/g
You can choose 24 ch (W52/W53/W56/W58*1) in the 5 GHz (IEEE802.11n/a), and in the 2.4 GHz
(IEEE802.11n/g), you can choose from 1 to 11ch. So, it is possible to design a flexible wireless network
to adjust a radio wave interference.
- Supports a various power supply
This product support a various power supply, such as AC adapter, DC power from 5 to 30 VDC, and PoE.
- The proprietary encryption technology "WSL" that is available along with WPA2/WPA and WEP.
This product supports an sophisticated security standard "WPA2/WPA", "IEEE 802.1X authentication",
"MAC address filtering" and ""ESSID hide". In the addition, it also supports the proprietary encryption
technology "WSL" that is available along with WPA2/WPA and WEP.
- Features variety of functions, including VLAN and a virtual AP function
This product has a virtual AP function that allows operating VLAN function and an AP as a multi-AP,
and configuring the settings for different security. Furthermore, this product can store a large event log
capacity (Conventional ratio: seven times, Approx: 15,000 logs).
*1 USA (FCC):
W52: 36, 40, 44, 48ch / W53: 52, 56, 60, 64ch / W56: 100, 104, 108, 112, 116, 132, 136, 140ch / W58: 149, 153, 157, 161, 165ch
FXE2000-G
1
1. Introduction
Customer Support
CONTEC provides the following support services for you to use CONTEC products more efficiently and
comfortably.
Web Site
Japanese
English
Chinese
http://www.contec.co.jp/
http://www.contec.com/
http://www.contec.com.cn/
Latest product information
CONTEC provides up-to-date information on products.
CONTEC also provides product manuals and various technical documents in the PDF.
Free download
You can download updated driver software and differential files as well as sample programs available in
several languages.
Note!
For product information
Contact your retailer if you have any technical question about a CONTEC product or need its price,
delivery time, or estimate information.
Limited One-Year Warranty
CONTEC products are warranted by CONTEC CO., LTD. to be free from defects in material and
workmanship for up to one year from the date of purchase by the original purchaser.
Repair will be free of charge only when this device is returned freight prepaid with a copy of the original
invoice and a Return Merchandise Authorization to the distributor or the CONTEC group office, from
which it was purchased.
This warranty is not applicable for scratches or normal wear, but only for the electronic circuitry and
original products. The warranty is not applicable if the device has been tampered with or damaged
through abuse, mistreatment, neglect, or unreasonable use, or if the original invoice is not included, in
which case repairs will be considered beyond the warranty policy.
How to Obtain Service
For replacement or repair, return the device freight prepaid, with a copy of the original invoice. Please
obtain a Return Merchandise Authorization number (RMA) from the CONTEC group office where you
purchased before returning any product.
* No product will be accepted by CONTEC group without the RMA number.
Liability
The obligation of the warrantor is solely to repair or replace the product. In no event will the warrantor
be liable for any incidental or consequential damages due to such defect or consequences that arise from
inexperienced usage, misuse, or malfunction of this device.
2
FXE2000-G
1. Introduction
Safety Precautions
Understand the following definitions and precautions to use the product safely.
Safety Information
This document provides safety information using the following symbols to prevent accidents resulting in
injury or death and the destruction of equipment and resources. Understand the meanings of these labels
to operate the equipment safely.
DANGER
DANGER indicates an imminently hazardous situation which, if not avoided, will
result in death or serious injury.
WARNING
WARNING indicates a potentially hazardous situation which, if not avoided, could
result in death or serious injury.
CAUTION
CAUTION indicates a potentially hazardous situation which, if not avoided, may result
in minor or moderate injury or in property damage.
Precaution on use
It is prohibited to modify the inside of this product. The product cannot be used in any country other than
those authorized for use.
Usage limitation
This product has not been developed or manufactured to be used in systems including the equipment
which is directly related to human lives *1 or the equipment which involves human safety and may
significantly affect the maintenance of public functions *2. Therefore, do not use the product for such
purposes. In addition, do not use the product within 20cm from a human body on a regular basis.
*1:
Medical devices such as life-support equipment and devices used in an operating theater.
*2: Main control systems at nuclear power stations, safety maintenance systems at nuclear facilities, other important safety-related systems,
operation control systems within group transport systems, air-traffic control systems, etc.
If using the IEEE802.11a standard, ensure that you comply with all relevant laws in the country of use. Outdoor use of IEEE802.11a is
prohibited in some countries. It is not possible to use it by limiting Radio Law in Japan.
Precautions Related to Service
Clean this product by wiping lightly with a soft cloth moistened with water or a cleaning solution.
Take care to avoid the use of benzene, thinners or other volatile solutions which may cause deformation
or discoloration.
FXE2000-G
3
1. Introduction
Notes on Radio Interface
The 2.4 GHz band used by this product covers the operating frequencies of mobile-identification local
radio stations (requiring the license), specific low-power radio stations (requiring no license) and amateur
wireless stations (requiring the license) as well as industrial, scientific, and medical equipment such as
microwave ovens.
1.
Before using this product, make sure that there is no mobile-identification local radio station, specific
low-power radio station and amateur wireless station operating near the product.
2.
If the product should cause radio interface with any mobile-identification local radio station or
specific low-power radio station, immediately change the operating frequency to avoid the radio
interface.
3.
Placing wireless terminals near each other may slows down their data rate because of their mutual
interference. You should allow a minimum clearance of about 1m between stations, 3m between
access point and station, and 3m between access points.
4.
Contact your local retailer or CONTEC if the product has trouble such as recurrent radio interface
with mobile-identification local radio stations or specific low-power radio stations
Security Precautions
Wireless LAN uses radio waves instead of LAN cables to send and receive data between a computer and
a wireless access point, making it possible to freely establish a LAN connection within a range of the
radio waves. However, radio waves can be received through obstacles, such as walls, when within the
range. Therefore, if security settings are not made, the following problems may occur. Unauthorized
viewing of data An unauthorized third party can intercept the radio waves and view e-mail messages and
personal information, such as user ID and password or your credit card information. Unauthorized access
An unauthorized third party can access a personal or corporate network and cause the following damage:
-
Intercepting personal information and confidential information (information leak)
-
Using a false identity to communicate and disclose information illegally (identity theft)
-
Changing and transmitting intercepted data (tampering)
-
Damaging data and systems by spreading a computer virus (destruction)
The wireless LAN card and wireless access point have security features to counter these problems. Using
the security settings of the wireless LAN equipment can help prevent these problems from occurring. The
security settings of the wireless LAN equipment are not configured at the time of purchase.
4
FXE2000-G
1. Introduction
Federal Communications Commission
This equipment has been tested and found to comply with the limits for a Class A digital device, pursuant
to part 15 of the FCC Rules. These limits are designed to pro-vide reasonable protection against harmful
interference when the equipment is operate din a commercial environment. This equipment generates,
uses, and can radiate radiofrequency energy and, if not installed and used in accordance with the
instruction manual, may cause harmful interference to radio communications. Operation of this
equipment in a residential area is likely to cause harmful interference in which case the user will be
required to correct the interference at his own expense.
If this equipment does cause harmful interference to radio or television reception, which can be
determined by turning the equipment off and on, the user is encouraged to try to correct the interference
by one of the following measures:
-
Reorient or relocate the receiving antenna.
-
Increase the separation between the equipment and receiver.
-
Connect the equipment into an outlet on a circuit different from that to which the receiver is
connected.
-
Consult the dealer or an experienced radio/TV technician for help.
FCC Caution: Any changes or modifications not expressly approved by the party responsible for
compliance could void the user's authority to operate this equipment.
This device complies with part 15 of the FCC Rules. Operation is subject to the following two conditions:
(1) This device may not cause harmful interference, and
(2) This device must accept any interference received, including interference that may cause undesired
operation. This transmitter must not be co-located or operating in conjunction with any other antenna
or transmitter.
Radiation Exposure Statement: This equipment complies with FCC radiation exposure limits set forth for
an uncontrolled environment. This equipment should be installed and operated with minimum distance
20cm between the radiator & your body.
This device is intended only for OEM integrators under the following conditions:
-
The antenna must be installed such that 20 cm is maintained between the antenna and users, and
-
The transmitter module may not be co-located with any other transmitter or antenna.
As long as 2 conditions above are met, further transmitter test will not be required. However, the OEM
integrators is still responsible for testing their end-product for any additional compliance requirements
required with this module installed
IMPORTANT NOTE: In the event that these conditions can not be met (for example certain laptop
configurations or co-location with another transmitter), then the FCC authorization is no longer
considered valid and the FCC ID can not be used on the final product. In these circumstances, the OEM
integrator will be responsible for re-evaluating the end product (including the transmitter) and obtaining a
separate FCC authorization.
FXE2000-G
5
1. Introduction
End Product Labeling this transmitter module is authorized only for use in device where the antenna may
be installed such that 20 cm may be maintained between the antenna and users. The final end product
must be labeled in a visible area with the following: “Contains FCC ID: PQRFXE2000-G”. The grantee's
FCC ID can be used only when all FCC compliance requirements are met.
Manual Information to the End User the OEM integrator has to be aware not to provide information to the
end user regarding how to install or remove this RF module in the user’s manual of the end product which
integrates this module.
The end user manual shall include all required regulatory information/warning as show in this manual.
Handling Precautions
DANGER
Do not use the product where it is exposed to flammable or corrosive gas. Doing so may result in an
explosion, fire, electric shock, or failure.
CAUTION
-
This product contains precision electronic elements and must not be used in locations subject to
physical shock or strong vibration. Otherwise, the board may malfunction, overheat, or cause a
failure.
-
Do not use or store this device in high temperature or low temperature surroundings, or do not expose
it to extreme temperature changes. Otherwise, the board may malfunction, overheat, or cause a
failure.
-
Do not use or store this device where it is exposed to direct sunlight or near stoves or other sources of
heat. Otherwise, the board may malfunction, overheat, or cause a failure.
-
Do not use or store this device near strong magnetic fields or devices emitting electromagnetic
radiation. Otherwise, the board may malfunction, overheat, or cause a failure.
-
If an unusual smell or overheat is noticed, unplug the power cable immediately In the event of an
abnormal condition or malfunction, please contact your retailer.
-
The specifications of this product are subject to change without notice for enhancement and quality
improvement. Even when using the product continuously, be sure to read the manual and understand
the contents.
-
Do not attempt to modify this device. The manufacturer will bear no responsibility whatsoever for
the device if it has been modified.
-
The product must always be associated with the instruction manual.
-
Regardless of the foregoing statements, CONTEC is not liable for any damages whatsoever
(including damages for loss of business profits) arising out of the use or inability to use this
CONTEC product or the information contained herein.
6
FXE2000-G
1. Introduction
Environment
Use this product in the following environment. If used in an unauthorized environment, the board may
overheat, malfunction, or cause a failure.
Operating temperature
0 - 50ºC
Humidity
10 - 90%RH (No condensation)
Corrosive gases
None
Floating dust particles
Not to be excessive
Inspection
Inspect the product periodically as follows to use it safely.
Storage
When storing this product, keep it in its original packing form.
(1) Put this product in the storage bag.
(2) Wrap it in the packing material, and then put it in the box.
(3) Store the package at room temperature at a place free from direct sunlight, moisture, shock, vibration,
magnetism, and static electricity.
Disposal
When disposing of the product, follow the disposal procedures stipulated under the relevant laws and
municipal ordinances.
FXE2000-G
7
1. Introduction
8
FXE2000-G
2. Setup
2. Setup
The antenna must be mounted and installed properly before configuring this product.
procedure for the product shown below.
Follow the setup
Component Locations
WLAN
POWER
LAN
MODEL : FXE2000
(1)
LAN port
(2)
Power connector
(3)
DC JACK
(4)
INIT connector
(5)
DIP Switches
(6)
DIP LED
LED display
LED name
Status
ON
POWER
Flashing
OFF
ON
LAN
Flashing
OFF
ON
WLAN
Flashing
POWER/ LAN/ WLAN
POWER/LAN
OFF
Indicator
Indicates that the device is operating.
Indicates that the device is being started (This device turned on)
Indicates that the device is power off.
Indicates that a wired LAN has been connected.
Indicates that the product is transmitting/receiving data to/from the
connected terminal through wired LAN.
Indicates that a wired LAN not logged-in.
Indicates that the device has been connected.
Indicates data is being transmitted to or received from the device
connected through wireless LAN.
Indicates that the device has been no connected.
Flashing (simultaneously) Indicates that firmware has been reprogrammed. *1
Blinking twice / On
DHCP error
*1 Not include LogFile
DIP switches
INIT connector
No.
Name
Operation / function
1
INIT
Turning on this switch flashes the POWER,
WLAN LEDs.If the switch is turned off
before the LEDs change their status from
flashing to ON (about 3 seconds), all the
settings are restored to the default settings
after the product is started next time.
Reboot the product after the LEDs stop
flashing. *1
-
2
FXE2000-G
No. Name
Operation / function
1
INIT
Short the INIT signal with the GND so that
the POWER, WLAN, and LAN LEDs will
flash. Then if you open the INIT signal
before the LEDs turn on (approx. 3 seconds),
the settings are restored to the default
settings the next time the product is started.
2
GND
GND
9
2. Setup
Pin heder (JP2)
1
3
5
7
1
3
5
7
2
4
6
8
Name
No.
LAN port
1
4pin
2
3
TX-
Transmit (-)
3
RX+
Receive (+)
LAN port
The GND can be connected to via pin 5
pin 4
The power supply line can be connected
4
to via pin 7 on the LAN port by shorting
Short the INIT signal with the GND so that
the POWER, WLAN, and LAN LEDs will
flash. Then if you open the INIT signal
before the LEDs turn on (approx. 3
seconds), the settings are restored to the
INIT/NC
default settings the next time the product
is started.*1
* Usable when JP2 No. 1 and No. 2 are
pin 5 and pin 6.
LAN port
The GND can be connected to via pin 8
5
GND
GND
on the LAN port by shorting pin 7 and
6
RX-
Receive (-)
pin 8.
7
24VDC
Power Supply
8
GND
GND
GND
*1
on the LAN port by shorting pin 3 and
24VDC
8pin
8
Operation / function
Transmit (+)
2
7pin
7
Name
TX+
by shorting pin 1 and pin 2.
LAN port
6
No.
1
connected to via pin 4 on the LAN port
GND
5
Operation / function
The INIT (initialization) signal can be
INIT
5pin
4
LAN connector
2
4
6
8
connected.
Usable when JP2 No. 1 and No. 2 are connected. When initializing the product by turning the INIT signal on and off,
the LEDs will continue flashing for a short time after the signal is turned off. This indicates the internal memory
files are being deleted. If the power is turned off while the LEDs are flashing, the internal memory files may be
damaged and the product may no longer be able to start properly. Always restart the product after the LEDs stop
flashing.
CAUTION
When supplying power via the LAN connector, do not use a combination of power supplied from the
power connector and the AC adapter.
Checking the Network Addresses
The Ethernet (wired LAN), wireless LAN MAC address and IP address are defined on the housing sticker
on the side of this product. Write down the MAC addresses for Ethernet and wireless LAN in the
following table as they are device-individual values and may be required for future setup.
Table 2.1. Network Address
Description on the
housing sticker
Explanation
IP:
Default IP Address
LAN MAC:
LAN MAC Address
WLAN MAC:
10
Address
192.168.0.1
Wireless LAN MAC
Address
FXE2000-G
2. Setup
Power Supply
Power Supply
Using the DC JACK
The power plug to be used must conform to EIAJ voltage classification 2.
CAUTION
When supplying power via the LAN connector, do not use a combination of
power supplied from the power connector and the AC adapter.
Using the Power connector
The power connector in Figure 1 can be used to supply
power from an external source. Use the following power
cable or its equivalent.
CAUTION
When supplying power from the power connector, do
not use a combination of power supplied via the LAN
connector and the AC adapter.
Power connector
Housing: JST S02B-PASK-2(LF)(SN)
Cable: AWG28-16(equivalent to it)
Pin No.
Name
Operation /
Function
1
Vi+
5-30VDC±5%
2
Vi-
GND
When supplying the LAN cable power
CAUTION
- Create the power cable correctly as specified. Using the power cable with the housing pins assigned
wrong numbers may result in device faults or accidents.
- The input voltage range of this product is from 5 to 24 VDC ±5%. Supply power outside that range
may result in device faults or accidents.
- Use the power supply whose supply voltage rises to at least 4.75VDC within the input voltage range
within 10ms. Using a power supply which does not satisfy this condition may result in device faults or
accidents.
- Input voltage range: 5 to 30 VDC ± 5%. Use a power supply that rises to 4.75 VDC or higher in the
input voltage range within 10 ms. There is a risk of damage to the device or accident if a power supply
outside this range is used.
FXE2000-G
11
2. Setup
Installation
Read and understand the following precautions before installation :
- Leaving a metal object in the vicinity of 30mm from the antenna board affects the antenna
characteristics.
Do not place metal objects near the antenna as possible.
- This product has a protrusion of up to 14mm on the front surface and a protrusion of up to 3mm on the
rear surface. Allow clearance around this product and use it within the range of ambient temperatures
satisfying the environment conditions for installation.
- Figure 2 shows the locations the mounting holes for installing this product and external dimensions.
- Use M3 screws for the mounting holes (φ2.3 mm).
- The lower right mounting hole is the FGND (grounding) hole. Connect it to FGND (ground).
* 1 Always reboot the product after the flashing stops. The flashing continues for a little while after the product is switched off during
initialization by switching on and off the INIT switch. This indicates internal memory files are being deleted. The internal memory files
may be damaged and the product may not start up properly if the power is switched off before the flashing stops.
Connecting the external antenna
This product uses a MIMO antenna system, which allows two
antennas to be used simultaneously. When connecting the
external antennas, connect two antennas.
Remove the white harnesses from connectors 7 and 15 and from
connectors 6 and 11.
Connect an FX-ANT-CEX2 or FX-ANT-CEX3 conversion cable
to connectors 6 and 7, and connect an optional CONTEC antenna
to the end of each conversion cable.
Recommended removal tool: U.FL-LP-N-2 (HRS)
12
FXE2000-G
3. Connection to Devices and Setup Methods
3. Connection to Devices and Setup
Methods
This product is set up via a network using a Web browser or TELNET.
below once the product is set up.
Follow the setup procedure
Preparation before Setup
You must use a PC which can be connected to a network as the product is set up via the network.
The setup is performed by connecting a PC for setup purposes and then using a Web browser or
TELNET.
Connecting for the first time
(1) Connect this product to PC on a wired LAN.
(2) Select an IP address 192.168.0.XXX (e.g. 192.168.0.10) for the PC, which is not the same address as
for this product. And then set the subnet mask to 255.255.255.0
* The default setting IPaddress is 192.168.0.1.
The following example settings are for Windows 7, Windows Vista, or Windows XP using Internet
Explorer 7.0.
Windows 7 / Windows Vista :
(1) Click [Start] (or the Windows logo button) - [Control Panel] - [Network and Internet] - [Network and
Sharing Center] - [Change adapter settings], and then right-click the icon for the local area
connection to open up the [Properties] screen.
(2) If a User Account Control window appears, click "Yes" or "Continue".
(3) Select the "Internet Protocol Version 4 (TCP/IPv4)" check box, and click "Properties".
(4) In the "Use the following IP address" field, type an IP address 192.168.0.XXX, which is not the
same address as this product (e.g. 192.168.0.10), and then set the subnet mask to 255.255.255.0.
(5) Click "OK", and then click "OK" or "Close" to enable the settings.
FXE2000-G
13
3. Connection to Devices and Setup Methods
Windows XP :
(1) Click [Start] - [Control Panel] - [Network Connection], and then right-click the icon for local area
connection to open up the [Properties] screen.
(2) In the "Use the following IP address" field, type an IP address
192.168.0.XXX, which is not the same address as this product
(e.g. 192.168.0.10), and then set the subnet mask to
255.255.255.0.
(3) Click "OK", and then click "OK" or "Close" to enable the
settings.
Changing the settings
(1) Connect this product to PC on a wired LAN.
(2) Set the network address of the PC to the same network address as for this product.
14
FXE2000-G
3. Connection to Devices and Setup Methods
Setup Using a Web Browser
Start up a Web browser and enter the IP address of this product after “http : //” in the address bar.
If connecting for the first time, enter the default IP address. When the default setting IPaddress is
192.168.0.1, enter as follows.
http://192.168.0.1/
Enable the JavaScript function in the browser setting as it is used.
Supported web browsers (recommended)
-
Microsoft Internet Explorer 7 or higher
-
Mozilla Firefox 3.0 or higher
Setting the Browser
You may have to change the browser settings as well as the IP address and subnet mask for the PC to be
connected to this product via the network.
Changing browser settings
(1) Proxy Settings
Networks at companies and schools may use broswers with proxy settings. Proxy is not required as
a PC is used to set up the product, which is on a local network. Disable the proxy settings
temporarily when setting up this product on a Web browser.
The following example settings are for Internet Explorer, or Firefox.
Actual settings will depend upon the environment you are using. For details, see your web
browser's help information or contact the software manufacturer.
- Internet Explorer
(1) Launch Internet Explorer.
(2) From the [Tools] menu, select [Internet Options], and
then click the [Connections] tab.
(3) In the dial-up settings area, select "Never dial a
connection".
* If the option is grayed-out, go to the next step.
(4) Click [LAN Settings].
FXE2000-G
15
3. Connection to Devices and Setup Methods
(5) Clear the "Automatically detect settings", "Use
automatic configuration script", and "Use a proxy
server for your LAN" check boxes, and then click
"OK".
(6) Click "OK", and then enable the settings.
- Firefox3.0
(1) Launch Firefox.
(2) From the menu bar, click [Tools] - [Options].
(3) Click [Advanced], open the [Network] tab, and then
click [Settings].
(4) Select "No proxy", and then click "OK".
(5) Click "OK" button.
16
FXE2000-G
3. Connection to Devices and Setup Methods
(2) Enable JavaScript.
The following example settings are for Internet Explorer and Firefox .
Actual settings will depend upon the environment you are using. For details, see your web browser's
help information or contact the software manufacturer.
- Internet Explorer
(1) Click [Start] - [Control Panel] - [Network and Internet] - [Internet Options].
* If using Windows Vista or Windows XP, click [Start] - [Control Panel] - [Classic View] (or
[Switch to Classic View]) - [Internet Options].
(2) Click the [Security] tab, and then click [Trusted sites] - [Sites].
(3) Clear the "Require server verification (https:)
for all sites in this zone" check box.
(4) In the "Add this website to the zone" box, type
"http://192.168.0.1/", click [Add], and then
click [Close]. * If using Internet Explorer 6.0,
in the "Add this website
to the zone" box, type", http://192.168.0.1/",
click
[Add], and then click [OK].
* If you have changed this product's IP address,
type the
set IP address.
(5) Click [Custom Level].
(6) Scroll down and select "Enable" under "Active
scripting" and "File download", and then click
[OK].
(7) Click [Yes], click [Apply], and then click [OK]
to enable the settings.
FXE2000-G
17
3. Connection to Devices and Setup Methods
- Firefox3.0
(1) Launch Firefox.
(2) From the menu bar, click [Tools] - [Options].
(3) Click [Content], and then select the "Enable
JavaScript" check box.
(4) Click "OK" button.
CAUTION
When the Web browser settings have been changed, restore the original browser settings upon the
completion of setup of this product.
Connecting to This Product Using Web Browser
The following login screen is displayed when connected to this product using web browser.
If the login screen is not displayed, the IP address setting for PC, browser settings, or the URL entered in
the address bar of the browser may be incorrect.
When connecting for the first time, enter the default user name (admin) and password (pass) and click
[OK].
Figure 3.1. Login screen
There will be no problem if you just save the settings now but reboot the product later when necessary. In
this case, saving the settings does not actually change the settings of the product. Therefore, make sure
to reboot the product later.
*
For explanations of functions and setting instructions, see the manual available from the CONTEC
website or see help information.
CAUTION
It takes approximately 5 - 10 seconds to save settings (writing to internal flash memory). During that
period, the LEDs for POWER, LAN and WLAN at the front part of the main unit blink
simultaneously. Do not reboot or turn off the product until the screen indicates the completion of the
saving process. The setup file data and firmware data may be damaged and the product may not
operate properly if it is rebooted or switched off during the saving process.
18
FXE2000-G
4. Setup and Status Display
4. Setup and Status Display
This chapter describes how to setup the AP using a web browser, explains each setting item and status
display and IEEE802.1X supplicant setting. Always read Chapter 2 “Setup” and Chapter 3 “Connection
to Devices and Setup Methods” for preparation before performing setup or viewing the status.
This section describes how to perform setup using a web browser.
Basic settings
System
DHCP Client
To set the IP address of the device using the DHCP client function, set to "Enable". To specify the IP
address of the device, set to "Disable".
When set to "Disable", the address configured by "IP Address" is the IP address for the device.
Default setting : Disable
IP Address
Set the IP address for the device. This setting is valid when "DHCP Client" is set to "Disable".
Default setting : 192.168.0.1
Subnet Mask
Set the subnet mask for the device. This setting is valid when "DHCP Client" is set to "Disable".
Default setting : 255.255.255.0
Default Gateway
Set the IP address of the default gateway for the device.
to "Disable". To disable this setting, enter "0.0.0.0".
This setting is valid when "DHCP Client" is set
Default setting : 0.0.0.0
FXE2000-G
19
4. Setup and Status Display
Language
Set the language to display the "Wireless LAN Manager" configuration web page.
You can select either "Japanese" or "English".
Default setting : English
Time Zone
Set the time zone for the device.
Default setting : EST+5
Radio
WLAN Interface
To use the wireless interface, set to "Enable". If set to "Disable", wireless networking cannot be used, so
this setting should normally be "Enable".
Default setting : Enable
Unit Type
Select the operation mode as "Access Point", "Station", or "Repeater".
Default setting : Station
Table 4.1 Description of Unit Type
Item
Access Point
Station
Description
The device serves as a base station for client devices to connect to under the access point.
Virtual AP settings can be configured for VAP1 to VAP4.
The device serves as a client device (slave station) to connect to a station access point.
Only VAP1 settings are used.
The device operates simultaneously as a repeater access point and a station and it serves as a
repeater.
VAP1 settings are the access point settings. VAP2 settings are the station settings.
On wireless networks that use repeaters, the channel and wireless networking specification
Repeater
must be the same for all devices.
On networks that use two or more repeaters, configure the "Preferred AP" and "Connections to
Non-Preferred APs" functions in the advanced settings and take care to specify the connection
destination clearly so the repeaters do not loop. We also recommend that you set "Wireless
Connection Mode" to "Advanced Infrastructure".
20
FXE2000-G
4. Setup and Status Display
Repeater Independent
When "Disable" repeater independent, behavior of the repeater access point (VAP1) and the repeater
station (VAP2) are linked. Repeater station (VAP2) is not connected to an access point, repeater access
point (VAP1) will not work. In addition, the channel configuration is ignored, and operate on the same
channel as the access point to which the repeater station (VAP2) is connected.
When "Enable" repeater independent, the repeater access point (VAP1) and the repeater station (VAP2)
operate independently and separately. Regardless of whether the repeater stations (VAP2) are connected
to the access point, the repeater access point (VAP1) operates. The repeater station (VAP2) can only be
connected to the access point same channel setting.
Default setting : Enable
WLAN Standard
Select the wireless networking standard to use on the device.
When the unit type is "Station", the "Auto" selection appears. Auto means both "IEEE802.11n(5GHz)"
and "IEEE802.11n(2.4GHz)". If you want to allow connections to both the 5 GHz and 2.4 GHz wireless
networks, select "Auto". When set to "Auto", dual channel mode is fixed as "Enable".
Default setting : Auto
Dual Channel Mode
This setting can only be configured when the wireless networking standard is "IEEE802.11n(5GHz)" or
"IEEE802.11n(2.4GHz)". To set the wireless networking bandwidth to 20 MHz, select "Disable". To set
it to 40 MHz, select "Enable". However, even when set to "Enable", if the connected wireless device
has dual channel mode set to "Disable", the bandwidth is 20 MHz. When set to "Enable", communication
is performed with a bandwidth of 40 MHz when possible.
Default setting : Disable
Channele
This setting is available when the unit type is "Access Point" or "Repeater". Select the channel to use on
the device. The channel that can be used changes according to the selected wireless networking standard
and unit type.
Default setting : 1
WLAN Infrastructure Mode
Select the operation mode for the device. There are three types of operation modes: "Standard
Infrastructure", "Compatible Infrastructure", and "Advanced Infrastructure". When the unit type is
station, "Advanced Infrastructure" cannot be selected.
Default setting : Compatible Infrastructure
FXE2000-G
21
4. Setup and Status Display
Table 4.2
Description of WLAN Infrastructure Mode
Item
Description
A configuration where a standard infrastructure access point is the core and stations (wireless
Standard Infrastructure networking cards, etc.) are located under it. (Infrastructure)
With standard infrastructure, the device can use its own wireless networking feature.
A configuration where a compatible infrastructure access point is the core and stations
Compatible
(wireless networking cards, etc.) are located under it. (Infrastructure)
Infrastructure
Select this mode when connecting to access points created by other companies.
However, the
device cannot use its own wireless networking feature.
Advanced Infrastructure
A mixed mode of both modes where the device can use an advanced infrastructure access point
as standard infrastructure while also using compatible infrastructure at the same time.
TX Power
Select the transmit power.
You can select either "MAX, "50%", "25%", or "12%".
Default setting : MAX
Antenna Selection
This setting can only be configured when the wireless networking standard is "IEEE802.11a",
"IEEE802.11b", or "IEEE802.11g". Select the antenna mode as "Auto" or "Fixed (Antenna:1)". This
setting is not normally required. When using the device with only one external antenna installed, select
the antenna mode as "Fixed (Antenna:1)".
Default setting :
Auto
VAP
22
FXE2000-G
4. Setup and Status Display
▼VAP Settings
ESSID
Set the ESSID for the device as alphanumeric characters between 2 and 32 characters in length. The
ESSID for VAP1 must be set.
When the unit type is "Access Point", VAP2 through VAP4 (virtual AP) are enabled by configuring their
ESSIDs. When setting the ESSIDs for multiple VAPs, ensure that the ESSID values are not already in
use.
When the unit type is "Station", the VAP2 through VAP4 settings are not required.
When the unit type is "Repeater", set the ESSID for VAP1 and VAP2. Due to the characteristics of the
repeater, normally set the ESSID for VAP1 and VAP2 to the same setting.
Default setting : LocalGroup
▼Encryption Settings
Encryption
Select the encryption to use with wireless networking. Further settings that must be configured are
displayed depending on the selected setting, so configure the displayed settings.
Default setting : Disable
CAUTION
WEP and TKIP cannot be used with IEEE 802.11n due to the rules of the standard. Note that when
the wireless networking standard is IEEE 802.11n and encryption is configured that uses those
settings, the device will operate with the legacy standards (IEEE 802.11a and IEEE 802.11g).
WSL
The setting that selects whether or not to encrypt wireless data with our proprietary encryption (WSL).
Note that communication between a terminal with the WSL feature enabled and a terminal with the WSL
feature disabled is not possible. This device can only use WSL (Type 2) that utilizes the new algorithm.
The WSL key setting is only valid when the WSL feature is enabled. Note that communication between
terminals with different WSL keys is not possible.
Enter the WSL key as a 20 digit hexadecimal value (0 to 9, a to f or A to F).
Default setting : Disable, (Blank)
▼Key Setting
Default Key
This setting is only available when the encryption is set to either "WEP(Open)", "WEP(SharedKey)",
"WEP(Auto)", or "AES".
Select the key to use as "Fixed Key 1" to "Fixed Key 4".
Default setting : Fixed Key 1
FXE2000-G
23
4. Setup and Status Display
Fixed Key
This setting is only available when the encryption is set to "WEP(Open)", "WEP(SharedKey)",
"WEP(Auto)", or "AES".
Set the fixed key. Set as a hexadecimal value (0 to 9, A to F).
For "WEP", there are three lengths of fixed keys: 64 bits, 128 bits, and 152 bits. These keys require you
to enter 10 characters, 26 characters, and 32 characters.
For "AES", the length is only 128 bits, so enter 32 characters.
The fixed keys are a common setting for the VAPs. The fixed keys are displayed in the settings for each
VAP, but if the setting is changed, the change is reflected in the fixed keys for the other VAPs.
Default setting : (Blank)
▼RADIUS Server Settings
Reauthentication Interval (sec)
When the encryption is set to "IEEE802.1X", "WPA", or "WPA2", set the interval for reauthentication in
seconds. This setting can be configured as 0 (disabled) or between 120 (2 minutes) and 259200 (3
days).
When set to 0, the setting is disabled and reauthentication is not performed.
Default setting : 0 (disabled)
Server IP Address
When the encryption is set to "IEEE802.1X", "WPA", or "WPA2", set the IP address for the RADIUS
server.
Default setting : 0.0.0.0
Server Port
When the encryption is set to "IEEE802.1X", "WPA", or "WPA2", set the port number for the RADIUS
server.
Default setting : 1812
Shared Secret
When the encryption is set to "IEEE802.1X", "WPA", or "WPA2", set the shared secret for the RADIUS
server as alphanumeric characters with a maximum length of 64 characters.
Default setting : (Blank)
▼Supplicant Settings
Authentication Type
Set the RADIUS authentication method to either "PEAP" or "EAP-TLS".
When "PEAP", you must register a server certificate with "Certificate Registration".
When "EAP-TLS", you must register the server certificate, client certificate, and private key with
"Certificate Registration".
Default setting : PEAP
24
FXE2000-G
4. Setup and Status Display
User Name
Set the authentication user name for RADIUS authentication as alphanumeric characters with a maximum
length of 32 characters.
Default setting : (Blank)
User Password
Set the authentication password for RADIUS authentication as alphanumeric characters with a maximum
length of 32 characters.
Default setting : (Blank)
Certificate Registration
Register (upload) the certificates required for RADIUS authentication.
When you click the button to register certificates, the certificate registration frame will open. Browse to a
file in that frame and upload the certificate to the device with the "Upload" button.
Next to the button to open the certificate registration frame is a message that indicates whether or not that
certificate has been registered. When the certificate is registered, "Registered" is displayed. When not
registered, "Not Registered" is displayed.
Default setting : (Not Registered)
▼WPA Settings
Group Key Updating Interval (sec)
When the encryption is set to "WPA", "WPA2", "WPA-PSK", or "WPA2-PSK", set the group key
renewal interval in seconds.
This setting can be configured as 0 (disabled) or between 120 (2 minutes) and 259200 (3 days).
When set to 0, the setting is disabled and group key renewal is not performed.
Default setting : 3600
▼PSK Settings
WPA Pre-Shared Key (PSK)
When the encryption is set to "WPA-PSK" or "WPA2-PSK", set the WPA encryption key (PSK:
pre-shared key) to use for encryption.
Enter the value as alphanumeric characters between 8 and 63 characters.
Default setting : (Blank)
FXE2000-G
25
4. Setup and Status Display
Advanced Settings
System
HTTPS
To use the HTTPS function (Port 443), set to "Enable".
By accessing the https://(IP address), HTTP over SSL/TSL communication is enabled.
Default setting : Disable
▼Access Security
HTTP Server
To use the HTTP Server (Port 80), set to "Enable".
Default setting : Eisable
FTP Server
To use the FTP Server, set to "Enable".
Default setting : Eisable
Wireless Access
By setting to disable this feature, you can deny access to HTTP and FTP via wireless LAN, and allow
access only via ethernet.
Default setting : Eisable
Allowed IP Address Function
If you want to use the function to specify the IP addresses that can access the HTTP or FTP, please set to
"Enable".
Default setting : Disable
26
FXE2000-G
4. Setup and Status Display
Allowed IP Address
When the "Enable" allowed IP address function, please specify the IP addresses that are allowed to access.
You can specify the IP address to specify a range, or only one.
If you specify only one, please enter the IP address only in the left form of the allowed IP address 1/2. If
you specify a range, please enter the start IP address in the left form of the allowed IP address 1/2, and
enter the end IP address in the right form.
Please note that because if you've set the IP address that is not intended, you may become not be able to
access this equipment in a FTP or HTTP. If you've lost the IP address, you will need to be initialized with
the initialization switch.
Default setting : Blank
▼Interception Settings
Management Traffic Interception
To use the management traffic interception, set to "Enable".
If the WLAN infrastructure mode is set to "Compatible Infrastructure" and the multi-clilent is set to
"Disable", you can access to this equipment via WLAN.
Default setting : Disable
Interception Target
Select a target of management traffic interception.
Default setting : Disable (All)
Ethernet
Port Speed
Select the Ethernet port speed. You can select from "Auto-Negotiation", "100Mbps(full duplex)",
"100Mbps(half duplex)", "10Mbps(full duplex)", and "10Mbps(half duplex)".
"Auto-Negotiation" is used normally.
Default setting : Auto-Negotiation
FXE2000-G
27
4. Setup and Status Display
CAUTION
-
If one side is set to "Auto" and the other side is set to "100M Full Duplex", the communication mode
for the "Auto" side is recognized as "100M half Duplex". In this case, there may be a high error rate
and normal communication may not be possible. It is recommended that you set the correct
communication mode.
-
If one side or both sides are set to "Auto" and the two sides cannot recognize each other, set the
communication mode to the unchanging setting for both sides.
-
If port speeds are set incorrectly (for example, one side is set to unchanging 10M and the other side is
set to unchanging 100M), only one device may be able to establish a link or the link may be
repeatedly established and disconnected depending on the communication status. In this case, set the
correct communication mode.
Link Down Condition
When "Link Down Sense" is enabled in the "Advanced Settings" for each VAP, set the link down
judgment condition.
The condition for "Link Status" is when the Ethernet link is disconnected. The condition for "Ping" is
when a specific address can no longer be pinged, in addition to that for "Link Status".
When "Ping" is selected, the settings for "Ping Parameters" appear.
Default setting : Link Status
Ping Parameters – Ping IP Address
When the link down condition is set to "Ping", set the IP address for the device to ping.
Set the IP address for the device to ping to a device connected to this device by the wired network.
Be careful not to set the IP address for a device that cannot be pinged when this device starts, such as
setting the IP address to a device on the wireless network.
Default setting : 0.0.0.0
Ping Parameters - Ping Interval (sec)
When the link down condition is set to "Ping", set the interval to ping the IP address between 1 and 65535
seconds.
Default setting : 60
Ping Parameters - Ping Response Wait Time (sec)
When the link down condition is set to "Ping", set the interval to ping the IP address between 1 and 65535
seconds. Set this value between 1 and 15 seconds.
Default setting : 3
Ping Parameters - Ping Retry Count
Set the number of times to retry pinging the IP address from 0 to 15.
When a ping timeout occurs, the ping is retried within the number of times set here. If all the pings
timeout, the ping is judged to have failed.
Default setting : 3
28
FXE2000-G
4. Setup and Status Display
VAP
TX Rate
Set the transmission rate for wireless networking for the device.
This setting is normally set to "Auto". To lock the transmission rate, select "Lock" and select the locked
transmission rate.
Default setting : Auto
Maximum TX Rate
When the transmission rate is "Auto", set the upper limit for the transmission rate.
This setting is normally set to "Disable". To lock the maximum transmission rate, select "Lock" and
specify the rate. The device can automatically select and communicate at a rate that does not exceed the
specified rate.
Some rates cannot be set as the maximum transmission rate due to the wireless LAN standard. Those
rates are not shown in the drop-down list.
Default setting : Disable
Link Down Detection
This function monitors the wired networking port and stops the wireless function when the wired
networking port link is down (when disconnected). To use this function, set to "Enable".
If the unit type is set to "Station", use caution when using this function because the wireless network
cannot be accessed when the wired networking port is down.
This setting is not available when the unit type is set to "Repeater". It is forcibly set to disabled.
Default setting : Disable
FXE2000-G
29
4. Setup and Status Display
ESSID Security
This setting is available when the unit type is "Access Point" or "Repeater".
You can prohibit access by ANYID terminals (terminals with no ESSID set) by setting ESSID security to
"Enable", and you can also hide the ESSID from being broadcast by the station.
In this manner, you can restrict unauthorized access using ANYID and prevent third parties from easily
learning the ESSID.
Default setting : Disable
Maximum Client Logins
This setting is available when the unit type is "Access Point" or "Repeater".
Set the number of client logins to the station. The value can be set from 1 to 128 for each VAP.
However, note that the total number of logins for all VAPs (VAP1 to VAP4) is 128. When the total
number of client logins is 128, even if the number of logins to the VAP set here does not exceed the
maximum number of logins, stations can no longer log in.
Default setting : 128
Denial Response (Maximum Client Logins)
When the login number has reached to "Maximum Client Logins", is to ignore the connection request
from the station, does not return a response. To use this function, set to "Enable".
This feature, you might want to use when there is the station to connect repeatedly.
Default setting : Disable
Beacon Interval (msec)
This setting is available when the unit type is "Access Point" or "Repeater".
Set the interval to send the beacon.
This value can be set between 100 ms and 1000 ms. It is not normally necessary to change the default
value (100 ms). This setting is a common setting for the VAPs.
Default setting : 100
DTIM Period
This setting is available when the unit type is "Access Point" or "Repeater".
Set the DTIM (delivery traffic indication message) interval which is information added to the beacon for
wireless terminals in a power-saving state to cancel that state.
This value can be set as 1 to 15.
Default setting : 1
11g Protect Mode
When the wireless networking standard is IEEE 802.11n (2.4 GHz) or IEEE 802.11g, protect mode is
used for stable communication in an environment with a mix of IEEE 802.11b wireless terminals by
setting "RTS-CTS" or "CTSonly".
When "RTS-CTS", RTS and CTS are used. When "CTSonly", only CTS is used.
11g protect mode is displayed for each VAP, but this setting is common to VAP1 through VAP4.
Default setting : Disable
30
FXE2000-G
4. Setup and Status Display
11g Only Mode
This setting is available when the unit type is "Access Point" or "Repeater".
When the wireless networking standard is IEEE 802.11n (2.4 GHz) or IEEE 802.11g, this function
prohibits logins by IEEE 802.11b wireless terminals. To use this function, set to "Enable".
Default setting : Disable
Basic Rate
When the unit type is access point or repeater and the wireless networking standard is IEEE 802.11b,
IEEE 802.11g, or IEEE 802.11n (2.4 GHz), you can set the basic rates.
You can select 802.11 which sets the basic rates to 1 Mbps and 2 Mbps or 802.11b which sets the basic
rates to 1 Mbps, 2 Mbps, 5.5 Mbps, and 11 Mbps.
If 11g only mode is enabled, this setting is ignored.
Default setting : 802.11b (1, 2, 5.5, 11 Mbps)
MAC Address Filtering
This setting is available when the unit type is "Access Point" or "Repeater".
The device can allow logins from stations (client terminals) with their wireless MAC addresses registered
in advance and forbid logins from all other stations by enabling the MAC address filtering function.
To enable the function and to edit the list of terminals allowed to log in, click the "Edit List" button and
use the page that is displayed.
Enter the addresses to register in "Registered Addresses". Enter the MAC address as two characters, a
hyphen, two characters, and so on. (Ex: 00-80-4C-00-00-00)
To register only a single address, enter the address only in "Address (Start)" and click the "Add" button.
To set a range of addresses, enter the range in "Address (Start)" and "Address (End), and click the "Add"
button. All the MAC addresses within that range are allowed.
The registered addresses are applied only to the VAP checked with "Applicable VAP". Typically there is
no problem leaving VAP1 through VAP4 checked. When applicable VAPs are specified, select the
VAPs to check.
The registered MAC addresses are displayed in the "MAC Address Filtering List". When you wish to
delete an entry, click the "DEL" button for the appropriate entry to delete it. Click the "ALL" button to
delete all the entries.
A maximum of 1024 MAC addresses that allow login can be registered.
Default setting : Function: Disable, no entries
WLAN Bridge Between VAP
This setting is available when the unit type is "Access Point".
When set to "Disable", node on this VAP can not communicate (WLAN bridge) with nodes on other
VAPs. When set to "Enable" this is allowed.
Default setting : Enable
WLAN Bridge in This VAP
This setting is available when the unit type is "Access Point".
When set to "Disable", node on this VAP can not communicate (WLAN bridge) with other nodes on this
VAP. When set to "Enable" this is allowed.
Default setting : Enable
FXE2000-G
31
4. Setup and Status Display
Multi-Client
This setting is available when the unit type is "Station" or "Repeater" and the wireless connection mode is
"Compatible Infrastructure".
To connect multiple PCs under this device, set to "Enable".
When set to "Disable", only one PC can connect under this device.
When the unit type is "Repeater", this setting is not available in VAP2. It is forcibly set to enabled.
Default setting : Disable
Static Node Address
This setting is available when the unit type is "Station" or "Repeater", the wireless connection mode is
"Compatible Infrastructure", and the multi-client function is "Disable".
Enter the MAC address for the PC that will connect to this device. Normally this setting is required when
connecting to a device that will only receive communications, such as a POS terminal.
When not using this function, enter the MAC address "00-00-00-00-00-00" which indicates it is disabled.
This setting is not normally required, so it is set to "00-00-00-00-00-00".
Enter the MAC address as two characters, a hyphen, two characters, and so on. (Ex: 00-80-4C-00-00-00)
When the unit type is "Repeater", this setting is not available in VAP2. It is forcibly set to disabled.
Default setting : 00-00-00-00-00-00
Roaming Threshold
This setting is available when the unit type is "Station".
When the RSSI value for the connected access point falls below the set value, the station scans access
points and searches for an access point that it can roam to.
This value can be set as 0 to 106. The larger the value, scans happen more often (roaming happens more
easily). The smaller the value, scans happen less often (roaming happens less easily).
When the unit type is "Repeater", this setting is not available in VAP2.
Default setting : 24
Scan Channels
This setting is available when the unit type is "Station".
Select the channels to be scanned.
Note that communication between access point that is not set to the channel to be scanned is not possible.
Default setting : (All)
32
FXE2000-G
4. Setup and Status Display
Preferred AP
This setting is available when the unit type is "Station" or "Repeater".
This setting is for when there are multiple access points that can be connected to and you wish to apply a
priority to the access points.
You can set the access point to preferentially connect to by specifying this setting. Enter the wireless
MAC address for the access points in "Preferred AP1" to "Preferred AP5".
For the priority of access points to connect to, "Preferred AP1" has the highest priority, "Preferred AP5"
has the lowest priority. This function is enabled by entering a valid wireless MAC address. When entering
MAC addresses, specify them in order from "Preferred AP1".
When not using this function, enter the MAC address "00-00-00-00-00-00".
Enter the MAC address as two characters, a hyphen, two characters, and so on. (Ex: 00-80-4C-00-00-00)
When the unit type is "Repeater", we recommend that you configure this setting and clearly specify the
connection destination in the settings for VAP2 (station) on networks with two or more repeaters. If you
do not specify the connection destination, when a chained repeater goes down, repeaters under it may
connect to repeaters even further below themselves and form a loop.
By clicking the button to the right of the entry form, you can display a list of wireless MAC addresses for
access points based on the "Wireless Node Information" in a drop-down list. By selecting an address from
this list, it can be entered in the form.
Default setting
00-00-00-00-00-00 (all 1 to 5)
Connections to Non-Preferred APs
This setting is available when the unit type is "Station" or "Repeater".
When using the preferred AP function and the device cannot connect to the access points specified in
"Preferred AP1" to "Preferred AP5", set whether or not to allow connections to other access points.
To allow a connection to access points other than the access points specified as preferred APs, set this
setting to "Enable". To forbid connections, set this setting to "Disable".
When the unit type is "Repeater", we recommend that you set this setting to "Disable" and clearly specify
the connection destination in the settings for VAP2 (station) on networks with two or more repeaters. If
you do not specify the connection destination, when a chained repeater goes down, repeaters under it may
connect to repeaters even further below themselves and form a loop.
Default setting : Enable
FXE2000-G
33
4. Setup and Status Display
SNMP
▼Common Settings
SNMP Agent
To enable the device's SNMP agent function, set to "Enable".
This device can be accessed by an external SNMP manager and its MIB can be acquired by enabling the
SNMP agent function.
Default setting : Disable
Community Name
Set the SNMP authentication string, called the community name, as alphanumeric characters between 1
and 32 characters in length.
The SNMP authentication string works like a password for accessing the device when using SNMP. The
SNMP manager can access this device's MIB by using the community name.
Default setting : public
sysContact
Set the address for the system contact as alphanumeric characters d with a maximum length of 32
characters. It is okay to leave this value blank.
Default setting : Unknown
sysName
Set the SNMP name for the device as alphanumeric characters with a maximum length of 32 characters.
It is okay to leave this value blank.
Default setting : Unknown
34
FXE2000-G
4. Setup and Status Display
sysLocation
Set a description of the installation location for the device as alphanumeric characters with a maximum
length of 32 characters.
It is okay to leave this value blank.
Default setting : Unknown
▼Trap Settings
Trap IP Address
Traps are a function to notify users that a change has occurred in the SNMP agent system. The trap
function can be enabled by specifying the trap destination IP address, and the trap is sent to the specified
IP address.
When set to 0.0.0.0, the trap function is disabled.
Default setting : 0.0.0.0
Notification : Link Status (Ethernet)
Set whether or not to send a trap when the wired network link status has changed (link up/down).
When enabled, the device sends a trap regarding the wired network link status change.
Default setting : Disable
Notification : Link Status (WLAN)
Set whether or not to send a trap when the wireless network link status has changed (link up/down).
When enabled, the device sends a trap regarding the wireless network link status change.
Default setting : Disable
Notification : Channel Change (DFS)
Set whether or not to send a trap when a channel change occurs by DFS when "Unit Type" is access point
and "Channel" is set to a channel subject to DFS.
When enabled, the device sends a trap regarding the DFS channel change.
Default setting : Disable
Notification : Initialize (INIT-SW)
Set whether or not to send a trap when the device was initialized by pressing the initialization switch on
the unit. When enabled, the device sends a trap regarding initialization by the initialization switch.
Default setting : Disable
FXE2000-G
35
4. Setup and Status Display
Network Time
Network Time Function
The device can synchronize its time with network time by enabling the network time function and
configuring the NTP server setting. To use this function, select "Enable".
Default setting : Disable
NTP Server
When enabling the network time function, specify the IP address for the NTP server.
Default setting : 0.0.0.0
36
FXE2000-G
4. Setup and Status Display
VLAN
VLAN Function
To use the VLAN function, configure the settings. There are two types of VLAN: "Static VLAN" and
"Dynamic VLAN". To use the VLAN function, select the one to use.
For "Static VLAN", set the VLANID for each virtual AP (VAP).
"Dynamic VLAN" is a VLAN function that only passes packets with an attached VLANID tag configured
in the VLAN table.
When not using the VLAN function, set to "Disable".
Default setting : Disable
Local VLAN ID
Set the VLANID for the wired networking port on the device.
Set this value between 1 to 4094.
Default setting : 1
Native VLAN ID
Set the native VLANID.
Set this value between 1 to 4094.
When you wish to discard all packets without a VLAN tag, specify an appropriate VLANID that is
unused.
Default setting : 1
VAP VLAN ID
To use a static VLAN, set the VLANID assigned to the VAP (virtual AP).
Specify this value between 1 to 4094. When the device is a repeater, only the VLANID for VAP1
(repeater AP) can be configured. With a repeater, VAP1 (repeater AP) and VAP2 (repeater ST) operate
with the same VLANID.
Default setting : 1
FXE2000-G
37
4. Setup and Status Display
VLAN Table – VLAN ID
To use a dynamic VLAN, you must create a VLAN table that specifies the VLAN IDs to use. Set the
VLAN IDs to use.
The VLANIDs can be set from 1 to 4094.
When using "Dynamic VLAN", at least one VLAN table entry must be created.
Default setting : (Entirely blank)
VLAN Table - VLAN Name
Set the VLAN ID name. The VLAN name can be entered up to 32 characters, and it can also be set to
no VLAN name (blank). However, when setting a VLAN name, take care not to use a VLAN name for
another entry.
Default setting : (Entirely blank)
38
FXE2000-G
4. Setup and Status Display
Log
Log Function
To record the log for the device using the log function, set to "Enable".
You can prevent the log from being recorded by setting this setting to "Disable", but in normal operation
this is unnecessary.
Default setting : Enable
Save Log
To save the recorded log information as a file, set to "Enable". To only temporarily retain the recorded
log information in memory, set to "Disable".
Temporary retention means the log information is retained only while the device is running. When
"Disable", the log information is deleted when the device restarts or the power is disconnected.
Default setting : Disable
SYSLOG Server
To send the acquired log information to a SYSLOG server as a SYSLOG, set the IP address for the
SYSLOG server.
When not sending the log information to a SYSLOG server, set to 0.0.0.0 to disable.
Default setting : 0.0.0.0
Debugging Log
Please set to "Enable" if you want to log for more detailed debugging.
You do not need to "Enable", usually.
Default setting : 0.0.0.0
CAUTION
Please refer to help of browser setting screen for the explanation of a setting item etc. that increase
because it updated it to the latest firmware.
The latest explanation is described in help of the latest firmware.
FXE2000-G
39
4. Setup and Status Display
Status
System
Loader Version
Shows the loader version.
Firmware Version
Shows the firmware version.
Product ID
Shows the product ID.
Machine ID
Shows the machine ID.
Product Name
Shows the product name.
Country ID
Shows the country ID.
Ethernet MAC Address
Shows the Ethernet MAC address.
Wireless MAC Address
Shows the wireless MAC address.
IP Address
Shows the IP address.
Subnet Mask
Shows the subnet mask.
Default Gateway
This displays the IP address of the standard connected gateway. When not configured
(00-00-00-00-00-00), nothing is shown.
40
FXE2000-G
4. Setup and Status Display
WLAN
▼Basic Information (Access Point)
Shown when the unit type is access point.
WLAN Standard
Shows the configured wireless networking standard.
Dual Channel (Bandwidth)
Shows the bandwidth when the configured wireless networking standard is IEEE 802.11n.
channel mode is disabled, 20 MHz is shown. When enabled, 40 MHz is shown.
When dual
WLAN Infrastructure Mode
Shows the configured wireless connection mode.
Wireless MAC Address
Shows the wireless MAC address.
Channel
Shows the configured channel.
(VAP) Wireless MAC Address
Shows the wireless MAC address for each VAP.
the VAP is disabled.
(VAP) ESSID
Shows the ESSID for each VAP.
disabled.
FXE2000-G
From VAP2 onward, the value is not displayed when
From VAP2 onward, the value is not displayed when the VAP is
41
4. Setup and Status Display
(VAP) Client Logins
Shows the number of client logins for each VAP.
the VAP is disabled.
From VAP2 onward, the value is not displayed when
▼Basic Information (Station)
Shown when the unit type is station.
WLAN Standard
Shows the current wireless networking standard. This is hidden when the device is not logged in to an
access point.
Dual Channel (Bandwidth)
Shows the bandwidth when the current wireless networking standard is IEEE 802.11n. When dual
channel mode is disabled, 20 MHz is always shown. When enabled, 20 MHz or 40 MHz is shown
depending on the access point settings.
WLAN Infrastructure Mode
Shows the configured wireless connection mode.
Wireless MAC Address
Shows the wireless MAC address.
Channel
Shows the current channel. This is hidden when the device is not logged in to an access point.
ESSID
Shows the configured ESSID.
Assigned AP
Shows the wireless MAC address for the access point currently logged in to.
This is hidden when the device is not logged in to an access point.
RSSI
Shows the RSSI which indicates the signal strength for the wireless connection for the access point
currently logged in to.
This is hidden when the device is not logged in to an access point.
42
FXE2000-G
4. Setup and Status Display
TX Rate
Shows the transmission rate for the wireless connection for the access point currently logged in to.
This is hidden when the device is not logged in to an access point.
RX Rate
Shows the reception rate for the wireless connection for the access point currently logged in to. This is
hidden when the device is not logged in to an access point.
Supplicant Authentication Status
Shows the authentication status for the authentication supplicant in WPA and WPA2. "Invalid(1)" is
shown when not using a supplicant. "Success(2)" is shown when wireless connection authentication using
a supplicant was successful. "Failure(3)" is shown when authentication fails. "Authenticating(4)" is
shown during authentication.
Certificate Information
When the unit type is station, shows the value when the device was able to complete the wireless
connection and authentication using encryption that uses a WPA or WPA2 authentication supplicant.
Certificate Information – Issuer by
Shows the name of the certificate publisher (CA).
Certificate Information - Issued to
Shows the name of the organization the certificate was issued to.
Certificate Information – Valid from
Valid from
Certificate Information – Valid to
Shows the date the certificate expires.
▼Statics Information
- TX Unicast Packets
Shows the total number of unicast packets that transmitted.
- TX Multicast Packets
Displays the total number of multicast packets that have been transmitted.
- TX Unicast Bytes
Displays the total number of unicast bytes that have been transmitted.
FXE2000-G
43
4. Setup and Status Display
- TX Multicast Bytes
Displays the total number of multicast bytes that have been transmitted.
- TX Short Retry Packets
Displays the number of times that packets have been retransmitted one time.
- TX Long Retry Packets
Displays the number of times that packets have been retransmitted multiple times.
- TX FIFO Errors
Displays the number of FIFO Errors that occurred when transmitting data.
- RX Unicast Packets
Displays the total number of unicast packets that has been received.
- RX Multicast Packets
Displays the total number of multicast packets that has been received.
- RX Unicast Bytes
Displays the total number of unicast bytes that has been received.
- RX Multicast Bytes
Displays the total number of multicast bytes that has been received.
- RX FIFO Errors
Displays the number of FIFO Errors that occurred when receiving data.
▼Wireless Node Information (Station List)
Shown when the unit type is access point.
Shows a list of the stations logged in to the device.
▼Wireless Node Information (Access Point List)
Shown when the unit type is station.
Shows a list of access points that the device was able to scan and confirm the existence of.
44
FXE2000-G
4. Setup and Status Display
MAC Address Table
Shows a list of MAC address the device has learned of by communications over the wired and wireless
networks.
MAC Addresses
Shows the MAC addresses for this device and those of other learned of devices.
Interface
Devices learned of via the wired network are shown as "LAN(1)", devices learned of via the wireless
network are shown as "WLAN(2)".
Aging Time
Shows the aging time (expiration time) for the target device.
WLAN MAC Addresses
Shows the wireless MAC address of devices learned of via the wireless network.
FXE2000-G
45
4. Setup and Status Display
Log
Shows the log recorded by the device.
If the number of log entries exceeds 500 entries, the most recent 500 entries are displayed. If you wish to
check the entire log, open the link to the log file at the bottom of the page.
When the device's "Save Log" setting is enabled, the log in memory is regularly written to the unit's flash
ROM. The number of times the log has been written to the flash ROM is displayed in "Number of Times
Log Saved" at the top of the page.
To delete the entire device log, click "Clear Log", and then click "OK" on the confirmation dialog. Use
caution as the log cannot be restored when cleared.
46
FXE2000-G
4. Setup and Status Display
An explanation of the items recorded in the log is detailed below.
Category
System
Ethernet
Log content
System Start Start
Manual reboot
Manual reboot
Switch: Init
Initializing using the initialization switch
LAN: Link down
Link down
LAN: Link up (100/10Mbps full/harf
duplex)
DHCP
DHCP: Lease X.X.X.X (Xh)
DHCP: No lease
WLAN: Login
XX-XX-XX-XX-XX-XX (VAPX)
WLAN: Roaming
XX-XX-XX-XX-XX-XX (VAPX)
WLAN: Logout
XX-XX-XX-XX-XX-XX (VAPX)
WLAN
Description
Start
Link up (link speed and communication mode)
IP address lease for DHCP client (leased IP address &
lease time)
An IP address for the DHCP client was not leased
Login (wireless terminal MAC address & VAP)
Roaming (wireless terminal MAC address & VAP)
Logout (disconnected terminal MAC address & VAP)
WLAN: Login NG(1)
Login denied by MAC address filtering (disconnected
XX-XX-XX-XX-XX-XX (VAPX)
terminal MAC address & VAP)
WLAN: Login NG(2)
Login denied by client logins restriction (disconnected
XX-XX-XX-XX-XX-XX (VAPX)
terminal MAC address & VAP)
WLAN: DFS Xch(XMHz) ->
Xch(XMHz)
DFS (original channel & new channel)
WLAN: Auth Success
Authentication successful (MAC address of terminal that
XX-XX-XX-XX-XX-XX
was successfully authenticated)
WLAN: Auth Error
Authentication error (MAC address of terminal that failed
XX-XX-XX-XX-XX-XX
to authenticate)
WLAN: HT40X intolerant channel
Detected a congested channel detected before dual
(Xch)
channel mode operation
WLAN: Switching band width from Disabling dual channel mode because a congested channel
WEB
FXE2000-G
20/40MHz to 20MHz
was detected
WEB: Setting clock (old time)
Setting the clock
WEB: Default setup
Setting defaults
WEB: Set password
Setting password
WEB: Save config
Saving settings
WEB: Firmware update (XXX ->
XXX)
Updated firmware (old version -> new version)
WEB: Server certificate upload
Server certificate upload
WEB: Client certificate upload
Client certificate upload
WEB: Private key upload
Private key upload
WEB: Clear logfile
Clear log
47
4. Setup and Status Display
Category
Log content
FTP: Login
Logout
FTP: Login NG
Login failed
FTP: Firmware update
Updated firmware
FTP: Firmware update error
(States)
FTP: Config write
FTP: Config write error
(States)
FTP: Cconfig write
FTP: Cconfig write error
(States)
FTP: Macfil write
FTP: Macfil write error
(States)
FTP: Server certificate write
FTP: Server certificate write
error(States)
FTP: Client certificate write
FTP: Client certificate write
error(States)
FTP: Private key write
FTP: Private key write error
(States)
Network time
Firmware update failed
Writing configuration file
Writing configuration file failed
Writing encryption configuration file
Writing encryption configuration file failed
Writing MAC address filter file
Writing MAC address filter file failed
Writing server certificate
Writing server certificate failed
Writing client server certificate
Writing client certificate failed
Writing private key
Writing private key failed
Reset command issued
NTP: Setting clock (Old time)
Setting time
(link down condition)
LDS: VAPX up
(link down condition)
48
(old version -> new version)
FTP: RST command
LDS: VAPX down
link down Detection
Login
FTP: Logout
(XXX -> XXX)
FTP
Description
VAP stopped by link down sense
VAP started by link down sense
FXE2000-G
4. Setup and Status Display
Maintenance
Firmware Update
You can update the firmware on the device.
Click the "Browse" button, select the version update file system file, and then click the "Update" to
upload the file to the device. The file is uploaded and the update task finishes about one to one and a half
minutes after clicking the "Update" button, then the page changes. After uploading the file finishes, the
device starts with the overwritten firmware by restarting.
When the version update fails, check that the uploaded file is the correct file, and then try to update the
version again.
Do not turn off the device's power under any circumstances during the updating task from when the
"Update" button is clicked until the screen changes as this will result in malfunction.
The progress bar displayed during the update is a guide that indicates the progress status in terms of time,
it does not indicate the actual progress of the work. The progress bar indicates the completion time when
the gauge is full.
Do not turn off the device's power while the firmware is being uploaded until the screen changes.
Time Adjustment
Set the date and the time for the device. Enter the year as four digits, the month, the day, the hour
(24-hour time), the minute, and the seconds, and then click the update button. When the month and day
are a single digit, a 0 is added and they are displayed as two digits. You can enter the values as either a
single digit or as two digits. (Example: 2011/4/1 0:0:0) Or click the "Set PC Time" button to set the
time in the PC's internal clock where the browser is open in the entry form.
Password
You can change the login password to this device including the Wireless LAN Manager (this
configuration web page). Enter the password as alphanumeric characters with a maximum length of 32
characters. The changed password is valid after the device restarts.
FXE2000-G
49
4. Setup and Status Display
Download
You can download the device's current configuration file and log file by clicking the link. If the file is
opened in the browser, right click on the link and select the save to file item. The name of downloaded
file has the extension .txt added to it.
Upload
You can update the device's configuration file (config) and MAC address filtering file (macfil). Click
the "Browse" button, select the file to be uploaded from each form, and then click the "Upload" to upload
the file to the device. The file is uploaded and the update task finishes several seconds or several tens of
seconds after clicking the "Upload" button, then the page changes.
If the upload fails, check that the uploaded file is the correct file, and then try uploading again. Do not
turn off the device's power under any circumstances during the updating task from when the "Upload"
button is clicked until the screen changes as this will result in malfunction.
Default Settings
You can restore the device's settings to the default settings. At this time, select with the radio button to
also restore the IP addresses (including subnet mask) to the defaults or to leave them as they are. Then
click the "Default" button.
Even when the default settings are restored, they are not saved to the device's configuration file, so you
must save and restart to reflect the settings.
50
FXE2000-G
4. Setup and Status Display
Ping
You can ping to the specified IP address.
Enter the IP address of the ping to "Target IP Address".
Select the time to run a ping "Timeout (sec)". ping is done once per second, this time will be the number
of ping.
Set the ping data size to "Data Size (bytes)".This value can be set between 4 and 65000 bytes.
By clicking the "Ping" button, then the results displayed below the button.
FXE2000-G
51
4. Setup and Status Display
52
FXE2000-G
5. Wireless Link Mode and Wireless LAN Function
5. Wireless Link Mode and Wireless LAN
Function
This chapter describes the major functions of the FLEXLAN series as a wireless LAN system and the
wireless link modes of the product along with configuration examples of networks available in the
wireless link modes.
Wireless Link Mode
This product has three wireless link modes. The available functions and network configurations differ
depending on the mode. Use the wireless link mode most suitable to the type of network you are
constructing.
The factory default setting is “Advanced Infrastructure Mode”.
Chapters 3 and 4 describe the software setting procedures for the wireless link modes and related items.
Standard Infrastructure Mode
In this mode, each access point (AP) can accommodate stations (ST) to make up a network.
This mode allows the use of multiple APs to configure a wide-area wireless LAN. All communication
between wireless terminals must go through an AP.
Network A
Network B
Router
AP2
AP1
FS
AP : Access point
ST : Station
FS : File server
: Wireless connection
: Wired connection
HUB
ST2
ST1
ST3
Network C
Figure 5.1.
Standard Infrastructure Mode
In the Standard Infrastructure mode above, all wireless terminals communicate via AP. Roaming
functions are supported, allowing login to any AP within range of radio waves.
For the IP tunneling function to work properly, one of the APs must be setup as a master AP.
-
Advantages
(1) Allows log-in restrictions (security function).
(2) Improves security using the WSL (Wireless Security Link).
(3) When connecting a CONTEC station to this product using a wired connection, there is no limit
to protocols and the number of devices that can be connected.
FXE2000-G
53
5. Wireless Link Mode and Wireless LAN Function
Compatible Infrastructure Mode
This mode allows the product to be networked with other manufacturers’ Wi-Fi certified wireless
terminals other than the FLEXLAN series. Communications between the wireless terminals are always
made via the APs.
CAUTION
The Compatible Infrastructure mode does not guarantee interconnection with Wi-Fi compliant
products of other manufacturers.
Network A
AP1
FS
AP : Access point
ST : Station
FS : File server
: Wireless connection
: Wired connection
ST1
ST2
ST3
Figure 5.2. Compatible Infrastructure Mode
In the Compatible Infrastructure mode, each wireless terminal performs communication via the AP as in
the Standard Infrastructure mode. Roaming functions are supported, allowing login to any AP within
range of radio waves.
APs do not provide NZ2WL series' unique functions since APs work as a simple bridge.
54
FXE2000-G
5. Wireless Link Mode and Wireless LAN Function
Advanced Infrastructure Mode
The Advanced Infrastructure mode is a mixture of the Standard Infrastructure and Compatible
Infrastructure modes. The Advanced Infrastructure mode can be used only when the product is configured
as an access point.
Network A
AP
AP : Access point
FS
ST : Station
FS : File server
: Wireless connection
: Wired connection
ST1
HUB
ST5
ST2
Figure 5.3.
ST3
ST4
Network B
Advanced Infrastructure Mode
On the terminal set to the Standard Infrastructure mode, the FLEXLAN series' unique functions can be
used.
The terminal set to the Compatible Infrastructure mode serves as a simple bridge and thus the FLEXLAN
series’ unique functions cannot be used on this terminal.
FXE2000-G
55
5. Wireless Link Mode and Wireless LAN Function
Installation in a Network
This section describes how to install the FXE2000 to construct a network with improved performance and
discusses the general features and radio characteristics of the wireless LAN as well as the guidelines for
constructing the network.
Features of the Wireless Network
In general, the operation of a wireless network is the same as for most other types of LAN. The most
prominent feature of the wireless network is that it uses radio waves as its medium, eliminating the need
for cabling. The wireless network thus requires no cabling cost and has other advantages as listed
below :
-
Quick construction of a LAN
-
Temporary installation of a LAN
-
Higher flexibility in layout of connected PCs (terminals)
-
Assured mobility of connected PCs (terminals)
On the other hand, the wireless network has the following drawbacks from the operational point of view
due to the nature of radio waves :
-
Signal attenuation
-
Signal interference
Also, although this unit does not require a radio license, it is subject to radio regulations.
56
FXE2000-G
5. Wireless Link Mode and Wireless LAN Function
Operating Environment and Radio Waves
When using this product to construct a network, install and operate it considering the radio environment
to optimize the performance.
Is allowed to use radio equipment at the installation location?
In some medical institutions and laboratories, radio-sensitive precision instruments are used and it may be
prohibited to use radio equipment.
Radio waves are attenuated.
Although a radio wave is attenuated naturally as it travels from its transmission source, it may also be
attenuated by an object existing in its way. Major obstacles that attenuate radio waves are as follows :
-
Concrete wall
-
Metal surfaces in the vicinity of the antenna
Obstacles blocking radio waves include metal walls and walls containing a metal firewall.
Strictly speaking, nearly all objects in the path of the radio waves (such as partitions or people) cause
some attenuation but these do not have a significant impact on network performance.
RSSI (Receive Signal Strength Indication) utility is available as a means of knowing the signal strength of
an incoming radio wave. Placing this product for a greater RSSI value makes the communication state
more stable. If the RSSI value is small and slightly moving the position of the product does not increase
the RSSI value, it indicates radio wave attenuation either to the distance or by an obstacle.
FXE2000-G
57
5. Wireless Link Mode and Wireless LAN Function
Pay attention to radio interference.
Radio interference means the reception of radio waves in the frequency band used by this network that are
generated by equipment that is not part of the network to which this product belongs. Listed below are
major examples of sources of interfering radio waves generated in general environments excluding plants
and factories :
-
5GHz (if using IEEE 802.11n draft standard or IEEE 802.11a standard in the 5GHz band) or 2.4GHz
(if using IEEE 802.11n draft standard or IEEE 802.11b/IEEE 802.11g standard in the 2.4GHz band)
band wireless networks that do not comply with IEEE802.11.
-
if using IEEE 802.11b/IEEE 802.11g standard in the 2.4GHz band. Ex. microwave ovens, security
gates (installed near the entrances of some department stores and rental shops), copiers which give off the
2.4GHz electric waves.
Where there is a large metal wall such as in a warehouse, the radio wave generated from the sender is
reflected, resulting in those radio waves reaching the receiver which have taken different routes (thereby
phase-shifted). This has the similar effect as the generation of interfering radio waves, possibly slowing
down data transfer.
Most of the interfering radio wave sources other than wireless networks have local and/or temporary
effects, not so affecting network performance. Rarely, however, the date rate is reduced and, in the
worst case, communication is disabled temporarily. In such cases, change the location of this product
and the channel used for communication. This may solve the problem.
58
FXE2000-G
5. Wireless Link Mode and Wireless LAN Function
Constructing a Network
This section gives some pointers and cautions relating to constructing a network using the AP and station,
and provides some practical examples.
(1) When using this product in the 5GHz band, any of the following channels can be set:
W52: channels 36, 40, 44, and 48
W53: channels 52, 56, 60, and 64
W56: channels 100, 104, 108, 112, 116, 120, 124, 128, 132, 136, and 140.
When using in IEEE 802.11g (2.4GHz), channels 1 to 13, and in IEEE 802.11b (2.4GHz), channels 1
to 14 can be set.
Wireless communication is possible with stations that support the above channels.
Using different channels for wireless networks adjacent to each other (In 5GHz band, set it to 36.44,
8ch or more apart and in 2.4GHz, 1, 6, 11 5ch or more apart) prevents radio interference and
improves the throughput of either network.
1ch
6ch
11ch
Design when using in 2.4GHz
36ch
44ch
Design when using in 5GHz
(2) Check the coverage (cover area) of the AP. To use the AP with two or more station logged in AP,
all the station must be installed within the cover area. The AP’s coverage varies with obstacles
(concrete walls, iron doors, elevator halls, etc.). Note also that the number of transmission/reception
errors increases beyond a certain transmission distance.
Cover area
ST3
ST2
AP1
ST1
When setting up the network, check the RSSI level then confirm that communication works correctly
with the application you plan to use. For a TCP/IP system, for example, you can use the Windows
PING command. To use PING, start the command prompt (MS-DOS) and enter the following command.
The example command is for an AP with an IP address of 192.168.0.2.
ping 192.168.0.2
FXE2000-G
59
5. Wireless Link Mode and Wireless LAN Function
(3) Two or more stations can log in the AP at the same time However, remember that the
communication speed slows due to the increased loading as the number of user units for a particular
AP increases.
Low impact on
communication speed
Small load
High impact on
communication speed
Large load
ST3
ST5
AP
ST1
AP
ST4
ST1
ST2
(4) If a pair of wireless terminals are communicating via a particular channel, no other communications
can use that channel within the range of the radio signal (the exception is broadcasting which
transmits to all terminals). As a result, communication speed tends to drop as the density of
wireless terminals increases although this depends to a large extent on how frequently the network is
used.
Simultaneous communication impossible
ST2
AP
ST1
(5) If the AP is connected to an Ethernet hub or similar, a unexpectedly large load can occur on the AP if
the Ethernet traffic is heavy and this may reduce the performance of the wireless network. This can
be solved by changing the hub connected to the AP to a switching hub (bridge).
PC1
AP1
PC2
Slower communication speed
HUB
ST1
60
Faster communication speed
FXE2000-G
5. Wireless Link Mode and Wireless LAN Function
(6) Setup the software in accordance with how the network will be used.
(7) The communication speed may also drop due to interference if two wireless terminals are located
close to each other. In general, maintain a gap of about 1m between station, 3m between APs and
station, and 3m between APs.
AP1
AP2
3m or more
1m or more
ST1
ST2
(8) The best performance is achieved from antennas if they are located in an open space free from
obstructions. Avoid locating antennas where they will be hidden. In particular, when
communication distance is an important consideration, it is recommended that you install antennas in
a high location with a clear view.
(9) Floors often contain steel beams or metal firewalls and therefore communication between floors is
often not possible.
FXE2000-G
61
5. Wireless Link Mode and Wireless LAN Function
62
FXE2000-G
6. Maintenance
6. Maintenance
This chapter describes how to perform maintenance on the AP and explains the tools to be used. Here,
“maintenance” means the following : log file collection, firmware upgrades, and saving and restoring
the software settings.
Maintenance Tool
This maintenance tool is available for the FTP, Web browser and FLEX HELPER. This section
describes how to use the tool by the FTP. For details about downloading using a Web browser, see the
section titled "Download" in Chapter 4 "Setup and Status Display".
For details and applications of FLEX HELPER, contact your dealer.
Log File Collection
To collect the log file, you collect it by using Web browser or FTP via the LAN.
The log file is in text format and can be displayed in the Notepad or WordPad programs that come with
Windows.
The collected log file is stored the CF card with the following file name.
File name
:
LOGFILE
CAUTION
To collect the log file, log collection must be enabled. Note also that the contents of the log file
differ depending on the operating mode and software settings.
Using FTP to Get the Log File
Log files that use the FTP are collected according to the following procedure.
(1)
Move to the folder in which you wish to save the file.
(2-1)
Run FTP to log in to the AP.
(2-2)
Run FTP to log in to the AP. (Enter FTP user’s name)
(2-3)
Run FTP to log in to the AP. (Enter FTP password)
(3)
Transfer the log file.
(4)
Exit FTP.
FXE2000-G
63
6. Maintenance
The following is an example for the time when Windows Command Prompt (MS-DOS Prompt) is used.
In this example, the file will be moved to the saving folder D : ¥tmp and LOGFILE will be collected after
connecting to this product via FTP. The example assumes the User as admin (blank is OK), Password as
Pass (initial setting) and the IP address as 192.168.0.1.
*
64
C:¥>cd D:¥tmp
………… (1)
D:¥tmp>ftp 192.168.0.1
………… (2-1)
User (192.168.0.1:none)):admin
………… (2-2)
Password:pass
………… (2-3)
ftp>get LOGFILE
………… (3)
ftp>bye
………… (4)
For details about downloading using a Web browser, see the section titled "Download" in Chapter 4
"Setup and Status Display".
FXE2000-G
6. Maintenance
Saving the Settings File
Making a backup of the AP software settings file has the following benefits :
-
If you have more than one AP and all APs have the same settings, you just need to setup one AP then
use the resulting settings file for the other APs. (However, as this sets the same IP address for all
APs, you need to change the IP address separately.)
-
The old settings can be restored easily if a fault causes the settings file to be erased.
The settings file is stored the CF card with the following file name.
File name --- --- --- --- --- CONFIG
If the MAC address filtering is used, it’s setting file should also be saved.
memory on the AP with the following file name :
The setting file is stored in
MAC address filtering --- MACFIL
The file is in the memory even when the MAC address filtering function is not in use It, however, does
not have to be saved.
Using FTP to Backup the Settings File
Configuration files that use the FTP are collected according to the following procedure.
(1) Move to the folder in which you wish to save the file.
(2) Run FTP to log in to the AP.
(3) Transfer the settings file (CONFIG).
MACFLIST is also transferred if necessary.
(4) Exit FTP.
The following is an example for the time when Windows Command Prompt (MS-DOS Prompt) is used.
In this example, the file will be moved to the saving folder D : ¥tmp and CONFIG and MACFLIST will
be collected after connecting to the product via FTP. The example assumes the IP address as
192.168.0.1.
C:¥>cd D:¥tmp
*
………… (1)
D:¥tmp>ftp 192.168.0.1
………… (2-1)
User (192.168.0.1:none)):admin
………… (2-2)
Password:pass
………… (2-3)
ftp>get CONFIG
………… (3)
ftp>get MACFIL
………… (3)
ftp>bye
………… (4)
For details about downloading using a Web browser, see the section titled "Download" in Chapter 4
"Setup and Status Display".
FXE2000-G
65
6. Maintenance
Restoring the Software Settings
The software settings of this product can be recovered by using the saved setup file.
Using FTP to Restore the Settings
Follow the procedure below to recover the software settings using FTP.
(1) Move to the folder with file.
(2) Run FTP to log in to the AP.
(3) Transfer the settings file(config).
MACFLIST is also transferred if necessary.
(4) Issue the reset request command(command :
quote crst).
(5) Quit FTP.
The following is an example for the time when Windows Command Prompt (MS-DOS Prompt) is used.
In this example, the file will be moved to the folder with file D : ¥tmp and CONFIG and MACFLIST will
be transferred after connecting to the product via FTP. The example assumes the IP address as
192.168.0.1.
C:¥>cd D:¥tmp
………… (1)
D:¥tmp>ftp 192.168.0.1
………… (2)
ftp>put CONFIG
………… (3)
ftp>put MACFLIST
………… (3)
ftp>quote rst
………… (4)
ftp>bye
………… (5)
The reset request command shown in (4) is a command used to reboot the product.
to skip (4), stop FTP in (5) and reboot the product later.
66
There is no problem
FXE2000-G
6. Maintenance
Upgrading the Firmware
The AP firmware may be upgraded to resolve any bugs found in the software or to add new functions.
Contact CONTEC via our web site for details of the latest firmware.
The firmware is stored the AP memory with the following file name.
File name
:
APFIRM.BIN
This file can be written over to upgrade the version of the firmware.
There are two ways to upgrade the version of the firmware :
Web setup screen.
FTP; and Access Point Manager with a
Performing an Upgrade Using FTP
Follow the procedure below for the firmware version up settings using FTP.
(1) Move to the folder with file.
(2) Run FTP to log in to the AP.
(3) Change the transfer mode to binary.
(4) Transfer the firmware file APFIRM.BIN.
(5) Issue the reset request command (quote crst).
(6) Quit FTP.
The following is an example for the time when Windows Command Prompt (MS-DOS Prompt) is used.
In this example, the firmware file for version up will be moved to the folder with file D : ¥tmp and
APFIRM.BIN will be transferred after connecting to the product via FTP. The example assumes the IP
address as 192.168.0.1.
C:¥>cd D:¥tmp
*
………… (1)
D:¥tmp>ftp 192.168.0.1
………… (2)
ftp>bin
………… (3)
ftp>put FIRMWARE.BIN
………… (4)
ftp>quote rst
………… (5)
ftp>bye
………… (6)
For details about downloading using a Web browser, see the section titled "Download" in Chapter 4
"Setup and Status Display".
CAUTION
The setup file data and firmware data may be damaged and the product may not operate properly if it
is rebooted or switched off while the firmware is still being updated (data being written).
FXE2000-G
67
6. Maintenance
Initialization
There are two ways to initialize this product (recovering the factory settings).
-
Using a Web browser
-
Using the INIT switch of the main unit
Each initialization method is described below.
Using a Web Browser
Follow the procedure below when using Web browser to initialize the product.
(1) Follow the procedure below when using Web browser to
initialize the product.
(2) Select “Maintenance” - “Default setting” from the menu.
(3) To leave the IP address of the product unchanged without
initialization, tick “Do not set IP address to default”. To
initialize the IP address, tick “Set IP address to default”
and then click “Default”.
(4) Click “Save/Reboot” on the menu to save the default
setting and reboot the product.
CAUTION
If the default setting is selected by mistake, click “Logout” on the menu to close the Web setup
screen.
Using the DIP Switch of the Main Unit
Follow the procedure below when using the DIP Switch of the Main Unit to initialize the product.
(1) The LEDs of POWER, LAN and WLAN
continue to blink for a little while after DIP
switch 1 is turned off.
(2) Release this button after the LED starts
flashing but before it reverts to an ON state
(an interval of approx. 3 seconds).
OFF
ON
Factory setting
1 pin
1: OFF
2: OFF
(3) All the settings are restored to the default
settings after the product is started next time.
CAUTION
*The flashing continues for a little while after the product is switched off during initialization by switching on and
off the INIT switch No.1.
This indicates internal memory files are being deleted. The internal memory files may be
damaged and the product may not start up properly if the power is switched off before the flashing stops. Always
reboot the product after the flashing stops.
68
FXE2000-G
7. Troubleshooting
7. Troubleshooting
This chapter describes common problems that may occur with this product and what to do about them.
If any problems occur that are not described here, check to confirm that the re-occur, then contact the
retailer.
When Communication Fails
Check wired LAN communication
Check the wired LAN communication between this product and the connected PC.
-
Check that the LAN cable is connected correctly.
-
Check if the IP addresses and subnet masks of the product and PC are set correctly.
-
The communication with this product is not possible unless the TCP/IP protocol is installed in the
PC.
Check wireless LAN communication
If no problem is detected in the wired LAN communication between the product and PC, check the
wireless LAN communication between the product and access point.
-
The FLEXLAN series is designed to handle a variety of operating formats, and requires software
setting for each type of operation. Check that the settings are appropriate for the type of operation,
and check the format in which communication is being attempted. Also check DIP switch settings.
-
The terminals that cannot communicate with each other may have the same ESSID. Two terminals
with the same ESSID cannot communicate with each other.
Check whether the wireless link mode has been set correctly. The wireless link mode of the station
(slave station) must support the wireless link mode set on this product.
-
Check whether communication is restricted by security functions such as the MAC address filtering.
-
Check whether the data encryption setting is the same as that of the recipient.
Communication cannot be performed while data encryption is being switched between ON (enabled)
and OFF (disabled).
Check the peripheral environment and place of installation
-
A nearby source of electromagnetic interference can prevent communication. In general locations
(excluding factories) the following may be sources of electromagnetic emissions.
-
2.4GHz band wireless network not conforming to wireless LAN (IEEE802.11a/b/g/n).
-
When using by 2.4GHz band, electric devices which give off 2.4GHz band electric wave microwave oven, security gate (it is a antitheft gate in the shop), copy machine and so on.
Most electromagnetic sources other than wireless networks are local and not continuous, and therefore by
moving the location of the unit and waiting briefly, communication may be possible.
FXE2000-G
69
7. Troubleshooting
-
Sometimes communication is hindered by attenuation of electric waves. Attenuation occurs
naturally as distance from the source of transmission increases, but may also be caused by objects in
the path of the transmission. The objects primarily responsible for attenuation are the following.
-
Concrete walls
-
Metallic surfaces around this product
Setup Screen Unavailable on Web Browser
-
Check if communication is possible between the product and PC.
-
If no problem is detected in the communication between the product and PC, it may be related to the
browser settings. For the browser settings, see Chapter 3 “Connection to Devices and Setup
Methods”.
When the AP Will Not Start
Check the LED
-
Check whether the “POWER” LED is illuminated. If it is not illuminated, check the power cable
and make sure that it is connected correctly to the power jack and the socket.
-
Check whether the Power LED is flashing. If the power LED is still flashing more than 5 minutes
after the power is switched on, the problem may be an AP firmware failure.
In this case, the problem may be a startup error caused by corrupt data in the memory of this product.
If you cannot restore it, contact your retailer.
Check the power
-
If using an AC adapter, check that the adapter is an optional accessory of a type specified by
CONTEC. Only use AC adapters specified by CONTEC with this product.
-
If supplying power from the power connector, check the power supply connection, supply voltage,
etc., and make sure that there are no problems. For details about connecting the power supply, see
Chapter 2 "Setup".
70
FXE2000-G
8. Appendix
8. Appendix
Factory Default Settings List
Table 8.1
Initial Setting List (1/12)
Item
Specification
Basic settings
System
DHCP Client
Disable, Enable
IP address
192.168.0.1
Subnet Mask
255.255.255.0
Default Gateway
0.0.0.0
Language
English, Japanese
Time Zone
AKST+9, AKDT+8, HAST+10, WET+0, WEST+1, CET-1, CEST-2,
EET-2, EEST-3, TST-8, CST-8, KST-9, JST-9
EST+5, EDT+4, CST+6, CDT+5, MST+7, MDT+6, PST+8, PDT+7,
Radio
WLAN Interface
Enable, Disable
Unit Type
Station, Access Point, Repeater
Repeater Independent
Enable, Disable
WLAN Standard
Auto*1, IEEE802.11n (5GHz)
IEEE802.11n (2.4GHz), IEEE802.11a, IEEE802.11b, IEEE802.11g
Dual Channel Mode *2
Disable, Enable
Channel *3
Varies depending on the country in which the product is used.
WLAN Infrastructure Mode
Standard Infrastructure,
Compatible Infrastructure,
Advanced Infrastructure*3
*1 :
*2 :
*3 :
*4 :
TX Power
MAX, 50%, 25%, 12%
Antenna Selection*4
Auto, Fixed (Antenna 1)
This setting is available when the unit type is "Station".
This setting is available when the unit type is "Access Point" or "Repeater" and the wireless networking standard is
"IEEE802.11n(5GHz)" or "IEEE802.11n(2.4GHz)".
This setting is available when the unit type is "Access Point" or "Repeater".
This setting can only be configured when the wireless networking standard is "IEEE802.11a", "IEEE802.11b", or
"IEEE802.11g".
FXE2000-G
71
8. Appendix
Table 8.1
Initial Setting List (2/12)
Item
Specification
Basic Settings
VAP Settings
VAP1
VAP Settings
LocalGroup, (between 2 and 32 characters in length,
ESSID
single-byte alphanumeric characters only,)
Disable, WEP(Open), WEP(Shared Key), WEP (Auto) *3,
AES, IEEE802.1X(WEP), WPA(AES), WPA(TKIP),
WPA-PSK(TKIP), WPA-PSK(AES), WPA2(AES),
WPA2(TKIP), WPA2-PSK(AES),
Encryption
WPA2-PSK(TKIP),WPA-AUTO(TKIP)*3,
WPA-AUTO(AES)*3, WPA-AUTO-PSK(TKIP)*3,
WPA-AUTO-PSK(AES)*3
WSL*6
Function
Disable, Enable (Type2)
Key
None a 20 digit hexadecimal value (0 to 9, a to f or A to F).
Default key
Fixed Key 1, Fixed Key 2, Fixed Key 3, Fixed Key 4
Fixed Key 1
64bit : a 10 digit hexadecimal value, 128bit : a 26 digit
hexadecimal value, 152bit : a 32 digit hexadecimal value
Fixed Key 2
64bit : a 10 digit hexadecimal value, 128bit : a 26 digit
hexadecimal value, 152bit : a 32 digit hexadecimal value
Fixed Key 3
64bit : a 10 digit hexadecimal value, 128bit : a 26 digit
None , When set to None, the setting is disabled
None , When set to None, the setting is disabled
Key
Setting *7
None , When set to None, the setting is disabled
hexadecimal value, 152bit : a 32 digit hexadecimal value
None , When set to None, the setting is disabled
Encryption
Settings
Fixed Key 4
Authentication
Type
Supplicant User Name
Settings
*8
Password
Certificate
Registration
WPA
Settings *9
Updating Interval
(sec)
PEAP, EAP-TLS
None Up to 32 characters in length, single-byte alphanumeric
characters only
None Up to 32 characters in length, single-byte alphanumeric
characters only
Server certificate, Client certificate, Private key
3600
0(Disable) or 120 - 259200
Recertification
0(Disable)
RADIUS
Interval (sec)
0(Disable) or 120 - 259200
Server
Settings
Server IP Address
0.0.0.0
Server Port
1812
*10
PSK
Settings
*11
72
Group Key
64bit : a 10 digit hexadecimal value, 128bit : a 26 digit
hexadecimal value, 152bit : a 32 digit hexadecimal value
Shared Secret
WPA Pre-Shared
Key (PSK)
None Up to 64 characters in length, single-byte alphanumeric
characters only, no spaces
None Alphanumeric characters between 8 and 63 characters.
FXE2000-G
8. Appendix
*3 :
*6 :
This setting is available when the unit type is "Access Point " or "Repeater".
This setting is available when the wireless connection mode is "Advanced Infrastructure" or "Standard
Infrastructure".
*7 : This setting is available when the encryption is set to either "WEP(Open)", "WEP(SharedKey)", "WEP(Auto)", or
"AES".
*8 : This setting is available when the unit type is "Station " and the encryption is set to either "IEEE802.1X", "WPA",
or "WPA2".
*9 : This setting is available when the unit type is "Access Point" or " Repeater" and the the encryption is set to either
"WPA", "WPA2", "WPA-PSK", or "WPA2-PSK".
*10 : This setting is available when the unit type is "Access Point " and the encryption is set to either "IEEE802.1X",
"WPA", or "WPA2".
*11 : This setting is available when the encryption is set to either "WPA-PSK", or "WPA2-PSK".
FXE2000-G
73
8. Appendix
Table 8.1
Initial Setting List (3/12)
Item
Specification
Basic Settings
VAP Settings
VAP2*3
None , (When set to None, the setting is disabled, between 2
VAP Settings
and 32 characters in length, single-byte alphanumeric
characters only,)
ESSID
Disable, WEP(Open), WEP(Shared Key), WEP(Auto) *4, AES,
IEEE802.1X(WEP), WPA(AES), WPA(TKIP),
WPA-PSK(TKIP), WPA-PSK(AES), WPA2(AES),
WPA2(TKIP), WPA2-PSK(AES),
Encryption
WPA2-PSK(TKIP),WPA-AUTO(TKIP)*4,
WPA-AUTO(AES)*4, WPA-AUTO-PSK(TKIP)*4,
WPA-AUTO-PSK(AES)*4
WSL*6
Function
Disable, Enable (Type2)
Key
None a 20 digit hexadecimal value (0 to 9, a to f or A to F).
Default key
Fixed Key 1, Fixed Key 2,
Fixed Key 3, Fixed Key 4,
None , When set to None, the setting is disabled
Fixed Key 1
64bit:a 10 digit hexadecimal value, 128bit:a 26 digit
hexadecimal value, 152bit:a 32 digit hexadecimal value
Fixed Key 2
64bit:a 10 digit hexadecimal value, 128bit:a 26 digit
None , When set to None, the setting is disabled
Key
Setting *7
hexadecimal value, 152bit:a 32 digit hexadecimal value
None , When set to None, the setting is disabled
Fixed Key 3
64bit:a 10 digit hexadecimal value, 128bit:a 26 digit
hexadecimal value, 152bit:a 32 digit hexadecimal value
Fixed Key 4
64bit:a 10 digit hexadecimal value, 128bit:a 26 digit
None , When set to None, the setting is disabled
Encryption
Settings
hexadecimal value, 152bit:a 32 digit hexadecimal value
Authentication
Type
Supplicant
Settings *8
User Name
Password
Certificate
Registration
WPA
setting *9
RADIUS
Server
Settings
*10
PSK
Settings
*11
74
PEAP, EAP-TLS
None Up to 32 characters in length, single-byte alphanumeric
characters only
None Up to 32 characters in length, single-byte alphanumeric
characters only
Server certificate, Client certificate, Private key
Group Key
3600
Updating Interval
(sec)
0(Disable) or 120-259200
0(Disable)
Recertification
Interval (sec)
0(Disable) or 120-259200
Server IP Address
0.0.0.0
Server Port
1812
Shared Secret
WPA Pre-Shared
Key (PSK)
None Up to 64 characters in length, single-byte alphanumeric
characters only, no spaces
None Single-byte alphanumeric characters (from 8 to 63
characters)
FXE2000-G
8. Appendix
*3 :
*4 :
*6 :
This setting is available when the unit type is "Access Point" or "Repeater".
This setting is available when the unit type is "Access Point ".
This setting is available when the wireless connection mode is "Advanced Infrastructure" or "Standard
Infrastructure".
*7 : This setting is available when the encryption is set to either "WEP(Open)", "WEP(SharedKey)", "WEP(Auto)", or
"AES".
*8 : This setting is available when the unit type is "Station " and the encryption is set to either "IEEE802.1X", "WPA",
or "WPA2".
*9 : This setting is available when the unit type is "Access Point" or " Repeater" and the the encryption is set to either
"WPA", "WPA2", "WPA-PSK", or "WPA2-PSK".
*10 : This setting is available when the unit type is "Access Point" and the encryption is set to either "IEEE802.1X",
"WPA", or "WPA2".
*11 : This setting is available when the encryption is set to either "WPA-PSK", or "WPA2-PSK".
FXE2000-G
75
8. Appendix
Table 8.1
Initial Setting List (4/12)
Item
Specification
Basic Settings
VAP Settings
VAP3*4
None , (When set to None, the setting is disabled, between 2 and
32 characters in length, single-byte alphanumeric characters
only,)
VAP Settings ESSID
None , WEP(Open), WEP(Shared Key), WEP(Auto), AES,
IEEE802.1X(WEP), WPA(AES), WPA(TKIP), WPA-PSK(TKIP),
WPA-PSK(AES), WPA2(AES), WPA2(TKIP), WPA2-PSK(AES),
WPA2-PSK(TKIP),WPA-AUTO(TKIP), WPA-AUTO(AES),
Encryption
WPA-AUTO-PSK(TKIP), WPA-AUTO-PSK(AES)
WSL*6
Function
None , Enable (Type2)
Key
None a 20 digit hexadecimal value (0 to 9, a to f or A to F).
Default key
Fixed Key 1, Fixed Key 2,
Fixed Key 3, Fixed Key 4,
None , When set to None, the setting is disabled,
Fixed Key 1
64bit:a 10 digit hexadecimal value, 128bit:a 26 digit
hexadecimal value, 152bit:a 32 digit hexadecimal value
None , When set to None, the setting is disabled,
Key Setting Fixed Key 2
64bit:a 10 digit hexadecimal value, 128bit:a 26 digit
*7
hexadecimal value, 152bit:a 32 digit hexadecimal value
None , When set to None, the setting is disabled,
Fixed Key 3
64bit:a 10 digit hexadecimal value, 128bit:a 26 digit
hexadecimal value, 152bit:a 32 digit hexadecimal value value
Fixed Key 4
64bit:a 10 digit hexadecimal value, 128bit:a 26 digit
None , When set to None, the setting is disabled,
Encryption
Settings
hexadecimal value, 152bit:a 32 digit hexadecimal value
Authentication
Type
Supplicant
Settings *8
User Name
Password
Certificate
Registration
Group Key
WPA setting
Renewal Interval
*9
(sec)
RADIUS
Server
Settings
*10
PSK
None Up to 32 characters in length, single-byte alphanumeric
characters only
None Up to 32 characters in length, single-byte alphanumeric
characters only
Server certificate, Client certificate, Private key
3600 0(Disable) or 120-259200
Recertification
Interval (sec)
0(Disable) 0(Disable) or 120-259200
Server IP Address
0.0.0.0
Server Port
1812
Shared Secret
WPA Pre-Shared
Settings *11 Key (PSK)
76
PEAP, EAP-TLS
None Up to 64 characters in length, single-byte alphanumeric
characters only, no spaces
None Single-byte alphanumeric characters (from 8 to 63
characters)
FXE2000-G
8. Appendix
*4:
*6:
*7:
*8 :
*9:
*10:
*11:
This setting is available when the unit type is "Access Point ".
This setting is available when the wireless connection mode is "Advanced Infrastructure" or "Standard
Infrastructure".
This setting is available when the encryption is set to either "WEP(Open)", "WEP(SharedKey)", "WEP(Auto)", or
"AES".
This setting is available when the unit type is "Station " and the encryption is set to either "IEEE802.1X", "WPA",
or "WPA2".
This setting is available when the unit type is "Access Point" or " Repeater" and the the encryption is set to either
"WPA", "WPA2", "WPA-PSK", or "WPA2-PSK".
This setting is available when the unit type is "Access Point" and the encryption is set to either "IEEE802.1X",
"WPA", or "WPA2".
This setting is available when the encryption is set to either "WPA-PSK", or "WPA2-PSK".
FXE2000-G
77
8. Appendix
Table 8.1
Initial Setting List (5/12)
Item
Specification
Basic Settings
VAP Settings
VAP4*4
None , (When set to None, the setting is disabled, between 2
VAP Settings
and 32 characters in length, single-byte alphanumeric
characters only,)
ESSID
None , WEP(Open), WEP(Shared Key), WEP(Auto), AES,
IEEE802.1X(WEP), WPA(AES), WPA(TKIP),
WPA-PSK(TKIP), WPA-PSK(AES), WPA2(AES),
WPA2(TKIP), WPA2-PSK(AES),
Encryption
WPA2-PSK(TKIP),WPA-AUTO(TKIP), WPA-AUTO(AES),
WPA-AUTO-PSK(TKIP), WPA-AUTO-PSK(AES)
WSL*6
Function
Disable, Enable (Type2)
Key
None a 20 digit hexadecimal value (0 to 9, a to f or A to F).
Default key
Fixed Key 1, Fixed Key 2,
Fixed Key 3, Fixed Key 4,
None , When set to None, the setting is disabled,
Fixed Key 1
64bit:a 10 digit hexadecimal value, 128bit:a 26 digit
hexadecimal value, 152bit:a 32 digit hexadecimal value
None , When set to None, the setting is disabled,
Key
Setting *7
Fixed Key 2
64bit:a 10 digit hexadecimal value, 128bit:a 26 digit
hexadecimal value, 152bit:a 32 digit hexadecimal value
Fixed Key 3
64bit:a 10 digit hexadecimal value, 128bit:a 26 digit
None , When set to None, the setting is disabled,
hexadecimal value, 152bit:a 32 digit hexadecimal value
None , When set to None, the setting is disabled,
Encryption
Settings
Fixed Key 4
Authentication
Type
Supplicant
Settings *8
WPA
setting *9
User Name
Password
PEAP, EAP-TLS
None Up to 32 characters in length, single-byte alphanumeric
characters only
None Up to 32 characters in length, single-byte alphanumeric
characters only
Certificate
Server certificate, Client certificate,
Registration
Private key
Group Key
Renewal Interval
3600 0(Disable) or 120-259200
(sec)
Recertification
0(Disable) 0(Disable) or 120-259200
RADIUS
Interval (sec)
Server
Settings
Server IP Address
0.0.0.0
Server Port
1812
*10
PSK
Settings
*11
78
64bit:a 10 digit hexadecimal value, 128bit:a 26 digit
hexadecimal value, 152bit:a 32 digit hexadecimal value
Shared Secret
WPA Pre-Shared
Key (PSK)
None Up to 64 characters in length, single-byte alphanumeric
characters only, no spaces
None Single-byte alphanumeric characters (from 8 to 63
characters)
FXE2000-G
8. Appendix
*4:
*6:
*7:
*8 :
*9:
*10:
*11:
This setting is available when the unit type is "Access Point ".
This setting is available when the wireless connection mode is "Advanced Infrastructure" or "Standard
Infrastructure".
This setting is available when the encryption is set to either "WEP(Open)", "WEP(SharedKey)", "WEP(Auto)", or
"AES".
This setting is available when the unit type is "Station " and the encryption is set to either "IEEE802.1X", "WPA",
or "WPA2".
This setting is available when the unit type is "Access Point" or " Repeater" and the the encryption is set to either
"WPA", "WPA2", "WPA-PSK", or "WPA2-PSK".
This setting is available when the unit type is "Access Point" and the encryption is set to either "IEEE802.1X",
"WPA", or "WPA2".
This setting is available when the encryption is set to either "WPA-PSK", or "WPA2-PSK".
FXE2000-G
79
8. Appendix
Table 8.1
Initial Setting List (6/12)
Item
Specification
Advanced Settings
System
Disable, Enable
HTTPS
Access Control
HTTP server
Enable, Disable
FTP server
Enable, Disable
Wireless access
Enable, Disable
Allowed IP Address Function
Disable, Enable
Administrator IP Address 1
0.0.0.0
Administrator IP Address 2
0.0.0.0
Interception Settings
Management Traffic Interception
Disable, Enable
HTTP
Disable, Enable
HTTPS
Disable, Enable
SNMP
Disable, Enable
SNMP Trap
Disable, Enable
SYSLOG
Disable, Enable
Network Time
Disable, Enable
Ethernet
Auto Recognition, 100M(full-duplex), 100Mbps(half-duplex),
Port speed
10Mbps(full-duplex), 10Mbps(half-duplex)
Link status, Ping
Link down condition
Ping Parameter
80
Ping IP Address
0.0.0.0
Ping Interval (sec)
60 1 - 65535
Ping Response Wait Time
(sec)
3 1 - 15
Ping Retry Count
3 0 - 15
FXE2000-G
8. Appendix
Table 8.1
Initial Setting List (7/12)
Item
Specification
Advanced Settings
VAP Settings
VAP1
IEEE802.11n (2.4GHz)
Auto, 1Mbps, 2Mbps, 5.5Mbps, 11Mbps, 6Mbps, 9Mbps,
12Mbps, 18Mbps, 24Mbps, 36Mbps, 48Mbps, 54Mbps, MCS0,
MCS1, MCS2, MCS3, MCS4, MCS5, MCS6, MCS7, MCS8,
MCS9, MCS10, MCS11, MCS12, MCS13, MCS14, MCS15
Auto , 1Mbps, 2Mbps, 5.5Mbps, 11Mbps, 6Mbps, 9Mbps,
Auto*1
12Mbps, 18Mbps, 24Mbps, 36Mbps, 48Mbps, 54Mbps, MCS0,
MCS1, MCS2, MCS3, MCS4, MCS5, MCS6, MCS7, MCS8,
MCS9, MCS10, MCS11, MCS12, MCS13, MCS14, MCS15
Auto, 6Mbps, 9Mbps, 12Mbps, 18Mbps, 24Mbps, 36Mbps,
TX Rate
IEEE802.11n (5GHz)
48Mbps, 54Mbps, MCS0, MCS1, MCS2, MCS3, MCS4, MCS5,
MCS6, MCS7, MCS8, MCS9, MCS10, MCS11, MCS12,
MCS13, MCS14, MCS15
IEEE802.11a
IEEE802.11g
IEEE802.11b
IEEE802.11n (2.4GHz)
Auto, 6Mbps, 9Mbps, 12Mbps, 18Mbps, 24Mbps, 36Mbps,
48Mbps, 54Mbps
Auto, 1Mbps, 2Mbps, 5.5Mbps, 11Mbps, 6Mbps, 9Mbps,
12Mbps, 18Mbps, 24Mbps, 36Mbps, 48Mbps, 54Mbps
Auto, 1Mbps, 2Mbps, 5.5Mbps, 11Mbps
Disable, 1Mbps, 2Mbps, 5.5Mbps, 11Mbps, 12Mbps, 18Mbps,
24Mbps, 36Mbps, 48Mbps, 54Mbps, MCS1, MCS2, MCS3,
MCS4, MCS5, MCS6, MCS11, MCS12, MCS13, MCS14,
MCS15
Disable , 1Mbps, 2Mbps, 5.5Mbps, 11Mbps, 12Mbps, 18Mbps,
Auto*1
24Mbps, 36Mbps, 48Mbps, 54Mbps, MCS1, MCS2, MCS3,
MCS4, MCS11, MCS12, MCS13, MCS14, MCS15
Maximum TX Rate
IEEE802.11n (5GHz)
Disable, 6Mbps, 9Mbps, 12Mbps, 18Mbps, 24Mbps, 36Mbps,
48Mbps, 54Mbps, MCS0, MCS1, MCS2, MCS3, MCS4, MCS5,
MCS6, MCS11, MCS12, MCS13, MCS14, MCS15
IEEE802.11a
IEEE802.11g
IEEE802.11b
*1:
Disable, 6Mbps, 9Mbps, 12Mbps, 18Mbps, 24Mbps, 36Mbps,
48Mbps, 54Mbps
Disable, 1Mbps, 2Mbps, 5.5Mbps, 11Mbps, 12Mbps, 18Mbps,
24Mbps, 36Mbps, 48Mbps, 54Mbps
Disable, 1Mbps, 2Mbps, 5.5Mbps, 11Mbps
This setting is available when the unit type is "Station".
FXE2000-G
81
8. Appendix
Table 8.1
Initial Setting List (8/12)
Item
Specification
VAP1
Link Down Detection
Disable, Enable
ESSID security *3
Disable, Enable
Maximum Client Logins *3
128, 1 - 128
Denial Response (Maximum Client
Logins) *3
Disable, Enable
Beacon Interval (msec) *3
100, 100 - 1000
DTIM Period *3
1, 1 - 15
11g Protect Mode
Disable, RTS-CTS, CTS-only
11g Only Mode *12
Disable, Enable
Basic Rate *13
802.11b(1,2,5.5,11Mbps), 802.11(1,2Mbps)
MAC Address Filtering *3
Disable, [Edit List : Max. 1,024 entries]
WLAN Bridge Between VAP *4
Enable, Disable
WLAN Bridge in This VAP *3
Enable, Disable
Multi-Client *14
Disable, Enable
Static Node Address *15
00-00-00-00-00-00(Not specified), [Specify MAC address of AP]
Roaming Threshold *16
24 0 - 106
Scan Channels
All
Preferred AP 1
00-00-00-00-00-00(Not specified), [Specify MAC address of AP]
Preferred AP 2
00-00-00-00-00-00(Not specified), [Specify MAC address of AP]
Preferred
Preferred AP 3
AP *16
Preferred AP 4
Preferred AP 5
Connections to Non-Preferred APs
*16
*3:
*4:
*12:
*13:
*14:
*15:
*16:
82
00-00-00-00-00-00(Not specified), [Specify MAC address of AP]
00-00-00-00-00-00(Not specified), [Specify MAC address of AP]
00-00-00-00-00-00(Not specified), [Specify MAC address of AP]
Enable, Disable
This setting is available when the unit type is "Access Point" or "Repeater".
This setting is available when the unit type is "Access Point".
This setting is available when the unit type is "Access Point" or "Repeater" and the wireless networking standard is
"IEEE 802.11n (2.4GHz)" or "IEEE 802.11g".
This setting is available when the unit type is "Access Point" or "Repeater" and the wireless networking standard is
"IEEE 802.11b", "IEEE 802.11g", or "IEEE 802.11n (2.4GHz)".
This setting is available when the unit type is "Station" or "Repeater" and the wireless connection mode is
"Compatible Infrastructure".
This setting is available when the unit type is "Station" or "Repeater", the wireless connection mode is "Compatible
Infrastructure", and the multi-client function is "Disable".
This setting is available when the unit type is "Station" or "Repeater".
FXE2000-G
8. Appendix
Table 8.1
Initial Setting List (9/12)
Item
Specification
Advanced Settings
VAP Settings
VAP2*3
Auto, 1Mbps, 2Mbps, 5.5Mbps, 11Mbps, 6Mbps, 9Mbps, 12Mbps, 18Mbps,
IEEE802.11n
(2.4GHz)
24Mbps, 36Mbps, 48Mbps, 54Mbps, MCS0, MCS1, MCS2, MCS3, MCS4,
MCS5, MCS6, MCS7, MCS8, MCS9, MCS10, MCS11, MCS12, MCS13,
MCS14, MCS15
Auto, 6Mbps, 9Mbps, 12Mbps, 18Mbps, 24Mbps, 36Mbps, 48Mbps, 54Mbps,
TX Rate
IEEE802.11n (5GHz) MCS0, MCS1, MCS2, MCS3, MCS4, MCS5, MCS6, MCS7, MCS8, MCS9,
MCS10, MCS11, MCS12, MCS13, MCS14, MCS15
IEEE802.11a
Auto, 6Mbps, 9Mbps, 12Mbps, 18Mbps, 24Mbps, 36Mbps, 48Mbps, 54Mbps
IEEE802.11g
Auto, 1Mbps, 2Mbps, 5.5Mbps, 11Mbps, 6Mbps, 9Mbps, 12Mbps, 18Mbps,
24Mbps, 36Mbps, 48Mbps, 54Mbps
IEEE802.11b
Auto, 1Mbps, 2Mbps, 5.5Mbps, 11Mbps
IEEE802.11n
(2.4GHz)
Disable, 1Mbps, 2Mbps, 5.5Mbps, 11Mbps, 12Mbps, 18Mbps, 24Mbps,
36Mbps, 48Mbps, 54Mbps, MCS1, MCS2, MCS3, MCS4, MCS5, MCS6,
MCS11, MCS12, MCS13, MCS14, MCS15
Disable, 6Mbps, 9Mbps, 12Mbps, 18Mbps, 24Mbps, 36Mbps, 48Mbps,
Maximum IEEE802.11n (5GHz) 54Mbps, MCS0, MCS1, MCS2, MCS3, MCS4, MCS5, MCS6, MCS11, MCS12,
MCS13, MCS14, MCS15
TX Rate
IEEE802.11a
Disable, 6Mbps, 9Mbps, 12Mbps, 18Mbps, 24Mbps, 36Mbps, 48Mbps, 54Mbps
IEEE802.11g
Disable, 1Mbps, 2Mbps, 5.5Mbps, 11Mbps, 12Mbps, 18Mbps, 24Mbps,
36Mbps, 48Mbps, 54Mbps
IEEE802.11b
Disable, 1Mbps, 2Mbps, 5.5Mbps, 11Mbps
Link Down Detection
Disable, Enable
ESSID security *3
Disable, Enable
Maximum Client Logins *3
128, 1 - 128
Denial Response (Maximum
Client Logins) *3
Disable, Enable
Beacon Interval (ms) *3
100, 100 - 1000
DTIM Period *3
1, 1 - 15
11g Protect Mode
Disable, RTS-CTS, CTS-only
11g Only Mode *12
Disable, Enable
Basic rate *13
802.11b (1,2,5.5,11Mbps), 802.11(1,2Mbps)
MAC Address Filtering *3
*2:
*3:
*4:
*12:
*13:
Disable, [Edit List : Max. 1,024 entries]
WLAN Bridge Between VAP *4
Enable, Disable
WLAN Bridge in This VAP *3
Enable, Disable
This setting can be configured "Repeater" or "Access Point ".
This setting is available when the unit type is "Access Point" or "Repeater".
This setting is available when the unit type is "Access Point ".
This setting is available when the unit type is "Access Point" or "Repeater" and the wireless networking standard is
"IEEE 802.11n (2.4GHz)" or "IEEE 802.11g".
This setting is available when the unit type is "Access Point" or "Repeater" and the wireless networking standard is
"IEEE 802.11b", "IEEE 802.11g", or "IEEE 802.11n (2.4GHz)".
FXE2000-G
83
8. Appendix
Table 8.1
Initial Setting List (10/12)
Item
Specification
Advanced Settings
VAP Settings
VAP3*3
Auto, 1Mbps, 2Mbps, 5.5Mbps, 11Mbps, 6Mbps, 9Mbps, 12Mbps, 18Mbps,
IEEE802.11n
(2.4GHz)
24Mbps, 36Mbps, 48Mbps, 54Mbps, MCS0, MCS1, MCS2, MCS3, MCS4,
MCS5, MCS6, MCS7, MCS8, MCS9, MCS10, MCS11, MCS12, MCS13,
MCS14, MCS15
TX Rate
IEEE802.11n
MCS0, MCS1, MCS2, MCS3, MCS4, MCS5, MCS6, MCS7, MCS8, MCS9,
MCS10, MCS11, MCS12, MCS13, MCS14, MCS15
IEEE802.11a
Auto, 6Mbps, 9Mbps, 12Mbps, 18Mbps, 24Mbps, 36Mbps, 48Mbps, 54Mbps
IEEE802.11g
Auto, 1Mbps, 2Mbps, 5.5Mbps, 11Mbps, 6Mbps, 9Mbps, 12Mbps, 18Mbps,
24Mbps, 36Mbps, 48Mbps, 54Mbps
IEEE802.11b
Auto, 1Mbps, 2Mbps, 5.5Mbps, 11Mbps
IEEE802.11n
(2.4GHz)
Maximum TX
Rate
*3:
*4:
*12:
*13:
84
Auto, 6Mbps, 9Mbps, 12Mbps, 18Mbps, 24Mbps, 36Mbps, 48Mbps, 54Mbps,
(5GHz)
IEEE802.11n
(5GHz)
Disable , 1Mbps, 2Mbps, 5.5Mbps, 11Mbps, 12Mbps, 18Mbps, 24Mbps,
36Mbps, 48Mbps, 54Mbps, MCS1, MCS2, MCS3, MCS4, MCS5, MCS6,
MCS11, MCS12, MCS13, MCS14, MCS15
Disable, 6Mbps, 9Mbps, 12Mbps, 18Mbps, 24Mbps, 36Mbps, 48Mbps,
54Mbps, MCS0, MCS1, MCS2, MCS3, MCS4, MCS5, MCS6, MCS11, MCS12,
MCS13, MCS14, MCS15
IEEE802.11a
Disable, 6Mbps, 9Mbps, 12Mbps, 18Mbps, 24Mbps, 36Mbps, 48Mbps, 54Mbps
IEEE802.11g
Disable, 1Mbps, 2Mbps, 5.5Mbps, 11Mbps, 12Mbps, 18Mbps, 24Mbps,
36Mbps, 48Mbps, 54Mbps
IEEE802.11b
Disable, 1Mbps, 2Mbps, 5.5Mbps, 11Mbps
Link Down Detection
Disable , Enable
ESSID security *3
Disable , Enable
Maximum Client Logins *3
128, 1 - 128
Denial Response (Maximum
Client Logins) *3
Disable, Enable
Beacon Interval (ms) *3
100, 100 - 1000
DTIM Period *3
1, 1 - 15
11g Protect Mode
Disable, RTS-CTS, CTS-only
11g Only Mode *12
Disable, Enable
Basic rate *13
802.11b (1,2,5.5,11Mbps), 802.11(1,2Mbps)
MAC address filtering *3
Disable, [Edit List : Max. 1,024 entries]
WLAN Bridge Between VAP *4
Enable , Disable
WLAN Bridge in This VAP*3
Enable , Disable
This setting is available when the unit type is "Access Point" or "Repeater".
This setting is available when the unit type is "Access Point ".
This setting is available when the unit type is "Access Point" or "Repeater" and the wireless networking standard is
"IEEE 802.11n (2.4GHz)" or "IEEE 802.11g".
This setting is available when the unit type is "Access Point" or "Repeater" and the wireless networking standard is
"IEEE 802.11b", "IEEE 802.11g", or "IEEE 802.11n (2.4GHz)".
FXE2000-G
8. Appendix
Table 8.1
Initial Setting List (11/12)
Item
Specification
Advanced Settings
VAP Settings
VAP4*3
Auto, 1Mbps, 2Mbps, 5.5Mbps, 11Mbps, 6Mbps, 9Mbps, 12Mbps, 18Mbps,
IEEE802.11n
(2.4GHz)
24Mbps, 36Mbps, 48Mbps, 54Mbps, MCS0, MCS1, MCS2, MCS3, MCS4,
MCS5, MCS6, MCS7, MCS8, MCS9, MCS10, MCS11, MCS12, MCS13,
MCS14, MCS15
TX Rate
IEEE802.11n
(5GHz)
IEEE802.11a
IEEE802.11g
IEEE802.11b
IEEE802.11n
(2.4GHz)
Maximum TX
Rate
IEEE802.11n
Auto, 6Mbps, 9Mbps, 12Mbps, 18Mbps, 24Mbps, 36Mbps, 48Mbps, 54Mbps,
MCS0, MCS1, MCS2, MCS3, MCS4, MCS5, MCS6, MCS7, MCS8, MCS9,
MCS10, MCS11, MCS12, MCS13, MCS14, MCS15
Auto, 6Mbps, 9Mbps, 12Mbps, 18Mbps, 24Mbps, 36Mbps, 48Mbps, 54 bps
Auto, 1Mbps, 2Mbps, 5.5Mbps, 11Mbps, 6Mbps, 9Mbps, 12Mbps, 18Mbps,
24Mbps, 36Mbps, 48Mbps, 54Mbps
Auto, 1Mbps, 2Mbps, 5.5Mbps, 11Mbps
Disable, 1Mbps, 2Mbps, 5.5Mbps, 11Mbps, 12Mbps, 18Mbps, 24Mbps,
36Mbps, 48Mbps, 54Mbps, MCS1, MCS2, MCS3, MCS4, MCS5, MCS6,
MCS11, MCS12, MCS13, MCS14, MCS15
Disable, 6Mbps, 9Mbps, 12Mbps, 18Mbps, 24Mbps, 36Mbps, 48Mbps,
(5GHz)
54Mbps, MCS0, MCS1, MCS2, MCS3, MCS4, MCS5, MCS6, MCS11, MCS12,
MCS13, MCS14, MCS15
IEEE802.11a
Disable, 6Mbps, 9Mbps, 12Mbps, 18Mbps, 24Mbps, 36Mbps, 48Mbps, 54Mbps
IEEE802.11g
IEEE802.11b
Disable, 1Mbps, 2Mbps, 5.5Mbps, 11Mbps, 12Mbps, 18Mbps, 24Mbps,
36Mbps, 48Mbps, 54Mbps
Disable, 1Mbps, 2Mbps, 5.5Mbps, 11Mbps
Link Down Detection
Disable, Enable
ESSID security *3
Disable, Enable
Maximum Client Logins *3
128, 1 - 128
Denial Response (Maximum
Client Logins) *3
Disable, Enable
Beacon Interval (ms) *3
100, 100 - 1000
DTIM Period *3
1, 1 - 15
11g Only Mode *12
Disable, Enable
Basic rate *13
802.11b (1,2,5.5,11Mbps), 802.11(1,2Mbps)
MAC address filtering *3
Disable,
WLAN Bridge Between VAP *4
Enable, Disable
WLAN Bridge in This VAP*3
Enable, Disable
[Edit List : Max. 1,024 entries]
*3:
This setting is available when the unit type is "Access Point" or "Repeater".
*4:
*12:
This setting is available when the unit type is "Access Point ".
This setting is available when the unit type is "Access Point" or "Repeater" and the wireless networking standard is
"IEEE 802.11n (2.4GHz)" or "IEEE 802.11g".
This setting is available when the unit type is "Access Point" or "Repeater" and the wireless networking standard is
"IEEE 802.11b", "IEEE 802.11g", or "IEEE 802.11n (2.4GHz)".
*13:
FXE2000-G
85
8. Appendix
Table 8.1
Initial Setting List (12/12)
Item
Specification
Advanced Settings
SNMP
General Settings
Disable, Enable
SNMP Agent
Public, up to 32 characters in length, single-byte alphanumeric characters
Community Name
only, no spaces
Unknown, up to 32 characters in length, single-byte alphanumeric
System Contact Address
(sysContact)
characters only, no spaces
Unknown, up to 32 characters in length, single-byte alphanumeric
Device Name (sysName)
characters only, no spaces
Device Installation Location
Unknown, up to 32 characters in length, single-byte alphanumeric
(sysLocation)
characters only, no spaces
Trap Settings
Trap IP Address
0.0.0.0(disable), specify IP address
Notification: Link Status Change
(Ethernet)
Disable, Enable
Notification: Link Status Change
Disable, Enable
(WLAN)
Notification: Channel Change (DFS) Disable, Enable
Notification: Initialization (DIP-SW) Disable, Enable
Network Time
Network Time Function
Disable, Enable
NTP Server
0.0.0.0(disable), specify IP address
VLAN
VLAN Function
Disable, static VLAN, dynamic VLAN
Local VLANID
1, 1 - 4094
Native VLANID
1, 1 - 4094
Static VLAN VAP1 VLAN ID
1, 1 - 4094
Static VLAN VAP2 VLAN ID
1, 1 - 4094
Static VLAN VAP3 VLAN ID
1, 1 - 4094
Static VLAN VAP4 VLAN ID
1, 1 - 4094
Static VLAN VLAN table
1-32
VLAN ID
Dynamic VLAN VLAN table
None(Disable), 1 - 4094
Disable, up to 32 characters in length, single-byte alphanumeric
characters only, no spaces
Log
86
Log function
Enable, Disable
Save Log
Disable, Enable
SYSLOG Server
0.0.0.0(disable), specify IP address
Debugging Log
Disable, Enable
FXE2000-G
9. Specifications
9. Specifications
Table 9.1
Specifications
Name
Specification
Unit Type
Wired LAN
Ethernet standard
Port Speed
Wireless LAN
Wireless Networking Standard
Channel*1
Access point
/ Repeater
IEEE802.11n
IEEE802.11a
Station
USA
(FCC)
IEEE802.11n
IEEE802.11g
IEEE802.11b
IEEE802.11n
Data transmission speed *2
IEEE802.11a
Data transmission speed *2
IEEE802.11b
Data transmission speed *2
IEEE802.11g
Data transmission speed *2
Security
Station / Access Point / Repeater
IEEE802.3(10BASE-T), IEEE802.3u(100BASE-TX)
10/100Mbps/Half Duplex, Full Duplex/ 1
IEEE802.11n, IEEE802.11a, IEEE802.11b, IEEE802.11g
5GHz: 24h(36, 40, 44, 48ch[W52], 149, 153, 157, 161, 165ch [W58] )
5GHz: 21h(36, 40, 44, 48ch[W52], 52, 56, 60, 64ch [W53],
100, 104, 108, 112, 116, 132, 136, 140ch [W56]
149, 153, 157, 161, 165ch [W58] )
2.4GHz: 11ch (1 - 11)
300 - 6.5Mbps[MSC0 - 15, Short/Long GI] (Fixed/Auto)
54, 48, 36, 24, 18, 12, 9, 6Mbps (Fixed/Auto)
11, 5.5, 2, 1Mbps (Fixed/Auto)
54, 48, 36, 24, 18, 12, 9, 6Mbps (Fixed/Auto)
WPA(AES), WPA2(AES), WPA-PSK(AES), WPA2-PSK(AES),
WSL(combination mentioned above are possible)
WEP(open/ Shared Key /Auto), WPA(AES, TKIP), WPA-PSK(AES,TKIP),
IEEE802.11a/b/g
WPA2(AES, TKIP), WPA2-PSK(AES,TKIP), IEEE802.1X(EAP-TLS, PEAP),
WSL(combination mentioned above are possible)
Antenna
chip-antenna×2 MIMO
External dimension (mm)
87.0(W) x 89.2(D) x 17.5(H)
Weight
50g
*1 Varies depending on the country in which the product is used
*2 These are theoretical values based on their respective wireless LAN standards; they do not indicate actual data transfer
rates.
IEEE802.11n
Environmental Specifications
Table 9.2
Environmental Specifications
Name
Specification
Input voltage range
5VDC±5% (DC Jack), 5 - 30VDC±5% (power connector), 24VDC±10% (PoE)
Rating input current
1.05A (5VDC input), 0.19A (30VDC input) (Max.), 0.24A (PoE input 24V)
Operating ambient temperature
0 - 50°C
Operating ambient humidity
10 - 90%RH (No condensation)
Floating dust particles
Not extreme
Corrosive gases
None
FXE2000-G
87
9. Specifications
External Dimensions
Figure 9.1
88
External Dimensions
FXE2000-G
9. Specifications
I/O Interface
Pin Layout of LAN Port
Signal name
Pin No.
Operation / Function
1
TX+
Transmit (+)
2
TX-
Transmit (-)
3
RX+
Receive (+)
Short the INIT signal with the GND so that the POWER, WLAN, and LAN LEDs will
flash. Then if you open the INIT signal before the LEDs turn on (approx. 3 seconds), the
4
INIT/NC
5
GND
GND
6
RX-
Receive (-)
7
24VDC
Power Supply
8
GND
GND
settings are restored to the default settings the next time the product is started.*1
* Usable when JP2 No. 1 and No. 2 are connected.
Pin assignment of power connector
Housing
Cable
: JST S02B-PASK-2(LF)(SN)
: AWG28-16(equivalent to it)
Pin No.
Signal name
Operation / Function
1
Vi+
5-30VDC±5%
2
Vi-
GND
Pin assignment of DC Jack (EIAJ#2)
Pin
Center
Periphery
Sign
Input power*
GND
* DC jack is a EIAJ#2-standards connector, so please use it within the range of DC4.5V - 6.3V.
FXE2000-G
89
FXE2000-G
User’s Manual
CONTEC CO.,LTD.
January 2015 Edition
3-9-31, Himesato, Nishiyodogawa-ku, Osaka 555-0025, Japan
Japanese
http://www.contec.co.jp/
English
http://www.contec.com/
Chinese
http://www.contec.com.cn/
No part of this document may be copied or reproduced in any form by any means without prior written
consent of CONTEC CO., LTD.
[02032012]
[08312012]
[01072015_rev4]
Management No.
Parts No.
NA02093
LYPG944