1
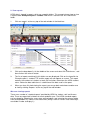
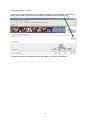
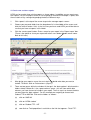
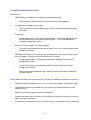
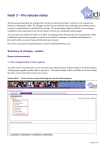
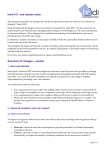
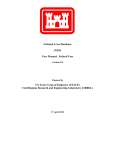
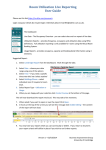
Introduction to HEIDI, the UK higher education statistics database
David Manning, Planning and Resource Allocation Section
This quick start guide covers the following areas:
•
the function and scope of HEIDI
•
an introduction to the following HEIDI functions:
o
o
o
o
o
o
o
o
•
view existing reports
export reports to Excel
create new custom reports
sort data in HEIDI
select groups of institutions
share a report with other Oxford HEIDI users
make a copy of someone else’s report
group column headers
sources of further information for HEIDI users
FUNCTION AND SCOPE OF HEIDI
HEIDI is an online database containing statistics on all UK higher education institutions,
including HESA data on staff, student and finance. It allows users to select data from
standard reports or create their own customised reports which can then be exported into
Excel or PowerPoint. The database enables comparison of data for all UK institutions, or
subgroups of institutions. It provides a single point of access online to data from a range of
sources.
The main categories of data in HEIDI are as follows:
HESA student data
HESA staff data
HESA finance data
Includes categories such as:
Includes categories such as:
Includes:
level of study
mode of study
subject area
gender
ethnicity
degree classification
domicile
type of job role (academic or
non-academic) or 13-way
split
age group
gender
mode of employment
source of salary
income and expenditure,
including breakdown by type
capital expenditure
key financial indicators
Other data in HEIDI:
•
•
•
•
•
•
•
•
•
Destinations of Leavers from Higher Education survey (DLHE)
HESA Performance Indicators
National Student Survey (subject levels 2 and 3)
UCAS data
RAE results 2001 and 2008
TDA (Training Development Agency) data
Universities UK Pattern Data
HEMS (Estate Management Statistics)
Admissions data on nursing (NMAS), graduate teacher training (GTTR) and
admissions to conservatoires (CUKAS)
A full specification of the data held in HEIDI is available by clicking the ‘data specification’ link
at https://heidi.hesa.ac.uk.
INTRODUCTION TO USING HEIDI
1. How to log on
Any member of University of Oxford staff can gain access to HEIDI by registering for a user
account. To do this email [email protected] stating your name, email address and
department/section. Log-in instructions will then be sent to you by a local administrator
(usually within 1-2 days).
If you already have registered, and want to access HEIDI, go to https://heidi.hesa.ac.uk, and
enter your email address, and password. If you have forgotten your password, go to the
‘forgotten password’ box on the right of this window and enter your email address. A
replacement password will then be generated and sent to you by email.
-2-
2. View reports
HEIDI data is viewed in reports, which are saved in folders. This example shows how to view
a report called ‘Example Report 1: student FTE’ which is stored in the ‘All Oxford Users’
folder.
1.
Click on ‘reports’ at the very top of the web window in the black bar.
2.
Click on the drop-down list in the middle of the screen and select ‘All Oxford users’, and
then click on the ‘refresh’ button.
3.
The list of reports contained in this folder are now displayed. Click on the hyperlink for
‘Example report 1: student FTE’ and the report will now appear on screen. This report
contains the numbers of students at each UK institution, taken from the HESA student
return. Below the data table there is a definition of the data used in the report.
4.
When you have finished viewing the report, you can go back and choose another one
to view by clicking ‘Reports’ at the very top of the web window.
More on viewing reports
There are a number of ‘standard reports’ provided by HESA for student, staff and finance
data. These are organised in folders for each academic year. The HESA standard reports
can be viewed by following the same steps outlined above, and selecting the relevant folder
from the drop-down list, shown in the screenshot. (Always click on ‘refresh’ after choosing a
new folder in order to display it.)
-3-
3. Export reports to Excel
Start by viewing the report you want to export, following the steps above. To export the
report, click on the Excel button at the top of the report on the right hand side.
You will then be given the option to save the report as an Excel spreadsheet.
-4-
4. Create new custom reports
HEIDI can be used to view existing reports as shown above. In addition you can create your
own reports. For this example, we are first of all going to recreate the Example 1 report, and
then customise it by sorting and grouping the data in different ways.
1.
Click ‘reports’ at the top of the screen to go to the manage reports screen.
2.
Choose your personal folder from the drop-down list in the middle of the screen, and
click the ‘refresh’ button. If this is the first time you have used HEIDI you will be able to
see that you have no reports in this folder.
3.
Click the ‘create report’ button. Enter a name for your report in the ‘Report name’ box.
(There is the option to share your report with other users below this but we will come
back to this later.)
4.
After giving your report a name, the next step is to decide what data you want to
include. To do this click on ‘Data columns (step 2)’.
5.
There are two panes within the window. At the top is the ‘data explorer’ which contains
folders of data. Below this is the ‘report columns’ pane – this will show which data
columns you have chosen to include in your report. The first step is to choose the data
you want from the ‘data explorer’. For this example we are going to choose total
student FTE for 2007-08. Click on the folders as follows:
(a)
click on ‘2007-08’
(b)
click on ‘HESA student’
(c)
click on ‘Student FTE – HE’
(d)
now click on ‘Total populations’ and click on the link that appears: ‘Total FTE’.
-5-
6.
You should now see in the ‘report columns’ pane the data that you have chosen:
‘2007-08 students FTE – HE Total populations Total FTE’.
7.
Click the ‘view & save report’ button.
8.
The report shows the total student FTE in 2007-08 for each institution.
This report could now be used in many different ways. For example, you might want to find
out the largest institution by student FTE, or rank institutions by size. Alternatively you might
want to select the Russell Group institutions only. This kind of data analysis could be done by
exporting the report to Excel and sorting or selecting from the data as required. However it
can sometimes be preferable to manipulate the data first in HEIDI before exporting it. Sorting
and grouping is described below.
5. Sort data in HEIDI
In this section we will find out which is the largest institution by student FTE, using the report
created in the previous step.
1.
View the report you have created above, and click on ‘Go to update report’.
2.
Click on the tab titled ‘Report options (optional)’
3.
Look towards the bottom of the screen for the section headed ‘sorting sequence’. You
can now choose how to sort the data in the report. At the moment the report is sorted in
ascending alphabetical order by name of institution. We want to change this to show
the institutions in descending order by size of student population:
(a)
open the drop-down list below ‘Sorting sequence’ and change this to the column
of data we are interested in, called ‘2007/08 Student FTE – HE Total populations
Total FTE’.
(b)
select descending from the buttons to the right of the dropdown list, and click
‘view report’.
The report now shows institutions in descending order by size of student FTE population,
showing that the Open University was the largest in 2007-08.
6. Select groups of institutions
By default HEIDI reports contain all UK institutions, however you may wish to look at a
smaller selected group of institutions. For this example we will select the Russell Group
institutions in our custom student number reports created above.
1.
View the report that you created in Part 4 showing the student FTE, sorted by size of
institution (nb do not choose the ‘Example 1’ report that you viewed originally in part 2
as this will not work for this exercise).
2.
Open the drop-down list called ‘Report Group’. You can now choose a group of
institutions.
(a)
From the list select ‘Institutions – Russell Group – 2007-04-13’.
-6-
(b)
Click the ‘refresh’ button.
Your report should now contain data for the 20 members of the Russell Group only. There
would be no immediately easy way of selecting this data in Excel, so this is an example
where the Group function in HEIDI can provide a quicker way of manipulating the data than
using Excel.
NB if you want to go back to viewing all institutions, go to the ‘report group’ drop-down list
and choose ‘Institutions – all’ from towards the bottom of the list. Do not choose the first
option in the list called ‘2001/02 HESA institutions all’, as this will exclude some institutions;
use ‘Institutions – all’ to display a complete data set.
7. Share your report with other Oxford HEIDI users
When you create a new report in HEIDI it is stored in your personal folder. You can also
choose to make the report visible to other HEIDI users if you want to. Other users will be able
to view the report, but they will not be able to edit it.
1.
Go to the reports screen and open your personal folder. You should now see the list of
reports that you have created.
2.
Click the check box next to the report that you want to share.
3.
Click the ‘update report’ button (below the list of reports).
4.
You should now see the update report screen for this particular report. You can now
add the report to any of the folders listed. For example, you could make the report
visible to just the users in your department/section. Alternatively, you could share the
report will all Oxford users. Select the check boxes from the list of folders.
5.
Click the ‘save and close’ button.
-7-
You should now be able to view reports created by other users in this session. They may
either be in your department/section folder, or in the ‘All Oxford users’ folder, depending on
the permissions granted by the report’s author in this exercise.
8. Making a copy of someone else’s HEIDI report
As described above, you can view someone else’s report in HEIDI, but you cannot edit
someone else’s report. For this example open the report titled ‘Example report 5: students no
column formatting’. You cannot edit this report because you did not create it. However you
can copy it and then make changes to this new report. The following steps explain how to
copy this report to your personal folder.
1.
Go to the manage reports screen (by clicking ‘Reports’ at the top of the screen)
2.
Open the folder containing the report you wish to copy. For the purpose of the next
exercise the report is in ‘All Oxford Users’ folder, and it is called ‘Example report 5:
students no column formatting’.
3.
Check the tick box next to that report and click ‘copy report’.
4.
A copy of the report has now been created in your personal folder with the report name
beginning ‘Copy of …’, and the report builder screen for this report has opened.
5.
You can now edit this report in the normal way. You may wish to rename the report by
changing it in the report builder screen that is now visible.
9. Group column headings
The example report 5 we looked at in the last sheet had a lot of columns, and the column
headers are quite difficult to read because they repeat a lot of the same text. If you open
‘Example report 7’ you can see the same data, but with column header formatting applied.
This section explains how to apply column header formatting. For this example we will use
the copy of ‘Example report 5’ that you created in the previous step.
1.
Go to the manage reports screen, check the tick box next to the copy of Example
report 5 that you created in the last section.
2.
Click on ‘update report’.
3.
Now click on the tab ‘Report options (optional)’
4.
Click on the button ‘Apply column header formatting’
5.
A long explanation should now appear about how to turn column header formatting on
and off. Click on ‘confirm column header formatting’
6.
Scroll down the screen and click ‘view report’
7.
You can now see the report with column header formatting. This formatting will be
preserved if you export the report to Excel.
-8-
FURTHER INFORMATION ON HEIDI
Data issues
•
HEIDI displays rounded values to nearest 5 on headcount data
−
•
Institution name changes and mergers
−
•
A large database like this can be expected to give reliable total populations but
will inevitably contain some errors at the margins … very small populations
should be treated with caution
Results are only as good as the data provided
−
•
There are two ‘University of Manchester’ rows for the pre-merged and merged
institutions
Data quality
−
•
HEIDI calculates derived columns and totals on the unrounded data
The notes section below the data tables details any issues concerning data from
individual institutions
HESA data for Universities of Oxford and Cambridge covers the central University but
not the Colleges. In general terms the HESA returns include:
−
all registered students, studying on a programme leading to the award of a
qualification or credit
−
all staff with a contract of employment with the University, but not staff on
College-only contracts
−
financial information reported in the University accounts, but not the individual
College accounts
Other HEIDI functions not covered in this session (see HEIDI user manual for details)
•
Add calculated rows and/or columns such as ratios, percentages, totals and averages
•
Filter data by criteria (e.g. exclude rows with values less than or greater than userspecified limits)
•
Adjust the year of the report forwards or backwards
•
Change row values from institutions to cost centres or unit of assessment for summary
reports of whole-sector data
•
Create charts, including bar charts and Taylor Squares, and export them to PowerPoint
-9-
Further information on HEIDI
•
On-screen help in HEIDI, and downloadable user manual
•
Oxford HEIDI user guide to be posted on PRAS website
•
Training videos, PowerPoint presentations, news of future improvements to the HEIDI
system: www.heidi.ac.uk
•
Detailed data definitions on HESA staff, student and finance data: www.hesa.ac.uk
•
User queries and requests for new user accounts to [email protected]
•
Forgotten password? Request a new one online at https://heidi.hesa.ac.uk
•
HESA offer training sessions for HEIDI users held at their offices in Cheltenham.
Further information at www.heidi.ac.uk
David Manning, HEIDI local administrator
Planning & Resource Allocation Section
October 2009
- 10 -