1
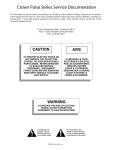
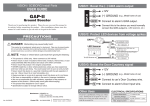
2-WAY RF PAGING SYSTEM
models
TR537S
TR835S
For 1480 & 1460 Series Security Systems
User ’s Guide
© 2011-2015 KIRAMEK, INC., Aichi Japan
Ver. 1.5, Sep. 2015
Thank you for purchasing this VISION
2-way Paging System. This system is a
state of the art device that will provide
you with years of trouble free service if
used properly. Please familiarize yourself with the content of this User’s Guide
to get the most out of your new system.
We trust you will enjoy using the product.
IMPORTANT NOTICE! PLEASE READ!
If you have not yet purchased this product and are evaluating the features, please consider that 1480 features vary from car to car. This is
because digital CAN signals differ by car and it is therefore impossible
to guarantee all features will function on all compatible cars.
Door Locking and Light Flash are two of the most fundamental features
of the VISION 1480 that may not be available on all cars. As you read
the Arming/Disarming sections on pages 7-10, the words “if supported”
mean that door locking and light flash are not guaranteed features because they vary by car. Whether or not the doors will Lock & Unlock
and/or Hazards will flash when you press a Pager button will depend
on whether your car is compatible with those features.
To see 1480 feature compatibility for your car, please visit our website:
http://visionsecurity.jp/en/systems/1480.html
TABL E OF CONTENTS
Limited One Year Warranty ...................................1
Included Items ..............................................2
2-Way Pager Remote ........................................3
General Pager Functions ..................................3
Special Pager Functions ...................................4
Pager Icon Descriptions ......................................5
Pager Usage & Care .........................................6
System Operation ...........................................7
Arming ..................................................7
Error Chirp ...............................................8
Disarming ..............................................10
Panic Mode ............................................11
Pager Response to Factory Remote & 1480 Program Switch ....12
Direct Door Lock ........................................13
Trunk Release ...........................................13
Alarm Triggers ............................................ 14
2-Stage Sensor Trigger ....................................14
Door Trigger ............................................14
Ignition Trigger ..........................................15
Hood Trigger ............................................15
Trunk Trigger ............................................16
Power-Cut Trigger .......................................16
Special Pager Features .................................... 17
LCD Backlight ...........................................17
Vehicle Status ..........................................17
In-Range Indicator ......................................17
Installation & Learning ..................................... 18
Installation .............................................19
Pager Learning ..........................................20
Troubleshooting ........................................... 21
NOTICE! Although reasonable efforts have been taken to ensure accuracy in this
User’s Guide, Kiramek Inc. shall not be held liable for any errors, omissions, property
damage, or injury resulting from the use of this information.
All product specifications and features are subject to change without notice.
© 2011-2015 KIRAMEK, INC.
L IMITED ONE YEAR Warrant y
The VISION 2-way RF Paging System is backed by a limited one year
warranty against defective components and/or improper product assembly to the original purchaser for as long the vehicle is owned by that
same purchaser, contingent upon installation by an Authorized VISION
Dealer. This warranty becomes void if the Paging System was not sold
and installed by an Authorized VISION Dealer or the system is moved
to another vehicle.
During the warranty period, Kiramek Inc. will repair or replace, at its
sole discretion, any system component that is found defective in material or assembly during the warranty period, provided that the product
is returned to Kiramek Inc. by an Authorized VISION Dealer and is accompanied by a clear and legible copy of the original purchaser’s receipt.
Any damage to your VISION Paging System that results from normal
wear-and-tear, accidents, drops, strong impact, water damage, leaked
battery damage, improper use, neglect, faulty wiring, incorrect installation, modification, removal or defacement of the product serial number,
alteration or repair outside Kiramek Inc or its Authorized VISION Dealers immediately voids this warranty.
This warranty is limited to defective parts only and does not provide
any compensation whatsoever for damages associated with the VISION
Paging System. This warranty does not cover installation labor, product removal and/or reinstallation fees. This warranty does not cover the
elimination of externally generated RF noise, or weak reception. This
warranty also does not cover the lifespan of the included AAA battery,
nor any damage to the pager that may occur if that or any other battery
leaks inside the pager and causes corrosion to the contacts or causes
other related malfunction or damage.
This warranty is valid for the original purchaser only and may not be
transferred to another party. Kiramek Inc makes no warranty against
theft or vandalism of the vehicle in which the VISION Paging System
was installed. This warranty shall not be interpreted as an insurance
policy against loss, nor shall Kiramek Inc be liable any in way for such
loss, financial or otherwise.
KIRAMEK may opt to validate the above Warranty, in writing, for shipments outside Japan, in cases where there is no local VISION Dealer available to perform the install.
1
© 2011-2015 KIRAMEK, INC.
INC L UDED ITEMS
CALL
TR53A-7X
Pager Remote (1pc)
TR68A-3LX
Antenna Unit (1pc)
Antenna Harness (1pc)
TX-CASE
Pager Case (1pc)
OTHER INCLUDED ITEMS:
• Double-Sided Mounting Tape for Antenna Unit (1pc)
• AAA Battery for Pager Remote (1pc)
• This User’s Guide
VISION RF PAGING SYSTEM USER’S GUIDE
2
2-WAY PAGER REMOTE
OVERVIEW
Vehicle Status or Trunk Release
Function
Button
Button-III
Antenna
LCD
Button-II
Button-I
p/n TR53A-7X (ARIB T-67, Japan)
TR83A-7X (FCC, USA)
GENERAL PAGER FUNCTIONS
(S) stands for a Short press, while (L) means a Long press.
1 indicates the icon blinks ON/OFF.
After pressing any pager button, if the icon disappears, you are either out of
range or RF noise is interfering with the pager signal.
SELECTABLE
FUNCTIONS
BUTTON
OPERATION
ICON
ALERT
PAGER
BEEPS
SIREN
CHIRPS
LIGHT
FLASHES
1
1
1
Normal Arm
(S)
Normal Disarm
(S)
2
3
3
Silent Mode Arm
(S)
MELODY
none
1
Silent Mode Disarm
(S)
2
none
3
No Confirmation Arm
(S)
1
none
1
(S)
2
none
3
1
2
1
No Confirmation Disarm
+
Sensor Bypass Arm
Sensor Bypass Disarm
or
+
Door Lock / Unlock
Panic Siren
(S)
or
or
1
(S)
(S)
or
Vehicle Status
(S)
Trunk Release
(L)
(L)
none
1
#
various
1
#
2
3 or none
3
none
none
1/3
SIREN SOUND
Siren Blast
Continuous
MELODY
none
none
3
none
3
Also see page 4, “SPECIAL PAGER FUNCTIONS.”
3
VISION RF PAGING SYSTEM USER’S GUIDE
SPECIAL PAGER FUNCTIONS
(S) means a Short press, (L) means a Long press.
1 RF receiver sleeps, power cut to 1/3 of normal.
2 hour digit(s) selected for adjustment.
3 minute digits selected for adjustment.
4 adjusts upward; adjusts downward.
5 routine exists after 8 seconds of inactivity.
TIP: When pressing
along with other buttons,
Press & Hold
before pressing other buttons.
SELECTABLE
FUNCTIONS
BUTTON
OPERATION
E.L. Backlight ON
(S)
ICON
ALERT
PAGER
BEEPS
none
none
Power Save Mode 1
+ (S)
2
Audio/Vibe Alert
+ (S)
none
Time Adjustment
Mode 4 5
(L)
(1st) 2
2
3
none
(2nd) (S)
(3rd) (S)
2
none
(4th) (S)
3
none
ON or OFF
(5th) (S)
Countdown Timer
(6th) (S)
2
none
(7th) (S)
3
none
(8th) (S)
+ (S)
Alarm Clock
ON or OFF
Alarm Toggle
Fixed Timer
OFF
5
none
none
(when ON)
FUNCTIONAL
DETAILS
Turns off in 5 sec.
Activates in 2 min.
*
Keep adjusting hour
to change AM/PM.
When alarm goes
off, a special melody
plays on the pager
for 25 sec.
When count reaches
zero, the pager will
beep
continuously
for 10 sec.
2
(1st) + (S)
2
(2nd) + (S)
2
All times in hours:min.
(3rd) + (S)
2
(4th) + (S)
2
(5th) + (S)
2
(6th) + (S)
2
Use the Time Adjustment Mode “Countdown Timer” feature
to set a custom timer
that is not shown
here.
(7th) + (S)
2
Pager Power Save Mode only works while the system is DISARMED. If you try to activate Power
*Save
Mode while Armed, the icon will appear but Power Save Mode is in fact not active (the
icon never disappears). The reason for not working while Armed is that your pager would not
automatically receive notification of vehicle threats in Power Save Mode because Power Save
Mode improves battery life only by shutting down the pager’s RF receiver. When the RF receiver
is off, your pager won’t update. If you push any button, Power Save Mode will deactivate (even
though the icon will continue displaying on the pager) and then reactivate 2 minutes later.
© 2011-2015 KIRAMEK, INC.
4
Pager Icon Descrip tions
1.
2.
3.
4.
5.
6.
7.
8.
9.
10.
11.
12.
13.
14.
Silent Mode ARMED (siren off)
Siren Active Mode ARMED
Vehicle Doors Locked
Vehicle Doors Unlocked
Trunk Opened (1460 WHT/BLK)
Engine Running
Low Battery Indicator
Valet Mode Active
Pager Vibration Alert Mode
Door Opened
Hood Opened (1480 GRY)
Sensor: Heavy Impact or Bypass
Sensor: Light Impact
RF Receiver Enabled (icon) or
Disabled (no icon)
15. RF Transmitter Enabled (icon)
or Disabled (no icon)
16. In-range Indicator (icon vanishes
if pager is outside communication
range or in Power Save Mode)
17. Transmitting (whenever a pager
button is pressed)
18.
19.
20.
21.
22.
23.
Pager Power Save Mode Active
Countdown Timer Mode
Alarm Clock Enabled
Morning Time Indicator
Afternoon Time Indicator
Hour & Minute Display
NOTES
1) After you Arm or Disarm, there are times when you may receive 2
answer-back notifications. This is normal.
2) If a sensor sends a Warning response to the 1480/1460 multiple times
very quickly (e.g., more than 2 times in 8 seconds), the pager will not
produce more than 2 answer-back notifications.
5
© 2011-2015 KIRAMEK, INC.
PAGER USAGE & C ARE
PRECAUTIONS
Your 2-way pager is a delicate device that can be easily damaged by excessive
vibration, heat, direct sunlight, humidity, dirt, oil and water. Small particles
in a very dirty pocket can also damage the pager over time. Never immerse
your pager in water. If it gets wet, remove the battery and allow to dry. Never
drop your pager. Impact can break the LCD and/or cause the answer-back
functionality to stop working. Rough handling is not covered under warranty!
COMMUNICATION RANGE
Your pager’s range is affected by RF noise. Typical in-city range is often
greater than 300m (>985ft), while range in the country can be as high as
600m (2,000ft.). Note that if metal objects (e.g., coins in your pocket) touch
or surround the antenna, range may decrease. Also, close proximity to TV
stations and or powerful mobile phones can also limit range.
RESPONSIVENESS
It can take several seconds before your pager is updated with the current
status of the vehicle (e.g., door open, siren blast, etc.). During this time,
the pager may become less responsive to your button presses. Also, the
pager will not receive updates while you are pressing any button.
LOW BATTERY INDICATOR
A pager battery will last just over 1 month with normal use. When the icon appears on the LCD, replace the battery. The battery icon may flash
and the pager may beep 6 times when the battery is just about to die. Replace the battery soon with a fresh (+)1.5v AAA Alkaline. (Rechargeables
may not work if the voltage is much less than 1.5v.) Also note that leaving
a battery in the pager too long without using it could cause the battery to
leak, resulting in corrosion of the battery contacts and pager malfunction.
Follow this procedure every time you replace the battery:
(1)
(2)
(3)
(4)
Remove the cover and take out the old battery.
Press the button for 2 seconds to clean out the pager memory.
Insert the new battery and replace the cover.
Press the button again to initiate communication.
VISION RF PAGING SYSTEM USER’S GUIDE
6
System Operation
Be sure to read the “Arming Mode
Note” at the bottom of page 9.
ARMING
NORMAL ARMING
This method is the typical way to Arm,
with the shock sensor enabled. Ensure
that all doors are closed and then press
Button-I on the Pager remote. After you
press Button-I, the doors will lock and hazard lights will flash once (if
supported). The siren will chirp 1 time, the Pager remote will beep once
and update (see Fig-1 below), and Status LED will light for 5 seconds.
(The siren can’t be triggered while the LED is lit — See “Error Chirp” on
the next page.)
FIG-1: Pager LCD Icon Change After Arming
SILENT MODE ARMING
This method of Arming will completely disable the siren (no confirmation
chirps, no warning chirps, no siren
blast). Press Pager Button-II then release. The doors will lock and hazard lights will flash once (if supported).
The Pager will play a melody and update (see Fig-2 below), and Status
LED will light for 5 seconds. (The siren can’t be triggered while the LED
is lit — See “Error Chirp.” )
FIG-2: Pager LCD Icon Change After “Silent Mode” Arming
7
VISION RF PAGING SYSTEM USER’S GUIDE
System Operation
NO CONFIRMATION CHIRP ARMING
This method is identical to “Normal
Arming” except there is no siren chirping after you Arm or Disarm. Ensure
that all doors are closed and then press
Button-III on the Pager remote. After you press Button-III, the doors will lock and hazard lights will flash once (if supported).
The Pager Remote will beep once and update (see Fig-1), and Status LED
will light solid for 5 seconds. (The siren can’t be triggered while the LED
is lit — See “Error Chirp” below.)
SENSOR BYPASS ARMING
This method allows you to disable the
shock sensor and any other external
sensor while keeping all other triggers
active (door, trunk, hood, IG). Press
Pager Buttons I & II at the same time, then release. The doors will lock and
hazard lights will flash once (if supported). The siren may chirp 2 times,
the Pager will beep once and update as shown in Fig-1 but also with the
icon, and the Status LED will light for 5 sec. NOTE: If you later short-press
the Pager’s
button to update the LCD with the car’s current status, the
icon will disappear but the 1480/1460 is still in Sensor Bypass mode.
Error Chirp
When you Arm, the siren chirps 1 time (if using Normal Arming with Confirmation Chirps enabled) and the Status LED lights for 5s. If any door,
or the trunk or hood is opened during the 5s and stays open, the siren will
chirp 2 more times (“Error Chirp”), your pager will also beep and update
icons, and that particular trigger will be bypassed. If the bypassed door or
hood or trunk is later closed, it will be re-enabled 5s later. (You will hear
the 2 Error Chirps even when Arming with Button-II or III.)
NOTE
Your 2-way pager will update its icons during an Error Chirp condition
to show the bypassed sector. However, the pager will not update if that
sector is later re-enabled. Press the
button to update the pager status.
© 2011-2015 KIRAMEK, INC.
8
System Operation
AUTO-ARM
PROGRAMMABLE
This method of Arming is disabled by default — see page 11 in the
1480 or 1460 Owner’s Guide to program it. This feature automatically
Arms your system when you do the following: (1) Turn Ignition ON, (2)
Turn Ignition OFF, (3) Open a Door and then (4) Close the Door. Twenty
seconds later, you will hear 1 chirp and 1 pager beep and you may see 1
light flash. Five seconds later, the Status LED will start flashing, and
all zones will be secured (i.e., the system will be Armed). Fig-1 on page 7
shows the pager LCD display for Auto-Rearm.
NOTE: Doors will not be locked.
20s TIMER NOTE
If you open a door before hearing the Arm chirp, the system will wait until
you close the door. Then after the door closes, the siren will chirp, the 20s
delay-to-Arm timer will reset and start again. Also, during the 20s, the siren
cannot be triggered because the system is not yet Armed.
AUTO-REARM
PROGRAMMABLE
This method of Arming is disabled by default — see page 11 in the
1480 or 1460 Owner’s Guide to program it. This feature automatically
Arms your system 60 seconds after it is Disarmed. Fig-1 on page 7 shows
the pager LCD display for Auto-Rearm.
NOTE: Doors will be locked (if supported), unlike Auto Arm.
60s TIMER NOTE
If a door is opened during the 60s, the system will not Rearm. Also, during
the 60s, the siren cannot be triggered because the system is not yet Armed.
ARMING MODE NOTE
The Pager button you last used to Arm or Disarm determines the Arming mode
when you subsequently Lock by Factory Keyless or by AutoArm/AutoRearm.
For example, if you last Disarmed with Button-II (Silent Mode), then each time
you Arm with Factory Keyless or AutoArm/AutoRearm, the system will be in
Silent mode; and the system will remain in Silent Mode even when you Arm,
Disarm and Arm by Factory Keyless multiple times. (Note that you can enable
Confirmation Chirps via Program Switch while in Silent Mode.)
9
© 2011-2015 KIRAMEK, INC.
System Operation
DISARMING
NOTE: To Disarm without a remote, see pg.5 in the 1480/1460 Owner’s Guide.
NORMAL DISARMING
This is the typical way to Disarm, with confirmation chirps ON. Press Button-I on the Pager while
Armed. Doors will then unlock and hazards will flash
3 times (if supported). The siren will chirp 3 times.
The Pager remote will beep 2 times (or vibrate twice), and icons will update (see Fig-3 below). You may now enter the vehicle.
FIG-3: Pager LCD Icon Change After Disarming
NOTE: If you Arm with the factory remote’s Lock button and then you Disarm with the pager, the doors will not Unlock on most cars. In this case,
simply Unlock by the factory remote, or Arm & Disarm with the pager.
NO-CHIRP DISARMING
Push Button
II or III
This method is identical to “Normal Disarming”
except there are no siren chirps emitted when
you Disarm. Press Pager Button-II or Button-III
then release. The doors will then unlock and hazard lights will flash 3 times (if supported). The Pager
Remote will beep 2 times (or vibrate twice, if Vibe Mode is selected), and
icons will update as shown in Fig-4 above. The system is now Disarmed,
and you may enter the vehicle without triggering the siren.
HIGH SECURITY DISARMING
When the system is “triggering” (warning chirps,
siren blast, hazard flash), two button presses are
required to Disarm. This feature allows you to stop
the trigger condition with only 1 press while keeping
the system Armed. You can press Button I or II or III.
(Continues on the next page.)
VISION RF PAGING SYSTEM USER’S GUIDE
Push Button
I or II or III
continues...
10
System Operation
HIGH SECURITY DISARM continued...
Your first press of Button I, II or III stops the trigger (i.e., kills the siren,
or kills hazard light flash if in Silent Mode). Your second press Disarms
the system. In other words, “two presses” are required to Disarm whenever something triggers the full siren blast.
NOTE
For the first few seconds after the pager siren tone (or vibration) begins,
you may not be able to disarm with 2 presses. If you wait 3 seconds or
so, 2 presses will always work (you can stop the siren with one press, and
disarm with the second). But during the first few seconds, it may take
multiple presses before you can stop the siren and disarm.
Push Button
I or III
for 3 sec.
Panic Mode
Panic Mode allows you to trigger the full 30 second
siren blast from your remote, whether the system
is Armed or Disarmed. Press Button-I or Button-III
for 3 seconds. When you release, the pager icons will
update as shown in Fig-4 below, and the pager will emit a siren tone (or vibrate). Vehicle hazard lights will flash (if supported), the Status LED will flash
rapidly, and the siren will go off for 30s. (You can also trigger Panic Mode with
Button-II to flash the Hazard lights, if supported, but the siren will not trigger.)
To stop Panic Mode and silence the siren, simply press Button I, II or
III for a short duration (1 sec. or less) and release. Note that you must wait
approximately 4 seconds after you initiate Panic Mode before you press Button
I, II or III, otherwise your button press will be ignored and the siren will keep
sounding.
PANIC
ICON
FLASHES
FIG-4: Pager LCD Icon Display During Panic Mode
11
VISION RF PAGING SYSTEM USER’S GUIDE
System Operation
PAGER RESPONSE TO FACTORY REMOTE & 1480/1460 PROGRAM SWITCH
Operation of the 1480 using your factory remote is described on pages 3-6 in the 1480/1460 Owner’s Guide, while 3rd party remote starters are described on page 7. Below you can see how the pager responds
when the factory remote and Program Switch are used, as well as when the
engine is remote-started (see RSCM on page 7 of the 1480/1460 Owner’s Guide).
LOCK
Factory Remote
TRUNK RELEASE
ARMED
UNLOCK
DISARMED
Pager LCD
Factory Remote
Pager LCD
TRUNK OPENED
ENGINE RUNNING
ST
A
ST RT
OP
Factory Remote
Pager LCD
2 PUSHES
1480 Program SW
1 PUSH
1480 Program SW
Pager LCD
Engine Starter
LOCK
Factory Remote
LOCK
Factory Remote
SENSOR BYPASS ARMED
Pager LCD
ARMED, CONF. CHIRPS OFF
Pager LCD
NOTE
In the first picture above showing “LOCK –> ARMED,” note that the last pager
button pressed determines the icons you see. For example, if you last pressed
Button-II on the pager, when you then push Lock on the factory remote, instead of seeing the
icon, you will see
. (See the “Arming Mode Note”
at the bottom of page 9.)
© 2011-2015 KIRAMEK, INC.
12
System Operation
DIRECT DOOR LOCK
Not available on the 1460.
Not available on some cars.
Push Buttons
II & III
Pressing Button-II & Button-III at the same time for
a short duration will lock or unlock the doors (if supported) without Arming or Disarming the security system. The pager will beep once and icons will update as
shown in Fig-5 below.
LOCKED
UNLOCKED
FIG-5: Pager LCD Icon Change for Direct Door Lock
This feature can be useful if you want to lock the doors while someone is
inside the vehicle. In such a case, you can temporarily leave the vehicle
and lock the doors but keep the 1480 from accidentally triggering the siren
due to someone inside the car.
CAUTION!
Never use this feature to leave unattended children in a car!
NOTE
Direct Door Lock only works when the 1480 is Disarmed. If you press
Buttons II & III while the system is Armed, the security system will
merely Disarm. Also, if you lock the doors with this feature and later try
to Arm, the doors will unlock and the system will be Disarmed—a second
press will be required to Arm.
TRUNK RELEASE
Not available on some cars.
Push the
Button for 2s
On most cars that have a dedicated Trunk Release button on the factory remote, the 1480/1460 and Paging
System provide another way to remotely open the trunk
(on compatible cars). Simply press-and-hold the
button for about 2s and then release. You should hear 3 beeps from the pager
and see the trunk open icon appear on the LCD (as shown on page 12).
NOTE: If you press for the
button for only 1s or less, you will hear a different melody sound signifying a different pager feature: Vehicle Status.
13
© 2011-2015 KIRAMEK, INC.
AL ARM TRIGGERS
2-STAGE SENSOR TRIGGER
1st Stage (“Warning Chirps”). When the shock sensor detects
a light impact, the siren will chirp 5 times, the pager will beep
and update icons as shown in Fig-6 below. Any optional sensors
can you have installed can also trigger the 5 warning chirps. No chirps will
be produced in Sensor Bypass Mode or Silent Mode.
2nd Stage (“Full Trigger”).
When the shock sensor detects
strong impact to the vehicle body, the siren will blast for 30 sec.
(or until stopped by a button press), and the pager will emit a siren tone and update icons as shown in Fig-6 below. Any optional
sensors you have installed can also trigger the full siren blast sequence.
The siren will not be triggered while in Sensor Bypass Mode or Silent Mode.
SHOCK
ICON
FLASHES
FIG-6: Pager LCD Icon Change Upon Shock Detection
DOOR TRIGGER
The siren will blast for 30s (unless in Silent Mode) whenever a door is opened
while the system is Armed. Vehicle hazard lights will flash (if supported), and
your pager will emit a siren tone and update icons as shown in Fig-7 below.
DOOR
ICON
FLASHES
FIG-7: Pager LCD Icon Change Upon Door Trigger
VISION RF PAGING SYSTEM USER’S GUIDE
14
AL ARM TRIGGERS
IGNITION TRIGGER
There are two different modes that pertain to Ignition triggers, as described on page 7 of the 1480/1460 Owner’s Guide. In either case, the pager
icon is the same when you switch on the Ignition while Armed, as shown in
Fig-8 below. But in IG Protect Mode, if the Ignition is switched on while
Armed, the pager will also emit a siren sound.
“Exhaust” icon shows
the Ignition switched
ON while Armed. Icon
is the same for RSCM
or IG Protect Modes.
FIG-8: Pager LCD Icon Change Upon Ignition ON
Note that if you Disarm, or if you are using Direct Door Lock, your pager
will not auto-update when you switch on the Ignition. However, if you
short-press the
button while the Ignition is switched on, the pager will
then display the Exhaust icon.
HOOD TRIGGER
Pager Hood icon doesn’t display with the 1460.
On compatible vehicles (or on any vehicle when the 1480’s gray Hood input
wire is connected), the siren will blast for 30 seconds when the hood is
opened while Armed. The pager will also emit a siren sound. But whether
the pager will display a flashing Door icon and/or flashing Hood icon will
depend on the car and whether the optional gray Hood input wire is connected. (See page 15 in the 1480 Owner’s Guide for details.)
Assuming your car does not support Hood triggers via CAN, and assuming
the optional Gray input wire of the 1480 is connected, whenever the Hood
is opened while Armed, the pager will update as shown in Fig-9 below.
HOOD TRIGGER
HOOD
ICON
FLASHES
FIG-9: Pager LCD Icon Change Upon Hood Trigger
15
VISION RF PAGING SYSTEM USER’S GUIDE
AL ARM TRIGGERS
TRUNK TRIGGER
Requires 1460 WHT/BLK wire connection.
The siren will blast for 30s if the trunk is opened (without the remote)
while Armed, and the LCD pager will emit a siren sound and update its
icons as shown in Fig-10 below.
TRUNK TRIGGER
TRUNK
ICON
FLASHES
FIG-10: Pager LCD Icon Change Upon Trunk Trigger
POWER-CUT TRIGGER
X
If you have the 1480S or 1460S which has a Standard Siren, there will be
no siren sound if the car’s main battery power is cut, nor will your LCD
pager receive an update. But if you have the 1480B or 1460B with Battery
Backup Siren, the siren will sound when the main power is cut; however,
your pager still won’t receive an update. But when the power is restored,
regardless of whether you have the 1480S/1460S or 1480B1460B, the siren
will blast and your pager will emit a siren sound and show the same icons
as in Fig-4 on page 11.
Also see “RESUME” on page 10 in the 1480 or 1460 Owner’s Guide.
NOTE
If the car’s main battery power is cut (or the battery dies and voltage
drops to around 6 volts — which can happen if you leave the headlights
on while the engine is off), the backup siren of the 1480B/1460B will
trigger. In this case, you cannot Disarm with the factory remote or with
your LCD pager, at least, not until the battery power is restored to about
10v or higher. So if you have a 1480B/1460B backup siren, the only
way to shut it off in this case is with the included siren keys. See pg.12
in the 1480 Install Guide or pg.14 in the 1460 Install Guide for details.
© 2011-2015 KIRAMEK, INC.
16
SPECIAL PAGER FEATURES
LCD BACKLIGHT
Push the
Button
At night or in a dark room, the pager’s LCD may become difficult or impossible to see. To illuminate the
LCD, simply press the pager’s
button and a green
EL backlight will turn on for 5s. The backlight is very
weak in order to conserve battery power, which means
you probably won’t be able to see it during the day or in a well-lit room.
But it provides sufficient light in dark places where it would otherwise be
impossible to see the LCD.
VEHICLE STATUS
As shown on page 3, pressing the
button for a short
duration of 1s or less will reconfirm the status of your
vehicle and then update the LCD icons accordingly. Be
careful not to press the
button for much more than 1s
or you may activate Trunk Release (see page 13).
Push the
Button for <1s
IN-RANGE INDICATOR
As shown in number “16” on page 5, the in-range indicator icon looks like
a little antenna. It appears on your pager’s LCD whenever you are within
communication range. If the
icon disappears from the LCD, it means
that you are not within range, or it could mean that you have the pager in
Battery Save Mode
(see bottom of page 4). You can confirm if you are
within range at any time simply by pressing the
button for a short duration (Vehicle Status).
VALET MODE INDICATOR
When you activate Valet Mode (1480/1460 Owner’s Guide pg. 10), the
icon will display on your pager. Note however that if you press
for a
short duration (Vehicle Status), the the
icon will disappear even though
you are still in Valet Mode. You cannot Activate/Deactivate Valet mode
with your pager.
NOTE
Be sure to read through pages 3-6 to see more pager features, as well as
pager handling and care.
17
© 2011-2015 KIRAMEK, INC.
Installation & Learning
READ THIS FIRST
Installation is very easy, as it amounts to little more than attaching two
connectors and taping the antenna unit to the car. However, you will
need to gain access to the 1480/1460 security system control module.
And if you did not install that yourself, you may not know where it is.
Furthermore, you will need to open some of the plastic panels in your car
to hide the antenna unit wires. If you don’t feel comfortable doing this
yourself, you will need to hire a professional installer to do the job.
INSTAL L ATION
Two connectors on back are for
firmware programming only.
1480/1460
Control
Module
LED
Program
Switch
IR
VI
SH
SI
OC
K
ON
SE
NS
OR
Shock
Sensor
Main
Harness
Antenna Unit
“A” Pillar
CALL
The “CALL” button is non-functional.
Suggested Mounting Location
MOUNTING STEPS
1) First locate the 1480/1460 Control Module, which is most likely installed
on the driver’s side, behind the cover just above the brake and accelerator
pedals. Don’t disconnect anything from the Control Module.
2) Connect the Antenna Unit’s wire harness between the 1480/1460 Control Module and the Antenna Unit as shown above.
3) We recommend mounting the Antenna Unit in open view on the outside
of the driver’s side A-pillar as shown above. Remove the plastic pillar cover
so you can hide the wires underneath. Then use the included 2-sided tape
to affix it to the outside of the pillar. Alternatively, you can use velcro (not
included) and affix it to the ceiling, just above the top of the A-pillar, as
most car ceilings are of a fuzzy material that velcro sticks to. Keep the Antenna Unit out of constant contact with sunlight (heat negatively affects RF
communication), and mount it as far as possible from metal parts.
19
VISION RF PAGING SYSTEM USER’S GUIDE
PAGER L EARNING
Before you can begin using your pager, you must first learn it to
the system. One pager is included with this system, but you can
learn up to 4 total. The learning procedure is given below.
IMPORTANT
All previously learned remotes will be deleted from memory. If you have
more than one remote, you must re-learn all of them.
1. Disarm, and turn on the Ignition. (1480: LED will flash if a door is open.)
2. Press-and-hold the Program Switch. The Status LED will light. Release
the switch only when the LED turns off and you hear 3 siren chirps (after about 6 seconds of pressing). Pager memory has now been wiped.
3. 1480: Press buttons
&
at the same time. 1460: Press button
You should then hear 1 siren chirp, and the pager will beep 1 time.
.
4. If you have another pager, learn it now by pressing buttons
&
(1480), or button
(1460). You will then hear 2 siren chirps. And if
you program a 3rd pager you will then hear 3 siren chips, and for a 4th
pager you will hear 4 siren chirps.
5. Switch off the Ignition. The Status LED will light for 6 seconds and
then turn off. The LED will then flash the same number of times as your
Manual Disarm Code (default = 6). Learning is finished.
If you delay more than 6 seconds after Steps 2 or 3 above, a timeout will
occur and you will need to start over from Step 1.
If at any time you mess up, perform Step 5, then start over from Step 1.
MULTIPLE PAGER OPERATION
When using more than one pager, only the pager that last communicated with
the 1480/1460 will receive an Answer-Back response from the 1480/1460.
MIXING PAGER MODELS
You cannot learn a TR537S (ARIB T-67) pager and a TR835S (FCC)
pager. All your pagers must be the same model.
© 2011-2015 KIRAMEK, INC.
20
TROUBL ESHOOTING
MY PAGER ORIGINALLY WORKED FINE BUT NOW IT DOESN’T.
If you sent your vehicle in for maintenance and/or the battery was disconnected, or if substantial noise was present on the 12-volt line in the vehicle, it is possible that transmitter memory could be lost. For this reason
we strongly recommend that the main wire harness of the 1480/1460 be
disconnected BEFORE you disconnect the vehicle’s battery.
• If the 1480/1460 is Armed, please use your factory remote to Disarm, or
you can your Manual Disarm Code to Disarm (Owner’s Guide page 5).
Then relearn your transmitters as described on page 20 in this manual.
I LOST MY PAGER AND NOW I’M WORRIED ABOUT SECURITY.
Simply relearn the pager(s) you have according to the steps given on page
20. Pager Learning always erases previously learned transmitters from
memory, preventing stolen pagers from Disarming your car.
I SOMETIMES CAN’T LOCK or UNLOCK or START THE ENGINE.
You probably have your VISION Pager on the same keychain as your
factory keyless remote. If so, RF interference between the two remotes
is preventing the factory remote from working. When that happens, it is
very possible you won’t be able to start the engine (on Push Start cars)
or use the Smart Key or Intelligent Key features to Lock/Unlock the car
doors. The solution is simple. Just separate the pager from the factory
remote by at least 10cm (i.e., don’t put them on the same keychain).
I CAN’T TRIGGER THE SIREN WHILE ARMED.
• Did you Arm with Button-II (Silent Mode)? (See page 7.)
PAGER NOT RESPONSIVE WHEN THE SIREN IS BLASTING.
You may not be able to effectively control your vehicle with the pager
for the first few seconds after the full siren goes off. Simply wait a few
seconds after the siren triggers before pushing transmitter buttons. See
“Responsiveness” on page 6 for more information.
PAGER ICONS ARE STRANGE. PAGER IS ACTING CRAZY.
The pager battery could have leaked. Check battery contacts to ensure
they are clean and not bent. And most importantly, always press trunk
button for 2s before you insert a new AAA battery. (See page 6.)
21
© 2011-2015 KIRAMEK, INC.
TROUBL ESHOOTING
TRANSMITTER BATTERY DIED.
If you don’t see any icons on the LCD, put in a fresh AAA battery. To Disarm when your pager is not working, simply press Unlock on your factory
remote, or use Manual Disarming (pg.5 in the 1480/1460 Owner’s Guide).
CAN’T MAKE SIREN TRIGGER AFTER ARMING.
• Did you use Sensor Bypass Arming? That would explain why the shock
sensor is not triggering the siren. (See page 8 in this manual, and page
3 in the 1480/1460 Owner’s Guide.)
• Did you use Button-II Silent Mode Arming? (See page 7.)
• If used Normal Arming (Button-I), did you hear a single chip when you
Armed? If not, you may not have Armed the system at all! You cannot
Arm with the pager when the Ignition is ON and “IG Protect Mode” is enabled. (See pages 7 & 12 in the 1480/1460 Owner’s Guide.) Also note that
some cars won’t allow you to use Lock on the factory remote to Arm while
the Ignition is ON, regardless of the 1480/1460’s programmed setting.
WARNING CHIRPS GO OFF FOREVER, CAN’T DISARM WITH REMOTE.
If you are using an Ultrasonic Sensor along with the 1480/1460’s shock
sensor, it is likely that the two sensors were installed too close together.
They must be separated by more than 30cm (1 ft.) or interference will
cause a continual false triggering of the siren.
FULL SIREN GOES OFF WITH ONLY LIGHT IMPACT TO THE VEHICLE.
If you do not have an Ultrasonic Sensor installed, try adjusting sensitivity of your shock sensor or mounting it in another location. If that doesn’t
work, you will need to snap open the housing of the shock sensor and
verify if the suspended reflector has been jolted out of position (see page
17 in the 1480/1460 Installation Guide).
I ONLY DRIVE MY CAR ONCE A MONTH, WILL MY CAR BATTERY DIE?
Assuming you run the engine long enough to fully charge your car’s battery, then it will depend on what electronic devices you have installed.
The current consumption of the 1480S & 1460S is very low, so starting
the engine once every 3 weeks should be fine. But with the 1480B or
1460B, consider running the engine every couple weeks to charge your
car’s battery. Or consider purchasing a 3rd party solar 12-volt trickle
charger (noting that our company does not sell or support these devices,
nor do we recommend which model/brand to buy).
VISION RF PAGING SYSTEM USER’S GUIDE
22
TROUBL ESHOOTING
I TRIGGERED THE ALARM SIREN FOR A VERY LONG TIME BUT THE PAGER
ONLY UPDATED ME TWICE.
This is normal. In most cases the pager will not report more than 2 notifications per session. But if there is a long enough delay between triggers (e.g., between multiple shock sensor triggers), then the pager should
notify you each time the trigger occurs.
WHEN I PRESS THE TRUNK BUTTON THE FULL SIREN BLAST OCCURS.
A long press on the Trunk button produces a Trunk Release output, while
a short press should only update the Pager with the car’s current status. If the siren blasts, then you need to Disarm and check the Status
LED flashes. Page 9 of the 1480 or 1460 Owner’s Guide shows what
each flash pattern means. Seven (7) flashes show the Shock Sensor (or
another attached sensor) is the culprit. The most likely cause of a shock
sensor trigger in that case is your installation. If shock sensor’s wire harness touches or is in close vicinity to the Paging System’s “Antenna Unit”
wires, false triggers can and will occur, and they may not even be related
to your pressing the Trunk button. The fix is simple. Just use wire ties to
keep the shock harness as far as possible from the Antenna Unit harness.
Never allow the two harnesses to touch.
THE FULL SIREN BLAST OCCURS MOST OFTEN IN STRONG SUNLIGHT.
Never put the Antenna Unit in direct sunlight. That normally causes
communication problems with the pager, but other problems can occur as
well. We also received one report where mounting the Shock Sensor in
strong sunlight caused it to trigger. While this is rare, in such a case, we
recommend relocating the sensor to see if that helps, but make sure the
sensor is never located near sources of strong RF signals, and make absolutely sure the shock harness does not touch the Antenna Unit harness.
YOU SAY NOT TO MOUNT THE SHOCK SENSOR TO METAL. WHY NOT?
The car’s metal frame is the most sensitive part. You normally may not
see any problem, but if you park close to another car and if they slam
their door rather hard, that shock wave is sent throughout the body of
your car, and if the shock sensor is affixed to metal it will detect that door
slam. In such cases the Warning Chirps would likely trigger, but the
full siren blast could occur if you set the sensitivity high. If you affix the
sensor to metal, a bus or Harley Davidson motorcycle or muffler-modified
sports car driving by could cause a trigger. Low frequency shock waves
are filtered-out only when you affix the shock sensor to firm plastic surfaces in your car. You can affix it to metal, but false triggers may occur.
23
VISION RF PAGING SYSTEM USER’S GUIDE
NOTES
VISION products are engineered in Japan and manufactured in
strict accordance with Japanese QC standards at an ISO9000/
QS9000 certified factory.
9-183-1 Itayama-cho, Handa-shi, Aichi-Ken 475-0936 JAPAN
TEL: +81-569-20-5585 • FAX: +81-569-20-5586 • EMAIL: [email protected]