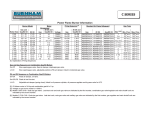
1
IOMTIF-4
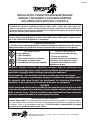
INSTALLATION, OPERATION AND MAINTENANCE
MANUAL FOR INDIRECT GAS-FIRED HEATERS
INCLUDING UNITS WITH DDC CONTROLS
ATTENTION: READ THIS MANUAL AND ALL LABELS ATTACHED TO THE UNIT CAREFULLY BEFORE
ATTEMPTING TO INSTALL, OPERATE OR SERVICE THESE UNITS! CHECK UNIT DATA PLATE FOR
TYPE OF GAS AND ELECTRICAL SPECIFICATIONS AND MAKE CERTAIN THAT THESE AGREE WITH
THOSE AT POINT OF INSTALLATION. RECORD THE UNIT MODEL AND SERIAL No.(s) IN THE SPACE
PROVIDED. RETAIN FOR FUTURE REFERENCE.
FOR YOUR SAFETY
The use and storage of gasoline or other flammable vapors and liquids in open containers in the vicinity of this appliance is hazardous.
POUR VOTRE SÉCURITÉ
L'utilisation et l'entreposage d'essence ou d'autres liquides ou produits émettant des vapeurs
inflammables dans des récipients ouverts à proximité de cet appareil est dangereux.
FOR YOUR SAFETY
If you smell gas:
1. Open Windows
2. Don’t touch electrical switches.
3. Extinguish any open flame.
4. Immediately call your gas supplier.
c
POUR VOTRE SÉCURITÉ
Si vous sentez une odeur de gaz :
1. Ouvrez les fenêtres.
2. Ne pas actionner d'interrupteur.
3. Éteindre toute flamme ouverte.
4. Appelez immédiatement votre
fournisseur de gaz.
WARNING: Improper installation, adjustment, alteration, service or maintenance can
cause property damage, injury or death. Read the installation, operating and maintenance
instructions thoroughly before installing or servicing this equipment.
AVERTISSEMENT : Une installation déficiente, de même qu'un mauvais réglage,
modification, entretien ou maintenance peuvent occasionner des dommages matériels, corporels voire causer la mort. Lire attentivement les instructions d'installation,
d'utilisation et d'entretien avant d'installer ou d'intervenir sur cet appareil.
WARNING
Install, operate and maintain unit in accordance with manufacturer's instructions to avoid
exposure to fuel substances or substances from incomplete combustion which can cause
death or serious illness. The state of California has determined that these substances
may cause cancer, birth defects, or other reproductive harm.
INSTALLER'S RESPONSIBILITY
Installer Please Note: This equipment has been test fired and inspected. It has been shipped
free from defects from our factory. However, during shipment and installation, problems such as
loose wires, leaks or loose fasteners may occur. It is the installer's responsibility to inspect
and correct any problems that may be found.
4830 Transport Drive, Dallas, TX 75247 Phone: 214-638-6010 Fax: 214-905-0806
www.tempriteheating.com
SECTION I - FOREWORD
As is the case with any fine piece of equipment, care
must be taken to provide the proper attention to the operation and maintenance detail of this machine.
This manual of instructions along with Digital Control
System User Manual (for systems with optional DDC
controls) has been prepared in order for you to become
well-acquainted with those details, and in doing so, you
will be able to give your Indirect Gas-Fired System the
care and attention which any piece of equipment needs
and deserves.
It is the customer and installation personnel
responsibilty to determine if the unit is equipped
with all of the safety devices required for the particular application. Safety considerations include
the accessibility of the unit to non-service personnel, the provision of electrical lockout switches,
maintenance procedures and automatic control
sequences. Clearly mark any shutoff devices.
Table of Contents
Section I: Foreword and Table of Contents ................. 2
Section II: General Information ................................... 3
Section III: Installation ................................................. 4
Section IV: Pre-Start Up ........................................... 19
Section V: Unit Start Up without DDC Controls ......... 21
Section V: Unit Start Up with DDC Controls ............. 26
Section VI: Unit Shut Down ....................................... 30
Section VII: Troubleshooting ..................................... 31
Section VIII: Servicing the Burner ............................. 52
Section IX: Maintenance Schedule and
Lubrication Requirements ...................... 57
Section X: Thermistor Output Curve for
units with DDC Controls ........................ 62
Section XI: Replacement Parts ................................ 63
* IMPORTANT NOTICE *
Temprite assumes no responsibility for loss or damage in transit; therefore, you should protect yourself
by following these instructions. Failure to do so is your
responsibility.
BILL OF LADING
Save your bill of lading. It is a contract, and you will need
it, provided you have to file a loss or damage claim. Remember, claims are outlawed after nine months.
LOSS IN TRANSIT
Before you sign for this shipment, check against the bill
of lading, also the transportation company's delivery
ticket. Make sure that you get the exact total of articles
listed. Should the delivery ticket show more or less
items than you are offered, then the carrier's agent must
mark the difference on your freight bill before you sign.
VISIBLE DAMAGE IN TRANSIT
If something is damaged, accept the shipment only
if the carrier's agent places a notation on your freight
bill explaining the nature and extent of damage. Upon
inspection of article, make claim to the delivering carrier.
CONCEALED DAMAGE IN TRANSIT
Sometimes transit damage is not noticed until the goods
are unpacked. In such cases, notification to the carrier
must be made within fifteen (15) days of receipt of shipment. In such cases, save the packages and packing
material, then notify the transportation company at once,
and request an inspection. When the inspector calls,
have him make out and leave a "concealed" bad order
report. He is obliged to give one to you. Insist on it.
DISPOSITION OF DAMAGED ARTICLES
Never return damaged articles to us. They are the property of the transportation company when the claim is
filled. They will give you disposition instructions.
PACKING
We comply with the packing requirements of the transportation companies, and your bill of lading proved that
everything was in good condition when shipped. That
bill of lading contract requires them to deliver in perfect
condition.
–2–
SECTION II - GENERAL INFORMATION
A. Purpose
The purpose of this manual is to present a guide for
proper installation, maintenance, and operation of the
Indirect Gas-Fired System, and supplement, but not to
replace, the services of qualified field service personnel
to supervise the initial start-up and adjustment of the
unit. Persons without previous experience with large
commercial and industrial heating equipment should not
attempt the initial adjustment and checkout procedure,
which is essential before such installations may be
considered ready for operation. This manual should be
made readily available to all operating personnel as an
aid in troubleshooting and proper maintenance. Due
to the custom nature of Temprite equipment, not all
possibilities are addressed in this manual. The customer
or installer can obtain information from Temprite’s sales
representative or theTemprite factory.
WARNING: Failure to comply with general safety
information may result in extensive property
damage, severe personal injury or death.
B. Shipping
Base Indirect Gas-Fired units are shipped completely
assembled where shipping limitations allow. Optional
inlet hoods, filter and /or damper sections, or other
large accessories are assembled and shipped mounted
and wired whenever possible within limitations of
shipping and handling. Some optional accessories
shipped separately may require field assembly. Any
wired accessories, which have been disassembled for
separate shipment, require no additional conduit or wire
for field reassembly. All wire leads will be tagged for
ease of reconnection in the field.
If the heater and/or accessories cannot be installed
immediately, they should be stored in a clean
dry environment. If this is not possible and the
heater must be stored outdoors, it should be
protected from the weather with tarpaulins or
plastic coverings. Rotate the fans monthly. Prior
to beginning installation of a unit that has been
in storage for weeks or months, the unit and its
components should be closely inspected.
Prior to beginning installation of a unit that has been
in storage for weeks or months, the unit and its
components should be closely inspected.
Shipments are made F.O.B. Dallas, Texas by truck.
The unit is securely strapped, tied, and blocked to
prevent shipping damage. All shipments are checked
by an inspector before they are accepted by the carrier.
Parts that are shipped un-mounted are noted on the bill
of lading. These parts, where feasible, are packaged
and shipped with the units. Upon receipt of shipment,
all units should be checked against the bill of lading
to insure all items have been received. All equipment
(and any optional accessories) should be checked
carefully for physical damage in the presence of the
carrier’s representative. If parts are missing or damage
has occurred, a claim should be filed immediately with
the carrier.
All Indirect Gas–Fired units are given a complete
operations test and control circuit checkout before
shipment. Copies of the wiring diagram, piping diagram
and bill of material are included with each unit shipped.
If correspondence with the factory is necessary, please
provide the unit model and serial number.
C. Optional Factory Service
Periodic service on any piece of mechanical equipment
is necessary for efficient operation. A nationwide
service support network is available to provide quick
and dependable servicing of make-up air, heating,
ventilating, or air handling types of equipment. The
factory also offers start-up service, which includes the
presence of a service engineer to supervise the initial
start-up and adjustment of the equipment and provide
instructions for the owner’s maintenance personnel in
proper operations and maintenance. Consult factory for
quotations on periodic or start-up service.
–3–
SECTION III - INSTALLATION
FOR CANADIAN INSTALLATIONS ONLY
1. All installations must conform with local building codes,
or in the absence of local codes, with current CAN/CGAB149-Installation Codes for Gas Burning Appliances and
Equipment.
2. All electrical connections must be in accordance with
Canadian Electrical Code, Part 1, CSA Standard C22.1.
During transit, unloading and setting of the unit; bolts
and nuts may have become loosened, particularly in the
pillow block ball bearing assemblies in the fan section. It is
recommended that all nuts and set screws be tightened.
Turn fan shaft by hand to make certain that blower does
not rub against blower housing, and that bearing set
screws are tight.
All electrical connections must conform to the current
edition of ANSI/NFPA No. 70 National Electrical Code
and applicable local codes: in Canada, to the Canadian
Electrical Code, Part 1 CSA Standard C22.1. The
following recommendations are not intended to supplant
any requirement of federal, state, or local codes having
jurisdiction. Authorities having jurisdiction should be
consulted before installations are made. Local codes
may require additional safety controls and /or interlocks.
All installations in airplane hangers must be in
accordance with current ANSI/NFPA No. 409. All
installations in public garages must be in accordance
with current NFPA No. 88A and NFPA No. 88B.
If units are not set immediately, cover all openings that
might be exposed to the weather.
CAUTION: Do not install heating system in corrosive
or flammable atmospheres! Premature failure of, or
severe damage to the unit will result!
CAUTION: Heating system must not be installed in
locations where air for combustion would contain
chlorinated, halogenated or acidic vapors. If
located in such an environment, premature failure
of the unit will occur!
Rotate fans monthly.
IMPORTANT: Lift and install the modules or sections
of a unit separately. Flange connections provided
between modules or sections are not structural
and damage will occur if any attempt is made to lift
modules that have flanged together.
See the specification sheet and submittal drawing
for unit or section weight and to determine proper
orientation for each section.
When unloading sections and/or units or moving
equipment to its final location, exercise care to avoid
distortion. Lift sections and/or units only by the
lifting lugs provided and follow the procedures as
outlined below.
RIGGING AND MOUNTING – INDIRECT FIRED UNITS
A. Handling the Equipment
As explained previously, the basic unit is designed for
shipping in one piece where shipping limitations allow.
Some optional accessories may require field mounting.
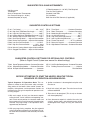
The Indirect Gas-Fired unit has been designed for rigging
and handling through the use of special lifting lugs installed
on the top and/or sides of each unit. When unloading and
setting the unit, use the lifting lugs provided as shown in
Drawing #C000539 or move the equipment on rollers.
Hooks, jacks, or chains must not be used around the
casing, main control panel or exterior mounted controls.
Warning: To insure that a proper unit lift is
made, lift unit approximately 24 inches and
verify proper center of gravity lift point. To avoid
dropping of unit, reposition lifting point if unit
is not level. Failure to properly lift unit could
result in death or serious injury or possible
equipment or property-only damage.
–4–
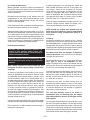
B. Locating the Unit
Prior to locating the unit, authorities having jurisdiction
should be consulted before installations are made. Approval
permits should be checked against the unit received.
In addition to the combustible clearances listed above,
access for service should be allowed around the unit.
The recommended minimum access clearance is
shown in Table 2.
Combustion air shall be provided at a rate of at least
0.20 CFM, or 1 square inch of free opening, per 1000
BTU per hour of rated input. If a separate mechanical
means provides this air, an interlock with the combustion
blower shall be provided.
Table 2
Unit
Size
Up to
1750
MBH
Output
The rated output of gas burning appliances decreases
with higher altitudes above 2,000 feet, the furnace shall
be de-rated 4 % for each additional 1,000 feet of altitude
above sea level. Factory testing rating plate information
is recorded on sea level conditions. High altitude ratings
may be obtained by a change in manifold pressure.
Appliances must be suitably marked to indicate their
altitude adjusted input rating.
Under no circumstances should this equipment be
installed in a negatively pressurized space. Consult
jurisdictional authority for proper ventilation requirements.
Combustion air containing or recirculation of room air may
be hazardous in the presence of:
a) Flammable solids, liquids and gases.
b) Explosive materials (i.e., grain, dust, coal dust.
gunpowder, etc).
c) Substances, which may become toxic when, exposed
to heat (i.e., refrigerant, aerosols, etc.).
Minimum
Access*
Unit
Size
Minimum
Access*
36 inches
2000 MBH
Output
and Larger
50 inches
*Optimum clearance for shaft removal would be
equivalent to cabinet width.
Make a visual inspection to insure no damage has
occured to the unit during installation.
C. Curb Mounted Units
Outdoor units can be supplied with an optional roof
curb. The curb greatly facilitates installation thereby
reducing installation costs. All connections to the unit:
duct, piping, electrical power and control wiring can
be made through the roof opening. The curb may be
shipped prior to unit shipment. All curbs are shipped
un-assembled from the factory.
Use extreme caution in handling the curb. Proper
handling and positioning will assure a water-tight curb
unit installation.
Locate the unit exactly level. Special attention should be
given to the duct, electrical, and fuel connection points.
Install ductwork with adequate flexible connection to
isolate vibration from the ductwork.
Re-check approval prints prior to installation. Be sure
that there are no obstructions to ducting and that proper
planning has been exercised in connection of piping
and/or electrical services.
All ductwork should have taped or caulked seams.
Ductwork should be properly sized so as not to inhibit
airflow. This information should be crossed-checked
with the position of support beams and stand pipes to
insure that clearance dimensions coincide with those
of the unit. The minimum clearance to combustible
material must be maintained as listed in Table 1
The curb assembly may be bolted or welded to either
trusses or roof decking; however, connection to roof
trusses is recommended. The curb is designed to carry
the weight of the unit. Additional support is required for
certain applications.
Table 1
Minimum clearance to combustible material, also,
consult local codes and regulations.
Front*
Rear
Right
Left
Top
Floor
Clearances to Combustible Material
Vertical Units
Horizontal Units
48 inches
48 inches
18 inches
18 inches
18 inches
18 inches
18 inches
18 inches
18 inches
18 inches
Zero
6 inches
Placement of the curb is critical in squareness and
leveling. Shims for leveling must be applied to the curb;
application of shims to the unit will tend to destroy the
sealing effect after installation. Make sure sealing tape
is in place before unit is set. Be careful not to allow gaps
where two pieces of sealing tape meet. A bubble level
must be used in the leveling process. Measure across
diagonals to check for squareness. Allowable tolerance
is 1/4" difference between diaganol measurements.
Double-check approval prints before setting the unit.
Upon completion of setting the curb, apply roofing
material and flashing as required.
*Consider control side as front of unit
–5–
–6–
–7–
–8–
–9–
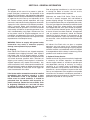
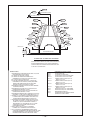
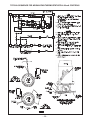
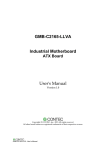
LIFTING LUG
GRILLS 3 DIRECTION DISCHARGE
BOX (4 DIRECTION OPTIONAL)
GASKET
PROP FAN SECTION
ALIGNMENT FLANGE CAP
GASKET
COOLING SECTION (OPTIONAL)
ALIGNMENT FLANGE CAP
GASKET
V-BANK AND INLET SECTION
DISCHARGE BOX
GASKET
PLENUM EXTENSION
SHEET METAL SCREW
IN PLACE
C000712
– 10 –
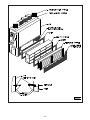
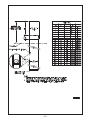
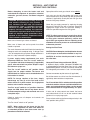
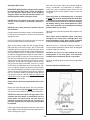
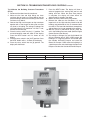
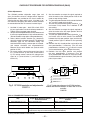
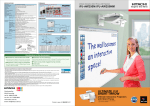
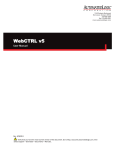
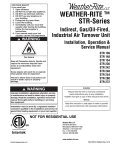
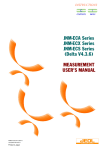
DIRECTIONS FOR FIELD ASSEMBLING
AND WEATHERPFOOFING SECTIONS
1. Apply gasket material to the end of the first section
(blower, discharge, heater, ets). (See Fig. 1.)
NOTE: One roof cap is attached to a standing seam
on each section for shipping purposes only. It will
be necessary to remove this PRIOR TO SLIDING
SECTIONS TOGETHER. Failure to do so may damage seams, preventing proper seal.
2. Slide adjoining section against the tacky taped first
section. If bolt holes are provided, bolt the sections
together tightly. If bolt holes are not provided, use
furniture clamps to pull sections TIGHTLY together.
Sections, whether bolted or not, will be held together
and sealed by the standing seams and hugger strips
(Fig. 2), which will be attached later.
3. Once the sections are connected, apply caulking
or silicone sealant along the standing roof seam
(Fig. 3) and side seams where the sections come
together. (Fig.1) It is mandatory to seal the roof and
side seams along the entire outside of the unit, and it
is strongly suggested that the seams also be sealed
along the inside of the unit, if possible.
4. Apply caulking material along the top of both sides of
the standing roof seam (Fig.4). Place roof cap (Fig. 4)
on top of the seam and secure it with two rows of TEK
screws (one down each side), spaced approximately
8-10 inches apart down the entire length of the seam.
5. Apply two strips of tacky tape (one down each side)
to the back side of each hugger strip (Fig. 2). Secure
hugger strip with two rows of TEK screws (one down
each side) spaced approximately 8-10 inches apart
down the entire length of the seam.
6. After hugger strips are installed, caulk around the
edges to complete the seal.
7. Repeat this process for each section as it is attached.
The number of sections varies by application.
NOTE: HOOD REQUIRES ADDITIONAL, INSTALLER
PROVIDED, SUPPORT.
– 11 –
D. Location of Accessories
Where applicable, standard or optional accessories will
be placed inside the fan section of the unit for shipment,
and must be removed and installed by the mechanical or
electrical contractor.
Remotely located discharge or inlet dampers must be
equipped with an end switch and interlocked to insure
maximum design opening before starting and running
circuits may be energized.
Field constructed intake accessories should be properly
designed to minimize the entry of rain and snow.
Adequate building relief must be provided, so as to not
over-pressurize the building, when the heater is operating
at its rated capacity. This can be accomplished by taking
into account, through standard engineering methods, the
structure’s designed infiltration rate, by providing properly
sized relief openings, by interlocking a powered exhaust
system, or by a combination of these methods.
E. Electrical Connections
Warning: Open all disconnect switches and
secure in that position before wiring unit.
Failure to do so may result in personal injury or
death from electrical shock.
If optional disconnect is not furnished with heater, the
field provided disconnect must be of the proper size
and voltage. Refer to unit nameplate for minimum
circuit ampacity and voltage. The disconnect must be
installed in accordance with Article 430 of the current
edition of ANSI/NFPA No. 70 National Electrical Code,
and applicable local codes; in Canada, to the Canadian
Electrical Code, Part 1, CSA Standard C22.1.
Check the supply voltage before energizing the unit. The
maximum voltage variation should not exceed ±10%.
Phase voltage unbalance must not exceed 2%.
NOTE: Should any original wire supplied with the
heater have to be replaced, it must be replaced with
wiring material having a temperature rating of at
least 105°C.
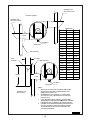
F. Venting
All venting installations must conform to Part 7, Venting
of Equipment in the current version of the National Fuel
Gas Code ANSI Z223.1, or applicable provisions of local
building codes. The National Fuel Gas Code is subject to
change, questions regarding venting requirements should
be directed to the local authority having jurisdiction.
All Indirect Fired Units are Category III appliances
and must be vented. Each unit must have an individual
vent pipe and vent terminal.
Warning: Controls must be protected from water. Do not allow water to drip on the electrical
controls.
Note: Before installing any wiring, check the unit
rating plate for power supply voltage, and minimum
amperage.
All electrical connections must conform to the current
edition of: ANSI/NFPA No. 70 National Electrical Code
and applicable state and local codes; in Canada, to the
Canadian Electrical Code, Part 1 CSA Standard C22.1
and applicable provincial and local codes. Since shipment
of unit may require disassembly after factory check and
test, reconnection of some electrical devices will be
required in the field. Connect electrical wires (supplied
in factory furnished conduit) to appropriate terminals.
All leads are tagged to facilitate field connections. See
wiring diagram provided with equipment. Complete all
wiring to any optional accessories as shown on unit bill of
material and electrical wiring diagram as required before
applying voltage to the unit.
If damper actuators require field wiring, be sure the gasket
and cover are securely mounted and assembly is watertight.
Entry location for all field-installed and control wiring is
through the control panel.
Recommended vent pipe is 14 Gauge Series Stainless
Steel. Type “B” vent is not acceptable. DO NOT
support the weight of the stack on the induced draft fan
housing of the unit. Insulate single wall vent pipe exposed
to cold air or running through unheated areas.
The venting system for these heaters shall terminate at
least four feet below, four feet horizontally from, or one
foot above any door, window, or gravity air inlet into any
building. All vents must be able to maintain a minimum
of – 0.20" W.C. in high fire.
Through the wall vents for these heaters shall not
terminate over public walkways or over an area where
condensate or vapor could create a nuisance or hazard
or could be detrimental to the operation or regulators,
relief valves, or other equipment.
The vent pipe diameter must be as shown in
specification chart on following page. An adaptor
from induced draft fan housing to vent pipe must be
field supplied.
The vent pipe should be fitted with a drip leg with a clean
out and a drain plug in the bottom. The vent pipe shall be
constructed so that any water that collects in the stack will
remain in the stack drip leg and not drain into the induced
draft fan housing. Be sure drip leg is made so water will not
fall on heater controls when drain plug is removed.
– 12 –
– 13 –
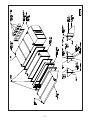
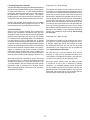
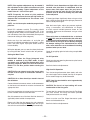
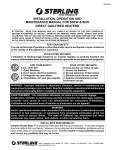
APPROVED SIDE
WALL VENT DEVICE
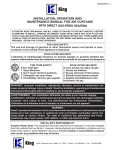
SIDE WALL VENTING
APPROVED SIDE
WALL VENT DEVICE
DIMENSIONS
SIZE
HXW
SEE NOTE 4
EXHAUSTER
BUILDING WALL
8"-10"MIN
RAIN
DIVERTER
24"MIN
BUILDING WALL
HXW
"H"
"W"
35
6-1/4
6-3/8
40
6-1/4
6-3/8
45
6-1/4
6-3/8
55
6-1/4
6-3/8
65
7
7-3/8
75
7
7-3/8
85
7
7-3/8
100
7
7-3/8
125
9
9-3/8
150
9
9-3/8
175
9
9-3/8
200
9
9-3/8
250
10-5/8
11-1/8
275
10-5/8
11-1/8
300
10-5/8
11-1/8
325
10-5/8
11-1/8
350
10-5/8
11-1/8
400
10-5/8
11-1/8
500
10-5/8
11-1/8
600
10-5/8
11-1/8
SEE NOTE 4
EXHAUSTER
ALTERNATE SIDE
WALL DESIGN
NOTES:
1. WEIGHT OF STACK MUST BE SUPPORTED FROM FLOOR
OR BUILDING STRUCTURE. DO NOT SUPPORT STACK
FROM INDUCED DRAFT FAN.
2. RECOMMENDED STACK MATERIAL IS 14 GAGE SERIES
400 STAINLESS STEEL, CONTINUOUSLY BUTT WELDED
EXHAUST STACK.
3. PITCH HORIZONTAL RUNS UPWARD 41 INCH PER FOOT
TOWARD OUTLET FOR CONDENSATE DRAINAGE. SUPPORT
HORIZONTAL RUNS AS REQUIRED TO PREVENT SAGGING.
4. FOR NON HIGH TURNDOWN BURNERS, WHENEVER USING
SIDE WALL VENTING A DRAIN LINE SHOULD BE ADDED
TO THE BOTTOM OF THE EXHAUSTER HOUSING FOR
CONDENSATE REMOVAL.
C000563A
– 14 –
Pitch horizontal pipes downward ¼ inch per foot toward
outlet for condensate drainage. Support horizontal runs
as required to prevent sagging.
Vents should terminate that would not cause a down draft
to occur. This could affect the negative pressure required
in the heat exchanger. Do not install dampers or other
restrictive devices in the flue vent pipe.
The stack should not be installed in such a manner that
access to the components is obstructed. Guy wires may
be required to brace the stack above rooflines.
Outdoor units are supplied with a stack. The stack shall have
a minimum of at least 36" clearance to combustible materials.
WARNING: CARBON MONOXIDE! Your venting
system must not be blocked by any snow, snow
drifts, or any foreign matter. Inspect your venting
system to ensure adequate ventilation exists at
all times! Failure to heed these warnings could
result in carbon monoxide poisoning (symptoms
include grogginess, lethargy, inappropriate
tiredness, or flu-like symptoms).
G. Field Piping
Gas Piping
All gas piping must be in accordance with the requirements
outlined in the National Fuel Gas Code – ANSI Z223.1. It
is required that a ground union be installed adjacent to the
manifold for easy servicing. A drip leg and/or filter should
be provided upstream of the unit’s inlet gas connection.
An additional shut-off must be located external of the
unit’s enclosure where required by local code. The
location of this valve must comply with all local codes. A
1/8 inch N.P.T. plugged tapping, accessible for test gauge
connection, must be installed immediately upstream of the
gas supply connection to the unit.
WARNING:To avoid equipment damage or possible
personal injury, do not connect gas piping to this
unit until a supply line pressure/leak test has been
completed. Connecting the unit before completing
the pressure/leak test may damage the unit gas
valve and result in a fire hazard.
DANGER: Never use an open flame to detect
gas leaks. Explosive conditions may exist which
would result in personal injury or death.
The gas line should be supported so that no strain is placed
on the unit. Pipe compounds, which are not soluble to liquid
petroleum gases, should be used on threaded joints.
Refer to the heater’s rating plate to determine the minimum
gas supply pressure for obtaining the maximum gas
capacity for which this heater is specified.
The appliance and its individual shutoff valve must
be disconnected from the gas supply piping system
during any pressure testing of that system at test
pressures in excess of ½ PSIG.
The appliance must be isolated from the gas supply
piping system by closing it’s individual manual
shutoff valve during any pressure testing of the gas
supply piping system at test pressure equal to or
less than ½ PSIG.
Correctly sized piping must be run to the unit.
Please note that gas line pressure must be as shown on
specification plate when unit is operating at full input.
The high-pressure regulator and relief valve should be,
if possible, mounted at least 5 to 10 feet upstream from
the appliance regulator on the unit (if applicable).
Building Pressure Transducer Piping (PT-13)
Pipe the high side to location inside the building that will
not be affected by air movement. Pipe the low side to the
atmosphere, positioned so it will not be affected by the
wind and not exposed to the elements. Be sure that all
tubing is clean and clear of any debris before installing
tubes on the transducer.
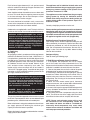
Refrigerant Piping
Refer to drawing on following page.
H. Field Wiring and Remote Control Installation
1. If the optional low temperature was not an integral
part of the heater, the factory recommends that a low
temperature limit control be installed in areas where freeze
protection is needed in the event of burner shut down.
2. Connect the power lines to the line side of the power
distribution block or optional main disconnect switch.
3. Field wiring is indicated on the wiring diagram, typically
dashed lines. Where field wiring of the control circuit is
required, take care to size the wires for a maximum 10%
voltage drop. The VA rating of the transformer should be
the maximum load.
4. Mount and wire remote control panel, thermostat
temperature sensors, and any other field-installed controls
as indicated on the unit control-wiring diagram.
5. Connect all wiring to the appropriate field wiring terminal
and any shielded or twisted wires as indicated on the unit
control-wiring diagram.
6. Field wiring shall have a temperature rating of at least
105°C. The minimum size of the supply cable circuit shall
be sufficient for the maximum ampacity of the heater.
NOTE: Burner and exhauster motor wiring must
be connected to the corresponding starter. As
each motor and starter are sized as a matched set,
incorrectly wired components may cause some
motors to have nuisance shutdowns and others will
not have proper overload protection.
Refer to the heater’s rating plate to determine the maximum
supply pressure to the heater.
– 15 –
RP-10
RP-10
SECOND STAGE COOLING
FIRST STAGE COOLING
COIL 'A'
RP-16
TO
COIL 'B'
RP-17
RP-12A
RP-12B
RP-11
TO RP-11
RP-09
RP-09
RP-18
RP-18
RP-13A
TO
RP-13B
RP-11A
TO RP-11A
RP-09
RP-09
RP-18
RP-18
RP-19
SEE NOTE #12
12"
TO
24"
SECOND STAGE SUCTION
FIRST STAGE SUCTION
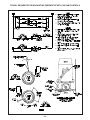
A-FRAME COIL ASSEMBLY END ELEVATION
THE ABOVE PIPING SCHEMATIC SHOULD BE USED AS A GUIDE ONLY.
PROPER ENGINEERING DESIGN OF THE OVERALL REFRIGERATION
SYSTEM MAY DICTATE AN ALTERNATE PIPING SCHEMATIC BE USED
TO THE ONE ILLUSTRATED ABOVE.
COMPONENT IDENTIFICATION
GENERAL NOTES:
1. RECOMMEND FIRST STAGE AND SECOND STAGE OF COOLING
BE PROVIDED WITH HOT GAS BYPASS.
2. ALL PIPING TO BE ACR TYPE 'L' COPPER.
3. ALL PIPING TO BE PITCHED IN THE DIRECTION OF
REFRIGERANT FLOW. PITCH TO BE 1 INCH PER 10 FEET.
4. ALL SUCTION LINES TO BE INSULATED.
5. LIQUID LINE FILTER/DRIER, SIGHT GLASS, SUCTION LINE
FILTER/DRIER, ISOLATION VALVES, FITTINGS, DISCHARGE
VIBRATION ABSORBER, ACCUMULATORS AND OTHER
AVAILABLE SYSTEM OPTIONS ARE NOT SHOWN.
6. RECOMMEND LONG RADIUS ELBOWS BE USED TO MINIMIZE
SYSTEM PRESSURE DROP.
7. RECOMMEND LIQUID LINES FOR R-410A BE SIZED FOR A
MAXIMUM PRESSURE DROP OF 6 PSIG.
8. RECOMMEND SUCTION LINES FOR R-410A BE SIZED FOR A
MAXIMUM PRESSURE DROP OF 3 PSIG.
9. RECOMMEND CONDENSER SUBCOOLING CIRCUIT FOR R-410A
BE CAPABLE OF SUBCOOLING LIQUID BETWEEN 12 TO 19°F.
10. CONNECT 1/4" O.D. EXTERNAL EQUALIZING LINE GENERALLY
LOCATED IN EACH SUCTION HEADER OF EACH DX COIL TO
THE APPROPRIATE THERMAL EXPANSION VALVE (TXV).
11. SENSING BULB FROM THERMAL EXPANSION VALVE (TXV) TO
BE LOCATED ON THE SIDE OF A HORIZONTAL PORTION OF
THE DX COILS' SUCTION LINE PIPING AT AN ANGLE OF
APPROXIMATELY 120° FROM VERTICAL. DO NOT LOCATE
SENSING BULB ON ANY PIPING USED IN A TRAP OR
DOWNSTREAM OF A TRAP.
12. INSTALL TRAP IN SUCTION LINE AS ILLUSTRATED IF
COMPRESSOR IS LOCATED BELOW THE THE DX COIL.
13. ALL COIL SPECIALTIES AND REFRIGERANT PIPING SHOWN
OTHER THAN THE REFRIGERANT DISTRIBUTOR AND ANY OTHER
REQUIRED REFRIGERATION SYSTEM SPECIALTIES ARE TO BE
PROVIDED BY AND INSTALLED IN THE FIELD BY OTHERS.
RP-09
RP-10
RP-11
RP-11A
RP-12A
RP-13A
RP-12B
RP-13B
RP-16
RP-17
RP-18
RP-19
HOT GAS BYPASS TEE
LIQUID LINE SOLENOID VALVE
HOT GAS BYPASS VALVE - SECOND STAGE
HOT GAS BYPASS VALVE - FIRST STAGE
THERMAL EXPANSION VALVE (TXV-1A)
CIRCUIT #2 - COIL 'A'
THERMAL EXPANSION VALVE (TXV-2A)
CIRCUIT #1 - COIL 'A'
THERMAL EXPANSION VALVE (TXV-1B)
CIRCUIT #2 - COIL 'B'
THERMAL EXPANSION VALVE (TXV-2B)
CIRCUIT #1 - COIL 'B'
DX EVAPORATOR COIL 'A' - INTERTWINED
DX EVAPORATOR COIL 'B' - INTERTWINED
REFRIGERANT DISTRIBUTOR
CONDENSATE PAN PROVIDED WITH DRAIN
CONNECTIONS ON BOTH ENDS
P000971R410
– 16 –
I. Locating Temperature Controls
The room or outdoor thermostats should be mounted where
they will not be subjected to direct impact of the heated air
or radiant heat from the sun. It is also recommended that
thermostats, especially those with mercury bulb contacts,
be mounted on a vibration free surface. The sides of
building columns away from the heater or interior walls are
usually the location best suited for mounting thermostats.
Controls with outdoor bulbs require that the outdoor
bulb be shielded from direct radiation from the sun. Unit
mounted sensors are factory located and mounted.
J. Drains and Traps
Some furnaces maybe supplied with condensation
removal pipe connections. Condensate from the heat
exchanger is acidic and may contain chemical compounds
requiring special drainage. The drain must be installed
in accordance with all plumbing codes. The condensate
is to be drained via PVC or steel pipe with an indirect
connection to the plumbing wastes. Where a condensate
neutralizer is used, an overflow shall be provided such that
condensate will be directed to the drain in the event that
the neutralizer becomes plugged. Indoor units typically
require a condensate trap to be installed to prevent
combustion gasses entering the space. Outdoor units
may require installing a heat-trace or special attention to
drains to prevent freezing and clogging of the drain line.
Since the condensate is drained by gravity, avoid long
runs of drain piping. If a long run of trapping cannot be
avoided or the piping has water flow restrictions such
as several elbows, and extra height to provide enough
hydrostatic head to overcome the frictional losses.
Always slope piping down a minimum of 1/8" per foot in
the direction of the flow.
Evaporator Coil – Draw Through
The cooling coil section can be located in the unit so
that supply air is drawn through the evaporative coil(s).
This results in the condensate being induced to the area
of low static pressure. Unless some means of pressure
equalization is provided in the condensate drain, the air
rushing through the drain will cause the condensate to
accumulate in the drain pan. As the unit continues to
operate, the accumulated water will be picked up by the
in-rushing air and carried with the air over the side of the
drain pan causing possible water leaks into the supply
duct and/or through the bottom of the unit causing water
damage in the building. A trap should be installed to
prevent this condensate water buildup. See drawing
on next page.
Evaporator Coil – Blow Through
The cooling coil section can be located in the unit so
that supply air is blown through the evaporative coil(s).
A properly piped trap should be installed to control
the condensate flow from the unit and also eliminate
conditioned air from being blown out the condensate
drain. See drawing on next page.
On initial start-up, it may be necessary to fill the trap
manually or, after unit has operated sufficiently for a
small amount of condensate to collect in the drain pan,
turn off the unit and the trap will automatically fill.
During the winter months when the cooling system
is turned off and the unit is exposed to freezing
conditions, an antifreeze solution should be poured
into the condensate pan trap to prevent freezing and
possible damage. The condensate drain trap may also
be drained and capped, but be sure to remove the cap
when starting the cooling for the next season.
– 17 –
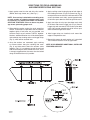
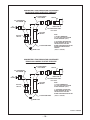
SUGGESTED P-TRAP DESIGN FOR CONDENSATE
DRAIN PANS UNDER A NEGATIVE PRESSURE
90° LONG RADIUS
PVC ELBOW
NIPPLE
90° LONG RADIUS
PVC ELBOW
K
TO
DRAIN
DRAIN PAN
PVC ADAPTER FITTING
FPT x SLIP
PVC PIPE
NIPPLE
PVC PIPE
NIPPLE
NOTE:
'H' TO BE A MINIMUM OF
1/2" PLUS THE TOTAL SYSTEM
STATIC PRESSURE ("W.C.).
H
PVC RETURN BEND
DRAIN PLUG
'K' TO EXCEED THE NEGATIVE
STATIC PRESSURE IN "W.C. OF
THE SECTION OF THE UNIT
WHERE THE DRAIN IS INSTALLED
AND DOUBLE WHEN SPACE
PERMITS.
(10/30/09 C000659B)
SUGGESTED P-TRAP DESIGN FOR CONDENSATE
DRAIN PANS UNDER A POSITIVE PRESSURE
90° LONG RADIUS
PVC ELBOW
NIPPLE
90° LONG RADIUS
PVC ELBOW
J
TO
DRAIN
DRAIN PAN
PVC ADAPTER FITTING
FPT x SLIP
PVC PIPE
NIPPLE
PVC PIPE
NIPPLE
G
NOTE:
'G' TO BE A MINIMUM OF
1/2" PLUS THE TOTAL SYSTEM
STATIC PRESSURE ("W.C.).
'J' TO EXCEED THE POSITIVE
STATIC PRESSURE IN "W.C. OF
THE SECTION OF THE UNIT
WHERE THE DRAIN IS INSTALLED.
PVC RETURN BEND
(10/30/09 C000659B)
DRAIN PLUG
10/30/09 C000659B
– 18 –
SECTION IV – PRE START-UP
Do not attempt start-up without completely reading
and understanding this manual, along with the
Digital Control System user manual (if applicable).
Pre Start-Up
The owners representative or equipment operator should
be present during start-up to receive instructions on care
and adjustments of the equipment.
All equipment has been factory tested, adjusted, metered
and inspected to meet conditions set at the time the order
was placed. Only minimal adjustments should be required.
All information in this service manual is typical. All products are semi-custom and changes may occur.
14.
15.
16.
17.
CAUTION: Line side of disconnect may be energized.
Follow proper “lockout/tagout” procedures.
NOTE: A qualified service engineer should perform all
servicing and adjustments of the Indirect Gas-Fired
unit.
Perform a visual inspection, internally and externally, to
make sure no damage has occurred and that everything
is secure. This inspection is very important and should be
completed with great care given to detail. A good pre-start
inspection will insure against possible unit damage on
start-up and will save valuable analysis time.
1. Check that the physical condition of the unit exterior is
acceptable.
2. Check that any insulation inside the unit is properly
secured.
3. Remove all shipping blocks, brackets and bolts from
supply fan base with optional isolation base.
4. Check all terminals for loose connections and inspect
all wiring terminations to insure that all crimped connections are tight.
5. Inspect all fan and motor bearings and lubricate if
necessary.
18.
19.
20.
21.
22.
23.
24.
25.
26.
27.
CAUTION: DO NOT RUTURE GREASE SEALS.
6. Inspect pulleys and belts for tightness, tension and
alignment. Do not overtighten belts.
7. Check set screws on all bearings, pulleys, fans and
couplings for tightness.
8. Check voltage supplied to disconnect switch; the
maximum voltage variation should not exceed + 10%.
Phase voltage unbalance must not exceed 2%.
9. Check thermostat(s) for normal operation.
10. Check that system duct work is installed and free of
obstructions.
11. Check that fans turn freely in housing.
12. Check that the area around the unit is clear of flammable vapors or containers of flammable liquids.
13. Check that all piping connections, particularly unions,
are tight. Check all gas piping for leaks using a soap
28.
29.
– 19 –
bubble solution. The most common types of problems
found relative to the gas train itself is free of foreign
material within the gas piping. This will interfere with
the proper operation of the gas train components and
burner. Purge all air from gas lines per gas codes.
Check that all accessories requiring field wiring have
been properly installed.
Check burner for proper location and alignment.
Check that filters, filter stops, accessories and any
ship loose items are installed properly.
Check that vent lines (if applicable) are run to atmosphere on gas regulators and pressure switches for
indoor units. Vent lines should terminate outside the
building, with a turndown elbow and bug screen. Note
that some units will use vent limiters and vent lines are
not required. If vent lines are even partially plugged,
this will interfere with proper venting of pressure control devices.
Check that all manual gas shut-off valves are closed.
When failure or malfunction of this heater creates a
hazard to other fuel burning equipment, (e.g. when
the heater provides make-up air to a boiler room), the
heater is to be interlocked to open inlet air dampers or
other such devices.
Motor overload relay setting should match the motor’s
nameplate full load amperage.
Check any dampers or mixing boxes (if supplied).
Make sure all damper linkage is free to move and no
binding will occur. If dampers are of the modulating
type, check control capillary tubes to insure that the
tubes and bulbs are in the proper location and will not
rub against any other parts.
Check to ensure all manual reset safety devices have
been reset and limits are in the normal operating position.
Check to ensure the flue stack is installed properly
and is free of obstructions.
Adjust the induced draft damper so it is approximately
75% open.
Remove shipping screw from rear relief door (if applicable).
Check that all fuses are installed.
Check that inlet gas pressure is the same as shown
on the rating plate.
Check that field wiring connections to the burner motor and draft inducer motor are connected to the correct starters.
Check to make sure the inlet gas pressure is the same
as the rating plate.
SUGGESTED TOOLS AND INSTRUMENTS
U-Tube Manometer (0 – 10" W.C.) Two Required
Flue Gas Test Equipment
Standard Hand Tools
D.C. Volt Meter
BAC View 6 for DDC Controls (if applicable)
Volt/Ohm meter
Tachometer
Stack & Temperature Thermometer
Gas Pressure Gauge (0 – 35 lbs.)
Ammeter/Amprobe (or equal)
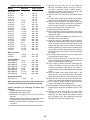
SUGGESTED CONTROLS SETTINGS
Fan Control………....…...…….......…95o – 110oF
High Limit (TDM Down Discharge).........…165o F
High Limit (All Other Units)...................…200o F
Auxiliary High Limit (TDM Down Discharge)..175o F
Auxiliary High Limit (All Other Units)……...210o F
Draft Proving Switch........Adjust to field condition
Burner Proving Switch.....Adjust to field condition
Low Gas Pressure Switch...............…..1.0” W.C.
High Gas Pressure Switch..….........125% above
burner firing rate
PS-10 Main Air Proving Switch Adjust to field condition
PS-12 Clogged Filter Switch.….Adjust to field condition
FL-01
FL-02
FL-02
FL-04
FL-04
PS-01
PS-02
PS-04
PS-07
RE-21
TC-01
TC-02
TC-03
TC-06
TC-07
TC-08
TC-55
TC-58
Time Clock………………..Customer Discretion
Room Thermostat ……… Customer Discretion
Modulating Discharge Ductstat…….…… 70o F
On-Off Inlet Ductstat…………...………….65o F
High Limit Discharge Ductstat…………. 100o F
Low Limit Discharge Ductstat……...…..…60o F
Freeze Thermostat…………...45o F & 3 Minutes
Return Air Ductstat…….....Customer Discretion
Night Setback Thermostat....Customer Discretion
SUGGESTED CONTROLS SETTINGS FOR OPTIONAL DDC CONTROLS
(Refer to Digital Control System user manual for default settings)
TS-02 Space Temperature Sensor..Customer Discretion
KP-01 Keypad/Display Module ….. Customer Discretion
MP-05 Damper Control Potentiometer.............Customer
Discretion
MP-15 Unit Enable Potentiometer...Customer Discretion
PT-13 Building Pressure Transducer................Adjust to
Field Condition
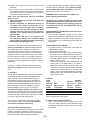
BEFORE ATTEMPTING TO START THE HEATER, READ THE TYPICAL
SEQUENCE OF OPERATION AS SHOWN BELOW:
Typical Sequence Of Operations Note: This sequence is written for only the burner safety and operating portion of the heater. Other control systems for
dampers, mixing boxes, and temperature controls are
included in the unit typical sequence of operation and /
or wiring diagram:
1. With main supply air fan(s) on, thermostat setpoint
calling for heat, and all switches and operating controls in their normal position, the exauster motor and
burner motor will run and "pre-purge" the combustion
chamber. Pre-purge timing is not adjustable and is
approximately 90 seconds.
3. Ignition transformer is de-energized and pilot valve
remains on.
4. Main fuel valve(s) will open. The main burner flame
will be established.
5. Pilot valve is de-energized. (This is only on heaters
with interrupted pilots).
6. Once thermostat setpoint is satisfied, the main fuel
valve(s), burner motor, and exhauster motor will be
de-energized. Main supply air fan(s) will continue to
run.
2. With pre-purge timing complete, the pilot solenoid
valve and ignition transformer are energized. The pilot flame will be established and sensed by the flame
sensor.
– 20 –
SECTION V – UNIT START-UP
WITHOUT DDC CONTROLS
Before attempting to start the heater read and
understand the sequence of operations, electrical
schematic, gas train, burner, and flame safeguard
control.
WARNING: During installation, testing, servicing
and trouble shooting of this product, it
may necessary to work with live electrical
components. Have a qualified licensed
electrician or other individual who has been
properly trained in handling live electrical
components to perform these tasks. Failure to
follow all electrical safety precautions when
exposed to live electrical components could
result in death or serious injury.
Open pilot and first main gas shut-off valves slowly.
Last main gas shut-off valve before the burner must
remain closed at this time. Reset high-low gas pressure
switches (if applicable). Check pilot and main gas lines
for leaks using soap solution.
Check the gas supply pressure by replacing the plug
fitting on the pilot gas line with a pressure gauge with
appropriate range. Check that pressure reading is
within the specified range on the raring plate.
Make sure all manual gas valves are closed.
Make sure all doors and service panels have been
closed or replaced.
NOTE: To adjust gas pressure on supply lines where
a regulator has been installed (to set inlet pressure
to rating plate maximum pressure), remove dust
cap of main gas regulator and turn adjusting screw
clockwise to increase pressure or counterclockwise
to decrease pressure.
Setting the Pilot Flame
Turn main disconnect switch off. Check the incoming line
voltage to match unit nameplate rating. If voltage is over
+10% of nameplate rating or phase voltage unbalance is
over 2%, notify contractor or power company.
If power supply meets requirements turn main
disconnect switch on. Turn Fan “on-off” switch to
“on” position. Inlet shut-off damper(s) (if applicable)
opens, after end switch has proven damper is open
the blowers or props run.
Turn Fan “on-off” switch to “off” position. Check
supply fans for proper rotation. The burner and
induced draft fan rotation can be checked when the
heat section is started.
NOTE: To change rotation of the fans, simply
interchange any two (2) of the line leads of the
motor starter for 3 phase motors. On single-phase
motors, refer to motor nameplate.
Turn Fan “on-off” switch to “on” position. Check for
proper fan RPM. Check that all amp draws do not
exceed nameplate ratings and overloads are set to
nameplate amps.
Check to make sure all dampers and controls are
working properly.
CAUTION: Do not attempt to start the pilot when furnace
is full of vapor or combustion chamber is very hot.
CAUTION: At no time should you stand in front of
the relief door.
Honeywell Flame Safeguard Control (RE-02)
A keyboard display module (Honeywell #S7800A1142)
is recommended to read the flame signal, and is a good
troubleshooting device. A V.O.M. can also be used on the
D.C. voltage test jacks marked “+” and “-“ on flame amplifier.
Connect manometer to pilot test tee (if applicable).
Set all thermostats to call for heat. Set inlet ductstat (if
applicable) above outside air temperature.
Turn Fan and Heat-Off-On switches to the On position
and check rotation of burner and induced draft fans,
amps, and overload settings. Make sure the damper
on the induced draft fan is approximately 75% open.
If limits and all safety controls are closed, the burner
and induced draft fan will run for 90 seconds before
ignition trial as a pre-purge cycle.
Place run/test switch on the flame safeguard relay in the
“test” position during P.F.E.P.
Turn Fan “on-off” switch to “off” position.
NOTE: When setting up the burner for the first
time or if the appliance has been shut down for
an extended period of time, these same start up
procedures should be followed.
– 21 –
NOTE: Pilot regulator adjustment may be needed if
the adjustment of the needle valve does not yield
the required reading. Typical adjustment of the
needle valve is 1-1/2 to 2 turns open.
NOTE: Frequently the cause of pilot problems
relates to gas pressures that are too high and/or air
dampers that are closed too far. This causes a fuel
rich mixture.
NOTE: 3 or 4 trials may be needed to purge air from
pilot line.
Watch D.C. voltmeter carefully. The reading should
be steady and between 2.0 and 5.0 Volts D.C. If the
reading is too low, slowly turn the needle valve in or out
until satisfactory flame signal is obtained (See separate
literature for testing of flame safeguard).
Make sure that the combustion air and pilot gas
pressure is sufficient to provide instant ignition, a stable
flame, and flame signal. Cycle pilot several times to
insure reliability.
With pilot adjusted, you can now shut down the burner
by turning the Heat "on-off" switch to the "off" position.
CAUTION: If main flame does not light within a few
seconds after pilot flame is established, shut the
burner down and repeat steps. You may have to
eliminate air from the main gas line. The main gas
pressure and / or burner air setting may also need
to be readjusted.
If flame signal drops significantly when main gas valves
open, slightly increase or decrease pilot gas pressure to
attain a steady flame signal.
After the burner lights; adjust gas pressure regulator,
using a manometer, and combustion air damper
to match normal manifold pressure shown on unit
nameplate. Make sure the thermostat and gas valves
are in high fire.
These units have an induced draft fan, a minimum
of –0.20" W.C. must be maintained at the relief door,
simultaneously while setting the fuel to air pressure
on the burner at full input. This is done by changing
the damper setting at the induced draft fan outlet
with a warm stack. Be sure to lock down the locking
quadrant when you are done.
Check all gas piping again for leaks using a soap bubble
solution.
Setting the Main Flame
On-Off Operation
IMPORTANT: When the Flame Safeguard relay
module is switched to the TEST mode, it stops
and holds at the next Run/Test Switch point in the
operating sequence. Make sure that the Run/Test
Switch is in the Run position before starting the
burner.
Check to make sure operating thermostat cycles burner
and induced draft fan.
See final checks and adjustments.
High-Low-Off Operation
CAUTION: Do not attempt to start the burner when
furnace is full of vapor or combustion chamber is
very hot.
CAUTION: At no time should you stand in front of
the relief door.
Connect the test instruments, meters, and thermometers
on the heater and controls to measure and record the
appropriate data.
Install one manometer at test port on the last tee of the
burner manifold and one at the relief door.
Set all thermostats to call for heat. Set inlet ductstat (if
applicable) above outside air temperature.
Restart unit. After the pilot proves the main automatic
fuel valves will be energized. Slowly open the last gas
shut-off valve and the burner should light immediately.
Turn the two stage thermostat down slowly until main
gas valve begins to drive closed (low fire) or the power
on the second stage may be disconnected.
NOTE: Low fire rate should be set at approximately
50% of high fire.
CAUTION: Too low of an input setting will cause
condensation of the flue gases.
To reset low fire, remove the cover from the Two Stage
gas valve actuator and using the wrench provided
readjust the internal cam setting.
Check to make sure Two Stage thermostat cycles
burner and induced draft fan.
See final checks and adjustments.
– 22 –
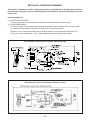
Modulating Operation
C000723
Set high fire by adjusting main gas regulator and by the
high fire adjusting screw on the butterfly valve.
Observe flame as burner modulates when thermostats
are adjusted.
NOTE: Flame should modulate slowly and evenly
throughout the entire travel, although flame may
become somewhat “dirty” during travel. If stopped
at any point, proper combustion should resume.
Turn all modulating thermostats to their lowest setting
without turning the burner off, or with power off remove
the coil wire on low fire hold relay and restart burner.
Set low fire with the low fire adjusting screw on the
butterfly valve.
Observe low fire, it should be substantial enough to
maintain proper combustion and be within the designed
turndown range of the burner.
CAUTION: Too low of an input setting will cause
condensation of the flue gases, this should be
avoided unless condensate drains are provided.
See following drawings for operation of modulating
thermostat and typical circuit. SW-11/SW-13 should
cycle the burner.
See final checks and adjustments toward the end of
this section.
– 23 –
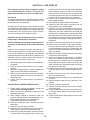
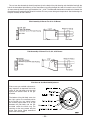
TYPICAL SEQUENCE FOR MODULATING THERMOSTAT WITH 135 OHM CONTROLS
– 24 –
TYPICAL SEQUENCE FOR MODULATING THERMOSTAT WITH 4-20 mA CONTROLS
– 25 –
SECTION V – UNIT START-UP
WITH DDC CONTROLS
Before attempting to start the heater read and
understand the sequence of operations, electrical
schematic, flame safeguard control, control components, gas train, burner and the Digital Control
System user manual.
WARNING: During installation, testing, servicing
and trouble shooting of this product, it may be
necessary to work with live electrical components.
Have a qualified licensed electrician or other
individual who has been properly trained in
handling live electrical components to perform
these tasks. Failure to follow all electrical safety
precautions when exposed to live electrical
components could result in death or serious
injury.
Make sure all manual gas valves are closed.
To disable the fans, go to “Unit Modes” and enter
[OFF].
NOTE: A BACview or PC is required to change Unit
Modes. For a more detailed control sequence see
the Digital Control User Manual.
If power supply meets requirements, turn main
disconnect switch on and Enable fans. Damper opens
(if applicable). After end switch has proven damper is
open, the blower fan turns on. (See operating modes
in Digital Control System user manual).
Disable the fans. Check supply blower for proper
rotation. The burner and induced draft fan rotation
will be checked when the heat section is started.
Make sure all doors and service panels have been
closed or replaced.
NOTE: To change rotation of the blower, simply
interchange any two (2) of the line leads of the
motor starter for three (3) phase motors. On single
phase motors refer to motor nameplate.
Turn main disconnect switch off. Check the incoming line
voltage to match unit nameplate rating. If voltage is over
+10% of nameplate rating or phase voltage unbalance
is over 2%, notify contractor or power company.
Enable the fans. Check for proper blower rpm.
Check that all motor amp draws do not exceed
motor nameplate ratings and overloads are set to
motor rating plate amps.
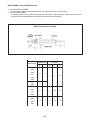
Fans Are Enabled And Disabled By The Following:
Check all dampers for proper operation, and linkage
does not bind, see “Sequence of Operation”, and Digital
Control System user manual for damper control modes.
MDT And MRT Standard:
By rotating the remote “Temperature Setpoint” knob
(MP-15).
Clockwise will enable the fans.
Counterclockwise will disable the fans.
MRT-PRO With Smart Room Sensor:
To enable the fans and place the unit in the Occupied
Mode, press the “Manual On” button on the face
of the (TS-02) MRT-PRO room sensor. Pressing the
“Warmer” button will add 30-minute increments of
time for a total of 9-hours of operating time. To disable
the fans and place unit in the Unoccupied Mode, press
and hold down the “Manual On” button. Alternately
pressing the “Manual On” button will also decrease
the amount of operating time until it reaches zero and
turns the fans off.
MRT Expert or MDT Expert With A BACview (KP-01):
To enable the fans, go to “Unit Modes” and enter
[MANUAL], this mode will enable the fans.
To also enable the fans, go to “Unit Modes” and enter
[AUTO]; this mode has four different functions that
control the fans and unit operation. They are a Time
Clock, Heating and Cooling Night Setbacks, and signal
from an external source to an auxiliary digital input.
Disable the fans.
NOTE: When setting up the burner for the first time
of if appliance has been shut down for an extended
period of time, these same start up procedures
should be followed.
Open pilot and first main gas shut-off valves slowly.
Last main gas shut-off valve before burner must remain
closed at this time. Reset high-low gas pressure
switches (if applicable). Check pilot and main gas lines
for leaks using soap solution.
Check the gas supply pressure by replacing the plug
fitting on the pilot gas line with a pressure gauge with
appropriate range. Check that pressure reading is within
the specified range on the rating plate.
NOTE: To adjust gas pressure on supply lines
where a regulator has been installed (to reduce the
inlet pressure to rating plate maximum pressure),
remove dust cap of main gas regulator and turn
adjusting screw clockwise to increase pressure or
counterclockwise to decrease pressure.
– 26 –
Heat is Enabled By The Following:
MDT And MRT Standard:
To enable the heat, rotate the “Temperature Setpoint”
knob (MP-15) clockwise to the desired setpoint above
the actual air temperature. The allowable temperature
range is 55° to 90°F.
Honeywell Flame Safeguard Control (RE-02):
A keyboard display module (Honeywell #S7800A1142)
is recommended to read the flame signal, and is a good
troubleshooting device. A V.O.M. can also be used on
the D.C. voltage test jacks marked “+” and “-“ on flame
amplifier.
Connect manometer to pilot test tee (if applicable).
MRT-PRO With Smart Room Sensor:
To enable the heat, press the “Warmer” or “Cooler”
button on the face of the remote MRT-Pro room sensor
(TS-02) to the desired room setpoint. Each push of the
button changes the temperature setpoint by 1°F. The
setpoint can be changed a maximum of + 10°F from the
default of 65°F. Changing the heating setpoint also
changes the cooling setpoint.
MRT Expert or MDT Expert With a BACview (KP-01):
To enable the heat for MRT Expert scroll through the
“Setpoints” menu in the BACview and enter the desired
room Heating Occupied and Unoccupied Setpoints. For
VDT Expert enter the desired Heating Discharge Air
Setpoint.
Energy Savings Modes:
There are three (3) Energy Savings Modes that
could disable the burner.
NOTE: A BACview or PC is required to change
Setpoints. For a more detailed control sequence,
see the Digital Control System Users Manual.
Sequence and Burner Setup with DDC
The I/O Zone 583 Controller (UC-01) must be calling for
the burner to be enabled. The DO-2 light will be on and
Burner Enable Relay (RE-28) needs to be energized.
If the outside or inlet air temperature is above the
Heating Economizer Setpoint 65°F the burner will
be disabled. You will need to disconnect the plug where
the Outside or Inlet Air Temperature Sensor (TS-01) and
Discharge Air Temperature Sensor (TS-03) are wired
to the I/O Zone 583 Controller (UC-01). Reconnect the
plug if you are getting close to the Freezestat lockout
time, which is approximately 3 minutes. To reset the
Freezestat alarm, simply turn the power off and back on
at the disconnect switch.
NOTE: A BACview or PC is required to change
settings. See the Digital Control System User
Manual for a more detailed sequence of operation.
Setting the Pilot Flame
CAUTION: Do not attempt to start the pilot when
furnace is full of vapor or combustion chamber is
very hot.
CAUTION: You will have approximately three
(3) minutes before the unit shuts down on
Freezestat (Low Discharge Temperature, if you have
disconnected plug wires TS-01 and TS-03).
Enable the fan and heat as described earlier in this
section. Check rotation of burner and induced draft
fans, amps, and overload settings. Make sure the
damper on the induced draft fan is approximately
75% open.
If limits and all safety controls are closed, the burner and
induced draft fan will run for 90 seconds before ignition
trial as a pre-purge cycle.
NOTE: Do not leave the Run/Test switch on the
flame safeguard relay (RE-02) in the TEST position
during P.F.E.P. for more than 60 seconds. This could
cause the control program to go into a burner status
alarm. You can recycle the power to the unit to reset
the burner status alarm.
NOTE: Pilot regulator adjustment may be needed if
the adjustment of the needle valve does not yield
the required reading. Typical adjustment of the
needle valve is 1-1/2 to 2 turns open.
NOTE: Frequently the cause of pilot problems
relates to gas pressures that are too high and/or air
dampers that are closed too far. This causes a fuel
rich mixture.
NOTE: 3 or 4 TRIALS MAY BE NEEDED TO PURGE
AIR FROM PILOT LINE.
Watch D.C. voltmeter carefully. The reading should
be steady and between 2.0 and 5.0 Volts D.C. If the
reading is too low, slowly turn the needle valve in or out
until satisfactory flame signal is obtained (see separate
literature for testing of flame safeguard).
Make sure that the combustion air and pilot gas
pressure is sufficient to provide instant ignition, a stable
flame, and flame signal. Cycle pilot several times to
insure reliability.
With pilot now adjusted, you can now shut down the
burner by disabling the heat.
CAUTION: At no time should you stand in front of
the relief door.
– 27 –
Setting the Main Flame
IMPORTANT: When the Flame Safeguard relay module
is switched to the TEST mode, it stops and holds at
the next Run/Test Switch point in the operating
sequence. Make sure that the Run/Test Switch is in
the RUN position before starting the burner.
CAUTION: Do not attempt to start the burner when
furnace is full of vapor or combustion chamber is
very hot.
CAUTION: At no time should you stand in front of
the relief door.
Connect the test instruments, meters, and thermometers
on the heater and controls to measure and record the
appropriate data.
Install one manometer at test port on the last tee of the
burner manifold and one at the relief door.
With all the safeties made, this will energize Burner
Relay (RE-02) and burner will light. The I/O Zone 583
Controller (UC-01) will send a 0 to 10 VDC signal to the
Interface Module (IM-02) located inside the Modulating
Gas Valve Operator (MT-11). See check out procedure
for (IM-02). At approximately 0 VDC the valve will be in
low fire and 10 VDC is high fire. Prior to setting low and
high fire you should have your test equipment installed
and be familiar with the Butterfly Valve (GP-39) and its
adjustment. For the high fire setpoint, refer to the unit
rating plate for Normal Manifold Pressure in inches
of W.C. With the Modulating Gas Valve Operator (MT11) in its high fire position set high fire using the Main
Gas Pressure Regulator (GP-05) and with the high fire
adjusting screw on the Butterfly Valve (GP-39). Remove
the + or – wire from (IM-02) and set low fire with the low
fire adjusting screw on (GP-39). See final checks and
adjustments. Cycle the pilot and burner several times to
be sure it lights off reliably.
After the burner lights; adjust gas pressure regulator,
using a manometer, and combustion air damper to
match the normal manifold pressure shown on unit
nameplate. Make sure the setpoint and gas valves are
in high fire.
These units have an induced draft fan, a minimum
of -0.20" W.C. must be maintained at the relief door,
simultaneously while setting the fuel to air pressure
on the burner at full input. This is done by changing
the damper setting, at the induced draft fan outlet,
with a warm stack. Be sure to lock down the locking
quadrant when you are done.
Observe flame as burner modulates when setpoints are
adjusted.
Note: Flame should modulate slowly and evenly
throughout the entire travel, although flame may
become somewhat “dirty” during travel. If stopped
at any point, proper combustion should resume.
Observe low fire, it should be substantial enough to
maintain proper combustion and be within the designed
turndown range of the burner.
CAUTION: Too low of an input setting will cause
condensation of the flue gases, this should be
avoided unless condensate drains are provided.
Check all gas piping again for leaks using a soap bubble
solution.
See final checks and adjustments.
C000723
Enable the fans and heat as described earlier in this
section.
Restart unit. After the pilot proves, the main automatic
fuel valve(s) will be energized. Slowly open the last gas
shut-off valve and the burner should light immediately.
CAUTION: If main flame does not light within a few
seconds after pilot flame is established, shut the
burner down and repeat steps. You may have to
eliminate air from the main gas line. The main gas
pressure and/or burner air setting may also need to
be adjusted.
If flame signal drops significantly when main gas valves
open, slightly increase or decrease pilot gas pressure to
attain a steady flame signal.
– 28 –
GP-39
FINAL CHECKS AND ADJUSTMENTS
After the burner has been in operation for at least 10
minutes, this allows the combustion chamber and
heat exchanger to reach an equilibrium temperature;
a flue gas analysis can now be performed. There is
a test plug in the stand off box where the induced
draft fan airflow switch tube is located.
Detectable Carbon Monoxide (CO)
The following readings should be taken but not limited
to:
Excessive Stack Temperature (480°F Above Ambient)
CO2 %
O2 %
CO %
•
•
•
•
•
•
•
•
Net Stack Temperature
Combustion Efficiency
If necessary, make adjustments on burner air shutter.
DO NOT change the fuel input rate.
CAUTION: Check local codes for maximum
allowable percentages and amounts of emissions.
Low Carbon Dioxide (CO2)
•
•
•
Fuel input too low
Excess burner air
Wrong draft setting
Draft setting too high
Excess burner air
Fuel input too high
Blocked and/or restricted secondary tubes
Low Oxygen (O2)
•
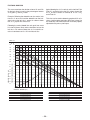
The following list covers general combustion problems
and some of the possible cures. Conditions may vary in
the field. Refer to combustion chart for efficiency.
Fuel input too high
Not enough burner air
Restricted draft
Flame impingement
Oxygen reading must always be a positive
percentage
Make sure there is a minimum of –0.20" W.C. at relief
door when burner is in high fire with a warm stack.
Cycle burner several times to ensure smooth light
off and proper operation. Visually observe the flame
pattern. There must be no flame impingement or hot
spots on the combustion chamber that could cause
scaling.
Check voltage and amperage on all motors.
Check all dampers, linkages, and locking quadrants to
make sure they are secure and operating correctly.
Check all gas piping for leaks.
SAFETY AND CONTROLS CHECKOUT
Flame Safeguard – Close the last manual gas valve
before burner. Operate unit in heat mode. After pilot
flame has been established, quickly close manual
pilot gas valve. The flame safeguard must trip out in
approximately 15 seconds.
Gas Pressure Switches – The low gas pressure switch
will trip out and must be reset before resuming operation
when the inlet gas shut off valve is turned off, or inlet
gas pressure is lower than the trip point. The high gas
pressure switch can be checked by reducing the setting
of its trip point lower than the burner operating pressure.
The switch should trip out and shut off the burner.
Return the adjustment to its original setting and reset to
resume operation.
Air Pressure Switches – The air pressure switches
can be checked by turning the adjusting screw to call for
a higher pressure than is normally used on the system.
Recycle is automatic when the switch returned to its
original setting. If the burner or draft proving switches
open, this could cause the flame safeguard to go into
standby mode.
Limit Controls – The limit controls are checked by
adjusting control to a lower temperature setting while
the unit is operating on high fire and observe cut-off.
Return the adjustment to its original setting. Manual
reset may be required on some controls.
Temperature Controls – The temperature controls are
checked by adjusting control to a higher temperature
to allow burner to cycle on. Adjust control to a lower
temperature to allow burner to cycle off. Return the
adjustment to its original setting.
– 29 –
Make sure all the safeties and controls
are working properly.
Cooling is Enabled By The Following
MDT & MRT Standard:
To enable the cooling, rotate the remote “Temperature
Setpoint” knob (MP-15) clockwise to the desired
setpoint below the actual air temperature. The allowable
temperature range is 55° F to 90° F.
MRT-PRO With Smart Room Sensor:
To enable the cooling, press the “Warmer” or “Cooler”
button on the face of the remote (TS-02) MRT-Pro
room sensor to the desired room setpoint. Each push
of the button changes the temperature by 1° F. The
setpoint can be changed a maximum of +10° F from the
default of 73° F. Changing the cooling setpoint also
changes the heating setpoint.
MRT or MDT Expert With a (KP-01) BACview:
To enable the cooling for MRT Expert, scroll through
the “SETPOINTS” menu in the BACview and enter
the desired room Cooling Occupied and Unoccupied
Setpoints. For VDT Expert, enter the desired Cooling
Discharge Air Setpoints.
Energy Savings Mode:
Energy Savings Mode 4-can disable the cooling.
NOTE: The cooling outputs are protected by an
anti-cycle timer which has a 3 minute off / 3 minute
on delay. A BACview or PC is required to change
Setpoints. For a more detailed control sequence,
see the Digital System User Manual.
SECTION VI - UNIT SHUTDOWN
A. Extended Shutdown
1. Disable the heat for 3 minutes, or a sufficient
amount of time to allow the heat exchanger to
cool down. Then disable the fans.
2. Close all the manual gas shut off valves.
3. Open the main electrical disconnect switch.
4. If the unit is to remain idle for an extended period, the fan and motor shafts should be rotated
by hand to spread the grease over the bearings.
B. Emergency Shutdown Only —
1. Open the main electrical disconnect switch.
2. Close the main manual gas valve.
– 30 –
SECTION VII - TROUBLE SHOOTING
Check Safety Shutdown Performance
WARNING: Fire or explosion hazard. Can cause
property damage, severe injury or death. Perform
the safety shutdown test any time work is done on
a gas system.
NOTE: Read steps 1 through 7 before starting, and
compare to the safety shutdown or safety lockout
tests recommended for the intermittent or interrupted
pilot flame safeguard relay module. Where different,
use the procedure recommended for the module.
1. Turn off gas supply.
2. Adjust setpoint above room temperature to call for
heat.
3. Watch for ignition spark following prepurge. See flame
safeguard relay module specifications.
4. Time the length of the spark operation. See the flame
safeguard relay module specifications.
5. After the module locks out, open the manual gas cock
and make sure no gas is flowing to the pilot or main
burner.
6. Reset the flame safeguard relay (RE-02).
7. Operate system through one complete cycle to make
sure all controls operate properly.
This equipment has been electrically and fire tested prior
to shipment. However, during transit control setpoints can
change, and wiring can come loose. Do not assume controls are defective until all associated setpoints and wiring
are checked.
You also need to reference the Digital Control System
User Manual for additional trouble shooting and diagnostics for units with DDC controls.
If you do not have the optional BACview 6 (KP-01)
keypad display, it will be difficult to troubleshoot any
alarm that may occur on units with DDC controls. To
reset most alarms on the I/O Zone 583 Controller (UC01) without a BACview 6 keypad display, simply turn
the power off and back on at the unit disconnect. If you
have a BACview 6 keypad display, the alarm can be reset remotely or at the I/O Zone 583 (UC-01) Controller.
The following is a simplified list of possible problems and
typical causes and remedies. However, it does not cover
all possibilities, and is intended as a guide only.
Refer to the burner manufacturer IOM for additional
instructions.
WARNING: Many of the steps listed on the following pages require electrical cabinet and blower access while the unit is powered. High voltage and
moving parts are present, and these steps should
be performed by qualified service personnel. If any
of the controls requiring manual rest were at fault
this is an indication of a problem with the system
that should be investigated.
– 31 –
SECTION VII - TROUBLE SHOOTING continued
HONEYWELL RM7897A1002, RM7897C1000
7800 SERIES RELAY MODULES
PRINCIPAL TECHNICAL FEATURES
The RM7897 provides all customary flame safeguard
functions as well as significant advancements in safety,
annunciation, and system diagnostics.
Safety Shutdown (Lockout) Occurs if:
1. INITIATE PERIOD
a. Purge card is not installed or removed.
b. Purge card is bad.
c. Configuration jumpers have been changed (after
200 hours) - Fault Code 110.
d. AC line power errors occurred, see Operation.
e. Four minute INITIATE period has been
exceeded.
2. STANDBY PERIOD
a. Airflow lockout feature is enabled and the airflow
switch does not close after ten seconds or within
the specified purge card timing.
b. Flame signal is detected after 240 seconds.
c. Ignition/pilot valve terminal is energized.
d. Main valve terminal is energized.
e. Delayed main valve terminal is energized
(RM7897C).
f. Internal system fault occurred.
g. Purge card is removed.
h. Purge card is bad.
i. Preignition Interlock open.
3. PREPURGE PERIOD
a. Airflow lockout feature is enabled and the airflow
switch opens.
b. Ignition/pilot valve terminal is energized.
c. Main valve terminal is energized.
d. Delayed main valve terminal is energized
(RM7897C).
e. Internal system fault occurred.
f. Purge card is removed.
g. Purge card is bad.
h. Flame signal is detected for 30 seconds.
i. Preignition interlocks open durning stand by.
4. PILOT FLAME ESTABLISHING PERIOD (PFEP)
a. Airflow lockout feature is enabled and the airflow
switch opens.
b. No flame signal at end of PFEP.
c. Ignition/pilot valve/intermittent pilot valve
terminal is not energized.
d. Main valve terminal is energized (RM7897A).
e. Delayed (second stage) main valve terminal is
energized (RM7897C).
f. Internal system fault occurred.
g. Purge card is removed.
h. Purge card is bad.
5. MAIN FLAME ESTABLISHING PERIOD (MFEP)
(RM7897A, teminal 21)
a. Airflow lockout feature is enabled and the airflow
switch opens.
b. Ignition terminal is energized.
c. Ignition/pilot valve terminal is not energized.
d. Main valve terminal is not energized.
e. Delayed main valve terminal is energized.
f. Loss of flame signal
g. Internal system fault occurred.
h. Purge card is removed.
i. Purge card is bad.
6. RUN PERIOD
a. No flame present (JR2 removed).
b. Airflow lockout feature is enabled and the airflow
switch opens.
c. Interrupted pilot valve terminal is energized
(RM7897A, terminal 21).
d. Main valve terminal is not energized.
e. Delayed main valve terminal is not energized
(RM7897C).
f. Internal system fault occurred.
g. Purge card is removed.
h. Purge card is bad.
i. Ignition terminal is energized.
OPERATION
Sequence of Operation
The RM7897A has the operating sequences listed below; see Fig. 5 and 6. The RM7897A LED provide positive visual indication of the program sequence: POWER,
PILOT, FLAME, MAIN and ALARM.
Initiate
The RM7897A Relay Module enters the INITIATE
sequence when the relay module is powered. The
RM7897A can also enter the INITIATE sequence if
the relay module verifies voltage fluctuations of +10/15% or frequency fluctuations of ±10% during any part
of the operating sequence. The INITIATE sequence
lasts for ten seconds unless the voltage or frequency
tolerances are not met. When not met, a hold condition
is initiated and displayed on the optional KDM for at
least five seconds; when met, the INITIATE sequence
restarts. If the condition is not corrected and the hold
condition exists for four minutes, the RM7897A locks
out.
– 32 –
SECTION VII - TROUBLE SHOOTING continued
Causes for hold conditions in the INITIATE sequence:
1. AC line dropout detection.
2. AC line noise that can prevent a sufficient reading of
the line voltage inputs.
3. Low line voltage brownouts.
a. After PFEP, and with the presence of flame, the
main fuel valve, terminal 9, is powered. If a flameout occurs, the relay module locks out or recycles
(depending on status of jumper JR2) within 0.8
or 3 seconds, depending on the Flame Failure
Response Time (FFRT) of the amplifier.
b. The RM7897A (terminal 21) has a ten second
MFEP. After the Ignition Trials, the interupted pilot
valve, terminal 8 is de-energized. If a flameout
occurs, the relay module locks out or recycles
(depending on status of jumper JR2) within 0.8
or 3 seconds, depending on the amplifier FFRT.
The INITIATE sequence also delays the burner motor
starter from being energized and de-energized from an
intermittent AC line input or control input.
Standby
The RM7897A is ready to start an operating sequence
when the operating control input determines a call for
heat is present. The burner switch, limits, operating limit
control and all microcomputer-monitored circuits must
be in the correct state for the relay module to continue
into the PREPURGE sequence.
Normal Start-Up Prepurge
The RM7897A Relay Module provides PREPURGE
timing selectable from two seconds to thirty minutes
with power applied and the operating control indicating
a call for heat.
1. The Airflow Interlock, burner switch, Run/Test switch
and all microcomputer-monitored circuits must also
be in the correct operating state.
2. The motor output, terminal 4, is powered to start the
PREPURGE sequence.
3. The Airflow Interlock input closes ten seconds into
PREPURGE or within the specified purge card
timing; otherwise, a recycle to the beginning of
PREPURGE or lockout occurs, depending on how
the Airflow Switch selectable jumper (JR3) is configured.
Ignition Trials
1. Pilot Flame Establishing Period (PFEP):
a. When the PFEP begins:
(1) The pilot valve and ignition transformer,
terminal 21 is energized. The RM7897A has
an intermittent pilot valve, terminal 8 and interrupted pilot valve, terminal 21.
(2) Flame must be proven by the end of the ten
second PFEP (four seconds if Configuration
Jumper JR1 is clipped) to allow the
sequence to continue. If a flame is not proven
by the end of PFEP, a safety shutdown occurs.
(3) The pre-ignition inter lock is ignored
throughtout the trial for ignition state.
2. Main Flame Establishing Period (MFEP):
Run
1. The RM7897C has a delayed main valve that is energized once the RUN period is entered.
2. The relay module is now in RUN and remains in
RUN until the controller input, terminal 6, opens,
indicating that the demand is satisfied or a limit has
opened.
Post Purge
After demand is satisfied or a limit opens,
de-energizing terminal 6, the Ignition/Pilot valve,
main valve and delayed main valve, terminals 8, 9,
and 21 are de-energized. The blower motor, terminal
4, remains powered during the specified programmed
time. The Pre-Ignition Interlock closes within the first five
seconds of Post Purge.
Run/Test Switch
The Run/Test Switch is located on the top side of the
relay module, see Fig. 4. The Run/Test Switch allows
the burner sequence to be altered as follows:
1. In the measured PREPURGE sequence, the Run/
Test Switch, placed in the TEST position, causes the
PREPURGE timing to stop.
2. In the Pilot Flame Establishing Period, the Run/
Test Switch, placed in the TEST position, stops the
timer during the first eight seconds of a ten-second
PFEP selection or during the first three seconds
of a four-second PFEP selection. It allows for pilot
turn-down test and other burner adjustments. This
activates a fifteen-second flameout timer that permits pilot flame adjustment without nuisance safety
shutdowns. The Run/Test Switch is ignored during
PFEP for the C relay module if terminals 8 and 9 or
9 and 21 are jumpered.
IMPORTANT: When the relay module is switched to
the TEST mode, it stops and holds at the next Run/
Test Switch point in the operating sequence. Make
sure that the Run/Test Switch is in the RUN position
before leaving the installation.
– 33 –
SECTION VII - TROUBLE SHOOTING continued
SETTINGS AND ADJUSTMENTS
Selectable Site-Configurable Jumpers
The relay module has three site-configurable jumper
options, see Fig. 6 and Table 7. If necessary, clip the
site-configurable jumpers with side cutters and remove
the resistors from the relay module.
Figure 6 - Selectable Site-Configurable Jumpers
SELECTABLE CONFIGURATION JUMPERS
RUN/TEST SWITCH
(EC7895C; RM7895C,D; RM7896C,D)
SERVICE NOTE: Clipping and removing a site-configurable jumper enhances the level of safety.
Figure 5 - Sequence Status LEDs
RUN/TEST SWITCH
(RM7895C,D;
EC7895C;
RM7896C,D)
CAPTIVE
MOUNTING
SCREW
PLUG-IN
PURGE
CARD
M7553A
DUST
COVER
SEQUENCE
STATUS
LEDs
Table 7 - Site-Configurable Jumper Options
RELAY
MODULE
RESET
PUSHBUTTON
Jumper
Number
FLAME
AMPLIFIER
FLAME
SIMULATOR INPUT
FLAME CURRENT
TEST JACKS
M7552A
Description
Intact
Clipped
JR1*
Pilot Flame
Establishing Period (PFEP)
10 Seconds
4 Seconds
JR2
Flame Failure Action
Recycle
Lockout
JR3
Airflow Switch (ILK)
Failure
Recycle
Lockout
IMPORTANT: Clipping and removing a jumper after
200 hours of operation causes a nonresettable Fault
110. The relay module must then be replaced.
WIRING
SUBBASE
RUN/TEST (C,D ONLY)
SWITCH
HONEYWELL
RELAY
MODULE
CONFIGURATION
JUMPERS
PURGE
TIMER
SEQUENCE
STATUS
LED PANEL
POWER
RESET
BUTTON
PILOT
FLAME
MAIN
ALARM
KEYBOARD
DISPLAY
MODULE
RESET
BURNER CONTR
EDIT:
_
+
OL
CAPTIVE
MOUNTING
SCREW
FLAME
AMPLIFIER
BACK
- ENTER -
M22827
Figure 4 - RM7897A,C Relay Module Exploded View
– 34 –
SECTION VII - TROUBLE SHOOTING continued
Figure 2 - Wiring Subbase and Sequence Chart for RM7897A
Q7800
FOR DIRECT SPARK IGNITION
(OIL OR GAS)
G
12
L2
13
10
IGNITION
TRANSFORMER
LINE VOLTAGE ALARM
3
14
8
MAIN VALVE
BURNER MOTOR
(BLOWER)
4
15
L2
5 (L1)
16
BURNER
CONTROLLER/LIMITS
6
17
RUNNING INTERLOCK
(INCLUDING
AIRFLOW SWITCH)
7
18
INTERMITTENT
PILOT/IGNITION
8
19
MAIN FUEL VALVE(S)
9
20
10
21
F
22
2
IGNITION
FLAME DETECTOR
PREIGNITION
INTERLOCK
10-SECOND
INTERRUPTED
PILOT
MASTER
SWITCH
L1
(HOT)
3
INITIATE
(INITIAL
POWERUP
ONLY)
POWER
LED
DISPLAY
BURNER
1
L2
PFEP
5
00
10 SEC.
00(4 SEC. IF 10
TIMED
PREPURGE
JR1 CLIPPED
STANDBY
MFEP
POWER
00
20
4
POSTPURGE STANDBY
RUN
POWER
POWER
POWER
POWER
PILOT
PILOT
PILOT
PILOT
FLAME
FLAME
FLAME
FLAME
MAIN
MAIN
MAIN
MAIN
ALARM
ALARM
ALARM
ALARM
BURNER/BLOWER MOTOR
10
POWER
POWER
5
IGN.
INTERMITTENT PILOT
8
INTERRUPTED PILOT 21
MAIN VALVE
OPERATING
CONTROLS
AND
INTERLOCKS
LIMITS AND BURNER CONTROLLER CLOSED L1 TO 6
RUNNING INTERLOCKS CLOSED 6 TO 7
PREIGNITION INTERLOCK CLOSED
FLAME
SIGNAL
5 TO 20
PII
SAFE START CHECK
FLAME PROVING
1 120 VAC, 50/60 HZ POWER SUPPLY. PROVIDE DISCONNECT MEANS
AND OVERLOAD PROTECTION AS REQUIRED.
2
9
DO NOT CONNECT ANY WIRES TO UNUSED TERMINALS.
SSC
3
SEE FLAME DETECTOR SPECIFICATIONS FOR CORRECT WIRING.
4
PROGRAMMED ON SETUP USING S7800A1142 DISPLAY.
5
PURGE TIME DEPENDS ON WHICH ST7800 IS INSTALLED.
M22728B
– 35 –
SECTION VII - TROUBLE SHOOTING continued
The POWER LED provides fault identification when the Relay Module locks out on an alarm. Fault identification is
a series of fast- and slow-blinking LED lights. The fast blinks identify the tens portion of the fault code (three fast
blinks is 30), while the slow blinks identify the units portion of the fault code (two slow blinks is 2). Three fast blinks
followed by two slow blinks would be fault code 32. This identifies a running interlock on during STANDBY. (See
following Table for Blinking Fault Code List.)
The LED code repeats as long as the fault exists. To clear the fault, press the RESET button.
Blinking Fault Codes and Recommended Troubleshooting
Fault Code
System Failure
Recommended Troubleshooting
Code 1-1
*Low AC Line
Voltage*
Low AC Line detected.
1.
2.
3.
Code 1-2
*AC Quality
Problem*
Excessive noise or
device running on slow,
fast, or AC line dropout
detected.
4.
Check the relay module and display module connections.
Reset and sequence the Relay Module.
Check the 7800 power supply and make sure that frequency and voltage meet
specifications.
Check the backup power supply, as appropriate.
Code 2-1
*Unexpected
Flame Signal*
Flame sensed when no
flame is expected during
STANDBY or PURGE.
1.
2.
3.
4.
5.
6.
7.
Check that flame is not present in the combustion chamber; correct any errors.
Make sure that the flame amplifier and flame detector are compatible.
Check the wiring and correct any errors.
Remove the flame amplifier and inspect its connections. Reseat the amplifier.
Reset and sequence the relay module.
If the code reappears, replace the flame amplifier and/or the flame detector.
If the fault persists, replace the relay module.
Code 2-2
*Flame Signal
Absent*
No-flame time present
at the end of the PIlot
Flame Establishing
Period; lost during the
Main Flame Establishing
Period or during RUN.
1.
2.
3.
4.
Measure the flame signal. If one exists, verify that it meets specifications.
Make sure that the flame amplifier and flame detector are compatible.
Inspect the main fuel valve(s) and valve connection(s).
Verify that the fuel pressure is sufficient to supply fuel to the combustion chamber.
Inspect the connections to the fuel pressure switches. Make sure they are
functioning properly.
Inspect the Airflow Switch and make sure that it is functioning properly.
Check the flame detector sighting position; reset and recycle. Measure the flame
signal strength. Verify that it meets specifications. If not, refer to the flame detector
and/or flame amplifier checkout procedures in the installation instructions.
Replace the flame amplifier and/or the flame detector, if necessary.
If the fault persists, replace the relay module.
5.
6.
7.
8.
Code 2-3
*Flame Signal
Overrange*
Flame signal value is
too high to be valid.
1.
2.
3.
4.
5.
6.
Code 3-1
*Running/
Interlock Switch
Problem*
Running or Lockout
Interlock fault during
Prepurge.
1.
2.
3.
4.
5.
Make sure the flame detector and flame amplifier are compatible.
Remove the flame amplifier and inspect its connections. Reset the flame amplifier.
Reset and sequence the relay module.
Check the flame detector sighting position; reset and recycle. Measure flame
strength. Verify that it meets specifications. If not, refer to the flame detector
and/or flame amplifier checkout procedures in the installation instructions.
If the code reappears, replace the flame amplifier and/or the flame detector.
If the fault persists, replace the relay module.
Check wiring; correct any errors.
Inspect the fan; make sure there is no air intake blockage and that it is supplying air.
Make sure the Lockout Interlock switches are functioning properly and the contacts
are free from contaminants.
Reset and sequence the relay module to Prepurge (place the TEST/RUN Switch
in the TEST position, if available). Measure the voltage between terminal 7 and G
(ground); 120 Vac should be present. Switch TEST/RUN back to RUN.
If steps 1 through 4 are correct and the fault persists, replace the relay module.
– 36 –
Blinking Fault Codes and Recommended Troubleshooting
Fault Code
Code 3-2
*Running/
Interlock On
During
Standby*
System Failure
Lockout Interlock
powered at improper
point in sequence or On
in Standby.
Recommended Troubleshooting
1.
2.
3.
4.
5.
Code 3-3
*VPS in
Improper State*
VPS (Valve Proving
Switch) in wrong state
during VPS Test.
1.
2.
3.
4.
5.
Code 4-1
*Purge Card
Problem*
Code 4-2
*Wiring
Problem/
Internal Fault*
No purge card or the
purge card timing has
changed from the
original configuration.
Pilot (ignition) valve
terminal, main valve,
ignition or Main Valve 2
was on when it should
be off.
1.
2.
Check wiring to make sure that the Lockout Interlocks are connected properly
between terminals 6 and 7. Correct any errors.
Reset and sequence the relay module.
If the fault persists, measure the voltage between terminal 6 and G (ground), then
between terminal 7 and G. If there is 120 Vac at terminal 6 when the controller is off,
the controller switch may be bad or is jumpered.
If steps 1 through 3 are correct and there is 120 Vac at terminal 7 when the
controller is closed and the fault persists, check for a welded or jumpered Running
Interlock or Airflow Switch. Correct any errors.
If steps 1 through 4 are correct and the fault persists, replace the relay module.
Check wiring, making sure upstream valve is connected to terminal 9 and
downstream valve is connected to terminal 17.
Conduct Valve Seat leakage test using a manometer.
Reset and sequence the relay module; if fault repeats, test VPS (connected to
terminal 16) is functioning properly; replace if necessary.
Reset and sequence the relay module.
If fault persists, replace the relay module.
3.
4.
5.
6.
Make sure the purge card is seated properly.
Inspect the purge card and the connector on the relay module for any damage or
contaminants.
Reset and sequence the relay module.
If the fault code reappears, replace the purge card.
Reset and sequence the relay module.
If the fault code persists, replace the relay module.
1.
2.
3.
4.
5.
WARNING
Electrical Shock Hazard; Fire or Explosion Hazard.
Can cause severe injury, death or property damage.
Remove system power and turn off power supply.
Remove system power and turn off fuel supply.
Check wiring; correct any errors.
inspect Pilot Fuel Valve(s), both places, and connections.
Reset and sequence the relay module.
If the fault persists, replace the relay module.
Code 4-3
*Flame
Amplifier
Problem*
Flame not sensed, or
sensed when it should
be on or off.
1.
2.
3.
4.
5.
6.
Check wiring; correct any errors.
Make sure the flame amplifier and flame detector are compatible.
Remove the flame amplifier and inspect the connections. Reseat the amplifier.
Reset and sequence the relay module.
If the code reappears, replace the flame amplifier and/or the flame detector.
If the fault persists, replace the relay module.
Code 4-4
*Configuration
Jumper
Problem*
The configuration
jumpers differ from the
sample taken at startup.
1.
2.
3.
Inspect the jumper connections. Make sure the clipped jumpers were completely
removed.
Reset and sequence the relay module.
If the fault persists, replace the relay module.
Code 5-1
*Preignition
Interlock*
Preignition Interlock
fault.
1.
2.
3.
4.
5.
Check wiring and correct any errors.
Check Preignition Interlock switches to assure proper functioning.
Check fuel valve operation.
Reset and sequence the relay module; monitor the Preignition Interlock status.
If the fault persists, replace the relay module.
Code 5-2
*High Fire Sw.
or Low Fire
Sw.*
Either High Fire Switch
or Low Fire Switch
failure.
1.
2.
3.
Check wiring and correct any errors.
Reset and sequence the relay module.
Use manual motor potentiometer to drive the motor open and closed. Verify at
motor switch that the end switches are operating properly. Use RUN/TEST switch if
manual potentiometer is not available.
Reset and sequence the relay module.
If the fault persists, replace the relay module.
4.
5.
– 37 –
Blinking Fault Codes and Recommended Troubleshooting
Fault Code
System Failure
Recommended Troubleshooting
Code 5-3
*Man-Open
Sw.; Start Sw.
or Control On*
Man-Open Switch, Start
Switch or Control On in
the wrong operational
state.
1.
2.
Code 6-1
*Internal Faults*
Relay Module self-test
failure.
1.
2.
3.
4.
5.
3.
Code 6-2
*Internal Faults*
Relay Module Self-Test
failure.
1.
2.
3.
4.
Code 6-3
*Device
Specific*
Fault with special OEM
input circuits.
1.
2.
3.
4.
5.
Code 6-4
*Accessory
Fault*
Unused at this time.
—
Code 7-7
*Unused*
Unused at this time.
—
Check wiring and correct any errors.
Make sure that the Manual Open Valve Switch, Start Switch and Control are
operating properly.
Stat Switch held ìOnî too long.
Reset and sequence the relay module.
Reset and sequence the relay module. If the fault persists, replace the relay module
(RM7838A1014; RM7838B1013 or RM7838C1004 only).
Reset and sequence the relay module.
If fault reappears, remove power from the device, reapply power, then reset and
sequence the relay module.
If the fault persists, replace the relay module.
Reset and sequence the relay module.
If fault reappears, remove power from the device, reapply power, then reset and
sequence the relay module.
If fault does not repeat on the next cycle, check for electrical noise being copied
into the relay module through the external loads or possibly an electrical grounding
issue.
If the fault persists, replace the relay module.
Check wiring and operation of special OEM inputs.
Reset and sequence the relay module.
If fault reappears, remove power from the device, reapply power, then reset and
sequence the relay module.
If the fault does not repeat on the next cycle, check for electrical noise being copied
into the relay module through the external loads or possibly an electrical grounding
issue.
If the fault persists, replace the relay module.
– 38 –
SECTION VII - TROUBLESHOOTING continued
Symptom
A. Supply fan(s) do not
operate.
Cause
1. Low or no voltage.
2. Fuse(s) blown.
3. Customer’s interlock not
closed or connected.
4. Fan “on-off” switch in
“off” position.
5. Door switch open.
6. Freeze protection tripped.
7. Damper motor not operating,
its end switch not making, or
dampers binding.
8. Overload protection on
motor starter tripped.
9. Belts loose or broken.
10. Motor may be burned or
incorrectly wired.
11. Time clock or field installed
controls not closed.
12. Night set back thermostat
not closed.
13. Bearing seized on shaft.
– 39 –
Remedy
1. Check power source.
2. Replace fuse(s).
3. Close or connect customer
interlock.
4. Switch to “on” position.
5. Close door, check and/or replace
switch.
6. Check stat and settings, reset
by re-cycling the power.
Check sensor and location.
7. Check for power at damper
motor and that end switch has
been wired correctly. End
switch should be wired N.O.
(normally open). Clear
linkage.
8. Reset the starter by pushing
red button on starter, check
amp draw.
9. Turn power off and check
belts.
10. Turn power off and check
motor and wiring.
11. Check time clock and field
installed controls for correct settings and voltage.
12. Check night set back
thermostat for correct
settings.
13. Turn power off and check
bearings.
SECTION VII - TROUBLESHOOTING continued
Symptom
B. No voltage at flame
safeguard relay input
terminals (RE-02).
Cause
1. Fan and Heat "off-on"
switch in "off" position.
2. SW-11/SW-13 in MT-11/MTR-4
(if applicable) not closed.
3. Auxiliary switch on starter
not closed.
4. Proof of closure switch open
(if applicable).
5. Thermostat open.
6. High temperature limit is open.
7. High-Low gas pressure
switches open.
8. Outside air temperature
higher than on-off inlet
ductstat setting.
9. Time clock or field installed controls open.
Remedy
1. Place switch in "on"
position.
2. Check modulating motor for
proper operation (see sheet in
manual).
3. Check auxiliary circuit wiring
and contacts.
4. Check and see if gas valve
is closed, check wiring on
circuit.
5. Check thermostat for proper setting.
6. Check limit for proper
settings.
7. Correct gas pressure and reset
switches.
8. Check ductstat for proper
setting.
9. Check time clock and field controls for correct settings
and voltage.
C. Flame safeguard relay
(RE-02) goes into safety
shutdown (Lockout).
1. See technical data sheets on
flame safeguard relay.
1. Determine the cause of
lockout. Push reset button on
flame safeguard relay.
D. Pilot does not light after
90 second pre-purge
has timed out and voltage
is present on flame
safeguard output
terminals.
1. Manual pilot shut-off valve
closed.
2. Inlet gas pressure lower than
minimum gas pressure
required.
3. No gas through pilot regulator
with sufficient inlet gas
pressure.
4. No gas flow through pilot
solenoid valve.
1. Slowly open valve.
5. Type of gas supplied (natural
gas or propane) different than
shown on unit rating plate.
6. Flame detection system not
sensing pilot flame. (See
section for servicing burner).
7. No voltage on secondary side
of ignition transformer.
– 40 –
2. Increase gas pressure.
3. Clear obstruction in vent
orifice or line, replace if
defective.
4. Check for proper installation,
and voltage. Correct or
replace if defective.
5. Connect to proper fuel supply
of contact factory for field
conversion parts.
6a. U.V. Sensor – Clean lens,
check wiring and spark rod.
6b. Flame Rod - Assure rod is in
pilot flame, check wiring, and
flame rod.
7. Check wiring. Replace
transformer if defective.
SECTION VII - TROUBLESHOOTING continued
Symptom
Cause
Remedy
E. If pilot does not light
after 90 second prepurge has timed out
and there is no voltage at
flame safeguard relay
output terminals.
1. Flame safeguard relay
run/test switch in test
position or is defective.
2. Burner or draft motor not
running
3. Burner or draft air
proving switch is open.
1. Place switch in run position, see
technical cut sheet on flame safe
guard relay, or replace if defective.
2. Check wiring, fuses, and amp
draw on motors.
3. Check for correct rotation of
motors and/or adjust switch.
F. If there is no heat with
pilot on and voltage
is present at flame
safeguard relay output
terminals.
1. Last manual gas shut-off valve
closed.
1. Turn Heat "off-on" switch to the
"off" position. Slowly open all
manual gas shut-off valves.
2. Clear obstruction in vent orifice
or line. Check for correct size
spring. Replace if defective.
3. Check wiring, voltage, and
adjustment. Correct wiring or
replace if defective.
4. Check for proper operation, see
sheet in manual for proper settings.
2. No gas on outlet side of
regulator with proper inlet
pressure.
3. No gas on outlet side of valve
or actuator with proper inlet
pressure.
4. Low fire start switch, SW-10/SW12 in MT-11/MTR-4 is open (if
applicable).
5. Inlet gas pressure lower than
the required gas pressure.
6. Normally open vent valve (if
applicable) not closing.
7. Gas nozzles obstructed or
plugged.
5. Increase gas pressure.
6. Check for correct installation
and voltage. Correct or replace.
7. Clear obstruction or blockage.
(see burner IOM)
G. If there is no heat with
pilot on and no
voltage is present at
flame safeguard relay
output terminals.
1. Flame safeguard relay run/test
switch in test position or is
defective.
1. Place switch in run position,
see technical cut sheet on flame
safeguard relay, or replace if
defective.
H. Flame safeguard
goes into alarm when
main flame is trying to
establish on units with
interrupted pilot.
1. Pilot gas pressure may be too
high.
1. Adjust needle valve – typically
1-1/2 to 2 turns open from closed
position.
I.
1. Damper motor and/or end switch
not wired correctly or defective.
2. Thermostat, relays and/or potentiometer not wired correctly or
defective.
3. Dampers binding and/or loose.
1. Check wiring and/or replace
end switch.
2. Check wiring and/or replace
bad components.
1. Thermostat and/or relays not wired
correctly or defective.
2. Setpoint is lower than design
conditions.
3. Insufficient cooling.
1. Check wiring and/or replace bad
components.
2. Adjust thermostat to correct
setpoint.
3. If desired space temperature
is not reached and cooling is
at full capacity, system may be
undersized.
4. See Trouble Shooting Guide
for your condensing section or
evaporative cooler.
J.
Return air or outside air
damper not functioning
properly (see sequence
of operations).
Cooling not functioning
properly.
4. Condensing section or evaporative
cooler is not operating properly.
– 41 –
3. Check and/or replace.
SECTION VII - TROUBLESHOOTING WITH DDC CONTROLS
Symptom
A. Supply fan(s) do not
operate.
Cause
1. Low or no voltage.
2. Fuse(s) blown.
3. Customer’s interlock not
closed or connected.
4. Fan is disabled.
5. Door switch open.
6. DO-1 on UC-01 not energized.
7. RE-57 contacts not closed.
8. Freeze protection tripped.
9. Damper motor not operating,
its end switch not making, or
dampers binding.
10. Overload protection on
motor starter tripped.
11. Belts loose or broken.
12. Motor may be burned or
incorrectly wired.
13. Time clock or field installed
controls not closed.
14. Auxiliary Unit Enable Switch
(SW-09) not closed.
15. Bearing seized on shaft.
16. Multiplexed voltage values not
correct.
– 42 –
Remedy
1. Check power source.
2. Replace fuse(s).
3. Close or connect customer
interlock.
4. Enable the fan(s).
5. Close door, check and/or replace
switch.
6. See digital control system user
manual.
7. Check power source and/or
replace.
8. Check stat and settings, reset
by re-cycling the power.
Check sensor and location.
9. Check for power at damper
motor and that end switch has
been wired correctly. End
switch should be wired N.O.
(normally open). Clear
linkage.
10. Reset the starter by pushing
red button on starter, check
amp draw.
11. Turn power off and check
belts.
12. Turn power off and check
motor and wiring.
13. Check time clock and field
installed controls for correct settings and voltage.
14. Close switch (if applicable).
15. Turn power off and check
bearings.
16. See multiplex voltage value chart.
SECTION VII - TROUBLESHOOTING WITH DDC CONTROLS continued
Symptom
B. No voltage at flame
safeguard relay input
terminals (RE-02).
Cause
1. Heat Mode is disabled.
2. Incorrect setpoint.
3. DO-2 or RE-28 is not energized.
4. Auxiliary switch on starter
not closed.
5. Air flow switch open.
6. RE-27, RE-56 and/or RE-65
contacts open.
7. Proof of closure switch open
(if applicable).
8. High temperature limit is open.
9. High-Low gas pressure
switches open.
10. Outside air temperature
higher than heating economizer
setpoint.
Remedy
1. Enable the heating mode.
2. Check for proper setting.
3. See digital control system user
manual.
4. Check auxiliary circuit wiring
and contacts.
5. Check for proper CFM. Adjust
and/or replace switch.
6. See multiplexed voltage value
chart.
7. Check and see if gas valve
is closed, check wiring on
circuit.
8. Check limit for proper
settings.
9. Correct gas pressure and reset
switches.
10. Check for proper setpoint.
C. Flame safeguard relay
(RE-02) goes into safety
shutdown (Lockout).
1. See technical data sheets on
flame safeguard relay.
1. Determine the cause of
lockout. Push reset button on
flame safeguard relay.
D. Pilot does not light after
90 second pre-purge
has timed out and voltage
is present on flame
safeguard output
terminals.
1. Manual pilot shut-off valve
closed.
2. Inlet gas pressure lower than
minimum gas pressure
required.
3. No gas through pilot regulator
with sufficient inlet gas
pressure.
4. No gas flow through pilot
solenoid valve.
1. Slowly open valve.
5. Type of gas supplied (natural
gas or propane) different than
shown on unit rating plate.
6. Flame detection system not
sensing pilot flame. (See
section for servicing burner).
7. No voltage on secondary side
of ignition transformer.
– 43 –
2. Increase gas pressure.
3. Clear obstruction in vent
orifice or line, replace if
defective.
4. Check for proper installation,
and voltage. Correct or
replace if defective.
5. Connect to proper fuel supply
of contact factory for field
conversion parts.
6a. U.V. Sensor – Clean lens,
check wiring and spark rod.
6b. Flame Rod - Assure rod is in
pilot flame, check wiring, and
flame rod.
7. Check wiring. Replace
transformer if defective.
SECTION VII - TROUBLESHOOTING WITH DDC CONTROLS continued
Symptom
Cause
Remedy
E. If pilot does not light
after 90 second prepurge has timed out
and there is no voltage at
flame safeguard relay
output terminals.
1. Flame safeguard relay
run/test switch in test
position or is defective.
2. Burner or draft motor not
running
3. Burner or draft air
proving switch is open.
1. Place switch in run position, see
technical cut sheet on flame safe
guard relay, or replace if defective.
2. Check wiring, fuses, and amp
draw on motors.
3. Check for correct rotation of
motors and/or adjust switch.
F. If there is no heat with
pilot on and voltage
is present at flame
safeguard relay output
terminals.
1. Manual gas shut-off valve
closed.
2. No gas on outlet side of
regulator with proper inlet
pressure.
3. No gas on outlet side of valve
or actuator with proper inlet
pressure.
4. Low fire start switch, SW-10/SW-12
in MT-11/MTR-4 is open.
5. Inlet gas pressure lower than
the required gas pressure.
6. Normally open vent valve (if
applicable) not closing.
7. Gas nozzles obstructed or
plugged.
1. Disable the heat. Slowly open all
manual gas shut-off valves.
2. Clear obstruction in vent orifice
or line. Check for correct size
spring. Replace if defective.
3. Check wiring, voltage, and
adjustment. Correct wiring or
replace if defective.
4. Check for proper operation, see
sheet in manual for proper settings.
5. Increase gas pressure.
6. Check for correct installation
and voltage. Correct or replace.
7. Clear obstruction or blockage.
(see burner IOM)
G. If there is no heat with pilot 1. Flame safeguard relay run/test
on and novoltage is present
switch in test position or is
at flame safeguard relay
defective.
output terminals.
1. Place switch in run position,
see technical cut sheet on flame
safeguard relay, or replace if
defective.
H. Burner will not respond
to temperature.
1. For units with DDC Controls.
1. See Digital Control System User
Manual.
I.
Flame safeguard goes
into alarm when main
flame is trying to
establish on units with
interrupted pilot.
1. Pilot gas pressure may be too
high.
1. Adjust needle valve – typically
1-1/2 to 2 turns open from closed
position.
J.
Return air or outside air
damper not functioning
properly (see sequence
of operations for damper
control).
1. Building Pressure Transducer (PT-13),
Damper Control Potentiometer (MP05), or Photohelic Controller (PS-13)
defective or not calibrated.
2. Building Pressure Transducer (PT-13),
Damper Control Potentiometer (MP05), or Photohelic Controller (PS-13)
defective or not wired correctly.
3. Building Pressure Transducer (PT-13),
Damper Control Potentiometer (MP05), or Photohelic Controller (PS-13)
defective or not installed correctly.
4. Unit Control Module (UC-01 defective.
5. Unit Control Module (UC-01) not
wired correctly.
6. Two position switch defective.
7. Damper motor defective.
8. Dampers binding and/or loose.
1. Check and/or replace components.
See section on trouble shooting
PT-13.
– 44 –
2. Check wiring and/or replace bad
components.
3. Install correctly. See section
on trouble shooting PT-13 and
manufacturer’s cut sheet.
4. Check and/or replace. Contact Factory.
5. Check wiring.
6. Check and/or replace.
7. Check and/or replace.
8. Check and repair.
SECTION VII - TROUBLESHOOTING WITH DDC CONTROLS continued
Modulating Discharge Temperature (MDT or MDT EXPERT) Controls
Symptom
Possible Cause
Field Test
A. No Gas Flow
with DO-2
or UC-01
energized.
1. Gas valves improperly
installed.
B. Continuous Low
Fire (Electronics
Problem).
1. Incorrect operation of
1. Check for 2-10 VDC at IM-02
1. See checkout procedure if
Interface Module (IM-02).
input terminals.
voltage is correct.
2. No output voltage on UC-01. 2. Check 0-10 VDC Voltage on AO-1. 2. Contact Factory.
C. Continuous Low
Fire (Electronics
OK).
1. Defective modulating
gas valve operator (MT11) and/or burned out
transformer.
D. Incorrect
Minimum Fire.
1. Incorrect low-fire butterfly 1. See butterfly valve adjustment. 1. Adjust to proper minimum fire.
valve (GP-39) adjustment.
E. Continuous High
Fire (Electronics
Problem).
1. Open circuit in Outside or 1. Check Outside or Inlet Air
1. Replace Outside or Inlet Air
Inlet Air Temperature Sensor
Temperature Sensor (TS-01)
Temperature Sensor (TS-01)
(TS-01) and/or Discharge
and/or Discharge Air Temperature
and/or Discharge Air
Air Temperature Sensor
Sensor (TS-03) for open internal
Temperature Sensor (TS-03)
(TS-03) circuit or wiring.
circuit. See Thermistor curve.
F. Continuous High
Fire (Electronics
OK).
1. Foreign object holding
butterfly valve (GP-39)
open.
1. Inspect linkage and valve.
1. Readjust linkage on valve or
replace if necessary.
G. Incorrect
High Fire.
1. Inlet pressure too low.
1. Read pressure at inlet to
modulating valve using a
manometer with unit operating
at full fire. Pressure should
be equal to the sum of outlet
pressure setting plus pressure
drop of the valve.
2. Read manifold pressure using
manometer and compare with
the pressure stated on the
specification plate.
1. Increase inlet pressure if
possible.
1. Check setpoint on Unit Enable
Potentiometer (MP-15)
2. Check Discharge Air
Temperature Sensor (TS-03)
and wiring. See Thermistor
curve.
3. Check setpoint with BACview
or PC.
1. Change to correct setpoint
setting.
2. If readings are not correct,
replace Discharge Air
Temperature Sensor (TS-03)
or repair wiring.
3. Change to correct setpoint.
See Digital Control System
User Manual.
2. Incorrect outlet pressure
adjustment of Pressure
Regulator.
H. Incorrect
Discharge Air
Temperature
1. Unit Enable Potentiometer
(MP-15) not set correctly.
2. Discharge Air
Temperature Sensor (TS03) not reading correctly.
3. The Heating Discharge
Air Setpoint on
VDT-EXPERT Control
System is not set
correctly.
1. Arrow on side or bottom of
valves should point in direction
of gas flow.
Remedy
1. Inspect wiring (see checkout
procedure in section X).
1. Install properly.
1. Replace modulating gas
valve operator (MT-11) or
transformer.
2. See Sequence and Burner
setup in Section X.
(Refer to Digital Control System User Manual for additional troubleshooting suggestions)
– 45 –
SECTION VII - TROUBLESHOOTING WITH DDC CONTROLS continued
Modulating Room Temperature (MRT, MRT-PRO or MRT-EXPERT) Controls
Symptom
Possible Cause
A. No Gas Flow with
DO-2 on UC-01
energized.
1. Gas valves improperly
installed.
1. Arrow on side or bottom
of valves should point in
direction of gas flow.
1. Install properly.
B. Continuous Low
Fire (Electronics
OK).
1. Defective modulating
gas valve operator (MT11) and/or burned out
transformer.
1. Inspect wiring (see check out
procedure in Section X).
1. Replace modulating gas
valve operator (MT-11) or
transformer.
C. Continuous Low
Fire (Electronics
Problem).
1. Incorrect operation of
interface module (IM-02).
2. No output voltage on
UC-01.
1. Check for 2-10 VDC at input
terminals.
2. Check 0-10 VDC voltage on
AO-1.
1. See checkout procedure if
voltage is correct.
2. Consult factory.
D. Incorrect
Minimum Fire.
1. Incorrect low fire butterfly
valve (GP-39) adjustment.
1. See Butterfly Valve Adjustment.
1. Adjust to proper minimum
fire.
E. Continuous
Minimum
Discharge Air
Temperature.
1. Incorrect room
temperature.
F. Incorrect
Maximum
or Minimum
Discharge Air
Temperature.
1.
Maximum or minimum
heating discharge
temperature setpoint
not set correctly.
Field Test
Remedy
1a. Check Space Temperature
1a. Replace Sensors if reading is
Sensor (TS-02), use a
incorrect or correct wiring.
BACview 6 to read TS-02
and Discharge Air Sensor
(TS-03) for correct readings.
See Thermistor curve.
1b. Check Space Temperature
1b. Change to correct setpoint.
Sensor (TS-02) and/or Unit
Enable Potentiometer (MP-15)
setpoint.
1c. Check Heating Occupied
1c. Change to correct setpoint.
and/or Unoccupied setpoint.
1. Install a BACview 6 or PC.
1. Change to correct setpoints.
(Refer to Digital Control System User Manual for additional troubleshooting suggestions)
Control circuits external to MRT Controls can cause burner malfunction.
Always check manual valve to be certain gas is on, and check limit controls for normal operation.
– 46 –
SECTION VII - TROUBLESHOOTING WITH DDC CONTROLS continued
Modulating Room Temperature (MRT, MRT-PRO or MRT-EXPERT) Controls continued
Symptom
Possible Cause
Field Test
Remedy
G. Continuous High 1. Foreign object holding
Fire (Electronics
butterfly valve (GP-39)
OK).
open.
1. Inspect linkage valve.
1. Readjust linkage on valve or
replace if necessary.
H. Continuous High 1. Open circuit in Outside
Fire (Electronics
or Inlet Air Temperature
Problem).
Sensor (TS-01) and
Discharge Air Temperature
Sensor (TS-03)
1. Measure resistance per
Thermistor Curve.
1. If readings are incorrect,
replace Outside or Inlet Air
Temperature Sensor (TS-01)
or Discharge Air Temperature
Sensor (TS-03) or repair
wiring.
I. Incorrect High
Fire.
1. Read inlet pressure at
valve, using a manometer
with heater operating at full
fire. Pressure should be at
least equal to the sum of:
outlet pressure setting and
pressure drop of the valve.
2. Read outlet pressure using
manometer and compare
with the pressure stated on
the specification plate.
1. Increase inlet pressure
if possible or change to
larger valve. Consult factory
about possibility of using
special spring to reduce
pressure drop on selected
installations.
2. See Sequence and Burner
Setup in Section X.
1. Open circuit in Discharge
Air Temperature Sensor
(TS-03).
1. Measure resistance per
Thermistor Curve.
2. Incorrect Maximum
Heating Discharge
Temperature Setpoint.
2. Check to see if heater is
delivering at Maximum
Heating Temperature
Discharge Setpoint.
1. If readings are incorrect,
replace Discharge Air
Temperature Sensor
(TS-03) or repair wiring.
2. If desired temperature is
not reached, increase
Maximum Heating Discharge
Temperature Setpoint.
1. Incorrect Minimum Heating
Discharge Temperature
Setpoint.
1. Check to see if heater
is delivering at Minimum
Discharge Setpoint.
1. Inlet pressure too low.
2. Incorrect outlet
pressure adjustment.
J. Continuous
Maximum
Discharge Air
Temperature.
K. Incorrect Space
Temperature.
2. Incorrect space setpoint.
2a. Check Unit Enable
Potentiometer (MP-15)
Setpoint.
2b. Check Heating Occupied
and/or Unoccupied setpoint.
3. Insufficient burner capacity. 3. Check to see if heater is
operating at high fire.
1. If desired Space
Temperature is not reached,
increase Minimum Heating
Discharge Setpoint.
2a. Change to correct setpoint.
2b. Change to correct setpoint.
3. If desired Space Temperature is not reached with
heater at high fire, it may be
undersized. Consult Factory.
(Refer to Digital Control System User Manual for additional troubleshooting suggestions)
Control circuits external to MRT Controls can cause burner malfunction.
Always check manual valve to be certain gas is on, and check limit controls for normal operation.
– 47 –
SECTION VII - TROUBLESHOOTING WITH DDC CONTROLS continued
Cooling Mode
Symptom
Cause
Remedy
A. There is no voltage at cooling relays
(RE-34) (RE-35) and/or (RE-33) and
the fan is enabled.
1. Cooling mode is disabled
2. Auxiliary switch on starter (ST-01)
is not closed.
3. Air flow switch open.
1. Enable the cooling mode.
2. Check auxiliary circuit wiring and
contact.
3. Check for proper CFM. Adjust and/
or replace switch.
4. Change to correct setpoints. See
Digital Control User Manual.
4. Cooling Changeover and/or
Economizer Setpoints not set
correctly.
5. DO-3 and/or DO-4 are not
energized.
B. Cooling relays (RE-34) (RE-35)
and/or (RE-33) are energized and
condensing unit or evaporative
cooler is not on.
C. Incorrect Space Temperature.
5. See Digital Control System User
Manual.
1. Cooling relays (RE-34) (RE-35)
and/or (RE-33) contacts are not
closed.
2. Cooling relays (RE-34) (RE-35)
and/or (RE-33) contacts are not
wired correctly.
3. Compressors or evaporative pump
not running.
1. Check and/or replace.
1. Incorrect Maximum Cooling
Discharge Temperature Setpoint.
1. Decrease Maximum Cooling
Discharge Temperature Setpoint.
See Digital Control System User
Manual.
2. Decrease Minimum Cooling
Discharge Temperature Setpoint.
See Digital Control System User
Manual.
3. Change to correct setpoints.
See Digital Control System User
Manual.
4. Change to correct setpoint settings.
See Digital Control System User
Manual.
5. If desired Space Temperature is
not reached and cooling is at full
capacity, it may be undersized.
6. See Troubleshooting Guide for your
condensing unit or evaporative
cooler.
2. Incorrect Minimum Cooling
Discharge Temperature Setpoint.
3. Unit Enable Potentiometer (MP-15)
not set correctly.
4. Cooling Occupied and/or
Unoccupied setpoints not set
correctly.
5. Insufficient cooling.
6. Condensing section or evaporative
cooler is not operating correctly.
2. Correct wiring.
3. See Troubleshooting Guide for your
condensing unit or evaporative
cooler.
(Refer to Digital Control System User Manual for additional troubleshooting suggestions)
– 48 –
SECTION VII - TROUBLESHOOTING WITH DDC CONTROLS continued
To Calibrate the Building Pressure Transducer
(PT-13)
1. Disconnect the tubes from the transducer.
2. Make sure the Low and High fittings are clean
and clear (do not insert any sharp objects into the
pressure fittings). Make sure the tubing is also clean
and clear of any debris.
3. Connect the High and Low ports on the transducer
together with a short length of tubing. Do not allow
any kinks in the tubing. The voltage at Voltage Out
and Gnd/4-20mA Out should be 2.5 VDC. If not,
continue to the next step.
4. Place the rotary switch into the [+/-] position. The
current directional mode will show on the display.
Press the NEXT button until –bI shows on the
display.
5. Place the rotary switch in the [OUT] position. Press
the NEXT button until 0 – 5 shows on the display.
6. Place the rotary switch into the [0] position. The
display will show Aut0.
7. Press the NEXT button. The display will show a
series of progress bars starting with one bar and
ending with four. When the Auto Zero process
is complete, the display will show “done” for
approximately 4 seconds, then Aut0.
8. Return the rotary switch to the [R1] position.
9. Reinstall the tubes on the transducer. It is very
important that the High tube be placed inside the
building, and positioned so that air movement does
not affect it. The Low side should be to atmosphere,
and positioned so it is not exposed to the weather.
10. With the use of a BACview 6 (KP-01) place the
unit in the Building Pressure mode. (See the Digital
Control System User Manual).
11. The voltage at Voltage Out and Gnd/4-20mA Out
will vary between 0 to 5 VDC. 0 VDC means the
building is in a negative pressure and should open
the Outside Air/Profile Damper and close the
Return Air Damper. 5 VDC means the building is in
a positive pressure and should open the Return Air
Damper and close the Outside Air/Profile Damper.
PT-13
Bapi P/N
Mestex P/N
Range
Rotary Switch Position
ZPS-LR-EZ-NT-IN
68.0330.82
± 0.1 IN WC
R1
– 49 –
MULTIPLEXED VOLTAGE CHART
RESISTOR
VALUE
RESISTOR ID
1000
2000
4020
8060
RS1
RS2
RS3
RS4
MULTIPLEXED VOLTAGE
VALUES
SWITCH
CLOSED
OHMS IN
CIRCUIT
VOLTS DC
RS1,2,3,4
RS2,3,4
RS1,3,4
RS3,4
RS1,2,4
RS2,4
RS1,4
RS4
RS1,2,3
RS2,3
RS1,3
RS3
RS1,2
RS2
RS1
NONE
UNPLUGGED
0
1000
2000
3000
4020
5020
6020
7020
8060
9060
10060
11060
12080
13080
14080
15080
NA
0
0.30
0.55
0.76
0.95
1.10
1.24
1.36
1.47
1.57
1.65
1.73
1.80
1.87
1.92
1.98
3.30
IN-3
TO
GND
JUMPER
RE-56
RE-09
SW-72
RS-04
RS-03
RS-02
RS-01
MIXED AIR TEMP
SAFETY CKT STATUS
FLAME FAILURE
100% OA or 100% OUTPUT
= 1.36
= 1.73
= 1.87
= 1.92
IN-4
TO
GND
RE-27
RE-65
RE-12
SW-09
RS-04
RS-03
RS-02
RS-01
BURNER STATUS
FAN STATUS
CLOGGED FILTER
AUXILIARY UNIT ENABLE
= 1.36
= 1.73
= 1.87
= 1.92
CHECK ALL TERMINAL CONNECTIONS FOR TIGHTNESS
The DC voltage is to be checked at the UC-01 board
With the Fan and Burner Enabled:
With the Fan Enabled:
When the fan status relay (RE-65) is energized, the
contacts will close and the VDC at IN-4 & GND will be
1.73.
When the safety circuit relay (RE-56) is energized,
the contacts will close and the VDC at IN-3 & GND
will be 1.73. When the burner status relay (RE-27) is
energized, the contacts will close and the VDC at IN-4
& GND will be 0.76.
– 50 –
CHECKOUT PROCEDURE FOR INTERFACE MODULE (IM-02)
Q7230 Adjustments
The Q7230A provides adjustable range (zero and
span) for two-wire current or voltage control. Separate
potentiometers are provided on the circuit module for
adjusting the zero point and the span. It includes a cw/
ccw switch for configuring the motor to rotate clockwise
or counterclockwise with an increase in control signal.
1. Set Mod IV motor pots – both CW or both CCW
for your application. Use the checkout procedure in
Table 3 to ensure proper motor function.
2. Verify that the zero potentiometer is fully clockwise and
that the span potentiometer is fully counterclockwise.
(Do not exceed the stop point of the potentiometer.)
3. Select desired rotation direction [cw (electrically
normally closed) is the most common]. The following
directions apply for the clockwise setting. For
counterclockwise setting, reverse open and closed,
and reverse clockwise and counterclockwise.
Remove film on switch before use. (Default switch
position is CW.)
4. For current control, connect the current input signal
to I+ (screw terminal 3) and COM (screw terminal
5). For voltage control, connect the voltage input
signal to V+ (screw terminal 1) and COM (screw
terminal 5).
5. Set the controller to output the signal required to
drive the motor to the closed position. Wait for the
motor to stop driving closed.
6. Turn the zero potentiometer slowly counterclockwise
until the motor starts to open.
7. Turn the zero potentiometer slowly clockwise
until motor is fully closed. This is defined as the
zero setting.
8. Set the controller to output the signal required to
drive the motor to the fully open position. Wait for
the motor to stop driving open.
9. Turn the span potentiometer slowly clockwise
until motor starts to drive closed. The difference
between the fully open position signal and the fully
closed position signal is defined as the operating
span.
10. Recheck the fully closed position and readjust the
zero potentiometer, if necessary. (Turn the zero
potentiometer clockwise
to close the motor
and counterclockwise
to open the motor.)
11. Recheck the fully open position and readjust
the span potentiometer, if necessary. (Turn the
span potentiometer clockwise to close the motor,
counterclockwise to open the motor.) Verify the mid
point of your stroke.
2-10 Vdc
CONTROLLER
MOTOR
1
T1
T2
F COM
1+
V+
3
L1
(HOT)
T1
L2
T2
COM
-
V+
+
F
2
SPAN
ZERO
CCW
CW
Fig 5. Q7230A terminals and adjustments.
C000719
1
POWER SUPPLY. PROVIDE DISCONNECT MEANS AND
OVERLOAD PROTECTION AS REQUIRED.
2
CONNECTING TO EITHER (+) OR (-) WILL DRIVE THE
MOTOR TO FULLY OPEN.
3
INTERNAL MODUTROL IV
CONNECTION.
Fig 8. Typical wiring diagram for Q7230A Interface
Module and M91XXX Modutrol IV Motor with 2-10 Vdc
controller.
C000720
Table 3. Q7230/M91XX Checkout Procedure
Step
Proper Motor Response Switch in
Clockwise Position
Switch in Counterclockwise
Position
1. Open terminals (+), (-), F
Motor closes fully ccw
Motor closely fully cw
2. Jumper F to (-)
Motor opens fully cw
Motor closes fully ccw
3. Remove either T terminal
Spring return motors return to normal spring position (fully ccw for mechanically normally
closed motors, fully cw for mechanically normally open motors).
(+) and (-) denotes terminals on the controller
– 51 –
SECTION VIII - SERVICING THE BURNER
This section is intended as a guide in making some repairs and adjustments to the power burner. Many of
the repairs will require the service of a skilled heating service technician. For more information refer to the
burner I.O.M.
Power Flame Burners
1) GAS-ELECTRIC IGNITION
The gas-electric pilots used on Power Flame burners are either flame rod or scanner design.
2) POOR FLAME SIGNAL
Try adjusting needle valve or pilot pressure regulator. Should this not be successful, check the primary pilot
air. If neither of these methods improve the reading, inspect the flame rod position.
The spark is to arc against the outside radius of the pilot assembly case (not the pilot head nozzle). The
normal spark gap should be 1/16" – 3/32". See the drawings for pilot assembly for the J-Burner.
Pilot Assembly–J-Burner with Flame Rod - Natural Gas Only
Pilot Assembly–J-Burner with Scanner - Natural or LP Gas
– 52 –
The arc from the electrode tip should jump from tip to the body of the pilot housing and should be lined with the
hole in the backside of pilot housing, so that the blower air passing throught this hole will cause the arc to "FLAG"
(or move around). Normal spark gap should be 1/16" – 3/32". The electrode should not be moved so far forward that
the pilot flame will impinge on the porcelain insulator. This may cause damage to the porcelain. See the drawings for
the pilot assembly for the C-Burner.
Pilot Assembly–C-Burner For C1 & C2 Burner
Pilot Assembly–C-Burner For C3, C4, & C5 Burner
Pilot Case to Gas Manifold Adjustment
Pilot case to gas manifold adjustment is
very important. As depicted, the inside
radius of the pilot body must be tight
against the outside radius of the gas
manifold.
The bottom of the pilot body must also
be tight against the notched portion
of the baffle ring, just slightly above
the scanner pipe. If there is an air gap
between the pilot body and the gas
manifold and/or the baffle ring, the
resulting air flow may prevent the pilot
flame from being swept downward
across the scanner pipe.
– 53 –
Gas, Oil or Gas/Oil Burner Diffuser Adjustment
Gas/Air Premix Adjustment Knob
Gas Inlet
Blast Tube Diffuser Position Adjustment
DIFFUSER POSITION ADJUSTMENT
Moving the blast tube diffuser assembly fore or aft on
gas or oil firing will move the flame front (point of retention) in order to attain the best (quietest/smoothest)
combustion for specific job conditions. If the initial midway point factory setting does not provide satisfactory
results, move fore or aft in small increments to achieve
the best combustion results. If unit is oil or combination
gas/oil, the attached, flexible copper oil nozzle line will
move fore or aft with the assembly. When firing on oil,
moving the assembly forward will tend to broaden the
flame pattern and moving it back will narrow the flame
pattern. Similar results are obtained on gas, but observation of sound and combustion tests are the best
determinants of results on either gas or oil.
G-P Burners
1) GAS-ELECTRIC IGNITION
The gas-electric pilots used on G-P burners are either flame rod or scanner design.
2) POOR FLAME SIGNAL
Try adjusting needle valve or pilot pressure regulator. Should this not be successful, check the primary pilot
air. If neither of these methods improve the reading, inspect the flame rod position.
Ignition Electrode For Straight G-P Gas Burners Using A Flat Diffuser Plate
3) IGNITION ELECTRODE
The igniion electrode is positioned as shown, with the horizontal part of the electrode flush with the diffuser
plate. Leaving a gap of 1/16" to 1/8" wide. The pointing direction of the electrode is as shown, but is not critical.
4) FLAME SENSOR
a. The flame sensor shown is a rectification, or a flame rod. A UV scanner can be used instead. In that case
the scanner tube is positioned in the same holder as the flame rod.
– 54 –
MAXON MODEL ( 400 ) OVENPAK Burners
1) GAS-ELECTRIC IGNITION
The gas-electric pilots used on MAXON burners are either flame rod or scanner design.
2) POOR FLAME SIGNAL
Try adjusting needle valve or pilot pressure regulator. Should this not be successful, check the primary pilot air.
If neither of these methods improve the reading, inspect the flame rod position.
MAXON Electrode & Flame Rod
Burner Model
Spark Ignitor
Dimensions
X
Y
1.3
.4
Flame Rod
Dimensions
X
Y
Z
.4
6
2.9
405
407M
408M
408
412M
413M
415
1.5
.4
1.2
.4
.8
10.8
3.5
1.3
.4
.4
12.8
2.9
422M
425
432M
435
442M
445
456M
470M
487M
– 55 –
FLUE GAS ANALYSIS
This curve correlates the relative values of O2 and CO2
for the fuels listed, as well as the percentage of excess
air at given O2 and CO2 values.
Example: Following the dotted line on the vertical axis
from 4% O2 to curve H and the dotted line on the horizontal axis to the left, the % excess air column shows
that 4% O2 equals 25% excess air.
Again following the 4% O2 vertical axis fo fuel line E (#2
Fuel Oil ) and to the left to the CO2 column shows that
4% O2 and 25% excess air correlate to 12-1/2 % CO2
on #2 Fuel Oil.
This chart can be used to determine required CO2 or O2
values (and therefore equivalent BTU input values) for
the secondary fuel when the burner has been properly
adjusted for the primary fuel inputs.
Following the vertical dotted line axis again from curve
H to fuel A (Natural Gas) and the horizontal axis to the
left, the % CO2 column shows that 4% O2 and 25% excess air correlate to 9-1/2% CO2 for Natural Gas.
Table 13
CO2- O2 Ratio Curves for Fuel Oils and Gases
17
160
16
150
15
140
14
130
13
120
12
110
11
100
10
90
9
80
PERCENT EXCESS AIR
70
60
50
40
30
20
PERCENT CARBON DIOXIDE (CO2)
170
10
H
F
E
G
D
B
C
A
8
7
6
5
4
3
2
1
0
1
2
3
4
PERCENT OXYGEN (O2 )
CURVE
A
B
C
D
FUEL
Nautral Gas
Natural Gas
Propane
Butane
5
6
7
8
9
10
MAXIMUM CO2%
11.7
12.1
12.1
14.0
11
12
CURVE
E
F
G
H
– 56 –
13
14
15
16
17
FUEL
#2 Fuel Oil
#5 Fuel Oil
#6 Fuel Oil
Excess Air vs. O2
18
19
20 20.93
MAXIMUM CO2%
15.2
16.0
16.9
SECTION IX - MAINTENANCE SCHEDULE AND LUBRICATION REQUIREMENTS
WARNING: Failure to comply with the general
safety information may result in extensive
property damage, severe personal injury or
death.
Periodic maintenance is essential to the efficient
operation and extended service life of this equipment.
Failure to provide maintenance as recommended may
void the equipment warranty.
A. Maintenance Schedule
1. Daily
a. Check gauges, monitors, instruments and equipment
settings.
2. After 8 hours of operation
a. Check that fan belts are tight and sheaves are aligned.
The fan belts can be checked every 30 days after the
first 60 days of new belt run-in. CAUTION: Do not
overtighten belts.
b. Check set screws and bolts on the fan, bearings, couplings, and burner assembly.
c. Check gas pressure at regulator.
3. After 48 hours of operation, check bearings for any
unusual vibration or excessive temperature.
4. Monthly
a. Check all valves, piping and connections forleaks.
b. Check the pilot and burner flame signal, and
safety lockout (RE-02).
c. Check the fuel pressure in the fuel supply line to
each heater.
d. Check the burner manifold pressure and draft.
e. Do a flue gas analysis.
f. Inspect filters. Clean or replace as necessary.
g. Inspect main fan bearings; lubricate if necessary.
See following section on bearing lubrication.
h. Check all dampers, damper actuators and linkages. Adjust and tighten if necessary.
i. Inspect area and make sure that no combustible
or hazardous material has been stored within
clearances as shown on the specification plate.
j. Check for any vibration or unusual noise. If any is
observed, locate the cause and correct.
k. Ensure the supply, discharge, combustion air,
vents, and stack remain clean and open.
l. Check and clear air sensing tubes and fittings.
CAUTION: Remove tubes from switches and
transducers before using compressed air to blow
through tubing.
5. Quarterly
a. Complete the monthly maintenance schedule.
b. Inspect all drives for proper belt tension, wear,
and alignment.
c. Check that bearings, fans, props, sheaves, and
coupling setscrews are securely locked to the
shaft.
d. Remove pilot assembly. Clean and adjust if necessary. (Refer to burner manufacturer IOM).
e. Check the voltage and amps on all motors.
f. Check the operation of all safety limits and controls. Clean and recalibrate or replace.
g. Check the operation of the automatic gas shutoff valves, and check them for leakage at the
pressure test ports provided.
h. Inspect all electrical components, connections,
and terminals. Clean or replace and tighten as
necessary.
i. For DDC Controls: Check that the battery in
the UC-01 controller has 3 VDC. CAUTION: Do
not remove the battery with the power to the
unit turned off.
6. Off Season or Yearly
a. Complete the monthly and quarterly maintenance schedules.
b. Inspect, and if necessary, clean all fan wheels,
props, and housings.
c. Check all nuts and bolts for tightness.
d. Inspect all bearings and check condition and
alignment.
e. Check the condensation lines for any leaks or
blockages (if applicable).
f. Inspect all burner components.
g. Clean flame sensor, ignition electrodes, and
check for cracks.
h. Test the flame safeguard relay (RE-02) and
replace components if necessary.
i. Inspect all regulators, relief valves, motorized
valves, solenoid valves, vent valves, manual
shut-off valves, and safety shut-off valves.
Check their operation and clean or replace as
necessary.
j. Inspect and clean all drip legs in fuel lines and in
the flue.
k. Remove the rear panel and the rear header box
cover. Inspect the header box and tubes. Look
for carbon deposits, soot, scale or rust. Clean if
necessary.
l. Inspect the combustion chamber for carbon
deposits, soot, scale, or signs of flame impingement. Clean if necessary. If there is evidence of
flame impingement, a complete burner adjustment must be made.
m.Lubricate fan motors as directed by motor manufacturer. Inspect motors for loose connections.
n. Lightly oil all door latches.
o. Check that the cabinet is weather-tight. Replace
door gaskets and re-caulk as needed.
p. Check the CO level in the entering and leaving
airstream of the furnace. If the CO is greater in
the leaving airstream, it is possible that the heat
exchanger is leaking CO into the airstream. The
leak must be located and repaired or replace the
heat exchanger.
NOTE: Keep screened air intakes clear of obstructions at all times.
– 57 –
B. Lubrication Instructions
CAUTION: An excess of grease will overheat the
bearings.
Item
Manufacturer
Bearing Type
All 3 phase
US., Baldor
Single row ball
fan motors
or equal
bearings
(1 HP to
100 HP)
ODP, TEFC
Recommendation: See following note.
NOTE: On totally enclosed fan cooled (TEFC)
motors, the rear end fan housing must be removed
to expose the grease plugs.
2. Pillow Block Bearings – Pillow block bearings are
used on supply blower(s). Bearings have been prelubricated with a number 2 lithium base grease. Relubrication should be done with a similar grease using a
low pressure grease gun. Wipe all grease fittings clean
before adding grease. Grease should be added slowly,
in small amounts at frequent intervals while the shaft is
being manually rotated.
All 1 phase
Century, G.E.,
Bronze sleeve
motors
or equal
bearings
(Fractional
HP) ODP,
TEFC or
TEAO
Recommendation: See following note.
Fractional HP Century, G.E.
Bronze sleeve
single phase, or equal
bearings
ODP or
TEFC
Recommendation: See following note.
Fan shaft
bearings
Fafnir
or equal
Self-aligning
single row or
double row
ball bearings,
resilient mounted
Recommendation: See following note.
Dampers
Factory
Sleeve
or equal
Recommendation: See following note.
1. Blower Motors – Some motors require lubrication
while others do not. Those that require lubrication can
be identified by the presence of grease plugs in the motor casing at each end. Motors that do not have grease
plugs cannot be greased and are lubricated for the life
of the motor bearing.
Lubrication of motors should be done while the motor is
warm and at a standstill. Remove and clean all grease
plugs and insert a grease fitting in the upper hole in the
motor casing at each end. (Viewed as if motor were
sitting horizontally on its base). There may be one or
two plugs in each end casing of the motor. Add a small
amount of a clean, good grade ball bearing grease,
such as Exxon Polyrex EM or equal, with a low pressure
grease gun. Run the motor five minutes before removing the grease fittings and replacing the plugs.
A slight showing of grease at the seals with accompanying normal bearing temperature indicates proper
lubrication. Normal temperature can range from “cool”
to “hot to the touch” depending on size, speed and
surrounding conditions. Excessive bearing temperature
indicates faulty lubrication. An insufficient amount of
grease is suggested by a bearing showing no grease
at the seals, and a higher than normal temperature
and noise level. Excessive leakage of grease at the
seals, and a high operating temperature suggest too
much grease.
Frequency of Lubrication – Frequency of lubrication depends upon operating conditions. The bearing
operating temperature is the best index for determining a relubrication schedule. The following chart gives
the frequency of relubrication based upon continuous
operation for various operating temperatures and can
be used as a satisfactory guide for determining when
all ball and roller bearings should be relubricated.
Speed
100 RPM
500 RPM
1000 RPM
1500 RPM
Any Speed
Temperature
Up to 125°F
Up to 150°F
Up to 210°F
Over 150°F
Up to 150°F
Cleanliness
Clean
Clean
Clean
Clean
Dirty
Any Speed Over 150°F
Dirty
Any Speed Any Temp.
Very Dirty
Any Speed Any Temp.
Extreme
Conditions
– 58 –
Interval
6 months
2 months
2 weeks
weekly
1 week
to 1 month
daily to
1 week
daily to
1 week
daily to
1 week
Browning Bearing Set Screw Torque Values
Model#
Shaft Size
Torque (in-lbs)
Set Screw
VPS-212
VPS-214
VPS-116
VF2S-116
VPS-219
VF4S-219
VPS-220
VPS-223
VPS-323
VF4S-227
VPS-327
VPS-231
VF4S-231
VPS-331
VPS-235
VF4S-235
VPS-236
VPS-239
VF4S-243
VPS-343
VPS-347
3/4
7/8
1
1
1 3/16
1 3/16
1 1/4
1 7/16
1 7/16
1 11/16
1 11/16
1 15/16
1 15/16
1 15/16
2 3/16
2 3/16
2 1/4
2 7/16
2 11/16
2 11/16
2 15/16
66 - 85
66 - 85
66 - 85
66 - 85
66 - 85
66 - 85
126 - 164
126 - 164
126 - 164
126 - 164
228 - 296
228 - 296
228 - 296
228 - 296
228 - 296
228 - 296
228 - 296
228 - 296
348 - 452
348 - 452
348 - 452
BOA Concentric
VPB-231
VPB-331
1 15/16
1 15/16
220 - 240
220 - 240
Spherical Roller
SPB 1000 NE
SPB 1000 NE
SPB 1000 NE
SPB 1000 NE
SPB 1000 NE
SPB 1000 NE
SPB 1000 NE
SPB 1000 NE
1 3/16
1 7/16
1 11/16
1 15/16
2 3/16
2 7/16
2 11/16
2 15/16
290 - 380
290 - 380
290 - 380
290 - 380
290 - 380
620 - 930
620 - 930
620 - 930
Sealmaster Sleevloc
SPB 2115 C2
1 15/16
65
When replacing bearings refer to the manufacturers
installation instructions included with the bearing.
Typical Procedure For Changing The Shaft And
Bearings
1. Remove protective shaft coating.
2. Remove the drive side sheave.
3. Disconnect the grease lines from the existing
bearings.
4. Identify the total shim thickness at each bearing and
mark the bearing mount for future reference.
5. Remove mounting bolts for bearings and remove
any shims.
6. Loosen bearing and blower wheel shaft setscrews.
7. Remove the shaft from the unit by sliding the
bearings and blower wheels along the shaft as
the shaft is extracted. Unless a blower wheel is
damaged, it should be unnecessary to remove the
blower wheel from the blower housing.
8. Slide the new shaft through the first blower wheel
hub.
9. Once the shaft is completely through the first blower
wheel, slide a bearing onto this end of the shaft.
10. Slide the shaft through the next blower wheel hub
and add another bearing. Continue this procedure
until the shaft is through all of the blower wheels.
11. Place a bearing on each end of the shaft.
12. Replace the old shims with new.
13. Bolt the bearings in place and reattach the grease
lines. (When installing a Sleevlock bearing see note
at bottom of page).
14. Adjust the shaft so the blower hub keyways are in
the middle of the shaft keyways.
15. Adjust the shaft so it protrudes past the non-drive
end bearing, the blower sheave keyway mates with
the shaft keyway, and the drive side sheave can be
aligned with the motor sheave. Ideally, the blower
sheave should be as close to the drive side bearing
as possible, the motor sheave should be as close to
the motor housing as possible, and the belts should
be straight.
16. Be sure the shaft does not rub on or interfere with
the closing of the access door.
17. Align all bearing setscrews, so that the same set
screw on each bearing is pointed in the same direction as the other bearings’ setscrews.
18. Place a drop of “BLUE” Loctite on the bearing setscrews and tighten all of the setscrews. Follow the
mounting instruction’s procedure on the inside of
the bearing box, for the proper tightening and torque
values.
19. Align the blower hubs’ keyway with those in the
shaft. Be sure the clearance between the blower
wheel and blower housing is the same on each side.
20. Rotate the shaft by hand to insure free operation.
Correct any rubbing of the blowers on the housings.
21. Place a drop of “BLUE” Loctite on the blower setscrews and tighten all of the setscrews.
22. Align the blower and motor sheaves using a laser or
straight edge and tighten the blower sheave to the
shaft.
23. Replace the belts and tighten the motor base
adjustment for the proper belt tension. Over
tightening the belt tension will severely reduce
belt and bearing life. Belt deflection should be
approximately 1/64 inch of the belt span.
– 59 –
24. Monitor for excessive heat or vibration during
operation.
25. All bearings are pre-lubricated and should not
require greasing. Refer to the bearing manufacturer’s
instructions or the unit manufacturer’s instructions
for proper bearing maintenance.
Note: Drive side Sleevlock bearing installation
(SPB-2115-C2).
1. Mount all the bearings and leave all the bolts and
setscrews loose
2. Tighten setscrews on Sleevlock bearing to
the tightening pattern as described in the
installation sheet that comes with the bearing
to a final 65 inch lbs while rotating the shaft.
Check to make sure the insert of the bearing is
centered in the bearing housing and then bolt
bearing down.
3. Tighten down the bolts and setscrews on
the remaining bearings per installation sheet
starting from the end bearing back toward’s the
Sleevlock while rotating the shaft.
It is necessary, therefore, to tighten all belts during the
first few months of operation, and to check for proper
tension weekly during the first 60 days, after which
30-day check intervals are sufficient.
3. Dampers – Dampers should be inspected monthly
(daily in icy weather) for securely fastened linkages,
and smooth operation. If dampers are binding or
excessively noisy, then lubrication may be required.
Place one drop of #20 wt. machine oil, silicone spray,
graphite or equal on each blade bearing, and linkage
ball joint. Do not over lubricate, and wipe any excess
from the area. Be sure to note that dampers over 49
inches long have intermediate bearings which require
lubrication.
Alternate Belt Tension Method
2. To properly tension a conventional V-belt drive use
the following procedure:
a. Measure the span length.
b. At the center of the span, apply a force perpendicular to the span to deflect the belt 1/64 inch for
every inch of span length. For example, for a 40
inch span, apply a force that will deflect the belt
40/64 or 5/8 of an inch.
c. Compare the force you have applied with the
values given in the table below. If the force is
between the values for normal tension and 1-1/2
times normal tension, the belt tension should be
satisfactory. If the belt tension is not within this
range, it can be adjusted by loosening the motor
mounting bolts, and adjusting the position of the
motor along its base.
3. Louvers – Louvers should be inspected monthly
(daily in icy weather) to insure they are clean and
clear.
C. Air Filters
All filter banks should be equipped with a manometer
or differential pressure switch to indicate when the
filters are dirty. Filters should be replaced when
the differential pressure across them reaches the
manufacturer’s recommended final value. Dirty filter
elements should be replaced with a clean element
of the same type and size. In addition, the factory
not only suggests, but insists, that air filters be
checked every 30 days (daily in icy weather) and
replaced with new filters (throw-away type) or cleaned
(washable type) as required. Cleanable filters should
be given new application of filter coating after washing
to maintain optimum filter performance.
The frequency of cleaning and replacing air filters
applies twelve months of the year, where blowers
are used for ventilation and heating.
D. Belt Tensions and Adjustments
Belt tension is adjusted during the initial run-in and test
periods at the factory. However, the belts are run as
slack as possible to prevent excessive damage to the
bearings, yet tight enough to prevent slippage.
WARNING: Turn off all power to the equipment
before checking belt tensions.
CAUTION: Do not attempt to tighten any belt or belts
by changing the pitch of an adjustable pulley, as this
will change the speed of a driven pulley, causing the
unit to be rendered OUT OF AIR BALANCE. Do not
overtighten belts.
Suggested Belt Tension Method is with the use of a
Belt Tension Checker
1. Check tension frequently during the first 24-48
hours of run-in operation. Ideal tension is the lowest
tension at which the belt will not slip under peak
load conditions. Over tensioning shortens belt and
bearing life.
B Section
small
Pounds
pulley
Pounds
Force for
diameter Belt
Force for 11/2 times
range in
Manufacturer
Normal
Normal
Inches
& Type Belt
Tension
Tension
3.4-4.2
Gates Hi-Power
4.4
6.6
4.4-4.6
Gates Hi-Power
4.9
7.4
5.8-8.6
Gates Hi-Power
5.8
8.7
Note: For recommendation of other types of belts,
consult respective manufacturers.
E. Optional Coils And Related Items
1. Coils – Coil surfaces must be kept clean of dirt
and lint in order to operate at rated efficiency. Coils
should be inspected on a regular basis and cleaned
as required.
– 60 –
CAUTION: Solutions used to clean coils must not
be corrosive to metals or materials used in the
manufacture of this equipment. When using any
type of coil cleaner, always read the manufacturer's
warnings and directions to properly use their
product. If cleaning solutions are applied through
means of high pressure spray, care must be taken
to avoid damaging coil fins.
2. Condensate Drain Pan – Periodically flush the
condensate pan and drain system.
F. Gaskets
Gaskets are used on doors, inspection covers, some
filter racks, and some outdoor air dampers. Inspect
gaskets periodically and repair or replace as required.
G. Caulking
Inspect cabinet and add caulking as required.
H. Casing
Periodic cleaning of the casing is recommended to
remove dirt, grease and any corrosive substances that
may harm the finish. Rusted or corroded spots should
be cleaned and repainted.
I. Support Means
Inspect the entire unit and burner support means to be
sure everything is firmly in place.
J. Burner
Refer to burner manufacturer IOM for recommended
burner maintenance.
– 61 –
SECTION X - THERMISTOR OUTPUT CURVE
FOR UNITS WITH DDC CONTROLS
Typical 10,000 Ohm Thermistor Output Curve
Resistance (Ohms)
30000
25000
20000
15000
10000
5000
0
32
41
50
59
68
77
86
Temperature in Degrees F
– 62 –
95
104
SECTION XI - REPLACEMENT PARTS
Replacement parts may be ordered from the factory.
All warranty parts will be shipped freight allowed from
the factory via standard ground service. Warranty parts
must be returned within 30 days. Credit will be issued if
part is complete, defective and returned on time.
NUMBER, FACTORY ORDER (F.O.) AND PART NUMBERS are required. Belts, filters and fuses are not covered under warranty.
Dealer/Contractor Name:______________________
Address:_________________________________
City:______________________________________
State:_______Zip:_______Ph:________________
When parts are ordered, MODEL NUMBER, SERIAL
– 63 –
4830 Transport Drive, Dallas, TX 75247
Phone: 214-638-6010 Fax: 214-905-0806
www.tempriteheating.com