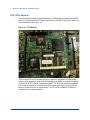
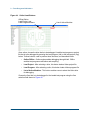
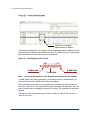
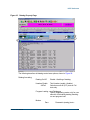
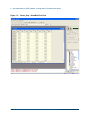
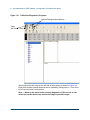
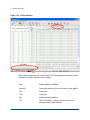
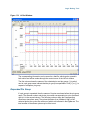
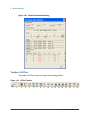
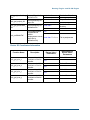
1
KALOS 2 USER MANUAL KALOS® 2 Series User Manual October 2005, PN: 071-0359-02 Credence Systems Corporation 1421 California Circle Milpitas, CA 95035 Tele: (408) 635-4300 Fax: (408) 635-4984 Customer Service Center (503) 466-7678 (North America and International) (800) 328-7045 (Toll-free within the United States) [email protected] (Internet email) (503) 466-7814 (Fax) Legal Notice No part of this publication may be reproduced or transmitted in any form, or transcribed, stored in a retrieval system, or translated into any language or computer language, in any form or by any means—electronic, mechanical, magnetic, optical, chemical, manual or otherwise—without the prior written permission of Credence Systems Corporation. Credence Systems Corporation makes no representations or warranties with respect to the contents hereof and specifically disclaims any implied warranties of merchantability or fitness for any particular purpose. Furthermore, Credence reserves the right to revise this publication and to make changes from time to time in the content hereof without obligation of Credence to notify any person of such revision or changes. Restricted Rights Legend Use, duplication, or disclosure by the Government is subject to restrictions as set forth in subparagraph (c)(1)(ii) of the rights in Technical Data and Computer Software Clause at DFARS 252.227-7013 or in subparagraph (c)(2) of the Commercial Computer Software - Restricted Rights Clause at FAR 52.227-19, as applicable. Printed in October 2005 in the U.S.A. All rights reserved. © 2005 Credence Systems Corporation Notices: Credence, Kalos, ASL x000, Sapphire and other Credence products and services mentioned herein as well as their respective logos are trademarks or registered trademarks of Credence Systems Corporation in the United States and other countries. Gemini is a registered trademark of Micro-Probe, Inc. and is licensed for use to Credence Systems Corporation. The following are trademarks or registered trademarks of their respective companies or organizations: UNIX / X/Open Company Ltd. Sun Microsystems, Sun Workstation, OpenWindows, SunOS, NFS, Sun-4, SPARC, SPARCstation, Java, Solaris / Sun Microsystems Ethernet / Xerox Corporation Microsoft, Windows, Windows NT / Microsoft Corporation All other brand or product names are trademarks or registered trademarks of their respective companies. CONTENTS About This Manual . . . . . . . . . . . . . . . . . . . . . . . . . . . . . . . . . . . . . . . . . . . . . xxi Scope of Manual . . . . . . . . . . . . . . . . . . . . . . . . . . . . . . . . . . . . . . . . . . . . . . . . . . . xxii Typographical Conventions . . . . . . . . . . . . . . . . . . . . . . . . . . . . . . . . . . . . . . . . . . .xxiii Menu Conventions . . . . . . . . . . . . . . . . . . . . . . . . . . . . . . . . . . . . . . . . . . . . . .xxiii Document Conventions . . . . . . . . . . . . . . . . . . . . . . . . . . . . . . . . . . . . . . . . . . .xxiii Keyboard Conventions . . . . . . . . . . . . . . . . . . . . . . . . . . . . . . . . . . . . . . . . . . .xxiii Mouse Actions . . . . . . . . . . . . . . . . . . . . . . . . . . . . . . . . . . . . . . . . . . . . . . . . . xxiv Related Publications . . . . . . . . . . . . . . . . . . . . . . . . . . . . . . . . . . . . . . . . . . . . . . . . xxv Related Manuals: . . . . . . . . . . . . . . . . . . . . . . . . . . . . . . . . . . . . . . . . . . . . . . . xxv Online Help Documentation . . . . . . . . . . . . . . . . . . . . . . . . . . . . . . . . . . . . . . . . . xxvi Audience . . . . . . . . . . . . . . . . . . . . . . . . . . . . . . . . . . . . . . . . . . . . . . . . . . . . . . . . xxvii Safety Considerations . . . . . . . . . . . . . . . . . . . . . . . . . . . . . . . . . . . . . . . . . . . . . .xxviii Safety Statements . . . . . . . . . . . . . . . . . . . . . . . . . . . . . . . . . . . . . . . . . . . . . . . . . xxix Operators Safety Summary . . . . . . . . . . . . . . . . . . . . . . . . . . . . . . . . . . . . . . . . . . xxx Service Safety Summary . . . . . . . . . . . . . . . . . . . . . . . . . . . . . . . . . . . . . . . . . . . xxxi For Qualified Service Personnel Only . . . . . . . . . . . . . . . . . . . . . . . . . . . . . . . xxxi Electromagnetic Compatibility (EMC) System Requirements . . . . . . . . . . . . . . . . xxxii Immunity . . . . . . . . . . . . . . . . . . . . . . . . . . . . . . . . . . . . . . . . . . . . . . . . . . . . . xxxii Kalos 2 Hardware Configuration . . . . . . . . . . . . . . . . . . . . . . . . . . . . . . . . . . . .1 Introduction . . . . . . . . . . . . . . . . . . . . . . . . . . . . . . . . . . . . . . . . . . . . . . . . . . . . . . . . .2 Kalos 2 Test Head . . . . . . . . . . . . . . . . . . . . . . . . . . . . . . . . . . . . . . . . . . . . . . . . . . . .5 I/O Pin Configuration . . . . . . . . . . . . . . . . . . . . . . . . . . . . . . . . . . . . . . . . . . . . . . .5 Backplane and Wiring . . . . . . . . . . . . . . . . . . . . . . . . . . . . . . . . . . . . . . . . . . . . . .7 Power and Ethernet Connection . . . . . . . . . . . . . . . . . . . . . . . . . . . . . . . . . . .7 Main Clock . . . . . . . . . . . . . . . . . . . . . . . . . . . . . . . . . . . . . . . . . . . . . . . . . . .7 Backplane IDROM . . . . . . . . . . . . . . . . . . . . . . . . . . . . . . . . . . . . . . . . . . . . .8 Test Head Opening Mechanism . . . . . . . . . . . . . . . . . . . . . . . . . . . . . . . . . . . . . .8 Test Head Power Shutoff Switch . . . . . . . . . . . . . . . . . . . . . . . . . . . . . . . . . .10 Tester Cooling . . . . . . . . . . . . . . . . . . . . . . . . . . . . . . . . . . . . . . . . . . . . . . . . . . .11 DUT and Interface . . . . . . . . . . . . . . . . . . . . . . . . . . . . . . . . . . . . . . . . . . . . . . . .12 Kalos 2 Server . . . . . . . . . . . . . . . . . . . . . . . . . . . . . . . . . . . . . . . . . . . . . . . . . . . . .14 EMO and Test Head Switch . . . . . . . . . . . . . . . . . . . . . . . . . . . . . . . . . . . . . . . .14 AC Controller Box . . . . . . . . . . . . . . . . . . . . . . . . . . . . . . . . . . . . . . . . . . . . . . . .15 AC Configuration . . . . . . . . . . . . . . . . . . . . . . . . . . . . . . . . . . . . . . . . . . . . . . . . .15 Host PC . . . . . . . . . . . . . . . . . . . . . . . . . . . . . . . . . . . . . . . . . . . . . . . . . . . . . . . . . . .16 Kalos 2 User Manual i Main Board . . . . . . . . . . . . . . . . . . . . . . . . . . . . . . . . . . . . . . . . . . . . . . . . . . . . . . . .17 Hardware Configuration . . . . . . . . . . . . . . . . . . . . . . . . . . . . . . . . . . . . . . . . . . .17 ETX (CPU Module) . . . . . . . . . . . . . . . . . . . . . . . . . . . . . . . . . . . . . . . . . . . .18 User Operations . . . . . . . . . . . . . . . . . . . . . . . . . . . . . . . . . . . . . . . . . . . . . . . .19 Operating Environment . . . . . . . . . . . . . . . . . . . . . . . . . . . . . . . . . . . . . . . . . . . . . . .20 Networking . . . . . . . . . . . . . . . . . . . . . . . . . . . . . . . . . . . . . . . . . . . . . . . . . . . . .20 PC Requirements . . . . . . . . . . . . . . . . . . . . . . . . . . . . . . . . . . . . . . . . . . . . . . . .20 Basic System Operation . . . . . . . . . . . . . . . . . . . . . . . . . . . . . . . . . . . . . . . . . . . . . .21 Logging Into the System . . . . . . . . . . . . . . . . . . . . . . . . . . . . . . . . . . . . . . . . . . . . . .22 User Password . . . . . . . . . . . . . . . . . . . . . . . . . . . . . . . . . . . . . . . . . . . . . . . . . .23 Logging Off and Shutdown . . . . . . . . . . . . . . . . . . . . . . . . . . . . . . . . . . . . . . . . . . . .25 Software Architecture . . . . . . . . . . . . . . . . . . . . . . . . . . . . . . . . . . . . . . . . . . . . . . . .26 File Structure . . . . . . . . . . . . . . . . . . . . . . . . . . . . . . . . . . . . . . . . . . . . . . . . . . . .26 C:\Kalos Directory . . . . . . . . . . . . . . . . . . . . . . . . . . . . . . . . . . . . . . . . . . . . .26 C:\KalosOS Directory . . . . . . . . . . . . . . . . . . . . . . . . . . . . . . . . . . . . . . . . . .27 Windows XP® Interface Controls . . . . . . . . . . . . . . . . . . . . . . . . . . . . . . . . . . . .28 Start Menu . . . . . . . . . . . . . . . . . . . . . . . . . . . . . . . . . . . . . . . . . . . . . . . . . . .28 Windows Explorer . . . . . . . . . . . . . . . . . . . . . . . . . . . . . . . . . . . . . . . . . . . . .29 Control Menu . . . . . . . . . . . . . . . . . . . . . . . . . . . . . . . . . . . . . . . . . . . . . . . . .29 Close, Minimize, and Maximize Buttons . . . . . . . . . . . . . . . . . . . . . . . . . . . .30 Title Bar . . . . . . . . . . . . . . . . . . . . . . . . . . . . . . . . . . . . . . . . . . . . . . . . . . . . .30 Status Bar . . . . . . . . . . . . . . . . . . . . . . . . . . . . . . . . . . . . . . . . . . . . . . . . . . .31 Shortcuts . . . . . . . . . . . . . . . . . . . . . . . . . . . . . . . . . . . . . . . . . . . . . . . . . . . . . . .31 Creating Shortcuts . . . . . . . . . . . . . . . . . . . . . . . . . . . . . . . . . . . . . . . . . . . . .31 Launching Applications . . . . . . . . . . . . . . . . . . . . . . . . . . . . . . . . . . . . . . . . . . . .33 Launching KITE . . . . . . . . . . . . . . . . . . . . . . . . . . . . . . . . . . . . . . . . . . . . . . .33 Working with Files and Folders in Windows® XP . . . . . . . . . . . . . . . . . . . . . . . . . . .34 Creating Folders . . . . . . . . . . . . . . . . . . . . . . . . . . . . . . . . . . . . . . . . . . . . . . . . .34 Naming Folders and Files . . . . . . . . . . . . . . . . . . . . . . . . . . . . . . . . . . . . . . .34 Moving Folders and Files . . . . . . . . . . . . . . . . . . . . . . . . . . . . . . . . . . . . . . .34 Copying Folders and Files . . . . . . . . . . . . . . . . . . . . . . . . . . . . . . . . . . . . . .34 Deleting Folders and Files . . . . . . . . . . . . . . . . . . . . . . . . . . . . . . . . . . . . . .35 Test Program Definition . . . . . . . . . . . . . . . . . . . . . . . . . . . . . . . . . . . . . . . . . .37 Test Program Language . . . . . . . . . . . . . . . . . . . . . . . . . . . . . . . . . . . . . . . . . . . . . .38 Kalos Test Language (KTL) . . . . . . . . . . . . . . . . . . . . . . . . . . . . . . . . . . . . . . . . .38 Kalos Pattern Language (KPL) . . . . . . . . . . . . . . . . . . . . . . . . . . . . . . . . . . . . . .39 C Source File (CMODULE) . . . . . . . . . . . . . . . . . . . . . . . . . . . . . . . . . . . . . . . . .40 Test Program File . . . . . . . . . . . . . . . . . . . . . . . . . . . . . . . . . . . . . . . . . . . . . . . . . . .41 KTL Program File Layout . . . . . . . . . . . . . . . . . . . . . . . . . . . . . . . . . . . . . . . . . .42 Socket Table . . . . . . . . . . . . . . . . . . . . . . . . . . . . . . . . . . . . . . . . . . . . . . . . . . . .44 ii PN: 071-0359-02, October 2005 Contents Pin Types . . . . . . . . . . . . . . . . . . . . . . . . . . . . . . . . . . . . . . . . . . . . . . . . . . .45 Pingroups . . . . . . . . . . . . . . . . . . . . . . . . . . . . . . . . . . . . . . . . . . . . . . . . . . . . . .47 DC Tests Parametric . . . . . . . . . . . . . . . . . . . . . . . . . . . . . . . . . . . . . . . . . . . . . .49 Functional Test . . . . . . . . . . . . . . . . . . . . . . . . . . . . . . . . . . . . . . . . . . . . . . . . . .51 Bin Table . . . . . . . . . . . . . . . . . . . . . . . . . . . . . . . . . . . . . . . . . . . . . . . . . . . . . . .51 Flow Statement . . . . . . . . . . . . . . . . . . . . . . . . . . . . . . . . . . . . . . . . . . . . . . . . . .52 Program Files . . . . . . . . . . . . . . . . . . . . . . . . . . . . . . . . . . . . . . . . . . . . . . . . . . .53 CYCLE_NAMES . . . . . . . . . . . . . . . . . . . . . . . . . . . . . . . . . . . . . . . . . . . . . .54 CONSTANT . . . . . . . . . . . . . . . . . . . . . . . . . . . . . . . . . . . . . . . . . . . . . . . . . .54 VARIABLE . . . . . . . . . . . . . . . . . . . . . . . . . . . . . . . . . . . . . . . . . . . . . . . . . . .54 DPSSET . . . . . . . . . . . . . . . . . . . . . . . . . . . . . . . . . . . . . . . . . . . . . . . . . . . .54 PMUTEST . . . . . . . . . . . . . . . . . . . . . . . . . . . . . . . . . . . . . . . . . . . . . . . . . . .54 LEVELS . . . . . . . . . . . . . . . . . . . . . . . . . . . . . . . . . . . . . . . . . . . . . . . . . . . . .54 EDGESET . . . . . . . . . . . . . . . . . . . . . . . . . . . . . . . . . . . . . . . . . . . . . . . . . . .55 AXIS . . . . . . . . . . . . . . . . . . . . . . . . . . . . . . . . . . . . . . . . . . . . . . . . . . . . . . .55 SHMOO . . . . . . . . . . . . . . . . . . . . . . . . . . . . . . . . . . . . . . . . . . . . . . . . . . . . .55 VLOG . . . . . . . . . . . . . . . . . . . . . . . . . . . . . . . . . . . . . . . . . . . . . . . . . . . . . .55 PATTERN . . . . . . . . . . . . . . . . . . . . . . . . . . . . . . . . . . . . . . . . . . . . . . . . . . .55 LOADDBM . . . . . . . . . . . . . . . . . . . . . . . . . . . . . . . . . . . . . . . . . . . . . . . . . .55 SEQUENCE . . . . . . . . . . . . . . . . . . . . . . . . . . . . . . . . . . . . . . . . . . . . . . . . .56 CMODULE . . . . . . . . . . . . . . . . . . . . . . . . . . . . . . . . . . . . . . . . . . . . . . . . . .56 EVENT_MAP . . . . . . . . . . . . . . . . . . . . . . . . . . . . . . . . . . . . . . . . . . . . . . . .56 CONFIG . . . . . . . . . . . . . . . . . . . . . . . . . . . . . . . . . . . . . . . . . . . . . . . . . . . .56 Online Help Documentation . . . . . . . . . . . . . . . . . . . . . . . . . . . . . . . . . . . . . . . . . . .57 Kedit . . . . . . . . . . . . . . . . . . . . . . . . . . . . . . . . . . . . . . . . . . . . . . . . . . . . . . . . . . . . .59 Launching Kedit . . . . . . . . . . . . . . . . . . . . . . . . . . . . . . . . . . . . . . . . . . . . . . . . .59 Program Loading . . . . . . . . . . . . . . . . . . . . . . . . . . . . . . . . . . . . . . . . . . . . . . . . .59 Concept of the Workspace . . . . . . . . . . . . . . . . . . . . . . . . . . . . . . . . . . . . . . . . .61 Resource Icons . . . . . . . . . . . . . . . . . . . . . . . . . . . . . . . . . . . . . . . . . . . . . . . . . .63 Navigation and Edit Tools . . . . . . . . . . . . . . . . . . . . . . . . . . . . . . . . . . . . . . . . . .64 Standard Tools . . . . . . . . . . . . . . . . . . . . . . . . . . . . . . . . . . . . . . . . . . . . . . .65 Bookmarks . . . . . . . . . . . . . . . . . . . . . . . . . . . . . . . . . . . . . . . . . . . . . . . . . .65 Anonymous Macros . . . . . . . . . . . . . . . . . . . . . . . . . . . . . . . . . . . . . . . . . . .66 Debug Tools . . . . . . . . . . . . . . . . . . . . . . . . . . . . . . . . . . . . . . . . . . . . . . . . .66 Tool Functions . . . . . . . . . . . . . . . . . . . . . . . . . . . . . . . . . . . . . . . . . . . . . . . .66 Pulldown Menus . . . . . . . . . . . . . . . . . . . . . . . . . . . . . . . . . . . . . . . . . . . . . .68 Navigating in Kedit . . . . . . . . . . . . . . . . . . . . . . . . . . . . . . . . . . . . . . . . . . . . . . .71 Debugging Using Kedit . . . . . . . . . . . . . . . . . . . . . . . . . . . . . . . . . . . . . . . . . . . .74 Debug Tools . . . . . . . . . . . . . . . . . . . . . . . . . . . . . . . . . . . . . . . . . . . . . . . . .75 Debugging KPL Source Code in Kedit . . . . . . . . . . . . . . . . . . . . . . . . . . . . . . . .76 Kalos 2 User Manual iii Introduction to KITE (Kalos 2 Integrated Test Environment) . . . . . . . . . . . . . . . . . . . . . . . . . . .95 Description of KITE . . . . . . . . . . . . . . . . . . . . . . . . . . . . . . . . . . . . . . . . . . . . . . . . . .96 Test Preparation . . . . . . . . . . . . . . . . . . . . . . . . . . . . . . . . . . . . . . . . . . . . . . . . . . . .97 DUT Interface . . . . . . . . . . . . . . . . . . . . . . . . . . . . . . . . . . . . . . . . . . . . . . . . . . .97 Test Fixtures . . . . . . . . . . . . . . . . . . . . . . . . . . . . . . . . . . . . . . . . . . . . . . . . . . . .97 Configuration Manager . . . . . . . . . . . . . . . . . . . . . . . . . . . . . . . . . . . . . . . . . . . . . . .98 Target Manager . . . . . . . . . . . . . . . . . . . . . . . . . . . . . . . . . . . . . . . . . . . . . . . . . . . .101 Target Status . . . . . . . . . . . . . . . . . . . . . . . . . . . . . . . . . . . . . . . . . . . . . . . . . . .101 Show Target Manager Log . . . . . . . . . . . . . . . . . . . . . . . . . . . . . . . . . . . . . . . .102 Removing the Target Manager . . . . . . . . . . . . . . . . . . . . . . . . . . . . . . . . . . . . .103 Loading Test Programs/Projects in KITE . . . . . . . . . . . . . . . . . . . . . . . . . . . . . . . .104 Test Program Load Setup . . . . . . . . . . . . . . . . . . . . . . . . . . . . . . . . . . . . . . . . .106 Front Panel Interface . . . . . . . . . . . . . . . . . . . . . . . . . . . . . . . . . . . . . . . . . . . . . . .108 KITE Software . . . . . . . . . . . . . . . . . . . . . . . . . . . . . . . . . . . . . . . . . . . . . . . . . . . . .110 Starting KITE . . . . . . . . . . . . . . . . . . . . . . . . . . . . . . . . . . . . . . . . . . . . . . . . . . .110 Graphical User Interface . . . . . . . . . . . . . . . . . . . . . . . . . . . . . . . . . . . . . . . . . .110 Menu Bar . . . . . . . . . . . . . . . . . . . . . . . . . . . . . . . . . . . . . . . . . . . . . . . . . . . . . .110 Toolbar . . . . . . . . . . . . . . . . . . . . . . . . . . . . . . . . . . . . . . . . . . . . . . . . . . . . . . .114 View Area . . . . . . . . . . . . . . . . . . . . . . . . . . . . . . . . . . . . . . . . . . . . . . . . . . . . .116 Function Keys . . . . . . . . . . . . . . . . . . . . . . . . . . . . . . . . . . . . . . . . . . . . . . .116 Active Slices . . . . . . . . . . . . . . . . . . . . . . . . . . . . . . . . . . . . . . . . . . . . . . . .116 Overview . . . . . . . . . . . . . . . . . . . . . . . . . . . . . . . . . . . . . . . . . . . . . . . . . . .117 Operator IF Property Page . . . . . . . . . . . . . . . . . . . . . . . . . . . . . . . . . . . . .120 DIB Info . . . . . . . . . . . . . . . . . . . . . . . . . . . . . . . . . . . . . . . . . . . . . . . . . . . .121 Device IF . . . . . . . . . . . . . . . . . . . . . . . . . . . . . . . . . . . . . . . . . . . . . . . . . . .123 Summary . . . . . . . . . . . . . . . . . . . . . . . . . . . . . . . . . . . . . . . . . . . . . . . . . . .126 DataLog . . . . . . . . . . . . . . . . . . . . . . . . . . . . . . . . . . . . . . . . . . . . . . . . . . . .144 Yield Monitor . . . . . . . . . . . . . . . . . . . . . . . . . . . . . . . . . . . . . . . . . . . . . . . .151 Engineering . . . . . . . . . . . . . . . . . . . . . . . . . . . . . . . . . . . . . . . . . . . . . . . . .152 DBM/SRAM Viewer in Front Panel . . . . . . . . . . . . . . . . . . . . . . . . . . . . . . .155 History RAM Control . . . . . . . . . . . . . . . . . . . . . . . . . . . . . . . . . . . . . . . . . . . . . . . .158 History RAM Theory . . . . . . . . . . . . . . . . . . . . . . . . . . . . . . . . . . . . . . . . . . . . .160 Arm . . . . . . . . . . . . . . . . . . . . . . . . . . . . . . . . . . . . . . . . . . . . . . . . . . . . . . .165 Trigger . . . . . . . . . . . . . . . . . . . . . . . . . . . . . . . . . . . . . . . . . . . . . . . . . . . . .166 Breaktrap Settings . . . . . . . . . . . . . . . . . . . . . . . . . . . . . . . . . . . . . . . . . . . . . . . . .169 Implementation . . . . . . . . . . . . . . . . . . . . . . . . . . . . . . . . . . . . . . . . . . . . . . . . .170 Test . . . . . . . . . . . . . . . . . . . . . . . . . . . . . . . . . . . . . . . . . . . . . . . . . . . . . . .170 Measurement . . . . . . . . . . . . . . . . . . . . . . . . . . . . . . . . . . . . . . . . . . . . . . .171 FAIL . . . . . . . . . . . . . . . . . . . . . . . . . . . . . . . . . . . . . . . . . . . . . . . . . . . . . . .171 Step . . . . . . . . . . . . . . . . . . . . . . . . . . . . . . . . . . . . . . . . . . . . . . . . . . . . . . .171 Examples . . . . . . . . . . . . . . . . . . . . . . . . . . . . . . . . . . . . . . . . . . . . . . . . . . . . .171 iv PN: 071-0359-02, October 2005 Contents Test Flow . . . . . . . . . . . . . . . . . . . . . . . . . . . . . . . . . . . . . . . . . . . . . . . . . . .172 Example 1 . . . . . . . . . . . . . . . . . . . . . . . . . . . . . . . . . . . . . . . . . . . . . . . . . .172 Example 2 . . . . . . . . . . . . . . . . . . . . . . . . . . . . . . . . . . . . . . . . . . . . . . . . . .173 Set Up and Execute BreakMeas Breaktrap Setting . . . . . . . . . . . . . . . . . .173 Set Up and Execute BreakFail Breaktrap Setting . . . . . . . . . . . . . . . . . . . .175 Set Up and Execute LoopTest Breaktrap Setting . . . . . . . . . . . . . . . . . . . .176 Set Up and Execute LoopMeas Breaktrap Setting . . . . . . . . . . . . . . . . . . .177 Set Up and Execute Pause Breaktrap Setting . . . . . . . . . . . . . . . . . . . . . .178 Idrom Property Page . . . . . . . . . . . . . . . . . . . . . . . . . . . . . . . . . . . . . . . . . . . . . . . .181 Save To IDROM . . . . . . . . . . . . . . . . . . . . . . . . . . . . . . . . . . . . . . . . . . . . . . . .182 CView Utility . . . . . . . . . . . . . . . . . . . . . . . . . . . . . . . . . . . . . . . . . . . . . . . . . . .183 CView Window . . . . . . . . . . . . . . . . . . . . . . . . . . . . . . . . . . . . . . . . . . . . . .183 Calibration and Diagnostics . . . . . . . . . . . . . . . . . . . . . . . . . . . . . . . . . . . . . . . . . .185 Calibration Compatibility . . . . . . . . . . . . . . . . . . . . . . . . . . . . . . . . . . . . . . . . . .185 dibcal.cal . . . . . . . . . . . . . . . . . . . . . . . . . . . . . . . . . . . . . . . . . . . . . . . . . . . . . .185 kcal.cal . . . . . . . . . . . . . . . . . . . . . . . . . . . . . . . . . . . . . . . . . . . . . . . . . . . . . . .185 Running System Diagnostics . . . . . . . . . . . . . . . . . . . . . . . . . . . . . . . . . . . . . . . . .187 Diagnostic Program - kchk.dia . . . . . . . . . . . . . . . . . . . . . . . . . . . . . . . . . . . . .187 Diagnostic Windows . . . . . . . . . . . . . . . . . . . . . . . . . . . . . . . . . . . . . . . . . .190 Diagnostic Settings . . . . . . . . . . . . . . . . . . . . . . . . . . . . . . . . . . . . . . . . . . .191 Summary Window . . . . . . . . . . . . . . . . . . . . . . . . . . . . . . . . . . . . . . . . . . . .192 Running Calibration . . . . . . . . . . . . . . . . . . . . . . . . . . . . . . . . . . . . . . . . . . . . . . . .198 Mapping Active Kalos Slices . . . . . . . . . . . . . . . . . . . . . . . . . . . . . . . . . . . . . . .198 Device Testing Procedure . . . . . . . . . . . . . . . . . . . . . . . . . . . . . . . . . . . . . . . . . . . .200 KITE Utilities . . . . . . . . . . . . . . . . . . . . . . . . . . . . . . . . . . . . . . . . . . . . . . . . . .207 Overview . . . . . . . . . . . . . . . . . . . . . . . . . . . . . . . . . . . . . . . . . . . . . . . . . . . . . . . . .208 Toolbar . . . . . . . . . . . . . . . . . . . . . . . . . . . . . . . . . . . . . . . . . . . . . . . . . . . . . . .208 CView (Console Viewer) . . . . . . . . . . . . . . . . . . . . . . . . . . . . . . . . . . . . . . . . . . . . .209 CView Window . . . . . . . . . . . . . . . . . . . . . . . . . . . . . . . . . . . . . . . . . . . . . . . . .209 Menu and Toolbar . . . . . . . . . . . . . . . . . . . . . . . . . . . . . . . . . . . . . . . . . . . .210 Test Debugger . . . . . . . . . . . . . . . . . . . . . . . . . . . . . . . . . . . . . . . . . . . . . . . . . . . . .212 Kedit . . . . . . . . . . . . . . . . . . . . . . . . . . . . . . . . . . . . . . . . . . . . . . . . . . . . . . . . . . . .213 Launching Kedit . . . . . . . . . . . . . . . . . . . . . . . . . . . . . . . . . . . . . . . . . . . . . . . .213 Program Loading . . . . . . . . . . . . . . . . . . . . . . . . . . . . . . . . . . . . . . . . . . . . . . . .213 Waveform (AWT) . . . . . . . . . . . . . . . . . . . . . . . . . . . . . . . . . . . . . . . . . . . . . . . . . . .215 Introduction . . . . . . . . . . . . . . . . . . . . . . . . . . . . . . . . . . . . . . . . . . . . . . . . . . . .215 General . . . . . . . . . . . . . . . . . . . . . . . . . . . . . . . . . . . . . . . . . . . . . . . . . . . .216 Operation . . . . . . . . . . . . . . . . . . . . . . . . . . . . . . . . . . . . . . . . . . . . . . . . . .219 Waveform Filetypes . . . . . . . . . . . . . . . . . . . . . . . . . . . . . . . . . . . . . . . . . . .219 User Interface . . . . . . . . . . . . . . . . . . . . . . . . . . . . . . . . . . . . . . . . . . . . . . .220 Setting Options . . . . . . . . . . . . . . . . . . . . . . . . . . . . . . . . . . . . . . . . . . . . . . . . .222 Kalos 2 User Manual v Drawing Style . . . . . . . . . . . . . . . . . . . . . . . . . . . . . . . . . . . . . . . . . . . . . . .223 Display Mode . . . . . . . . . . . . . . . . . . . . . . . . . . . . . . . . . . . . . . . . . . . . . . .223 Graticule Setting . . . . . . . . . . . . . . . . . . . . . . . . . . . . . . . . . . . . . . . . . . . . .223 Stack Display Order . . . . . . . . . . . . . . . . . . . . . . . . . . . . . . . . . . . . . . . . . .224 Synchronize Y Axes . . . . . . . . . . . . . . . . . . . . . . . . . . . . . . . . . . . . . . . . . .224 Synchronize on Scroll . . . . . . . . . . . . . . . . . . . . . . . . . . . . . . . . . . . . . . . . .224 Background, Graticule, or Marker Color . . . . . . . . . . . . . . . . . . . . . . . . . . .224 CWaveform Colors . . . . . . . . . . . . . . . . . . . . . . . . . . . . . . . . . . . . . . . . . . .225 Maximum Waveform Display . . . . . . . . . . . . . . . . . . . . . . . . . . . . . . . . . . . .225 Log Results in the Script File . . . . . . . . . . . . . . . . . . . . . . . . . . . . . . . . . . . .226 Mark Results . . . . . . . . . . . . . . . . . . . . . . . . . . . . . . . . . . . . . . . . . . . . . . . .226 Convert Spaces to Underscores . . . . . . . . . . . . . . . . . . . . . . . . . . . . . . . . .227 Print in Black and White . . . . . . . . . . . . . . . . . . . . . . . . . . . . . . . . . . . . . . .227 Undo Level . . . . . . . . . . . . . . . . . . . . . . . . . . . . . . . . . . . . . . . . . . . . . . . . .227 File Locations . . . . . . . . . . . . . . . . . . . . . . . . . . . . . . . . . . . . . . . . . . . . . . .227 Creating a Waveform . . . . . . . . . . . . . . . . . . . . . . . . . . . . . . . . . . . . . . . . . . . .228 Waveform Parameter Details . . . . . . . . . . . . . . . . . . . . . . . . . . . . . . . . . . .229 Opening a Waveform File . . . . . . . . . . . . . . . . . . . . . . . . . . . . . . . . . . . . . . . . .233 Working with Cursors . . . . . . . . . . . . . . . . . . . . . . . . . . . . . . . . . . . . . . . . . . . .233 Cursor Boxes . . . . . . . . . . . . . . . . . . . . . . . . . . . . . . . . . . . . . . . . . . . . . . .233 Creating a Cursor . . . . . . . . . . . . . . . . . . . . . . . . . . . . . . . . . . . . . . . . . . . .234 Modifying a Cursor . . . . . . . . . . . . . . . . . . . . . . . . . . . . . . . . . . . . . . . . . . .235 Grabbing and Moving a Cursor . . . . . . . . . . . . . . . . . . . . . . . . . . . . . . . . . .237 Moving a Cursor by Moving its Cursor Box . . . . . . . . . . . . . . . . . . . . . . . . .238 Attaching a Cursor to a Waveform . . . . . . . . . . . . . . . . . . . . . . . . . . . . . . .238 Understanding the Delta Information . . . . . . . . . . . . . . . . . . . . . . . . . . . . . .238 Name Pane . . . . . . . . . . . . . . . . . . . . . . . . . . . . . . . . . . . . . . . . . . . . . . . . .239 Y Scale . . . . . . . . . . . . . . . . . . . . . . . . . . . . . . . . . . . . . . . . . . . . . . . . . . . .243 Color . . . . . . . . . . . . . . . . . . . . . . . . . . . . . . . . . . . . . . . . . . . . . . . . . . . . . .244 Superimpose On/Off . . . . . . . . . . . . . . . . . . . . . . . . . . . . . . . . . . . . . . . . . .244 Clear Superimpose . . . . . . . . . . . . . . . . . . . . . . . . . . . . . . . . . . . . . . . . . . .244 Navigating the Waveform Graphic Pane . . . . . . . . . . . . . . . . . . . . . . . . . . . . . .244 Zooming . . . . . . . . . . . . . . . . . . . . . . . . . . . . . . . . . . . . . . . . . . . . . . . . . . .245 Scrolling . . . . . . . . . . . . . . . . . . . . . . . . . . . . . . . . . . . . . . . . . . . . . . . . . . .245 Annotating Waveforms (Markers) . . . . . . . . . . . . . . . . . . . . . . . . . . . . . . . . . . .247 Type . . . . . . . . . . . . . . . . . . . . . . . . . . . . . . . . . . . . . . . . . . . . . . . . . . . . . .247 Location . . . . . . . . . . . . . . . . . . . . . . . . . . . . . . . . . . . . . . . . . . . . . . . . . . . .247 Label . . . . . . . . . . . . . . . . . . . . . . . . . . . . . . . . . . . . . . . . . . . . . . . . . . . . . .248 Data . . . . . . . . . . . . . . . . . . . . . . . . . . . . . . . . . . . . . . . . . . . . . . . . . . . . . . .248 Marker Types . . . . . . . . . . . . . . . . . . . . . . . . . . . . . . . . . . . . . . . . . . . . . . . . . .248 Title Marker . . . . . . . . . . . . . . . . . . . . . . . . . . . . . . . . . . . . . . . . . . . . . . . . .249 Cycle Marker . . . . . . . . . . . . . . . . . . . . . . . . . . . . . . . . . . . . . . . . . . . . . . . .249 vi PN: 071-0359-02, October 2005 Contents Cycle Count Marker . . . . . . . . . . . . . . . . . . . . . . . . . . . . . . . . . . . . . . . . . .250 Vector Marker . . . . . . . . . . . . . . . . . . . . . . . . . . . . . . . . . . . . . . . . . . . . . . .250 Scan Marker . . . . . . . . . . . . . . . . . . . . . . . . . . . . . . . . . . . . . . . . . . . . . . . .250 Elapsed Time Marker . . . . . . . . . . . . . . . . . . . . . . . . . . . . . . . . . . . . . . . . .250 Cycle Set Marker . . . . . . . . . . . . . . . . . . . . . . . . . . . . . . . . . . . . . . . . . . . . .250 Time Set Marker . . . . . . . . . . . . . . . . . . . . . . . . . . . . . . . . . . . . . . . . . . . . .250 Compare Marker . . . . . . . . . . . . . . . . . . . . . . . . . . . . . . . . . . . . . . . . . . . . .250 Results Marker . . . . . . . . . . . . . . . . . . . . . . . . . . . . . . . . . . . . . . . . . . . . . .252 Note Marker . . . . . . . . . . . . . . . . . . . . . . . . . . . . . . . . . . . . . . . . . . . . . . . .253 Generic Marker . . . . . . . . . . . . . . . . . . . . . . . . . . . . . . . . . . . . . . . . . . . . . .253 Marker Control in CMD Files . . . . . . . . . . . . . . . . . . . . . . . . . . . . . . . . . . . . . . .253 Marker Syntax In AWAV Files . . . . . . . . . . . . . . . . . . . . . . . . . . . . . . . . . . .254 Using the Display Buttons . . . . . . . . . . . . . . . . . . . . . . . . . . . . . . . . . . . . . . . . .255 Clear . . . . . . . . . . . . . . . . . . . . . . . . . . . . . . . . . . . . . . . . . . . . . . . . . . . . . .256 Push . . . . . . . . . . . . . . . . . . . . . . . . . . . . . . . . . . . . . . . . . . . . . . . . . . . . . .256 Pop . . . . . . . . . . . . . . . . . . . . . . . . . . . . . . . . . . . . . . . . . . . . . . . . . . . . . . .256 Push2 . . . . . . . . . . . . . . . . . . . . . . . . . . . . . . . . . . . . . . . . . . . . . . . . . . . . .256 Swap . . . . . . . . . . . . . . . . . . . . . . . . . . . . . . . . . . . . . . . . . . . . . . . . . . . . . .256 Rotate Down . . . . . . . . . . . . . . . . . . . . . . . . . . . . . . . . . . . . . . . . . . . . . . . .256 Rotate Up . . . . . . . . . . . . . . . . . . . . . . . . . . . . . . . . . . . . . . . . . . . . . . . . . .256 Concatenate . . . . . . . . . . . . . . . . . . . . . . . . . . . . . . . . . . . . . . . . . . . . . . . .256 Segment . . . . . . . . . . . . . . . . . . . . . . . . . . . . . . . . . . . . . . . . . . . . . . . . . . .256 Using the DSP Function Menus . . . . . . . . . . . . . . . . . . . . . . . . . . . . . . . . . . . .257 Wc Arith Functions . . . . . . . . . . . . . . . . . . . . . . . . . . . . . . . . . . . . . . . . . . .258 Wf Arith Functions . . . . . . . . . . . . . . . . . . . . . . . . . . . . . . . . . . . . . . . . . . . .258 Wf Math Functions . . . . . . . . . . . . . . . . . . . . . . . . . . . . . . . . . . . . . . . . . . .259 wf Trans Functions . . . . . . . . . . . . . . . . . . . . . . . . . . . . . . . . . . . . . . . . . . .262 Statistic Functions . . . . . . . . . . . . . . . . . . . . . . . . . . . . . . . . . . . . . . . . . . . .263 wf Meas Functions . . . . . . . . . . . . . . . . . . . . . . . . . . . . . . . . . . . . . . . . . . .263 Pulse Functions . . . . . . . . . . . . . . . . . . . . . . . . . . . . . . . . . . . . . . . . . . . . . .269 Filter Functions . . . . . . . . . . . . . . . . . . . . . . . . . . . . . . . . . . . . . . . . . . . . . .274 Windows Functions . . . . . . . . . . . . . . . . . . . . . . . . . . . . . . . . . . . . . . . . . . .277 Int/Diff Functions . . . . . . . . . . . . . . . . . . . . . . . . . . . . . . . . . . . . . . . . . . . . .278 User Functions . . . . . . . . . . . . . . . . . . . . . . . . . . . . . . . . . . . . . . . . . . . . . .278 Working with the Stack . . . . . . . . . . . . . . . . . . . . . . . . . . . . . . . . . . . . . . . . . . .279 Storing/Recalling a Waveform . . . . . . . . . . . . . . . . . . . . . . . . . . . . . . . . . . . . . .280 Saving a Waveform . . . . . . . . . . . . . . . . . . . . . . . . . . . . . . . . . . . . . . . . . . . . . .280 Creating and Executing Scripts . . . . . . . . . . . . . . . . . . . . . . . . . . . . . . . . . . . . .281 Monitoring Errors, Warnings and Comments . . . . . . . . . . . . . . . . . . . . . . . . . .283 Entering a Shell Command . . . . . . . . . . . . . . . . . . . . . . . . . . . . . . . . . . . . . . . .285 Executing Script Files: A Closer Look . . . . . . . . . . . . . . . . . . . . . . . . . . . . . . . .285 Printing a Waveform . . . . . . . . . . . . . . . . . . . . . . . . . . . . . . . . . . . . . . . . . . . . .298 Kalos 2 User Manual vii Closing a Waveform . . . . . . . . . . . . . . . . . . . . . . . . . . . . . . . . . . . . . . . . . . . . .298 Exiting the Analog Wavetool . . . . . . . . . . . . . . . . . . . . . . . . . . . . . . . . . . . . . . .298 Logic Debug Tool . . . . . . . . . . . . . . . . . . . . . . . . . . . . . . . . . . . . . . . . . . . . . . . . . .299 LDTool Window . . . . . . . . . . . . . . . . . . . . . . . . . . . . . . . . . . . . . . . . . . . . . . . . .299 Waveform Window . . . . . . . . . . . . . . . . . . . . . . . . . . . . . . . . . . . . . . . . . . . . . .307 Change Scale Dialog . . . . . . . . . . . . . . . . . . . . . . . . . . . . . . . . . . . . . . . . .308 LATool Window . . . . . . . . . . . . . . . . . . . . . . . . . . . . . . . . . . . . . . . . . . . . . . . . .308 Expanded Pin Group . . . . . . . . . . . . . . . . . . . . . . . . . . . . . . . . . . . . . . . . . .309 Collapsed Pin Group . . . . . . . . . . . . . . . . . . . . . . . . . . . . . . . . . . . . . . . . .310 Waveform Area Conventional Symbols . . . . . . . . . . . . . . . . . . . . . . . . . . . .310 Additional Information . . . . . . . . . . . . . . . . . . . . . . . . . . . . . . . . . . . . . . . . .311 DSTool window . . . . . . . . . . . . . . . . . . . . . . . . . . . . . . . . . . . . . . . . . . . . . . . . .314 Setup Group . . . . . . . . . . . . . . . . . . . . . . . . . . . . . . . . . . . . . . . . . . . . . . . .314 Datalog Window . . . . . . . . . . . . . . . . . . . . . . . . . . . . . . . . . . . . . . . . . . . . . . . .316 Detailed Information Dialog . . . . . . . . . . . . . . . . . . . . . . . . . . . . . . . . . . . . .323 Toolbar of LDTool . . . . . . . . . . . . . . . . . . . . . . . . . . . . . . . . . . . . . . . . . . . .324 Save Dialog . . . . . . . . . . . . . . . . . . . . . . . . . . . . . . . . . . . . . . . . . . . . . . . . .327 Find Dialog . . . . . . . . . . . . . . . . . . . . . . . . . . . . . . . . . . . . . . . . . . . . . . . . .332 Find And Replace Dialog . . . . . . . . . . . . . . . . . . . . . . . . . . . . . . . . . . . . . .333 Find And Replace String Dialog . . . . . . . . . . . . . . . . . . . . . . . . . . . . . . . . .334 Find And Replace Column Dialog . . . . . . . . . . . . . . . . . . . . . . . . . . . . . . . .336 Go to Dialog . . . . . . . . . . . . . . . . . . . . . . . . . . . . . . . . . . . . . . . . . . . . . . . .336 LDTool Menu . . . . . . . . . . . . . . . . . . . . . . . . . . . . . . . . . . . . . . . . . . . . . . . .338 DBM Editor (DBMEDIT) . . . . . . . . . . . . . . . . . . . . . . . . . . . . . . . . . . . . . . . . . . . . .340 Primary Window . . . . . . . . . . . . . . . . . . . . . . . . . . . . . . . . . . . . . . . . . . . . . . . .340 Property Pages . . . . . . . . . . . . . . . . . . . . . . . . . . . . . . . . . . . . . . . . . . . . . . . . .342 DBM Editor . . . . . . . . . . . . . . . . . . . . . . . . . . . . . . . . . . . . . . . . . . . . . . . . .342 Socket File . . . . . . . . . . . . . . . . . . . . . . . . . . . . . . . . . . . . . . . . . . . . . . . . .344 DBM Viewer and Overrides (Buffer Memory) . . . . . . . . . . . . . . . . . . . . . . .346 Hex Format . . . . . . . . . . . . . . . . . . . . . . . . . . . . . . . . . . . . . . . . . . . . . . . . .347 Example . . . . . . . . . . . . . . . . . . . . . . . . . . . . . . . . . . . . . . . . . . . . . . . . . . .349 Multiple DBM Files Per Program . . . . . . . . . . . . . . . . . . . . . . . . . . . . . . . . .350 Datalog Engine and DLOG Engine . . . . . . . . . . . . . . . . . . . . . . . . . . . . . . . . . . . . .354 Differences Between Data Engine and Dlog Engine . . . . . . . . . . . . . . . . . . . . .354 DE Structure . . . . . . . . . . . . . . . . . . . . . . . . . . . . . . . . . . . . . . . . . . . . . . . . . . .354 DE GUI . . . . . . . . . . . . . . . . . . . . . . . . . . . . . . . . . . . . . . . . . . . . . . . . . . . . . . .355 Postprocessor . . . . . . . . . . . . . . . . . . . . . . . . . . . . . . . . . . . . . . . . . . . . . . . . . .358 Collecting Log Files for Debugging . . . . . . . . . . . . . . . . . . . . . . . . . . . . . . . . . .359 Offline Mode . . . . . . . . . . . . . . . . . . . . . . . . . . . . . . . . . . . . . . . . . . . . . . . . . . .360 Production/Engineering Modes . . . . . . . . . . . . . . . . . . . . . . . . . . . . . . . . . . . . .361 Disabling File Generation for Specified Flow . . . . . . . . . . . . . . . . . . . . . . . . . .361 Test Program Loading After Dlog Engine Startup . . . . . . . . . . . . . . . . . . . . . . .361 viii PN: 071-0359-02, October 2005 Contents Icon Displaying Enabled/Disabled State . . . . . . . . . . . . . . . . . . . . . . . . . . . . . .361 STDF Viewer Utility . . . . . . . . . . . . . . . . . . . . . . . . . . . . . . . . . . . . . . . . . . . . . .362 Installation Procedure . . . . . . . . . . . . . . . . . . . . . . . . . . . . . . . . . . . . . . . . . . . .362 Data Engine General Installation Procedure . . . . . . . . . . . . . . . . . . . . . . . .363 Configuration Transferring from Previous Installation . . . . . . . . . . . . . . . . .363 Changes Needed for Engineering Environment . . . . . . . . . . . . . . . . . . . . .364 Configuration with kalos_production.ini . . . . . . . . . . . . . . . . . . . . . . . . . . . . . . .365 DE Global Settings . . . . . . . . . . . . . . . . . . . . . . . . . . . . . . . . . . . . . . . . . . .365 Local Override Settings for DE DLLs . . . . . . . . . . . . . . . . . . . . . . . . . . . . .368 Kalos 2 External Datalogging Overview . . . . . . . . . . . . . . . . . . . . . . . . . . . . . .373 Data Engine Connection to Kalos Datalog Stream . . . . . . . . . . . . . . . . . . .373 Dlog Engine Connection to Kalos Datalog Stream . . . . . . . . . . . . . . . . . . .374 Data From Prober DLLs . . . . . . . . . . . . . . . . . . . . . . . . . . . . . . . . . . . . . . .374 Use of Runtime Decode Strings and STDF.ini . . . . . . . . . . . . . . . . . . . . . .375 Test Program Modifications for Data Collection . . . . . . . . . . . . . . . . . . . . . . . .376 Switch Datalog Files Generation On/Off . . . . . . . . . . . . . . . . . . . . . . . . . . .376 Selective Datalog Files Generation . . . . . . . . . . . . . . . . . . . . . . . . . . . . . . .377 Storing ASCII Strings in the STDF File . . . . . . . . . . . . . . . . . . . . . . . . . . . .378 Putting C-Hook Computed Data Into the STDF File . . . . . . . . . . . . . . . . . .379 Assigning a Unique Test Number to Each Test and Bin . . . . . . . . . . . . . . .380 Custom DLL Creation . . . . . . . . . . . . . . . . . . . . . . . . . . . . . . . . . . . . . . . . . . . .380 Custom DLL Structure . . . . . . . . . . . . . . . . . . . . . . . . . . . . . . . . . . . . . . . . .380 Required Elements for Custom DLL Creation . . . . . . . . . . . . . . . . . . . . . . .380 Custom DLL API Standard Functions . . . . . . . . . . . . . . . . . . . . . . . . . . . . .381 Standard Event Functions . . . . . . . . . . . . . . . . . . . . . . . . . . . . . . . . . . . . . .381 Exported Functions of DE EXE . . . . . . . . . . . . . . . . . . . . . . . . . . . . . . . . .383 Custom DLL Generation . . . . . . . . . . . . . . . . . . . . . . . . . . . . . . . . . . . . . .384 List of Exported Functions of DE EXE . . . . . . . . . . . . . . . . . . . . . . . . . . . .388 Example Code Listing . . . . . . . . . . . . . . . . . . . . . . . . . . . . . . . . . . . . . . . . .404 Cal/Diag . . . . . . . . . . . . . . . . . . . . . . . . . . . . . . . . . . . . . . . . . . . . . . . . . . . . . . . . .410 ShowBitz Utility . . . . . . . . . . . . . . . . . . . . . . . . . . . . . . . . . . . . . . . . . . . . . . . . . . . .411 ShowBitz Interface . . . . . . . . . . . . . . . . . . . . . . . . . . . . . . . . . . . . . . . . . . . . . .411 Navigator . . . . . . . . . . . . . . . . . . . . . . . . . . . . . . . . . . . . . . . . . . . . . . . . . . .413 Channel Views . . . . . . . . . . . . . . . . . . . . . . . . . . . . . . . . . . . . . . . . . . . . . .413 Omni Views . . . . . . . . . . . . . . . . . . . . . . . . . . . . . . . . . . . . . . . . . . . . . . . . .413 Slice Views . . . . . . . . . . . . . . . . . . . . . . . . . . . . . . . . . . . . . . . . . . . . . . . . .413 Register Views . . . . . . . . . . . . . . . . . . . . . . . . . . . . . . . . . . . . . . . . . . . . . .413 Protected Views . . . . . . . . . . . . . . . . . . . . . . . . . . . . . . . . . . . . . . . . . . . . .414 Shortcuts View . . . . . . . . . . . . . . . . . . . . . . . . . . . . . . . . . . . . . . . . . . . . . .414 Toolbar . . . . . . . . . . . . . . . . . . . . . . . . . . . . . . . . . . . . . . . . . . . . . . . . . . . .414 Send View . . . . . . . . . . . . . . . . . . . . . . . . . . . . . . . . . . . . . . . . . . . . . . . . . .414 Message Window . . . . . . . . . . . . . . . . . . . . . . . . . . . . . . . . . . . . . . . . . . . .414 Kalos 2 User Manual ix Idrom . . . . . . . . . . . . . . . . . . . . . . . . . . . . . . . . . . . . . . . . . . . . . . . . . . . . . . . . . . . .415 NVMDIB . . . . . . . . . . . . . . . . . . . . . . . . . . . . . . . . . . . . . . . . . . . . . . . . . . . . . . . . .416 System Monitor . . . . . . . . . . . . . . . . . . . . . . . . . . . . . . . . . . . . . . . . . . . . . . . . . . . .417 MAP INIT . . . . . . . . . . . . . . . . . . . . . . . . . . . . . . . . . . . . . . . . . . . . . . . . . . . . . . . .418 Test Debugger . . . . . . . . . . . . . . . . . . . . . . . . . . . . . . . . . . . . . . . . . . . . . . . . .419 Introduction . . . . . . . . . . . . . . . . . . . . . . . . . . . . . . . . . . . . . . . . . . . . . . . . . . . . . . .420 Graphical User Interface . . . . . . . . . . . . . . . . . . . . . . . . . . . . . . . . . . . . . . . . . . . . .422 Test Debugger Application . . . . . . . . . . . . . . . . . . . . . . . . . . . . . . . . . . . . . . . . . . .423 Primary Window (Overview) Functions . . . . . . . . . . . . . . . . . . . . . . . . . . . . . . .425 Toolbar . . . . . . . . . . . . . . . . . . . . . . . . . . . . . . . . . . . . . . . . . . . . . . . . . . . . . . .427 Property Page Functions . . . . . . . . . . . . . . . . . . . . . . . . . . . . . . . . . . . . . . . . . . . .428 Overview Window . . . . . . . . . . . . . . . . . . . . . . . . . . . . . . . . . . . . . . . . . . . . . . .428 Socket . . . . . . . . . . . . . . . . . . . . . . . . . . . . . . . . . . . . . . . . . . . . . . . . . . . . . . . .429 Socket File . . . . . . . . . . . . . . . . . . . . . . . . . . . . . . . . . . . . . . . . . . . . . . . . .429 Package . . . . . . . . . . . . . . . . . . . . . . . . . . . . . . . . . . . . . . . . . . . . . . . . . . .430 Flow . . . . . . . . . . . . . . . . . . . . . . . . . . . . . . . . . . . . . . . . . . . . . . . . . . . . . . . . . .431 Bin Table . . . . . . . . . . . . . . . . . . . . . . . . . . . . . . . . . . . . . . . . . . . . . . . . . . .431 Flow Table . . . . . . . . . . . . . . . . . . . . . . . . . . . . . . . . . . . . . . . . . . . . . . . . . .432 Flow Diagram . . . . . . . . . . . . . . . . . . . . . . . . . . . . . . . . . . . . . . . . . . . . . . .433 Test . . . . . . . . . . . . . . . . . . . . . . . . . . . . . . . . . . . . . . . . . . . . . . . . . . . . . . . . . .434 Test Blocks . . . . . . . . . . . . . . . . . . . . . . . . . . . . . . . . . . . . . . . . . . . . . . . . .435 Test Elements . . . . . . . . . . . . . . . . . . . . . . . . . . . . . . . . . . . . . . . . . . . . . . .435 Sequence . . . . . . . . . . . . . . . . . . . . . . . . . . . . . . . . . . . . . . . . . . . . . . . . . . . . .438 Levels . . . . . . . . . . . . . . . . . . . . . . . . . . . . . . . . . . . . . . . . . . . . . . . . . . . . . . . .439 Level Table . . . . . . . . . . . . . . . . . . . . . . . . . . . . . . . . . . . . . . . . . . . . . . . . .439 Levels . . . . . . . . . . . . . . . . . . . . . . . . . . . . . . . . . . . . . . . . . . . . . . . . . . . . .440 Timings . . . . . . . . . . . . . . . . . . . . . . . . . . . . . . . . . . . . . . . . . . . . . . . . . . . . . . .441 Chn Checker . . . . . . . . . . . . . . . . . . . . . . . . . . . . . . . . . . . . . . . . . . . . . . . .442 Waveforms . . . . . . . . . . . . . . . . . . . . . . . . . . . . . . . . . . . . . . . . . . . . . . . . .443 DPS/PMU . . . . . . . . . . . . . . . . . . . . . . . . . . . . . . . . . . . . . . . . . . . . . . . . . . . . .443 Setups . . . . . . . . . . . . . . . . . . . . . . . . . . . . . . . . . . . . . . . . . . . . . . . . . . . . . . . .445 Cons/Vars . . . . . . . . . . . . . . . . . . . . . . . . . . . . . . . . . . . . . . . . . . . . . . . . . . . . .446 Misc(nvm,pat...) . . . . . . . . . . . . . . . . . . . . . . . . . . . . . . . . . . . . . . . . . . . . . . . . .447 NVM ID’s . . . . . . . . . . . . . . . . . . . . . . . . . . . . . . . . . . . . . . . . . . . . . . . . . . .448 Patterns Tab . . . . . . . . . . . . . . . . . . . . . . . . . . . . . . . . . . . . . . . . . . . . . . . .449 Shmoo and Bitmap Tools . . . . . . . . . . . . . . . . . . . . . . . . . . . . . . . . . . . . . . . .451 Introduction . . . . . . . . . . . . . . . . . . . . . . . . . . . . . . . . . . . . . . . . . . . . . . . . . . . . . . .452 Shmoo Tool . . . . . . . . . . . . . . . . . . . . . . . . . . . . . . . . . . . . . . . . . . . . . . . . . . . . . . .453 Graphical User Interface . . . . . . . . . . . . . . . . . . . . . . . . . . . . . . . . . . . . . . . . . .453 Menu Bar . . . . . . . . . . . . . . . . . . . . . . . . . . . . . . . . . . . . . . . . . . . . . . . . . . .454 x PN: 071-0359-02, October 2005 Contents Toolbar . . . . . . . . . . . . . . . . . . . . . . . . . . . . . . . . . . . . . . . . . . . . . . . . . . . .456 Control Area . . . . . . . . . . . . . . . . . . . . . . . . . . . . . . . . . . . . . . . . . . . . . . . .456 Header . . . . . . . . . . . . . . . . . . . . . . . . . . . . . . . . . . . . . . . . . . . . . . . . . . . .456 View Area . . . . . . . . . . . . . . . . . . . . . . . . . . . . . . . . . . . . . . . . . . . . . . . . . .456 Setting Up the Shmoo Plot . . . . . . . . . . . . . . . . . . . . . . . . . . . . . . . . . . . . . . . . . . .459 Selects Property Page . . . . . . . . . . . . . . . . . . . . . . . . . . . . . . . . . . . . . . . . . . .459 XY Origin . . . . . . . . . . . . . . . . . . . . . . . . . . . . . . . . . . . . . . . . . . . . . . . . . . .460 Types . . . . . . . . . . . . . . . . . . . . . . . . . . . . . . . . . . . . . . . . . . . . . . . . . . . . . .460 Axis Selects . . . . . . . . . . . . . . . . . . . . . . . . . . . . . . . . . . . . . . . . . . . . . . . . .462 ASCII Outputs . . . . . . . . . . . . . . . . . . . . . . . . . . . . . . . . . . . . . . . . . . . . . . .464 Socket File Property Page . . . . . . . . . . . . . . . . . . . . . . . . . . . . . . . . . . . . . . . .464 Online . . . . . . . . . . . . . . . . . . . . . . . . . . . . . . . . . . . . . . . . . . . . . . . . . . . . .465 Interactive . . . . . . . . . . . . . . . . . . . . . . . . . . . . . . . . . . . . . . . . . . . . . . . . . .466 Setups Property Page . . . . . . . . . . . . . . . . . . . . . . . . . . . . . . . . . . . . . . . . . . . .468 Composites Property Page (Accumulate Mode) . . . . . . . . . . . . . . . . . . . . . . . .470 Online Operations . . . . . . . . . . . . . . . . . . . . . . . . . . . . . . . . . . . . . . . . . . . . . . .471 ASCII or Screen Print Operations . . . . . . . . . . . . . . . . . . . . . . . . . . . . . . . . . . .471 One-Dimensional Shmoo Plot . . . . . . . . . . . . . . . . . . . . . . . . . . . . . . . . . . . . . .472 Two-Dimensional Shmoo Plot . . . . . . . . . . . . . . . . . . . . . . . . . . . . . . . . . . . . . .473 Three-Dimensional Shmoo Plot . . . . . . . . . . . . . . . . . . . . . . . . . . . . . . . . . . . .474 PMU and DPS Plots . . . . . . . . . . . . . . . . . . . . . . . . . . . . . . . . . . . . . . . . . . . . .476 Accumulate Mode . . . . . . . . . . . . . . . . . . . . . . . . . . . . . . . . . . . . . . . . . . . . . . .476 ASCII Printout Examples . . . . . . . . . . . . . . . . . . . . . . . . . . . . . . . . . . . . . . . . . . . .479 1-D and 2-D Plots . . . . . . . . . . . . . . . . . . . . . . . . . . . . . . . . . . . . . . . . . . . . . . .479 3-D Plots . . . . . . . . . . . . . . . . . . . . . . . . . . . . . . . . . . . . . . . . . . . . . . . . . . . . . .482 PMU XY Plots . . . . . . . . . . . . . . . . . . . . . . . . . . . . . . . . . . . . . . . . . . . . . . . . . .484 PPMU Plots . . . . . . . . . . . . . . . . . . . . . . . . . . . . . . . . . . . . . . . . . . . . . . . . . . . .484 Shmoo Plot Example . . . . . . . . . . . . . . . . . . . . . . . . . . . . . . . . . . . . . . . . . . . . . . .485 Implementation . . . . . . . . . . . . . . . . . . . . . . . . . . . . . . . . . . . . . . . . . . . . . . . . .485 Pin Monitor . . . . . . . . . . . . . . . . . . . . . . . . . . . . . . . . . . . . . . . . . . . . . . . . . . . . . . .493 Pin Monitor Window . . . . . . . . . . . . . . . . . . . . . . . . . . . . . . . . . . . . . . . . . .493 Power Setups Window . . . . . . . . . . . . . . . . . . . . . . . . . . . . . . . . . . . . . . . .495 Level/Time Setups Window . . . . . . . . . . . . . . . . . . . . . . . . . . . . . . . . . . . . .496 Levels Window . . . . . . . . . . . . . . . . . . . . . . . . . . . . . . . . . . . . . . . . . . . . . .498 Times Window . . . . . . . . . . . . . . . . . . . . . . . . . . . . . . . . . . . . . . . . . . . . . . .500 Socket Window . . . . . . . . . . . . . . . . . . . . . . . . . . . . . . . . . . . . . . . . . . . . . .501 Value Log . . . . . . . . . . . . . . . . . . . . . . . . . . . . . . . . . . . . . . . . . . . . . . . . . . . . . . . .518 Bitmap . . . . . . . . . . . . . . . . . . . . . . . . . . . . . . . . . . . . . . . . . . . . . . . . . . . . . . . . . . .521 Property Pages . . . . . . . . . . . . . . . . . . . . . . . . . . . . . . . . . . . . . . . . . . . . . . . . .521 Menu and Toolbar . . . . . . . . . . . . . . . . . . . . . . . . . . . . . . . . . . . . . . . . . . . .524 Bitmap Property Page . . . . . . . . . . . . . . . . . . . . . . . . . . . . . . . . . . . . . . . . .526 Definition - Display, Socket & Setups Property Page . . . . . . . . . . . . . . . . .529 Kalos 2 User Manual xi Setups . . . . . . . . . . . . . . . . . . . . . . . . . . . . . . . . . . . . . . . . . . . . . . . . . . . . .533 Search Tables (Fail / User) Property Page . . . . . . . . . . . . . . . . . . . . . . . . .534 Overview & BIM Viewer . . . . . . . . . . . . . . . . . . . . . . . . . . . . . . . . . . . . . . . .535 BitPower . . . . . . . . . . . . . . . . . . . . . . . . . . . . . . . . . . . . . . . . . . . . . . . . . . . . . . . . .539 Appendix A - Glossary of Terms . . . . . . . . . . . . . . . . . . . . . . . . . . . . . . . . . . . . . . . . . . .541 Index . . . . . . . . . . . . . . . . . . . . . . . . . . . . . . . . . . . . . . . . . . . . . . . . . . . . . . . . .555 List of Figures Figure 1. Kalos 2 Test System . . . . . . . . . . . . . . . . . . . . . . . . . . . . . . . . . . . . .3 Figure 2. Tester Set Up . . . . . . . . . . . . . . . . . . . . . . . . . . . . . . . . . . . . . . . . . .4 Figure 3. Test Head Layout . . . . . . . . . . . . . . . . . . . . . . . . . . . . . . . . . . . . . . .6 Figure 4. Pin Configuration Breakdown . . . . . . . . . . . . . . . . . . . . . . . . . . . . . .7 Figure 5. Backplane Board. . . . . . . . . . . . . . . . . . . . . . . . . . . . . . . . . . . . . . . .8 Figure 6. Control Air Schematic . . . . . . . . . . . . . . . . . . . . . . . . . . . . . . . . . . . .9 Figure 7. Test Head Opening Mechanism . . . . . . . . . . . . . . . . . . . . . . . . . . .10 Figure 8. Power Shutoff Switch . . . . . . . . . . . . . . . . . . . . . . . . . . . . . . . . . . .11 Figure 9. Tester Cooling System . . . . . . . . . . . . . . . . . . . . . . . . . . . . . . . . . .12 Figure 10. Interface Unit and Pin Layout . . . . . . . . . . . . . . . . . . . . . . . . . . . .13 Figure 11. EMO and Test Head On/Off Controls . . . . . . . . . . . . . . . . . . . . . .14 Figure 12. AC Control Box . . . . . . . . . . . . . . . . . . . . . . . . . . . . . . . . . . . . . . .15 Figure 13. Host Computer . . . . . . . . . . . . . . . . . . . . . . . . . . . . . . . . . . . . . . .16 Figure 14. Hardware Configuration . . . . . . . . . . . . . . . . . . . . . . . . . . . . . . . .17 Figure 15. ETX Module . . . . . . . . . . . . . . . . . . . . . . . . . . . . . . . . . . . . . . . . .18 Figure 16. Logging On . . . . . . . . . . . . . . . . . . . . . . . . . . . . . . . . . . . . . . . . . .22 Figure 17. Logon Information . . . . . . . . . . . . . . . . . . . . . . . . . . . . . . . . . . . . .22 Figure 18. Windows XP Desktop . . . . . . . . . . . . . . . . . . . . . . . . . . . . . . . . . .24 Figure 19. Log Off and Shut Down. . . . . . . . . . . . . . . . . . . . . . . . . . . . . . . . .25 Figure 20. Kalos2 Directory . . . . . . . . . . . . . . . . . . . . . . . . . . . . . . . . . . . . . .27 Figure 21. KalosOS Directory . . . . . . . . . . . . . . . . . . . . . . . . . . . . . . . . . . . .28 Figure 22. Windows XP Start Menu and Explorer . . . . . . . . . . . . . . . . . . . . .29 Figure 23. Creating Shortcuts . . . . . . . . . . . . . . . . . . . . . . . . . . . . . . . . . . . .32 Figure 24. KTL File. . . . . . . . . . . . . . . . . . . . . . . . . . . . . . . . . . . . . . . . . . . . .39 Figure 25. KTL Program. . . . . . . . . . . . . . . . . . . . . . . . . . . . . . . . . . . . . . . . .40 Figure 26. File Organization . . . . . . . . . . . . . . . . . . . . . . . . . . . . . . . . . . . . . .43 Figure 27. Flow Levels . . . . . . . . . . . . . . . . . . . . . . . . . . . . . . . . . . . . . . . . . .44 Figure 28. Socket Table . . . . . . . . . . . . . . . . . . . . . . . . . . . . . . . . . . . . . . . . .47 xii PN: 071-0359-02, October 2005 Contents Figure 29. Pingroups . . . . . . . . . . . . . . . . . . . . . . . . . . . . . . . . . . . . . . . . . . .48 Figure 30. Pingroups and Socket Table Interrelationship. . . . . . . . . . . . . . . .49 Figure 31. DC Tests . . . . . . . . . . . . . . . . . . . . . . . . . . . . . . . . . . . . . . . . . . . .50 Figure 32. Bin Table . . . . . . . . . . . . . . . . . . . . . . . . . . . . . . . . . . . . . . . . . . . .52 Figure 33. Flow Statement . . . . . . . . . . . . . . . . . . . . . . . . . . . . . . . . . . . . . . .53 Figure 34. Kedit Online Help . . . . . . . . . . . . . . . . . . . . . . . . . . . . . . . . . . . . .58 Figure 35. Kedit Icon . . . . . . . . . . . . . . . . . . . . . . . . . . . . . . . . . . . . . . . . . . .59 Figure 36. Program Load and Workspace . . . . . . . . . . . . . . . . . . . . . . . . . . .60 Figure 37. Resource Icons . . . . . . . . . . . . . . . . . . . . . . . . . . . . . . . . . . . . . . .64 Figure 38. Toolbars . . . . . . . . . . . . . . . . . . . . . . . . . . . . . . . . . . . . . . . . . . . .65 Figure 39. Pulldown Menu Items . . . . . . . . . . . . . . . . . . . . . . . . . . . . . . . . . .68 Figure 40. Navigating in Kedit . . . . . . . . . . . . . . . . . . . . . . . . . . . . . . . . . . . .72 Figure 41. View Existing FLOW Files. . . . . . . . . . . . . . . . . . . . . . . . . . . . . . .73 Figure 42. Debugging in Kedit . . . . . . . . . . . . . . . . . . . . . . . . . . . . . . . . . . . .74 Figure 43. Target Manager/Tester Communication . . . . . . . . . . . . . . . . . . . .77 Figure 44. Online/Load Buttons . . . . . . . . . . . . . . . . . . . . . . . . . . . . . . . . . . .78 Figure 45. Flow Selection. . . . . . . . . . . . . . . . . . . . . . . . . . . . . . . . . . . . . . . .79 Figure 46. Breakpoint Settings . . . . . . . . . . . . . . . . . . . . . . . . . . . . . . . . . . . .79 Figure 47. Step Control of Execution . . . . . . . . . . . . . . . . . . . . . . . . . . . . . . .80 Figure 48. Variables Selection . . . . . . . . . . . . . . . . . . . . . . . . . . . . . . . . . . . .81 Figure 49. Start KPL Debugging . . . . . . . . . . . . . . . . . . . . . . . . . . . . . . . . . .82 Figure 50. KPL Debugging Resources. . . . . . . . . . . . . . . . . . . . . . . . . . . . . .82 Figure 51. Arm And Trigger Conditions . . . . . . . . . . . . . . . . . . . . . . . . . . . . .85 Figure 52. Run PG Button . . . . . . . . . . . . . . . . . . . . . . . . . . . . . . . . . . . . . . .86 Figure 53. Datalog Dialog Window. . . . . . . . . . . . . . . . . . . . . . . . . . . . . . . . .87 Figure 54. Resource Selection. . . . . . . . . . . . . . . . . . . . . . . . . . . . . . . . . . . .88 Figure 55. Source File Location . . . . . . . . . . . . . . . . . . . . . . . . . . . . . . . . . . .89 Figure 56. Counter Group Format . . . . . . . . . . . . . . . . . . . . . . . . . . . . . . . . .90 Figure 57. Data Display in Hex Format . . . . . . . . . . . . . . . . . . . . . . . . . . . . .90 Figure 58. Pin Options Menu . . . . . . . . . . . . . . . . . . . . . . . . . . . . . . . . . . . . .91 Figure 59. Timing Edge Window . . . . . . . . . . . . . . . . . . . . . . . . . . . . . . . . . .92 Figure 60. Timing Edge Details . . . . . . . . . . . . . . . . . . . . . . . . . . . . . . . . . . .93 Figure 61. Timing Edge Definitions . . . . . . . . . . . . . . . . . . . . . . . . . . . . . . . .94 Figure 62. Kalos Configuration Manager . . . . . . . . . . . . . . . . . . . . . . . . . . . .98 Figure 63. Software Version Selection . . . . . . . . . . . . . . . . . . . . . . . . . . . . . .98 Figure 64. Start Target Manager . . . . . . . . . . . . . . . . . . . . . . . . . . . . . . . . . .99 Figure 65. Configuration Manager Options . . . . . . . . . . . . . . . . . . . . . . . . .100 Figure 66. Target Status Window . . . . . . . . . . . . . . . . . . . . . . . . . . . . . . . . .101 Figure 67. Target Status Image Descriptions . . . . . . . . . . . . . . . . . . . . . . . .102 Kalos 2 User Manual xiii Figure 68. Target Icon Pop-up . . . . . . . . . . . . . . . . . . . . . . . . . . . . . . . . . . .102 Figure 69. Project/Program Loading . . . . . . . . . . . . . . . . . . . . . . . . . . . . . .105 Figure 70. Test Program Load Process . . . . . . . . . . . . . . . . . . . . . . . . . . . .106 Figure 71. System Front Panel Window (Default View) . . . . . . . . . . . . . . . .109 Figure 72. Front Panel Toolbar (Engineering Mode) . . . . . . . . . . . . . . . . . .115 Figure 73. Front Panel Toolbar (Production Mode) . . . . . . . . . . . . . . . . . . .115 Figure 74. Property Page Tab Selection . . . . . . . . . . . . . . . . . . . . . . . . . . .116 Figure 75. Function Keys . . . . . . . . . . . . . . . . . . . . . . . . . . . . . . . . . . . . . . .116 Figure 76. Overview Property Page . . . . . . . . . . . . . . . . . . . . . . . . . . . . . . .117 Figure 77. Optional PK2 Sort Results . . . . . . . . . . . . . . . . . . . . . . . . . . . . .119 Figure 78. Optional PK2 Sort History . . . . . . . . . . . . . . . . . . . . . . . . . . . . . .120 Figure 79. Operator IF Property Page . . . . . . . . . . . . . . . . . . . . . . . . . . . . .121 Figure 80. DIB Info . . . . . . . . . . . . . . . . . . . . . . . . . . . . . . . . . . . . . . . . . . . .123 Figure 81. Device Interface Property Page . . . . . . . . . . . . . . . . . . . . . . . . .124 Figure 82. Device Interface Loading . . . . . . . . . . . . . . . . . . . . . . . . . . . . . .125 Figure 83. Summary Property Page (Text Sums) . . . . . . . . . . . . . . . . . . . .127 Figure 84. Summary Property Page (Graphics) . . . . . . . . . . . . . . . . . . . . . .128 Figure 85. Primary (Main) Window. . . . . . . . . . . . . . . . . . . . . . . . . . . . . . . .130 Figure 86. Primary Window Layout . . . . . . . . . . . . . . . . . . . . . . . . . . . . . . .133 Figure 87. Summary Bar Chart . . . . . . . . . . . . . . . . . . . . . . . . . . . . . . . . . .135 Figure 88. Summary Pie Charts . . . . . . . . . . . . . . . . . . . . . . . . . . . . . . . . . .136 Figure 89. Text Summary and Wafermap File . . . . . . . . . . . . . . . . . . . . . . .137 Figure 90. Wafermap Functional Diagram . . . . . . . . . . . . . . . . . . . . . . . . . .138 Figure 91. Wafermap Tool . . . . . . . . . . . . . . . . . . . . . . . . . . . . . . . . . . . . . .139 Figure 92. Sort Property Page . . . . . . . . . . . . . . . . . . . . . . . . . . . . . . . . . . .140 Figure 93. Mask Editor Property Page . . . . . . . . . . . . . . . . . . . . . . . . . . . . .141 Figure 94. Interactive Wafermap . . . . . . . . . . . . . . . . . . . . . . . . . . . . . . . . .143 Figure 95. Datalog Property Page . . . . . . . . . . . . . . . . . . . . . . . . . . . . . . . .145 Figure 96. DataLog Property Page: Setups . . . . . . . . . . . . . . . . . . . . . . . . .148 Figure 97. Datalog Property Page: Histograms . . . . . . . . . . . . . . . . . . . . . .149 Figure 98. Yield Monitor Property Page . . . . . . . . . . . . . . . . . . . . . . . . . . .152 Figure 99. Engineering Property Page. . . . . . . . . . . . . . . . . . . . . . . . . . . . .153 Figure 100. DBM/SRAM Viewer. . . . . . . . . . . . . . . . . . . . . . . . . . . . . . . . . .157 Figure 101. History Ram Control From Front Panel KDatalog Icon . . . . . . .158 Figure 102. History Ram Control From Datalog Property Page . . . . . . . . . .159 Figure 103. History Ram Control Window . . . . . . . . . . . . . . . . . . . . . . . . . .160 Figure 104. History Ram Control Default Settings . . . . . . . . . . . . . . . . . . . .163 Figure 105. Setting Arm Conditions . . . . . . . . . . . . . . . . . . . . . . . . . . . . . . .166 Figure 106. Setting Trigger Conditions. . . . . . . . . . . . . . . . . . . . . . . . . . . . .167 xiv PN: 071-0359-02, October 2005 Contents Figure 107. Apply/Reset Save/Get Settings. . . . . . . . . . . . . . . . . . . . . . . . .168 Figure 108. Breaktrap Settings . . . . . . . . . . . . . . . . . . . . . . . . . . . . . . . . . .170 Figure 109. BreakMeas - Select Read_CKBD_all Test . . . . . . . . . . . . . . . .174 Figure 110. Pause_Step - ShowBitz PG Burst . . . . . . . . . . . . . . . . . . . . . . .179 Figure 111. Pause_Step - ShowBitz Eset View . . . . . . . . . . . . . . . . . . . . . .180 Figure 112. IDRom Icon . . . . . . . . . . . . . . . . . . . . . . . . . . . . . . . . . . . . . . . .181 Figure 113. Idrom Window . . . . . . . . . . . . . . . . . . . . . . . . . . . . . . . . . . . . . .182 Figure 114. Save to IDROM Procedure . . . . . . . . . . . . . . . . . . . . . . . . . . . .183 Figure 115. CView (Console Viewer) . . . . . . . . . . . . . . . . . . . . . . . . . . . . . .184 Figure 116. Front Panel Toolbar . . . . . . . . . . . . . . . . . . . . . . . . . . . . . . . . . .187 Figure 117. Calibration and Diagnostic Programs . . . . . . . . . . . . . . . . . . . .187 Figure 118. Calibration/Diagnostics Programs . . . . . . . . . . . . . . . . . . . . . . .188 Figure 119. Test Suites. . . . . . . . . . . . . . . . . . . . . . . . . . . . . . . . . . . . . . . . .189 Figure 120. Test Suite Execution . . . . . . . . . . . . . . . . . . . . . . . . . . . . . . . . .189 Figure 121. Diagnostic Windows . . . . . . . . . . . . . . . . . . . . . . . . . . . . . . . . .190 Figure 122. Options Dialog (Settings) Window . . . . . . . . . . . . . . . . . . . . . .191 Figure 123. Options Dialog - Page 2 . . . . . . . . . . . . . . . . . . . . . . . . . . . . . .192 Figure 124. Summary Options . . . . . . . . . . . . . . . . . . . . . . . . . . . . . . . . . . .193 Figure 125. Matrix Chart . . . . . . . . . . . . . . . . . . . . . . . . . . . . . . . . . . . . . . .194 Figure 126. Slice and Channel Summaries . . . . . . . . . . . . . . . . . . . . . . . . .195 Figure 127. Tool Icons . . . . . . . . . . . . . . . . . . . . . . . . . . . . . . . . . . . . . . . . .196 Figure 128. Front Panel Toolbar. . . . . . . . . . . . . . . . . . . . . . . . . . . . . . . . . .198 Figure 129. Calibration/Diagnostics Programs. . . . . . . . . . . . . . . . . . . . . . .198 Figure 130. MAP INIT . . . . . . . . . . . . . . . . . . . . . . . . . . . . . . . . . . . . . . . . .199 Figure 131. Flow Selection. . . . . . . . . . . . . . . . . . . . . . . . . . . . . . . . . . . . . .201 Figure 132. Front Panel Toolbar. . . . . . . . . . . . . . . . . . . . . . . . . . . . . . . . . .208 Figure 133. CView (Console Viewer) Property Page . . . . . . . . . . . . . . . . . .209 Figure 134. CView Icon . . . . . . . . . . . . . . . . . . . . . . . . . . . . . . . . . . . . . . . .210 Figure 135. Test Bugger Icon . . . . . . . . . . . . . . . . . . . . . . . . . . . . . . . . . . . .212 Figure 136. Kedit Icon . . . . . . . . . . . . . . . . . . . . . . . . . . . . . . . . . . . . . . . . .213 Figure 137. Kedit (Text Editor) . . . . . . . . . . . . . . . . . . . . . . . . . . . . . . . . . . .214 Figure 138. Analog Waveform Icon . . . . . . . . . . . . . . . . . . . . . . . . . . . . . . .215 Figure 139. Analog Wave Tool Window . . . . . . . . . . . . . . . . . . . . . . . . . . . .221 Figure 140. Options Window . . . . . . . . . . . . . . . . . . . . . . . . . . . . . . . . . . . .222 Figure 141. Marker Color Window . . . . . . . . . . . . . . . . . . . . . . . . . . . . . . . .225 Figure 142. Preferences Window Options . . . . . . . . . . . . . . . . . . . . . . . . . .226 Figure 143. Default Location Window . . . . . . . . . . . . . . . . . . . . . . . . . . . . .228 Figure 144. New Waveform Window . . . . . . . . . . . . . . . . . . . . . . . . . . . . . .229 Figure 145. Cursor Menu . . . . . . . . . . . . . . . . . . . . . . . . . . . . . . . . . . . . . . .234 Kalos 2 User Manual xv Figure 146. New Cursor . . . . . . . . . . . . . . . . . . . . . . . . . . . . . . . . . . . . . . . .235 Figure 147. Cursor Menu . . . . . . . . . . . . . . . . . . . . . . . . . . . . . . . . . . . . . . .235 Figure 148. Change Name Window . . . . . . . . . . . . . . . . . . . . . . . . . . . . . . .236 Figure 149. Find Level Window . . . . . . . . . . . . . . . . . . . . . . . . . . . . . . . . . .237 Figure 150. Delta Boxes. . . . . . . . . . . . . . . . . . . . . . . . . . . . . . . . . . . . . . . .239 Figure 151. Name Pane . . . . . . . . . . . . . . . . . . . . . . . . . . . . . . . . . . . . . . . .239 Figure 152. Markers . . . . . . . . . . . . . . . . . . . . . . . . . . . . . . . . . . . . . . . . . . .249 Figure 153. Pulse Measurement Result Markers . . . . . . . . . . . . . . . . . . . . .252 Figure 154. Display Buttons of the Calculator Area . . . . . . . . . . . . . . . . . . .255 Figure 155. DSP Functions . . . . . . . . . . . . . . . . . . . . . . . . . . . . . . . . . . . . .257 Figure 156. Shell Dialog. . . . . . . . . . . . . . . . . . . . . . . . . . . . . . . . . . . . . . . .278 Figure 157. Stack Menu . . . . . . . . . . . . . . . . . . . . . . . . . . . . . . . . . . . . . . . .279 Figure 158. Waveform Registers . . . . . . . . . . . . . . . . . . . . . . . . . . . . . . . . .280 Figure 159. File Menu . . . . . . . . . . . . . . . . . . . . . . . . . . . . . . . . . . . . . . . . .281 Figure 160. Creating a Script Dialog Box . . . . . . . . . . . . . . . . . . . . . . . . . . .281 Figure 161. Execute Script Dialog Box . . . . . . . . . . . . . . . . . . . . . . . . . . . .283 Figure 162. Transcript Pan with Drop Down Edit Menu . . . . . . . . . . . . . . . .284 Figure 163. Shell Command Dialog Box . . . . . . . . . . . . . . . . . . . . . . . . . . .285 Figure 164. Exit Dialog Box . . . . . . . . . . . . . . . . . . . . . . . . . . . . . . . . . . . . .298 Figure 165. LD Icon . . . . . . . . . . . . . . . . . . . . . . . . . . . . . . . . . . . . . . . . . . .299 Figure 166. LDTool Window . . . . . . . . . . . . . . . . . . . . . . . . . . . . . . . . . . . . .300 Figure 167. Vector Data Shown by Device Pins. . . . . . . . . . . . . . . . . . . . . .301 Figure 168. Device Pin Numbers Shown With Names. . . . . . . . . . . . . . . . .301 Figure 169. Fail/Pass . . . . . . . . . . . . . . . . . . . . . . . . . . . . . . . . . . . . . . . . . .302 Figure 170. Fail Channel Pins . . . . . . . . . . . . . . . . . . . . . . . . . . . . . . . . . . .302 Figure 171. Row and Column Selection. . . . . . . . . . . . . . . . . . . . . . . . . . . .304 Figure 172. Cell Selection . . . . . . . . . . . . . . . . . . . . . . . . . . . . . . . . . . . . . .305 Figure 173. Channels Dialog . . . . . . . . . . . . . . . . . . . . . . . . . . . . . . . . . . . .306 Figure 174. WaveForm Window . . . . . . . . . . . . . . . . . . . . . . . . . . . . . . . . .307 Figure 175. Change Scale Dialog. . . . . . . . . . . . . . . . . . . . . . . . . . . . . . . . .308 Figure 176. LATool Window . . . . . . . . . . . . . . . . . . . . . . . . . . . . . . . . . . . . .309 Figure 177. Settings Dialog . . . . . . . . . . . . . . . . . . . . . . . . . . . . . . . . . . . . .313 Figure 178. DSTool Window. . . . . . . . . . . . . . . . . . . . . . . . . . . . . . . . . . . . .314 Figure 179. Datalog Window . . . . . . . . . . . . . . . . . . . . . . . . . . . . . . . . . . . .316 Figure 180. Resouce Selection . . . . . . . . . . . . . . . . . . . . . . . . . . . . . . . . . .317 Figure 181. Selection of Radix . . . . . . . . . . . . . . . . . . . . . . . . . . . . . . . . . . .318 Figure 182. Data by Channels . . . . . . . . . . . . . . . . . . . . . . . . . . . . . . . . . . .318 Figure 183. Data by Device Pins . . . . . . . . . . . . . . . . . . . . . . . . . . . . . . . . .319 Figure 184. TG Field Context Menu . . . . . . . . . . . . . . . . . . . . . . . . . . . . . .319 xvi PN: 071-0359-02, October 2005 Contents Figure 185. Brief Mode. . . . . . . . . . . . . . . . . . . . . . . . . . . . . . . . . . . . . . . . .320 Figure 186. Detail Mode . . . . . . . . . . . . . . . . . . . . . . . . . . . . . . . . . . . . . . . .321 Figure 187. Detail Mode . . . . . . . . . . . . . . . . . . . . . . . . . . . . . . . . . . . . . . . .323 Figure 188. Detailed Information Dialog. . . . . . . . . . . . . . . . . . . . . . . . . . . .324 Figure 189. LDTool Toolbar . . . . . . . . . . . . . . . . . . . . . . . . . . . . . . . . . . . . .324 Figure 190. List of Active Modules . . . . . . . . . . . . . . . . . . . . . . . . . . . . . . . .327 Figure 191. Save Dialog Window . . . . . . . . . . . . . . . . . . . . . . . . . . . . . . . . .327 Figure 192. Save Format . . . . . . . . . . . . . . . . . . . . . . . . . . . . . . . . . . . . . . .329 Figure 193. Arm and Trigger Conditions Window . . . . . . . . . . . . . . . . . . . .330 Figure 194. Set, Get, Reset Buttons . . . . . . . . . . . . . . . . . . . . . . . . . . . . . .332 Figure 195. Find Dialog . . . . . . . . . . . . . . . . . . . . . . . . . . . . . . . . . . . . . . . .333 Figure 196. Find And Replace Dialog . . . . . . . . . . . . . . . . . . . . . . . . . . . . .334 Figure 197. Find And Replace String Dialog . . . . . . . . . . . . . . . . . . . . . . . .335 Figure 198. Find Warning Messages . . . . . . . . . . . . . . . . . . . . . . . . . . . . . .335 Figure 199. Find And Replace Column Dialog . . . . . . . . . . . . . . . . . . . . . . .336 Figure 200. Go To Dialog . . . . . . . . . . . . . . . . . . . . . . . . . . . . . . . . . . . . . . .337 Figure 201. DBMEdit Icon . . . . . . . . . . . . . . . . . . . . . . . . . . . . . . . . . . . . . .340 Figure 202. Toolbar . . . . . . . . . . . . . . . . . . . . . . . . . . . . . . . . . . . . . . . . . . .341 Figure 203. DBM Editor (Viewer) Primary Window . . . . . . . . . . . . . . . . . . .343 Figure 204. DBM Editor . . . . . . . . . . . . . . . . . . . . . . . . . . . . . . . . . . . . . . . .344 Figure 205. Socket File - Default . . . . . . . . . . . . . . . . . . . . . . . . . . . . . . . . .345 Figure 206. DBM View and Override (Buffer Memory). . . . . . . . . . . . . . . . .347 Figure 207. Translation Format (Hex) . . . . . . . . . . . . . . . . . . . . . . . . . . . . .348 Figure 208. DBM Editor - Default 16 Wide 4 Megs Addressing . . . . . . . . . .350 Figure 209. DE Structure . . . . . . . . . . . . . . . . . . . . . . . . . . . . . . . . . . . . . . .355 Figure 210. DE menu with Data Engine icon . . . . . . . . . . . . . . . . . . . . . . . .356 Figure 211. Settings dialog. . . . . . . . . . . . . . . . . . . . . . . . . . . . . . . . . . . . . .357 Figure 212. About dialog . . . . . . . . . . . . . . . . . . . . . . . . . . . . . . . . . . . . . . .358 Figure 213. Binary File Selection in Offline Mode . . . . . . . . . . . . . . . . . . . .360 Figure 214. Dlog Engine Icon Enabled/Disabled States . . . . . . . . . . . . . . .362 Figure 215. Datalog Architecture in Kalos 2 Software v 1.9 and Before . . .374 Figure 216. Datalog Architecture in Kalos 2 Software v 1.10 and Later. . . .374 Figure 217. Structure of custom DLL . . . . . . . . . . . . . . . . . . . . . . . . . . . . . .384 Figure 218. Cal/Diag Icon . . . . . . . . . . . . . . . . . . . . . . . . . . . . . . . . . . . . . .410 Figure 219. ShowBitz Icon . . . . . . . . . . . . . . . . . . . . . . . . . . . . . . . . . . . . . .411 Figure 220. ShowBitz Interface Window . . . . . . . . . . . . . . . . . . . . . . . . . . .412 Figure 221. IDRom Icon . . . . . . . . . . . . . . . . . . . . . . . . . . . . . . . . . . . . . . . .415 Figure 222. System Monitor . . . . . . . . . . . . . . . . . . . . . . . . . . . . . . . . . . . . .417 Figure 223. MAP INIT . . . . . . . . . . . . . . . . . . . . . . . . . . . . . . . . . . . . . . . . .418 Kalos 2 User Manual xvii Figure 224. Test Bugger Icon . . . . . . . . . . . . . . . . . . . . . . . . . . . . . . . . . . . .420 Figure 225. Compile Option Settings . . . . . . . . . . . . . . . . . . . . . . . . . . . . . .421 Figure 226. Test Debugger Primary (Main) Window . . . . . . . . . . . . . . . . . .422 Figure 227. Overview (Primary Window) . . . . . . . . . . . . . . . . . . . . . . . . . . .426 Figure 228. Toolbar Icons. . . . . . . . . . . . . . . . . . . . . . . . . . . . . . . . . . . . . . .427 Figure 229. Overview Property Page . . . . . . . . . . . . . . . . . . . . . . . . . . . . . .429 Figure 230. Socket Property Page - Table . . . . . . . . . . . . . . . . . . . . . . . . . .430 Figure 231. Socket Property Page - Package . . . . . . . . . . . . . . . . . . . . . . .431 Figure 232. Flow Property Page - Bin Table . . . . . . . . . . . . . . . . . . . . . . . .432 Figure 233. Flow Property Page - Flow Table . . . . . . . . . . . . . . . . . . . . . . .433 Figure 234. Flow Property Page - Flow Diagram . . . . . . . . . . . . . . . . . . . . .434 Figure 235. Test Property Page - Test Blocks . . . . . . . . . . . . . . . . . . . . . . .435 Figure 236. Test Property Page - Test Elements . . . . . . . . . . . . . . . . . . . . .438 Figure 237. Sequence Property Page . . . . . . . . . . . . . . . . . . . . . . . . . . . . .439 Figure 238. Levels Property Page - Level Table . . . . . . . . . . . . . . . . . . . . .440 Figure 239. Levels Property Page - Pin/Group . . . . . . . . . . . . . . . . . . . . . .441 Figure 240. Timings Property Page - Timings EdgeSet . . . . . . . . . . . . . . .442 Figure 241. Timings Property Page - Waveforms . . . . . . . . . . . . . . . . . . . .443 Figure 242. DPS/PMU Property Page DPS Setups Tab . . . . . . . . . . . . . . .444 Figure 243. DPS/PMU Property Page PMU Setups Tab . . . . . . . . . . . . . . .445 Figure 244. Setups Property Page . . . . . . . . . . . . . . . . . . . . . . . . . . . . . . . .446 Figure 245. Cons/Vars Property Page . . . . . . . . . . . . . . . . . . . . . . . . . . . . .447 Figure 246. Misc NVM ID’s Property Page. . . . . . . . . . . . . . . . . . . . . . . . . .449 Figure 247. Misc Patterns Property Page . . . . . . . . . . . . . . . . . . . . . . . . . .450 Figure 248. Shmoo, PMon, VLog Tools . . . . . . . . . . . . . . . . . . . . . . . . . . . .453 Figure 249. Shmoo Primary Window . . . . . . . . . . . . . . . . . . . . . . . . . . . . . .454 Figure 250. Shmoo Toolbar . . . . . . . . . . . . . . . . . . . . . . . . . . . . . . . . . . . . .456 Figure 251. Shmoo Display . . . . . . . . . . . . . . . . . . . . . . . . . . . . . . . . . . . . .457 Figure 252. Selects Property Page . . . . . . . . . . . . . . . . . . . . . . . . . . . . . . .459 Figure 253. Pass Skip Example . . . . . . . . . . . . . . . . . . . . . . . . . . . . . . . . . .463 Figure 254. Socket File Property Page - Default With Interactive Enabled .465 Figure 255. Socket File Property Page (Online) . . . . . . . . . . . . . . . . . . . . .466 Figure 256. Socket File Property Page (Online->Transfer=>Interactive) . . .467 Figure 257. Setups Property Page . . . . . . . . . . . . . . . . . . . . . . . . . . . . . . . .468 Figure 258. Property Page - Setup Example . . . . . . . . . . . . . . . . . . . . . . . .470 Figure 259. Composites Property Page . . . . . . . . . . . . . . . . . . . . . . . . . . . .471 Figure 260. 1-D Normal Shmoo . . . . . . . . . . . . . . . . . . . . . . . . . . . . . . . . . .472 Figure 261. Normal 2-D Shmoo Plot . . . . . . . . . . . . . . . . . . . . . . . . . . . . . .473 Figure 262. Standard 3-D Shmoo Plot . . . . . . . . . . . . . . . . . . . . . . . . . . . . .475 xviii PN: 071-0359-02, October 2005 Contents Figure 263. Accumulate Passed Percentage Plot . . . . . . . . . . . . . . . . . . . .477 Figure 264. Accumulate Passed Threshold Plot (Value = 50%) . . . . . . . . .478 Figure 265. Basic 2-D (Default Setup) . . . . . . . . . . . . . . . . . . . . . . . . . . . . .479 Figure 266. Pass Skip 2-D (1 < PSkip# < XSteps) . . . . . . . . . . . . . . . . . . . .480 Figure 267. Boundary Shmoo (PSkip >= XSteps) . . . . . . . . . . . . . . . . . . . .481 Figure 268. 3-D Fail to Pass . . . . . . . . . . . . . . . . . . . . . . . . . . . . . . . . . . . .482 Figure 269. 3-D Pass to Fail . . . . . . . . . . . . . . . . . . . . . . . . . . . . . . . . . . . .483 Figure 270. PMU XY Plot . . . . . . . . . . . . . . . . . . . . . . . . . . . . . . . . . . . . . . .484 Figure 271. PPMU XY Plot (Leakage) . . . . . . . . . . . . . . . . . . . . . . . . . . . . .484 Figure 272. Read Cycle of read_AAAA_fast (Period is Set to 200 ns) . . . .486 Figure 273. tACC_neg_index Setup . . . . . . . . . . . . . . . . . . . . . . . . . . . . . . .489 Figure 274. VCC Setup . . . . . . . . . . . . . . . . . . . . . . . . . . . . . . . . . . . . . . . .490 Figure 275. Selects Property Page . . . . . . . . . . . . . . . . . . . . . . . . . . . . . . .491 Figure 276. Shmoo Display . . . . . . . . . . . . . . . . . . . . . . . . . . . . . . . . . . . . .492 Figure 277. Pin Monitor Window . . . . . . . . . . . . . . . . . . . . . . . . . . . . . . . . .494 Figure 278. Power Setups Window . . . . . . . . . . . . . . . . . . . . . . . . . . . . . . .495 Figure 279. Level/Time Setups Window. . . . . . . . . . . . . . . . . . . . . . . . . . . .497 Figure 280. Levels Window . . . . . . . . . . . . . . . . . . . . . . . . . . . . . . . . . . . . .499 Figure 281. Times Window. . . . . . . . . . . . . . . . . . . . . . . . . . . . . . . . . . . . . .500 Figure 282. Socket Window . . . . . . . . . . . . . . . . . . . . . . . . . . . . . . . . . . . . .501 Figure 283. Select Flow . . . . . . . . . . . . . . . . . . . . . . . . . . . . . . . . . . . . . . . .504 Figure 284. Set Breaktrap . . . . . . . . . . . . . . . . . . . . . . . . . . . . . . . . . . . . . .505 Figure 285. Front Panel with Breaktrap Set . . . . . . . . . . . . . . . . . . . . . . . . .506 Figure 286. Manually Selecting Level Table. . . . . . . . . . . . . . . . . . . . . . . . .507 Figure 287. Using the Break Test Button. . . . . . . . . . . . . . . . . . . . . . . . . . .508 Figure 288. Manually Selecting the EdgeSet . . . . . . . . . . . . . . . . . . . . . . . .509 Figure 289. Selecting an EdgeSet . . . . . . . . . . . . . . . . . . . . . . . . . . . . . . . .510 Figure 290. IOs Subtab . . . . . . . . . . . . . . . . . . . . . . . . . . . . . . . . . . . . . . . .511 Figure 291. Adjust Index. . . . . . . . . . . . . . . . . . . . . . . . . . . . . . . . . . . . . . . .512 Figure 292. Auto Sequence Test . . . . . . . . . . . . . . . . . . . . . . . . . . . . . . . . .513 Figure 293. Grouped Testing . . . . . . . . . . . . . . . . . . . . . . . . . . . . . . . . . . . .514 Figure 294. Setting DPSSET Using the Break Test Button . . . . . . . . . . . . .515 Figure 295. Manually Selecting a DPSSET . . . . . . . . . . . . . . . . . . . . . . . . .516 Figure 296. Power Supply Shmoo Results. . . . . . . . . . . . . . . . . . . . . . . . . .517 Figure 297. Value Log Property Pages . . . . . . . . . . . . . . . . . . . . . . . . . . . .519 Figure 298. Value Log Socket Table and Setups . . . . . . . . . . . . . . . . . . . . .520 Figure 299. Bitmap Icon . . . . . . . . . . . . . . . . . . . . . . . . . . . . . . . . . . . . . . . .521 Figure 300. Bitmap (Primary Window) 1 Mbit Display . . . . . . . . . . . . . . . . .523 Figure 301. Bitmap (Primary Window) 256 Kbit Display . . . . . . . . . . . . . . .524 Kalos 2 User Manual xix Figure 302. Bitmap Toolbar . . . . . . . . . . . . . . . . . . . . . . . . . . . . . . . . . . . . .526 Figure 303. Bitmap Property Page (Bitmap and Mega Options) . . . . . . . . .527 Figure 304. Bitmap - Editor . . . . . . . . . . . . . . . . . . . . . . . . . . . . . . . . . . . . .528 Figure 305. Bitmap - Scan . . . . . . . . . . . . . . . . . . . . . . . . . . . . . . . . . . . . . .529 Figure 306. Display, Socket & Setups (Definitions) Property Page . . . . . . .530 Figure 307. Online Socket File Property Page . . . . . . . . . . . . . . . . . . . . . .531 Figure 308. Display Socket File Property Page . . . . . . . . . . . . . . . . . . . . . .532 Figure 309. Scan Setups Property Page . . . . . . . . . . . . . . . . . . . . . . . . . . .533 Figure 310. Search Tables (Fail / User) Property Page . . . . . . . . . . . . . . . .535 Figure 311. Overview Property Page - Block Diagram. . . . . . . . . . . . . . . . .537 Figure 312. *.bim Viewer . . . . . . . . . . . . . . . . . . . . . . . . . . . . . . . . . . . . . . .538 Figure 313. BitPower Icon . . . . . . . . . . . . . . . . . . . . . . . . . . . . . . . . . . . . . .539 List of Tables Table 1. Multi-Slice Configuration Data. . . . . . . . . . . . . . . . . . . . . . . . . . . . . .3 Table 2. Network Protocols . . . . . . . . . . . . . . . . . . . . . . . . . . . . . . . . . . . . . .20 Table 3. Pin Types and Tester Resources . . . . . . . . . . . . . . . . . . . . . . . . . . .45 Table 4. Kedit - File Menu Description . . . . . . . . . . . . . . . . . . . . . . . . . . . . . .60 Table 5. Resource Fly-By Tool Tips . . . . . . . . . . . . . . . . . . . . . . . . . . . . . . . .62 Table 6. Kedit Menu Bar Description . . . . . . . . . . . . . . . . . . . . . . . . . . . . . . .68 Table 7. Front Panel Menu Bar Description . . . . . . . . . . . . . . . . . . . . . . . . .111 Table 8. Sine Waveforms . . . . . . . . . . . . . . . . . . . . . . . . . . . . . . . . . . . . . .230 Table 9. Ramp Waveforms . . . . . . . . . . . . . . . . . . . . . . . . . . . . . . . . . . . . .230 Table 10. Triangle Waveforms . . . . . . . . . . . . . . . . . . . . . . . . . . . . . . . . . .230 Table 11. Sawtooth Waveforms . . . . . . . . . . . . . . . . . . . . . . . . . . . . . . . . .231 Table 12. Pulse Waveforms . . . . . . . . . . . . . . . . . . . . . . . . . . . . . . . . . . . .232 Table 13. Gaussian Noise Waveforms . . . . . . . . . . . . . . . . . . . . . . . . . . . .232 Table 14. DC Waveforms . . . . . . . . . . . . . . . . . . . . . . . . . . . . . . . . . . . . . .233 Table 15. Result Markers . . . . . . . . . . . . . . . . . . . . . . . . . . . . . . . . . . . . . . .252 Table 16. WC Arith Function Descriptions . . . . . . . . . . . . . . . . . . . . . . . . .258 Table 17. Wf Arith Function Descriptions . . . . . . . . . . . . . . . . . . . . . . . . . .259 Table 18. Wf Math Function Descriptions . . . . . . . . . . . . . . . . . . . . . . . . . .259 Table 19. Wf Trans Function Descriptions . . . . . . . . . . . . . . . . . . . . . . . . . .262 Table 20. Statistic Function Descriptions . . . . . . . . . . . . . . . . . . . . . . . . . .263 Table 21. Wf Meas Function Descriptions . . . . . . . . . . . . . . . . . . . . . . . . .264 Table 22. Pulse Function Descriptions. . . . . . . . . . . . . . . . . . . . . . . . . . . . .270 Table 23. Filter Function Descriptions . . . . . . . . . . . . . . . . . . . . . . . . . . . . .275 Table 24. Windows Function Descriptions . . . . . . . . . . . . . . . . . . . . . . . . . .277 Table 25. Int/Diff Function Descriptions . . . . . . . . . . . . . . . . . . . . . . . . . . . .278 Table 26. Commands recognized by AWT user_command_Interpreter . . .286 xx PN: 071-0359-02, October 2005 Contents Table 27. Conventional symbols in LATool waveform area . . . . . . . . . . . . .311 Table 28. Mnemonic for 6-Bit of TG Fail Latch . . . . . . . . . . . . . . . . . . . . . .322 Kalos 2 User Manual xxi This page intentionally left blank xxii PN: 071-0359-02, October 2005 ABOUT THIS MANUAL This manual describes the Kalos 2 test system from the operator’s point of view. Information within the manual explains how to prepare a test station for device testing, load and run device tests, and manage the software system at the test station. Included is a description of the system’s architecture, an overview of the software, and instruction on how to use the software tools and utilities. Kalos 2 User Manual xxiii About This Manual Scope of Manual This manual contains information for the Kalos 2 test system. Information in this manual is intended for use by operators, test engineers, and test-site (or system) administrators. Topics in this manual include: Kalos 2 configurations—introduction to the Kalos 2 test system. An overview describes the major units, their features, functions, configurations, and information on the Kalos 2 tester hardware, including the test system interface and the test head. User operations—description of basic user operations, including description of the operating environment, basic system operation, logging on/off and shutdown, and working with files and folders. Test program definitions—definition for the Kalos Test Language (KTL) and Kalos Pattern Language (KPL), and an overview of the procedures involved in developing a test program file for the Kalos 2 memory tester. Instructions are provided for using the Kedit utility; a Kalos supplied text editor used to generate, edit, and compile test programs. Introduction to KITE—introduction to KITE software. The functions of the Front Panel, which serves as a graphical front-end to load and control execution of test programs are described. Instructions on how to prepare a device for test, load a test program, and test the device once test system preparations are completed are provided. Also included are basic calibration and diagnostics procedures. KITE utilities—describes each KITE utility and provides information on function and usage. Test Debugger—introduction to the Test Debugger application. Information is provided on this interactive utility that allows the user to modify test program components; including flow, sockets, tests, levels, and timing data, within a Kalos 2 test program. Shmoo and Bitmap tools—an operational description of the Shmoo tool, which includes Pin Monitor and Value Log. The shmoo is used to characterize various parameters of the device under test by creating a graphic display of the relationship between defined parameters over a range of values. The Bitmap tool provides multiple operational modes. These operations include online and offline interactions. The Bitmap viewer displays current (online) cell/address failures of the device under test. This includes two screen displays: Bitmap and MegaMap. xxiv PN: 071-0359-02, October 2005 Typographical Conventions Typographical Conventions The following typographical conventions are used to represent computer-related information. Menu Conventions This manual identifies menu bar submenu commands by referring to both the menu and the submenu item names. For example, instructions to choose the New command under the File menu item are stated as, “select File > New from the pulldown menu.” Document Conventions This User Example courier Literal text appearing in a program listing (code), or as displayed on a terminal screen. area = length * width; bold Software commands entered from the keyboard. tar -cvf /dev/rmt/0 italic File, directory, and program names. Kalos_program.ktl => A series of a menu selections Kalos=>File=>Castaldi Project <Label> Represents a labeled key on the keyboard <Return> Keyboard Conventions This manual refers to special keys as shown in the following table. Kalos 2 User Manual This Key Means Arrow The keys labeled ←, ↑, →, and ↓. Return The key labeled Return or Enter. Alt The key labeled Alt. xxv About This Manual This Key Means Control The key labeled Ctrl or Control. Shift The key labeled Shift. space The space bar. Mouse Actions This manual also uses the following terms for mouse actions. Use the left mouse button unless otherwise instructed. xxvi Instruction Action Click Click the mouse button once. Select/Choose Click the mouse button once on the referenced item, so that it is highlighted. Right-click Click once with the right mouse button. Double-click Click the mouse button twice rapidly without moving the mouse. Shift-click Hold down the Shift key and click the mouse button. PN: 071-0359-02, October 2005 Related Publications Related Publications The following Credence publications are currently included on the Kalos 2 Series software that is shipped with each system. • Kalos 2 User Manual - (This manual), Part Number 071-0359-xx • Kalos 2 KITE Reference Manual, Part Number 071-0455-xx • ShowBitz ‘Help’ Online Reference Manual • NVM User’s Guide (Device Interface Board) • System Monitor User’s Guide These online help documents are available in PDF format on a CD-ROM that can be read with Adobe Acrobat Reader. Refer to the following directory/path: C:\Kalos2\doc\kpl or ktl (make a shortcut to easily access this online documentation). Direct Kalos 2 KITE Reference Manual access is provided from the Kedit utility Help menu. Also refer to the Online Help Documentation section of this preface. The following Kalos 2 manuals and guides are available on the Kalos 2 Documentation Set CD, part number, 063-4790-xx. • Kalos 2 User Manual, Part Number 071-0359-xx • Kalos 2 KITE Reference Manual, Part Number 071-0455-xx • Kalos 2 Service Manual, Part Number 071-0454-xx • Personal Kalos 2 (PK2) Site Preparation Guide, Part Number 071-0336-xx • Kalos 2 Site Preparation Guide, Part Number 071-0379-xx • PK2 Unpacking and Installation Manual, Part Number 071-0477-xx • Kalos 2 Unpacking and Installation Manual, Part Number 071-0479-xx Related Manuals: Microsoft Manuals • Kalos 2 User Manual MS Manuals, IEEE xxvii About This Manual Online Help Documentation The Kalos 2 documentation set is a collection of Credence manuals and technical documents which have been prepared for online viewing using Adobe Acrobat Reader. To view the documentation, Adobe Acrobat Reader with Search must be installed on the computer. The 32-bit version of Reader with Search for Windows is included on the Kalos 2 CD. To install it, locate the file named rs405eng.exe and double click on its icon. (Installation instructions can also be found in the Readme.txt file located on the Kalos 2 CD.) Follow the instructions provided by the Adobe installation wizard to complete the task. To access Kalos 2 documentation, insert the CD into the CD-ROM drive of the computer. If the KITE software installation contained on the CD was run previously, the documentation is already loaded into the Kalos2/doc directory. The documentation can be accessed by selecting the Help Menu on Kedit application or by double clicking on KITE_Reference_Manual.pdf or User_Manual.pdf files located in the Kalos/doc directory. These files launch the Kalos 2 KITE Reference Manual and the Kalos 2 User Manual, respectively. xxviii PN: 071-0359-02, October 2005 Audience Audience This manual is intended primarily for test personnel responsible for operating Kalos 2 test equipment. Knowledge of the Windows® XP operating software and user interface is required. The goal of this manual is to provide information that enables users to achieve maximum utilization of Kalos 2 test systems in a production environment. This information may also be useful to test engineers who need a quick overview of a Kalos 2 system’s architecture and fixturing features. To supplement this manual, users are also encouraged to participate in the formal training offered by Credence. Classes that cover all aspects of device programming, operation, and maintenance of Kalos 2 test systems are available on a regular basis. Contact your local Credence sales or service center for information and scheduling. Kalos 2 User Manual xxix About This Manual Safety Considerations This section describes the safety information. This information meets the SEMI S2-93 safety standards as well as those of Underwriters Laboratories (UL), Factory Mutual, Canadian Standards Association (CSA), and VDE (Verband Deutscher Elektrotechniker [Association of German Electrical Engineers]). Product safety information in Credence Systems manuals serves at least three purposes. 1. It helps prevent injury to personnel. 2. It observes government mandated requirements for safety issues. 3. It complies with the safety requirements in the countries where Credence products are sold. These requirements apply to instruction, operators, maintenance, and service manuals for semiconductor test systems and associated apparatus manufactured by Credence Systems Corporation. xxx PN: 071-0359-02, October 2005 Safety Statements Safety Statements Safety statements in this manual are preceded by Caution, Warning, and Danger signs that alert readers of hazards of increasing severity. A description of these hazards is as follows: CAUTION A statement with information essential to avoid loss of data, program failure, or equipment damage. • This statement is not used for a personal injury hazard. The hazard can only result in property damage or loss. • The hazard is not immediate. • Safety is contingent upon following the message instructions. WARNING A statement with information essential to the safety of the operator. • The hazard is not immediately accessible. • One level of protection is present between a person and the hazard. • The hazard can result in personal injury. A statement indicating that an imminent hazard exists. Kalos 2 User Manual • The hazard is immediately accessible. • The hazard can result in personal injury. • Safety is dependent upon awareness and skill. • No safeguards can be provided. xxxi About This Manual Operators Safety Summary The general safety information in this summary is for both operating and servicing personnel. Specific warnings and cautions will be found throughout the manual where they apply, but may not appear in this summary. Terms in This Manual CAUTION statements identify conditions or practices that could result in damage to the equipment or other property. WARNING statements identify conditions or practices that could result in personal injury or loss of life. Terms as Marked on Equipment CAUTION indicates a personal injury hazard not immediately accessible as one reads the marking or a hazard to property including the equipment itself. DANGER indicates a personal injury hazard immediately accessible as one reads the marking. Symbols as Marked on Equipment DANGER—High Voltage ATTENTION—Refer to manual Protective ground (earth) terminal Power Source and Ground This equipment operates from a power source that applies dangerous voltage between the supply conductors and between any supply conductor and ground. If the ground connection is interrupted, all accessible conductive parts could render an electric shock. If a power cord is not provided with the product, refer power connection to qualified service personnel. Do Not Remove Covers or Panels To avoid personal injury, do not remove product covers or panels. Do not operate the product without the covers and panels installed. Refer installation to qualified service personnel. Do Not Operate in Explosive Atmospheres To avoid explosion, do not operate this equipment in an explosive atmosphere unless it has been specifically certified for such operation. xxxii PN: 071-0359-02, October 2005 Service Safety Summary Service Safety Summary For Qualified Service Personnel Only Also refer to the preceding Operators Safety Summary. Do Not Service Alone Do not service or adjust this product internally unless another person capable of rendering first aid and resuscitation is present. Use Care When Servicing With Power On Dangerous voltages and currents may exist at several points in this product or in the equipment with which this product is used. To avoid personal injury, do not touch exposed connections and components while power is on. Disconnect power before removing protective covers and making internal changes. Do Not Wear Jewelry Remove jewelry prior to servicing. Rings, necklaces, watchbands, and other metallic objects could come into contact with dangerous voltages or currents. Power Source This product is intended to operate from single phase (3-phase for Kalosxw) AC power source, 200 - 240 VAC, 40A - 50/60 Hz. The power source may be L1, L2, ground or L, N, ground. Refer to the installation instructions before attempting to connect the product to the power source. Grounding the Product The product is grounded through the protective grounding conductor of the power cord (or service wiring in lieu of a power cord). To avoid electrical shock, the grounding conductor must be connected to a properly wired receptacle or junction box. Replace Covers To avoid injury to other personnel, replace covers before leaving the equipment unattended. Lifting Two or more persons may be needed to lift and maneuver equipment such as test head and rack-mounted units because of their physical size, shape, weight or location. To avoid injury, do not attempt to handle this type of equipment alone. Kalos 2 User Manual xxxiii About This Manual Electromagnetic Compatibility (EMC) System Requirements Immunity The use of hand-held wireless communication equipment should be limited to distances in excess of ten (10) meters from the tester to avoid the possibility of erroneous data or misclassification of devices under test. Accessibility of ESD sensitive devices and wiring in the vicinity of the test head requires that users wear a grounded wrist strap at all times. Wrist strap ground points are provided at the test head and at numerous points on the main cabinet. ESD wrist strap ground points are identified elsewhere in the system operator's manual. Other ESD abatement practices should also be implemented such as the use of ESD abatement flooring, conductive shoe straps, ESD preventive coat, ESD wrist strap connectivity monitors, etc. xxxiv PN: 071-0359-02, October 2005 1 KALOS 2 HARDWARE CONFIGURATION This chapter provides an introduction to the Kalos 2 tester architecture and system functionality. An overview describes the testers, its features, functions, and configuration. The major units discussed include: • Test Head • Server • Host PC • Main Board IMPORTANT — Version Compatibility - Recompile Test Programs Per the Kalos software release policy, all test programs must be recompiled when upgrading to a major release, i.e., 2.3.x to 2.5. In order to use the 2.5 version of software, all test programs must be compiled with the 2.5 compiler. An error message will be issued at load time if the program was not compiled with the 2.5 compiler. When upgrading a minor release, i.e., 2.3.1 to 2.3.2, or patching an existing release, i.e., 2.3.1 to 2.3.1.1, test programs do not require recompiling. Kalos 2 User Manual 1 1 - Kalos 2 Hardware Configuration Introduction The Kalos 2 test system is a general purpose test system with the additional features necessary to optimally test non-volatile memories, embedded non-volatile memories, and high volume logic. As shown in Figure 1, its small size and highly integrated design optimizes test floor space and lowers the cost of testing. Use of common I/O pins and resources per pin allow testing and programming of logic pattern device tests and standard device under test (DUT) interfaces. Tester-per-DUT architecture allows each device test to proceed independently, maximizing throughput for nondeterministic parallel test flows. Handlers and probers are accommodated by design, with program loading and central control by way of a workstation computer. Performance features include a 100 MHz basic test rate, per-DUT redundancy analysis, per-DUT AC and DC test. Kalos 2 test systems have the capability to test all future sizes of memory, peripheral logic, and memory arrays of up to terabit data size and I/O pin counts in multiples of 96 to 768 I/O pins. The test head, with four modules, provides 36 independent test systems, each with 96 I/O pins, for a total of 3456 I/O pins. Each of the I/O pins has individually programmed tri-level voltages, current loads, and comparators. Each of the possible 36 Kalos 2 test systems in a test head has two dedicated central processing unit (CPU) Modules (ETX). As a result, Kalos 2 has none of the test overhead and restrictions of shared resource architecture test systems, where all devices must wait for the slowest device or when serial binning is mandated. With 36 x 96 pin (or 72 x 48 pin) DUTs simultaneously tested asynchronously in parallel—this sequence independence means each DUT is tested with maximum throughput. Each 48 I/O pin tester slice has its own CPU module, error capture RAM (ECR), and data buffer memory (DBM) for compatibility with existing Kalos 1 programs. It is possible for one tester controller to control up to four tester slices. In addition, when two 48 pin slices are controlled by one tester controller, any I/O pin can be assigned to any DUT physical pin or ECR pin. For parallel 96 pin tester configurations, the I/O’s are in blocks of 96 I/O pins. Complex sequential programming loops and redundancy analysis programs are executed independently, reducing the processor overhead of the test flow to an absolute minimum. Higher pin count test system configurations are accommodated by a unique controller design that provides software control from one controller to take synchronous master control of up to eight Kalos 2 systems. This allows each test head to be configured as: 72 sites of 48 I/O pins 36 sites of 96 I/O pins 16 sites of 192 pins Parallel operation of up to eight devices from one tester controller supports 576 DUTS with 6 I/O pins. 2 PN: 071-0359-02, October 2005 Introduction The Kalos 2 test system can also be configured in multi-slice mode. Refer to Table 1 for details. Table 1. Multi-Slice Configuration Data Slices Channels Parallel Test Sites 2 96 36 4 192 16 *8 384 8 *16 768 4 * Not supported in this release version. Figure 1. Kalos 2 Test System Kalos 2 User Manual 3 1 - Kalos 2 Hardware Configuration The workstation computer is PC-based and runs under the Windows XP operating system. The workstation computer is readily networked to a host server using a standard 100/100 Base TX Ethernet. A separate (private) 100 Base TX Ethernet is used to communicate with the 72 ETX controllers in the Kalos 2 test head. The complex system management support requirements imposed on floor operators by a workstation environment are avoided by use of standard Windows based operator interface. A 2.4 GHz cycle rate Intel processor provides computing, and a monitor display offers responsive operator control for viewing test results. See Figure 2. Figure 2. Tester Set Up Boards 00-08 Boards 09-17 Monitor AC input PC BP0 Switch BP1 BP2 BP3 Boards 28-35 Boards 18-27 Power Supply Rack NOTE — Optionally, an additional PC can be added as the data server of Kalos 2 systems. 4 PN: 071-0359-02, October 2005 Kalos 2 Test Head Kalos 2 Test Head This section describes the Kalos 2 test head. Information on I/O pin configuration, backplane and wiring, test head opening mechanism, cooling, DUT and interface are discussed. I/O Pin Configuration The Kalos 2 test head consists of four backplane boards and 36 Kalos 2 96 pin main boards. Each side of the Kalos 2 test head consists of 2 backplane boards and 18 Kalos 2 96 pin main boards. Each backplane board connects to nine 96 pin Kalos 2 main boards. Each of the Kalos 2 96 pin main boards can be broken down into two 48 pin slices (slice 0 and slice 1). Each slice is a 100 MHz test rate, 48 I/O pins, single board tester, and can test up to eight DUTs (see Figure 3). Kalos 2 User Manual 5 1 - Kalos 2 Hardware Configuration Figure 3. Test Head Layout 02 BP 03 BP BP 00 BP 01 Eighteen Kalos 2 memory boards are located on each side of the Kalos 2 test head Up to eight DUTs per 48 channels can be tested 48 pins with a ETX Nine boards per backplane 48 pins with a ETX Each board is split into two sections of 48 channels; 96 pin total. Through Kalos 2 software, the 36 slots of Kalos 2 can be grouped as follows: One Kalos 2 main board for 96 pins Two Kalos 2 main boards for 192 pins The test head pin configuration breaks down further, as shown in Figure 4. 6 PN: 071-0359-02, October 2005 Kalos 2 Test Head Figure 4. Pin Configuration Breakdown 0 1 0 1 0 1 0 1 0 1 0 1 0 1 0 1 0 1 2 2 2 2 2 3 3 2 2 3 2 2 3 4 4 Not currently supported 5 slice (0/1) - 48 pins 0/1 5 768 pins (Not currently supported) 96 pins 2 192 pins 3 384 pins 4 (Not currently supported) Backplane and Wiring The Kalos 2 backplane is shown in Figure 5. Power and Ethernet Connection The backplane board contains the DC power, Internal Board Monitor (IBM) link, and Ethernet connections from the server to the Kalos 2 96 pin main boards. Also on the backplane board are two DC to DC power converter modules. One is for the Kalos 2 main board and the other is for the DUT connector. The circuits that control fan speeds, (set of three fans) that control the cage temperature are also located here. Main Clock Each backplane contains a 400 MHz crystal as the main clock. This clock is the original clock source for each set of nine Kalos 2 96 pin memory boards connected to each backplane board. Kalos 2 User Manual 7 1 - Kalos 2 Hardware Configuration Backplane IDROM A non-volatile memory (NVM) chip is located on the backplane that contains the electronic information of the backplane, such as part number, ECO level, etc. Figure 5. Backplane Board Test Head Opening Mechanism The test head opening mechanism is pneumatically driven using 80 psi of compressed air. This provides access to one side of the test head. Compressed air is ported to provide the pressure necessary for the pneumatically driven motor to open the test head when the Power Lock Switch is pressed. 8 PN: 071-0359-02, October 2005 Kalos 2 Test Head To close the test head, pull down the test head cover and press the Power Lock Switch (OFF). Compressed air is ported to provide the pressure necessary for the pneumatically driven motor to close the test head. See Figure 6 and Figure 7. Figure 6. Control Air Schematic Kalos 2 User Manual 9 1 - Kalos 2 Hardware Configuration Figure 7. Test Head Opening Mechanism Test Head Power Shutoff Switch Each half of the test head has an interlock switch or cam switch used to shut down the test head power. These switches are in series with the test head push button located on backplane boards 0 and 3. Two din connectors (DB25) with two pins on the rear of the power rack (located on the server), are used to connect the interlock switches (located on the test head) to the remote enable from the power supplies rack on the server. See Figure 8. 10 PN: 071-0359-02, October 2005 Kalos 2 Test Head Figure 8. Power Shutoff Switch Cam switch Tester Cooling Kalos 2 test systems use forced air to cool the test head. The test head comprises six axial fans that are configured into two groups of three fans each (see Figure 9). Two sensors, located on each side of the tester, control the speed of each fan. The air intake is at the sides of the test head. This forces the air up through the test head, where the Kalos 2 96 pin memory boards are located. The air passes out through the top of the test head where the sensors are located. Once out of the test head, the air is exhausted from the top of the test head out to the ceiling. Kalos 2 User Manual 11 1 - Kalos 2 Hardware Configuration Figure 9. Tester Cooling System Temperature sensor Kalos 2 memory board Airflow over the rest of the Kalos 2 memory board is lighter. 24 pin electronic ASICs and the 2 OMNI chips heatsinks Airflow over the PE ASICS and the OMNI chips is heavy. DUT and Interface Kalos 2 DUT and interface are integrated together. The cable bundle connects the Kalos 2 main board to the interface unit. Kalos 2 interface unit is a pogo tower integrated interface. Therefore, the DUT pin is a pogo pin at the end of the interface. A photo of the interface unit and pin layout is shown in Figure 10. 12 PN: 071-0359-02, October 2005 Kalos 2 Test Head Figure 10. Interface Unit and Pin Layout Kalos 2 User Manual 13 1 - Kalos 2 Hardware Configuration Kalos 2 Server This section describes the Kalos 2 server. Information on emergency switches, AC control box, and AC configuration are discussed. EMO and Test Head Switch Emergency off (EMO) control and test head push buttons are located on the front door of the server, as shown in Figure 11. The EMO button is on the top and the test head power control button is on the bottom. The test head On and Off button controls all DC power to Kalos 2 test head and boards. The LED’s on the test head button illuminate when the switch is on. The EMO switch is used for emergency system shut off. It will trip the main circuit breaker on the AC controller box. An auxiliary voltage for remote control to trip the main circuit breaker uses 24 VAC converted from 220 VAC through a transformer. A safety circuitry guarantees 24 VAC is present, at all times, when the tester is on. Figure 11. EMO and Test Head On/Off Controls Top: EMO Bottom: Test Head Switch 14 PN: 071-0359-02, October 2005 Kalos 2 Server AC Controller Box The main circuit breaker on the AC controller box controls the AC power to the server (see Figure 12). This circuit breaker shuts down the entire Kalos 2 test system, including the server and test head. All power shuts off to the tester due to the activation of EMO or current overload. There is also a switch on the AC controller box for accessories such as computer, monitor, and hubs. There are eight 220 VAC outlets on the AC controller box. Each uses a 15 Amp common single phase circuit breaker. All accessories such as computer, monitor, and hubs are connected to those outlets. The maximum use for all outlets is limited to 15A. Figure 12. AC Control Box Test head power and EMO switch connector PC main power switch Main circuit breaker AC Configuration The Kalos 2 input power range is 3 Phase 220 VAC@100 A or 3 Phase 380 VAC@ 60 A (Voltage are +/-10%). A cable for AC input wiring is provided for each Kalos 2 shipped. A 4 wire cable is used for a US version or countries using 3 phase 220 VAC. A 5 wires cable is used for European countries or countries using 3 phase 380 VAC. Kalos 2 User Manual 15 1 - Kalos 2 Hardware Configuration Host PC The host computer, one per system, is a 2.4 GHz Intel Xeon processor, Pentium 4 based PC and runs under the Windows XP Professional operating system (see Figure 13). It uses a high-resolution monitor (1600x1200) with a CD-RW drive (48x/ 24x/48x). It also loads with Kalos 2 software for testing. The host PC is readily networkable to a local networking link using a standard 100 Base TX Ethernet port (to and from the test head) that is used to communicate with the 72 ETX controllers in the Kalos 2 test head. An external 10 BaseT/100 Base TX Ethernet port is used by the host PC to ensure that the Kalos 2 test system is readily networkable to a local networking link. The host PC has a 36 GB Ultra 320 SCSI hard drive. The serial, parallel, and USB ports of the PC link to the backplane for Internal Board Monitor (IBM) communication. A GPIB external port is also included for communication between the Kalos 2 system and a prober or handler. An optional second PC can be added as the data server of Kalos 2 systems. Figure 13. Host Computer 16 PN: 071-0359-02, October 2005 Main Board Main Board The Kalos 2, main board; hardware configuration and ETX modules are described in this section. Hardware Configuration The Kalos 2 board consists of the main board as well as the following modules (see Figure 14): • 2 ETX’s (CPU Modules) • 2 PMU Modules • 2 DPS Modules • 2 EMU Modules Figure 14. Hardware Configuration Kalos 2 User Manual 17 1 - Kalos 2 Hardware Configuration ETX (CPU Module) The ETX module is used for data transactions. The Ethernet inputs data into the ETX, the ETX converts this to a PCI signal, outputting it to the BIF by way of the ANC and Omni subsystem (see Figure 15). Figure 15. ETX Module There is one ETX or CPU module per slice. It has a PI-266 MHz ETX Intel mobile Pentium (X86) based controller with 128 Megabytes of DRAM. It uses the WindRiver VxWorks AE ROTS (real time operating system). The ETX has Broadcast capability to write per-pin resources or central resources across more than one slice and the ability to control from one to sixteen slices. The ETX uses 100 Base TX Ethernet connections to the host computer. 18 PN: 071-0359-02, October 2005 2 USER OPERATIONS This chapter describes the operating environment, and provides information on the following user operations: Kalos 2 User Manual • Basic System Operation • Logging On / Off and Shutdown • Working With Files and Folders in Windows XP 19 2 - User Operations Operating Environment The Kalos Integrated Test Environment (KITE) software operates on the Kalos 2 workstation computer, an Intel® Pentium® processor-based system. The user interface is implemented using the Microsoft® Windows XP® operating system. The KITE software provides access to development, debug, and diagnostic tools and utilities through a graphical user interface. For the purposes of this manual, it is assumed that the user is familiar with the Microsoft Windows operating environment, including its commands and system file structures. The following section contains a short description of the Windows XP interface controls that are referred to in this documentation. Networking Kalos 2 operates stand-alone or connected to other computer systems on a network that support Ethernet and TCP/IP protocol. The network provides a flexible test environment, allowing program development and the tester data base to be hosted on different computers within the network. PC Requirements Following are personal computer requirements necessary to run Kalos 2 test systems. • Windows XP Professional • 16-bit small font • 1280 x 1024 minimum monitor settings • 1600 x 1200 for special Bitmap (Mega Map) Table 2. Network Protocols 20 Feature Characteristics Network protocol TCP/IP Network software Windows XP Professional PN: 071-0359-02, October 2005 Basic System Operation Basic System Operation Following is a definition of terms. Home Directory Directory in which the user is placed upon login. This is also where user “start up” files are located. Working Directory The current location, of the user, within the hierarchical directory structure. Use the dir command to print working directory. Parent Directory This is the directory one level directly above the current directory. Child Directory This is the directory one level directly below the current directory. \ (back slash) Kalos 2 User Manual Symbol used to separate directory levels. 21 2 - User Operations Logging Into the System In order to log into a system or workstation, a user account is needed. User account requirements: • A user ID (login name) • A password (usually user selected) Once a user account is acquired, login information, including user ID and password is entered at the login prompt in Windows XP, as follows: The system workstation automatically boots on power up. Once booted, a message appears on the screen prompting the user to press ‘Ctrl + Alt + Delete’ to log on (see Figure 16). Figure 16. Logging On Begin Logon Press Ctrl+Alt+Delete to log on Pressing the Ctrl + Alt + Delete keys simultaneously, invokes the Logon Information window which asks for a user name and password (see Figure 17). Note that user name and password are case sensitive. Figure 17. Logon Information Logon Information Enter a user name and password that is valid for this system. User name. Password. OK 22 Cancel Help Shut Down... PN: 071-0359-02, October 2005 Logging Into the System User Password When you first acquire a user account, a standard password should be assigned to your account. This helps to maintain the integrity of your programs and data. The assigned Windows XP system administrator should have tools for managing user accounts. Before changing your account password, contact the system administrator for any additional instructions or requirements. The system prompts you to enter your old password for confirmation before allowing you to change passwords. Enter your current password and press the Return key. The system now prompts you to enter your new password. Again, password characters are not displayed on screen. Enter the new password and press the Return key. The system prompts you to enter your new password again to confirm what you entered is correct. The system informs you that your password is changed. NOTE — • Password character lengths are determined by the system administrator. A warning message is displayed if the password is not long enough. • Upon your next login, remember that you have changed your password. Upon logging into the system, the user desktop display shows the resources that are accessible. These resources are set up by the system administrator. NOTE — The system does not display password characters on screen. This is for security purposes. Once logged in, the Windows XP desktop appears (see Figure 18). Kalos 2 User Manual 23 2 - User Operations Figure 18. Windows XP Desktop Title bar 24 PN: 071-0359-02, October 2005 Logging Off and Shutdown Logging Off and Shutdown When you have completed work on the computer, you should log off the system. Log off of the system by pressing CTRL-ALT-DELETE keys to get the Windows XP Security window, or by selecting Log off or Shut down from the Start menu (See Figure 19). Log off is used to log off your account, without turning off the workstations power. Shut down is used to power down the workstation. Figure 19. Log Off and Shut Down To log off, click here with the left mouse button. Next, click on the Shut down or the Log off button, again with the left mouse button. Select Log Off or Shut down. The system completes any necessary cleanup and logs you out of the system. This process is complete when the Login dialog box appears or the screen saver becomes active. Kalos 2 User Manual 25 2 - User Operations Software Architecture The KITE software operates on the Kalos 2 workstation computer, an Intel® Pentium® processor-based system. The user interface is implemented using the Microsoft® Windows XP® operating system. For the purposes of this manual, it is assumed that the user is familiar with the Microsoft Windows operating environment, including its commands and system file structures. The following section contains a short description of the Windows interface controls that are referred to in this documentation. File Structure There are two directories that contain files and data necessary to operate the Kalos software (KITE). The two primary subdirectories are: C:\Kalos and C:\KalosOS. These files are located on the C drive. C:\Kalos Directory The C:\Kalos directory contains subdirectories that include files and data that have traditional locations that users must be aware of. The primary subdirectory is the bin subdirectory. The bin directory contains the executables, as well as all the calibration and diagnostic routines that are run on Kalos 2 test systems. By default, files are saved to this subdirectory location unless otherwise specified (i.e., summary files of a calibration run). The doc subdirectory located off of the Kalos directory contains .pdf files which contain the documents used in the help files as well as the user applications changes, etc. The Kalos/Test/ DeviceIF subdirectory contains the driver files as well as the production.ini files. The production .ini files contain the settings for prober drivers. The Data_Engine and custom GUIs are currently applications supported hardware. This directory structure is shown in Figure 20. 26 PN: 071-0359-02, October 2005 Software Architecture Figure 20. Kalos2 Directory C:\KalosOS Directory The Kalos.OS subdirectory contains the vxworks files which direct the TTarget to load the correct version of software. This directory structure is shown in Figure 21. Kalos 2 User Manual 27 2 - User Operations Figure 21. KalosOS Directory Kalos OS Directory Windows XP® Interface Controls The Windows XP graphical user interface contains standard controls and display areas which are part of the interface for any application which runs under Windows XP. Their functions are explained in this section. The Windows XP Graphical User Interface (GUI) provides the standard controls and displays of KITE. This section is not intended to provide a full description of the Windows XP operating system, but rather to explain the standard controls and interactions as they pertain to the KITE interface. Each is discussed in the following subsections. Start Menu The Start button, used to quickly start a program or find a file, is located on the taskbar at the bottom of the screen (see Figure 22). When a program, document, or window is opened, a button identifying it appears on the taskbar. This button can be used to quickly switch between the windows that are open. 28 PN: 071-0359-02, October 2005 Software Architecture Windows Explorer In Windows Explorer, the hierarchy of folders on the computer and all files and folders within each selected folder can be seen. This is especially useful for copying and moving files. You can open the folder that contains the file you want to move or copy, then select and drag it to the folder or location you want to put it in. To find Windows Explorer, right-click the Start button, then point and click on Programs --> Accessories--> Windows Explore (see Figure 22). Figure 22. Windows XP Start Menu and Explorer Control Menu Close, Minimize, and Maximize X Windows Explorer Start Menu Control Menu The control menu is opened by selecting (left mouse) the control menu box in the upper-left corner of the application window, on the title bar for the application or file (see Figure 22). When an application is minimized, this menu can be accessed by right-clicking on the application icon in the Window’s Start menu bar. The control menu box provides a drop down menu containing the following options. Kalos 2 User Manual 29 2 - User Operations Restore The Restore option returns the application window to its former size after the window is enlarged (maximized) or reduced (minimized). Move This option allows the application window to be moved to another position by using the keyboard. Size This allows the application window to be resized using the keyboard. Minimize Minimize reduces the application to an icon on the Start menu bar. Maximize The Maximize control switches the size of the window between its former and maximum size. When the window is not in its maximum size, the height and width of its borders can be changed by clicking on the outside edge of the window, until the cursor changes to a two-sided arrow, and dragging it to the desired dimensions. Close For an application, the Close command is used to quit the application and close any of its opened files. For an opened file, the Close command closes only the file for which the control was chosen. Close, Minimize, and Maximize Buttons Every window has an x (close button) in the upper-right corner that can be clicked to close the window and quit the program. The minimize and maximize buttons are positioned next to the close button. Title Bar The title bar spans the top of the application window and displays the application name. When a file is opened within an application, there may also be a title bar across the top of the file which contains the path and file name. Any window can be moved by clicking on the title bar and dragging the window to a new location. 30 PN: 071-0359-02, October 2005 Software Architecture Status Bar The Status Bar is a single message line that can be seen at the bottom of any Windows XP application window. It acts as an interface to the user from the tester to communicate the operations of the associated application. If the Status Bar is not present, choose View => Status Bar from the pulldown menu at the top of the application window to display it. Shortcuts Shortcuts allow the user to directly launch a specific application without using the Start menu button. Creating Shortcuts To create a shortcut, go to the Start menu and launch Windows Explorer. Next, select the desired file or application and click on the right mouse button. A pulldown menu appears (see Figure 23). Choose “Create Shortcut.” In the directory where the file or application is located, a Shortcut file is created. Kalos 2 User Manual 31 2 - User Operations Figure 23. Creating Shortcuts The created shortcut Using Shortcuts Once the shortcut is created, click and hold the shortcut icon using the right mouse button. While holding down the right mouse button, drag the icon to the background area where you want it to reside. To launch the application or file, double click the left mouse button on the shortcut icon. 32 PN: 071-0359-02, October 2005 Software Architecture Launching Applications There are two ways to launch an application when using Windows XP. You can open the application by double clicking on the application in Windows Explorer, using the right mouse button, or you can double click on a shortcuts icon using the left mouse button. If you choose to launch a file using a shortcut icon, the application in which the file was created is also launched. For example, if the chosen file is a FrameMaker file, FrameMaker launches, then the selected file opens. Launching KITE The launching of KITE software is part of the start-up procedure for the Kalos 2 test system. The user must invoke the KITE software in order to launch the Front Panel application. The default condition of the KITE application is the production environment from which Kalos test programs are loaded and executed. From Front Panel, all other applications, tools, and utilities can be launched. The menu bar and toolbar provide the mechanism for executing these other applications. Kalos 2 User Manual 33 2 - User Operations Working with Files and Folders in Windows® XP This section describes some of the basic methods used to create, name, move, copy, and delete files and folders using the Windows XP environment. Creating Folders New folders are created in the current directory. Before creating a new folder, ensure that you are in the directory in which you want the folder to reside. To create a new folder: 1. Launch the Explorer application. 2. Left mouse click on the File button and drag the cursor down to New. 3. While still depressing the mouse button, drag the cursor to the right and select Folder. A “New Folder” appears in the current directory. Naming Folders and Files Name a New Folder or rename an existing folder by slowly double clicking the left mouse button on New Folder or on an existing folder name. Type in the new name or change the existing name. File names can be changed in the same manner. Moving Folders and Files While in the Explorer application, move a folder or file by left mouse clicking on the image to the left of the folder or file and while still depressing the left mouse button, drag it to the new location. If the folder or file is to be placed inside of an existing folder, drag the folder/file to that location (the folder will highlight) and release the mouse button. Copying Folders and Files While in the Explorer application, copy a folder by right mouse clicking on the folder you want to copy. A pop-up menu appears. Left mouse click on Copy. Open the directory in which the copied folder is to be placed. Using the left mouse button, go to Edit => Paste in the pulldown menu and release. Copy a file by right mouse clicking on the file you want to copy. A pop-up menu appears. Left mouse click on Copy. Open the directory in which the copied file is to be placed. If the file is to be placed in an existing folder, select the folder and using the left mouse button, go to Edit => Paste in the pulldown menu and release. 34 PN: 071-0359-02, October 2005 Working with Files and Folders in Windows® XP Deleting Folders and Files While in the Explorer application, delete a folder or file by right mouse clicking on the folder or file you want to delete. A pop-up menu appears. Left mouse click on Delete. A pop-up menu appears to verify the execution of this command. Kalos 2 User Manual 35 2 - User Operations This page intentionally left blank. 36 PN: 071-0359-02, October 2005 3 TEST PROGRAM DEFINITION This chapter provides a definition of the Kalos Test Language (KTL) and Kalos Pattern Language (KPL), and an overview of the procedures involved in developing a test program file for the Kalos 2 memory tester. Instructions for using the Kedit utility, a Kalos supplied text editor used to generate, edit, compile and debug test programs, are also provided. Topics include: • Test Program Language - C Source File (CMODULE) • Test Program File - Program File Layout - Socket Table - Pingroups - DC Tests Parametric - Functional Test - Bin Table - Flow Statement - Program Files • Kedit - Program Loading • Navigation and Edit Tools • Debugging Using Kedit • Debugging KPL Source Code in Kedit IMPORTANT — Version Compatibility - Recompile Test Programs Per the Kalos software release policy, all test programs must be recompiled when upgrading to a major release. In order to use the 1.11 version of software, all test programs must be compiled with the 1.11 compiler. Kalos 2 User Manual 37 3 - Test Program Definition Test Program Language This section provides the definitions for the Kalos Test Language (KTL) and Kalos Pattern Language (KPL). Also provided is an overview of the procedures involved in developing a test program file for the Kalos 2 memory tester. Kalos Test Language (KTL) Kalos 2 test programs are written in the Kalos Test Language (KTL). This intuitive test language, designed specifically for the needs of Kalos 2 memory testers, is based on the ANSI-C programming language. There is no procedural code-test flow, and test sequences are encapsulated into data structures. The compiled binary formatted executable version of the KTL file includes a .kbi (Kalos binary interface) extension. KTL files are created using one of the following two methods: • Any ASCII text editor • Kedit (A Credence supplied text editor) Figure 24 shows a typical KTL program file. The programs that are listed on the left are optional parts that can be used in a test program run. The main window shows the program header information. Header information may list program information such as the device type, description, origin, application dates, etc. Header lists are not required, but they provide a history of the test program. 38 PN: 071-0359-02, October 2005 Test Program Language Figure 24. KTL File Kalos Pattern Language (KPL) The Kalos Pattern Language (KPL) enables the creation of test patterns in ASCII text format. These patterns are then transformed by the Kalos Pattern Compiler (KPC) into binary images which are loaded into the pattern generator(s) prior to the execution of a test. The compiled binary version of the KPL file includes a .pbi (pattern binary interface) extension. Labels.h file(s) are also created by the pattern compiler to map labels to micro-instruction locations. The KPL is a block structured language that comprises elements shared with the test program. Some elements are optional, and some may appear more than once in a pattern file. Kalos 2 User Manual 39 3 - Test Program Definition C Source File (CMODULE) C functions can be used inside of a test sequence in a KTL program as long as they are first declared inside a CMODULE statement. When used in a Kalos 2 test program, C functions are referred to as C-Hooks. The C source file defines the C function(s). The compiled binary CMODULE(s) are given a .o (C-Hook object file) and a .h (C-Hook header file) extension. See Figure 25. Figure 25. KTL Program Kalos 2 Files: Before Compilation .ktl .kpl .c After Compilation .kbi .pbi Labels.h .o .cmodule.h NOTE — File extensions may change in future revisions of software. 40 PN: 071-0359-02, October 2005 Test Program File Test Program File The KTL test program file contains the overall procedure for testing a device. It includes functions for setting up the tester, stimulating the device, and checking the responses of the device. The contents of a KTL test program file look similar to the contents of a simplified C language file. The KTL file may begin with a header that contains directives common to the functions that follow. It may also contain directives at different points throughout the program. The body of the program contains several test program operations, or data objects. Each is defined in a statement block that is specific to its function. There are five types of directives which are supported in the KTL. They are: #include Points to a KTL program file. #clibrary Allows you to load compiled C object files to be included with your test program and can also load C-Hooks from a directory other than where the test program is loaded from. #define Labels that are replaced by user defined text when the program is loaded or a text string is replaced. #ifdef Conditionally compile the block of lines through terminating #endif. #endif Terminates corresponding block of lines that began with #ifdef). #pragma Invokes special features The test program is a collection of data and sometimes includes compiled user code. Conceptually the data is organized into the following parts: • Test Containers - For test operations • Bins - End points in a flow • Flow - Connection of tests and bins • Events - Such as “start test” and “end of lot” • Resources - Data used by various test operations • I/O specifications and pingroups • User code - C-Hooks Kalos 2 User Manual 41 3 - Test Program Definition KTL Program File Layout The organization of statements in a KTL file is dictated by one simple rule: “Nothing can be used unless it has been previously defined.” For example, the name of a test cannot be used in a flow statement before that test is defined in a test statement (the sequence actions of the test). The order in which the test is laid out in the test program is critical to the test makeup. A recommended order of KTL statements is provided in Figure 26. Notice that the socket table, which defines all of the device pins, comes before the pingroups which use device pins in their definition. Next come several resource definitions which use pin names to program the hardware. These are followed by tests, which use resources in their sequences. The BINTABLE is defined next, although it can occur anywhere before FLOW. Then comes FLOW and EVENT_MAP, which use tests in their tables. Following this standard order helps to avoid compile errors. 42 PN: 071-0359-02, October 2005 Test Program File Figure 26. File Organization Sometimes included and more than one is possible CMODULE name = {...}; or #include “cmodule.cmodule.h” SOCKET name = {...}; or #include “socket.h” Generally, only one each of these items is required PINGROUP name = {...}; resource name = {...}; TEST name = {...}; BINTABLE name = {...}; FLOW name = {...}; EVENT_MAP name = {...}; The KTL is made up of several levels of abstraction. The highest level defines the sequence of tests that are performed, using references that then point to the next level of abstraction, which in turn is made up of references that point to another level of abstraction. Figure 27 illustrates two of several levels of abstraction used in the KTL. The first level, the flow, defines which test is executed first. What follows depends on whether that test passes or fails. Typically, when a test fails, the device is assigned to a fail bin. Kalos 2 User Manual 43 3 - Test Program Definition Figure 27. Flow Levels START Perform user specified tests based on specific events. EVENT_MAP Test syntax for the Opens test Opens Bin 2 Shorts Bin 3 InputLeak Bin 4 OutputLeak Bin 5 ICC Bin 6 Standby Bin 7 TEST Opens = { TEST NO = 100; DESC = “Test for opens”; SEQUENCE = { opens_lev, all_to_lo_seq, opens_pmu, MEAS(PMU) }; }; Bin Table Syntax Chip EraseVerify Bin 8 WrtRd ChkBd Bin 9 ECRreadMEM_B Bin 10 Bin 1 STOP BINTABLE Bins = { // name hard soft PASS I FAIL Bin 1, 1, 1, PASS; Bin 2, 2, 2, FAIL; Bin 3, 3, 3, FAIL; }; Socket Table The Socket table contains information for mapping device pins to tester channels (see Figure 28). It also defines the properties of each pin. Each device pin must be declared in the Socket Table before it can be assigned resources. 44 PN: 071-0359-02, October 2005 Test Program File A device pin is designated by DPn, where n is a number from 1 to 1024 (768 + 256 non signal pins). There are at most 768 tester channels on a Kalos 2 16-board configuration, but there can be up to 256 non-signal pins (power, ground, and noconnect). Each pin is given a unique name which may be used to program resources or create pingroups. Signal pins are given a type and default Pattern Generator (PG) assignment. Each pin may be assigned 1 to 4 channels on a Kalos 2 board, but all pins must have the same number of channels assigned. This is necessary for support of parallel test within each Kalos 2 slice. Pin Types Two pin types and assignments are accepted in the pin definitions in order to allow specification of the second half of extended cycles, where characteristics may differ from the first half. For example, DRAM devices with multiplexed address pins. KTL supports up to 36 I/Os in the socket table that map to pattern generator resources. The I/O count is accumulated from input, output, and input/output pin types. Table 3 lists the allowed pin types and available assignments. Table 3. Pin Types and Tester Resources DUT Pin Type Pin Type Resource Designator Tester Resource Power pin PWR_PIN DPS VCC0 to VCC31 VPP0 to VPP31 Ground pin GND_PIN No connect NC_PIN Input pin INPUT_PIN D0 ... D17, D18 ... D35 Tester Channel 1-768 Output pin OUTPUT_PIN O0 ... O17, O18 ... O35 Tester Channel 1-768 Clock pin CLOCK_PIN NA Tester Channel 1-768 Address pin ADDR_PIN X0 ... X15, Y0 ... Y15, Z0 ... Z7 Tester Channel 1-768 Input/Output Pin IO_PIN IO0 ... IO17, IO18 ... IO35 Tester Channel 1-768 Kalos 2 User Manual 45 3 - Test Program Definition All signal pins must be mapped to a tester channel. Power pins should be mapped to a device power supply (DPS). Ground pins and no connect pins do not require a channel or assignment. NOTE — The N/A means not assigned. For example a CE_ pin is an unassigned pin while an address pin is an assigned pin. Also, DQ represents data which is the same as a bidirectional pin (I/O pin). Use I/O in place of DQ in your socket table. When testing more than one device with a single Kalos 2 slice (multi-DUT testing), the FLOW statement must always branch to a bin on a fail and all signal pins are connected to the same number of tester channels. However, this is subject to change in future revisions of software. Although it is possible to use DPS1, etc. for identifying a power supply, using VCC0, etc., is recommended. Using a DPS identifier generates a warning message when compiling. 46 PN: 071-0359-02, October 2005 Test Program File Figure 28. Socket Table Pingroups A pingroup is a user-defined collection of related pins (see Figure 29). The PINGROUP statement assigns a unique name to the pingroup and lists the device pins or other defined pingroups to include in it. Defining pingroups is useful when there are several pins that are often used together in a test program; for example, pins that are part of a bus. Instead of listing each pin individually, all can be specified with one entry. This makes the test program more reliable, reduces its size, and decreases execution time. Kalos 2 User Manual 47 3 - Test Program Definition Figure 29. Pingroups An example of the interrelationship between the pingroups and the socket table is shown in Figure 30. 48 PN: 071-0359-02, October 2005 Test Program File Figure 30. Pingroups and Socket Table Interrelationship Pingroup statement for allpins PINGROUP allpins = { address_pins, data_pins, control_pins }; Pingroup statement for address_pins PINGROUP address_pins = { A0, A1, A2, A3, A4, A5, A6, A7 }; Socket table statement for defining A0 SOCKET single = { DP1 = A0, ADDR_PIN, X10, 9; DP2 = A1, ADDR_PIN, X11, 10; ,.... }; DC Tests Parametric Tests contain and point to data that is used to perform actions and measurements on a device under test (DUT). Figure 31 shows basic DC test examples. This includes setting up the tester resources (DPS), stimulating the device (sending patterns to the DUT), and verifying the results (measuring parametric values or verifying patterns from the DUT). A test statement defines a point in a flow which consists of an entry point and two exit points: one for pass and one for fail. Each test has an associated pass/fail counter which is initialized to a 0 whenever a test is created. Each time the test is executed, one of the pass/fail counters increments to reflect the test result. These counters are used to track part of the statistical data that is provided in summaries. Tests should be completely self-contained. Any step required to perform a measurement or other action should be included in the sequence. This allows for movement within the flow or deletions without effecting other tests. This also facilitates the development of test libraries, which help to reduce program development time. Kalos 2 User Manual 49 3 - Test Program Definition Each test statement may contain a test name and number, a description of up to 1023 characters, and a sequence. The test number can be any positive integer. The test name cannot be repeated but the test number can. Depending on the nature of a test, its sequence may contain data to be applied to the tester, known as resources: actions, such as taking a measurement and/or references to the user code, known as a C-Hook. When the test is executed, each item in the sequence executes in order until a failure occurs or all items are completed. Refer to the SEQUENCE section in the Kalos 2 Test Language chapter, of the KITE Reference Manual, for a list of available actions. Figure 31. DC Tests 50 PN: 071-0359-02, October 2005 Test Program File Functional Test Functional testing verifies that the DUT correctly performs its intended logical functions. These tests verify functionality of the device by applying pattern vectors, which detect faults within the DUT. These vectors apply all the necessary input signals, and monitor the output signals to determine pass/fail results. Bin Table A Bin Table is a statement which contains information for sorting tested devices into appropriate groups, known as bins, based on pass or fail results. Since the result of testing a device is to assign it to a bin, a bin is also considered an end point in a flow. There are 32 hardware and 1024 software bins available for each test program. • Hardware bins are used to physically separate devices using a mechanical handler or prober. • Software bins facilitate the collection of summary information for tested devices by recording the number of times a test branches to each device. In order to interpret the data this generates, each software bin should be assigned a unique bin number. Once a test branches to a bin, the testing of the DUT is complete and the binning information is logged to the workstation computer (see Figure 32). Kalos 2 User Manual 51 3 - Test Program Definition Figure 32. Bin Table Flow Statement A flow statement defines the order in which tests of a Kalos 2 test program are executed and the manner in which tests and bins are connected. When a test is executed, it results in a pass or a fail. Based on that result, the flow branches to another test or a bin. Typically when the test passes, the flow directs the system to go on to the next test until all tests are executed. When the device is assigned a pass bin, testing stops. When a test fails, the device is assigned a fail bin and testing stops without performing other tests. As shown in Figure 33, the flow statement consists of three columns. The first column contains the name of the test to be executed. The second column contains the name of the test or bin to be branched to when a pass result is received. The third column contains the name of the test or bin to be branched to when a fail result is received. 52 PN: 071-0359-02, October 2005 Test Program File Figure 33. Flow Statement Program Files The KTL file contains various statement blocks, most of which are given a unique name. The following are brief descriptions of typical KTL statements. These statements are possible parts that can be used in a test program run. For in-depth information on each KTL statement, refer to the applicable section of the Kalos 2 Test Language (KTL) Chapter in KITE Reference Manual. Kalos 2 User Manual 53 3 - Test Program Definition CYCLE_NAMES The CYCLE_NAMES statement lists the names used for cycles in both the CYCLE_TABLE statement and pattern file. If a test program contains any CYCLE_TABLE statements, a CYCLE_NAMES statement is required, and only one is allowed. CONSTANT A program is easier to read and change if certain numbers are assigned a name. A CONSTANT statement assigns a unique name to a defined value. Once defined, a CONSTANT is substituted anywhere within the test program where a value or variable expression (var-expr) is used. VARIABLE A VARIABLE is a storage place for numbers. When it is created it is assigned a unique name and a value using the VARIABLE statement. Once created and assigned a value it may be substituted anywhere within the test program where a number would normally be used. The DPSSET, PMUTEST, TSET_TABLE, PSET_TABLE, TIMING, and LEVELS all accept variable expressions (var-expr) when assigning values to their associated resources. DPSSET The DPSSET statement sets up the device power supplies. There are four device power supplies on each Kalos 2 slice. For the Kalos 2 (xp), eight device power supplies are available on each Kalos 2 slice. Two/four are referred to as VCC (normal voltage) supplies and two/four are referred to as VPP (high voltage) supplies. PMUTEST The PMUTEST statement is used to set up measurements for the system parametric measurement unit (PMU). The system PMU supports a full range of operation. LEVELS The LEVELS statement defines the voltages to be used for driving input data, comparing output data, and performing current loading. Levels on the Kalos 2 system are per-pin. Each pin has three driver levels (VIL, VIH, and VIHH), two output compare levels (VOL and VOH), and two current loads (IOL and IOH) which are triggered by the DUT output crossing the threshold voltage VTH. VTH is a reference voltage set somewhere between VOH and VOL that determines when to source or 54 PN: 071-0359-02, October 2005 Test Program File sink current to or from the DUT. If the DUT output goes above VTH, the IOH current load turns on and sinks current from the DUT. If the DUT output goes below VTH, the IOL current load turns on and sources current to the DUT. EDGESET The EDGESET statement contains the timing (tset), format (fset), and period information used to completely define the waveforms for each pin of each cycle. AXIS The AXIS statement specifies the parameters used in generating Value Log (VLOG) data and Shmoo plots. SHMOO The SHMOO statement specifies the parameters for generating a Shmoo plot. A Shmoo plot graphs the PASS/FAIL result of testing a device while changing one or more of the test parameters. VLOG The VLOG statement allows users to find the PASS/FAIL transition point while test conditions are changed. One “AXIS” can change several resources. For example, the VLOG statement can ramp the strobe time from a short time to a long time to determine when an output goes to the expected logic level. This value can be saved in a variable and displayed or used to make runtime decisions. PATTERN The PATTERN statement specifies the source file of the test patterns, where in memory to load the test patterns, and what to do if a fail occurs. The pattern data source file is referred to by its file name and must be in the same directory as the test program at load time. LOADDBM The LOADDBM statement causes an Intel hexadecimal (HEX) object file to be loaded into the Data Buffer Memory (DBM) in either MEM_A or MEM_B. This is only performed once—at the time the KTL test program is loaded. Multiple files may be loaded and are stored in a DRAM file system. Kalos 2 User Manual 55 3 - Test Program Definition SEQUENCE The SEQUENCE statement provides a way to define a test sequence external to the TEST statement. Sequences may be embedded in other SEQUENCE statements such as in a SEQUENCE parameter in a TEST statement. CMODULE KTL supports the use of C programming code within a test program by referencing it using the CMODULE statement. This capability provides the user with access to the full power of the C programming language and the standard ANSII C library. EVENT_MAP Typically tests are run based on the order specified in a flow statement. The EVENT_MAP statement permits running specific tests based on the occurrence of an event. There are seven events that the EVENT_MAP statement looks for to trigger the running of a user specified test. CONFIG The CONFIG statement provides two functions. One is to allow the user to select which FLOW and initialization SEQUENCE to activate when loading a test program. The second is to run specific tests based on the occurrence of an event. This second feature is similar to the function of the EVENT_MAP statement. 56 PN: 071-0359-02, October 2005 Online Help Documentation Online Help Documentation The Kalos 2 documentation set is a collection of Credence manuals and technical documents which have been prepared for online viewing using Adobe Acrobat Reader. To view the documentation, Adobe Acrobat Reader with Search must be installed on the computer. The 32-bit version of Reader with Search for Windows is included on the Kalos 2 CD. To install it, locate the file named rs405eng.exe and double click on its icon. (Installation instructions can also be found in the Readme.txt file located on the Kalos 2 CD.) Follow the instructions provided by the Adobe installation wizard to complete the task. To access Kalos 2 documentation, insert the CD into the CD-ROM drive of the computer. If the KITE software installation contained on the CD was run previously, the documentation is already loaded into the Kalos/doc directory. The documentation can be accessed by selecting the Help menu on Kedit application, as shown in Figure 34, or by double clicking on KITE_Reference_Manual.pdf or User_Manual.pdf files located in the Kalos/doc directory. These files launch the Kalos 2 KITE Reference Manual and the Kalos 2 User Manual, respectively. Kalos 2 User Manual 57 3 - Test Program Definition Figure 34. Kedit Online Help 58 PN: 071-0359-02, October 2005 Kedit Kedit The Kedit utility is a Kalos 2 supplied text editor. Kedit is used to generate, edit, compile, and debug test programs. Launching Kedit Kedit can be launched by clicking on the KTL icon located on the toolbar of Front Panel (see Figure 35) or by selecting Utilities => KEDIT from the menu bar. Kedit can also be launched from the Kalos 2 bin directory by double clicking on the Kedit application. Figure 35. Kedit Icon Click here to launch Kedit. NOTE — For easy accessibility, a Kedit shortcut can be created. Program Loading Once the editor is launched, click the left mouse button on the file pulldown menu (see Figure 36). From this pulldown menu a program can be selected for loading. Options include: New to create a new file; Open to load a file; Open Workspace to edit an existing file. Additional options are provided to save, print, close, and review recent files. Kalos 2 User Manual 59 3 - Test Program Definition Figure 36. Program Load and Workspace New... Open... Close Open Workspace... Close Workspace... Save Ctrl+S Save As... Save All Print Ctrl+P Print Preview Page Setup... Recent Files Recent Workplaces Exit Table 4 provides a description for each menu option in the File pulldown window. Table 4. Kedit - File Menu Description Option Function File 60 New Create a new KPL, KTL, KPJ, C, or Other (text) file. Open Open an existing file. Close Close the opened test program file. PN: 071-0359-02, October 2005 Kedit Table 4. Kedit - File Menu Description (Cont.) Option Function Open Workspace... Open a workspace file for editing/modifications. Close Workspace... Close opened workspace file and all associated files. Save Save edits/modifications. Save As... Save an opened file under another name or to another location. Save All Save all modified files. Print Print a file to a specified printer. Print Preview View file as it will appear in print. Page Setup... Setup printing specifications. Recent Files View file names of the previous four files opened. Recent Workspaces View workspace names of the previous four workspaces opened. Exit Exit Kedit. Concept of the Workspace When using Kedit, you can open a Workspace to enable modification or creation of associated files (KPJ, C, KTL, and KPL files). When KPJ or KTL files are opened as a workspace, all associated C and KPL files also open. A test program opened as a workspace enables navigation using resource icons, as shown in Figure 37, as well as the use of the Files tab. The Files tab is used to view the files associated with the program. The workspace also enables the Resource Completion feature, and mouse fly-by selected tool tips, that indicate the type of resource symbols. Fly-by tool tips are messages that appear when the mouse cursor passes over a word in a text field or other GUI object, such as a toolbar icon. In .ktl files, Kedit produces a fly-by display of the resource type of symbols defined with resource keywords. A keywords list of supported fly-by tool tips follows: SOCKET CYCLE_NAMES CMODULE PINGROUP DPSSET Kalos 2 User Manual 61 3 - Test Program Definition PMUTEST LEVELS TSET_TABLE FSET_TABLE SHMOO VLOG AXIS PSET_TABLE CYCLE_TABLE PATTERN SEQUENCE TEST VARIABLE FLOW EVENT_MAP BINTABLE LOADDBM CONFIG TIMING CONSTANT CYCLE_NAMES EDGESET Kedit provides resource completion templates in the form of tool tips for the keywords shown in Table 5. The template string is displayed after the "{" character is entered when defining a new resource. Table 5. Resource Fly-By Tool Tips 62 Resource Keyword Template CMODULE function, PN: 071-0359-02, October 2005 Kedit Table 5. Resource Fly-By Tool Tips (Cont.) Resource Keyword Template FLOW test_name, pass_branch, fail_branch; BINTABLE bin_name, bin_no, soft_no, PASS | FAIL; SOCKET DP# = name, type, assign, channel; To open a Workspace, select File => Open Workspace, and a browser menu appears that allows you to select the test program you wish to edit or modify, as well as its associated files. A new Workspace can be created from an existing Workspace by opening the file and renaming it. This is accomplished by selecting File => Save As, and a browser menu appears. Enter the name of the new file and select Save. To create a new Workspace, click the left mouse button on View and ensure Workspace is selected. Then from the File menu, select New, and a window appears from which you can elect to create a new file: KPL, KTL, KPJ, C, or Other. Resource Icons The resource icons (see Figure 37) allow you to go to the location in the test program of specific resources by clicking on the item with the left mouse button. It initially shows the keywords for resources in the test program and works much like the Windows Explorer. NOTE — This feature is activated only for test programs opened as a workspace. When the positive (+) symbol to the left of the name of the resource you wish to view is clicked, a list of the items that make up that resource can be viewed. For example: Clicking on the positive symbol next to CYCLE_TABLE lists the CYCLE_TABLEs in the program. Double click on the desired entry to view and/or edit that location in the program. When a resource is selected, a minus (-) symbol appears to the left, replacing the positive symbol. If you no longer wish to view the individual entries, click on the minus symbol to close the list of files. Double click on the desired entry to view and/or edit the file in that location. These functions allow for quick and convenient test program navigation. The blue arrow (pointing to the left) on the toolbar allows you to go one selection back. Kalos 2 User Manual 63 3 - Test Program Definition Figure 37. Resource Icons Resource header Resource Navigation and Edit Tools Navigating while using the toolbar (see Figure 38) provides the user with options to perform functions that can be performed using pulldown menus. The Kedit toolbar consists of four sections: Standard Tools, Bookmarks, Anonymous Macros, and Debug Tools. 64 PN: 071-0359-02, October 2005 Kedit Figure 38. Toolbars 1 2 3 30 4 5 20 21 31 32 6 22 Debug Tools Anonymous Bookmarks Macros Standard Tools 7 8 9 10 12 24 23 33 34 11 35 36 37 38 39 40 13 14 15 16 25 26 27 28 29 41 43 44 42 17 18 19 Standard Tools These tool icons perform standard functions found in similar applications. These functions include file operations such as open and close, edit operations such as undo and redo, and project operations such as compile and build. Bookmarks These tool icons perform bookmarking functions that allow for quicker movement within the editing environment and flagging of syntax. Kalos 2 User Manual 65 3 - Test Program Definition Anonymous Macros Macros provide a shortcut to typing a sequence of commands that are applied repeatedly to a body of text. One use is inserting a space at the beginning of each line. Debug Tools These tool icons perform debug operations such as setting or clearing breakpoints, and controlling the flow of execution through the test program. Refer to the Debugging Using Kedit section of this chapter for additional information, and details on using this tool. Tool Functions The following is a functional description of each tool (icon) on the toolbar. Standard Tools 1. New - Allows the user to create new files of which the type must be specified. 2. Open Workspace - Brings up a pop-up window which allows the user to select a file to open as a workspace. 3. Open - Allows the user to open a file to be used with Kedit. 4. Save - Saves the changes made on a workspace or Kedit. 5. Cut - Cuts the highlighted section of a file. 6. Copy - Allows the user to select and copy part of a file. 7. Paste - Allows the user to paste the copied part of a file to another part of the file or a different file. 8. Find in Files - Search engine to find files, etc. 9. Print - Allows the user to print the file. 10. Compile File - Recompiles only the file in the current document window. 11. Build - Recompiles all files that were updated/modified in the current project workspace. 12. Rebuild All - Recompiles all files in the workspace. 13. Stop Build - Stops the build of the current project workspace. 14. K1 to K2 - Translates Kalos 1 syntax (CYCLE_TABLE) to Kalos 2 syntax (EDGESET). 66 PN: 071-0359-02, October 2005 Kedit 15. Brace matching - Bounces between brace pairs to ensure proper brace matching (matches up a brace at the same nested level). 16. Back To Reference Point - Goes back to previous reference point. May be used successively. 17. Clear Output Window - Clears the output window. 18. Undo - Undo the last entry or change. 19. Redo - Redo the last entry or change. Bookmarks 20. Toggle Bookmark - Toggles (on/off) a bookmark for the current line. 21. Next Bookmark - Moves to the line containing the next bookmark. 22. Previous Bookmark - Moves to the line containing the previous bookmark. 23. Clear all Bookmarks - Clears all bookmarks in the window. Anonymous Macros 24. Start Recording Anonymous Macro - Records each keystroke for playback until Stop Recording is clicked. 25. Stop Recording Macro - Stop the current macro. 26. Pause Recording - Allow other commands before resuming recording. 27. Play Anonymous Macro Once - Play the last recorded macro. 28. Play Anonymous Macro Many - Play the last recorded macro N times. (Dialogue box prompts you to indicate how many times.) 29. Save Anonymous Macro - Save the last recorded macro to a file. Debug Tools 30. Online/Offline - Online mode enables debugging through Kedit. Offline mode enables test program modification and compiling. 31. Load Project - After selecting a slice, load the Kalos 2 project file. 32. Load Program - After selecting a slice, load the Kalos 2 test program. 33. Start KTL Debugging - Enables debugging for the last loaded pattern. 34. Run PG - Allows the user to burst the last loaded pattern in debug mode. 35. Stop PG - Stops pattern burst in debug mode. 36. Insert/Remove Breakpoint - Toggles breakpoint at the line where the cursor is positioned. Kalos 2 User Manual 67 3 - Test Program Definition 37. Start/Continue Test - Starts or resumes testing after a breakpoint. 38. Step over - Execute the test element at cursor location. 39. Step into - Execute the test element one level below cursor location. 40. Step Out - Execute until next test element one level above cursor location. 41. Clear All KTL Breakpoints - Remove breakpoints from all lines in test program. 42. Clear All C Breakpoints - Remove breakpoints from all lines in C file. 43. Stop test - Stops the test. 44. List of active modules - The first step in debugging is to select the Kalos 2 slice where debugging is to occur. Pulldown Menus In Kedit, pulldown menu options are available (see Figure 39) which allow the user to edit and navigate through the test program. Table 4 and Table 6 provide a description of each menu option. Figure 39. Pulldown Menu Items Table 6. Kedit Menu Bar Description Option Function Edit 68 Undo Undo the last entry or change. Redo Redo the last entry or change. Cut Cuts the highlighted section of a file. Copy Allows the user to select and copy part of a file. Paste Allows the user to paste the copied part of a file to another part of the file or a different file. Select All Highlight all text in the file. PN: 071-0359-02, October 2005 Kedit Table 6. Kedit Menu Bar Description (Cont.) Option Function Find... Search engine to find text in the current file. Find Next Find next occurrence in the current file. Replace... Find and replace text within the current file. Go to... Position to line in file based on line number, compile error or bookmarks. Brace Matching Bounces between brace pairs to ensure proper brace matching (matches up a brace at the same nested level). Back to Reference Point Goes back to previous reference point only. May be used successively. Tabify Selection Not currently available. Untabify Selection Not currently available. Format Selection Not currently available. View Toolbar Enable/disable presence of toolbar. Status Bar Enable/disable presence of status bar. Workspace Enable/disable presence of workspace. Output Enable/disable presence of output tools. Bookmarks Macros Enable/disable presence of macro tools. Debug Enable/disable presence of debug tools. Debug Dialog Displays debug views for online debugging. Datalog Dialog Displays PG and TG datalog results (captured under specified storage conditions) after the pattern burst. Compile Compile File Recompiles only the current file. Build Recompiles all files that were updated/modified in the current project workspace. Rebuild All Recompiles all files in the workspace. Kalos 2 User Manual 69 3 - Test Program Definition Table 6. Kedit Menu Bar Description (Cont.) Option Function Stop Build Stops the build of the current project workspace. Translate ktl from K1 to K2 timing Translates Kalos 1 syntax (CYCLE_TABLE) to Kalos 2 syntax (EDGESET). Tools Find in Files... Search engine to find text in a set of files. Macros... Manipulate saved macros. Start Recording Anonymous Macro Records each keystroke for playback until Stop Recording is clicked. Stop Recording Macro Stop the current macro. Play Anonymous Macro Once Play the last recorded macro. Play Anonymous Macro Many... Play the last recorded macro N times. Save Anonymous Macro... Save the last recorded macro to a file. Options Saving... Select options for backups and auto save. Resource Completion... Enable or disable tool tips when defining new resources. Format... Sets the format of the active window file: foreground/ background, color, font size, etc. Tabs... Sets tabs and/or auto indent for all files. Compiler Options... Select C and KTL compile options. Window 70 Cascade Puts all opened files in cascade order in the window; putting one file in front of the other cascading down. Tile Sets all opened files in a tile look, splitting the work environment into equal parts showing all loaded files at once. PN: 071-0359-02, October 2005 Kedit Table 6. Kedit Menu Bar Description (Cont.) Option Function Arrange Icons Arranges the minimized files automatically. Help Select PDF format reference file. About Kedit Display Kedit version information. Navigating in Kedit In addition to using the Explore Icons, there are other ways to navigate in Kedit. Users can click the left mouse button on a table name or object, then click the right mouse button and a pop-up appears. The pop-up enables one of the two following text lines: Open Document Name of file Go To Definition Of Name resource • “Go To Definition Of ______” takes the user to the defining text within the program where the resource resides. • “Open Document ______.kpl” takes the user to the external KPL file that defines this particular pattern. • “Open Document _______.c” takes the user to the C source file which defines the CMODULE. The example in Figure 40 opens the pattern file called rdaa_subroutine.kpl. If both options are grayed (disabled), the object is unknown within the project. NOTE — When clicking the right mouse button on a pattern or a CMODULE, the standard Go To Definition Of _____ pop-up appears. However, when clicked, followed by a pop-up: The _____ is undefined appears, indicates that the file does not exist within the KTL project. Users can use the scroll bar on the right and bottom when navigating through the active window, as well as use the Back To Reference Point arrow on the toolbar to successively go back to previous selections. Kalos 2 User Manual 71 3 - Test Program Definition Figure 40. Navigating in Kedit Cut Copy Paste Open Document rdaa_subroutine.kpl -> Go To Definition Of rdaa_subroutine The Cut, Copy, and Paste options are like other text editor options. The Cut and Copy selections become active only when text is selected (highlighted). The Paste selection will paste whatever is in the clipboard at the insertion point (cursor position). The Resource Completion feature allows the user to see existing resources, e.g., CONFIGs: FLOW, etc. For example, as shown in Figure 41, by typing in FLOW=, the existing flows appear in a pop-up that can be entered by selecting the desired option. NOTE — This feature is activated only for test programs opened as a workspace. 72 PN: 071-0359-02, October 2005 Kedit Figure 41. View Existing FLOW Files When defining a TEST resource, the SEQUENCE keyword followed by “=” and “{” brings up a menu of the following resource types: PMUTEST PATTERN LEVELS DPSSET CYCLE_TABLE SEQUENCE VLOG CHOOK EDGESET Kalos 2 User Manual 73 3 - Test Program Definition Select one of these resource types with a single mouse click or the Enter key. A list box of names with that resource type is then displayed. Use the Enter key, or double click the mouse to add the selected resource symbol to the test sequence. When a comma is entered, the list of resource types is displayed again. Debugging Using Kedit Debugging operations are available when using the Kedit utility, as shown in Figure 42. The Debug tool icons perform debug operations such as setting or clearing breakpoints, and controlling the flow of execution through the test program. Figure 42. Debugging in Kedit Debug Icons 1 2 3 4 5 6 7 8 9 10 11 12 13 14 15 Variables Window 74 PN: 071-0359-02, October 2005 Kedit Debug Tools The following is a functional description of each Debug tool (icon) on the Kedit toolbar, shown in Figure 42. 1. Online/Offline - Online mode enables debugging through Kedit. Offline mode enables test program modification and compiling. Note: The program cannot be modified from the online mode. 2. Load Project - After selecting a slice, load the Kalos 2 project file. 3. Load Program - After selecting a slice, load the Kalos 2 test program. 4. Start KPL Debug - Enables debugging for the last loaded pattern. 5. PG Run - Allows the user to burst the last loaded pattern in debug mode. 6. Stop PG - Stops pattern burst in the debug mode. 7. Insert/Remove Breakpoint - Toggles breakpoint at the line where the cursor is positioned. 8. Start/Continue Test - Starts or resumes testing after a breakpoint. 9. Step over - Execute the test element at cursor location. 10. Step into - Execute the test element one level below cursor location. 11. Step Out - Execute until next test element one level above cursor location. 12. Clear All KTL Breakpoints - Remove breakpoints from all lines in test program. 13. Clear All C Breakpoints - Remove breakpoints from all lines in C file. 14. Stop test - Stops the test. 15. List of active modules - The first step in debugging is to select the Kalos 2 master slice where debugging is to occur. Using Debug Tools To debug a test program using Kedit debug tools, proceed through the following steps. 1. Compile the test program workspace. 2. Click the Online/Offline icon on the Debug toolbar. 3. Select the module to debug on from the List of active modules on the Debug toolbar. 4. Click the Load Project or Load Program icon on the Debug toolbar to load a .kpj or .ktl workspace. Kalos 2 User Manual 75 3 - Test Program Definition 5. Select the Flow to run from the variables window at the bottom of the Kedit window (see Figure 42). 6. In KTL, position the cursor on a line that contains a sequence action, a CONFIG, EVENT_MAP, or the Flow line to break on, and click the Insert/ Remove breakpoint icon on the Debug toolbar to set the breakpoint. In C code, position the cursor on a valid line of C code and click the Insert/Remove breakpoint icon on the Debug toolbar to set the breakpoint?. 7. Click the Start/Continue Test icon on the Debug toolbar to begin testing. If the breakpoint is reached, where the flow stopped appears in the Context field of the variable window. 8. Use the Step over or Step into icon on the Debug toolbar to navigate to the next test in the flow, or to step into the test sequence of the current test. 9. When the Step into icon is clicked, the next sequence action to be executed is marked with a yellow arrow, under the Context field in the variables window. Whether the Step into or Step over icon is clicked, the current action is executed and the next action is displayed. The Step Out icon in the Debug toolbar executes the remaining sequence actions of the current test, and stops at the next test in the flow. For C code, use the Step over or Step into icon to execute to the next line of code. The Step out icon stops at the next line of calling function, or the next line in KTL code if the current function is a C-Hook called from KTL. 10. When the test program ends by binning out, the final results may be seen in the CView application. 11. Use the Clear All KTL Breakpoints or the Clear All C Breakpoints icon on the Debug toolbar to remove the breakpoints set in KTL or C code. Use the Stop test icon on the Debug toolbar to immediately stop testing. 12. To make modifications to the test program, first click the Online/Offline icon to go offline. Make program changes, compile, then begin with step 1 above. Debugging KPL Source Code in Kedit The history RAM can also be viewed from Kedit, which allows users to more easily debug patterns within a test program. Kedit can only launch the History Ram Control window once the debugging tools are launched. Debugging tools that are launched from Kedit can debug C-source file code as well as pattern code within a KPL file. The tester must be powered on and the Target Manager launched and communicating with the tester in order to launch debugging tools in Kedit (see Figure 43). 76 PN: 071-0359-02, October 2005 Kedit Figure 43. Target Manager/Tester Communication Although it is not necessary, launching the Front Panel and the Cview utility are helpful in allowing users to track tester functions and view results of the test program being debugged. The Datalog property page should be viewed by the user during the debugging. NOTE — The Front Panel is used as a viewer only when debug tools in Kedit are in use. Next, get the editor online using the online button on the Kedit toolbar, as shown in Figure 44. Kalos 2 User Manual 77 3 - Test Program Definition Figure 44. Online/Load Buttons Offline/Online, Load Project, and Load Program buttons List of Active Modules Once online, choose the slice that is to be debugged. Load the test program or project file that is to be debugged by pressing the load program (.kbi) or the load project (.kpj) button. Toolbar buttons, used to perform these functions, are described below: • Online/Offline - Online mode enables debugging through Kedit. Offline enables test program modification and compiling. • Load Project - After selecting a slice, this button loads a Kalos project file. • Load Program - After selecting a slice, this button loads a Kalos program file. • List of Active Modules - This button enables users to select the Kalos slice for debugging. Choose the flow that is to be debugged in the loaded test program using the flow selection field shown in Figure 45. 78 PN: 071-0359-02, October 2005 Kedit Figure 45. Flow Selection Flow selection field Watch window Variables field Once this is done users can set the breakpoints within the chosen flow, the tests within the flow, the sequences within the tests, the C-functions within the tests, or the load of a pattern within the tests. This is done by clicking on the insert/remove breakpoint button shown in Figure 46. Figure 46. Breakpoint Settings Insert/remove breakpoint and start/continue test Highlighted file type indicates breakpoint set Breakpoint Execution pointer Kalos 2 User Manual 79 3 - Test Program Definition Once the breakpoints are set, the code within the flow of the loaded program is executed until it reaches the selected breakpoints. This is performed by clicking on the start/continue test button. The file with the breakpoint set is highlighted on the toolbar. If both a C-source and a .ktl file have breakpoints set, then both file type indicator buttons are highlighted. Clicking on either of these buttons clears breakpoint settings for the respective file type. Using the following Step options, shown in Figure 47, users can further control the execution of the code within the test program, during the current debugging session. • Step Over - Allows the user to execute the source code at the location of the cursor. • Step into - Allows the user to execute the source code one level below the cursor level (that is, step into a sequence that is within a test or step into pattern code from a pattern executed within a test or a sequence). • Step out - Allows the user to execute the source code one level above the cursor level (that is, step out of a sequence that is within a test or step out of pattern code from a pattern executed within a test or a sequence). Figure 47. Step Control of Execution Step Over Step Into Step Out As shown in Figure 48, two windows appear at the bottom of Kedit. The watch window, which appears while debugging, allows users to monitor, watch, or edit global resources from within the C-source file or variables that are declared external variables, which are passed into the C-source file from other C-source files. This is accomplished by clicking on the selected variables and dragging them into the watch window. 80 PN: 071-0359-02, October 2005 Kedit Figure 48. Variables Selection Passed in external variable Context window Variables window Watch window Flow selection Current C-function Local variables The variables window displays local variables (variables declared within a C-function). Within the variables window, users can select the flow to debug using the flow selection. This is performed first, or before executing code during the debug session. The variables window is a view only window. To edit these local variables, users must drag the selected variables into the watch window. The context window displays where you are in the debug session. NOTE — As C-code executes, variables that have changed appear in red. Variables declared with the static keyword will always have a value of 0. The value of static variables is hidden from the debugger. The watch and variables windows are used to track the values of the variables used within the loaded C-source file. Any currently loaded pattern can be debugged using the KPL debugger. From C-source files, use the applicable step button, located on the toolbar of the editor, to step to the line of code that will run the loaded test pattern. At this point, the Start KPL Debug button, located on the debug section of the toolbar (see Figure 49), will highlight. To start KPL debugging, click the Start KPL Debugging button. The source file of the currently loaded pattern is displayed and KPL debugging resources are enabled. Place the cursor on the first line of code in the pattern file. You will notice that there is now a new window loaded at the bottom of the editor (see Figure 50). Kalos 2 User Manual 81 3 - Test Program Definition Figure 49. Start KPL Debugging Figure 50. KPL Debugging Resources Start KPL button Cursor is Initially placed here Source line context menu The currently loaded pattern is debugged from a C-source file or from the loaded test program. Datalog, Pattern Generator (PG) and Timing Generator (TG) windows, at the bottom of the editor, allow users to vertically and horizontally scroll to view and select columns and menus to display the values of variables used within the test program or loaded C-source file. Within a pattern file, users must set the arm and trigger to the required microram (URAM) location. This is set by clicking on the appropriate line of code. The context menu of a source line contains the following items: 82 PN: 071-0359-02, October 2005 Kedit • • • • • Arm & Trigger This Line Arm First Instruction Trigger First Instruction Trigger ON FAIL Storage Mode As described in the History RAM Control section of the Introduction to KITE chapter, arm and trigger are two conditions that must be met either simultaneously or sequentially (first arm, then trigger) to start and stop storing data in history RAM N cycles later (see the number of cycles after arm & trigger conditions are met box in the History Ram Control dialog, shown in Figure 51). Some of the conditions that can be used to arm and trigger are: 1. Fail occurs 2. A URAM address is executed 3. Any counter reaches a condition value 4. Any combination of the above (logical AND combination) Arming on the first cycle and triggering on fail is the commonly used setup for a datalogger. Separate arm capability allows users to delay triggering to a URAM or cycle that occurs later during the burst, possibly after many other fails have occurred. Arm & Trigger This Line Sets Kedit to begin storing in history RAM at the current line and stop storing N cycles later by programming a value to the number of cycles after arm & trigger. Arm First Instruction Sets Kedit to begin storing in history RAM at the first instruction of the pattern. Trigger First Instruction Sets Kedit to pass N cycles, then stop storing in history RAM after the first instruction. Trigger ON FAIL Sets Kedit to pass N cycles, then stop storing in history RAM after the first fail occurs. Storage Mode Provides the following mode selections: • Store All During each tester cycle, all of the PG/TG data for that cycle are stored until an arm and trigger occur, followed by the number of cycles specified in After Arm & Trig. Kalos 2 User Manual 83 3 - Test Program Definition • Store This Vector This mode allows condition test cycles to be captured in the history RAM under the control of the URAM program or logic pattern. There is a Store This Vector (STV) bit in the URAM or LVM that causes data to be stored whenever that URAM is executed. This interactive debug feature (or advanced datalogger) modifies the URAM at debug time, allowing the user to examine the state of the PG/TG at various points in the program. Arming and triggering inhibit storing in this mode after N cycles that have the STV bit set. • Store Only Fails In this mode only tester cycles with a strobe failure are stored. The history RAM can still be armed and triggered, however only data from fail cycles will exist in the history RAM at the end of test. This mode allows more fail data to be collected since passing cycles are not stored. • Store This Vector and Store Fail Only This is the default mode for Kalos 2. This is a hybrid mode that stores fails on the tagged vectors/cycles only. To facilitate its use, all logic vectors set stv as do all algorithmic pattern instructions, except conditional fail instructions. Conditional fail instructions are those which jump, increment, or call a subroutine based on whether or not a fail occurs in the kpl. In this mode, it is likely that the user will arm and trigger on first fail since this is the objective of this default. The History Ram Control window, shown in Figure 51, allows users to set any combination of arm and trigger conditions, as well as the number of cycles before and after arm & trigger conditions are met. 84 PN: 071-0359-02, October 2005 Kedit Figure 51. Arm And Trigger Conditions Number of cycles before and after arm & trigger Arm and Trigger Condition fields Resource combo box Check box Edit box The Before Arm & Trig edit box allows users to specify how many cycles to retrieve prior to the arm and trigger event. The After Arm & Trig edit box allows users to specify N, that is, the number of cycles to be stored in the History RAM once the arm and trigger conditions are met. A valid number is from 0 to 63. The sum of cycles before and after arm & trigger cannot exceed 64. The Arm Condition and Trigger Condition fields contain arm/trigger conditions. A definition of each condition (box), shown in Figure 51, follows: • Cycles - Set number of cycles before and after trigger conditions are met • Storage Mode - Specify storage condition (i.e., store all, store this vector, store only fails, store this vector and store fail only). • Other Settings - Arm and trigger instructions • Resource combo box - Contains the selection list of available resources • Check box - Checked/unchecked (enable/disable) corresponding condition Kalos 2 User Manual 85 3 - Test Program Definition • Edit box - Specify the value of the selected resource to match during the test to generate arm/trigger events • Save Settings - Save the current settings • Get Settings - Restore the previous settings • Reset - Reset to Kalos software defaults: - select SOF and STV - cycles before arm & trigger set to 0 - cycles after arm & trigger set to 1 - arm first instruction selected - arm URAM address 0 selected • Apply - Apply current settings to active targets • Close - Close the History Ram Control application After setting arm/trigger conditions and storage modes, perform a pattern burst by clicking the Run PG button on the debug section of the toolbar (see Figure 52). Figure 52. Run PG Button After the pattern burst, datalog results (captured under the specified storage conditions) are displayed in the datalog dialog window at the bottom of Kedit (see Figure 53) and on the Front Panel Datalog property page. 86 PN: 071-0359-02, October 2005 Kedit Figure 53. Datalog Dialog Window Datalog dialog window NOTE — Users can manually bring up the datalog dialog window by selecting View => Datalog Dialog from the menu bar. The PG section allows users to call up resources from within the pattern generator. By default, all possible resources (loop counters, cycle counters, address generator, data generators, etc.) are displayed in a context menu by right mouse clicking on any line in the datalog dialog field, as shown in Figure 54. Select the desired resource to display the column of its value. However, users can choose between the resources to be viewed. Kalos 2 User Manual 87 3 - Test Program Definition Figure 54. Resource Selection PG Section The following describes column items on the PG side of the datalog dialog window. No. History RAM (cycle) number - This number starts at 0 and displays the location of the data within the 64 deep history RAM. When checked, trigger and arm indicators within the pattern code reflect the chosen history RAm position (a green arrow inside the pattern source code). Uram Address Uram address number - This number displays the Uram address for the associated history RAM location. Arm Arm state - If checked, indicates the arm is set for this location of the history RAM. Trigger Trigger state - If checked, indicates the trigger is set for this location of the history RAM. Fail - Pass/Fail - A red F indicates a fail. An empty box indicates a pass. NOTE — Saved data appears in the history RAM as soon as the pattern is armed and triggered. Double click on any line in the datalog dialog window to see the corresponding line in the source file of the pattern. A green arrow, shown in Figure 55, indicates that line in the source file. A trigger icon, a T within the symbol, indicates the line where the first arm and trigger occurred. 88 PN: 071-0359-02, October 2005 Kedit Figure 55. Source File Location Trigger icon Green arrow indicates the pattern code location after a history RAM location is highlighted below. PG section TG section PG information displayed for the Addr M/N windows is the data presented to the address generator(s). As shown in Figure 56, counter group format can be displayed in decimal or hex. This is selectable by right mouse clicking on the address field. Kalos 2 User Manual 89 3 - Test Program Definition Figure 56. Counter Group Format Choose how to display data presented to Addr M. If the data are displayed in a hex format, it has the least significant bit (LSB) on the left side and the most significant bit (MSB) on the right. The data in Figure 57 displays the bits combinations for the counter group in a hex format. Figure 57. Data Display in Hex Format MSB ------------> LSB 0x 00 0000 0002 Z addr bits X addr bits Y addr bits NOTE — If in a decimal format, it is the decimal equivalent of the hex number. TG data stored in the timing generators, are listed by the pin ID information for I/O pins as it is listed on the socket table of the test program. Users can right mouse click to view a pulldown menu that shows a pin options list (see Figure 58). Point to the Selected Pins option and select the desired pin from the pop-up context menu to display the column of its states. The selected pins are check marked. The same context menu allows users to Show all Pins, or Hide all Pins at once, or Show IO Pins only. 90 PN: 071-0359-02, October 2005 Kedit Two modes are available for showing the states of pins: Brief and Detail. In Brief mode the cells of the TG field show only pass (P) or Fail (F) states. To switch the TG field to Detail mode, right mouse click on any cell and select Detail from the context menu. Figure 58. Pin Options Menu Pins displayed in the TG window list pins from the least significant bit (LSB) (I/O 0) on the left side to the most significant bit (MSB) (I/O#) on the right side of the window. The data are further broken down to show all four timing edges for each of the pins listed. The following is a list of entries for each timing edge and their meanings (see Figure 59). Kalos 2 User Manual • X - Represents the data is Don’t Care or that there was no programmed data for this pin edge. • L - Indicates pass data if shown in the color green. Therefore, the format was an expect data low, which is the TG data. • H - Indicates pass data if shown in the color green. Therefore, the format was an expect data high, which is the TG data. • H/L - Indicates the expected format for the data was an expect high although the data retrieved from the device was low. This means the first entry is the expect data and the second entry is the actual data retrieved. This entry always appears in the color red, indicating a difference between the expect data and the actual data, or a failure for that particular device pin. • L/H - Indicates the expected format for the data was an expect low although the data retrieved from the device was high. This means the first entry is the expect data and the second entry is the actual data retrieved. This entry always appears in the color red, indicating a difference between the expect data and the actual data, or a failure for that particular device pin. 91 3 - Test Program Definition Figure 59. Timing Edge Window When the cursor is placed over an edge, a window appears showing details of the expected, actual, failed, and strobe information (see Figure 60). Definitions and possible entries are shown in Figure 61. NOTE — The data shown only appears for a couple seconds while the cursor remains over the edge. To redisplay the data, drag the cursor over to another edge then back to the original edge. 92 PN: 071-0359-02, October 2005 Kedit Figure 60. Timing Edge Details Kalos 2 User Manual 93 3 - Test Program Definition Figure 61. Timing Edge Definitions Expected Actual Fail Strobe Mnemonic Hi Lo Hi Lo X X X X X 0 X 1 1 1 1 0 1 H 0 1 0 1 0 1 M 0 0 0 0 0 1 L 1 1 0 1 1 1 H/M 1 1 0 0 1 1 H/L 0 1 1 1 1 1 M/H 0 1 0 0 1 1 M/L 0 0 1 1 1 1 L/H 0 0 0 1 1 1 L/M 1 1 1 1 1 1 H/G 0 1 0 1 1 1 M/G 0 0 0 0 1 1 L/G H (High) L (Low) M (Midband) G (Glitch) X (Don’t Care) Once debugging of the pattern code is completed, click on the Start KPL Debugger button on the toolbar of Kedit. From this point debugging operations other than patterns, can be performed. If all debugging operations in Kedit are completed, click on the Stop Test button, on the toolbar, then click on the disconnect button. The Stop Test button stops the test and the disconnect button disconnects the debugger from the tester. This allows the Front Panel to control tester operations from that point. 94 PN: 071-0359-02, October 2005 4 INTRODUCTION TO KITE (KALOS 2 INTEGRATED TEST ENVIRONMENT) This chapter provides an introduction to KITE software. It includes a description of the functions of the Front Panel. The Front Panel serves as a graphical front-end to load and control execution of test programs. An overview of each property page is provided, and how each property page relates to KITE tools and utilities is explained. Instructions are provided on how to prepare a device for test, load a test program, and test the device once test system preparations are completed. Topics include: • Test Preparation • Target Manager • Loading the Test Program • Front Panel Interface • KITE Software • Calibration and Diagnostics • Device Testing Procedure Kalos 2 User Manual 95 4 - Introduction to KITE (Kalos 2 Integrated Test Environment) Description of KITE KITE is a collection of software tools that aid the development of test programs for testing devices on a Kalos 2 memory test system. These tools are supplied on CDROM for installation and used in a Windows XP environment. Although test programs are based on the ANSI-C language, their development using the tools of KITE should present no problems, even to users with limited C programming experience. All KITE functions are compatible with the ANSI-C language environment, and input files can be created with most text editors along with the tools provided. The basic steps involved in creating a test program in KITE, as well as the resources required at each step, follow. Each step is discussed in greater detail later in the KITE Tools and Utilities chapter in this manual. 96 PN: 071-0359-02, October 2005 Test Preparation Test Preparation To get the equipment at a Kalos 2 test system ready for a device test, you must fit a device test fixture with necessary components, mount it to a test head and, in most production runs, join it to a device handler or wafer prober. The device test fixture for a given device has power runs and signal paths designed for accuracy and minimal aberrations. The combination of test head and device test fixture is usually set up for one of three testing modes: manual, device handler, or wafer prober. The major steps in test station preparation consist of mounting the appropriate device test fixture to the test head and, if called for, docking the combination to a handler or prober. DUT Interface The Kalos 2 system requires a device under test (DUT) interface board(s) specifically designed for the customer application. The available signals are: • Tester signal pins • DPS force and sense lines • Analog ground = AGND • Analog ground reference = DZ • Digital = DGT • Available load board supplies Test Fixtures The Kalos 2 has available a variety of optional test fixtures. These include calibration and verification fixtures, DUT interface boards for both prober and handler type testers, and utility bits. Kalos 2 User Manual 97 4 - Introduction to KITE (Kalos 2 Integrated Test Environment) Configuration Manager The Kalos Configuration manager is loaded separately from the standard Kalos KITE software. This manager allows the user to load more than one version of Kalos KITE software onto the computer, or access multi-version capabilities. To invoke the Kalos Configuration Manager, double click on the Kalos Configuration Manager icon (see Figure 62) located on the desktop or the task bar at the bottom of the desktop. Figure 62. Kalos Configuration Manager Once the Kalos Configuration Manager is launched, the user can choose the path to the version of software to be used during the current session. Click the down arrow to choose previously selected Kalos home paths. Add a new Kalos home path by clicking on the browse button and selecting the home directory from which to launch the Kalos software (see Figure 63). Figure 63. Software Version Selection List of previously selected Kalos home paths Once the path to Kalos software is selected, click on the Target Manager icon (see Figure 64) to start the Target Manager. The Target Manager establishes connection with the target CPUs in the test head. Next, the Front Panel application can be launched, or a custom GUI application designed to perform Front Panel functions. 98 PN: 071-0359-02, October 2005 Configuration Manager Figure 64. Start Target Manager Options Start Target Manager Front Panel icon Choose the Options button on the menu bar to modify configuration options. A Customize options window is shown in Figure 65. Select Show Kalos Bin Directory to display the KALOS BIN pane on the Configuration Manager window. Select Show KALOS_SYS to display KALOS.SYS pane on the Configuration Manager window. Add Application is used to select executable objects that are added to the applications list. Each checked application on the list has its icon displayed in the Configuration Manager window. Applications occurring within the Kalos bin directory are always matched with the selected Kalos home path. If ShowBitz is selected from a Kalos home path, then when the icon in the Configuration Manager view is clicked, the ShowBitz application will start from the currently selected Kalos home path and KALOS BIN directory. Delete an entry from the applications list by first clicking on the name to select it, then click on the Remove button. Rename an entry by clicking on the name to select it, then type in the name change and click on the Rename button. Kalos 2 User Manual 99 4 - Introduction to KITE (Kalos 2 Integrated Test Environment) Figure 65. Configuration Manager Options 100 PN: 071-0359-02, October 2005 Target Manager Target Manager The Target Manager application is used to view the status of all boards in the test head. The Target Manager (TTarget) is responsible for establishing connection with the target CPUs in the test head. This is also the first application to enable interactive control of the test head from the host PC. After TTarget is started, its icon (see Figure 67) appears in the task bar notification area (also know as the System Tray) found at the far right of the task bar. When the mouse hovers over this icon, the message “Double-click TTarget icon to show Target Manager Viewer” appears. Right mouse clicking on this icon displays the pop-up window shown in Figure 68. Doubling clicking on the TTarget icon in the System Tray or clicking the right mouse button and selecting Show Targetmgr viewer displays the Target Status window, shown in Figure 66. Target Status The Target Status window (see Figure 66) displays the 72 possible targets or Kalos 2 slices.These are further broken down into groups (A, B, C, and D), representing 18 slices each. Graphical images show the status of each slice. Figure 66. Target Status Window Status image Clicking on the Help button displays all graphical images and provides a description for each (see Figure 67). Kalos 2 User Manual 101 4 - Introduction to KITE (Kalos 2 Integrated Test Environment) Figure 67. Target Status Image Descriptions TTarget icon Show Target Manager Log Click on the Show / Hide targetmgr log in the pop-up window, shown in Figure 68, to view or hide the Target Manager log. The Target Manager log shows logged information for connections to each target in the test head. This view provides detailed information that can be helpful when connection problems occur. Figure 68. Target Icon Pop-up 102 PN: 071-0359-02, October 2005 Target Manager Removing the Target Manager To remove the target manager, right mouse click on either the target icon located at the bottom of your display or the pop-up menu in Figure 68. Click on Exit targetmgr and viewer with the left mouse button. Users are then prompted to confirm the request, since the action closes the Font Panel application and terminates communication with the tester. Kalos 2 User Manual 103 4 - Introduction to KITE (Kalos 2 Integrated Test Environment) Loading Test Programs/Projects in KITE Kalos test programs and projects are loaded onto the tester hardware through the Front Panel. The Front Panel serves as a graphical front-end to load and control execution of test programs/projects. Programs/projects are loaded by choosing one of the load options from the File pulldown menu, or by choosing one of the load button icons on the toolbar (see Figure 69). This action invokes a browse window that allows the user to locate an existing test program/project file. Executable Kalos test programs have a .kbi extension. The Load Project Files (.kpj extension) option, like test program files, loads a project file. Double clicking on the selected file loads the program/project (.kbi or .kpj) file. Another load option, Operator Interface, is a one stop selection with execution (load) that allows either program files or projects to be loaded with the following selected options: 1. Auto-run DIB Cal 2. Datalog Engine 3. Sum Validation (16 or 32 code) 4. HEX file selection 5. Optional header entries NOTE — Refer to the Device Testing Procedure section of this chapter for additional options when loading a project file. Kalos Active Slices (Banks A, B, C, D) can be viewed on the Front Panel. The buttons below the text Active Slices correspond to the Kalos 2 boards found in the system. Banks corresponding to the slices physically attach to the various backplane boards in the test head. On a Kalos2 tester these begin with slice A0 (Bank A Slice 0) and display up to D71 (Bank D Slice 17). Once a program is loaded, slices that have a valid program load appear blue. Invalid programs appear red. 104 PN: 071-0359-02, October 2005 Loading Test Programs/Projects in KITE Figure 69. Project/Program Loading Load options file pulldown menu Load buttons Kalos 2 User Manual 105 4 - Introduction to KITE (Kalos 2 Integrated Test Environment) Test Program Load Setup This section provides a basic overview of the Kalos 2 program load procedure. Embedded in the test program file are: • All the information necessary to verify the test program matches the Kalos software used to load it. • Tester configuration required by this test program. • Names of all files required to be loaded on the Kalos 2 target processor in order for the test program to run. All of the test program files that may be required by a particular test program are shown in Figure 70. Figure 70. Test Program Load Process PC ETX Ethernet interface Kalos OS Test program runtime image DRAM DBM Kalos 2 master slice LVM .ebd .o .kbi file .pbi .hex The following sequence of actions take place at program load time. The types of files and related KTL resources involved at each step are noted. Each step is performed on all tester targets selected for the load program operation. 1. Delete current test program on target. The last loaded test program is deleted on the target in preparation for loading the next test program. As long as no configuration change occurs, such as going from a 48-channel to 96-channel DUT width, the contents of files previously loaded to the DRAM remain unchanged. 2. Unload CMODULEs or #clibrary files, C object modules with the extension .o, that were loaded for the previously loaded test program. 3. Process Kalos revision number, which terminates the load process if the test program is out of date with Kalos software being used to load it. 106 PN: 071-0359-02, October 2005 Loading Test Programs/Projects in KITE 4. Process test configuration, which ensures the tester matches the DUT width of this program. Valid DUT widths are 48, 96, 192, 384, and 768. 5. Load the CMODULEs or #clibrary files, C object modules with the extension .o, defined in the test program. 6. Load the test program, which is a file name with a .kbi extension. 7. Load pattern files defined in the test program. Patterns are defined with the PATTERN resource keyword. The FILE parameter defines the pattern file name. Every pattern has a file name with .pbi extension. Patterns that contain LVM data also have a file name with an .ebd extension. The LVM data portion of the pattern is loaded into the DRAM on the target, as well as SRAM, which may be viewed in Front Panel from the DRAM/SRAM Viewer. If inadequate space exists to load a pattern, unused files in the DRAM are removed one at a time. 8. Load DBM files defined in the test program. DBM files are defined with the LOADBM resource keyword. The FILE parameter defines the DBM file name. DBM files have an .hex extension. At load time, the DBM file is converted to the Kalos binary format and loaded to the DRAM, as well as SRAM, on the target. If inadequate space exists to load a pattern, unused files in the DRAM are removed one at a time. The status of loaded DBM files may be viewed in Front Panel from the DRAM/SRAM Viewer. 9. If a Kalos Project file was loaded (file name with extension .kpj) and the associated config keyword defines a KTL CONFIG statement, the specified FLOW is selected on the target. 10. If a Kalos Project file was loaded (file name with extension .kpj) and the associated deviceif keyword defines a prober or handler DLL, the specified DLL is loaded on the Host PC. NOTE — Test program loading will fail if the full path name of any loaded file exceeds 100 characters in length. Kalos 2 User Manual 107 4 - Introduction to KITE (Kalos 2 Integrated Test Environment) Front Panel Interface The System Front Panel is an interface between the Windows XP workstation and the Kalos 2 test system (see Figure 71). The Front Panel application is the main interface of KITE and serves as a viewer for directing, exploring, and altering environmental and operational functions. These functions include all normal operations required for the user to run a test program, including program management. The Front Panel is used to access the system diagnostic programs and the system calibration programs. To invoke the Front Panel graphical user interface (GUI), double click the Front Panel icon, Shortcut to FrntPanel icon located on the desktop, or through the Kalos Configuration Manager application. Double click The Front Panel provides the main user interface to the tester hardware. The System Front Panel application provides the setup functions for device testing. One of its functions includes loading of device programs. It is from Front Panel that test programs are loaded and executed, and that summary and datalog information are reported back to the user. These functions include all typical operations required for the user to run a test program and interpret the results. NOTE — A password is required to enable Engineering application modes (nonproduction). Kalos 2 test systems are provided with a default password. This password appears in the Tester ID section of the Header panel on the Engineering property page. 108 PN: 071-0359-02, October 2005 Front Panel Interface Figure 71. System Front Panel Window (Default View) Menu bar Toolbar Control area Function keys Property page tabs Header area Bin results by slice View area NOTE — Slices can be activated or deactivated on the Overview and Engineering property pages. Kalos 2 User Manual 109 4 - Introduction to KITE (Kalos 2 Integrated Test Environment) KITE Software The Kalos Integrated Test Environment (KITE) software provides access to development, debug, and diagnostic tools and utilities through a graphical user interface. Starting KITE The launching of KITE software is part of the start-up procedure for the Kalos 2 test system. The user must invoke the KITE software in order to launch the System Front Panel application or the Kalos 2 Configuration Manager. The default condition of the KITE application is the production environment from which Kalos test programs are loaded and executed. From Front Panel, all other applications, tools, and utilities can be launched. The menu bar and toolbar provide the mechanism for executing these other environments. NOTE — Before re-starting KITE once the tester is running, ensure that all previous KITE windows are closed, then double click on the Front Panel icon. Graphical User Interface At start-up, KITE defaults to the main window of the System Front Panel application shown in Figure 71. This window is subdivided into the following defined operational areas: • Menu bar • Toolbar • Control area • View area Menu Bar The menu bar contains pulldown menu controls that include File, View, Utilities, Tools, and Help options. The following table describes all areas of the menu bar. 110 PN: 071-0359-02, October 2005 KITE Software Table 7. Front Panel Menu Bar Description Option Function File Clicking on the File option invokes the following list of selections: Operator IF The Operator IF option launches the operator IF window which provides the operators with a one page program loading interface. Load Project File *.kpj The Load Project File operation is used to load an executable Kalos 2 test project onto the tester hardware. Kalos 2 project files must include a .kpj extension. Load Program File *.kbi The Load Program File operation is used to load an executable Kalos 2 test program onto the tester hardware. It invokes a navigation window used for locating and selecting the desired test program file. Kalos 2 executable programs must include a .kbi extension. Start (GO) Test Allows the user to run the currently selected flow. Exit The Exit operation exits Front Panel and closes any open data files or associated programs. View View lists the following view option for Front Panel: Kalos 2 User Manual Pathnames... Allows the user to see the pathname assignments selected for the program files. Options Clicking on options invokes the following selections: Kalos 2 Sort Views Expands the sort bin view to enable viewing of the bin numbers on a Kalos 2 tester. PK2 Sort Views Expands the sort bin view to enable viewing of the bin numbers on a PK2 tester. 111 4 - Introduction to KITE (Kalos 2 Integrated Test Environment) Table 7. Front Panel Menu Bar Description (Cont.) Option Function HistoryRam Datalog Allows users to monitor conditions of the pattern Formatting and timing generator at a set condition point within (KDatalog) a functional test or a point within a patterns execution. Utilities Selection of the Utilities option invokes the following list of available KITE application utilities: 112 CVIEWER The Console Viewer is a viewer for observing communication messages sent from the i960 of each Kalos 2 board to the workstation computer. TBUGGER (Test Bugger) This menu item activates the test debugger (Test Debugger) environment. This utility allows the user to modify resources for the current test program on the fly, without the need to re-compile. KEDIT Kedit, Kalos 2 (KTL) Editor, is a Credence supplied text editor. WAVEFORM (AWT) Analog Wavetool is a graphical tool used for manipulating waveforms. LDTOOL A front-end application intended for advanced debugging, editing, and running of test patterns, as well as viewing the results of running stored patterns in History RAM. DBMEDIT Data Buffer Memory (DBM) Editor allows the user to select a fixed or customized format for the graphical table views—Kalos 2 defined and/or user defined. DLOGEngine (Datalog Engine) Allows the user to launch the Datalog Engine (which gives the user access to the data stream).Note: No Dialog window is displayed. Visual confirmation is seen in the Front Panel Overview status or on the icon tray of the task bar. CAL DIAG Selection of the Cal/Diag menu item activates the KITE Calibration and Diagnostics environment. PN: 071-0359-02, October 2005 KITE Software Table 7. Front Panel Menu Bar Description (Cont.) Option Function SHOW BITZ Selection of the ShowBitz menu item activates the ShowBitz environment. This environment allows the user to interact with the Kalos 2 system hardware at a register level for debugging purposes. Refer to the Reference Manual located under the Help menu of the ShowBitz utility for additional information. IDROM Provides the user with non-volatile program memories information (Motherboard, PMU, DPS, DAC, SRAM slice, and ETX). NVMDIB The Non-Volatile Memory (NVM) on the Device Interface Board (DIB) is a small memory located on the test hardware that contains identification and configuration information needed by the test program. SYSTEM MONITOR Monitors the electrical state of the tester system in terms of voltage, current, and temperature readings. MAP INIT The MAP INIT selection brings up the MAP Initialization dialog box that allows the user to select all slice. Tools The Tools menu item includes the following KITE external support application tools: Kalos 2 User Manual 113 4 - Introduction to KITE (Kalos 2 Integrated Test Environment) Table 7. Front Panel Menu Bar Description (Cont.) Option Function Shmoo, PMon VLog The Shmoo menu item launches the Shmoo Plot Bitmap tool which supports 1, 2, and 3 dimensional shmoo plots. The Pin Monitor (PMon) allows the user to evaluate the performance of a DUT on a per pin basis. The evaluation is performed by creating one dimensional shmoo plots of each resource that is allocated to a pin. VLog (ValueLog) provides an AC datalogger. Two types of test execution are available: binary (search) or linear (sweep) test. Valuelog sequencer has a testing matrix for single (selected row) or flow testing (all rows). The Bitmap viewer displays current cell/address failures of the DUT. This includes two displays: MegaMap (compressed view) and Bitmap (uncompressed view). BitPower BitPower tool (optional application) allows the user to analyze failed bit information collected at wafer sort. Help The following items are provided under the Help menu: About FrntPanel... This menu item displays the current revision identification of the Kalos 2 software, as well as limited system software and hardware information. Version Check (VCheck) Informs the user of the available versions of Kalos software installed on the system. Toolbar The toolbar is an arrangement of graphical icon buttons, clustered in functional groups, that execute commands and invoke KITE software tools and utilities. These buttons provide quick access to the most commonly used commands of the pulldown menu bar. 114 PN: 071-0359-02, October 2005 KITE Software The toolbar is located directly below the menu bar of the System Front Panel window. Figure 72 shows the layout of the toolbar (in Engineering mode), and lists the commands executed for each toolbar button. KITE commands, tools, and utilities are invoked by a single click of the left mouse button. When in Engineering application mode (non-production), all tools are displayed (enabled). When in production mode (see Figure 73) Shmoo Plot-PinMonitorValueLog, Test Bugger, DBM Editor, Bitmap, BitPower, Kalos Editor, Analog Waveform Editor, Kalos Logic Debug, ShowBitz, Cal/Diag, IDRom, and NVMDIB are disabled (grayed areas). Users must logon by way of the Front Panel’s Engineering mode to enable these tools. Refer to Table 7 for a description of the toolbar items. NOTE — Breaktrap setting and operations also require logon and password. Figure 72. Front Panel Toolbar (Engineering Mode) Operator IF Load Project Shmoo Pin Monitor Value Log Console Viewer Load Program System Monitor DBM Editor Datalog Engine Test Bugger KDatalog Analog Waveform IDRom ShowBitz Editor BitPower Bitmap Kalos Editor Kalos Logic Debug VCheck Cal/Diag About NVMDIB Figure 73. Front Panel Toolbar (Production Mode) Operator IF Load Project Shmoo Pin Monitor Value Log Console Viewer Load Program Kalos 2 User Manual Datalog Engine KDatalog System Monitor DBM Editor Test Bugger BitPower Bitmap Analog Waveform ShowBitz Editor Kalos Editor Kalos Logic Debug IDRom Cal/Diag VCheck About NVMDIB 115 4 - Introduction to KITE (Kalos 2 Integrated Test Environment) View Area The view area of the Front Panel provides a selection of tabbed property pages with specific overviews of the Kalos 2 hardware and current test program. Selected information is displayed on each page. In addition to providing a viewer for specific functions, each property page allows for modification of components when the selected environment allows such changes. Information on active slices is also provided. The selection of a property page is accomplished by moving the cursor over the desired tab and clicking the left mouse button (see Figure 74). This action selects the property page and brings it to the top of the stack for viewing. Figure 74. Property Page Tab Selection The following subsections describe the Front Panel property pages. Function Keys There are 16 function keys (see Figure 75) that allow the user to activate certain sequences that are assigned for specific uses in the test program. To use the function keys, click on the appropriate function key. Functionality (program flow sequences) is program dependent. Any test sequence can include an FKey (#, seq_name) function. If the key number is active, the specified seq_name is executed. Figure 75. Function Keys Active Slices The area labeled Active Slices displays buttons which correspond to Kalos 2 slices in the system. Buttons for enabled Kalos 2 slices appear blue in color, while those for disabled slices display a black background. You can enable/disable any of the slices by clicking on them. If there is only one slice enabled, it cannot be de-selected (i.e., one slice must be enabled). Slices can be enabled or disabled on the Overview and Engineering property pages. (Any slice(s) brought up after Front Panel is launched will display as disabled.) Any board in the system can be selected or de-selected by clicking its corresponding button on this screen. Slices begin with slice A0 (Bank A Slice 1) and display up to D72 (Bank D Slice 18). 116 PN: 071-0359-02, October 2005 KITE Software NOTE — Once a program is loaded, slices that have a valid program load appear blue. Any that do not have a valid program appear red. Overview The Overview property page displays the current system configuration, as well as all available hardware and software configurations. It is divided into functional areas: Kalos 2 Active Slices, Header, Configuration, Status (FP Datalog, DLogServer, Monitor, and Device IF), and Sort Bin Results as shown in Figure 76. Figure 76. Overview Property Page The Header area displays header information for the current test program. The first field, labeled Program, contains the test program file name which is read in at load time. The remaining fields contain descriptions and comments which are optionally input by the user. Once a test program is loaded, the user may select any flow in the loaded test program by clicking on the Flow field. Clicking in the window displays a pulldown menu showing the defined flows from within the program. Kalos 2 User Manual 117 4 - Introduction to KITE (Kalos 2 Integrated Test Environment) The Sort Results -> which toggles to Sort History -> displays the Sort Bin Results of the previous three and current sort results. This includes the pass/fail condition, its sort category, and the Kalos 2 slice it was tested on. The Configuration area shows DUTs per module of the last program that was loaded. This is an information only area; functions cannot be controlled. The Status area displaying FP Datalog, DLogServer, Monitor, and Device IF are highlighted when enabled. Kalos 2 Active Slices are under user control. Slices can be enabled or disabled by clicking the respective slice. • At least one slice must be enabled. • Slices must be physically present (slices appear across the panel). • Slices that appear as disabled require rebooting. Overview Property Page (Personal Kalos 2 - Optional) Personal Kalos (PK2) sort views are displays in Figure 77. This view (optional condition) is provided for sort result and/or history on a PK2 test system. The PK2 is defined as a one board system (two slices). Optional view is an expansion of the sort/history views for the single board tester. 118 PN: 071-0359-02, October 2005 KITE Software Figure 77. Optional PK2 Sort Results Kalos 2 User Manual 119 4 - Introduction to KITE (Kalos 2 Integrated Test Environment) Figure 78. Optional PK2 Sort History Operator IF Property Page The Front Panel requires interaction on multiple pages: Overview, Dib Info, Device IF, and Yield Monitor. The Operator IF property page, shown in Figure 79, provides a one page program loading interface for Kalos 2 test systems. This property page allows the user to load GPIB drivers (DLL’s) and perform an automatic dibcal, if enabled, before a program load. To access this property page, select Operator IF from the File menu of Front Panel. Loading of the datalog server can be selected (radio button selection) by way of the Operator IF property page. There is also an option that loads and calculates the checksum for a selectable DBM file. The Operator IF validates the checksum by verifying it against another input (or checksum). The GPIB and hex file options are configurable within the project files.The user can also specify header information for the System Front Panel application. Once the Operator IF is launched, it locks the Front Panel property pages until the user either loads or cancels the Operator IF operation by clicking on the applicable button (Load / Cancel) at the bottom of the property page. 120 PN: 071-0359-02, October 2005 KITE Software NOTE — Device IF, yield monitor, and selectable options on the Operator IF feature are setup in the KPJ file. Figure 79. Operator IF Property Page DIB Info The DIB application (see Figure 80) interacts directly with the Device Interface Board (DIB) Non-Volatile Memory (NVM) devices. It can perform the following tasks: • Search and broadcast DIB NVM data to all the Kalos 2 boards. • Allow interactive modification of the NVM contents if the NVM uses the recommended NVM format. • Format a NVM device. • Load the NVM from a file. Kalos 2 User Manual 121 4 - Introduction to KITE (Kalos 2 Integrated Test Environment) • Save the NVM contents to a file. • Protect/Unprotect NVM data from change (factory use only). The follow are read only view options available from the Front Panel DIB Info property page. • Show a map of which slots are attached to NVM devices. • Show the contents of any DIB NVM slots if the NVM uses the recommended NVM format. DIB Info is the readback calibration status of each Kalos 2 slice. It has no relationship to the NVMDIB; the two are independent of each other. NVMDIB is the readback of the current device interface board, IDROMs, if the user has implemented them. Detailed information on the NVMDIB utility is provided in the NVM User’s Guide located under the Help menu of the NVMDIB utility. DIB slices Kalos 2 sites where a DIB-CAL will be performed. DIB-CAL - ALL Performs DIB-CAL on all available sites. DIB-CAL Status - current active status of DIB-CAL for the specified site(s). Kalos Slices: Condition => Read NVM (status conditions): MapInit (nothing performed yet) CAL Pass (passed dibcal green) CAL Fail (failed dibcal) Read IDROM on load board or probe card. NVM-DIB Identification - identifies all load board IDROM information. 122 PN: 071-0359-02, October 2005 KITE Software Figure 80. DIB Info NOTE — Anytime the DIB Info property page is selected, the call for readback is automatically executed. It is not possible to edit the NVMDIB loadboard identification from this page. Device IF The Device Interface (Device IF) property page, shown in Figure 81, contains information for any peripheral probing or handling device. Direct Test or manual mode is the default mode of the tester. In manual mode, the test start command is sent directly to active slices when the Start button is clicked. Testing is completed after test results are reported for every slice, at which time the Start button may be clicked again. Kalos 2 User Manual 123 4 - Introduction to KITE (Kalos 2 Integrated Test Environment) Figure 81. Device Interface Property Page The *.DLL Libraries area contains a list of software drivers for peripheral wafer probers and handlers. From this list the user may install the proper driver for the equipment being used. Load the specified driver by clicking on it and then depressing the Load button. Confirm that the driver is loaded by the text that appears under Current in the DeviceIF Information area (see Figure 82). Credence maintains and can provide a list of supported prober and handler equipment drivers. 124 PN: 071-0359-02, October 2005 KITE Software Figure 82. Device Interface Loading 5 1 3 2 6 4 (1) Control (if activated by a loaded *.dll program) and current testing status. (2) ListBox showing current *.dll programs that are available. (3) Current information of the *.dll loaded. (4) Selected *.dll Filename. Clicking on a filename in the ListBox (2) selects that *.dll program for the “Load” operation. Three step process: (4, 5, and 6). After loading, the tester goes into automatic mode. Once the driver is loaded and you are ready to start testing, click on the Start button. In Single Site testing you will not need to choose the Site Mapping File (SMF). The SMF maps the DUTs to slices. Kalos 2 User Manual 125 4 - Introduction to KITE (Kalos 2 Integrated Test Environment) If you are in AutoTest Mode and you press the Stop button, a dialog box appears confirming the stop auto test action. Tests on the wafer continue to execute until you select Yes or No from the dialog box. If you choose Yes, the current test will complete execution for that die and bin out. If you choose No, it acts as a cancel and testing continues. NOTE — If you are in manual mode and you press the Stop button, the test stops immediately. The DeviceIF Information area displays the type of interface and characteristics of the interface, such as the Device Type, Device Mode, the Diameter of the Wafer, and temperature you are testing at. To update the prober mask, click on the Update to .dll button under the Prober Mask area. The Readbacks area specifies the data structure from the selected *.dll. NOTE — The Pause button, when depressed, completes the current test and then halts the test program. The Resume button continues from the pause location. Summary The Summary property page, shown in Figure 83, provides an interface for getting current summaries using either a text table format or graphical displays such as bar or pie graphs for the selected Kalos 2 slices. Summary information includes the header of the current test program: totals for number of devices tested, number passed, and number failed, as well as a breakdown of the binning categories. Basic features of the Summary property page include: 126 • Summary (Kalos 2 formatted) text table and multi lot summaries with Kalos 2 slice selections for individual and/or composite summary viewing. • Bin summaries (graphical) bar charts for sort, soft, and functional bins (FBins) for online lot displays only. Kalos 2 slice selections are also available (see Figure 84). PN: 071-0359-02, October 2005 KITE Software Figure 83. Summary Property Page (Text Sums) Slices Kalos 2 User Manual 127 4 - Introduction to KITE (Kalos 2 Integrated Test Environment) Figure 84. Summary Property Page (Graphics) Functionality The Kalos 2 defined summary structures are divided into four groups: header, totals, sort categories, and soft categories. Two tabbing methods are available for viewing: text summaries (Text Sums) and graphical summaries (Graphics). To select a view, left mouse click on the desired tab. The graphic views may be toggled to select specific views. Bar Graphs or Pie Charts are selected from TYPE. The BINS selection displays Sort, Soft, and FBins. 128 PN: 071-0359-02, October 2005 KITE Software Text Sums In Figure 83 only Kalos slices A00 and A01, which are the Total, Sort (Optional: MultiDUT - individual summaries) and the Soft binning results. The device counts and the their respective percentages are displayed with or under defined labels. If a prober *.dll is loaded, then two summary types are made available to the user: a standard text summary and the optional text wafermap. Printouts are available for both summaries (standard text summary file *.smy and the wafermap file *.wmp). FBin is an optional function that is available for displaying KTL FBins, if they are in the currently loaded program. Figure 83 illustrates the summary showing the current active Kalos 2 slices (A00 and A01). If an individual Kalos 2 slice summary is desired, click the respective summary slice tab for the results of that slice. NOTE — Switching between views does not destroy summary data. The system type (Kalos 2 “64 site / 48 channel”) is displayed at the top, next to the Start/Stop control buttons. The second header “All” Summary, shown in Figure 83, is determined by the selection of the tab (All, or A00 through D17) (Banks A, B, C, and D, #’s 0-17) on the System Front Panel Summary Property page. Figure 83 shows the Tab All selected, which comprises all the enabled Kalos 2 slices. In this case, A00 and A01 are the only enabled slices. If A00 or A01 are selected, then the “All” Summary changes to Kalos(#) Summary. Summary Graphics The Graphics selection provides viewing options for bar graphs or pie charts (opposite TYPE:). Sort, soft, or FBins viewing selections are available opposite BINS: (see Figure 84). Primary Window The primary window of the Summary feature is divided into view or control areas. See Figure 85 for the location of the following areas: 1. Menu and toolbar Interface for selecting the operations of the application. 2. Property page (tab) Functional page selection (Text Sums/Graphics). 3. Control area Specify control and/or mode selection. 4. Slice tabs Select Kalos 2 slice(s) for viewing. Kalos 2 User Manual 129 4 - Introduction to KITE (Kalos 2 Integrated Test Environment) 5. Draw area Displays selected views. 6. Current status / messages (two locations) Displays status and messages. Figure 85. Primary (Main) Window 1 6 2 3 Slices 4 5 6 130 PN: 071-0359-02, October 2005 KITE Software Primary Window Functions The following is a description of features contained within the main Summary window. See Figure 86 for locations. 1. Control Area • Text Sums / Graphics - Selection of text summary or graphics (bar graphs or pie chart). • WaferMap - Graphical view (interpretation) of the text wafermap information. Location in relationship to die, information behind xy coordinates, pass/fail information, etc. • Interactive - Allows interaction (by way of pausing) with a particular or problem wafer/die. • Slices - Displays text summary information of the selected slice(s). • Phy Site - Displays the actual (physical) site location. • DUTs - Displays text summary information on the selected slice with an expansion of DUTs per slice. File Manager: LinePrinter: File... Allows the user to save the contents of the current summary to a text file. (This function requires clicking on the Save button.) Close Shortcut for closing the current file. Save Saves the current summary to a named file. If no filename is specified, the save action is ignored. Generates a hard copy of the current summary and sends it to the selected printer. In order for the print function to work, a printer must be set up for the system. Refer to the Windows XP online help if instructions for printer setup are needed. Final... Sends the summary to a printer (also saves the summary to a backup file) and clears all summaries. Partial... Same as Final except it does not clear summaries. Backup Summary: DUT Sampling If enabled, automatically saves to a backup file. Kalos 2 User Manual 131 4 - Introduction to KITE (Kalos 2 Integrated Test Environment) Print... Prints the last summary that was transferred to a backup file. Clear Erases any information currently displayed in the window. FBins Functional bins (FBins) visible (highlighted) if Get FBins button is enabled. Get FBins Gets current FBins from enabled Kalos 2 slices (if all slices are in Ready state). 2. Summary Slices tabs - Graphical tabs that when clicked, select the Kalos 2 slice for individual viewing. The “All” tab combines all available slices. 3. Draw area - User selected functional page. Displays selection of summary text or graphic. 4. Status bar - Displays the status of the application, including real time clock. 132 PN: 071-0359-02, October 2005 KITE Software Figure 86. Primary Window Layout Slices 1 2 3 4 Text Summaries The summary text table is a composite (All) summary with the totals added automatically for the selected slices. A summary text table is displayed in Figure 86, item 3. Kalos 2 User Manual 133 4 - Introduction to KITE (Kalos 2 Integrated Test Environment) Summary Graphics The summary provides multiple views of current summaries of active Kalos 2 slices. Two types of views are available under this property page. They are bar graphs and pie charts. The selection of which view is displayed is determined by clicking the Bar Graphs or Pie Charts selection next to the TYPE button. Individual Kalos 2 summaries can be viewed by clicking on the applicable summary slice subtab. Selecting the All (the default) subtab displays a composite summary of all enabled slices. NOTE — Switching between display views does not destroy data. Summary Bar Graphs Clicking the Bar Graphs button displays a bar graphic view of the composite (All) summary. Figure 87 is a bar graph representation of the previous summary text table. The draw area is divide into two sections: Sort, Soft, or FBins summary (selected from the BINS option) and the bin counts category bar graph. The Sort Summary consists of a color key for each sort number and its respective Pass/Fail assignment. The Pass/Fail assignment is determined by the bin table of the current program. The bar graph is an xy coordinate display of the die counts versus the selected bins categories: Bins Bin flow - defines hard bins 0-31 Soft Bin flow - defines soft bins 0-255 FBins KTL program - defines functional bins 0-1023 NOTE — This is a Viewer only property page. Interactive operations are not available. 134 PN: 071-0359-02, October 2005 KITE Software Figure 87. Summary Bar Chart Summary Pie Charts Clicking the Pie Charts button displays a pie chart view of the composite (All) summary. Figure 88 is a pie chart representation of the previous summary text table. The draw area is divide into two sections: Sort, Soft, or FBins summary (selected from the BINS option) and the pie chart. The Sort Summary consists of a color key for each sort number and its respective Pass/Fail assignment. The Pass/Fail assignment is determined by the bin table in the current program. The pie chart is a graphical display of the die counts versus the selected bins categories converted into pie slice percentage of a whole. NOTE — This is a viewer only property page. Interactive operations are not available. Kalos 2 User Manual 135 4 - Introduction to KITE (Kalos 2 Integrated Test Environment) Figure 88. Summary Pie Charts Wafermap Feature The Wafermap feature is a read only (data container) engineering tool. If a prober *.dll is loaded, then two summary types are made available to the user: a standard text summary and the optional text wafermap (see Figure 89). Printouts are available for both summaries (standard text summary file *.smy and the wafermap file *.wmp). The Kalos 2 tester is the master while the prober is the slave. Testing is controlled by the Kalos 2 tester while the prober moves across the wafer. A driver is loaded by way of the System Front Panel application Device IF property page. Depressing the Start button loads the Site Mapping File (SMF). Once the driver is loaded, the tester is put into automatic mode. From this property page you can pause and restart the test. Keep in mind that if the test is paused, the prober should not be touched. If another site is chosen, the tester will continue testing from the point the test was paused. NOTE — The driver that is used may or may not use a mask of the Wafer. This depends on the driver. 136 PN: 071-0359-02, October 2005 KITE Software Figure 89. Text Summary and Wafermap File Text summary Wafermap graphic The information received by the Wafermap is used to generate the map. This data comes from the prober and the tester. The prober supplies the X and Y coordinates, while the tester supplies the binning (sort and soft bin) information to the Wafermap through the result packet. The results packet resides in KNET (Kalos network software functions and code), as shown in Figure 90. The Wafermap has no control over the prober or the tester, as it is a read only tool. NOTE — In automatic mode you can start or stop the test from the prober or the tester. Otherwise, the test stops when the executable Kalos test program (.kbi) is completed. Kalos 2 User Manual 137 4 - Introduction to KITE (Kalos 2 Integrated Test Environment) Figure 90. Wafermap Functional Diagram Slices Binning start Information test Wafermap KNET Device IF Result Packet X and Y coordinates contains the X, Y coordinates, and Prober binning information. The Wafermap displays pass/fail results, or sorted die categories of selected wafers, plotted within a two-dimensional coordinate system. Basic features include: • Mask Editor and Generation • Data Evaluation Mode • Composite Modes • Graphical Operations There are two functional operations available on the Wafermap: Sort Results and Mask Editor. The basic top level window (see Figure 91) of the Wafermap is subdivided into multiple view or control areas, these are: 138 • Control Area - Execution control and mode selection. • Viewing - Pass/fail condition, die number and row/column position. • Summary - Standard wafer summary report. PN: 071-0359-02, October 2005 KITE Software • View Area - Graphical representation of wafer data and/or summaries. • Status Area - Tool messages, test status, time, etc. Normal operation, both interactive and automatic, uses the tester’s hardware and its supplied software utilities. Usually the user provides the test program flow, which supplies the sorting and binning criteria, the pass/fail criteria, and all the individual test setups. Figure 91. Wafermap Tool Control area Viewing View area Summary Status area The following describes basic functions of the Wafermap feature property pages. Sort Results The Sort Result property page, shown in Figure 92, displays results of the test program currently running or the last completed wafer. There is no Interactive Mode available to the user. Kalos 2 User Manual 139 4 - Introduction to KITE (Kalos 2 Integrated Test Environment) Figure 92. Sort Property Page Mask Editor The Mask Editor property page, shown in Figure 93, allows the user to define and edit the wafer mask by number of rows, number of columns, add die, delete die, skip die, and test die. The Get On-Line Sort Mask option gets the current mask into editor mask. The user can generate a wafer mask for the selected device type, which can be used for all available modes of the Wafermap. The generated mask is used to represent the product die, the test die, and the skip die placements. The initial generation of the wafer mask is determined by the number of row (x) and columns (y) selected, with the rectangle (die) corner points being in a circle (wafer). The editor allows you to add or subtract die, and designate skip or test die. 140 PN: 071-0359-02, October 2005 KITE Software Figure 93. Mask Editor Property Page NOTE — Included is a Get Sort Mask push-button for transferring the current online mask into the editor mask. Automatic Mode (Production) Automatic mode provides for data gathering and visual display of the current wafer sorting action, with an instant summary of the executing wafer. The viewing area of the Wafermap window is under user control for defining which optional views are active. By default, the draw area shows a single wafer graphical view of the sorting criteria, whereas the control area displays the current die coordinates, the die pass/ fail status and the current running summary, including the count and percentage of sorted die of the wafer. During this process, the prober supplies the x and y coordinates of the die, with the tester suppling the pass/fail sort and soft bins to the application. Kalos 2 User Manual 141 4 - Introduction to KITE (Kalos 2 Integrated Test Environment) The automatic mode causes the Wafermap to become a slave application to the tester and selected device program. This means the user has control from their device program for determining the sort criteria for the pass/fail decisions, whereas the tester supplies the start test, end of test, and the individual wafer summary to the feature. Interactive Wafermap Interactive Wafermap allows users to interact with problem wafers, for example, low or zero yield or excessive fails. Interactive Wafermap provides control of the prober to move over and pause on a particular die for further examination (click on the die to stop production). Three conditions must be met in order to use Interactive Wafermap: 1. The *.ini file must have PP_INTERACTWMAP enabled in Front Panel. a. In the Kalos binary files (release tree) search for FrntPanel.ini. b. Bring up an editor to open the file (suggested Notepad). c. Change the PP_INTERACTWMAP to enabled (the default is disabled). 2. Engineering environment must be enabled (login required). 3. Users must Start the program by way of *.dll, then activate the Pause operation (either from DeviceIf or Summary Wafermap property page). NOTE — Loaded *.dll controls messaging and operations to the prober (Chuckup, Chuckdown, and MoveDie). 142 PN: 071-0359-02, October 2005 KITE Software Figure 94. Interactive Wafermap ASCII or Graphical Operations Wafermap can be output either in an ASCII format or a screen capture. The entire screen or a specified region of the window can be selected and captured to the clip board. Images must be pasted to a separate application, such as Paint. The ASCII output can be directed to a line printer or saved as a file. Summary File Examples The following are examples of an individual summary file and a composite file printout. Kalos 2 Summary File - Example Printout Kalos Summary Tester ID: ccastaldi Program: lkg_b1 Device: deviceName Flow: flow Lot: Alpha-numeric Kalos 2 User Manual Date: September 17,1998 07:29AM 143 4 - Introduction to KITE (Kalos 2 Integrated Test Environment) Operator: operatorName Comment: ..comment.. Users_C: ..user message.. Tested: 136 Passed: 0.00 136 100.00 Failed: 0 Categories Sort# 1P 2P 4P 6P Soft# 11 12 14 16 End K00 35 07 26 00 K00 35 07 26 00 K02 21 00 00 47 K02 21 00 00 47 = = = = = = = = Totals 56 07 26 47 Totals 56 07 26 47 Percent 41.18 5.15 19.12 34.56 DataLog The DataLog control application supplies a basic interface for printout of the current datalog (Print... button), and for setting up options. The Datalog application is a viewer that displays the current datalogging results and histogram for DC parametrics, Valuelog, and judge tests (a result from C-Hook pass/ fail TPE). Basic features of the application include: • Kalos formatted text table and result text table with Kalos slice selections for individual and/or composite datalogging viewing. • Datalog mode controls. • File management for ASCII text output file with either format. The Datalog property page provides a basic interface for getting the current datalog results for the selected Kalos slice (see Figure 95). The following identifies the numbered sections: 1. Specifics control and mode selection. 2. Datalog file manager (save, save as, close). 3. Update the current datalogging (by line or at the end of testing). 4. Clear (erases) any information currently displayed in the window. 5. Print specifications. 6. Selection for datalog slice viewing. 144 PN: 071-0359-02, October 2005 KITE Software Figure 95. Datalog Property Page 1 3 2 4 5 6 The following describes all datalog control area options, shown in Figure 95: Datalog formatting: Datalog On/Off Enable / disabling of datalog. Headers Enable All/Fail Test Headers (enable / disable). Selection mode All (P/F) tests or Fail tests only. Program Loading, reset Datalogger Option (Engineering mode only) for user selection for disabling datalog resetting on next program load. Modes: Para Kalos 2 User Manual Parametric (analog) tests - 145 4 - Introduction to KITE (Kalos 2 Integrated Test Environment) Shows all parametric test and results. Shmoo Shows the Inline shmoo from the KTL on the ASCII datalogger Value Value Log tests (AC testing) Shows Value Log from the KTL on the ASCII datalogger. User User defined (TPEprint) - Allows the user to control the TPE function for the datalogger. LVM Allows the user to view Linear Vector Memory (LVM) datalog outputs. Rules Allows the user to view Rules check violations (program versus system resources). Func Functional tests - Shows all functional tests and results. Brief Cells of the TG field show only pass (P) or Fail (F) states. Detail Shows detailed information on the states of pins. Datalog File manager: 146 Files... Launches the Save As dialog to open or save files. Enables the following functions: Close Closes the file manager. Single file Toggles between Single file or Multi-files. Single file combines datalogs into a single file. Multi-files are per Kalos 2 slice. Save Send current dialog to the open file. User interaction (manual mode) to save PN: 071-0359-02, October 2005 KITE Software datalog data. AutoSave Send current data to the end of the current test sequence. by LINE Displays by line, as received, updated datalog information. at EOT Displays updated information at End-ofTest (EOT). Update: Clear Erases any information currently displayed in the window. Print... Generates a hard copy of the current datalog and sends it to the selected printer. Datalog Slices Select datalog display. All means every slice is enabled. Selecting the Kalos 2 slice number displays only datalog results. The Print... button launches the dialog window for controlling properties, printer selection, and the number of copies. The data sent is the data currently displayed in the Datalog Slices - Bank “#”. The datalog slice(s) file manager is activated by clicking File..., which launches the Save As dialog window for opening a new file or save an open file. The directory path name is included with this operation. The lower text field, if a file is opened, displays the filename. Two modes are available: Save and Automatic. • Save mode allows the user to manually send the current datalog to the open file (Adds to the file; does not overwrite). • AutoSave mode sends the data to the file at the end of the current test sequence. Format selection is only active when the Datalog On button is highlighted in green. Current formats are Trace mode, which allows the user to view the executing flow with test headers only, (all modes are disabled and the All/Fail check boxes are enabled) and Para. All other selections are derived from this format. Refer to the Datalog Formatting Modes section above for a description of each available mode. The Clear operation erases all datalog slice(s) information. This deletes the current datalog data (All Slices) and defaults to the header information only. The cleared data is not retrievable. Kalos 2 User Manual 147 4 - Introduction to KITE (Kalos 2 Integrated Test Environment) The Datalog Active Slices tabs section allow the selection of which datalogging results are displayed. In Figure 95, “All” active slices are collected, and data results are displayed in the background. Setups Property Page The Setups property page of the Datalog application is used to program the parameters display of the Histograms property page (see Figure 96). Figure 96. DataLog Property Page: Setups Histogram Property Page The Histogram property page of the Datalog application displays the results of the chosen parametric test. The results are also based on the limits programmed on the Datalog Setups property page. 148 PN: 071-0359-02, October 2005 KITE Software Figure 97. Datalog Property Page: Histograms NOTE — You cannot change formats with the ASCII Datalogger. The Datalog saves by events or by slice. Kalos 2 User Manual 149 4 - Introduction to KITE (Kalos 2 Integrated Test Environment) Example Printout of a Datalog File The following is an example of a datalog file printout. Tester ID: op-id Date: July 31,1999 08:46AM Program: program_name Device: device_type Flow: flow_name Serial: 5 Kalos: 0 Lot: Alpha-numeric Operator: user_name Comment: ..comment.. Users_C: ..user message.. Test 100.00.01.** Contact 100.00.**.** Contact chook (dprint1) result message! Test.Mdl.Site.PS Pin/Grp Test Description Force/Range Measure/Range Fail 100.00.01.** A0 Contact -100uA/250uA -500mV/12.5 V 100.00.01.** A1 Contact -100uA/250uA -500mV/12.5 V 100.00.01.** OE_ Contact -100uA/250uA -500mV/12.5 V 100.00.01.** WE_ Contact -100uA/250uA -500mV/12.5 V Test 133.00.01.** NoLevTim 133.00.**.** NoLevTim chook (dprint1) result message! Max / Min Pass- NA/-1 V NA/-1 V PASS PASS NA/-1 V NA/-1 V PASS PASS est.Mdl.Site.PS Pin/Grp Test Description Force/Range Measure/Range Max / Min PassFail 300.00.01.** ABUS InputLeakageHigh 5.5 V/12.5 V 0 A/25uA 1uA/-1uA PASS Test 400.00.01.** InputLeakageLow Test.Mdl.Site.PS Pin/Grp Test Description Force/Range Measure/Range Max / Min PassFail 400.00.01.** ABUS InputLeakageLow 0 V/12.5 V 0 A/25uA 1uA/-1uA PASS Test 500.00.01.** OutputLeakageHigh Test.Mdl.Site.PS Pin/Grp Test Description Force/Range Measure/Range Max / Min PassFail 500.00.01.** DBUS OutputLeakageHigh 5.5 V/12.5 V 0 A/25uA 11uA/-11uA PASS Test 600.00.01.** OutputLeakageLow Test.Mdl.Site.PS Pin/Grp Test Description Force/Range Measure/Range Max / Min PassFail 600.00.01.** DBUS OutputLeakageLow 0 V/12.5 V 0 A/25uA 11uA/-11uA PASS Test 700.00.01.** rdarrayff_Test Test 750.00.01.** rdarrayff_LOOP Test.Mdl.Site.PS Test Description Cycle_Count CntrA(0x Z.Y.X) CntrB(0x Z.Y.X) CntrC(0x Z.Y.X) Pass/Fail 750.00.01.** rdarrayff_LOOP 0x00000000 0x00.0000.0000 0x00.0000.0000 0x00.0000.0000 PASS Test 800.00.01.** erase_device Test 810.00.01.** erase_LOOP Test.Mdl.Site.PS Test Description Mem_Read IO15 IO14 IO13 IO12 IO11 IO10 IO9 IO8 IO7 IO6 IO5 IO4 IO3 IO2 IO1 IO0 810.00.01.** erase_LOOP Fail_Cnt 0 0 0 0 0 0 0 0 0 0 0 0 0 0 0 0 810.00.01.** erase_LOOP Exp/Act 0/0 0/0 0/0 0/0 0/0 0/0 0/0 0/0 0/0 0/0 0/0 0/0 0/0 0/0 0/0 0/0 Test.Mdl.Site.PS Test Description Cycle_Count CntrA(0x Z.Y.X) CntrB(0x Z.Y.X) CntrC(0x Z.Y.X) Pass/Fail 810.00.01.** erase_LOOP 0x00000000 0x00.0000.0000 0x00.0000.0000 0x00.0000.0000 PASS Test 900.00.01.** wrt55_Test Test 950.00.01.** wrt55_LOOP Test 1000.00.01.** read55_Test Test 1100.00.01.** read55_LOOP 150 PN: 071-0359-02, October 2005 KITE Software Yield Monitor Yield Monitor provides an option to stop (yield) the test after a specified pass/fail percentage or bin count is reached on each Kalos 2 slice. This option can be used during production to monitor yield and stop the test if failures or bin counts go beyond a predefined percentage. For example, if the probe card develops an open pin, Yield Monitor can be configured to stop the test before the entire lot is tested (see Figure 98). The following setting options are available on the Yield Monitor property page: Monitor Disabled / Enabled - Toggles to turn Yield Monitor off/on. Type Pass/Fail Percent - Select to stop test based on total yield failures of tester or module (next two buttons). Bin Counts - Select to stop test based on total failures of a particular bin. (In Kalos versions 1.8.8 and higher, this can be selected for the Tester only, not per module.) Sample Size Select to sample yield every nth die. For example, sample size = 1:10. This means sample every 10th die to check yield. Greater Percentage % - Pass/Fail percent mode. The tester stops when the percentage of fails is greater than the number entered here. Module Module number or All (composite). Tested Total number of devices tested. Pass Count Total number of devices that passed. Fail Count Total number of devices that failed. Failed % Percentage of fails. Greater than Failed % Fail percentage greater than the number entered. Kalos 2 User Manual 151 4 - Introduction to KITE (Kalos 2 Integrated Test Environment) Figure 98. Yield Monitor Property Page Engineering Engineering application Engineering modes (non-production) is used to login and enable all tools and utilities (see Figure 99). When in production mode Shmoo PlotPinMonitor-Value Log, Bitmap, Test Bugger, DBM Editor, ShowBitz, Cal/Diag, IDRom, NVMDIB, and Kalos 2 Editor are disabled (grayed areas). Users must log on by way of the Engineering property page to enable these tools and utilities. To login, enter the password into the Password field then press the Tab key. This enables the Engineering application mode. The default password used to login is the Tester ID: Name that appears on the Engineering property page header. 152 PN: 071-0359-02, October 2005 KITE Software Figure 99. Engineering Property Page Kalos 2 Active Slices Tester ID View Area Engineering Login The Kalos 2 Active Slices boxes (see Figure 99) are located on the Front Panel window. A box representing each board slice in the test head is reflected. The top section of the view area displays the header information for the current test program. Header information can only be changed from the Overview property page (from any user application). Or the information can be changed from the loaded *.ktl program and the loaded *.DLL Device IF. Breaktrap Settings Breaktrap setting operations are available under the Engineering property page. Breaktrap settings are conditions set by the user to configure the Kalos 2 system to specific requirements prior to executing a test flow. Once the user has selected the desired Kalos 2 module to Breaktrap on, one of the following available Breaktrap settings can be chosen: Pause / Step Kalos 2 User Manual When the Pause / Step Breaktrap is set, the user can step through each action item in a test. 153 4 - Introduction to KITE (Kalos 2 Integrated Test Environment) BreakMeas When BreakMeas is set on a selected test/measurement, the program executes all tests in the flow up to and including the selected test, then waits for the user to click on the Start or Stop button or launch Kalos 2 application/debugging tools, such as Shmoo, Test Debugger, and ShowBitz. BreakTestSeq Allows the entire selected test sequence to execute. This is used with the cell current measure feature of the Bitmap tool which allows the user to run a setup pattern. BreakFail BreakFail can be used to detect the first failing test in the test flow. However, after the first failing test is detected, you can manually step through the test flow. After the failing test is displayed in the yellow action field, users can launch the ShowBitz utility to modify the current settings, such as, voltage levels. LoopTest LoopTest Breaktrap is useful when examining signals on the oscilloscope. While looping on a test, the user can launch the Test Debugger application to modify DPS, Levels, and Timings value on-the-fly. LoopMeas LoopMeas Breaktrap is useful when examining signals on the oscilloscope. While looping on a measurement, the user can launch the Test Debugger application to modify DPS, Levels, and Timings values on-the-fly. NOTE — You can only debug one module at a time. Choose the module by clicking on the module you wish to debug under Debug Module in the Breaktrap Settings area on this property page. Implementation Following is the definition of the Breaktrap Settings, as defined by the Kalos 2 Test System: 154 Test The execution of each item in its SEQUENCE. Measurement 1. A measurement taken on one of the power supplies or the parametric measurement unit: MEAS (VCC0 I VCC1 I VPP0 I VPP1 I PMU) or 2. The execution of a pattern burst: PG_RUN ( ). FAIL Fail of a measurement. Note: There could be more than one measurement in a test SEQUENCE. PN: 071-0359-02, October 2005 KITE Software Step Sequentially execute every action item (resource statement, C-function, etc.) in its SEQUENCE upon pressing the Start button. To enable the Step Breaktrap Setting, the Pause button must first be selected. Once BreakMeas is set on a selected test/measurement, the program executes all tests in the flow up to and including the selected test, then waits for the user to click on the Start or Stop button or launch Kalos 2 application/debugging tools, such as Shmoo, Test Debugger, and ShowBitz. If the user executes a shmoo plot, every data point on the plot is the result of running the selected breaktrap/measurement. The Test Debugger tool reads the current test components and allows viewing and modification of them. ShowBitz displays and allows modification of the contents of all hardware registers in the Kalos 2 system. Refer to the Test Debugger chapter in this manual for additional information on break test settings. DBM/SRAM Viewer in Front Panel All DBM and LVM data in a test program is stored in the tester DRAM. At program load time, the SRAM contains the last data loaded into it, in the order it occurs, in the test program. At test program runtime, the SRAM is updated from the DRAM by the test program itself when a DBM or pattern resource name occurs as a SEQUENCE action. The Redundancy Analysis function may also save and restore the SRAM from DRAM. The smallest unit of storage used in the DRAM is one row, which is 288 bits of data. The SRAM is also composed of rows of 288 bits of data. When the DUT width is a power of 2, from 1 to 32, only the first 256 bits of data in a row are used. The upper 32 bits of these rows are ignored. NOTE — Although each DRAM entry has a fixed and re-locatable component, at times the fixed component may be used for re-locatable data. In this case, the fixed descriptors represent re-locatable values. Look for RELOC to appear for both MEM_A and MEM_B to indicate this usage. The DRAM/SRAM Viewer property page (see Figure 100) lists the entries in the DRAM by filename (the table is updated). The following provides a description of each column in the DRAM entry. Filename Represents either the DBM or pattern filename defined by a test program resource. Only LVM or Scan pattern data is stored in the DRAM. Algorithmic pattern data is stored in the CPU memory on the ETX board. DRAM fixed offset (fixed size) The fixed offset is used for DBM or Scan data that always starts at a fixed address in the SRAM. The fixed size is count of rows allocated in the DRAM. Kalos 2 User Manual 155 4 - Introduction to KITE (Kalos 2 Integrated Test Environment) DRAM reloc offset (reloc size) The re-locatable offset is used for LVM data that can have any starting address in the SRAM. The reloc size is count of rows allocated in the DRAM. SRAM fixed offset (reloc offset) Since each entry in this view can have both a fixed and relocatable component, the offset to the start row of fixed component appears first, followed by the start row of the relocatable component in parentheses. Unused components have a default value of 0. Refer to the SRAM Status to determine whether a component is in use. 156 SRAM Status This field reports the type of components in this entry. The value may be RELOC and/or FIXED. If this entry is not currently in the SRAM, the status is filled with dashes (-------). SRAM This field reports the SRAM assigned to the fixed and/or reloc components in this entry. The value may be MEM_A, MEM_B or BOTH, where BOTH indicates the two memory fields are combined into one. BOTH occur only in the single slice configuration of 48 channels. The two-slice configuration of 96 channels always has SRAMs MEM_A and MEM_B. Row Start Depending upon the organization of DUT data in the SRAM rows, partial SRAM rows may result. Row start represents the first bit of the first row of this entry at which to start. Zero (0) indicates starting at the first bit in the row. Row End Depending upon the organization of DUT data in the SRAM rows, partial SRAM rows may result. Row end represents the last bit of the last row of this entry to which it ends. Zero (0) indicates ending at the last bit in the row. Resource This field is the test program resource name that defined this entry. PN: 071-0359-02, October 2005 KITE Software Figure 100. DBM/SRAM Viewer SRAM Kalos 2 User Manual 157 4 - Introduction to KITE (Kalos 2 Integrated Test Environment) History RAM Control The history RAM is a 64 location deep memory that is capable of storing nearly the entire state of the Omni including both the Pattern Generator (PG) subsystem (URAM address, loop counters, and logical address and data), and Timing Generator (TG) subsystem (comparator expect and actual data) at set condition cycles. The primary function of the history RAM is to improve datalogging. This means: • More complete datalog information is available. • Improved programmability when selecting windows and cycles. • Relevant values are contained for DUT-time rather than terminal values at the end of the burst. The history RAM Control allows users to monitor conditions of the pattern and timing generator at a set condition point within a functional test or a point within a patterns execution. The History Ram Control is launched by clicking on the KDatalog icon (see Figure 101) on the Front Panel, or it can be launched (selected) from the Datalog property page. If selected from the Datalog property page, ensure that Datalog On is highlighted, then select the Func modes option, followed by the Detail option, as shown in Figure 102. Figure 101. History Ram Control From Front Panel KDatalog Icon Click here (KDatalog icon) to launch the History Ram Control 158 PN: 071-0359-02, October 2005 History RAM Control Figure 102. History Ram Control From Datalog Property Page Datalog On Select Func, then Detail The History Ram Control window appears, as shown in Figure 103. Kalos 2 User Manual 159 4 - Introduction to KITE (Kalos 2 Integrated Test Environment) Figure 103. History Ram Control Window History RAM Theory The History Ram is a 64-location memory which stores various Omni central and channel resources including the observed responses of the DUT. The memory wraps around when the maximum storage is exceeded. When the storethis-vector and store-on-fail storage modes are not enabled, the History Ram stores data on every cycle until an arm and trigger condition is met, then stops after the selected number of cycles in stop cycle counter, or the Patgen stops. Various conditions can be set to arm and trigger the stop cycle counter. An arm event can 160 PN: 071-0359-02, October 2005 History RAM Control occur at the same time as a trigger event or prior to it. Once armed, a trigger event causes the stop cycle counter to count down from its preset value. Upon reaching the terminal count the stop cycle counter inhibits further storage. The stop cycle counter value can be set between 0 and 63. A non-zero value of N allows N more cycles to be stored including the trigger event itself, while a zero prevents any storing. When the store-this-vector mode is enabled, only cycles which have the URAM bit STV set store data into the History Ram. When the store-on-fail mode is enabled, only the cycles that have a strobe fail store data. When both the store-this-vector and store-on-fail modes are enabled, both the STV URAM bit and the strobe fail must be true for storage. Storage Stored system resources include: Uram Address Counter Subroutine Stack Address Repeat Counter Loop Counters 0, 1, 2, 3 Match Counter Cycle Counter Refresh Counter Logic Address M, N Logic Data M, N LVM Address LVM Cycle Counter Arm Occurred Trigger Occurred Stored channel resources include (either high/low comp glitch or high/low expect data is stored depending on the selection at db_sel_tg_comp_EXp_data: TG A/B/C/D high comp glitch or high comp expect data TG A/B/C/D low comp glitch or low comp expect data TG A/B/C/D high comp data TG A/B/C/D low comp data TG A/B/C/D fail TG A/B/C/D strobe on this edge Kalos 2 User Manual 161 4 - Introduction to KITE (Kalos 2 Integrated Test Environment) Arm When arm first instruction is selected, arm occurs on the first cycle; otherwise, arm occurs when all enabled arm conditions are true. The following resources can be used to set the condition or conditions for arm: Uram Address Counter Subroutine Stack Address Repeat Counter Loop Counters 0, 1, 2, 3 Match Counter Cycle Counter Refresh Counter Logic Address M, N Logic Data M, N LVM Address LVM Cycle Counter Trigger When trigger first instruction is selected, trigger occurs on the first cycle; otherwise, trigger occurs when all enabled trigger conditions are true. The following resources can be used to set the condition or conditions for trigger: Uram Address Counter Subroutine Stack Address Repeat Counter Loop Counters 0, 1, 2, 3 Match Counter Cycle Counter Refresh Counter Logic Address M, N Logic Data M, N LVM Address LVM Cycle Counter 162 PN: 071-0359-02, October 2005 History RAM Control Synchronized Fail The History RAM default settings are shown in Figure 104. Figure 104. History Ram Control Default Settings Storage mode selection. A check indicates the selection. NOTE — The settings that are chosen within the History Ram Control popup window affect whatever pattern is currently loaded in the URAM. The following storage modes of operation are provided by the History Ram Control. • Before/After Arm & Trig - These fields are used to stop storing history RAM data after the specified number of cycles are stored. If the pattern completes before the specified value is reached, only the actual number of cycles stored are available in the history RAM. Before Arm & Trigger - Specify the number of cycles to be passed before arm and trigger event (0 to 63). Cycles are stored after all arm conditions are met. Kalos 2 User Manual 163 4 - Introduction to KITE (Kalos 2 Integrated Test Environment) After Arm & Trigger - Specify the number of cycles to be passed after arm and trigger event (0 to 63). The sum of Before and After Arm & Trig must be less then or equal to 64. • Store This Vector (STV) - In this storage mode only test cycles with the Store This Vector (STV) bit enabled are captured in the history RAM. In addition, if the SOF bit described below is set, only STV cycles that fail are stored. This interactive debug feature (or advanced datalogger) allows the user to enable or disable storing of cycles in the pattern that have the STV bit enabled. STV is enabled by default for every cycle in a pattern. Use of the stvOff keyword disables STV for all cycles until the stvOn keyword is specified. These code operations allow the user to specify a block of cycles/vectors that will either be stored (stvOn) or not (stvOff) when the STV control storage mode is selected. Following is an example of stvOn and stvOff fail processor operations. write_cyc t40us1: (stvOn, data = 0xff); noop1us_cyc ( link cga(x<y)) jump if (loop(0)); noop_cyc(stvOff , ++cga(x<y)) jump wrt if (loop(1)); (tset0) stvOn “H0000000000000”; (tset0) stvOff “0H00000000000”; The stvOff mode may be overridden for a single cycle with the syntax shown below. write_cyc (stv, ++cga(x<y), data = 0xff); (tset0) repeat 10, stv 164 “000000000000”; • Store Only Fail (SOF) - In this storage mode, only tester cycles with a strobe failure are stored. The History RAM can still be armed and triggered; however, only data from fail cycles will exist in the RAM at end of test. This mode allows more fail data to be collected since passing cycles are not stored. • Store This Vector and Store Fail Only - By default both of these storage modes are enabled for Kalos 2. This is a hybrid mode that stores fails only for vectors/cycles with the STV bit set. To facilitate its use, by default all logic vectors and algorithmic pattern instructions have the STV bit set, except conditional fail instructions. Conditional fail instructions are those which jump, increment, or call a subroutine based on whether or not a fail occurs in the kpl. In this mode, it is likely that the user will arm and trigger on first fail since this is the objective of this default. PN: 071-0359-02, October 2005 History RAM Control • Store All Mode - All cycles are stored if neither STV or SOF modes are chosen in the History Ram Control window. During each tester cycle, all of the PG/TG data for cycles is stored up until an arm and trigger occur, followed by the number of cycles in the Before Arm & Trig field. In this mode, a complete window of execution can be reconstructed around the trigger cycle. Arm The arm condition allows users to identify a condition that must occur before the History RAM can trigger. After the arm condition is set, the history RAM stores data until the trigger condition is met. The advantage of having a separate arm capability is to delay the triggering to a URAM or cycle that occurs later during the burst, possibly after many other fails have occurred. NOTE — Arming on the first cycle and triggering on the first fail is the Kalos 2 default. The following are conditions that can be used to arm as well as trigger an event: • A fail occurs • A URAM address is executed • Any counter reaches a condition value • Any combination of the above (logical AND combination) As shown in Figure 105, users can choose one or more conditions which must be met to set an arm condition. Kalos 2 User Manual 165 4 - Introduction to KITE (Kalos 2 Integrated Test Environment) Figure 105. Setting Arm Conditions 1.) Choose the condition to arm the device. 2.) Activate the arm condition by clicking the box, then setting the value for the activated arm condition. Trigger Trigger is used to establish what event or condition causes the history RAM to stop storing data after N cycles. The Before/After Arm & Trig in the History Ram Control popup window are used for storing N cycles after triggering the event. For example, setting Before Arm & Trig to 32 cycles of data before the trigger event leaves at most 32 cycles that follow the trigger event. Changing these two values allows the window of 64 cycles around the trigger event to be moved (see Figure 106). The Apply button applies the settings to the currently loaded pattern. The Reset button resets the History Ram Control to the default settings. Once the settings are made and accepted, the user is prompted to click OK in the pop-up window, shown in Figure 107. 166 PN: 071-0359-02, October 2005 History RAM Control NOTE — The window does not allow users to enter a number greater than 63. If the user attempts to enter a number greater than 63 an informative error message is displayed. Figure 106. Setting Trigger Conditions Set before and after counters here The trigger condition shown here is the default setting. Save Settings - Save the current settings Get Settings - Restore the previous settings Kalos 2 User Manual 167 4 - Introduction to KITE (Kalos 2 Integrated Test Environment) Figure 107. Apply/Reset Save/Get Settings Save and Get Settings Apply and Reset buttons OK prompt for applied settings NOTE — The user can only apply the history RAM to the currently loaded pattern. 168 PN: 071-0359-02, October 2005 Breaktrap Settings Breaktrap Settings Breaktrap setting operations are available under the Engineering property page window only. Breaktrap settings are conditions set by the user to configure the Kalos 2 system to specific requirements prior to executing a test flow. Once the user has selected the desired Kalos 2 slice to Breaktrap on, one of the following available Breaktrap settings can be chosen: Pause / Step When the Pause / Step Breaktrap is set, the user can step through each command line in a test. BreakMeas When BreakMeas is set on a selected test/measurement, the program executes all tests in the flow up to and including the selected test, then waits for the user to click on the Start or Stop button or launch Kalos 2 application/debugging tools, such as Shmoo, Test Debugger, and ShowBitz. BreakTestSeq BreakTestSeq operates the same as BreakMeas, however this setting allows the entire sequence to run. BreakFail BreakFail can be used to detect the first failing tests in the test flow. However, after the first failing test is detected, you can manually step through the test flow. After the failing test is displayed in the Action field, users can launch the ShowBitz utility to modify the current settings, that is, voltage levels, timing, etc. LoopTest LoopTest Breaktrap is useful when examining signals on the oscilloscope. While looping on a test, the user can launch the Test Debugger application to modify DPS, Levels, and Timings value on-the-fly. LoopMeas LoopMeas Breaktrap is useful when examining signals on the oscilloscope. While looping on a measurement, the user can launch the Test Debugger application to modify DPS, Levels, and Timings values on-the-fly. NOTE — You can only debug one slice at a time. Choose the slice by clicking on the slice you wish to debug under Debug Slice in the Breaktrap Settings area on this property page. A visual diagram, showing each breaktrap setting, is provided in Figure 108. Kalos 2 User Manual 169 4 - Introduction to KITE (Kalos 2 Integrated Test Environment) Figure 108. Breaktrap Settings BreakOnTest (Pause button) Test block BreakMeas LoopTest MEAS LoopMeas Pass Break Test Sequence Fail Implementation Following is the definition of the Breaktrap Settings, as defined by the Kalos 2 Test System. Test Test is the execution of each item in its SEQUENCE. NOTE — Test in the Kalos Test Language is a point in a test flow. It contains a test number, a description of up to 80 characters, and a SEQUENCE. The SEQUENCE can contain names of resources (data which are applied to the tester), actions (taking a measurement, setting a delay, running/stopping the pattern generator, executing a PAUSE, setting a power supply, pin, or pingroup to a state), and the names of C-functions declared in a CMODULE statement. In Example 1 on page 172, the execution of the IccStandbyHi test implies execution of every item between the open and closed brackets of the SEQUENCE: Levels_VccStandby_hi, StandbyICChi_VCCPP, SET(CECONTROL,VIH), SET(VCC0,MAIN), SET(VPP1,MAIN), StandbyHIIcc_VCC0, MEAS(PMU) 170 PN: 071-0359-02, October 2005 Breaktrap Settings In Example 2 on page 173, the execution of the Read_CKBD_all test implies execution of: VCC_5V_VPP_0V, Levels_Read, READ_FF_STATE, cycle_table1, read_CKBD, PG_RUN, PG_STOP() Measurement 1. A measurement taken on one of the power supplies or the parametric measurement unit: MEAS (VCC0 I VCC1 I VPP0 I VPP1 I PMU) or 2. The execution of a pattern burst: PG_RUN ( ). In Example 1 on page 172, execution of the Measurement in the IccStandbyHi test is the execution of the MEAS(PMU) command. In Example 2 on page 173, execution of the Measurement in Read_CKBD_all test is the execution of the PG_RUN() command. FAIL FAIL is defined as a fail of a measurement. Note: There could be more than one measurement in a test SEQUENCE. Step Step is to sequentially execute every command line (resource statement, action, Cfunction) in its SEQUENCE upon pressing the Start button. To enable the Step Breaktrap Setting, the Pause button must first be selected. Examples The following device test program examples are provided in order to illustrate and step the user through setting up and executing the following: - BreakMeas Breaktrap Setting - BreakFail Breaktrap Setting - LoopTest Breaktrap Setting - LoopMeas Breaktrap Setting - Pause Breaktrap Setting Kalos 2 User Manual 171 4 - Introduction to KITE (Kalos 2 Integrated Test Environment) Test Flow The following test flow is used in this Examples section. FLOW flow4 = { //test_name, pass_branch, fail_branch; Opens, Shorts, InputLeakageHigh, InputLeakageLow, OutputLeakageHigh, OutputLeakageLow, IccStandbyHi, VCCReadICC_CMOS, VCCReadICC_TTL, Read_dut_ID, Erase_array, Read_all_ff, Write_5555_WORD, Read_5555_WORD, erase_block0, readff_block0, Write_AAAA_all, Read_AAAA_all, Write_5555_all, Read_0000_all, Erase_array1, Read_all_ff1, Write_CKBD_all, Read_CKBD_all, Write_INVCKBD_all, Read_0000_all1, Shorts, InputLeakageHigh, InputLeakageLow, OutputLeakageHigh, OutputLeakageLow IccStandbyHi, VCCReadICC_CMOS, VCCReadICC_TTL, Read_dut_ID, Erase_array, Read_all_ff, Write_5555_WORD, Read_5555_WORD, erase_block0, readff_block0, Write_AAAA_all, Read_AAAA_all, Write_5555_all, Read_0000_all, Erase_array1, Read_all_ff1, Write_CKBD_all, Read_CKBD_all, Write_INVCKBD_all, Read_0000_all1, Bin1, Bin2; Bin3; Bin4; Bin5; Bin6; Bin7; Bin8; Bin9; Bin10; Bin11; Bin12; Bin13; Bin14; Bin15; Bin16; Bin17; Bin18; Bin19; Bin18; Bin20; Bin21; Bin22; Bin23; Bin24; Bin25; Bin26; }; Example 1 The following section of code illustrates an example of a parametric test. The name of the test is IccStandbyHI. TEST IccStandbyHi = { TESTNO = 800; DESC = "This test is for VCC Standby Hi Current"; SEQUENCE = 172 { PN: 071-0359-02, October 2005 Breaktrap Settings Levels_VccStandby_hi, StandbyICChi_VCCVPP, SET(CECONTROL,VIH), SET(VCC0, MAIN), SET(VPP1, MAIN), StandbyHIIcc_VCC0, MEAS(PMU) //LEVELS statement //DPSSET statement //set CECONTROL to VIL //using levels in LEVELS //PMUTEST statement //performs current meas on //VCC0 using the PMU }; }; Example 2 The following section of code illustrates an example of a functional test. The name of the test is Read_CKBD_all. TEST Read_CKBD_all = { TESTNO = 2000; DESC = "Read CKBD "; SEQUENCE = { VCC_5V_VPP_0V, Levels_Read, READ_FF_STATE, cycle_table1, read_CKBD, PG_RUN }; //DPSSET statement //LEVELS statement //SEQUENCE statement //PATTERN statement }; Set Up and Execute BreakMeas Breaktrap Setting Once BreakMeas is set on a selected test/measurement, the program executes all tests in the flow up to and including the selected test, then waits for the user to click on the Start or Stop button or launch Kalos 2 application/debugging tools, such as Shmoo, Test Debugger, and ShowBitz. If the user executes a shmoo plot, every data point on the plot is the result of running the selected breaktrap/measurement. The Test Debugger tool reads the current test components and allows viewing and modification of them. ShowBitz displays and allows modification of the contents of all hardware registers in the Kalos 2 system. 1. Load the desired test program. Select the appropriate flow from the Flow pulldown menu (the Flow field is in the header section of the Front Panel Overview Property window). Kalos 2 User Manual 173 4 - Introduction to KITE (Kalos 2 Integrated Test Environment) 2. Place the cursor on the check box (circle) to the left of BreakMeas and click the left mouse button. When BreakMeas is enabled, the check box (circle) button is colored green. 3. In the Breaktrap Settings section, under Debug Slice, select the Kalos 2 slice you wish to Breaktrap on. 4. Place the cursor on the field next to BreakOnTest: This activates a pulldown menu displaying all available tests that are loaded in the program. In the example shown in Figure 109, test Read_CKBD_all is selected. Figure 109. BreakMeas - Select Read_CKBD_all Test 5. Click on the Start button to execute the test program. All tests in the flow are executed up to and including the Read_CKBD_all test. At this point, the Action field at the top section of Front Panel turns yellow and displays the name and test number (2000) of the Read_CKBD_all test: On Measure: Read_CKBD_all id=2000. 174 PN: 071-0359-02, October 2005 Breaktrap Settings 6. A display of the contents can be viewed from the CView utility window. 7. Once BreakMeas is set on a test, the user can launch Kalos 2 application tools, such as Shmoo, Test Debugger, and ShowBitz. 8. If the user clicks the Start button again, the tester continues executing subsequent tests in the flow until it finds the next measurement and then will BreakMeas on that. In this example, the next measurement is the pattern write_INCKBD. The user may also set BreakMeas on any other measurement in the flow by selecting it from the BreakOnTest field and clicking on the Start button. This measurement must follow the Read_CKBD_test, otherwise the test program executes through the end of the flow. If the user clicks on the Clear Breaktrap button while BreakMeas is set on a test, the ENDTEST of the EVENTMAP is executed (if one exists), then the pattern generator is reset and the message mode set to NORMAL appears in the CView window. Set Up and Execute BreakFail Breaktrap Setting The BreakFail Breaktrap Setting can be used to detect all failing tests in the test flow. 1. Load the desired test program and select a flow. For this example the flow loaded is as follows: FLOW failing flow = { //test_name, Opens, Shorts, InputLeakageHigh, InputLeakageLow, OutputLeakageHigh, OutputLeakageLow, IccStandbyHi, VCCReadICC_CMOS, VCCReadICC_TTL, Read_dut_ID, Erase_array, Read_all_ff, Write_5555_WORD, Read_5555_WORD, erase_block0, readff_block0, Write_AAAA_all, Read_AAAA_all, Kalos 2 User Manual pass_branch, fail_branch; Shorts, InputLeakageHigh, InputLeakageLow, OutputLeakageHigh, OutputLeakageLow IccStandbyHi, VCCReadICC_CMOS, VCCReadICC_TTL, Read_dut_ID, Erase_array, Read_all_ff, Write_5555_WORD, Read_5555_WORD, erase_block0, readff_block0, Write_AAAA_all, Read_AAAA_all, Write_5555_all, Bin2; Bin3; Bin4; Bin5; Bin6; Bin7; Bin8; Bin9; Bin10; Bin11; Bin12; Bin13; Bin14; Bin15; Bin16; Bin17; Bin18; Bin19; 175 4 - Introduction to KITE (Kalos 2 Integrated Test Environment) Write_5555_all, Read_0000_all, Erase_array1, Read_all_ff1, Write_CKBD_all, Read_0000_all1, Write_INVCKBD_all, Read_0000_all2, Read_0000_all, Erase_array1, Read_all_ff1, Write_CKBD_all, Read_0000_all1, Write_CKBD_all, Read_0000_all2, Bin1, Bin18; Bin20; Bin21; Bin22; Bin23; Bin24; Bin25; Bin26; }; NOTE — Write_CKBD_all programs the entire array to a checkerboard pattern. Therefore, Read_0000_all1, the subsequent test in the flow, fails. 2. Select BreakFail. 3. Select the Debug Slice. NOTE — After the failing test is displayed in the Action field, the user can launch the ShowBitz utility to modify the current settings (e.g., voltage levels, pattern uRam contents). To re-execute the test, select PG Burst in the Navigator tree of ShowBitz. Click once on the Run button to execute the failing test. To see if any pins failed, click on the TG PassFail View under Omni view to display all the channels. In order to bin-out the device, return to Front Panel and click on the Start button. A PASS or FAIL flag displays. 4. Click on the Start button to execute the program. The program breaks on the first fail, which in this case is Read_0000_all1 test. 5. If the user clicks the Start button again (if there are no other failing measurements), program execution stops. Set Up and Execute LoopTest Breaktrap Setting The LoopTest Breaktrap is useful when examining signals on the oscilloscope. While looping on a test, the user can launch the Test Debugger application to modify DPS, Levels, and Timings value on-the-fly. (The Apply/Set button in Test Debugger allow modified settings to be re-loaded to the ETX slice and to Kalos 2 hardware.) 1. Load the desired program and select a flow. 2. Select the LoopTest Breaktrap Setting. 3. Select the Debug Slice. 4. From the BreakOnTest pulldown menu (see Figure 109), select the Read_CKBD_all test. 5. Click on the Start button to execute the program. All tests in the flow are executed up to the Read_CKBD_test. Once this test is reached, the program loops on the entire test sequence, i.e., timing, levels, power supply setup, 176 PN: 071-0359-02, October 2005 Breaktrap Settings loading of the pattern, and pattern execution. The Action field at the top of Front Panel turns yellow and displays the message: Looping on Test: Read_CKBD_all id=2000. 6. A display of the test contents can be viewed from the CView utility window. NOTE — The user can click on the PAUSE button to pause looping. The program pauses at the beginning of the read_CKBD_all test. As the step button is clicked, each line in the read_CKBD_all test executes sequentially. After the read_CKBD pattern is loaded, the user can launch ShowBitz, modify the current hardware configuration, and execute (or loop on) the pattern using the PG Burst window (refer to steps 7 and 8 in the Set Up and Execute Pause Breaktrap Setting section of this chapter). 7. If the user clicks the Start button again, the program begins to loop on the next test in the test flow. In this example the next test is write_INVCKBD_all. 8. The user can stop looping either by clicking on the Clear Breaktrap or the Stop button. In both cases the pattern generator stops. The difference is the BreakOnTest field shows the Null_Test if Clear Breaktrap is clicked, whereas if the Stop button is clicked, it shows the test originally set as the Breaktrap test (read_CKBD_all. Set Up and Execute LoopMeas Breaktrap Setting The LoopMeas Breaktrap is useful when examining signals on the oscilloscope. While looping on a measurement, the user can launch the Test Debugger application to modify DPS, Levels, and Timings values on-the-fly. (The Apply/Set button in Test Debugger allow modified settings to be re-loaded to the ETX slice and to Kalos 2 hardware.) 1. Load the desired test program and select a flow. 2. Select the LoopMeas Breaktrap Setting. 3. Select a Debug Slice. 4. Select the Read_CKBD_all test from the BreakOnTest pulldown menu. Click on the Start button to execute the test program. All tests in the flow are executed up to the Read_CKBD_all test. The program then loops on the pattern Read_CKBD_all. The message: Looping on Measurement: Read_CKBD_all id=2000 is displayed in the Action field of Front Panel. A display of the test contents when LoopMeas is set on the Read_CKBD_all test can be viewed from the CView utility window. 5. Click the Start button again to begin looping on the next measurement in the test flow. Kalos 2 User Manual 177 4 - Introduction to KITE (Kalos 2 Integrated Test Environment) 6. The user can stop looping by clicking the Clear Breaktrap or Stop button. In both cases the pattern generator stops. The difference is the BreakOnTest field shows the Null_Test if Clear Breaktrap is clicked, whereas if the Stop button is clicked, it shows the test originally set as the Breaktrap test (read_CKBD_all). Set Up and Execute Pause Breaktrap Setting When the Pause/Step Breaktrap is set, the user can step through each command line in a test. Users can step to the point of loading a pattern, then launch the ShowBitz utility to modify timings, levels, PMU, DPS values, and pattern uRam contents on-thefly. 1. Load the desired test program. 2. Select the Pause button. The Step button automatically becomes highlighted. 3. Select a Debug Slice. 4. Choose the Read_CKBD_all test. 5. Click on the Start button to execute the test program. The program runs until it reaches the Read_CKBD_all test. It then pauses and waits for the user to click on the Step button. Each command line inside the Read_CKBD_all test is executed sequentially as the user clicks on the Step button. 6. Click on the Step button until the Read_CKBD_all pattern is loaded. As the Step button is pressed, a display of the test contents can be viewed from the CView utility window. 7. Launch the ShowBitz utility by selecting Utilities--> SHOW BITZ from the Front Panel menu bar. Select the slice you are breaktrapped on (slice A0 or slice A1). In the PG Burst window (see Figure 110) click on the Run button for the Read_CKBD_all pattern to execute Click on the box next to loop and press the Run button: the program loops on the Read_CKBD_all pattern. Click on the Stop button in the PG Burst window to discontinue looping. 178 PN: 071-0359-02, October 2005 Breaktrap Settings Figure 110. Pause_Step - ShowBitz PG Burst PG Burst Omni Views Eset View 8. In ShowBitz, click on Omni Views -> Eset view and then on Level Sets. This launches Eset View (channels) windows (see Figure 111). These windows display the timing and level sets applied to all channels/pingroups specified in the channel slices when the Read_CKBD_all pattern is loaded. Now only the Timing and Levels settings applied to ADDRESS DBUS and CECONTROL pingroups are displayed. The user can now modify the levels, format, and timing and click on the Run button of the PG Burst window to run the Read_CKBD_all pattern with the modified settings. Kalos 2 User Manual 179 4 - Introduction to KITE (Kalos 2 Integrated Test Environment) Figure 111. Pause_Step - ShowBitz Eset View 180 PN: 071-0359-02, October 2005 Idrom Property Page Idrom Property Page Each Kalos board contains five serial electrically erasable non-volatile memories (Motherboard, PMU, DPS, EMV modules, and ETX). Each is called an IDROM. IDROM is an NVM memory chip which stores module information on each Kalos board module. This information includes part number, revision number, ECO level, etc. In addition, each backplane in the test head contains an IDROM. Each IDROM contains formatted data identifying the manufacturer of the hardware and its capabilities. This information is programmed into the IDROM during the manufacture of the hardware. Each time the Kalos 2 test system is initialized, the IDROM data is retrieved and made available to all Kalos 2 boards and XP software. This information is used by Kalos 2 software to determine how to best utilize the hardware. The Idrom utility is launched by clicking on the IDRom icon on Front Panel, as shown in Figure 112, or it can be selected from the Utilities pulldown menu item. The IDROM utility appears, as shown in Figure 113. Figure 112. IDRom Icon Single click to open the IDRom window The Idrom tool allows users to view this detailed information as well as check serial numbers and other information used to identify the slices mounted on the Kalos 2 boards. Kalos 2 User Manual 181 4 - Introduction to KITE (Kalos 2 Integrated Test Environment) Figure 113. Idrom Window Save To IDROM IDROM information can be copied, or saved on the hard drive or to a portable drive. The procedure follows (see Figure 114): 1. Launch the Idrom utility. 2. Click on Kalos to read the Kalos board xxxxxxxS from Lot Number. 3. Save all IDROM data by selecting File, from the menu bar option, then select Generate Report. 4. Select all slots to be saved. 5. Click Save to File; save the file in .txt format. 6. Open the .txt file in Notepad or Wordpad. 182 PN: 071-0359-02, October 2005 Idrom Property Page Figure 114. Save to IDROM Procedure CView Utility The CView (Console Viewer) utility (see Figure 115), is a debug viewer for observing communication messages between the CPU of each Kalos 2 board and workstation computer. These communication messages show the processing of events and sequence of execution by the Test Program Executor (TPE). A display panel appears for each active slices. CView Window The CView window opens a console display of all execution activity. It is suggested that the user open the CView window at the start of each session and position the window out of the center of the CRT display, where it can be seen, but not as the main window. Open the CView by double clicking on the CV icon in the Front Panel window or by selecting Utility => CVIEWER from the menu bar. Kalos 2 User Manual 183 4 - Introduction to KITE (Kalos 2 Integrated Test Environment) Figure 115. CView (Console Viewer) Single click to open the CView window Front Panel Toolbar Display for each active slice The CView utility does give some run time overhead or causes additional run time in production. Do not open the CView utility in the middle of a production run since it might crash the system due to an initiate CPU for communications. NOTE — The SHMOO in the KTL will be shown in the CView window. 184 PN: 071-0359-02, October 2005 Calibration and Diagnostics Calibration and Diagnostics This section describes basic calibration and diagnostics functions. Kalos 2 diagnostics and calibration programs are located in the C:\Kalos\bin directory. The standard calibration program is called kcal.cal, and the standard diagnostics program is called kchk.dia. There may be other programs visible in the menu, however, they are not standard maintenance programs and should not be run without full understanding of the calibration software. The Kalos 2 tester is automatically calibrated by running calibration/diagnostics from Front Panel. Calibration, beyond power supplies, is performed by the software, which requires no manual manipulation. In order to execute calibration, however, manual intervention is required to mount two types of load boards at various points in the process. Calibration Compatibility Regardless to what Kalos OS system is running, the latest software version of calibration and diagnostics must be used. Enhancements and improvements to the calibration and diagnostics software help to ensure that the most accurate and robust system environment is available. Calibration of the system is intended to always be backward compatible to previous operation system revisions. dibcal.cal The dibcal.cal program is invoked by selecting C:\Kalos\bin\dibcal.cal from the File => Open menu or from the Open Flow tool bar button in the Calibration/Diagnostics window (see Figure 118). The dibcal.cal calibrates to the open socket of the load board. This calibration program must be run anytime the Kalos 2 tester is initialized (that is, other calibration programs were run, loss of communications, Map INIT, load board/probe card change, Front Panel load, etc.). This calibration adjusts tester timing for the specific device load board and thus requires that the board is present. NOTE — This program is the same as DIB-CAL on Front Panel. Refer to the DIB Info tab selection. kcal.cal The standard calibration program is kcal.cal. It is located in the same directory as dibcal.cal. The program appears as a window within the Calibration/Diagnostics window. Both calibration and diagnostics programs are controlled in the same matter. The kcal.cal calibrates out to the pogo pin. Calibration is run as a periodic Kalos 2 User Manual 185 4 - Introduction to KITE (Kalos 2 Integrated Test Environment) maintenance; whenever a board is changed; a power system change occurs; and with any major change, such as repair of the tester. Periodic maintenance calibration is run every 90 days. 186 PN: 071-0359-02, October 2005 Running System Diagnostics Running System Diagnostics System diagnostics is launched by clicking on the Cal/Diag icon on the Front Panel toolbar (see Figure 116), or by selecting CAL DIAG from the Utilities pulldown menu. Figure 116. Front Panel Toolbar Single click to open the Calibration/Diagnostics window Calibration and diagnostics software programs are located under the File menu, inside the Calibration/Diagnostics window (see Figure 117). Figure 117. Calibration and Diagnostic Programs Standard Diagnostic and Calibration programs Diagnostic Program - kchk.dia The kchk.dia program is used to verify the system hardware. Invoke this diagnostic program by selectingC:\Kalos\bin\kchk.dia from the File menu in the Calibration/ Diagnostics window. The program appears, as shown in Figure 118. Kalos 2 User Manual 187 4 - Introduction to KITE (Kalos 2 Integrated Test Environment) Figure 118. Calibration/Diagnostics Programs Options Dialog window selection Open bin files Various test suites are listed on the left side of the window, as shown in Figure 119. Each suite contains several tests that can be viewed by clicking on the “+” box to the left of each test suite’s folder button. NOTE — Warm up the tester before running diagnostics. Failure to do so can cause test results that are too close to the edge of pass/fail ranges. 188 PN: 071-0359-02, October 2005 Running System Diagnostics Figure 119. Test Suites Click here to expand test suite. Note: Expanding is a view only function. To execute a test or test suite, click on the folder icon. To execute the entire diagnostic sequence, click on the folder icon next to the program name (see Figure 120). Figure 120. Test Suite Execution Click here to execute the entire diagnostic sequence. Note - Some test suites have several levels of tests Kalos 2 User Manual 189 4 - Introduction to KITE (Kalos 2 Integrated Test Environment) Diagnostic Windows The Diagnostic program is divided into four windows, as shown in Figure 121. The test suites, in icon form, are displayed in the window on the left. Individual test names (as they are executed) along with pass/fail checkboxs are displayed in the center. The datalog window, which displays test results for each individual test, is on the right. The execution status of the program is displayed in the bottom window. Figure 121. Diagnostic Windows Slices selected Test suites in Icon form Status Bar Selection Button Status Window Individual test Datalog window To view datalog results, pause the diagnostic test, then click on the selection button to the left of the individual test name in the center window. The test results appear at the top of the datalog window. The pass/fail (P/F) checkbox displays a green check mark for passing tests or a red x for failing tests. 190 PN: 071-0359-02, October 2005 Running System Diagnostics Diagnostic Settings The ability to set and control test parameters, datalogging and hardware selection is accomplished through the Options Dialog (settings) window. This diagnostic setting option is invoked by selecting the Options menu item or the Options icon on the toolbar in the Calibration/Diagnostic window, shown in Figure 118. The Options Dialog window, shown in Figure 122, has three pages. As illustrated, the first page is used to establish test parameters and data logging. The test flow is controlled by way of the Break Condition selections which specify where testing stops: None All Test Fails Only Test # no stopping stop on all test stop on fails only stop on selected test number (When selected, a window is provided to specify test number.) SPC (Statistics Process Control) is used for tester development only. Figure 122. Options Dialog (Settings) Window Datalog control Datalog file name Name of calibration data file Summary file name NOTE — The calibration data file name and tester speed are standard Credence defaults and should not be altered. Pages two (see Figure 123) and three of the Options Dialog window are used to select individual slices or channels, respectively, to be tested. Kalos 2 User Manual 191 4 - Introduction to KITE (Kalos 2 Integrated Test Environment) Figure 123. Options Dialog - Page 2 To test a single channel, first click the Clear All button, then select the channel to be tested. NOTE — Always check the settings pop-up window when opening the diagnostic or calibration programs to ensure proper results. Summary Window Graphical summaries with viewing options, as shown in Figure 124, are available in the [Channel Summary] options windows. To view the graphical summaries, select the View menu option or click on the Summary icon in the Calibration/Diagnostics window, shown in Figure 124. The Summary window appears in compressed form, displaying active slices in green. 192 PN: 071-0359-02, October 2005 Running System Diagnostics Figure 124. Summary Options Click to view Summary windows Expanded Summary Window A matrix chart is displayed in the expanded summary window (see Figure 125). The horizontal axis represents the execution number, that is, how many times the program was executed, and the vertical axis depicts the individual test suites. Each matrix square is color coded to depict its test status. A green box indicates the test has completed execution and passed. A gray box represents a test in the sequence that has not been executed. A red box indicates a completed test that failed. Kalos 2 User Manual 193 4 - Introduction to KITE (Kalos 2 Integrated Test Environment) Figure 125. Matrix Chart Test suite name Slice and channel summaries are displayed in Figure 126. 194 PN: 071-0359-02, October 2005 Running System Diagnostics Figure 126. Slice and Channel Summaries Channel summary Slice summary Calibration/Diagnostic Tool Icons A description of the tool icons located at the top of the Calibration/Diagnostic window, as shown in Figure 127, follows: Kalos 2 User Manual 195 4 - Introduction to KITE (Kalos 2 Integrated Test Environment) Figure 127. Tool Icons Print Options Open file Summary Datalog 196 Pause Channel Summary Slice Summary Paste Step Slots Setup Checker Copy Abort Cut Expand Tree Clear Results 3-D Summary Colors Close Tree About Auto Scroll Save Summary Open file Brings up a browser to enable selection of a file. Print Prints the ASCII file depicting the current test suite(s). Options Set up test parameters, datalogging and summary information. Slices Select the channels and slots for the current calibration or diagnostic run. Pause Pauses the execution of the current running calibration or diagnostic test suite. Step Tests each suite manually, stopping after each test. Cut Removes the selected text (ASCII representing test suites) from the file and puts it onto the clipboard. Copy Duplicates the selected text (ASCII representing test suites) from the file and puts it onto the clipboard. Paste Inserts the clipboard at the insertion point. Abort Aborts the running calibration or diagnostic. Colors Edit the color scheme. PN: 071-0359-02, October 2005 Running System Diagnostics About Displays the software version of the Calibration/Diagnostic program. (This window must be closed to return control back to the previous window.) Datalog Invokes the datalog window. Summary Invokes the Summary window. Slice Summary Displays the summary information by slice. Channel Summary Displays the summary information by channel. Setup Checker Displays the channels and slots, chosen for testing, on the loaded diagnostic or calibration program. Note: This feature is not implemented with this version of Kalos 2. Clear Results Clears the results of the currently loaded calibration or diagnostic routine. 3-D Summary Indicates how many times a test passed or failed. This is displayed in the summary views. Expand Tree Expands all subtests of the diagnostic and calibration routine. Close Tree Closes all subtests of the diagnostic and calibration routine. Auto Scroll Automatically scroll to the latest result during testing. Save Summary Saves the summary information to a text file. Kalos 2 User Manual 197 4 - Introduction to KITE (Kalos 2 Integrated Test Environment) Running Calibration The Calibration program, like Diagnostics, is invoked by single clicking the Cal/Diag icon on the System Front Panel, or by selecting Utilities => CAL DIAG from the menu bar, shown in Figure 128. Figure 128. Front Panel Toolbar Utilities menu Cal/Diag icon Calibration and Diagnostic software programs are located under the File menu, inside the Calibration/Diagnostic window, shown in Figure 129. Figure 129. Calibration/Diagnostics Programs Calibration programs The standard Calibration program is called kcal.cal. The program is located in the C:\Kalos\bin directory. Running calibration is required before production testing to prevent inaccuracies and confusion during tests. A 30 minute warm up (looping the kchk) must be performed before running calibration. Mapping Active Kalos Slices Before running maintenance software, the active Kalos slices (Kalos boards) must be mapped. The Kalos 2 Active Slices boxes (see Figure 99) are located on the Front Panel window. A box representing each test board in the test head should be reflected. If not, there may be a problem with communication between the boards and the CPU, or possibly a power supply problem with the Kalos board in the test head. 198 PN: 071-0359-02, October 2005 Running Calibration The MAP INIT selection brings up the MAP Initialization dialog box (see Figure 130) that allows the user to select all slices (most typical) or any one slice. To map the boards manually, click on the Utilities pulldown menu and select MAP INIT. Otherwise the interface automatically runs the mapping when the slice is set up by TTarget. CAUTION Map INIT will erase the dibcal values. Figure 130. MAP INIT MAP INIT Active slices Kalos 2 User Manual 199 4 - Introduction to KITE (Kalos 2 Integrated Test Environment) Device Testing Procedure This section provides a step by step example of a basic device test procedure. The Load Program operation is used to load an executable test program onto the tester hardware. It invokes a navigation window used for locating and selecting the desired test program file. Once a test program is loaded, the user may select any flow in the loaded test program for .kbi files by clicking on the Flow field (see Figure 131). For .kpj files, the flow cannot be changed except from engineering mode. Clicking in the window displays a pulldown menu showing the defined flows from within the program. If an automatic prober or handler is used, the Libraries area contains a list of software drivers for peripheral wafer probers and device handlers (refer to "Device IF" on page 123). From this list the user can install the proper driver for the equipment being used. The Status area displays information regarding the status of the installed peripheral device. (Refer to Step 7 in the following setup steps.) The Wafermap feature is a viewer for displaying the pass/fail results or sorted die categories of selected wafers, plotted within a two-dimensional coordinate system. The Sort Results display the previous and current sort results. This includes the pass/ fail condition, its sort category, and the Kalos 2 module it was tested on. The Wafermap feature is accessed by way of the Front Panel Summary property page. 200 PN: 071-0359-02, October 2005 Device Testing Procedure Figure 131. Flow Selection Select Flow Select Flow Proceed through the following setup steps to perform device testing: 1. Verify that the required Kalos 2 Active Slices appear in the Overview tab. 1 2. Load the test program by selecting the File menu item Load Program, or by clicking on the Load Program icon. 2 OR, load the project file by clicking the Load Project file icon. Kalos 2 User Manual 201 4 - Introduction to KITE (Kalos 2 Integrated Test Environment) 3. Select the test program file using the Open dialog box. Navigate to the folder where the test program is located. 3 To load the project file, select the appropriate KPJ project folder that appears in the Open dialog box. 202 PN: 071-0359-02, October 2005 Device Testing Procedure Select the Program Selection from the list, then click on the OK button. 4. Select the test program flow by clicking in the Flow section. 4 5. Enter the information in the Header section, including Device, Lot, Operator, and Comment. Kalos 2 User Manual 203 4 - Introduction to KITE (Kalos 2 Integrated Test Environment) 5 6. Click on the Clear Device IF button. 6 8 9 7 7. Select a device library name. The selection appears in the Selection box. 8. Click on the Load button. 9. Any required device input is requested in the dialog box of the selected device. The loaded *.DLL, with its respective coding (implemented by the user), determines if additional input is required. This information could be GPIB device name, list of wafers, number of DUTs to be tested, etc. 10. The device parameters are displayed under the Current heading when device loading is completed. 204 PN: 071-0359-02, October 2005 Device Testing Procedure 10 The indicator in the upper right hand corner changes from Direct Test to Auto Test. 11. To collect wafermap data during sort, refer to the Wafermap Feature section of this chapter to perform the applicable setup. 12. Perform setup on the prober or handler to be used for device testing. 13. Click on the Start button to begin testing. 13 14 14. For wafer sort: testing completes automatically when the “end of lot” message is signaled by the prober. For handler testing: the Stop button must be pressed to end testing. When the Stop button is pressed, the following dialog box appears. Select Yes to abort (stop) testing, or No to continue testing. Kalos 2 User Manual 205 4 - Introduction to KITE (Kalos 2 Integrated Test Environment) The Clear Device IF button unloads the software device and returns the tester to Direct Test. 206 PN: 071-0359-02, October 2005 5 KITE UTILITIES The Kalos Integrated Test Environment (KITE) software provides access to development, debug, and diagnostic utilities This chapter describes each utility and provides information on their functions and usage. KITE utilities consist of the following: • CView (Console Viewer) Utility • Test Debugger (TBUGGER) Utility • Kedit Utility • Waveform (AWT) • LDTool • DBM Editor (DBMEdit) Utility • DLOGEngine • Cal/Diag Utility • ShowBitz Utility • IDRom Utility • NVMDIB • MAP INIT Kalos 2 User Manual 207 5 - KITE Utilities Overview The Kalos Integrated Test Environment (KITE) software provides access to development, debug, and diagnostic utilities through a graphical user interface (GUI). Utilities can be opened (launched) by clicking on the applicable toolbar icon, shown in Figure 132, or from the Utilities pulldown menu located on the menu bar of Front Panel. Toolbar The Toolbar is an arrangement of graphical icon buttons, clustered in functional groups, that execute commands to KITE. These buttons contain the most commonly used commands of the pulldown menu bar. The Toolbar is located directly below the menu bar of the Front Panel window. If the Toolbar is not present, choose View > Toolbar from the pulldown menu to display it. Figure 132 shows the layout of the toolbar, and lists the commands executed for each toolbar button. Utilities are invoked by a single click of the left mouse button. Figure 132. Front Panel Toolbar Operator IF Load Project Shmoo Pin Monitor Value Log Console Viewer Load Program Datalog Engine KDatalog System Monitor DBM Editor Test Bugger BitPower Bitmap Analog Waveform IDRom ShowBitz Editor Kalos Editor Kalos Logic Debug Cal/Diag VCheck About NVMDIB Many of these tools are launched only from engineering mode. Log in to engineering mode from the Front Panel Engineering tab. 208 PN: 071-0359-02, October 2005 CView (Console Viewer) CView (Console Viewer) The CView (Console Viewer) utility (see Figure 133) is a debug viewer for observing communication messages between the CPU of each Kalos 2 board and workstation computer. These communication messages show the processing of events and sequence of execution by the Test Program Executor (TPE). A display panel appears for each active slice. Figure 133. CView (Console Viewer) Property Page Display for Each Active Slice CView Window The CView window displays all program execution activity. It is suggested that the user open the CView window at the start of each session and position the window out of the center of the CRT display, where it can been seen, but not as the main window. The CView utility is accessible in both production and engineering modes. That is, user login is required. Open the CView by clicking the CV icon in the Front Panel window (see Figure 134) or by selecting Utility => CVIEWER from the menu bar. Kalos 2 User Manual 209 5 - KITE Utilities Figure 134. CView Icon Click here to open the CView window. NOTE — The CView does give some run time overhead, which causes additional run time in production. Menu and Toolbar The following are descriptions of the CView property page menu and toolbar options. File • Selected Slice: standard SaveAs selected slice to file. • All Active Slices: standard SaveAs all active slices to file. • Exit: closes the application. Edit • Find text. View • All Kalos Slices: show all slices (even if not physically present). • Kalos (Active) Slices: show only the physical slice that is present. • FrontPanel (Active) Slices: show only Front Panel enabled slices. • Clear Selected Slice: only the selected (highlighted) slice is cleared. • Clear All Slices. Window • Cascade: standard XP display for manual data input (MDI) windows. • Tile: standard XP display (most commonly used). • List of available slice windows (click to bring forward). Options - 210 • TPE Printf On: enable all messages using TPE Print. • TPE Printf Off: disable all messages using TPE Print. PN: 071-0359-02, October 2005 CView (Console Viewer) • Always On Top: keep CView application on top of all others applications on desktop. Utilities Launch the selected utility application. Tools • Launch the selected tool application. Help • Kalos 2 User Manual About CView: standard help window. 211 5 - KITE Utilities Test Debugger KITE’s device debugger, known as Test Debugger, is an interactive utility that allows the user to modify settings, such as levels, timing and flow, within a Kalos test program and immediately return to program execution of the selected slice without the need to recompile. The Test Debugger is accessed from the Front Panel. The Test Debugger utility is launched by clicking on the Test Bugger icon (see Figure 135) or it can be selected (launched) from the Utilities TBUGGER menu item. Figure 135. Test Bugger Icon Click here to open the Test Bugger utility. All Test Debugger editing property pages have some common operations for getting, setting, and selecting the respective resource for editing. These operations are located in the property page’s control area (top of the selected page). The Get and Set buttons, if available for the respective property page, are for updating or sending the utilities’ current data table. Some of the property pages have an Apply button, which is a superior set operation. Apply executes the set function and then applies the specific resource table to the Kalos 2 hardware. The Break Test button, if available for the respective property page, allows users to select the Front Panel’s Break Test resource or select a specific resource (from the currently selected slice program) for editing. Refer to the Test Debugger chapter in this manual for complete information and details on the Test Debugger utility. 212 PN: 071-0359-02, October 2005 Kedit Kedit The Kedit utility is a Kalos 2 supplied text editor. Kedit is used to generate, edit, and compile test programs. Launching Kedit The Kedit utility is accessible only in Engineering mode. That is, user login is required. Kedit can be launched by clicking on the KTL icon located on the toolbar of Front Panel (see Figure 136) or by selecting Utilities => KEDIT from the menu bar. Figure 136. Kedit Icon Click here to launch Kedit. Program Loading Once the editor is launched, click the left mouse button on the File pulldown menu (see Figure 137). From this pulldown menu a program can be selected for loading. Options include: • New to create a new file • Open to load a file • Open Workspace to edit an existing file Additional options are provided to save, print, close, and review recent files. Refer to the Kedit section in the Test Program Definition chapter in this manual for in-depth information on the Kedit utility. Kalos 2 User Manual 213 5 - KITE Utilities Figure 137. Kedit (Text Editor) New... Open... Close Open Workspace... Close Workspace Save Ctrl+S Save As... Save All Print Ctrl+P Print Preview Page Setup... Recent Files Recent Workplaces Exit 214 PN: 071-0359-02, October 2005 Waveform (AWT) Waveform (AWT) The Analog Waveform (AWT) Editor, also know as the Analog Wavetool is a graphical tool for manipulating waveforms. This section includes: • Operation • Waveform Filetypes • User Interface The Analog Waveform (AWT) utility is launched by clicking on the Analog Waveform (AWT) Editor icon (see Figure 138) or it can be selected (launched) from the Utilities Waveform (AWT) menu item. Figure 138. Analog Waveform Icon Click here to open the Analog Waveform (AWT) Editor utility Introduction The graphical Waveform tool is based on a stack system, like a postfix (reverse Polish notation) pocket calculator. With the Waveform tool, you can: • Create various types of waveforms. • Read from and write to waveform files. • Modify waveforms using the Analog Wavetool’s extensive toolset, including the following: - Display cross-hair cursors that are mouse draggable with ∆x and ∆y values. - Zoom and pan in both x and y directions. - Select the number of waveforms to display. - Perform Digital Signal Processing (DSP) operations and measurements on waveforms. Kalos 2 User Manual 215 5 - KITE Utilities • Read from and write to waveform resources on Credence highperformance testers. • Create and execute scripts. The Analog Wavetool has an extensive library of DSP routines, waveform generation templates, and multiple waveform displays to output a variety of different waveform formats. General Analog Wavetool is a cross-platform tool that currently includes Windows XP operating systems. The user interface incorporates the Microsoft User Interface Guidelines, with screens, dialogs and a menu structure that adhere to Windows standards. Creating a Waveform To create a waveform: 1. Choose File > New (or click the New File icon). 2. Choose the waveform type 3. Click OK. Establishing the Current Directory Use the File > Save As menu item to establish the current directory. The Analog Wavetool remembers this directory until you change it. Opening a Command File The File > Open menu item is reserved for opening waveforms only. To open a command file in Analog Wavetool, select the desired script from the Tools menu drop-down list. Command files in Analog Wavetool have both the .cmd and .aws extensions. Since the .cmd extension conflicts with a Windows predefined extension, the .aws extension is added. However, both are recognized as command files in Analog Wavetool. In addition to opening a specific command file from those listed on the Tools menu, the Tools > Script > Execute menu item can also be selected. Selecting this item prompts you for the command file to execute. This can also be done through the Execute a Script toolbar icon. 216 PN: 071-0359-02, October 2005 Waveform (AWT) Saving a Waveform Analog Wavetool has only one save option: File > Save As. Connecting to a Tester or Emulator Not Supported at present time. Setting Preferences This category includes the following features: • Options are set by way of the Tools > Options menu item. • To set the number of panes (sub windows) to display, use Tools > Options > Display tab. • To view selected markers, use View > Markers menu item or the Select Marker Type icon. • To turn on/off the scripting, use Tools > Script > Record menu item or click on Begin Script Recording icon in the toolbar. Undo and Redo Undo and redo any operation using the Edit->Undo and Redo menu items. NOTE — Undo and redo cannot be applied when scripting is on. Custom Zoom To select the zoom rectangle in the pane after choosing the View > Custom Zoom menu item, click and drag the left mouse button, or use the Custom Zoom toolbar icon. View Options Using View menu item allows the user to pick and choose among the four Analog Wavetool components: Cursors Bar, Calculator, Transcript Pane and Stack Preview. A check mark by the item signifies that it will display; no check mark means that it will not display. Online Help Online help is available by way of the Help menu item or toolbar icon. Kalos 2 User Manual 217 5 - KITE Utilities No System Cursors The Analog Wavetool does not provide default system cursors. All cursors must be created manually (and can be deleted). This is done by right-clicking in the Waveform Graphics pane and selecting Create New Cursor. Flexible Cursor Delta Boxes To display delta information, select any two cursors. Cursor Pop-up The cursor pop-up menu features of Analog Wavetool 2.0 behaves as follows: • Edit > Undo or Redo Create cursor menu item or toolbar icon is used to undo or redo create cursor. • Cursor menu items also include: - Set as left cursor and Set as right cursor to establish the delta cursor. - Change name to change the name of a cursor. - Change color to change the color of a cursor. X Scale and Y Scale Each displayed waveform contains the X and Y Scale (with Scale Factor selection) and Units parameters. Paging and Scrolling in the Waveform Graphics Pane The pop-up menu that appears when you right-click on the horizontal and vertical scroll bars have several items that provide more control over waveform placement: • Page Up and Down • Scroll Up and Down In addition, the scroll bars on the edges of the waveform graphic pane (see Figure 139) scroll all panes simultaneously so that you can view any waveform without rotating and resizing. There is also a display option that enables you — for performance reasons — to opt to real-time scroll only one patch at a time (the other patches snap to the new scroll position upon releasing the mouse button). This is the default. Calculator Pane Access the functions of the calculator items by left-clicking on the buttons. 218 PN: 071-0359-02, October 2005 Waveform (AWT) Operation The Analog Wavetool is based on a stack principle. It works like a postfix pocket calculator. When a waveform is read — either from a file or directly from a tester — it is put onto the top of the stack (TOS). Operations work on waveforms from the top down. For example, operations targeting one operand use the waveform at the top of stack. Operations targeting two operands use the top two elements in the stack, and so on. NOTE — Putting too many waveforms onto the stack causes the waveform(s) at the bottom of the stack to be lost with no warning message. Waveform Filetypes The filetypes that the Analog Wavetool deals with can be divided into two categories: Read-in Filetypes AWAV (*.awav) An ASCII *awav file. AWG (*.awg) An ASCII Kalos 2 AWG formatted waveform. CAP (*.cap) A raw binary file of longs from the Kalos 2 capture processor. This file is generated when using the cp_store_data primitive. NOTE — The file-read function used to read capture processor files is a generalized file reader and reads any file, regardless of whether it contains capture-processor data or not. Reading an arbitrary file produces unexpected results. Spice (*.sp) A spice waveform file. Save As Filetypes Saving a waveform writes the TOS waveform to the assigned file name. There are four filetypes to which you can save a waveform: AWAV Kalos 2 User Manual 219 5 - KITE Utilities This filetype is automatically given an extension of .awav unless a different extension is specified. AWG - Kalos 2 series only. Save as an AWG-ready waveform. If an extension is provided, it is kept, otherwise the .awg extension is appended to the name when the file is written. This is user readable and editable with any standard ASCII editor (EDT, VI, EMACS, CRISP, Notepad, etc.). Select the target AWG (HF, LF) and the optimization level (low noise, low distortion). Only HF and LF AWG file formats are supported. User Interface The Analog Wavetool window contains the following major areas: • Menu bar across the top • Toolbar with icons for common tasks • Delta box for information pertaining to any two selected cursors • Name pane for information related to the displayed waveforms • Cursor strip for the cursors • Graphic pane for displayed waveforms • Calculator area for modifying waveforms • Transcript pane for errors, warnings and test output All major areas of the Analog Wavetool window are shown in Figure 139. 220 PN: 071-0359-02, October 2005 Waveform (AWT) Figure 139. Analog Wave Tool Window Menu Bar Delta Box Calculator Pane Name Pane Cursor Box DSP functions Graphic Waveforms Transcript Pane Graphic Pane Stack listing Pane Throughout the Analog Wavetool, there are several Parameter-Input dialogs, or data entry dialogs. Any time one of these dialogs is displayed, all other functions of the Analog Wavetool are inhibited until either Accept or Cancel is clicked in the dialog (or tab to the button selection and press the Enter key). Pressing the Esc key also cancels the dialog. A few additional tips: Kalos 2 User Manual 221 5 - KITE Utilities • Parameter-Input dialogs remember values from one call to the next. If a value is set in a dialog box and the same function is performed again, the same dialog box comes up with the values last accepted. The exceptions to this are the names of waveforms and cursors. New default names are generated each time the function is accepted. • Pressing Ctrl-a: selects the entire parameter. • Pressing Ctrl-h: backspaces and deletes the previous character. Setting Options To specify preferences for items shown in the Options window (see Figure 140): 1. Choose the menu item Tools > Options. 2. Click the tab that corresponds to the item you wish to set. 3. Adjust settings. 4. Click OK. Figure 140. Options Window To choose options for display: 222 PN: 071-0359-02, October 2005 Waveform (AWT) Select the Display tab from the Options window. Drawing Style There are four waveform Drawing Styles in the Options window. Line — Basic dot-to-dot mode where each data point is connected by a straight line. Points — Displays only the data points. Sample Mode — Imitates a DAC output. In this mode, the display magnitude does not change until the next data point. Histogram — A basic bar code chart centered around zero. Display Mode The Display mode for the X axis in the Options window has two choices: User Units or Points. User Units — Displays the X axis in terms of user interval units (sample interval). If user interval units are seconds, display is in the time domain. Points — Changes all X axes to Points mode (samples per division). In User Units mode, the waveforms are displayed at the same scale, if the units are the same. In Points mode, units are ignored. This means that in user units mode, a single cycle waveform sampled at 5 ns intervals with 800 points graphically looks the same as a single cycle waveform sampled at 10 ns intervals with 400 points. In Points mode, however, the first of these two waveforms are displayed at twice the width of the second. Graticule Setting To select the type of graticule in the Options window, when displaying with a waveform patch: 1. Choose one of the following four types: Cartesian — Sets the scales for the X axes at the bottom of the waveform patches. Scale — Sets the scales for the X axes in the center of the waveform patches, as is Y axis label. Grid — Overlays a grid of lines on the waveform panes. The distance between lines is equal to the X and Y scale factors. Off — Turns off the graticules. 2. Click OK. Kalos 2 User Manual 223 5 - KITE Utilities Stack Display Order To choose the stack display order: Select the Display Stack Topdown checkbox in the Tool > Options window, to display the stack from the top down. Deselect the checkbox to display the stack from the bottom up. Synchronize Y Axes The Synchronize Y Axes option is controlled by an on/off toggle switch. When the Synchronize Y Axes checkbox in the Tool > Options window is selected, all waveforms on the stack with Y units that match the Y units of the TOS are synchronized. In other words, when the TOS waveform is scaled and/or scrolled, all matching waveforms scale and scroll along with it. This enables direct comparison of waveforms and is useful when combined with the superimpose feature (described later in this section). When off, all Y axes parameters are maintained separately: 1. Select or deselect the Synchronize Y Axes checkbox from Tools> Options> Display window. (See Figure 140.) 2. Click OK. Synchronize on Scroll This on/off toggle switch is off by default. When the feature is turned on, all patches synchronize simultaneously on a horizontal or a vertical scroll in any given patch. NOTE — To work on Y axis, the Synchronize Y Axes feature must be turned on. Background, Graticule, or Marker Color To specify the background, graticule, or a marker color: 1. Click the marker color button in tools> Options> Display window. (See Figure 140.) 2. Using the color palettes, slider bars and color value fields, choose or create the background color from the Choose a Graticule Color window, as shown in Figure 141. 224 PN: 071-0359-02, October 2005 Waveform (AWT) Figure 141. Marker Color Window 1. Click OK. 2. Click OK again. CWaveform Colors To turn automatic color incrementing on/off: 1. Select or deselect the Cycle Waveform Colors checkbox from tools> Options> Display window. With the feature turned on, successive waveforms pushed onto the stack appear in different colors. If the feature is off, automatic color selection is turned off and the color is reset to the default color selection. 2. Click OK. Maximum Waveform Display To set the maximum number of waveforms display: 1. Enter a value for X in the Display (...) Waveforms Max item in tools> Options> Display window. 2. Click OK. Kalos 2 User Manual 225 5 - KITE Utilities Log Results in the Script File If scripting is turned on, the option of writing comments to the currently open script file is available. With this logging feature on, any wave tool function that prints results in the transcript pane also prints the results to the script file. To turn the Log Results feature on/off: 1. Select the Preferences tab from the options window, as shown in Figure 142. Figure 142. Preferences Window Options X 2. Select or deselect the Log Results checkbox. 3. Click OK. Mark Results The results of several waveform measurements (most of the pulse characteristics) can be displayed as results markers on the waveform(s). The generation of these results markers can be turned on or off. To turn results marker generation on/off: 1. Select the Preferences tab from Tools > Options window. 226 PN: 071-0359-02, October 2005 Waveform (AWT) 2. Select or deselect the Mark Results checkbox. 3. Click OK. Convert Spaces to Underscores The Analog Wavetool can automatically convert the spaces to underscores. To convert spaces to underscores: 1. Click the Preferences tab from Tools > Options window. 2. Select Convert Spaces to Underscores. 3. Click OK. Print in Black and White To print in black and white: 1. Choose the menu item Tools > Options. 2. Click the Preferences tab. 3. Select Print in black and white. 4. Click OK. Undo Level To set the maximum number of times you can undo previous operations: 1. Choose the menu item Tools > Options. 2. Click the Preferences tab. 3. At the Undo Level tag, enter a number between 0 and 32. 4. Click OK. File Locations To see the default location of different types of files: 1. Choose the menu item Tools > Options. 2. Click the Default Locations tab (see Figure 143). Kalos 2 User Manual 227 5 - KITE Utilities Figure 143. Default Location Window To change the storage location of any or all of the filetypes: 1. Click on the file type, then click the Modify button. 2. Browse for the desired storage location. 3. Click OK. 4. Click OK again. NOTE — Selecting the User Scripts item and clicking the Modify button brings up a slightly different dialog box that allows you to select multiple directories. Click OK after selecting the directory. Creating a Waveform To create a waveform: 1. Choose File > New...or... click the New File icon on the toolbar to open the new Waveform window, shown in Figure 144. 228 PN: 071-0359-02, October 2005 Waveform (AWT) Figure 144. New Waveform Window 2. On the left side of the dialog, select a waveform type. 3. On the right side of the dialog, enter the parameters for the waveform you are creating. 4. Click OK. Waveform Parameter Details The sine waveform parameters are described in Table 8. Kalos 2 User Manual 229 5 - KITE Utilities Table 8. Sine Waveforms Parameter Meaning Name Num Cycles (M) Name associated with the waveform/wavelet. Number of waves to display. One cycle equals one complete wave. Num Samples (N) Number of samples distributed over M cycles. Sample Interval (1/Fs) Time required to elapse between samples. Phase (radians) Fraction of the period of time that is required to elapse with respect to a fixed datum point. Amplitude Magnitude of variation in a changing quantity from its zero value. Offset Relative location of zero on the Y axis to start the drawing of a waveform. The ramp waveform parameters are described in Table 9. Table 9. Ramp Waveforms Parameter Meaning Name Sample per Ramp Name associated with the waveform/wavelet. Number of points per ramp used to create the waveform. Sample Interval (1/Fs) Time required to elapse between samples. Start Voltage Initial voltage of ramp waveform. Stop Voltage Final voltage of ramp waveform. If stop voltage is lower than start voltage, the resulting waveform will have a negative slope. Start Delay The duration to maintain the start voltage after (sample time) which the ramp decrements/increments toward the stop voltage. The triangle waveform parameters are described in Table 10. Table 10. Triangle Waveforms Parameter Meaning Name Num Cycles (M) Name associated with the waveform/wavelet. Number of complete waves to display. One cycle equals one complete wave. Number of points per cycle used to create the waveform. Samples per Cycle 230 PN: 071-0359-02, October 2005 Waveform (AWT) Table 10. Triangle Waveforms (Cont.) Parameter Meaning Sample Interval (1/Fs) Time that is to elapse between samples. Start Delay Length of time to wait before beginning the sample. Rise Time Time required for the output of a circuit to change its output from a low voltage level (0) to a high voltage level (1) after the change starts. Fall Time The measure of time required for the output of a circuit to change its output from a high voltage level (1) to a low voltage level (0) after the change starts. Amplitude The magnitude of variation in a changing quantity from its zero value. Offset The relative location from zero on the Y axis at which to begin the drawing of the waveform. The sawtooth waveform parameters are described in Table 11. Table 11. Sawtooth Waveforms Parameter Meaning Name Num Cycles (M) Name associated with the waveform/wavelet. Number of complete waves to display. One cycle equals one complete wave. Samples per Cycle Number of points per cycle used to create the waveform. Sample Interval (1/Fs) Time that is to elapse between samples. Start Delay Length of time to wait before beginning the sample. Rise Time Time required for the output of a circuit to change its output from a low voltage level (0) to a high voltage level (1) after the change starts. Amplitude Magnitude of variation in a changing quantity from its zero value. Offset Relative location from zero on the Y axis at which to begin the drawing of the waveform. The pulse waveform parameters are described in Table 12. Kalos 2 User Manual 231 5 - KITE Utilities Table 12. Pulse Waveforms Parameter Meaning Name Num Cycles (M) Name associated with the waveform/wavelet. Number of complete waves to display. One cycle equals one complete wave. Samples per Cycle Number of points per cycle used to create the waveform. Sample Interval (1/Fs) Time that is to elapse between samples. Start Delay Length of time to wait before beginning the sample. Rise Time Time required for the output of a circuit to change its output from a low voltage level (0) to a high voltage level (1) after the change starts. Pulse Width The width - measured in time - of the sample pulse. Fall Time Time required for the output of a circuit to change its output from a high voltage level (1) to a low voltage level (0) after the change starts. Amplitude Magnitude of variation in a changing quantity from its zero value. Offset Relative location from zero on the Y axis at which to begin the drawing of the waveform. The Gaussian noise waveform parameters are described in Table 13. Table 13. Gaussian Noise Waveforms Parameter Meaning Name Num Samples (N) Sample Interval (1/Fs) Seed (must be odd) Name associated with the waveform/wavelet. Number of samples to take in one cycle. Time that is to elapse between samples. Starting value that will be used to randomly generate the waveform. Average value of the total number of waveforms. Average amount of variance from the mean. Mean Standard Deviation The DC waveform parameters are described in Table 14. 232 PN: 071-0359-02, October 2005 Waveform (AWT) Table 14. DC Waveforms Parameter Meaning Name Num Samples (N) Sample Interval (1/Fs) Offset Name associated with the waveform/wavelet. Number of samples to take in one cycle. Time that is to elapse between samples. Relative location from zero on the Y axis at which to begin the drawing of the waveform. Opening a Waveform File Opening a waveform file loads the file at the top of the stack. To open a waveform from a file: 1. Choose File > Open...or... click the Open File icon on the toolbar. 2. In the Files of Type field, specify the type of waveform you wish to open. 3. Browse for the specific waveform file you wish to open. 4. Double-click the filename...or... select the filename and click the Open button. Working with Cursors Cursors allow you to make measurements on waveforms. They appear in the Waveform graphic pane as cross-hairs. The vertical part of the cross-hair follows the pointer; the horizontal part of the cross-hair always tracks the Y data value for the data point closest to the vertical part of the cross-hair. Each cursor has a cursor box, displayed above the waveform graphic pane. Cursors and their cursor boxes track together; when you move one, the other moves as well (see Figure 146). Cursor Boxes A cursor’s corresponding cursor box is located as directly as possible above its cursor. If a cursor is off screen (to the left or the right), the cursor box corresponding to that cursor remains on screen, but at the side of the screen to show in which direction you must pan to find the cursor. If a cursor is attached to a waveform that is not currently displayed (a waveform that is far enough into the stack that it is not being drawn), the cursor box remains displayed, but the cursor will be invisible. In order to make the cross-hair cursor visible, you must rotate the waveform stack up or down until the waveform is visible. Kalos 2 User Manual 233 5 - KITE Utilities If two or more cursors are close to each other, the boxes may not have enough room to be directly above the cursors. In this case, each cursor box shuffles around to be as near as possible to its cursor without any cursor boxes being hidden. If there is not room to display all of the cursor boxes, the boxes furthest to the right do not display. Each cursor box contains a label, a Y value, and an X value. Label — The first item in the box: the name of the cursor. Y Value — The Y value at the current cursor location. Changing this value changes the data point. X Value — The X value at the current cursor location. Changing this value moves the cursor. Creating a Cursor To create a cursor: 1. Right click in the patch that contains the waveform to which you want to attach a new cursor. 2. From the pop-up menu, choose Create New Cursor, as shown in Figure 145. Figure 145. Cursor Menu 3. Enter the name of the new cursor, as shown in Figure 146 234 PN: 071-0359-02, October 2005 Waveform (AWT) Figure 146. New Cursor cursor name Cursor Box cursor 4. Click OK. Modifying a Cursor To modify a cursor: 1. Right click on the label of the cursor box or near the vertical cross-hair of the cursor to display a pop-up menu list, as shown in Figure 147. Figure 147. Cursor Menu The pop-up menu contains the name of the cursor. Thus, a cursor can be identified without moving it. This is done by pressing the right mouse button near the vertical cross-hair of the cursor. 2. Using the guide below, choose the action to perform the desired changes. Kalos 2 User Manual 235 5 - KITE Utilities Change Name — Allows you to rename the cursor, as shown in Figure 148. Figure 148. Change Name Window Change Color — Enables you to choose a new cursor color from a color palette. Remove Cursor — Deletes a cursor. Set as Left Delta Cursor — Sets the selected cursor as the left cursor in the Delta area (upper left corner of tool) for comparison. Set as Right Delta Cursor — Sets the selected cursor as the right cursor in the Delta area (upper left corner of tool) for comparison. Zoom to Cursors — Adjusts the X scale factor and position such that the waveform is centered between the cursors and the cursors are one minor division (tic mark) from each end. If more than two cursors are defined, a list of cursors is provided. If the two cursors are on the same data point, the scale is adjusted so that one sample interval fills the entire display. Zoom to Region — This works the same as zoom to cursors but the Y scale and position are adjusted as well. The waveform is centered between the minimum and maximum data values included between the cursors. The maximum and minimum values are one minor division from the top and bottom of the display patch, respectively. Find Level — Prompts for a level and an edge (rising, falling, or either), as shown in Figure 149. 236 PN: 071-0359-02, October 2005 Waveform (AWT) Figure 149. Find Level Window The Find Level window option allows for positioning of the cursor at the next location in the waveform that crosses the level in that direction. If the cursor is not assigned to a waveform, this operation assigns it to the top of stack waveform. Set Track Cursor — Provides a list of other cursors. Selecting None turns tracking off. When a cursor is set to track another, it maintains the same relative X value as the cursor being tracked. The cursor tracks the original cursor when the original cursor is moved. Cursors can be chained (for example, cursor B tracks cursor A and cursor C tracks cursor B). The act of setting one cursor to track another is not by default reciprocal. Setting cursor A to track cursor B does not cause cursor B to track cursor A. You can move cursor B by itself or move cursor A with B tracking it and maintain the same relative X separation. In order to have cursor A track cursor B and B track A, you must set each tracking separately. Remove Track Cursor — Returns the track cursor to its native state. Grabbing and Moving a Cursor To grab and move a cursor: 1. Place the mouse pointer on or very near the cross-hairs (within ten pixels or about an eighth of an inch) until the pointer turns into a four-headed arrow. The pointer must be in the same patch as the cursor. 2. Click and drag the cursor to its new destination. Once you have grabbed a cursor, its cross-hairs extend horizontally and vertically to the edge of the waveform graphic pane. NOTE — If you move the mouse left or right, the cursor tracks the waveform to which it was originally attached. If you move the cursor up or down, it attaches itself to the waveform above or below on the stack. Kalos 2 User Manual 237 5 - KITE Utilities If a cursor is not displayed in the waveform area, grab the cursor by clicking the label of the cursor box. If the cursor is attached to a waveform that is not displayed, it remains in the original waveform until the cursor is moved into the waveform graphic pane. At that time it jumps from waveform to waveform as the mouse pointer moves from waveform to waveform. Moving a Cursor by Moving its Cursor Box To move a cursor by changing its X or Y values: 1. In a cursor’s box, click in either the X value or the Y value field. 2. Change the value in the field, then press the Enter key. The waveform is modified to have that value at the current cursor location, and the cursor is moved to the next data point. The waveforms are redrawn if the new location is off screen. If the cursor for a cursor box is scrolled off the screen, entering a return in this box causes the screen to snap to that cursor position in the waveform. If the cursor is not assigned to a waveform, it is assigned to the top of stack waveform. To move a cursor by dragging its cursor box: Click and drag on the label of the cursor box. Attaching a Cursor to a Waveform Cursors are normally attached to a waveform. When a cursor is moved from one waveform to another, the cursor now attaches to the new waveform. If, however, you pop (remove the TOS waveform off of the stack) a waveform that a cursor is currently attached to, that cursor becomes unattached, its X and Y value fields become blank, and the cross-hair is removed from the screen. To reattach that cursor to a waveform, move to the label in the cursor box, press the left mouse button, drag down to the waveform that you want the cursor attached to, and release the button. The cross-hair and numbers in the X and Y value fields will reappear. Understanding the Delta Information Two delta boxes are located in the upper left corner of the Analog Wavetool window. See Figure 150. 238 PN: 071-0359-02, October 2005 Waveform (AWT) Figure 150. Delta Boxes To view the delta information about two cursors: 1. From the two cursor drop-down lists, choose the two cursors you wish to compare. 2. Use the guide below to interpret the readings. Y Delta — Displays the difference in Y magnitudes of any two designated cursors. X Delta — Displays the difference in X values of any two designated cursors. 1/X — Displays the difference in X values of two designated cursors in terms of 1/X. In other words, if the waveform is in the time domain, and the units are in seconds, this field displays Hertz (1/seconds). NOTE — If two cursors are placed on top of one another, the Y Delta and X Delta values are 0.0 and the 1/X field displays “Infinite 1/(s)”. Also, if either the X or Y units are not the same, the delta boxes display the string incompatible units. Name Pane Each waveform displayed has an information pane located along the left edge of the waveform window, just below the delta information. Characteristics about the waveform are provided in the pane. An example is shown in Figure 151. Figure 151. Name Pane Kalos 2 User Manual 239 5 - KITE Utilities Following are descriptions of all fields and buttons located in the name pane area(s) of the Analog Wavetool windows. Stack Position Stack position displays the waveform’s position on the stack of waveforms. Stack position 0 is the TOS (top-of-stack), stack position 1 is the next waveform, etc. This parameter cannot be directly edited -- it is updated after push, pop, create, and other operations which change the number of waveforms on the stack. Name This field displays the name of the waveform. To edit the name of a waveform: 1. Delete the current contents of the Name field. 2. Enter the new name with an optional extension. (This becomes the new name of the waveform file.) NOTE — If you enter an extension, the extension is kept; if you do not enter an extension, an appropriate extension is added for you. Leading and trailing spaces are removed, and all spaces within the name are converted to underscores. 3. Press the Enter key. Samples This field displays the number of samples in the waveform. To change the number of samples in the waveform: 1. Delete the current contents of the Samples field. 2. Enter the number of samples 3. Press the Enter key. At the Confirmation dialog, click OK. The Analog Wavetool then performs a cubic spline interpolation on the waveform to give the desired number of samples. This operation deletes the original waveform data. Interval There are three parts to the Interval field: 1. Value 2. Units Prefix 240 PN: 071-0359-02, October 2005 Waveform (AWT) 3. Units Each of these variables pertains to the current sample (note the /Sample designation at the end of the field). Value This field displays the sample interval of a time domain waveform. It is the bin weight of a frequency domain waveform. It can be any value. To change the interval: 1. Delete the current content of the Interval field. 2. Enter a new value, then press the Enter key. This does not actually change the waveform, but rather changes the header information that is used by the DSP functions. There are two other parts to this field: • Units Prefix • Units Units Prefix This field works in conjunction with the Units field. To specify a Prefix: 1. Click the drop-down menu in the middle of the Interval field. 2. Choose the desired prefix (n = nano-, m = milli-, etc.). This Prefix can also be selected by typing the appropriate letter when entering the interval value. A space represents a plain unit. Units This is an optional field that displays units for the distance between points in the X direction. Seconds are represented by s, and is the default entry here. This value can be set to any string; the string is used to determine what waveforms track the TOS waveform when the scale factor and position are changed. To change the X units: 1. Delete the current content of the Units portion (third item) of the Interval field. 2. Enter a new value, then press the Enter key. Changing this value for the TOS waveform automatically updates the X Scale units box as well. Kalos 2 User Manual 241 5 - KITE Utilities Type This is divided into sections. The first section cannot be edited and displays the waveform type: RRECT, CRECT or Polar. The second part provides a drop-down list for the selection of one of five components: VALUE, REAL, IMAG (imaginary), MAG (magnitude) and PHASE. To choose a new component for a given waveform type: 1. Click the down arrow in the second part of the Type field. 2. Choose a component. Not all components are available for each waveform type: RRECT — Value is the only selection. CRECT — Choices are REAL and IMAG Polar — Choices are MAG and PHASE The new component displays in the waveform patch to the right. X Scale X Scale field includes: • Scale • Units Prefix • Units • Zoom Up/Down Each of these variables pertains to the current division (note the /Div designation at the end of the field). Scale This is the relative scale of the X graticule marks. It can be changed to a preselected scale by using the drop-down list or any desired scale can be entered in directly. Units Prefix This field works in conjunction with the Units field. To specify a time fraction: 1. Click the drop-down menu in the middle of the X Scale field. 2. Choose the Units Prefix (n = nano-, m = milli-, etc.). Units The units from the TOS Interval units box are included in scale display but cannot be modified here. 242 PN: 071-0359-02, October 2005 Waveform (AWT) Zoom Up/Down These buttons change the X scale factor up or down by one step (in a 1-2-5 sequence). If the displayed scale factor is 2.0, pressing the up button changes the scale factor to 5.0, and pressing the down button changes the scale factor to 1.0. If the displayed scale factor is manually set to 2.5, pressing the up button still changes the scale factor to 5.0, but pressing the down button changes the scale factor by the nearest step in the 1-2-5 sequence, and the result is 2.0. Y Scale There are four parts to the Y Scale field: • Scale • Units Prefix • Units • Zoom Up/Down Scale This field displays the relative scale of the Y graticule marks. It can be changed to a preselected scale by using the drop-down list or any desired scale can be entered in directly. Units Prefix This field works in conjunction with the Units field. To specify a fraction of the unit that follows, enter a prefix such as nano-, milli-, etc. To specify a time fraction: 1. Click the drop-down menu in the middle of the Y Scale field. 2. Choose the Units Prefix (n = nano-, m = milli-, etc.). Units This optional field (to the right of the fractional measurement field) displays the units in the Y direction. To the right of this field is a string, /Div. Zoom Up/Down These buttons change the Y scale factor up or down by one step (in a 1-2-5-10 sequence). If the displayed scale factor is 2.0, pressing the up button changes the scale factor to 5.0, and pressing the down button changes the scale factor to 1.0. If the displayed scale factor is manually set to 2.5, pressing the up button still changes the scale factor to 5.0, but pressing the down button changes the scale factor by the nearest step in the 1-2-5 sequence, and the result is 2.0. Kalos 2 User Manual 243 5 - KITE Utilities Color The user can choose any color for a waveform. To change the color of a waveform: 1. Click the color bar to the right of the Color label. 2. Use the color palettes and/or the color value tab to create a waveform color. 3. Click OK. Superimpose On/Off Superimposition displays a copy of a waveform patch onto the TOS waveform. This is useful for evaluating differences between waveforms. Several waveforms can be superimposed simultaneously. To turn the superimpose feature on/off: 1. In the name pane section for the waveform you wish to affect, click the Superimpose On button. The waveform is superimposed upon the TOS waveform and the button reverts to read Superimpose Off. The scale and scroll values that are used to display this waveform in its own waveform patch are used to display it superimposed on the TOS waveform. Any modifications to a superimposed waveform are reflected in the TOS waveform patch. Any markers that are enabled display their graphical representation in the TOS patch, but no text is printed. All marker text applies only to the patch in which it appears. 2. To turn the superimpose feature off, click the Superimpose Off button. The button returns to its original form and superimposition is removed. Clear Superimpose Clicking this button clears all superimposed waveforms, even those that have scrolled off the display. Navigating the Waveform Graphic Pane Waveforms are displayed in the waveform graphic pane section of the Analog Wavetool window (see Figure 139). This display is divided into waveform panes, each displaying one waveform. Other options, selected by way of the View menu, are reflected here as well. 244 PN: 071-0359-02, October 2005 Waveform (AWT) Aside from cursors, which can be used to modify waveforms, there are two primary ways to navigate around the graphic pane: • Zooming • Scrolling Zooming Zoom in on a region of a waveform patch using the custom zoom capability. To define an area on which to zoom: 1. Choose the menu item View > Custom Zoom... or... click the Custom Zoom icon (magnifying glass), or click in the center and drag to select a region. 2. Click and drag diagonally to specify the area to zoom. 3. Release the mouse button. The X and Y positions and scale factors are updated to cause the selected region to fill the patch. To return to the default state of the patch waveform (unzoomed): Choose the menu item Edit > Undo Custom Zoom. Scrolling Scroll a waveform along both axes: • Scrolling Along the Y Axis • Scrolling Along the X Axis Scrolling Along the Y Axis If a waveform extends vertically beyond the edges of the graphic pane or there are more waveforms that are fully displayed in the graphic pane, vertical scroll bars appears to the right of the waveform(s). NOTE — If there are more waveforms than fit on the graphic pane, an additional vertical scroll bar that spans all of the patches appears. However, this scroll bar has no scroll menu. To scroll a waveform along its Y axis (vertically): Click and drag the scroll box up and down. ...or... Click above or below the scroll box (fastest method). ...or... Kalos 2 User Manual 245 5 - KITE Utilities Click the up and down arrow buttons at the ends of the scroll bar. To scroll a waveform along its Y axis using menu options: 1. Right-click in one of the vertical scroll bars. 2. Choose one of the nine options below to position the waveform as desired: Scroll Here — Scrolls according to where you click on the scroll bar. Location — Scrolls to the Y axis point you specify. Enter a value and click OK. Top — Displays the top of the waveform. Center — Displays the vertical center of the waveform. Bottom — Displays the bottom of the waveform. Page Up — Scrolls up the waveform using the height of the patch as the scroll increment. Page Down — Scrolls up the waveform using the height of the patch as the scroll increment. Scroll Up — Scrolls up the waveform in very small increments. Scroll Down — Scrolls down the waveform in very small increments. Scrolling Along the X Axis If any of the displayed waveforms extend horizontally beyond the edges of the graphic pane, a horizontal scroll bar appears along the bottom of the pane. This X scroll bar applies to the TOS waveform and all other waveforms on the stack that have the same X units. This means that waveforms having fractional measurement designations will not scroll along with those that display in whole units. To scroll waveforms along their X axes: Click and drag the scroll box left and right. ...or... Click to the left or right of the scroll box (fastest method). ...or... Click the left and right arrow buttons at the ends of the scroll bar. To scroll waveforms along their X axes using menu options: 1. Right-click the horizontal scroll bar. 2. Choose one of the nine options below to position the waveform as desired: 246 PN: 071-0359-02, October 2005 Waveform (AWT) Scroll Here — Scrolls according to where you click on the scroll bar. Location — Scrolls to the X axis point you specify. Enter a value and click OK. Left — Displays the far left of the waveform. Center — Displays the horizontal center of the waveform. Right — Displays the far right of the waveform. Page Left — Scrolls left on the waveform(s) in page-like increments. Page Right — Scrolls right on the waveform(s) in page-like increments. Scroll Left — Scrolls left on the waveform(s) in very small increments. Scroll Right — Scrolls right on the waveform(s) in very small increments. To fit a waveform to its patch: 1. Right-click in the patch that contains the waveform to be rescaled. 2. Choose the menu item Fit to Window. NOTE — Waveforms with the same units as the one being rescaled are also rescaled. Annotating Waveforms (Markers) Markers consist of four parts: • Type • Location • Label • Data Type A string that specifies the type of the marker. Several markers of the same type can be defined at different locations. Each instance of a particular marker type has its own location, label, and data. Location The X and Y coordinates define the location of the marker with respect to the waveform. These coordinates are in the same units as the waveform. If the waveformdata X units is seconds, the marker X coordinate is in seconds. If the waveform Y units is volts, the marker Y units is volts. Kalos 2 User Manual 247 5 - KITE Utilities In the Waveform tool, markers are sorted by X coordinate. If two or more markers have the same X coordinate, they are in the order they were defined. Label A label is a string that contains information about the specific marker. In many cases, the label contains all the necessary information for a marker. In other cases, the label is used to specify variations on a marker type. Data Data can represent any number of integers, doubles, or strings. Each data item is defined as a label / value pair; a string that labels the value and the actual data value. In general, the number, labels, and types of data items are the same for all markers of the same type. Markers are transferred from the tester to the Waveform tool, and read from and written to .awav files. The only way to define or modify markers is to edit a .awav file by editing the markers according to the syntax described in the Marker Syntax section. While no constraints are placed on markers, the Waveform tool recognizes some specific marker types and displays them in a predefined way. Markers that are not recognized by the Waveform tool are drawn as generic markers. Marker Types There are several types of markers: 248 • Title Marker • Cycle Marker • Cycle Count Marker • Vector Marker • Scan Marker • Elapsed Time Marker • Cycle Set Marker • Time Set Marker • Compare Marker • Results Marker • Generic Marker Pulse PN: 071-0359-02, October 2005 Waveform (AWT) • Generic Marker Figure 152. Markers To control which markers display and which do not: 1. Choose the menu item View > Markers. 2. A checkbox list of all marker types that currently exist are shown in the Marker Display Selection dialog. Select and/or deselect marker type checkboxes based on what to display in the waveform graphic pane area. 3. Click OK. Also refer to: Marker Control in CMD Files Marker Syntax In AWAV Files Title Marker The title text appears centered at the top of the waveform patch. The text is taken from the marker label. The title contains the pin name, if pin name was defined, and number of the pin that is digitized. Only one title is displayed. If more than one title marker is defined for a waveform, the first title marker found is printed. The X coordinate is used to order the title markers. If more than one title marker is defined at the same location, the order is determined by the order the markers were defined. The Y coordinate is not used. Cycle Marker A cycle is shown by a dashed line from top to bottom of the patch at the location specified by the X coordinate. The Y coordinate is used to show which of the eight possible support modules provide the cycle timing. This value is used to select one of eight colors for the display of the cycle boundary (the eight colors are the grMarker1Color through grMarker8Color resources and can be redefined using the resource file). Kalos 2 User Manual 249 5 - KITE Utilities Cycle Count Marker The label text contains the cycle number of the displayed cycle. It is positioned near the top of the patch just to the right of the vertical line. Vector Marker The vector marker prints only text from the label field of the marker. It is positioned at the marker X coordinate with other cycle related text. The Y coordinate is not used. The label contains the number of the vector for the current cycle. Scan Marker The scan marker prints text only. It is positioned at the marker X coordinate with other cycle related text. The Y coordinate is not used. The label contains the scan partition and link for the current cycle. Any given cycle has either a vector or scan, never both. Elapsed Time Marker The elapsed time marker prints text only. It is positioned at the marker X coordinate with other cycle related text. The Y coordinate contains the elapsed time value. This is done so that the Waveform tool can format the data appropriately (using engineering notation) and add the X units from the waveform data structure. The text displayed consists of the marker label followed by the formatted elapsed time value and the appropriate units. Cycle Set Marker The cycle set marker prints text only. It is positioned at the marker X coordinate with other cycle related text. The Y coordinate contains the cycle set used for the current cycle. This information is also contained in the label so the Waveform tool does not use the Y coordinate. Time Set Marker The time set marker prints only text. It is positioned at the marker X coordinate with other cycle related text. The Y coordinate contains the time set used for the current cycle. This information is also contained in the label so the Waveform tool does not use the Y coordinate. Compare Marker The Analog Wavetool groups the following three marker types together under the label, Compare: 250 PN: 071-0359-02, October 2005 Waveform (AWT) • Compare Edge • Start Window Compare • Stop Window Compare Compare Edge Marker The compare edge marker uses the label field to show the type of edge compare: high, low, or tristate. The marker is located at the marker X coordinate. The Y coordinate shows the comparator threshold. In the case of a tristate compare, an additional data item of type double is for the marker. The label for this data item is high and the data is the comparators high threshold level. If the marker label is low, a vertical line is drawn from the top of the patch to the compare threshold (Y coordinate). If the marker label is high, a vertical line is drawn from the bottom of the patch to the comparator threshold. If the marker label is tristate, a vertical line is drawn from the top of the patch to the high compare threshold (Y coordinate) and a vertical line is drawn from the bottom of the patch to the low compare threshold (data item labeled high). The compare lines are drawn in the same color as the waveform. Start Window Compare Marker The start window compare and stop window compare markers define a window comparison. It is assumed that a start window compare precedes each stop window compare although other markers can be defined between the two. The X coordinate shows the start time of the window compare, the Y value shows the comparator threshold. The label is used to specify the type of comparison, low, high, or tristate. The start window compare marker does not cause anything to be drawn but the data is stored until the companion stop window compare is found. Stop Window Compare Marker The stop window compare uses the data gathered from the start window compare to draw the window comparison indication in the waveform patch. The X coordinate is the stop compare time. The Y coordinate is used only when the comparison type is tristate, when it contains the comparator high threshold (the start window compare Y coordinate contains the low threshold). The label is unused. If the comparison type is low, a rectangular box is drawn from the top of the patch down to the low threshold (start compare Y coordinate) between the start and stop times (start window compare X coordinate and stop window compare X coordinate). If the comparison type is high, the box is drawn from the bottom of the patch up. If the type is tristate, both low and high boxes are drawn. The color of the compare box is the same as the waveform. Kalos 2 User Manual 251 5 - KITE Utilities Results Marker Results markers are generated by the Waveform tool when results marking is enabled and a pulse measurement function is performed on the top of stack waveform. The X and Y coordinates determine where the marker is drawn, the label indicates how the marker indication is to be labeled. All results markers are drawn as a cross-hair with the label printed to the right of the cross-hair vertical and just above or below the cross-hair horizontal line. When you modify waveform data, results markers are updated. Figure 153. Pulse Measurement Result Markers All result markers defined in the pulse parameter pop-up, shown in figure Figure 153, are listed in Table 15. Table 15. Result Markers High Low Proximal Mesial 252 The high value of the pulse as computed for pulse amplitude. The low value of the pulse as computed for pulse amplitude. The proximal point of a rising or falling edge. The mesial point of a rising or falling edge. PN: 071-0359-02, October 2005 Waveform (AWT) Table 15. Result Markers (Cont.) Distal Rise Overshoot or Fall Preshoot The distal point of a rising or falling edge. The peak value in a pulse after a rising edge. If the peak occurs in the first half of the pulse, it is assumed to be overshoot from the preceding rising edge. If the peak occurs in the second half of the pulse, it is assumed to be preshoot from the following falling edge. Fall The peak value in a pulse after a falling edge. If the peak occurs Overshoot or in the first half of the pulse, it is assumed to be overshoot from Rise the preceding falling edge. If the peak occurs in the second half Preshoot of the pulse, it is assumed to be preshoot from the following rising edge. Note Marker A note marker is displayed in the same manner as a results marker, with a cross-hair at the location specified by the X and Y coordinates and the label printed near the cross-hair. In general, notes include a multiline string that describes why that point is of interest. Note you must hand edit the ASCII AWAV file to add these markers. Generic Marker Any marker type not described above is considered to be a generic marker. These markers are drawn as a diamond shape with a dot in the center of the diamond at the location of the X and Y coordinates. The label is printed to the right of the diamond marker. Note you must hand edit the ASCII AWAV file to add data for these markers. Marker Control in CMD Files As an alternative to turning marker display on/off using the menu system, use the display marker command in a command file. Command files have one of two file extensions: .cmd or .aws. To turn marker display on/off using the command file: 1. Open a command file. 2. Using the syntax shown below, enter one or a series of commands that control the marker display. The syntax is... display marker <type> '=' [on | off] ';' ...where <type> is a string for the marker type. Kalos 2 User Manual 253 5 - KITE Utilities 3. Save the command file. NOTE — If these commands are included in the initialization file, awtinit.cmd, the marker display is set up automatically when the Waveform tool is launched. Example: The following series of commands turn on the display of title, cycle, vector and compare markers and turns off the display of the others: display display display display display display display display display display marker marker marker marker marker marker marker marker marker marker "Title" = on; "Cycle" = on; "Vector" = on; "Scan" = off; "Elapsed Time" = off; "Cycle Set" = off; "Time Set" = off; "Compare" = on; "Results" = off; "Note" = off; Marker Syntax In AWAV Files Marker data is stored in AWAV files. Currently, the only way to edit or delete markers is by editing the AWAV file generated when a waveform with markers is saved using the Save As menu item. The syntax for markers in the AWAV file is as follows: MSTMT: 'marker' TYPE LABEL '=' X_COORD ',' Y_COORD [ ';' | BLOCK ] BLOCK: '{' DSTMT [ ',' DSTMT ... ] '}' DSTMT: LABEL '=' [ INTEGER | DOUBLE | TEXT ] ';' TEXT: STRING [ ',' STRING ... ] TYPE: STRING LABEL: STRING X_COORD: DOUBLE Y_COORD: DOUBLE Where: STRING is a quoted string. DOUBLE is a double precision number (floating INTEGER is an integer (fixed point format). [ P | Q ] denotes a choice between P or Q ... denotes repetition 'xyz' denotes a literal point format). A marker statement of type, type1, having the label, label1, with X and Y coordinate values of 1.0 and 2.0 respectively and having no additional data appears as follows in the AWAV file: 254 PN: 071-0359-02, October 2005 Waveform (AWT) marker "type1" "label1" = 1.0, 2.0 ; A marker statement similar to the above with an integer data value labeled labelInt, a double data value labeled labelDbl, a single line text data value labeled labelText1 and a multi-line text value labeled labelText2 appears as follows in the AWAV file: marker "type2" "label2" = 3.0, 4.0 { "labelInt" = 5 ; "labelDbl" = 6.0 ; "labelText1" = "One line text" ; "labelText2" = "First line of multi line", "Second line of multi line", "Third line of multi line" ; } Using the Display Buttons The rectangular area in the lower left corner of the Analog Wavetool window is sometimes collectively referred to as the calculator area. The display buttons are the nine push buttons that make up the left half of this area. The other buttons are DSP function menus. Figure 154. Display Buttons of the Calculator Area Menus DSP Function Calculator Buttons All operations and measurements (with the exception of the Segment function) are performed across the entire waveform on a data point by data point basis. For binary operations such as add or multiply, the sample interval is ignored and the data points of the two waveforms are combined based upon the selected operation. The resulting waveform has the same sample interval and number of points as the TOS waveform before the operation. The display buttons are described in the following section. Kalos 2 User Manual 255 5 - KITE Utilities Clear Clicking this button removes all waveforms from the stack. Push Clicking this button pushes a copy of the TOS waveform onto the stack. Pop Clicking this button removes the TOS waveform off of the stack. Push2 Clicking this button pushes two waveforms (TOS and next to TOS) onto the stack together. This is quite useful when both components of a complex or polar waveform are on the stack. Swap Clicking this button exchanges the TOS and the next to TOS waveforms. Rotate Down Clicking this button rotates the stack down one. This causes the element on the top of the stack to be placed on the bottom of the stack and the next to TOS becomes the TOS. Rotate Up Clicking this button rotates the stack up one. This causes the element on the bottom of the stack to be placed on the top of the stack. Concatenate Clicking this button takes the TOS waveform and concatenates it at the end of the next to TOS waveform producing a single waveform with a length that is the sum of the lengths of the two original waveforms. Segment Clicking this button creates a new waveform based on a segment specified on the current TOS waveform. If one or more cursors exist, there are three ways to designate the values. The segment between any of the following can be designated: 256 PN: 071-0359-02, October 2005 Waveform (AWT) • Two cursors (unless there is only one cursor). • One cursor and one axis value. • Two axis values. To specify a waveform segment: 1. Click the Segment calculator button. 2. Using the two columns, define the segment that is to be the new waveform. 3. Click OK. The new waveform appears in the TOS position. The original waveform remains unchanged and next to TOS. Using the DSP Function Menus The rectangular area in the lower left corner of the Analog Wavetool is sometimes collectively referred to as the calculator area. The DSP functions menu section comprises 11 buttons, as shown in Figure 155, that make up the right half of this area. The other buttons are the display buttons. Figure 155. DSP Functions The ( ) symbol on these buttons indicates that each has a pop-up menu. To see the menu, click the button. The following sections describe menu options for each button. All operations and measurements (with the exception of the Segment function) are performed across the entire waveform on a data point by data point basis. For binary operations such as add or multiply, the sample interval is ignored and the data points of the two waveforms are combined based upon the selected operation. The resultant waveform has the same sample interval and number of points as the TOS waveform before the operation. Kalos 2 User Manual 257 5 - KITE Utilities Wc Arith Functions Wc Arith menu items and a description of each function are shown in Table 16. Table 16. WC Arith Function Descriptions Menu Item Function Add Const Sub Const Mult Const Div Wf/Const Div Const/Wf Adds a constant to the TOS waveform. Subtracts a constant from the TOS waveform. Multiplies the TOS waveform by a constant. Divides the TOS waveform by a constant. Divides a constant by the TOS waveform. This can be used to invert the waveform (1.0/Wf). Clips the TOS waveform to a constant, that is, does not allow the magnitude of the waveform to go above the constant value. Clips the TOS waveform to upper and lower constants, that is, does not allow the magnitude of the waveform to go above the upper constant or below the lower constant. Shifts the numeric value of each point in the TOS waveform left or right by some number of bits, with zero fill, and replaces the TOS waveform with the result. Performs a logical AND, OR, or XOR of the mask with the numeric value of each point in the TOS waveform and replaces the TOS waveform with the result. Sets the X offset time for the TOS waveform. Note that the X offset is in terms of waveform and sample interval (user units). Performing this operation may move the waveform out of the field of view. Normalizes the TOS waveform to be between 0 and 1. Takes the absolute value of the TOS waveform. That is, it makes all negative values positive, and leaves all positive and zero values unchanged. Clip Const Clip Bipolar Shift Const Boolean X Offset Norm Abs Wf Arith Functions Wf Arith menu items and a description of each function are shown in Table 17. 258 PN: 071-0359-02, October 2005 Waveform (AWT) Table 17. Wf Arith Function Descriptions Menu Item Function Add Adds the magnitudes of the TOS and next TOS waveforms together. Places the result on TOS. Original waveforms are deleted. Subtracts the magnitude of the TOS from the magnitude of the next TOS waveform. Places the result on TOS. Original waveforms are deleted. Multiplies the magnitudes of the TOS and next TOS waveforms together. Places the result on TOS. Original waveforms are deleted. Divides the magnitude of the TOS by the magnitude of the next to TOS waveform. Places the result on TOS. Original waveforms are deleted. Sub Mult Div Clip Clips the TOS waveform by the next to TOS waveform; that is, does not let the magnitude of the waveform go above the value in the next to TOS waveform. The TOS waveform is replaced but the next to TOS waveform is left unchanged. Reverse Reverses the indexes of the TOS waveform; that is, the first index now equals the last index and the last index equals the first index. Another way to do this is to rotate the waveform around the Y axis. Wf Math Functions Wf Math menu items and a description of each function are shown in Table 18. Table 18. Wf Math Function Descriptions Menu Item Function Polar Performs a Polar conversion of a CRECT waveform; that is, converts Sine and Cosine (vector) components of a CRECT waveform into MAGnitude and PHASE (POLAR). Performs a Rectangular (CRECT) conversion of a POLAR waveform; that is, converts the MAGnitude and PHASE components of the POLAR to Sine and Cosine (vector) components. Takes the log (any base) of the TOS waveform. Rectang Log Kalos 2 User Manual 259 5 - KITE Utilities Table 18. Wf Math Function Descriptions (Cont.) Menu Item Function Power (base^ wf) Takes the BASEX of the TOS waveform. Base defaults to 10. Note that this is the inverse of the log function. Raises the TOS waveform to a power. Takes the Square Root of the TOS waveform. Creates a histogram of the TOS waveform. The waveform must be scaled such that its minimum is greater than or equal to zero (0) and its maximum is less than or equal to the size of the histogram waveform. Thus, if the size of the histogram waveform is 256, the original waveform should contain values between 0.0 and 255.0. Averages the TOS waveform. The number of averages is used to determine the size of the resulting averaged waveform. If the length of the original waveform is 1024 and the number of averages is specified as four, the resulting averaged waveform has a length of 256. In this case, elements 0, 256, 512, and 768 would be added and divided by 4 to produce element 0 of the resulting waveform. Interleaves one or more source waveforms into one destination waveform. Deinterleaves a source waveform into one or more destination waveforms. Converts data from a decoded RLONG or RRECT waveform to an encoded RLONG waveform, which is then placed on TOS. The operation transforms N bits of each waveform point using the specified data encoding. Decodes the TOS waveform according to the specified number of bits and the specified code format. When the SWAV format is specified in the Save As dialog, the code formats are listed in a drop-down menu. Selecting NATURAL_BINARY causes no change in the data. When selecting alaw, u-law, or BCD, the number of bits parameter is not used. Power (wf ^ exp) Sqrt Histogram Average Interleave Deinterleave Encode Decode 260 PN: 071-0359-02, October 2005 Waveform (AWT) Table 18. Wf Math Function Descriptions (Cont.) Menu Item Function Mux Multiplexes data from the TOS waveform data that gets replaced by the result. Some A-D converters store an output signal in two or more output words; for example, storing a 16-bit signal in two 8-bit words. The unpacked information must be multiplexed in order to process the signal properly. The number of bits used per sample means the number of valid bits per data word. In other words, out of 32 bits per word of data, how many are valid? Mux Factor is the number of input data samples to be multiplexed into each sample of the output waveform. The operation takes M bits (Bits per Sample) from each N successive points (Nbr of Samples) in the TOS waveform and multiplexes them together into a single point in the resultant waveform. The number of points in the resulting waveform is the original number divided by Nbr of Samples. Note: Mux and Demux are not the inverse of one another. Demultiplexes data from the TOS waveform data, pushing the resulting waveform(s) on top of stack. The operation extracts up to four waveforms from the TOS waveform. Each non-zero mask is applied to each value in the TOS waveform to yield another waveform that is then pushed onto the stack. The waveform for mask 1 is pushed onto the stack first, followed by waveforms for mask 2, 3, and 4, if specified. Note: Mux and Demux are not the inverse of one another. Reorders the samples of the TOS waveform, thus changing the number of repetitive cycles displayed and making the details of each cycle more or less visible. Demux Reorder Kalos 2 User Manual 261 5 - KITE Utilities Table 18. Wf Math Function Descriptions (Cont.) Menu Item Function Split Splits a CRECT or Polar waveform into two RRECT waveforms. Splices two RRECT waveforms into a single Polar waveform. Splices two RRECT waveforms into a single CRECT waveform. POLAR Splice CRECT Splice wf Trans Functions Wf Trans functions are used in Waveform transformations between time domain and frequency domain; convolution and correlation. Wf Trans menu items and a description of each function are shown in Table 19. Table 19. Wf Trans Function Descriptions Menu Item Function FFT IFFT Takes the FFT of the TOS waveform. Takes the Inverse FFT of the TOS waveform. Note: The waveform must be of type CRECT. Performs a linear convolution of the TOS with the next to TOS waveform. Performs a circular convolution of the TOS with the next to TOS waveform. Correlates the TOS with next to TOS. Takes the TOS waveform as a carrier and the nextto TOS waveform as a modulator and pushes the result of modulating the carrier by the modulator onto the stack. Both waveforms must be of type RRECT. Selecting Modulate... invokes the Phase and Modulate window that requires choosing Modulation type (Frequency or Phase) and input the output waveform sample interval. The defaults are frequency modulation and a 1.0-ns sample interval. Linear Convolve Circular Convolve Correlate Modulate When modulation is performed, both carrier and modulator are linearly interpolated and the result used to modulate the carrier either by frequency or phase, depending on the selection made. The resulting waveform is pushed onto the stack. 262 PN: 071-0359-02, October 2005 Waveform (AWT) Statistic Functions The Statistic functions are DSP measurement functions that return numerical results (minimum, maximum, standard deviation, etc.). They do not alter any waveforms. Statistic menu items and a description of each function are shown in Table 20. Table 20. Statistic Function Descriptions Menu Item Function MinMax Wf Finds the minimum and maximum values in the TOS waveform and their respective locations. The results are written in the transcript pane. MinMax Segment Finds the minimum and maximum values in the TOS waveform between two points -- cursors or axis points -- and writes the results in the transcript pane section of the Analog Wavetool window. MeanStd Calculates the following statistics on the TOS waveform and writes the results in the transcript pane: Mean, Standard Deviation, Variance, and Root Mean Square (RMS). Median Finds the median of the TOS waveform and writes the results in the transcript pane. wf Meas Functions The Wf Meas functions are DSP measurement functions that return numerical results (SNR, INL etc.); they do not alter any waveforms. Wf Meas menu items and a description of each function are shown in Table 21. Kalos 2 User Manual 263 5 - KITE Utilities Table 21. Wf Meas Function Descriptions Menu Item Function Ratios This operation extracts the following functions from the TOS waveform: RMS noise, signal to noise ratio, signal to distortion ratio, signal to noise and distortion ratio, magnitude of fundamental, and DC offset. The user is prompted for the following parameters when choosing this option: - Number of harmonics Negative one (−1) is the default that tags all non-aliased harmonics to be included in the total harmonic content (SDR) calculation. This parameter allows for the inclusion of aliased harmonics in the SDR calculation that implies that they are not included in the SNR calculation. The following results are written in the transcript pane: - RMS noise in dB - Signal to noise ratio (SNR) in dB - Signal to distortion ratio (SDR) in dB - Signal to noise & distortion ratio (SNDR) in dB - Magnitude of fundamental - DC offset 264 PN: 071-0359-02, October 2005 Waveform (AWT) Table 21. Wf Meas Function Descriptions (Cont.) Menu Item Function Ratios(Filt) This operation extracts the following functions from a filtered TOS waveform: - RMS noise - Signal to noise ratio - Signal to distortion ratio - Signal to noise and distortion ratio - Magnitude of fundamental - Fundamental bin - DC offset The user is prompted for the following parameters when choosing this option: - Fundamental bin - Number of harmonics Negative one (−1) is the default that tags all non-aliased harmonics to be included in the total harmonic content (SDR) calculation. This parameter allows for the inclusion of aliased harmonics in the SDR calculation that implies that they are not included in the SNR calculation. The following results are written in the transcript pane: - RMS noise in dB - Signal to noise ratio (SNR) in dB - Signal to distortion ratio (SDR) in dB - Signal to noise & distortion ratio (SNDR) in dB - Magnitude of fundamental - DC offset EffBits This operation performs an effective bits measurement on the TOS waveform. It takes the sine curve fit of the waveform and compares the pure sine wave it calculated to the original waveform to get the resulting figure of merit. The user is prompted for the following parameters when choosing this option: - ADC full scale - Frequency convergence - Phase convergence The following results are written in the transcript pane: - Effective bits Kalos 2 User Manual 265 5 - KITE Utilities Table 21. 266 Wf Meas Function Descriptions (Cont.) Menu Item Function INL/DNL (Ramp) This operation measures the integral non-linearity (INL) and differential non-linearity (DNL) on a set of user-collected data. The data must be digitized from a linear ramp(s). This is allowed if the full scale range of the ADC is broken up into multiple segments, but the order of segments must start from the most full-scale ramp on TOS to the most zero-scale. The user is prompted for the following parameters when choosing this option: - Number of segments - Number of ADC bits - Number of ramps per segment (averaging) - Ramp magnitude - Vref of ADC (+ref to -ref) - Starting offset of AWG ramp The following results are written in the transcript pane: - DNL minimum error - DNL maximum error - INL minimum error - INL maximum error - Offset error - Gain error In addition, the following waveforms are created and placed on the TOS: DNL waveform, INL waveform. The original waveforms are simply pushed farther onto the stack, but are otherwise unaltered. PN: 071-0359-02, October 2005 Waveform (AWT) Table 21. Wf Meas Function Descriptions (Cont.) Menu Item Function INL/DNL (Sine) This operation measures the integral non-linearity (INL) and differential non-linearity (DNL) on a histogram of user-captured data. The data must be digitized from a sine wave. The user is prompted for the following parameters: - ADC full scale - Sine wave amplitude - Missing codes threshold The following results are written in the transcript pane: - DNL maximum error - DNL minimum error - INL maximum error - INL minimum error - Offset error - Full scale error - Number of missing codes In addition, the following waveforms are created and placed on the TOS: DNL waveform, INL waveform. The original waveforms are simply pushed farther onto the stack, but are otherwise unaltered. IntermodDist This operation performs an intermodulation distortion measurement of the TOS waveform. The user is prompted for the following parameters: - First frequency bin - Second frequency bin The following results are written in the transcript pane: - Intermodular distortion Kalos 2 User Manual 267 5 - KITE Utilities Table 21. Wf Meas Function Descriptions (Cont.) Menu Item Function SineCurveFit This operation performs a sine-curve-fit of the TOS waveform. It uses a polynomial cubic spline approach to define the best-fit sine wave to the TOS waveform. The user is prompted for the following parameters: - Frequency convergence - Phase convergence - Starting frequency Group Delay The following results are written in the transcript pane: - Amplitude - Offset - Frequency - Phase - Number of cycles This operation takes the two TOS waveforms and calculates the group delay and frequency response waveforms. The TOS waveform is assumed to be the output of the DUT while the next-to-TOS waveform is assumed to be the input waveform to the DUT. Both input/output waveforms must contain a single edge, not a pulse. The user is prompted for the following parameters: - Bandwidth limit (enter 0.0 for no limit) - Filter type (Low Pass, High Pass, Band Pass, or Band Stop) When this function is performed, the group delay waveform is pushed onto the stack followed by the frequency response waveform. The following results are written in the transcript pane: - Frequency response In addition, the following markers are added to the waveforms: - Low Pass Filter Frequency Response in Hz (the −3dB point of the frequency response waveform). - Group Delay (peak to peak, maximum and minimum of group delay waveform before the 3dB point). - High Pass Filter Frequency Response in Hz (the point 3dB down from the last data point in the frequency response waveform). 268 PN: 071-0359-02, October 2005 Waveform (AWT) Table 21. Wf Meas Function Descriptions (Cont.) Menu Item Function Group Delay (Continued) - Band Pass Filter Center Frequency (maximum of the frequency response waveform). - Band Stop Filter Center Frequency (minimum of the frequency response waveform). Note: The center frequency for band pass and band stop filters can be misleading if the bandwidth limit is not set for these filter types. Pulse Functions This pop-up menu offers several sets of functions that can be measured. In all cases except settling time, quadratic interpolation is used to increase the accuracy of the measurements. To select the pulse (for all but settling time): 1. Place one cursor before the first edge of the pulse. 2. Place another cursor after the last edge of the pulse. The region between the cursors is used for the pulse measurements. If this region contains two edges between the cursors, the Period / Pulse Width function returns just the pulse width. If three or more edges are in the region, the period and duty factor (based on the first three edges) are returned. To select the pulse for settling time: 1. Place the first cursor at the location from which the settling time is to be measured. 2. Place the second cursor in a region of the pulse that is settled (usually near the end of the pulse). No interpolation is done by the settling time function. Pulse menu items and a description of each function are shown in Table 22. Kalos 2 User Manual 269 5 - KITE Utilities Table 22. Pulse Function Descriptions Menu Item Function All This function measures and displays all pulse functions except for settling time. This function displays the following: - Pulse high level - Pulse low level - Amplitude (high - low) These values are determined by creating a histogram of the data values between the cursors, finding the two most populated bins of the histogram, then using either the mode or the mean of all data values to determine the final high and low values. Note: If the pulse being measured is very small and somewhat noisy, the function may not be able to discern two discrete levels. After clicking the Amplitude, the user is prompted for the following parameters: Amplitude - Range (the voltage size of one bin in the level detection histogram) - Level Algorithm (Mode or Mean) Rising Edge Falling Edge 270 This function measures the falling edge. The fall interval (fall time if the X axis is in time units) and the location of the proximal, mesial, and distal points of the falling transition are printed. The user is prompted for the following parameters: - Proximal percent (default 100%) - Distal percent (default 90%) - Range (size of one bin in the level detection histogram) - Level Algorithm (Mode or Mean) - Cross Count (number of points above/below a level for a valid cross) PN: 071-0359-02, October 2005 Waveform (AWT) Table 22. Pulse Function Descriptions (Cont.) Menu Item Function Period / Pulse This function measures the period (if three edges are Width included in the region), or pulse width (if only two edges are included). Rising / Falling Overshoot Kalos 2 User Manual The user is prompted for the following parameters: - Mesial percent (default 50%) - Range (the size of one bin in the level detection histogram) - Level Algorithm (Mode or Mean) - Cross Count (number of points above/below a level for a valid cross) This function measures the overshoot on the rising and falling edges of the pulse. The overshoot (as a percentage of the pulse amplitude) as well as the peak value and the location of the peak value are printed. The user is prompted for the following parameters: - Range (the size of one bin in the level detection histogram) - Level Algorithm (Mode or Mean) - This function gives a settling time (to the limits of the sample rate) for a rising or falling edge. One cursor is placed on the edge at the point from which the settling time is to be measured. The other cursor is placed near the end of the pulse, well after the signal has settled. 271 5 - KITE Utilities Table 22. Pulse Function Descriptions (Cont.) Menu Item Function Settling Time This function gives a settling time (to the limits of the sample rate) for a rising or falling edge. One cursor is placed on the edge at the point from which the settling time is to be measured. The other cursor is placed near the end of the pulse, well after the signal has settled. The user is prompted for the following parameters: - Stable Period (the amount of time the signal must remain within the range to be considered stable) - Level Averaging Period (amount of time before the second cursor location over which to average the signal to determine the stable value of the pulse) - Allowed Delta (the size of the range of values for which the signal can be considered settled) - The values at the first and second cursors of the waveform determine if the edge is a rising or falling edge. The first cursor value must be less than the second cursor value for rising edges and vice versa for falling edges. This function does no interpolation. It works directly with the data points from the waveform. Therefore, the results are always a multiple of the sample interval and may not be as accurate as with other pulse functions. Note: Settling times of zero print neither a result nor an error message. Zero settling times occur for perfect waveforms, such as those created by waveform creation routines. 272 PN: 071-0359-02, October 2005 Waveform (AWT) Table 22. Pulse Function Descriptions (Cont.) Kalos 2 User Manual Menu Item Function Serial to Parallel This function converts a serial pulse train into a series of parallel words. The TOS waveform is sampled at a specified rate (starting from a given offset). At each sample point, the waveform amplitude is compared to a specified threshold. If the waveform amplitude is above the threshold, the value is considered a logical high (1). If the waveform amplitude is below the threshold, it is considered a logical low (0). The user is prompted for the following parameters: - Resample start point - Resample rate and threshold - Number of bits in the resulting parallel word - Bit ordering (MSB First or LSB First) - Where the result is displayed (waveform, the transcript pane, or both) 273 5 - KITE Utilities Table 22. Pulse Function Descriptions (Cont.) Menu Item Function Parallel to Serial This function converts a waveform into a serial pulse train to create a bit stream for a serial DAC. Save the file as a .swav, and input that to the serial DAC. The TOS waveform is assumed to represent a series of parallel words, one word per data point. These words are converted into a series of pulses, based on the number of bits and bit order. At each data point, the waveform value is rounded to an integer and the resulting twos complement integer value determines the bit values to put in the output waveform. The user is prompted for the following parameters: - Number of bits per input value in the resulting serial bit stream - Bit ordering (MSB first or LSB first) If a data point from the input waveform has a value of 5, the number of bits set to 4, and the bit ordering to MSB first, the following four data points are put into the output waveform: 5 ⇒ 0101 A value of −3 for the input produces the following set of four output data points: −3 ⇒ 1101 Since in this case, only four bits are being looked at, the data values of −3, 13, −19 and 269 all produce the output sequence of 1101. The number of data values in the output waveform is the number of data values in the input waveform multiplied by the number of bits specified. Filter Functions Choosing one of the seven finite impulse response (FIR) filter causes a time domain waveform to be pushed onto the TOS. This waveform can be convolved with the next to TOS waveform (refer to wf Trans) to create a filtered version of the original. Filter menu items and a description of each function are shown in Table 23. 274 PN: 071-0359-02, October 2005 Waveform (AWT) Table 23. Filter Function Descriptions Menu Item Function Low Pass - Creates a low pass digital filter. The user is prompted for the following parameters: - Name - Sample Interval - Pass Frequency - Number of Samples Creates a high pass digital filter. The user is prompted for the following parameters: - Name - Sample Interval - Pass Frequency - Number of Samples Creates a band pass digital filter. The user is prompted for the following parameters: - Name - Sample Interval - Start Frequency - Stop Frequency - Number of Samples Creates a band stop (notch) digital filter. The user is prompted for the following parameters: - Name - Sample Interval - Start Frequency - Stop Frequency - Number of Samples High Pass Band Pass Band Stop Kalos 2 User Manual 275 5 - KITE Utilities Table 23. Filter Function Descriptions (Cont.) Menu Item Function C Message Creates a C-message filter. A C-message filter is essentially a band-pass filter. These filters are used in testing telecom devices. The user is prompted for the following parameters: - Name - Sample Interval - Number of Samples Creates a psophometric filter. A psophometric filter is essentially a band-pass filter. These filters are used in testing telecom devices. The user is prompted for the following parameters: - Name - Sample Interval - Number of Samples Creates a brick wall filter waveform. The user is prompted for the following parameters: - Name - Sample Interval - Start Frequency - Stop Frequency - Number of Samples Psophometric Brick Wall NOTE — To use the filter waveform in a convolve operation, the sample interval must match the sample interval of the waveform to be filtered. 276 PN: 071-0359-02, October 2005 Waveform (AWT) Windows Functions Windows operations enable users to apply various window functions to the TOS waveform. Window menu items and a description of each function are shown in Table 24. Table 24. Windows Function Descriptions Menu Item Function Taper Applies a taper windowing function to the TOS waveform.The user is prompted for the following parameters: - Windowing Function - Fraction (0.0 - 1.0) Window functions include: - Rectangular - Triangular - Hanning - Hamming - Blackman - Flattop Applies a Kaiser window to the TOS waveform. The user is prompted for the following parameters: - Fraction (0.0 - 1.0) - Peak Approximate Error (in dB) of resulting waveform Applies a Chebyshev (filter) window to the TOS waveform. The user is prompted for the following parameters: - Fraction (0.0 - 1.0) - Normalized Transition Width - Ripple, Main Lobe to Side Lobe Either the ripple of the side lobes or the transition width must be set to a non-zero value. The other of these two parameters must be set to zero. Kaiser Chebyshev Kalos 2 User Manual 277 5 - KITE Utilities Int/Diff Functions This option performs integration and differential (Int/Diff) functions. Note that after integrating a waveform, the area can be determined by subtracting the magnitudes of two X values. This is done by using the cursors. Int/Diff menu items and a description of each function are shown in Table 25. Table 25. Int/Diff Function Descriptions Menu Item Function SimpInt Performs a Simpson integration on the TOS waveform. Performs a Trapezoidal integration on the TOS waveform. Performs a differentiation of the TOS waveform. TrapInt Differ NOTE — For waveforms that have an even number of cycles, the Trapezoidal integration provides more accuracy. User Functions This menu begins with the Shell item (Shell prompt window, shown in Figure 156) and is followed by the filenames for any scripts that you have created. Figure 156. Shell Dialog To enter a shell command: 1. Choose the Calculator menu item User > Shell. (This is the same as choosing the menu item Tools > Shell). 2. Enter a shell command. 3. Click OK. To invoke a script: 278 PN: 071-0359-02, October 2005 Waveform (AWT) Choose the DSP menu item User > <ScriptFilename>, where <ScriptFilename> is any script that you have created. These can also be accessed by way of the Tools menu option. By default, the Documents and Settings\<username> folder is checked. This can be changed at Tools > Options > Default Locations. If no appropriate file is found in this location, the button is left undefined. Working with the Stack The Stack menu item on the main menu bar (see Figure 157) displays the current state of the waveform stack with status information about each entry on the stack. This information is also displayed in the lower right corner of the Analog Wavetool. The data is printed in the same color as its corresponding waveform. Figure 157. Stack Menu Main Menu bar Waveform Stack The stack index number shows the relative location in the stack of the waveform. The index of the top of stack waveform is zero, the next to top of stack waveform has an index of one, and so on. A “+” following the index indicates that at least one cursor is attached to the waveform. The letter “S” indicates that the waveform is superimposed on the TOS waveform. The waveform name is listed followed by the type. “R” is a real rectangular waveform, Cr and Ci are complex rectangular waveforms with the real or imaginary component displayed, Pm and Pp are a polar waveforms with magnitude or phase displayed. The number of points in the waveform is displayed next followed by the sample interval and vertical units. For waveforms currently connected to a tester, additional information is displayed. The tester read mode is the current read mode: Read, Auto Update, or Retrace. The command file identifies the command file that is currently specified and enabled. If a command file is specified but not enabled, no command file is listed in the stack display. To clear the stack: Choose the menu item Stack > Empty Stack. This removes all waveforms. To move a different waveform to the TOS: Select the desired waveform from the Stack menu. Kalos 2 User Manual 279 5 - KITE Utilities Storing/Recalling a Waveform The Analog Wavetool has 10 waveform registers (numbered 0 through 9), as shown in Figure 158. Waveform Registers Figure 158. Waveform Registers To store the TOS waveform in a register: 1. Click the Store menu. 2. Choose any empty register. The menu notation by the register you choose changes from Empty to the name of the stored waveform. The X and Y scale and position data is stored. To recall a waveform from a register: 1. Click the Recall menu. 2. Click the register that contains the waveform you wish to recall. The waveform automatically becomes TOS. The X and Y display values are restored. Saving a Waveform Saving a waveform writes the TOS waveform to disk in the specified file type. The file name is derived from the name specified in the Name field upon creating the waveform. The name can be changed in the Save As dialog. 280 PN: 071-0359-02, October 2005 Waveform (AWT) Figure 159. File Menu To save a waveform to disc: 1. Choose the menu item File > Save As in the main menu bar. 2. Navigate to the directory to which you want to save the waveform. 3. Name your waveform file with the appropriate extension. 4. Click OK. Creating and Executing Scripts In addition to all the functions available, scripts that execute specific functions can be created with the display and DSP function buttons. These script files can have one of two extensions: .aws (default) or .cmd. The dialog box for creating and executing a script is shown in Figure 160. Figure 160. Creating a Script Dialog Box To create a script: 1. Choose the menu item Tools > Script > Record. 2. Click the Record to File checkbox. Kalos 2 User Manual 281 5 - KITE Utilities 3. Enter the name of a new script file that does not currently exist. ...or... Enter or browse for the name of an existing script file to which commands can be appended. To browse for an existing script file, click the Browse button, navigate to the desired .aws or .cmd file, then click OK. 4. Click OK. All subsequent actions are recorded and written to the file specified in step 3. NOTE — If the Record to File checkbox is already checked, you can click the Begin Script Recording icon on the toolbar to begin recording. To include comments to this file as well, choose the Tools > Options menu item, click the Preferences tab, and click the Log Results checkbox. To end a recording session and close the script file: 1. Choose the menu item Tools > Script > Record. 2. Deselect the Record to File checkbox...or... click the End Script Recording icon on the toolbar. 3. Click OK. NOTE — To ensure the data is complete, you must end the recording session and close the script file before editing or moving it. The open script dialog box used to browse and select the file to execute is shown in Figure 161. 282 PN: 071-0359-02, October 2005 Waveform (AWT) Figure 161. Execute Script Dialog Box To execute a script: 1. Choose the menu item Tools > Script > Execute. From the Execute dialog, choose the script file to execute. If there is already an open script file, it is closed before the new file is opened. 2. Click OK. Monitoring Errors, Warnings and Comments The transcript pane section of the Analog Wavetool window, shown in Figure 162, is a scrollable text region that displays errors, warnings, and textual results. Although this is a scrollable region, it is limited. Also see Figure 139. Kalos 2 User Manual 283 5 - KITE Utilities Figure 162. Transcript Pan with Drop Down Edit Menu NOTE — The size of the transcript pane varies depending on the physical size of the Waveform tool. To delete results from the transcript pane: 1. Select the text to be deleted. 2. Right-click in the transcript pane and choose the Cut menu item. To copy results from the transcript pane to another editor: 1. Select the text to be copied. 2. Right-click in the transcript pane and choose the Copy menu item. 3. Open a text editor or other word processor and select the menu item Edit > Paste. To copy text into the transcript pane: 1. In the source editor, select the text you wish to copy and choose Edit > Copy. 2. In the transcript pane, right-click and choose the Paste menu item. To write the results of the transcript pane to a text file: 1. Right-click in the transcript pane and choose the Write to File menu item. 2. In the dialog, browse to the desired directory and choose a filename. 3. Click the Save button. To delete all text in the transcript pane: Right-click in the transcript pane and choose the Clear menu item. 284 PN: 071-0359-02, October 2005 Waveform (AWT) Entering a Shell Command To enter a shell command: 1. Click the menu item Tools > Shell. (This is the same as choosing the Calculator menu item User > Shell). See Figure 163. 2. Enter a shell command. 3. Click OK. Figure 163. Shell Command Dialog Box Executing Script Files: A Closer Look A command interpreter is built into the Waveform tool. It allows script files to be executed to perform operations that are normally performed manually. These script files have the suffix .aws or .cmd. When the editor starts up, it performs the following script-file-related operations. Kalos 2 User Manual • Opens a file named log.aws. Most commands executed during a Wavetool session are written to this file. A different file can be specified using the script on name = <string> command, or from selecting the menu item Tools > Script > Record (or by clicking the Begin Script Recording icon in the toolbar). If the file cannot be opened, an error message is printed in the transcript pane section of the Analog Wavetool window. • Looks for a file named awtinit.cmd, and if it exists, interprets the file. The local directory (the directory from which the Waveform tool is invoked) is checked first, then the users home directory, and finally the directory specified by the AWED_DEFAULT_DIR environment variable. 285 5 - KITE Utilities • Looks for files with the .aws or .cmd extensions, and assigns the found files to the user function buttons. By default, the Documents and Settings\<username> folder is checked. This can be changed at Tools > Options > Default Locations. If a button statement is in the file, that string is used as the button label. If no appropriate file is found in this location, the button is left undefined. Button labels are assigned only upon initialization of the Waveform tool. All commands recognized by the Waveform tool user-command-interpreter are listed in Table 26. <int> implies a decimal integer value <double> implies a floating point number (that must include a decimal point and can include an exponent) <string> implies a string. To protect special characters (including spaces), strings must be quoted: “a string.” Apostrophes surround literals ('=') that must be entered exactly as indicated. Values inside square brackets are options; one of the literals indicated must be used. Table 26. Commands recognized by AWT user_command_Interpreter Command Meaning abs ';' add ';' add const '=' <double> ';' Take the absolute value of top waveform on the stack. Add the top two waveforms on the stack. Add a constant to each data point in the top waveform on the stack. apply taper Applies the indicated window function to the indicated window '=' [rectang | triang | hanning fraction of the TOS waveform. | hamming | blackman | flattop] fract '=' <double> ';' apply kaiser fract '=' <double> Applies a Kaiser window function to the indicated appErr '=' <double> ';' fraction of the TOS waveform with the specified approximation error. apply chebyshev fract '=' <double> Applies a Chebyshev window function to the indicated trans width '=' <double> fraction of the TOS waveform with the indicated ripple '=' <double> ';' transition width or ripple (one of the two values must be zero). auto increment colors '=' [on | off] ';' Turn automatic color assignment on or off. Turning off resets color to the default color (Color 1). 286 PN: 071-0359-02, October 2005 Waveform (AWT) Table 26. Commands recognized by AWT user_command_Interpreter (Cont.) Command Meaning average number '=' <int> ';' Average the TOS waveform. Number specifies the number of times to average the waveform. button '=' <string> ';' Put a label on a user button, <string> is the label to use. circular convolve ';' Convolve the TOS waveform with the next-to TOS waveform. clear ';' Clear the waveform stack. No warning is given, the stack is just cleared. clip ';' Clip the top waveform on the stack according to the next waveform on the stack. clip const '=' <double> ';' Clip the top waveform on the stack to a constant value. concatenate ';' Places the TOS onto the end of the next-to TOS waveform. convolve ';' Convolve the top two waveforms on the stack. A linear convolution or a circular convolution can be chosen. correlate ';' Correlate the top two waveforms on the stack. create band pass name '=' <string> Creates a band pass filter waveform with the given sample rate '=' <double> parameters. low freq '=' <double> high freq '=' <double> length '=' <int> ';' create band stop name = <string> Creates a band stop (notch) filter waveform with the sample rate '=' <double> given parameters. low freq '=' <double> high freq '=' <double> length '=' <int> ';' create brickwall name '=' <string> Creates a mathematically ideal filter with the given sample freq '=' <double> parameters. start freq '=' <double> stop freq '=' <double> number samples '=' <int> create cWeight name '=' <string> Creates a C Message weighted filter (for use in sample rate '=' <double> telecom applications). length '=' <int> ';' create cursor '=' <string> ';' Creates a user cursor with the given name. create dc name '=' <string> Creates a DC waveform with the given parameters. rate '=' <double> length '=' <int> offset '=' <double> ';' Kalos 2 User Manual 287 5 - KITE Utilities Table 26. Commands recognized by AWT user_command_Interpreter (Cont.) 288 Command Meaning create gauss name '=' <string> rate '=' <double> length '=' <int> seed '=' <int> mean '=' <double> std '=' <double> ';' create high pass name '=' <string> sample rate '=' <double> pass freq '=' <double> length '=' <int> ';' create low pass name '=' <string> sample rate '=' <double> pass freq '=' <double> length '=' <int> ';' create pulse name '=' <string> rate '=' <double> cycles '=' <int> points '=' <int> start '=' <double> rise '=' <double> width '=' <double> fall '=' <double> amp '=' <double> offset '=' <double> ';' create pWeight name '=' <string> sample rate '=' <double> length '=' <int> ';' create saw name '=' <string> rate '=' <double> cycles '=' <int> points '=' <int> start '=' <double> rise '=' <double> amp '=' <double> offset '=' <double>';' Creates a Gaussian noise distribution with the given parameters. If seed is not specified, a random seed value is generated. Creates a high pass filter waveform with the given parameters. Creates a low pass filter waveform with the given parameters. Creates a waveform consisting of pulses with the given parameters. Creates a psophometric weighted filter (for use in telecom applications). Creates a waveform consisting of sawtooth cycles with the given parameters. PN: 071-0359-02, October 2005 Waveform (AWT) Table 26. Commands recognized by AWT user_command_Interpreter (Cont.) Command Meaning create sine name '=' <string> cycles '=' <int> length '=' <int> rate '=' <double> phase '=' <double> amp '=' <double> offset '=' <double> ';' create triang name '=' <string> rate '=' <double> cycles '=' <int> points '=' <int> start '=' <double> rise '=' <double> fall '=' <double> amp '=' <double> offset '=' <double> ';' cursor track <string> <string> ';' Creates a sine waveform with the given parameters. cursor untrack <string> ';' decimate factor '=' <int> ';' deinterleave name '=' <string> interleave factor '=' <int> decode number bits '=' <int> code format '=' <int> ';' differentiate ';' display colors '=' [print | normal] ';' display marker <string> '=' [on | off] ';' display mode '=' [user | points] ';' div ';' Creates a waveform consisting of triangular cycles with the given parameters. Set the second named cursor to track the first named cursor. Remove cursor tracking from the named cursor. Decimate the top waveform on the stack according to the indicated factor. TBD Decode the TOS waveform according to the specified number of bits and code format. If code format indicates a-law, u-law, or BCD, the number of bits is not used. Differentiate the top waveform on the stack. Set the display colors to print (black on white) or normal. Enable or disable the display of the named marker. Set the display mode to user units or points. Divide the top waveform on the stack by the next waveform on the stack. div const_wf const '=' <double> ';' Divide a constant by the top waveform on the stack. div wf_const const '=' <double> ';' Divide the top waveform on the stack by a constant. drawing style '=' [line | point | sample Set the drawing style to line, point, sample mode, or | hist] ';' histogram. Kalos 2 User Manual 289 5 - KITE Utilities Table 26. Commands recognized by AWT user_command_Interpreter (Cont.) Command Meaning eff bits full scale '=' <double> fconv '=' <double> phconv '=' <double> ';' fft ';' Determine the effective bits of the top of stack waveform based on the parameters given. interleave name '=' <string> interleave factor '=' <int> ';' Interleave takes a set of waveforms and combines them to produce a single waveform. This is the inverse of the 'deinterleave' function. Interleave name is the waveform name of the resulting interleaved waveform. Interleave factor is the number of waveforms on the stack to combine to produce the output waveform. Note that all the waveforms to interleave must have the same number of samples. Find the intermodulation distortion of the top of stack waveform based on the parameters given. Find the Fast Fourier Transform of the top waveform on the stack. find level <string> '=' <double> Cause the named cursor to find the indicated level on [rising | falling | either] ';' a rising, falling or either rising or falling edge. graticule '=' [cartesian | grid | scale | Select the graticule type, Cartesian, grid, scale or off. off] ';' histogram type '=' [normal | Generate a histogram of the TOS waveform. Size weighted] must be a power of two. size '=' <int> ';' ifft ';' Find the Inverse Fast Fourier Transform of the top waveform on the stack. inl dnl ramp segs '=' <int> Find Integral and Differential Non-Linearity of the top bits '=' <int> of stack waveform based on the given parameters. ramps '=' <int> The top of stack waveform must be a linear ramp or mag '=' <double> set of ramp segments. vref '=' <double> offset '=' <double> ';' inl dnl sine full scale '=' <double> Find Integral and Differential Non-Linearity of the top amp '=' <double> of stack waveform based on the given parameters. threshold '=' <int> ';' The top of stack waveform must be sine wave. intermod dist full scale '=' <int> first freq '=' <double> second freq '=' <double> ';' linear convolve ';' log base '=' <double> ';' 290 Performs a mathematical linear convolution of top two waveforms on the stack. Take the log of each data point in the top waveform on the stack. PN: 071-0359-02, October 2005 Waveform (AWT) Table 26. Commands recognized by AWT user_command_Interpreter (Cont.) Command Meaning log results [on | off] ';' Enable or disable logging of results in the log file. When on, any results that print in the transcript pane are also printed as comments in the log file. Enable or disable the creation of markers for the results of measurements. When on, results of simple measurements (mean_std, minmax, pulse measurements, etc.) have markers of type. Results added to the appropriate location in the waveform. Find the mean and standard deviation of the top of stack waveform. Find the median of the top of stack waveform. Find the minimum and maximum data points in the top waveform on the stack. If start and stop values are provided, only the region between these values is checked. If no values are provided, the entire waveform is checked. Multiply the top two waveforms on the stack. Multiply the top waveform on the stack by a constant. Normalize the top waveform on the stack (max = 1.0, min = 0.0). Convert the complex rectangular waveform on the top of the stack into a polar waveform. Convert the top two real rectangular waveforms on the stack into a single polar waveform. Pop the top waveform off the stack. The waveform is lost. Raise base to the power of the data value in the TOS waveform. Note that the calculator button for this command is labeled Power (base ^ wf). Raise each data point in the TOS waveform to the indicated exponent. Note that the calculator button for this command is labeled Power (wf ^ exp). Measures all pulse parameters except settling time. These include amplitude, rise time, fall time, period, and duty factor (or pulse width) and rising and falling overshoot or preshoot. mark results [on | off] ';' mean_std ';' median ';' minmax [start '=' <double> stop '=' <double>] ';' mult ';' mult const '=' <double> ';' norm ';' polar ';' polar splice ';' pop ';' power base '=' <double> ';' power exp '=' <double> ';' pulse all start '=' <double> stop '=' <double> range '=' <double> level algo '=' [mode | mean] cross cnt '=' <int> proximal '=' <double> mesial '=' <double> distal '=' <double> ';' Kalos 2 User Manual 291 5 - KITE Utilities Table 26. Commands recognized by AWT user_command_Interpreter (Cont.) Command Meaning pulse amplitude start '=' <double> stop '=' <double> range '=' <double> level algo '=' [mode | mean] pulse fall start '=' <double> stop '=' <double> range '=' <double> level algo '=' [mode | mean] cross cnt '=' <int> proximal '=' <double> distal '=' <double> ';' pulse overshoot start '=' <double> stop '=' <double> range '=' <double> level algo '=' [mode | mean] Measures the pulse high and low values and the amplitude of the pulse (high - low). pulse period start '=' <double> stop '=' <double> range '=' <double> level algo '=' [mode | mean] cross cnt '=' <int> mesial '=' <double> ';' pulse rise start '=' <double> stop '=' <double> range '=' <double> level algo '=' [mode | mean] cross cnt '=' <int> proximal '=' <double> distal '=' <double> ';' pulse settle start '=' <double> stop '=' <double> stable '=' <double> level period '=' <double> delta '=' <double> ';' push ';' push2 ';' 292 Measures the fall time of the falling edge of the pulse. The locations of the proximal, mesial, and distal points are also printed. Measures the rising and falling overshoot percentage, peak pulse value and location of the peak based on the supplied parameters. Results for both the rising and falling edges are printed. If the preshoot amplitude is greater than the overshoot, this value is computed instead. Measures the period and duty cycle (if three edges are included between the indicated indexes) or pulse width (if only two edges are included between the indicated indexes) of the pulse. Measures the rise time of the rising edge of the pulse. The locations of the proximal, mesial and distal points are also printed. Measures the settling time based on the supplied start and stop indexes, stable period, level period, and allowable signal delta. No interpolation is done in this function. Duplicate the TOS waveform. Duplicate the top two waveforms on the stack. PN: 071-0359-02, October 2005 Waveform (AWT) Table 26. Commands recognized by AWT user_command_Interpreter (Cont.) Command Meaning ratios harm '=' <int> ';' Finds the signal-to-noise ratio (SNR), signal-todistortion ratio (SDR) and signal-to-noise-anddistortion ratio (SNDR). The number of harmonics to include must be provided. If this value is -1, all harmonics are included. Read the indicated AWAV file and push it onto the top of the stack. If an ADIF file is specified, it is read. Read the indicated AWG (Arbitrary Waveform Generator) file and push it onto the top of the stack. Read the indicated CAP (Capture Processor) file and push it onto the top of the stack. Read and execute the indicated command file. Recall the waveform from indicated register and push it onto the stack. Convert the top two real rectangular waveforms on the stack into a single complex rectangular waveform. Remove the named cursor. Reverse the top waveform on the stack: last data point becomes first, second to last becomes second, etc. Rotate the waveform stack up or down by one waveform. Digitize the data on the current pins using the current setup values. Enable or disable auto update mode. Set the pin, pins or pin lists for which to acquire data. Set the number of data points to acquire. Set the reference value to a vector, cycle, time, scan partition: link, or pin. Time can be set as 1.0e-6 or 1u (1 microsecond). read awav <string> ';' read awg <string> ';' read cap <string> ';' read cmd <string> ';' recall <int> ';' rectang splice ';' remove cursor <string> ';' reverse ';' rotate [up | down] ';' scope acquire ; scope auto = [on | off] ; scope pins = %s ; scope points = %d ; scope reference [vector = %d | cycle = %d | time = [%s | %g] | scan = %d : %d | pin = %s] ; scope sample interval = [%s | %g] ; scope start = [%s | %g] ; scope stop = [%s | %g] ; scope vmax = [%s | %g] ; Kalos 2 User Manual Set the time interval between samples (T reso). Time can be set as 1.0e-6 or 1u (1 microsecond). Set the start time (Tmin) for acquisition relative to the reference point. Time can be set as 1.0e-6 or 1u (1 micro second). Set the stop time (Tmax) for acquisition relative to the reference point. Time can be set as 1.0e-6 or 1u (1 micro second). Set the maximum voltage to be checked. Voltage can be set as 5.00e-1 or 500m (500 millivolts). 293 5 - KITE Utilities Table 26. Commands recognized by AWT user_command_Interpreter (Cont.) Command Meaning scope vmin = [%s | %g] ; Set the minimum voltage to be checked. Voltage can be set as 5.00e-1 or 500m (500 millivolts). Set the voltage resolution for acquisition. Voltage can be set as 5.00e-1 or 500m (500 millivolts). Turn output to the log file on. If no name is specified, the current default (last name specified) is used. If a different log file is currently open, it is closed before the new file is opened. Turn output to the log file off and closes the log file. Extract a section from the TOS waveform. The start value is the time index of the first sample from the TOS waveform to include in the extracted waveform. The stop value is the time index of the last sample from the TOS waveform to include in the extracted waveform. TBD scope vreso = [%s | %g] ; script on [name '=' <string>] ';' script off ';' segment start '=' <double> stop '=' <double>';' serial to parallel resample start '=' <double> resample rate '=' <double> resample threshold '=' <double> [lsb/msb] first number bits '=' <int> display [tscript|waveform|both]';' set <int> display color '=' [default | 1 .. 32] ';' set <int> display y center '=' <double> ';' set <int> display y pan '=' <double> ';' set <int> display y scale '=' <double> ';' set <int> super '=' [on | off] ';' set <int> wave component '=' [value | [real | imag] | [mag | phase]] ';' set <int> wave data '[' <int> ']' '=' <double> ';' set <int> wave name '=' <string> ';' 294 Set the color of the indicated waveform to the indicated value. Set the indicated waveform such that the indicated value is at the center of the display patch. Set the top of the indicated waveform to be the indicated percentage of the waveform. Set the Y scale factor of the indicated waveform to the indicated value. Turn superimpose on or off for the indicated waveform. Select the waveform component to display for the indicated waveform. Set the waveform data value in the indicated waveform at the index specified in brackets to the indicated data value (double). Set the name of the indicated waveform. PN: 071-0359-02, October 2005 Waveform (AWT) Table 26. Commands recognized by AWT user_command_Interpreter (Cont.) Command Meaning set <int> wave offset '=' <double> ';' Set the X offset for the specified waveform. The offset is the X value of the first data point in the waveform data array. set <int> wave phase units '=' Set the phase units string for the indicated waveform. <string> ';' (Only valid if waveform type is polar.) set <int> wave Set the sample rate of the indicated waveform to the sample rate '=' <double> ';' specified value. set <int> wave x units '=' <string> ';' Set the X units string for the indicated waveform. set <int> wave y units '=' <string> ';' Set the Y units string for the indicated waveform. set cursor location Set the named cursor to the indicated location (X <string> '=' <double> ';' coordinate). set cursor waveform Set the named cursor to the indicated waveform (0 = <string> '=' <int> ';' top of stack). set display x begin '=' <double> ';' Set the display such that the indicated value is at the beginning (left side) of the display. set display x pan '=' <double> ';' Set the X display to begin at the indicated percentage of the waveform. set display x scale '=' <double> ';' Set the X scale factor to the indicated value. set edit mode '=' [light | heavy] ';' Set the editor to the specified mode. set waveform Set the size of a waveform patch to be the indicated size '=' [small | medium | large] ';' value. shell prompt <string> ';' Pop up the shell prompt input box with the specified string. The string can be edited before being submitted to a shell or the input box can be cancelled without performing the indicated shell command. shell <string> ';' Execute the command in string by submitting it to a shell. simp integr ';' Perform a Simpson integration of the waveform on the top of the stack. sin curve fit fconv '=' <double> Find the sine wave that most closely fits the TOS phconv '=' <double> waveform. start freq '=' <double> ';' sin interp factor '=' <int> ';' Perform a sine interpolation of the waveform on the top of the stack using the indicated factor. split ';' Split the complex rectangular or polar waveform on the top of the stack into two real rectangular waveforms. sqrt ';' Take the square root of each data point in the top waveform on the stack. Kalos 2 User Manual 295 5 - KITE Utilities Table 26. Commands recognized by AWT user_command_Interpreter (Cont.) Command Meaning store <int> ';' Store the waveform on the top of the stack into the indicated register. Subtract the next to top of stack waveform from the top of stack waveform. Subtract a constant from the top of stack waveform. Swap the top waveform on the stack with the next waveform on the stack. Set the Y axes synchronize on or off. Connect to the specified tester and test head. sub ';' sub const '=' <double> ';' swap ';' sync y '=' [on | off] ';' tester connect <string> head '=' [1 | 2] ';' tester disconnect ';' tester read <string> mode '=' [read | auto | retrace] cmd '=' [on | off] [cmd name '=' <string>] ‘:’ tester update <string> mode '=' [read | auto | retrace] cmd '=' [on | off] [cmd name '=' <string>] ‘:’ tester write <string> ';' trap integr ';' tscript print <string> ';' tscript read <string> ';' 296 Disconnect from the currently connected tester. Read a waveform from the tester. A connection must already be established. The first string is the full path to the desired waveform on the tester. Mode specifies the update mode. If cmd is set to on, command file processing is enabled, it is disabled otherwise. If no command file is specified by this command, command file processing is disabled regardless of the cmd value specified. The command file name is optional. Modify the parameters of a waveform connected to the tester. The first string is the name of the waveform as it appears in the name field of the waveform patch. If multiple waveforms with the same name are attached to the tester, the specified parameters are applied to all waveforms of the specified name. The read mode, command file enable and, optionally, the command file name are modified. The TOS waveform is written to the tester waveform specified by the string. The tester connection must already be established and the specified destination waveform must be the full path of the waveform on the tester. Perform trapezoidal integration of the waveform on the top of the stack. Prints the string in the transcript pane. Opens the file specified by the string and prints the contents of the file in the transcript pane. PN: 071-0359-02, October 2005 Waveform (AWT) Table 26. Commands recognized by AWT user_command_Interpreter (Cont.) Command Meaning unscramble cycles '=' <int> ';' Rearranges samples by skipping the entered number of samples. It wraps around the last sample and continues from the first sample until all samples are rearranged. This can be used to view samples in phase order instead of time order. This has been replaced by the Reorder input cycles function, which provides more control over the reordering process. Write the waveform on the top of the stack to the indicated file in ASCII AWAV format. ADIF format is no longer supported for writing waveforms. Write the waveform on the top of the stack in AWG format. The file name is derived from the waveform name. Write the waveform on the top of the stack to the indicated file in parallel SWAV format based on the given parameters. write ascii awav <string> ';' write awg ';' write parallel swav <string> number bits '=' <int> scale '=' <double> offset '=' <double> interleave factor '=' <int> code format '=' <int> ';' write serial swav <string> number bits '=' <int> scale '=' <double> offset '=' <double> [lsb | msb] first code format '=' <int> ';' zoom <int> display y [up | down]';' zoom cursor <string> <string> ';' zoom display x [up | down]';' zoom previous <string> ';' zoom region <string> <string> ';' Kalos 2 User Manual Write the waveform on the top of the stack to the indicated file in serial SWAV format based on the given parameters. Go to the next higher (up) or lower (down) scale factor for the Y axis of the indicated waveform. Zoom the X axis between the two named cursors. All waveforms with the same units as the waveform(s) included by the indicated cursors are zoomed. Go to the next higher (up) or lower (down) scale factor for the X axis. All waveforms with units the same as the TOS waveform are rescaled. Restore the previous X and Y scale and position values for the waveform for the indicated cursor. The same as zoom cursor but the Y axis of the waveform(s) for the indicated cursors is zoomed as well. 297 5 - KITE Utilities Printing a Waveform To print a waveform: 1. Choose the menu item File > Print or click the Print icon in the toolbar. 2. In the dialog that displays, choose what you wish to print. 3. Print TOS Waveform — Prints only the TOS waveform with pertinent information about the waveform, minus the cursor. 4. Print Stack View — Prints everything on the screen, including the Name Pane, all patches shown, the cursors, and the cursor boxes. 5. Click OK. 6. Set the rest of the print preferences, click OK. Closing a Waveform To close a waveform file: 1. Move the waveform to be closed to TOS. 2. In the display button area (lower left corner of the tool), click the Pop button. Exiting the Analog Wavetool To exit the Analog Wavetool: • Choose the menu item File > Exit. • Click Yes. (See Figure 164.) Figure 164. Exit Dialog Box 298 PN: 071-0359-02, October 2005 Logic Debug Tool Logic Debug Tool The Logic Debug tool (LDTool) is a front-end application intended for advanced debugging, editing, and running of test patterns, as well as viewing the results of running stored patterns in History RAM. The LDTool displays the correspondence between pattern and History RAM fail data, failing pins and fail counts, and allows bitwise editing and rerunning of patterns for acquiring new fail data. LDTool automatically detects the LVM mode and displays it in the status bar of the main LDTool window. The following LVM modes are supported: 48x1, 48x2, 96x1, 96x2, 96x4, 192x1, and 192x2, 384x1, 384x2, 384x4, 768x1, 768x2 and 768x4. The LDTool (utility) is launched by clicking on the Kalos Logic Debug icon (see Figure 165) or it can be selected (launched) from the Utilities menu item. Figure 165. LD Icon Click here to open the Kalos Logic Debug utility. The main window of the LDTool operates in the following modes: - LDTool - Waveform - LATool - DSTool - Datalog The desired mode is selected by clicking the corresponding tab at the bottom left of the main window (see Figure 166). LDTool Window The main LDTool window (Figure 166) displays the currently loaded pattern and allows bitwise editing and rerunning, as well as displaying the newly acquired fail data. Kalos 2 User Manual 299 5 - KITE Utilities Figure 166. LDTool Window Select the application mode Pattern data is displayed in a column format. The following data is provided (column information noted as (editable) can be edited): 300 Addr Pattern address in SRAM. Vector ID Sequential number of the current vector in the .kpl file. FSet Format set. TSet Timing set. Rpt Repeat counter (editable). STV Store This Vector; 1 sets the current vector to be stored in History RAM (editable). PN: 071-0359-02, October 2005 Logic Debug Tool SYNC (editable) IGNF Ignore fail; 1 sets the failed address to be shown in the LDTool window like the addresses with no fail are shown (editable). P/F Pass/Fail; X, if there is no information; FAIL (in red), if fail occurred; Pass (in green), if passed without fail. CHANNELS/DEVICE PINS This field displays the current vector data by channels (see Figure 166) or device pins (see Figure 167) in source format (editable). The column headers display channel numbers, or device pins. The corresponding names below the channel or pin numbers (see Figure 168) can also be displayed from the column header context menus. If the names are not displayed, point the cursor to the column header to display the name. Figure 167. Vector Data Shown by Device Pins Figure 168. Device Pin Numbers Shown With Names FAIL SUMMARY for each channel is shown on the last row of the column (see Figure 169). The fail summary for a channel can be P (Pass), F (Fail), or X (no pass/ fail information is available) (see Figure 169). Placing the cursor over the column displays the number of fails that occurred for a channel, or to indicate no pass/fail information for this channel. Kalos 2 User Manual 301 5 - KITE Utilities Fail/Pass without showing the numbers of the occurred fails is indicated in Figure 169. Figure 169. Fail/Pass If in the context menu of the Fail Summary row, the Show fail summary item is checked then the number of the occurred fails for each failed channel is shown below the symbol "F" (see Figure 170). In Figure 170, Failed channels/pins indicated along with the numbers of the occurred fails. Figure 170. Fail Channel Pins If a vector data of some vector and pin is shown with gray background and red border ( ), it indicates fail fixed for that data. The headers of the CHANNELS/DEVICE PINS columns are provided with the following context menu: 302 PN: 071-0359-02, October 2005 Logic Debug Tool Displays the Channels dialog for selecting the channels to be shown Shows the current vector data by channels if checked Shows the current vector data by device pins if checked Shows the names of channels or device pins if checked Check/uncheck these items to show/hide the corresponding data columns User can select any row in the LDTool window by clicking that row, and/or select columns by clicking their headers. For better visibility the selected row is highlighted in dark gray, and the selected column(s) in blue. In Figure 171, the selected row and columns are highlighted. Kalos 2 User Manual 303 5 - KITE Utilities Figure 171. Row and Column Selection The keys “Up Arrow” and “Down Arrow”, “Page Up” and “Page Down”, “Home” and “End” are available for moving the selection of row up and down. The vector data in the LDTool window are shown in correspondence with the VectorChar definition defined in the current test program. An example of VectorChar definition is presented below: VectorChar { 0 = DD1, // G2L, G2L, 1 = DD1, // G2H, G2H, N = DD1, // G2L, G2H, P = DD1, // G2H, G2L, L = DD1, 304 DD2, DC, DC DD2, DC, DC DD2, DC, DC DD2, DC, DC DD2, EMASK1, EMASK2 (0, 0, 0, 1); EMASK1, EMASK2 (0, 1, 1, 1); EMASK1, EMASK2 (0, 0, 1, 1); EMASK1, EMASK2 (0, 1, 0, 1); EMASK1, EMASK2 (1, 0, 0, 0); PN: 071-0359-02, October 2005 Logic Debug Tool // G2Z, H = // G2Z, X = // G2Z, n = // G2Z, p = // G2Z, }; G2Z, DD1, G2Z, DD1, G2Z, DD1, G2Z, DD1, G2Z, EL, EL DD2, EH, EH DD2, DC, DC DD2, EL, EH DD2, EH, EL EMASK1, EMASK2 (1, 1, 1, 0); EMASK1, EMASK2 (1, 0, 0, 1); EMASK1, EMASK2 (1, 0, 1, 0); EMASK1, EMASK2 (1, 1, 0, 0); Users can right-click any editable cell in the LDTool window and select the desired value from the pop-up list of the available values (see Figure 172). Figure 172. Cell Selection The Channels dialog allows the user to select the channels to be displayed in the LDTool window. Kalos 2 User Manual 305 5 - KITE Utilities Figure 173. Channels Dialog The check marks in the Select Channels field indicate the currently selected channels. Click the left/right spin buttons at the top of the dialog to view to the desired channel range. Check/uncheck the check boxes to select the desired channels. The Selected Channels field shows the selected channels. Type the desired channel numbers, and/or pin/group names in the Enter channels, pin names, groups field and click the Select button to check the corresponding check boxes and to display the data of the selected channels in the LDTool window. Click the Sort by number button to show the selected channels in the LDTool window sorted by their numbers. Click the Show VCD button to show all channels in the LDTool window in the same order as defined in the pattern file. Click Show All to show all channels (0-767) sorted by their numbers. Click Hide All to hide all channels in the LDTool window. 306 PN: 071-0359-02, October 2005 Logic Debug Tool Waveform Window This window shows the data presented in the LDTool window by means of waveforms. Figure 174. WaveForm Window The conventional symbols used in this window are described in the first five rows of the. The leftmost column in the WaveForm window is provided with the same context menu as the headers of the CHANNELS/DEVICE PINS columns in the LDTool window. The Scale row presents the time scale. The values of time points are presented in terms of ns. The scale is provided with the following context menu: Kalos 2 User Manual 307 5 - KITE Utilities Change Scale Dialog This dialog allows the user to set the index by choosing the desired value from the Index combo box, or by moving the slider at its right. Figure 175. Change Scale Dialog. Users can also set the thickness of the waveform lines using the Line thickness combo box, as well as the line color using the sliders for Red, Green and Blue. LATool Window This window provides graphical view of the programmed pattern waveforms and actual measured waveforms for the selected pins or pin groups. 308 PN: 071-0359-02, October 2005 Logic Debug Tool Figure 176. LATool Window The corresponding information can be saved to a .lat file, which can be opened in both online and offline modes through the context menu of the LATool window. The first column shows the names of the selected pins and pin groups. [+] symbol next to a pin group name indicate that the pin group is expendable. Click [+] or [-] to expand or collapse a pin group. Expanded Pin Group If a pin group is expanded, then the names of its pins are shown bellow the pin group name. The channel number and device pin number corresponding to a pin are shown right to it in the second column. The following columns show the corresponding waveforms (waveform area). They show the states (Low, Midband, High) of the selected pins at the cycles the numbers of which are indicated in the Cycle row. The total number of the shown cycles may be 64 at most. Kalos 2 User Manual 309 5 - KITE Utilities Users can double-click any channel waveform at any cycle to open the Detailed Information dialog showing detailed information on that part of the waveform (refer to the Detailed Information Dialog). Collapsed Pin Group If a pin group is collapsed, then the corresponding hex values of Exp Hi, Exp Low (for each time edge), as well as Act Hi and Act Low (for each period of steady actual value) are shown in the waveform area. The expected and actual values are shown in blue and black correspondingly, in case of no fail, and both in red, in case of occurred fail. Waveform Area Conventional Symbols The following table shows the conventional symbols (by default colors) used in the waveform area: 310 PN: 071-0359-02, October 2005 Logic Debug Tool Table 27. Conventional symbols used in the waveform area of the LATool window. Symbol No Fail Indicates Fail ( green ) ( red ) Expect Hi ( green ) ( red ) Expect Low ( green ) ( red ) Expect Midband ( green ) ( red ) Expect Valid ( green ) ( red ) Open Window ( blue ) ( red ) Programmed level ( blue ) ( red ) Programmed "don't care" or undefined level ( black ) ( red ) Actual measured level ( black ) ( green ) Level not measured yet ( green ) Base line Additional Information The rows at the bottom of the waveform area show the values of the following three variables at the beginning of each cycle: • Time (nS) - time in terms of nS • TSet - the number of the used timing set • Cycle - the cycle number. In addition to it the following values are shown in the lower left corner of the window: Kalos 2 User Manual 311 5 - KITE Utilities • Sample - n/m, where n is the number of the samples already obtained during the ongoing measurements, and m is the number of the samples to be obtained within the cycles of maximum duration (i.e. the number of the samples actually obtained within the shorter cycles will be less than m). • Resolution (pS) - the time interval between the two obtained sequential samples in terms of pS. • Time Scale - a conventional time scale factor (refer to the Settings dialog). • Time (nS) - the time corresponding to the current position of the mouse cursor in the waveform area in terms of nS. LATool Window Context Menu The LATool window provides the following context menu: Displays the Channels dialog to select the desired channels. Displays the Settings dialog to set the precision and the waveform area scale. Settings of the colors. Shows only the expected states if checked. Shows only the actual states if checked. Shows both the expected and actual states. Shows/hides the hex values of states of the groups. Turns to the DSTool window for accurate measurement. Displays the Open dialog box to choose and open the desired .lat file. Displays the Save As dialog box to save the current data as a .lat file. The Save As dialog contains the Save detailed info check-box, which is checked by default. It allows the user to include or omit the data for the Detailed Information dialog (see the Detailed Information Dialog). 312 PN: 071-0359-02, October 2005 Logic Debug Tool Click Reset to reset the default colors used in the LATool window. Click any other item to change its current color using the displayed Color dialog. The Focus color is the color of the rectangle framing the focused signal to which the data shown in the currently displayed Detailed Information dialog refer (refer to the Detailed Information Dialog). The dialog window in Figure 177 allows users to define the following settings: Samples (max 100) Number of the samples to be obtained within the cycles of maximum duration. Time Scale (1-100) Time scale factor; increase or decrease this value to expand or shrink the waveform area horizontally. Line Height (10-50) Line height scale factor; increase or decrease this value to expand or shrink the waveform area vertically. Figure 177. Settings Dialog Kalos 2 User Manual 313 5 - KITE Utilities DSTool window DSTool window allows the user to perform accurate voltage measurement on any channel during any cycle and provides detailed view of the result. Figure 178. DSTool Window Setup Group Select or type the desired channel number in the Channel combo box and the cycle number in the Cycle edit box. If the LATool window is opened, you can right-click the cycle of the channel you are interested in and choose the Scope This command from its context menu. In this case LDTool turns to the DSTool window with the corresponding numbers for the channel and cycle already set. 314 PN: 071-0359-02, October 2005 Logic Debug Tool Define the following values for VOH and TIME: Start Values of VOH and TIME from which the measurement should start. Index Increment of VOH and TIME between two sequential measurements. Stop VOH and TIME at which the measurement should stop. Steps Numbers of measurements to be done beginning from Start values up to the Stop values. Click the Default button to set the following default values for the selected channel: • the start value of VOH equal to VIL; • the stop value of VOH equal to highest of VIH or VIHH; • the start time equal to 0; • the stop time equal to the duration of the selected cycle. Click the Zoom Wnd button (the mouse cursor turns to "+") and drag the mouse cursor over the desired area of the plot to zoom and fit it to the whole plot area. Click the Details button to open the Detailed Information dialog (). Levels Group This group indicates the LEVELS KTL statement, which is used for the selected pin, the voltage values defined in that statement, as well as the conventional color of each level used in the voltage plot. Cursor Group This group indicates the Time and Voltage values corresponding to the current position of the mouse cursor. Measure Group This group indicates the Time and Voltage ranges corresponding to the space you have dragged the mouse from one point to another in the plot area. Thus, the DSTool window allows the user to measure the time and voltage intervals between any two points of the plot. Kalos 2 User Manual 315 5 - KITE Utilities Datalog Window The Datalog window allows the user to view the data stored in History RAM. Figure 179. Datalog Window The first five columns show the following data: 316 No. Cycle number Vector Addr (SRAM) Vector’s address in SRAM Uram Addr URAM Address Arm Arm state (a check mark indicates arm occurred on that URAM) PN: 071-0359-02, October 2005 Logic Debug Tool Trig Trigger state (a check mark indicates trigger occurred on that URAM) Fail Pass/Fail (red “F” indicates “Fail”; empty cell means “Pass”) The PG and TG fields allow the user to view the PG/TG data (). Right-click the top part of the PG field to open its context menu and select the desired resource to display the column of its values. Selection of resources to be displayed are shown in Figure 180: Figure 180. Resource Selection Users can also Show All or Hide All resources at once. Each cell of the PG field is provided with context menu allowing selection of radix in Figure 181. Kalos 2 User Manual 317 5 - KITE Utilities Figure 181. Selection of Radix The TG field also allows the user to view data by channels (Figure 182) or by pins (Figure 183). Figure 182. Data by Channels 318 PN: 071-0359-02, October 2005 Logic Debug Tool Figure 183. Data by Device Pins Right-click the top part of the TG field to open its context menu (Figure 184). Figure 184. TG Field Context Menu Users can Show all Pins, Show IO Pins only, or Hide all Pins. Point to the Selected Pins (Figure 185) and select the desired pins from the pop-up menu to display the columns of their states. The selected pins are marked with check marks. Select Show Channels to view the states by channels or select Show Device Pins to view them by pins. Select also Show Pin Names to view the corresponding names. Two modes are available for showing the states of channels/pins: Brief and Detail. In Brief mode the cells of the TG field show only Pass (“P”) and Fail (“F”) states (see Figure 185). Kalos 2 User Manual 319 5 - KITE Utilities Figure 185. Brief Mode User can point to any cell of the TG field and see the corresponding states at T1, T2, T3 and T4 in a pop-up tip. Right-click any cell and select Detail from its context menu to turn the TG field to Detail mode (Figure 186). 320 PN: 071-0359-02, October 2005 Logic Debug Tool Figure 186. Detail Mode In the Detail mode T1, T2, T3 and T4 are displayed for each pin, and the cells of the TG field show the states according to the mnemonic symbols presented in the last column of Table 28. Kalos 2 User Manual 321 5 - KITE Utilities Table 28. Mnemonic for 6-Bit of TG Fail Latch Expected Hi Lo Actual Hi Lo Strobe Fail Mnemonic (Exp/Act) X X X X 0 X X 1 1 1 1 1 0 H H – High 0 1 0 1 1 0 M 0 0 0 0 1 0 L 1 1 0 1 1 1 H/M 1 1 0 0 1 1 H/L 0 1 1 1 1 1 M/H L – Low M– Midband G – Glitch X – Don’t Care 0 1 0 0 1 1 M/L 0 0 1 1 1 1 L/H 0 0 0 1 1 1 L/M 1 1 1 1 1 1 H/G 0 1 0 1 1 1 M/G 0 0 0 0 1 1 L/G In the Detail mode users can point to any cell of the TG field and see all the six bits of the fail latch (Figure 187). 322 PN: 071-0359-02, October 2005 Logic Debug Tool Figure 187. Detail Mode Detailed Information Dialog Double-clicking any vector data in the LDTool window, any signal in the WaveForm or LATool window, or the DSTool window to open the Detailed Information dialog (Figure 188) and view detailed information on the focused vector char or signal, which appears framed by a bold rectangle (green by default) in the LDTool, Waveform and LATool Kalos 2 User Manual 323 5 - KITE Utilities Figure 188. Detailed Information Dialog Toolbar of LDTool The toolbar of LDTool, shown in provides the following buttons: Figure 189. LDTool Toolbar 1 324 2 3 4 5 6 7 8 9 10 11 12 13 14 15 16 17 18 PN: 071-0359-02, October 2005 Logic Debug Tool 1. Online/Offline Switches between online and offline modes. Offline Online 2. List of active modules Allows selection of the active module (figure below). 3. Save Opens the Save dialog for saving data as a .vbd file. 4. Arm and Trigger Conditions Opens the Arm and Trigger Conditions dialog for setting the arm and trigger conditions. 5. Show VCD Shows all channels in the LDTool and WaveForm windows in the same order as defined in the pattern file. 6. Get Vector Data Reads from SRAM the currently loaded patterns and shows the data in the LDTool, WaveForm and LATool windows. 7. Set Vector Data Loads the edited data back to SRAM. 8. Run In the LDTool window this button runs the pattern once (sends the input data to the device under test and gets back the output data). In the LATool window it repeats running cycles incrementing the time by the Sample Resolution value starting from zero to the longest period defined in the pattern. In the DSTool window it repeats running cycles incrementing the VOH and TIME by the Index and within the range defined in the Setup group. Kalos 2 User Manual 325 5 - KITE Utilities 9. Stop Stops pattern running. 10. Undo Reverses the last edition of any editable data. 11. Redo Repeats the last reversed edition. 12. Find Opens the Find dialog allowing the user to find a specified value or vector character in the LDTool window. 13. Find And Replace Opens the Find And Replace dialog allowing the user to find a specified value or vector character in the LDTool window and replace it with another value or vector character. 14. Find And Replace String Opens the Find And Replace String dialog allowing the user to find a specified string in the LDTool window along the rows and replace it with another string. 15. Find And Replace Column Opens the Find And Replace Column dialog allowing the user to find a specified string in the LDTool window along the columns and replace it with another string. 16. Go To Opens the Go to dialog allowing the user to jump to the desired line or fail in the LDTool window. 17. Show VectorChar Info Opens the VectorChar Info dialog and shows the vector character definitions. 18. Clear Current window Clears the data only in the currently opened window if it is the LATool, DSTool, or Datalog window, or in all windows if the LDTool window is opened. When the user turns to Online mode the List of active modules, Arm and Trigger Conditions, Get Vector Data and Clear buttons become active (Online/Offline). If there is no data in SRAM, then after clicking the Get Vector Data button the following message will be displayed: “Error, no logic pattern loaded!”. If SRAM contains data, then after Get Vector Data the Save, Set Vector Data, Run, Find, Find And Replace, Find And Replace String, Find And Replace Column, Go To and Show VectorChar Info buttons become active, and the List of Active Modules button become inactive (see Figure 190). 326 PN: 071-0359-02, October 2005 Logic Debug Tool Figure 190. List of Active Modules To change the active module user must clear the currently loaded data. Save Dialog The Save dialog allows users to specify which data of the LDTool window is to be saved and save it as a .vbd file (Figure 191). Figure 191. Save Dialog Window Kalos 2 User Manual 327 5 - KITE Utilities The following describes features of the Save dialog window: Columns Check/uncheck the check boxes to select the columns to be saved along with the desired radices (if available). Sram Address Block Specify the desired address block by typing the numbers of the first and last addresses of the block in the From and To edit boxes correspondingly. The whole available address range is indicated below (Use Sram Addresses). Channels VCD – saves all channels in the same order as in the pattern file. Current – saves the channels currently shown in the LDTool window. Selected – saves only the selected channels. Format KPL – saves the data in KPL format (see Figure 192). SRAM – saves the data as stored in SRAM. The SRAM and EMU combo boxes bellow are active if SRAM is selected. SRAM - allows the user to save the content of the selected SRAM. EMU - allows the user to save the content of the selected EMU. 328 PN: 071-0359-02, October 2005 Logic Debug Tool Figure 192. Save Format Kalos 2 User Manual 329 5 - KITE Utilities The Arm and Trigger Conditions The Arm and Trigger Conditions window allows the user to set arm and trigger conditions and other related settings. (See Figure 193) Figure 193. Arm and Trigger Conditions Window 330 PN: 071-0359-02, October 2005 Logic Debug Tool Cycles The Before Arm & Trig edit box allows the user to specify the number of cycles to be passed before arm and trigger event. The After Arm & Trig edit box allows the user to specify the number of cycles to be passed after arm and trigger event. This number can be at most 63. The sum of these two numbers can be at most 64. Storage Mode The STV (Store This Vector) and SOF (Store Only Fail) checkboxes allow selection of STV or SOF mode. Other Settings Arm First Instruction – if checked LDTool starts data storing in History RAM at the first instruction of the pattern. Trigger First Instruction – if checked LDTool passes after the first instruction as many cycles as specified in the After Arm & Trig edit box and then stops storing. Trigger ON FAIL – if checked LDTool passes after the first occurred fail as many cycles as specified in the After Arm & Trig edit box and then stops storing. The Arm Condition and Trigger Condition fields contain arm/trigger conditions. Definition of each condition is presented by the following boxes: Resource Box Contains the name of the resource to be conditioned. Check Box Check/uncheck for enable/disable the defined condition. Edit Box Allows users to specify the value of the selected resource to be Matched during the test for generating arm/trigger event. Users can save the current settings by clicking the Save Settings button and then restore them by clicking the Get Settings button. The Reset button resets the settings as shown in Figure 194. Kalos 2 User Manual 331 5 - KITE Utilities Figure 194. Set, Get, Reset Buttons Find Dialog This modeless dialog allows the user to find a value or vector character in the LDTool window. See Figure 195. 332 PN: 071-0359-02, October 2005 Logic Debug Tool Figure 195. Find Dialog In case of searching a value user should select the desired column by clicking one of the TSet, Repeat, STV, SYNC, IGNF radiobuttons and specify in the Find what edit box the value to be looked for in that column. In case of searching a vector character user should select the desired range of channels (Current, VCD, Selected) and choose the vector character to be looked for from the Find what combo box. To find the next or previous occurrence of the specified value/vectorchar starting from the first cell of the channel(s) selected in the LDTool window user should select the Down or Up radiobutton and click Find Next. The currently found occurrence appears in the LDTool window in gray background Find And Replace Dialog This modeless dialog allows the user to find a value or vector character in the LDTool window and replace it with another value or vector character. See Figure 196. Kalos 2 User Manual 333 5 - KITE Utilities Figure 196. Find And Replace Dialog This dialog provides the same finding options as in the Find dialog, besides the additional Any value check box, which allows replacement of any value with the value specified in the Replace with edit box beginning from the selected line in the LDTool window. In case of finding and replacing a vector character the Replace with combo box offers the user to choose only among those vector characters, with which the vector character selected in the Find what combo box can be replaced. Click Find Next to find the next occurrence of the value (vector character) specified in the Find what box (combo box) and then stop. Click Replace to replace the found occurrence with the value (vector character) specified in the Replace with box (combo box) and then stop. Click Replace All to replace automatically all occurrences of the search criteria in the LDTool window. In this case a message appears and shows the total number of the occurred replacements. Find And Replace String Dialog This modeless dialog allows the user to search and find a string of vector characters along the lines of the LDTool window and replace it with another string. See Figure 197. 334 PN: 071-0359-02, October 2005 Logic Debug Tool Figure 197. Find And Replace String Dialog The search and replacement go on forward (if Down is selected) or backward (if Up is selected) along the lines of the LDTool window, starting from the selected line. If no line is selected, then it starts from the first line. The user-specified strings in the Find what and the Replace with edit boxes should be of the same length. Otherwise, a warning message will appear about the unequal lengths of the specified strings. If any vector char of the string specified in the Find what edit box is not replaceable with corresponding vector char of the string specified in the Replace with edit box, then a warning message appears about the impossible replacement (see Figure 198). Figure 198. Find Warning Messages Kalos 2 User Manual 335 5 - KITE Utilities Find And Replace Column Dialog This modeless dialog allows the user to search and find a string of vector characters along the columns of the LDTool window and replace it with another string (see Figure 199). Figure 199. Find And Replace Column Dialog The search and replacement go on down (if Down is selected) or up (if Up is selected) along the columns of the LDTool window, starting from the first selected column. If no column is selected, then it starts from the first column. User can check the Find only in the selected column(s) check box to cover only the selected column(s). Go to Dialog This modeless dialog allows the user to jump to the desired Address, Vector ID or Fails (see Figure 200). 336 PN: 071-0359-02, October 2005 Logic Debug Tool Figure 200. Go To Dialog If Address is selected in the Go to what list, then you can specify the desired address in the Enter Address edit box and click Goto to jump to it. If Vector ID is selected in the Go to what list, then you can specify the desired Vector ID in the Enter Vector ID edit box and click Goto to jump to it. For more options click the More button () to display additional options for advanced fail survey. Loop Fails: if checked allows looping back to the first (last) fail upon reaching the last (first) fail while stepping through the fixed fails. First Fail: jumps to the first fail. Last Fail: jumps to the last fail. If Fail is selected in the Go to what list, then the Goto button turns to Next button. If any fail is fixed, the Next and Previous buttons will become active. Use these buttons to jump to the next or previous address with fixed fail. Kalos 2 User Manual 337 5 - KITE Utilities In all cases the LDTool window scrolls and brings the address with the fixed fail to its top. LDTool Menu LDTool provides the following menu: File menu items: Saves the data of the LDTool window to a .vbd file through the Save dialog. Ends the current LDTool session. Action menu items: Switches between online and offline modes. Reads from SRAM and shows the currently loaded patterns. Loads the edited data back to SRAM. Starts pattern running. Stops pattern running. Clears the data in the LDTool and Datalog windows. Edit menu items: Reverses the last edition of any editable data. Repeats the last reversed edition. View menu items: Opens the Go to dialog to jump to the desired address/fail in the LDTool window Shows/hides the toolbar Shows/hides the status bar 338 PN: 071-0359-02, October 2005 Logic Debug Tool Options menu items: Opens the Arm and Trigger Conditions dialog. Loops to the first (last) fail upon reaching the last (first) fail Opens the Channels dialog Shows vector data by channels Shows vector data by pins Shows/hides names Shows/hides fail summary Help menu item: Displays the copyright notice and version number of your copy of LDTool. Kalos 2 User Manual 339 5 - KITE Utilities DBM Editor (DBMEDIT) The Data Buffer Memory (DBM) Editor utility is a viewer, generator and modifier of DBM Patterns. These Patterns can be read from a *.dbi (DBM binary extension) file or directly from the Kalos 2 SRAM hardware (requires Get support). Also the output of the utility generates a *.dbi or sends output directly to the SRAM hardware (requires Set support). Operations include Online (getting, setting, and modifying Online DBM Patterns) and Offline (*.dbi saved during operations) interactions. This also allows online or .dbi data to be translated into *.hex files. Multiple operations are available but single operation selection is under control of property page selections. Four property page operations are available: DBM Editor, Socket File, DBM View and Overrides, and Hex (ASCII) Format. The DBMEdit application utility allows the user to select a fixed or defined format for the graphical table views—Kalos defined and/or user defined. The DBMEdit utility is launched by clicking on the DBMEdit icon (see Figure 201) or it can be selected (launched) from the Utilities menu item. Figure 201. DBMEdit Icon Click here to open the DBMEdit utility. Primary Window The following is a general description of the primary DBM Editor window. File Menu and Toolbar Options DBM File menu pulldown options and the toolbar options (see Figure 202) are described below. 340 Import*.dbi Allows importing of a *.dbi file, originally exported for this application, and re-configures to the input buffer data. Export*.dbi Allows exporting of a *.dbi file with the current application status and conditions. PN: 071-0359-02, October 2005 DBM Editor (DBMEDIT) Get DBM Data (HW) Get current DBM data from the specified Kalos slice and its respective hardware. Set DBM Data (HW) Send to the specified Kalos SRAM hardware. Note: if in Simulation Mode, data has a maximum length of 256K. Print... Print allows the user to schedule a print hardcopy operation for the selected DBM pattern. Print Preview Allows reviewing of the data before the Print operation is invoked. Print Setup... Setups, formatting, and path control for the Print operation. Exit Closes the DBM Editor utility and all associated windows. The toolbar is an arrangement of graphical buttons (clustered by functional groups) that when clicked send messages, as do menus and keyboard accelerators, for requested functions of the DBMEdit utility (see Figure 202). Figure 202. Toolbar 1 2 3 4 5 6 1. Import*.dbi - (same as the above File menu definition). 2. Export*.dbi - (same as the above File menu definition). 3. Print - (same as the above File menu definition). 4. Get DBM Data (HW) - (same as the above File menu definition). 5. Set DBM Data (HW) - (same as the above File menu definition). 6. About - displays software version information. Kalos 2 User Manual 341 5 - KITE Utilities Property Pages DBMEdit has four property pages: DBM Editor, Socket File, DBM View & Overrides, and Hex (ASCII) Format. Select the desired property page view by mouse clicking on the property page tab. Some of these views may be toggled between different formats by clicking the View Selections button where applicable. The following describes the functions of each DBMEdit property page. DBM Editor The top-level window of DBMEdit is sub-divided into multiple view or control areas (see Figure 203). The following describes each area: 1. Menu bar and toolbar - interface for selecting operations of the application. 2. Property page (tab) selection. 3. Pattern, DBM segments and list view pointers selections. 4. Control selection buttons and text field entries - current edit operations. 5. Format header - selected titles and data from selected formats. 6. Draw area - scroll view of the selected DBM pattern and/or segment. 7. Application message line and status bars Viewer The data buffer Viewer option shows online DBM patterns or offline DBM files using multiple formatting graphical displays; Kalos defined and/or user defined. 342 PN: 071-0359-02, October 2005 DBM Editor (DBMEDIT) Figure 203. DBM Editor (Viewer) Primary Window 1 2 5 3 4 6 7 Editor DBMEdit Editor allows the user to perform basic table editing operations to modify columns and rows. The following describes the six areas of focus on this property page (see Figure 204). 1. DBM header titles using the formats from the DBM Viewer selections. Changing formats does not destroy the current DBM data, it changes only the way the data is presented to the user. 2. Column bit selection (yellow highlight) for vertical editing. 3. Pattern list selector and text field pointer for selecting the segment and/or start point of the segment for viewing. 4. Specified address range for row editing. Kalos 2 User Manual 343 5 - KITE Utilities 5. Current selected address view and a DBM (highlighted) for row editing. 6. Control area for editing operations. Figure 204. DBM Editor 1 3 2 5 4 6 Socket File The Socket File provides the compare table for the internal checks when configuring viewing displays, i.e., 16 wide. Only the selected file is used for this purpose and only the Interactive selection allows for generation and/or modification. NOTE — Online Socket File information can be transferred for display setups. 344 PN: 071-0359-02, October 2005 DBM Editor (DBMEDIT) Defaults The Socket File (Defaults) property page provides a socket definition to the initialized slice (see Figure 205). Another view is available under Socket File: Online. This view is discussed later in this section. Figure 205. Socket File - Default 12 10 The Default Socket File has no relationship to any device types. Its prime use is to ensure that the application initializes with some pre-defined conditions, these are 16 IOs, 4 Meg of addressing and device symbols from pn00 to pn47. Online The Online Socket File provides a viewer for looking at the socket definition of the currently loaded program file. The Online Socket File in is divided into two areas (as with most property pages): control area and displayed area. The displayed area is a read only view of the current socket file. Kalos 2 User Manual 345 5 - KITE Utilities The first three columns show the device information of Dpins, device symbol and the type of function of the Dpin. The remaining columns show the Kalos 2 system definitions channel number, DPS number, ground, channel type, and address decoder assignment. DBM Viewer and Overrides (Buffer Memory) The pattern segments provide a way for segmenting the current DBM pattern (ALL) into 256 pieces, allowing utility viewers to focus on specific segments of the pattern. There are two areas of focus on this property page. The following describes the two areas (see Figure 206). Pattern DBM section, left sub-slice, is used to define the “ALL” for this DBM Pattern and up to eight segments. The segments can be anywhere inside the ALL definition and can overlap one another. The alternating (A/B...A/B) DBM addressing is only a graphical representation of the current Kalos 2 SRAM (256 Megbit). Note that the steering addresses are defined at the top of the slice (26 through 06, 30, 36 through 31). Bit 30 is the bank switching for this configured SRAM. 346 PN: 071-0359-02, October 2005 DBM Editor (DBMEDIT) Figure 206. DBM View and Override (Buffer Memory) Hex Format Hex format defines a custom format (Hex) for viewing the DBM data of the selected memory buffer file. The Hex format is an ASCII file. Currently this is the only format that is supported by the Kalos 2 operating system. :020000020000FC :020000040010EA :10000000FFFFFFFFFFFFFFFFFFFFFFFFFFFFFFFF00 Record :10001000FFFFFFFFFFFFFFFFFFFFFFFFFFFFFFFFF0 Extended Segment Address Extended Linear Address Addr 0000 - Data :10FFF000FFFFFFFFFFFFFFFFFFFFFFFFFFFFFFFF91 Record Addr FFF0 - Data :00000001FF End-of_FileRecord Figure 207 is an example that illustrates 16 byte count record, with addressing for a 16 wide device. Kalos 2 User Manual 347 5 - KITE Utilities Figure 207. Translation Format (Hex) NOTE — Kalos currently supports only BY8, BY16, and BY32. The example shows: 348 • 16 Bytes per line Record Type: first 8 positions Data: 9 through 40 Checksum: 41 and 42 • 32 Bytes per line Record Type: 1 through 8 Data: 9 through 56 Checksum: 57 and 58 PN: 071-0359-02, October 2005 DBM Editor (DBMEDIT) Example Printout of a DBM (*.hex file) :020000020000FC :020000040000FA :10000000FFFFFFFFFFFFFFFFFFFFFFFFFFFFFFFF00 :10001000FFFFFFFFFFFFFFFFFFFFFFFFFFFFFFFFF0 :10002000FFFFFFFFFFFFFFFFFFFFFFFFFFFFFFFFE0 :10003000FFFFFFFFFFFFFFFFFFFFFFFFFFFFFFFFD0 :10004000FFFFFFFFFFFFFFFFFFFFFFFFFFFFFFFFC0 :10005000FFFFFFFFFFFFFFFFFFFFFFFFFFFFFFFFB0 :10006000FFFFFFFFFFFFFFFFFFFFFFFFFFFFFFFFA0 :10007000FFFFFFFFFFFFFFFFFFFFFFFFFFFFFFFF90 :10008000FFFFFFFFFFFFFFFFFFFFFFFFFFFFFFFF80 :10009000FFFFFFFFFFFFFFFFFFFFFFFFFFFFFFFF70 :10FFD000FFFFFFFFFFFFFFFFFFFFFFFFFFFFFFFFB1 :10FFE000FFFFFFFFFFFFFFFFFFFFFFFFFFFFFFFFA1 :10FFF000FFFFFFFFFFFFFFFFFFFFFFFFFFFFFFFF91 :00000001FF Test suite (default Q16 4 M) Kalos 2 User Manual 349 5 - KITE Utilities Figure 208. DBM Editor - Default 16 Wide 4 Megs Addressing Layout - Data Buffer Memory (SRAM) Conditions: DUT Addressing Rows 12 Columns 4 Data Width 16 addressing bank DBM variables m_nIOs 16 DperA 4 vmax 4194303 ......0000000000000 ......0000000000000 ......1111111111111 ......1111111111111 quadrant 11 10 01 00 0 0 1 1 Multiple DBM Files Per Program In the releases of Kalos software versions 1.9.5 and higher, the end user is allowed the flexibility to choose between one of multiple hex files to load with the device program. This is accomplished by declaring a generic load within the KTL program, and using a project file (KPJ) to list a configuration that points to a source directory for the DBM files. The syntax for both KTL and KPL is listed below: KTL Syntax: LOADDBM hex_dbm = { FILE = "hextest"; PGDBM = DBM1; DUTWIDTH = 16; CHECK = TRUE; }; //This generic file is required to be in //the subdirectory with the object files. KPJ Syntax: Minimum requirements [nDBM_D_s] socket = single subdir = TEST_DBMD dbm_source = hexfiles 350 [program selection description] Name of the Socket table to load Subdirectory for the object code Source directory for the DBM files PN: 071-0359-02, October 2005 DBM Editor (DBMEDIT) Launching the Operator IF is done by clicking on the Operator IF Icon in the top left corner of the Front Panel. When the KPJ is loaded into the Operator IF, the DBM area of the Operator IF becomes active (if the keywords are in the KPJ). This allows the operator to load any one of the hex files listed within the dbm_source directory. (see “Operator IF Hex Load” below). Operator IF Hex Load Load Time Calculations Checksums on the Kalos can be calculated in many ways. One way is to calculate a file specific “SUM Check”. This is done by loading a DBM file into Kalos Front Panel using the Operator IF (version 1.9.7 and Higher). The algorithm used to calculate the SUM Check simply sums the individual line checksums (line checks) in the hex file. The result is a unique SUM check for the DBM files. (see “Operator IF Hex Load” above). Within the Operator IF there is some validation for the SUM Checks to be as expected. In the upper left corner there is the option to select “SUM Validation”. Enabling this function required the person loading the program to enter the expected Kalos 2 User Manual 351 5 - KITE Utilities value to the SUM check. If this value does not match the calculated value for this DBM file, the load operation is aborted. Run Time Calculations In the releases of Kalos software versions 1.10.1 and higher, the end user has been allowed the flexibility to choose between one of two functions to calculate checksums or CRC’s on the data loaded into the DBM by using TPE functions. These functions read back a section of the DBM data determined by the programmer, and calculate either a simple sum, or a CRC (cyclic redundancy check) of the data within this area. These functions are listed below. TPECheckCRCDbmData Synopsis UINT TPECheckCRCDbmData(TPE_PG tpe_pg,UINT dutWdth,UINT phy_addr,UINT len,UINT crc) Description This function This function performs a 32 bit cyclical redundancy check on data in the DBM. Arguments TPE_PG tpe_pg - one of: TPE_PG1 | TPE_PG2 UINT dutWdth - DUT width, width of data bus. Valid choices are 1, 2, 4, 8, 9, 16, and 18. UINT phy_addr - starting address. UINT len - number of addresses to include in check. Return Thirty-two bit unsigned value which is the CRC of the bytes representing the DUT data. 352 PN: 071-0359-02, October 2005 DBM Editor (DBMEDIT) TPEChecksumDbmData Synopsis UINT TPEChecksumDbmData(TPE_PG tpe_pg,UINT dutWdth,UINT phy_addr,UINT len) Description This function performs checksum on data in the DBM. Arguments TPE_PG tpe_pg - one of: TPE_PG1 | TPE_PG2 UINT dutWdth - DUT width, width of data bus. Valid choices are 1, 2, 4, 8, 9, 16, and 18. UINT phy_addr - starting address. UINT len - number of addresses to include in check. Return Thirty-two bit unsigned sum of the bytes representing the DUT data. Kalos 2 User Manual 353 5 - KITE Utilities Datalog Engine and DLOG Engine Data Engine and Dlog Engine are highly customizable datalog utilities for Kalos2 series testers. Both utilities generate several standard and user defined file formats for device testing results. Both Data Engine and Dlog Engine are referred to as DE in this chapter. If either program is specified directly, that reference applies to a specified program only. Differences Between Data Engine and Dlog Engine Data Engine and Dlog Engine are the same application intended to work with different versions of Kalos 2 Software (refer to Kalos 2 External Datalogging Overview). • Data Engine for Kalos 2 Software version 1.9 and before. • Dlog Engine for Kalos 2 Software version 1.10 and after. The difference is the way the applications are connected to Kalos 2 datalog, from which they receive data: • Data Engine uses Dlogserver for connection. • Dlog Engine connects directly. Dlog Engine includes all functions of Data Engine, Dlogserver, STDF.ini file parsing (refer to Use of Runtime Decode Strings and STDF.ini), and other functions that require modifications in Dlogserver. Although DLLs (Dynamic Link Library) for both applications have the exact same functions, they are NOT interchangeable. DE Structure DE receives all necessary data from the Kalos 2 datalog stream (refer to Kalos 2 External Datalogging Overview). Data is received by messages. Each message is a structure containing several variables. For example, start wafer message contains lot name, wafer number, and wafer ID. All configuration settings of DE are stored in the kalos_production.ini file (INI file), which is located in the %KALOS_HOME%\Test\DeviceIF directory. %KALOS_HOME% is the Kalos 2 software install directory, which is C:\Kalos by default (refer to Configuration with kalos_production.ini, also see Figure 209). DE mainly consists of one main EXE file and several DLLs. The main EXE file is responsible for receiving data from Kalos 2 datalog stream (refer to Kalos 2 External Datalogging Overview), processing it, and exporting it to DLLs. Each DLL is responsible for specific file format creation. There are several standard DLLs delivered with DE. Users can also add DLLs for custom file format generation. 354 PN: 071-0359-02, October 2005 Datalog Engine and DLOG Engine Figure 209. DE Structure STDF 4 files Postprocessor Wafermap DLL Wafermap files Postprocessor Summary DLL Summary files Postprocessor Shmoo DLL Shmoo files Postprocessor ASCII DLL ASCII files Postprocessor 8 User DLLs User format files Postprocessor STDF 4 DLL Kalos Datalog DE EXE kalos_production INI Data Engine Standard DLL formats are: • STDF 4 (Standard Test Data Format) file. • Wafermap (multiwafermap) file. • Summary file for wafer and lot. • Shmoo file for wafer. • ASCII text file (The ASCII.dll is no longer supported, however, it remains for legacy applications only.) DLLs must adhere to a specific structure of exported functions to be correctly loaded and initialized by DE EXE. Call functions exported by main EXE can be included. Refer to Custom DLL Creation for additional information on DLL structure and adding user custom DLLs. Although DLLs for both Data Engine and Dlog Engine have the exact same functionality, they are NOT interchangeable. All created datalog files are processed by a postprocessor. By default the postprocessor is one batch file for all DLLs (def_move.bat), which copies generated files to a destination folder (this can be a network folder). It is possible to have different batch or executable files as postprocessors for each DLL (refer to Postprocessor). DE GUI A DE icon (refer to DE menu with Data Engine Icon) is displayed in the system tray near Windows clock. Right mouse click to invoke the menu: Kalos 2 User Manual 355 5 - KITE Utilities • Settings – displays DE settings dialog. • About – displays DE about box. • Exit – closes DE. Figure 210. DE menu with Data Engine Icon Settings Dialog The Settings dialog permits switching on/off generation of certain file types. This dialog is locked out in production mode. Kalos_production.ini file contains all of these settings (refer to Configuration with kalos_production.ini), but changes in the GUI do not affect the INI file. All changes in the GUI are lost after DE restart. Kalos_production.ini file must be edited for permanent changes. If the DE cannot load a DLL in the path specified in the INI file, the corresponding checkbox is disabled. DE standard DLLs are switched on/off by checkboxes: • STDF 4 • Wafermap • Summary • Shmoo • ASCII (The ASCII.dll is no longer supported, however, it remains for legacy applications only.) DE datalog binary file collection is switched on/off by Binary Dump checkbox (see Figure 211). DE custom DLLs are switched on/off by User 1, User 2, etc., checkboxes. Paths to these DLLs can be set in corresponding edit boxes. Events such as DLLs loading/unloading, the creation of a test results file and warning messages are displayed in the field at the bottom of the dialog window. All messages can also be written to the DE text dump file (refer to Collecting Log Files for Debugging). The current kalos_production.ini path is displayed in the header of the settings dialog. 356 PN: 071-0359-02, October 2005 Datalog Engine and DLOG Engine Figure 211. Settings dialog Event messages About Box The About box displays versions of Kalos Software, DE EXE, all loaded DLLs (including user DLLs), and kalos_production.ini. Version information can be saved to a text file with the Save As button and standard save dialog. Kalos 2 User Manual 357 5 - KITE Utilities Figure 212. About dialog Postprocessor All standard datalog files are processed by a postprocessor. User DLLs must include an applicable API call to invoke the desired function(s) (refer to Create Custom Code). Postprocessor can be a batch file or executable file. By default, there is one batch file (def_move.bat) for all DLLs, which copies generated files and sends them to this destination folder, which can be a network folder. All processed files and errors of file processing are logged by default and sent to the %KALOS_HOME%\test\data_engine\def_move.log file. The destination folder and the path name of the postprocessor file are set in kalos_production.ini by DESTINATION_DIR and POSTPROCESSOR fields accordingly. It is possible to use different postprocessors or copy files to different folders for each DLL. However, it is necessary to use local overrides of these fields in the INI file for these purposes. DE passes several parameters with command line to the postprocessor. Following is the list of command line corresponding flags: 358 • file_type (-t) – type of file (kdx_stdf4, kdx_summary, kdx_user etc.) • inFile (-f) – name of processing file • sourceDir (-s) – source directory of file • destDir (-d) – destination directory of file • logFile (-l) – name of log file for messages PN: 071-0359-02, October 2005 Datalog Engine and DLOG Engine For example, command line -t kdx_stdf4 -s D:\logfiles -d D:\logfiles\dest -f example.std creates the script to move STDF 4 type file example.std from D:\logfiles to D:\logfiles\dest. The default def_move.bat script consists of three main sections: command line parameter parsing, processing, messages, and errors handling. • In the first section, script parses the command line to get passed parameters. Usually this section does not require modifications. • In the second section of the default script the most significant is the move command from the source directory to the destination. The defaults are the command line parameters: move %sourceDir%\%inFile% %destDir%\%inFile% Users are free to modify this command. • If the source file or destination directory does not exist, the script performs a corresponding error handling at the end of the batch file. Error handlers write the error message to the log file and exit from the script. Users are free to add error handlers here or modify the behavior of the existing ones. Refer to DOS batch file documentation for the script command syntax. Type help from a DOC command shell for a list of commands. Collecting Log Files for Debugging DE has the capability to create log files. These files can be used for debugging purposes. The primary one is datalog binary file. Other files are supplemental. Datalog Binary Dump File DE receives data from the datalog and saves it to a datalog binary dump file without any changes. This allows users to recreate the DE state later. It is advisable to enable this option if problems with DE are encountered. It is commonly used for customer support purposes. This function is enabled and adjusted using BINARY_ENABLED, COMPRESS_TYPE, BINARY_SPLIT_LOTS, ADD_BIN_HEADERS, BINARY_DIR, DISK_SPACE_LIMIT, and BINARY_ROTARY fields in kalos_production.ini (refer to DE Global Settings). The datalog file can be collected with real-time compression (COMPRESS_TYPE is 1). This saves hard disk space significantly. The option must not be used in the crash condition, as a ZIP file is not readable. The ZIP file must be closed by switching the Binary Dump checkbox to off on the Settings dialog. Kalos 2 User Manual 359 5 - KITE Utilities If the file was created using real-time compression, decompressing the created file and compressing it back with third party ZIP or RAR compressors is recommended. This provides higher compression rates. The purpose of the DE compressor is to provide real-time compression, not the highest compression rate. Text Dump File Events such as DLLs loading/unloading, test results file creation, and warning messages are displayed in the field at the bottom section of the settings dialog. All messages can also be written to the DE text log file. The file collection can be enabled and adjusted using KDX_LOG_DUMP and DUMP_DIR fields in kalos_production.ini (refer to DE Global Settings). Postprocessor Dump File The default postprocessor (def_move.bat) uses another log file (refer to Postprocessor). Errors are logged by default for all processed files to the %KALOS_HOME%\test\data_engine\def_move.log file. The file name and logging process can be adjusted by modifying the postprocessor script. Offline Mode DE in offline mode does not connect to Kalos 2 datalog, and it uses the datalog binary file as input. Offline mode recreates the runtime environment using the data in the binary file. Selection of Online/Offline modes is performed by the OFFLINE key in the [DATA ENGINE] section of the kalos_production.ini. If this key is true, the binary file, open, dialog appears at DE startup. The datalog binary file, TestBin101.bin, is supplied for customer support purposes. Figure 213. Binary File Selection in Offline Mode 360 PN: 071-0359-02, October 2005 Datalog Engine and DLOG Engine Production/Engineering Modes Production and engineering modes are very similar. Depending on the current mode, MIR.MODE_COD field in STDF gets P and E (Production/Engineering) values, respectively. In production mode the settings dialog is locked out. Selection of Production/Engineering modes is performed by the NT_PROD_NAME key in the [DATA ENGINE] section of the kalos_production.ini. When the user login name specified matches the current user, production mode is selected; otherwise, engineering mode is selected. Disabling File Generation for Specified Flow It is possible to disable/enable file generation for a specified flow by changing the KPJ file. All flows are enabled by default. Change de_output_general to set the general setting for all flows for that configuration (value can be disabled or enabled). Making this change by name of flow overrides the general setting (value can be de_output_disabled or de_output_enabled). In the following example Check_Chip1_flow flow generates files that other flows will not generate. [General_1] socket = single_1 config = single1_conf subdir = general_1 de_output_general = disabled Check_Chip1_flow = de_output_enabled Test Program Loading After Dlog Engine Startup If the test program is not loaded after Dlog Engine startup, files will not be generated. Dlog Engine receives socket table, bin table, and flow information at test program loading. Files generated without that data contain improper data. In offline mode files are always generated. Icon Displaying Enabled/Disabled State The Dlog Engine icon changes displaying enabled/disabled state (as shown in Figure 214); disabled state indicates files will not be generated. State is always enabled in offline mode, and may be disabled in online mode in the following cases: • Kalos 2 User Manual Runtime connection failed (e.g., TTarget was not started). 361 5 - KITE Utilities • Selected flow is disabled. • Test program is not loaded after Dlog Engine startup. Figure 214. Dlog Engine Icon Enabled/Disabled States Enabled state Disabled state STDF Viewer Utility A STDF file viewer (stdf2ascii.exe) is supplied with the DE utility. This command line utility translates STDF to a text file. The following command line translates input.std to output.txt: stdf2ascii -f input.std > output.txt The generated file format appears as follows: … REC_LEN (2) Pir.head_num Pir.site_num REC_LEN (46) Ptr.test_num Ptr.head_num Ptr.site_num Ptr.test_flg Ptr.parm_flg Ptr.result Ptr.test_txt Ptr.alarm_id Ptr.opt_flag Ptr.res_scal Ptr.llm_scal Ptr.hlm_scal Ptr.lo_limit Ptr.hi_limit … REC_TYP (5) REC_SUB (10) = 1 = 0 REC_TYP (15) = 10 = 1 = 0 0x0 = 0x0 = 0.2 = judgeRes = = 0xE = 3 = 0 = 0 = 0 = 3 REC_SUB (10) Installation Procedure The Dlog Engine is installed with Kalos 2 Software. The Data Engine requires a separate installation. 362 PN: 071-0359-02, October 2005 Datalog Engine and DLOG Engine DE (Data Engine) installation for the production environment is performed as a standard Windows installation. Manual intervention (actions) are required only to transfer changes from the previous installation and for the engineering environment. Data Engine General Installation Procedure This section describes the Data Engine installation procedure using the installation script. The Data Engine requires that Kalos 2 Software is installed on the system. Following are steps to install the Data Engine in the production environment. • Exit all Windows applications. • Run Data Engine installation file SetupDataEngine.exe. • Wait while setup is preparing for installation. • Press the Next button on the displayed Welcome dialog. • Specify Kalos 2 home directory for Kalos 2 software on the Choose Destination Location dialog. Usually, it is C:\Kalos, which is the default. Press the Next button after setting directory. • Wait while the installation copies files. • Press the OK button on the installation completion message box. • Restore Data Engine previous configuration if it existed earlier (refer to Configuration Transferring from Previous Installation). These steps conclude Data Engine setup. Setup process can be interrupted at any step by pressing Cancel and then Exit Setup buttons. Configuration Transferring from Previous Installation If a previous version of DE installation exists, the old configuration files (kalos_production.ini, def_move.bat, Kalos_startup.bat) are not replaced by the new DE installation. The newer versions of files are installed in the same directories with other names representing versions (for example, Data Engine 2.0.3.4 becomes kalos_production2034.ini, def_move2034.bat, Kalos_startup2034.bat). After installation, users can transfer the previous configuration to the new installation in several ways. NOTE — Newer versions of DE may have configuration files with additional fields. • Kalos 2 User Manual If the installed version of DE is the same as the previous version, no actions are necessary. 363 5 - KITE Utilities • If the version is changed and there are minor and known changes in the configuration files, it is possible to recreate the changes manually in the new files using previous files as references. Replace previous files with new ones. • If the version is changed, leaving the previous kalos_production.ini file is recommended. If the newly installed DE is an older version, new fields are ignored. If the newly installed DE is a newer version, default values are used instead of missing fields, although this is not related to the custom DLL fields. If custom DLLs were used in the previous installation, they will not be removed by DE install. Their configuration in the kalos_production.ini must be transferred as described above. If these DLLs were removed due to complete system reinstall or other causes, they must be installed in their usual way. Changes Needed for Engineering Environment In the production environment, Kalos_startup.bat, batch file is used for DE startup. DE install script automatically adds a shortcut to this file in the Windows startup folder. In engineering environment, Kalos_startup_for_kconfig.bat, batch file and Kalos Configuration Manager must be used for startup in the engineering environment. This batch file is put in C:\WinNT by the installation. The following steps are required for this purpose. • In the C:\WinNT\Profiles\All Users\Start Menu\Programs\Startup directory, remove the Kalos Startup shortcut. • In this directory, add a shortcut to War from %KALOS_HOME%\bin. • In the Kalos 2 Configuration Manager select the Option|Customize... menu and then select Add Application... • Use the browse window to go to C:\WinNT. • In the File name: selection box type in *.bat and press Enter. A file called Kalos_startup_for_kconfig.bat appears. • Select this file and press OK. The new icon (looks like a computer) for the batch file appears on the Kalos 2 Configuration Manager. TTarget (refer to Target Manager in the Introduction to KITE (Kalos 2 Integrated Test Environment) chapter of this manual for details) must be started before Dlogserver and Data Engine. Dlogserver will not attach to core software if started before TTarget. If TTarget is restarting, Dlogserver and Data Engine must be closed using the tray icon (near Windows clock) before starting TTarget. TTarget and Dlog Engine startup sequence does not matter. 364 PN: 071-0359-02, October 2005 Datalog Engine and DLOG Engine Configuration with kalos_production.ini The kalos_production.ini file (INI file) contains settings for the DE, prober drivers, and custom GUIs. DE settings make up the majority of the kalos_production.ini file. They consist of DE global settings, DE standard DLL settings, and DE custom DLL settings. The five main standard DLLs for the DE are STDF4, wafermap (multiwafermap), summary, shmoo, and ASCII datalog. The default path for kalos_production.ini is %KALOS_HOME%\Test\DeviceIF\kalos_production.ini. It is possible to specify another INI file at DE startup as the parameter in the command line. It is especially used for working in offline mode. The current kalos_production.ini path is displayed in the header of the settings dialog. DE Global Settings Global settings to the DE are those used if no local settings are specified. The global [DATA ENGINE] section contains many settings that can be repeated in the local settings of DE DLLs. For that reason, settings for the individual DLLs are called local overrides. For example, if FILENAME is specified under the section labeled [kdx_summary], the local override FILENAME is used for summary files, instead of that specified under [DATA ENGINE] section. If duplicate settings exist, the setting under the local override is used. Global settings are: [DATA ENGINE] Beginning of section of DE global settings. REVISION = 2,0,0,7 Revision number of the kalos_production.ini file. Not to be confused with the DE major revision. NT_PROFILING = True ; Can be [ True | False | 1 | 0 ] When this setting is True, the operator name in any output file is the user name for NT. NT_PROD_NAME = prod Login, which is used for setting production mode (refer to Production/Engineering Modes). OFFLINE =1 ; Can be [ True | False | 1 | 0 ] Option to set offline mode (refer to Offline Mode). KDX_DLL_DIR = $(KALOS_HOME)\test\data_engine The directory of the DE DLLs location. User defined DLLs can also be in this directory. Kalos 2 User Manual 365 5 - KITE Utilities OUTPUT_DIR = D:\logfiles The directory location for data files created by the DE DLLs. Users can go to this directory to view data created during test. For each data DLL, a unique OUTPUT_DIR can be specified in the local override. For example, if all summary files are to go to the D:\summary directory, specify OUTPUT_DIR = D:\summary under the [kdx_summary] local override section. [kdx_summary] default is usually logfiles\summary. DESTINATION_DIR = D:\logfiles\dest Destination directory for data files. Used with the postprocessor. POSTPROCESSOR = %KDX_DLL_DIR%\def_move.bat Location and filename for a postprocessor file that executes at the end of each file generation. The default file is def_move.bat, which moves files created during data collection from OUTPUT_DIR to DESTINATION_DIR. FILENAME = %machine_id%_%lotname%_%start_time="%b_%d_%Y_%H%M%S"% Global default for file naming convention used in non-probe situations. The basic difference between FILENAME and WAFER_FILENAME is the default WAFER_FILENAME always includes the wafer number. WAFER_FILENAME, explained below, is used in probe situations. WAFER_FILENAME = %machine_id%_%lotname%_%wafer_num=INT00%_%start_time="%b_%d_%Y _%H%M%S"% Global default for file naming convention used in probe situations with wafers. Options for the filename are by default: %machine_id% - machine ID. %lotname% - as specified in the Front Panel Overview Lot: entry. %wafer_num = INT00% - wafer number, integer format, two characters, e.g., 01, %start_time = %b_%d_%Y_%H%M%S - time that file is created. The month, day, and year are %b, %d, and %y, respectively. Hour, minutes, and seconds are %H, %M, and %S, respectively. LOWERCASE_FILENAME = false ; Can be [ True | False | 1 | 0 ] Option to make the filename lowercase. BINARY_ENABLED = FALSE ; Can be [ True | False | 1 | 0 ] If set to 1 (TRUE), a datalog binary dump file is created (refer to Collecting Log Files for Debugging). This setting can also be changed in the DE Settings box in the Binary Dump check box. COMPRESS_TYPE = 1 ; Can be [ 0 - no compression | 1 - ZIP ] Option to compress datalog binary file in real-time during its creation. If set to 0, an ordinary binary file is created. If set to 1, binary file is created and compressed to ZIP format. Due to large sizes of binary files (hundreds of megabytes per lot) and high (~90%) compression ratio, this feature helps to save hard disk space or collect much more data. 366 PN: 071-0359-02, October 2005 Datalog Engine and DLOG Engine BINARY_SPLIT_LOTS= FALSE ; Can be [ True | False | 1 | 0 ] Option to split datalog binary file per lots. If set to 1, the current binary file is closed and a new one is opened after the end of each lot. This avoids extra large binary files creation. ADD_BIN_HEADERS = True ; Can be [ True | False | 1 | 0 ] Option to add header data at the start of every lot file if split lot feature is enabled. These headers include data, which is received only once at test program, or prober/handler DLLs loading and runtime decode strings. BINARY_DIR = d:\binFiles Directory of the binary files location, when BINARY_ENABLED = TRUE. DISK_SPACE_LIMIT = 300; in Mb, <=0 – don’t check Hard disk free space limit in Mb for datalog binary file logging. Logging of the datalog file stops when reaching this limit. Creation of test result files (STDF, wafermap etc.) continues. Setting this limit above 50 percent of the total hard disk free space is not recommended. BINARY_ROTARY= False ; Can be [ True | False | 1 | 0 ] When true, remove oldest datalog binary file in user directory when hard disk space limit is reached. KDX_LOG_DUMP = FALSE ; Can be [ True | False | 1 | 0 ] In the DE and data DLLs, there may be many kdx_printf() statements, which work like printf() C statements for the text output. This information appears in the DE settings dialog if this parameter is true. This can be used for the debugging of custom user DLLs (refer to Collecting Log Files for Debugging). DUMP_DIR = %OUTPUT_DIR% Directory location for kdx_printf() debug information, when KDX_LOG_DUMP = TRUE. DIB_NVM_INFO = False ; Can be [ True | False | 1 | 0 ] Option to include DIB part and DIB serial fields into the wafermap, summary and shmoo files. The data are read from NVM on the Kalos board, and also displayed in the Overview section of Front Panel. PROCESS_RETEST = False ; Can be [ True | False | 1 | 0 ] Option to take into account die retest; to never have die counters over the real gross number of dies. This has an effect on all die counters including: Kalos 2 User Manual • Counter values returned by Data Engine API. • Counter values summary files. • Counter values in PCR, TSR, HBR, SBR records in STDF files. 367 5 - KITE Utilities STDF4_DLL = $\kdx_stdf4.dll Location and filename of the standard STDF DLL. The default directory is %KDX_DLL_DIR%, also specified in the kalos_production.ini file. The $ represents the default for this field, which in this case is %KDX_DLL_DIR%. ASCII_DLL = %KDX_DLL_DIR%\kdx_ascii.dll Location and filename of the ASCII Datalog dll. ; WAFERMAP_DLL = $\kdx_waferMap.dll WAFERMAP_DLL = $\kdx_Multiwafermap.dll Location and filename of the wafermap dll. Currently, there are two options for wafermap: standard wafermap and multi-wafermap. For a more detailed explanation, refer to local override settings below. SUMMARY_DLL = %KDX_DLL_DIR%\kdx_summary.dll Location and filename of summary dll. SHMOO_DLL = $\kdx_shmoo.dll Location and filename of shmoo dll. USER1_DLL = $\kdx_tpePrintf.dll Location and filename of user defined DLL. Eight user defined DLLs may run simultaneously. They should be specified in keys, USER1_DLL to USER8_DLL, respectively. Local Override Settings for DE DLLs Local override settings are those intended for each data collection DLL. Local override settings are used instead of global settings, if they are specified in the section of that DLL. It is critical that the section name for local overrides is the same as the name of its DLL. For example, the section name for local overrides is [kdx_stdf4]. This must match exactly the name of the STDF4_DLL in the global settings, which is kdx_stdf4.dll. The .dll extension is not included in the section name. Many of the local override keys are duplicated, therefore, only a full explanation of the STDF and multi-wafermap are included below. The information in these sections also apply to the Summary, Shmoo, ASCII Datalog, and Wafermap DLLs. For example, ENABLED = True may appear in all of the local overrides, but it is only explained in the STDF local override section. STDF Local Overrides [kdx_stdf4] Local overrides header for STDF DLL. Must match the name specified for the DLL in global settings, only without the .dll extension. 368 PN: 071-0359-02, October 2005 Datalog Engine and DLOG Engine ENABLED = True ; Can be [ True | False | 1 | 0 ] Default switch for active or inactive. If 1 (TRUE), the kdx_stdf4.dll is turned on, by default. This setting can also be changed in the DE Settings box, in the STDF 4 check box. FILENAME = %machine_id%_%program_name%_%flow_id%_%lotname%_%start_time="%b _%d_%Y_%H%M%S"% Local override for FILENAME. Refer to the FILENAME explanation in DE Global Settings. WAFER_FILENAME = %machine_id%_%program_name%_%flow_id%_%wafer_id%_%wafer_num=int 00%_%time% Local override for WAFER_FILENAME. Refer to explanation of WAFER_FILENAME in DE Global Settings. FILE_EXTENSION = std Filename extension, which is used for the output data file. LOWERCASE_FILENAME = True Local override for LOWERCASE_FILENAME. Refer to the explanation of LOWERCASE_FILENAME in DE Global Settings. SITE_255_SUMMARIES = True ; Can be [ True | False | 1 | 0 ] Some STDF readers automatically generate a site 255. When this is the case, setting this variable to 0 or False turns off the generation of site 255. LOG_PASS = TRUE ; Can be [ True | False | 1 | 0 ] STDF option to log results for passed tests. If this setting is 0 (FALSE), results for passed tests are not logged. LOG_FAIL = True ; Can be [ True | False | 1 | 0 ] STDF option to log results for failed tests. If this setting is 0 (FALSE), results for failed tests are not be logged. LOG_PARA = True ; Can be [ True | False | 1 | 0 ] STDF option to log parametric results. If this setting is 0 (FALSE), parametric results are not logged. LOG_FUNC = True ; Can be [ True | False | 1 | 0 ] STDF option to log functional results. If this setting is 0 (FALSE), functional results are not logged. LOG_DTR = True ; Can be [ True | False | 1 | 0 ] STDF option to log DTR (Datalog Text Records) records (Refer to Storing ASCII Strings in STDF File). If this setting is 0 (FALSE), functional results are not logged. Kalos 2 User Manual 369 5 - KITE Utilities SAMPLE_RATE = 5 STDF option to collect data on a sampling basis. For example, if the SAMPLE_RATE is set to 5, data for every fifth device is collected. SAMPLE_LIMIT = 100 STDF option to limit the data collection to n devices. For example, if SAMPLE_LIMIT is set to 100, data is collected for a maximum of 100 devices on each wafer, then data collection stops. Per lot in final test. <modifiable field> = <default value> ; atr.cmd_line = %program_name% ... ... ... ; wir.wafer_id = %info_wafer_id% Fields for STDF values runtime insertion. For example, to change the default behavior runtime setting of value for atr.cmd_line, it is necessary to uncomment corresponding field (i.e., remove ‘;’) in INI file. An atr.cmd_line in STDF file is a value of any runtime decode string, received by DE with key program_name (refer to Use of Runtime Decode Strings and STDF.ini). It is possible to specify another combination of runtime strings for that STDF field, e.g., atr.cmd_line = %program_name%_%job_revision% A atr.cmd_line in STDF file is a combination of values of runtime decode strings with keys program_name and job_revision. Multiwafermap Local Settings The multiwafermap creates a wafermap for both functional and parametric tests. If there are multiple PMU measurements in one test, it uses the results of the last one. The results of the function, TPEJudgeResults(), are also available to the multiwafermap. Wafermap creates: • Hex wafermap. • Normal wafermap. • Soft bin wafermap. • Site wafermap. Multiwafermap also creates: • Wafermaps for specific test results. Selection between wafermap end multiwafermap is performed by the WAFERMAP_DLL key in [DATA ENGINE] section. 370 PN: 071-0359-02, October 2005 Datalog Engine and DLOG Engine [kdx_Multiwafermap] Beginning of section of local overrides for the multiwafermap DLL. This must match the name specified for the DLL in global settings, without the .dll extension. ENABLED = True ; Can be [ True | False | 1 | 0 ] Refer to DE Global Settings. WAFER_FILENAME = %machine_id%_%lotname%_%flow_id%_%wafer_num=INT02%_%time% Refer to DE Global Settings. FILE_EXTENSION = wmp Refer to DE Global Settings. ; LOWERCASE_FILENAME Refer to DE Global Settings. = True HEX_MAP = True ; Can be [ True | False | 1 | 0 ] Option to create wafermap that shows hard bins in hex. HEX_MAP_WIDTH = 1 Character width of each bin is represented in the wafermap. This indicates how wide each bin location is, and affects the appearance and the readability of the wafermap. This is multiwafermap specific. NORMAL_MAP = True ; Can be [ True | False | 1 | 0 ] Option to create wafermap that shows hard bins in decimal. NORMAL_MAP_WIDTH = 4 Character width of each bin is represented in the wafermap. This indicates how wide each bin location is, and affects the appearance and readability of the wafermap. This is multiwafermap specific. SOFT_BIN_MAP = True ; Can be [ True | False | 1 | 0 ] Option to create wafermap that shows soft bins in decimal. SOFT_BIN_MAP_WIDTH = 4 Character width of each bin is represented in the wafermap. This indicates how wide each bin location is, and it affects the appearance and readability of the wafermap. This is multiwafermap specific. SITE_MAP = True ; Can be [ True | False | 1 | 0 ] Option to create a site map wafermap. SITE_MAP_WIDTH = 6 Character width of each bin is represented in the wafermap. This indicates how wide each bin location is, and it affects the appearance and readability of the wafermap. This is multiwafermap specific. Kalos 2 User Manual 371 5 - KITE Utilities USER_MAP_1 = 5000 Matching the test number. In this case, test number 5000 is represented in the multiwafermap. This is multiwafermap specific. USER_MAP_1_WIDTH = 7 Character width of each bin is represented in the wafermap. This indicates how wide each map node location is, and it affects the appearance and readability of the wafermap. This is multiwafermap specific. USER_MAP_1_NAME = Test 5000 Multi Wafermap 1, values multiplied by 1e9 Title of the wafermap. This is multiwafermap specific. USER_MAP_1_FMT = %*.2f ; The * is required for the width to work Standard formatting, based on printf() parameters. The * is required. This is multiwafermap specific. USER_MAP_1_MULT = 9 ;value in nano seconds. Result is multiplied by 10^x, where x is the value of USER_MAP_1_MULT. For example, if 9 were entered here, the value would indicate nanoseconds. This is multiwafermap specific. USER_MAP_1_NAME should reflect this value. Refer to the example above. NOTE — The above settings can be repeated for additional multiwafermaps, as shown in the example below. This example is currently set to 10 maps (each map has a parametric or functional component). USER_MAP_2 = 300 USER_MAP_2_WIDTH = 6 USER_MAP_2_NAME = Test number 300. USER_MAP_2_FMT = %*.1f ; The * is required for the width to work USER_MAP_2_MULT = 0 Summary Local Settings LOT_FILE_EXTENSION Lot summary file extension. = lsum PROG_FULL_PATH = True ; Can be [ True | False | 1 | 0 ] Option to put the full path of the test program in the summary files. LSUM_SITE_INFO = True ; Can be [ True | False | 1 | 0 ] Option to put the test program site information in the lot summary files. SITE_LETTER_S = False ; Can be [ True | False | 1 | 0 ] Option to indicate site by letter S instead of K. PHYS_SITES = False ; Can be [ True | False | 1 | 0 ] Option to indicate a separate summary for each module and phys site. 372 PN: 071-0359-02, October 2005 Datalog Engine and DLOG Engine Shmoo Local Settings FILE_PER_MODULE = False ; Can be [ True | False | 1 | 0 ] Option to create separate shmoo file for each module. CVIEW_FORMATTING = true ; Can be [ True | False | 1 | 0 ] Option to use formatting for shmoo headers, like in CVIEW. HIDE_FILE_HEADER = true ; Can be [ True | False | 1 | 0 ] Option to hide standard file header of files generated by DE. HIDE_TEST_INFO = true ; Can be [ True | False | 1 | 0 ] Option to hide sender test information for stings sent by TPEDatalogPrintf(), if FILE_PER_MODULE option is enabled. Kalos 2 External Datalogging Overview DE saves testing results in several formats, including user defined formats. DE receives all necessary information from Kalos 2 datalog. Datalog can be enabled by the TPEDatalogOn() function or by the buttons on the DataLog tab of Front Panel. The use of TPE functions is strongly recommended (refer to Switch Datalog Files Generation On/Off). Datalog enabling from Front Panel also enables datalog displaying, which significantly increases testing time. Data Engine Connection to Kalos Datalog Stream Datalog server/client architecture in Kalos 2 software version 1.9 and before provides a mechanism for capturing test datalog in binary format by several applications. Datalog server/client is composed of two main components: Dlogserver application and a client application. The Dlogserver application captures all test datalog and sends it to the client application in binary format. The client application formats the binary test datalog sent from the Dlogserver. The client applications communicate with the Dlogserver through dlogclient.dll. The Data Engine connects to datalog as a client application for Dlogserver. This is illustrated in Figure 215. Kalos 2 User Manual 373 5 - KITE Utilities Figure 215. Datalog Architecture in Kalos 2 Software Versions 1.9 and Before Client appl. 1 (Data Engine) Client appl. 2 Client appl. 3 Dlogclient DLL Dlogclient DLL Dlogclient DLL Other clients Dlogserver Prober DLL Knet DLL i960 datalogger Dlog Engine Connection to Kalos Datalog Stream The Dlogserver is not a separate application in Kalos 2 software. Dlogserver functionality is included in the Dlog Engine, which connects directly to the Kalos 2 datalog stream. This is illustrated in Figure 216. Figure 216. Datalog Architecture in Kalos 2 Software Dlog Engine Prober DLL Knet DLL i960 datalogger Data From Prober DLLs DE receives information from prober DLL through datalog that includes: 374 PN: 071-0359-02, October 2005 Datalog Engine and DLOG Engine • Lot name. • Wafer name. • Disposition of the devices on the wafer. • Wafer geometry. It also receives information about major process events: • Start wafer. • End wafer. • End lot. Use of Runtime Decode Strings and STDF.ini The intent of runtime decode strings is to pass values of custom defined variables to DE from any application integrated with Kalos 2 core software. They are passed as a structure STATIC_LOOKUP_UMSG that has two strings: • Key (identifier) of variable. • Value of variable. Values for these variables can be received and used by the DE and its DLLs. To use this feature from custom DLLs refer to Runtime Decode String Functions. This method is used to fill in applicable STDF fields. Some prober DLLs perform runtime decode string generation, which is passed to Data Engine for several STDF fields. Dlog Engine includes that function and does not require such DLLs. Data is read (for sending) from the STDF.ini file. Parsing is performed at program loading. STDF.ini must reside in the same directory as the KBI file. Refer to the sample of STDF.ini in the \Test\data_engine directory of the DE install. Each section of that file contains values for STDF record with the same name. Users can enter information into required fields for generating STDF files by writing values in STDF.ini. Refer to the following example. [ATR] cmd_line = [MIR] job_nam = job_rev = sblot_id = oper_nam = node_nam = etc. Kalos 2 User Manual 375 5 - KITE Utilities Test Program Modifications for Data Collection Modifications include switching datalog on/off, selective datalog file generation, storing ASCII strings in the datalog files, putting C-Hook computed data into the datalog files, and assigning a unique test number to each test. Switch Datalog Files Generation On/Off It is typically necessary to generate datalog data for every test in the test flow in the production environment. In this case datalog must be switched on at the very start of the test program. This can be accomplished by using the KTL EVENT_MAP: EVENT_MAP generic = { // STARTLOT = start_lot; // STARTWFR = start_wafer; STARTTEST = start_test; // ENDTEST = save_dies_bin; // ENDWFR = save_end_of_wafer; // ENDLOT = save_end_of_wafer; }; For this purpose STARTTEST event is used in the EVENT_MAP: TEST start_test = { SEQUENCE = { dlog_on }; }; The start_test executes a C-Hook that must be defined in a separate C file. In this example, the following C file is named datalog.c: /* datalog.c - C module */ #include <chook.h> RESULT dlog_on(void) { TPEDatalogOn(); return PASS; } RESULT dlog_off(void) { TPEDatalogOff(); return PASS; } 376 PN: 071-0359-02, October 2005 Datalog Engine and DLOG Engine This C-Hook consists of two functions: dlog_on() enables STDF data generation and dlog_off() disables it. This is accomplished using the TPE functions, TPEDatalogOn() and TPEDatalogOff(). This file must be defined as a CMODULE in the ktl test program: CMODULE utils = {dlog_on, dlog_off }; The example above automatically enables the datalog information at the start of the test program and it stays switched on during the entire test flow. By switching the datalog on with the TPEDatalogOn() function, the datalog stream passes to the DE. The system automatically makes a decision as to whether it is dealing with a parametric, functional, or user test. The data ends up respectively in the PTR, FTR, or DTR record. For a full description of each of the STDF records, refer to the Standard Test Data Format (STDF) Specification manual. After receiving the datalog stream, DE can format the datalog information and put it into the STDF file format syntax. This is done automatically. Selective Datalog Files Generation For selective generation of datalog files, it is necessary to disable datalog for tests that are not to be logged. Leave datalog on for all other tests. Relevant KTL code to accomplish this scenario follows: TEST Cont_io = {TESTNO=110; DESC = "This tests for continuity"; SEQUENCE ={ dlog_off, all_to_zero_seq, contact_pmu, MEAS(PMU), all_to_zero_seq, dlog_on }; ON_FAIL = { dlog_on }; }; In the example above, dlog_off turns the datalog stream off at the beginning of the test and switches it back on at the end of the test sequence. The ON_FAIL sequence ensures that datalog is turned on even when the main sequence reaches a failing point. HINT — Do NOT use the example below: NOTE — The following is an example of code that should NEVER be used. This is due to the datalog being turned on, then off within a test. This is the WRONG way to do selective datalog. Kalos 2 User Manual 377 5 - KITE Utilities Consider the following KTL test: TEST Cont_io = {TESTNO=110; DESC = "This tests for continuity"; SEQUENCE ={ dlog_on, all_to_zero_seq, contact_pmu, MEAS(PMU), all_to_zero_seq, dlog_off }; }; The above example can cause problems for the following reasons: 1. If the test passes, the next test may not be setup correctly, since the test name and test number are not passed to the DE, because datalog is disabled at the end of the test. 2. If the test failed, then results from the next test may be generated depending on a flow, because datalog is enabled. NOTE — Typically the generation of the datalog files includes all tests, therefore, the method of switching on the datalog in the EVENT MAP is the preferred method. Storing ASCII Strings in STDF File DE can determine if a test is a functional test or a parametric test. According to that determination, the DE automatically stores the information in the FTR or PTR fields. It is sometime necessary to insert a certain string into the STDF file, independent from the test name and test number. For example, this string may reflect information regarding a functional test. In this case, it is possible to use the STDF DTR (Data test Record) for this purpose. The TPEDatalogPrintf() function must be used to put an ASCII string into this DTR. DTR is generated every time this TPEDatalogPrintf() is used in the test program. The LOG_DTR switch in kalos_production.ini enables/disables this feature. NOTE — Not all STDF data analysis packages can read the DTR. If that is the case, refer to the following section (Putting C-Hook Computed Data Into the STDF File). 378 PN: 071-0359-02, October 2005 Datalog Engine and DLOG Engine Putting C-Hook Computed Data Into the STDF File The ability to judge a result is calculated in the C-Hook. This result is categorize as pass or fail using the TPEJudgeResult() function. This function only accepts the Value, LLim, and ULim as arguments and does not facilitate putting the result in the STDF file. However, there are scenarios to log multiple results in the STDF from the same test, with the same test name. In this scenario the TPE function, TPESetTestName (const char *name), must be used. Within a C-Hook, this allows for changing the test name just before executing the TPEJudgeResult() function. This distinguishes results coming from TPEJudgeResult() by giving the test a unique name, and to enable storage of multiple computed test results in separate STDF fields. NOTE — Use caution when using TPESetTestName(). After the computed records are calculated, executed in the C-Hook, and logged in the STDF fields, it is critical to change the test name back to the name used in the flow. Following is an example: /* tpe_example.c */ #include <chook.h> const REAL EXT_VX_START = 8.0; const REAL EXT_VX_STOP = 5.5; RESULT JudgeResult(void) { ELEC meas, llim_elec, ulim_elec; LIMIT llim, ulim; /* assign variables for inserting STDF records */ meas.volts = 1; meas.amps = 0; meas.secs = 0; llim_elec.volts = 1; llim_elec.amps = 0; llim_elec.secs = 0; ulim_elec.volts = 1; ulim_elec.amps = 0; ulim_elec.secs = 0; llim_elec.value = EXT_VX_START; ulim_elec.value = EXT_VX_STOP; ElecCpy(&(llim.limit), &llim_elec); llim.type = K_CHECK; ElecCpy(&(ulim.limit), &ulim_elec); ulim.type = K_CHECK; /* to ignore a limit use K_IGNORE instead of K_CHECK */ TPESetTestName ("original_testname_1"); TPEJudgeResult(&meas, &ulim, &llim); return PASS; } In this example, STDF logging is accomplished by using the EVENT MAP, which switches on the datalogging in the start and endtest section of the EVENT_MAP. Kalos 2 User Manual 379 5 - KITE Utilities NOTE — For additional information on TPEJudgeResults and TPESetTestName use, refer to the TPE API Reference chapter of the KITE Reference Manual, part number 071-0455-xx. Also, refer to the View C-Hook Results in the Histogram Application Note for detailed information on TPEJudgeResults. Assigning a Unique Test Number to Each Test and Bin Using the same test numbers for different tests is not restricted by KTL syntax. Test numbers and test names are also optional. Using the same hard or soft bin numbers is not restricted, although the current structure of Datalog and DE does NOT support this flexibility and refers to the tests and bins by their numbers. Using the same test number for different tests can however cause unpredictable results in generated files. Using the same hard and soft bin number for different bins can cause bin names in generated files, such as, Hard_1 or Soft_1 instead of real names. Therefore, it is up to users to ensure that the different tests in the test flow have unique/different test numbers. DE can also create consecutive test numbers automatically. For example, there is a test in the KTL with test number 1000. In the test sequence of this test a C-Hook is called, which executes 10 PMU measurements inside a loop. This means the STDF file contains 10 PTR (parametric test records) records, 1000 –1009. Therefore, it is incorrect to have the following test in the test flow start with number 1001, because these values are overwritten by the C-Hook measurements of the test trimming, which is test number 1000. Custom DLL Creation This section provides information on how to create and implement custom DLLs. Custom DLL Structure Users can add custom DLLs to the DE. These DLLs must have a specific structure of exported functions in order to be correctly loaded and initialized by DE. A number of functions exported by main EXE can also be called. DE custom DLLs are event driven. Although DLLs for both Data Engine and Dlog Engine may have the exact same functionality, they are NOT interchangeable. The DLLs created for Data Engine must be recompiled with dlog_engine.lib before using with Dlog Engine. Required Elements for Custom DLL Creation The following elements are required for custom DLL creation. • 380 data_engine.lib or dlog_engine.lib are located in %KALOS_HOME%\lib. PN: 071-0359-02, October 2005 Datalog Engine and DLOG Engine • dlogex_types.h, data_engine_if.h, and kdx_if.h, kdx_tpe_dlog.h along with other standard Kalos include files are located in %KALOS_HOME%\include. • Microsoft Visual C++ 6. NOTE — This manual describes the creation of custom DLL with Microsoft Visual C++ 6. Usage of other compilers is not tested. Custom DLL API Standard Functions DE custom DLLs include the following exported functions: kdx_return kdx_register_callbacks(void) – mandatory kdx_return kdx_initialize(void) – optional kdx_return kdx_shutdown(void) – optional kdx_return macro defines the function as a callback function, which returnsint type. Usually a 1 is returned. These functions are called by DE EXE to perform specific actions. kdx_initialize() is called at test program loading and can be used for DLL data initialization purposes, e.g., reading INI file settings. kdx_shutdown() is called before DE closing, DLL unloading, and before kdx_initialize() at test program loading. It can be used to close the file generated by DLL. kdx_register_callbacks() is called to register DLL callback functions with standard events (refer to Standard Event Functions) in DE. DE EXE calls registered functions when the event occurs: bool kdx_add_callback(const type, char *CB_FuncName, const dlogType = 0 / * MSG_EMPTY */); where: type – type of the event CB_FuncName – name of the function to call dlogType – type of datalog message (only for datalog messages functions) Standard Event Functions Standard event functions are used to register functions using kdx_add_callback(). Registered functions must have kdx_return macro as a return value. Parameters of these functions are shown in Table 29. Kalos 2 User Manual 381 5 - KITE Utilities Table 29. Standard Event Functions Event KDX_START_LOT KDX_START_WAFER KDX_START_DEVICE KDX_DUT_TEST KDX_END_DEVICE Description Parameters void void int site int devNum Start of device testing int x int y Description of Parameters Start of lot Start of wafer Results of test execution Results of device testing dutTestInfo *dti void *uData void *xyData int site int devNum int hBin int sBin int ResFlag int inWafer int x int y void void KDX_END_WAFER KDX_END_LOT End of wafer End of lot KDX_USER_PRINTF TPEDatalogPrintf() is called in the test void program KDX_END_SHMOO Complete shmoo execution is finished int site Site number Device number X coordinate Y coordinate DUT test information (refer to data_engine_if.h) User data XY Data Site number Device number Hardware bin Software bin Test result (refer to RESULT enum in ktypes.h) 1 – in wafer 0 – not in wafer X coordinate Y coordinate Site number NOTE — Not all of the function events are described in Table 29. For example: kdx_return kdx_register_callbacks(void) { 382 PN: 071-0359-02, October 2005 Datalog Engine and DLOG Engine if ((kdx_add_callback(KDX_START_LOT, false) return 0; if ((kdx_add_callback(KDX_START_WAFER, false) return 0; … "start_lot_trig")) == "start_wafer_trig")) == return 1; } Any user-defined name can be used for the function instead of start_lot_trig, start_wafer_trig, etc. These functions must however include arguments and a return value for each type of event. Exported Functions of DE EXE Some custom DLLs have the ability to call functions exported by the DE EXE. As described above, kdx_add_callback() is an example of such a function. These functions are declared in the data_engine_if.h and are implemented in the DE EXE. The result of this function call can be DLL specific or not. If the function is DLL specific, DE EXE determines from which DLL the function is called, and takes action specific to that DLL. For example: CString file_name = kdx_get_output_file(); CString prog_name = kdx_get_program_name(); … kdx_runBatchFile((LPCTSTR) fname); The first function returns a name for a file to be created by DLL, which is set in INI file. The second function returns the name of the test program. The third function processes a file after it is created by the postprocessor (refer to Postprocessor). The result of the first function call is different for each DLL because created file names are different for each DLL. The result of the second function call is the same in all DLLs because the test program is the same for all DLLs. The third function does not return anything, but calls the postprocessor that was specified in the INI file using local overrides for that DLL. Kalos 2 User Manual 383 5 - KITE Utilities Figure 217. Structure of Custom DLL kdx_register_callbacks() Custom DLL Loading Data Collected KDX_START_WAFER KDX_START_DEVICE KDX_DUT_TEST KDX_END_DEVICE KDX_END_WAFER Exported Functions kdx_initialize() kdx_shutdown() KDX_START_LOT Datalog Parser Kalos Datalog Data Collected -> OnStartWafer ->OnStartDevice ->OnDutTest ->OnEndDevice ->OnEndWafer KDX_START_WAFER OnStartWafer KDX_START_DEVICE OnStartDevice KDX_DUT_TEST OnDutTest KDX_END_DEVICE OnEndDevice KDX_END_WAFER OnEndWafer KDX_END_LOT KDX_USER_PRINTF Data Engine EXE OnStartWafer() OnStartDevice() OnDutTest() OnEndDevice() OnEndWafer() Custom DLL Custom DLL Generation The following steps are necessary to create DE custom DLL with Microsoft Visual C++ 6 (VC++). Configure Kalos Configuration Manager for VC++ VC++ session for custom DLL development must be run from Kalos Configuration Manager only. This is required to include all header and LIB files properly. For this purpose VC++ icon must be added to the Kalos Configuration Manager. • In the Kalos Configuration Manager, select Option|Customize... menu and then select Add Application... • Use the browser window to go to C:\Program Files\Microsoft Visual Studio\Common\MSDev98\Bin. A file called msdev.exe appears. • Select the msdev.exe file and press OK. A new icon for VC++ appears in the Kalos Configuration Manager. This step is required only once. 384 PN: 071-0359-02, October 2005 Datalog Engine and DLOG Engine Create Project The project for DLL must be created using MFC AppWizard (dll) template project. • Run VC++ from Kalos Configuration Manager. • Select File|New... from the VC++ menu and then Projects tab from opened dialog. • Select MFC AppWizard (dll) template from the list. • Enter the name for the custom DLL in Project name box and check project path in the Location box. • Click the OK button. • Select the Regular DLL using shared MFC DLL radio button. • Press the Finish button, then the OK button. Include Header Files Kalos 2 and DE header file, kdx_if.h, must be included to get type and function declarations. Include the files at the main CPP project file, just after the automatically created include statements. Setup Header Files Directory The directory of the included header files must be set in the project’s settings. These files are put in the $(KALOS_HOME)\include directory at DE installation. Here $(KALOS_HOME) is the environmental variable representing the Kalos 2 setup home directory. It is set in KALOS HOME box in the Kalos Configuration Manager. • Select Project|Settings... from the VC++ menu to open the Project Settings dialog. • Select All Configurations in the Settings For box. • Select the C/C++ tab in the Project Settings dialog, then select Preprocessor in the Category box. • Enter $(KALOS_HOME)\include in the Additional include directories box. Do not close the Project Settings dialog. It is necessary for the next step. Set Linking with LIB File Linking with Data Engine static library data_engine.lib, or Dlog Engine static library dlog_engine.lib must be set in the project’s settings. This file is put into the $(KALOS_HOME)\lib directory at DE installation. • Kalos 2 User Manual Select the Link tab in the Project Settings dialog, then select Input in the Category box. 385 5 - KITE Utilities • Enter data_engine.lib in the Object/library modules box. • Enter $(KALOS_HOME)\lib in the Additional library path box. Do not close Project Settings dialog. It is necessary for the next step. Setup Output Directory An output directory for the project must be set in the directory were a custom DLL resides. It is possible to specify any directory. Usually other DLLs of DE reside in $(KALOS_HOME)\Test\data_engine. • Select the General tab in the Project Settings dialog. • Enter the path in the Output files box. • Press the OK button to close the Project Settings dialog. It is possible to specify different paths for each configuration in the Settings for box. Specify DLL in kalos_production.ini The name of the custom DLL must be set in the kalos_production.ini to ensure the DE knows the custom DLL exists and where it is located. This path must correspond to the path in the project settings. • Write the full name of DLL for the key USER1_DLL or USER2_DLL in the [DATA ENGINE] section of kalos_production.ini. Use $\ for the path if DLL is in the default directory for DE DLLs or specify the full path. The default directory for DE DLLs is the directory specified for KDX_DLL_DIR key (refer to DE Global Settings). For example: USER1_DLL = $\custom_test.dll Here custom DLL custom_test.dll resides in the default directory. Create DLL Section in kalos_production.ini The section for DLL must be created in the kalos_production.ini to contain configuration settings for DLL. The [kdx_tpePrintf] section in the default kalos_production.ini can be used as a template. 386 • Copy the [kdx_tpePrintf] section to the end of file. • Rename the section to the name of DLL without the .dll extension. • Enter true for ENABLED to enable DLL. • Enter the desired extension for created by DLL files in FILE_EXTENSION. PN: 071-0359-02, October 2005 Datalog Engine and DLOG Engine • Change filename settings in FILENAME and WAFER_FILENAME if necessary. • Apply other local overrides if necessary (refer to DE Global Settings and Local Override Settings for DE DLLs). For example, the section for custom_test.dll, which creates files with cst extension would be: [custom_test] ENABLED = true ; Can be [ True | False | 1 | 0 ] FILENAME = %machine_id%_%lotname%_%flow_id%_%time% WAFER_FILENAME = %machine_id%_%lotname%_%flow_id%_%wafer_num=INT02%_%time% FILE_EXTENSION = cst Export Required Functions Functions exported by the DLL must be created. These functions include DE DLL standard functions and functions registered for special events. All exported functions must include the kdx_return macro instead of the return value. This macro defines these as callback functions, which return int type. Usually a 1 is returned. • Create custom DLL API standard functions (refer to Custom DLL API Standard Functions). • Create and register necessary for standard event functions (refer to Standard Event Functions). • List all exported functions in the DEF file of the custom DLL project. An example for registration of exported functions in CPP and DEF files follows (the implementation of registered functions is not shown): custom_test.cpp kdx_return kdx_register_callbacks(void) { // standard event functions if ((kdx_add_callback(KDX_START_LOT, "start_lot_trig")) == false) return 0; if ((kdx_add_callback(KDX_START_WAFER, "start_wafer_trig")) == false) return 0; return 1; Kalos 2 User Manual 387 5 - KITE Utilities } custom_test.def kdx_register_callbacks start_lot_trig start_wafer_trig Create Custom Code Implement registered functions with code is required for created DLL. DLL can collect data during testing and create files at certain events, such as, end lot or end wafer. The data can be collected using parameters passed with registered functions, which are called by DE EXE. Data can be collected or DE EXE exported functions (refer to Exported Functions of DE EXE ) can be called. The Postprocessor must process all created files. The kdx_runBatchFile() function is used for this purpose. List of Exported Functions of DE EXE The following is a list of DE EXE exported functions, which are declared in the data_engine_if.h. These functions are the main API functions to get information for DE DLL. Data type definitions that are used in the functions follow: • Standard C/C++ data types. • DE specific types from data_engine_if.h. • Kalos 2 software specific types from deviceif.h and ktypes.h. • Pin assignment enums from nettypes_exp.h. Functions marked with an ‘*’ have DLL specific call. Common Functions Function Name kdx_printf 388 Return Value / Parameters Description Puts string to text dump file (refer to Collecting Log Files for Debugging) int char *format, ... Description of Return Value / Parameters Number of characters written String format like for standard printf() PN: 071-0359-02, October 2005 Datalog Engine and DLOG Engine kdx_add_callback* kdx_get_device_info Register DE callback bool function for certain const type event (refer to Custom DLL API char *CB_FuncName Standard Functions) const dlogType = 0 Gets device bool information by DI_DEVICE_INFO DI_DEVICE_INFO structure *DI True – Success False – Fail Type of the event Name of the function to call Internal use only True – Success False – Fail Destination buffer for device info Kalos Types Conversion to String Function Name kdx_get_unit kdx_getElecStr kdx_getElecStr Description Returns units string for ELEC structure like "V", "A^2", "Ohm" etc. Returns string representation for ELEC structure Returns string representation for ELEC structure Returns string representation for LIMIT structure Returns string representation for kdx_get_dlogtype_str “dlogtype” member in some datalog structures Returns string representation for “vlog_type” member kdx_get_vlogtype_str in DLOG_VLOG_MSG datalog structure kdx_getLimitStr Kalos 2 User Manual char * Description of Return Value / Parameters Units string ELEC *elec ELEC structure const char * ELEC string ELEC *elec ELEC structure const char * ELEC elec const char * ELEC string ELEC structure Destination buffer for ELEC string LIMIT string LIMIT *limit LIMIT structure char * “dlogtype” string unsigned int dt “dlogtype” value char * “vlog_type” string int vt “vlog_type” value Return Value / Parameters char *elecStr 389 5 - KITE Utilities Returns string kdx_get_RESULT_str representation for RESULT enum Returns string kdx_get_dev_info_ty representation for pe_str DI_DEVICE_TYPE enum char * RESULT string RESULT r RESULT enum DI_DEVICE_TYPE string DI_DEVICE_TYPE DI_DEVICE_TYPE t enum DI_TEST_MODE Returns string char * string kdx_get_dev_info_te representation for stmode_str DI_TEST_MODE DI_TEST_MODE DI_TEST_MODE t enum enum DI_INTERFACE_TYP Returns string char * E string kdx_get_dev_info_ifT representation for ype_str DI_INTERFACE_TYP DI_INTERFACE_TYP DI_INTERFACE_TYP E enum Et E enum DI_WAFER_FLAT Returns string char * string kdx_get_dev_info_fla representation for t_str DI_WAFER_FLAT DI_WAFER_FLAT DI_WAFER_FLAT t enum enum DI_WAFER_ORIGIN Returns string char * string kdx_get_dev_info_ori representation for gin_str DI_WAFER_ORIGIN DI_WAFER_ORIGIN DI_WAFER_ORIGIN enum t enum DI_DIE_CONFIG Returns string char * string kdx_get_dev_dieConf representation for ig_str DI_DIE_CONFIG DI_DIE_CONFIG DI_DIE_CONFIG t enum enum char * Device Pin Assignment Information Function Name Returns number of kdx_getNumDpins device pins in socket table Returns number of kdx_getDutsPerModu DUTs (sites) per le module 390 Return Value / Parameters Description int void int Description of Return Value / Parameters Number of device pins Number of sites void PN: 071-0359-02, October 2005 Datalog Engine and DLOG Engine Returns string representation for "pintype" and kdx_get_pintype_str "pintype_exp" members in DPIN datalog structure Returns string representation for kdx_get_pinassign_st "assign" and r "assign_exp" members in DPIN datalog structure const char * Pin type string int ref Pin type number in PINTYPE enum from “nettypes_exp.h” const char * int ref bool int entry int *numChan int *chan kdx_getDpinEntry Gets info for specified device pin char *pinName char *pinType char *assign char *pinType_exp char *assign_exp Kalos 2 User Manual Pin assignment string Pin assignment number in PIN_ASSIGN_TYPE enum from “nettypes_exp.h” True – Success False – Fail Number of device pin to get info Destination buffer for number of channels connected to pin Destination array of connected channels numbers. Size of array must be [MAX_DLOG_MOD_ SITES] Destination buffer for pin name string Destination buffer for pin type string Destination buffer for pin assignment string Destination buffer for pin alt type string Destination buffer for pin alt assignment string 391 5 - KITE Utilities General InformationD Function Name Description kdx_get_program_na Gets test program me name kdx_get_device_nam Gets device name e Return Value / Parameters const char * char *buf = NULL const char * char *buf = NULL const char * kdx_get_flow_id Gets flow ID kdx_get_lot_id Gets lot ID char *buf = NULL const char * char *buf = NULL const char * kdx_get_operator_id Gets operator ID kdx_get_user_text Gets user text from Front Panel kdx_get_user_comm Gets user comment ent from Front Panel char *buf = NULL const char * char *buf = NULL const char * char *buf = NULL const char * kdx_get_machine_id Gets machine ID kdx_get_tester_id kdx_get_tester_type kdx_get_wafer_id 392 char *buf = NULL Gets tester ID, which const char * is same as machine char *buf = NULL ID Gets tester type like const char * "KalosXP", "Kalos48" char *buf = NULL or "Kalos2" Gets wafer ID, which const char * includes lot ID, wafer number and char *buf = NULL checksum Description of Return Value / Parameters Test program name string Destination buffer for test program name Device name string Destination buffer for device name Flow ID string Destination buffer for flow ID Lot ID string Destination buffer for lot ID Operator ID string Destination buffer for operator ID User text string Destination buffer for user text User comment string Destination buffer for user comment Machine ID string Destination buffer for machine ID Tester ID string Destination buffer for tester ID Tester type string Destination buffer for tester type Wafer ID string Destination buffer for wafer ID PN: 071-0359-02, October 2005 Datalog Engine and DLOG Engine const char * kdx_get_part_type Gets part type kdx_get_wafer_num Gets wafer number char *buf int void Part type string Destination buffer for part type or NULL Wafer number Time and Date Information Function Name Description kdx_get_time_str Returns string representation for current Time/Date Return Value / Parameters const char * const char *fmtStr = "%b_%d_%Y_%H% M%S" const char * Returns string kdx_get_start_time_s representation for lot const char *fmtStr = tr start Time/Date "%b_%d_%Y_%H% M%S" const char * Returns string kdx_get_finish_time_ representation for lot const char *fmtStr = str finish Time/Date "%b_%d_%Y_%H% M%S" const char * Returns string kdx_get_start_wafer_ representation for const char *fmtStr = time_str wafer start Time/Date "%b_%d_%Y_%H% M%S" Returns string kdx_get_wafer_finish representation for _time_str wafer finish Time/ Date Kalos 2 User Manual const char * const char *fmtStr = "%b_%d_%Y_%H% M%S" Description of Return Value / Parameters Current Time/Date string Time/Date format like for strftime() standard C function Lot start Time/Date string Time/Date format like for strftime() standard C function Lot finish Time/Date string Time/Date format like for strftime() standard C function Wafer start Time/Date string Time/Date format like for strftime() standard C function Wafer finish Time/ Date string Time/Date format like for strftime() standard C function 393 5 - KITE Utilities Returns string kdx_get_start_device representation for _time_str device start Time/ Date const char * Returns string kdx_get_device_finis representation for h_time_str device finish Time/ Date const char * const char *fmtStr = "%b_%d_%Y_%H% M%S" const char *fmtStr = "%b_%d_%Y_%H% M%S" Returns current Time/ time_t kdx_get_time Date void kdx_get_start_lot_tim Returns lot start Time/ time_t e Date void time_t kdx_get_finish_lot_ti Returns lot finish me Time/Date void time_t kdx_get_start_wafer_ Returns wafer start time Time/Date void kdx_get_wafer_finish Returns wafer finish _time Time/Date time_t kdx_get_start_device Returns device start _time Time/Date time_t Lot start Time/Date Lot finish Time/Date Wafer start Time/Date Wafer finish Time/ Date void Device start Time/ Date void kdx_get_device_finis Returns device finish time_t h_time Time/Date void unsigned long Returns elapsed test kdx_getTestTime time for device int site kdx_get_time_diff Device start Time/ Date string Time/Date format like for strftime() standard C function Device finish Time/ Date string Time/Date format like for strftime() standard C function Current Time/Date Returns elapsed time long from reference time struct _timeb tb Device finish Time/ Date Test time in msec Kalos DUT site number Time in msec Reference time Device Number and Site Information Kalos DUT site number, used in the following functions, is calculated by the formula: Kalos DUT site = module * (DUTs per module) + (DUT site on this module), where modules range from 0 to (number boards in system - 1) and DUT sites range from 0 to (number DUTs per board - 1). 394 PN: 071-0359-02, October 2005 Datalog Engine and DLOG Engine Function Name Return Value / Parameters Description Returns the number of site, to which kdx_get_current_site current datalog data refers Returns device sequence number in kdx_get_device_num wafer for last device ber or for current device on specified site int void int int site = -1 Returns total number int kdx_get_total_part_c of tested devices in ount wafer void Returns total number int kdx_get_good_part_c of passed devices in ount wafer void Returns device int sequence number in kdx_get_lot_device_n lot for last device or umber for current device on int site = -1 specified site Returns total number int kdx_get_lot_total_par of tested devices in t_count lot void Returns total number int kdx_get_lot_good_pa of passed devices in rt_count lot void int kdx_get_site_info Kalos 2 User Manual Gets total number of active sites and puts their Kalos DUT site numbers into array Description of Return Value / Parameters Kalos DUT site number int *sites Device sequence number in wafer Kalos DUT site number or –1 for last device Total number of tested devices in wafer Number of passed devices in wafer Device sequence number in lot Kalos DUT site number or –1 for last device Total number of tested devices in lot Number of passed devices in lot Total number of active sites Destination array for Kalos DUT site numbers of active sites. Size of array must be [MAX_DLOG_SITES] 395 5 - KITE Utilities int kdx_get_site Returns Kalos DUT site number based on int mod module number and int site site number on module int phy_dut Kalos DUT site number Module number Site number on module Default Kalos DUT site number or –1 Bin Information Function Name Return Value / Parameters Description char * int binNum kdx_get_binName Gets hardware or software bin name char *buf bool isSoftBin = true int kdx_get_binNums Gets total number of bins and puts their numbers into array int *bins bool isSoftBin = true int kdx_get_bin_pf Gets Pass/Fail type of bin int bin bool isSoftBin = true int Returns number of devices in the wafer, int site kdx_get_bin_site_cnt which were tested by specified site and put int bin to specified bin bool isSoftBin = true 396 Description of Return Value / Parameters Bin name Bin number Destination buffer for bin name True – Software bin False – Hardware bin Total number of bins Destination array for numbers of bins. Size of array must be [MAX_DLOG_BINS] True – Software bin False – Hardware bin Integer representation of RESULT enum values Bin number True – Software bin False – Hardware bin Number of devices Kalos DUT site number Bin number True – Software bin False – Hardware bin PN: 071-0359-02, October 2005 Datalog Engine and DLOG Engine Returns number of int devices in the wafer, int bin kdx_get_total_bin_cn which were tested by t all sites and put to bool isSoftBin = true specified bin int Returns number of int site devices in the lot, kdx_get_bin_lot_site_ which were tested by cnt specified site and put int bin to specified bin bool isSoftBin = true Returns number of int devices in the lot, int bin kdx_get_total_lot_bin which were tested by _cnt all sites and put to bool isSoftBin = true specified bin Number of devices Bin number True – Software bin False – Hardware bin Number of devices Kalos DUT site number Bin number True – Software bin False – Hardware bin Number of devices Bin number True – Software bin False – Hardware bin Number of Tests Information Test numbers, used in the following functions, are defined as: • Base test number – number assigned to the test in the KTL. • Auto test number – number assigned to the test by DE. These numbers coincide if KTL is created by Assigning a Unique Test Number to Each Test and Bin. Function Name kdx_getNumTests Return Value / Parameters Description Number of tests executed for device int int site int kdx_getTestNum kdx_getCurTestNum Kalos 2 User Manual Gets base and auto test numbers for specified site Gets base and auto test numbers for current site int site int *baseTnum = NULL int int *baseTnum Description of Return Value / Parameters Number of tests Kalos DUT site number Auto test number Kalos DUT site number Destination buffer for base test number Auto test number Destination buffer for base test number 397 5 - KITE Utilities Work Environment Information Function Name kdx_isWafer kdx_inWafer kdx_isK2 kdx_isK96 kdx_isProduction kdx_isMultisite kdx_useNTprofiling kdx_getProdProfile kdx_get_userName Description Return Value / Parameters Returns flag of wafer bool testing void Returns flag of wafer bool testing void Returns type of bool tester: Kalos 1 or Kalos 2 void Returns type of bool tester: Kalos96 or Kalos48 void Returns type of test mode bool Description of Return Value / Parameters True if wafer test True if currently testing a wafer, False if between wafers True – Kalos 2 False – Kalos 1 True – Kalos96 False – Kalos48 True – Production False – Engineering void Returns flag of testing bool by multiple sites simulteniously void Returns value of bool NT_PROFILING key in INI file void Returns value of char * NT_PROD_NAME key in INI file void const char * Returns current username char *buf = NULL True – Multisite False – Single site True – Use False – Don’t use Username for production mode Current username Output/Destination Files Function Name kdx_get_output_file* 398 Description Returns full path of output file Return Value / Parameters const char * void Description of Return Value / Parameters Output file path PN: 071-0359-02, October 2005 Datalog Engine and DLOG Engine kdx_get_destination_ Returns full path of file* destination file kdx_get_output_dir* Returns directory for output file kdx_get_destination_ Returns directory for dir* destination file kdx_runBatchFile* const char * void const char * void const char * Destination file path Output file directory Destination file directory void Runs postprocessor bool for specified file (default postprocessor moves const char *fileName File to postprocess output file to destination file) Device XY Coordinates Information Function Name kdx_get_min_x kdx_get_max_x kdx_get_min_y kdx_get_max_y Kalos 2 User Manual Return Value / Parameters Description Returns minimal X coordinate of device on wafer Returns maximal X coordinate of device on wafer Returns minimal Y coordinate of device on wafer Returns maximal Y coordinate of device on wafer int Description of Return Value / Parameters Minimal X coordinate void int Maximal X coordinate void int Minimal Y coordinate void int Maximal Y coordinate void 399 5 - KITE Utilities bool int x int y Gets device testing results based on device XY coordinates on the wafer kdx_get_xy_info int *sbin int *hbin int *site int *dieNum kdx_get_xy_uNode void * Multi node data for x, y location. Refer to int x multiwafermap for an example. int y True – Success False – Fail (device not tested yet) X coordinate of device Y coordinate of device Destination for software bin number or NULL Destination for hardware bin number or NULL Destination for site number on module or NULL Destination buffer for device sequence number or NULL Pointer to XY node X coordinate of device Y coordinate of device Runtime Decode String Functions The general parameter for runtime decode string functions is a key string, which is defined as: Runtime key of string – key of string, received from Kalos 2 datalog with structure of STATIC_LOOKUP_UMSG type. Key of string in INI – key of string in kalos_production.ini file, which is used for connects. For example, the use of these functions for STDF atr.cmd_line field filling by runtime decode strings is: kalos_production.ini atr.cmd_line DE EXE = %program_name%_%job_revision% // stat_lookup is STATIC_LOOKUP_UMSG type structure, // Sets values of “program_name” and “job_revision” 400 PN: 071-0359-02, October 2005 Datalog Engine and DLOG Engine // Called each time STATIC_LOOKUP_UMSG received from datalog kdx_add_string_value((LPCTSTR) stat_lookup.key, (LPCTSTR) stat_lookup.value); // added per dll DE DLL // Connects “atr.cmd_line” with %program_name%_%job_revision% from INI // If “atr.cmd_line” does not exist in INI file, connects it with "%program_name%" // Called only once kdx_return kdx_initialize(void) { kdx_add_runtime_str("atr.cmd_line", "%program_name%"); return 1; } // Gets value of "atr.cmd_line" which is runtime value of // %program_name%_%job_revision% // Called at each STDF file creation void get_atr_cmd_line(char* atr_cmd_line) { atr_cmd_line = kdx_get_runtime_str("atr.cmd_line"); // sets latiest value } Function Name Description Connects key in INI kdx_add_runtime_str* file with runtime key of string Return Value / Parameters const char * const char *key const char *defaultValue Gets runtime decode const char * kdx_get_runtime_str* string value based on the key in INI file const char *key Adds runtime decode const char * kdx_add_string_value string with specified const char *key runtime key const char *buf kdx_remove_string_v Removes runtime alue decode string Kalos 2 User Manual bool const char *key Description of Return Value / Parameters Current value of runtime decode string Key of string in INI Default runtime key of string Current value of runtime decode string Key of string in INI Current value of runtime decode string Runtime key of string String to add True – Success False – Fail Runtime key of string 401 5 - KITE Utilities Gets runtime decode const char * kdx_get_string_value string value based on the runtime key const char *key Current value of runtime decode string Runtime key of string Kalos_production.ini Parsing Functions Function Name Description Return Value / Parameters kdx_get_kpi_bool* Gets bool value from int INI file, considering local overrides const char *entry kdx_get_kpi_int* Gets int value from INI file, considering local overrides kdx_get_kpi_float* bool const char *entry int *val bool Gets float value from const char *entry INI file, considering local overrides float *val bool Gets string value from kdx_get_kpi_static_st INI file, considering const char *entry r* local overrides char *buffer Description of Return Value / Parameters 1 – true 0 – false –1 – failed Key name in INI True – Success False – Fail Key name in INI Destination buffer for int value True – Success False – Fail Key name in INI Destination buffer for float value True – Success False – Fail Key name in INI Destination buffer for string value Test Trigger Functions Function Name Description Return Value / Parameters Description of Return Value / Parameters bool int numTrigs On trigger test data kdx_set_trigger_test_ will contain valid user int *TrigNums = NULL numbers* data bool useAutoNums = false 402 PN: 071-0359-02, October 2005 Datalog Engine and DLOG Engine Used for kdx_is_tNum_trigger histogramming, test number log, etc. bool int *index Test Execution Information Functions kdx_get_parametric_data() and kdx_get_functional_data() can be called at the KDX_DUT_TEST to get results of the test execution in ParamData and FuncData structures, respectively. These structures are declared in the data_engine_if.h file. The record fields have the same purpose as STDF records PTR and FTR. “isValid” flag field is different from STDF and represents valid fields in the structures. Bit flag macros are also defined in the data_engine_if.h. For example to get vector name for functional test: FuncData *pFuncData = kdx_get_functional_data(); if(pFuncData->isValid & VECT_NAM_VALID) set_vect_nam(pFuncData->vect_nam); Function Name Description const char * void Gets pattern name for const char * last executed char *name functional test int Scan through void testNodeInfo * All test execution info int idx int site = -1 Gets results of ParamData* parametric test execution void Gets results of FuncData* functional test execution void kdx_get_current_test Gets test name for Name last executed test kdx_get_pattern_nam e kdx_get_num_testNo des kdx_getIndexed_test NodeInfo kdx_get_parametric_ data kdx_get_functional_d ata Kalos 2 User Manual Return Value / Parameters Description of Return Value / Parameters Test name Test pattern name Destination buffer for test pattern name Pointer to parametric test results structure Pointer to functional test results structure 403 5 - KITE Utilities kdx_get_shmoo_hea Gets buffered shmoo ShmooHeader* der header int site Gets buffered data for ShmooData* one line in shmoo kdx_get_shmoo_data graph. Next call returns next line data int site Pointer to shmoo header data structure Site number Pointer to structure of data for one line in shmoo graph Site number Example Code Listing The code example below creates a custom DLL (wafer_summary.dll) for hardware bins summary file generation at the end of wafer. For example: Tester ID : KALOS-VAGHINAK Tester Type : Kalos48 Interface : TEL P8 Date : 06 Aug 2002, 15:54:22 Program : A5C0 Device : A5C0 Flow : s00_1ews_k Lot : A219568 Wafer ID : A219568-25G6 Wafer Num : 25 Operator : Vaghinak User Text : ..comment.. Users_C : ..user message.. Site : CREDENCE_US Tested: 1062 Passed: 820 77.21% Failed: Categories Sort# Name 00P Bin_good_ 01P Hard_1 02F Hard_2 03F Hard_3 04F Hard_4 End K00 91 98 13 17 23 K01 102 115 17 22 35 K02 97 121 10 21 29 K03 79 80 15 18 22 242 22.79% Totals Percent 369 34.75% 451 42.47% 55 5.19% 78 7.32% 109 10.28% The files in project, which do not require manual changes, are not listed. kalos_production.ini 404 PN: 071-0359-02, October 2005 Datalog Engine and DLOG Engine [DATA ENGINE] … USER2_DLL … [wafer_summary] ENABLED = $\wafer_summary.dll = true ; Can be [ True | False | 1 | 0 ] FILENAME = %machine_id%_%lotname%_%flow_id%_%time% WAFER_FILENAME = %machine_id%_%lotname%_%flow_id%_%wafer_num=INT02%_%time% FILE_EXTENSION = wsm TEST_SITE = CREDENCE_US wafer_summary.def LIBRARY "wafer_summary" DESCRIPTION 'wafer_summary Windows Dynamic Link Library' EXPORTS ; Explicit exports can go here kdx_register_callbacks kdx_shutdown wafer_summary_report wafer_summary.cpp #include "stdafx.h" #include "wafer_summary.h" // Include DE header files #include <kdx_if.h> #ifdef _DEBUG #define new DEBUG_NEW #undef THIS_FILE static char THIS_FILE[] = __FILE__; #endif ///////////////////////////////////////////////////////////////////////////// // CWafer_summaryApp BEGIN_MESSAGE_MAP(CWafer_summaryApp, CWinApp) //{{AFX_MSG_MAP(CWafer_summaryApp) Kalos 2 User Manual 405 5 - KITE Utilities // NOTE - the ClassWizard will add and remove mapping macros here. // DO NOT EDIT what you see in these blocks of generated code! //}}AFX_MSG_MAP END_MESSAGE_MAP() ///////////////////////////////////////////////////////////////////////////// // CWafer_summaryApp construction CWafer_summaryApp::CWafer_summaryApp() { // TODO: add construction code here, // Place all significant initialization in InitInstance } ///////////////////////////////////////////////////////////////////////////// // The one and only CWafer_summaryApp object CWafer_summaryApp theApp; // Code for DE DLL #define BUF_SIZE 256 #define STRBUF_SIZE1024 #define PRINTSTR_SIZE132 #define STR2HDR "" int wafer_summary_report(void); // Register wafer_summary_report() function to be called at KDX_END_WAFER int kdx_register_callbacks(void) { if ((kdx_add_callback(KDX_END_WAFER, "wafer_summary_report")) == false) return 0; if ((kdx_add_runtime_str("test_site", "UNKNOWN")) == false) return 0; return 1; } // We are shutting down, make sure all summary reports are generated. int kdx_shutdown(void) { return wafer_summary_report(); } // Called from DE EXE at the ane of wafer 406 PN: 071-0359-02, October 2005 Datalog Engine and DLOG Engine int wafer_summary_report() { CString fname; int site_ndx, hbin_ndx, bin_num; int num_hbins, hbin_nums[MAX_DLOG_BINS]; int hbin_cnt = 0, cnt = 0; int num_tested, num_good, num_failed; int num_sites, site_nums[MAX_DLOG_SITES]; char bufr1[BUF_SIZE], bufr2[BUF_SIZE], strbuf[BUF_SIZE]; FILE *fp; int pf; char pfc; DI_DEVICE_INFO devInfo; // Before opening any file or generating a record, check that there are parts // tested, if not then just return. num_tested = kdx_get_total_part_count(); if (num_tested == 0) { kdx_printf("kdx_summary not been generated as there are no devices tested.\n"); return 1; // Even though there will be no summary file, this is a successful // return location, therefor return 1. } if (kdx_get_device_info(&devInfo) == false) return 0; fname = kdx_get_output_file(); fp = fopen( (LPCTSTR) fname, "w+"); if (!fp) { kdx_printf ("kdx_summary file '%s' open error\n", (LPCTSTR) fname); return 0; } kdx_printf("Opened summary file : %s\n", (LPCTSTR) fname); // Generate summary file header fprintf (fp, "Tester ID : %s\n", kdx_get_machine_id()); fprintf (fp, "Tester Type : %s\n", kdx_get_tester_type()); fprintf (fp, "Interface : %s\n", devInfo.model); fprintf (fp, "Date : %s\n", kdx_get_start_wafer_time_str("%d %b %Y, %H:%M:%S")); fprintf (fp, "Program : %s\n", kdx_get_program_name()); fprintf (fp, "Device : %s\n", kdx_get_device_name()); fprintf (fp, "Flow : %s\n", kdx_get_flow_id()); fprintf (fp, "Lot : %s\n", kdx_get_lot_id()); if (kdx_isWafer()) { fprintf (fp, "Wafer ID : %s\n", kdx_get_wafer_id()); Kalos 2 User Manual 407 5 - KITE Utilities fprintf (fp, "Wafer Num : %d\n", kdx_get_wafer_num()); } fprintf (fp, "Operator : %s\n", kdx_get_operator_id()); fprintf (fp, "User Text : %s\n", kdx_get_user_text()); fprintf (fp, "Users_C : %s\n", kdx_get_user_comment()); fprintf (fp, "Site : %s\n", kdx_get_runtime_str("test_site")); // Generate wafer summary num_good = kdx_get_good_part_count(); num_failed = num_tested - num_good; fprintf (fp, "Tested:%8d Passed:%8d %6.2f%% Failed:%8d %6.2f%%\n", num_tested, num_good, ((float)num_good / (float)num_tested) * 100.00, num_failed, ((float)num_failed / (float)num_tested) * 100.00); // Generate Categories summary strcpy(strbuf, "\nCategories\nSort# Name "); num_sites = kdx_get_site_info(site_nums); for (site_ndx = 0; site_ndx < num_sites; site_ndx++) { sprintf (bufr1, "K%02d", site_nums[site_ndx]); sprintf (bufr2, "%8s", bufr1); if (strlen(strbuf) + strlen(bufr2) >= PRINTSTR_SIZE) { fprintf (fp, "%s", strbuf); strcpy (strbuf,STR2HDR); } strcat(strbuf, bufr2); } strcat(strbuf, " Totals Percent\n"); fprintf (fp, "%s", strbuf); // Generate hard bin summary num_hbins = kdx_get_binNums(hbin_nums, false); // false = Not softBins. for (hbin_ndx = 0; hbin_ndx < num_hbins; hbin_ndx++) { bin_num = hbin_nums[hbin_ndx]; if ((hbin_cnt = kdx_get_total_bin_cnt(bin_num, false))!= 0) { pf = kdx_get_bin_pf(bin_num, false); // false = Not softBins. if (pf == PASS) pfc = 'P'; else if (pf == FAIL) pfc = 'F'; else pfc = 'U'; sprintf (bufr1, " %02d%c", bin_num, pfc); strcpy(strbuf, bufr1); sprintf (bufr2, " %-10s", kdx_get_binName(bin_num, bufr1, false)); strncat(strbuf, bufr2, 10); for (site_ndx = 0; site_ndx < num_sites; site_ndx++) { // 408 PN: 071-0359-02, October 2005 Datalog Engine and DLOG Engine // Get hard bin count // cnt = kdx_get_bin_site_cnt(site_nums[site_ndx], bin_num, false); sprintf (bufr1, "%8d", cnt); if (strlen(strbuf) + strlen(bufr1) >= PRINTSTR_SIZE) { fprintf (fp, "%s", strbuf); strcpy (strbuf,STR2HDR); } strcat(strbuf, bufr1); } // // Get totals // sprintf (bufr1, " %8d", hbin_cnt); strcat(strbuf, bufr1); sprintf (bufr1, " %6.2f%%\n", ((float)hbin_cnt / (float)num_tested) * 100.00); strcat(strbuf, bufr1); fprintf (fp, "%s", strbuf); } } // End report fprintf (fp, "End\n"); fclose(fp); // Run created file with postprocessor kdx_runBatchFile((LPCTSTR) fname); return 1; } Kalos 2 User Manual 409 5 - KITE Utilities Cal/Diag The Kalos 2 tester is calibrated by running calibration/diagnostics from Front Panel. Calibration, beyond power supplies, is performed by software which requires no manual manipulation. In order to execute calibration, however, manual intervention is required to mount two types of load boards at various points in the process. The Calibration/Diagnostics utility is launched by clicking on the Cal/Diag icon (see Figure 218) or it can be selected (launched) from the Utilities menu item. Figure 218. Cal/Diag Icon Click here to open the Cal/Diag utility. The Calibration programs are located in the directory C:\Kalos\bin. The calibration data is stored in the ETX on the tester. There may be other programs visible in the menu, however, they are not standard maintenance programs and should not be run without full understanding of the calibration software. Refer to the Calibration and Diagnostics section in Chapter 4, Introduction to KITE, of this manual for calibration and diagnostics procedures. 410 PN: 071-0359-02, October 2005 ShowBitz Utility ShowBitz Utility ShowBitz is a Kalos 2 application debugging utility intended for the advanced user. It is designed to bypass the layers of software separating the user from the tester. It accesses the hardware directly, revealing how the tester is truly programmed. ShowBitz provides an in-depth view into the Kalos 2 hardware. All functions of the tester are organized hierarchically, and all aspects of tester operation can be explored; channels can be studied, and registers can be read. Equally important, ShowBitz has the ability to change the hardware. Most views in ShowBitz are interactive. Users have the option to choose an item from a list, or type in a new voltage, and the hardware is instantly changed and refreshed. Changes made using ShowBitz do not modify the test program and do not affect the test results (datalog, summary, etc.). When testing continues, changes made using ShowBitz are discarded, however, ShowBitz has a recording feature that allows the user to easily repeat any sequence of changes made using the interactive views. Two of the most basic functions of the Kalos 2 tester, pattern runs and parametric measurements, can also be performed using ShowBitz. ShowBitz is suited for use throughout all phases of Kalos 2 development for debugging hardware, run-time software, diagnostics, GUI tools, and test programs. Because ShowBitz is not bound by the methodology of any test program, it can perform functions that cannot be performed any other way. For detailed information on using the ShowBitz utility, click on the ShowBitz utility Help button and select Reference Manual. The ShowBitz utility is launched by clicking on the ShowBitz icon (see Figure 219) or it can be selected (launched) from the Utilities menu item. Figure 219. ShowBitz Icon Click here to open the ShowBitz utility. ShowBitz Interface The ShowBits interface (main) window is shown in Figure 220. The ShowBitz utility comprises the following parts. • Kalos 2 User Manual Navigator 411 5 - KITE Utilities • Channel Views • Omni Views • Slice Views • Register Views • Protected Views • Shortcuts Views • Toolbars • Send View • Message Window Figure 220. ShowBitz Interface Window 412 PN: 071-0359-02, October 2005 ShowBitz Utility Navigator The navigator is the first window that appears when the ShowBitz application is launched. An overview of the tester architecture is graphically presented, using a tree. Each branch of the tree represents a part of the Kalos 2 tester hardware. Clicking on an item in the Navigator launches a window that displays the registers of a part of the hardware. If such a window is already launched, but not visible, the navigator does not create a new window; it brings the existing window to the top of the window stack. To create another instance of a view (window), hold down the Shift key and click on the node in the tree. The Navigator contains several classes of views. The class of a view can be distinguished by an icon image in the tree. A description of each class and an image, were applicable, of its icon are provided in the following sections. Channel Views Channel views show channel resources. The channels displayed are selected using the channel edit box on the ShowBitz toolbar or by using the Channel Selection Dialog. Channel views are interactive and allow users to instantly change the hardware with a point and click approach. Omni Views Omni views show registers in the Omni ASIC that are not channel related. The Omni selector on the ShowBitz toolbar selects which Omni ASIC is displayed. If ALL is selected, each Omni ASIC in the current slice mode is read back and compared. If values differ from one ASIC to another the value is shown with a red background. Omni views are interactive and allow users to instantly change the hardware with a point and click approach. When the Omni selector is set to ALL, entering a value changes all the Omni ASICs. Typically the Omni selector should be set to ALL. Slice Views Slice views show non-channel resources that are not part of the Omni ASIC. The slice selector on the ShowBitz toolbar selects which slice is displayed. Only one slice at a time can be viewed or modified. Slice views are interactive and allow users to instantly change the hardware with a point and click approach. Register Views Register views show the contents of a single tester register or related group of registers. The register views encompass every register in the tester. Registers are organized in the navigator exactly as they appear in Sierra, the bit chart viewer. Kalos 2 User Manual 413 5 - KITE Utilities Protected Views Other hardware views (windows) display the tester registers in a protected form. The hardware contents can be viewed, but not modified. Shortcuts View Similar to the navigator, the shortcuts view lists the names of interactive and protected views. A view can be launched by clicking on a name in the shortcuts view. Unlike the navigator which arranges the tester architecture in a tree, the Shortcuts view is a web linking the views together. All views can be linked together. There are hundreds of built-in links in ShowBitz. In addition, as the navigator is used to launch views, the old and new views are linked to each other. Each view has its own shortcuts to other views. Whenever a view becomes active the shortcuts view changes to show the links for the active view. Toolbar The toolbar consists of three sections. Each section controls a different aspect of the program. This includes control of which Kalos 2 slot (slice) ShowBitz is attached to, which channels are displayed (only for Channel Views), the execution of Send scripts, and the record and replay feature. Send View The Send View is an environment for creating and running Send Scripts. A Send Script is a user-defined sequence of commands that manipulate the tester hardware. Built-in commands can read or write any register in the tester by name. For more complex operations, the Send Hardware Language (SHL) can be used. The Send View contains an interactive debugger for running Send scripts, setting breakpoints, single-stepping, looping, etc. Any operation that is performed using a Premier View can be performed using Send. Message Window Warnings and error messages from ShowBitz are displayed in this window. 414 PN: 071-0359-02, October 2005 Idrom Idrom Each Kalos 2 board contains five serial electrically erasable non-volatile memories (Motherboard, PMU, DPS, EMU, and TCON for each of the two slices on the board). Each is called an IDROM. IDROM is an NVM memory chip which stores module information on each Kalos 2 board module. This information includes part number, revision number, etc. In addition, each backplane in the test head contains an IDROM. Each IDROM contains formatted data identifying the manufacturer of the hardware and its capabilities. This information is programmed into the IDROM during the manufacture of the hardware. Each time the Kalos 2 test system is initialized, the IDROM data is retrieved and made available to all Kalos 2 boards and software. This information is used by Kalos 2 software to determine how to best utilize the hardware. The Idrom utility is launched by clicking on the IDRom icon (see Figure 221) or it can be selected (launched) from the Utilities menu item. For additional information on the Idrom utility, refer to the Idrom section of the Introduction to KITE chapter of this manual. Figure 221. IDRom Icon Click here to open the IDRom utility. Kalos 2 User Manual 415 5 - KITE Utilities NVMDIB The Non-Volatile Memory (NVM) on the Device Interface Board (DIB) is a small memory located on the test hardware that contains identification and configuration information needed by the test program. NVMDIB is the readback of the current device interface board, IDROMs, if the user has implemented them. Detailed information on the NVMDIB utility is provided in the NVM User’s Guide located under the Help menu of the NVMDIB utility. The NVMDIB has no relationship to the DIB Info. 416 PN: 071-0359-02, October 2005 System Monitor System Monitor The System Monitor monitors the electrical state of the tester system in terms of voltage, current, and temperature readings. The System Monitor utility is launched by clicking on the System Monitor icon (see Figure 222) or it can be selected (launched) from the Utilities menu item. Figure 222. System Monitor Click here to open the System Monitor utility. The system monitor is started automatically when the Kalos 2 test system software is started (i.e., Ttarget/Kalos 2 server). It exits when Ttarget/Kalos 2 server is shutdown. Normally the System Monitor runs silently in the background, monitoring conditions in the test head. If an abnormal condition occurs, the System Monitor notifies Front Panel, which updates its message box in the top center of the program. If a serious problem is detected the test head, the System Monitor can shutoff the test head power to prevent damage to the Kalos 2 test system hardware. If this occurs, Front Panel displays the message Shutdown in the main message box. A service technician should be called to investigate and correct the problem before system operation is restarted. For additional information about the System Monitor, refer to the online System Monitor User’s Guide. This user guide can be viewed by opening the System Monitor program from Front Panel and clicking the Help button on the toolbar. Kalos 2 User Manual 417 5 - KITE Utilities MAP INIT The MAP INIT selection brings up the MAP Initialization dialog box (see Figure 223) that allows the user to select all slices (most typical) or any one slice. To map the boards manually, click on the Utilities pulldown menu and select MAP INIT. Otherwise the interface automatically runs the mapping when the slice is set up by TTarget. Figure 223. MAP INIT MAP INIT Active slices 418 PN: 071-0359-02, October 2005 6 TEST DEBUGGER This chapter provides an introduction to the Test Debugger application. This interactive utility allows the user to modify test program components; including flow, sockets, tests, levels, and timing data, within a Kalos 2 test program and immediately return to program debugging without the need to re-compile. Kalos 2 User Manual 419 6 - Test Debugger Introduction The Test Debugger (TBugger) utility provides the graphical user interface between the PC(XP) and the Kalos 2 tester. The interface is a collection of viewers and controls that allow the user to control, investigate, and change parameters of the Kalos 2 tester hardware using a device program test as the template. With this utility, users are able to read back and change test data without the need to re-compile or reload the test program. It allows the flexibility needed for interactive creation and debugging of test programs while online. The effect of changes are seen immediately and turn around time for the creation of new test programs is reduced. Test Debugger uses the current test program as a template and requires a set breaktrap in Front Panel to read test components. Features of Test Debugger include the following: • Both text and graphical viewing capabilities for flow, sockets, tests, levels, and timing data of the selected test at the specified break point. • The ability to modify the specific components of the selected test. • Linkage for support of other tools, such as Shmoo. • Online operation capabilities only. The Test Debugger utility is launched by clicking on the Test Bugger icon (see Figure 224) or it can be selected (launched) from the Utilities TBUGGER menu item. Figure 224. Test Bugger Icon Click here to open the Test Bugger utility. A Release compile option, located in Kedit, restricts user access to the Test Debugger utility once a program is compiled. The Compile Options pulldown, chosen from the Kedit menu bar, is shown in Figure 225. 420 PN: 071-0359-02, October 2005 Introduction Figure 225. Compile Option Settings Click this area to set the Release (No TBugger support) compile option. When this option is set, and the user brings up the Front Panel and logs into the Engineering Property page, the Test Bugger icon is grayed out, resulting in no test debugger access. Kalos 2 User Manual 421 6 - Test Debugger Graphical User Interface The primary window (property page) display of the Test Debugger application is shown in Figure 226, This property page is subdivided into the following defined operational areas: 1. Menu bar - Interface for selecting the operations of the application. 2. Toolbar icon - Icon short cuts to the menu bar operations. 3. Control area - Select functional operations, controls, and a system monitor 4. View area - Tabbed views for selecting specific overviews with their respective components. Table and graphical views are available 5. Status bar - Displays messages and status. Figure 226. Test Debugger Primary (Main) Window 1 2 3 4 5 422 PN: 071-0359-02, October 2005 Test Debugger Application Test Debugger Application The Test Debugger utility is an application consisting of two modes of operation for its respective functions: Breaktrap or Selected. Breaktrap requires the Front Panel to set a breaktrap, thus enabling it to read (get) the current test components and allow for viewing and modification (set) of these components. Selected allows the selection of data and or table data from the loaded program for viewing and modification (set) of these components. Online mode of operation is the only mode available when using the Test Debugger. All editing property pages have some common operations for getting, setting, and selecting the respective resource slice for editing. These operations are located in the property page’s control area (top of the selected page). The Get and Set buttons, if available for the respective property page, are used to update or send the Test Debugger current data table. Some of the property pages have an Apply button, which is a superior set operation. The Apply executes the set function and then applies the specific resource table to the Kalos 2 hardware. The Break Test button, if available for the respective property page, allows the user to select a specific test (Break Test) or select a specific slice type for editing. NOTE — Any restart of testing shows the effects of the modified slice resource. This is because the program was permanently changed. In all table displays, the white areas are used for editing and the light-gray areas are not available for editing. The following is a description of the functionality of each property page. Refer to the specific property page sections in this chapter for detailed information. Overview Displays an overview of all programming slices of the loaded program. No editing operations are allowed on this property page. Socket A current file viewer. Displays the socket file of the loaded program. A sub-page (graphic) is available for viewing the device package of choice. No editing operations are allowed on this property page. Flow Allows for editing of the Bin and Flow tables of the loaded program. As with all table displays, the white areas are for editing and the light-gray areas are not available for editing. Three views are available on this page: Bin Table, Flow Table, and Flow Diagram. Bin Table - The default view. The current Bin file is viewed here. This table represents the bin conditions, made up of a bin name, Sort Kalos 2 User Manual 423 6 - Test Debugger (Hard Bins), Counter (Soft Bins), and PASS/FAIL Designation. Flow Table - Allows for editing of the Flow Table of the loaded program (white areas only). Flow Diagram - A viewer that combines the Bin and Flow Tables and integrates them into a flow diagram. 424 Test The selected test slice, which is determined by Select Test or Break Test (pointing to the highlighted text field), displays the overall block components or the element editing for the test components. The editing also includes the test identifiers and the sequence elements. Any modification to the test enables the Set button (yellow), which the user must activate if the modification is to be invoked in the program. Sequence In a similar manner to the Test property page, the Sequence page allows the user to edit the Sequence elements. Levels Allows for modification of all level values by either selecting an element from a pulldown list or by editing the text field. Timings Allows for modification of all timing values by either selecting an element from a pulldown list or by editing the text field. DPS/PMU Allows for modification of all DPS and PMU modes and values by either selecting an element from a pulldown list or by editing the test field. Setups Shmoo and Valuelog setup tables and expression sequence editors. Allows for modification of setup values by editing the respective text field (white area only). Cons/Vars (Constants and Variables) allows for modification of variable values or expressions by editing the respective text field (white areas only). Also displays the constants and their respective values, however, modifications to these areas are not allowed. Misc(nvm,pat...) Displays NVM loadboard data, pattern statement fail modes (which can be changed by way of the Patterns tab), and waveform (AWT) statement. PN: 071-0359-02, October 2005 Test Debugger Application Primary Window (Overview) Functions The following is a description of features contained within the main Test Debugger Application window. See Figure 227 for locations. 1. Application control button - Enables Windows pulldown menu for Test Debugger Application controls. • Restore -Returns to the previous applications window condition. • Move - Allows screen positioning of the application window. • Size - Enables resizing of the applications window. • Minimize - Icons the application and closes associated windows. • Maximize - Enlarges the application window to its maximum size. • Close - Shuts down the application and all associated windows. 2. Title bar NOTE — Clicking the left mouse button in the title area enables direct window movement. Clicking the right mouse button launches the application control button dialog window. 3. Icon button - Minimizes the application window and shuts down all associated windows. 4. Maximize button - Enlarges the application window to its maximum allowed width and height. 5. Close button - Closes the Test Debugger Application GUI. 6. Menu bar - Interface for selecting the operations of the application. • File - Pulldown menu includes: SaveAs... - Saves the current debugging binary file (*.kbi) to a specified *.ktl file. Print tbugger_ktl... - Prints a hardcopy of the currently selected *.ktl program Exit - Closes the Test Debugger Application tool and all associated windows. Kalos 2 User Manual • Utilities - pulldown menu Launches the selected utility application. • Tools - Pulldown menu Launches the selected tool application. • Help - About TBugger Displays the current revision information. 425 6 - Test Debugger 7. Toolbar icons - Consist of three graphical buttons (Save As, Print tbugger_ktl, and About) that when clicked send save and print commands, as do menus and keyboard accelerators, for requested functions of the Test Debugger utility. The Help button displays software version information (see Figure 228). 8. Program, Flow, and Action - Displays the current test program, flow the system is operating under, and Breaktrap condition. 9. Property page (tabs) - Functional page selection: functional operations, interface controls; display tables, charts, and graphs; timing information, and system monitoring. 10. View area - Views for selecting specific overviews with their respective components. Graphical views are available when required. 11. Status bar - Displays messages and status. Figure 227. Overview (Primary Window) 1 7 6 5 3 2 4 8 9 10 11 426 PN: 071-0359-02, October 2005 Test Debugger Application Toolbar The Toolbar is an arrangement of three graphical icon buttons that when chosen execute commands. These buttons contain the most commonly used commands of the pulldown menu bar. The Toolbar comprises Save As, Print tbugger_ktl, and About buttons that when clicked send save and print commands, as do menus and keyboard accelerators, for requested functions of the Test Debugger utility, or display software version information. The following are definitions for the toolbar buttons shown in Figure 228: a. SaveAs - saves the current debugging binary file (*.kbi) to a specified *.ktl file. The selected file, ASCII text, is the entire program de-compiled from the binary file that is currently loaded. No comments are saved with this command. b. Print tbugger_ktl - allows the user to print a hardcopy of the currently selected *.ktl program (currently loaded). The entire program, de-compiled from binary to ASCII text, is sent to the selected printer. c. About TBugger - launches a dialog window and displays the current version information. Figure 228. Toolbar Icons A B Kalos 2 User Manual C 427 6 - Test Debugger Property Page Functions This section provides detailed descriptions on the functionality of each property page of the Test Debugger utility. Overview Window The Overview window (Test Debugger default window), as with all property pages, contains a row of property page tabs (see Figure 229) which open specified property pages. Each property page contains information regarding values set for a particular function of the Kalos 2 hardware and the current test program. Property pages display data in a text table format, some of the pages include a graphical representation. These views are designed for interfacing between the XP (non-real time) and the ETX (real time). In addition to providing a viewer for this information, each page allows modification of its data when the selected environment allows such changes. The view area of the Overview property page displays the current contents of each resource table in a device program. As shown in Figure 229, the Overview page displays an overview of the current loaded device program. The selection of a property page is accomplished by moving the cursor over the desired tab and clicking the left mouse button. This action selects the desired property page and brings it to the top of the stack for viewing. The following sections describe the functionality of each Test Debugger property page. 428 PN: 071-0359-02, October 2005 Property Page Functions Figure 229. Overview Property Page Property Page Tabs View Area Socket The Socket property page (see Figure 230) provides a view of the socket definition for the currently loaded test program file. The Socket property page, as with most property pages, is divided into two areas: control and display. Two views are available on this property page: Socket File and Package. Under the control area, the user can select either the Socket File (text table) or the Package display (graphical display) of the Device Under Test (DUT). The display area is a read only interruption of the current socket file. Socket File Socket File is the default view (see Figure 230) of the socket information. This is a spreadsheet formatted text representation of the current socket file. From left to right, the columns provide information on: DUT number, Dpins, Device Symbols and type of Dpin function; Pin Definition, Channel numbers and Assignment Type (Normal - Opt/ ECE). Kalos 2 User Manual 429 6 - Test Debugger Figure 230. Socket Property Page - Table Control Area Display Area Package The Package page view (see Figure 231) displays a graphical representation of the DUT; showing the mapping of the device pins to tester channels. The package type may be chosen manually from the choices at the top of the property page. The following package types are available: 430 DIP Dual inline package SOJ Small outline J-lead SOP Small outline package TSOP Thin small outline package FLAT Lead on both sides QUAD Quad small outline PN: 071-0359-02, October 2005 Property Page Functions PLCC Plastic leaded chip carrier The default view is of a plastic leaded chip carrier (PLCC). Figure 231. Socket Property Page - Package Package type choice option Flow The Flow property page (see Figure 232) displays information regarding the connection of tests and bins for the selected flow of the current test program. Three views are available by way of the control area: Bin Table, Flow Table, and Flow Diagram. The different views are accessed by clicking on their corresponding subproperty page tabs. Bin Table The Bin Table (default view) lists the data of the current bin file, row by row. This information includes Bin Name, Sort (Hard Bins), Counter (Soft Bins), and PASS/FAIL Designation. Kalos 2 User Manual 431 6 - Test Debugger Figure 232. Flow Property Page - Bin Table Control Area Display Area Flow Table The Flow Table displays the flow of the current test program in spreadsheet format (see Figure 233). The information listed in each column represents a test sequence made up of the Test Name, with its respective Pass Branch (Test or Bin), and Fail Branch (Test or Bin) conditions. This view does not confirm that the flow is correct, but simply shows the currently selected flow of the loaded. 432 PN: 071-0359-02, October 2005 Property Page Functions Figure 233. Flow Property Page - Flow Table Flow Diagram The Flow Diagram combines the Flow and Bin Table (see Figure 234). This is compiled, resulting in a graphical view. The graph displays the layout of the tests and bins for the current test program as a flow chart. Objects which represent tests and bins are connected by green and red lines which represent pass and fail conditions respectively. The test for which the breaktrap was set in Front Panel is highlighted in turquoise. There are two control buttons under the graphical view: Scale and Grid. The Scale button allows the user to zoom in or out of the display. Grid toggles between showing and hiding grid lines on the flow chart. Kalos 2 User Manual 433 6 - Test Debugger Figure 234. Flow Property Page - Flow Diagram Test The Test property page (see Figure 235) displays details about the current test for which the breaktrap was set in Front Panel. There are two views available: Break Test and Select Test. As with most property pages, Test is divided into two areas: control and display. The Test property page allows for viewing/displaying the contents of Break Test or any selected test of the currently loaded program by clicking on the Select Test/Break Test toggle button. In Figure 235, testppmu_fvmi_RZM is displayed. The Set button (enabled only after executing an edit in Test Elements), re-loads the modified test to the selected ETX slice. Unless debug modes of looping are being executed, the user must restart the device program to initiate changes. Test Blocks is a display (read only) area (see Figure 235). 434 PN: 071-0359-02, October 2005 Property Page Functions Test Blocks The Test Blocks property page is divided into four block areas. These blocks are provided for interpreting the displayed test, or a selected test of the current flow selection. They are Entries into Test, Test (composition), PASS Exit, and FAIL Exit. The Test Blocks display a read-only view of the instructions contained in the test for which the breaktrap was set in Front Panel. The first block contains the name of the instruction or test which occurred directly before the breaktrap was set. The middle block shows the contents of the breaktrapped test. The last two blocks show the names of the next instructions or tests to be executed. The path taken depends on whether the current test passes (green line) or fails (red line). Figure 235. Test Property Page - Test Blocks Control Area Display Area Test Elements The Test Elements property page (see Figure 236), also the test editor, is available by clicking the Test Elements button. This provides an alternate view of the current test status and component selections. Kalos 2 User Manual 435 6 - Test Debugger NOTE — A yellow highlighted “Set” button indicates the displayed test is different from the ETX test. TEST testppmu_fvmi_R2M is the selected program test name. The Edit Operations allow the user to edit selections in the “Selections” area to the test sequence by way of Edit Operations options. The Selections section displays all current *.ktl function calls and selectable slice tables for inserting and/or appending into the Sequence of the current test. The syntax of a test statement is shown in the example below. Any information enclosed in brackets [ ] is optional. TEST name = { [TESTNO = number;] [DESC = “string”;] [SEQUENCE = { item1, item2, ... itemN};] }; The following actions are available for use in the test sequence. Refer to the Kalos Test Language chapter of the KITE Reference manual for a definition of each test sequence. ADC(control) CRAM_CLR(ALL | loc) CRAM_LOG(“desc_text”, loc) CRAM_LOG(“msg”, loc) DELAY(time) ECR_CLR() ECR_CLR(PG1 | PG2 [, ALL]) ECR_CLR(PG1 | PG2, DUTwidth, Xsize, Ysize) FORCE(PMU [, voltage]) IF(CRAM(loc) operator expr2, true_sequence, false_sequence) IF(expr1 operator expr2, true_sequence, false_sequence) IF((FLAG&elope2),XT,XF) INC_FBIN(functional_bin) LOOP(count, sequence) MEAS(unit) ON(fkey, sequence) PAUSE() 436 PN: 071-0359-02, October 2005 Property Page Functions PG_RUN([pattern] | pc [, ALL_PINS]) PG_RUN (PRECOND) PG_STOP() PMUCONN(pin | dps | OPEN) PMU_RUN() PMU_SET_BUMP_V(voltage) SET(pin | dps, state) SET(var_name, value) SET(variable, expression) SET_ALT(pin, alternate state) SET_BIN(target_bin, source_bin) SET(flag) SYNC_CYCLE(name) SYNC_PC(pc) Kalos 2 User Manual 437 6 - Test Debugger Figure 236. Test Property Page - Test Elements Sequence The Sequence property page displays the details of any sequence(s) in a test for which the breaktrap was set, or any selected sequence of the current program in Front Panel (see Figure 237). Sequencer is used as a container of events that can be represented by a name. There are two views available: Break Test and Sequence. Clicking on the Break Test/Sequence toggle button allows interaction between the Break Test or any selected Sequence of the currently loaded program. The functionality and editing options of the Sequence are the same as the Test property page. 438 PN: 071-0359-02, October 2005 Property Page Functions Figure 237. Sequence Property Page Select a Sequence Levels The Levels property page displays up to eight DC levels for each pin of a device under test. Available levels include VIH, VIL, VOH, VOL, IOH, IOL, VTH, and VIHH. This information may be displayed in either spreadsheet of graphical format. Level Table The Level Table property page provides a text representation of the levels data in a spreadsheet format. This property page allows for interaction between the Break Test or any Level Table of the current loaded program. The Pin/Group and Chn Checker are view only property pages, while the Level Table page allows the user to edit and modify the loaded levels for each pin/group. The Apply/Set buttons allows the modified Level Table to re-load in the selected ETX slice. The difference is the Apply operation also sends the resource table to the Kalos 2 hardware. When selecting the Set operation (unless the debug modes of looping are being executed), the user must restart the device program to initiate changes. Kalos 2 User Manual 439 6 - Test Debugger NOTE — The Apply/Set buttons are active only if their backgrounds are highlighted yellow. The current Break Tests Level Tables or the selected Level Table controls allow for the selection of a specific Level Table of which can be viewed and/or edited. The selection of three types of views are available: Level Table (shown in Figure 238), Pin/Group, or Chn Checker. The Chn Checker view is a read only view of the Break Test or any Level Table of the currently loaded program that is decoded to the basic socket file components (Dpins). In the Level Table view, the white background cells are available for editing. All entries are checked against the respective system limits. NOTE — Undefined pins are shown in red text. Figure 238. Levels Property Page - Level Table Levels The Pin/Group view option (see Figure 239) displays a graphical representation of the levels information for a single pin. Levels for each device pin can be viewed by choosing the symbol for the desired pin from the PE Device Symbol pulldown menu. 440 PN: 071-0359-02, October 2005 Property Page Functions NOTE — The Test Debugger utility shows the levels in the applicable test as well as the levels in the sequence attached to the test. In other words it goes two levels deep when showing the levels settings for the tester hardware. If there is another sequence, nested within the original sequence, the levels feature is unable to display those levels. Figure 239. Levels Property Page - Pin/Group PE Device Symbol Selection Timings EdgeSet displays the timing, Format and Period, data in a spreadsheet format. The Chn Checker and Waveforms are view only pages. The white fields in the Timings, can be edited/modified. The Apply/Set buttons allow the modified cycle table to re-load in the selected ETX slice. The difference is the Apply operation also sends the resource table to the Kalos 2 hardware. When selecting the Set operation (unless the debug modes of looping are being executed), the user must restart the device program to initiate changes. NOTE — The Apply/Set buttons are active only if their backgrounds are highlighted yellow. Kalos 2 User Manual 441 6 - Test Debugger The current Break Tests cycle table or the selected cycle table controls allow for the selection of a specific cycle table for viewing and/or editing. The user can tab through and select which one of the three views to display: EdgeSet, Chn Checker, or Waveforms. Figure 240 shows the EdgeSet property page with the white background cells available for editing. All entries are checked against the respective system limits. NOTE — If a Kalos 1 program is loaded or if Kalos 1 timing tables are included, then Timings, Format, and Period property pages are provided. In this case, a button appears (in the Cycles field) that allows you to switch back and forth. Figure 240. Timings Property Page - Timings EdgeSet Chn Checker The Chn Checker property page allows for a Device Pin checker for their respective resources. This is a view only property page. 442 PN: 071-0359-02, October 2005 Property Page Functions Waveforms The Waveforms view in Figure 241 shows a read-only display of the timing waveforms for each pin. Figure 241. Timings Property Page - Waveforms DPS/PMU The DPS (power supplies) Setups (tab) editor on the DPS/PMU property page (see Figure 242) allows for interaction between the Break Test or any selected DPSSET of the current loaded program. The Apply/Set buttons reload the modified DPSSET in the selected ETX slice. The difference is the Apply operation also sends the resource table to the Kalos 2 hardware (if it is displayed in yellow). When selecting the Set operation (unless the debug modes of looping are being executed), the user must restart the device program to initiate changes. NOTE — The Apply/Set buttons are active only if their backgrounds are highlighted yellow. Kalos 2 User Manual 443 6 - Test Debugger By selecting Break Test, if the Break Test sequencer has a DPSSET or DPSSETs, the user can select one for display and modification. NOTE — If the Break Test sequencer has no DPSSET present, the selection must be the DPSSET Tables. Figure 242. DPS/PMU Property Page DPS Setups Tab The PMU Setups (tab) editor on the DPS/PMU property page (see Figure 243) allows for interaction between the Break Test or any selected PMU test of the currently loaded program. The Apply/Set buttons allows the modified PMU test to re-load in the selected ETX slice. The difference is the Apply operation also sends the resource table to the Kalos 2 hardware. When selecting the Set operation (unless the debug modes of looping are being executed), the user must restart the device program to initiate changes. NOTE — The Apply/Set buttons are active only if their backgrounds are highlighted yellow. The PMU test of the current test can be displayed and its setup viewed and/or edited. The selected PMU conditions are displayed by entering the test string or by way of the pulldown selection. All or any conditions can be changed. 444 PN: 071-0359-02, October 2005 Property Page Functions Figure 243. DPS/PMU Property Page PMU Setups Tab Setups Setups are Shmoo and Valuelog setup tables and expression sequence editors (see Figure 244). This allows for modification of setup values by editing the respective text field (white area only). A toggle button in the upper left corner of the page allows the user to select Shmoo or VLog. If shmoo is selected, the user can select a shmoo table from the Shmoo Table drop-down menu. If VLog is selected, the user can select a value log table from the VLog Table drop-down menu. Kalos 2 User Manual 445 6 - Test Debugger Figure 244. Setups Property Page Cons/Vars Constants and Variables (Cons/Vars) allows for modification of variable values or expressions by editing the respective text field (white areas only). See Figure 245. Also displayed are the constants and their respective values, however, modifications are not allowed. A program is easier to read and change if certain numbers are assigned a name. A CONSTANT statement assigns a unique name to a defined value. Once defined, a CONSTANT is substituted anywhere within the test program where a value or varexpr is used. A VARIABLE is a storage place for numbers. When it is created it is assigned a unique name and a value using the VARIABLE statement. Once created and assigned a value it may be substituted anywhere within the test program where a number would normally be used. The DPSSET, PMUTEST, TSET_TABLE, PSET_TABLE, TIMING, and LEVELS all accept variable expressions (var-expr) when assigning values to their associated resources. 446 PN: 071-0359-02, October 2005 Property Page Functions Variables provide a powerful tool for runtime modification of resource values. They can also be used to make decisions within a C-Hook using TPEGetVar() and TPESetVar(). Variables that do not reference other variables are referred to as scalar. Only scalar variables can be modified using TPESetVar() or the SET option in a SEQUENCE statement. Refer to the Kalos Test Language chapter of the KITE Reference Manual for additional information, definitions, and examples of variables. NOTE — The maximum amount of variables and constants available to users is 2048 on a Kalos 2 tester. On a Kalos 1 tester, the maximum amount available is 1024. Figure 245. Cons/Vars Property Page Misc(nvm,pat...) The Misc(nvm,pat...) property page displays NVM loadboard data, and pattern statement fail modes of which can be changed by way of the Patterns tab. Kalos 2 User Manual 447 6 - Test Debugger NVM ID’s The NVM ID's property page (see Figure 246) displays selected fields from the optional Non-Volatile Memory (NVM) on the Device Interface Board (DIB) of the Kalos 2 test system. The INTERFACE_ID table is not currently supported in KTL. The following fields are read from the loadboard on the system, and displayed in the LOAD_BOARD field: Serial Number - up to 16 character string Part Number - up to 16 character string User String 1 - up to 16 character string User String 2 - up to 16 character string Use the Read (Refresh) NVM button to read the loadboard data, and display it in the LOAD_BOARD fields of the NVMDIB ID property page. If an NVM device with the PIB board part number, serial number, and path exists, the contents can be read by selecting DBI Info from Front Panel, then select Utilities => NVMDIB to launch the dib- [NVM View] window. Program help is provided in the Device Interface Board NVM User’s Guide. This guide is accessed from the dib- [NVM View] window. From this window, select Help => User Guide. 448 PN: 071-0359-02, October 2005 Property Page Functions Figure 246. Misc NVM ID’s Property Page Patterns Tab The Patterns property page, shown in Figure 247, allows the user to view the patterns statements that are listed within the loaded test program and modify the FAIL_MODE argument in the patterns statement. The fail modes are: • Abort_on_fail - Encounters a failure and stops the pattern burst. Then goes to the fail flow call. • Continue_On_Fail - Completes the pattern burst and then goes to the fail flow call. Kalos 2 User Manual 449 6 - Test Debugger Figure 247. Misc Patterns Property Page 450 PN: 071-0359-02, October 2005 7 SHMOO AND BITMAP TOOLS This chapter provides operational descriptions of Shmoo and Bitmap tools. An introduction to the BitPower tool is also provided. The Shmoo tool includes multiple applications, Pin Monitor, and Value Log. The shmoo is used to characterize various parameters of the device under test by creating a graphic display of the relationship between defined parameters over a range of values. Setup parameters are easily entered at any time for any test program. A total of 4096 tracking parameters per axis are available, and any parameter of the tester can be shmooed against any other. The Pin Monitor is an application that allows the user to evaluate the performance of a DUT on a per pin basis. The evaluation is performed by creating one dimensional shmoo plots of each system resource that is allocated to a pin, with pass/fail criteria supplied by the breaktrap test. The Value Log application provides an AC Datalogger that is available on Kalos 2 test systems. Two types of test execution are available to users: a binary (search) or a linear (sweep) test. The Bitmap tool has multiple operational modes available on Kalos 2 tester systems. These operations include online (data gathered using Kalos 2 Memory Tester) and offline (*.bfm files, saved during online/offline operations) interactions. The Bitmap viewer displays current (online) cell/address failures of the device under test. This includes two screen displays: Bitmap and MegaMap. The MegaMap is a compressed view of the total DUT’s bit array, whereas the Bitmap is a selected encompassed block of the MegaMap. Maximum size of the MegaMap is 256 x 256 compression. Maximum size of the Bitmap, selected block, is 1024 x 1024 (or 1 megabit display). Kalos 2 User Manual 451 7 - Shmoo and Bitmap Tools Introduction The Shmoo Application tool is used to characterize various parameters of the DUT by creating a graphic display of the relationship between two parameters over a range of values. Setup parameters are easily entered at any time for any test program. The Shmoo Application tool is a viewer that shows pass/fail regions of a selected device, and/or system variables plotted within a two-dimensional coordinate system. Basic features of this tool include the following: • One (1-D) and Two-dimensional (2-D) plot for normal, pass skip, linear, binary, linear log, and binary log shmoo plots. • Three-dimensional (3-D) plot for fail to pass or pass to fail surface displayed results in the third dimension. • DPS and DC parametric XY plot; the XY plot of forced versus measured values. • Accumulate operational mode for all plots except three-dimensional. • ASCII file operations including import setups, export setups, and print support. • Support for online and offline setup (import/export) operations. The Shmoo tool includes multiple applications. The Shmoo tool is the top level operation that incudes Pin Monitor and Valuelog property pages. The Pin Monitor is an application which allows the user to evaluate the performance of a DUT on a per pin basis. The evaluation is performed by creating one dimensional shmoo plots of each system resource that is allocated to a pin. This provides detailed information for the device margins with respect to the system resource, and is also helpful in debugging applications. The Value Log application provides an AC Datalogger that is available on Kalos 2 test systems. Two types of test execution are available to users: a binary (search) or a linear (sweep) test. The result is determined by the selected Setup, and is the pass point at the detected fail/pass region. 452 PN: 071-0359-02, October 2005 Shmoo Tool Shmoo Tool The Shmoo tool is accessible only in Engineering mode. That is, user login is required. The Shmoo tool can be launched by clicking on the Shmoo, PMon VLog icon located on the toolbar of Front Panel (see Figure 248) or by selecting Tools => Shmoo, PMon VLog from the menu bar. Figure 248. Shmoo, PMon, VLog Tools Click here to open the Shmoo (VLog/PMon) tool and applications Graphical User Interface The Shmoo Application tool is executed by selecting Tools => Shmoo from the Front Panel menu bar or clicking the Shmoo, PMon VLog button on the Front Panel toolbar. The main Shmoo Application window, shown in Figure 249 in its minimized state, is subdivided into the following defined operational areas. Kalos 2 User Manual • Menu Bar • Toolbar • Control Area • Header • View Area 453 7 - Shmoo and Bitmap Tools Figure 249. Shmoo Primary Window Menu Bar Toolbar Control Area Header View Area (Message Area) Menu Bar The menu bar contains pulldown menu controls that include File, Edit, View, Selects, Utilities, Tools, and Help. The following describes each item on the menu bar: • 454 File - Pulldown menu includes: Export Setups Saves all current setups. Import Setups Erases the current setups, then reads the setups of the selected file into the application. Print Schedules a print hard copy or write file operation for the current shmoo plot screen. Output is an ASCII data printout or file. PN: 071-0359-02, October 2005 Shmoo Tool Print Preview Displays a screen view of how the file will look once it is printed, allowing the user to review the data before invoking the Print operation. Print Setup Allows setup, formatting and path control of the print operation. Shmoo (*.shm) Open File Opens *.shm (shmoo file extension) file for saving shmoo plots. Save to File Option to manually save the current completed shmoo plot to the Open *.shm file. Auto Save to Open File Sets automatic save at the completion of each shmoo plot. Composite (*.acc) Open File Opens *.acc (composite shmoo file extension) file for saving a Composite Shmoo plot. User controlled save is the only option available. Save to File Option to manually save the current Composite Shmoo plot to the Open *.acc file. Exit Closes the Shmoo tool and any associated windows. • Edit - Pulldown menu The Edit pulldown menu contains a list of setup edit commands. These are available only when the Setup property page is selected. These commands are discussed in detail in the Setups Property Page section of this chapter. • Utilities - pulldown menu: Launches the selected utility application. • Tools - Pulldown menu; Launches the selected tool application. • Help - Pulldown menu (About Shmoo): Displays the current revision information for the Shmoo tool. Kalos 2 User Manual 455 7 - Shmoo and Bitmap Tools Toolbar The toolbar is an arrangement of graphical icon buttons, clustered in functional groups that when chosen, execute commands. These buttons contain the most commonly used commands of the File and Selects pulldown menu options located on the menu bar. When displayed, the toolbar is located directly below the menu bar of the main application window. Figure 250 shows the layout of the toolbar, and lists the command executed for each toolbar button. Figure 250. Shmoo Toolbar Export Import Setups Setups Print About Control Area The Control Area in Figure 249 contains buttons to start testing, stop testing, and clear the current shmoo data. Header The Header area in Figure 249 consists of a working shmoo plot header showing the current status of the X, Y and Z axes. View Area The view area provides a display of the selected property page. Moving the cursor over the desired tab and clicking the left mouse button accomplishes the selection of a property page. Shmoo Display (Property Page) The Shmoo display interface property page of the Shmoo Application, shown in Figure 251, illustrates a normal 2-D shmoo - VCC versus access timing. 456 PN: 071-0359-02, October 2005 Shmoo Tool Figure 251. Shmoo Display Datapoint area Datapoint The X and Y coordinates of a particular datapoint on the shmoo plot are shown in the Datapoint area (see Figure 251) of the Shmoo display view when the cursor is placed over that point in the plot. As the cursor moves, the current XY coordinates of the datapoint are displayed. X and Y coordinates are shown whether the shmoo plot has data or not. The read back values are up to date to the current selected X and Y axis variables. The Datapoint coordinates are displayed in the Point= section when clicking (left mouse button) on a datapoint in the view area. The Pt. Test re-executes the measurement for the selected datapoint. NOTE — Single point testing is only available in normal 2-D shmoo. Kalos 2 User Manual 457 7 - Shmoo and Bitmap Tools Colors The Colors section of the interface identify datapoints that passed, failed, or were not tested by color: All Pass - green All Fail - red Not Tested - gray Graphic Area The graphic area displays the current shmoo. 458 PN: 071-0359-02, October 2005 Setting Up the Shmoo Plot Setting Up the Shmoo Plot The user has exceptional control over shmoo plot parameters. Setting properties and conditions is accomplished by way of the shmoo graphical user interface. The property pages are used to the setup these conditions. Selects Property Page The shmoo plot Selects property page contains setup controls for XY origin, shmoo plot type, and defined variable setups for the X, Y, and Z axes. The variable setups are defined under the Setups property page. The Selects interface, shown in Figure 252, is divided into functional areas based on these basic controls. Figure 252. Selects Property Page Kalos 2 User Manual 459 7 - Shmoo and Bitmap Tools XY Origin The XY Origin condition allows the user to set the starting datapoint origin (step zero of the selected variables) of the current shmoo plot. When a new XY origin is chosen, the shmoo is redrawn using the new origin. There are four possible settings. The following describes each setting. Top Left Corner Places the origin at the upper-left corner of the shmoo display so that execution of the plot is from top to bottom and left to right. This is the default condition of the shmoo environment. Bottom Left Corner Resets the origin to the lower-left corner of shmoo display so that execution of the plot is from bottom to top and left to right. Top Right Corner Resets the origin to the upper-right corner of the shmoo display so that execution of the plot is from top to bottom and right to left. Bottom Right Corner Resets the origin to the lower-right corner of shmoo display so that execution of the plot is from bottom to top and right to left. NOTE — The shmoo origin can be chosen, from the top level shmoo, by mouse clicking the desired corner. Types The Types condition allows the user to choose the type of shmoo plot to be executed: One Dimensional (1-D), Two Dimensional (2-D), or Three Dimensional (3-D). 1-D Shmoo 1-D Shmoo setting causes the shmoo plot to be generated in one dimension along the X-axis so that only the X Select variable setup is active. There are no additional Type setups for a 1-D Shmoo. 460 Normal Shmoo Tests every datapoint from the first to the last point. BINARY Binary search - looks for a pass, then a fail, then selects the next test point in between those two points. (Binary search is faster than linear search.) PN: 071-0359-02, October 2005 Setting Up the Shmoo Plot Example 1. Starts pass/fail search in the center of X minimum/ maximum parameters. If pass: move the strobe to maximum X. If pass: move strobe to minimum X...If pass, move to...If pass move to... Continue until all test points are verified. Example 2. Starts pass/fail search in the center of X minimum/ maximum parameters. If pass: move strobe to maximum X. If pass: move strobe to minimum X...If fail, move to...If fail, move to... Continue until all test points are verified. LOG.BIN Performs the same search routine as the BINARY search, except that it only displays the last pass point and value at the last pass/fail boundary. LINEAR Linear search - looks for a pass/fail at each location. This is the most complete shmoo search. (Linear search is the slowest shmoo search.) Example Starts pass/fail search at the minimum X value. It strobes for pass/fail and places the result in shmoo display, then moves to the next [index]. This process is repeated until all locations are verified. LOG.LIN Performs the same search routine as the LINEAR search, except that it only displays the last pass point and value at the last pass/fail boundary. 2-D Shmoo 2-D Shmoo setting causes the shmoo plot to be generated in two dimensions along the X and Y axes. Both the X Select and Y Select variable setups are active. Normal (Pass/Fail) Shmoo Causes the fail datapoints of the generated shmoo plot to be represented by a red colored datapoint. No interpretation of the fail data is performed. Kalos 2 User Manual 461 7 - Shmoo and Bitmap Tools PMU Plot XY plot of PMU Forced variable (YAxis only) versus the measured value (XAxis). Also checks that breaktraps test has initial conditions (Engineering units and FVMI/FIMV) equal to the forced variable. Note: Only one PMU variable per setup is allowed. If multi-pins are to be measured then there must be a pre-defined pingroup for that selection. DPS IMEAS Plot XY plot of DPS forced variable (YAxis only) versus the measured value (XAxis). 3-D Shmoo This setting causes the shmoo plot to be generated in three dimensions along the X, Y versus Z axes. When this option is chosen, the sweep condition (sweep for fail or pass) for the Z axis variable setup is selected. Fail to Pass Sweep Enables execution of the Z axis sweep condition until a pass datapoint is detected. Pass to Fail Sweep Enables execution of the Z axis sweep condition until a fail datapoint is detected. Axis Selects Axis Selects provides information on the current shmoo plot conditions and allows for the selection of pass skip or pre-defined variable setups. Pass Skip Number Controls the skip datapoints between pass points along the X axis. This results in faster execution in the pass region, as a specified number of datapoints are skipped. A boundary shmoo plot is generated when the pass skip number is greater than or equal to the number of X axis steps. X Select This field allows the user to choose from a list of pre-defined axis variable setups. Left mouse click in the white area to view the list. Y Select This field allows the user to choose from a list of pre-defined axis variable setups. Left mouse click in the white area to view the list. 462 PN: 071-0359-02, October 2005 Setting Up the Shmoo Plot Z Select This field allows the user to choose from the list of pre-defined variable setups. Left mouse click in the white area to view the list. The Z Select option is activated when 3D Shmoo is selected. Start Value The axis start value (x, y, or z) displayed on the shmoo plot. Index Value The axis index value (x, y, or z). Size of step increments as shown in the shmoo plot. (The index value is independent for print and tracking values.) Steps Total number of steps/increments on the axis. The example in Figure 253 illustrates a 2-D Shmoo plot with the pass skip set to five. Figure 253. Pass Skip Example Kalos 2 User Manual 463 7 - Shmoo and Bitmap Tools ASCII Outputs Standard and optional shmoo plot ASCII base hardcopy printout options are available to users. The following is an ASCII representation of the three types of datapoints: Standard ( ) Fail tested (*) Pass (.) Not Optional (.) Fail tested (*) Pass ( ) Not Socket File Property Page The Socket File (Default) property page, shown in Figure 254, provides a viewer that displays the socket definition of the initialized tool. Two other views are available under Socket File: Get Online and Interactive. The default socket file has no relationship to any device type. Its primary use is to ensure that the application was initialized with predefined conditions: 16 IOs, 64 k of Addressing, and Device Symbols from Pn00 to Pn47. To modify the name associated with a particular device pin, click the left mouse button in the Device Symbols column. Clicking the left mouse button in the Pin Definition column allows you to modify a pin’s type, i.e., INPUT ADDRESS, NULL. The Assignment Type column allows you to modify the pattern generator assignment for a pin (see Figure 254). The Interactive button provides the option of editing the internal shmoo socket table. 464 PN: 071-0359-02, October 2005 Setting Up the Shmoo Plot Figure 254. Socket File Property Page - Default With Interactive Enabled Modify pin type information NOTE — The Socket File, defaults, property page condition has no interactive control operations. Online The Socket File (Online) property page, shown in Figure 255, provides a viewer that displays the socket definition of the currently loaded program file. The online Socket File property page shown in Figure 255, as with most property pages, is divided into two areas. The control area and the display area. Note the displayed area is a read only interruption of the current socket file. Kalos 2 User Manual 465 7 - Shmoo and Bitmap Tools If you have clicked on the Get Online button to display the current property page, the Socket File display is the text view of the current socket file. The first three columns show the device information of DPin, Device Symbols and the type of function of the Dpin. Whereas the remaining columns show the Kalos 2 system definitions channel number, DPS number, ground, the channel type and address decoder assignment. NOTE — The Socket File, Get Online, property page condition has no interactive control operations. Figure 255. Socket File Property Page (Online) Interactive The Socket File (Interactive) property page, shown in Figure 256, provides a viewer for displaying the socket definition of a user generated socket file. This property page is selected by clicking on Get Online->Transfer=>. 466 PN: 071-0359-02, October 2005 Setting Up the Shmoo Plot The interactive socket file might not have a relationship to any device type. It has multiple uses, with the main use of reading a *.csp (extension for source setup parameter) file into the tool to check and ensure pin and/or pingroups are in sync in the Setups. NOTE — The *.csp file extension can be used across Value Log, Bitmap, and Shmoo Plot tools/applications. Besides providing a compare table for the internal checks, this property page allows for Offline generation of Setups with valid checking. Figure 256. Socket File Property Page (Online->Transfer=>Interactive) Kalos 2 User Manual 467 7 - Shmoo and Bitmap Tools Setups Property Page The Setups property page contains edit functions for defining variable setups for the X, Y, and Z axes. The Setups property page, shown in Figure 257, contains a spreadsheet with data fields for user input of values that define the variable setups. The variable setups are then used to set the axis selects conditions on the Selects property page. Figure 257. Setups Property Page Axis Printout System Resource Variables Element Rows The following Setup Edit operations are available for a selected setup. These operations are also available on the Edit menu option. 468 • New • Delete • Rename • Clear PN: 071-0359-02, October 2005 Setting Up the Shmoo Plot Add Element allows you to add another element in the table. The following Add Element operations can be selected (added to the elements row) by clicking on the desired button: • Time • Voltage • Current • Period • DPS • PMU The minimum setup consists of the Axis Printout (METE) variables. These include parameter name, start value, index value, stop value, and number of datapoints (steps) to be executed from the start value. See Figure 257. Every axis setup has two edit areas: axis printout and system resource variables. The difference being the axis printout is not system related, therefore the values are not checked for boundary limits. New, Delete, Rename, or Clear operations for the selected setup are accomplished by way of the menu bar->Edit selection or by way of the pop-up menu, activated by right mouse clicking in the table area. Modification of the element row contents is performed by way of pulldown lists and/or text edit boxes. Both are activated by a single left mouse click in the respective table area. NOTE — As with all Kalos 2 applications, any field that is white in color can be edited, while grayed-out fields or options are either read-only or unavailable. The METE and all tracking parameters have individual start, index, and stop values with a common steps value. Although they all have entry points, only the following equation is used for each parameter entry: start value plus index value times step number equals the stop value. The assumption is if the user wants to control the parameter range by inputting the stop value (instead of the index value), then the step number must be entered before any stop value entrees. Changing the step number and/or the index values change the respective stop value(s). Figure 258 shows an example of an expanded complex setup with multiple device (system resources) variables. Elements 1 through 4 illustrate the use of device pin (DPin) symbols, whereas a pingroup can be substituted for these device pins (if so defined). Either way is acceptable. The Element Edit: Delete... option allows you to delete any element in the table. The Insert... option allows you to insert an element before any other element. Kalos 2 User Manual 469 7 - Shmoo and Bitmap Tools Figure 258. Property Page - Setup Example Composites Property Page (Accumulate Mode) The Composites property page allows users to enable or disable the accumulate modes (see Figure 259). These modes are selected by clicking on the Accumulate toggle button in the Shmoo Display property page. Enabling this button allows you to display accumulated shmoo data in the Composites property page. The total number of devices currently accumulated is shown in the far left in the control area of the Composites property page. This counter increments only if the mode is enabled, the selected comparison status is equal, and the selected shmoo plot is completed. Two types of accumulate views are available: accumulate percent (10% steps) and threshold by categories (cut %). Threshold by categories considers the input value as a cut off figure and anything below it as a failed datapoint. Its view has a status zero pass, less than the value and equal or greater than the value. Percentage view is displayed by values of ten. 470 PN: 071-0359-02, October 2005 Setting Up the Shmoo Plot Figure 259. Composites Property Page Online Operations Online is the normal operational mode. In this mode, the software interacts with the tester hardware. Tests programmed by the user supply the pass/fail criteria and system resource setups. ASCII or Screen Print Operations Shmoo plots may be output to a printer or file, in ASCII or color hard copy. Color hard copy may include the entire Shmoo Application window or a specified region of the window. For color copies, use Ctrl + Alt + Print Screen to save the output to the clipboard. A third party software application (e.g., Paint) must be used to paste the content of the clipboard, then print the color copy to a printer. Kalos 2 User Manual 471 7 - Shmoo and Bitmap Tools One-Dimensional Shmoo Plot The 1-D Shmoo consists of a selected variable setup executed across a specified range, with the resulting pass/fail region displayed as a one line plot along the X-axis. Options include selected pass datapoint skipping, and all accumulation modes. Including the original datapoint, the minimum number of datapoints in the axis direction is two and the maximum number is 101 (origin and steps: steps 1 to 100). Figure 260 shows a single DUT, 1-D Shmoo plot. This is considered to be a normal 1D Shmoo. Figure 260. 1-D Normal Shmoo 472 PN: 071-0359-02, October 2005 Setting Up the Shmoo Plot Two-Dimensional Shmoo Plot A 2-D Shmoo plot consists of two selected variable setups executed across their respective ranges, with the resulting pass/fail regions displayed on a 2-D coordinate system. Options include interpretation of the fail datapoints, selected pass datapoint skipping, and all accumulation modes. Including the original datapoint, the minimum number of datapoint in either axis direction is two and the maximum number is 101 (origin and steps: steps 1 to 100). Figure 261 illustrates a single DUT 2-D Shmoo plot. This is considered to be a normal 2-D Shmoo. Figure 261. Normal 2-D Shmoo Plot Kalos 2 User Manual 473 7 - Shmoo and Bitmap Tools Three-Dimensional Shmoo Plot A 3-D Shmoo consists of three selected variable setups executing the assigned X and Y variables across their respective ranges, with the third variable, Z, executing either a fail to pass or pass to fail selection. Variable setups defined for 1-D or 2-D plots are available for the 3-D plot. An example of a standard 3-D Shmoo is shown in Figure 262. 474 PN: 071-0359-02, October 2005 Setting Up the Shmoo Plot Figure 262. Standard 3-D Shmoo Plot 3-Dimensional shmoo fail to pass 3-Dimensional shmoo pass to fail Kalos 2 User Manual 475 7 - Shmoo and Bitmap Tools None of the following options, defined for plots in one and two dimensions, are available for 3-D plots. • Pass-skip. The pass-skip number is forced to the value of 1. • Accumulate mode. Including the original datapoint, the minimum number of datapoint in either axis direction is two and the maximum number is 101 (origin and steps: steps 1 to 100). Color assignments for the 3-D Shmoo are determined by a threshold value. The reason for this is after the pass/fail/not tested color assignments are made, only 10 available colors are left. The threshold value acts like a slide bar. All steps below the threshold are represented by one color, and all steps above the threshold are represented by another color. The steps between the threshold values are then assigned unique colors. PMU and DPS Plots PMU and DPS XY plots are supported with Kalos 2 release. Accumulate Mode Accumulate mode is a background operation for accumulating multiple 1-D or 2-D Shmoo plots. This mode is selected by clicking on the Accumulate toggle button in the Shmoo Display property page. The resulting accumulation can be displayed interactively at any specified time. When accumulate mode is enabled, the current status of the accumulated data is displayed in the shmoo graphic area. The total number of devices accumulated is shown below the Accumulate button. This counter increments only when the following is true. • Accumulate mode is enabled. • The selected comparison status is equal. • The selected shmoo plot is completed. Two types of accumulate plots are available: accumulate percent and threshold by categories. Each is shown in Figure 263 and Figure 264. 476 PN: 071-0359-02, October 2005 Setting Up the Shmoo Plot Figure 263. Accumulate Passed Percentage Plot Program: filename Ser: 1 Lot: 1 Date: mon,day,year time Comment: user statement Level: tablename Time: tablename Pattern: sequencername Options: ......... X Axis: VariableName Start: 10.00nS Index: 0.500nS Steps: 50 Stop: 35.00nS Y Axis: VariableName Start: 5.000 V Index: 0.125 V Steps: 20 Stop: 1.000 V Accumulate Passed Percentage Plot Total Tested= 250 (Space)= 0%; (0)= 1-9%; (1)= 10-19%; (2)= 20-29%; (3)= 30-39%; (4)= 40-49%; (5)= 50-59%; (6)= 60-69%; (7)= 70-79%; (8)= 80-89%; (9)= 90-99%; (*)= 100% 5.000 V 4.000 V 3.000 V 2.000 V 1.000 V + ! ! ! ! + ! ! ! ! + ! ! ! ! + ! ! ! ! + Kalos 2 User Manual 12456************************************ 11234567*********************************** 3467777********************************** 4567777********************************* 56777********************************* 467788********************************* 56788********************************* 678888********************************* 78999********************************* 65677********************************* 55566********************************* 555556******************************* 445555***************************** 4444445*************************** 444445************************** 3334444************************* 33334************************* 22223************************ 121223*********************** 111222********************** 1111111111***************** 477 7 - Shmoo and Bitmap Tools Figure 264. Accumulate Passed Threshold Plot (Value = 50%) Program: filename Ser: 1 Lot: 1 Date: mon,day,year time Comment: user statement Level: tablename Time: tablename Pattern: sequencername Options: ......... X Axis: VariableName Start: 10.00nS Index: 0.500nS Steps: 50 Stop: 35.00nS Y Axis: VariableName Start: 5.000 V Index: 0.125 V Steps: 20 Stop: 1.000 V Accumulate Passed Threshold (Value= 50.0%) Plot Total Tested= 250 (Space)= 0%; (.)<Threshold; (*)>Threshold; 5.000 V 4.000 V 3.000 V 2.000 V 1.000 V 478 + ! ! ! ! + ! ! ! ! + ! ! ! ! + ! ! ! ! + ..........******************************* ............******************************** ............***************************** .........******************************* ......******************************** .......******************************** .........***************************** ...........**************************** ..........**************************** ........****************************** .......******************************* ...........************************** .......************************* .......********************** .........************** ...........************* ..........************** ..........**************** ......******************* ........****************** ...........**************** PN: 071-0359-02, October 2005 ASCII Printout Examples ASCII Printout Examples Figure 265 through Figure 271 are examples of ASCII shmoo plots which utilize the different options available for execution modes, and multiple DUT data gatherings for 1-D, 2-D, 3-D and, PMU plots. 1-D and 2-D Plots Figure 265. Basic 2-D (Default Setup) Program: filename Ser: 1 Date: mon,day,year time Comment: user statement Level: tablename Time: tablename Options: ........ X Axis: VariableName Start: 10.00nS Stop: 35.00nS Y Axis: VariableName Start: 5.000 V Stop: 1.000 V 5.000 V 4.000 V 3.000 V 2.000 V 1.000 V + ! ! ! ! + ! ! ! ! + ! ! ! ! + ! ! ! ! + Kalos 2 User Manual Lot: 1 Pattern: sequencername Index: 0.500nS Index: 0.125 V Steps: 50 Steps: 20 ***************************************** **************************************** *************************************** ************************************** ************************************** ************************************** ************************************** ************************************** ************************************** ************************************** ************************************** ************************************ ********************************** ******************************** ******************************* ****************************** ****************************** ***************************** **************************** *************************** *********************** 479 7 - Shmoo and Bitmap Tools Figure 266. Pass Skip 2-D (1 < PSkip# < XSteps) Program: filename Ser: 1 mon,day,year time Comment: user statement Level: tablename Time: tablename ........ X Axis: VariableName Start: 10.00nS 35.00nS Y Axis: VariableName Start: 5.000 V 2.000 V 5.000 V 4.000 V 3.000 V + ! ! ! ! + ! ! ! ! + ! ! ! ! Lot: 1 Date: Pattern: sequencername Index: 0.500nS Index: 0.125 V Steps: 50 Steps: 15 Options: Stop: Stop: *....*....*....*....*....*....*....*....* *....*....*....*....*....*....*....*...* *....*....*....*....*....*....*....*..* *....*....*....*....*....*....*....*.* *....*....*....*....*....*....*....*.* *....*....*....*....*....*....*....*.* *....*....*....*....*....*....*....*.* *....*....*....*....*....*....*....*.* *....*....*....*....*....*....*....*.* *....*....*....*....*....*....*....*.* *....*....*....*....*....*....*....*.* *....*....*....*....*....*....*....* *....*....*....*...*....*....*...* *....*....*....*....*....*....** *....*....*....*....*....*....* 2.000 V+ +---------+---------+---------+---------+---------+ 10.00nS 15.00nS 20.00nS 25.00nS 30.00nS 35.00nS 480 PN: 071-0359-02, October 2005 ASCII Printout Examples Figure 267. Boundary Shmoo (PSkip >= XSteps) Program: filename Ser: 1 mon,day,year time Comment: user statement Level: tablename Time: tablename ........ X Axis: VariableName Start: 10.00nS 35.00nS Y Axis: VariableName Start: 5.000 V 1.000 V 5.000 V 4.000 3.000 2.000 1.000 Lot: 1 Date: Pattern: sequencername Index: 0.500nS Index: 0.125 V Steps: 50 Steps: 20 Options: Stop: Stop: + ! ! ! ! + ! ! ! ! + ! ! ! ! + ! ! ! ! + *.......................................* *......................................* *.....................................* *....................................* *.................................* V *.................................* *.................................* *.................................* *.................................* *.................................* V *................................* *..............................* *...........................* *...........................* *..........................* V *.........................* *..........................* *.........................* *........................* *.......................* V *...................* +---------+---------+---------+---------+---------+ 10.00nS 15.00nS 20.00nS 25.00nS 30.00nS 35.00nS Kalos 2 User Manual 481 7 - Shmoo and Bitmap Tools 3-D Plots Figure 268. 3-D Fail to Pass Program: filename Ser: 1 mon,day,year time Comment: user statement Level: tablename Time: tablename ........ X Axis: VariableName Start: 10.00nS 35.00nS Y Axis: VariableName Start: 5.000 V 2.000 V Y Axis: VariableName Start: 1.500 V 2.500 V Fail to Pass 3D Shmoo Plot ( )= All Fail; (1)= 1.600 V; (2)= 1.700 2.000 V; (*)= All Pass; (6)= 2.100 V; (7)= 2.200 2.500 V 5.000 V 4.000 V 3.000 V 2.000 V 482 + ! ! ! ! + ! ! ! ! + ! ! ! ! + Lot: 1 Date: Pattern: sequencername Index: 0.500nS Steps: 50 Options: Stop: Index: 0.125 V Steps: 15 Stop: Index: 0.100 V Steps: 10 Stop: V; (3)= 1.800 V; (4)= 1.900 V; (5)= V; (8)= 2.300 V; (9)= 2.400 V; (0)= 22222211111************************************ 2222111111*********************************** 333222211********************************** 33333332********************************* 54333333********************************* 555544433********************************* 55555544********************************* 6655555********************************* 666555555****************************** 76755555****************************** 8877666******************************* 9888877****************************** 9888888**************************** 99999987************************** 999098************************** 000999888888888888************ PN: 071-0359-02, October 2005 ASCII Printout Examples Figure 269. 3-D Pass to Fail Program: filename Ser: 1 mon,day,year time Comment: user statement Level: tablename Time: tablename ........ X Axis: VariableName Start: 10.00nS 35.00nS Y Axis: VariableName Start: 5.000 V 2.000 V Y Axis: VariableName Start: 2.500 V 1.500 V Pass to Fail 3D Shmoo Plot ( )= All Fail; (1)= 2.400 V; (2)= 2.300 2.000 V; (*)= All Pass; (6)= 1.900 V; (7)= 1.800 1.500 V 5.000 V 4.000 V 3.000 V 2.000 V + ! ! ! ! + ! ! ! ! + ! ! ! ! + Kalos 2 User Manual Lot: 1 Date: Pattern: sequencername Options: Index: 0.500nS Steps: 50 Stop: Index: 0.125 V Steps: 15 Stop: Index: -0.100 V Steps: 10 Stop: V; (3)= 2.200 V; (4)= 2.100 V; (5)= V; (8)= 1.700 V; (9)= 1.600 V; (0)= 88888899999************************************ 8888999999*********************************** 777888999********************************** 77777778********************************* 66777777********************************* 555566667********************************* 55555566********************************* 4444555********************************* 444555555****************************** 34335555****************************** 2233444******************************* 1121333****************************** 1122222**************************** 11111112************************** 001111************************** 000111111122222222************ 483 7 - Shmoo and Bitmap Tools PMU XY Plots Figure 270. PMU XY Plot Program: filename Ser: 1 Lot: 1 Date: mon,day,year time Comment: user statement Level: tablename Time: tablename Pattern: sequencername Options: ......... X Axis: VariableName Start:-1.500uA Index: -0.200uA Steps: 50 Stop: 1.000uA Y Axis: VariableName Start: 5.500 V Index: 0.100 V Steps: 20 Stop: 4.500 V 5.500 V 5.000 V + ! ! ! ! + ! ! * * * * * * * * PPMU Plots Figure 271. PPMU XY Plot (Leakage) Program: filename Ser: 1 Lot: 1 Date: mon,day,year time Comment: user statement Level: tablename Time: tablename Pattern: sequencername Options: ........ X Axis: VariableName Start:-1.500uA Index: -0.200uA Steps: 50 Stop: 1.000uA Y Axis: VariableName Start: 5.500 V Index: 0.100 V Steps: 20 Stop: 4.500 V 5.500 V 5.000 V 484 + ! ! ! ! + ! ! ! PN: 071-0359-02, October 2005 Shmoo Plot Example Shmoo Plot Example The following are the specifications for the shmoo plot example used in this section: Device used: 28F016SV 16-MBIT (1 MBIT x16) FlashFileTM MEMORY X-axis variables: PINGROUP DBUS = Pins DQ0...DQ15 NOTE — In KTL (Kalos Test Language), a PINGROUP can contain one or several pins. After a pingroup is defined, it can be used as a shorthand approach (shortcut) for referring to several related pins. Y-axis variables: VCC_1 Parameter tested: tACC = tAVQV = time(t) from address (A) valid (V) to the outputs (Q) becoming valid (V). Datasheet specification: tAVQV (max) = 70ns. Implementation 1. The following example is the method used to Breaktrap on the read_AAAA_fast pattern. 2. Figure 272 illustrates the timing diagram of the read cycle in the read_AAAA_fast pattern. Kalos 2 User Manual 485 7 - Shmoo and Bitmap Tools Figure 272. Read Cycle of read_AAAA_fast (Period is Set to 200 ns) T1= 5 ns CECONTROL OECONTROL WECONTROL T2= 90 ns T1= 10 ns T1= 5 ns T2= 90 ns T2= 95 ns T1= 80 ns T2= 85 ns DBUS T1= 5 ns T2= 90 ns ADDRESS The timing, format, and period for the cycle shown in Figure 272 are defined in the section of the KTL program quoted in the following KTL Program Segments: TSET, FSET, PSET. TSET tset4 = { DESC = "tset for read "; CECONTROL={ T1 = 5ns; T2 = 90ns; }; OECONTROL={ T1 = 10ns; T2 = 90ns; }; WECONTROL={ T1 = 5ns; T2 = 95ns; }; DBUS={ T1 = 80ns; T2 = 85ns; }; ADDRESS={ T1 = 5ns T2 = 90ns; }; }; 486 PN: 071-0359-02, October 2005 Shmoo Plot Example ...... ...... FSET fset6 = { DESC = "fset for read "; CECONTROL={ F1 = G2L; F2 = G2H; }; OECONTROL={ F1 = G2L; F2 = G2H; }; WECONTROL={ F1 = G2H; F2 = G2H; }; DBUS={ F1 = ED; F2 = DC; }; ADDRESS={ F1 = G2D; F2 = G2D; }; }; ..... ..... PSET pset2 = { DESC = "pset for read tests"; MAIN = 200ns; ALT = 200ns; }; 3. Create a shmoo plot to measure the minimum value of the address access time tACC. In order to achieve this, the DBUS pingroup on the X-axis must be moved from 85 ns (tACC = 80 ns) to 45 ns (tACC = 40 ns). Vary the value of VCC on the Y-axis from 2.5 V to 5 V. 4. Step 1: Before launching the Shmoo tool (application), the user must Breaktrap on the read_AAAA_fast test. In the Engineering property page of Front Panel, select BreakMeas. Then in BreakOnTest field: select the read_AAAA_fast test. Press Start button for the test program to execute. Step 2: From Front Panel, launch the Shmoo tool by selecting Tools => Shmoo from the menu bar. Kalos 2 User Manual 487 7 - Shmoo and Bitmap Tools Step 3: Once the Shmoo tool window is open, click on the Socket File property page tap, then click on the Get Online button to load the test program socket table into the Shmoo application. Step 4: Click on the Property page tab marked Setups. Step 5: Select Edit => New Setup from the menu bar. Enter TAA_neg_index for the name of this setup table. In Figure 272, the read cycle of read_AAAA_fast pattern illustrates that the strobe occurs at 80 ns. Therefore, in order to measure the minimum tACC of the 16 M device, the user must move the edge of the DBUS, in negative time, from 85 ns to 45 ns. By moving the edge of the DBUS in this manner, tACC varies between 80 ns and 40 ns (offset of 5 ns from address TI). Next select Edit => Add Time Element. Under Pin/Pin Group Symbol, select DBUS. Under Type, select TIM. Under Set#, select 3. Under CycleName, select read_tight_cycle. In KTL the TSET used is tset4 (Sets in shmoo are defined as Set#0, Set#1, Set#2 and so on. TSETs in KTL are defined as tset1, tset2, tset3 and so on. Therefore, Set#3 in the Shmoo tool corresponds to tset4 in KTL). Under Resource, select T1_EDGE. Under Start, enter 85 ns (tACC =80 ns). Under Index, type -2ns. This moves the edge backward 2 ns for each shmoo point. The Stop is grayed-out because it is a view only field. Next enter the Axis Printout Start value, Index value and steps. For this example, set the Start value to 80 ns, set the Index value to -2 ns, and set the number of Steps to 20. NOTE — The difference between the Axis Printout (Name, Start value, Index value, Steps) and the System Resource Variables (Pin/Pin Group Symbol, Type, Set#, Resource, Start, Index, Stop) is the Axis Printout is not system/hardware related. It simply defines the X and Y axis of the Shmoo display. In this example, the Axis Printout index and the System Variable index are both set to 2 ns. The TAA_neg_index setup is shown in Figure 273. 488 PN: 071-0359-02, October 2005 Shmoo Plot Example Figure 273. tACC_neg_index Setup Step 6: Next select Edit=> New Setup from the menu bar in order to enter VCC for the name of the second setup table. Then select Edit-> Add DPS Element. Under Pin/Pingroup Symbol, select VCC_1 and under Type, select DPS. Under Set#, 0 is now the only selection available since the DPS resource is independent of the tsets inside the KTL program. Under Resource, select VCC0_MAIN. Under Start, type 2.5 V. Under Index, type 100mV. The Stop is grayed-out because it is a view only field. Next enter the Axis Printout Start value, Index value, and Steps. For this example set the Start value to 2.5 V, set the Index value to 100 mV, and set the number of Steps to 25. The VCC setup is shown in Figure 274. Kalos 2 User Manual 489 7 - Shmoo and Bitmap Tools Figure 274. VCC Setup CC Step 7: Now that Setups are defined, select the Selects property page which allows the user to define a.) the XY origin (Top Left, Bottom Left, Top Right, Bottom Right), b.) the Type of shmoo (1D, 2D, 3D), and c.) which pre-defined variable Setup (from Steps 5 and 6) to plot on the X and Y axis. a.) For the XY origin, click on the box labeled Bottom Left Corner. b.) Under Types, select the 2Dimensional Shmoo. c.) In the Axis selects section, set the Pass Skip number to 1 and choose TAA_neg_index for the X Select and VCC for the Y Select. NOTE — Pass Skip number: controls the skip datapoints between the pass points. For example, if Pass Skip is set to 5, then the Shmoo keeps testing until it finds the first pass. Then it will not test the next five datapoints. If the fifth datapoint tested is a pass, then once again the next five datapoints are not tested (the system assumes the points not tested are passing datapoints). If however, the fifth datapoint tested is a fail, the system goes back to test every point that it skipped in the last five datapoints until it finds another passing datapoint, at which time the skipping process starts again. 490 PN: 071-0359-02, October 2005 Shmoo Plot Example The Select Property page is shown in Figure 275. Figure 275. Selects Property Page Step 8: Now that the Setups and Selects are defined, click on the Shmoo display property page. Once the Test button is pressed, the shmoo plot executes. Any given point on the plot results in either a Pass, Fail, or PassSkip and is represented by a matrix color on the grid display. Pass points are shown in green and Fail points are shown in red. Figure 276 shows the shmoo execution results of this example. Kalos 2 User Manual 491 7 - Shmoo and Bitmap Tools Figure 276. Shmoo Display 5. From the shmoo plot, note the access time tACC of the 16 M device at room temperature and at VCC=5 V is 50 ns. 6. In order to save the Setup to a File, select File=> Export Setups. 7. The shmoo plot can be printed by selecting Print from the File menu item. 492 PN: 071-0359-02, October 2005 Pin Monitor Pin Monitor Pin Monitor is an application which allows the user to evaluate the performance of a DUT on a per pin basis. The evaluation is performed by creating one dimensional shmoo plots of each resource that is allocated to a pin. This provides detailed resource marginality information of the device, and is also helpful in debugging applications. In order to use the Pin Monitor application, a breaktrap is set in the Front Panel on a functional test. Refer to Example 1, page 503, for information on breaktrap setting. The Pin Monitor application is separated into the following six tabs: 1. Pin Monitor tab 2. Power Setup tab 3. Level/Time Setup tab 4. Level tab 5. Times tab 6. Socket tab When selected, each tab provides a viewer (window) for the respective selection of the application. A description of each viewer follows. Pin Monitor Window The Pin Monitor window is used to view the shmoo plots that are generated by the tool. This window is divided into six subtabs which organize the tester channels type. The user may generate the plots by individual channel or as a group (see Figure 277). Kalos 2 User Manual 493 7 - Shmoo and Bitmap Tools Figure 277. Pin Monitor Window 6 5 7 1 2 3 4 8 9 10 Following is the description of each individual field of the Pin Monitor window: 1. Slices - shows the slice number on which the breaktrap is set. 2. Action - shows the test on which the breaktrap is set. 3. Pin Monitor Tab Selection - opens the window for the selected tab. 4. Pin Type - perform a test on a pin of that type by selecting one of these tabs. The tester channels are organized by the pin types. 5. Test - initiates testing of each resource for the selected pin after shmoo setups are created. 6. Stop - stops a test in progress. 7. Clear All - clears the results of a previous test. 8. Select Sequence - switches between Selected and Auto Sequence. When a test is initiated from Selected Sequence, the test is only performed on the selected pin. When a test is initiated from Auto Sequence, the test is performed one at a time on each pin of the selected pin type. 494 PN: 071-0359-02, October 2005 Pin Monitor 9. Individual - performs the test using one pin at a time. 10. Grouped - tests evaluate a resource by taking all pins into account. That is, all pins are tested at the same time and affect the outcome of a single result. To view the results, the pin that was selected when the test was initiated must remain selected. Power Setups Window The Power Setups window helps in characterizing device performance based on DUT power levels. Select the DPSSET used by the test on which the breaktrap is set. If the test explicitly defines a DPSSET, then choose the Break Test button (see Figure 278). If no DPSSET is defined and it is inherited from a previous test, then select the DPSSET manually. Once the DPSSET is selected, the tool automatically creates shmoo setups for the power pins on a per pin basis. These setups are based on the default values of the tool, but may be modified by the user (see Figure 278). Figure 278. Power Setups Window 2 1 4 Kalos 2 User Manual 3 5 6 7 8 9 10 495 7 - Shmoo and Bitmap Tools Following is the description of each individual field of the Power Setups window: 1. Break Test - switches between Break Test and DPSSET. When Break Test is selected, Pin Monitor retrieves the KTL programmed DPSSET from the test program. If DPSSET is selected, manually select the DPSSET. 2. Break Test/DPSSET - when Break Test is selected, this window acts as read only and displays the DPSSET retrieved from the test program. If DPSSET is selected, a drop-down menu appears. The user must use this drop-down menu to select the DPSSET used by the breaktrap. 3. DPS - shows currently selected DPSSET. 4. Names/Resources - shows the power supplies that are defined in that DPSSET. 5. Programmed - shows the value programmed in the test program for the respective power supply. 6. Start Value - shows the starting value of the shmoo, determined by the index and number of steps with the programmed value at the midpoint. 7. Stop Value - shows the stopping value of shmoo, determined by the index and number of steps with the programmed value at the midpoint. 8. *Index - when a DPSSET is selected, shmoo setup is generated based on the default index value, however the user may change the value by selecting one of the predefined values in this window. 9. *Steps - when a DPSSET is selected, shmoo setups are generated based on the default value of steps, however the user may change the value by selecting one of the predefined values in this window. 10. Reset button - returns the Index and Steps windows to the default values. NOTE — * Only index and steps can be changed. Level/Time Setups Window Level/Time Setups window allows the user to select the cycle and levels with which Pin Monitor generates the shmoo plots. Once this information is input, Pin Monitor automatically creates generic setups on a per pin basis for each resource that a pin is allocated to in the KTL program. These values may be adjusted manually on a per channel basis. This tab is separated into five subtabs which organize the channels by pin type for easier use, as shown in Figure 279. 496 PN: 071-0359-02, October 2005 Pin Monitor Figure 279. Level/Time Setups Window 1 2 4 3 5 6 7 8 9 10 11 12 13 Following is the description of each individual field of the Level/Time Setups window: 1. Break Test button - switches between Break Test and Level Table or EdgeSet respectively. When Break Test is selected, Pin Monitor retrieves the KTL programmed Level Table and EdgeSet from the test program. If Level Table or EdgeSet is selected, manually select the Level Table or EdgeSet. 2. BreakTest/Level /EdgeSet - when Break Test is selected, these windows act as read only and display the Level Table or EdgeSet retrieved from the test program. If Level Table or EdgeSet is selected, a drop-down menu appears. The user must use this drop-down menu to select the Level Table or EdgeSet used by the breaktrap. 3. Table - shows the current Level Table and EdgeSet. 4. EdgeSet - select the EdgeSet on which the breaktrap is set. 5. Address - separates the tester channels by pin type. The user must select a tab to view that pin type. Kalos 2 User Manual 497 7 - Shmoo and Bitmap Tools 6. Address Channel - select a single pin of the selected pin type to modify the shmoo setups for that pin. 7. Name/Resource - once a Level Table and EdgeSet are selected, this area shows the resources defined for the selected pin. 8. Programmed - shows the value programmed in the test program for the respective resource. 9. Start Value - shows the Starting value the shmoo starts at, determined by the index and number of steps with the programmed value at the midpoint. 10. Stop Value - shows the Stopping value the shmoo stops at, determined by the index and number of steps with the programmed value at the midpoint. 11. *Index - Shmoo generated setup is based on the default Index value; however, the user may change the value by selecting one of the predefined values in this field. 12. *Steps - Shmoo generated setup is based on the default Steps value; however, the user may change the value by selecting one of the predefined values in this field. 13. Reset button - returns the Index and Steps field tables to the default values. NOTE — * Index and steps can be changed. Levels Window The Levels window provides a view only window that displays the levels set in any Level Table contained in the KTL program. The user may select a Level Table for viewing, or allow the application to automatically select the Level Table used by the test on which the breaktrap is set. See Figure 280 for the layout of the Levels window. 498 PN: 071-0359-02, October 2005 Pin Monitor Figure 280. Levels Window 1 2 3 4 Following is the description of each field of the Levels window: 1. Break Test button - switches between Break Test and Level Table. When Break Test is selected, Pin Monitor retrieves the KTL programmed Level Table from the test program. If Level Table is selected, manually select the Level Table. 2. BreakTest/Level Table - when Break Test is selected, this window acts as read only and displays the Level Table retrieved from the test program. If Level Table is selected, a drop-down menu appears. Use this drop-down menu to select the Level Table used by the breaktrap. 3. Table - shows the currently selected Level Table. 4. Channel Levels - shows each tester channel with its pin name and the programmed value of each resource. Kalos 2 User Manual 499 7 - Shmoo and Bitmap Tools Times Window The Times tab displays a window that is similar to the Levels window. It allows the user to select an EdgeSet and view the timing and format information for that edgeset. Also, this application feature can automatically select the edgeset used by the test on which the breaktrap is set (see Figure 281). Figure 281. Times Window 1 2 4 3 5 6 7 Following is the description of each field of the Times window: 1. Break Test - switches between Break Test and EdgeSet. When Break Test is selected, Pin Monitor retrieves the KTL programmed EdgeSet from the test program. If EdgeSet is selected, manually select the EdgeSet. 2. Break Test/Level Table - when Break Test is selected, this window acts as read only and displays the EdgeSet retrieved from the test program. If EdgeSet is selected, a drop-down menu appears. Use this drop-down menu to select the EdgeSet used by the breaktrap. 3. Table - shows the currently selected EdgeSet. 500 PN: 071-0359-02, October 2005 Pin Monitor 4. EdgeSet - selects the EdgeSet number from the option list on which the breaktrap is set. 5. Period - shows the Period value used by the selected edgeset. 6. EdgeSet Index - shows the edgeset number used by the selected edgeset. 7. Channel (Formats) Times - shows each tester channel with its pin name and the programmed value of each resource. Socket Window The Socket window provides a view only display of the automatically inherited socket file from the test program loaded in Front Panel. This display allows the user to observe the DUT pin to tester channel assignments of the test program. Information concerning address steering and data bus width is also provided. See Figure 282 for the layout of the Socket window. Figure 282. Socket Window Kalos 2 User Manual 501 7 - Shmoo and Bitmap Tools Explicitly Defined Versus Inherited Resources Resources such as the Level Table, EdgeSet, and DPSSET may be retrieved by explicitly defining them within the test block or they can be inherited from a previous test block. Read_test explicitly defines these resources within the test block as follows: TEST Read_test = { TESTNO = 1; DESC = "Standard Read Test"; SEQUENCE = { normal_dps, // Explicitly defined DPSSET read_levels, // Explicitly defined Level Table edgeSet1, // Explicitly defined EdgeSet read__pat, PG_RUN }; }; Resources are inherited from a previous test block if a test which explicitly defined a resource is run, followed by a test which does not explicitly define that resource. When this occurs, the current test inherits the resource from the previous test. For example, if the Write_test is executed before running the Read_test, the Read_test inherits the DPSSET, Level Table, and EdgeSet from the Write_test. TEST Write_test = { TESTNO = 1; DESC = "Standard Write Test"; SEQUENCE = { normal_dps, // Explicitly defined DPSSET read_levels, // Explicitly defined Level Table edgeSet1, // Explicitly defined EdgeSet write_pat, PG_RUN }; }; TEST Read_test = { TESTNO = 1; DESC = "Standard Read Test"; SEQUENCE = { read__pat, PG_RUN }; }; 502 PN: 071-0359-02, October 2005 Pin Monitor This difference affects the way a user can configure the Pin Monitor application. If a resource is explicitly defined in a test block, the user can select the Break Test button to obtain the resource from the test program. However, if the resource is inherited from a previous test block, then the user must manually select the resource from the drop-down list in Pin Monitor window. Examples The following examples provide shmoo test procedures using the Pin Monitor application. Example 1 - Setting up and Running a Test on T1 of an I/O This example explains the procedure to run a shmoo on the T1 resource of an I/O channel. This procedure includes setting a breaktrap in Front Panel, configuring Pin Monitor, and setting up the shmoo parameters. This example also covers the different testing options available on the Pin Monitor application. Use the following procedure to run the Shmoo tool. 1. Prepare the device and load the test program in the Front Panel. 2. Select the flow type of the test program by choosing one of the options from the drop-down menu list of the Flow options (see Figure 283). Note that this option requires two or more available test flows. Kalos 2 User Manual 503 7 - Shmoo and Bitmap Tools Figure 283. Select Flow 3. Select the Engineering tab from Front Panel and enter the password. 4. Click the BreakMeas button and select the test on which the breaktrap is set (see Figure 284). 504 PN: 071-0359-02, October 2005 Pin Monitor Figure 284. Set Breaktrap 5. Click the Start button of Front Panel to initiate the breaktrap (see Figure 285). Kalos 2 User Manual 505 7 - Shmoo and Bitmap Tools Figure 285. Front Panel with Breaktrap Set 6. Click the Pin Monitor button on Front Panel to start the Pin Monitor application. 7. Click on the Level/Time Setups tab. 8. Select a Level Table either by clicking on the Break Test button (see Figure 287) or by manually selecting the Level Table (see Figure 286) used by the test on which the breaktrap is set. 506 PN: 071-0359-02, October 2005 Pin Monitor Figure 286. Manually Selecting Level Table 9. Select an EdgeSet either by clicking on the Break Test button (see Figure 287) or by manually selecting the EdgeSet (see Figure 288) used by the test on which the breaktrap is set. Kalos 2 User Manual 507 7 - Shmoo and Bitmap Tools Figure 287. Using the Break Test Button. 508 PN: 071-0359-02, October 2005 Pin Monitor Figure 288. Manually Selecting the EdgeSet 10. Select the edgeset that the breaktrap is set on (see Figure 289). Kalos 2 User Manual 509 7 - Shmoo and Bitmap Tools Figure 289. Selecting an EdgeSet 11. Click on the IOs subtab of the Level/Time Setups tab (see Figure 290). 510 PN: 071-0359-02, October 2005 Pin Monitor Figure 290. IOs Subtab 12. Adjust the Index and Step values for the shmoo. Adjusting these values changes the shmoo setups for all channels (see Figure 291). Kalos 2 User Manual 511 7 - Shmoo and Bitmap Tools Figure 291. Adjust Index. 13. Click the Pin Monitor tab. 14. Click the IO subtab of the Pin Monitor tab. 15. Select the IO channel to perform the test on. 16. Click the T1 button to run the shmoo of the T1 resource only. To run Pin Monitor test for all resources one at a time, click the Test button. NOTE — Since Selected Sequence and Individual are the defaults, the test is run on the single pin that is selected. 17. Click the Selected Sequence button to go to Auto Sequence mode, then click the T1 button again (see Figure 292). NOTE — In Auto Sequence mode, shmoo runs on each channel, one at a time. The user can view the results of each shmoo by selecting the desired channel. 512 PN: 071-0359-02, October 2005 Pin Monitor Figure 292. Auto Sequence Test 18. First click the Grouped Button then click the T1 button again (see Figure 293). NOTE — Clicking on the Grouped button automatically changes Pin Monitor to Selected Sequence mode and gives one final result as all of the channels are treated as one group. This result is visible only if the selected channel remains the same after the test is run. Kalos 2 User Manual 513 7 - Shmoo and Bitmap Tools Figure 293. Grouped Testing Example 2 - Characterization of Power Supplies This example shows how to setup and run shmoo testing of a power supply using the Pin Monitor application. Using Pin Monitor to initiate shmoo testing of a power supply is very similar to that of a channel. The following steps are used to setup and run the shmoo testing using Pin Monitor: 1. Set a breaktrap as shown in Example 1. 2. Initiate the Pin Monitor application. 3. Click the Power Setups tab. 4. Select a DPSSET either by clicking the Break Test button (see Figure 294) or by manually selecting the DPSSET used by the test on which the breaktrap is set (see Figure 295). 514 PN: 071-0359-02, October 2005 Pin Monitor Figure 294. Setting DPSSET Using the Break Test Button Kalos 2 User Manual 515 7 - Shmoo and Bitmap Tools Figure 295. Manually Selecting a DPSSET 5. Adjust the Index and Step values for the shmoo. Adjusting these values changes the shmoo setups for all channels (see Figure 291). 6. Click the Pin Monitor tab. 7. Click the Pwr subtab of the Pin Monitor viewer. 8. Select a power supply on which to perform the test. 9. Click the PS1M button to run the shmoo of the main resource only. To test all resources one at a time, click the Test button (see Figure 296). NOTE — Power supplies may not be tested in Grouped mode. 516 PN: 071-0359-02, October 2005 Pin Monitor Figure 296. Power Supply Shmoo Results Kalos 2 User Manual 517 7 - Shmoo and Bitmap Tools Value Log The Value Log application provides an AC Datalogger that is available on Kalos 2 test systems. Two types of test execution are available to users: a binary (search) or a linear (sweep) test. Parametric, PMU and/or PPMU, type of testing is not supported under this release. The result is determined by the selected Setup, and is the pass point at the detected fail/pass region. Define single test (selected row) or multiple testing (all rows). The start and stop test execution is determined by the pulldown, Start Test:, menu on the Value Log property page (see Figure 297). The Socket Table property page (see Figure 298) allows the user to select Get Online or Interactive Socket Table. If the Online Socket Table is being used, the device program controls the Value Log configurations, whereas the Interactive Socket Table allows the user to override any of the Value Log configurations. NOTE — The Online Socket Table cannot be modified directly, but it can be transferred to the Interactive Socket Table where generation, deletion, and/or modification can occur. The Value Log test variables setups (see Figure 298) are the same as defined by the Kalos 2 Shmoo and Bitmap tools. This allows the setups to be interchangeable between the tools. 518 PN: 071-0359-02, October 2005 Value Log Figure 297. Value Log Property Pages Value Log Property Page Start Test: menu Sequence Property Page Kalos 2 User Manual 519 7 - Shmoo and Bitmap Tools Figure 298. Value Log Socket Table and Setups Socket Table Setups 520 PN: 071-0359-02, October 2005 Bitmap Bitmap The Bitmap tool has multiple operational modes available on Kalos 2 tester systems. These operations include online (data gathered using Kalos 2 Memory Tester) and offline (*.bfm files, saved during online/offline operations) interactions. The Bitmap viewer displays current (online) cell/address failures of the device under test. This includes two screen displays: Bitmap and MegaMap. The MegaMap is a compressed view of the total DUT’s bit array, whereas the Bitmap is a selected encompassed block of the MegaMap. Maximum size of the MegaMap is 256 x 256 compression: 288 M-bit SRAM (1 SRAM), 576 x M-bits (2 SRAMs tied together) with the Bitmap having a maximum of a 1024 x 1024 (1 Meg) display of any place on the MegaMap (Zoom dependent). NOTE — If Zoom scale is: 1:1, the maximum cell representation is a 1M-bits. 16 : 16, the minimum cell representation is a 4 K-bits. The Bitmap tool is launched by clicking on the Bitmap icon (see Figure 299) or it can be selected (launched) from the Tools menu item. Figure 299. Bitmap Icon Click here to open the Bitmap tool. Property Pages The Bitmap tool property pages allow users to select which viewing operation to display. There are four selections available: Bitmap, Definitions (Display, Socket & Setups), Search Tables (Fail / User), and Overview & BIM Viewer. Property pages are selected by left mouse clicking on the desired property page tab. Bitmap (sub-pages Bitmap, Editor, and Scan) Includes the selection of the SRAM for ready display. Kalos 2 User Manual 521 7 - Shmoo and Bitmap Tools Definitions (Display, Socket & Setups) Display Online Socket file and Display Socket File. Socket Displays the currently configured socket table. Setups Set variable resource parameters for overriding the static conditions of the current test if the optional scanner operation is executed. Search Tables (Fail / User) Lists failures. Error by row or column preference to a text table. Overviews & BIM Viewer Overviews Hardware block diagram, support matrix configuration of the Kalos 2 288 Mega-bit SRAM with address steering definitions for pointing to the requested ECR sequence start and stop addresses (from SRAM minimum to maximum), and selected display configuration. .bim Viewer Allows the user to load and view BIM file (either text table or bitmap display). The primary windows (1 Mbit display see Figure 300, 256 Mbit see Figure 301) of the Bitmap are sub-divided into multiple view and/or control areas. These include the following, illustrated on Figure 300: 1. Menu Bar and Toolbar - Interface for selecting application operations. 2. Property Page (Tab) - Functional selection. 3. Breaktrap conditions - Controlled by way of the Front Panel. 4. Control Area - Specific control and mode selection. 5. Draw Area - Selected Bitmap View (max of 1024 x1024) with zooming. 6. Draw Area - MegaMap with compression, 288 M-bit SRAM (1 SRAM), 576 M-bits (2 SRAMs tied together). 7. Bitmap/Editor/Scan sub-page for the respective controls. 8. Application message line and status bars. 522 PN: 071-0359-02, October 2005 Bitmap Figure 300. Bitmap (Primary Window) 1 Mbit Display 1 2 3 4 6 5 7 8 Kalos 2 User Manual 523 7 - Shmoo and Bitmap Tools Figure 301. Bitmap (Primary Window) 256 Kbit Display Menu and Toolbar The following are descriptions of File menu and toolbar options. File Menu The following describes the File menu pulldown options. Get ECR Data via Mode Selected Get current ECR data from the specified Kalos 2 slice and its respective hardware. 524 PN: 071-0359-02, October 2005 Bitmap Set ECR Data via Mode Selected Set the application’s ECR data to the specified Kalos 2 slice and its respective hardware (width mode only). Import Setups Saves all current setup tables to a file, without deleting the setup tables (*.csp). Export Setups Deletes current setup tables and reads the selected file setup tables into the application (*.csp). Read *.bfm Opens a binary file (with *.bfm extension) and reads the Socket Definition and the ECR data into the application. Write *.bfm Saves selected Socket Definition and the ECR data to a binary file (with *.bfm extension). Bit Image File (*.bfm) reader Opens a previously created *bim file. Exit - Close the tool and all windows associated with it. NOTE — The *.bim file is a KTL generated file type used for bitmapping; either KLA (third party) or Kalos 2 Bitmap application. Toolbar The Bitmap toolbar is an arrangement of graphical buttons that when clicked send messages, as do menus and keyboard accelerators, for requested functions of the Bitmap tool. Below are definitions for the toolbar buttons (see Figure 302). 1. Import Setups - (same as the above File menu definition). 2. Export Setups - (same as the above File menu definition). 3. Read *.bfm - (same as Read *.bfm above File menu definition). 4. Write *.bfm - (same as Write *.bfm above File menu definition). 5. Read Bit Image File 6. Get ECR via Mode Selected - (same as Get ECR Data via Mode Selection File menu definition above). 7. Set ECR via Mode Selected - (same as Set ECR Data via Mode Selection File menu definition above). 8. Width Bitmap - width display. 9. Array Bitmap - array display. 10. Array Blocked Bitmap - block array display. Kalos 2 User Manual 525 7 - Shmoo and Bitmap Tools 11. IO Scrambler - I/O positioning. 12. Readback Expansion - read-back override. 13. About - displays the Bitmap About dialog box. Figure 302. Bitmap Toolbar 1 2 3 4 5 6 7 8 9 10 11 12 13 Bitmap Property Page The Bitmap Application provides two (2) display options, as shown in Figure 303, dependent upon the system monitor settings: 1600 x 1200 1Mbit display 1280 x 1024 256 Kbit display NOTE — Any setting below 1600 x 1200 but greater than 1280 x 1024 will configure to 1280 x 1024. 526 PN: 071-0359-02, October 2005 Bitmap Figure 303. Bitmap Property Page (Bitmap and Mega Options) l Mbit display 256 Kbit Kalos 2 User Manual 527 7 - Shmoo and Bitmap Tools The Editor (property page) subtab (see Figure 304) allows the user to change the bitmap by width, row, or column. This option is normally used to generate test suites, however it can be used as a compare feature by highlighting specified areas. Figure 304. Bitmap - Editor Subtab property page selections The Scan (property page) subtab allows operations for executing a Setup scan (1D Shmoo plot). The Scan operation consists of two steps for gathering and displaying Bitmaps. The First step is to execute a 1-D Shmoo plot, using the selected Setup Variable parameter. Then the user must select a datapoint on the visual 1-D plot and re-execute (single point) the selected point. If the selected point has failures, it gets current data from the selected Failed Memory and displays the results to the Mega and the Bitmap using the defined display settings. In Figure 305, the Bitmap Scan shows the initial control for the viewer’s dimensions. Activation of these operations are available by way of the subtab property page, Display, Socket & Setups selection. Breaktraps settings are required for this operation. The breaktrap conditions are highlighted on the Bitmap property page. 528 PN: 071-0359-02, October 2005 Bitmap Figure 305. Bitmap - Scan Test pt data pts Executing the scanner does not destroy the current Bitmap. Only when a data point value is set and the point test (Test pt) is executed does the Bitmap Application tool become updated. Definition - Display, Socket & Setups Property Page The Display, Socket & Setups (Definitions) property page allows the user to get online. If the Online Socket File is being used, the device program controls the Bitmap configurations, whereas the Display feature allows the user to override the socket setting of the DUT program. NOTE — The Online Socket File cannot be modified directly, but can be modified by the Display feature of the Bitmap tool. The Display, Socket & Setups property page, shown in Figure 306, provides a viewer that displays the socket file definition and setups of the initialized tool. Kalos 2 User Manual 529 7 - Shmoo and Bitmap Tools The Display by socket definition has no relationship to any device type. Its primary use is to ensure that the application is initialized with predefined conditions. The Display Socket File button updates the display by row, column, and IO selections to the socket table. NOTE — If the Display by socket file is compatible, a socket table is generated in the display, however it has no relationship to the socket table. Figure 306. Display, Socket & Setups (Definitions) Property Page Online Socket File Display Socket File NOTE — The Display Socket File property page condition has no interactive control operations. 530 PN: 071-0359-02, October 2005 Bitmap Online The Online Socket File, shown in Figure 307, provides a viewer that displays the socket definition of the currently loaded program file. This section of the property page is divided into three areas: display area, socket table, and scan setup area. Notice the Socket Table area is a read only display of the current socket file. The socket table display area is the text view of the current socket definition. The first four columns show the device information: DUT, DPin, IO Scram, and Device Symbols and the type of function of the Dpin. The remaining columns show the Kalos 2 system pin definitions, channel number, and assignment type. Figure 307. Online Socket File Property Page Online Socket File Kalos 2 User Manual 531 7 - Shmoo and Bitmap Tools Display The Display Socket File, shown in Figure 308, provides a bitmap display that allows you to configure the bitmap to the display by parameters (rows, columns, and I/O’s). Clicking on the Display Socket File button updates the display to reflect your selections. The socket table has multiple uses, with the main use of reading a *.vlg file into the tool to check and ensure pin and/or pingroups are in sync in the Setups. Besides providing a compare table for the internal checks, this property page allows for Offline generation of Setups with validity checking. Figure 308. Display Socket File Property Page 532 PN: 071-0359-02, October 2005 Bitmap Setups The Setups area of the Bitmap Application property page, shown in Figure 309, provides for scan editing functions. The test variables setups are the same as defined by the Kalos 2 Shmoo and Value Log tools. This allows the setups to be interchangeable between the tools. Editing functions that define variable setups (1-D shmoos use only one setup) are performed here. A spreadsheet containing data fields for user input of values that define the variable setups, used with the scan function of the Bitmap Application, is shown in Figure 309. Figure 309. Scan Setups Property Page Scan setup area The minimum setup consists of the Axis Printout (METE) variables. These include parameter name, start value, index value, stop value, and number of datapoints (steps) to be executed from the start value. Kalos 2 User Manual 533 7 - Shmoo and Bitmap Tools Every axis setup has two edit areas: axis printout and system resource variables. The difference between them is the axis printout is not system related, therefore the values are not checked for boundary limits. NOTE — On input, the system checks resource variables against their respective hardware limits. New, Delete, Rename, or Clear operations for the selected setup are accomplished by way of the menu bar->Edit selection or by way of the pop-up menu, activated by right mouse clicking in the table area. Modification of the element row contents is performed by way of the a pulldown lists and/or text edit boxes. Both are activated by a single left mouse click in the respective table area. NOTE — As with all Kalos 2 applications, any field that is white in color can be edited, while grayed-out fields or options are either read-only or unavailable. The METE and all tracking parameters have individual start, index, and stop values with a common steps value. Although they all have entry points, only the following equation is used for each parameter entry: start value plus index value times step number equals the stop value. If the user wants to control the parameter range by inputting the stop value instead of the index value, then the step number must be entered before any stop value entries. Changing the step number or the index value changes the respective stop value. Search Tables (Fail / User) Property Page The Search Tables (Fail / User) property page is used to search and display failures. Physical addresses of failures are listed in a text type table. The error is listed by row or column preference, selected from the Listing Criteria option, as shown in Figure 310. The measurement cell current from the bitmap feature allows the user to measure cell current at a failing address using the system PMU. Note that there must be syntax within the pattern to allow this feature to work. Also, a breaktrap setting of BreakOnSeq must selected by way of Front Panel. 534 PN: 071-0359-02, October 2005 Bitmap Figure 310. Search Tables (Fail / User) Property Page Measurement cell current feature Overview & BIM Viewer The Overview & BIM Viewer property page, shown in Figure 311, is a view only (overview sub-page) display of the Kalos 2 SRAM physical layout. Users can select either the Socket File definition or the Optional Views in the Source Selects area, the right hand side of the property page, to see the configuration of the SRAM. The Block Diagram window, depicted in the Enhanced Memory Unit (EMU) area (left side of the property page), shows the layout of the SRAM. The Support Matrix area, in the center of the property page, shows what the Bitmap Application supports. The Selected Display Configuration area, in the bottom center of the property page, shows the current selection of a bitmap with read-back diagrams. Kalos 2 User Manual 535 7 - Shmoo and Bitmap Tools NOTE — The BIM viewer has interactive control of Bitmap configuration and display settings. The base of the SRAM conditions is the current socket definition. If the width of the device being represented is smaller than the definition of the original socket definition, a pop up message informs the user that the configuration is not supported. NOTE — The Overview & BIM Viewer property page (Overview sub-page) has no interaction with the Bitmap operations. 536 PN: 071-0359-02, October 2005 Bitmap Figure 311. Overview Property Page - Block Diagram Enhanced Memory Unit (EMU) area Support Matrix area Source Selects area Selected Display area The *.bim Viewer (subtab) property page, shown in Figure 312, allows the user to load and view a .bim file. Text block information is read, bitmap can be viewed, or users can return to the top level bitmap to see the graphical representation. Editing functions cannot be perform on this page. Kalos 2 User Manual 537 7 - Shmoo and Bitmap Tools Figure 312. *.bim Viewer 538 PN: 071-0359-02, October 2005 BitPower BitPower BitPower tool is an optional application that allows the user to quickly and easily analyze failed bit information collected at wafer sort. Features include: • Compresses and consolidates bitmap files into one BitPower file per wafer. • Converts electrical addresses for failing bits into accurate topological addresses and physical mapping. • Converts and displays bitmap files for quick and easy identification of failed bit patterns at the wafer, die, and sub-die levels. • Provides a graphical user interface for easy comparison of test results, wafers, and die and wafer lots. • Increases and scales wafers and individual die. • Displays bin types for classification. • Allows users to change device types by resetting die configuration and wafer description. The BitPower system works with bitmap files generated during the wafer sort. The system consists of a group of applications that perform various functions to convert data and analyze bit failure patterns. For detailed information on using the BitPower tool, refer to the BitPowerTM Analysis System User Manual, supplied with the application. The BitPower tool is launched by clicking on the BitPower icon (see Figure 313) or it can be selected (launched) from the Tools menu item. Figure 313. BitPower Icon Click here to open the BitPower tool. Kalos 2 User Manual 539 7 - Shmoo and Bitmap Tools This page intentionally left blank. 540 PN: 071-0359-02, October 2005 A GLOSSARY OF TERMS This glossary defines terms particular to Credence test systems, as well as terms specific to ATE applications. These terms appear throughout all Credence highperformance tester manuals. Numerics A active load A programmable circuit that acts as a pullup or pulldown load when connected to a DUT pin. active test site An operational test site that has tester channel numbers present in the pinlists of the test program. A multisite device test starts with all operational sites active, as determined by a prober or handler device interface. If a device fails, its site is deactivated; that is, its channel numbers (pins) are removed from the pinlists. At the end of the test, all sites are activated again. ADC Analog to digital converter. APG Algorithmic pattern generator. API Application programming interface. A collection of functions or classes that are written in C or C++, or another programming language. argument A value or address passed to a function at the time of call; also referred to as actual parameter. ASIC Application specific integrated circuit. autorange The change of the measurement range by an automatic instrument so it can report with best accuracy a quantity at its input. Kalos 2 User Manual 541 A - Glossary of Terms B bidir Bidirectional access. Input/output, or I/O; used in phrases like bidir pin. board A single Kalos tester circuit board. board controller The dedicated controller for each Kalos board. It is an Intel Pentium microprocessor with 32-bit register-based RISC architecture. The Test Program Executor portion of the Kalos Test Language software resides on each board controller. breakpoint A point in a program where execution is suspended so that one may examine partial results. channel The tester functions and the path through a pingroup card and DUT fixture dedicated to one DUT pin. characterization test A series of tests designed to determine the operating regions and reliability of a device under varied operating conditions. chip Jargon for a packaged device; a synonym for die or integrated circuit (IC). clamp voltage A fixed voltage coupled by a diode or its equivalent to limit the voltage excursion of a transition or a current supply. CMOS Complementary medal-oxide semiconductor. comparator A circuit whose output is a digital logic level that depends on whether its input signal is above or below a threshold at a specified time interval. compare Application of functional data to a comparator in order to obtain the response. compliance voltage The voltage range a current source or sink can produce within its constant current specifications. continuous active load An active load for which arbitrarily specified voltage-current pairs are corrected from key pre-calibrated points by interpolation on the characteristic curves of the pullup and pulldown FETs. cycle time The time duration from the start of one cycle to the start of the next. C 542 PN: 071-0359-02, October 2005 D DAC Module Digital-to-analog converter module. This module works along with the level ASICs to control pin levels for all of the tester channels. data collection The collection of selected information in a file during a specified operation. data logging The recording of selected information during a specified operation, such as data recorded during a device-test run. data reduction The transformation of raw data, such as that logged during a device-test run, to human-usable forms, such as graphical representations and tables. DBM Data buffer memory. This is a mode for the memory module used during ROM testing. In DBM mode, the memory module supplies non-algorithmic data based on a address provided from the PG. debugger A process used for test-program development, device characterization, incoming inspection, and production-floor troubleshooting. DFT Design for test. DG Data generator. DGRAM Data generator RAM. diagnostic tests Tests intended to determine the cause of a possible malfunction and to suggest a repair strategy. die A piece of semiconductor with circuitry fabricated on it; one location on a wafer; compare chip. diode bridge A circuit contained within the PE chip. The purpose of the dynamic or I load is to provide accurate device loading to the DUT. The I load is a true constant current source that provides a user selectable IOH and IOL value. DPS DUT power supply. DRAM Dynamic random access memory. driver The circuitry that adds voltage levels to input signals and applies the results to a DUT pin. Kalos 2 User Manual 543 A - Glossary of Terms DUT Device under test. DUT fixture A circuit board that interfaces the test head to a device-undertest (DUT) socket, a probe card, or a connector for a device handler. It has pads to mate with the pogo pins on the pin-group cards in the test head and includes power terminals, signal lines (often microstrip), and connections for loads. EBD Binary file format for vector data. EBNF Extended Backus - Naur form. ECR Error capture RAM. Memory module responsible for mirroring the DUT and capturing the fails using device address as an index. edge An abrupt voltage or current change. edge-placement accuracy The precision within which an edge can be placed relative to a reference. EMU External memory unit. Comprises SRAM, DRAM and EMU controller. EOL End of lot. EOT End of test. EOW End of wafer. error A discrepancy between an expected value and a measured value. error capture The collection of a specified group of functional vectors upon detection of a functional error. file name Part of the identification used to locate a file on a volume. FLASH A high density EEPROM. force To stimulate DUT pins with formatted pattern data. E F 544 PN: 071-0359-02, October 2005 format To produce a waveform from pattern data and timing information in accordance with a format mode. FSET Format set - referring to driver formats. functional preconditioning Setting a logic device (for example, a counter) to a desired state by applying stimulus (sequencing through functional test vectors) and checking output until the desired state is reached. Also called match mode or loop-until-pass. functional test A process that applies pattern vectors to a device and checks the output to determine that the device is operating according to its truth table. go/no-go test A test with minimum and maximum limits that stops on the first error without performing any diagnostics, characterization, or actual measurements other than limit checking. GPIB General purpose interface bus. Defined by ANSI/IEEE 488 1978. guard band 1. (Device testing) Adjustment made to a DUT’s test specification to take into account test-system accuracy, repeatability, reproducibility, and correlation. G 2. (Wafer probing) Portion of a pad (on a die) taboo to a probe. During a probe-mark inspection, probe marks encroaching on the guard band are counted as bad. GUI Graphical user interface. Hex system A Kalos system with 16 boards installed in the test head. hexadecimal notation The representation of numbers in the positional number system with base 16. The sixteen hexadecimal digits are usually represented by 0-9, A-F. H Kalos 2 User Manual 545 A - Glossary of Terms I I/O channel An input/output tester port that is capable of both stimulating a device pin and monitoring a response from the same pin. inhibit To turn off a driver, placing it in a state that approximates an open circuit. Kalos Name of test system - however the word itself is a greek word for beauty, usually applied to masculine objects. It has overtones of usefulness. KBI Kalos test program binary interface. This is the executable test program file, with file name extension .kbi. KITE The Kalos software environment. An acronym for Kalos interactive testing environment. KNET Kalos network software functions and code. KPC Kalos pattern compiler. KPL Kalos pattern language. KTC Kalos test program language compiler. KTL Kalos test language. LAN Local area network. level ASIC One of several custom CMOS chips on the Kalos. The Level ASIC contains six tester channels worth of sample and hold circuits for controlling pin levels (VIH, VIL, VOH, VOL, IOH, IOL, VTH, and VIHH). library A collection of routines, data, or other material in a file from which a user can draw for use in a project such as a test program. K L 546 PN: 071-0359-02, October 2005 link 1. (scan) The data fed to a scan pin on one scan clock cycle — the scan equivalent of a parallel vector. 2. To join together two or more separately compiled program modules, usually with additional library modules, to form an executable program. lot (device production context) A group of semiconductor devices, usually from the same production run, treated as a unit. LSET Level set. LV Large vector memory. This refers to the memory module when used in vector testing mode. LVM Linear vector mode (PMODE 1). mask To set a comparator state used to ignore the result of a comparison. memory module The memory module, of which there are two per board. This memory can be used for DBM, ECR or Vector testing. microRAM (µRAM) The internal memory of the PG ASIC. A user’s test pattern is stored in the microRAM of the PG chip. module Synonym for Kalos circuit board. Comprises two slices. multidie probing Using probes on several dice on a wafer to conduct a parallel test of more than one die at a time. multisite Refers to more than one test site on a single test head. multisite testing Using a single test program and a single test head with more than one test site to test more than one device either in parallel or in sequence. The sequential test of two or more devices is called a ping-pong test. MUX Multiplexer. non-volatile A memory device type that does not require a power source to maintain its data contents. M N Kalos 2 User Manual 547 A - Glossary of Terms O Omni A highly integrated .18 u CMOS chip comprising timing, formatting, pattern sequencing, and algorithmic pattern generation for 48 I/O channels and 2 utility channels. operational test sites Test sites on a multisite test head declared on to the test program. This assures that a test site is usable—no broken socket, channel runs exist. An operator can declare test sites non-operational. PAC Pin analog controller. parallel test Testing more than one device simultaneously using a single test program and a test head with more than one test site. parameter A quantity in a function (or subroutine), or at a device port, the value of which is selected according to circumstances. Parameters are distinguished from variables — recorded measurements — and constants — fixed values. A formal parameter is one defined within a function. parameter file A data set containing the voltage, current and timing information for a specified test on a particular device. parametric test The measurement and verification of terminal voltage and current characteristics at a device pin. PASM Pattern assembler/loader. pattern The binary data applied to and expected from a DUT during a functional test. pattern vector The pattern data applied to and expected from a DUT during one test cycle. PBI Pattern binary interface. Files of this type have a .pbi extension. PE Pin electronics - mainly the driver, comparator and active load. PE ASIC The pin electronics ASIC. Each PE ASIC contains four tester channels and provides driver, dual comparator, and dynamic load circuitry per pin. P 548 PN: 071-0359-02, October 2005 PG Pattern generator. Contains a 2K deep microRAM, several scramble memories and muxing circuitry to get an address or I/O signal to any Kalos pin. Also in the PG are fail counters for ECR mode. pin A metal stem connected to circuitry on a chip to enable external access. pinlist An array of pin-name/channel-number pairs. PLD Programmable-logic device (the target DUT for the tri-level driver). PMU Parametric measurement unit. pogo pin A kind of spring-loaded pin formed of two small tubular sections joined together with an internal spring and with a contactor formed on the end of the smaller tube; used to contact pads on a circuit board. programmable logic levels The signal and reference voltage levels applied to the driver and comparator rails. PSET Period set - referring to timing parameters for periods. PTC Pull to center; a load tied to a voltage midway between a specified high voltage and a specified low voltage. PTU Parametric test unit - used for go/nogo parametric testing. PVM A synonym for vector mode. resource In the Kalos Test Language (KTL), a resource is a component of a test program which contains data to be applied to the DUT. RISC Reduced-instruction-set computer. RS-232C An ANSI standard interface for interconnecting computers and peripherals such as terminals, device handlers, and wafer probers. R Kalos 2 User Manual 549 A - Glossary of Terms S 550 SAC System analog controller. SBC Surround by complement. Precede and trail a force pulse by its complement within a test cycle. SCAN DFT methodology which uses dedicated, embedded shift registers. shmoo plot A one-axis or two-axis pass/fail plot of a series of measurements corresponding to plot coordinates, thus showing the operating region for a device for those parameters. shutdown The (usually graceful) termination of operation-system execution on a processor (or system of processors). sink current (active load) Conventional current flow into a DUT with the active load as pullup. sink voltage (active load) Terminal voltage at a DUT acting as current sink. site A DUT position on a test head with more than one such position. site number A number that identifies a site location on the test head. skew The effect of different propagation delays between signal origins and device pins (or other points, for example, probes). slew rate Rate of change of a voltage or current. slice One 48-channel component of a Kalos circuit board (module). socket table In the Kalos Test Language (KTL), a data structure that contains pin maps and pin resource definitions. source current (active load) Conventional current flow out of a DUT with the active load as pulldown. source voltage (active load) Terminal voltage at a DUT acting as current source. spooler A process that queues jobs for background printing (or other tasks). SRAM Static random access memory. EMU memory for data generation and error capture. PN: 071-0359-02, October 2005 strobe A signal that clocks a logic state into a latch or D flip-flop. In a semiconductor test, an edge strobe records a comparison result at a specified instant in the cycle; a window strobe records any error occurring during a timed interval. switch ASIC Another custom CMOS chip on Kalos 2. The switch ASIC serves several purposes. First, it provides for electrical disconnect of the Pin Electronics and the PMU from the DUT. Second, it provides the Vihh drive circuitry, and finally it provides the Thevenin resistive load. There are six channels per Switch ASIC. TØ Time zero—the instance used as the reference for the timed events of a device test during one clock cycle. terabit Ten to the twelfth (1012) bits. test specification A document defining the operational parameters of a device. tester An assembly of apparatus used for evaluating semiconductor devices. TG The timing generator. Each TG ASIC provides timeset, format and period memories and verniers for six tester channels. Thevenin load The Kalos 2 contains a variable resistor with a programmable bias supply behind it. This can be used to provide device loading (either as a pullup or pulldown load) or as a source of termination. time-out An error event that occurs after a maximum time interval for an expected event. timing set Timing set. The specification of cycle length and edge placements that can be referenced collectively for up to four edges. TPE Test program executor. A portion of the Kalos 2 test operating system which runs on the CPU of each Kalos 2 board. trace To monitor the execution of a program and report the sequence of actions carried out. T Kalos 2 User Manual 551 A - Glossary of Terms tristate A high-impedance third state for a device output. TSET Timing set. The specification of cycle length and edge placements that can be referenced collectively for up to four edges. uRAM Pattern controller micro-RAM. VCH Voltage clamp high - used to clamp the I/O’s high voltage. VCL Voltage clamp low - used to clamp the I/O’s low voltage. vector 1. A parallel vector is the functional logic applied to a DUT during one clock cycle. U V 2. A scan vector is equivalent to a partition, and uses multiple scan clock cycles. See also partition. 552 VIH Voltage input high, with respect to the DUT. This term, in context of the tester, refers to the drivers output when high. VIL Voltage input low, with respect to the DUT. This term, in context of the tester, refers to the drivers output when low. VIOH Voltage/current output high. This term defines the voltage to produce the current for the active load when the DUT is high. VIOL Voltage/Current output low. This term defines the voltage to produce the current for the active load when the DUT is low. VOH Voltage output high, with respect to the DUT. This term, in context of the tester, refers to the comparators input when comparing for highs. VOL Voltage output low, with respect to the DUT. This term, in context of the tester, refers to the comparators input when comparing for lows. VT Voltage threshold - used to determine the switch voltage point for the active load. PN: 071-0359-02, October 2005 W wafer A thin, polished slice of monolithic semiconductor on which an array of die are fabricated. wafer map A plot of the viable dice on a wafer showing pass/fail information, parameter variation, or some other characteristic. waveform The succession of signal levels applied to the DUT pin after combining pattern and timing information. workstation computer The computer located in the Kalos 2 power server which runs the Windows XP operating system and the front-end portion of the Kalos operating system. yield The proportion of good devices in a lot or run. ZIF Zero insertion force, a kind of DUT socket used for manual device testing. Y Z Kalos 2 User Manual 553 A - Glossary of Terms This page intentionally left blank. 554 PN: 071-0359-02, October 2005 INDEX Symbols argument, 541 Arm Condition, 85 arm condition, history RAM, 165 ASCII shmoo plots, printout, 479 ASIC, 541 attaching a cursor, 238 autorange, 541 awtinit.cmd file, 285 axis selects, 462 AXIS statement, 55 #clibrary, 41 #define, 41 #endif, 41 #ifdef, 41 #include, 41 .kbi extension, 104 Numerics 1-D normal shmoo, 472 1-D plot, 452 1-D Shmoo, 460, 528 1-D Shmoo plot, 472 2-D plot, 452 2-D Shmoo, 461 2-D Shmoo plot, 473 3-D plot, 452 3-D Shmoo, 462 3-D Shmoo plot, 474, 476 A AC configuration, 15 AC controller box, 15 AC datalogger, 451, 452, 518 account password, 23 accumulate mode, shmoo plots, 476 accumulated data, shmoo, 470, 476 active Kalos slices, 129 active load, 541 active slices, 153, 198 active test site, 541 ADC, 541 analog waveform (AWT) editor, 215 Analog Wavetool exiting, 298 annotating waveforms, 247 anonymous Macro, 67 ANSI-C language, 96 environment, 96 APG, 541 API, 541 application, ShowBitz, 413 applications, launching, 33 Kalos 2 User Manual B background color, 224 backplane and wiring, 7 basic system operation, 21 bidir, 542 bin table, 51, 431, 433 bin table, flow property page, 431 bin table, test debugger, 423 bins categories, 134, 135 Bitmap, 114 application tool, 451, 521 configurations, 529 Display, Socket & Setups property page, 529 fail table, 534 functions, 521 Overview & BIM property page, 535 property pages, 526 scan, setups property page, 533 scanner operation, 528 Search Tables property page, 534 viewer, 451, 521 BitPower, 114 board, 542 board controller, 542 bookmarks, 67 break test, 423, 434 button, 423 breakpoint, 542 breaktrap, 423 breaktrap settings, 153, 169 BreakFail, 169 BreakMeas, 169 definition, 170 examples, 171 555 Index set up and execute BreakFail, 175 set up and execute BreakMeas, 173 set up and execute LoopMeas, 177 set up and execute LoopTest, 176 set up and execute Pause, 178 FAIL, 171 LoopMeas, 169 LoopTest, 169 measurement, 171 Pause / Step, 169 test flow, 172 C C Kalos2 directory, 26 KalosOS directory, 27 C functions, 40 Cal/Diag, 112 Cal/Diag (also see Calibration and Diagnostics), 410 Cal/Diag icon, 198 Calculator Pane, 255 calibration execution, 410 programs, 410 calibration fixtures, 97 calibration programs, 185 calibration/diagnostic, 185 Calibration/Diagnostics (also see Cal/Diag), 410 changing a waveform name, 240 the interval, 240 the number of samples, 240 the waveform color, 244 channel, 542 characterization test, 542 chart, pie in summary, 135 child directory, 21 chip, 542 Chn checker property page, 442 clamp voltage, 542 Clear button, 256 clock, 7 closing a waveform, 298 CMODULE, 40 CMODULE statement, 40 CMOS, 542 color background, 224 graticule, 224 marker, 224 colors, shmoo, 458 command interpreter, 285 556 comparator, 542 compare, 542 compare edge marker, 251 complex rectangular waveforms, 279 compliance voltage, 542 components for waveforms, 242 composite (All) summary, 133 composites/accumulate mode, 470 computer, host, 16 Concatenate button, 256 CONFIG statement, 56 configurations, 1 Console Viewer (CView), 183 Console Viewer, see CView, 209 CONSTANT statement, 54, 446 continuous active load, 542 control area, shmoo, 456 controlling markers in CMD files, 253 converting spaces in filenames, 227 cooling system, tester, 11 CPU module (ETX), 18 creating a cursor, 234 a waveform, 228 scripts, 281 cross count, 270 cubic spline interpolation, 240 current summary, 131 current test program, 126 cursor boxes, 233 cursors attaching, 238 changing the color of, 236 changing the name of, 236 creating, 234 find level, 236 grabbing, 237 modifying, 235 moving by using the box, 238 manually, 237 removing, 236 set track, 237 working with, 233 zooming to, 236 CView, 209 menu and toolbar, 210 CView (Console Viewer), 183, 209 CViewer, 112 cycle count marker, 250 cycle set marker, 250 cycle time, 542 cycle waveform colors, 225 CYCLE_NAMES statement, 54 PN: 071-0359-02, October 2005 Index D DAC Module, 543 data collection, 543 Data Engine, 354 data logging, 543 data reduction, 543 DataLog, 144 (View) Slices, 147 AutoSave, 147 control area, 144 File manager, 146 formatting, 145 Save, 147 Datalog, 145 control area, 145 property page, 144 Datalog Engine, also see DE, 354 datapoint, shmoo, 457 DBM, 543 Hex format, 347 pattern segments, 346 socket file, 344 DBM (Data Buffer Memory) editor, 340 DBM Editor menu and options, 340 DBM Editor (DBMEdit), 340 DBMEdit, 112 DBMEdit (editor), 342 DC parametric plot, 452 DC power, 7 DC tests, 50 DC tests parametric, 49 DC waveforms, 233 DE also see Data Engine and Dlog Engine, 354 ASCII string storing, 378 bin information, functions, 396 C-Hook computed data, 379 Configuration Manager for VC++, 384 configuration transferring, 363 configuration with kalos_production.ini, 365 conversion to string, functions, 389 custom code, 388 custom DLL code example, 404 custom DLL creation, 380 custom DLL generation, 384 custom DLLs, 380, 381 data collection, 376 Debugging, 359 DLL override settings, 368 DLL settings, 386 Dlogserver, 373 Kalos 2 User Manual DUT and site number, 394 enabled/disabled, 361 engineering environment, 364 EXE exported functions, 388 external datalogging, 373 file generation, 376 Flows, 361 functions, 388 functions, exporting, 387 get functions, 392 global settings, 365 GUI, 355 header files, 385 in offline mode, 360 installation, 362 kalos_production.ini, 365 kalos_production.ini parsing, functions, 402 log files, 359 multiwafermap settings, 370 number of tests, functions, 397 output directory, 386 output/destination, functions, 398 pin assignment, functions, 390 postprocessor, 358 prober DLL, 374 production and engineering, 361 project creation, 385 runtime decode string, functions, 400 runtime decode strings, 375 settings, 356 shmoo settings, 373 standard event functions, 381 static library, 385 STDF file viewer, 362 STDF.ini, 375 structure, 354 summary settings, 372 test execution, functions, 403 test numbers, 380 test program load, 361 test program modifications, 376 test trigger, functions, 402 time and date, functions, 393 work environment, functions, 398 XY coordinates, functions, 399 DE (Datal Engine/Dlog Engine), 354 debug tools, 67 debug tools, Kedit, 74 debug viewer, 183, 209 debugger, 543 debugger, overview, 420 debugging breakpoints, 79 breaktrap settings, 154 557 Index KPL, 81 patterns, 82 source code, 78 source code in Kedit, 76 test programs, 420 using Kedit, 75 debugging tool, ShowBitz, 411 debugging tools, Kedit, 76 debugging, using Kedit, 74 definition, test program, 37 definitions property page, Bitmap, 529 DELAY(time), 436 delta information, 238 device debugger, 212 Device IF property page, 123 Device Interface Board (DIB), 121, 448 Device Interface property page, 123 device test procedure, 200 setup steps, 201 device testing main user interface, 108 preparation, 97 DFT, 543 DG, 543 DGRAM, 543 diagnostic program, kchk.dia, 187 diagnostic tests, 543 diagnostics programs, 185 DIB (Device Interface Board), 448 DIB help, 448 DIB Info, 121 DIB NVM data, 121 dibcal.cal, 185 die, 543 diode bridge, 543 directories, 21 directory file structure, 26 directory levels, 21 directory preferences, 227 display maximum waveform, 225 mode, 223 stack, 224 display buttons, 255 Display, Socket & Setups property page, Bitmap, 529 DLL (Dynamic Link Library), 354 Dlog Engine, 354 Dlog Engine, also see DE, 354 DLOGServer, 112 documentation, xxviii documentation, Kalos 2, 57 DPn, 45 558 DPS, 543 DPS (power supplies) property page, 443 DPS IMeas, 452 DPS modes, test debugger, 424 DPS modules, 17 DPS plots, 476 DPSSET statement, 54 DRAM, 543 draw area, summary, 130 drawing style, 223 driver, 543 DSP operations, 257 DSTool, 314 DUT, 544 DUT and interface, 12 DUT fixture, 544 DUT interface, 97 E EBD, 544 EBNF, 544 ECR, 544 edge, 544 edge-placement accuracy, 544 EdgeSet, 441 EDGESET statement, 55 Edit tools, 64 editor, DBM, 342 elapsed time marker, 250 Electromagnetic Compatibility (EMC) System requirements, xxxiv Emergency off (EMO) control, 14 EMO (emergency off control), 14 EMU, 544 EMU modules, 17 Engineering application mode, 115 Engineering login, 152 Engineering modes (non-production), 152 environment variable, 285 EOL, 544 EOT, 544 EOW, 544 error, 544 error capture, 544 errors and warnings monitoring, 283 ESD, safety, xxxiv Ethernet connection, 7 ETX (CPU module), 17, 18 EVENT_MAP statement, 56 executing script files, 285 exiting the Analog Wavetool, 298 PN: 071-0359-02, October 2005 Index F FBins (functional bins), 126 file locations, 227 file name, 544 file organization, 43 file structure, 26 filetypes read-in, 219 save as, 219 filetypes of waveforms, 219 Filter parameters, 274 fit to window, 247 FLASH, 544 flow diagram, 433 flow level, 43 flow property page, 432 bin table, 431, 432 graphical, 434 test debugger, 431 flow statement, 52 flow table, 432 flow table, flow property page, 433 flow tables, test debugger, 423 fly-by tool tips, 61 folder, 34 force, 544 format, 545 FrntPanel icon, 108 Front Panel, 108 main window, 116 menu bar, 110 property pages, 116 Shmoo tool, 453 toolbar, 114, 208 FSET, 545 functional bins (FBins), 126 functional preconditioning, 545 functional test, 51, 545 functions, Front Panel, 108 guard band, 545 GUI, 545 KITE, 110 H handler, 200 hardware configuration, 17 header information, 38 header, shmoo, 456 help, online, 57 Hex system, 545 hexadecimal notation, 545 histogram drawing style, 223 history RAM, 158 arm condition, 165 control, 158 debugging source code, 76 Kedit, 88 Store All Mode, 165 Store Only Fail (SOF), 164 Store This Vector and Store Fail Only, 164 trigger condition, 166 home directory, 21 host computer, 16 I I/O channel, 546 I/O pins, 5 IDROM, 113 IDROM backplane, 8 inhibit, 546 Int/Diff parameters, 278 interface controls, 20, 26 user, 20, 26 interface board, DUT, 97 interface, Front Panel, 108 interpolation Cubic Spline, 240 interval changing the, 240 introduction, 215 introduction, Kalos 2 tester, 2 G Gaussian Noise waveforms, 232 generic marker, 253 go/no-go test, 545 GPIB, 545 grabbing a cursor, 237 graph, pie in summary, 135 graphic area, shmoo, 458 graphical, flow property page, 433 graticule color, 224 graticule types, 223 Kalos 2 User Manual K Kalos, 546 documentation, xxviii Kalos 2 architecture, 1 Kalos 2 documentation, 57 Kalos 2 interface, 12 Kalos 2 test system, introduction, 2 559 Index Kalos Active Slices, 118 Kalos Integrated Test Environment (KITE), 20, 95, 110, 207, 208 Kalos Pattern Language (KPL), 37 Kalos summaries, 134 Kalos Test Language (KTL), 37 KalosOS directory, 27 KBI, 546 kcal.cal, 185 kchk.dia, 187 Kedit, 112 anonymous macros, 66 bookmark tools, 65 counter group format, 89 datalog dialog, 86 Debug tool functions, 75 debug tools, 66, 74 debugging tools, 77 file menu, 60 Files tab, 61 hex format data display, 90 history RAM, 88 navigating, 64, 71 pins option, 90 pulldown menus, 68 Resource Completion, feature, 72 resource icons, 63 resource selection, 87 source file location, 88 standard tools, 65 timing edge definitions, 92 timing edge display, 91 tool functions, 66 Workspace, 61 Kedit (Kalos editor), 59 Kedit utility, 59, 213 KITE, 104, 546 description, 96 GUI, 110 interface, 108 re-starting, 110 software tools, 96 start-up procedure, 33, 110 KITE (Kalos Integrated Test Environment), 20, 95, 110, 207, 208 KITE software, introduction, 95 KITE software, operating, 110 KNET, 546 KPC, 546 KPL, 38, 546 KPL (Kalos Pattern Language), 37 KPL debugging, 81 KTC, 546 KTL, 38, 546 560 file, 53 file name, 53 file organization, 42 statements, 42 KTL (Kalos Test Language), 37 KTL file layout, 42 KTL program file, 38 KTL program flow, 43 L LAN, 546 LATool, 308 launched Kedit, 59 LDTOOL, 112 LDTool Arm and Trigger Conditions, 330 Datalog window, 316 datalog window, 316 Detailed Information dialog, 323 DSTool, 314 expanded pin group, 309 main window, 299 menu, 338 save options, 327 toolbar, 324 LDTool (also see Logic Debug tool), 299 level ASIC, 546 level table, 440 level table, property page, 439 level values, test debugger, 424 levels property page, 439 LEVELS statement, 54 Libraries area, 200 library, 546 line drawing style, 223 link, 547 load a test program, 95 Load Program File, 111 Load Program operation, 200 Load Project File, 111 LOADDBM statement, 55 loading test programs, 104 log.aws file, 285 logging off, 25 logging results, 226 Logic Debug tool (also see LDTool), 299 login, Engineering mode, 152 lot, 547 LSET, 547 LV, 547 LVM, 547 PN: 071-0359-02, October 2005 Index M NVMDIB utility, 122, 416 main board, 17 main clock, 7 manually moving a cursor, 237 MAP INIT, 113, 199, 418 mapping, active slices, 198 mapping, sites, 137 marker color, 224 markers controlling in CMD files, 253 general, 247 syntax for, 254 types of, 248 marking results, 226 mask, 547 maximize buttons, 30 maximum waveform display, 225 MEAS(PMU|DPS), 436 MegaMap, 451, 521 memory module(s), 547 menu bar, Front Panel, 110 METE variables, Bitmap setup, 533 METE variables, shmoo setup, 469 microRAM (uRAM), 547 minimize buttons, 30 modes points, 223 user units, 223 modifying a cursor, 235 module, 547 monitoring errors and warnings, 283 multidie probing, 547 multisite, 547 multisite testing, 547 MUX, 547 N Name Pane, 239 navigate, in Kedit, 71 network support, 20 networking, 20 new password, 23 non-production mode, 115, 152 non-volatile, 547 Non-Volatile Memory (NVM), 448 normal 2-D Shmoo plot, 473 note marker, 253 NVM (Non-Volatile Memory), 424, 447, 448 NVM help, 448 NVM ID’s property page, 448 NVMDIB, 113 Kalos 2 User Manual O Off switch, main, 14 Omni, 548 On/Off switch, 14 online documentation, xxviii online help, 57 online operations, shmoo, 471 opening a waveform file, 233 operating environment, 20, 26 operational test sites, 548 overshoot, 253 Overview area, test debugger, 428 Overview property page, 117 overview, in test debugger, 423 overview, test property page, 435 overview, tester, 1 P PAC, 548 panes Calculator, 255 Name, 239 Transcript, 283 Waveform Graphic, 244 parallel test, 548 parameter, 548 parameter details for waveforms, 229 parameter file, 548 parametric test, 548 parent directory, 21 PASM, 548 Pass Skip Number, 462 Pass/Fail assignment, summary, 134 pass/fail results, 200 password, 23 pattern, 548 pattern data, 55 source, 55 pattern debugging, 82 PATTERN statement, 55 pattern vector, 548 PBI, 548 PC requirements, 20 PE, 548 PE ASIC, 548 PG, 549 PG_RUN(pc | pattern), 436 PG_STOP(), 437 pie chart, summary, 134, 135 pie charts, summary, 135 561 Index pin, 549 pin configuration breakdown, 7 pin configuration, I/O, 5 pin layout, 12 Pin Monitor, 114, 451, 493 breaktrap, 493 examples, 503 Level/Time Setups, 496 Levels, 498 Power Setups, 495 socket file, 501 Times, 500 pin types, 45 Pin/Group, view option, 440 PINGROUP statement, 47 pingroups, 47 pinlist, 549 PLD, 549 PMon, 114 PMU, 549 PMU editor, 444 PMU modules, 17 PMU plots, 476 PMU shmoo, 476 PMU testing, 54 pogo pin, 549 points drawing style, 223 points mode, 223 polar waveforms, 279 Pop button, 256 power shutoff switch, 10 print operations, shmoo, 471 printing in black and white, 227 prober, 200 production mode, 115, 152 program file layout, 42 program flow selection, 203 program loading, 59, 201 program loading, in Kedit, 213 programmable logic levels, 549 project loading, 201 property page Chn checker, 442 DPS, 443 flow, 433 level table, 440 levels, 439, 441 Scan Setups, Bitmap, 533 Setups, shmoo, 468 socket, 429 summary application, 134 test debugger, 423, 428, 431 562 test elements, 438 timings, 442 property pages Front Panel, 116 PSET, 549 PTC, 549 PTU, 549 Pulse parameters, 269 pulse waveforms, 232 Push button, 256 Push2 button, 256 PVM, 549 R read-in filetypes, 219 real rectangular waveforms, 279 recalling a waveform, 280 region zooming to, 236 removing a cursor, 236 resource, 549 resource icons, 63 results marker, 252 RISC, 549 Rotate Down button, 256 Rotate Up button, 256 RS-232C, 549 S SAC, 550 safety information, xxx safety statements, xxxi safety, ESD, xxxiv safety, operators, xxxii safety, service, xxxiii sample mode drawing style, 223 sample rate, 241 samples changing the number of, 240 save as filetypes, 219 saving a waveform, 280 sawtooth waveforms, 231 SBC, 550 scale fit to window, 247 X, 242 Y, 243 SCAN, 550 scan marker, 250 script files executing, 285 scripts PN: 071-0359-02, October 2005 Index creating, 281 scroll synchronize, 224 scrolling X, 246 Y, 245 Segment button, 256 select test, 434 selects property page, shmoo plot, 459 SEQUENCE IF, 436 INC_FBIN, 436 ON, 436 SET_BIN, 437 SYNC_CYCLE, 437 sequence property page, 438 sequence, test debugger, 424 service, safety, xxxiii set track cursor, 237 SET(pins|dps, state), 437 setting dimensions, shmoo, 461 setting up shmoo plot, 459 setups property page, shmoo, 468 shell command, 285 Shmoo, 114 shmoo accumulate mode, 470 axis selects, 462 choosing origin, 460 composites, 470 conditions, setting, 460 control area, 456 display, 456 header, 456 online operations, 471 PMU, 476 print operations, 471 setups, 468 setups property page, 468 Socket File property page, 464 toolbar, 456 view area, 456 XY origin, 460 shmoo plot, 452, 460, 550 ASCII outputs, 464 Selects, 459 setting up, 459 shmoo plot, 1-D, 472 shmoo plot, 2-D, 473 shmoo plot, 3-D, 474, 476 shmoo plot, example, 485 shmoo plots accumulate mode, 476 ASCII printout, 479 Kalos 2 User Manual SHMOO statement, 55 Shmoo tool, 451, 452 Edit, 455 GUI, 453 menu bar, 454 primary window, 454 shortcut, creating, 31 ShowBitz, 113 channel views, 413 interface, 411 Message Window, 414 Navigator, 413 Omni views, 413 Protected Views, 414 register views, 413 Send View, 414 shortcuts views, 414 slice views, 413 Toolbars, 414 utility, 411 shutdown, 25, 550 sine waveforms, 230 sink current, 550 sink voltage, 550 site, 550 site mapping, 136 site number, 550 skew, 550 slew rate, 550 slice, 550 slice, sort bin results, 118 socket file, 429 socket property page, 429 package, 431 table, 430 Socket Table, 44 socket table, 550 socket, test debugger, 423 sort bin results, 118 sort summary, 134 sorted die categories, 200 source current, 550 source file test program pattern data, 55 source voltage, 550 spooler, 550 SRAM, 550 stack, 279 stack display order, 224 stack index, 279 stack position, 240 standard 3-D Shmoo plot, 475 standard tools, Kedit, 66 start button, 28 563 Index start menu, 28 start window compare marker, 251 starting KITE, 33, 110 Statistics parameters, 263 status bar, 31 stop window compare marker, 251 Store All Mode, 165 store modes debugging in Kedit, 83 Store Only Fail (SOF), 164 Store Only Fails, 84 Store This Vector, 84 Store This Vector (STV), 164 Store This Vector and Store Fail Only, 164 storing a waveform, 280 strobe, 551 style drawing, 223 Summary main window, 131 property page, 126, 134 summary bar chart, 135 bar graph, 134 charts, 134, 135 graphs, 136 individual file example printout, 143 Summary Application control area, 129 tool, functionality, 128 view area, 129 summary structures, 128 superimpose clear, 244 on/off, 244 Swap button, 256 switch ASIC, 551 synchronize on scroll, 224 synchronize Y axes, 224 system operation, 21 SYSTEM MONITOR, 113 System Monitor, 417 T table, socket property page, 429 target manager, 101 target manager, removing, 103 TBugger, 112 TBUGGER (Test Debugger), 212, 420 terabit, 551 Test break test, 434 select test, 434 564 Test Bugger, 212 test debug breaktrap settings, 153 test debugger, 212, 419, 420, 422, 424 Cons/Vars, 424 DPS, 424 flow, 423 levels, 424 NVM ID’s, 448 overview, 423 PMU Sets, 424 property page, 423, 428, 434 sequence, 424 setups, 424, 445 socket, 423 test, 424 timings, 424 window, 422 test editor, 435 test elements, 435 test execution binary (search), 451, 452, 518 linear(sweep), 451, 452, 518 test fixture components, 97 test fixtures, 97 test head cooling, 11 description, 5 layout, 6 opening mechanism, 8 power shutoff switch, 10 test overview, 435 test program components, 419 current, 131 file organization, 42 loading, 200 test program file, 41 test program language, 37 test programs, 104 Test property page, 434 overview, 435 test elements, 438 test specification, 551 Test, break test, 424 tester, 551 hardware, 108 introduction, 1 set up, 4 tester resources, pin types, 45 testing devices, 95 TG, 551 Thevenin load, 551 time set marker, 250 PN: 071-0359-02, October 2005 Index time-out, 551 timing data EdgeSet, 441 timing set, 551 timings property page, 442 waveforms, 443 title bar, 30 title marker, 249 TØ, 551 toolbar, test debugger, 427 tools debugger, 419 tools, editing, 64 tore This Vector and Store Fail Only, 84 TPE, 551 trace, 551 Transcript Pane, 283 triangle waveforms, 230 Trigger Condition, 85 tristate, 552 TSET, 552 TTarget, 101 Types condition, shmoo, 460 types of markers, 248 U undo level, 227 uRAM, 552 user account, 22 ID, 22 interface, 20, 26, 28 operations, 19 password, 23 User Functions, 278 user interface, 220 user units mode, 223 V Value Log, 451 Application Tool, 451, 452, 518 configurations, 518 ValueLog, 114 VARIABLE, 54, 446 VARIABLE statement, 54, 446 VCH, 552 VCheck (version check), 114 VCL, 552 vector, 552 vector marker, 250 verification fixtures, 97 version check (VCheck), 114 Kalos 2 User Manual view area, shmoo, 456 view areas, summary, 129 VIH, 552 VIL, 552 VIOH, 552 VIOL, 552 VLog, 114 VLOG statement, 55 VOH, 552 VOL, 552 VT, 552 W wafer, 553 wafer map, 553 wafer sort, 205 Wafermap, 200 functional operations, 138 Mask Editor, 140 property pages, 139 Sort Results, 139 Wafermap tool, 136 functional diagram, 138 waveform, 553 WAVEFORM (AWT), 112 Waveform (AWT), 215 waveform (AWT) editor, 215 waveform colors cycling, 225 Waveform Graphic Pane, 244 waveforms, 443 annotating, 247 changing the color of, 244 changing the name of, 240 complex rectangular, 279 components for, 242 creating, 228 DC, 233 filetypes of, 219 Gaussian Noise, 232 opening, 233 parameter details for, 229 polar, 279 pulse, 232 real rectangular, 279 recalling, 280 saving, 280 sawtooth, 231 sine, 230 storing, 280 triangle, 230 types of CRECT, 242 565 In d e x Polar, 242 RRECT, 242 wf Arith parameters, 258 wf Math parameters, 259 wf Trans parameters, 262 window types Chebyshev, 277 Kaiser, 277 Taper, 277 Windows Explorer, 29 Windows parameters, 277 Windows XP control menu, 29 Close, 30 Maximize, 30 Minimize, 30 Move, 30 Restore, 30 Size, 30 interface controls, 28 Windows XP environment, 34 folders, 34 working directory, 21 working with cursors, 233 Workspace, 61 workstation computer, 553 This page intentionally left blank. X X scale, 242 X scroll, 246 X Select, shmoo, 462 XY Origin, 460 Y Y scale, 243 Y scroll, 245 Y Select, shmoo, 462 yield, 553 Yield Monitor, 151 Z Z Select, shmoo, 463 ZIF, 553 zooming to a region, 236 zooming to cursors, 236 566 PN: 071-0359-02, October 2005