1
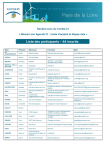
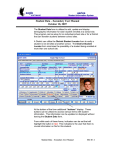
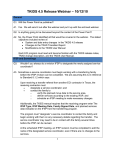
IFSP Form Users Manual
Orange County Department of Education, Special Education Services
Revision date: 5/5/2011
Table of Contents
About the IFSP form ...................................................................................................................................... 3
Installing the IFSP Form ................................................................................................................................ 4
Finding Your Way through the IFSP Form ..................................................................................................... 5
Entering Data: ............................................................................................................................................... 8
Capture Additional Information by Adding a Page ..................................................................................... 11
Automatically-Populating Fields ................................................................................................................. 15
Printing the IFSP Form ................................................................................................................................ 17
Saving the IFSP form ................................................................................................................................... 20
2
About the IFSP form
This IFSP was created by Orange County Department of Education to assist you in maintaining your Early
Start records. This form is compatible with any version of MS Excel and can be used on either PC or Mac
platforms.
For questions about the proper use of the IFSP, contact Dillon Henry at [email protected]
For technical questions about IFSP data entry, contact Robin Gurien at [email protected]
3
Installing the IFSP Form
The IFSP Form is a template: an electronic file with a predesigned, customized format and
structure. To ensure that you do not save this form as an individual Early Start file, you must
save the document into your computer’s templates folder.
1. Click on the office button to open the drop down menu.
2. Choose the Save As option.
3. Choose the Other formats option.
4. Choose the Save As option to open the Save As dialog box.
5. Click on the Save as type option to open the drop down list.
6. Scroll through the list to find the Excel 97 - 2003 Template (*.xlt) option
Once saved, your template is stored in the templates folder on your computer. To open the IFSP
template, follow these steps:
1. Click on the office button to open the drop down menu.
2. Choose the New option.
3. In the New Workbook screen, select My Templates.
4. Select the IFSP icon and click “OK.”
5. A new IFSP form opens. You are ready to enter new data into the form.
4
Finding Your Way through the IFSP Form
The IFSP form contains several pages. Each page is labeled and can be found in the worksheet bar on
the bottom of the page.
5
To go to a page, click on the tab in the worksheet bar:
6
You may also right-click on the arrows to the left of the worksheet bar to see the full list of pages, and
scroll down to select the page you want.
7
Entering Data:
You may enter data only in the fields that are shaded. Use the “tab” key to move from field to field.
Alternatively, you may move your mouse and click on the data field.
Some fields have check-boxes. To check the box, move the cursor into that field and press “x.” The box
will be checked. To uncheck the box, click on the “undo” key.
“check box”
“Undo” key
8
Some data fields have drop-down menus. The drop-down arrows will show up when you move the
cursor into that field. Once the drop-down arrow appears, click on it and scroll to the correct list item.
To delete the selected item, click on the “undo” key.
Race 1, Race 2, and Race 3 on the Information Sheet contain drop-down menus. To activate the menu,
click the shaded field next to the item. A drop-down arrow will appear. Click on the drop-down arrow
and scroll through the menu to the correct selection. The selection will appear in the field. To delete
the selection, press the “undo” key.
“drop down arrow”
Some drop down menus relate to specific fields in the CASEMIS reporting system. For further guidance
on making the correct selections, please consult the CASEMIS manual or your supervisor.
9
To enter information into the large text boxes, double-click inside the text box. This will activate the
cell, and a flashing cursor will be found in the upper-left corner of the box.
You may write in this box as if you are using a word-processor, however DO NOT hit the “enter” key to
start a new line. Instead, use “alt”+”enter.” Hitting only the “enter” key will move the cursor to the
next text box.
You may enter as much information as you would like. Any text that extends beyond the field borders
will be saved and you will be able to see it on the screen. However, text that extends beyond the field
borders will not print.
10
Capture Additional Information by Adding a Page
To capture information that extends beyond the field borders, you may create extra pages to any part of
the IFSP form. This additional page can be printed along with the rest of the form. For example, if your
notes for Child’s Level of Development—Gross Motor Skills extends beyond the text box, you can insert
an additional page to immediately follow that page.
Right-clicking on the worksheet tab
11
Select “move or copy” from the display menu
12
In the Move or Copy Display Box, select the sheet you would like this page to be placed in front of.
Click the “create a copy” box, and click OK
13
Your new page has been created. Because it is an exact copy of the original page, it will be named
“Child’s present level of Dev 1 (2).” To rename the page,
Double-click on the worksheet tab
The worksheet tab will be highlighted. Click on the text and rename your folder. When you are done,
click off the tab.
14
Automatically-Populating Fields
Several fields on the IFSP form are designed to automatically populate. For example, once the child’s
name and date of birth have been entered on the information sheet, they will automatically populate
onto all remaining IFSP pages.
Child’s Name field
on Information
Sheet
Automatically-populating fields are not shaded, since the cells are locked from data-entry.
Automaticallypopulating field
15
Similarly, each Outcome number will automatically populate on the Summary of Early Intervention
Services pages to help the user document the services related to meeting each Outcome.
16
Printing the IFSP Form
To print the current page only:
Click on the Microsoft Office button and select the print icon.
In the “Print” screen, select “Active Sheet” and press the “ok” button
17
To print the entire form:
Click on the Microsoft Office button and select the print icon.
In the “Print” screen, select “Entire workbook” and press the “ok” button
18
To print a sub-set of pages, for example, only the pages which include data:
First hold the “ctrl” key and click on the tabs to select the pages you would like to print.
For example, in the screen below, the Information Sheet, Family Resources, Priorities and
Concerns Sheet, and the Child’s Birth History and Health Status #1 Sheet are selected. Only these
sheets will be printed.
Next, follow the directions to “print the current page,” on Page 17 of this document.
NOTE: All page numbers will automatically adjust according to the number of pages selected to
print.
19
Saving the IFSP form
The IFSP form is a template. To preserve the document for each individual child, you must save each
IFSP with a different name.
In the Microsoft Office Button, select “Save As.”
Name the document, for example “IFSP Jane Doe 4.25.11”.
Select the software format you would like to save the child’s IFSP document in. Hint: since newer
versions of MS Excel are not compatible with other formats, you may prefer to save your form as an
Excel 97-2003 document.
20
The next time you need to add information to the child’s IFSP form, you may add information directly to
the form you saved previously and rename the updated document.
Your SELPA may wish to determine a consistent format for naming/saving new IFSP documents and
create a central system for storing/backing up these Early Start records.
21