1
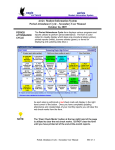
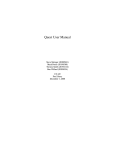
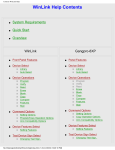
Student Data – Secondary User Manual
October 18, 2007
The Student Data form is utilized to add, update and display
demographic information for each student enrolled at a school site.
This program can be setup for an individual school site or for a District
that can transfer students between school sites.
A District can utilize the District Student Locator form to verify a
student is not enrolled at another school. The District Student
Locator form minimizes the possibility of a student being enrolled at
more than one school site.
At the bottom of the form additional “buttons” display. These
buttons can be utilized to access various forms with student
information. This information can be updated or displayed without
leaving the Student Data form.
From within each of these forms, indicators can be set that will
highlight the button in red. This indicates to the user that there is
crucial information on file for this student.
Student Data – Secondary User Manual
SEC10 - 1
Page 2 – Aeries™ Student Information System
TO DISPLAY
STUDENT
DATA
The Locate options can be used to select a particular student to be
displayed on the form.
To use the Get option, click the mouse on the Get button. A small
window will display. Type the student number in the Student# field or
type the last name of the student in the text box.
The first student containing these letters will display. If the desired
student displays, click the mouse on the OK button.
If the student is not the one desired an alphabetical listing is also
available. Click the mouse on the arrow to the right of the text box and
a listing will display starting with the student displayed.
NOTE:
When performing a Get using the student number leading zeros
are not required.
Student Data – Secondary User Manual
SEC10 - 2
Page 3 – Aeries™ Student Information System
DISTRICT
DATABASE
If using a District Database when adding a student the District
Student Locator will be used to locate, add or transfer a student.
This will ensure that the student being enrolled at your school site is
not already enrolled at another school site.
ADD A NEW
STUDENT
Click the mouse on the Add button. A form will display to locate a
student by typing in a student’s name and first name, permanent ID
number or birthdate. Type the information into the field selected.
Click the mouse on the Search for Student button.
NOTE:
A District wide database is required in order to use the District
Student Locator.
Student Data – Secondary User Manual
SEC10 - 3
Page 4 – Aeries™ Student Information System
A list of students will display enrolled in the District that meet the
criteria entered. The student’s name, sex, grade, birthdate,
permanent ID number and school number will display.
Verify that the student has been flagged inactive from the school
displayed.
NOTE:
If the student is not inactive and flagged in the Tag field, Aeries
will not allow the transfer of the student.
Select the student by clicking on the student’s name once. The student
information will be hi-lited. Verify the correct student has been
selected.
Student Data – Secondary User Manual
SEC10 - 4
Page 5 – Aeries™ Student Information System
After selecting the student click the mouse on Review Tables to Copy
at the bottom of the form. The following form will display records to
select to be transferred over with the student.
The tables will display on the right side of the form that will
automatically be transferred with the student’s records. On the left side
of the form are tables that do not transfer automatically.
To select a table to be transferred or to de-select a table, click the
mouse on the table selected.
NOTE:
A message may display at the top of the form indicating that the
database administrator has locked these tables and cannot be
changed.
Student Data – Secondary User Manual
SEC10 - 5
Page 6 – Aeries™ Student Information System
The table selected will be hi-lited. Click the mouse on the arrow.
The table will now be listed in the Tables Transferred column and will
be hi-lited. After all tables have been selected or de-selected click the
mouse on the Exit button.
Student Data – Secondary User Manual
SEC10 - 6
Page 7 – Aeries™ Student Information System
Click the mouse on the Update button. The message, ADD THIS
STUDENT? will display with the student name selected. Verify this is
the correct student to be added. Click the mouse on the Yes button.
A message may display if the student records contain a course not
defined in the course table. Clicking the mouse on the Yes button will
add this course to your course table.
If this students Telephone number matches a telephone number
already in the database a message will display to change family keys.
To change family keys click the mouse on the Yes button.
The student information will now display on the Student Data form.
The Stu# will automatically be assigned. Type any changes and press
Enter. The student will be added to the student database.
Student Data – Secondary User Manual
SEC10 - 7
Page 8 – Aeries™ Student Information System
Student is NOT currently enrolled in attendance will display in the
middle of the form. The student must be enrolled into attendance the
first day the student will begin class.
NOTE:
STUDENT
NOT FOUND
IN DISTRICT
DATABASE
New students DO NOT get added to attendance automatically.
If the District database has been searched and the student cannot be
located, the student can now be added to the student database. Click
the mouse on the Student Not Found button.
The Student Data form will display with the cursor in the Last Name
field. Type the student’s information in the Student Data form. The
Stu# and Perm ID# will automatically be assigned. Press Enter. The
student will be added to the STU table.
Student Data – Secondary User Manual
SEC10 - 8
Page 9 – Aeries™ Student Information System
Student is NOT currently enrolled in attendance will display in the
middle of the form. The student must be enrolled into attendance the
first day the student will begin class.
NOTE:
New students DO NOT get added to the attendance automatically.
INDIVIDUAL
SCHOOL
SITE
If an individual school site does not have a District database the
District Student Locator form will not display when adding a student.
ADD A NEW
STUDENT
To add a new student, click the mouse on the Add button. The
Student Data form will display with the cursor in the Last Name field.
Type the student’s information in the Student Data form. The Stu#
and Perm ID# will automatically be assigned. Press Enter. The student
will be added to the STU table.
Student has no ATT enrollment and/or summer withdrawal will
display in the middle of the form. The student must be enrolled into
attendance the first day the student will begin class.
NOTE:
New students DO NOT get added to the attendance automatically.
Student Data – Secondary User Manual
SEC10 - 9
Page 10 – Aeries™ Student Information System
ENROLL A NEW After a student has been added to the STU table they must be
added to the ATT table. Click the mouse on the UpdATT button.
STUDENT IN
ATTENDANCE
The following form will display. Verify the information is correct for
the student displayed.
Student Data – Secondary User Manual
SEC10 - 10
Page 11 – Aeries™ Student Information System
The Reason, Effective Date, AttPgm1 and AttPgm2 are the only
fields that can be changed from this form. If the date is changed and
needs to be updated in the STU table, click the mouse on Yes to
update the date.
All other changes that need to be performed must be changed on
the Student Data form.
If all information is correct, click the mouse on the OK button. A
message will display that the student has been enrolled in the ATT
table successfully. Click the mouse on the OK button.
Student Data – Secondary User Manual
SEC10 - 11
Page 12 – Aeries™ Student Information System
ADD A PREENROLLED
STUDENT
If a new student will be attending the school next year they can be
pre-enrolled into the current school year. When the new database is
created for the next school year the student will be activated in the
database. To pre-enroll a new student, click the mouse on the Add
button. Type all student information.
Type an * into the Tag field. The N/Grd field MUST contain the same
grade as the Grade field for the upcoming school year. Type the
grade into the N/Grd field and press Enter. The student will now be
entered into this year’s database as pre-enrolled and is inactive in
the current year’s file. When the new year database is created this
student will “roll-over” into the new year file with the same grade level
entered in the Grade field.
NOTE:
DO NOT add pre-enrolled students into the attendance table.
Student Data – Secondary User Manual
SEC10 - 12
Page 13 – Aeries™ Student Information System
CHANGE
STUDENT
DATA
Use the Locate options to display the student selected. Click the
mouse on the Change button. The cursor will automatically display in
the Sex field. Press Tab to the field to be changed. Enter the new
information in the field selected and press Enter.
NOTE:
Use the BACK TAB function (Shift and TAB) to access the fields
prior to the sex field.
If changes are made to the student’s number, last name, first name,
middle name, permanent ID or sex a message will display verifying
that the change is correct. Click the Yes button to continue.
To remove a change, click the mouse on the No button and press the
Esc key. The field will be reversed back to the original data.
Student Data – Secondary User Manual
SEC10 - 13
Page 14 – Aeries™ Student Information System
If information is changed that affects the attendance it must be
updated in the ATT table and a message will display.
To update the ATT table, click the mouse on the UpdATT function.
The following form will display. The Change From Effective Date will
be the current date. The Effective Date can be changed. The
Update To Effective Date most likely will be the next school day.
The grade, program and track are taken from the current student data
and can only be changed in Student Data. Click the mouse on the
OK button and two entries will be made in the ATT table.
Student Data – Secondary User Manual
SEC10 - 14
Page 15 – Aeries™ Student Information System
The following message will display. Click the mouse on the OK
button.
NOTE:
All changes to the student information that affect the ATT table
should be verified in the Attendance data.
INACTIVATE
OR WITHDRAW
A STUDENT
Use the Locate options to display the student to be inactivated.
Click the mouse on the down arrow key to the right of the Tag field.
Click the mouse on the code selected and press Enter.
Inactive student still enrolled in attendance will display in the
middle of the form and a colored border will display around the form.
To update the attendance record, click the mouse on the UpdATT
button.
NOTE:
Students ARE NOT inactivated from attendance automatically.
Student Data – Secondary User Manual
SEC10 - 15
Page 16 – Aeries™ Student Information System
The Attendance Leave form will display. The Effective Date will be
the current date. To change the effective date, type the new date into
the Effective Date field. Choose a Reason code. Next School can
also be entered.
Click OK to create a ‘leave record’ for this student. If the student has
attendance data after the effective date the following error message
will display. To cancel click the mouse on the No button.
To delete the attendance data, click the mouse on the Yes button and
the following message will display. Click the mouse on the OK button.
NOTE:
All changes made MUST be verified in Attendance for the
student record changed.
Student Data – Secondary User Manual
SEC10 - 16
Page 17 – Aeries™ Student Information System
TO DELETE
A STUDENT
The Delete function may be used to delete a student from the STU
table. But this function is rarely used and most schools will
inactivate the student.
Use the Locate options to display the student and click the mouse on
the Delete button. The following message will display.
Click the mouse on the Yes button and this record will permanently
be removed from the student database.
A student cannot be deleted if enrolled in Attendance. If a student is
enrolled in attendance the following message will display after the
Delete button has been selected.
NOTE:
If a delete CANNOT be performed the student must be Withdrawn
or Inactivated.
Student Data – Secondary User Manual
SEC10 - 17
Page 18 – Aeries™ Student Information System
PRINT STUDENT
DATA
STUDENT
REPORTS
BUTTON
To print a copy of the student data, click the mouse on the Print
button. The following printout will be generated.
This function will display a menu containing all the various student
reports available for printing from the student database.
For more information see the Student Reports documentation.
Student Data – Secondary User Manual
SEC10 - 18
Page 19 – Aeries™ Student Information System
ADDITIONAL
STUDENT
DATA
At the top of the form additional “tabs” display. These tabs allow
you to access various student information to update or display
without leaving the Student Data form.
The Other Student Data is accessible by clicking the mouse on the
second tab. Additional Student Data will display.
Student Data – Secondary User Manual
SEC10 - 19
Page 20 – Aeries™ Student Information System
The Secondary Student Data is accessible by clicking the mouse on
the third tab. Additional Student Data will display.
At the bottom of the form additional “buttons” display. These
buttons allow you to access various student information to update or
display without leaving the Student Data form.
Student Data – Secondary User Manual
SEC10 - 20
Page 21 – Aeries™ Student Information System
From within each of these forms, indicators can be set that will
highlight the button in red. Theses buttons indicate to the user that
there is crucial information on file for this student.
To access this data, click the mouse on the button selected. The
information will display for the student currently displayed on the
Student Data form.
ATTENDANCE
The Period Attendance is a form that is used to display or update a
student’s attendance record. For procedures see the Attendance
Cycle documentation.
Student Data – Secondary User Manual
SEC10 - 21
Page 22 – Aeries™ Student Information System
SUPPLEMENTAL The Supplemental Data is a form that stores unique student data
for each District and can be customized by the District.
To update the Supplemental form, click the mouse on the Change
button. The cursor will display in the first field available. Press Tab
to the field selected. Type the data into the field and press Enter.
Student Data – Secondary User Manual
SEC10 - 22
Page 23 – Aeries™ Student Information System
MEDICAL
The Medical form gives access to various forms that allows you to
add different medical information for a student by category. To
select a form to display click the mouse on the Tab selected.
To add information to any of the Medical forms displayed, click the
mouse on the Add button. The arrow will display in the gray box to
the left of the form. The current date will display. Press Tab to the
field selected. Type the data into the field and press Enter.
Student Data – Secondary User Manual
SEC10 - 23
Page 24 – Aeries™ Student Information System
Additional Medical forms are also available. The following is the
Medical History form accessible by clicking the mouse on the Tab.
The following is the Immunization form accessible by clicking the
mouse on the Tab.
Student Data – Secondary User Manual
SEC10 - 24
Page 25 – Aeries™ Student Information System
The following is the Hearing form accessible by clicking the mouse
on the Tab.
The following is the Vision form accessible by clicking the mouse
on the Tab.
Student Data – Secondary User Manual
SEC10 - 25
Page 26 – Aeries™ Student Information System
The following is the Other form accessible by clicking the mouse on
the Tab.
The following is the Scoliosis form accessible by clicking the
mouse on the Tab.
Student Data – Secondary User Manual
SEC10 - 26
Page 27 – Aeries™ Student Information System
The following is the Other Immunization form accessible by
clicking the mouse on the Tab.
The following is the Dental form accessible by clicking the mouse
on the Tab.
Student Data – Secondary User Manual
SEC10 - 27
Page 28 – Aeries™ Student Information System
DISCIPLINE
The Assertive Discipline form is used to store information for a
student that has violated the schools rules. Detention or demerits
can be stored along with the description of the violation and teacher
involved.
Student Data – Secondary User Manual
SEC10 - 28
Page 29 – Aeries™ Student Information System
The Discipline form is used to store information for a student being
counseled for various purposes.
To add information to either of the Discipline forms, click the mouse
on the Add button. A black arrow will display in the gray box to the
left of the form. The current date will display. Press the Tab key to
the field selected. Type the data into the field and press Enter.
Student Data – Secondary User Manual
SEC10 - 29
Page 30 – Aeries™ Student Information System
SIBLINGS
The Siblings form will display all students that have the same
telephone number. These students are considered siblings. A
family ID number is assigned to each student.
When letters or labels are generated one-per-family the program will
use the family ID number and will only create one letter or label for
each ID number.
TO REASSIGN
FAMILY ID
NUMBERS TO
ALL STUDENTS
To reassign the family ID number, click the mouse on the
Reassign button. The following message will display. Click the
mouse on the Yes button. All students will be reassigned a new
Family ID.
Student Data – Secondary User Manual
SEC10 - 30
Page 31 – Aeries™ Student Information System
CONTACTS
The Contacts form can be used to store emergency contacts,
individuals other than the parents allowed to pick up the student,
etc. This form also allows you to add individuals who should
receive a copy of all mail or only grades.
To add information to the Contacts form, click the mouse on the
Add button. A blank record will display. Type the data into the field
and press the Tab key to the fields selected. Press Enter. The
Quick Contacts form displays a quick view of contact information
which includes the name, various phone numbers and relationship.
Student Data – Secondary User Manual
SEC10 - 31
Page 32 – Aeries™ Student Information System
TEST SCORES
The Test Scores form is used to store all test data and scores for
tests that the student has taken.
Test scores from an outside file that contains a student’s permanent
ID number can be loaded into Aeries through various programs.
Scores can also be manually added or changed in the file.
To manually add information to the Test Scores form, click the
mouse on the Add button. The arrow will display in the gray box to
the left of the form. Type the data into the field and press Tab to
the fields selected. Press Enter.
Student Data – Secondary User Manual
SEC10 - 32
Page 33 – Aeries™ Student Information System
FEES
The Fees form can be used to store fees or fines owed for textbooks,
sports equipment, etc. This form will also keep a running balance of
all fees owed by the student.
To add information to the Fees form, click the mouse on the Add
button. The black arrow will display in the gray box on the left of the
form. Type the data into the field and press Tab to the fields
selected. Press Enter.
If a student has paid the complete amount of a fine click the mouse
on the Paid button. The Amount Paid field will automatically be
filled with the Amount Charged and Date Paid will be the current
date.
A partial amount can also be manually entered in the Amount Paid
field. This form will keep a running balance of all money paid and
the Balance Due by the student.
Student Data – Secondary User Manual
SEC10 - 33
Page 34 – Aeries™ Student Information System
ASSESSMENT
The Assessment form in Aeries contains information based on
test scores and academic grades entered into Aeries.
There are also Student Assessment Reports available by clicking
the mouse on the Reports button.
NOTE:
To setup student assessment see the documentation for
Student Assessment Setup.
Student Data – Secondary User Manual
SEC10 - 34
Page 35 – Aeries™ Student Information System
COUNSELING
The Counseling Visitation form can be used to store any pertinent
information about the student.
To add information to the Visitation form, click the mouse on the
Add button. The arrow will display in the gray box to the left of the
form. Type the data into the field and press Tab to the fields
selected. Press Enter.
Student Data – Secondary User Manual
SEC10 - 35
Page 36 – Aeries™ Student Information System
The Conference form can be used to store any information in
regards to conferences held with the student. To access this form
click the mouse on the Switch button at the right hand corner of the
Visitation form.
To add information to the Conference form, click the mouse on the
Add button. A black arrow will display in the gray box to the left of
the form. Type the data into the field and press Tab to the fields
selected. Press Enter.
Student Data – Secondary User Manual
SEC10 - 36
Page 37 – Aeries™ Student Information System
SPECIAL ED
The Special Education form is used to store all special education
information.
To add information to the Special Education form, click the mouse
on the Change button. The cursor will display in the SELPA field.
Press Tab to the field selected and enter data into the field. Press
Tab to the other fields selected. When complete press Enter.
Student Data – Secondary User Manual
SEC10 - 37
Page 38 – Aeries™ Student Information System
LANGUAGE
ASSESSMENT
The Language Assessment form is used to store all language
assessment information and test history.
To access the other Test forms click the mouse on Tab and the test
form selected will display.
Student Data – Secondary User Manual
SEC10 - 38
Page 39 – Aeries™ Student Information System
INTERVENTIONS
The Interventions form can be used to store any pertinent
information in regards to interventions being taken.
To add information to the Intervention form, click the mouse on the
Add button. A black arrow will display in the gray box to the left of
the form. Type the data into the field and press Tab to the fields
selected. Press Enter.
Student Data – Secondary User Manual
SEC10 - 39
Page 40 – Aeries™ Student Information System
The Retentions form can be used to store information in regards to
the steps taken to retain a student. To access this form click the
mouse on the Switch button at the right hand corner of the
Interventions form.
To add information to the Retentions form, click the mouse on the
Add button. A black arrow will display in the gray box to the left of
the form. Type the data into the field and press Tab to the fields
selected. Press Enter.
Student Data – Secondary User Manual
SEC10 - 40
Page 41 – Aeries™ Student Information System
SPECIAL
PROGRAMS
The Special Programs form can be used to store information in
regards to special programs that a student has participated in
such as the Gifted and Talented Education program.
Student Data – Secondary User Manual
SEC10 - 41
Page 42 – Aeries™ Student Information System
STUDENT CLASS
SCHEDULE
The Class Schedule form will display all courses that a student
is actively enrolled in and all pertinent information for these
courses.
To add information to the Class Schedule form, click the mouse on
the Add button. A black arrow will display in the gray box to the left
of the form. Type the data into the field and press Tab to the fields
selected. Press Enter.
Student Data – Secondary User Manual
SEC10 - 42
Page 43 – Aeries™ Student Information System
GRADES
The Grades form will display all courses that each student is
currently enrolled in and any grades that have been entered for
each mark.
To add information to the Grades form, click the mouse on the Add
button. A black arrow will display in the gray box to the left of the
form. Type the data into the field and press Tab to the fields
selected. Press Enter.
Student Data – Secondary User Manual
SEC10 - 43
Page 44 – Aeries™ Student Information System
TRANSCRIPT
The Transcript form will display all history for the courses,
grades, credits attempted and credits completed. The right side
of the form displays various GPA calculations.
To add information to the Transcript form, click the mouse on the
Add button. A black arrow will display in the gray box to the left of
the form. Type the data into the field and press Tab to the fields
selected. Press Enter.
If changes have been made to the grades the GPA totals need to
be updated. To re-compute the GPA totals click the mouse on the
Recompute button. All GPA totals will be recalculated and will
display.
Student Data – Secondary User Manual
SEC10 - 44
Page 45 – Aeries™ Student Information System
The Graduation Status form will display all history for the credits
attempted and credits completed for the required subject areas
for graduation. To access this form click the mouse on the
Status button at the right hand corner of the Transcript form.
Student Data – Secondary User Manual
SEC10 - 45
Page 46 – Aeries™ Student Information System
COURSE
ATTENDANCE
The Course Attendance form will display the course enrollment
history of each course that a student has enrolled in as well as a
date that they stopped attending the course.
Changes made to the CAR table MUST be updated and will do so
automatically. However, to update the CAR table click the mouse
on the Update button.
Student Data – Secondary User Manual
SEC10 - 46
Page 47 – Aeries™ Student Information System
COLLEGE
ENTRANCE
TESTS /
REQUIREMENTS
The College Entrance Tests / Requirements form will display
information for all college course completions, SAT I, SAT II,
ACT, GSE, AP and Other information.
To display the test data available click the mouse on the Tab
displayed and the form will display for the Test Tab selected.
Student Data – Secondary User Manual
SEC10 - 47
Page 48 – Aeries™ Student Information System
GATE
The GATE form is used to track all information related to the
GATE process for the student.
Student Data – Secondary User Manual
SEC10 - 48
Page 49 – Aeries™ Student Information System
DISTRICT
STUDENT
LOOKUP
The District Student Lookup form will display previous school
year information currently stored in the District Database.
To display this information enter the student’s last name and first
name, the permanent ID or student’s birthdate. Click the mouse
on the Search button.
All students will display that meet the information selected. Click
the mouse on the student selected and the District information
will display at the bottom of the form.
Student Data – Secondary User Manual
SEC10 - 49