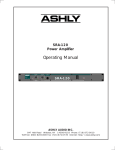
1
THERMAL ARC 180 AC/DC
THERMAL ARC 220 AC/DC
THERMAL ARC 250 AC/DC
USER’S MANUAL
The machine you have just acquired has taken advantages, in its production, of
Thermal Arcs' wide experience in the manufacturing of welding machines, along
with the latest technology strides in power electronics.
It will give you entire satisfaction for years if you respect all the operating and
maintenance instructions given in this manual.
We strongly suggest you read very carefully chapters concerning safety and individual protection
before using this machine.
We thank you in advance for your co-operation.
THERMADYNE INDUSTRIES reserve the right to make changes without previous notification. Illustrations, descriptions and
characteristics are not contractually binding and do not engage the responsability of the manufacturer.
USER’S MANUAL
Page 2/40
THERMAL ARC
180 – 220 - 250 AC/DC
Notice NOT 034
Rev : 07
Date : 18/12/07
TABLE OF CONTENTS
WARRANTY POLICY STATEMENT ........................................................................................... 5
SAFETY....................................................................................................................................... 6
1.
ELECTROMAGNETIC COMPATIBILITY ................................................................................................................6
1.1.
DECLARATION OF CONFORMITY ......................................................................................................................6
1.2.
INSTALLATION AND USE.....................................................................................................................................6
1.2.1.
ASSESSMENT OF AREA ...................................................................................................................................................7
1.2.2.
METHODS OF REDUCING EMISSIONS..........................................................................................................................7
1.2.2.1. Public supply system.........................................................................................................................................................7
1.2.2.2. Maintenance of the arc welding equipment.......................................................................................................................7
1.2.2.3. Welding cables..................................................................................................................................................................7
1.2.2.4. Equipotential bonding .......................................................................................................................................................7
1.2.2.5. Earthing of the workpiece .................................................................................................................................................8
1.2.2.6. Screening and shielding ....................................................................................................................................................8
2.
3.
ELECTRIC SAFETY.......................................................................................................................................................8
2.1.
CONNECTION OF THE WELDING POWER SOURCE TO THE NETWORK ....................................................8
2.2.
WORKING AREA.....................................................................................................................................................8
2.3.
INTERVENING.........................................................................................................................................................9
2.4.
MAINTENANCE.......................................................................................................................................................9
2.5.
RISKS OF FIRE AND EXPLOSION ........................................................................................................................9
INDIVIDUAL PROTECTION........................................................................................................................................9
3.1.
RISK OF EXTERNAL INJURIES.............................................................................................................................9
3.1.1.
3.1.2.
THE WHOLE BODY ...........................................................................................................................................................9
FACE AND EYES..............................................................................................................................................................10
3.2.
RISK OF INTERNAL INJURIES............................................................................................................................10
3.3.
SAFETY IN THE USE OF GASES (welding with TIG or MIG inert gases).........................................................11
3.3.1.
3.3.2.
3.3.3.
COMPRESSED GAS CYLINDERS ..................................................................................................................................11
PRESSURE RELIEF VALVE............................................................................................................................................11
DETAILS ABOUT GASES................................................................................................................................................11
DESCRIPTION .......................................................................................................................... 12
4.
GENERAL CHARACTERISTICS...............................................................................................................................12
5.
TECHNICAL CHARACTERISTICS ..........................................................................................................................12
SETTING UP ............................................................................................................................. 14
6.
CONNECTION TO THE MAIN SUPPLY...................................................................................................................14
USER’S MANUAL
Page 3/40
THERMAL ARC
180 – 220 - 250 AC/DC
Notice NOT 034
Rev : 07
Date : 18/12/07
TABLE OF CONTENTS
7.
CONNECTION TO THE GROUND ............................................................................................................................14
8.
PRELIMINARY PRECAUTIONS ...............................................................................................................................14
USING........................................................................................................................................ 15
9.
DESCRIPTION OF THE FRONT PANEL..................................................................................................................15
10.
DESCRIPTION OF THE BACK PANEL ................................................................................................................17
11.
MMA (STICK) WELDING..........................................................................................................................................17
12.
TIG WELDING ..........................................................................................................................................................18
12.1.
2 STROKE & 4 STROKE MODE .......................................................................................................................18
12.2.
BEFORE WELDING ...........................................................................................................................................19
12.3.
WELDING ...........................................................................................................................................................20
12.4.
USING REMOTE CONTROL.............................................................................................................................21
12.5.
CONNECTION OF A COOLING UNIT.............................................................................................................21
12.6.
READING PARAMETERS WHEN WELDING ................................................................................................21
12.7.
VENTILATION in tig welding ............................................................................................................................21
13.
WELDING WITH PULSE DC CURRENT..............................................................................................................22
14.
AC CURRENT TIG WELDING ...............................................................................................................................23
15.
TIG WELDING IN PULSE AC CURRENT ............................................................................................................25
16.
HIDDEN WELDING PARAMETERS.....................................................................................................................26
MAINTENANCE ........................................................................................................................ 27
17.
MAINTENANCE .......................................................................................................................................................27
18.
SPARE PARTS ...........................................................................................................................................................27
19.
PCB’S CONNECTORS .............................................................................................................................................30
20.
TROUBLE SHOOTING ............................................................................................................................................36
21.
WIRING DIAGRAMS ...............................................................................................................................................37
APPENDICE .............................................................................................................................. 39
22.
APPENDICE : ADJUSTABLE VALUES FOR WELDING PARAMETERS ......................................................39
USER’S MANUAL
Page 4/40
THERMAL ARC
180 – 220 - 250 AC/DC
Notice NOT 034
Rev : 07
Date : 18/12/07
WARRANTY POLICY STATEMENT
Thermal Arc 180 AC/DC, 220 AC/DC and 250 AC/DC units are guaranteed 24 months from date of
invoice.
Defects caused by natural wear or accidental damage (wrong assembly, defective maintenance,
abnormal use ...) or by modification of the product, which has not been accepted in writing by the
manufacturer, are not included in the guarantee.
Guarantee covers free of charge replacement of parts, which have been admittedly defective
(transport included).
Every part replaced under guarantee will be automatically invoiced after a period of 1 month in
case of non-return of the defective part.
Labour executed by the distributor is entirely at their cost. However, if you request, labour can be
performed free of charge by Thermadyne Industries, in its factory. In this case, transport to and
from Thermadyne Industries will be at the distributor’s costs.
USER’S MANUAL
Page 5/40
THERMAL ARC
180 – 220 - 250 AC/DC
Notice NOT 034
Rev : 07
Date : 18/12/07
SAFETY
The equipment you have just acquired will give you entire satisfaction if you respect the operating and
maintenance instructions.
Its design, the specification of the components and its manufacture are in accordance with the existing rules,
French standards (NF), ISO and CEI international injunctions, EEC general lines and CEN/CENELEC
standards.
In this chapter, you will find safety rules in the use of electric arc welding power sources with coated electrodes.
We give you hereunder a list of recommendations and obligations you have to respect.
Safety rules must be observed, and particulary those relating to Decree 88.1056 dated November 14., 1988
concerning protective measures against electrical currents.
1.
ELECTROMAGNETIC COMPATIBILITY
1.1.
DECLARATION OF CONFORMITY
THERMADYNE Industries hereby declare that the machine object of this manual complies with the following
European regulations :
Electromagnetic compatibility :
Rule 89/336-EEC of 3/05/89 modified by rules 92/31-EEC of 28/04/1992 and 93/68-EEC of 22/07/1993.
Low voltage :
Rule 73/23-EEC of 19/02/1973 modified by rule 93/68-EEC of 22/07/1993.
and with the national legislation transposing them.
THERMADYNE Industries also declare that following harmonised standards have been applied :
EN 60974-10 (2003) Electromagnetic compatibility (CEM) – Product norm for arc welding material.
EN 50060 (1990): Current source for arc manual welding with limited service.
EN 60974-1: Security rules for electric welding material.
Part 1: welding current sources.
EN 50192 (1995): Arc welding material – plasma cutting systems.
1.2.
INSTALLATION AND USE
The machine object of this manual complies with the European regulations about electromagnetic
compatibility 89/336 CEE. It also complies with EN 60974-10 standard: Electromagnetic compatibility,
product standard for welding machines.
The user is responsible for installing and using the arc welding equipment according to the manufacturer’s
instructions.
If electromagnetic disturbances are detected, then it shall be the responsibility of the user of the arc welding
equipment to resolve the situation with the technical assistance of the manufacturer. In some cases this
remedial action may be as simple as earthing the welding circuit, see Note. In other cases it could involve
USER’S MANUAL
Page 6/40
THERMAL ARC
180 – 220 - 250 AC/DC
Notice NOT 034
Rev : 07
Date : 18/12/07
SAFETY
constructing an electromagnetic screen enclosing the welding power source and the work complete with
associated input filters. In all cases electromagnetic disturbances shall be reduced to the point, where they
are no longer troublesome.
NOTE - The welding circuit may or may not be earthed for safety reasons. Changing the earthing
arrangements should only be authorised by a person who is competent to assess whether the changes will
increase the risk of injury, e.g. by allowing parallel welding current return paths, which may damage the earth
circuits of other equipment.
Further guidance is given in IEC 62081 "Arc welding equipment - Installation and use" (under consideration).
1.2.1. ASSESSMENT OF AREA
Before installing arc welding equipment the user shall make an assessment of potential electromagnetic
problems in the surrounding area. The following shall be taken into account :
a) Other supply cables, control cables, signalling and telephone cables, above, below and adjacent to the arc
welding equipment;
b) Radio and television transmitters and receivers;
c) Computer and other control equipment;
d) Safety critical equipment, e.g. guarding of industrial equipment,
e) The health of the people around, e.g. the use of pacemakers and hearing aids;
f) Equipment used for calibration or measurement;
g) The immunity of other equipment in the environment. The user shall ensure that other equipment being
used in the environment is compatible. This may require additional protection measures;
h) The time of day that welding or other activities are to be carried out.
The size of the surrounding area to be considered will depend on the structure of the building and other
activities that are taking place. The surrounding area may extend beyond the boundaries of the premises.
1.2.2. METHODS OF REDUCING EMISSIONS
1.2.2.1.
Public supply system
Arc welding equipment should be connected to the public supply system according to the manufacturer’s
recommendations. If interference occurs, it may be necessary to take additional precautions such as filtering
of the public supply system. Consideration should be given to shielding the supply cable of permanently
installed arc welding equipment, in metallic conduit or equivalent. Shielding should be electrically continuous
throughout its length. The shielding should be connected to the welding power source so that good electrical
contact is maintained between the conduit and the welding power source enclosure.
1.2.2.2.
Maintenance of the arc welding equipment
The arc welding equipment should be routinely maintained according to the manufacturers
recommendations. All access and service doors and covers should be closed and properly fastened when
the arc welding equipment is in operation. The arc welding equipment should not be modified in any way,
except for those changes and adjustments covered in the manufacturer’s instructions. In particular, the spark
gaps of arc striking and stabilising devices should be adjusted and maintained according to the
manufacturer’s recommendations.
1.2.2.3.
Welding cables
The welding cables should be kept as short as possible and should be positioned close together, running at
or close to the floor level.
1.2.2.4.
Equipotential bonding
Bonding of all metallic components in the welding installation and adjacent to it should be considered.
USER’S MANUAL
Page 7/40
THERMAL ARC
180 – 220 - 250 AC/DC
Notice NOT 034
Rev : 07
Date : 18/12/07
SAFETY
However, metallic components bonded to the work piece will increase the risk that the operator could receive
an electric shock by touching these metallic components and the electrode at the same time. The operator
should be insulated from all such bonded metallic components.
1.2.2.5.
Earthing of the workpiece
Where the workpiece is not bonded to earth for electrical safety, nor connected to earth because of its size
and position, e.g. ships hull or building steelwork, a connection bonding the workpiece to earth may reduce
emissions in some, but not all instances. Care should be taken to prevent the earthing of the workpiece
increasing the risk of injury to users, or damage to other electrical equipment. Where necessary, the
connection of the workpiece to earth should be made by a direct connection to the workpiece, but in some
countries where direct connection is not permitted, the bonding should be achieved by suitable capacitance,
selected according to national regulations.
1.2.2.6.
Screening and shielding
Selective screening and shielding of other cables and equipment in the surrounding area may alleviate
problems of interference. Screening of the entire welding installation may be considered for special
applications.
2.
ELECTRIC SAFETY
2.1.
CONNECTION OF THE WELDING POWER SOURCE TO THE NETWORK
Before connecting your equipment, you must check that:
-The meter, the safety device against over-currents, and the electric installation are compatible with the
maximum power and the supply voltage of the welding power source (refer to the instructions plates).
-The connection, either single-phase, or three-phase with earth can be effected on a socket compatible with
the welding power source cable plug.
If the cable is connected to a fixed post, the earth, if provided, will never be cut by the safety device against
electric shocks.
-The ON/OFF switch (if exists) situated on the welding power source, is turned off.
2.2.
WORKING AREA
The use of arc welding implies a strict respect of safety conditions with regard to electric currents (Decree
dated 14.12.1988).
It is necessary to check that no metal piece accessible to the operators and to their assistants can come into
direct contact with a phase conductor and the neutral of the network. In case of uncertainty, this metal part
will be connected to the earth with a conductor of at least equivalent section to the largest phase conductor.
Make sure that all metal pieces that the operator could touch with a non insulated part of his body (head,
hands without gloves on, naked arms ...) is properly grounded with a conductor of at least equivalent section
to the biggest supply cable of the ground clamp or welding torch. If more than one metal ground are
concerned, they need to be all interlinked in one, which must be grounded in the same conditions.
Unless very special care have been taken, do not proceed to any arc welding or cutting in
USER’S MANUAL
Page 8/40
THERMAL ARC
180 – 220 - 250 AC/DC
Notice NOT 034
Rev : 07
Date : 18/12/07
SAFETY
conductive enclosures, whether it is a confined space or the welding machine has to be left outside. Be even
more prudent when welding in humid or non ventilated areas, and if the power source is placed inside
(Decree dated 14.12.1988, Art. 4).
2.3.
INTERVENING
-Before carrying out any internal checking or repair work, check that the power source has been separated
from the electrical installation by locking and guard devices.
-The current plug has to be taken out. Provisions have to be taken to prevent an accidental connection of the
plug to a socket.
-Cut-off through a fixed connecting device has to be omnipolar (phases and neutral). It is in the "OFF"
position and cannot be accidentally put into operation.
-Maintenance works of electrical equipment must be entrusted to qualified people (Section VI, Art. 46).
2.4.
MAINTENANCE
Check the good state, insulation and connection of all the equipment and electrical accessories: plugs and
flexible supply cables, cables (NF A 32-510), conduits, connectors, extension cables (NF A 85-610 and
CENELEC HD 433), sockets on the power source, ground and electrode-holder clamps (NF A 85-600).
These connections and mobile accessories are marked according to standards, if consistent with the safety
rules. They can either be controlled by you or by accredited firms.
- Maintenance and repair works of conduits and liners have to be properly carried out (Section VI, Art. 47).
-Repair or replace all defective accessories
-Check periodically that the electrical connections are tightened and do not heat.
2.5.
RISKS OF FIRE AND EXPLOSION
Welding can occur risks of fire or explosion. You have to pay attention to fire safety regulation
- Remove flammable or explosive materials from welding area.
- Always have sufficient fire fighting equipment
- Fire can break out from sparks even several hours after the welding work has been finished.
3.
INDIVIDUAL PROTECTION
3.1.
RISK OF EXTERNAL INJURIES
3.1.1. THE WHOLE BODY
Arc rays produce very bright ultra violet and infra red light. They will damage yours eyes and burn your skin if
you are not properly protected
-The welder is dressed and protected according to the constraints his works impose him.
-Insulate yourself from the workpiece and the ground. Make sure that no metal piece, especially those
connected to the network, can come into contact with the operator.
-The welder must always wear an individual insulating protection (decree of 14/12/1988, article 3-3).
Protective clothing : gloves, aprons, safety shoes offer the additional advantage to protect the operator
against burns caused by hot pieces and spatter.
This protective equipment should be kept in good order and checked on a regular basis.
USER’S MANUAL
Page 9/40
THERMAL ARC
180 – 220 - 250 AC/DC
Notice NOT 034
Rev : 07
Date : 18/12/07
SAFETY
3.1.2. FACE AND EYES
-.It is absolutely necessary to protect your eyes against arc rays.
- Protect your hair and your face against sparks
The welding shield, with or without headset, is always equipped with a proper filter according to the arc
welding current (NS S 77-104 / A 88-221 / A 88.222 standards).
In order to protect shaded filter from impacts and sparks, you have to add a plain glass in front of the shield.
The helmet provided with your equipment (if requested) is equipped with a protective filter. When you want to
replace it, precise the reference and number of opacity degree of the filter. Use the shade of lens as
recommended in the instruction manual (opacity graduation number)
Protect others in the work area from arc rays by using protective booths, UV protective goggles, and if
necessary, a welding shield with appropriate protective filter on (NF S 77-104 - by A 1.5).
Opacity gradation numbers and recommended use for arc welding
Current intensity in Amps
Welding process or
connected techniques
0.5
2.5
1
10
5
20
15
40
30
80
60
125
100
175
225 275 350 450
150 200 250 300 400 500
Coated electrodes
9
10
11
12
MIG on heavy metals
10
11
12
MIG on light alloys
10
11
12
13
TIG on all metals
9
10
11
12
13
14
MAG
10
11
12
13
Air/Arc gouging
10
11
12
13
Plasma cutting
9
10
11
12
13
Depending on the conditions of use, the next highest or lowest category number may be used.
The expression “heavy metals” covers steels, alloyed steels, copper and its alloys.
The shaded areas represent applications where the welding processes are not normally used at present.
CARE :
3.2.
13
13
14
14
14
14
14
15
15
15
Use a higher degree of filters if welding is performed in premises which are not well lighted.
RISK OF INTERNAL INJURIES
GASES AND FUMES
Gases fumes produced during the welding process can be dangerous and hazardous to your health. Arc
welding works have to be carried out in suitable ventilated areas.
Ventilation must be adequate to remove gases and fumes during operation. All fumes produced during
welding have to be removed as soon as they are given off, and as close as possible from the place they
are produced to be the most efficient.
Vapors of chlorinated solvents can form the toxic gas phosgene when exposed to ultraviolet radiation from
an electric arc.
USER’S MANUAL
Page 10/40
THERMAL ARC
180 – 220 - 250 AC/DC
Notice NOT 034
Rev : 07
Date : 18/12/07
SAFETY
3.3.
SAFETY IN THE USE OF GASES (WELDING WITH TIG OR MIG INERT GASES)
3.3.1. COMPRESSED GAS CYLINDERS
Compressed gas cylinders are potentially dangerous. Refer to suppliers for proper handling procedures.
- No impact: secure the cylinders and keep them away from impacts.
- No excess heat (over 50°C)
3.3.2. PRESSURE RELIEF VALVE
Check that the pressure relief screw is slackened off before connecting to the cylinder.
Check that the union is tight before opening the valve of the cylinder. Open it slowly a fraction of a turn.
If there is a leak, NEVER tighten a union which is under pressure, but first close the valve on the cylinder.
Always check that hoses are in good condition.
3.3.3. DETAILS ABOUT GASES
Gas and gaseous mixtures containing less than 20% of CO2:
If these gases or mixtures take the place of the oxygen in the air, there is a danger of asphyxia. An
atmosphere containing less than 17% oxygen is dangerous.
hydrogen and hydrogen-based combustible gaseous mixtures
These are very light gases. In the case of leaks, they collect under the ceiling.
Provide for ventilation at ceiling level.
These are also inflammable gases. The flame of hydrogen is almost invisible. There is therefore a risk
of burns.
Air/hydrogen and oxygen/hydrogen mixtures are explosive in the following proportions:
- 4 to 74.5 % of hydrogen in air.
- 4 to 94 % of hydrogen in oxygen.
Store the bottles in the open or in a well-ventilated place.
Avoid any leakage by limiting the number of connections or couplings to a minimum.
USER’S MANUAL
Page 11/40
THERMAL ARC
180 – 220 - 250 AC/DC
Notice NOT 034
Rev : 07
Date : 18/12/07
DESCRIPTION
4.
GENERAL CHARACTERISTICS
THERMAL ARC 180 AC/DC, 220 AC/DC and 250 AC/DC welding machines have been designed as
integrated and portable units using the newest techniques in power electronics, based on an inverter
process with IGBT, wich enables the following :
- a considerable reduction of weight and volume
- the dynamic control of the welding current
- the specific protection of power components
- a high power in a small space at a very low power consumption
With their innovative design, these machines are both robust (plastic front and back panel, new
internal conception) and ergonomic.
The THERMAL ARC 180 and 220 AC/DC units must be connected to a single phase power supply,
and the THERMAL ARC 250 AC/DC units to a three phase power supply.
THERMAL ARC 180 and 220 AC/DC units have built-in over voltage protection.
THERMAL ARC 250 AC/DC units detect lack of one phase on the supply.
These 2 machines can be supplied by engine driven generators.
They offer a very high quality of welding in :
1- stick welding
Exceptional arc characteristics with a microprocessor that ensures regulation and perfect blade
appearence and spatter control.
Maximum user’s comfort strengthened by arc force and anti stick.
2- TIG welding
Ignition of the arc can be made with high frequency or using a lift arc technique, either in 2 stroke or
in 4 stroke modes.
Welding with DC or AC current
Integrated pulse current, totally controlled through the microprocessor.
Powerful and direct H.F
Female socket on the back side for a direct connection to a cooling unit
These power sources are perfectly suited to welding in :
- TIG DC for high alloyed steels, stainless steels, copper and copper alloys, titanium …
- TIG AC for aluminium and its alloys, magnesium.
- Stick welding with coated electrodes of all types in positive or negative polarity.
5.
TECHNICAL CHARACTERISTICS
THERMAL ARC 180 and 220 AC/DC
THERMAL ARC 250 AC/DC
DIMENSIONS ( in mm )
USER’S MANUAL
Page 12/40
L = 407 mm
L = 457 mm
Notice NOT 034
THERMAL ARC
180 – 220 - 250 AC/DC
Rev : 07
Date : 18/12/07
DESCRIPTION
Ces caractéristiques sont données pour une température ambiante de 40°C
180 AC/DC
220 AC/DC
250 AC/DC
PRIMARY
Power supply
V
Single phase : 230 V (+/- 13%)
Frequency
Hz
50/60
Three phase :
400 V (+/- 10%)
MMA (stick) welding
Maximum primary current
Maximum power consumption
Main supply protection
A
kVA
A
29.5
6.8
25
33.8
7.8
25
12.7
8.8
16
TIG welding
Maximum primary current
Maximum power consumption
Main supply protection
A
kVA
A
18.6
4.2
25
5.7
16
10
6.9
Power factor (cos Ø)
0,98
SECONDARY
Off load voltage
Minimum secondary current
V
A
50 / 60
3
MMA (stick) welding
Welding current range
Welding current at 40 %
Welding current at 45 %
Welding current at 50 %
Welding current at 60 %
Welding current at 100 %
A
A
A
A
A
A
3 to 180
TIG welding
Welding current range
Welding current at 30 %
Welding current at 50 %
Welding current at 60 %
Welding current at 100 %
A
A
A
A
A
3 to 180
180
160
140
Courant alternatif / AC current
Frequency
Waves form
Balance cleaning/penetration
Pulse current
low current
Frequency
Cycle ratio
Protection degree
Insulation class
Standards
Weight
Dimensions L x W x H
3 to 200
-
3 to 220
220
200
180
160
140
170
150
3 to 220
220
170
150
190
170
3 to 250
250
210
180
Hz
From 20 to 250
square waves
Cleaning from 20% (penetration.80%) to 60% (penetration.40%)
A
Hz
%
From 3 to welding current
From 0.2 to 99.9
From 20 to 80
kg
mm
IP 23
H
EN 60974-1/EN 60974-10
19
407 x 209 x 372
USER’S MANUAL
Page 13/40
21.1
457 x 209 x 372
THERMAL ARC
180 – 220 - 250 AC/DC
Notice NOT 034
Rev : 07
Date : 18/12/07
SETTING UP
6.
CONNECTION TO THE MAIN SUPPLY
The power source THERMAL ARC 180 and 220 AC/DC must be connected to a single-phase 230V - 50
Hz/60 Hz mains + ground with a tolerance of +/- 13%.
The power source THERMAL ARC 250 AC/DC must be connected to a three-phase 400V - 50 Hz/60 Hz
mains + ground with a tolerance of +/- 10%.
It has built-in over voltage protection which allows engine driven generator supply
Main supply must be protected by fuses or circuit-breaker according to the value I1eff written on the
specifications of the power source.
It is strongly suggested to use a differential protection for the operator’s safety.
7.
CONNECTION TO THE GROUND
For the operator's protection, the power source must be correctly grounded (according to the International
Protections Norms).
It is absolutely necessary to provide a good ground connection installation with the green/yellow lead of the
power cable. This will avoid discharges caused by accidental contacts with grounded pieces.
If no earth connection has been set, a high risk of electric shock through the chassis of the unit remains
possible.
8.
PRELIMINARY PRECAUTIONS
For the good operation of your welding power source, make sure that the air flow produced by the fan inside
the unit is not obstructed.
Also try to operate in a non-dusty area.
Avoid all impacts, exposure to damp areas or excessive temperatures.
USER’S MANUAL
Page 14/40
THERMAL ARC
180 – 220 - 250 AC/DC
Notice NOT 034
Rev : 07
Date : 18/12/07
USING
9.
DESCRIPTION OF THE FRONT PANEL
USER’S MANUAL
Page 15/40
THERMAL ARC
180 – 220 - 250 AC/DC
Notice NOT 034
Rev : 07
Date : 18/12/07
USING
ITEM
F1
F2
F3
F4
F5
F6
F7
F8
F9
F10
F11
F12
F13
F14
F15
F16
F17
F18
F19
F20
F21
F22
F23
F24
F25
F26
F27
DESCRIPTION
Female socket for torch’s signals connection
Gas output
Power terminal – (torche)
Power terminal +
Digital display
« voltage/intensity displayed» setting key
« pre gas time » setting key
« up slope time » setting key
Welding current and other parameters knob
Knob for arc down slope time adjustment
« post gas time » setting key
« 2 stroke / 4 stroke » setting key
« HF or PAE ignition » setting key
Welding mode « TIG / Stick » setting key
Welding mode « TIG DC, pulse TIG DC, TIG AC, pulse TIG AC » setting key
« pulse low current » setting key
« pulse frequency » setting key
« AC current frequency » setting key
« pulse cycle ratio » setting key
Balance « cleaning/penetration » setting key
« current in Amps displayed » indicator
« voltage displayed (in Volts) » indicator
Warning indicator
« 2 stroke » indicator
« 4 stroke » indicator
H.F ignition indicator
« TIG welding » indicator
« Stick welding » indicator
« AC current » indicator
« pulse current » indicator
PINOUT OF THE FEMALE SOCKET F1
You can use the power source with a torch with potentiometer (optional). Potentiometer’s value has to
be 10K ohms. The connection is centralised to the female socket F1 as described below :
PINS
1
2
3
4
5
CONNECTION
Torch trigger
Torch trigger
Minimum of the torch potentiometer
Cursor of the torch potentiometer
Maximum of the torch potentiometer
USER’S MANUAL
Page 16/40
THERMAL ARC
180 – 220 - 250 AC/DC
Notice NOT 034
Rev : 07
Date : 18/12/07
USING
10. DESCRIPTION OF THE BACK PANEL
ITEM
B1
B2
B3
B4
B5
DESCRIPTION
Female socket for remote control
ON/OFF main switch
Female socket for connexion to cooler unit
Gas input
Input cable
11. MMA (STICK) WELDING
Connect the power source to the main supply and the ground as explained in the chapter « Setting
up » (as para 6 and 7).
Connect the ground cable and the electrode-holder to the appropriate power connections + (F4) and –
(F3) according to the electrode polarity being used (refer to the electrodes manufacturer’s datasheets).
Start up the power source with the main switch ON/OFF (B2).
When you start the machine, the orange indicator (F20) illuminates during 2s and then goes out if no
failure has been found.
Select MMA(stick) welding mode with setting key F14, the indicator F25 illuminates.
Adjust welding current with potentiometer F9.
Digital display F5 shows the selected current in Amps (indicator F18 illuminates)..
Place the electrode on the workpiece in order to strike the arc.
NOTE
The welding current of ELEKTROTIG 220 AC/DC in MMA welding mode could be adjusted from 3 to
200A (in TIG welding mode, from 3 to 220A)
The welding current of ELEKTROTIG 250 AC/DC in MMA welding mode could be adjusted from 3 to
220A (in TIG welding mode, from 3 to 250A)
Arc force control
Arc force control is not adjustable, but it is optimised for welding with a large range of rutile and basic
electrodes.
Hot start time
The Hot start is an over current of 20% higher than the welding current chosen.
The hot start time pre-adjusted is 0s (no over current) but it is possible to adjust it until 5s (see
chapter. 16).
Using remote control RC01 or RC04
The unit recognises the remote control as soon as you plug it in female socket B1.
USER’S MANUAL
Page 17/40
THERMAL ARC
180 – 220 - 250 AC/DC
Notice NOT 034
Rev : 07
Date : 18/12/07
USING
IMPORTANT : using the potentiometer of the remote control, you can adjust the welding current
from 3A to the current selected with the main potentiometer F9 of the power source. This value is
displayed on F5 when the potentiometer of the remote control is on “maximum”.
This allows you to set the welding current with fine adjustment directly on the remote control
Reading the parameters when welding
When welding, digital display F5 shows welding current in Amps measured by the machine.
It is possible to read the welding voltage when pressing the setting key F6. The value is displayed in
Volts (indicator F18 goes out and F19 illuminates). Press setting key F6 in order to display current’s
value again.
Ventilation in MMA (stick) welding
Fan allows the cooling of electronic components.
Ventilation is permanent.
Fan speed changes according to the components’ temperature.
This method is a good solution between cooling and protection from dust circulation in the machine.
12. TIG WELDING
12.1. 2 STROKE & 4 STROKE MODE
2 STROKE MODE
USER’S MANUAL
Page 18/40
THERMAL ARC
180 – 220 - 250 AC/DC
Notice NOT 034
Rev : 07
Date : 18/12/07
USING
4 STROKE MODE
12.2. BEFORE WELDING
- connect the power source to the main supply and the ground as explained in the chapter « Setting
up » (as para 6 and 7).
- connect the ground cable to the power connection + (F4) and the torch to the – (F3).
- start up the power source with the main switch ON/OFF (B2).
- select the TIG welding mode with the key F14, to light indicator F24. Check that the indicators F26
and F27 are extinguished. If not, press the setting key F15 to extinguish them.
- select the « 2 stroke or 4 stroke » welding mode with the key F12.
If the mode « 4 stroke » is selected, the indicator F22 illuminates.
If the mode « 2 stroke » is selected, the indicator F21 illuminates.
- select the ignition mode with the key F13. If « HF ignition » is selected, the indicator F23 illuminates.
- set the TIG cycle parameters :
During their adjustment, the parameter’s value is displayed by digital display F5. When adjusting a
current, the indicator F18 illuminates (A - Amps). In the other case, it is OFF. Then, the unit of the
value displayed is written on the setting key.
XPre-gas :
Press the setting key F7, adjust the pre-gas time with the potentiometer F9.
When the potentiometer is at the minimum, the pre-gas time is 0.1s, and at the maximum, the pre-gas
time is 5s.
The value can be read on the display F5 (The indicator F18 or F19 goes out).
The pre-adjusted value is 0.5s.
Release the key when your setting is finished.
YUp slope time
Press the setting key F8, adjust the up-slope time with the potentiometer F9.
When the potentiometer is at the minimum, the up-slope time is 0s, and at the maximum, the up-slope
time is 10s.
USER’S MANUAL
Page 19/40
THERMAL ARC
180 – 220 - 250 AC/DC
Notice NOT 034
Rev : 07
Date : 18/12/07
USING
The value can be read on the display F5 (The indicator F18 or F19 goes out).
The pre-adjusted value is 1.0s.
Release the key when your setting is finished.
ZDown-slope time
Adjust the down-slope time between 0s to 16s with the potentiometer F10.
[Post-gas :
Press the setting key F11, adjust the post-gas time with the potentiometer F9.
When the potentiometer is at the minimum, the pre-gas time is 3s, and at the maximum, the pre-gas
time is 25s.
The value can be read on the display F5 (The indicator F18 or F19 goes out).
The pre-adjusted value is 5.0s.
Release the key when your setting is finished.
\Welding current :
Set the welding current from 3A to maximum value with potentiometer F9.
The value can be read on the display F5 and indicator F18 illuminates.
12.3. WELDING
Select tungsten electrode
Place on the torch a tungsten electrode thoriated 2% or 4%, or even better, electrode DLZ (Itrium
Lanthane Zirconium) or lanthane, not so radioactive.
Grid electrode’s head at 60° or 90°.
See adviced electrode’s diameter adapted to welding current.
Electrode’s diameter
Welding DC current
mm
A
1
<75
1.6
50 - 120
2.0
2.4
90 - 190 130 - 250
3.0
4.0
170 - 300 250 - 400
H.F ignition
Place the tungsten electrode a few mm away from the workpiece.
Press the trigger on.
After the selected pre-gas time, the arc strikes. The high frequency stops.
The welding current increases during the up-slope time between the value of initial current and the
value of welding current chosen.
The value of the initial current (Id) is pre-adjusted at 50% of the value of welding current chosen but it
is possible to adjust (see chapter 16).
At the end of the weld, the arc fades away during the down-slope time and the welding current
reduces from the welding current chosen to the final current.
The final current (If) is pre-adjusted to 3A but it is possible to adjust it (see chapter 16).
The arc goes out. The gas flows according to the post-gas time to ensure the protection of the
tungsten as well as of the weld pool.
PAE ignition
Put the tungsten electrode in direct contact with the workpiece. Push on the trigger.
Raise the torch slowly. The arc strikes. The welding cycle will then be the same as described above.
NOTE : This type of ignition is especially useful when welding in surroundings sensitive to radioelectric
disturbances (next to computers or digital controlled equipments).
USER’S MANUAL
Page 20/40
THERMAL ARC
180 – 220 - 250 AC/DC
Notice NOT 034
Rev : 07
Date : 18/12/07
USING
12.4. USING REMOTE CONTROL
CAUTION : Do not connect at the same time remote control to socket B1 and torch with
potentiometer to socket F1.
Using remote control RC01 or RC04
The unit recognises the remote control RC01 as soon as you plug it in female socket B1.
The unit recognises the foot pedal remote control RC04 as soon as you plug it in female socket F1.
Using torch with potentiometer
The generator is equiped to work with all torches with potentiometer of 10kΩ. The connection is
centralised on the female socket F1 as described in chapter 9.
The unit recognises the torch with remote control as soon as you plug it in female socket F1.
IMPORTANT : using the potentiometer of remote control or torch, you can adjust the welding current
from 3A to the current selected with the main potentiometer F9 of the power source. This value is
displayed on F5 when the potentiometer of the remote control is on “maximum”.
This allow you to set the welding current with fine adjustment directly on the remote control.
12.5. CONNECTION OF A COOLING UNIT
Connect directly the cooling unit to the female socket B3.
Use a water cooled torch. Connect the water plug to the cooling unit according to the water circulation.
The machine starts the cooling unit automatically when necessary. Lack of water or water circuit
blocked create a default.
12.6. READING PARAMETERS WHEN WELDING
When welding, digital display F5 shows welding current in Amps measured by the machine.
It is possible to read the welding voltage when pressing the setting key F6. The value is displayed in
Volts (indicator F18 goes out and F19 illuminates).
12.7. VENTILATION IN TIG WELDING
Fan allows the cooling of electronic components.
In TIG welding, ventilation doesn’t start systematically.
When welding, the component’s temperature rise starts the ventilation and fixes the fan’s speed which
will change according to temperature.
This method is a good solution between cooling and protection from dust’s circulation in the machine.
NOTE : When ambient temperature is high, the fan can operate for a short period even if you are not
welding.
In MMA (stick) mode, ventilation is permanent
USER’S MANUAL
Page 21/40
THERMAL ARC
180 – 220 - 250 AC/DC
Notice NOT 034
Rev : 07
Date : 18/12/07
USING
13. WELDING WITH PULSE DC CURRENT
The THERMAL ARC 180 AC/DC, 220 AC/DC and 250 AC/DC units have got a pulse current function
built in.
To set the pulse current, press the setting key F15. The indicator F27 illuminates (indicator F26 OFF).
To remove the pulse current, press the setting key F15 until indicator F27 fade out.
XAdjustment of the pulse high current
Adjust the high current with the potentiometer F9.
The value can be read on display F5.
YAdjustment of the pulse low current
When F26 OFF and F27 ON, press the setting key F15 for 3 s. Maintain the key pressed and adjust
the low current‘s value with the potentiometer F9.
The value can be read on the display F5.
When the potentiometer is at the minimum, the current is 3A, and at the maximum, it is high pulse
current value.
The low current is pre-adjusted at 30A.
Release the key when your setting is finished.
ZAdjustment of the frequency
The frequency is the number of pulses per second. Fpulse=1/(th+ tb) in Hz
When F26 OFF and F27 ON, press the setting key F16 and adjust the frequency with the
potentiometer F9.
The value (in Hz) can be read on the display F5.
When the potentiometer is at the minimum, the frequency is 0.2 Hz, and at the maximum, the
frequency is 99.9 Hz
The frequency is pre-adjusted at 20 Hz.
Release the key when your setting is finished.
USER’S MANUAL
Page 22/40
THERMAL ARC
180 – 220 - 250 AC/DC
Notice NOT 034
Rev : 07
Date : 18/12/07
USING
[Cycle ratio
The cycle ratio is the ratio between the time of high current (warm time - th) and the total time (th+ tb) of
the pulse (in %)
i.e R = th / (th+ tb).
When F26 OFF and F27 ON, press the setting key F17, adjust the cycle ratio with the potentiometer
F9.
The value (in %) can be read on the display F5.
When the potentiometer is at the minimum, the ratio is of 20%, and when it is at the maximum, it is of
80%.
The ratio pre-adjusted is 50%
Release the key when your setting is finished.
For welding, see indications in chapter 12.
NOTE
When welding, you can read alternately, on the display F5, values of high and low current.
Only the value of high current can be adjusted with remote control.
14. AC CURRENT TIG WELDING
X Select of « TIG AC current » welding mode
- Select « TIG welding » with the setting key F14, the indicator F24 illuminates.
- Press 2 times the setting key F15 in order to select « AC current », the indicator F26 illuminates
(indicator F27 OFF).
Y Set « AC current » parameters
Frequency adjustment
The frequency is the number of periods per second. TAC = TD+TP. FAC=1/ TAC in Hz.
When F26 ON and F27 OFF, press the setting key F16, adjust the frequency with the potentiometer
F9.
The value (in Hz) can be read on the display F5.
USER’S MANUAL
Page 23/40
THERMAL ARC
180 – 220 - 250 AC/DC
Notice NOT 034
Rev : 07
Date : 18/12/07
USING
When the potentiometer is at the minimum, the frequency is 20 Hz, and at the maximum, the
frequency is 250 Hz.
High frequencies allow arc concentration and reduce the area affected by the arc on the workpiece.
The frequency is pre-adjusted at 100 Hz.
Release the key when your setting is finished.
Balance adjustment
This adjustment has an effect upon the proportion of positive current in the arc.
The balance is TD/ (TD+TP) in %.
Penetration : The negative halfcycle (TP) is longer than the positive (TD). You need a lower welding
current which allows :
• less heating of the tungsten electrode, which allows longer time between electrode grinding.
• reduction of the affected area on the workpiece
Use for clean workpiece only.
Cleaning : The positive alternating (TD) is longer than the negative one (TP), which heat the tungsten
electrode and means :
• higher welding current
• more important tungsten electrode diameter
• electrode’s rounded so the arc is less directional
• larger affected area on the workpiece
Use for dirty workpiece only.
When F26 ON and F27 OFF, press the setting key F17, adjust the balance with the potentiometer F9.
The value (in % of cleaning ratio) can be read on the display F5.
Release the key when your setting is finished.
50% of balance means that the 2 alternating positive and negative are equal.
Balance can be adjusted from 20% to 60% (cleaning).
In order to maintain a sharp tungsten it is better to use a shorter cleaning time
The balance is pre-adjusted to 40% (cleaning 40% - penetration 60%), which is a good solution
between the 2 modes and allow aluminium welding in almost all the cases.
Z Select tungsten electrode
Place a tungsten electrode pure or DLZ (Itrium Lanthane Zirconium) or lanthane, without radiation.
For low current, use the smallest diameter possible.
For very low current (3A to 15A), use only grinded tungsten electrode
Electrode’s diameter
Welding AC current
mm
A
1
<50
1.6
40 - 80
2.0
60 - 110
2.4
70 - 140
3.0
90 - 180
4.0
5.0
160 - 240 230 - 340
[ Welding
For the adjustment of other parameters and for welding, see instructions given in chapter 12 : DC
Current TIG welding
USER’S MANUAL
Page 24/40
THERMAL ARC
180 – 220 - 250 AC/DC
Notice NOT 034
Rev : 07
Date : 18/12/07
USING
15. TIG WELDING IN PULSE AC CURRENT
The selection of « TIG in AC current » welding mode is made in 4 stages :
X Select TIG welding mode
Press the setting key F14 to choose « TIG welding mode », the indicator F24 illuminates.
To adjust the parameters, see instructions given in chapter 12 : DC Current TIG welding
Y Select « pulse DC current» welding mode
Press the setting key F15 one time to choose « pulse DC current welding mode », the indicator F27
illuminates (indicator F26 OFF).
To adjust the parameters, see instructions given in chapter 13 : TIG welding in pulse DC current
Z Select « AC current » welding mode
Press the setting key F15 one time to choose « pulse current welding mode », the indicator F26
illuminates (indicator F27 dies out).
To adjust the parameters, see instructions given in chapter 14 : AC current TIG welding
[ Select « pulse AC current » welding mode
Press the setting key F15 one time to choose « pulse AC current welding mode », the indicators F26
and F27 illuminate.
NOTE :
In this case (indicators F26 and F27 ON), you could not make any more adjustments, that the reason
why you have to do them in previous stages.
To make any modification, change the welding mode with the setting key F15 :
Indicator F26 ON and indicator F27 OFF : modification of « AC current » parameters
Indicator F27 ON and indicator F26 OFF : modification of « pulse current » parameters
At the end of modifications, come back to « pulse AC current » welding mode : indicators F26 and F27
ON.
USER’S MANUAL
Page 25/40
THERMAL ARC
180 – 220 - 250 AC/DC
Notice NOT 034
Rev : 07
Date : 18/12/07
USING
16. HIDDEN WELDING PARAMETERS
Some welding parameters are not directly adjustable :
- Pre-heat time at ignition in TIG AC welding mode
- initial current
- final current
- Hot start time
To adjust these parameters, press in the same time setting keys F7 and F14, then release. The
indicator F18 (A) goes out.
Turn potentiometer F9 until value :
33 for adjustment of pre-heat time at ignition in TIG AC welding mode
40 for adjustment of initial current
41 for adjustment of final current
42 for adjustment of Hot start time
238 for return of pre-adjusted values (factory settings)
Press any key to finish selection
Adjustment of pre-heat time at ignition in TIG AC welding mode
This time is the duration of the first positive alternating at the ignition in TIG AC welding mode. Chosen
a long time gives a better ignition. Unfortunatly, it damages grinded electrode’s head.
Adjust the time with potentiometer F9. The value can be read on display F5.
The time can be adjusted from 0.1s to 1.0s.
It is pre adjusted to 0.1s.
Adjustment of initial current (Id)
Adjust the current with potentiometer F9. The value can be read on display F5.
The initial current can be adjusted between 3A and maximum current of the machine (180A for
THERMAL ARC 180 AC/DC – 220A for the THERMAL ARC 220 AC/DC and 250A for THERMAL ARC
250 AC/DC).
If initial current is less than 3A, the machine will automatically adjust the initial current to the preadjusted value i.e 50% of welding current.
If initial current is more than welding current, the machine will automatically adjust the initial current to
welding current.
Adjustment of final current (If)
Adjust the current with potentiometer F9. The value can be read on display F5.
The final current can be adjusted between 3A and maximum current of the machine (180A for
THERMAL ARC 180 AC/DC – 220A for the THERMAL ARC 220 AC/DC and 250A for THERMAL ARC
250 AC/DC).
If final current chosen is more than welding current, the machine will automatically adjust the final
current to welding current.
If initial current is more than welding current, the machine will automatically adjust the initial current to
welding current.
Adjustment of Hot start time : Stick welding
Adjust the Hot start time with the potentiometer F9. The value can be read on the display F5.
Time can be adjusted between 0.0s and 5.0s.
The pre-adjusted value is 0.0s.
The over current at ignition is 20%.
USER’S MANUAL
Page 26/40
THERMAL ARC
180 – 220 - 250 AC/DC
Notice NOT 034
Rev : 07
Date : 18/12/07
MAINTENANCE
17. MAINTENANCE
CAUTION : BEFORE OPENING the unit, disconnect the power source from the mains. Voltages are high and
dangerous inside the machine.
In spite of their robustness, THERMAL ARC power sources require some regular maintenance.
Once every 6 months (more often in dusty surroundings) :
-
the machine must be blown through with dry, oilfree compressed air
check all connections for electrical continuity.
Checkall cable connections, including ribbon cables.
18. SPARE PARTS
USER’S MANUAL
Page 27/40
THERMAL ARC
180 – 220 - 250 AC/DC
Notice NOT 034
Rev : 07
Date : 18/12/07
MAINTENANCE
USER’S MANUAL
Page 28/40
THERMAL ARC
180 – 220 - 250 AC/DC
Notice NOT 034
Rev : 07
Date : 18/12/07
MAINTENANCE
ITEM
1
2
3
4
5+34
6
7
8
9
10
11
12
13
14
15
16
17
18
19+20
21
22
23
24
25
26
27
28
29
30
31
32
33
REFERENCE
I05911
I05921
060153
V01002
V01008
E11210/SMI/VE
E32408/SMI/VE
S07011
S07015
S10015
T18703
T18704
T28303
E10011
T02013
L93021
L93101
L93191
L93072
L93121
S01051
S01053
P02100
G02010
G02011
I05977
B00009/TH
B01060
B01062
C02025
C04025
F12004-1
F04002
F18008
C02612
C02613
C02614
C02107
I05901
I05902
I05933
I05935
I05932
I05934
J15021-2
J15021-3
I05919
B04038
T03005
DESCRIPTION
Black front frame
Black back frame
Power terminal 35/50 mm²
Fan 12VDC for THERMAL ARC 180 and 220 AC/DC
Fan 12VDC for THERMAL ARC 250 AC/DC
MAIN PCB without heat sinks for THERMAL ARC 180-220 AC/DC
MAIN PCB without heat sinks for THERMAL ARC 250 AC/DC
Diode BYV 255 V200
Diode STTB 12006
IGBT GA200SA60S
Transformer for THERMAL ARC 180 and 220 AC/DC
Transformer for THERMAL ARC 250 AC/DC
Inductor
Complete ferrite
Auxiliary transformer 80VA
Front face PCB CI 302
Filter PCB CI 310 for THERMAL ARC 180 and 220 AC/DC
Filter PCB CI 319 for THERMAL ARC 250 AC/DC
Regulation PCB CI 307
Secondary block PCB CI 312
Single phase rectifier bridge 35A for 180 and 220 AC/DC
Three phase rectifier bridge 35A for THERMAL ARC 250 AC/DC
Resistor 120W 100 ohms
Commutator for THERMAL ARC 180 and 220 AC/DC
Commutator for THERMAL ARC 250 AC/DC
Shunt
Front fascia
Knob diam 14
Knob diam 23
Female socket 5 pins
Male plug 5 pins for C02025
Gas output 3/8 BSP
Gas valve 220V
Gas valve output F12/100 – M3/8 BSP
12 pins Female socket without pins
10 female pins for C02612
Cover for C02612 (in option)
Female socket 7 pins
Chassis for THERMAL ARC 180 and 220 AC/DC
Chassis for THERMAL ARC 250 AC/DC
Panel for THERMAL ARC 180 and 220 AC/DC
Panel for THERMAL ARC 250 AC/DC
Cover for THERMAL ARC 180 and 220 AC/DC
Cover for THERMAL ARC 250 AC/DC
Handle for THERMAL ARC 180 and 220 AC/DC
Handle for THERMAL ARC 250 AC/DC
Bottom of the front face
Thermistor CTN 47K
Ferrite for THERMAL ARC 250 AC/DC
USER’S MANUAL
Page 29/40
THERMAL ARC
180 – 220 - 250 AC/DC
Notice NOT 034
Rev : 07
Date : 18/12/07
MAINTENANCE
19. PCB’S CONNECTORS
PCBs in THE MACHINE THERMAL ARC 180 AC/DC:and 220 AC/DC
L92861 : 286 PCB for primary block E11208/SMI
L93051 : 600V IGBT module PCB
L93072 : 307 PCB : regulator
L93021 : 302 front panel PCB
L93101 : 310 PCB main supply and filter
L93121 : 313 PCB HF, gas and secondary blockPCB
PCBs in THE MACHINE THERMAL ARC 250 AC/DC
L92863 : 286 PCB for primary block E11208/SMI
L93052 : 1200V IGBT module PCB
L93072 : 307 PCB : regulator
L93021 : 302 front panel PCB
L93191 : 319 PCB main supply and filter
L93121 : 312 PCB HF, gas and secondary blockPCB
PCB L92861 : primary block PCB (THERMAL ARC 180 -220 AC/DC)
Connector J1 :
Pin 1 : duty cycle limitation input (image of primary inverter current)
Pin 2 : +15V DC
Pin 3 : PWM1 output for IGBT1 control
Pin 4 : electronic ground
Pin 5 : ENABLE input for inverter start/stop (0-4V)
Pin 6 : electronic ground
Pin 7 : +20V DC
Pin 8 : current control input (0-3.4V)
Pin 9 : PWM2 output for IGBT2 control
Pin 10 : -20V DC
Pin 11 : striked arc information (0V when striked, +5V when not striked)
Pin 12 : Arc force control input (not used on 160TE)
Pin 13 : Positive polarity of shunt (same as positive output of generator).
Pin 14 : not used
Pin 15 : Negative polarity of shunt
Pin 16 : Negative output of generator
Connector J2 :
Pin 1 : electronic ground
Pin 2 : open drain for thermal default led on/off
Pin 3 : +15V DC
Pin 4 : current control input (0-3.4V)
Pin 5 : Arc force control output
Pin 6 : ENABLE output for inverter start/stop (0-5V)
Pin 7 : +20V DC
Pin 8 : -20V DC
Pin 9 : NTC thermistor return (0-5V) for primary temperature measurement
Pin 10 : striked arc information (0V when striked, +5V when not striked)
Pin 11 : Fan control (PWM from front panel.
Pin 12 : 15V AC signal
Pin 13 : Positive polarity of shunt (same as positive output of generator).
Pin 14 : Negative polarity of shunt
Pin 15 : Negative output of generator
USER’S MANUAL
Page 30/40
THERMAL ARC
180 – 220 - 250 AC/DC
Notice NOT 034
Rev : 07
Date : 18/12/07
MAINTENANCE
Connector J3 :
Pin 1 & 2 : thermostat loop 1
Pin 3 & 4 : thermostat loop 2
Pin 5 & 7 : 18VAC supplies
Pin 6 : electronic ground
Pin 8 & 9 : shunt information
Pin 10 : - polarity of welding output
Connector J4 :
Pin 1 & 2 : not used
Pin 3 & 4 : 12VDC fan
Connector J6 & J8 : primary connections of main transformer
Connector J7 : - of inverter
Connector J9 : + of inverter
PCB L92863 : primary block PCB (THERMAL ARC 250 AC/DC)
Connector J1 :
Pin 1 : duty cycle limitation input (image of primary inverter current)
Pin 2 : +15V DC
Pin 3 : PWM1 output for IGBT1 control
Pin 4 : electronic ground
Pin 5 : ENABLE input for inverter start/stop (0-4V)
Pin 6 : electronic ground
Pin 7 : +20V DC
Pin 8 : current control input (0-3.4V)
Pin 9 : PWM2 output for IGBT2 control
Pin 10 : -20V DC
Pin 11 : striked arc information (0V when striked, +5V when not striked)
Pin 12 : Arc force control input (not used on 160TE)
Pin 13 : Positive polarity of shunt (same as positive output of generator).
Pin 14 : not used
Pin 15 : Negative polarity of shunt
Pin 16 : Negative output of generator
Connector J2 :
Pin 1 : electronic ground
Pin 2 : open drain for thermal default led on/off
Pin 3 : +15V DC
Pin 4 : current control input (0-3.4V)
Pin 5 : Arc force control output
Pin 6 : ENABLE output for inverter start/stop (0-5V)
Pin 7 : +20V DC
Pin 8 : -20V DC
Pin 9 : NTC thermistor return (0-5V) for primary temperature measurement
Pin 10 : striked arc information (0V when striked, +5V when not striked)
Pin 11 : Fan control (PWM from front panel.
Pin 12 : 15V AC signal
Pin 13 : Positive polarity of shunt (same as positive output of generator).
Pin 14 : Negative polarity of shunt
USER’S MANUAL
Page 31/40
THERMAL ARC
180 – 220 - 250 AC/DC
Notice NOT 034
Rev : 07
Date : 18/12/07
MAINTENANCE
Pin 15 : Negative output of generator
Connector J3 :
Pin 1 & 2 : thermostat loop 1
Pin 3 & 4 : thermostat loop 2
Pin 5 & 7 : 18VAC supplies
Pin 6 : electronic ground
Pin 8 & 9 : shunt information
Pin 10 : - polarity of welding output
Connector J4 :
Pin 1 & 2 : not used
Pin 3 & 4 : 12VDC fan
Connector J6 & J8 : primary connections of main transformer
Connector J7 : - of inverter
Connector J9 : + of inverter
PCB L93021 : Front panel PCB (THERMAL ARC 180 – 220 and 250 AC/DC)
Connector J1 : multiplexed datas to/from front panel keyboard
Connector J2 :
Pin 1 : -20V DC
Pin 2 : +20V DC
Pin 3 : overvoltage AC fault return
Pin 4 : AC + IGBT control
Pin 5 : AC – IGBT control
Pin 6 : remote control or torch’s potentiometer value
Pin 7 : 15V AC signal (used for torch trigger detection)
Pin 8 : Open drain for HF ON /OFF control
Pin 9 : input of torch trigger detection
Pin 10 : Open drain for gas ON /OFF control
Pin 11 : Open drain for cooler pump ON /OFF control
Pin 12 : Cooling default input (+20V when default)
Pin 13 : Over voltage protection or phase missing input
Pin 14 : NTC thermistor return (0-5V) for primary temperature measurement
Pin 15 : electronic ground
Connector J3, J4 : options, not used
Connector J5 : matches with J2 of L92861 PCB
Pin 1 : electronic ground
Pin 2 : open drain for thermal default led on/off
Pin 3 : +15V DC
Pin 4 : current control input (0-3.4V)
Pin 5 : Arc force control output
Pin 6 : ENABLE output for inverter start/stop (0-5V)
Pin 7 : +20V DC
Pin 8 : -20V DC
USER’S MANUAL
Page 32/40
THERMAL ARC
180 – 220 - 250 AC/DC
Notice NOT 034
Rev : 07
Date : 18/12/07
MAINTENANCE
Pin 9 : NTC thermistor return (0-5V) for primary temperature measurement
Pin 10 : striked arc information (0V when striked, +5V when not striked)
Pin 11 : Fan control (PWM from front panel.
Pin 12 : 15V AC signal
Pin 13 : Positive polarity of shunt (same as positive output of generator).
Pin 14 : Negative polarity of shunt
Pin 15 : Negative output of generator
PCB L93072 : Regulator PCB (THERMAL ARC 180 -220 and 250 AC/DC)
Connector J1 :
Pin 1 : duty cycle limitation input (image of primary inverter current)
Pin 2 : +15V DC
Pin 3 : PWM1 output for IGBT1 control
Pin 4 : electronic ground
Pin 5 : ENABLE input for inverter start/stop (0-4V)
Pin 6 : electronic ground
Pin 7 : +20V DC
Pin 8 : current control input (0-3.4V)
Pin 9 : PWM2 output for IGBT2 control
Pin 10 : -20V DC
Pin 11 : striked arc information (0V when striked, +5V when not striked)
Pin 12 : Arc force control input (not used on 160TE)
Pin 13 : Positive polarity of shunt (same as positive output of generator).
Pin 14 : not used
Pin 15 : Negative polarity of shunt
Pin 16 : Negative output of generator
PCB L93101 : main supply and filter PCB (THERMAL ARC 180 – 220 AC/DC)
Connector J1 & J2 : 230VAC secured main supply
Connector J3 & J4 : 230VAC main supply
Connector J5 : +5V auxiliary supply (only when overvoltage mode is active)
Connector J6 :
Pin 1 : to pin 1 of cooling socket when used
Pin 2 : to pin 5 of cooling socket when used
Pin 3 & 5 : 230VAC to primary coil of auxiliary transformer
Pin 4 : not used
Pin 6 : to pin 4 of cooling socket when used
Connector J7 & J8 : protective earth
PCB L93191 : main supply and filter PCB (THERMAL ARC 250 AC/DC)
Connector J1, J2, J3 : 3x400V AC input
Connector J4, J6, J7 & J8 : Protective Earth
USER’S MANUAL
Page 33/40
THERMAL ARC
180 – 220 - 250 AC/DC
Notice NOT 034
Rev : 07
Date : 18/12/07
MAINTENANCE
Connector J5 : Phase fault (phase missing) information
Connector J9 :
Pin 1 & 3 : 400VAC to auxiliary transformer
Connector J13 :
Pin 1 & 3 : 400VAC to pin 4 & 6 of cooling unit socket
PCB L93121 : Secondary block PCB (THERMAL ARC 180 -220 and 250 AC/DC)
Connector J1 :
Pin 1 & 2: - welding output (compares to the electronic ground, which is the +)
Pin 3 : earth protection
Connector J2 :
Pin 1 & 3: connections for the 200 Ohm – 200W discharge resistors
Pin 2 : not used
Connector J3 :
Pin 1 & 3: connections for the HF transformer primary coil
Pin 2 : not used
Connector J4 :
Pin 1 & 2: torch trigger
Pin 3 : minimum of the torch potentiometer
Pin 4 : cursor of the torch potentiometer
Pin 5 : maximum of the torch potentiometer
Connector J5 :
Pin 1 & 2: torch trigger
Pin 3 : +20V
Pin 4 : minimum of the torch potentiometer
Pin 5 : cursor of the torch potentiometer
Pin 6 : maximum of the torch potentiometer
Connector J6 :
Pin 1 : -20V DC
Pin 2 : +20V DC
Pin 3 : overvoltage AC fault return
Pin 4 : AC + IGBT control
Pin 5 : AC – IGBT control
Pin 6 : remote control or torch’s potentiometer value
Pin 7 : 15V AC signal (used for torch trigger detection)
Pin 8 : Open drain for HF ON /OFF control
Pin 9 : input of torch trigger detection
Pin 10 : Open drain for gas ON /OFF control
Pin 11 : Open drain for cooler pump ON /OFF control
USER’S MANUAL
Page 34/40
THERMAL ARC
180 – 220 - 250 AC/DC
Notice NOT 034
Rev : 07
Date : 18/12/07
MAINTENANCE
Pin 12 : Cooling default input (+20V when default)
Pin 13 : Over voltage protection or phase missing input
Pin 14 : NTC thermistor return (0-5V) for secondary temperature measurement
Pin 15 : electronic ground
Connector J7 :
Pin 1 & 3 : electronic ground
Pin 2 : NTC thermistor return (0-5V) for secondary temperature measurement
Pin 4 : Main supply overvoltage information (+5V)
Connector J8 :
Pin 1 & 2 : gas solenoid connections (230VAC)
Connector J9 :
Pin 1 & 3 : insulated 230VAC input (from the auxiliary transformer)
Connector J10 :
Pin 1 : cooling unit ON/OFF control (open drain)
Pin 2 : cooling unit flow warning return (optocouplor input)
Pin 3 & 4 : common point for cooling unit control
USER’S MANUAL
Page 35/40
THERMAL ARC
180 – 220 - 250 AC/DC
Notice NOT 034
Rev : 07
Date : 18/12/07
MAINTENANCE
20. TROUBLE SHOOTING
BEWARE : BEFORE ANY INTERNAL INTERVENTION, disconnect the power source from the power
supply. Internal voltages are high and dangerous
POSSIBLE CAUSES
CHECKING / REMEDY
DIGITAL DISPLAY AND ORANGE INDICATOR F20 OFF
= NO SUPPLY
ON/OFF main switch is OFF
Put the switch ON
Power supply cable is cut
Check cable and connections
No main supply
Check circuit breaker and fuses
Defective ON/OFF main switch
Replace the switch
DIGITAL DISPLAY OFF AND ORANGE INDICATOR F20 ON
= INPUT VOLTAGE OVER RATED LIMIT
THERMAL ARC 180 AC/DC – 220 AC/DC
Input voltage > 260 V
Check supply voltage
Power source supplied between 2 phases (400V)
Connect the machine to proper line voltage (230V)
THERMAL ARC 250 AC/DC
Lack of one phase
Check the supply
DIGITAL DISPLAY SHOW « tH » AND ORANGE INDICATOR F20 ON
= WARMING UP
Duty cycle over rated (particulary if ambient t°
Let the machine cool, it will automatically start again
is > 25°C)
Insufficient cooling air
Clean the air inlets
Very dusty machine
Open the machine and blow it through
Fan doesn’t start
Replace the fan
DIGITAL DISPLAY SHOW « CO » AND ORANGE INDICATOR F20 ON
= COOLING UNIT DEFAULT
(if a cooling unit is connected)
Lack of water
Check the water level
Water circuit blocked up
Check the torch
DIGITAL DISPLAY SHOW « AC » AND ORANGE INDICATOR F20 ON
=AC SECONDARY CIRCUIT DEFAULT
AC current frequency too high
Reduce AC current frequency
Torch length too long
Reduce torch length
Stop the machine and restart it
IMPROPER WELDING
Wrong electrode polarity
Use the right polarity according to the indications of
electrode’s manufacturer
IGNITION FAILURE
Wrong polarity
Check the connection
Torch to power terminal –
Ground to power terminal +
Pre gas time selected
You must wait for the end of the pre gas flow or
cancel it
No gas arrives to the machine
Check the gas supply
No gas goes out of the machine
Check the gas valve
Initial current too low
Check the value of initial current (see chapter 14)
In pulse current welding, arc is on and off
Check the low current value
= low current too low
USER’S MANUAL
Page 36/40
21. WIRING DIAGRAMS
THERMAL ARC 180 AC/DC
THERMAL ARC 220 AC/DC
Wiring diagram
Rev : 107
THERMAL ARC 250 AC/DC
Wiring diagram
Rev : 104
22. APPENDICE : ADJUSTABLE VALUES FOR WELDING PARAMETERS
Units
THERMAL ARC
180 AC/DC
THERMAL ARC
220 AC/DC
THERMAL ARC
250 AC/DC
Factory settings
MMA (Stick) welding
Hot start time
s
0.0 – 5.0
0.0
Pre gas time
s
0.1 – 5.0
0.5
Post gas time
s
3 - 25
5
Up-slope time
s
0.0 – 10.0
1.0
Down-slope time
s
0 - 16
-
Hot start time
s
0.0 – 5.0
0.0
Pre heat time at
ignition (TIG AC)
s
0.1 – 1.0
0.1
Initial current
A
3 - 180
3 - 220
3 - 250
50% welding current
Final current
A
3 - 180
3 - 220
3 - 250
3
Pulse frequency
Hz
0.2 – 99.9
20
Pulse cycle ratio
%
20 - 80
50
Pulse low current
A
3 – welding current
30
AC current frequency
Hz
20 - 250
100
Balance
cleaning/penetration
%
20 - 60
40
TIG welding
Thermadyne Industries, Ltd.
U.K
Chorley, England
Tel : (44) 01257 261 755
Fax : (44) 01257 224 802
Thermadyne Industries, Ltd.
Netherlands
Hoofddorp, Holland
Tel : (31) 23 561 4182
Fax : (31) 23 565 5074
Thermadyne Industries, Ltd.
Italia
Milan, Italy
Tel : (39) 039 204 991
Fax : (39) 039 204 9922
PTA Plasmatechnik.
Germany
Westerburg, Germany
Tel : (49) 2663 915666
Fax : (49) 2663 915667
THERMADYNE INDUSTRIES reserve the right to make changes without previous notification. Illustrations, descriptions and
characteristics are not contractually binding and do not engage the responsability of the manufacturer.