1
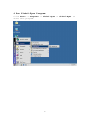
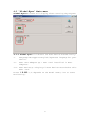
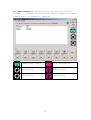
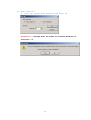
easyRAID RAID Management S/W User’s Guide
1. Introduction
The RAID management S/W is an easy-to use, user-friendly S/W
design for easyRAID solution. User should create the RAID
configuration via the RAID unit’s front panel button (please
refer to your user’s manual) and use the RAID management S/W
to monitor status or modify configuration.
The RAID Management S/W includes 2 programs:
I. SCSI In-band (Global-Eyes): Global-Eyes supports host
connected with Disk Array under Windows 98/Me, NT/2000/XP
system. This program should install into the host server
so as to monitor status and change configuration locally.
II. Ethernet (Global-Net): This program allows users to
monitor status and change configuration remotely through
web browser. Users should install this program into a Web
server. If your RAID set equipped with an Ethernet (RJ45)
connector, just connect it with network environment to get
access by web browser.
For more info go to
www.easyRAID.com
1
2
2. Global-Eyes Revision History
Global-Eyes Ver 2.00
z
z
z
z
z
z
Add English/Japanese version switching function.
Add remote RAID configuration.
Support multiple RAID setting.
Add firmware update function.
Add advance setting.
Add log exportation.
Global-Eyes Ver 1.01
z
Remove S/W Terminator option of Array Configuration.
Global-Eyes Ver 1.00
z
First version release.
Note: The Global-Eyes is applied to all of the SCSI host RAID
systems. But some of the functions may not be applied on some
models. (Please see explanation below mark with “*”)
Please refer to your “User’s Manual” to get detailed spec.
3
3. Global-Eyes Local Access
3-1 Hardware:
To use Global-Eyes you will need to connect the RAID with Host
Server installed with SCSI card and cable.
3-2 Software:
Follow the steps below to install Global-Eyes on your host
computer.
I.
Adaptec ASPI Package: This package is required in order
to proceed Global-Eyes program, if you have this package
installed, please go to next step; otherwise please
download from Adaptec and install it.
Warning!! If you didn’t install “ASPI” driver before running
the GUI program, it will display “No SCSI Adapters found”
4
II. Global-Eyes: Insert the CD-ROM.
II.1 Before proceeding, we recommend that you close all
applications in use.
II.2 Run “Global-Eyes\disk1\setup.exe” file to start the
installation.
Click “Next” button to continue the installation, or change
the directory you like.
5
Click “Next” to continue.
Click “Next” to go to next step.
6
Click “Finish” to finish the installation.
7
4 Run Global-Eyes Program
Click Start -> Programs -> Global-Eyes -> Global-Eyes
start this program.
8
to
4-1 “Global-Eyes” Main menu
Global-Eyes main menu will display after starting the program.
4-1-1 Global-Eyes will detect the SCSI device automatically.
I.
Language: We support English/Japanese language for your
choice.
II. SCSI Host Adapter(s): SCSI card installed in Host
computer.
III. SCSI Device(s): Display all SCSI devices attached at this
SCSI card.
Press “ID-X8P” (it depends on the model name) icon to start
monitoring.
9
4-1-2 The “Disk Array Information” windows will pop-up, and
temperature, fan status will display.
I. Activity Event: Information about activity events.
10
II. System Info: Display RAID hardware information such as
Model Name, Serial Number, Firmware Version, Write Buffer,
Memory Size, Host Channel Number and Disk Channel Number.
HDD is On-line
HDD Failed
HDD is Spare Disk
Spare HDD Failed
HDD is Rebuilding or
On-line Expanding
Not Install HDD
11
III. Host Channel: Display information about SCSI ID, S/W
Termination, Command Tag, Transfer rate, Ultra Wide info and
Lun mapping.
12
IV. Array Detail: Display information about Raid Level, Disk
Number, Raid Member, Hot Spare Disk, Stripe Size, Total
Capacity and Each Slice Size.
13
V. Hard Disk:
『O』:
『S』:
『A』:
『R』:
『X』:
HDD
HDD
HDD
HDD
Not
is On-line
is Spare Disk
is Rebuilding or On-line Expanding
Failed
Install HDD
14
VI. Environment(*): Automatically detect environmental
status, i.e. Temperature and Fan set status. (Support for some
models with environmental sensing)
Temperature status
High Temperature
Fan1 status
Fan1 Failed
Fan2 status
Fan2 Failed
15
4-1-3 Setup: Setup function includes Array configuration,
monitoring, Alarm. (Before accessing the function you need
to enter the password, the password is same as you’ve defined
from front panel setup.)
16
I. Configuration:
¾
Array:
1. Configuration: Select Array Group, RAID Level, Hot
Spare disk and number of Member disks. (You would
setup a RAID level from front panel, then change
the configuration to “Multiple RAID” here.)(*)
Warning!! Please backup your data first before
processing any change of the configuration.
17
2. Online Expand: Select Array Group(*) and expanded
Disk number to set capacity expansion.
3. Slice: Select the Array Group(*) and define slice
to partition the capacity.
18
¾
Host Channel:
1. SCSI ID: Setup Host Channel and SCSI ID.
Attention!! Change SCSI ID needs to restart Windows to
activate it.
19
2. Lun Map: This function allow user to map the Host
Channel ID to the partitioned Lun size.
¾
Advance:
1. Update ROM: Click this button and select a firmware
file for updating.
(Warning!! Unpredictable results will occur if
firmware update is attempted during Host computer and
Disk Array activity. All activity to the controller
should be stopped before updating firmware.)
20
2. Password: Setup new password.
3. Beeper: Enable/Disable beeper for initial, rebuild,
HDD failed, HDD too many bad blocks, fan failed,
temp. warning..etc.
21
¾
Save & Restart: Save and restart to activate new setup.
If you tried to change the configuration, a warning
dialogue will be pop-up “Warning!! All data on the
disk drivers will be lost by changing the RAID Level.”
22
II. Monitoring:
1. Refresh Interval- Allow to change the RAID Status
Refresh Interval from 10/Sec to 10/Min.
2. Web Access- Enable/Disable Web Access
function and setup listened port. If Web Access
function is active, it will allow user to monitor and
configure via browser.
23
III. Alarm:
Enable the “Active” function of Messager, Global-Eyes will
send e-Mail to the defined address when error occurred.
¾
e-Mail
1. SMTP Server- The SMTP server of your ISP.
2. From e-Mail- You don’t need to setup in normal
condition. Only requested when ISP need mail
account.
3. To e-Mail- E-Mail address for system to alert when
error occurred (**).
4. Delivery Interval- Setup alert mail delivery
interval. (Default is 10 minutes i.e. same message
will not resend in 10 minutes.)
5. Bad blocks to issue alarm- Setup bad block number
then system will alert when detect bad blocks over
defined numbers.
**. HDD failed, HDD too many bad blocks, Fan failed,
Temperature warning, Rebuild done or transmission
interrupt from Array Controller.
24
¾
Message Description:
1. Time: Event happened time by host server.
2. Host Name: Name of server which attached RAID unit.
3. IP Address: IP address of host server.
4. Port No: Port of web access.
5. Model: Model name of RAID unit.
6. Serial#: Serial number of RAID unit.
7. Event: Event description.
8. Web Access: Web access is enable/disable.
25
4-1-4 Logs
1. Event Logs: To display the time logs and error message.
2. Purge Logs: You can delete the log by press purge logs
icon and choose the day.
26
3. Export Logs: Export logs to file.
For more info go to www.easyRAID.com.
27