1
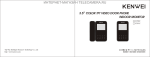
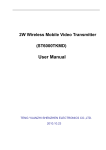
Video Door Phone Indoor Monitor
User Manual
Top Way Intelligent Science & Technology Co., Ltd
http://www.kenwei.com
目录
PRODUCT INTRODUCTION………………………………………………………2
FEATURES AND PARTS………………………………………….……………….3
SPECIFICATIONS AND ACCESSORIES……………………………………….. 4
OPERATION GUIDE……………………………………………….……………… 5
POWER ON/OFF …………………………………………………………………..5
CALL REMIND………………………………………………………………………5
MONITOR / EXIT MONITOR……………………..………………………………. 5
TALK / STOP……………………………………………………………………….. 5
OPEN THE DOOR….…………………………………….……………………...... 6
NO BOTHER ( MUTE )FUNCTION…………………………………………....... 6
EXIT NO BOTHER ( MUTE ) SETUP…..……………………………………......6
CALLING BETWEEN INDOOR UNITS (with an extension unit KW-111 )….... 6
INTERCOM………………………………..……………………………………...... 6
OUTDOOR UNIT CALL TRANSFER (with KW-111 extension)………………. 7
RING VOLUME ADJUSTMENT………………………………………..………… 7
BIRGHTNESS ADJUSTMENT…………………………………….………………7
INDICATION OF NOT PLACING WELL OF EXTENSION'S HANDLE
(with KW-111 extension) …….……….…….…….…….…….…….……….……. 7
WIRLING DIAGRAMS…………………………………………………………...... 8
INSTALLATION…………………………………………………………………….. 9
KW-120 INSTALLATION…………………………….……………………………..9
CONNECTION DIAGRAM…………………………………………………………9
INSTALLATION ATTENTION ………………………………………………….... 11
TROUBLE SHOOTING GUIDE…………………………………………………...12
SPECIFICATIONS………………………………………………………………….13
1
PRODUCT INTRODUCTION
FEATURES AND PARTS
Thank you for purchasing our products of building intercom system series. Please
read the instructions carefully and follow the directions before install the products.
Any problem regarding to the product, please query your supplier.
1
2
GENERAL FEATURES:
4
Hands-free
No Bother Function
Brightness Adjustment
Ring Volume Adjustment (2 grade)
“Ding Dong” ring and Clear Talking Tone
Monitor and Remote Unlock
Connect with Extension Unit KW-111, Have The Function of Call
Transfer and Intercom.
Power Supply: AC100-240V and DC13.5V/1.5A (Optional)
5
6
7
9
1.Speaker
2.Screen
3.Power Indicator
4.No Bother Indicator
5.Monitor/No Bother
6.Intercom
7.Open
8.Talk/Stop
9.Talking Indicator
10.Microphone
11.Ring Volume Adjustment
12.Power Switch
13.Brightness Adjustment
14.Connection Terminal
1
2
3
4
5
6
7
8
9
10
11
12
13
14
15
16
Remind users that important operation and maintenance
guides are included in the attached user's manual.
2
8
10 11 12 13
CAUTION:
Please ask professional person if maintenance needed.
* KENWEI reserves the right to change or modify design,features,
functions and specifications without any prior notice for the
improvement and promotion of products quality.
3
14
* Remark:the function after "/ "means the button with
different functions under different status.
3
SPECIFICATIONS AND ACCESSORIES
OPERATION GUIDE
1. Power On/Off
Product dimension:
a. Power on
When on the monitor, dial the power switch to the right,
then the monitor will enter into standby mode, the power
indicator will light on at the same time.
b. Turn off
1
Dial the power switch to the left, power off, then monitor
under OFF mode, and the power indicator will turn off at
the same time.
2. Call remind
a. Outdoor camera call indoor monitor
When outdoor camera call indoor monitor, the indoor monitor will display images
from outdoor camera automatically, meanwhile, “Ding Dong” ring will sound.
If monitor is under No Bother status, it will not sound the ring tone.
b. Indoor monitor call extension unit (KW-111)
When main indoor monitor calling extension unit, the monitor will sound the
interval chord ring.
53.4
3. Monitor/Exit
When the monitor is under standby mode, press the “monitor”
button to monitor the image from outdoor camera. Press the
“monitor” button again, and it will exit the monitor function
and back to stand-by status. The monitor function will last
for 90s and will be off automatically after this period.
Accessories:
3
4. Talk/Stop
Mounting Screws: 4×25mm
a. Call to Talk
When the monitor being called, it will sound “Ding Dong”.
Press “Talk” button to talk with the visitor at door.
Dilatant plug
b. Monitor to Talk
When the indoor unit is under monitor status, press “Talk” button and then you can
directly talk with the outdoor camera. (Refer to Point 3 "Monitor/Exit")
c. Stop
When monitor is under talking status, press “Stop” button to stop talking and back
to stand-by status, or it will stop automatically after 90s.
Mounting Bracket
(Unit: mm)
4
5
4
5. Open the door
10、Outdoor unit call transfer (with an extension unit KW-111)
When monitor is under calling, monitor or talk status, press
the “Open” button to open the door. (the door opening time
is subject to the time of pressing “Open” button, moreover,
the outdoor camera should be equipped with an electronic
lock )
a. Main unit (KW-120) call extension unit (KW-111)
5
6. No bother (mute) function
When the monitor is under standby mode, press “No Bother”
button for 1~2s until the no bother indicator light on, then
the monitor enter into no bother status. you can only see the
picture of visitor without hearing the ring when there is a
calling. Press the “Talk” button to talk with outside.
6
7. Exit no bother (mute) function
When the monitor is under standby mode, press the “No
Bother” button for 1~2s until the no bother indicator turn
off, and the unit will exit no bother setup.
7
8a
11
12、Brightness adjustment
13、Indication of not placing well of extension unit's handset
(With Extension Unit KW-111)
When the extension unit is under standby mode, and its handset isn't placed
well, the no bother indicator will flash after 10s.You just have to place it in
a proper way.
8b
9、Intercom (with an extension unit KW-111)
6
10b
When extension unit is talk with outdoor camera, press
its “INTERCOM” button, the main unit, extension unit
and outdoor camera will all sound interval chord ring.
Now if the main unit press its “TALK” button, he can
talk with outdoor camera, the chord ring will stop, talk
indicator light on. You just hang up the extension unit's
handset.
The brightness of screen can be adjusted by switching the
brightness switch.
b. Extension unit KW-111 call main unit KW-120
During calling between indoor units, you can get into the
intercom between indoor units by picking up the handset
of the be-called indoor unit or pressing its “Talk” button.
When you pick up the handset of extension unit, the main
unit can talk with it just press the “Talk” button of main unit.
10a
The ring volume can be adjusted by switching the volume
switch in any condition.
a. Main unit (KW-120) calling extension unit KW-111
When main unit is under standby mode or No Bother
mode, pick up the handset of extension unit and press the
“Intercom” button, the main unit will sound interval chord
ring. Now you can get into intercom by pressing the “Talk”
button of main unit.
Remark: If there is no chord ring, maybe the main unit is
under any operation mode or No Bother status.
b. extension unit ( KW-111) call mail unit (KW-120)
11、Ring volume adjustment
8.Calling between indoor units (with an extension unit KW-111)
When KW-111 is under standby mode, press the “Talk”
button, the talking indicator will light on. Then press the
“Intercom” button, the main unit and extension unit will
sound interval chord ring, you can get into intercom by
picking up the handset of extension unit KW-111
Remark: if the talking indicator light on, you should
press the “Intercom” button within 10s, otherwise the
unit will back to standby mode automatically, meanwhile,
the talking indicator turn off. You should start the operation
once again.
When main unit is talking with outdoor camera, press its
“INTERCOM” button, the main unit, extension unit and
outdoor camera will all sound interval chord ring. Now
if the extension unit pick up the handset, he can talk with
outdoor camera, the chord ring will stop. In the meanwhile,
the talk between main unit and outdoor before will stop,
also its talk indicator will turn off.
9
7
12
WIRING DIAGRAM
INSTALLATION
KW-120 INSTALLATION
8.4cm
1
2
3
4
5
6
7
8
9
10
11
12
13
14
15
16
Installation with
embedded box
Installation without
embedded box
1
1. Fix the bracket to the embedded box which the embedded box have been installed in the wall.
If without embedded box, at the selected mounting location, drill 2 holes, the distance from top
to bottom is 8.4cm, then push in the dilatant plug, and use the mounting screws to fix the bracket.
5 VCC
3.VCC
6 VD
4.VD
7 AF
1.AF
8 GND
2.GND
9 VCC
3.VCC
10 INT.
Electronic
Lock power
2 GND
3
AF
4 GND
5 VCC
6
4.INT.
KW-111
Extension
1 +VCC
POWER
2.GND
7
AF
2 GND
AF
4 GND
5 VCC
6
VD
7
AF
8 GND
9 VCC
10 INT.
KW-120/C
8 GND
9 VCC
10 INT.
KW-120/C
8
1 +VCC
3
VD
DOOR
4 GND
9mm
EXTENSION
3 AF
50mm
POWER
-
Outdoor Camera
1.AF
Wire peeling length:
DOOR
2 GND
DC13.5V/1.5A
(Option)
EXTENSION
EXTENSION
+
1 +VCC
Electronic
Lock
DOOR
POWER
Connection Diagram:
9
1
2
3
4
5
6
7
8
9
10
11
12
13
14
15
16
INSTALLATION ATTENTION
1.Do not expose the unit to sunshine or rain:
Even if you do not use it,don't expose it to sunshine or rain.
2.Do not expose to intense light:
Spotlight may cause stain or striation in the screen.
Less than 1m
1
2
3
4
5
6
7
8
9
10
2
2.As the wiring diagram shows, firstly peel the wire, the peeling length should be as per the
picture. then connect the wire into the connection terminals, check if they are fixed well.
(Remark: the installation of without embedded box is the same as with embedded box).
Attention: Installation with embedded box: Tidy up the redundant line
and place in the embedded box. Installation without embedded box:
Tidy up the line and place it at the back cover's slot.
3.Do not disassemble the unit by yourself:
Improper disassembly may damage the unit or cause electric shock.
4.Do not splash water on the unit:
Install the unit in dry place.In case that the unit gets wet,turn off the unit and
contact your dealer.
5.Check the ambient temperature and humidity
Avoid using the unit where the temperature is hotter or colder than specified,
otherwise the internal parts may get affected.Special care is required to use
the unit at high temperature and humidity.
6.In case of trouble:
If any trouble occurs while you are using the unit,turn off the power and contact
your dealer to avoid worse problem or unpredictable accident.
7.About operation:
Keep the unit away from magnetic equipments such as microwave oven or big
speaker.If the unit will not be used for a long time,please switch it off.
8.About clean:
Use soft cloth to clean the unit.Do not use any impregnant,such as alcohol,
benzene.If you have any problem, please contact your dealer.
9. The equipment shall be installed near the socket outlet and shall be easily
accessible.
Installation with
embedded box
3
Installation without
embedded box
3.Push the wired monitor unit to the wall mounting bracket hooks and slide it down.
(If the installation is without embedded box, the wires should be pulled out from the
top or bottom of back cover)
10
* Remark:
When you choose the place to install the unit,please pay attention to:
Keep sufficient space for ventilation and easy communication.
Keep sufficient space to adjust while installing.
Not put hot resource under the unit.
11
TROUBLE SHOOTING GUIDE
Trouble
Possible Cause
Solution
The unit doesn't work
at all, the power indicator
is off.
The power is OFF,
or you do not switch
on the power.
Connect the power, or
turn on the power refer
to OPERATION Point 1.
Camera cannot call indoor
unit or the indoor unit
cannot monitor camera.
The connection between
indoor and outdoor is wrong,
or open circuit.
Connect the wire as
the diagram show.
SPECIFICATIONS
Model
KW-120
KW-120C
Display
4” B&W CRT
4” Color TFT
Power
Wiring
AC100V-240V ~ 50/60Hz, or DC13.5V/1.5A
Ring
Ding Dong
Communication
Max. wiring length
Hands free
Item
Wire
Working Temperature
Outdoor Camera
Extension (KW-111) and
main unit (KW-120)
cannot call each other.
The connection between
extension and main unit
is wrong, or open circuit.
Connect the wire as
the diagram show.
No sound during calling.
The main unit KW-120
has set the no bother mode.
Exit the no bother mode.
12
4 wires in polarity
30M
50M
100M
RVV4*0.3
RVV4*0.5
RVV4*0.8
0℃ - 40℃
Connectable with any 4 wire outdoor camera
from our company.
13