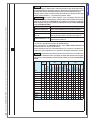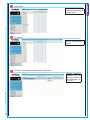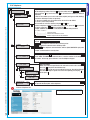
1
SECURITY ALARM CONTROL UNIT
PROGRAMMING MANUAL
EN
EN
English
English
1 SYMBOLS AND GLOSSARY . . . . . . . . . . . . . . . . . . . . . . . . . . . . . . . . . . . . . . . . . . . . . . . . . . . . . . . . . . . . . . . . . . . . . . . . . . . . . . . . PAG. 2
2 TECHNICAL MENU . . . . . . . . . . . . . . . . . . . . . . . . . . . . . . . . . . . . . . . . . . . . . . . . . . . . . . . . . . . . . . . . . . . . . . . . . . . . . . . . . . . . . . . . PAG. 4
2.1 PROGRAMMING MODE . . . . . . . . . . . . . . . . . . . . . . . . . . . . . . . . . . . . . . . . . . . . . . . . . . . . . . . . . . . . . . . . . . . . . . . . . . . . . . . . . . . . . . . . . . . . . . 4
2.2 SYSTEM. . . . . . . . . . . . . . . . . . . . . . . . . . . . . . . . . . . . . . . . . . . . . . . . . . . . . . . . . . . . . . . . . . . . . . . . . . . . . . . . . . . . . . . . . . . . . . . . . . . . . . . . . . . . . 6
2.3 SCENARIOS. . . . . . . . . . . . . . . . . . . . . . . . . . . . . . . . . . . . . . . . . . . . . . . . . . . . . . . . . . . . . . . . . . . . . . . . . . . . . . . . . . . . . . . . . . . . . . . . . . . . . . . . . . 9
2.4 AREAS . . . . . . . . . . . . . . . . . . . . . . . . . . . . . . . . . . . . . . . . . . . . . . . . . . . . . . . . . . . . . . . . . . . . . . . . . . . . . . . . . . . . . . . . . . . . . . . . . . . . . . . . . . . . . 10
2.5 KEYPADS. . . . . . . . . . . . . . . . . . . . . . . . . . . . . . . . . . . . . . . . . . . . . . . . . . . . . . . . . . . . . . . . . . . . . . . . . . . . . . . . . . . . . . . . . . . . . . . . . . . . . . . . . . . 12
2.6 PLUGS . . . . . . . . . . . . . . . . . . . . . . . . . . . . . . . . . . . . . . . . . . . . . . . . . . . . . . . . . . . . . . . . . . . . . . . . . . . . . . . . . . . . . . . . . . . . . . . . . . . . . . . . . . . . . 13
2.7 RADIO MODULES. . . . . . . . . . . . . . . . . . . . . . . . . . . . . . . . . . . . . . . . . . . . . . . . . . . . . . . . . . . . . . . . . . . . . . . . . . . . . . . . . . . . . . . . . . . . . . . . . . . 13
2.8 INPUTS. . . . . . . . . . . . . . . . . . . . . . . . . . . . . . . . . . . . . . . . . . . . . . . . . . . . . . . . . . . . . . . . . . . . . . . . . . . . . . . . . . . . . . . . . . . . . . . . . . . . . . . . . . . . . 14
2.9 OUTPUTS.. . . . . . . . . . . . . . . . . . . . . . . . . . . . . . . . . . . . . . . . . . . . . . . . . . . . . . . . . . . . . . . . . . . . . . . . . . . . . . . . . . . . . . . . . . . . . . . . . . . . . . . . . . 19
2.10 TIMES. . . . . . . . . . . . . . . . . . . . . . . . . . . . . . . . . . . . . . . . . . . . . . . . . . . . . . . . . . . . . . . . . . . . . . . . . . . . . . . . . . . . . . . . . . . . . . . . . . . . . . . . . . . . . 21
2.11 TELEPHONE NOTIFICATIONS. . . . . . . . . . . . . . . . . . . . . . . . . . . . . . . . . . . . . . . . . . . . . . . . . . . . . . . . . . . . . . . . . . . . . . . . . . . . . . . . . . . . . . . 22
2.12 ASSOCIATING OUTPUTS . . . . . . . . . . . . . . . . . . . . . . . . . . . . . . . . . . . . . . . . . . . . . . . . . . . . . . . . . . . . . . . . . . . . . . . . . . . . . . . . . . . . . . . . . . . 28
2.13 CODES. . . . . . . . . . . . . . . . . . . . . . . . . . . . . . . . . . . . . . . . . . . . . . . . . . . . . . . . . . . . . . . . . . . . . . . . . . . . . . . . . . . . . . . . . . . . . . . . . . . . . . . . . . . . 30
2.14 KEYS. . . . . . . . . . . . . . . . . . . . . . . . . . . . . . . . . . . . . . . . . . . . . . . . . . . . . . . . . . . . . . . . . . . . . . . . . . . . . . . . . . . . . . . . . . . . . . . . . . . . . . . . . . . . . . 33
2.15 REMOTE CONTROLS . . . . . . . . . . . . . . . . . . . . . . . . . . . . . . . . . . . . . . . . . . . . . . . . . . . . . . . . . . . . . . . . . . . . . . . . . . . . . . . . . . . . . . . . . . . . . . . 34
2.16 TELEPHONES. . . . . . . . . . . . . . . . . . . . . . . . . . . . . . . . . . . . . . . . . . . . . . . . . . . . . . . . . . . . . . . . . . . . . . . . . . . . . . . . . . . . . . . . . . . . . . . . . . . . . . 35
2.17 TELEPHONE OPTIONS . . . . . . . . . . . . . . . . . . . . . . . . . . . . . . . . . . . . . . . . . . . . . . . . . . . . . . . . . . . . . . . . . . . . . . . . . . . . . . . . . . . . . . . . . . . . . 36
2.18 SPECIAL FUNCTIONS . . . . . . . . . . . . . . . . . . . . . . . . . . . . . . . . . . . . . . . . . . . . . . . . . . . . . . . . . . . . . . . . . . . . . . . . . . . . . . . . . . . . . . . . . . . . . . 39
2.19 DAILY SCHEDULER. . . . . . . . . . . . . . . . . . . . . . . . . . . . . . . . . . . . . . . . . . . . . . . . . . . . . . . . . . . . . . . . . . . . . . . . . . . . . . . . . . . . . . . . . . . . . . . . 41
2.20 EVENTS. . . . . . . . . . . . . . . . . . . . . . . . . . . . . . . . . . . . . . . . . . . . . . . . . . . . . . . . . . . . . . . . . . . . . . . . . . . . . . . . . . . . . . . . . . . . . . . . . . . . . . . . . . . 43
2.21 CLOCK . . . . . . . . . . . . . . . . . . . . . . . . . . . . . . . . . . . . . . . . . . . . . . . . . . . . . . . . . . . . . . . . . . . . . . . . . . . . . . . . . . . . . . . . . . . . . . . . . . . . . . . . . . . . 43
2.22 DEFAULT PARAMETERS. . . . . . . . . . . . . . . . . . . . . . . . . . . . . . . . . . . . . . . . . . . . . . . . . . . . . . . . . . . . . . . . . . . . . . . . . . . . . . . . . . . . . . . . . . . . 44
2.23 CONTROL UNIT VERSION. . . . . . . . . . . . . . . . . . . . . . . . . . . . . . . . . . . . . . . . . . . . . . . . . . . . . . . . . . . . . . . . . . . . . . . . . . . . . . . . . . . . . . . . . . . 44
2.24 VOICE RECORDINGS . . . . . . . . . . . . . . . . . . . . . . . . . . . . . . . . . . . . . . . . . . . . . . . . . . . . . . . . . . . . . . . . . . . . . . . . . . . . . . . . . . . . . . . . . . . . . . . 44
3 EVENTS MESSAGING . . . . . . . . . . . . . . . . . . . . . . . . . . . . . . . . . . . . . . . . . . . . . . . . . . . . . . . . . . . . . . . . . . . . . . . . . . . . . . . . . . . . . . PAG. 46
4 APPENDIX REGULATIONS . . . . . . . . . . . . . . . . . . . . . . . . . . . . . . . . . . . . . . . . . . . . . . . . . . . . . . . . . . . . . . . . . . . . . . . . . . . . . . . . . PAG. 50
5 DECLARATION . . . . . . . . . . . . . . . . . . . . . . . . . . . . . . . . . . . . . . . . . . . . . . . . . . . . . . . . . . . . . . . . . . . . . . . . . . . . . . . . . . . . . . . . . . . . PAG. 50
1 Symbols and glossary
This symbol shows the parts which describe safety issues.
This symbol shows parts which must be read with care.
Permanently on warning light.
Warning light off.
Rapidly flashing warning light.
INSTALLER: any person or business responsible for planning, installing and programming the system.
USER: any person using the security alarm system.
Page 2 - Programming Manual 24808800/12-02-2014 319F92C vers. 1.2- The data and information shown in this manual are to be considered as subject to change at any time and without the need for any advance warning on the part of BRAHMS
ENGLISH
CONTENTS
Page 3 - Programming Manual 24808800/12-02-2014 319F92C vers. 1.2- The data and information shown in this manual are to be considered as subject to change at any time and without the need for any advance warning on the part of BRAHMS
ENGLISH
ACCESSING TECHNICAL MENU FROM THE CONTROL UNIT
Depending on the parameter TEC MENU ACCESS (
menu may or may not be preceded by the User code.
CODES
->
INSTALLER'S TECHNICAL CODE
), access to the technical
Simultaneously accessing the technical menu or user menu from multiple keypads is not allowed.
INDIRECT ACCESS
To access the Technical Menu hold down the
/ESC # for 5 secs, enter the user code 123456 , hold down the
/ESC # key
222222
+
again for 5 secs and enter the technical code
. Using keys
you can move from character to character, while with keys
you can change the text.
5 sec
5 sec
123456
2
1
3
+
+
DIRECT ACCESS
4
+
222222
With the system completely disarmed hold down key
/ESC # for 5 secs and enter the technical code 222222 to go into the Tech+
nical Menu. Using keys
you can move from character to character, while with keys
you can change the text.
5 sec
222222
1
+
2
In the manual all the different submenus of the technical menu will be shown with access via the control unit.
After the technical code with keys A and B you can choose whether to go into the installer menu (key A ) or the autorecognition menu (key
B ). The choice of the two menus is available by going into the technical menu from the control unit only, and not from a remote keypad.
All the configurations in the technical submenus relating to "voice recordings" can only be seen on the technical menu via the control
unit keypad.
ACCESS TO TECHNICAL MENU FROM PXKTX or PXWKD KEYPAD
Indirect Access
1. Enter the user code 123456 (if less than 6 digits confirm with * ).
2. Enter the technical code 222222 (between the user code and the installer code do not press the
operation is cancelled).
/ESC # key or the
Direct Access
3. Enter the technical code 222222 directly (if less than 6 digits confirm with * ).
ACCESSING THE TECHNICAL MENU FROM THE PXWKTX KEYPAD
The PXWKTX radio keypad does not support the technical menu.
2.1 Programming mode
For the security alarm control unit to be as user-friendly as possible (for inexperienced installers as well as the most demanding
professionals), the system features the "programming mode" concept. This can provide a few or many programming parameters
depending on the installer's skill or requirements.
08:23
16/05/10
ENTER CODE
123456
AWAITING COMMAND
*=USER MENU
222222
*
PROGRAMMING 01
MODE
▼▲
PROGRAMM. MODE
EASY
+-
EASY
F S A
Programming mode: (Default
)
EASY
only basic parameters for simple systems are available.
STANDARD
ADVANCED parameters for simple STANDARD and ADVANCED systems are available (programming mode only available from PXManager).
In the manual the menus available only in STANDARD and ADVANCED mode will be
marked with icon
.
Moving from Standard to Easy means automatic reconfiguring of the parameters
which will be hidden.
Page 4 - Programming Manual 24808800/12-02-2014 319F92C vers. 1.2- The data and information shown in this manual are to be considered as subject to change at any time and without the need for any advance warning on the part of BRAHMS
ENGLISH
2 Technical Menu
To understand which mode a menu heading can be displayed and therefore edited in just look at which letters appear in the top righthand corner of each heading’s description.
F S A
Heading found in the three modes
S A
A
Heading found in standard and advanced
Heading found only in advanced mode
modes (available only from PXManager
(available only from PXManager
)
)
Below are the main differences between the three types:
The EASY programming mode lets you quickly and simply start up low-complexity systems or is used by installation engineers who
are not highly skilled.
The pre-configured settings are the following:
CONTENTS
AREA DESCRIPTION
CONTENTS
AREA DESCRIPTION
1
DAYTIME AREA
3
PERIMETER AREA
2
NIGHT-TIME AREA
CONTENTS
SCENARIO DESCRIPTION
ASSOCIATED AREAS
PROPERTIES
1
GOING OUT
1, 2, 3
ON+OFF EXACT
2
GOING TO BED
1, 3
ON+OFF EXACT
3
STAYING HOME
3
ON+OFF EXACT
KEYPADS
B
GOING TO BED
C
STAYING HOME
ALL PLUGS
GOING OUT
L2
GOING TO BED
L3
STAYING HOME
U2
System status, yields a negative if at least one
U4
area is on.
Technical, yields a negative when there is at least
one technical alarm.
RELAY
Relay 1, is activated during the alarm time.
CODES
CODE PROPERTIES
KEYS
DESCRIPTION AND PROPERTIES
all
TURNING ON + TURNING OFF of all areas.
all
TURNING ON + TURNING OFF of all areas.
TELEPHONE
NUMBER
DESCRIPTION
TYPE
ATTEMPTS
1..7
Telephone 1..7
VOICE
2
x
x
x
x
8
Technical
SMS
1
x
x
x
x
RESIDUAL
CREDIT
Breakdown, yields a negative when faults are
detected.
AUTO TEST
TC output to disinhibit the sensors’ microwave when
system is off (associated to the NIGHT-TIME area).
U3
Yields a positive with NIGHT-TIME area switched off.
HELP
U1
KEY
ENTERING
OUTPUT DESCRIPTION
CODE
ENTERING
OUTPUT DESCRIPTION
OUT OF ORDER
CONTENTS
SWITCHING ON
SWITCHING OFF
CONTENTS
L1
BURGLARY
GOING OUT
ASSOCIATED SCENARIOS
TECHNICAL
A
PLUGS
SABOTAGE
ALL KEYPADS
ASSOCIATED SCENARIOS
ALARM
Page 5 - Programming Manual 24808800/12-02-2014 319F92C vers. 1.2- The data and information shown in this manual are to be considered as subject to change at any time and without the need for any advance warning on the part of BRAHMS
EASY MODE
x
x
x
x
ENGLISH
MENU HEADINGS BELONGING TO THE THREE MODES
(available only from PXManager
)
Same settings as the EASY mode plus:
•
Customise scenarios.
•
Customise Keypads, plugs, codes, keys, ...
•
Customised telephone calls.
•
Restore default parameters and codes separately.
ADVANCED MODE
(available only from PXManager
)
Same settings as the EASY and STANDARD modes, plus:
•
Customise specific voice messages from keypad.
•
Advanced programming of inputs, codes, keys, telephones, telephone options, special functions.
•
Advanced programming of telephone signals.
•
Time, calendar scheduler.
•
Past events print-out.
ACCESS TO TECHNICAL MENU FROM PXKTX or PXWKD KEYPAD
Indirect Access
1. Enter the user code 123456 (if less than 6 digits confirm with * ).
2. Enter the technical code 222222 (between the user code and the installer code do not press the
operation is cancelled).
/ESC # key or the
Direct Access
3. Enter the technical code 222222 directly (if less than 6 digits confirm with * ).
ACCESSING THE TECHNICAL MENU FROM THE PXWKTX KEYPAD
The PXWKTX radio keypad does not support the technical menu.
2.2 System
The system menu is for defining the system components (areas, keypads, plugs, ...), assigning addresses to them, and carrying out
a whole series of tests. For programming go to the headings in the following menus.
EDIT SYSTEM
▲
SYSTEM
02
▼
▼▲
EDIT
SYSTEM
*
*
MANAGED AREAS
-##-–-––
#-
▼▲
--
KEYPADS
PLUGS
RADIO MODULES
--
▼▲
0..4
0..4
0..4
F S A
Managed areas: (Default: -##-–-–– )
+ - keys the areas that will be managed in the system can be enabled.
With the
The system is considered totally armed if all the areas selected are on.
Example: if you only have three areas (daytime zone, night-time zone and perimeter
zone) set -#####-- .
FSA
Keypads: (Default: #)
+ - the keypads used can be enabled.
Through keys
Example: if you want to use 3 keypads on the system set ####
Plugs: (Default: ---)
+ - the plugs used can be enabled.
Through keys
Example: if you want to use 2 plugs on the system set ##
Radio Modules: (Default: -- )
+ - the radio modules used can be enabled.
Through keys
Example: if you want to use 2 modules on the system set ##-
.
FS
.
F S A
.
Page 6 - Programming Manual 24808800/12-02-2014 319F92C vers. 1.2- The data and information shown in this manual are to be considered as subject to change at any time and without the need for any advance warning on the part of BRAHMS
ENGLISH
STANDARD MODE
+-
MITHO TOUCH
YES
Radio Siren: (Default: ---- )
+ - the radio sirens used can be enabled.
With keys
F S A
F S A
Mitho Touch (Default: YES )
+
Via the
keys you can enable/disable communication to BPT's MITHO building
automation system.
Note. The integration between PROXINET control units and BPT's MITHO building automation
system is only possible with control units that have the 1.0.16B4 version firmware or above.
Page 7 - Programming Manual 24808800/12-02-2014 319F92C vers. 1.2- The data and information shown in this manual are to be considered as subject to change at any time and without the need for any advance warning on the part of BRAHMS
ACCEPTING REMOTE PLUGS
▲
SYSTEM
▼
02
▼▲
▼▲
ADDRESSING
PLUGS
*
...AUTORECOG.
PLUGS...
*
ON PLUG
01
APPROACH KEY
PLUGS
AUTORECOGNISED
F S A
Autorecognition and automatic assignment of addresses of plugs:
Enables recognition of the system’s plugs. Approach the key to the plug that you
want to assign the address shown on the display to.
FSA
Plugs already autorecognised:
If the plugs have already been autorecognised a confirmation text is displayed.
SYSTEM TEST
▲
SYSTEM
▼
02
TEST
SYSTEM
*
▼▲
▼▲
INPUTS TEST
*=LAUNCH TEST
*
*
AREAS TO TEST
#####
C.U. TAMP. TEST
*=LAUNCH TEST
▼▲
C.U.BATT.TEST
*=LAUNCH TEST
TEST SIRENS
*=LAUNCH TEST
OUTPUTS TEST
*=LAUNCH TEST
F S A
Inputs test:
The open inputs test can be carried out on the whole system or just on some
selected areas.
Test control unit tamper
For checking control unit tamper status.
F S A
Test control unit battery:
For prompt checking control unit battery status.
FSA
Test sirens:
For manually commanding the alarm relay output of the control unit.
FSA
Outputs test:
The test enables you to manually control the system's outputs.
F S A
ENGLISH
+-
RADIO SIRENS
----
Set the RS485 BUS speed:
Allows configuration of the RS485 BUS speed from
the following: 115,200, 38,400, 9,600 (default),
4.800, 2,400.
PXLAN/PXWEB CONFIGURATION
DHCP: Automatic address assignment to network
boards
Enables/disables auto-addressing (DHCP) .
IP ADDRESS configuration
Network board IP address configuration.
SUBNET MASK configuration
Configures the SUBNET MASK.
GATEWAY configuration
Allows GATEWAY configuration.
PC connection port configuration
Allows configuration of the computer's IP connection port.
Keypad emulation (PXWEB):
Associates the virtual keypad to a physical keypad
address.
Page 8 - Programming Manual 24808800/12-02-2014 319F92C vers. 1.2- The data and information shown in this manual are to be considered as subject to change at any time and without the need for any advance warning on the part of BRAHMS
ENGLISH
RS485 BUS
▲
SCENARIOS
▼
03
MODIFY SCEN.
GOING OUT
*
*
01
AREA ACTION
ON+OFF EXACT
ASSOC. AREAS
#-
Page 9 - Programming Manual 24808800/12-02-2014 319F92C vers. 1.2- The data and information shown in this manual are to be considered as subject to change at any time and without the need for any advance warning on the part of BRAHMS
FSA
Associated areas:
The parameter defines the action that the scenario has to carry out in the areas from
among those specified in ASSOC. AREAS .
▼▲
DISABLED
The scenario does not alter the switched on status of the areas.
Example: scenario deactivated or scenario for which you only want to manage the asASSOC. OUTPUT .
01 + - sociated output defined in
ON+OFF EXACT
The selected areas will be forced to switch on and those deselected to switch off in the exact configuration set.
01
Example: this is the one used most and it is so that Users may set the switching on state
of the areas by selecting scenarios independently from the previous configuration.
GOING OUT ### ; daytime, night-time and perimeter areas on;
GOING TO BED #-# ; only daytime and perimeter on and night-time off;
STAYING HOME --# ; only the perimeter is on.
SEL.AREAS ON
Only the selected areas switch on, nothing changes with the status of the non-selected areas.
Example: used for specifically switching on some areas: for example a scenario that
only arms the perimeter area (PERIMETER ON --# ).
SEL.AREAS OFF
Only the selected areas switch off, nothing changes with the status of the non-selected areas.
Example: used for specifically switching off some areas: for example a scenario that
only switches off the perimeter area (PERIMETER OFF --# ).
SWITCH SEL. AREAS The selected areas change status: if on they switch off and if off
they switch on.
Example: used for combining the act of switching some areas on or off in a single scenario; for example a scenario that only switches on/off the perimeter area (SWITCH PERIMETER --# ).
▼▲
▼▲
VOICE RECORDING 01
*=OK #=ESC
*
A=PLAY B=REC #=ESC
AREA
01
A
B
DESCRIPTION
GOING OUT
[>>>>>>>>>>>>>>>]
PLAY
01
BEGIN TO SPEAK
*=END REC
01
*
FSA
Voice Recording:
Allows the audio message (about 3 seconds) linked to the selected scenario
to be customised.
Press key A to play back recorded message.
Press key B to record message and delete existing one. Recording will begin
only when you begin to speak and can be interrupted by pressing key * .
To exit press # .
Scenario description
Lets you edit the description of the scenario.
F S A
ENGLISH
2.3 Scenarios
Action on areas (Default: ON+OFF EXACT)
The parameter defines the action that the scenario has to carry out in the areas from among those specified in ASSOC. AREAS
DISABLED The scenario does not alter the switched on status of the areas.
Example: scenario disabled or scenario for which you only want to manage the associated output defined in ASSOCIATED
OUTPUT.
ON+OFF EXACT The selected areas will be forced to switch on and those deselected to switch off in the exact configuration set.
Example: this is the one used most and it is so that Users may set the switching on state of the areas by selecting scenarios
independently from the previous configuration.
GOING OUT ###; daytime, night-time and perimeter areas on;
GOING TO BED #–#; only daytime and perimeter on and night-time off;
STAYING HOME ––#; only the perimeter is on.
SEL. AREAS ON Only the selected areas switch on, nothing changes with the status of the non-selected areas.
Example: used for specifically switching on some areas: for example a scenario that only arms the perimeter area (PERIMETER
ON ––#).
SEL. AREAS OFF Only the selected areas switch off, nothing changes with the status of the non-selected areas.
Example: used for specifically switching off some areas: for example a scenario that only switches off the perimeter area (PERIMETER OFF ––#).
SWITCH SEL. AREAS The selected areas change status: if on they switch off and if off they switch on.
Example: used for combining the act of switching some areas on or off in a single scenario; for example a scenario that only
switches on/off the perimeter area (SWITCH PERIMETER ––#).
ACT ON OUTPUT
Act on output and output association: (Default: DISABLED)
If enabled, it lets an output be controlled directly by a scenario. The output to control is selected in ASSOC. OUTPUT,
DISABLED The scenario doesn't control any output. Scenario disabled or scenario only areas of which need to be controlled.
ON The scenario activates the selected output. Scenario that enables you to open a lock controlled by a timed output. Or a
scenario that switches on a light controlled by a stable output.
OFF The scenario deactivates the selected output. Scenario that lets you switch off a light controlled by a stable output.
SWITCH The scenario switches the status of the selected output (on becomes off and off becomes on). Scenario that brings
together the on and off commands of a light controlled by a stable output.
2.4 Areas
▲
AREAS
▼
04
MODIFY AREA
AREA
*
*
▼▲
▼▲
01
01
▼▲
VOICE RECORDING 01
*=OK #=ESC
*
A=PLAY B=REC #=ESC
AREA
01
A
B
DESCRIPTION
AREA
[>>>>>>>>>>>>>>>>]
PLAY
01
BEGIN TO SPEAK
*=END REC
01
01
*
F S A
Voice Recording:
Allows the audio message (about 3 seconds) linked to the selected scenario
to be customised.
Press key A to play back recorded message.
Press key B to record message and delete existing one. Recording will begin
only when you begin to speak and can be interrupted by pressing key * .
To exit press # .
Area description:
Lets you edit the description of the area.
F S A
Page 10 - Programming Manual 24808800/12-02-2014 319F92C vers. 1.2- The data and information shown in this manual are to be considered as subject to change at any time and without the need for any advance warning on the part of BRAHMS
ENGLISH
AREA ACTION
Page 11 - Programming Manual 24808800/12-02-2014 319F92C vers. 1.2- The data and information shown in this manual are to be considered as subject to change at any time and without the need for any advance warning on the part of BRAHMS
Force area: (Default: NO)
Forcing is the parameter which helps to define
whether an area can be switched on even when any
inputs are open (in this case, when the output time
has elapsed, the area alarm will be triggered).
An area with DISABLED forced opening will start the output time only if all of the inputs associated to it are closed.
Example: used in a home environment to enable the user to close any entrances that might be open.
An area with ENABLED forced opening will start the output time irrespective of whether there are inputs associated to it open.
At the end of the output time, if there are still inputs open, the area will go into alarm mode.
Example: used in office environment to prevent inattentive users from leaving the system with areas not switched on because
inputs are open. In this case the triggering of the alarm will inevitably warn that the system has been left with inputs open.
ENGLISH
FORCE AREA
Keypad Description:
Lets you edit the description of the keypad.
Keypad type:
Lets you choose the type of keypad: wired LCD, radio LCD or wired LED.
Associated Areas:
Associated areas are the areas which can be managed and viewed from the keypad. These also represent an AND-type filter on
the areas managed by the code or by the scenario.
Example: there is a flat above a ground-floor shop. The owner wants to be able to manage the flat and the shop using the same
code, with the possibility of also being able to manage the shop from home.
Area 1 = HOME
Area 2 = SHOP
Scenario 1 = CLOSE HOME (SWITCH ON SELECT. AREAS; areas = #–)
Scenario 2 = OPEN HOME (SWITCH OFF SELECT. AREAS; areas = #–)
Scenario 3 = CLOSE SHOP (SWITCH ON SELECT. AREAS; areas = #–)
Keypad 1 = Situated in the home: (associated areas = ##; scenario A =CLOSE HOME ; scenario B = OPEN HOME; scenario C =
CLOSE SHOP)
Keypad 2 = Situated in the shop: (associated areas = –#; scenario A = CLOSE SHOP)
Code 1 = Owner (associated areas = ##)
Code 2 = Employee (associated areas = –#)
Tamper (Default: NO)
Allows you to enable/disable the keypad tamper and the warning of no communication with the control unit.
Input Buzzer, Output Buzzer and Alarm Buzzer (Default: YES)
Allows the buzzer to be enabled/disabled during the entry time, during the output time and during the alarm time of the control
unit.
Radio Supervision (Default: YES)
If a radio keypad is chosen, this menu lets you activate a devices check by the control unit.
Scenarios (Default: A=Scenario 1, B=Scenario 2, C=Scenario 3...)
Associates scenarios with keypad keys.
Example: there is a home and the owner wishes to manage three areas (daytime, night-time and perimeter) using two activations: total, perimeter only.
Area 1 = DAYTIME
Area 2 = NIGHT-TIME
Area 3 = PERIMETER
Scenario 1 = GOING OUT (ON+OFF EXACT; areas = ###)
Scenario 2 = STAYING HOME (ON+OFF EXACT; areas = ––#)
Keypad 1 = associate areas = ###; scenario A = GOING OUT;
scenario B = STAYING HOME)
Page 12 - Programming Manual 24808800/12-02-2014 319F92C vers. 1.2- The data and information shown in this manual are to be considered as subject to change at any time and without the need for any advance warning on the part of BRAHMS
ENGLISH
2.5 Keypads
Page 13 - Programming Manual 24808800/12-02-2014 319F92C vers. 1.2- The data and information shown in this manual are to be considered as subject to change at any time and without the need for any advance warning on the part of BRAHMS
ENGLISH
2.6 Plugs
Plug Description:
Lets you edit the description of the plug.
Associated areas: (Default: ###)
Associated areas are the areas which can be managed from the plug. They also represent an AND-type filter on the areas
managed by the code or by the scenario.
Example: there is a flat above a ground-floor shop. The owner wants to be able to manage the flat and the shop with the same
key.
Area 1 = HOME
Area 2 = SHOP
Scenario 1 = CLOSE HOME (SWITCH ON SELECT. AREAS; areas = #–)
Scenario 2 = CLOSE SHOP (SWITCH ON SELECT. AREAS; areas = –#)
Plug 1 = Situated in the home: (associated areas = #–; scenario L1 = CLOSE HOME)
Plug 2 = Situated in the shop: (associated areas = –#; scenario L1 = CLOSE SHOP)
Code 1 = Owner (associated areas = ##)
Code 2 = Employee (associated areas = –#)
Tamper (Default: NO)
For activating / deactivating the warning of no communication from plugs.
Input Buzzer, Output Buzzer and Alarm Buzzer (Default: YES)
Allows the buzzer to be enabled/disabled during the entry time, during the output time and during the alarm time of the control
unit.
Radio Supervision (Default: YES)
If a radio keypad is chosen, this menu lets you activate a devices check by the control unit.
Scenarios: (Default: L1=Scenario 1, L2=Scenario 2, L3=Scenario 3...)
Associate the scenarios to the three plug LEDs.
Example: there is a home and the owner wishes to manage three areas (daytime, night-time and perimeter) using two activations: total, perimeter only.
Area 1 = DAYTIME
Area 2 = NIGHT-TIME
Area 3 = PERIMETER
Scenario 1 = GOING OUT (ON+OFF EXACT; areas = ###)
Scenario 2 = STAYING HOME (ON+OFF EXACT; areas = ––#)
Plug 1 = (associated areas = ###); scenario L1 = GOING OUT; scenario L2 = STAYING HOME; scenario L3 = NO SCENARIO)
2.7 Radio Modules
Module Description
Allows editing of the description of the module.
Jamming: (Default: NO)
By activating the JAMMING anti-conceal function,
in the event of systemic or permanent disturbance
of the transmission, the control unit will generate
a 24 hour alarm.
▲
INPUTS
▼
11
MODIFY INPUTS 001
INPUT 01
*
*
STATUS
ARMED
Status (Default:
▼▲
EXCLUDED
▼▲
001
ARMED
+-
EXCLUDED
)
An input is excluded when it is not used.
An input is armed when it is used in the system.
TEST
An input is in test mode when you want to monitor the performance of an
input through the events log without triggering alarms or telephone calls.
Example: after a system is installed it is noticed that an input continually goes into
alarm mode for no apparent reason. By putting it into test mode it is possible to continue to monitor possible alarms (through the events log) without triggering alarms.
Type: (Default: IMMEDIATE )
The type defines the operating characteristics of the input.
TYPE
001
IMMEDIATE
▼▲
+-
F S A
F S A
IMMEDIATE
This is the classic intruder-proof input, active when the control unit is
armed and inactive with the control unit disarmed. If unbalanced it triggers a general
alarm.
Example: input of a magnetic contact on a window.
SERVICE
It is active whether the control unit is armed or disarmed. It is not
considered as a security alarm input but only one to be monitored from a keypad, or to
activate outputs or calls irrespective of the control unit status. It is, of course, stored
in the events log.
BLOCK PRG
open.
If closed, it enables the time scheduler function, excluding it if it is
BREAKDOWN It is active whether the control unit is armed or disarmed. In the event
of an alarm the breakdown LED lights up, the system's breakdown output is activated
and the control unit displays the ANOMALY message followed by the description of
the input.
DELAYED 1
It is active only when the control unit is armed. If unbalanced, it sets
off input time 1, during which a valid code must be entered to disarm the control unit.
During this time the buzzer will make a continuous sound. If the control unit is not
disarmed the general alarm will be triggered.
Example: input associated to an entry point.
DELAYED 2
Like DELAYED 1, but with input time 2.
24 HOURS
Instantaneous input active both when the control unit is armed and when it
is disarmed. Unbalancing of a 24-hour input triggers a general alarm.
Example: input associated with the external siren tamper.
TECHNICAL
Instantaneous input active both when the control unit is armed and when
it is disarmed. Unbalancing of a technical input activates the output defined for the
TECHNICAL ALARM, triggering a continuous sound from the buzzer (for the duration of
the technical alarm) and the lighting up of the alarm LED on the keypads.
Example: an input associated with a fire or gas detection sensor.
PATH
Instantaneous input active with control unit armed. It performs like a
delayed input if a control unit DELAYED-type input starts off the input time. It performs
like an instantaneous input in all other situations.
Example: input associated with an infrared sensor placed in front of a delayed-type
entrance door. If the user opens the door the input time starts and the sensor behaves
in the same way; if on the other hand a burglar breaks in through a window the sensor
works instantaneously.
Page 14 - Programming Manual 24808800/12-02-2014 319F92C vers. 1.2- The data and information shown in this manual are to be considered as subject to change at any time and without the need for any advance warning on the part of BRAHMS
ENGLISH
2.8 inputs
DESCRIPTION
Impulsive switching on
When an input is unbalanced the associated areas switch on.
Impulsive switching off
When an input is unbalanced the associated areas switch off.
Impulsive switching
on + off
When an input is unbalanced the associated areas switch status:
when they are off they switch on and when on they switch off.
Stable switching on + off
When an input is unbalanced the associated areas switch on and
when balanced they switch off.
Example: if switching on and off must be managed via a mechanical key, it is necessary to have a mechanical lock with C, NC and NO contacts.
Input programmed to be SWITCHING ON type, action STABLE SWITCH ON+OFF and
associated areas, the areas to switch on/off.
Connect the input to the lock so that when the key is on "system on" the input is unbalanced (i.e. open) and when it is on "system off" the input is balanced (i.e. closed).
BURGLARY
Instantaneous input active both when the control unit is on and when it is
off. When it is unbalanced it does not trigger the alarm LEDs to light on the keypads
and it sends an alarm telephone call to the phone numbers associated with BURGLARY
ALARM.
X
X
X
X
X
X
Entry 2
X
Entry 1
X
Burglary
X
Technical
X
X
Sabotage
LED Breakdown
LED alarm
Breakdown
Burglary
Technical
X
Sabotage
X
Times
Alarm
X
Keypads/
Plugs
Buzzer
Immediate
Alarm
TYPE
Telephone
calls
Relay alarm
Plug
Status
Always
▼▲
ACTION
Associated areas
on
Page 15 - Programming Manual 24808800/12-02-2014 319F92C vers. 1.2- The data and information shown in this manual are to be considered as subject to change at any time and without the need for any advance warning on the part of BRAHMS
SWITCHING ON Input used to switch on/off the areas associated to the input. The
behaviour of the input is defined by the action parameter. Total switching off or partialisation of the system via a SWITCHING ON input simulates the entering of a code that
blocks telephone calls (if the parameter is programmed correctly to STOP FROM CODE
in the TELEPHONE OPTIONS).
Block PRG
Service
X
Breakdown
X
X
X
X
Delayed 1
X
Delayed 2
X
24 hours
X
Technical
X
X
X
X
X
X
X
Path
X
Memory
X
Switching on
X
Burglary
X
Tamper
X
X
X
X
X
X
X
X
X
X
X
X
X
X
X
X
X
X
X
X
X
X
X
X
X
X
X
ENGLISH
MEMORY Input active with control unit armed. If it is closed (i.e. balanced) once the
output time elapses, it behaves like a normal instantaneous input. On the other hand, if
once the output time has elapsed it is open (i.e. unbalanced), it is ignored until it is closed
(i.e. balanced) and from that moment it behaves like a normal instantaneous input.
Example: memory inputs are defined as the inputs that the user decides to leave open
(dormer window, windows, ...) even when the system is armed.
+-
NORM.CLS
▼▲
F S A
Balancing: (Default: SINGLE BAL. )
This Menu is valid ONLY for the first six inputs (wired type).
Input normally closed.
Protection
NORM.OPN
Input normally open.
Protection
SINGLE BAL.
Single balanced input.
Alarm
NC
Protection
DOUBLE BAL.
4.7 kohm
Double-balanced input.
Protection
Tamper (NC)
Alarm
NC
4.7 kohm
BALANCING
RADIO
007
*
RADIO CHANNEL 007
[1..03] NUMBER 03
RECOG.
007
*=OK #=ESC
SUPERVISION
NO
*
*
007
*
RADIO
Balancing: (Default:
)
This Menu is valid ONLY for inputs 7 and above (radio-type inputs).
F S A
F S A
Radio Channel: (Default: 3 )
Available only for multi-channel radio inputs (devices with several inputs): enables
setting of which input of the device is to be associated to the input.
Example: the radio magnetic contact has 3 channels:
1. Input 1
2. Input 2
3. Magnetic contact
F S A
Radio Device Recognition:
Only available for radio inputs. Enables a radio device to be associated to the input.
F S A
Radio Supervision: (Default: NO )
Only available for radio inputs. If enabled, in the event of no signal being received for
a time longer than that set in 'Supervision time', the control unit signals a technical
alarm (no tamper).
Page 16 - Programming Manual 24808800/12-02-2014 319F92C vers. 1.2- The data and information shown in this manual are to be considered as subject to change at any time and without the need for any advance warning on the part of BRAHMS
ENGLISH
BALANCING
001
SINGLE B.
001
Parameter visible only if the input is the type that switches on.
F S A
Switch on: (Default: PULSE SWITCH ON )
For managing the type of switching on/off action on the control unit areas associated
to the input.
PULSE SWITCH ON
When the input is unbalanced the control unit switches on the areas.
Page 17 - Programming Manual 24808800/12-02-2014 319F92C vers. 1.2- The data and information shown in this manual are to be considered as subject to change at any time and without the need for any advance warning on the part of BRAHMS
PULSE SWITCH OFF
ON ACTION
001
PULSE SWITCH ON
▼▲
PULSE ON+OFF
*
When the control unit is unbalanced the control unit reverses the
on/off status of the areas associated to the input.
STABLE ON+OFF
The on/off status of the areas associated to the input follows the
input's balancing status. If the input is unbalanced the areas are on, if it is balanced,
they are off.
Example: see the example given for the type of input set SWITCHING ON .
VOICE RECORDING 01
*=OK #=ESC
*
A=PLAY B=REC #=ESC
AREA
01
A
B
[>>>>>>>>>>>>>>>>]
PLAY
01
BEGIN TO SPEAK
*=END REC
DESCRIPTION 001
INPUT 001
When the input is unbalanced the control unit switches off the areas.
*
F S A
Voice Recording:
Allows the audio message (about 3 seconds) linked to the selected scenario
to be customised.
Press key A to play back recorded message.
Press key B to record message and delete existing one. Recording will begin only when you begin to speak and can be interrupted by pressing key * .
To exit press # .
Input description:
Lets you edit the description of the input.
F S A
Immediate
Immediate (Default: NEVER)
Parameter visible only if the input is of the delayed type. For managing the delayed input as instantaneous if partialised (i.e. if
associated to multiple areas or not all the areas are on).
NEVER Standard setting, the input is always delayed. Example: overhead garage door.
IF PARTIAL ON The input is delayed if all of the associated areas are switched on or if it is partialised (at least one area off and
one on).
Example: this parameter is set when it is necessary for the front door to be delayed when the user is not at home; it is instantaneous when he/she is at home (partialised system).
Area 1 = daytime.
Area 2 = night-time.
Area 3: perimeter.
Scenario 1: Going out; Areas ###
Scenario 2: Going to bed; Areas #–#
Front door input: DELAYED 1 type; Immediate IF PARTIAL.ON;
And/or areas: INS. IF AREAS OR; Areas –##.
ENGLISH
AREAS
---
FSA
Associated areas: (Default: #--)
The inputs can be freely associated to one or more areas. The performance of an
input associated to more than one area depends on the value selected for parameter
AND/OR AREAS .
And/or areas (Default: ARM. IF AREAS OR)
If several areas are associated to an input the input's armed/disarmed status, which is given by the on/off status of the associated areas, depends on this parameter:
ARM. IF AREAS OR Input armed if at least one associated area is switched on.
Example: used when you want to manage partialisations along with areas, which share several inputs.
ARM. IF AREAS AND Input armed if all associated areas are switched on.
Example: if there are two apartments that share the same garage, two areas are normally associated to the garage (one for each
apartment) and the AND function is set.
And Input
And Input: (Default: NO)
An input which is programmed in AND mode with another input triggers an alarm only if the second input is in alarm state. This
parameter is usually used to have a dual consent function to generate the alarm.
Example: two sensors are aimed on the same room and the user wants an alarm to be signalled only when both sensors go
into alarm mode.
Input 1: IMMEDIATE type; And input INPUT 2.
Input 2: IMMEDIATE type; And input INPUT 1.
AUTOEXCLUSION
Input autoexclusion (Default: yes, after 3 alarms):
This defines the number of times that the input can go into alarm mode, beyond which the input is automatically excluded. The
alarm counter resets and the input is reincluded if at least one associated area switches off.
Example: a classic example is external sensors.
Code 2 = Employee (associated areas = –#)
BUZZER OUTPUT
Buzzer output: (Default: NO)
For choosing whether the input will activate the "buzzer output" or not, or the keypads enabled to ring along with the buzzer
output. Always active irrespective of the status of associated areas.
Example bell on door opening: a classic use of this function is that of being able to make the keypad ring after a shop door is
opened.
Area 1: indoors.
Area 2: perimeter.
Keypad 1: loosely positioned to make it ring; Associated areas ##––
Front door input: Buzzer output: YES; Associated areas –#––
Buzzer output keypads: #–––
Perimeter area buzzer time 3 seconds.
OUTPUT ASSOCIATION
Output Association: (Default: NO)
Assigns the output to activate if the input is unbalanced. If the output commanded is of the stable type, when the input is unbalanced the output is activated, if the input is balanced the output is deactivated. If the output is of the pulse type, the output is
activated and starts timing when the input is unbalanced.
Depending on parameter OUTPUT CONTROL managing the output can be linked to the arming/disarming status of the input.
Page 18 - Programming Manual 24808800/12-02-2014 319F92C vers. 1.2- The data and information shown in this manual are to be considered as subject to change at any time and without the need for any advance warning on the part of BRAHMS
ENGLISH
And/Or areas:
Page 19 - Programming Manual 24808800/12-02-2014 319F92C vers. 1.2- The data and information shown in this manual are to be considered as subject to change at any time and without the need for any advance warning on the part of BRAHMS
Output command: (Default: ALWAYS)
Depending on this parameter, managing the output can be linked to the armed/disarmed status of the input.
ALWAYS The output is always commanded by the input status. To be more precise: the output is activated if the input is unbalanced and restored if the input is balanced.
ARMED If the input is active, i.e. one or more areas associated to it are armed, the output is controlled by the input's status. To
be more precise: the output is activated if the input is unbalanced and restored if the input is balanced.
NOT ARMED If the input is deactivated, i.e.no areas associated to it are armed, the output is controlled by the input's status. To
be more precise: the output is activated if the input is unbalanced and restored if the input is balanced.
2.9 Outputs.
Output description
Lets you edit the description of the output.
Status (Default: STABLE)
STABLE the activity of the output follows the status of the associated event.
Example: the output is activated by the associated input's OPEN condition.
PULSEthe activity of the output is determined by the associated event but only for a certain time, the duration of which can be selected.l
Activation duration: (Default: 0)
Parameter visible only if the output is the pulse type. Duration time of pulse output activation.
|-----------Activation duration -------------|
Example: you want to open a door lock with a code. If associated to a code a pulse output with an activation time of 3 seconds.
Parameters visible only if the output is the stable type.
Activation delay: (Default: 0)
Delay time between the activation command and the output’s activation.
Deactivation delay: (Default: 0)
Delay time between the deactivation command and the output’s deactivation.
STATUS OF
OUTPUT
|---Del. Act. --|
|--- Del. Deact.----|
OUTPUT
COMMAND
Example: you want to view the on/off status of the system via an output. In the Output Association menu assign the switching
on status of the areas to an output programmed as stable and with zero second delays on activation and deactivation.
ENGLISH
OUTPUT COMMAND
Security: (Default: NEGATIVE)
NEGATIVE The output is normally deactivated and is activated when it is commanded.
Example: by connecting a relay to an open collector output with NEGATIVE SECURITY, the relay will normally be de-energised
and will energise only when the output is activated.
POSITIVE The output is normally active and is deactivated when it is commanded.
Example: by connecting a relay to an open collector output with POSITIVE SECURITY, the relay will normally be energised and
will de-energise only when the output is activated.
Remote activation: (Default: NO)
If activated (YES) it lets you remotely activate the output via voice guide or SMS or ...
Example: you want to activate a pulse-type output via SMS to send a start command to heating.
Code 1: password 123456; remote control YES.
Output 2: PULSE type: remote activation YES.
Phone options: remote control by SMS YES,
SMS to be sent: activate heating.CRSMS.123456.6002.
Slave output: (Default: NO)
Enables the activation status of the output as a function to be tied to that of another output.
Example: you want to have two outputs on the general alarm bus.
Output 10: STABLE type
Output 21: STABLE type; follow output OUTPUT 10.
In the Outputs Association menu, assign general alarm status of the areas to OUTPUT 10.
Voice Message
Allows the audio message (about 3 seconds) linked to the selected scenario (TERMINAL) to be customised.
Write the message in 'VOICE MESSAGE' and press PLAY to hear the message just recorded.
Page 20 - Programming Manual 24808800/12-02-2014 319F92C vers. 1.2- The data and information shown in this manual are to be considered as subject to change at any time and without the need for any advance warning on the part of BRAHMS
ENGLISH
Security: (Default: NEGATIVE)
NEGATIVE The output is normally deactivated and is activated when it is commanded.
Example: by connecting a relay to an open collector output with NEGATIVE SECURITY, the relay will normally be de-energised
and will energise only when the output is activated.
POSITIVE The output is normally active and is deactivated when it is commanded.
Example: by connecting a relay to an open collector output with POSITIVE SECURITY, the relay will normally be energised and
will de-energise only when the output is activated.
▲
▼
Page 21 - Programming Manual 24808800/12-02-2014 319F92C vers. 1.2- The data and information shown in this manual are to be considered as subject to change at any time and without the need for any advance warning on the part of BRAHMS
*
TIMES
ENGLISH
2.10 Times
13
GENERAL ALARM
[0..255] HOURS 090
SABOTAGE
[0..255] SEC
090
TECHN. ALARM
[0..255] SEC
090
BURGLR. ALARM
[0..255] SEC
000
BUZZER OUTPUT
[0..255] SEC
000
OUTPUT TIME
[0..255] SEC
050
INPUT TIME 1
[0..255] SEC
030
INPUT TIME 2
[0..255] SEC
040
F S A
+-
General alarm time: (Default: 090 )
During the GENERAL ALARM TIME, the GENERAL ALARM RELAY is active.
The condition of general alarm is determined by the activations of the inputs.
+-
Sabotage time: (Default: 090 )
Alarm time associated to 24-hour inputs or to tamper/tempering alarms.
F S A
+-
Technical alarm time: (Default: 090 )
Alarm time associated to technical type inputs.
F S A
+-
Burglary alarm time: (Default: 000 )
Alarm time associated to burglary type inputs.
F S A
+-
+-
+-
+-
F S A
Buzzer output time: (Default: 000 )
The BUZZER ALARM condition is determined by activations of the inputs which have their
"Buzzer Output" property set to ON.
F S A
Output time: (Default: 050 )
During the OUTPUT TIME the control unit checks the state of the inputs and signals if any
are open. This warning is displayed visually on keypads and on plug LEDs and is sounded
on keypad buzzers.
F S A
Input time 1 and 2: (Default 1: 030 ) (Default 2: 040 )
When the system is armed, unbalancing of a DELAYED 1 or 2 type input activates the respective INPUT TIME counter. During the INPUT TIME, the control unit does not trigger the
alarm if PATH or DELAYED type inputs are unbalanced.
At the end of the INPUT TIME, if the system is not DISARMED, a GENERAL ALARM is triggered.
setting a time longer than 45 seconds voids the reference standard.
Selftest Interval
Selftest interval: (Default: 0)
This sets after how many hours the control unit must
automatically carry out an autotest of operation. The
first autotest after starting up the control unit is done
after the time set as the SELFTEST INTERVAL. If the value is set at 0, the autotest is not carried out.
Example: this function is generally used by security as
system survival.
Telephone 15: security firm number; format CONTACT-ID;
system code XXXX.
Selftest interval 24 hours.
By telephone notifications: telephones for autotest notification –––––––––––––#–.
Radio supervision interval
Radio supervision interval hours: (Default: 5)
This sets what period of not receiving the autotest, from one or more radio devices, is considered an anomaly. Not receiving it
triggers a technical alarm.
Missing network notification delay minutes: (Default:1)
This determines every how often the LACK of ELECTRIC POWER is considered an anomaly. The NETWORK MISSING event is entered into the events log. In the event of a power outage, the breakdown LED stays permanently on.
Battery test interval
Battery test interval minutes: (Default: 5)
It determines every how many minutes the control unit should automatically carry out a DYNAMIC TEST OF THE BATTERY. If the
value is set at 0 the test is disabled. In the event of a battery fault, the breakdown LED flashes and continues to flash until the
next test; it is also possible to associate an output or a remote communication.
N.B.: the breakdown status remains active until the next “BATTERY TEST”. To remove the breakdown status after replacing
the battery, do a manual "BATTERY TEST" by accessing the technical menu.
2.11 Telephone notifications
▲
▼
TELEPHONE
NOTIFICATIONS
14
▼▲
TEL. NOT. MENU 01
GENERAL ALARM
*
*
SYS. ALRM. ACTV.
#######
SYS. ALRM. REST.
-------
▼▲
TEL. NOT. MENU 02
SABOTAGE
*
ACT.SYS.SABOTG.
#######
TEL. NOT. MENU 03
TECHNICAL ALARM
*
ACT.SYS.TECH.
#######
TEL. NOT. MENU 04
BURGLARY ALARM
*
SYS BUR-ALRM ACT
####
TEL. NOT. MENU 05
ON/OFF
*
▼▲
TOTAL SYSTEM ON
----
TOTAL SYSTEM OFF
---SYSTEM PARTIAL.
---TEL. NOT. MENU 06
FAILURES
*
ACT SYST BRKDWN
#-##
Activation and restoration of system's general alarm (generic notification): F S A
Telephone notifications associated to the activation and restoration of the system's
+ - keys to set the telephone numbers.
general alarm. Use the
F S A
Activation of the system sabotage alarm (generic notification)
Telephone notifications associated to the activation of the system's sabotage mode.
+ - keys to set the telephone numbers.
Use the
FSA
Activation of the system technical alarm (generic notification)
Telephone notifications associated to the activation of the system's technical alarm
(the alarm is given by the technical inputs).
+ - keys to set the telephone numbers.
Use the
F S A
Activation of the system burglary alarm (generic notification)
Telephone notifications associated to the activation of the system's burglary alarm
(the alarm is given by the burglary inputs).
+ - keys to set the telephone numbers.
Use the
F S A
Total switching on, switching off and partialisation of the system;
Telephone notifications associated to totally switching on, totally switching off and
partialisation of the system (total power on means totally switching on the areas managed).
+ - keys to set the telephone numbers.
Use the
FSA
Activation and restoration after system breakdown.(generic notification)
Telephone notifications associated to the activation and restoration after the system's
breakdown.
+ - keys to set the telephone numbers.
Use the
Page 22 - Programming Manual 24808800/12-02-2014 319F92C vers. 1.2- The data and information shown in this manual are to be considered as subject to change at any time and without the need for any advance warning on the part of BRAHMS
ENGLISH
Notification delay through lack of network
Page 23 - Programming Manual 24808800/12-02-2014 319F92C vers. 1.2- The data and information shown in this manual are to be considered as subject to change at any time and without the need for any advance warning on the part of BRAHMS
Telephone notifications associated to the activation and
restoration of the system's
sabotage mode.
Activation and restoration of the system technical alarm (generic notification)
Telephone notifications associated to the activation and
restoration of the system's
technical alarm (the alarm
is given by the technical inputs).
Activation and restoration of the system sabotage alarm (generic notification)
Telephone notifications associated to the activation and
restoration of the system's
burglary alarm (the alarm is
given by the burglary inputs).
Activation and restoration after system breakdown.(generic notification)
Telephone notifications associated to the activation and
restoration after the system's
breakdown.
ENGLISH
Activation and restoring of the system sabotage alarm (generic notification)
Telephone notifications associated to the
activation and restoration of the individual
areas' general alarm .
Activation and restoration of the control unit's sabotage alarm and bus peripherals
Telephone notifications
associated to the activation and restoration
of the control unit's
sabotage alarm (tamper/tampering) and of
the peripherals (tamper
modules, no communication with peripherals,...).
Activation and restoration of individual areas' sabotage alarm
Telephone notifications associated to the
activation and restoration of the individual
areas' sabotage alarm
(the alarm is given by
the inputs associated
to the areas).
Activation and restoration of individual inputs' sabotage alarm
Telephone notifications associated to the
activation and restoration of the individual inputs' sabotage
alarm (tamper and 24hour inputs).
Page 24 - Programming Manual 24808800/12-02-2014 319F92C vers. 1.2- The data and information shown in this manual are to be considered as subject to change at any time and without the need for any advance warning on the part of BRAHMS
ENGLISH
Activation and restoration of individual areas' general alarm
Page 25 - Programming Manual 24808800/12-02-2014 319F92C vers. 1.2- The data and information shown in this manual are to be considered as subject to change at any time and without the need for any advance warning on the part of BRAHMS
Telephone notifications associated to the
activation and restoration of the individual
areas' technical alarm
(the alarm is given by
the technical inputs
associated to the areas).
Activation and restoration of individual areas' burglary alarm
Telephone notifications associated to the
activation and restoration of the individual
areas' burglary alarm
(the alarm is given by
the burglary inputs
associated to the areas).
Switching individual areas on and off
Telephone notifications associated to
switching on and off
individual areas.
Activation and restoration after battery breakdown
Telephone notifications associated to the
activation and restoration after the system's breakdown.
ENGLISH
Activation and restoration of individual areas' technical alarm
Telephone notifications associated to the
the absence and restoration of the control
unit's power supply
(230 Vac).
Activation and restoration after battery breakdown
Telephone notifications associated to the
activation and restoration after the system's breakdown.
Activation and restoration after battery breakdown
Telephone notifications associated to
the activation and restoration after breakdowns with fuses in
the control unit and
the peripherals.
Activation and restoration after PSTN and GSM breakdown
Telephone notifications
associated to the activation and restoration
after breakdown of the
PSTN and GSM lines
(PSTN line down, unsuccessful SIM registration,
...)
Page 26 - Programming Manual 24808800/12-02-2014 319F92C vers. 1.2- The data and information shown in this manual are to be considered as subject to change at any time and without the need for any advance warning on the part of BRAHMS
ENGLISH
Activation and restoration of 230 Vac power supply breakdown
Page 27 - Programming Manual 24808800/12-02-2014 319F92C vers. 1.2- The data and information shown in this manual are to be considered as subject to change at any time and without the need for any advance warning on the part of BRAHMS
Telephone notifications associated to entering the code
only from keypad.
Key entering
Telephone notifications associated to entering the key in
the plug.
Activation and restoration of individual inputs' generic alarm
Telephone notifications
associated to the activation and restoration of
the individual inputs' generic alarm .
ENGLISH
Code entering
Telephone notifications associated to the system's autotest
for system's "I'm alive" notification.
2.12 Associating outputs
Associating the same output to several events or several areas (breakdowns, alarms,...) gives the output the OR function.
Example: if the general alarm status of all the areas is associated to the same stable output, the output will be activated when at
least one area is in alarm mode.
System breakdown output (generic breakdown notification)
(Default: OUTPUT 03)
For selecting the output to associate to the system breakdown
status.
Battery breakdown output: (Default: NO)
For selecting the output to associate to the battery's fault status (control unit).
Missing 230 Vac line output: (Default: NO)
For selecting the output to associate to the lack of 230 Vac
power supply (control unit).
Page 28 - Programming Manual 24808800/12-02-2014 319F92C vers. 1.2- The data and information shown in this manual are to be considered as subject to change at any time and without the need for any advance warning on the part of BRAHMS
ENGLISH
Autotest Notifications
ENGLISH
Page 29 - Programming Manual 24808800/12-02-2014 319F92C vers. 1.2- The data and information shown in this manual are to be considered as subject to change at any time and without the need for any advance warning on the part of BRAHMS
Area general alarm output: (Default: NO)
For selecting the output to associate to the individual area's general alarm.
Area sabotage alarm output: (Default: NO)
For selecting the output to associate to the individual area's sabotage alarm (tamper inputs and 24-hour inputs).
Area technical alarm output: (Default: OUTPUT 04)
For selecting the output to associate to the individual area's technical alarm (technical inputs).
Area burglary alarm output: (Default: NO)
For selecting the output to associate to the individual area's burglary alarm (burglary inputs).
Area output ready: (Default: NO)
For selecting the output to associate to the ready status of the individual area (an area is ready when it has no associated input
open).
Area output on: (Default: OUTPUT 02)
For selecting the output to associate to the individual area's switch on status.
Area output off: (Default: OUTPUT 00)
For selecting the output to associate to the individual area's switch off status.
Area buzzer output: (Default: NO)
For selecting the output to associate to the "buzzer input" status of the individual area (the buzzer function can be associated
to an area).
Area TC output: (Default: OUTPUT 01)
For selecting the output to associate to the individual area's TC status.
The TC output is to block the sensors when the system is disarmed. It works as follows (example for control unit no. 1 which
when ON yields 13.8 Vdc):
• with area switched off it runs at 13.8V;
• the input is open with area on and during the output time.
▲
CODES
▼
16
▼▲
TECHNICAL CODE
INSTALLER
*
*
▼▲
EDIT
TECHNICAL CODE
Edit technical code.
For editing the technical code (default 222222).
*
F S A
USER CODES
CODE
USER
*
*
001
001
▼▲
STATUS
ENABLED
001
DESCRIPTION
USER 001
001
EDIT
001
USER CODE
Activating code (Default: ENABLED )
If you wish to use a code, it needs to be activated.
F S A
*
User code description:
Lets you edit the description of the User code.
F S A
*
Edit User code:
For editing the user code (default user 1: 123456)
F S A
+-
VOICE RECORDING 01
*=OK #=ESC
*
A=PLAY B=REC #=ESC
AREA
01
A
B
[>>>>>>>>>>>>>>>>]
PLAY
01
BEGIN TO SPEAK
*=END REC
F S A
Voice Recording:
Allows the audio message (about 3 seconds) linked to the selected scenario to be customised.
Press key A to play back recorded message.
Press key B to record message and delete existing one. Recording will
begin only when you begin to speak and can be interrupted by pressing
key * .
To exit press # .
Accessing technical menu
FROM CONTROL UNIT OFF (Default)
Access to the technical menu is only allowed when the control unit is completely
off (no area on).
AFTER USER CODE
Access to the technical menu is only allowed when the control unit is completely off (no area on) and the User code has
been entered.
Enabling control unit programming from PC
FROM CONTROL UNIT OFF (Default)
Programming the control unit from PC is
only allowed when the control unit is completely off (no area on).
AFTER USER CODE
Programming the control unit from PC is
only allowed when the control unit is completely off (no area on) and the User code
has been entered.
Page 30 - Programming Manual 24808800/12-02-2014 319F92C vers. 1.2- The data and information shown in this manual are to be considered as subject to change at any time and without the need for any advance warning on the part of BRAHMS
ENGLISH
2.13 Codes
ENGLISH
Page 31 - Programming Manual 24808800/12-02-2014 319F92C vers. 1.2- The data and information shown in this manual are to be considered as subject to change at any time and without the need for any advance warning on the part of BRAHMS
Associated Areas
Areas associated with the code: (Default: 3 Areas)
Allows the assignment of the User code areas of competence.
Authorisation
User code authorisation: (Default: ON+OFF)
SWITCH ON+OFF The code is activated to switch on and off the areas assigned to it.
ONLY SWITCH ON The code is only authorised to switch on the areas associated to it.
Example: used when you wish to assign the cleaning firm only the switching on code.
Remote control
Activating remote control: (Default: ENABLED)
Enables User to remotely access the system to manage it by SMS or voice guide.
Visibility
User code visibility: (Default: PUBLIC)
Setting a User code to public mode allows other codes, that are activated to access the “manage other codes” in the user
menu, to edit/activate said code.
Example: for systems in small businesses the business owner’s code is usually set as private so that it is hidden from those
of the employees.
Associated Output
Associating output: (Default: NO)
For associating a pulse-type output when entering the User code on the keypad.
Example: used to act on a lock through entering a code.
Group
Code group; (Default: NO )
Allows the association of codes with a group, so they can be managed simultaneously. The operation of this group can be
enabled/disabled by the timer.
Activating User Menu: (Default: ENABLED)
For accessing the user menu with a code.
Activate user menu heading Switching on
ENABLED (Default)
With the code you can access the
Switching on heading of the user
menu.
Activate user menu heading Events
ENABLED (Default)
With the code you can access the Events heading of the user menu.
Activate user menu heading Extension
ENABLED (Default)
With the code you can access the Extension heading of the user menu.
Activate user menu heading Telephones
ENABLED (Default)
With the code you can access the Telephones heading of the user menu.
Activate user menu heading Code
ENABLED (Default)
With the code you can access the Code heading of the user menu.
Activate user menu heading Manage Codes
ENABLED (Default)
With the code you can access the Manage Codes heading of the user menu.
Activate user menu heading Manage Keys
ENABLED (Default)
With the code you can access the Manage Keys heading of the user menu.
Page 32 - Programming Manual 24808800/12-02-2014 319F92C vers. 1.2- The data and information shown in this manual are to be considered as subject to change at any time and without the need for any advance warning on the part of BRAHMS
ENGLISH
Enabling user menu
▲
▼
*
KEYS 17
▼▲
CHECK KEY
F S A
Check key:
For checking if a key is entered in the database and if is is, the index and description are
displayed.
*
SELECT KEY
▼▲
Page 33 - Programming Manual 24808800/12-02-2014 319F92C vers. 1.2- The data and information shown in this manual are to be considered as subject to change at any time and without the need for any advance warning on the part of BRAHMS
ENGLISH
2.14 Keys
KEY
KEY
*
001
001
▼▲
STATUS
001
ENABLED
KEY RECOG.
001
*=OK #=ESC
▼▲
+-
*
Activating keys: (Default: ENABLED )
If you wish to use a key, it needs to be enabled.
F S A
Key recognition:
Lets a key be recognised and associated.
F S A
VOICE RECORDING 01
*=OK #=ESC
*
A=PLAY B=REC #=ESC
AREA
01
A
B
DESCRIPTION
KEY
[>>>>>>>>>>>>>>>>]
PLAY
01
BEGIN TO SPEAK
*=END REC
001
001
*
F S A
Voice Recording:
Allows the audio message (about 3 seconds) linked to the selected scenario to be customised.
Press key A to play back recorded message.
Press key B to record message and delete existing one. Recording will
begin only when you begin to speak and can be interrupted by pressing
key * .
To exit press # .
Key description:
Lets you edit the description of the key.
Associated areas
Areas associated to the key: (Default: 3 Areas)
Allows the assignment of areas of competence to the key.
Authorisation
SWITCH ON+OFF (Default)
SWITCH ON+OFF The key is activated to switch on and off the areas associated to it .
ONLY SWITCH ON The key is only authorised to switch on the areas associated to it.
Example: used when you wish to assign the cleaning firm only a switching on key.
Associated output
NO (Default)
For associating a pulse-type output to the entering of a key in a plug.
Example: used to act on a lock through a key.
F S A
▲
REMOTE CONTROLS 18
▼
▼▲
▼▲
REMOTE CONTROL 01
REMOTE CONTROL 01
*
*
▼▲
STATUS
ENABLED
01
RECOG.
01
*=OK #=ESC
DESCRIPTION
001
REMOTE CONTROL 001
+-
DISABLED
Remote control enabling: (Default:
If you wish to use a key, it needs to be enabled.
*
Remote control recognition:
Allows recognition of a remote control.
*
Remote control description:
Allows editing of the remote control description.
)
F S A
F S A
F S A
Associated areas
Areas associated with the remote control: (Default: 3 Areas)
Allows the assignment of the remote control areas of competence. Use the number keys to set the areas to be associated.
Scenarios
Scenarios: (Default: P1 going out; P2 going to bed; P3 staying home)
Associates scenarios with remote control keys.
Example: there is a home and the owner wishes to manage three areas (daytime, night-time and perimeter) using two
activations: total, perimeter only.
Area 1 = DAYTIME
Area 2 = NIGHT-TIME
Area 3 = PERIMETER
Scenario 1 = GOING OUT (ON+OFF EXACT; areas = 3)
Scenario 2 = STAYING HOME (ON+OFF EXACT; areas = 1)
Remote control 1 = associated areas = 3; scenario A = GOING OUT; scenario B = STAYING HOME
Page 34 - Programming Manual 24808800/12-02-2014 319F92C vers. 1.2- The data and information shown in this manual are to be considered as subject to change at any time and without the need for any advance warning on the part of BRAHMS
ENGLISH
2.15 Remote controls
▲
TELEPHONES
▼
19
TELEPHONE
TELEPHONE
*
▼▲
▼▲
01
01
*
Page 35 - Programming Manual 24808800/12-02-2014 319F92C vers. 1.2- The data and information shown in this manual are to be considered as subject to change at any time and without the need for any advance warning on the part of BRAHMS
PHONE NO
0491234567
01
*
F S A
Telephone number:
+ - keys and
Edit the telephone number. Press key * , write the number with the
confirm with the * keys and cancel with # . To deactivate the number just delete it
completely.
As well as the numbers you can also enter letters C (PBX) and P (pause while dialling),
used for the following functions respectively:
C In the event of GSM calls, all numbers before the C will not be dialled
P to insert a pause during dialling
The characters C and P are selected using the C and A keys.
To enter a telephone number first select the number to use, press the * key and enter
+ - . Then end with key * .
the figures using keys
Example: PSTN line connected to a switchboard with GSM calling functions.
0C 0456 789012
| | |______________|_ Telephone number
| | _________________ Indicates the switchboard is on line
| __________________
Number to request the line from the switchboard.
▼▲
FORMAT
VOICE
01
+-
F S A
Telephone communication format:
see
table
at
start
(Default:
)
VOICE The telephone communications will be by voice.
SMS The telephone communications will be by SMS.
CONTACT-ID The telephone communications will be digital CONTACT-ID (only with
PSTN line).
Example: communication to security firms.
+-
F S A
Call attempts: (Default: 02 )
Used in VOICE and CONTACT-ID communications, it sets the number of call attempts to
the number. To interrupt, press either 0 or 5 on the telephone keypad.
A=PLAY B=REC #=ESC
AREA 01
F S A
Voice Recording:
Allows the audio message linked to the selected scenario to be customised.
Press key A to play back recorded message.
Press key B to record message and delete existing one. Recording will begin
only when you begin to speak and can be interrupted by pressing key * .
To exit press # .
ATTEMPTS
01
[0..10] TRIES 02
VOICE RECORDING 01
*=OK #=ESC
*
A
B
DESCRIPTION
TELEPHONE
[>>>>>>>>>>>>>>>>]
PLAY
01
BEGIN TO SPEAK
*=END REC
001
01
*
Telephone description:
Lets you edit the description of the telephone.
F S A
Listen on telephone line
Activating/Deactivating telephone line check
ENGLISH
2.16 Telephones
ENGLISH
Common Messages
2.17 Telephone options
▲
▼
TELEPHONE
OPTIONS
20
▼▲
*
▼▲
LINE PRIORITY
PSTN
CALL DELAY
[0..255]s
+-
000
*
F S A
Telephone calls priority: (Default: PSTN )
The priority enables the selection of the type of network preset between either the PSTN
line or GSM line for voice calls. If the telephone dialler doesn't find the preset network, all
the voice calls will be rerouted onto the secondary network. SMS messages are always
sent on the GSM line. Digital call are made only on the PSTN line.
PSTN Voice calls via PTSN phone line
GSM Voice calls via GSM.
F S A
Call delay:
You can set a delay on the activation of the telephone dialler following an event in order to
avoid telephone calls caused by false alarms. On telephone options STOP BY CODE must
be activated.
Example: delay set at 10 s. If an input is unbalanced in error, but a valid user code is entered within 10 seconds, the telephone call will not be made. Conversely if more than 10
seconds elapse the telephone call will be sent as usual.
Call sequence
Call sequence: (Default:Continue 1-2-3-4)
For choosing whether, in the selection sequence for programmed telephone numbers, in the event of communications that are
NOT completed (e.g. the number called is engaged), another call to the same number is immediately made, or if the communicator should continue selecting other numbers.
Continue 1-2-3-4 Call and move on to next number.
Retry 1-1-2-2 Call and try calling back the number of times set up on the phone.
Page 36 - Programming Manual 24808800/12-02-2014 319F92C vers. 1.2- The data and information shown in this manual are to be considered as subject to change at any time and without the need for any advance warning on the part of BRAHMS
Default: Common Message 01
A voice message can be associated to each
telephone number, which is then sent with
each voice call.
Stop call sequence from phone: (Default: EVERYBODY'S)
EVERYBODY'S If the user presses key 5 on the phone while listening to a voice call, ALL subsequent telephone communications
(SMS, voice, CONTACT-ID) are interrupted automatically.
ONLY OWN If the user presses key 5 on the phone while listening to a voice call, ONLY repetitive call-backs to their own number
are interrupted automatically. ALL subsequent telephone communications are still made, however (SMS, voice, CONTACT-ID).
Page 37 - Programming Manual 24808800/12-02-2014 319F92C vers. 1.2- The data and information shown in this manual are to be considered as subject to change at any time and without the need for any advance warning on the part of BRAHMS
Stop by code
Stop call sequence by entering code/key: (Default NO)
EVERYBODY's If an event (general, technical, sabotage alarm etc.) starts the cycle of telephone calls, it can be interrupted
by entering on the keypad a code/key associated to the areas of competence which has the property of switching off areas.
NONE If an event (general, technical, sabotage alarm etc.) starts the cycle of telephone calls, it CANNOT be interrupted by
entering on the keypad a code/key associated to the areas of competence which has the property of switching off areas.
Remote control from PSTN (voice guide)
YES (Default)
For enabling access to the voice guide via the PSTN line.
Remote control by SMS
YES (Default)
Used for activating remote control via SMS.
Skip voice mail
YES (Default)
Activated if PSTN RMT-CTRL is set at YES.
You can access the voice guide even when there is a voice mail service programmed to answer before the telephone dialler. If
set at YES, you call the home number and hang up at the first ring; repeat the call within the next 60".
Number of rings from PSTN
03 (Default)
Activated if PSTN RMT-CTRL is set at YES. For setting the number of rings after which the telephone dialler will answer.
Example1: there is a home without a voice mail service and they want the telephone dialler to answer after 6 rings. Telephone
options: Remote control from PSTN YES; Skip voice mail NO; Rings from PSTN; 06.
Example 2: there is a home with a voice mail service that answers after 5 rings. Telephone options: Remote control from PSTN
YES; Skip voice mail YES
Remote assistance from PSTN
YES (Default)
For activating access to the programming via remote PC on the PSTN line.
Remote control by GSM
YES (Default)
For enabling access to the voice guide via the GSM line.
GSM safe
YES (Default)
By activating the GSM remote control you can create a filter which checks incoming calls against those in the contacts list.
Or you can activate access to all the telephones (the access password will still be required, regardless of whether the secure
GSM is activated or not).
ENGLISH
Stop from phone
ENGLISH
Telephones activated for secure GSM
PSTN line check
NO (Default)
If activated it checks the PSTN line, if it is absent a breakdown signal is given.
GSM line check
NO (Default)
If activated it checks the PSTN line, if it is absent a breakdown signal is given.
Listen on telephone line
NO (Default)
If activated before making a PSTN call wait for the dialling tone. To activate only when necessary.
System description
System description is the text to send along with the SMS communications.
Example: if an alarm is triggered and an SMS message is sent, it will read: MR ROSSI’S HOME SYSTEM ALARM …
With the system armed, activating a delay-type input will start up the input time (max 45 seconds in line with Standard
EN50131). If an alarm is activated during the input time, sirens will sound but telephone calls will be blocked and will not be made
until 30 seconds later or when the input time has elapsed.
Page 38 - Programming Manual 24808800/12-02-2014 319F92C vers. 1.2- The data and information shown in this manual are to be considered as subject to change at any time and without the need for any advance warning on the part of BRAHMS
By activating GSM remote control and secure
GSM you can select the telephone numbers
the telephone dialler must answer.
▲
▼
*
SPECIAL
FUNCTIONS
21
▼▲
DISPLAY KEYPADS
AREAS STATUS
+-
F S A
Display keypads: (Default: AREAS STATUS )
The keypads are made up of two rows of 16 characters. The date appears in the first and in
the second you can decide what to display from the following information:
KEYPAD NAME
Name of keypad.
AREAS STATUS Switched-on status of the individual areas.
SYSTEM STATUS System switched-on status: OFF, TOTAL SWITCH ON, PARTIALISED.
ENTER CODE
ENTER CODE fixed message.
Page 39 - Programming Manual 24808800/12-02-2014 319F92C vers. 1.2- The data and information shown in this manual are to be considered as subject to change at any time and without the need for any advance warning on the part of BRAHMS
▼▲
PRE-ARM TEST
DISABLED
DESCRIPTION
+-
+-
F S A
DISABLED
Pre-arming test:(Default:
)
PRE-ARMING TEST ENABLED: when the system is activated and there is one of the anomalies shown below you can force the system to activate just the same. The breakdown LED
will flash and the anomaly will be stored in the events log. If this operation is done from
the plug it will beep and cancel the reading.
Breakdown messages:
- BUS TAMPER: if one of the elements connected to the RS485 bus fails to communicate;
- BOX TAMPER: if a control unit or plug tamper is in alarm mode;
- ANOMALY/BREAKDOWN: if one of the inputs defined as having a BREAKDOWN is open;
- INPUT TAMPER: if an input is in tamper mode;
- NO PSTN LINE: if the line has been activated but is missing;
- NO GSM LINE: if the line has been activated but is not registered;
- NO NETWORK: if there is no network power supply;
- BATTERY BREAKDOWN: if the control unit battery is out of order;
- FUSE BREAKDOWN: if the fuses are faulty.
F S A
Company and service description:(Default: NO )
Here you can enter the name of the installation firm that will appear on the user menu
under the heading INFO.
Printer output
ENABLED (Default)
For activating the printer output for continuous
printouts of events on the RS-232. The serial
port setting is: Bits per second 9600; Data bits
8; Parity N; Bit stop 1.
Example: connect the control unit to the PX with
an rs-232 (male-female) cable. Open a serial port
receiving programme (Hyper Terminal for example)
and set the COM port and the serial port.
Control unit switched on status after Power On (restart)
PREVIOUS STATUS (Default)
TOTAL SWITCH ON All of the areas switch on.
TOTAL SWITCH OFF All of the areas switch off.
PREVIOUS STATUS The on/off status of the areas returns
to what it was before the power off.
ENGLISH
2.18 Special functions
DISABLED (Default)
If activated it lets you start scenarios from the keypads without having to enter a code.
Warning! When activated, open inputs cannot be excluded during switch on.
See area status
00 (Default)
Screening the status of the control unit from keypads and plugs If set at more than 0 the on/off status of the areas is
screened (hidden) after a preset time period.
Keypad buzzer output:
--- (Default)
If you set inputs to have buzzer properties enabled, you can select the keypads that must sound during the buzzer time.
Example: shop entrance doorbell.
Page 40 - Programming Manual 24808800/12-02-2014 319F92C vers. 1.2- The data and information shown in this manual are to be considered as subject to change at any time and without the need for any advance warning on the part of BRAHMS
ENGLISH
Quick switch on
The control unit has a simple weekly scheduler. The programme has 20 steps. For each step it is possible to set the starting TIME
and the ACTION to carry out. Each programmed step will be carried out automatically by the control unit ONLY WHEN IT COINCIDES
WITH THE TIME SET (HOURS AND MINUTES). If for any reason a step programmed at a particular time is not carried out then, it will
not be carried out at all that day. It is not necessary to follow a chronological time sequence when setting the steps.
Page 41 - Programming Manual 24808800/12-02-2014 319F92C vers. 1.2- The data and information shown in this manual are to be considered as subject to change at any time and without the need for any advance warning on the part of BRAHMS
IMPORTANT: it is imperative to pay careful attention when choosing the actions carried out automatically in the steps as,
if not programmed correctly, they can give rise to unwanted interventions of the control unit.
Step
DISABLED (Default)
To enable/disable a programme step set an action. The programme step is activated with the following programming:
- HOUR and MINUTES
- ACTION
- ADDRESS
- FUNCTION
- EXTENSION
Hours and Minutes
Lets you set hour and minutes for the action of the programme step.
Action
NO (Default)
Lets you set hour and minutes for the action of the programme step.
NONE No action anticipated;
CONTROL UNIT Action that concerns the whole system;
INPUT Action that concerns a single input of the system;
AREA Action that concerns a single area of the system;
CODE GROUP Action that concerns a group of codes;
KEY GROUP Action that concerns a group of keys;
SCENARIO Action that concerns a scenario.
Address
Lets you set the address of the subject (output, area, code group, key group, scenario) of the action in the programme step.
Function
Lets you set the address of the subject (output, area, code group, key group, scenario) of the action in the programme step.
ACTIVATE to activate the programme step at the time set;
ACTIVATE to activate the programme step at the time set;
ENGLISH
2.19 Daily scheduler
NO (Default)
By activating the extension of a programme step you can postpone the action from the user menu.
Example: if you want to delay system switch on until 19.30 you need to set: Action: 1; Address; non influential; Status: 1; Extension: Yes; Hour: 19; Minutes: 30.
If the system is armed from the scheduler, the output time will be started. Irrespective of the Force Area parameter, if inputs
are open at the end of the output time an alarm will be triggered.
Page 42 - Programming Manual 24808800/12-02-2014 319F92C vers. 1.2- The data and information shown in this manual are to be considered as subject to change at any time and without the need for any advance warning on the part of BRAHMS
ENGLISH
Extension
▲
EVENTS
24
▼
ENGLISH
2.20 Events
▼▲
*
MENU
EVENTS
F S A
Events menu:
Enables you to view events as in the user menu. See user manual for event viewing.
Page 43 - Programming Manual 24808800/12-02-2014 319F92C vers. 1.2- The data and information shown in this manual are to be considered as subject to change at any time and without the need for any advance warning on the part of BRAHMS
Event Print-out.
On the 'CONTROL UNIT/EVENT MEMORY'
press
to download the events. Press
to print out the events list.
To go back to the initial screen press .
2.21 Clock
▲
CLOCK
▼
25
▼▲
14:34 05/07/2010
A=CHANGE #=NO
*
A
03:46
YEAR:
01/01/2010
10
03:46 01/01/2010
MONTH:
01
▼▲
03:46
DAY:
F S A
Date and time:
Press A to change the date and time of the clock.
Changing from daylight savings to solar time is done automatically according to the Italian
national regulation.
++-
01/01/2010
01
+-
03:46 01/01/2010
HOURS:
03
+-
03:46 01/01/2010
MINUTES:
46
03:46 01/01/2010
SECONDS:
00
+-
F S A
Setting date:
Use the arrow keys to select the parameter to edit and with the + – keys edit the value.
Press # to end: then press * to save or # to cancel.
F S A
Setting time:
+
–
Use the arrow keys to select the parameter to edit and with the
keys edit the value.
Press # to end: then press * to save or # to cancel.
+-
CONFIRM EXIT
*=SAVE #=ESC
If the internal clock is not initialised, the keypad will display the message ‘INITIALISE DATE AND TIME’ and the breakdown
LED will be on. Once the clock has been initialised, the LED will go out and the message will disappear from the keypad.
▲
▼
DEFAULT
PARAMETERS
26
▼▲
Default parameters:
Press A to carry out the default parameters.
DEFAULT PARAM.?
*=YES #=ESC
*
F S A
The default parameters do not delete the acquired codes and keys.
2.23 Control Unit Version
▲
VERSION
CONTROL UNIT
*
27
▼▲
VERSION
PROXINETW 1.0.X
Check the version of the control unit
Display the control unit's firmware version
F S A
2.24 Voice Recordings
▲
VOICE
RECORDINGS
*
*
A=PLAY B=REC #=ESC
COMMON MESS.
B
[>>>>>>>>>>>>>>>>]
PLAY
01
BEGIN TO SPEAK
*=END REC
F S A
Voice Recording:
Allows the audio message linked to the selected common message to be customised.
Press key A to play back recorded message.
Press key B to record message and delete existing one. Recording will begin only
when you begin to speak and can be interrupted by pressing key * .
To exit press # .
SEL. VOICE MESS.
AREAS
001
A=PLAY B=REC #=ESC
AREAS
001
A
B
*
▼▲
SEL. VOICE MESS.
COMMON MESS 001
A
*
28
[>>>>>>>>>>>>>>>>]
PLAY
01
BEGIN TO SPEAK
*=END REC
F S A
Voice Recording:
Lets the audio message linked to the selected area be customised.
Press key A to play back recorded message.
Press key B to record message and delete existing one. Recording will begin only
when you begin to speak and can be interrupted by pressing key * .
To exit press # .
SEL. VOICE MESS.
SCENARIOS
001
A=PLAY B=REC #=ESC
SCENARIOS
001
A
B
[>>>>>>>>>>>>>>>>]
PLAY
01
BEGIN TO SPEAK
*=END REC
F S A
Voice Recording:
Allows the audio message linked to the selected scenario to be customised.
Press key A to play back recorded message.
Press key B to record message and delete existing one. Recording will begin only
when you begin to speak and can be interrupted by pressing key * .
To exit press # .
Page 44 - Programming Manual 24808800/12-02-2014 319F92C vers. 1.2- The data and information shown in this manual are to be considered as subject to change at any time and without the need for any advance warning on the part of BRAHMS
ENGLISH
2.22 Default parameters
A=PLAY B=REC #=ESC
OUTPUTS
001
A
Page 45 - Programming Manual 24808800/12-02-2014 319F92C vers. 1.2- The data and information shown in this manual are to be considered as subject to change at any time and without the need for any advance warning on the part of BRAHMS
B
*
A=PLAY B=REC #=ESC
INPUTS
001
B
[>>>>>>>>>>>>>>>>]
PLAY
01
BEGIN TO SPEAK
*=END REC
F S A
Voice Recording:
Lets the audio message linked to the selected input be customised.
Press key A to play back recorded message.
Press key B to record message and delete existing one. Recording will begin only
when you begin to speak and can be interrupted by pressing key * .
To exit press # .
SEL. VOICE MESS
KEYS
001
A=PLAY B=REC #=ESC
KEYS
001
*
A
B
*
BEGIN TO SPEAK
*=END REC
SEL. VOICE MESS
INPUTS 001
A
*
[>>>>>>>>>>>>>>>>]
PLAY
01
F S A
Voice Recording:
Lets the audio message linked to the selected output be customised.
Press key A to play back recorded message.
Press key B to record message and delete existing one. Recording will begin only
when you begin to speak and can be interrupted by pressing key * .
To exit press # .
[>>>>>>>>>>>>>>>>]
PLAY
01
BEGIN TO SPEAK
*=END REC
F S A
Voice Recording:
Lets the audio message linked to the selected input be customised.
Press key A to play back recorded message.
Press key B to record message and delete existing one. Recording will begin only
when you begin to speak and can be interrupted by pressing key * .
To exit press # .
SEL. VOICE MESS.
CODES
001
A=PLAY B=REC #=ESC
CODES
001
A
B
[>>>>>>>>>>>>>>>>]
PLAY
01
BEGIN TO SPEAK
*=END REC
F S A
Voice Recording:
Allows the audio message linked to the selected code to be customised.
Press key A to play back recorded message.
Press key B to record message and delete existing one. Recording will begin only
when you begin to speak and can be interrupted by pressing key * .
To exit press # .
ENGLISH
*
SEL. VOICE MESS
OUTPUTS
001
The events are made up of:
•
TIME and DATE
•
EVENT DESCRIPTION (activation / restoring)
•
EVENT INDEX
•
EVENT DESCRIPTION (part 2)
X
There is a partialisation event when there
are actions of non-total switching off of
areas (partial switching off). The second
description will show the on/off status
of the remaining areas (example ##--#).
X
TOTAL
There is a switching off event when the system is totally off.
X
CONT. UNIT
A tampered opening or tearing of the control
unit or an auxiliary power supply unit has been
detected. Check the integrity and the tamper.
X
Input xxx has been tampered with (either cut
or short-circuited depending on the balancing). Check the integrity of the input's electricity line. Even if it has restored itself "on
its own", check the input's electricity line
because there could still be faulty contacts.
X
TOTAL
SWITCHING ON
Areas switched on
PARTIALIS.
Areas switched on
SWITCHING OFF
Areas switched on
ALA. TAMPER xx
RES. TAMPER xx
ALA.INP.TAMP. xxx
RES.INP.TAMP. xxx
AREA ALARM
RES. AREA ALARM xx
xx
PWR.DESCR.
INPUT DESCR.
AREA DESCR.
When an input goes into alarm mode so do
the associated areas.
INPUT DESCR.
Input xxx has gone into alarm mode (it has
been unbalanced).
BATTERY TX xxx
INPUT DESCR.
Radio input xxx 's battery is dead. Replace it
as soon as possible.
ERR.COM.KEYPAD xx
KEYPAD DESCR.
Keypad xx is no longer communicating with
the control unit (red communication LED on
keypad not flashing). Check activation of
keypad, bus cabling, address.
X
MODULE DESCR.
The inputs expansion module on bus xx is
no longer communicating with the control
unit (red communication LED on module not
flashing). Check activation of module, bus
cabling, dip switch address.
X
MODULE DESCR.
The outputs expansion module on bus xx is
no longer communicating with the control
unit (red communication LED on module not
flashing). Check activation of module, bus
cabling, dip switch address.
X
ERR.MOD.RX xx
MODULE DESCR.
The outputs expansion module on bus xx is
no longer communicating with the control
unit (red communication LED on module not
flashing). Check activation of module, bus
cabling, dip switch address.
X
JAM.MOD.RX xx
MODULE DESCR.
The radio receiver module on bus xx has detected a radio transmission that could block
an radio transmitters (JAMMING function
activated on control unit).
X
INPUT DESCR.
Radio input xx has transmitted a person-detected communication.
MODULE DESCR.
The tamper of the inputs expansion module
on bus xx has been tampered with. Check
module tamper.
INP. ALARM xxx
ERR.MOD.IN xx
ERR.MOD.OUT xx
SUPERVIS.TX xxx
TAMP.MOD.IN xx
RESTORE INPUT xxx
X
X
X
Various
Entrance
Key
Code
X
Page 46 - Programming Manual 24808800/12-02-2014 319F92C vers. 1.2- The data and information shown in this manual are to be considered as subject to change at any time and without the need for any advance warning on the part of BRAHMS
There is a switching on event when the only
actions are (total or partial) switching on. If
switching on all of the areas managed by the
control unit, the second description will read
TOTAL, whereas for partial switching on the
areas on will be shown (example ##--#).
Breakdown
CAUSE
Switching on
DESCRIPTION 2
Burglary
RESTORE
Technical
ACTIVATION
Sabotage
Telephone notifications group
Alarm
ENGLISH
3 Events messaging
MODULE DESCR.
The tamper of the outputs expansion module
on bus xx has been tampered with. Check
module tamper.
X
TAMP.MOD.RX xx
MODULE DESCR.
The tamper of the radio receiver module on
bus xx has been tampered with. Check module tamper.
X
The tamper of keypad xx has been tampered with. Check keypad tamper.
X
KEYPAD DESCR.
TAMP.KEYPAD xx
The technical menu output is recorded in the
events log.
OUTPUT M.TECH
Page 47 - Programming Manual 24808800/12-02-2014 319F92C vers. 1.2- The data and information shown in this manual are to be considered as subject to change at any time and without the need for any advance warning on the part of BRAHMS
BATT. BREAK. xx
RES. BATTERY xx
CONT. UNIT
PWR.DESCR.
Control unit battery breakdown.
NETWORK BREAK xx
NETWORK BACK xx
CONT. UNIT
PWR.DESCR.
Breakdown with no 230 Vac power to control
unit.
CODE
N. xxx
CODE DESCR.
Entering a code (user or technical) is recorded in the events log.
KEY
N. xxx
KEY DESCR.
The action of approaching a key to a plug is
recorded in the events log.
R.SYS.BREAKDOWN
Generic system breakdown notification. The
breakdown might be caused by batteries, 230
power supply, power supply unit or fuses).
SYS.TEC.ALA.
RES.TEC.ALA.
Generic technical alarm event. It is generated with an area technical alarm (if an area
is not associated to a technical input, the
system technical alarm is not triggered).
GEN.SYS.ALA.
RES.GEN.ALA.
The generic general alarm event is triggered
by either an area alarm or a system tamper
alarm.
PWR BRK.DN. xx
RES.PWR BRK.
SYS.BREAKDOWN
CONT. UNIT
PWR.DESCR.
24H SYS.ALA.
X
X
X
X
X
X
Notification of breakdown of control unit
power supply - fuses.
X
xx
“RES.24H.SYS“
Generic notification of a tamper alarm (sabotage).
X
RES.24H ALA. xx
When an input goes into tamper alarm
mode so do the associated areas.
All tamper-type events which are not associated to any inputs automatically trigger a
tamper alarm of area 1.
X
REMOTE CONTROL XX
xx
BURGLARY ALA. xx
xxx
xxx
AREA DESCR.
REMOTE CONTROL DESCR.
REMOTE NO.xxx CODE
DEACTIV. CODE
X
The event is logged when the control unit is
powered up for the first time or it is reset
(the restart button is pressed on the control
unit's board).
POWER-ON
ACTIV.CODE
X
The autotest is normally used to check
whether the control unit is up and running
via a telephone communication.
AUTO TEST
TECH ALARM
X
The communication between the control unit and
local PC (uploading - downloading programming
and events) is recorded in the events log.
LOCAL CONN.
ALARM 24H
ENGLISH
TAMP.MOD.OUT xx
RES.TECH.ALA xx
RES.BURG.ALA. xx
Each time you use the system's remote control, it is logged in the events log.
CODE DESCR.
Entering a code (user) remotely (by voice
guide or SMS) is recorded in the events log.
AREA DESCR.
When an input goes into technical alarm
mode so do the associated areas.
SYSTEM
AREA DESCR.
When an input goes into burglary alarm
mode so do the associated areas.
CODE DESCR.
Code xxx has been activated from the user menu. The
event CODE N. xxx that came before chronologically shows who modified it.
CODE DESCR.
Code xxx has been deactivated from the user menu.
The event CODE N. xxx that came before
chronologically shows who modified it.
X
X
X
KEYPAD DESCR.
21 wrong codes have been entered from keypads. The description is that of the last keypad
on which a code entry was attempted.
X
INCORRECT KEY
PLUG DESCR.
21 invalid keys have approached plugs.
The description is that of the last plug to
which a key approach was attempted.
X
ERR.INS.COM.xxx
When a plug is not communicating with the
control unit.
X
INS.FORCE COD.xxx
When the user forces the control unit
switch-on in the event of a breakdown or
anomaly with the system
EXCL.INP.TMP.XXX
RES.EXCL.INP.XXX
When an input xxx is disabled temporarily.
SET DATE/TIME
When the clock is initialised by the keypad
or by the PC
TEL.CALL OK XXX
When the user receives a call from the control unit, press button 5 on your phone to
signal message receipt or KISS-OFF package receipt.
OUTPUT ON XXX
Output activation
OUTPUT OFF XXX
Output deactivation
PSTN BREAKDOWN
PSTN BREAKDOWN RES.
When the line has been enabled from the "Telephone Options" menu and has broken down.
GSM BREAKDOWN
RES. GSM BREAKDOWN
When the GSM function has been enabled
from the "Telephone Options" menu and has
broken down.
WRONG CODE
When an unknown code has been entered
more than 5 times.
WRONG KEY
When the user has tried to use an unknown
key more than 5 times.
ERR.READ.COM XXX
Event generated because of no communication with plugs.
REMOTE CONN.
The communication between the control
unit and remote PC via SSIP or SIFLAN (uploading - downloading programming and
events) is recorded in the events log.
T;C BATT.
GSM SIM EXP.
REMOTE CONTROL DESCR.
X
X
Each time the control unit detects a rundown battery in a remote control recognised
by the system, it is logged in the events log.
When the countdown set in the SIM EXPIRY
*This is part of the notifications of remenu runs out, it is logged in the events log
sidual credit.
and a phone call* (voice or SMS) is made.
Page 48 - Programming Manual 24808800/12-02-2014 319F92C vers. 1.2- The data and information shown in this manual are to be considered as subject to change at any time and without the need for any advance warning on the part of BRAHMS
ENGLISH
WRONG CODE
Page 49 - Programming Manual 24808800/12-02-2014 319F92C vers. 1.2- The data and information shown in this manual are to be considered as subject to change at any time and without the need for any advance warning on the part of BRAHMS
ENGLISH
Page 50 - Programming Manual 24808800/12-02-2014 319F92C vers. 1.2- The data and information shown in this manual are to be considered as subject to change at any time and without the need for any advance warning on the part of BRAHMS
ENGLISH
Page 51 - Programming Manual 24808800/12-02-2014 319F92C vers. 1.2- The data and information shown in this manual are to be considered as subject to change at any time and without the need for any advance warning on the part of BRAHMS
ENGLISH
The regulations to make the system conform to standard EN 50131 are given below:
- The plugs' buzzer signals cannot be deactivated (EN50131-1 8.3.8.2);
- '24-hour' and 'Technological' inputs must not be used;
- Inputs configured as 'Switch on' comply only if they are controlled by devices whose number of combinations is greater than 10000;
- If there are devices on the system that give breakdown notifications, they must be connected to the input defined as breakdown;
- The telephone dialler must be activated;
- The system must always have a self-powered external siren to signal any intruder alarms;
- The number of alarms to auto-exclude the entrance must be set between 3 and 10;
- The time for notifying no power must be set at one minute (1 minute);
- The quick switch-on must not be enabled;
- The ‘Stop Communication’ option must not be enabled when the control unit is off;
- Input time 1 and 2 must be set at a maximum of 45 seconds (EN50131-1 8.3.8.2);
- The battery test time must be set at a value higher than 5 minutes;
- Enable SEE SYSTEM STATUS by setting it at ≤ xx seconds
- Disable the 'QUICK SWITCH ON' function.
5 Declaration
Declares under its own responsibility that the following products for security alarm units:
PROXINETW
… comply with essential requisites and relative regulations, set by the following Directives and the applicable sections of the Standards listed below.
--- DIRECTIVES--2006/95/EC
Low Voltage Directive
1999/05/EC
Directive Concerning Radio and Telecommunications Terminal Equipment and the Reciprocal Recognition of their Compliance
2004/108/EC
Electromagnetic Compatibility Directive
EN 50130-4 + A1 + A2Alarm systems.
Part 4: Electromagnetic compatibility.
EN 60950-1
EN 61000-6-3
ETSI ES 203 021-1 EN 300 220-3
EN 301 489-3
Information technology equipment – Safety.
Part 1: General requirements.
Electromagnetic Compatibility (EMC).
Part 6-3: General standards - Emission standard for residential, commercial and light industrial environments.
Terminal Equipment (Te); Attachment Requirements For Pan-European Approval For Connection To The Analogue Public Switched Telephone Networks (Pstns) Of Te (Excluding Te Supporting The Voice Telephony Service) In
Which Network Addressing, If Provided, Is By Means Of Dual Tone Multi Frequency (Dtmf) Signalling.
Electromagnetic Compatibility And Radio Spectrum Matters (Erm); Short Range Devices (Srd); Radio Equipment To Be Used In The 25 Mhz To 1 000 Mhz Frequency Range With Power Levels Ranging Up To 500 Mw;
Part 3: Harmonized En Covering Essential Requirements Under Article 3.2 Of The R&Tte Directive.
Electromagnetic Compatibility And Radio Spectrum Matters (Erm); Electromagnetic Compatibility (Emc) Standard For Radio Equipment And Services;
Part 3: Specific Conditions For Short-Range Devices (Srd) Operating On Frequencies Between 9 Khz And 40 Ghz.
EN 50130-5Alarm Systems
Part 5: Methods for Environmental Tests.
EN 50131-1 EN 50131-6 Intrusion and security alarm systems.
General Requirements
Intrusion and burglary alarm systems.
Part 6: Power supplies.
Complies with Product Standard CEI 79-2 Second Level.
Page 52 - Programming Manual 24808800/12-02-2014 319F92C vers. 1.2- The data and information shown in this manual are to be considered as subject to change at any time and without the need for any advance warning on the part of BRAHMS
ENGLISH
4 Appendix Regulations