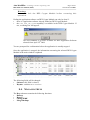
1
Haachtsesteenweg 1442
1130 Brussels
Belgium
DEP Documentation
DEP/NMS User Manual
Version: 04.04
Classification: Public
Atos Worldline - Technology & Products / Engineering / DEP
DEP/NMS User Manual (04.04)
Page: 2/139
Classification: Public
Version Management Report
Version
01.00
01.01
01.02
01.03
01.04
01.05
01.06
Name(s)
Paul STIENON
Paul STIENON
Paul STIENON
Paul STIENON
Paul STIENON
Paul STIENON
Paul STIENON
Date
25/10/2004
24/11/2004
06/04/2005
30/05/2005
02/08/2005
22/09/2005
18/10/2005
03.00
Paul STIENON
25/04/2006
03.01
03.02
David LHEUREUX
David LHEUREUX
08/03/2007
05/04/2007
03.03
03.04
03.05
03.06
Luc Braems
Energize Global Services
David Lheureux
Energize Global Services
2007
03/03/2009
01/04/2009
10/04/2009
03.07
03.08
03.09
03.10
03.11
03.12
04.00
04.01
David Lheureux
Energize Global Services
Energize Global Services
David Lheureux
Energize Global Services
David Lheureux
Anna Papayan
Anna Papayan
13/05/2009
03/06/2009
26/04/2010
27/04/2010
31/05/2010
31/05/2010
07/10/2010
21/12/2010
04.02
04.03
Anna Papayan
Anna Papayan
14/01/2011
19/07/2011
04.04
Anna Papayan
26/04/2012
Comments
First Draft
Second version
Third version
Few typo corrections
Review from FD and PS.
Adjust to version 1.27 of DEP/NMS
After review of version 5, and
modification of wizard images
Modification in the versioning, new
disclaimer
Adjust to version 2.5 of DEP/NMS
After internal review. Adjust to version
2.7 of DEP/NMS
Review
Multi loading description
Review
Multi SW loading/Keys restoring
description, DEP/NMS version 3.x
Review + make document up to date.
Adjust to version 3.1.2.0 of DEP/NMS
Cloning support added
Review with track changes.
Update
Finalize this version.
Software cloning support updated,
BIOS Reflash and Banksys Crypto
upgrade added.
Finalize this version
Software Cloning support: the
information only for DEP/NMS user is
kept. Referenced to DEP Software
Cloning Guide document.
Windows 7 support added.
Atos Worldline - Technology & Products / Engineering / DEP
DEP/NMS User Manual (04.04)
Page: 3/139
Classification: Public
CONFIDENTIALITY
The information in this document is confidential and shall not be disclosed to any
third party in whole or in part without the prior written consent of Atos Worldline
S.A./N.V.
COPYRIGHT
The information in this document is subject to change without notice and shall not
be construed as a commitment by Atos Worldline S.A./N.V.
The content of this document, including but not limited to trademarks, designs,
logos, text, images, is the property of Atos Worldline S.A/N.V. and is protected by
the Belgian Act of 30.06.1994 related to author’s right and by the other applicable
Acts.
The contents of this document must not be reproduced in any form whatsoever, by
or on behalf of third parties, without the prior written consent of Atos Worldline
S.A./N.V.
Except with respect to the limited license to download and print certain material
from this document for non-commercial and personal use only, nothing contained in
this document shall grant any license or right to use any of Atos Worldline
S.A./N.V.’s proprietary material.
LEGAL DISCLAIMER
While Atos Worldline S.A./N.V. has made every attempt to ensure that the
information contained in this document is correct, Atos Worldline S.A./N.V. does
not provide any legal or commercial warranty on the document that is described in
this specification. The technology is thus provided “as is” without warranties of any
kind, expressed or implied, included those of merchantability and fitness for a
particular purpose. Atos Worldline S.A./N.V. does not warrant or assume any legal
liability or responsibility for the accuracy, completeness, or usefulness of any
information, product or process disclosed.
To the fullest extent permitted under applicable law, neither Atos Worldline
S.A./N.V. nor its affiliates, directors, employees and agents shall be liable to any
party for any damages that might result from the use of the technology as described
in this document (including without limitation direct, indirect, incidental, special,
consequential and punitive damages, lost profits).
JURISDICTION AND APPLICABLE LAW
These terms shall be governed by and construed in accordance with the laws of
Belgium. You irrevocably consent to the jurisdiction of the courts located in
Brussels for any action arising from or related to the use of this document.
sa Atos Worldline nv – Chaussée de Haecht 1442 Haachtsesteenweg
B-1130 Bruxelles-Brussel - Belgium
RPM-RPR Bruxelles-Brussel - TVA-BTW BE 0418.547.872
Atos Worldline - Technology & Products / Engineering / DEP
DEP/NMS User Manual (04.04)
Page: 4/139
Classification: Public
TABLE OF CONTENTS
1.
INTRODUCTION................................................................................................ 8
1.1.
1.2.
1.3.
2.
DEP/NMS FIELDS OF APPLICATION........................................................... 9
2.1.
2.2.
2.3.
3.
INSTALLING THE APPLICATION ...................................................................... 12
STARTING UP ................................................................................................. 12
PERFORMING INITIAL CONFIGURATION ......................................................... 12
RESTARTING WITH CONFIGURATION DEFINED ............................................... 14
EXIT .............................................................................................................. 14
HANDLING CONFIGURATION FILES ....................................................... 16
4.1.
4.2.
4.3.
4.4.
4.5.
5.
DEP/NMS LITE .............................................................................................. 9
DEP/NMS FULL ........................................................................................... 10
DEP/NMS LOCAL ........................................................................................ 10
GETTING STARTED ....................................................................................... 12
3.1.
3.2.
3.3.
3.4.
3.5.
4.
SCOPE OF THE DOCUMENT .............................................................................. 8
RELATED DOCUMENTATION ............................................................................ 8
CONTACTING ATOS WORLDLINE .................................................................... 8
CREATING A NEW FILE .................................................................................. 16
OPENING AN EXISTING CONFIGURATION FILE ................................................ 16
OPENING AND MERGING FILE ........................................................................ 17
CLOSING A FILE ............................................................................................. 18
SAVING A CONFIGURATION ........................................................................... 19
PROVIDING PLATFORM INFORMATION................................................ 20
5.1.
ADDING A PLATFORM .................................................................................... 20
5.1.1.
Identifying the platform........................................................................ 20
5.1.2.
Selecting Crypto Modules .................................................................... 21
5.1.3.
Updating the configuration .................................................................. 22
5.2.
MODIFYING PLATFORM INFORMATION .......................................................... 22
5.3.
DELETING A PLATFORM FROM THE CONFIGURATION ..................................... 22
5.4.
PLATFORMS ORDER ...................................................................................... 23
6.
THE VIEW MENU ............................................................................................ 24
6.1.
REFRESHING THE INFORMATION.................................................................... 24
6.1.1.
Refreshing window globally ................................................................. 24
6.1.2.
Refreshing Item .................................................................................... 24
6.2.
VIEWING THE AUDIT TRAIL ........................................................................... 24
6.3.
SHOWING/HIDING THE STATUS BAR .............................................................. 26
6.4.
SHOWING/HIDING THE TOOLBAR ................................................................... 27
7.
MANAGING DEP PLATFORMS ................................................................... 28
7.1.
HANDLING PLATFORM STATUS INFORMATION ............................................... 28
7.1.1.
Requesting status information.............................................................. 28
7.1.2.
Interpreting the platform status information ....................................... 29
7.1.3.
Saving status information .................................................................... 30
7.1.4.
Modifying parameters .......................................................................... 30
7.2.
HANDLING PLATFORM LOCKING ................................................................... 37
Atos Worldline - Technology & Products / Engineering / DEP
DEP/NMS User Manual (04.04)
Page: 5/139
Classification: Public
7.2.1.
Lock ...................................................................................................... 38
7.2.2.
Unlock .................................................................................................. 38
7.2.3.
Forced Unlock ..................................................................................... 38
7.3.
HANDLING TRACES ....................................................................................... 39
7.3.1.
Activating the logging .......................................................................... 39
7.3.2.
Stopping the logging ............................................................................ 39
7.3.3.
Getting the trace file ............................................................................ 40
7.4.
MANAGING STATISTICS ................................................................................ 43
7.4.1.
Starting the statistics utility ................................................................. 44
7.4.2.
Stop the statistics utility ....................................................................... 44
7.4.3.
Getting the statistics information ......................................................... 44
8.
MANAGING DEP CRYPTO MODULES ...................................................... 47
8.1.
HANDLING MODULE STATUS INFORMATION .................................................. 47
8.1.1.
Requesting status information.............................................................. 47
8.1.2.
Interpreting module status information ............................................... 48
8.1.3.
Saving status information .................................................................... 49
8.1.4.
Modifying configuration settings ......................................................... 50
8.2.
HANDLING CRYPTO MODULE LOCKING ........................................................ 51
8.2.1.
Lock ...................................................................................................... 52
8.2.2.
Unlock .................................................................................................. 52
8.2.3.
Forced unlock ...................................................................................... 52
8.3.
MANAGING APPLICATIONS ........................................................................... 52
8.3.1.
Loading application software on DEP Crypto Module(s) ................... 53
8.3.2.
Ending an application .......................................................................... 58
8.4.
MANAGING KEYS.......................................................................................... 59
8.4.1.
Backing up keys.................................................................................... 60
8.4.2.
Restoring keys ...................................................................................... 61
8.4.3.
Changing the DMK .............................................................................. 65
8.4.4.
Merging backups .................................................................................. 69
8.5.
READING DEP INFORMATION ....................................................................... 73
8.5.1.
Understanding information about keys ................................................ 75
8.5.2.
Capabilities .......................................................................................... 76
8.5.3.
Counters ............................................................................................... 77
8.5.4.
Parameters ........................................................................................... 78
8.6.
PERFORMING DIAGNOSTICS .......................................................................... 79
8.6.1.
Reading Diagnostics ............................................................................ 80
8.6.2.
Testing Communication Hardware ...................................................... 81
8.6.3.
Performing DEP Self-Test ................................................................... 82
8.6.4.
Verifying the Keymac ........................................................................... 83
8.6.5.
Reading DEP Alarm Information ........................................................ 83
8.7.
RESETTING THE DEP PLATFORM OR ITS COMPONENTS .................................. 85
8.7.1.
Managing the backup battery .............................................................. 86
8.7.2.
Resetting Communication to the DEP platform................................... 87
8.7.3.
Resetting the DEP Crypto Module CPU .............................................. 88
8.7.4.
Resetting the DEP Alarm Processor .................................................... 88
8.8.
MANAGING DEP PARAMETERS ..................................................................... 88
8.8.1.
Modifying DEP parameters ................................................................. 90
8.8.2.
Adding a parameter instance ............................................................... 91
8.8.3.
Deleting a parameter instance ............................................................. 92
8.8.4.
Backing up parameters ........................................................................ 93
Atos Worldline - Technology & Products / Engineering / DEP
DEP/NMS User Manual (04.04)
8.8.5.
9.
Page: 6/139
Classification: Public
Restoring parameters ........................................................................... 94
DEP SOFTWARE CLONING.......................................................................... 95
9.1.
PREREQUISITES ............................................................................................. 95
9.2.
SETTING AS MASTER ..................................................................................... 95
9.3.
UNSET MASTER ............................................................................................ 96
9.4.
SETTING AS CLONE ....................................................................................... 97
9.5.
UNSET CLONE ............................................................................................... 98
9.6.
UNSELECT ALL ............................................................................................. 99
9.7.
START CLONING PROCESS ............................................................................ 99
9.7.1.
Cloning the Master DMK..................................................................... 99
9.7.2.
Customer Administrators authentication on Master and KAWL
Checking 100
9.7.3.
Cloning progress dialog .................................................................... 102
9.7.4.
Cloning summary ............................................................................... 103
9.8.
RESET MASTER/CLONE ............................................................................... 104
10.
FIRMWARE UPGRADE ............................................................................ 105
10.1. BIOS REFLASH ............................................................................................ 105
10.2. UPGRADE BANKSYS CRYPTO ...................................................................... 107
10.2.1. Prerequisites ...................................................................................... 107
10.2.2. Starting the Banksys Crypto Upgrade ............................................... 108
11.
TOOLS .......................................................................................................... 116
11.1. GENERAL SETTINGS .................................................................................... 116
11.1.1. Automatic refresh ............................................................................... 117
11.1.2. Event Manager ................................................................................... 117
11.1.3. C-ZAM/DEP ....................................................................................... 118
11.2. MANAGING PASSWORDS ............................................................................. 118
11.2.1. Understanding security levels ............................................................ 118
11.2.2. Entering a password .......................................................................... 120
11.2.3. Modifying a password ........................................................................ 121
11.3. TESTING LAN CONNECTION TO THE HOST .................................................. 122
11.4. SENDING A CALL TO A CRYPTO MODULE .................................................... 123
12.
12.1.
12.2.
12.3.
WORKING WITH PLUG INS ................................................................... 125
13.
ADDING PLUG INS ....................................................................................... 125
ORGANISING PLUG INS................................................................................ 127
USING PLUG INS. ......................................................................................... 127
13.1.
13.2.
OBTAINING HELP .................................................................................... 129
14.
CONSULTING THE ONLINE HELP................................................................... 129
OBTAINING INFORMATION ON DEP/NMS ................................................... 129
ANNEX A: INSTALLATION PROCEDURE .......................................... 131
14.1. DEP/NMS AND DEP/EM INSTALLATION ................................................... 131
14.1.1. Selecting the installation folder ......................................................... 132
14.1.2. Confirming installation ...................................................................... 133
14.1.3. Installing… ......................................................................................... 133
14.1.4. Installation Complete ......................................................................... 134
14.2. LICENSE DONGLE INSTALLATION ............................................................... 134
Atos Worldline - Technology & Products / Engineering / DEP
DEP/NMS User Manual (04.04)
14.2.1.
14.2.2.
Page: 7/139
Classification: Public
Performing preliminary steps ............................................................ 135
Finishing the actual installation ........................................................ 136
15.
ANNEX B: FUNCTION KEYS AND SHORTCUTS ............................... 138
16.
ANNEX C: AUDIT TRAIL OPERATIONS AND EVENTS .................. 138
Atos Worldline - Technology & Products / Engineering / DEP
DEP/NMS User Manual (04.04)
1.
Page: 8/139
Classification: Public
INTRODUCTION
1.1. SCOPE OF THE DOCUMENT
This document describes the version 3.x of the DEP/NMS (Network Management
System) application. This PC application allows the management and configuration of
DEP Platforms and the DEP Crypto Modules. It can be linked to the DEP/EM
application (Event Manager) to which it sends its events.
For information on the use of DEP/EM, refer to the document DEP/EM User Manual.
1.2. RELATED DOCUMENTATION
Information about the various DEP-products, technologies, and solutions is available
from an extensive set of documents accompanying these products.
People new to Atos Worldline' DEP technology, may find it beneficial to read these
three document:
•
DEP – Introduction to DEP
•
DEP Glossary
With respect to the DEP/NMS, the documents that are of particular interest are the
following:
•
DEP EM User Manual
•
DEP C-ZAM/DEP User Manual
•
DEP NT Installation Guide
•
DEP Host Interface Protocol
There are no references made to the following documents, but they could be useful to
understand this document.
•
•
•
•
DEP Introduction to DEP
DEP General Architecture
DEP Glossary
DEP T6 Owner's Manual
1.3. CONTACTING ATOS WORLDLINE
You can visit Atos Worldline on the World Wide Web to find out about new products
and about various other fields of interest.
URL: http://www.Atos Worldline.be
For documentation or support on issues related to DEP, customers, partners, resellers,
and distributors can send an email to the DEP Hotline:
[email protected]
Atos Worldline - Technology & Products / Engineering / DEP
DEP/NMS User Manual (04.04)
2.
Page: 9/139
Classification: Public
DEP/NMS FIELDS OF APPLICATION
The main purpose of the DEP/NMS application is to manage a pool of DEP Platforms
with several DEP Crypto Modules. It is intended for use on PCs with Windows 2000,
XP, Windows Vista and Windows 7 operating system on it.
The DEP/NMS application has following versions of functioning:
•
•
•
lite
full
local
Note:
Onl y one executable exists; the difference between the
lite/full/local versions is determined by external parameters.
2.1. DEP/NMS LITE
Starting the DEP/NMS without the hardware licence USB dongle, launches the “Lite
version” of the application.
Figure 1: DEP/NMS Lite configuration
In this Lite version of DEP/NMS application, there is:
•
no remote C-ZAM/DEP;
•
limited management capability (maximum 5 DEP platforms);
•
no “Automatic Refresh”;
•
no access to the “Plug Ins” functionality;
Atos Worldline - Technology & Products / Engineering / DEP
DEP/NMS User Manual (04.04)
•
•
Page: 10/139
Classification: Public
no load in parallel functionalities (software & keys);
Cloning functionalities allowed for TEST platforms (max 5 platforms).
2.2. DEP/NMS FULL
Starting DEP/NMS on a standard PC with the hardware licence USB dongle, launches
the application in the “Full version”.
Figure 2: DEP/NMS Full configuration
In this version the full functionality is available:
•
remote C-ZAM/DEP;
•
unlimited DEP Platform management;
•
Automatic Refresh;
•
access to the “Plug Ins” functionality;
•
full access to load in parallel functionalities (software & keys);
•
full access to the Cloning functionalities.
Note:
The possibilit y to use the C-ZAM/DEP in remote mode will be
available from version 1.4.2 of the C-ZAM/DEP software.
2.3. DEP/NMS LOCAL
When the DEP/NMS application is started on a DEP/XP platform, the local platform
is automatically detected and appears in the platform list on the general window:
Atos Worldline - Technology & Products / Engineering / DEP
DEP/NMS User Manual (04.04)
Page: 11/139
Classification: Public
Figure 3
This version has limited functionality to avoid performance deterioration of the DEP
platform.
The limitations are the following:
•
Only the local platform can be managed.
•
The commands in the File (except Exit) and Edit menus are disabled.
Figure 4
Atos Worldline - Technology & Products / Engineering / DEP
DEP/NMS User Manual (04.04)
3.
Page: 12/139
Classification: Public
GETTING STARTED
3.1. INSTALLING THE APPLICATION
The installation procedure is described in detail in ANNEX A: INSTALLATION
PROCEDURE.
3.2. STARTING UP
To start DEP/NMS application execute the DEP_NMS.exe file which is in
<Installation directory>\... folder.
After installation, a desktop shortcut to this file is available as well as an entry in the
Windows Start menu.
3.3. PERFORMING INITIAL CONFIGURATION
When the DEP/NMS is started for the very first time or when it is restarted without a
configuration file being available, the main window of the application appears with no
client platforms in the list.
The General Settings dialog box automatically appears, giving the possibility to
define some initial settings for the DEP/NMS.
Figure 5
For more detailed information, refer to the section General Settings on page 116.
Once you have completed the General Settings, you can start adding DEP Platforms
to the configuration. Available DEP Crypto Modules are displayed sequentially.
The date and time of the last refresh is indicated in the status bar of the window.
Atos Worldline - Technology & Products / Engineering / DEP
DEP/NMS User Manual (04.04)
Page: 13/139
Classification: Public
Figure 6
Operations that you perform from within the DEP/NMS main window are carried out
on the selected DEP platform or DEP Crypto Module.
Warning:
If you perform an operation via a C-ZAM/DEP, it is carried out
onl y on the selected DEP Crypto Module. If none is selected, the
following error box will appear:
There are several different items for refreshing in the View menu; it will implement a
manual refresh of the whole content of the main window (See General Settings
section on page 116).
When a problem is encountered, the DEP/NMS alerts the Operator by means of a
modification in the columns Platform Status and Module Status. Alarms can pop up
while requesting the Status or as a result of various DEP/NMS functions with a bad
answer of the selected DEP platform or DEP Crypto Module. If an alarm is raised, the
icon changes and the corresponding line become red:
If the event manager TCP/IP address and port are defined, the error messages are also
sent to the corresponding machine (see DEP EM User Manual).
Atos Worldline - Technology & Products / Engineering / DEP
DEP/NMS User Manual (04.04)
Page: 14/139
Classification: Public
3.4. RESTARTING WITH CONFIGURATION DEFINED
When you (re)start DEP/NMS after having defined a configuration, the main window
of the application appears with the information as it has been specified in the
configuration file that was last used.
The File menu contains a list of the last five configuration files that have been opened
and/or edited. You can load a configuration file from that list by clicking it.
Figure 7
3.5. EXIT
To close the DEP/NMS application click on the Exit command in the File menu.
Before the application actually closes, the following operations may (have to) be
performed.
If the user has locked some platforms or modules, you have the opportunity to unlock
them. The Forced Unlock dialog box appears, containing the list of the locked items.
Select the items that you wish to unlock before exiting.
For more information about locking and unlocking items, refer to the section
Handling Platform Locking on page 37.
Atos Worldline - Technology & Products / Engineering / DEP
DEP/NMS User Manual (04.04)
Page: 15/139
Classification: Public
Additionally, if you have modified the configuration, the application displays a dialog
box that prompts you to save the modifications before exiting.
The properties of the DEP/NMS application and the last saved configuration will
automatically be used at the next start-up, except for the version installed on a
DEP/XP platform.
Atos Worldline - Technology & Products / Engineering / DEP
DEP/NMS User Manual (04.04)
4.
Page: 16/139
Classification: Public
HANDLING CONFIGURATION FILES
A configuration file contains information about a group of DEP Platforms and DEP
Crypto Modules that are to be managed at the same time by DEP/NMS. Configuration
files have an extension .CFG.
DEP/NMS can handle only one configuration at the time.
4.1. CREATING A NEW FILE
To create a configuration file, use the New function from the File menu. Also you can
click the
icon or use the equivalent Ctrl+N keyboard shortcut.
Doing so closes the current configuration, if any, empties the main window of the
application and opens a new empty configuration.
If you have modified the current configuration, you will be prompted to save the
changes, before the new configuration opens.
4.2. OPENING AN EXISTING CONFIGURATION FILE
To load an existing configuration file, use the Open function from the File menu.
Also you can click the
icon or use the equivalent Ctrl+O keyboard shortcut.
By default, for Windows 2000 and Windows XP the configuration files are saved in
the Configuration_files subfolder with “C:\Documents and
Settings\[USER]\Atos Worldline\DEP_NMS and DEP_EM” path, and for Windows
Vista and Windows 7 with “C:\Users\[USER]\Atos Worldline\DEP_NMS and
DEP_EM” respectively.
If the configuration file that you wish to open appears in the list of the five recently
opened files in the File menu, you can open it from there by clicking its name.
Atos Worldline - Technology & Products / Engineering / DEP
DEP/NMS User Manual (04.04)
Page: 17/139
Classification: Public
The Open dialog box appears with a list of the available DEP/NMS configuration
files, from which you can choose the appropriate one.
If you have modified the current configuration, you will be prompted to save the
changes, before the new configuration opens.
Depending on the size and the complexity of the configuration, loading the file may
take a few moments. Progress is shown on the Open configuration file message box.
If the chosen file is not a valid DEP/NMS configuration file, an error box appears to
inform that the configuration file is corrupted:
4.3. OPENING AND MERGING FILE
The DEP/NMS application allows to open and merge the configuration files. To open
and merge a configuration file, use the Open & Merge function from the File menu
or use the equivalent Ctrl+M keyboard shortcut.
Atos Worldline - Technology & Products / Engineering / DEP
DEP/NMS User Manual (04.04)
Page: 18/139
Classification: Public
The Open dialog box appears with a list of the available DEP/NMS configuration
files, from which you can choose the appropriate one.
Depending on the size and the complexity of the configuration, loading the file may
take a few moments. The Merge configuration file dialog box displays the progress:
If the chosen file is not a valid DEP/NMS configuration file, an error message appears
saying that the configuration file is corrupted:
To avoid duplicate platforms in the merged configuration, checks will be made in the
selected file, and duplicate platforms will be eliminated from the resulting
configuration.
4.4. CLOSING A FILE
You can do so using the Close function from the File menu.
After closure of the current file, a new empty configuration will automatically appear.
Atos Worldline - Technology & Products / Engineering / DEP
DEP/NMS User Manual (04.04)
Page: 19/139
Classification: Public
If you have modified the current configuration, you will be prompted to save the
changes before the new configuration opens.
4.5. SAVING A CONFIGURATION
To save a configuration, you can use the function Save from the File menu, click the
icon or use its equivalent keyboard shortcut Ctrl+S, or you can use the function
Save As or its corresponding icon
.
The function Save is to store the information about the current configuration in the
current configuration file.
Save As is to be used for a new configuration for which no file name has been
specified yet or to save an existing configuration in a file with a different name.
With the item Save As of the menu File, the user asks the DEP/NMS application to
save the actual configuration in another file than the current configuration file or it is a
new file.
The Save As dialog box prompts you for the name of the configuration file.
An SHA-1 hash is foreseen in order to have integrity of the data contained in the file.
Atos Worldline - Technology & Products / Engineering / DEP
DEP/NMS User Manual (04.04)
5.
Page: 20/139
Classification: Public
PROVIDING PLATFORM INFORMATION
The basic elements in a DEP/NMS configuration are the DEP platforms to be
managed. The functions to supply this information are in the Edit menu, under the
item Platform.
The three functions are disabled for the limited version installed on a DEP/XP
platform.
5.1. ADDING A PLATFORM
When you select the function Add or the
icon or the equivalent function key F7,
the Add platform dialog box appears. In this dialog box, you have to fill in the
necessary information for DEP/NMS to identify the platform and communicate with
it.
5.1.1. Identifying the platform
To identify a platform that you want to appear in the configuration in order to manage
it via DEP/NMS, you have to provide the following bits of information:
•
Symbolic name
The Symbolic name is the name by which the DEP platform will be identified in
the platform list of the DEP/NMS main window.
•
Name or IP Address
In the Name or IP address field, you can either specify the Host name or the IPaddress of the DEP platform.
•
Port
Atos Worldline - Technology & Products / Engineering / DEP
DEP/NMS User Manual (04.04)
Page: 21/139
Classification: Public
In this field, you have to supply the port that is to be used for the TCP/IP
communication between the DEP Platform and the DEP/NMS application.
The default value is 1001.
Warning:
The Port value specified here must correspond to the value
defined on the DEP Platform, otherwise the DEP/NMS cannot
connect to it.
5.1.2. Selecting Crypto Modules
To automatically detect the DEP Crypto Modules presenting on selected DEP
Platform click on the Search modules button. Clicking this button connects to the
DEP Platform and selects the DEP Crypto Modules that have been detected.
The status field at the bottom provides feedback about the connection to the platform.
To determine the modules you want to appear in the configuration tree on the
DEP/NMS main window, you have to select or deselect the modules accordingly.
The dialog box below illustrates a case where only the second DEP Crypto Module is
selected to be included in the configuration.
Atos Worldline - Technology & Products / Engineering / DEP
DEP/NMS User Manual (04.04)
Page: 22/139
Classification: Public
5.1.3. Updating the configuration
When you have made the proper selections, you can report them to the configuration
tree on the main window using either of the two buttons:
•
•
OK
If search was performed before, this updates the configuration information in the
main window and closes the dialog box. Otherwise detects all DEP Crypto
Modules that are present on the platform, updates the configuration information
in the main window and closes the dialog box.
Apply
This updates the configuration information in the main window without closing
the dialog box. This allows to add several platforms in a row.
If you do not want to update the configuration with the changes you have made, click
the Cancel button. In that case, the dialog box closes without performing any
changes.
5.2. MODIFYING PLATFORM INFORMATION
To modify the DEP Platform information that is already in the configuration select
Modify function in the Platform submenu in Edit menu. Also you can select the
icon or the equivalent function key F8. The Modify platform dialog box appears.
5.3. DELETING A PLATFORM FROM THE
CONFIGURATION
To remove a DEP Platform from the current configuration, select the Delete function
from the Platform submenu in the Edit menu or use the equivalent Delete key from
the keyboard.
A dialog box appears prompting you to confirm your operation.
Atos Worldline - Technology & Products / Engineering / DEP
DEP/NMS User Manual (04.04)
Page: 23/139
Classification: Public
If you press Yes, the platform and all Crypto Modules linked to it will be removed
from the configuration tree and the main window will automatically refreshed.
If you press No, the dialog box will be closed without any changes.
5.4. PLATFORMS ORDER
To change the order of platforms in grid, select the Order function in the Platform
submenu in Edit menu.
A dialog box appears allowing you to perform this operation.
All the DEP Platforms of configuration are listed in the Platforms list. To change the
DEP Platforms position in the list select any of them and click Up or Down buttons to
up and down its position.
To confirm the new order of DEP Platforms click OK, otherwise simply click Cancel.
Atos Worldline - Technology & Products / Engineering / DEP
DEP/NMS User Manual (04.04)
6.
Page: 24/139
Classification: Public
THE VIEW MENU
The View menu contains functions that allow to determine the information being
present in the main window.
The View menu contains the following functions:
•
•
•
•
Refresh All and Refresh Item to refresh the contents of the main window,
globally or for a specific item;
Audit Trail to open Audit Trail window;
Status Bar to display/hide the status bar;
Toolbar to display/hide the toolbar or view the audit trail.
6.1. REFRESHING THE INFORMATION
6.1.1. Refreshing window globally
With the function Refresh All from the View menu or with the corresponding
function key F5, you can refresh in one go the information about all the DEP
Platforms and their respective DEP Crypto Modules listed in the DEP/NMS main
window.
6.1.2. Refreshing Item
With the function Refresh Item from the View menu or with the corresponding
function key F6, you can refresh the information about the selected DEP Platform or
DEP Crypto Module.
6.2. VIEWING THE AUDIT TRAIL
With the function Audit Trail from the View menu or the corresponding function key
F4, you can view the audit trail.
Atos Worldline - Technology & Products / Engineering / DEP
DEP/NMS User Manual (04.04)
Page: 25/139
Classification: Public
The function opens Windows Event Viewer window. In addition to the standard
Windows events, the window presents the logging of:
•
actions on the DEP/NMS itself (DEP_NMS Log),
•
any kind of warnings, errors, alarms,...that occurred (DEP_NMS_EM Log).
In the Event Viewer (Local) tree, there are two entries related to DEP/NMS:
•
•
DEP_NMS Log, which refers to the events that remain on the PC where the
DEP/NMS application is running;
DEP_NMS_EM Log, which refers to the events that are to be transmitted via
TCP/IP to the PC where the DEP/EM application is running.
For every event, the following bits of information are recorded in the event log file of
the PC where the DEP/NMS application is running:
•
•
•
•
date and time of the event or the operation;
source of the event or the operation (DEP/NMS);
type of the event: information - warning – error;
description: short explanation of the event or the operation (for example. settings
configuration of the DEP Platform, unlocking of DEP Platform or DEP Crypto
Module,…).
Atos Worldline - Technology & Products / Engineering / DEP
DEP/NMS User Manual (04.04)
Page: 26/139
Classification: Public
For a detailed list of operations that are logged, refer to the ANNEX c: audit trail
Operations and events:
With the function Save Log File As from the Action menu of the Windows Event
Viewer, you can store the data of the event log file into an ASCII file.
6.3. SHOWING/HIDING THE STATUS BAR
To show or hide the status bar at the bottom of the main menu respectively
select/deselect the Status Bar option in View menu.
From left to right, the status bar contains the following bits of information:
•
Status of the connection of the DEP/NMS to its DEP/EM ( for more information
about DEP/EM refer to the DEP/EM User Manual);
•
The date/time of the last refresh all (manual or automatic);
•
Caps Lock activated;
•
Num Lock activated;
•
Scroll Lock activated;
•
Status of security level of the DEP/NMS (see the specific chapter 10.2 for more
information).
Atos Worldline - Technology & Products / Engineering / DEP
DEP/NMS User Manual (04.04)
Page: 27/139
Classification: Public
6.4. SHOWING/HIDING THE TOOLBAR
To show or hide the toolbar underneath the menu bar in main window respectively
select/deselect the Toolbar option in View menu.
The table below gives an overview of the icons and their meaning:
Icon
Meaning
Create a new configuration
Open an existing configuration
Save configuration
Save as configuration
Add DEP platform
Modify DEP Platform
DEP Platform status
DEP Crypto Module status
Load application
End application
Backup keys
Restore keys
Open the help file for the DEP/NMS application
Upon hovering an icon, a tooltip displays the name of the function that is behind it. At
the same time, some additional information is provided at the left side of the status
bar.
Atos Worldline - Technology & Products / Engineering / DEP
DEP/NMS User Manual (04.04)
7.
Page: 28/139
Classification: Public
MANAGING DEP PLATFORMS
To obtain information about a DEP Platform or carry out an operation, you need to
select the DEP Platform from the configuration tree in the main window. To select the
DEP Platform click on the line with appropriate DEP Platform.
The functions that you can apply to a platform can be accessed in any of the following
ways:
•
•
•
•
via the DEP platform menu
via the context menu that opens when you right-click the platform
via an icon on the toolbar
via a shortcut key (refer to ANNEX B: Function keys and shortcuts on page
138).
In the table presented on the DEP/NMS main window, the information related to the
DEP platforms is in the columns entitled:
•
Security
•
Platform status
•
Trace
•
Statistics
•
TCP/IP address or name
7.1. HANDLING PLATFORM STATUS INFORMATION
7.1.1. Requesting status information
To open the DEP Platform’s status information dialog-box select the appropriate DEP
Platform and choose Status item from DEP Platform menu or press the F2 function
key.
The Platform Status window appears, comprising multiple tab sheets, each providing
information and/or parameters related to a specific aspect.
Atos Worldline - Technology & Products / Engineering / DEP
DEP/NMS User Manual (04.04)
Page: 29/139
Classification: Public
7.1.2. Interpreting the platform status information
7.1.2.1. Status tab sheet
The Status tab sheet contains the following items:
Item
Name
Symbolic Name
Address
Port
Status
Trace
Statistics
Total Opened connections
Total Messages sent
Total Messages received
Number of installed modules
Meaning
The TCP/IP name used by the DEP platform on the
LAN
The name used to represent the DEP platform
The TCP/IP address of the DEP platform on the
LAN
The TCP/IP port of the DEP platform on the LAN
for the messages with the DEP/NMS
−
locked: platform is locked by another user
−
unlocked
−
On: trace facility on the platform is active
−
Off: trace facility on the platform is not active
−
On: statistics facility on the platform is active
−
Off: statistics facility on the platform is not
active
The number of opened connections
The total number of messages sent by the DEP
platform
gives the total number of messages received by the
DEP platform
The number of the installed DEP Crypto Modules in
Atos Worldline - Technology & Products / Engineering / DEP
DEP/NMS User Manual (04.04)
Version software
Host listener
Type
Page: 30/139
Classification: Public
the DEP platform; it may differ from the number of
managed DEP Crypto Modules
The version of software that lies on the DEP
platform
Indicates whether the DEP platform is ready for
listening to the hosts
The type of DEP platform (DEP/T6, DEP/XP)
7.1.3. Saving status information
You can save the status information into a text file. Click the Save... button on
Platform Status window and supply the name of the destination file in the Save As
dialog box.
The filename presented by default is:
•
•
PlatformConfiguration.txt if status data is saved for the first time;
the name of the status file that was last used if status data has already been
saved.
If the file already exists, DEP/NMS requests confirmation to overwrite it.
By default, the status files are saved in the Data_files subfolder with path
“C:\Documents and Settings\[USER]\Atos Worldline\DEP_NMS and DEP_EM”
for Windows 2000 and Windows XP, and “C:\Users\[USER]\Atos
Worldline\DEP_NMS and DEP_EM” for Windows Vista and Windows 7 respectively.
7.1.4. Modifying parameters
In addition to presenting the status information, the “Platform status” window also
lets you change certain parameters.
Depending on the button that you press, the application behaves in a different way:
•
OK: all data are updated for the selected DEP platform and the dialog box closes;
•
Apply: all data are updated for the selected platform but the dialog box does not
close;
•
Cancel: data are not modified and the dialog box closes.
Atos Worldline - Technology & Products / Engineering / DEP
DEP/NMS User Manual (04.04)
Page: 31/139
Classification: Public
Remark:
When the platform is unlocked it is not possible to change
parameters and “Read onl y” is displayed in the title bar of the
window.
7.1.4.1. Connections
This tab sheet contains information about the connections between the hosts and the
DEP Platform.
The Connections tab sheet presents the list of open and closed connections. To easily
notice the open connections in the list, these are displayed in blue.
For each connection, the following information is presented:
Item
Host name
Host address
Sent
Received
Start time
Meaning
−
Hostname: name found by a DNS service
− ”-”: if no name has been found or disabled in the
configure communication protocol data
IP-address of the host connected. “-”: if Resolving
hostname is enabled in the configuration of
communication protocol data and hostname was
found by a DNS service
Total number of messages sent via the connection
(from open until close)
Total number of messages received via the
connection (from open until close)
Start date/time of connection
Atos Worldline - Technology & Products / Engineering / DEP
DEP/NMS User Manual (04.04)
End time
Page: 32/139
Classification: Public
End date/time of connection; this information is only
present for old connections (open connections have
the “-“ symbol printed)
Remarks:
1. The connections shown are onl y those for the host, not the one
(or those) opened b y DEP/NMS.
2. If the platform works in PDP, this will lead to an empt y list.
With the Refresh button or with the corresponding function key F5, you can perform
a manual refresh of the contents of the lists.
7.1.4.2. Host Protocol
On the Host protocol tab sheet, you can define the host protocol and set its
parameters used for communication between the hosts and the DEP Platform.
Warning:
The DEP Platform must be locked for this operation.
Two different protocols are available:
•
PDP
•
TCP/IP
Refer to the section below for detailed information about both protocols.
Atos Worldline - Technology & Products / Engineering / DEP
DEP/NMS User Manual (04.04)
Page: 33/139
Classification: Public
For each of the two protocols you can define various parameters. DEP/NMS stores
this information for each DEP Platform.
With regard to the settings, different operations are possible, Depending on the button
that you press:
•
Save: Stores the information of the user into the configuration file, in order to
quickly configure other platforms;
•
Restore: To retrieve the information saved during the save operation;
•
Defaults: Sets the fields to the default factory values coming from the DEP
platform.
7.1.4.3. Setting PDP parameters
PDP is an asynchronous protocol that is used to communicate with the DEP Platform
through a serial communication port of the PC.
The following parameters could be set:
Parameter
COM port
Meaning
Defines the serial communication
port of the DEP Platform that is
used for its communication
Default value
1
Note: For the DEP/T6,
this field is read-only
and fixed at a value of
2
The inter-character time-out 20 milliseconds
parameter in milliseconds that
defines the maximum delay
between two characters of the
message
Defines the check value that is CRC
used in the PDP protocol: CRC or
LRC
Defines the communication speed 9600
used for the DEP platform
communication; it ranges from
4800 to 115200 baud
I.C.T
Check value
Baud rate
7.1.4.4. TCP/IP
The standard TCP/IP protocol could also be used for establishing communication with
the DEP Platform.
Multiple TCP/IP sessions, up to a maximum of 16, could be established in parallel
between the DEP Platform and a host, called multi-connect DEP Platform.
The parameters for the TCP/IP protocol are:
Parameter
Name resolving
Meaning
Default value
Flag that indicates whether or not the Disabled
DEP Platform should use a DNS
Atos Worldline - Technology & Products / Engineering / DEP
DEP/NMS User Manual (04.04)
Alive
Application message
type
Application message
length
Port number
Int (sec)
Time (min)
Page: 34/139
Classification: Public
(Dynamic Name Solving) service to
lookup the hostname
Flag that indicates whether the DEP
Platform should use keep-alive
messages to check if the host is still
alive
Determines
where
the
Most
Significant Byte (MSB) and the
Least Significant Byte (LSB)
convention is used, it is limited to the
values LSBFirst and MSBFirst
Gives the length in bytes of the
message sent through TCP/IP; it is
limited to the values 2 and 4
should be defined to gain access to
the DEP Platform
Deactivated
---
---
1000
Warnings:
1. Do not use 1001 or 1002, since
these are used as the default values
for the communication between
respectively DEP Platform and
DEP/NMS and DEP Platform to
DEP/EM for the transfer of
commands or the handling of errors
or warnings
2. For the DEP/T6, this field is
read-only and fixed at a value of
2
Defines the interval (in seconds)
5 seconds
used for sending periodical alive
messages
Specifies the time-interval (in
2 minutes
minutes) of inactivity before alive
messages are exchanged
When the alive flag is disabled, the DEP Platform does not verify whether the host is
still connected.
In case the alive flag is enabled and there is no communication within a time interval
of <Time> minutes, the DEP Platform sends every <Int> seconds an alive message to
check the availability of the host. When the host does not respond the alive message
after three retries, the DEP Platform breaks off the TCP/IP connection so that the host
could possibly reconnect to the DEP Platform (no lost of connections).
7.1.4.5. Application Protocol
On this tab sheet you can set the parameters for the application protocol.
Warning:
The DEP Platform must be locked for this operation.
Atos Worldline - Technology & Products / Engineering / DEP
DEP/NMS User Manual (04.04)
Page: 35/139
Classification: Public
The following parameters can be set:
Parameter
Sequence Number
Length
Magic Number
Value
Meaning
Default value
Indicates the number of bytes 0
(decimal representation) occupied by
the host sequence number; value
ranges from 0 to 16
Note:
This feature is not available if
enhanced protocol is used
Identifies a host command as using a FE
dedicated DEP Platform protocol and
occupies the first byte(s) of a host
command
DEP/NMS stores this information for each DEP Platform in the configuration file.
With regard to the settings, different operations are possible, depending on the button
that you press:
•
Save: Stores the information of the user into the configuration file, in order to
quickly configure other platforms
•
Restore: To retrieve the information saved during the save operation
•
Defaults: Sets the fields to the default factory values coming from the DEP
Platform
For more detailed information on the Application Protocol, refer to the DEP Host
Interface Protocol document.
Atos Worldline - Technology & Products / Engineering / DEP
DEP/NMS User Manual (04.04)
Page: 36/139
Classification: Public
7.1.4.6. Platform Date/Time
The Date/Time tab sheet shows the Date/Time defined on the DEP Platform:
Here, you can change the date and /or the time of the DEP Platform.
It is also possible to adjust at the same time the Real Time Clock of the managed DEP
Crypto Modules of the selected DEP Platform. However, for doing so, you must make
sure that the DEP Crypto Modules have the capability CAP_STD_SET_RTC
activated.
7.1.4.7. Event Manager
Event Manager tab sheet shows information concerning the event manager that is
connected to the DEP Platform.
Atos Worldline - Technology & Products / Engineering / DEP
DEP/NMS User Manual (04.04)
Page: 37/139
Classification: Public
The DEP Platform uses this information to send events (information, warning, errors)
to the DEP/EM application that will listen to the specified IP-address and port.
If the fields are not filled in or no application is listening, the events are kept locally.
The list of information is the following:
Parameter
Event Manager name or
IP address
Event Manager port
Connected
Meaning
Gives the address or name of the DEP/EM
for the selected DEP Platform
Gives the port of the DEP/EM for the
concerned DEP Platform
Indicates if the Event Manager is effectively
connected to the DEP Platform
To force the DEP Platform to connect to the Event Manager in case it is locked, select
the option Connect to the DEP/EM and click OK or Apply.
Warning:
Do not use “localhost” as the value for the Name of the Event
Manager, because the information is sent to the platform and will
be used locally as address for its own Event Manager address.
7.2. HANDLING PLATFORM LOCKING
Multiple DEP/NMS application instances can have the same DEP Platforms in their
configuration. A user can decide to lock the platform, thus reserving it all to himself.
Atos Worldline - Technology & Products / Engineering / DEP
DEP/NMS User Manual (04.04)
Page: 38/139
Classification: Public
The Locking menu presents functions to control the locks on a platform. The
submenu offers the following functions:
•
Lock
•
Unlock
•
Forced Unlock
If one of the functions has been executed, the status of the DEP platform in the main
window is automatically updated.
7.2.1. Lock
The Lock function lets you reserve the DEP Platform exclusively to yourself. This
prevents other hosts or DEP/NMS instances from accessing it and performing specific
operations on it.
When a DEP Platform is locked, all its DEP Crypto Modules are also locked.
The status of the DEP Platform in the main window is now Locked.
7.2.2. Unlock
The function Unlock lets you free the DEP Platform in order to allow hosts or other
DEP/NMS instances to access it again.
When a DEP Platform is unlocked, all its DEP Crypto Modules are also unlocked.
The status of the DEP platform in the main window is now Unlocked.
Unlocking a DEP Platform implies unlocking of all its DEP Crypto Modules.
7.2.3. Forced Unlock
With the Forced Unlock function, you can unlock a DEP Platform that has been
locked by another DEP/NMS instance. The DEP Platform is locked by another user.
Before the platform is unlocked, you are prompted for confirmation.
Atos Worldline - Technology & Products / Engineering / DEP
DEP/NMS User Manual (04.04)
Page: 39/139
Classification: Public
When a DEP Platform is forced unlocked, all its DEP Crypto Modules are also forced
unlocked.
The status of the DEP Platform in the main window is now Unlocked.
After that, you can lock the DEP Platform.
7.3. HANDLING TRACES
A DEP Platform can trace the messages that are exchanged between the DEP Platform
and the hosts.
The Trace menu offers functions to manage the tracing feature. The following
functions appear in the submenu:
•
Start
•
Stop
•
Get Trace File
By default, the trace functionality is disabled.
At the start, the trace file is stored on the DEP Platform, but it can be copied
subsequently to the DEP/NMS.
7.3.1. Activating the logging
Use the function Start from the Trace submenu to start the trace utility and log the
messages exchanged between DEP Platform and host.
The status of the trace utility of the selected DEP Platform on the DEP/NMS switches
to On.
Note:
The trace of messages depends on the activation of the capabilit y
CAP_STD_TRACE in the DEP Crypto Module(s) of the DEP
Platform.
7.3.2. Stopping the logging
Use the Stop function to stop the trace utility. The status of the trace utility of the
selected DEP Platform on the DEP/NMS is switched to Off.
Atos Worldline - Technology & Products / Engineering / DEP
DEP/NMS User Manual (04.04)
Page: 40/139
Classification: Public
7.3.3. Getting the trace file
Select the Get Trace File function from the Trace submenu if you want to obtain a
local copy of the trace file that has been stored on the DEP Platform.
Before you can get a trace, you must stop the tracing.
When you select the function, a Save As dialog box appears, in which you specify the
path and name of the logging file on the DEP/NMS.
The filename presented by default is:
•
Trace.txt if trace data is saved for the first time
•
the name of the trace file that was last used if trace data has been saved before
If the file already exists, DEP/NMS requests confirmation to overwrite it.
By default, the status files are saved in the Data_files subfolder with path
“C:\Documents and Settings\[USER]\Atos Worldline\DEP_NMS and DEP_EM”
for Windows 2000 and Windows XP, and “C:\Users\[USER]\Atos
Worldline\DEP_NMS and DEP_EM” for Windows Vista and Windows 7 respectively.
When you have specified the name and location of the file, DEP/NMS starts copying
the trace file from the DEP Platform.
The Getting trace file dialog box informs you about the progress of the operation.
A normal trace file (after stopping the trace facility) has the following layout:
000000690 001048576
TRACE CREATED
Atos Worldline - Technology & Products / Engineering / DEP
DEP/NMS User Manual (04.04)
Page: 41/139
Classification: Public
22/03/2007 13:33:43.348 status=snd_host log=01 hst_msg_vers=0x30 serv_addr=0x01
int_msg_nr=0x00
arrival=0768374874 DEParture=0768374924 delta=0000000050
HST_CMD len=000017fe30010000ff0100010000051122334455
HST_RSP len=000006fe3001010000
22/03/2007 13:34:41.272 status=snd_host log=01 hst_msg_vers=0x30 serv_addr=0x01
int_msg_nr=0x01
arrival=0768432837 DEParture=0768432848 delta=0000000011
HST_CMD
len=000084fe30010000ff0125040000000003012502000e8b012508000018810004398927638200020
6658400038f47f4830003a7f34c0125090001012503000802250200022505000225030001250a000125
000001250b00
HST_RSP len=000015fe30010100f00225020003003c0001
TRACE DISABLED
The first line of every trace file contains the current trace position (000005365) and
the maximal length (000008192) of the trace file. Both values are presented in bytes.
They are kept and used for internal management of the trace file, especially for the
cyclic property of the file.
When the trace facility wasn’t stopped until after capture, a trace file has the
following layout:
TRACE CREATED
22/03/2007 13:33:43.348 status=snd_host log=01 hst_msg_vers=0x30 serv_addr=0x01
int_msg_nr=0x00
arrival=0768374874 DEParture=0768374924 delta=0000000050
HST_CMD len=000017fe30010000ff0100010000051122334455
HST_RSP len=000006fe3001010000
22/03/2007 13:34:41.272 status=snd_host log=01 hst_msg_vers=0x30 serv_addr=0x01
int_msg_nr=0x01
arrival=0768432837 DEParture=0768432848 delta=0000000011
HST_CMD
len=000084fe30010000ff0125040000000003012502000e8b012508000018810004398927638200020
6658400038f47f4830003a7f34c0125090001012503000802250200022505000225030001250a000125
000001250b00
HST_RSP len=000015fe30010100f00225020003003c0001
The statements TRACE CREATED and TRACE DISABLED refer to the moments
when the trace facility was started and stopped respectively.
Every record contains the information about a specific message exchanged between
the host and DEP Platform.
•
the date (22/02/2000) and time (14:12:19.988) express the registration
date of the trace record
•
status=snd_host indicates that the message comes from the host
•
log=01 indicates that the logging is allowed because of presence of the
CAP_STD_TRACE capability (00 means that tracing is not allowed)
•
hst_msg_vers=0x20 defines the version number of the internal messages
composition (only used for internal management)
•
serv_addr=0x01 indicates the server address (only used for internal
management)
•
int_msg_nr=0x08 is an internal message numbering of the treated messages
and can vary between 0x00 and 0x0F (only used for internal management)
•
arrival=0002425978 gives the time (in ticks) the host handler received the
command message
Atos Worldline - Technology & Products / Engineering / DEP
DEP/NMS User Manual (04.04)
•
•
•
•
Page: 42/139
Classification: Public
departure=0002425998 gives the time (in ticks) the host handler received
the response message
delta=0000000020 indicates the processing time (in ticks) and is the
difference between the DEParture and the arrival
the HST_CMD part is the logging of the received command message
− len=000680 (decimal) defines the length of the received command
message in bytes
− ff 01 13 03 00 … 01 13 04 00 is the hexadecimal
representation of the trace of the received command message (only
available when the log equals 01)
the HST_RSP part is the logging of the returned response message
− len=000009 (decimal) defines the length of the replied message in
bytes
− 00 01 13 04 00 b1 a1 21 bd is the hexadecimal representation
of the trace of the response message (only available when the log
equals 01)
As mentioned before, the trace file is a cyclic file. When the maximum length of the
file has been reached, the logging continues at the beginning of the file, thus
overwriting the oldest data in the file.
Below is a sample of a trace file that has started cycling. When the trace facility has
been stopped before consulting the trace file, the last record could easily be found by
searching for the words TRACE DISABLED.
22/03/2007 13:59:59.625 status=snd_host log=01 hst_msg_vers=0x30 serv_addr=0x01
int_msg_nr=0x35
arrival=0769951171 DEParture=0769951201 delta=0000000030
HST_CMD
len=001035fe3001000f0700000000000000000000000032dfff0100010003e8b24afcd6d5fd3613972
d03e4b8e41bf54ed12de4af4c0bb102bfba26fd5a61f4b7731ab265bd16ceb3b379c80005080877c774
cdd2cbd54142f9ae9d9575b95ced099be64c02bf203cd6231becf902280a316d92226c235dcd7a432f4
d61c6aef00e58ba60f6a2d5169a34088c9de0fe54f6877d190cf86128b67e8bb7bd4025de1981addc0a
c2d9a83634de5520ee3af63e908f729ce7fe4cd93ace2959d722e8e599af0fb0256e7d47ef4d2e085ef
ec356cf2b3f739ce666d0031fcc3e9c6b767224a6ab01260b448c333db40de272d5e05a2795090241e8
3c7b1520c5b6d862014f1a89185558122a75b8650a844f87cfc05f3d2c6b8b7795786c348ede769b0b0
86ac24485535d582c2c96425e258a1ef102b3ce3b25fdf40425f06ab3d4413ae276d538ec4f71b3f32b
0f38b2269238e19438432d00a7879b74bd50579afd9c926346dda7a13d0afbbc8c95649ad7b009ace11
62c47d69fc1f119daf09e6876f57b1a4e7423c54258d87c442aeab77ab55448f48b4340e47a48e65828
fd803e383b5eea36b25fe29fee23883305a1afe7ac380fae85ce6fcf8a29baad39999fdd856f64e4906
8468e9159c4fddfaa8c9228937b3ee1ad3d00eb4d0991f718997c5de1a5e943ee6f04c5fac01dbed9c2
207ebec3498e3fc1ece2c0bf1b1eb78d001ccbc8d575b5217487477a6b2c6c360d8b21c40fc839d23a5
d7339c4cb76c3b651262b7b2344e23753a20122e91301299c8970e63f7438232c7c6a7a708636f1dc64
74f280073027bdc3fbb417b2707915082b97a62e220692057a01b17da579b22598a410ddeb249ab7efa
5fd6134669fc24f1e36c9027338cb92ed87f773273d41b4018da9e582248dda0b066d326d325fab9e49
f98d60ba9260891ef2173aeaf3270dd6e3a9b9aaca0dd42076635e007d5eab7098afd7197ec8a3b7cf3
c15b99a95bd4df6a093cf14dc903e61444d8b3d80de8fd37445b8bac06d18c5e16f92b8f57e36c2acf2
67781fe2a73655736bc4c9349c2b7f3de1e3a2fe28cf6921eb4552ce8b49cf37be0693a4e5619d8e8aa
9e6ff053746a39efb2dff05cb2a7c247a1c910bd344ccf242a900c872033c29abda8468efe291a1d8e3
1e3ffce1c04d98f7ed06fcc47be5e3b567525f06a4b9dadabb9a6163756df42b5e3ac69bd53b41da1ef
463f1355dd5706dda1f451ee35b8f52b21d49d05cdd2f1411069c86678cc0c38d4bfd3c7559e50ada0e
9616a1c696c91bba3aa938448edcee9a3b0140543acfcfdc03188ac2265b12de017c24da12574611120
8f3601a5214c353d9b527c929eca0cc865fe7b7bfa3521546dd8538d4277f1d4cf08ada995718e384dc
98674c5a78e9839ba551ebc59231dd653e913dd436ad05982048e780332d1cdf9f3eb7e202000900010
00200
HST_RSP
len=001027fe3001010f0700000000000000000000000032df000100020003e8b24afcd6d5fd3613972
d03e4b8e41bf54ed12de4af4c0bb102bfba26fd5a61f4b7731ab265bd16ceb3b379c80005080877c774
cdd2cbd54142f9ae9d9575b95ced099be64c02bf203cd6231becf902280a316d92226c235dcd7a432f4
d61c6aef00e58ba60f6a2d5169a34088c9de0fe54f6877d190cf86128b67e8bb7bd4025de1981addc0a
c2d9a83634de5520ee3af63e908f729ce7fe4cd93ace2959d722e8e599af0fb0256e7d47ef4d2e085ef
Atos Worldline - Technology & Products / Engineering / DEP
DEP/NMS User Manual (04.04)
Page: 43/139
Classification: Public
ec356cf2b3f739ce666d0031fcc3e9c6b767224a6ab01260b448c333db40de272d5e05a2795090241e8
3c7b1520c5b6d862014f1a89185558122a75b8650a844f87cfc05f3d2c6b8b7795786c348ede769b0b0
86ac24485535d582c2c96425e258a1ef102b3ce3b25fdf40425f06ab3d4413ae276d538ec4f71b3f32b
0f38b2269238e19438432d00a7879b74bd50579afd9c926346dda7a13d0afbbc8c95649ad7b009ace11
62c47d69fc1f119daf09e6876f57b1a4e7423c54258d87c442aeab77ab55448f48b4340e47a48e65828
fd803e383b5eea36b25fe29fee23883305a1afe7ac380fae85ce6fcf8a29baad39999fdd856f64e4906
8468e9159c4fddfaa8c9228937b3ee1ad3d00eb4d0991f718997c5de1a5e943ee6f04c5fac01dbed9c2
207ebec3498e3fc1ece2c0bf1b1eb78d001ccbc8d575b5217487477a6b2c6c360d8b21c40fc839d23a5
d7339c4cb76c3b651262b7b2344e23753a20122e91301299c8970e63f7438232c7c6a7a708636f1dc64
74f280073027bdc3fbb417b2707915082b97a62e220692057a01b17da579b22598a410ddeb249ab7efa
5fd6134669fc24f1e36c9027338cb92ed87f773273d41b4018da9e582248dda0b066d326d325fab9e49
f98d60ba9260891ef2173aeaf3270dd6e3a9b9aaca0dd42076635e007d5eab7098afd7197ec8a3b7cf3
c15b99a95bd4df6a093cf14dc903e61444d8b3d80de8fd37445b8bac06d18c5e16f92b8f57e36c2acf2
67781fe2a73655736bc4c9349c2b7f3de1e3a2fe28cf6921eb4552ce8b49cf37be0693a4e5619d8e8aa
9e6ff053746a39efb2dff05cb2a7c247a1c910bd344ccf242a900c872033c29abda8468efe291a1d8e3
1e3ffce1c04d98f7ed06fcc47be5e3b567525f06a4b9dadabb9a6163756df42b5e3ac69bd53b41da1ef
463f1355dd5706dda1f451ee35b8f52b21d49d05cdd2f1411069c86678cc0c38d4bfd3c7559e50ada0e
9616a1c696c91bba3aa938448edcee9a3b0140543acfcfdc03188ac2265b12de017c24da12574611120
8f3601a5214c353d9b527c929eca0cc865fe7b7bfa3521546dd8538d4277f1d4cf08ada995718e384dc
98674c5a78e9839ba551ebc59231dd653e913dd436ad05982048e780332d1cdf9f3eb7e2
TRACE DISABLED
:58.183 status=snd_host log=01 hst_msg_vers=0x30 serv_addr=0x01 int_msg_nr=0x3d
arrival=0769949719 DEParture=0769949759 delta=0000000040
HST_CMD
len=001035fe3001000f0500000000000000000000000032f5ff0100010003e8b24afcd6d5fd3613972
d03e4b8e41bf54ed12de4af4c0bb102bfba26fd5a61f4b7731ab265bd16ceb3b379c80005080877c774
cdd2cbd54142f9ae9d9575b95ced099be64c02bf203cd6231becf902280a316d92226c235dcd7a432f4
d61c6aef00e58ba60f6a2d5169a34088c9de0fe54f6877d190cf86128b67e8bb7bd4025de1981addc0a
c2d9a83634de5520ee3af63e908f729ce7fe4cd93ace2959d722e8e599af0fb0256e7d47ef4d2e085ef
ec356cf2b3f739ce666d0031fcc3e9c6b767224a6ab01260b448c333db40de272d5e05a2795090241e8
3c7b1520c5b6d862014f1a89185558122a75b8650a844f87cfc05f3d2c6b8b7795786c348ede769b0b0
86ac24485535d582c2c96425e258a1ef102b3ce3b25fdf40425f06ab3d4413ae276d538ec4f71b3f32b
0f38b2269238e19438432d00a7879b74bd50579afd9c926346dda7a13d0afbbc8c95649ad7b009ace11
62c47d69fc1f119daf09e6876f57b1a4e7423c54258d87c442aeab77ab55448f48b4340e47a48e65828
fd803e383b5eea36b25fe29fee23883305a1afe7ac380fae85ce6fcf8a29baad39999fdd856f64e4906
8468e9159c4fddfaa8c9228937b3ee1ad3d00eb4d0991f718997c5de1a5e943ee6f04c5fac01dbed9c2
207ebec3498e3fc1ece2c0bf1b1eb78d001ccbc8d575b5217487477a6b2c6c360d8b21c40fc839d23a5
d7339c4cb76c3b651262b7b2344e23753a20122e91301299c8970e63f7438232c7c6a7a708636f1dc64
74f280073027bdc3fbb417b2707915082b97a62e220692057a01b17da579b22598a410ddeb249ab7efa
5fd6134669fc24f1e36c9027338cb92ed87f773273d41b4018da9e582248dda0b066d326d325fab9e49
f98d60ba9260891ef2173aeaf3270dd6e3a9b9aaca0dd42076635e007d5eab7098afd7197ec8a3b7cf3
c15b99a95bd4df6a093cf14dc903e61444d8b3d80de8fd37445b8bac06d18c5e16f92b8f57e36c2acf2
67781fe2a73655736bc4
…
The tracing is allowed only when CAP_STD_TRACE capability is activated in the
DEP Crypto Module(s) of the DEP.
In this case the trace file looks as follows:
000000690 001048576
TRACE CREATED
22/03/2007 13:33:43.348 status=snd_host log=00 hst_msg_vers=0x30 serv_addr=0x01
int_msg_nr=0x00
arrival=0768374874 departure=0768374924 delta=0000000050
HST_CMD len=000017
HST_RSP len=000006
22/03/2007 13:34:41.272 status=snd_host log=00 hst_msg_vers=0x30 serv_addr=0x01
int_msg_nr=0x01
arrival=0768432837 departure=0768432848 delta=0000000011
HST_CMD len=000084
HST_RSP len=000015
TRACE DISABLED
7.4. MANAGING STATISTICS
The DEP Platform can record statistics about the messages exchanged between the
DEP Platform and the hosts.
Atos Worldline - Technology & Products / Engineering / DEP
DEP/NMS User Manual (04.04)
Page: 44/139
Classification: Public
If you want to use this feature, you have to manually start the utility, as it is disabled
by default.
The Statistics menu contains the following functions:
•
Start
•
Stop
•
Get Statistics
Before you can consult the statistics, a statistics report must be written on the DEP
Platform first.
7.4.1. Starting the statistics utility
Use the function Start when you want to include all the messages exchanged between
DEP/NT and hosts in the statistics.
Only messages exchanged after the start of the utility are included in the statistics. In
the main window of DEP/NMS, the status of the statistics facility of the selected DEP
Platform is switched to On.
7.4.2. Stop the statistics utility
If you want to stop the statistics utility, select the function Stop from the Statistics
submenu. In the main window of DEP/NMS, the status of the statistics facility of the
selected DEP Platform is switched to Off.
7.4.3. Getting the statistics information
When you select this function, the Statistics dialog box appears, presenting a text
field with the latest information transferred from the DEP Platform to the DEP/NMS.
Atos Worldline - Technology & Products / Engineering / DEP
DEP/NMS User Manual (04.04)
Page: 45/139
Classification: Public
The table below gives an overview of the items that appear in the dialog box and their
meaning.
Item
Stat. printed
Stat. started
Stat. stopped
Record Time (ms)
Protocol Error
Counters
Message status
counters
Response Message
sent to Host
Message statistics
Average Command
Length
Average Response
Length
Average Dep
Processing Time
Meaning
Indicates that date and time the report is
generated and written in the zone
Defines when the statistics utility has been
started
Defines when the statistics utility has been
stopped if that has been the case
Shows the time-frame in milliseconds during
which the statistics were recorded
Gives a list of the protocol errors that were
detected and a counter that indicates the error
frequency
Indicates the number of messages that were
treated and lists some averages about those
messages:
Indicates the average length of the messages
sent by the DEP/NT to the DEP Crypto
Module;
Indicates the average length of the responses
sent from the DEP Crypto Module to the
DEP/NT;
Indicates the average time (in microseconds)
that the DEP Crypto Module needs for
processing the messages;
Atos Worldline - Technology & Products / Engineering / DEP
DEP/NMS User Manual (04.04)
Average Host
Transaction Rate
Page: 46/139
Classification: Public
Indicates the average number of messages per
second that the DEP Crypto Modules processed.
To save the statistical data locally in a file, click the Save button at the bottom of the
dialog box. A Save As dialog box will open to specify the path and name of the
statistics file.
The filename presented by default is:
•
Statistics.txt if statistical data is saved for the first time
•
the name of the statistics file that was last used if statistical data has been saved
before
If the file already exists, DEP/NMS requests confirmation to overwrite it.
By default, the status files are saved in the Data_files subfolder with path
“C:\Documents and Settings\[USER]\Atos Worldline\DEP_NMS and DEP_EM”
for Windows 2000 and XP, and “C:\Users\[USER]\Atos Worldline\DEP_NMS and
DEP_EM” for Windows Vista and Windows 7 respectively.
When you have specified the name and location of the file, DEP/NMS starts writing
the data to the local statistics file.
Warning:
The Statistics utilit y must be stopped before you can write the
data to a file.
Atos Worldline - Technology & Products / Engineering / DEP
DEP/NMS User Manual (04.04)
8.
Page: 47/139
Classification: Public
MANAGING DEP CRYPTO MODULES
To obtain information about a DEP Crypto Module or carry out an operation, you
need to select the DEP Crypto Module(s) from the configuration tree in the main
window. To select the DEP Crypto Module(s) click on the line(s) with appropriate
DEP Crypto Module(s).
The functions that you can apply to a DEP Crypto Module can be accessed in any of
the following ways:
•
•
•
•
via the DEP Crypto Module menu
via the context menu that opens when you right-click the platform
via an icon on the toolbar
via a shortcut key (refer to ANNEX B: Function keys and shortcuts on page
138).
8.1. HANDLING MODULE STATUS INFORMATION
8.1.1. Requesting status information
To open the DEP Crypto Module’s status information dialog-box select the
appropriate DEP Crypto Module and choose Status item from DEP Crypto Module
menu or press the F3 function key.
The Module Status window appears, presenting a tab sheet for each managed DEP
Crypto Module.
Atos Worldline - Technology & Products / Engineering / DEP
DEP/NMS User Manual (04.04)
Page: 48/139
Classification: Public
8.1.2. Interpreting module status information
The Module Status window contains the Configuration settings and Read only
settings of DEP Crypto Module.
The table below gives an overview of the read only settings and their meanings.
Item
Locking
Status
Keymac
Alarm status
Battery status
Serial number
Software active
Software boot
Software alarm
Software application
Configuration mode
Configuration authority
Meaning
Indicates whether the DEP Crypto Module is locked,
locked by another user or unlocked
Indicates whether the DEP Crypto Module is in
good mode or in fatal mode
Indicates the authentication code calculated over all
the keys:
between 00 00 00 00 and FF FF FF FF or
‘Not Available’)
Indicates the status of alarms
−
OK
−
Intrusion
−
Removal
−
Temperature
−
PIC
−
RAM
−
Motion
−
Battery
−
Vcc Off
Shows whether the battery is connected:
−
Connected
−
Not Connected
Gives the serial number of the DEP Crypto Module.
If this value does not correspond to the value
expected, a warning appears (See also the section
Automatic refresh on page 117)
Indicates what software is active:
−
Boot
−
Application
Shows the name and the version number of the
available boot software
Shows the name and the version of the available
alarm software
Shows the name and the version number of the
loaded application
Indicates in what mode the DEP Crypto Module is
configured:
−
Development
−
Test
−
Live
−
None
Shows the available authority level of the DEP
Crypto Module:
Atos Worldline - Technology & Products / Engineering / DEP
DEP/NMS User Manual (04.04)
Page: 49/139
Classification: Public
−
None
Banksys
−
Customer
Indicates the number of keys loaded
Indicates the number of capabilities loaded
Represents the unique identification number of the
customer
−
Keys
Capabilities
Customer ID
8.1.3. Saving status information
You can save the status information of the DEP Crypto Modules into a text file. Press
Save at the bottom of the Module status window. In the Save As dialog box that
appears, supply the name of the destination file.
The filename presented by default is:
ModulesConfiguration.txt if status data is saved for the first time
•
the name of the status file that was last used if status data has already been saved
•
If the file already exists, DEP/NMS requests confirmation to overwrite it.
By default, the status files are saved in the Data_files subfolder with path
“C:\Documents and Settings\[USER]\Atos Worldline\DEP_NMS and DEP_EM”
for Windows 2000 and XP, and “C:\Users\[USER]\Atos Worldline\DEP_NMS and
DEP_EM” for Windows Vista and Windows 7 respectively.
Atos Worldline - Technology & Products / Engineering / DEP
DEP/NMS User Manual (04.04)
Page: 50/139
Classification: Public
8.1.4. Modifying configuration settings
You can modify the configuration parameters that are in the upper part of the
window, related to the module configuration, if the module is in locked mode.
The table below gives an overview of the parameters, their meaning and their default
value.
Parameter
Host messages
Pool messages
Automatic recovery
period
Maximum response
time (in msec)
Meaning
If set, this attribute enables the DEP Crypto
Module to process command messages sent by
the host.
Otherwise, the module is able to process only
command messages generated by one of the
internal applications constituting the DEP
Platform system. This mode is enabled by
default.
If set, this attribute puts the DEP Crypto Module
in the pool of DEP Crypto Modules that are able
to process command messages sent to the DEP
POOL (device address = POOL);.
Otherwise, the DEP Crypto Module may process
only command messages explicitly sent to it
(enabled by default).
For more details, refer to the document DEP
Host Interface Protocol.
The amount of time that the DEP Handler waits
before trying to re-establish the communication
with a DEP Crypto Module that was in fatal
mode
The maximum amount of time that the DEP
Handler waits for a response message from the
DEP Crypto Module after the DEP Platform has
sent a message to the DEP Crypto Module. When
the DEP Crypto Module fails to respond within
Atos Worldline - Technology & Products / Engineering / DEP
DEP/NMS User Manual (04.04)
Date
Time
Message selection
algorithm
First In / First Out
Host Messages
First
Pool Messages
First
Page: 51/139
Classification: Public
the maximum response time allowed, the mode
of the DEP Crypto Module is automatically
changed to FATAL.
The default value is 5000 milliseconds, but for
long operations, such as RSA key generation, it
may be necessary to take a bigger value, for
example 120000 milliseconds.
The date of the DEP Crypto Module
The time of the DEP Crypto Module
Defines the priority of the different type of
command messages that could arrive
All command messages are processed in the
order they arrive (first command message that
arrives is treated first). This is the default value.
Priority is given to the command messages
coming from the host; the command messages
generated by other processes are treated when
there are no more host command messages to
process,
Priority is given to the command messages sent
to the POOL device address; the command
messages sent to the dedicated DEP Crypto
Module are treated when there are no more pool
messages to process.
With regard to the settings, different operations are possible, depending on the button
that you press:
•
Save: Stores the information of the user into the configuration file, in order to
quickly configure other DEP Crypto Modules
•
Restore: To retrieve the information saved during the save operation
•
Defaults: Sets the fields to the default factory values coming from the DEP
Crypto Module
Remark:
If the RTC (Real Time Clock) has never been set before, this
value is empt y. The Real Time Clock can onl y be set or modified
when the capabilit y CAP_STD_SET_RTC is available in the DEP
Crypto Module.
8.2. HANDLING CRYPTO MODULE LOCKING
Like DEP Platforms, DEP Crypto Modules can be accessible to multiple users at the
time. But a user may want to lock the module, thus reserving it exclusively to himself.
The Locking submenu in the DEP Crypto Module menu presents functions to
control the locks on a DEP Crypto Module.
The submenu offers the following functions:
•
Lock
•
Unlock
Atos Worldline - Technology & Products / Engineering / DEP
DEP/NMS User Manual (04.04)
•
Page: 52/139
Classification: Public
Forced Unlock
8.2.1. Lock
This function lets you lock the DEP Crypto Module, after which it is no longer
capable of processing command messages from the host.
The Status of the DEP Crypto Module on the DEP/NMS is changed to Locked.
8.2.2. Unlock
With this function you "free" the DEP Crypto Module, thus enabling it to process
command messages from the host.
The Status of the DEP Crypto Module on the DEP/NMS is changed to Unlocked.
8.2.3. Forced unlock
With this function, you can unlock a DEP Crypto Module that is already locked by
another DEP/NMS instance in order to lock it yourself, thus preventing access by, for
example, a host for commands or by another DEP/NMSs for modifications.
The status of the DEP Crypto Module in the main window is now Unlocked.
Before the DEP Crypto Module is unlocked, you are prompted for a confirmation.
After that, you can lock the DEP Crypto Module.
8.3. MANAGING APPLICATIONS
The Application submenu contains functions for loading and ending DEP Crypto
Module applications.
Atos Worldline - Technology & Products / Engineering / DEP
DEP/NMS User Manual (04.04)
Page: 53/139
Classification: Public
8.3.1. Loading application software on DEP Crypto
Module(s)
8.3.1.1. Starting the operation
Software loading operation allows loading DEP application software in one or more
DEP Crypto Modules. Operation can be done on each DEP Crypto Module
sequentially or on different DEP Crypto Modules of one or several DEP Platforms
simultaneously.
Select the Load function from the Application submenu or click the
icon on the
toolbar to load dedicated Application Software in selected DEP Crypto Module(s).
Warnings:
You must lock the DEP Crypto Module(s) before executing this
operation.
Simultaneous Application load operation for multiple selected
DEP Crypto Modules is possible on DEP Platform software with
version 4.0.0 or higher. Otherwise the following error box will
appear.
Loading of application software in more than one DEP Crypto
Modules is onl y available if you have the Hardware Licence USB
dongle.
Atos Worldline - Technology & Products / Engineering / DEP
DEP/NMS User Manual (04.04)
Page: 54/139
Classification: Public
The first phase of the Load operation consist of checking the three following
conditions:
•
Is the boot active?
The Crypto Module(s) status should read: Software active - Boot
•
Is the DEP Crypto Module(s) upgraded to CUST level?
•
Is the CAP_STD_SW_LOAD capability loaded in the DEP Crypto Module? For
detailed information on how to load the capability, refer to the DEP C-ZAM/DEP
User Manual.
If one of those conditions is not fulfilled, an information dialog box (see below)
appears with list of actions that user can take to bring DEP Crypto Module(s) to
Ready state.
For example if some of selected DEP Crypto Modules are not initialized at the good
level of authority or don’t have CAP_STD_SW_LOAD capability loaded the
following problems will occur:
While displaying the above information dialog box, application is doing background
check for state of DEP Crypto Modules enumerated in Problems Information list.
When one or more DEP Crypto Modules are brought to Ready state, Problems
Information list and General Information will be updated in the dialog box.
It is possible to select and remove one or more not ready modules from Problems
Information list.
Continue button will be enabled when in Problem Information list all DEP Crypto
Modules will be in Ready state. To terminate software loading process for all selected
DEP Crypto Modules click Cancel.
While loading application software in more than one DEP Crypto Module, additional
checks are made after initial checking phase.
All selected DEP Crypto Modules must be in the same mode (DEV, TST or LIV),
otherwise the following warning message box will appear.
Atos Worldline - Technology & Products / Engineering / DEP
DEP/NMS User Manual (04.04)
Page: 55/139
Classification: Public
All selected DEP Crypto Modules must have the same CUSTOMER ID, otherwise the
following warning message box will appear.
If the application is not PCI software, you are prompted for confirmation to continue
the loading.
8.3.1.2. Selecting the application
When all the DEP Crypto Modules are ready and the Continue button is enabled, you
should select the application you want to load on DEP Crypto Module. Select the
application software in opened Open dialog box and click Open.
The input file containing the Application Software must either be an:
•
Intel 16 bit HEX format (with HEX file extension)
Atos Worldline - Technology & Products / Engineering / DEP
DEP/NMS User Manual (04.04)
•
Page: 56/139
Classification: Public
encrypted Application Software file (with HEE file extension).
If you load an application for the first time, the path that is presented is
“C:\Documents and Settings\[USER]\Atos Worldline\DEP_NMS and
DEP_EM\Data_files” for Windows 2000 and Windows XP, and
“C:\Users\[USER]\Atos Worldline\DEP_NMS and DEP_EM\Data_files”
for
Windows Vista and Windows 7 respectively.
If applications have been loaded before, the name of the last application file is
presented.
8.3.1.3. Entering the certificate
After you have selected the Application Software, you have to enter the Software
Certificate, that is, the Software Authentication Code.
The SW Certificate can be found in the appropriate Software Authentication Code
File (.sac) that is delivered together with the Application Software.
In the Enter the Software Certificate dialog box fill in the correct SW Certificate
information.
By default, the Software Authentication Code that was last used is presented.
8.3.1.4. Monitoring the loading process
During the actual loading of the application, the Application load dialog box will
appear, displaying the progress of the process. It also displays the name of the
application that is being loaded.
If there is no ready DEP Crypto Module left during the loading process to proceed
with the load operation, the following error box appears, and the load process is
interrupted.
Atos Worldline - Technology & Products / Engineering / DEP
DEP/NMS User Manual (04.04)
Page: 57/139
Classification: Public
After pressing the OK button, the Application load report dialog appears with the
total number of successful and failed DEP module(s). For each failed DEP module(s)
there is a status line with the failure reason.
When multiple DEP Crypto Modules have been selected but not all of them are ready
to proceed with the loading operation during the loading process, the Application
load dialog box is expanded to show the status of the failed module(s).
At the end of the loading process, the software certificate is verified. If it is not a valid
certificate the following error box will appear:
If the application was successfully loaded at least on one DEP Crypto Module
successfully, it starts automatically:
Atos Worldline - Technology & Products / Engineering / DEP
DEP/NMS User Manual (04.04)
Page: 58/139
Classification: Public
If a DEP Crypto Module fails during the loading process, the Application load
report dialog will appear, showing the total successful and failed DEP Crypto
Module(s). For each failed DEP module there is status line with failure reason.
In the DEP/NMS main window information concerning the selected DEP Crypto
Module(s) is automatically refreshed.
The following fields will be updated:
•
Software: displays the name and version number of the application loaded
•
Keymac: initialized with 00 00 00 00
•
Mode
•
Authority
•
Serial Number: displays the serial number of the DEP Crypto Module.
8.3.2. Ending an application
Select the End function from the Application submenu or click the
toolbar to stop application software on the DEP Crypto Module.
icon on the
Atos Worldline - Technology & Products / Engineering / DEP
DEP/NMS User Manual (04.04)
Page: 59/139
Classification: Public
Warning:
You must lock the DEP Crypto Module before executing this
operation.
Ending the application software on DEP Crypto Module can only be done if:
•
there is a application software already loaded on DEP Crypto Module
•
the CAP_STD_SW_LOAD capability is available in the DEP Crypto Module. If
not, a warning box will appear:
This last condition is no more available for DEP Application Software
released from April 24th 2008.
You are prompted for confirmation before the application is actually stopped.
Once the application is stopped, the information concerning the selected DEP Crypto
Module in the main window is updated.
The following fields will be changed:
•
Software: this field is cleared,
•
Keymac: switches to FFFFFFFF.
8.4. MANAGING KEYS
The Keys submenu contains the following functions:
•
Backup
•
Restore
•
Change DMK
•
Merge Backups
Atos Worldline - Technology & Products / Engineering / DEP
DEP/NMS User Manual (04.04)
Page: 60/139
Classification: Public
8.4.1. Backing up keys
The Backup function lets you to create a secure backup of all the keys loaded into the
DEP Crypto Module, except the DEP Master Key and other Special Keys.
Warning:
You must lock the DEP Crypto Module before executing this
operation.
Backing up keys requires availability of:
•
the CAP_STD_SAVE_KEYS capability;
•
DEP Master Key.
If that is not the case, you will be prompted for action.
To actually start to backup the keys, supply the name of the backup file in the Save
As dialog box.
The filename presented by default is:
•
Backup, if status data is saved for the first time
•
the name of the backup file that was last used if a backup has previously been
made
Atos Worldline - Technology & Products / Engineering / DEP
DEP/NMS User Manual (04.04)
Page: 61/139
Classification: Public
If the file already exists, DEP/NMS requests confirmation to overwrite it.
By default, the status files are saved in the Data_files subfolder with path
“C:\Documents and Settings\[USER]\Atos Worldline\DEP_NMS and DEP_EM”
for Windows 2000 and XP, and “C:\Users\[USER]\Atos Worldline\DEP_NMS and
DEP_EM” for Windows Vista and Windows 7 respectively.
The Keys backup dialog box will appear indicating the progress of the specified
backup operation.
8.4.2. Restoring keys
Restore keys operation allows restoring keys from a previous backup in one or more
DEP Crypto Modules. Operation can be done on each DEP Crypto Module
sequentially or on different DEP Crypto Modules of one or several DEP Platforms
simultaneously.
Use the Restore function from the Keys submenu or select the
toolbar if you need to restore keys from a previous backup.
icon from the
Warnings:
•
You must lock the DEP Crypto Module(s) before executing
this operation.
•
Simultaneous Keys restore operation for multiple selected
DEP Crypto Modules is possible on DEP Platform software
Atos Worldline - Technology & Products / Engineering / DEP
DEP/NMS User Manual (04.04)
Page: 62/139
Classification: Public
with version 4.0.0 or higher. Otherwise the following error
box will appear.
•
Simultaneous multiple DEP Crypto Module Restore Keys
operations are onl y possible if you have the Hardware Licence
USB dongle.
Restoring keys requires availability of:
•
the CAP_STD_SAVE_KEYS capability;
•
DEP Master Key.
If one of those conditions is not fulfilled, an information dialog box (see below) will
appear with list of actions that user can take to bring the DEP Crypto Modules to
Ready state.
While displaying the above information dialog box, application is doing background
check for state of DEP Crypto Modules enumerated in Problems Information list.
When one or more DEP Crypto Modules are brought to Ready state, Problems
Information list and General Information will be updated in the dialog box.
It is possible to select and remove one or more not ready DEP Crypto Modules from
Problems Information list.
Continue button will be enabled when in Problem Information list all DEP Crypto
Modules will be in Ready state. To terminate software loading process for all selected
DEP Crypto Modules click Cancel.
Atos Worldline - Technology & Products / Engineering / DEP
DEP/NMS User Manual (04.04)
Page: 63/139
Classification: Public
Restore keys operation for multiple selected DEP Crypto Modules is possible when
all selected DEP Crypto Modules contain DEP Master Keys of the same type and with
the same value. Otherwise the following warnings will appear and operation will be
aborted.
To restore the keys supply the name of the backup file in the Open dialog box.
The filename presented by default is:
•
backup.dat if keys are restored for the first time;
•
the name of the restore file that was last used if keys have already been restored
before.
The default path for the backup files is “C:\Documents and
Settings\[USER]\Atos Worldline\DEP_NMS and DEP_EM\Data_files” for
Windows 2000 and XP, and “C:\Users\[USER]\Atos Worldline\DEP_NMS and
DEP_EM\Data_files” for Windows Vista and Windows 7.
When the correct backup file has been selected, the Keys restore dialog box will
appear indicating the progress of the specified restore operation.
Atos Worldline - Technology & Products / Engineering / DEP
DEP/NMS User Manual (04.04)
Page: 64/139
Classification: Public
Update of the information in the main window is done.
If during the key restore process selected DEP Crypto Module(s) are not ready to
proceed with the key restore operation, the following error box will appear, and the
restore process will be interrupted.
After pressing the OK button, the Keys restore report window will appear
containing the total number of successful and failed DEP Crypto Module(s). For each
failed DEP Crypto Module(s) there is status line with failure reason.
If after multiple DEP Crypto Modules have been selected some of them fail to
become ready to proceed with the key restore operation during the restore process,
the Keys restore dialog box is enlarged to show the status of the failed module(s).
Atos Worldline - Technology & Products / Engineering / DEP
DEP/NMS User Manual (04.04)
Page: 65/139
Classification: Public
If there are failed DEP Crypto Modules at the end of keys restore process, the Keys
restore report dialog appears, listing all the successful DEP module(s) and the failed
DEP module(s). For each failed DEP module there is a status line with failure reason.
8.4.3. Changing the DMK
To change the DEP Master Key of a set of backed up keys select the Change DMK
function from Keys submenu. The Change DMK Wizard will start.
The wizard guides you through the different steps of the procedure. Follow the
instructions and click Next to continue with the following step.
The series of images below show you the sequence of instructions that the wizard
steps through.
Atos Worldline - Technology & Products / Engineering / DEP
DEP/NMS User Manual (04.04)
Page: 66/139
Classification: Public
You must enter the DMK2 before you can continue with the next step.
You must enter the capability CAP_STD_CHANGE_DMK into the DEP Crypto
Module, before you can move to the next step.
At this stage, you have to load the capability CAP_STD_SAVE_KEYS into the DEP
Crypto Module.
You must load the capability CAP_STD_SAVE_KEYS before you can go to the next
step.
Atos Worldline - Technology & Products / Engineering / DEP
DEP/NMS User Manual (04.04)
Page: 67/139
Classification: Public
When the capability has been entered, you are prompted to load the DMK1.
When you have entered this key, the wizard continues with the key backup file to
restore.
In the Open dialog box, select the file to restore.
While the file is being restored, the Keys restore dialog box provides progress
information.
Atos Worldline - Technology & Products / Engineering / DEP
DEP/NMS User Manual (04.04)
Page: 68/139
Classification: Public
Next, the wizard prompts you for the file name for the key backup.
In the Save As dialog box, select the name of the backup file.
Then, the Keys backup dialog box will appear, providing progress information on the
key backup.
Atos Worldline - Technology & Products / Engineering / DEP
DEP/NMS User Manual (04.04)
Page: 69/139
Classification: Public
After that, the wizard presents the final stage of the operation. Click Finish to
complete it.
8.4.4. Merging backups
The Merge backups function from the Keys submenu allows to merge several key
backup files into a DEP Crypto Module. The procedure is guided by the same wizard
as changing the DMK.
The images below show screenshots of the different sequences of the procedure.
Atos Worldline - Technology & Products / Engineering / DEP
DEP/NMS User Manual (04.04)
Page: 70/139
Classification: Public
If the DMK is not entered, the following warning box appears prompting you to do
so:
The next step consists in loading the capability CAP_STD_SAVE_KEYS.
As long as the capability has not been entered, you cannot go on to the next step.
The following warning box will appear, prompting you to enter the capability.
After that, you have to supply the name of the first backup file that you want to use.
Atos Worldline - Technology & Products / Engineering / DEP
Page: 71/139
Classification: Public
DEP/NMS User Manual (04.04)
When you press the Open file button, the Open dialog box will appear where you
have to select the appropriate file.
When the file has been restored,
CAP_STD_MERGE_BACKUP capability.
you
are
prompted
If it is not entered, a warning box appears prompting you to do so.
After that, the wizard asks the name of the second backup file.
to
load
the
Atos Worldline - Technology & Products / Engineering / DEP
DEP/NMS User Manual (04.04)
Page: 72/139
Classification: Public
If you want to merge additional backup files, you need to repeat this step for each file
that you want to merge.
Finally, the wizard prompts you to erase the capabilities that you used to carry out the
merge.
Click Finish to close the wizard.
Atos Worldline - Technology & Products / Engineering / DEP
DEP/NMS User Manual (04.04)
Page: 73/139
Classification: Public
8.5. READING DEP INFORMATION
The Read DEP Information function retrieves the information about the following
items:
•
the keys loaded
It gives a list of the known and loaded key identifiers, together with the indicator
whether they are active or not. Additional information about the number of times
the keys are loaded is also available;
•
the capabilities loaded
Together with their type and value. Additional information about the number of
times the capabilities are loaded is also available;
•
the counters related to:
− the number of times certain functions were executed by the DEP
Crypto Module
− the number of times a certain error occurs
− the number of times some dedicated operations have been executed
•
the DEP parameters loaded.
Warning:
The Read DEP Information item is only enabled in locked mode.
You can select the function from the DEP Crypto Module menu or from the context
menu that appears when you right-click a specific DEP Crypto Module from the
configuration tree.
The DEP Information dialog box appears with the information about the abovementioned items organised on four tab sheets.
Atos Worldline - Technology & Products / Engineering / DEP
DEP/NMS User Manual (04.04)
Page: 74/139
Classification: Public
To store the information in the file click on the Save... button.. In the Save As dialog
box supply the name of the file.
The default location of the file is “C:\Documents and Settings\[USER]\Atos
Worldline\DEP_NMS and DEP_EM\Data_files” for Windows 2000 and XP, and
“C:\Users\[USER]\Atos Worldline\DEP_NMS and DEP_EM\Data_files” for
Windows Vista and Windows 7.
The file name that is presented by default is:
•
DEPinfo.txt if you save this information for the first time;
Atos Worldline - Technology & Products / Engineering / DEP
DEP/NMS User Manual (04.04)
•
Page: 75/139
Classification: Public
the name of the last used file if you have save information before.
If the filename already exists, the DEP/NMS prompts for confirmation to overwrite it.
8.5.1. Understanding information about keys
The top part of the Keys tab sheet list the following information for every key that has
ever been loaded into the DEP Crypto Module, even when it was deleted afterwards:
Feature
Tag
Length
Active
Registered
Counter
Iso 10118-2 Hash
CV (NORM)
Meaning
Identifies the key
Defines the length of the loaded key in bytes
Indicates whether the key is active (A) or has been
deleted (-)
Indicates whether the key is known (R) by the
loaded application or not (-)
Indicates how many times the key was loaded
Gives the Iso 10118 hash value on the key
Gives a check value of type norm on the
corresponding key, for symetrical keys known by
the DEP Application Software, else the field is
filled in with -
Atos Worldline - Technology & Products / Engineering / DEP
DEP/NMS User Manual (04.04)
Page: 76/139
Classification: Public
The bottom part of the tab sheet provides global key information:
Feature
KeyMac
Total
Active
Registered
Deleted
Not registered
Meaning
Gives the keymacs on all the keys
Defines the total number of keys there are available
in the list whether active or not, registered or not
Gives the total number of active loaded keys
Gives the number of keys known by the application
Indicates how many keys there were deleted
Gives the number of keys not known by the
application
8.5.2. Capabilities
The Capabilities tab sheet lists the following information about the different
capabilities loaded into the DEP Crypto Module:
Atos Worldline - Technology & Products / Engineering / DEP
DEP/NMS User Manual (04.04)
Feature
Tag
Type
Value
Counter
Page: 77/139
Classification: Public
Meaning
Identifies the tag of the capability
Defines the type of limitation that applies to the
capability:
−
Unlimited
−
Counter Limited
−
Time Limited
Indicates the remaining availability of the
capability. the value can ether define:
−
the number of times the capability can still be
used in case of a counter limited type
−
the number of minutes the capability can still be
used in case of a counter limited type
Defines the number of times the capability has been
loaded into the DEP Crypto Module
8.5.3. Counters
The Counters tab sheet lists the following information for every available counter in
the DEP Crypto Module:
Feature
Tag
Counter
Type
Meaning
Identifies the tag of the counter
Indicates the number of times the function was
executed, the error was generated or the dedicated
counter operation was executed
Identifies the counter: function counter, error
counter or dedicated counter; counters are grouped
according to their type.
Atos Worldline - Technology & Products / Engineering / DEP
DEP/NMS User Manual (04.04)
Page: 78/139
Classification: Public
8.5.4. Parameters
The Parameters tab sheet lists the following information for every available DEP
parameters in the DEP Crypto Module:
Feature
Tag
Value
Min ins
Max ins
Type
Format
Group
Meaning
Gives the tag of the DEP parameter
Gives the actual value of the DEP parameter
These parameters respectively define the lower and
upper borders of the DEP Parameter instances; new
DEP parameter instances outside these borders are
not allowed.
Identifies the type of the DEP parameter:
−
1 byte
−
WORD-2bytes
−
DWORD-4bytes
−
digit
−
string
This identifies the required format of the DEP
parameter during the introduction of the value:
−
NONE
−
DEC
−
HEX
Indiciates the group of parameters to which the
Atos Worldline - Technology & Products / Engineering / DEP
DEP/NMS User Manual (04.04)
Name
Unit
MinVL
Page: 79/139
Classification: Public
actual parameter belongs
Gives the textual description of the current DEP
parameter
Gives additional information on the DEP
parameter: for example Key per slice, …
These parameters define respectively the lower and
upper borders of the DEP Parameter value (V) or
length (L), whichever applies for the DEP
Parameter. DEP parameter values/lengths outside
these borders are not allowed.
Max VL
8.6. PERFORMING DIAGNOSTICS
The function Diagnostics allows you to test some internal devices of the DEP
Platform and to read the alarm information.
Warning:
Diagnostics item is only enabled in locked mode.
When you select this function, a submenu appears with functions that give access to
several tests.
Atos Worldline - Technology & Products / Engineering / DEP
DEP/NMS User Manual (04.04)
Page: 80/139
Classification: Public
8.6.1. Reading Diagnostics
The function Read Diagnostics gives information on the memory status of the DEP
Crypto Module.
The table below give an overview of the various features displayed in the DEP
diagnostics window with their meaning.
Feature
Critical_Boot
Meaning
Error handling of boot part, reset at start
only
Critical_System
Error handling in system part, reset after
successful application load
Critical_Application Error handling in application part, reset
after successful application load
Problem_Application
Error handling in application part, reset
after successful application load
Memory_Status
Status of the memory as in Borland’s
<alloc.h>
Memory_Core
Memory never used yet (in bytes)
Memory_BigFree
Size of biggest free block (1 block = 16
bytes)
Memory_Free
Remaining amount freed blocks
Memory_Frees
Number of freed blocks
Memory_Bigtaken
Size of biggest currently allocated blocks
Memory_Taken
Remaining number of allocated blocks
Memory_Takens
Number of currently allocated blocks
Reserved_1
Still reserved
Reserved_2
Still reserved
Reserved_3
Still reserved
Atos Worldline - Technology & Products / Engineering / DEP
DEP/NMS User Manual (04.04)
Page: 81/139
Classification: Public
The Save button at the bottom of the DEP diagnostics window allows you to store
the information in a file. In the Save As dialog box you have to specify the name of
the file that you want to use.
8.6.2. Testing Communication Hardware
The Test Communication Hardware function tests the PCI interface of the DEP
Platform. The Test communication hardware dialog box will appear where you
have to select kind of test(s) that you want to execute:
Feedback about the results of chosen tests are shown in the same dialog box.
Atos Worldline - Technology & Products / Engineering / DEP
DEP/NMS User Manual (04.04)
Page: 82/139
Classification: Public
8.6.3. Performing DEP Self-Test
With the function DEP Self-Test you can test the main board of the DEP Crypto
Module and displays some information. Depending on the hardware installed, the test
checks the DES and the RSA units or the unique cryptographic chip. When
application software is loaded, a check value over the cryptographic keys (Keymac) is
also verified.
When you select this function, one of the two dialog boxes appears with the following
information:
Feature
DES Chip mode
Meaning
Indicates the type of the DES chip
available
Gives the type of the RSA chip available
RSA Chip model
Cryptographic chip model Gives the type of the cryptographic chip
and all the version information:
−
family
−
hardware
−
micro-code
−
FIFO
Indicates the release of the main board
Main Board model
Represents the current cryptographic check
Actual KeyMAC
value
Atos Worldline - Technology & Products / Engineering / DEP
DEP/NMS User Manual (04.04)
Reference KeyMAC
Current Problems
Page: 83/139
Classification: Public
Is calculated automatically after a key has
been loaded
Gives a text description of the current
problem, if any
The Save button allows you to store the information in a file. In the Save As dialog
box, you have to specify the name of the file.
8.6.4. Verifying the Keymac
The function Verify Keymac allows you to verify the Keymac of the DEP Crypto
Module. The Keymac is evaluated and compared with the Reference Keymac. An
information box reports the result of the verification.
8.6.5. Reading DEP Alarm Information
The function Read DEP Alarm Information from the Diagnostics submenu reports
the status of the alarm processor and the logging information related to it.
When you have selected this function, the Alarm Information dialog box appears.
Atos Worldline - Technology & Products / Engineering / DEP
DEP/NMS User Manual (04.04)
Page: 84/139
Classification: Public
The Counters tab sheet consists of two parts:
•
a list of possible alarms in the top part of the sheet
It presents the name of the alarm, the number of times the alarm was detected by
the alarm processor and the type of alarm that was actually detected.
•
general information about the alarm board in the bottom part of the sheet:
− Hardware: gives the identification and version of the hardware alarm
board,
− Software: gives the name and the release version of the alarm software
− Max Length of the event file: gives the maximum length of the event
log list
The Event Log tab sheet contains a sequential overview of the alarm events that have
been detected with the type of alarm; all events are listed sequentially.
Atos Worldline - Technology & Products / Engineering / DEP
DEP/NMS User Manual (04.04)
Page: 85/139
Classification: Public
The Save button allows you to store the information in a file. In the Save As dialog
box, you have to supply the name of the file.
8.7. RESETTING THE DEP PLATFORM OR ITS
COMPONENTS
You can use the functions in the Reset submenu to reset different components of the
DEP Platform system.
The functions in the Reset submenu are ranked by increasing order of impact on the
hardware of the DEP Platform.
Warning:
When the DEP Crypto Module is not in locked mode, the
following information message box will appear.
Atos Worldline - Technology & Products / Engineering / DEP
DEP/NMS User Manual (04.04)
Page: 86/139
Classification: Public
When selecting this item, a submenu will appear with the several functions:
8.7.1. Managing the backup battery
8.7.1.1. Setting the DEP Battery On
The Set DEP Battery On function connects the backup battery in the DEP Crypto
Module. When the battery is connected, the DEP Crypto Module can retain memory
contents when the main power is turned off. Before the battery is actually set on, you
are prompted for confirmation.
After confirmation, the operation is executed. A confirmation message is displayed if
the reset of the DEP Crypto Module has succeeded:
Atos Worldline - Technology & Products / Engineering / DEP
DEP/NMS User Manual (04.04)
Page: 87/139
Classification: Public
8.7.1.2. Setting the DEP Battery Off
The Set DEP Battery Off function disconnects the backup battery in the DEP Crypto
Module. With the battery disconnected, the DEP Crypto Module relies on the mains
supply to maintain memory contents. This implies that keys and application are lost if
the current is cut.
Before actually setting the battery off, you are prompted for confirmation.
After confirmation, the operation is executed. A confirmation message box is
displayed if the reset of the DEP Crypto Module has succeeded.
8.7.2. Resetting Communication to the DEP platform
The Communication function clears the message buffers on the PCI interface of the
DEP Platform. Before resetting, DEP/NMS prompts you for confirmation.
After confirmation, the reset operation is executed. A confirmation message is
displayed if the reset of the DEP Crypto Module has succeeded.
Atos Worldline - Technology & Products / Engineering / DEP
DEP/NMS User Manual (04.04)
Page: 88/139
Classification: Public
8.7.3. Resetting the DEP Crypto Module CPU
The function DEP resets the main CPU. All the data in the memory is kept:
application software, keys, etc...
Before resetting the DEP/NMS prompts you for confirmation.
After confirmation, the reset operation is executed.
A message box will appear if the reset of the DEP Crypto Module has succeeded:
8.7.4. Resetting the DEP Alarm Processor
The DEP Alarm Processor function causes both the main CPU and the alarm
processor to be reset. Before resetting a confirmation is asked to the operator.
Warning:
Be aware that all the memory (application software, keys, …) will
be cleared b y this operation.
After confirmation, the reset operation is executed.
If the reset of the DEP Alarm Processor has succeeded, the main window is
automatically refreshed.
8.8. MANAGING DEP PARAMETERS
You can use parameters to fine-tune application software. The DEP Parameters
functions lets you set, modify, backup/restore, … DEP parameters of the DEP Crypto
Module.
Atos Worldline - Technology & Products / Engineering / DEP
DEP/NMS User Manual (04.04)
Page: 89/139
Classification: Public
Warning:
The DEP Parameters function is only enabled in locked mode.
When you select the DEP Parameters function from the DEP Crypto Module menu
or from the context menu that appears when you right click a DEP Crypto Module in
the configuration tree, a dialog box appears with the name of the selected module in
the title bar.
Note:
The DEP parameters list always contains all the known DEP
parameters b y the DEP Crypto Module. However, DEP parameters
are onl y ph ysicall y available (and used) in the DEP Crypt o
Module if they have a value (Value field contains a value).
The table below gives an overview of the DEP parameters.
Parameter
Group
Tag
Name
Values
Minimum instance
maximum instance
Unit
Meaning
Indicates the group of parameters to which the current
parameter belongs.
Gives the tag of the current parameter.
Gives the textual description of the current DEP
parameter.
Gives the actual value of the DEP parameter.
Note:
If you modify the value and do not click Apply or Ok,
the modified value is not sent to the DEP Crypto
Module.
These parameters respectively give the lower and upper
borders of the DEP Parameter instances. New DEP
Parameter instances outside these borders are not allowed.
Gives additional information on the DEP parameter (e.g.
key per slice, …); these units depend on the DEP
Atos Worldline - Technology & Products / Engineering / DEP
DEP/NMS User Manual (04.04)
Type
1 byte
WORD
DWORD
digits
string
Format
NONE
DEC
HEX
Page: 90/139
Classification: Public
parameter and are defined in the application software.
Identifies the type of the DEP parameter:
Identifies a one-byte DEP parameter and should be
entered as two characters in the Value field: 00-FF or
00-99 depending on the format and the allowed value
interval.
Identifies a two-byte DEP parameter and should be
entered as four characters in the Value field: 0000FFFF or 0000-9999 depending on the format and the
allowed value interval.
Identifies a four-byte DEP parameter and should be
entered as eight characters in the Value field:
00000000-FFFFFFFF or 00000000-99999999
depending on the format HEX/DEC and the allowed
value interval.
Identifies a DEP parameter as an array with an even
number of nibbles/(hexa)decimal digits: 0-F or 0-9
depending on the format; the length of the array
depends on the VL-/VL+ property.
Identifies a DEP Parameter as a text (string of ASCII
characters); the length of the text depends on the VL/VL+ property.
Identifies the required format of the DEP parameter during
introduction of the value.
The format is not applicable (for DEP parameters of
type string).
The DEP Parameter should be entered as a decimal
value (0-9).
DEP Parameter should be entered as a hexadecimal
value (0-F).
If you have performed an operation on any of the parameters (modify, add an
instance,…), you can proceed in different ways, depending on the button that you
press:
•
OK: updates the parameter(s) and closes the window
•
Apply: update the parameter(s) but does not close of the window
•
Cancel: the parameters are not modified and the window closes
8.8.1. Modifying DEP parameters
If you want to select a DEP parameter, first you should select it and then modify the
corresponding value.
Atos Worldline - Technology & Products / Engineering / DEP
DEP/NMS User Manual (04.04)
Page: 91/139
Classification: Public
Note:
Onl y the field Values can be modified, other fields are read-onl y.
8.8.2. Adding a parameter instance
In order to add an instance to a DEP parameter, you have to select the multi-instance
DEP parameter and click the Add instance button.
A new instance is generated, of which you can modify both instance and value.
Note:
These newl y defined values are onl y sent to the DEP Crypto
Module after you have pressed OK or Apply.
Atos Worldline - Technology & Products / Engineering / DEP
DEP/NMS User Manual (04.04)
Page: 92/139
Classification: Public
8.8.3. Deleting a parameter instance
You can use the button Del instance to either:
•
delete an instance of a multi-instance parameter;
•
erase the value of a mono-instance-parameter.
Note:
In the latter case, the DEP will return the corresponding default
value, if it exists.
If you press OK or Apply without the capability CAP_STD_SET_PARAM being
loaded, a warning box appears prompting you to load it.
If the operation fails, the following error box will appear:
In addition to that, the first wrong parameter is displayed in red and bold; the
following parameter that has not yet been sent to DEP are in red only:
Atos Worldline - Technology & Products / Engineering / DEP
DEP/NMS User Manual (04.04)
Page: 93/139
Classification: Public
8.8.4. Backing up parameters
The Backup button stores the parameter values available in the DEP Crypto Module
into a backup file on the DEP/NMS.
When this function is executed, a Save As dialog box appears where you have to
supply the name of the backup file.
By default, the backup file is stored in the Data_files subfolder with path
“C:\Documents and Settings\[USER]\Atos Worldline\DEP_NMS and DEP_EM”
for Windows 2000 and Windows XP, and “C:\Users\[USER]\Atos
Worldline\DEP_NMS and DEP_EM” for Windows Vista and Windows 7 respectively.
The default file name that is presented is:
•
BackupParameters.txt if you back up parameters for the first time;
•
the name of the last used backup file the other times.
When the DEP parameter backup file already exists, DEP/NMS prompts you for
confirmation to overwrite it.
Atos Worldline - Technology & Products / Engineering / DEP
DEP/NMS User Manual (04.04)
Page: 94/139
Classification: Public
Every DEP parameter backup file is created as an ASCII text file, which you can view
with any text editor. The DEP/NMS does not have any built-in feature for viewing
these files.
8.8.5. Restoring parameters
The Restore button is to restore the contents of a DEP parameter backup file to the
DEP Crypto Module.
When you select this function, you are prompted to specify the name of the backup
file from which you want to restore.
The default file name that is presented is:
•
backupparameters.txt if you restore parameters for the first time
•
the name of the last used backup file the other times.
The input file must be a valid DEP parameter backup file. DEP/NMS reads the file
and verifies the Sha-1 hash at the end of the file and if the file is corrupted, an error
messages is displayed:
Atos Worldline - Technology & Products / Engineering / DEP
DEP/NMS User Manual (04.04)
Page: 95/139
Classification: Public
Note:
You can restore older DEP parameter files without hash by
pressing Yes.
The DEP parameters are sent to the DEP Crypto Module and the parameter window is
refreshed.
9.
DEP SOFTWARE CLONING
Note:
This functionality is protected by the license dongle for the platforms with LIVE
mode. You can manage Cloning functionalities without license dongle for the
platforms with TEST mode (max 5 platforms).
9.1. PREREQUISITES
•
•
•
•
The minimum version of the DEP/NMS application must be 3.3.2.14;
Only one Master DEP Crypto Module and at least one or more Clone
candidate(s) should be selected;
There should be no (other) cloning process started on any of participating DEP
Crypto Modules
All the DEP Crypto Modules involved in the cloning process must be locked.
To lock the DEP Crypto Module, right-click on the appropriate DEP Crypto
Module, select Locking and click Lock option;
For more information about the DEP Software Cloning prerequisites please refer to
the DEP Software Cloning Guide.
9.2. SETTING AS MASTER
To set a DEP Crypto Module as Master for cloning, right-click on the appropriate
DEP Crypto Module, choose Cloning and then click on the Set as Master option.
Also you can set the DEP Crypto Module as Master from general menu. Select the
DEP Crypto Module you want to set as Master, click on the DEP Crypto Module in
main window, choose Cloning and click on the Set as Master option.
Atos Worldline - Technology & Products / Engineering / DEP
DEP/NMS User Manual (04.04)
Page: 96/139
Classification: Public
If Master is successfully selected the Cloning Status will become Master Candidate
and the row to light indigo.
9.3. UNSET MASTER
To unset the previously set as Master DEP Crypto Module, right-click on the DEP
Crypto Module, choose Cloning and then click on the Unset Master option. Also you
can unset the DEP Crypto Module Master candidate from general menu. Select the
Master DEP Crypto Module, click on the DEP Crypto Module in main window,
choose Cloning and click on the Unset Master option.
Atos Worldline - Technology & Products / Engineering / DEP
DEP/NMS User Manual (04.04)
Page: 97/139
Classification: Public
After the Master is unset, the Cloning Status will turn into Not Set. The background
of the DEP Crypto Module line returns to the DEP Crypto Module line usual colour.
9.4. SETTING AS CLONE
To set a DEP Crypto Module as a Clone candidate, right-click on appropriate DEP
Crypto Module, or if you want to set several DEP Crypto Modules as Clone
candidates in the same time, press Ctrl or Shift and hold it while selecting appropriate
DEP Crypto Modules and then right-click on any DEP Crypto Module, choose
Cloning and then click on the Set as Clone option. Also you can set the DEP Crypto
Modules as Clone from general menu. Select the DEP Crypto Modules you want to
set as Clone, select DEP Crypto Module in the menu bar, choose Cloning and click
on the Set as Clone option.
Atos Worldline - Technology & Products / Engineering / DEP
DEP/NMS User Manual (04.04)
Page: 98/139
Classification: Public
9.5. UNSET CLONE
To unset the previously set as Clone candidate DEP Crypto Module, right-click on the
DEP Crypto Module, choose Cloning and then click on the Unset Clone option. Also
you can unset the DEP Crypto Module Clone candidate from general menu. Select the
DEP Crypto Module which you want to unset, click on the DEP Crypto Module in
main window, choose Cloning and click on the Unset Clone option.
Atos Worldline - Technology & Products / Engineering / DEP
DEP/NMS User Manual (04.04)
Page: 99/139
Classification: Public
After the Clone candidate is unset, the Cloning Status will become Not Set. The
background of the DEP Crypto Module line returns to the DEP Crypto Module line
usual colour.
9.6. UNSELECT ALL
To unset all the previously set as Master and/or Clone candidate DEP Crypto
Modules, right-click on any DEP Crypto Module, choose Cloning and then click on
the Unselect All option. Also you can unset the DEP Crypto Module Master and/or
Clone candidates from general menu. Click on the DEP Crypto Module in main
window, choose Cloning and click on the Unselect All option.
Unselect All function is enabled only if at least one DEP Crypto Module is set as
Master or Clone Candidate and Cloning Process is not started.
After all the DEP Crypto Modules are unset, the Cloning Status will become Not Set
for all the DEP Crypto Modules and the backgrounds of the DEP Crypto Modules’
lines return to the line usual colour.
9.7. START CLONING PROCESS
Note:
Before starting the cloning process, one DEP Crypto Module
should be set as Master and at least one Clone candidate should be
selected (refer to the sections 9.2 and 9.4 for more information on
how to set the Master and the Clones).
To initiate the cloning process, right-click on any DEP Crypto Module, select the
Cloning menu and click on the Start Cloning Process option. Also you can start the
cloning process from general menu. Click on the DEP Crypto Module in main
window, choose Cloning and click on the Start Cloning Process option.
9.7.1. Cloning the Master DMK
If the Master DEP Crypto Module has already loaded DEP Master Key (DES or
AES), then it can be cloned too. You will be asked to confirm the Master DMK
cloning.
Atos Worldline - Technology & Products / Engineering / DEP
DEP/NMS User Manual (04.04)
Page: 100/139
Classification: Public
If you choose Yes, the application will clone the DEP Master Key. If you choose No,
the application won’t clone the Master Key and you will have a chance to delete the
DMK from the Master.
Now you can delete the DMK and continue the cloning process.
To stop the process and bring the DEP Crypto Modules in their previous status simply
click the Cancel button.
9.7.2. Customer Administrators authentication on Master
and KAWL Checking
The Customer Administrators must be authenticated in order to start a cloning
process. For more detailed information about how to authenticate the customer on
Master DEP Crypto Module, refer to the document DEP Customer's Security
Officer's Guide.
Atos Worldline - Technology & Products / Engineering / DEP
DEP/NMS User Manual (04.04)
Page: 101/139
Classification: Public
The following dialog is displayed when Customer Administrators are authenticated on
the Master, but K_AWLs are different or not loaded.
After doing required authentication the Continue button will be enabled.
Atos Worldline - Technology & Products / Engineering / DEP
DEP/NMS User Manual (04.04)
Page: 102/139
Classification: Public
You can click Continue to proceed the cloning process, or Cancel to reject cloning.
9.7.3. Cloning progress dialog
Cloning progress dialog box will show the status of cloning process.
Actually the DEP/NMS can divide the process in multiple sessions if the number of
clone candidates exceeds the maximum supported by the master.
For example, if there are 25 clone candidates, and maximum number supported by
master is 10, then the DEP/NMS will organize 3 sessions. The number of current
session and total number of sessions are in the first line of the progress dialog (see
below).
It is important to remark that cloning two DEP Crypto Modules on the same platform
is sequential, while cloning two DEP Crypto Modules on different platforms is
parallel. So, DEP/NMS will divide clones in the way to minimize the overall cloning
time.
Examples of progress dialog:
Atos Worldline - Technology & Products / Engineering / DEP
DEP/NMS User Manual (04.04)
Page: 103/139
Classification: Public
9.7.4. Cloning summary
After finishing the cloning process the Cloning Process Summary dialog will show
you the cloning results:
If you want to save the cloning summary as a text file click Save as..., if you want to
close the window, click OK.
Atos Worldline - Technology & Products / Engineering / DEP
DEP/NMS User Manual (04.04)
Page: 104/139
Classification: Public
9.8. RESET MASTER/CLONE
Reset Master/Clone function is supposed to be used in unexpected situations, if the
cloning process should be aborted.
To interrupt the cloning process, right-click on any DEP Crypto Module involved in
cloning process, select the Cloning and then click on the Reset Master/Clone option.
Also you can reset the DEP Crypto Modules from general menu tab. Select any DEP
Crypto Module involved in cloning process, click DEP Crypto Module in the menu
tab, select Cloning and click on the Reset Master/Clone option.
Using the Reset Master/Clone function the Master candidate DEP Crypto Module
will keep its initial state and the Clone candidate DEP Crypto Modules will lost all
already cloned information.
Atos Worldline - Technology & Products / Engineering / DEP
DEP/NMS User Manual (04.04)
Page: 105/139
Classification: Public
10. FIRMWARE UPGRADE
Note:
This functionality is protected by the license dongle when more than one DEP
Crypto Modules are selected. You can start Firmware upgrade without license
dongle for one DEP Crypto Module.
The Firmware Upgrade menu item allows to reflash the bios and upgrade the Banksys
Crypto firmware.
10.1. BIOS REFLASH
With the Bios Reflash function of Firmware Upgrade submenu you can reflash the
Bios of the DEP Crypto Module(s).
Also the Bios is supporting the cloning functionality. The cloning will be enabled
only if the Cloning Software is available on appropriate DEP Crypto Module. To set
the Cloning Software on DEP Crypto Module the cloning supported Bios should be
loaded.
Note:
The Reflash Bios function is available if the DEP Crypto Module is in boot
level. The DEP Crypto Modules should be locked.
Bios Reflash operation is allowed on one or more DEP Crypto Modules.
Simultaneous Bios Reflash operation for multiple selected DEP Crypto Modules is
possible if the minimum version of DEP Platform software is VENUS 4.0.0 or higher.
Atos Worldline - Technology & Products / Engineering / DEP
DEP/NMS User Manual (04.04)
Page: 106/139
Classification: Public
The procedure is identical to that of DEP Application loading, except that the user
will be prompted for confirmation an additional time, in view of the impact of the
operation.
Once you have confirmed, the loading starts and the Bios reflash load dialog appears
with a progress bar.
Warning:
Do not interrupt the application at this stage.
At the end of loading process the DEP/NMS will automatically perform Reset Alarm
Board to activate new bios. To check whether the newly loaded bios is running, select
the module and then choose the Status function from the DEP Crypto Module menu
or simply click F3. The Software boot and the Software cloning are presenting the
BIOS.
Atos Worldline - Technology & Products / Engineering / DEP
DEP/NMS User Manual (04.04)
Page: 107/139
Classification: Public
10.2. UPGRADE BANKSYS CRYPTO
The Upgrade Banksys Crypto function is used to upgrade the firmware of the
Banksys Crypto. This chapter describes how to upgrade the firmware to new
improved versions.
Firmware Upgrade operation allows to upgrade the Banksys Crypto on one or more
DEP Crypto Modules.
10.2.1. Prerequisites
•
•
•
•
•
The DEP Crypto Module should be locked;
The version of DEP Crypto Module should be DEP/PCI V4;
Minimum version of the DEP Platform Software must be VENUS 4.3.0 or
higher.
The minimum version of the DEP/NMS application must be 3.4.0.2;
A DEP Application Software that support I_STD_FW_UPGRADE interface
should be loaded on DEP Crypto Module;
Atos Worldline - Technology & Products / Engineering / DEP
DEP/NMS User Manual (04.04)
•
•
Page: 108/139
Classification: Public
The CAP_STD_FW_UPDATE capability should be loaded on the DEP
Crypto Module;
All the DEP Crypto Modules should be at CUST Authority Level.
10.2.2. Starting the Banksys Crypto Upgrade
10.2.2.1. Starting operation for Single Selected DEP Crypto
Module
Select the appropriate DEP Crypto Module, right-click on it, select the Firmware
Upgrade menu and click on the Upgrade Banksys Crypto option. Also you can start
the firmware upgrade process from general menu. Click on the DEP Crypto Module
in main menu, choose Firmware Upgrade and click on the Upgrade Banksys
Crypto option.
The Upgrade Banksys Crypto option is enabled only if:
•
•
•
•
•
•
•
the DEP Crypto Module is locked;
the version of DEP Crypto Module is DEP/PCI V4.
the minimum version of the DEP Platform Software is VENUS 4.3.0 or higher;
the Application Software is loaded in DEP Crypto Module. For more information
see paragraph 8.3.1 on page 53;
the loaded DEP Application Software supports the Banksys Crypto upgrade
functionality. To see if the Application Software supports the upgrade
functionality, look at the Software DFS document. To support the Firmware
Upgrade feature, the I_STD_FW_UPDATE interface must present in Software
DFS list;
the DEP Crypto Module(s) is upgraded to CUST authority level;
the CAP_STD_FW_UPDATE capability is loaded in the DEP Crypto Module.
For detailed information on how to load the capability, refer to the DEP CZAM/DEP User Manual.
Atos Worldline - Technology & Products / Engineering / DEP
DEP/NMS User Manual (04.04)
Page: 109/139
Classification: Public
When the DEP Crypto Module is ready and the Upgrade Banksys Crypto option of
Firmware Upgrade submenu is enabled, you should select the file (*.hee file) you
want to load on DEP Crypto Module. Select the appropriate file in opened Open
dialog box and click Open.
After you have selected the Firmware Upgrade file, you have to enter the Firmware
Certificate value.
The FW Certificate can be found in the appropriate Firmware Authentication Code
File (.sac) that is delivered together with the Firmware Upgrade file.
If the application file is not a valid firmware update file, the following error will
occur. You should select the valid firmware upgrade file.
After selecting the valid application file the Enter the Firmware Certificate dialog
box will open. Fill in the correct FW Certificate information.
Atos Worldline - Technology & Products / Engineering / DEP
DEP/NMS User Manual (04.04)
Page: 110/139
Classification: Public
10.2.2.2. Starting operation for Multiple Selected DEP
Crypto Modules
For multiple selection press Ctrl or Shift and hold it while selecting appropriate DEP
Crypto Modules, then right-click on any selected DEP Crypto Module, click on the
Firmware Upgrade menu and choose the Upgrade Banksys Crypto option. Also
you can start the firmware upgrade process from general menu. Click on the DEP
Crypto Module in main menu, choose Firmware Upgrade and click on the
Upgrade Banksys Crypto option.
The Upgrade Banksys Crypto option is enabled only if the minimum version of the
DEP Platform Software is 4.3.0 or higher;
The upgrading process will be cancelled if the USB dongle is not present. The
following message-box will appear:
After selecting the Upgrade Banksys Crypto function, select the appropriate update
file (*.hee file).
Atos Worldline - Technology & Products / Engineering / DEP
DEP/NMS User Manual (04.04)
Page: 111/139
Classification: Public
After you have selected the firmware upgrade file, enter the Firmware Certificate
from the appropriate Firmware Authentication Code File (see paragraph 10.2.2.1 on
page 108).
The next phase of the Upgrade Banksys Crypto operation consists of checking the
following conditions:
•
•
•
•
•
if the version of DEP Crypto Module is DEP/PCI V4;
if the Application Software is loaded in DEP Crypto Module;
if the loaded DEP Application Software supports the Banksys Crypto upgrade
functionality (check the availability of I_STD_FW_UPDATE interface in DEP
Application software);
if the CAP_STD_FW_UPDATE capability is loaded in the DEP Crypto Module.
For detailed information on how to load the capability, refer to the DEP CZAM/DEP User Manual.
if the DEP Crypto Module(s) is upgraded to CUST authority level;
If one of those conditions is not fulfilled, an information dialog box (see below) will
appear with the list of actions that user should take to bring the DEP Crypto Modules
to Ready state.
For example, if some of the selected DEP Crypto Modules don’t have
CAP_STD_FW_UPDATE capability loaded or the loaded Application Software
doesn’t support the Banksys Crypto upgrade functionality, the following problems
will occur:
Atos Worldline - Technology & Products / Engineering / DEP
DEP/NMS User Manual (04.04)
Page: 112/139
Classification: Public
Below is the list of errors which can appear in Problems Information list:
•
“Banksys Crypto upgrade is only allowed on DEP/PCI V4.0 modules!”. This
kind of error appears if the selected DEP Crypto Module’s version is not
DEP/PCI V4.0.
•
“The loaded DEP Application Software doesn’t support the Banksys Crypto
upgrade functionality!”. The Application Software loaded on DEP Crypto
Module(s) doesn’t support the I_STD_FW_UPGRADE interface.
•
“Bring to the 'Customer' level!. The DEP Crypto Module should be at CUST
Authority level.
•
“The CAP_STD_FW_UPDATE capability is not loaded!”. The
CAP_STD_FW_UPDATE capability should be loaded on selected DEP
Crypto Modules to continue the process.
•
“For multi module upgrade the USB license dongle is not installed!”. The
USB license dongle should be installed to continue the process.
•
“DEP Platform Software non compatible, the version 4.3.0 or higher need to
be installed!”. The minimum version of the DEP Platform Software should be
VENUS 4.3.0.
While displaying the above information dialog box, application is doing background
check for state of DEP Crypto Modules enumerated in Problems Information list.
When one or more DEP Crypto Modules are brought to Ready state, Problems
Information list and General Information will be updated in the dialog box.
It is possible to select and remove one or more not ready modules from Problems
Information list.
Continue button will be enabled when in Problem Information list all the DEP
Crypto Modules will be in Ready state. To terminate the Banksys Crypto Upgrade
process for all selected DEP Crypto Modules click Cancel.
Atos Worldline - Technology & Products / Engineering / DEP
DEP/NMS User Manual (04.04)
10.2.2.3.
Page: 113/139
Classification: Public
Monitoring the loading process
During the actual loading of the Banksys Crypto update file, the Banksys Crypto
Upgrade dialog box will appear, displaying the progress of the process. It also
displays the name of the file that is being loaded.
If there is no ready DEP Crypto Module left during the loading process the following
error will appear, and the load process will be interrupted.
After pressing the OK button, the Banksys Crypto update report dialog will appear
with the total number of successful and failed DEP Crypto Module(s). For each failed
DEP module(s) there is a status line with the failure reason.
Atos Worldline - Technology & Products / Engineering / DEP
DEP/NMS User Manual (04.04)
Page: 114/139
Classification: Public
Below is the list of errors which can appear in report dialog box:
•
E_STD_SEQ_ABORTED. This kind of error appears if entered Firmware
Certificate value was incorrect.
•
E_STD_DATA_INVALID. This kind of error returned by an interface if the
firmware file was corrupted.
When multiple DEP Crypto Modules have been selected but not all of them are ready
to proceed with the loading operation during the loading process, the Banksys Crypto
Upgrade dialog box can be expanded to show the status of the failed DEP Crypto
Module(s). To expand the dialog box click the Status>> button.
If the Banksys Crypto was successfully updated, it starts automatically:
Atos Worldline - Technology & Products / Engineering / DEP
DEP/NMS User Manual (04.04)
Page: 115/139
Classification: Public
After resetting the DEP, the self-test of DEP Crypto Modules is being started. If the
DEP Crypto Module(s) will not pass the self test, the following error will occur:
At the end of loading process to check the version number of currently loaded
Banksys Crypto select the Dep Self-Test function (see paragraph 8.6.3 on page 82).
Atos Worldline - Technology & Products / Engineering / DEP
DEP/NMS User Manual (04.04)
Page: 116/139
Classification: Public
11. TOOLS
The Tools menu contains following items:
•
•
•
•
General Settings
Passwords
Ping
Send a Call
11.1. GENERAL SETTINGS
To establish the automatic refresh, event manager and C-ZAM/DEP connection
settings select the General Settings item from Tools menu. The following dialog box
will appear.
It presents 3 groups of settings, related to:
•
Automatic refresh
•
Event Manager
•
C-ZAM/DEP
The data are stored in the file DEP_NMS.INI.
The dialog box presents three buttons:
Atos Worldline - Technology & Products / Engineering / DEP
DEP/NMS User Manual (04.04)
•
•
•
Page: 117/139
Classification: Public
Cancel: configuration is not modification and the window is closed;
Apply: updates the properties of the DEP/NMS without closing the window;
OK: updates the properties of the DEP/NMS and closes the window.
11.1.1. Automatic refresh
The automatic refresh is active only when it is selected in the General Settings
window and if a license hardware USB dongle is present.
If this feature is active, the information in the main window will be automatically
updated, except for the DEP Platform which is selected or has one of its DEP Crypto
Modules selected.
By default, the automatic refresh is activated. The refresh intervals defined in the
Interval Refresh field.
This parameter determines the time that the DEP/NMS, after the last refresh has been
done, waits before performing again another automatic refresh of all the information
viewed in the main window. The value must be in the range [10sec...3600sec].
A default value of 180 sec is foreseen.
The automatic refresh relies on the get status mechanism. If the result is not good (for
example: the DEP Crypto Module is in fatal mode, bad connection to the DEP
Platform. etc...), the information appears in the main window on the corresponding
line of the DEP Platform or DEP Crypto Module concerned.
Notes:
1. The serial numbers of the DEP Crypto Modules are saved in
the configuration file; if during the refresh a difference
appears between the expected value and the value that is read,
the corresponding line is highlighted.
2. A new DEP Crypto Module that is connected to a DEP
Platform is not automaticall y added (see Modifying platform
information on page 22).
11.1.2. Event Manager
DEP/NMS uses the TCP/IP address or name and the TCP/IP port to advertise alarms
to the DEP/EM application that will listen to the TCP/IP address and port. If these
fields are not filled in or nobody listens, nothing is sent.
The Event Manager will be advertised in case of:
•
Modification of the configuration of a DEP Platform or a DEP Crypto Module,
•
Modification in the communication protocol,
•
Modification in the application protocol,
•
End of application,
•
Shutdown,
•
Reset of alarms,
•
Forced unlock of a DEP Platform or a DEP Crypto Module.
Atos Worldline - Technology & Products / Engineering / DEP
DEP/NMS User Manual (04.04)
Page: 118/139
Classification: Public
11.1.3. C-ZAM/DEP
In the bottom part of the General Settings dialog box, you can configure the port for
the C-ZAM/DEP that is to be used on the PC on which the DEP/NMS application is
running.
With the option Active, you determine whether the C-ZAM/DEP is to be active or
not. By default, it is not activated.
Once it is active, you can select via the list box underneath the COM or RS232 Port
that is to be used for the C-ZAM/DEP operations. The label to the right of the list box
indicates whether the port is initialised or not initialised.
Warning:
Activating the Automatic Refresh or the C-ZAM/DEP if you have
onl y the lite version of the DEP/NMS application has no effect.
The following information box will appear if you do so.
11.2. MANAGING PASSWORDS
11.2.1. Understanding security levels
The DEP/NMS is able to work with a secure protocol for communicating with the
DEP Platforms.
There are two levels of security:
•
Semi-secure: works with a default password;
•
Fully secure: works with a user-defined password.
During the first start-up of the DEP/NMS the semi -secure mode is automatically
used. This is indicated at the right hand side of the status bar by means of a single key.
The security level of the DEP/NMS itself determines the maximum level of security
for all the DEP Platforms that it is to manage:
•
DEP Platforms without security (that is, platform software version 1.x)
A key with a red cross is present in the Security column.
•
DEP Platforms with security level semi-secure (that is, platform software version
3.x or higher)
A key is present in the Security column.
Atos Worldline - Technology & Products / Engineering / DEP
DEP/NMS User Manual (04.04)
Page: 119/139
Classification: Public
If you will try to add to the configuration a DEP Platform with a higher security level,
this results in security incompatibility.
The status bar of the Add platform dialog box will display an error message:
To realise authentication between the DEP/NMS and the DEP Platforms, select the
Authentication function from the Passwords submenu.
It allows you to define or modify the password used for authentication between
DEP/NMS and the DEP Platform (for security).
The password is permanent: if the DEP/NMS application is restarted, it is saved from
this password.
Atos Worldline - Technology & Products / Engineering / DEP
DEP/NMS User Manual (04.04)
Page: 120/139
Classification: Public
11.2.2. Entering a password
With the Enter a password function, you can provide the initial password needed for
the authentication between the DEP/NMS and the DEP Platforms that it is to manage.
Both entities must have the same password.
In the Enter password dialog box, enter the password once in the Password field and
repeat it in the Confirm password field.
To finish, click OK.
In both fields, the password characters are masked.
The password length must be between 8 and 20 characters; otherwise the following
message box will appear:
Note:
When you have confirmed the password, the DEP/NMS tries to
appl y it for all managed platforms.
If a problem occurs, the message box notifies you of the error that has occurred.
Atos Worldline - Technology & Products / Engineering / DEP
DEP/NMS User Manual (04.04)
Page: 121/139
Classification: Public
At this stage, the security level of the DEP/NMS is fully secure. This is indicated at
the right hand side of the status bar by means of two keys.
The fully secure DEP/NMS can manage:
DEP Platforms without security (that is, platform software version 1.x)
A key with a red cross is present in the Security column.
•
DEP Platforms with the semi-secure security level (that is, platform software
version 3.x or higher)
A key is present in the Security column.
•
DEP Platforms with the fully secure security level (Platform software version 3.x
or higher)
Two keys are present in the Security column.
•
11.2.3. Modifying a password
The Modify a password function is very similar to the previous one. It is used when
the password has previously been defined and must be changed.
In the Modify password dialog box, there are three fields: one for the current
password, one for the new password and one to confirm the new password.
Atos Worldline - Technology & Products / Engineering / DEP
DEP/NMS User Manual (04.04)
Page: 122/139
Classification: Public
This dialog box also provides the possibility to restore the default password. In that
case, you only have to fill in the current password.
11.3. TESTING LAN CONNECTION TO THE HOST
If you want to test the LAN connection between the DEP Platform and its hosts, select
the Ping function from the Tools menu.
The Packet Internet Groper (Ping) dialog box will appear.
Enter the IP-address or the host name in IP address or name field and click Ping to
start the test.
The feedback and the outcome of the test appear in the status bar at the bottom of the
box. The screenshots below illustrate the kind of information that can be appear in the
status bar.
Atos Worldline - Technology & Products / Engineering / DEP
DEP/NMS User Manual (04.04)
Page: 123/139
Classification: Public
Be aware that this host may be on another network than the one of the PC where the
DEP/NMS application is running (via the gateway).
11.4. SENDING A CALL TO A CRYPTO MODULE
From within DEP/NMS, you can send a specific call to a selected DEP Crypto
Module using the Send a Call function from the Tools menu.
Warning:
This function is only available if you have the Hardware Licence
USB dongle.
First, select a DEP Crypto Module or a DEP Platform and then click Send a Call. If
you select a Crypto Module, the call is sent to that module only; if you select a DEP
Platform, the call is sent to its pool of Crypto Modules.
The Send a Call… dialog box will appear:
In the Call to Send field fill in the call and click the Send button to actually transmit
the call to the DEP Crypto Modules.
The reply will appear in the Output field underneath. This output box is read-only, but
you can select and copy the content by double-clicking in the field.
The status bar at the bottom of the dialog box contains information about the
connection and the response time.
Atos Worldline - Technology & Products / Engineering / DEP
DEP/NMS User Manual (04.04)
Page: 124/139
Classification: Public
To close the dialog box, click Cancel. If you do so during the execution of the call,
the connection with the DEP Crypto Module will be terminated and the dialog box
will be closed.
To clear the Call to Send field click the Clear input field button.
To send a call to a DEP Crypto Module, it must be unlocked. If not an error message
will appear in the Output field.
If an error occurs during the transmission of the call, the error message will be
translated and showed in the output box:
DEP/NMS verifies the call before sending it and, in case of problems, it displays a
warning.
Atos Worldline - Technology & Products / Engineering / DEP
DEP/NMS User Manual (04.04)
Page: 125/139
Classification: Public
12. WORKING WITH PLUG INS
To extend the functionality of DEP/NMS, Atos Worldline has developed additional
tools, referred to as Plug Ins, which you can integrate in the application.
By default, you can add and organize plug-ins in DEP/NMS with the Add Plug in...
and Organize Plug Ins... functions from the Plug Ins menu.
Once a plug-in has been added, it will appear in Plug Ins menu.
The information about the plug-ins that have been added is stored in the
DEP_NMS.INI file. It allows correct rebuilding of the menu when the application
restarts or after an upgrade.
Remarks:
1. Before you can add a plug in, you need to install it (via its
own installation procedure).
2. Plug-ins take over the TCP/ IP configuration of the DEP/NMS
and need no configuration of their own.
3. Managing plug-ins is possible without the Hardware Licence
USB dongle, but using them, on the contrary, is not.
12.1. ADDING PLUG INS
To add a plug-in to the DEP/NMS application, select the Add Plug In... function
from the Plug Ins menu.
The Add Plug In dialog box will appear.
In the Name field supply the name of the plug-in that you want to add. The Browse
button lets you find on your system the executable for the plug-in.
Atos Worldline - Technology & Products / Engineering / DEP
DEP/NMS User Manual (04.04)
Page: 126/139
Classification: Public
By default, the name of the executable that you have selected will be entered in the
Name field. You can, however, change the name.
When you click OK, a link to the plug-in will be inserted in the Plug Ins submenu.
If the hardware license USB dongle is not present, the name of the plug-in is added to
the Plug Ins menu, but it is disabled.
You can add up to twelve Plug-Ins.
In case of adding an invalid plug-in, an error box will appear.
Atos Worldline - Technology & Products / Engineering / DEP
DEP/NMS User Manual (04.04)
Page: 127/139
Classification: Public
12.2. ORGANISING PLUG INS
With the Organize Plug Ins... function you can remove the name of plug-in(s) from
the list in the Plug Ins menu.
If you select the function, the Organize Plug Ins dialog box will appear. To remove
the plug-in select its name and click the Delete button.
The plug-in will be removed from the list.
Remark:
Removing a plug-in from the DEP/NMS Plug Ins menu, does not
impl y uninstallation of the plug-in.
12.3. USING PLUG INS.
Plug–ins are only available if the Hardware license USB dongle is present.
To start using a plug-in, select the appropriate DEP Crypto Module and click on the
appropriate plug–in in the Plug Ins menu. The appropriate application window will
open.
The image below illustrates the use of the plug in RSA Key Generation.
Atos Worldline - Technology & Products / Engineering / DEP
DEP/NMS User Manual (04.04)
Page: 128/139
Classification: Public
For more detailed information on RSA Key Generation plug-in, refer to the RSA Key
Generation User Manual.
Atos Worldline - Technology & Products / Engineering / DEP
DEP/NMS User Manual (04.04)
Page: 129/139
Classification: Public
13. OBTAINING HELP
The DEP/NMS application has integrated help facilities. The Help menu on the
DEP/NMS main window contains the following functions:
13.1. CONSULTING THE ONLINE HELP
To open the online help, select the Help Topics function from the Help menu or press
the corresponding F1 function key.
The DEP_NMS help window will appear, hosting a typical Windows hyperhelp
system, which you can navigate and search to consult the information you need..
13.2. OBTAINING INFORMATION ON DEP/NMS
When you select the function About DEP/NMS from the Help menu, the About
DEP/NMS window will appear with information on the version of the application and
with the legal disclaimer and copyrights.
Atos Worldline - Technology & Products / Engineering / DEP
DEP/NMS User Manual (04.04)
Page: 130/139
Classification: Public
Atos Worldline - Technology & Products / Engineering / DEP
DEP/NMS User Manual (04.04)
Page: 131/139
Classification: Public
14. ANNEX A: INSTALLATION PROCEDURE
An installation procedure is available for the DEP/NMS and DEP/EM applications. It
is a wizard-driven procedure that lets you install DEP/NMS, possibly DEP/EM, and
the License Dongle.
The wizard should normally start automatically and display the DEP/NMS and
DEP/EM Setup Launcher window, when you insert the installation CD-ROM.
Figure 8: Installation wizard
Notes:
1. A user must have administrative privileges to be able to start
the installation procedure.
2. If
the
CD-ROM
not
start
Setup_NMS.exe on the CD-ROM.
automaticall y,
execute
3. This version of the DEP/NMS uses a password to protect the
communication between the DEP/NMS and the DEP Platform.
If you use an old version (< 2.07), it is recommended to delete
the existing file DEP_NMS.pwd before installing this new
version.
14.1. DEP/NMS AND DEP/EM INSTALLATION
To launch the installation of DEP/NMS and DEP/EM, press the corresponding button
in the installation start-up window.
Atos Worldline - Technology & Products / Engineering / DEP
DEP/NMS User Manual (04.04)
Page: 132/139
Classification: Public
The Welcome dialog box appears and you can proceed with the installation by
clicking Next and following the instructions that the wizard presents.
If, for any reason, you do not want to proceed with the installation, press Cancel.
Below is a brief description of the different phases in the installation procedure.
14.1.1. Selecting the installation folder
In the Select Installation Folder dialog box you have to specify the path to the folder
where the DEP/NMS and DEP/EM applications are to be installed.
The default path is C:\Program Files\Atos Worldline\DEP_NMS and
DEP_EM.
It is recommended to use the default path, yet you can specify a different folder by
clicking Browse and selecting the desired folder for the installation of the DEP/NMS
and DEP/EM applications.
You also need to establish whether you want the application to be available to only
one or to all the user of the computer on which you are installing. In the former case
you select the option Just me, in the latter you select Everyone.
Click Next to continue.
If you want to return to the previous screen, press Back or if you want to abort the
procedure, click Cancel.
Atos Worldline - Technology & Products / Engineering / DEP
DEP/NMS User Manual (04.04)
Page: 133/139
Classification: Public
14.1.2. Confirming installation
The Confirm Installation dialog box gives an overview of the settings selected
during the installation procedure.
Click Next to continue.
If you want to return to the previous screen, press Back or if you want to abort the
procedure, press Cancel.
14.1.3. Installing…
Once you have confirmed the installation options, the actual installation starts.
The Installing DEP_NMS and DEP/EM dialog box will appear.
A progress bar combined with status information show you how the installation
moves on.
Atos Worldline - Technology & Products / Engineering / DEP
DEP/NMS User Manual (04.04)
Page: 134/139
Classification: Public
14.1.4. Installation Complete
When all the files and data have been copied, the Installation Complete dialog box
appears to notify you of a successful installation.
Click Close to exit the installation procedure.
To start the DEP/NMS and DEP/EM applications, the installation procedure creates
shortcuts on the Desktop and entries in the Windows Start menu.
14.2. LICENSE DONGLE INSTALLATION
To start the License Dongle installation, press the corresponding key in the
installation start-up window.
The Welcome dialog box appears, from which you can proceed with the installation
by clicking Next and following the instructions on the screen.
If, for any reason, you do not want to proceed with the installation, press Cancel.
Atos Worldline - Technology & Products / Engineering / DEP
DEP/NMS User Manual (04.04)
Page: 135/139
Classification: Public
Below is an overview of the different steps in the installation procedure.
14.2.1. Performing preliminary steps
14.2.1.1. Accepting license agreement
Read and accept the License Agreement and click Next.
Atos Worldline - Technology & Products / Engineering / DEP
DEP/NMS User Manual (04.04)
14.2.1.2.
Page: 136/139
Classification: Public
Specifying setup type
You have to select Complete in order to install all the program features.
Press Next to continue.
14.2.2. Finishing the actual installation
When you have provided all the preliminary information, you can proceed with the
actual installation by pressing Install on the Ready to install the Program dialog
box.
Atos Worldline - Technology & Products / Engineering / DEP
DEP/NMS User Manual (04.04)
Page: 137/139
Classification: Public
The Installing Sentinel SuperPro dialog box will appear, where a progress bar
combined with status information show how the installation moves on.
When all the files and data have been copied, the InstallShield Wizard Completed
dialog box will appear to notify you of a successful installation.
Click Finish to exit the installation procedure.
The hardware license USB dongle is now available for use.
Atos Worldline - Technology & Products / Engineering / DEP
DEP/NMS User Manual (04.04)
Page: 138/139
Classification: Public
15. ANNEX B: FUNCTION KEYS AND
SHORTCUTS
Key
F1
F2
F3
F4
F5
F6
F7
F8
Shortcut
CTRL +N
CTRL +O
CTRL + S
Use
Opens the help file
Gives the status of the selected DEP Platform
Gives the status of the selected DEP Crypto Module
Opens the audit trail
Refreshes all the content of the window: applies to the
main window globally and to the information on the
connections of a DEP Platform (Platform Status –
Connections)
Refreshes the selected item (DEP Platform or DEP Crypto
Module)
Opens the dialog box for adding a new DEP Platform to the
configuration
Opens the dialog box for modifying the selected DEP
Platform
Use
Opens a new empty configuration
Opens an existing configuration
Saves the current configuration
16. ANNEX C: AUDIT TRAIL OPERATIONS AND
EVENTS
Operation or event
First start, start and stop of the DEP/NMS application
Modification of the automatic refresh parameter of the DEP/NMS
Clear of alarms on a DEP platform
Add, modify or delete a DEP platform from the configuration
Open, save and save as of a configuration
C-ZAM/DEP actions: message from C-ZAM/DEP to DEP platform 1, DEP
Crypto Module 2
Presence of an alert (DEP/NMS initiative or DEP platform initiative)
Lock or unlock of a DEP platform
Modification in the connections parameters of a DEP platform
Modification of an application protocol parameter of a DEP platform
Modification of a parameter in the communication protocol of a DEP platform
Start, stop and save of trace of a DEP platform
Start, stop and save of statistic of a DEP platform
Configuration of a DEP Crypto Module
Load and end of applications of a DEP Crypto Module
Backup, restore and save info of keys of a DEP Crypto Module
Save info of capabilities of a DEP Crypto Module
Save info of counters of a DEP Crypto Module
Atos Worldline - Technology & Products / Engineering / DEP
DEP/NMS User Manual (04.04)
Page: 139/139
Classification: Public
Make diagnostics on a DEP Crypto Module
Reset a DEP Crypto Module
Modifying a DEP application parameter on a DEP Crypto Module
Modifying the Real Time Clock of a DEP Crypto Module.