1
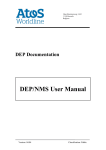
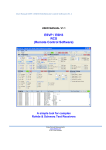
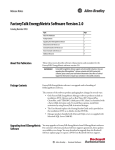
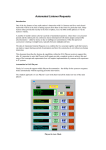
TMS Client - User Manual Product name TMS Client Product number 08020 Title TMS Client - User Manual Author wman / rdem Version 1.5 Status Released Classification Unclassified Info Saved as TMS_Client_User_Manual.docx, on 2013-09-13 16:04 Copyright Statement © 2013 Chess pT International B.V All rights reserved. Disclosure to third parties of this document or any part thereof, or the use of any information contained therein for purposes other than provided for by this document, is not permitted, except with the prior and express written permission of Chess payment Technology International B.V. Document history 2/21 Date Author Status Remarks 2010-08-06 fass Draft First release 2010-08-09 wman Draft Added comments for not implemented functionality, corrected spelling. 2010-08-13 wman Draft Removed ‘Terminal Swap’ paragraph. 2010-10-15 wman Draft Rewrote User Manual For TMS Client v2.0 ? wman Draft Update for TMS Client v2.0.1 ? wman Released Update for TMS Client v2.0.2 2011-11-08 wman Released Update for TMS Client v2.1.0 2013-09-12 rdem Released Update for TMS Client v2.2.1 Clean-up, update to Chess pT style, error fixing, removed superfluous and obsolete sections. Unclassified TMS Client - User Manual 1.5 References 3/21 [1] Trial-Use Standard, Standard for information Technology, Software Life Cycle Processes Software Development, Acquirer-Supplier Agreement, J-STD-016-1995, 30 September 1995 [2] PACT 2 SSDD, version 1.2, november 13th, 2008, Chess B.V. [3] Common Terminal Acquirer Protocol Terminal Specification version 3.0: ▪ CTAP Terminal Specification – Outline, CTAP.000 v3.0, june 2006, Interpay Nederland B.V. ▪ CTAP Terminal Specification – Online Terminal Functionality, CTAP.200 v3.0, april 2006, sa Banksys nv ▪ CTAP Terminal Specification – Process using the Terminal Security Component, CTAP.202 v3.0, april 2006 sa Banksys nv ▪ CTAP Terminal Specification – TSC Operations, CTAP.212, april 2006, sa Banksys nv ▪ CTAP Terminal Specification – Data Dictionary & Message Layout, CTAP.220 v3.0, april 2006, sa Banksys nv ▪ CTAP Terminal Specification – Requirement NL, CTAP.310, june 2006, Interpay Nederland B.V. ▪ CTAP Terminal Specification – Processing NL, CTAP.320 v3.0, june 2006, Interpay Nederland B.V. ▪ CTAP Terminal Specification – Telecom NL, CTAP.330 v3.0, june 2006, Interpay Nederland B.V. ▪ CTAP Terminal Specification – Implementation profiles NL, CTAP.340 v3.0, june 2006, Interpay Nederland B.V. ▪ CTAP Terminal Specification – Monoblock NL, CTAP.350 v3.1, july 2006, Interpay Nederland B.V. [4] RDM Web Service Interface, IDD, versie 1.2, 27 September 2010, Chess B.V. [5] IDD RDM, versie 2.1, Chess, 2010-08-24 [6] TBD TA applicatie, SUM ?! [7] RDM SUM, versie 2.2, 27 September 2010, Chess B.V. Unclassified TMS Client - User Manual 1.5 Table of Contents 1 2 3 Scope 5 1.1 Identification 1.2 System Overview 1.3 Document Overview 5 5 6 Software Summary 7 2.1 2.2 2.3 2.4 2.5 7 7 7 7 8 Software Application Software Inventory Software Environment Installation Instructions Assistance and Problem Reporting Access to the software 9 3.1 First-time use of the Software 9 3.1.1 3.1.2 3.1.3 4 9 10 11 3.2 Initiating a Session 3.3 Stopping and Suspending Work 11 11 Processing Reference Guide 12 4.1 Capabilities 4.2 Processing Procedures 12 13 4.2.1 4.2.2 4.2.3 4.2.4 5 Equipment Familiarization General Information Access Control TMS Client Settings Register New Terminals Manage Existing Terminals Manage Terminal Software Updates 13 15 17 19 Annexes 21 5.1 Abbreviations 21 Table of Figures Figure 1: TMS Client Main screen ..................................................................................................... 9 Figure 2: Settings screen .................................................................................................................. 9 Figure 3: Error message when the security certificate is not (correctly) installed ............................ 10 Figure 4: Current settings panel ...................................................................................................... 10 Figure 5: Status panel ..................................................................................................................... 10 Figure 6: TMS Client Main screen ................................................................................................... 12 Figure 7: Settings screen ................................................................................................................ 13 Figure 8: Terminal template properties ........................................................................................... 14 Figure 9: Create a new terminal ...................................................................................................... 15 Figure 10: Default C-TAP data ........................................................................................................ 16 Figure 11: Manage existing terminals ............................................................................................. 17 Figure 12: Technical configuration .................................................................................................. 18 Figure 13: Pending TMS actions ..................................................................................................... 19 Figure 14: Software update ............................................................................................................. 20 4/21 Unclassified TMS Client - User Manual 1.5 1 1.1 Scope Identification This document describes the usage of the TMS Client v2.2.1. The TMS Client is used for the following purposes: ▪ Creating new Pay4You terminals ▪ Managing existing Pay4You terminals 1 ▪ Creating new Pay4You terminal device groups (disabled since v2.2 ) ▪ Managing existing Pay4You terminal device groups (disabled since v2.2) ▪ Scheduling software updates for the Pay4You terminal software application All of the above functions are defined in [1]. 1.2 System Overview Pay4You Terminal is a development by Chess pT of a mobile point of sale terminal supporting debit (in Dutch: PIN) and credit card payments using either chip cards (EMV) or magstripe cards. The terminal conforms to all relevant payment industry and security requirements – PCI, PCI+, EMV level 1, EMV level 2 – to enable its use in the Dutch market according to the Dutch C-TAP specifications and also make it easily adaptable to other European markets. The complete configuration consists of the following parts: 5617.8000.xxx Pay4You terminal CONFIG 5617.8100.xxx TMS 5617.3000.xxx terminal Hardware 5617.8400.xxx Security Box Application 5617.8500.xxx Terminal application 5617.8550.xxx EMV L2 Kernel 5617.9700.xxx Personalisation Tooling 5617.9000.xxx PTS Tooling Build The TMS manages the payment terminals. By means of web services, the TMS allows for external components (e.g. a Customer-Relationship System (CRM)) to incorporate TMS-behaviour into their own application. In the case where a CRM is absent, the TMS offers the possibility to call the web services directly in order to obtain the desired functionality. As a direct consequence, functionality that is not known explicitly by the TMS is not provided by the TMS Client. Pay4You Terminal TMS Client TMS WSDL Interface 1 Later versions of TMS implement a group model in which users can only access terminals that are in the same group as the user. This enables separation of logical management units on the same TMS. Therefore assigning terminals to groups is not applicable anymore for users of the TMS Client. Terminals are assigned to a group by an administrator in TMS. 5/21 Unclassified TMS Client - User Manual 1.5 1.3 Document Overview This document is intended for technical users of the TMS Client. 6/21 Unclassified TMS Client - User Manual 1.5 2 2.1 Software Summary Software Application The TMS Client interfaces with the Pay4You TMS and is used for the following purposes: ▪ Creating new Pay4You terminals ▪ Managing existing Pay4You terminals ▪ Creating new Pay4You terminal device groups (disabled since v2.2) ▪ Managing existing Pay4You terminal device groups(disabled since v2.2) ▪ Scheduling software updates for the Pay4You terminal software application 2.2 Software Inventory For a listing of all required packages, please refer to the SVD of the current release. 2.3 Software Environment The TMS Client is dedicated software which is specifically designed and written to interface with the Pay4You TMS. The TMS Client software runs in a Windows environment and is delivered in the form of an installer 2 package or as ClickOnce application available from the Chess pT website. This package contains the installer application (wizard) as well as the necessary application files to install the TMS Client. 2.4 Installation Instructions Since the TMS client makes use of an SSL connection to the TMS, the TMS SSL certificate needs to be trusted on the client machine. This can be done by installing the “Pay4You Root CA” certificate in the “trusted base certification authorities” store. Contact Chess pT to obtain the certificate. Since version 2.2, the TMS client is distributed via the Chess pT website using ClickOnce. This enables automatic updates of the TMS client. The TMS client can still be distributed as a regular download while still being able to update via the Chess pT web server. 1. First uninstall the previous version of TMS Client if installed: Control Panel Remove programs TMS Client. 2. With Microsoft Internet Explorer or FireFox go to: http://www.chess-pt.com/Software/TMSClient/ 3. The website displays the prerequisites such as the .NET 4 framework. If the prerequisites are already installed, click the “launch” link. The “TMS Client” is downloaded, installed and run. If the prerequisites are not yet installed, click the “Install” button which downloads the “setup.exe” file. Run this file. The “TMS Client” and prerequisites are downloaded, installed and run. 4. When the “TMS Client” is installed, it can be started from the start menu: Programs Chess pT Pay4You TMS Client 2 ClickOnce is a software deployment technology from Microsoft where a Windows application is installed and started from a web site. 7/21 Unclassified TMS Client - User Manual 1.5 5. When the TMS Client is started it will automatically check if there is a new version of the TMS Client available. This might cause a small delay when starting the application. 2.5 Assistance and Problem Reporting Whenever a problem is detected with the TMS Client, please send a problem report to Chess pT. 8/21 Unclassified TMS Client - User Manual 1.5 3 3.1 3.1.1 Access to the software First-time use of the Software Equipment Familiarization The first screen you will encounter is the Main screen: Figure 1: TMS Client Main screen When running for the first time, the TMS Client has to be configured to be able to reach the desired TMS. Configuring the settings is done in the Settings screen. When the TMS client is started for the first time the Settings screen will be shown automatically at start-up. Alternatively the Settings screen can be opened from the Main screen via the “Settings Configure” menu. An example configuration is shown in Figure 2. Figure 2: Settings screen 9/21 Unclassified TMS Client - User Manual 1.5 Depending on your local configuration, you should enter the following information in the text boxes: ▪ Payment Webservice URL: This is the URL that is used by the TMS Client for payment web service calls. The MyTmsUrl part is the host name / IP address of your TMS. ▪ Management WebService URL: This is the URL that is used by the TMS Client for management web service calls. The MyTmsUrl part is the host name / IP address of your TMS. ▪ WSDL User name: The user name that is used when the TMS requires basic authentication. ▪ WSDL password: The password that is used when the TMS requires basic authentication. Click Update after entering your settings to save the configuration. Now the TMS Client is ready to be used. The following paragraphs provide guidance through the various application screens. Note: When entering the URLs, there is a distinction between a URL starting with http and https. The former requires the port number (the four digits after the ‘:’) to be set to 8080 and does not encrypt WSDL user name and password. The latter requires the port number (the four digits after the ‘:’) to be set to 8443 and does encrypt WSDL user name and password. Using https requires installation of a certificate on the client computer which causes the TMS Client to trust only data that was transmitted by an actual TMS. Otherwise, the following error is shown when the TMS Client tries to communicate with the TMS: Figure 3: Error message when the security certificate is not (correctly) installed Note: to have the TMS require basic authentication, please refer to [7]. When the user name/password is not correct, the following message will be shown: The request failed with HTTP status 401: Not authorized. 3.1.2 General Information In the various screens you will encounter, clicking Cancel or Exit will bring you back to the Main screen. Also, near the bottom of most windows, a panel indicates the current values of various settings and/or properties. This way, you can always quickly tell what data you were working with. An example is shown in Figure 4. Figure 4: Current settings panel The actual data may vary based on the different screens the TMS Client can display. For instance, when managing device groups, the current group ID is displayed instead of the current Logical ID. Most screens provide a progress bar and/or status icons to notify the user of the current status of an executed task by the TMS Client. An example of a status panel is shown in Figure 5: Figure 5: Status panel 10/21 Unclassified TMS Client - User Manual 1.5 The area above the progress bar displays informative messages concerning the result of the task (e.g. “Successful” or an error message in case the task failed). Additionally, there are three icons defined to indicate the status of the running task: Icon Description An error has occurred, (part of) the task has failed. The task has finished successfully. The task is running, please wait until it finishes. Table 1: Status icons 3.1.3 Access Control Some critical settings are protected by an administrator password. The administrator password can be changed from the Settings menu. After the first installation, the default password is set to “0000”. In case you have forgotten your administrator password, please contact your TMS Client supplier. 3.2 Initiating a Session Before working with the TMS Client, make sure the computer running the TMS Client has an active network connection to the TMS it has to communicate with. The TMS Client is started by running it from the StartPrograms menu (Default: StartProgramsChess pTPay4YouTMS Client). 3.3 Stopping and Suspending Work Terminating the TMS Client is done by either selecting FileQuit from the Main screen or by clicking the ‘X’ button in the top-right of the Main screen. When another screen than the Main screen is the active window, that window has to be exited first. 11/21 Unclassified TMS Client - User Manual 1.5 4 4.1 Processing Reference Guide Capabilities The Main screen of the TMS Client is displayed in Figure 6. It provides access to the following submenus: It contains a menu bar which gives access to: ▪ File Exit: Closes the application. This can also be achieved by clicking the ‘X’ button on the top right. ▪ Language: Presents the available display languages. ▪ Settings Configuration: Brings up the Settings Screen. Refer to section 4.2.1 for details. The following buttons are provided in the Main screen window: ▪ Create Terminal: Brings up the Create Terminal Screen (section 4.2.2). ▪ Manage Existing Terminals: Brings up the Manage Existing Terminals Screen (section 4.2.3). ▪ Terminal Software Update: Brings up the Terminal Software Update Screen (section 4.2.4). Figure 6: TMS Client Main screen 12/21 Unclassified TMS Client - User Manual 1.5 4.2 4.2.1 Processing Procedures TMS Client Settings The Settings Screen provides two types of settings: ▪ Client Settings: accessible through the Client tab. ▪ Terminal Settings: accessible through the Terminal tab. 4.2.1.1 Client Settings Figure 7: Settings screen The Client tab allows you to configure the URLs on which to contact the TMS as well as the WSDL user name and password used when contacting the TMS. Also, you can change the administrator password by clicking the Change link. This will bring up a change password dialog. After entering the current administrator password, you will be prompted to type in the new password. This password is required for various critical settings which are not to be changed lightly. The Update button must be clicked to save the settings else they will be lost when leaving the tab. 13/21 Unclassified TMS Client - User Manual 1.5 4.2.1.2 Terminal Settings The Terminal tab enables you to install default settings for every terminal that will be created. Some of the settings that can be changed are: ▪ TMS URL: This is the URL that the terminals will use to do management sessions. ▪ NTP Server: This is the URL that the terminals will use for time synchronization purposes. ▪ APN Name: The access point name that the terminal will use for GPRS communication. ▪ APN User: The user name that terminals will use for authentication using GPRS. ▪ APN Pass: The password that terminals will use for authentication using GPRS. ▪ Receipt footer: the value that will be displayed on the footer of a transaction receipt. By clicking Refresh, the current default settings are refreshed (if any). These settings are passwordprotected. To be able to edit the property value, uncheck the Lock defaults check box. You will be prompted for the administrator password. After entering the correct password, you may edit the settings. Click Submit to transmit the new settings values to the TMS. The check boxes in the first column indicate the settings that will be updated in the TMS after clicking Submit. Figure 8: Terminal template properties The list can be sorted by clicking on the column headers (except the Value column). Clicking the same column twice sorts it in the reversed direction. In general most lists in the TMS Client application can be sorted by clicking on the column header. 14/21 Unclassified TMS Client - User Manual 1.5 4.2.2 4.2.2.1 Register New Terminals Generate a Logical ID Upon loading this screen, a list with available logical IDs is displayed as shown in Figure 9. Available means that these IDs can be linked to a physical device (i.e. they can be activated). Creating a terminal essentially means registering a new logical device (i.e. a new activation code) in TMS. Figure 9: Create a new terminal Click the Create button to generate a new logical ID. The TMS Client will now ask TMS to generate a new activation code (logical ID) and register it in its database. If successful, the new ID is present in the list and it will have been selected. When a logical ID is selected the Default C_Tap Data tab is available. This tab provides functionality to further configure the selected logical ID and is described in the following paragraph. By clicking the Refresh button the list will be reloaded. By using the Find by ID button, it is possible to find an available logical ID in the list. The search query accepts a wildcard character (%) at the start, end and in the middle of the expression. For example the expression “%123” finds the first ID ending with 123. 15/21 Unclassified TMS Client - User Manual 1.5 4.2.2.2 Configure C-TAP Data By selecting the C-TAP Data tab, you can supply a default payment (C-TAP) configuration as shown in Figure 10. The TMS Client will list two tables, one with acquirer processors, and one with card brands. Whenever a row is changed, the update checkbox at the left will be checked. If a row should not be submitted, please uncheck the checkbox manually. Figure 10: Default C-TAP data For the acquirers that you want to activate, set the proper terminal ID and optionally shop logo and location. For the card brands that you wish to activate, select its associated acquirer processor from the drop down box and enter the desired merchant user ID. One can also configure whether the terminal should use “Open Internet” or a secure connection to contact the acquirer processors. This can be set using the Connection Method dropdown list. Click Submit when you are ready to send the payment configuration to TMS. The changes must be submitted before leaving the C-TAP Data tab or else the changes will be lost. Note: The values to be entered are specified in [3]. In case an invalid value is entered, an error icon is displayed in the incorrect cell as shown for acquirer AWL NL in Figure 10. In this case, the terminal ID ‘123456789’ contains too many characters. When the table contains invalid values and Submit is clicked, a status message is shown that the table contains invalid values. These invalid values then first have to be corrected to continue. 16/21 Unclassified TMS Client - User Manual 1.5 4.2.3 4.2.3.1 Manage Existing Terminals Terminal Identification Tab Upon entering this screen, the current list of devices is automatically retrieved and shown on the left. Devices that are already activated will show both a logical and physical ID. Devices that are not yet activated only show a logical ID and will display ‘None’ as physical ID. Select the terminal you want to manage by clicking its ID from the list. The panel below should display the selected terminal’s IDs. Additionally, the text fields describing the terminal details will now display values. If the details were successfully retrieved, additional tabs will be displayed at the top, as shown in Figure 11. If the terminal did not have an associated physical ID, only the Terminal Identification and C-TAP Configuration tabs are displayed. Figure 11: Manage existing terminals The device list can be refreshed manually with the Refresh button. Also, the list can be queried based on either logical or physical ID by using the Find by logical ID and Find by physical ID buttons respectively. The search query accepts a wildcard character (%) at the start, end and in the middle of the expression. 17/21 Unclassified TMS Client - User Manual 1.5 4.2.3.2 C-TAP Configuration Tab The values in this screen show the current terminal’s payment configuration. Editing and submitting the values is analogous to the Payment Configuration step from the Create Terminal screen as described in section 4.2.2.2. Note: the C-TAP values displayed are the default values that are updated at the same time as the terminal values. The values shown are thus not necessarily the values in the terminal. Only after the target terminal has communicated with TMS to retrieve the new values, the values in the terminal are updated. To check whether values will be updated, please inspect the Pending TMS Actions tab as described in section 4.2.3.4. 4.2.3.3 Technical Configuration Tab This tab allows you to view and configure various technical settings as shown in Figure 12. These are divided in two tables: a Technical Settings and a System Settings table. The possible values for these settings are described in [6]. The system settings are password protected like the template default settings in the settings menu. By checking the Submit to defaults check box, the settings will also be saved to the terminal’s factory defaults instead of only being set as property updates. Figure 12: Technical configuration 18/21 Unclassified TMS Client - User Manual 1.5 Press the Submit button to send the changed properties to the terminal. The changes must be submitted before another tab is selected else the changes will be lost. Note: the values displayed are the current values and thus does not display updates that are still pending. Reloading this tab will show the current values again. Only after the target terminal has communicated with TMS to retrieve the new values, this tab will display those communicated values. To check whether values will be updated, please inspect the Pending TMS Actions tab, as described in 4.2.3.4. 4.2.3.4 View Pending TMS Actions Tab This tab shows the currently pending actions to be performed by the TMS for the current terminal. These will be executed on the terminal after the next management session between terminal and TMS. This tab displays two things: pending property updates and pending notifications. Selecting a value from the list of pending property updates will display the pending update in more detail as shown in Figure 13. Figure 13: Pending TMS actions The terminal in the example above also has a notification pending. Click the Refresh button to refresh the current pending actions. 4.2.4 Manage Terminal Software Updates This screen makes it possible to schedule software updates of the Terminal Application as shown in in Figure 14. Select the device(s) you want to update and click Submit. More than one ID can be selected at once by holding the <ctrl> or <shift> keys. By using Find by logical ID and Find by physical ID buttons the list can be queried for an ID. The found ID will be added to the selection. 19/21 Unclassified TMS Client - User Manual 1.5 Figure 14: Software update 20/21 Unclassified TMS Client - User Manual 1.5 5 5.1 Annexes Abbreviations Abbreviation TMS Meaning Terminal Management System Table 2: Abbreviations 21/21 Unclassified TMS Client - User Manual 1.5