1
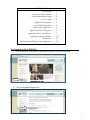
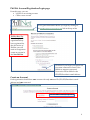
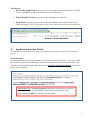
 PhilNet: Philanthropy Network for Broward Nonprofit Organization User Manual
1
PhilNet: Philanthropy Network for Broward User Manual_ Introduction Welcome to PhilNet: Philanthropy Network for Broward, a web‐based technology that allows you as a nonprofit organization to manage the Community Foundation grants process online. With the re‐launch of PhilNet, all grant proposals will be submitted online. Now, it’s easier for you to apply for and manage grants, freeing up your time to focus on your mission. What are the big changes? Area Benefit to You! General • A much simpler process Profile Info • Edit your profile information directly on the application. Do not need to navigate to a separate profile section. Applications • CEO/President/ED email address as login • Easier navigation • Open attachments from draft and submitted applications • Email a draft application to others in your organization right from PhilNet • Word limitations for answers, not character limitations Reports All grant reports can now be submitted via email in a Word document How Does PhilNet: Philanthropy Network for Broward work? Once a proposal is submitted through PhilNet, it is thoroughly reviewed by Community Foundation staff who determines if the proposal represents an innovative project that would address an area of considerable need and have significant positive impact in the community. If so, the proposal will be posted on PhilNet and is then available for staff to easily find and recommend to our Fundholders and our philanthropic partners. PhilNet is also a unique services for our donor advised Fundholders (those Fundholders who make grant recommendations directly from their charitable Funds). They have access to PhilNet and are able to search for projects that meet their interests. An account is required for all nonprofits to use PhilNet. Once registered, you will be able to: • submit proposals for grants • update organizational information • track draft and submitted proposals Please review the following material to help you better understand the process and get you started. If you have any questions, please call Nancy Rogan, manager of grants and initiatives, 954‐761‐
9503. 2
Table of Contents
Introduction …….2 Get Started in New PhilNet …….3 Account Registration/Login …….4 Your Account …….5 Application Worksheet …….6 Your Profile Information …….6 Open a New Application …….6 Application Basics Navigation …….6 Application Basics View/Review …….7 Application Question Details …….7‐8 Attachments …….9 Finishing and Submitting Your Application …….10 Get Started in New PhilNet 1. From Community Foundation of Broward home page, click the PhilNet link Click Here 2. Click the Nonprofit Login button. Click Here NONPROFIT LOGIN
3
Phil Net Account Registration/Login page From this page, you can: • Login in to an existing account • Create a new account Access grant information before you login by clicking on the PhilNet Resources and Forms link at the top of the PhilNet User Tip: Even though your organization may have registered for the old version of PhilNet, you will need to re‐register to create an account in the New PhilNet. Click here if you forgot your password. You must create an account in New PhilNet to request a password. Passwords will be mailed to the CEO/ED/President’s email address. Create an Account Each organization should have one account with only one user ID (CEO/ED/President’s email address) and one password. Your CEO/ED/[email protected]
4
Your Account Once you create an account, or logon to an existing one, your PhilNet Account page will open. You can access grant guidelines, PhilNet manual, RFPs and forms by clicking the PhilNet Resources and Forms link at the top of the page. Open new applications here! Draft applications are filed here! Submitted applications are filed here!
5
To Submit a Proposal I.
Application Worksheet 1. Download a copy of the worksheet from the PhilNet Resources and Forms link at the top of the page. Use the worksheet to spell check and check your word count before submitting the online proposal. Cut and paste your answers from the worksheet into the online form. PhilNet User Tip: The online form has word limitations. It will not move to the next section in the application if the answers exceed the limits.
II.
Open a New Application Click here to open a new application PhilNet User Tip: As you open a new application, you may need to re‐login to link that application to your account. III.
Your Profile Information: Organization profile information is entered when you begin your first application. Each subsequent application will open with the information already entered. You can review it and update as necessary, right from the form. IV.
Application Basics Navigation 1. Use the buttons on the bottom of the screen to navigate through the application. a. Save and Finish Later will close the application and take you to your Account page. b. Next will move to the next page 2. Use the page numbers at the top of the page to jump from section to section. Just click on a number and the application will take you to that page. So easy! 2.
6
View/Review 1. Review My Application allows you to review the application and make edits. This link will also highlight required fields that have not been completed. 2. Printer Friendly Version will print out the full application with text. 3. Email Draft will email a proposal to another email address (this should not be used to submit proposals). This is a great feature to use to have someone proof or approve the application. 1.
2.
3.
V.
Application Question Details The section will highlight application changes and explain questions that are crucial in describing your project. Project Summary The information here is the first description of your project a reviewer will see. A reviewer could be Foundation Staff, other philanthropic partners or Community Foundation Fundholders. This summary statement should grab their attention and provide a powerful snapshot of what your project will accomplish. PhilNet User Tip: The Project Summary should give all reviewers, even those not familiar with your organization or the services you provide, a clear understanding of what your project will accomplish. 7
Outcomes 1. Measurable Outcomes: Articulate what measurable changes will occur in your target population as a direct result of your program. 2. Outcome Strategy: Describe the specific service/assistance/training you will provide/ implement, etc… to achieve the above outcome. 3. Outcome Evaluation: Identify how you will evaluate your project so you are able to determine how effective your project was. Project Description The information here should paint a picture of your project. The reader should be able to visualize what will take place so they fully understand the project’s design and how it is implemented. PhilNet User Tip: The Project Description should give any reviewer, even someone who is not familiar with your organization or the services you provide, a clear understanding of how your project will accomplish the outcomes. • Please do not use technical jargon. • Spell out acronyms. 8
VI.
Attachments Please upload the following attachments. If documents are not electronic, they will need to be scanned to upload to the application. The different attachments are uploaded by clicking on the down arrow in the options field. 1. Fully completed Budget Forms. Complete all three tabs on the Excel spreadsheet. 2. The current IRS determination letter. 3. Most recent annual financial statement (independently audited, if available; if not available, attach IRS Form 990). Include a copy of management letter. 4. List of members of your Board of Directors with their affiliations (this information will not be shared with other parties). 5. Letters of support. Letters of support are required if third party is involved in delivering program. If no third party is involved, you may still include letters of support that verify project need and your organization’s ability to deliver proposed program. Letter should be on the third party’s letterhead. 6. Annual report or any marketing material(s) about your organization (if available) Limit to two items. 9
VII.
Finishing and Submitting Your Application 1. The Review My Application link at the top of the page will: a. Allow you to review your application b. Point out any required sections you are missing c. Make edits in this view 2. Printer Friendly Version will print a hard copy or your entire application. 3. Email Draft will email a copy of the application. This may be used to have others review a draft prior to submitting. 1.
2.
3.
4. Save & Finish Later button will close the application and save it in the Open application section on your home page. 5. Once you are satisfied with the application, click the Submit button. You will receive an email notification of your submission of your application. 4.
5.
6. You can access submitted applications and saved draft applications from the Account page. 4.
6.
10