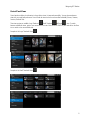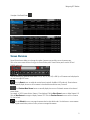
1
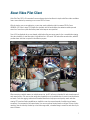
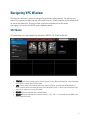
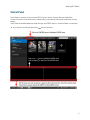
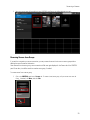
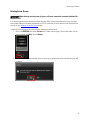
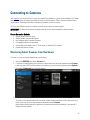
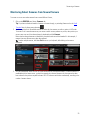
VIDEO PILOT CLIENT USER GUIDE ©2015 i3 International Inc. The contents of this user manual are protected under copyright and computer program laws. www.i3international.com 1.866.840.0004 CANADA 780 Birchmount Road, Unit 16, Scarborough ON, M1K5H4 U.S.A. 4450 Witmer Industrial Estates, Unit 4, Niagara Falls, NY, 14305 Table of Contents About Video Pilot Client ............................................................................................................................................ 1 Logging In ............................................................................................................................................................... 3 Forgetting a password.......................................................................................................................................... 4 Changing login info .............................................................................................................................................. 4 Navigating VPC Window ........................................................................................................................................... 5 VPC Modes ......................................................................................................................................................... 5 Control Panel....................................................................................................................................................... 6 Control Panel Tabs .......................................................................................................................................... 7 Control Panel Views ........................................................................................................................................ 8 Screen Divisions .................................................................................................................................................. 9 Search Bar ........................................................................................................................................................ 10 Help Menu ........................................................................................................................................................ 10 Close/Minimize .................................................................................................................................................. 10 Connecting to Servers............................................................................................................................................. 11 Connecting to Groups of Servers ......................................................................................................................... 13 Disconnecting from Servers and Groups of Servers ............................................................................................... 14 Managing Server Connections ................................................................................................................................. 15 Adding New Server Connection ........................................................................................................................... 15 Deleting Server Connection ............................................................................................................................ 17 Creating Server Groups ...................................................................................................................................... 18 Renaming Server Groups ............................................................................................................................... 19 Removing Servers from Groups ...................................................................................................................... 20 Deleting Server Groups .................................................................................................................................. 22 Connecting to Cameras ........................................................................................................................................... 23 Monitoring Select Cameras from One Server ........................................................................................................ 23 Monitoring Select Cameras from Several Servers .................................................................................................. 25 Monitoring Favorites Groups of Cameras .............................................................................................................. 26 Creating Favorites Folder .................................................................................................................................... 28 Editing Favorites Folder .................................................................................................................................. 30 Deleting Favorites Folders .............................................................................................................................. 31 Monitoring Color-Tagged Cameras ....................................................................................................................... 31 Color-tagging cameras ................................................................................................................................... 33 Text Search....................................................................................................................................................... 34 Monitoring Cameras via Maps ............................................................................................................................. 36 Linked Cameras............................................................................................................................................. 38 Live Viewing .......................................................................................................................................................... 40 On-screen Controls ............................................................................................................................................. 40 Dual Streaming.................................................................................................................................................. 41 PTZ / 360 degree Camera Control ....................................................................................................................... 42 Quick Search ..................................................................................................................................................... 44 Quick Search Control Panel ............................................................................................................................ 45 Quick Search Backup ..................................................................................................................................... 46 Video Search ......................................................................................................................................................... 47 Video Backup ......................................................................................................................................................... 49 i About Video Pilot Client Video Pilot Client (VPC) is i3 International’s remote software solution that allows for simple and efficient video surveillance from a remote location by connecting to one or more SRX-Pro Servers. With this intuitive, easy-to-use application, you can view, search and backup video from remote SRX-Pro Server HVR/NVRs. VPC offers a unique GUI (Graphic User Interface) with full screen display that maximizes usable space and ease-of-use. Faster boot-up and video backup times further improve user experience. Parts of GUI are displayed only on user demand, which helps utilize more screen space for live or recorded video viewing. Users have the ability to view video either in high definition or in VGA mode. VGA mode offers smoother video, while HD provides clearer video that is required for identification purposes. When connecting to multiple cameras at multiple remote sites, the VPC will create a thumbnail for each viewed camera of each remote location. The users can then assign these thumbnails one of six available colors for easier future identification and search. Such color-tagging, combined with thumbnail identification help improve and speed up search and video viewing. VPC search and backup capabilities are simplified to meet the resource demands of multiple site and camera connections. Once connected to the remote location, the user can perform historical search on the past 24 hours of video recording. Once the video clip is backed up to the local storage media, a thumbnail image is created for each video clip for ease of reference 1 About VPC A map of the facility can be loaded onto the VPC and available cameras can be laid out on the map in accordance with their physical installation locations. This helps users identify where the cameras are located and simplifies viewing cameras in the direct vicinity. This camera linking function provides the user with the ability to track the subject throughout the facility. Note: Video Pilot Client requires SRX-Pro Server v3.0 or higher. Some of the VPC features include: Instant camera search by name or customer-assigned color ID AVI and i3 Encrypted backup Live view snapshot “On Screen Display” - hide/unhide camera names, server name, or current date/time Hide/unhide text overlay or show text overlay on the “Side Panel” Picture-in-Picture digital zoom in/out Camera linking Automatic updates VPC hardware specs: CPU i5, memory 4GB, OS, Vista/Win7/Win8 2 Logging In VPC can be launched from your Desktop by double-clicking the Video Pilot Client icon. Login Screen will be displayed. Enter your User Name and Password and click Login. Note: To skip the login process next time, click on the Help icon on the main screen , select Options and uncheck Start VPClient with password checkbox. Optional: If you are using Video Pilot Client at a secure location and wish to avoid logging, check Remember Login Info checkbox. Once successfully logged in, Video Pilot client main screen will be displayed. By default, Servers tab of the CONTROL panel is displayed. Here, you can see all previously-added Servers. For more information on the VPC modes and general instructions on how to navigate between them, see Navigating VPC window section. 3 LogIn Forgetting a password If you cannot recall your password, do the following to reset it: 1. In the Login Security screen, enter your User Name and click on Forgot Password? 2. You will be prompted to answer Security Question. Security Question is set at the time of the first VPC installation. 3. Enter the answer to your Security Question and click Submit. 4. New Login Security window will be displayed, where you can now change your User Name, Password and Security Question & Answer information. Fill out all fields and click Submit. 5. Regular Login screen will be displayed. Enter your new Password and click Submit. Changing login info If you want to change any of your login credentials, do the following: 1. In the Login Security screen, enter your User Name and current Password and click Change password 2. New Login Security window will be displayed, where you can now change your User Name, Password and Security Question & Answer information. Fill out all fields and click Submit. 3. Regular Login screen will be displayed. Enter your new Password and click Submit. 4 Navigating VPC Window Video Pilot Client main screen is intuitive and is designed for optimal video viewing experience. This means that nonessential GUI components are hidden from view until required by the user. This way unnecessary buttons and controls do not interfere with camera view. This section will help you get more comfortable with the VPC window. After logging in, Servers tab of the CONTROL panel is displayed by default. VPC Modes VPC window allows you to switch between four main modes: CONTROL, LIVE, SEARCH and BACKUP. CONTROL mode: Switch between the list of Servers, Cameras, Favorites, Maps and Archived Files. Control Panel allows you to connect to multiple remote SRX-Pro Servers. LIVE: View live cameras from connected Servers. Note, when in LIVE mode, the GUI interface will be hidden after 1 minute of inactivity and the live cameras will take up the entire application frame. To see the user interface buttons again, simply roll your mouse cursor over the VPC window. SEARCH: Review recorded video from connected Cameras BACKUP: Backup recorded video from connected Cameras in *.JPG, *.AVI or *.i3 (encrypted) format to CD/DVD, flash drive or a hard drive location. 5 Navigating VPC Window Control Panel Control Panel is a repository for all your remote SRX-Pro Servers, Cameras, Favorites, Maps and Archived Files. You must first connect to the remote Server or camera before you can view live video, search recorded video or create backups. Control Panel can be hidden/displayed by simply clicking on the CONTROL button. It can also be hidden or re-sized using the or by using the re-size bar (gray bar with the ... button in the centre). 6 Navigating VPC Window Control Panel Tabs Control Panel consists of 5 tabs: Servers, Cameras, Favorites, Maps and Archived Files. Servers tab - is a repository for remote SRX-Pro Server connection information. When in Thumbnail/Small Thumbnail view, each server is represented by a screenshot of 4/1 of the actual cameras connected to this remote server. You must connect to the new server at least once for screenshots to be acquired by VPC. Cameras tab - is a repository for all previously connected cameras. Each one is represented by a video screenshot available at the time of last connection. Cameras tab allows browsing through all cameras from all added Servers and choosing individual cameras for Live viewing, searching and color-tagging. Favorites tab - allows creating custom folders (groups) of cameras for quick connection. For example, you may add front door cameras from all of your remote servers into a single Favorites folder and view them Live, together on one screen, with one click. Using favorites camera grouping is another level of remote camera management/sorting, in addition to available color-tagging. Maps tab - allows adding an image of your facility map and overlaying camera icons on top of the map image for quick access. Maps feature also allows viewing "linked cameras" to enhance live video monitoring. Cameras in close proximity on the facility map are considered "linked" by VPC. When viewing a camera Live, you may choose to view live video from all cameras in the immediate vicinity to track a subject, for example. Maps feature makes it easy to monitor high-risk or high-loss areas of the store. Archived Files - link one or more backup locations from this Control panel tab for instant saved video playback in VPC interface. 7 Navigating VPC Window Control Panel Views Control panel can display the information in three distinct views, for improved accessibility. You may choose whatever view suits your needs and preferences. Control Panel tab views can be set and controlled individually (Servers, Cameras, Favorites, Archived Files). Three view options are available: Large Thumbnail , Small Thumbnail and Details view. To switch between available list views, position your mouse cursor over one of the tabs in the CONTROL panel and click on the View icon to switch to the next available view. Examples of the Large Thumbnail Views : Examples of the Small Thumbnail Views : 8 Navigating VPC Window Examples of the Details Views : Screen Divisions Screen Division buttons allow you to change the number of cameras you are able to see on the same screen. Click on the current screen division to bring up the Screen Division panel. Screen Division panel is used in LIVE and SEARCH modes only. Start by selecting your preferred screen division: 2x2, 6, 3x3, 10, 5x5, 6x6, or 8x8. Up to 64 cameras can be displayed at one time on a single VPC screen. - Click the Rotate button to enable the rotation feature (optional). Available in LIVE mode only. Rotation feature will automatically display the next set of live cameras in the selected screen division every 3 seconds. - Use Previous/Next Screen buttons to manually display the next set of live/search cameras in the selected screen division. For example, in 2x2 (4) screen division, Cameras 1-4 are displayed. Click the Next Screen button to display Cameras 5-8. Click the Next Screen button again to display Cameras 9-12. Click the Previous Screen button to return to Cameras 5-8. And so forth. - Click the Default button to re-arrange the cameras back to their default order. Use this button to return cameras to their original screen division positions if after you have re-arranged the cameras. 9 Navigating VPC Window Search Bar Search Bar allows instant camera searching/filtering in all VPC modes: CONTROL, LIVE, SEARCH and BACKUP. Search field filters camera results based on text entry or previously-assigned color tag. To search by matching text entry, simply start typing inside the search text field. Text Search also works on servers, server groups, favorites folders, map names, and archived filter names. To filter camera results based on color-tag, click on the target icon and select the color tag of your choice: red, orange, yellow, green or blue. Note that only cameras can be color-tagged and the color tag must be assigned prior to using the search bar function. Color tags can be assigned to individual cameras in the CONTROL mode, inside the Cameras tab. Help Menu Click the Help question mark icon in the top-right corner of the screen to access Help menu. Help Menu Options: About – Click to find out VPC version number and to read i3 Software License Agreement. You must read through the entire agreement before being allowed to click "I Agree" button and to close the About window. Check for Updates – Click to automatically check our server for the most recent VPC software version. If a newer software version is detected on our server, you will be given the choice to upgrade your VPC to the most recent available version. SRX-Pro Remote – If you also have SRX-Pro Remote legacy software installed on the same PC, this command will launch it. Options – This menu allows you to either disable the VPC login screen on this PC or remember the login information. Manual – Displays the VPC user manual Online Help – Directs you to the VPC video tutorials. Internet connection is required. Language – Set VPC language to English or French Close/Minimize - Minimize VPC to your Desktop. All Server and camera connections will be maintained. / - Maximize the VPC window to the screen size / Restore VPC window size - Close VPC application. All Server and camera connections will be dropped. 10 Connecting to Servers Once Logged In, you can then connect to one or more remote Servers, or groups of servers/cameras. VPC allows you to create custom groups of servers for quick connection. Refer to the corresponding sections of this manual to learn various ways of connecting to the remote servers or a groups of servers you wish to monitor. When connecting to a remote Server, all servers' camera are automatically displayed in the LIVE mode. This the fastest way to connect to all cameras at the same time. To connect to specific cameras only or to custom groups of camera, see Connecting to Cameras section. LIMITATION: VPC will only connect to and display the first 64 cameras from the connected servers. To connect to one or more previously added Servers, 1. Click on the CONTROL panel button, Servers tab. Each remote server is represented with a split-screen thumbnail of actual cameras connected to that server. In this picture, three Servers have been previously added: i3-DEMO, 155-820, and demo_site2. 11 Connecting to Cameras 2. To connect to all or several remote server, use your mouse to select as many To connect to one remote server, position remote Servers as you like, then position your mouse cursor over one of the your mouse cursor over selected server's thumbnails and click Connect. Notice that the selected servers the server thumbnail and are identified by the white border around the thumbnail. In this example, i3click Connect. DEMO and demo_site2 servers have been selected. Tip: You may also select multiple servers by holding down Ctrl button on your keyboard while clicking on the remote servers' thumbnails. 3. VPC will automatically switch into the LIVE mode and display all live cameras from the connected Server. VPC selects screen division automatically, according to the number of cameras shown. In this case, 16 live cameras were displayed after connecting to the remote Server 155-820. Note, your user access level determines how many/which cameras are displayed. 12 Connecting to Cameras Connecting to Groups of Servers When monitoring a large number of Servers, you may use custom Server Groups for even faster one-click connection. Note, that remote Servers may not belong to multiple Server groups. LIMITATION: VPC will only connect to and display the first 64 cameras from connected servers. To connect to a group of remote servers, 1. Click on the CONTROL panel button, Servers tab. Server Groups are represented with a two-DVR thumbnail. In this example, one Server group called Region 1 has been added to VPC. 2. To connect to a Server group, position your mouse cursor over the server group thumbnail and click Connect. To connect to all or several server groups, use your mouse to select as many groups as you like, then position your mouse cursor over one of the selected groups' thumbnails and click Connect. Notice that the selected server groups are identified by the white border around the thumbnail. In this example, Region 1 and Region 2 servers have been selected. Tip: You may also select multiple server groups by holding down Ctrl button on your keyboard while clicking on the server groups' thumbnails. 13 Connecting to Cameras 3. VPC will automatically switch into the LIVE mode and display all live cameras from the all connected Servers. VPC selects screen division automatically, according to the number of cameras shown. Note, your user access level determines how many/which cameras are displayed. Disconnecting from Servers and Groups of Servers Important: Remote monitoring consumes your Internet bandwidth. To conserve Internet bandwidth, always disconnect from the remote Servers when not actively monitoring, or close the VPC application. When disconnecting from a remote server or server group, VPC is disconnected from all of the servers' cameras simultaneously. This the fastest way to disconnect from a remote server completely without closing VPC application. To disconnect from one or more remote servers / server groups, 1. Click on the CONTROL panel button, Servers tab. Notice that the connected servers and server groups are highlighted blue. 2. To disconnect from a To disconnect from all or several remote server, use your mouse to select as remote server, position many remote Servers as you like, then position your mouse cursor over one of your mouse cursor over the selected server's thumbnails and click Disconnect. Notice that the selected the server thumbnail and servers are identified by the white border around the thumbnail. In this example, click Disconnect. i3-DEMO and demo_site2 servers have been selected. To disconnect from a server group, position your mouse cursor over the server group thumbnail and click Disconnect. 3. To disconnect from all or several server groups, use your mouse to select as many server groups as you like, then position your mouse cursor over one of the selected server group's thumbnails and click Disconnect. Notice that the selected server groups are identified by the white border around the thumbnail. In this example, Region 1 and Region 2 server groups have been selected. Cameras from disconnected servers / server groups will be removed from LIVE mode. 14 Connecting to Cameras Managing Server Connections VPC allows saving connection information for multiple remote servers for instant connection. Server connection information is stored inside Servers tab of the CONTROL panel. Server connections can be organized into groups, for faster access. Adding New Server Connection To add a new remote SRX-Pro Server connection, 1. Click on the CONTROL panel button, Servers tab. 2. Position your mouse cursor over the Add Server thumbnail and click Add. 3. Fill out connection information in Add Server window and click Add. All fields are mandatory. Server Name field is custom and you may enter any Server Name for easy future identification. The rest of the fields must contain accurate information, otherwise remote connection will not be established. User Name and Password information will determine your access level to the remote server (i.e. live / search / backup 15 Connecting to Cameras permissions for each camera). 4. New Server thumbnail will be added to the main Servers group in CONTROL panel. You may organize your new connection into one of the existing folders (optional). See Creating Server Groups section for more information. Notice that the new thumbnail is gray. For the thumbnail to be updated with the actual camera screenshots, you must first connect to the server. 5. To connect to the new server, position your mouse cursor over the thumbnail and click Connect. All server cameras will be automatically displayed in LIVE mode. Note, your user access level determines how many/which cameras are displayed. LIMITATION: VPC will only connect to and display the first 64 cameras from the connected server(s). > > 16 Connecting to Cameras Deleting Server Connection To delete an a remote SRX-Pro Server connection from your VPC, 1. Click on the CONTROL panel button, Servers tab. Roll your mouse cursor over the server thumbnail that you wish to delete, click More, then click Delete. 2. Click Yes in the confirmation window. The entire servers group and all server connections inside the group will be deleted. 17 Connecting to Cameras Creating Server Groups To create a new group of remote Servers, 1. Click on the CONTROL panel button, Servers tab. Select one of the Servers you'd like to add to a new group. 2. Click and hold left mouse button, then drag-and-drop the selected server thumbnail onto the thumbnail of the second Server you'd like to add to a new group. In this case, the 64channels server thumbnail is being dragged on top of the TSDEMO server thumbnail. 3. New server group will be created. In this example, Group_1 has been created, consisting of two server connections: 64channels and TS-DEMO. 4. Drag-and-drop additional server thumbnails onto the Group_1 thumbnail to add them to the new group, if desired. 18 Connecting to Cameras Renaming Server Groups 1. Click on the CONTROL panel button, Servers tab. To rename a (new) server group, roll your mouse cursor over the Group_1 thumbnail, click More, then click Edit. 2. Enter the new group name in the name field (see image below). When done, click Save. 19 Connecting to Cameras 3. New server group name will be applied and saved. CONTROL panel Servers tab will be displayed once again. Removing Servers from Groups If you wish to re-organize your server connections, you may remove the server from its current server group without deleting the server connection information. Once removed from its server group, server connection will be once again displayed in the Servers tab of the CONTROL panel. From there, it could be sorted into another server group, if needed. To remove server from a server group, 1. Click on the CONTROL panel button, Servers tab. To rename a (new) server group, roll your mouse cursor over the Group_1 thumbnail, click More, then click Edit. 20 Connecting to Cameras 2. Inside the server group, position the cursor over the server you would like to remove from group. Click Remove, then click Save. Note, server connection will not be deleted, it will be relocated out of the current server group and back into the main Servers group under the Servers tab of the CONTROL panel. 3. CONTROL panel Servers tab will be displayed once again. Notice that the server connection 64channels that has been removed from Region 1 server group now appears in the main Servers group inside CONTROL panel. 21 Connecting to Cameras Deleting Server Groups IMPORTANT: When deleting an entire group of servers, all server connections contained inside will be deleted as well. If you wish to keep the server connections but delete the group (folder), remove servers from server group first. Empty server groups (folders) will be deleted automatically by VPC. For instructions on how to remove a server connection from server group, see Removing Servers from Groups section. To delete an entire server group, along with all server connections contained inside, 1. Click on the CONTROL panel button, Servers tab. To delete a server group, roll your mouse cursor over the group thumbnail, click More, then click Delete. 2. Click Yes in the confirmation window. The entire servers group and all server connections inside the group will be deleted. 22 Connecting to Cameras Once Logged In, you can then connect to one or more remote Servers/cameras, or groups of servers/cameras. VPC allows creating custom groups of cameras across different Servers for quick connection. Refer to the sections below to learn various ways of connecting to the remote camera/group of cameras you wish to monitor. VPC offers many different options of connecting to specific remote cameras and camera groups. IMPORTANT: The fewer remote cameras are being monitored, the less Internet bandwidth is being consumed. Camera Connection Methods: 1. 2. 3. 4. 5. 6. Selected cameras from one server Selected cameras from several/all servers User-configured group of cameras (Favorites) Color-tagged cameras (Color-tag search) Cameras with similar camera name, IP, Server name, or model name (Text search) Cameras positioned on the map Monitoring Select Cameras from One Server To connect to one or more select cameras from a specific Server, 1. Click on the CONTROL panel button, Servers tab. 2. If the Server is located inside a group, position your mouse cursor over the group thumbnail and click Expand. Locate your remote SRX-Pro Server, position your mouse cursor over the server thumbnail and click Expand. In this example, 64channels server has been selected. 3. To connect to one camera, position your mouse cursor over the server thumbnail and click Connect. To connect to all or several cameras use your mouse to select as many cameras as you like, then position your mouse cursor over one of the selected camera's thumbnails and click Connect. Notice that the selected cameras are identified by the white border around the thumbnail. In this example, 4 cameras have been selected. 23 Connecting to Cameras Tip: You may also select multiple cameras by holding down Ctrl button on your keyboard while clicking on the cameras' thumbnails. Tip: Try switching Cameras tab to the Small Thumbnail view for faster camera browsing . 4. VPC will automatically switch into the LIVE mode and display only the selected cameras. A remote connection is established with the remote server, to which the cameras are connected, however only the cameras that have been selected in the previous step will be shown LIVE. VPC selects screen division automatically, according to the number of cameras shown. In this case, 4 selected cameras are displayed in the quad-screen division. 24 Connecting to Cameras Monitoring Select Cameras from Several Servers To connect to one or more select cameras from a several different Servers, 1. Click on the CONTROL panel button, Cameras tab. Tip: If you have a substantial number of cameras to browse through, try switching Cameras tab to the Small Thumbnail view for faster camera browsing . 2. Scroll through the list of all available cameras and select only the cameras you wish to monitor in LIVE mode. To connect to all or several cameras use your mouse to select as many cameras as you like, then position your mouse cursor over one of the selected camera's thumbnails and click Connect. Notice that the selected cameras are identified by the white border around the thumbnail. In this example, 4 cameras from two different servers have been selected. Tip: To select multiple cameras, hold down Ctrl button on your keyboard, while clicking on the camera thumbnails. 3. VPC will automatically switch into the LIVE mode and display only the selected cameras. A remote connection is established with the remote server, to which the cameras are connected, however only the cameras that have been selected in the previous step will be shown LIVE. VPC selects screen division automatically, according to the number of cameras shown. 25 Connecting to Cameras In this case, 4 selected cameras are displayed in the quad-screen division. Monitoring Favorites Groups of Cameras To connect to and monitor a custom group of cameras, 1. Click on the CONTROL panel button, Favorites tab. 2. Folders inside the Favorites tab represent custom groups of cameras. The cameras from several different servers can be assigned to the same Favorites camera group. 3. To connect to a Favorites group of cameras, position your mouse cursor over the folder thumbnail and click Connect. To connect to all or several Favorites groups, use your mouse to select as many Favorites folders as you like, then position your mouse cursor over one of the selected folder's thumbnails and click Connect. Notice that the selected folders are identified by the white border around the thumbnail. 26 Connecting to Cameras Tip: To select multiple folders, Hold down Ctrl button on your keyboard while clicking on the folder thumbnails. 4. VPC will automatically switch into the LIVE mode and display all cameras in the selected Favorites folder. A remote connection is established with the remote servers, to which the cameras are connected, however only the cameras that have been selected in the previous step will be shown LIVE. VPC selects screen division automatically, according to the number of cameras shown. In this case, 26 selected cameras are displayed in the 36-screen division. 27 Connecting to Cameras Creating Favorites Folder For fast access to specific sub-groups of cameras, you may create custom Favorites camera groups. For example, you may assign all cameras installed inside a warehouse to one Favorites group, while all the cameras installed inside the office space - to another. Favorites folder may contain cameras from one or multiple remote SRX-Pro Servers. To create a new Favorites folder, 1. 2. Click on the CONTROL panel button, Favorites tab. Position your mouse cursor over the Add Favorite thumbnail and click Add. 3. Enter Folder Name inside Add Folder Name window and click Add. 4. Next, to add cameras to the newly created Favorites folder, position your mouse cursor over the folder thumbnail, click More and then click Edit. 5. Browse through all available cameras in the middle panel of the screen by scrolling up and down. Alternatively, use the Search Bar to filter cameras by text or color. Once you locate a camera that you wish to add to this Favorites folder, click and hold left mouse button, then drag-anddrop the selected camera thumbnail into the panel on the right. When finished, click Save. 28 Connecting to Cameras Tip: If you make a mistake, position the mouse cursor over the thumbnail of the camera you wish to remove from the Favorites list and click Remove. When finished, click Save. 6. New Favorites folder will be added to the Favorites tab.| 29 Connecting to Cameras Editing Favorites Folder To remove one or more cameras from Favorites folder, to add additional cameras, or to change the name of the Favorites folder, 1. 2. Click on the CONTROL panel button, Favorites tab. Position your mouse cursor over your desired Favorites thumbnail, click More, then click Edit. 3. To add additional cameras to the Favorites folder, browse through all available cameras in the middle panel of the screen by scrolling up and down. Alternatively, use the Search Bar to filter cameras by text or color. Once you locate a camera that you wish to add to this Favorites folder, click and hold left mouse button, then dragand-drop the selected camera thumbnail into the panel on the right. To remove cameras from the Favorites folder, browse through cameras in the selected Favorites folder in the panel on the right by scrolling up and down. Alternatively, use the Search Bar to filter cameras by text or color. Once you locate a camera that you wish to remove from this Favorites folder, position your mouse cursor over the camera thumbnail and click Remove. To change the name of this Favorites folder, position your mouse cursor over the current Favorites folder name and use your keyboard to enter a new name. When finished, click Save. 30 Connecting to Cameras Deleting Favorites Folders To delete an a Favorites folder, 1. Click on the CONTROL panel button, Favorites tab. Roll your mouse cursor over the Favorites folder thumbnail that you wish to delete, click More, then click Delete. 2. Click Yes in the confirmation window. The entire servers group and all server connections inside the group will be deleted. Monitoring Color-Tagged Cameras VPC allows color-tagging cameras for quick sorting and fast access to the exact sub-group of cameras you wish to monitor. Color-tag Search function works in all VPC modes: CONTROL, LIVE, SEARCH and BACKUP. Cameras must be color-tagged before using the Search function. See Color-tagging cameras section for instructions on how to assign a color tag to a specific camera. In CONTROL panel, color search filtering can be applied in Cameras, Favorites, Maps, To connect to a group of cameras based on their pre-assigned color-tag, 31 Connecting to Cameras 1. Click on the CONTROL panel button, Cameras tab. 2. On the Search Bar, click on the target icon and select the color tag of your choice: red, orange, yellow, green or blue. 3. Only the thumbnails of cameras with the matching color tag will be displayed. In this example, "red" color-tag filter has been applied and the color-tag search returned three cameras: Ax51B, Ax61D2 and Ax52C. Notice that the cameras belong to different servers (i3-DEMO and i3-DEMO2). Color tagging is possible across different servers. 4. To connect to one camera, position your mouse cursor over the server thumbnail and click Connect. To connect to all or several cameras use your mouse to select as many cameras as you like, then position your mouse cursor over one of the selected camera's thumbnails and click Connect. Tip: You may also select multiple cameras by holding down Ctrl button on your keyboard while clicking on the cameras' thumbnails. 5. VPC will automatically switch into the LIVE mode and display only the selected cameras. A remote connection is established with the remote servers, to which the cameras are connected, however only the cameras that have been selected in the previous step will be shown LIVE. VPC selects screen division automatically, according to the number of cameras shown. 32 Connecting to Cameras In this case, 3 selected cameras are displayed in the quad-screen division. Color-tagging cameras In order to use color tag search, the cameras must first be assigned one of the five available color tags: red, orange, yellow, green or blue. The color-tag assignment must be done in the Cameras tab of the CONTROL panel. To assign a color tag to the camera, 1. Click on the CONTROL panel button, Cameras tab. 2. Browse through the list of all available cameras by scrolling up and down. Tip: If you have a substantial number of cameras to browse through, try switching Cameras tab to the Small Thumbnail view for faster camera browsing . 33 Connecting to Cameras 3. Once you locate the camera you wish to assign a color tag to, position your mouse cursor over the camera thumbnail, click More then click on one of the color tag options: red, orange, yellow, green or blue. 4. Once the color tag has been assigned, the camera name and IP text will turn the matching color, for easier visual identification. In this example, the IP and camera name for Ax52E camera have turned red, to match the assigned color tag. 5. Repeat steps 2-3 for as many cameras as you wish. Please note that each camera may only be tagged with one color. Text Search Similar to color-tagging, VPC text search filter allows for quick sorting and fast access to the exact sub-groups of cameras you wish to monitor. Search function allows searching and filtering cameras that have a same or similar camera name, IP address, Server name, or camera model name. Text search function works in all VPC modes: CONTROL, LIVE, SEARCH and BACKUP. Text Search also works on servers, server groups, favorites folders, map names, and archived file names. When in CONTROL and BACKUP modes, search function works as a dynamic filter. Only matching search results are displayed, while the rest are hidden. This applies to servers, cameras, favorite folders, maps and archive file names. When in LIVE or SEARCH modes, search function positions cameras that match the search entry to be displayed in the top screen divisions. 34 Connecting to Cameras To search by matching text entry, simply start typing inside the search text field. Text Search also works on servers, server groups, favorites folders, map names, and archived filter names. Examples of Text Search filtering: Example 1. Only cameras that have the word "door" in the camera name are being displayed in the Cameras tab of the CONTROL panel. Example 2. Only cameras that have "127." in their IP address are being displayed in the Cameras tab of the CONTROL panel. Example 3. Cameras that have "door" in the camera name were moved to the top screen divisions. Cameras that match the search entry flash briefly on-screen for 2 seconds for easy identification. 35 Connecting to Cameras Example 4. Only cameras that have "62V" in their camera name/camera model are being displayed in the Cameras tab of the CONTROL panel. Note that Cameras tab is currently in the Details View . Certain information, such as Camera model, Resolution, Date Created (in Archived Files tab), etc. can only be seen in Details View. Monitoring Cameras via Maps VPC allows adding facility maps and laying out cameras on the map image for instant access. Users may prefer monitoring their facility with the help of the map that visually indicates camera's positioning in relation to other cameras and to other facility areas. Moreover, VPC's intelligent Linked Cameras feature makes it easy to monitor cameras installed in physical proximity to one another. To launch cameras directly from your pre-configured facility map, 1. Click on the CONTROL panel button, Maps tab. 36 Connecting to Cameras 2. Locate the desired facility map, position your mouse cursor over the map's thumbnail and click View. Tip: If you have multiple facility maps, you may use the Search Bar function to locate the required map quickly. 3. Your facility map will be displayed on the right-hand side. You may wish to re-size VPC window to increase the map size on the screen. To zoom in and out of the map image, use your mouse scroll wheel. Scroll UP to zoom IN, scroll DOWN to zoom OUT. Use your mouse to drag the zoomed map on the screen, to view different areas of the map. 4. To view a specific camera on the map, position your mouse cursor over the camera icon on the map and click Connect. To view all cameras, click Connect All. 37 Connecting to Cameras 5. When connecting to All cameras from the Map, VPC will When connecting to a single camera from the Map, VPC will automatically choose the appropriate screen division to display the camera in a quad-screen. display all Map cameras. Linked Cameras Linked Cameras function is VPC's intelligent feature groups cameras together by their physical proximity on the facility Map. Each camera on the map has its own vicinity area. Cameras that are positioned within the camera's vicinity area are considered "linked" to it. Linked Cameras feature allows instantaneous call-up of all "linked" cameras on the screen. To view all "Linked" cameras on the screen, click the "Linked" icon on the camera live screen: . Important: Only cameras that are connected to will be displayed as "Linked". To utilize Linked Cameras feature with the Map feature, make sure to click Connect All first. 38 Connecting to Cameras To view Linked Cameras in LIVE mode, 1. Connect to the camera by one of Camera Connection Methods. 2. In LIVE mode, position your mouse cursor over the camera stream, locate and click Linked Cameras icon: 3. Selected Camera will be displayed prominently in the middle of the screen, all Linked Cameras will be displayed in the pop-up pane on the right-hand side. Click on any thumbnail in the Linked Cameras pane to swap it with the camera in the main display area. 39 Live Viewing Live Viewing in VPC supports multiple functions of the SRX-Pro Server: Instant snapshot backup On-screen quick search Main/Sub stream switching On-screen data Display (incl. POS and Video Analytics) Control activation Sensor status monitoring Two-way audio On-screen Controls To access on-screen Live video controls, position your mouse cursor over the camera video, on-screen control panel will pop up in the bottom left-hand corner of the camera screen. 40 Live Viewing – Instant Snapshot Backup – PTZ Controls OFF/Basic/Advanced (PTZ camera only) – Switch between Sub-and Main Streams – Display Linked Cameras – Show OSD options (POS ON/OFF/Side Panel, OSD ON/OFF, VA ON/OFF – Quick Search Dual Streaming Please note that VPC takes full advantage of camera's dual streaming. When multiple cameras are displayed on the screen, sub-steam is used by default, to conserve bandwidth. Sub-stream is used for display purposes only, your recorded video data uses Main Stream's higher video settings. When camera is displayed in Full-Screen mode, Main video stream is shown by default. To show main video stream in multi-screen, click the HD on-screen control icon to display the Main video stream. To switch back to the sub-stream display, click the HD button again. 41 Live Viewing PTZ / 360 degree Camera Control To control PTZ camera, 1. Connect to the camera by one of Camera Connection Methods. 2. When in Full Screen, PTZ controls are enabled by default. If you wish to control PTZ camera while in multi-screen display, click on the PTZ icon inside the On-screen Controls panel. 3. Use on-screen Pan / Tilt / Zoom controls to move your camera. 42 Live Viewing To control 360-degree camera, 1. Connect to the camera by one of Camera Connection Methods. 2. When in Full Screen, click on the OSD options icon , click Dewarp Image. 3. Use on-screen Pan / Tilt / Zoom controls to move the camera. 43 Live Viewing Quick Search Quick Search is VPC's fastest video review and backup option. Quick Search can be used in multi-screen as well as Full Screen mode. One of the clear advantages of Quick Search is the ability to review archived video on one camera, while viewing the rest of the cameras in LIVE mode. To use Quick Search, 1. Connect to the server, camera or a group of cameras by one of Camera Connection Methods. 2. Adjust screen division for best visibility. Depending on the size of your screen, it may be difficult to perform quick search on screen divisions larger than 4x4 (16-screen division). 3. Position your mouse cursor over the camera of interest and click the Quick Search icon in the On-screen Control Panel. 4. Once the camera switches to the Quick Search mode, the video automatically rewinds 30 seconds and starts playing. This provides an instant review of an event that has just been observed in LIVE mode. Search Control 44 Live Viewing Panel is displayed at the bottom of the camera screen. 5. To return the camera back into LIVE mode, click the Live icon in the On-screen Control Panel. Quick Search Control Panel Quick Search Controls allow instant video replay, as well as video search. Quick Search is limited to the current 24-hour period. To search video recorded before 12:00AM of the current day, use the VPC's SEARCH mode As soon as the Instant Search is activated, video replay of the last 30 seconds of the recorded video begins. By default, the timeline is limited to a 10-minute interval. To view longer video interval on the screen, click Interval icon on the Quick Search Control Panel and select one of the other available interval options. You may re-position Current Playback Time slider anywhere within the 24-hour timeline to play back recorded video. Note that any gaps in the colored bar mean that no video recording is present. 45 Live Viewing Quick Search Backup Quick Search backup allows instantly burning a video clip to a writable CD or DVD media. Quick Search is limited to the current 24-hour period. To search video recorded before 12:00AM of the current day, use the VPC's SEARCH mode To backup a video clip to CD/DVD, 1. Connect to the server, camera or a group of cameras by one of Camera Connection Methods. 2. Adjust screen division for best visibility. Depending on the size of your screen, it may be difficult to perform quick search on screen divisions larger than 4x4 (16-screen division). 3. Position your mouse cursor over the camera of interest and click the Quick Search icon in the On-screen Control Panel. 4. Using the on-screen Quick Search Control Panel, adjust the Start Clip and End Clip sliders to the beginning and end times of your video backup clip. You may adjust the time to the whole minute only. The video backup clip will be highlighted gray. 5. The pop-up menu will confirm the clip beginning and end times, adjust the Start/End Clips sliders again if the times are incorrect. 6. Select video backup format: i3d (i3 Encrypted) or AVI. Encrypted format video backup takes less space, while AVI backups can be played on most computers. 7. Click Burn CD button. 8. Wait for the "Please insert a writable CD or DVD" message and click Ok. Please note that the processing of your backup session begins immediately, however depending on the length of the video backup and the video format selected, it may take several minutes until this confirmation message is displayed. Remain patient and do not click Burn CD again to avoid duplicate backups. 9. Insert the CD/DVD into your optical drive and wait until the backup is finished. 46 Video Search VPC offers two methods of video playback: 24-h Quick Search, accessible in LIVE mode, and Calendar Search, accessible in SEARCH mode. Quick Search allows instant video replay on one camera, while viewing the remaining cameras in LIVE mode. When in SEARCH mode, no live video can be viewed, all cameras are in Search mode, ready for video playback. The SEARCH mode user controls are identical to the Quick Search Control Panel, please review that section for more information on how to use those on-screen controls. The two key advantages of the SEARCH mode is the Master Playback Control Panel and the Calendar Window. Master Playback Control Panel is located at the top of the SEARCH mode window and allows queueing up all cameras to the exact same Current Playback Time. The Calendar button is located next to the Interval button and allows browsing through all available historical video. 47 Video Search To play back historical video, 1. Connect to the server, camera or a group of cameras by one of Camera Connection Methods. 2. Click on the Calendar button and select the day to review video. 3. Use the Master Playback Control Panel in the same way as the Quick Search Control Panel to create an instant CD backup. In the example above, 16 cameras are being backed up in i3 Encrypted format. The video clip starts at 3:22PM and ends at 3:59 PM on January 23rd, 2015. IMPORTANT: When creating an instant CD backup, make sure that all the cameras you wish to back up appear on the screen. I.e. If you adjust the screen division to display a lower number of cameras for better visibility, only the cameras that are displayed on screen at the time of backup creation will be backed up. 48 Video Backup Video Backup allows to burn multiple backup sessions, in a variety of backup formats (JPG/i3d/AVI) to the same backup media, all at the same time. To create a backup session in BACKUP mode, 1. Connect to the server, camera or a group of cameras by one of Camera Connection Methods. 2. Click on the Calendar button and select the day for video backup. Set the Start and End times in the Calendar window. 3. Scroll through the list of camera thumbnails in the left-hand side panel. 4. Position your mouse cursor over the desired camera thumbnail and select one of the available backup formats: JPG, i3d (i3 Encypted), or AVI. 49 Video Backup 5. The backup sessions list will be instantly updated below the Calendar window. 6. Continue steps 3-5 until all desired backup sessions have been created. 7. Select the Backup Destination. Click the folder icon next to the destination path to select CD/DVD, one of the previously selected destination parths or Other... to select a new destination. 8. Click Start Copy to begin video backup. 9. Monitor the backup progress in the Backup window. Once all sessions are completed, your backup is finished. 50