1
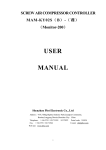
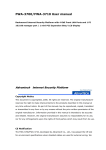
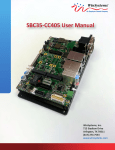
PROXKey Tool User Manual
1
Table of Contents
1 Introduction ............................................................................................................................................... 4
2 PROXKey Product ....................................................................................................................................... 5
2.1 PROXKey Tool...................................................................................................................................... 5
2.2 PROXKey function modules ................................................................................................................ 6
2.3 PROXKey using environment .............................................................................................................. 6
3 PROXKey Tool Installation.......................................................................................................................... 7
3.1 PROXKey Tool Installation................................................................................................................... 7
4 PROXKey Tool............................................................................................................................................. 9
4.1 Launching PROXKey Tool .................................................................................................................... 9
4.2 PROXKey Tool Overview ...................................................................................................................10
WD ProxKey ........................................................................................................................................ 12
Verify PIN ............................................................................................................................................ 12
Change PIN.......................................................................................................................................... 14
Change Admin PIN ..............................................................................................................................15
Change Token Name ...........................................................................................................................16
Unlock PIN........................................................................................................................................... 17
Format/Initialize Token.......................................................................................................................18
Delete Redundant Key Pair .................................................................................................................19
Certificate............................................................................................................................................ 20
Device Information .............................................................................................................................21
About...................................................................................................................................................21
2
Table of Figures
Figure 1 Installation ...................................................................................................................................... 1
Figure 2 Installation ...................................................................................................................................... 8
Figure 3 Proxkey Token Tool Main Menu ..................................................................................................... 9
Figure 4 Running Label of PROXKey Tool.................................................................................................... 10
Figure 5 Setting up User PIN .......................................................................................................................11
Figure 6 Set PIN Successful and Warning.................................................................................................... 11
Figure 7 Verify PIN ...................................................................................................................................... 13
Figure 8 Figure 8 Wrong PIN entered warning ...........................................................................................14
Figure 9 Figure 9 PIN Locked.......................................................................................................................14
Figure 10 USB token PIN change.................................................................................................................15
Figure 11 Change Admin PIN ......................................................................................................................16
Figure 12 Change Token name....................................................................................................................17
Figure 13 Unlock Token...............................................................................................................................18
Figure 14 Format/Initialize Token...............................................................................................................19
Figure 15 Delete Redundant Key Pair ......................................................................................................... 20
Figure 16 Device Information .....................................................................................................................21
3
1 Introduction
With the development of Internet and fast development of network technology a vast majority
of people communicate with each other online, instead of traditional methods of face to face
meeting. Due to this security authentication becomes vital for the network security, also the
bank transactions and fund transfer becoming online it is very important to protect data. The
USB tokens provide a secure way to store the Digital Signature Certificate.
The PROXKey USB Token is a hardware cryptographic module with a USB form factor for twofactor authentication which has been validated against the FIPS 140-2 at security level 2. The
public and private user’s key is generated and is stored on the chip embedded inside the token;
the key pairs are stored in EEPROM. Private Key is secured and cannot be exported.
4
2PROXKey Product
In internet applications, like e-business, e-government, network communication and etransaction, it is very important to ensure the information security. PROXKey Product is
developed as a solution of this security problem. It provides a convenient and reliable secure
environment for customers.
2.1 PROXKey Tool
High in security
1. Supporting 2048 bits RSA asymmetric cryptographic algorithms and SHA2.
2. Supporting password and hardware authentication.
3. Hardware device provide secure memory space which can be used to store password,
private key and other secret data. The secret data is not exportable; the hardware
device is not replicable.
4. Secure and reliable. All encryptions and decryptions are operated inside the PROXKey
device.
Uniformity specification
1. Following the worldwide universal standards: PKCS#11 v2.1 specification and Microsoft
CSP 2.0 specification.
2. Completely realized the security communication functions supported by SSL and
S/MIME. The specification covers application and storage of digital certificate, digital
signature and verification, encryption/decryption, etc.
3. Using standard interface to connect with browsers, the communications is strictly
abiding browser’s secure communication operating regulations.
4. Supporting certificate’s interoperability between CSP and PKCS#11.
5. Supporting certificate application and secure email exchange in the environment of
IE/Outlook, Foxmail, NetScape, Mozilla and Firefox/Thunderbird.
6. Supporting X. 509 v3 certificate storage.
Excellent compatibility
1. No need to install special PROXKey driver, the driver integrated inside the Windows
Operating System is used there by eliminating the driver installation.
2. The hardware is a kind of USB device which is following USB1.1/USB 2.0 specification. It
can be used conveniently in every USB supported facilities.
5
4. Uniform interfaces are used for UDK devices. One suite can supports both HID and UDK
devices.
5. The UI is supported in Windows/ME/2000/2003/XP/Vista/Windows7/Windows 8 and
Windows 8.1/ Linux Operating Systems are all supporting.
Flexible design
1. Using modularized design to meet customer’s dedicated requirements.
2. A convenient platform for user’s certificates management is provided.
3. UI (User Interface) is designed up to customer’s requirements.
4. Secondary development interface is provided.
2.2PROXKey function modules
PROXKey network security suite includes the following 5 modules:
CSP module:
1. It is a basic interface module based on Microsoft CSP2.0 specification.
2. It is configured at registry.
3. It can be used in IE browser, Outlook and Foxmail for certificate application, security
website visitation and security email service, etc.
PKCS#11 Module:
1. Supporting PKCS#11 v2.1 interface.
2. It is applicable in NetScape/Mozilla browser and ThunderBird email server.
Administrator’s tool:
It provides functions of key initialization, certificate operation and PIN operation, etc.
User’s tool:
It provides not only PIN operations of verification and modification, but also certificate
operations of checking and installation/uninstall.
Background:
At the time of PROXKey plug in and out, certificate registration/revocation will be
automatically done, and application programs will automatically start and end.
2.3 PROXKey using environment
The supporting operating systems are shown as below:
WIN XP SP2 and above
WIN 2000/2003/2008 Server
WINDOWS 7, 8, 8.1
The supporting software includes:
IE/Mozilla/Netscape/ browsers.
Outlook/Foxmail/ThunderBird email clients.
6
3PROXKey Tool Installation
The PROXKey comes with the Autorun supported ND (No Driver) feature. User can install the PROXKey tool
just by plugging the token into the USB slot, the installation and details of the PROXKey tool is explained in
detail below.
3.1 PROXKey Tool Installation
To begin with the installation just plug in the token into the USB slot of the Laptop or PC, the Autorun
supported product will automatically install PROXKey tool on the system
1. Once the token is plugged into the USB slot the Autorun features asks for the installation of the
token management tool as shown in the Figure 1, just click the install button to proceed with the
installation of the software.
Figure 1 Installation
7
2. The token management software installs as shown in the Figure 2, clickfinish button to complete the
installation.
Figure 1Installation
8
4 PROXKey Tool
4.1 Launching PROXKey Tool
The PROXKey tool can be launched using the short cut icon created on the desktop during
installation, or can be found by clicking Start menu on windows and then finding the WD
PROXKey Tool. The User Interface of PROX Key Token tool is easy and elegant as shown in
Figure 3. All the functionalities are represented by icons which are easy to access with just a
click of mouse button.
Figure 2 Proxkey Token Tool Main Menu
9
During PROXKey administrator’s tool running, the label of the tool will display in the right hand
bottom corner as shown in Figure 4.
Figure 3Running Label of PROXKey Tool
4.2 PROXKey Tool Overview
After the installation of the software and when the token is plugged in, the user will be advised
to set the PIN as shown in Figure 5. The user should enter the appropriate PIN length between
6-32 characters and set the user PIN. Each new token has to be set with a user defined PIN. The
length of the PIN should be between 6-32 (Alpha Numeric) characters. This PIN can be reset by
the user later if needed.
Figure 5 shows the Set User PIN prompt and Figure 6(a) shows the successful PIN set.
If the PIN is entered exceed the range of 6 to 32 characters, a warning window like Figure 6(b)
will out to tell you PIN for the token requirements.
10
Figure 4Setting up User PIN
Once the proper PIN is set the dialog as shown in Figure 6 (a) is prompted and in case of invalid
length of PIN setting a dialog as shown in Figure 6 (b) is prompted.
(a)
(b)
Figure 5Set PIN Successful and Warning
11
Figure 3 shows the basic functionalities of the PROXKey token tool.
1. Name of the token-WD ProxKey
2. Verify PIN
3. Change PIN
4. Change Admin PIN
5. Change Token Name
6. Unlock PIN
7. Format/Initialize Token
8. Delete Redundant Key Pair
9. Certificate
10. Device Information
11. About
WD ProxKey
This is the default name of the token, and it is displayed on the top of the token tool software
also, it can be renamed by the user. The user can rename the token to his desired name and
can change it as and when he/she wants to.
Verify PIN
The PIN which is set by the user can be verified using this. PIN verification is designed for
confirm PROXKey holder’s identity and avoid embezzlement (theft). The PIN verification
interface can be seen in Figure 7.
12
Figure 6Verify PIN
However the maximum User PIN error counter is set by default to 15 so the user cannot try to
verify the password more than 15 times in case if the user is not fully aware or forgotten his PIN
and wants to guess his PIN. As shown in Figure 8 user gets 15 attempts by default in case of
forgotten PIN. However if the user still not able to verify the set PIN after 10 guess attempts the
token gets locked as shown in Figure 9. The user needs to contact the PROXKey customer care
to unlock the token.
13
Figure 7Wrong PIN entered warning
Figure 9Figure 8PIN Locked
Change PIN
If the user wants to change the PIN which was set earlier this option helps to set a new PIN. The
user needs to remember his earlier set PIN which he needs to enter first and then set a new PIN
as shown in Figure 10.
14
Figure 9USB token PIN change
Change Admin PIN
If the user wants to change the PIN which was set earlier this option helps user to set a new
PIN. The customer can set user defined Admin PIN. TheAdmin PIN is necessary if the token
gets locked in the process of 15 wrong verify PIN attempts.
15
Figure 10Change Admin PIN
Change Token Name
Change Label provides administrators with the interface of change the label of user’s device. It
is shown in Figure
16
Figure 11Change Token name
Unlock PIN
The Unlock User PIN is the function to unlock the locked token which may have locked
due to 15 wron user PIN verification attempts.
17
Figure 12Unlock Token
Format/Initialize Token
Format token option is provided to delete all the contents of the token includig the user
PIN and certificates, this option will completely delete all the passwords and the
contenets of the token.
Note: User should not try to use this option, unless and until user is fully aware of the
consequences, which may result in permenant deletion of digital certificate.
18
Figure 13Format/Initialize Token
Delete Redundant Key Pair
This feature allows the user to delete the unwanted Key pairs against which the digital
certificates are not generated. This feature will be helpful to clear the redundant
containers or clear the redundant memory.
This function asks for the user confirmation to delete the redundant key once the user
gives the confirmation the redundant key are deleted, if there are no redundant keys
then the a dialog displays that there are no redundant keys.
19
Figure 14Delete Redundant Key Pair
Certificate
The PROXKey Token tool automatically registers the CA, CCA and also the user
certificate which is imported in the token, the user need not worry about registering
each certificate which he dwnloads.
Show Certificate
This function shows the certificate details such as the issuer information, issued to
information and validity information.
20
Delete Certificate
This feature enables to delete the unwanted certificates, the user PIN is needed to
delete the certificates which are not needed.
Import Certificate
Import Certificate feature enables the user to import the certificates into the token, the
user PIN is needed to import the certificates in the token.
Device Information
Device inforamtion provides the token information and the system environment as
shown in the figure. Such as the Winodos version, IE version,
Figure 15Device Information
About
This shows the version and copyright information of the company.
21