1
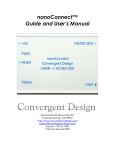
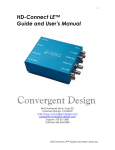
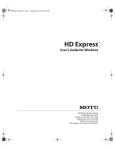
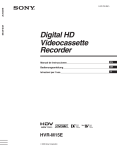
HD-Connect MI™
Guide and User’s Manual
4465 Northpark Drive, Suite 201
Colorado Springs, CO 80907
http://www.convergent-design.com
[email protected]
Support: 720-221-3861
Toll-Free: 866-654-0080
©2007 Convergent Design, Inc. All Rights Reserved. No part of this publication may be
reproduced, stored in a retrieval system, or transmitted, in any form or by any means,
electronic, mechanical, photocopying, recording or otherwise, without prior written
permission.
Table of Contents
1 GETTING STARTED .........................................................................................4
1.1 Welcome .................................................................................................................................................. 4
1.2 FCC Compliance .................................................................................................................................... 4
1.3 Shipping Contents .................................................................................................................................. 4
2 HD-CONNECT MI™ ..........................................................................................4
2.1 Overview.................................................................................................................................................. 4
2.2 Features ................................................................................................................................................... 5
2.3 Functional Block Diagram..................................................................................................................... 6
3 INSTALLATION AND QUICK START ..............................................................7
3.1 Connections............................................................................................................................................. 7
3.2 Status LED .............................................................................................................................................. 8
4 CONTROLLING HD-CONNECT MI™ ...............................................................9
4.1 Preparation ............................................................................................................................................. 9
4.2 Using the Control Application............................................................................................................... 9
5 UPDATING HD-CONNECT MI™.....................................................................14
5.1 Preparation ........................................................................................................................................... 14
5.2 Using the Update Application.............................................................................................................. 15
5.3 Rollbacks ............................................................................................................................................... 21
6 TIPS AND TROUBLESHOOTING...................................................................22
6.1 Operating Tips ...................................................................................................................................... 22
HD-Connect MI™ Guide and User’s Manual.
2
6.2 Troubleshooting Guide ........................................................................................................................ 26
7 SAFETY AND ESD PRECAUTIONS...............................................................28
8 SPECIFICATIONS...........................................................................................29
8.1 Inputs..................................................................................................................................................... 29
8.2 Outputs .................................................................................................................................................. 29
8.3 Physical.................................................................................................................................................. 30
8.4 Power ..................................................................................................................................................... 30
8.5 Temperature Ranges ............................................................................................................................ 31
8.6 Humidity................................................................................................................................................ 31
9 RMA AND WARRANTY ..................................................................................32
9.1 Conditions of the Warranty................................................................................................................. 32
9.2 Obtaining an RMA ............................................................................................................................... 33
HD-Connect MI™ Guide and User’s Manual.
3
1 Getting Started
1.1 Welcome
Congratulations on selecting Convergent Design HD-Connect MI™. HD-Connect
MI™ is shipped from the factory in the most secure packaging available. Please
inspect the content of the package and make sure to email us if you find any
shipping damage or missing components.
1.2 FCC Compliance
This professional equipment has been tested and found to comply with the
provisions for a Class A digital device under part 15 of the FCC rules. These
provisions are designed to provide reasonable protection against radio-frequency
emissions by digital devices in a commercial environment. This device may
interfere with radio and television reception in residential areas and is required to
accept all interference received, including that which may cause undesired
operation.
1.3 Shipping Contents
Your HD-Connect MI™ should come packaged with the following:
1) HD-Connect MI™
2) Power Supply with Changeable Plugs
3) Quick Start Guide
2 HD-Connect MI™
2.1 Overview
The Convergent Design HD-Connect MI is an HDMI to HD/SD-SDI converter
featuring embedded audio and time-code. This unique product converts the
uncompressed (YCbCr 4:2:2 or RGB 4:4:4) video and audio from HDMI devices
including Sony/JVC camcorders and decks into the HD/SD-SDI format used in
professional video applications. The HD-Connect MI offers two distinct
advantages over other HDV converters: DV as well as HDV support and the
ability to playback both 1080i and 720p tapes from a single deck (see FAQs for
more details). Users can connect the HD/SD-SDI output to their NLE systems
HD-Connect MI™ Guide and User’s Manual.
4
and convert HDV through HDMI to DVCProHD. The unit can also convert DV to
uncompressed SD, as well as HDV to uncompressed HD in real-time.
Additionally, the HD-Connect MI converts RS-422 deck commands to 1394, so
the HDV deck/camcorder can be directly controlled from an editing application.
Offline/ Online workflows as well as batch captures are easily supported. Finally,
tape dubs from HDV to HDCAM or DigiBeta entail only a single coax connection
via the HD/SD-SDI cable which carries video, audio and time-code.
The HD-Connect MI™ is your HDMI connection, bringing HDV and DV to your
studio and edit bays as well as supporting over-the-air playout.
2.2 Features
1) HDMI→ HD/SD-SDI Conversion (with emedded audio & time code)
2) HDV, DV and AVCHD Playback support
3) HDMI input formats: 1080i60, 1080i59.94, 1080i50, 1080p30,
1080p29.97, 1080p25, 1080p24, 1080p23.98, 720p60, 720p59.94,
720p50, 486i29.97, 576i25
4) DVI support (for formats matching listed HDMI input formats)
5) YUV 4:2:2 or RGB 4:4:4 HDMI support.
6) HDV Deck Control via RS-422 →1394 translation.
7) Cross Conversion and down-scale as provided by the deck. (see
compatibility chart available on website).
8) Eliminates Long-GOP (HDV) editing (and associated render times) by
enabling REAL-TIME conversion of HDV to DNxHD, DVCProHD and other
I-Frame Codecs
9) 1394-based Firmware Updates.
10) 100% digital, no A/D or D/A conversions.
11) Compatible with Sony HDCam & DigiBeta Decks
12) NOTE: Will not convert HDCP encrypted content
13) Color Bar Output.
14) Extremely low latency (< 100 μ sec)
15) Ability to force 1080i, 720p, and SD (486i or 576i) from HDMI devices that
would not otherwise support these formats (eg. Sony HDG-HC3).
HD-Connect MI™ Guide and User’s Manual.
5
2.3 Functional Block Diagram
MI™
HD - Connect MI™
1394
(Control)
1394
Interface
1394 Deck
Commands/
Time Code
RS-422
RS-422
Deck
Command/
Cntrl
Video
Micro
Controller
Control
Video
Processor
Audio
HDMI
Receiver
HDMI
Video
Audio
Timecode
HD/SD-SDI
HD/SD-SDI
Driver
Figure 1 Functional Block Diagram of HD-Connect
HD-Connect MI™ Guide and User’s Manual.
6
3 Installation and Quick Start
3.1 Connections
Refer to Figure 2 and the descriptions below when connecting HD-Connect MI™.
Figure 2 Connectors on the HD-Connect MI™
1) 1394 Control: Connect to your HDV camera/deck for device control.
2) RS-422: Connect to your SDI based editing system for RS-422 → 1394.
3) HD/SD-SDI Out: Connect to your monitor, NLE system, or dub target.
The HDMI format from your HDMI source determines output format. See
Tips and Troubleshooting for descriptions of how to select video formats
on various devices.
4) DC +5V in: Connect the supplied DC power supply unit. Warning: Use
only the power supply provided by Convergent Design, Inc. Damage
to the unit caused by connection to other power supplies is not
covered by warranty.
5) Status LED: User interface indicators for operation of the box. LED to the
right of the HDMI connector indicates Status.
HD-Connect MI™ Guide and User’s Manual.
7
6) Power LED: Indicates power connected to the unit.
7) HDMI In: Connect to your HDMI source (Note: Source video/audio must
not be encrypted).
HD-Connect MI
Connection Diagram
1394 (Deck Control & TC)
HDMI
(Video &
Audio)
HD-Connect MI
HDV Deck/Camcorder
with HDMI
HD/SD-SDI (Video + Audio + TC)
RS-422 Control
NLE
Figure 3 Connection Diagram
3.2 Status LED
The Status LED (Light Emitting Diode) to the right of the HDMI connector (Item 5
above) indicates the status of the HD-Connect MI™. When operating properly,
this LED will remain on when video is flowing, and will be off when there is no
video flow (e.g., color bars are generated). If the light is flashing, it is for one of
two reasons:
HD-Connect MI™ Guide and User’s Manual.
8
1) (2 flashes) The incoming HDMI video is HDCP encrypted. HD-Connect
MI™ can only stream unencrypted video.
2) (3 flashes) The incoming HDMI video is not of a format that the box can
handle (see Features above for a list of supported formats).
4 Controlling HD-Connect MI™
4.1 Preparation
When selecting options in the Control App, occasionally the HD-Connect MI™
will lose track of the 1394 uplink and may give you alert messages. If so, we
recommend unplugging and re-plugging the 1394 connection or power cycling
the box.
4.2 Using the Control Application
PC & Mac
1) Connect the HD-Connect MI™ to your computer using the 1394 port. You
must wait for your computer to recognize the box before the control
application will work. This may take up to 30 seconds for either Windows
XP or Mac.
2) Open and run the control application. Click on the “Open” or “Refresh”
button under the “Control” tab. The application will then display the current
firmware version. Figure 4 shows a screenshot of the application.
HD-Connect MI™ Guide and User’s Manual.
9
Figure 4 HD-Connect MI™ control application screen.
3) Perform the desired control operation as described below.
Control Operations
The operations available in the control application are described below. Following
your selection of a list item, checkbox, or radio button, a message should appear
confirming that your selection has been successfully loaded into your HDConnect MI™ box once you select “Apply”. Figures 5-7 show the use of the
control app for each operation. The interface for the PC and the Mac are identical
in operation.
1) Device Control. The device-control dropdown list allows selection of a
template representing a certain RS-422 controller or a set of controllers.
The text box should display the controller currently selected. Click on the
arrow to show the list and click on the text identifying the deck control
template the HD-Connect MI™ should use. Once selected and applied,
the blue text should display a confirmation message. By default, HDConnect MI™ comes pre-loaded with “Final Cut Pro” selected. Figure 5
illustrates.
HD-Connect MI™ Guide and User’s Manual.
10
Figure 5 Device Control selection confirmation.
HD-Connect MI™ Guide and User’s Manual.
11
2) Timecode Offset. This setting allows you to add an offset to the timecode
that will be reported to an RS-422 controller. Should you have other
pieces of equipment downstream from HD-Connect MI™ that add further
frame delays through your setup, you may wish to set an additional offset
here.
Figure 6 Timecode Offset Selection.
HD-Connect MI™ Guide and User’s Manual.
12
3) Output Format. This setting allows you to choose the video output format
from the following options:
Native – camera/deck output settings determine format; use this
setting if connected to an HDV deck
1080i – force 1080i output from camera
720p – force 720p output from camera
486i – force NTSC SD output from camera
576i – force PAL SD output from camera
Options that force output to a particular format work well for devices that
do not themselves have a menu selection for output formats. Figure 7
shows selection of “Force SD” as an example.
Figure 7 Input Format Selection
4) Color Bars. This selects the output test pattern when your HDMI source is
turned off or the HDMI cable is disconnected. Figure 8 illustrates the
various selections.
HD-Connect MI™ Guide and User’s Manual.
13
Figure 8 Color Bars Selection
5) Drop Frame. This setting has no effect in PAL mode. For the sake of
NTSC, check the box if you want HD-Connect MI™ to report dropframe
timecodes by default or uncheck it if you want HD-Connect MI™ to report
non-dropframe timecodes by default. Timecodes will follow the condition
of this checkbox on power-up or when you apply a change in the state of
the checkbox. Thereafter reported timecodes will follow the selected
format only until timecodes queried from a controlled device suggest a
change is needed. If HD-Connect MI™ is reporting dropframe timecodes
and detects a timecode valid only for non-dropframe material, it will switch
to reporting non-dropframe timecodes. Similarly, if HD-Connect MI™ is
reporting non-dropframe timecodes and finds a timecode sequence valid
only in dropframe material, it will begin reporting dropframe timecodes.
Note that HD-Connect MI™ can only detect a change in timecode at the
beginning of each minute, except those ending in zero (00, 10, 20, 30, 40,
and 50). This means that MI may not immediately detect a change in the
dropframe sense at a scene boundary. It may take up to two minutes,
though more typically up to one minute, to notice from queried timecodes
that the dropframe sense of the timecodes has changed.
5 Updating HD-Connect MI™
5.1 Preparation
To prepare for updating the HD-Connect MI™, complete the following steps:
HD-Connect MI™ Guide and User’s Manual.
14
1) Download and install the update and control application from the website.
Go to the HD-Connect MI™ downloads page at http://www.convergentdesign.com/MIdownloads.htm . Here you may download the latest code
updates for either PC or Mac.
2) In order to run the control application, you will need the Java Runtime
Environment 1.4.1 or better. If you need this to be installed on your
machine, follow the instructions on the product downloads page where the
installation files are located.
3) Connect the HD-Connect MI™ to your computer via the 1394 port. It is
recommended that the control and update application not be run alongside
other applications that use the 1394 port.
5.2 Using the Update Application
Follow the instructions below to complete the update process using either a PC
or a Mac.
PC
1) Connect the HD-Connect MI™ to your computer using the 1394 port. You
must wait for your computer to recognize the box before the update
application will work. This may take up to 30 seconds. It is recommended
you wait for 30 seconds.
2) Install the update and control application by running the installation file.
Figure 9 shows the installation process.
HD-Connect MI™ Guide and User’s Manual.
15
Figure 9 Installing the Control Application the PC & Mac
HD-Connect MI™ Guide and User’s Manual.
16
3) From the Start Menu, open the newly installed application
“HdConnectMIController”. When the application first starts, it will check
online for available updates. You will be prompted to update it upon first
use, click ok. When the update is finished, you will need to restart the
application. Figure 10 shows the dialog window.
Figure 10 Control Application Asking for Updates
4) Open the Control Application again. Click on the “Firmware Update” tab,
and click the “Open” or “Refresh” button to check the current software
loaded into the HD-Connect MI™, and display the newest version to
update to. Figure 11 illustrates.
HD-Connect MI™ Guide and User’s Manual.
17
Figure 11 Using the Update Application
5) Before updating, be sure that no HDMI cable is plugged into the HDMI
input of your unit. Click on the “Update” button to begin the update. It is
recommended that you record the current version before updating the box,
so that you can roll back to it if the new version does not work. This
process takes 3-6 minutes. During that time DO NOT unplug the box. A
HD-Connect MI™ Guide and User’s Manual.
18
success window will appear when the update is complete. See Figure 12
for a screenshot of a complete update.
Figure 12 Update Application in Action.
6) Once the update is complete, close the application. HD-Connect MI™ will
automatically switch between update and normal mode.
Mac
1) For the Mac OSX, the procedure for installation is identical to the PC.
Follow the instructions as before. Figure 13 shows the Mac installer
window.
HD-Connect MI™ Guide and User’s Manual.
19
Figure 13 Mac OSX Installer Screen
2) Open the HD-Connect MI™ Update Application window itself, using Finder
to locate the Applications, and select “HdConnectMIController”. Figure 14
illustrates this.
Figure 14 Finder in OSX
HD-Connect MI™ Guide and User’s Manual.
20
3) When you open the application, it should appear as in Figure 15. Use the
exact same procedure for PC to update the box. Click the “Refresh”
button, then click the “Update” button. The update should take around
three to five minutes. During that time DO NOT unplug the box.
Figure 15 Mac Update Application
5.3 Rollbacks
Firmware updates will appear periodically on the website. If you update your HDConnect MI™ as described above and find problems with the box in your
application, you can roll back to a previous code version using the Control App.
To do this, with the box in Update mode, click on the “Links/Downloads” tab.
Click on “Refresh List”. Using the drop down menu, select the code you wish to
use. This tells the Control App what code to load when it is restarted. Close the
Control App, restart it and allow it to download the appropriate code, then
proceed with the normal update procedure. Figure 16 below shows the
“Links/Downloads” tab.
HD-Connect MI™ Guide and User’s Manual.
21
Figure 16 Code Rollback Feature in the Control App
6 Tips and Troubleshooting
6.1 Operating Tips
The follow are recommendations for video-editing workflow and operation of HDConnect MI™ with other products that may appear in your configuration.
1)
Equipment Warm-Up Time. Turn on deck/camera and HD-Connect
MI™ for at least 5 minutes prior to use. This lets the crystal oscillators
inside the camera/deck and HD-Connect MI™ warm up and stabilize in
frequency.
2)
Continuous Timecode and Leaders in Video Capture. For purposes of
searching in the course of a batch capture, it is best to have a tape
without timecode breaks. A camera in free-run timecode mode will
continue to advance its internal timecode while the camera is not
recording. This can create significant gaps in timecode from one clip
recording to the next and may cause problems in later searches. Even
greater problems arise when there are multiple instances of the same
timecode on a single tape. For best results, the camera should be set in
record-run mode with a desired starting timecode and the timecode not
reset until the full tape has been recorded. This should cause the
HD-Connect MI™ Guide and User’s Manual.
22
camera to begin advancing its internal timecode only each time the
record button is pushed. It is also recommended that the first scene
recorded on a tape have a leader of 30 seconds or more of sacrificial
material in order to prevent a reverse search from overrunning the
timecodes on the tape. There should also be a leader before each
subsequent scene at least as long as the preroll during batch capture.
The recommended preroll time for a batch capture is 6 seconds
3)
Avoiding Multiple IEEE-1394 Devices. On any reset of the 1394 bus
(e.g., on power-up or plugging or unplugging a 1394 device), HDConnect MI™ searches the bus for the first HDV device it can find.
Where there is more than one, any beyond the first are ignored. The
order in which devices are queried may change from one reset to the
next, so it is best never to have more than a single HDV device plugged
in at the same time. With more than one device on the bus sending out
queries in the wake of a bus reset (e.g., HD-Connect MI™ and a PC or
Mac), communications between HD-Connect MI™ and an HDV device
may fail. This is known to happen with the Canon XLH1 camera. This
seems to result from queries from HD-Connect MI™ and the computer
arriving at the HDV device too close to one another. It is best,
especially with the Canon camera, to include only HD-Connect MI™
and a single HDV device on the 1394 bus and plug a computer in only
to run the controller application for HD-Connect MI™.
4)
Avoiding Avid Auto-Configure. Rather than use Avid’s automatic deck
configuration, select Generic Play Deck as a specific device-control
template.
5)
When using the Sony HVR-M25U Deck. The default fast forward and
rewind speed of the deck is too fast for HD-Connect MI™ to perform
batch captures properly. The deck needs to be set to the “Shuttlemax”
speed. To change this setting, go to the main menu on the deck, scroll
down to “VTR Set”, within that submenu go to “FF/Rew Speed”, the
default setting is “FF/Rew”. Simply select “Shuttlemax”, and batch
captures should work properly. Under the In/Out Rec Settings, force the
deck to HDV mode (not Auto or DV).
6)
Handling Dropframe/Non-Dropframe Timecodes. Added automatic
dropframe/non-dropframe timecode reporting for material that is not
PAL SD or HD at 50 fps. Previously HD-Connect MI reported
dropframe or non-dropframe timecodes based only on the state of the
Drop Frame checkbox in the HD-Connect MI Controller application. It
reported an error (one LED flash every five seconds) on encountering
timecodes of the opposite sense. In this firmware version, timecodes
follow the condition of the Drop Frame checkbox only on power-up or
when the user changes that checkbox through the Controller.
Thereafter timecodes follow the current format until timecodes queried
from the controlled device suggest a change is needed. If MI is
reporting dropframe timecodes and detects a timecode valid only for
HD-Connect MI™ Guide and User’s Manual.
23
non-dropframe material, it will switch to reporting non-dropframe
timecodes. Similarly, if MI is reporting non-dropframe timecodes and
finds a timecode sequence valid only in dropframe material, it will begin
reporting dropframe timecodes. Note that MI can only detect a change
in format at the beginning of each minute other than those ending in
zero (00, 10, 20, 30, 40, and 50). This means that MI will not
immediately detect a change in the dropframe sense at a scene
boundary. It may take up to two minutes, though more typically up to
one minute, to notice from queried timecodes that the dropframe sense
of the timecodes has changed.
7)
Offline/Online Workflow. While HD-Connect MI™ will allow you to use
your RS-422 controller to navigate through a tape in an HDV device, it is
best to reserve this capability for a rough look at source material rather
than for logging in and out points for later batch capture. Due to the
GOP (Group Of Pictures) structure of MPEG video and the transport
limitations of HDV devices, navigation can be quite choppy compared to
navigation through a tape on an RS-422-controlled deck. For ease of
clip logging, it may be better to capture an entire tape at a low
resolution, decompose the captured material through an editing
application into clips that will be a part of the final project, and then
capture just those clips again at the desired final resolution.
Two scenarios illustrate this approach. In the first, the DV scenario,
material from source tapes is captured directly using a DV editing
application and the DV output from an HDV device. In the second, the
SDI scenario, source material is captured instead from the SDI output
on HD-Connect MI™ connected to an SDI card installed in the editing
computer. The discussion below focuses on the advantages and
disadvantages of these two scenarios.
The DV scenario supports a simple offline capture and edit process that
can be accomplished on a laptop. Since the material is captured in a
format (DV) available as a direct output of the camera, the offline stage
of the process does not require any equipment beyond the camera and
the editing computer. Given minimal equipment and the relatively low
DV data rate, material could easily be captured and edited in the field.
For Avid users, DV also opens up the possibility of capture and edit on
low-cost Xpress Pro systems followed by full-resolution capture and
finishing on high-end Avid products. Of course, capturing and editing in
DV will mean that editors have no choice but to work with lower-quality
standard-definition video. Another problem in the DV scenario is that
timecode for the offline capture will be from one device in one mode (the
camera in DV mode), while the final online capture will be from a
different device in a different mode (HD-Connect MI™ in HD mode). It
HD-Connect MI™ Guide and User’s Manual.
24
may be necessary to set a timecode offset in the capture application to
ensure that the logged DV inpoints and outpoints correspond to the
correct frames during final online capture through HD-Connect MI™. In
addition, some HDV devices will not down-convert to SD and provide a
DV output, so this scenario would not be possible with all HDV devices.
While the need for an SDI capture card (HD or SD) in the SDI scenario
eliminates the possibility of capturing and editing on a laptop or with
Avid Xpress Pro, the SDI offline/online scenario eliminates the
difference in timecode source, since clips are captured through HDConnect MI™ at both offline and online stages. Also, the SDI scenario
allows the selection of a number of different codecs for video
compression during the offline tape capture. With SD-SDI output from
HD-Connect MI™ set in SD mode, a software DV codec could achieve
the same savings in disk space as in the DV scenario. For higherquality material during offline capture and edit, HD-Connect MI™ could
be set in HD mode and a DVC-Pro-HD or DNxHD codec used to
compress captured video. Recapture of just the final project clips could
then be done at the full HD data rate. The SDI scenario is also more
universal than the DV scenario, since it covers an HDV source such as
the JVC BR-HD50 deck that do not down-convert to DV.
The table below summarizes the advantages and disadvantages of the
DV and SDI scenarios.
DV Offline Capture
Advantages
• Laptop ok
• SD or HD
• Avid Xpress Pro ok
• Choice of SD or HD
codecs (DV, DVC Pro HD,
etc.)
• Minimal equipment
• Low data rate
Disadvantages
SDI Offline Capture
• Ok for HDV device
without down-conversion
• Lower offline quality
• No laptop
• SD only
• No Xpress Pro
• DV compression only
• May need timecode
offset in edit app
• Requires HDV
HD-Connect MI™ Guide and User’s Manual.
25
device that downconverts
6.2 Troubleshooting Guide
1) No video output from the box.
• Confirm output from your HDMI source by plugging directly into an
HDMI monitor.
• Confirm colorbar output from by unplugging the HDMI cable and
plugging its SDI output into an SDI monitor, if you have one available.
• If you are trying to connect to an SDI monitor and is putting out an HD
SDI stream, is your monitor HD-capable or is it limited to SD-SDI?
• If you are trying to connect SDI to an NLE system, does the expected
format in the NLE capture settings exactly match the format from your
HD-Connect MI™? Unplug HDMI and use the Controller application to
select appropriate colorbar formats for testing (1080i50, 1080i60, etc.).
• On a Sony HDMI source device, set the HDV/DV SEL option under the
In/Out Rec menu to HDV.
2) Box failed to update
• Make sure the computer recognizes the box before updating.
• Roll back to a previous working version.
3) RS-422 Deck control does not work.
• Select a generic play deck as the deck template in the NLE software.
• Ensure that the RS-422 cable is connected from HD-Connect MI™ to
the correct serial port on your NLE system.
• Ensure that a 1394 cable is connected from HD-Connect MI™ to your
HDMI source device.
• Ensure that 1394 control is enabled on the controlled device and that
the device allows remote control and is not set to allow only local
control.
4) Batch Capture Problems.
• On a Sony device, set the FF/Rew Speed option to SHUTTLE MAX.
• Set NLE preroll to 6 seconds.
HD-Connect MI™ Guide and User’s Manual.
26
5) I only see color bars when I turn on the box.
• When there is no HDMI device, the HD-Connect MI™ displays color
bars in the selected output mode.
HD-Connect MI™ Guide and User’s Manual.
27
7 Safety and ESD Precautions
1) Always connect the box to specified power source: 100 to 240 V AC,
50/60 Hz. DO NOT use any power supply other than the one supplied
with the HD-Connect MI™, as this voids the warranty.
2) Do not operate the unit in an unprotected outdoor installation or in wet
areas. Do not expose this product to rain or snow.
3) Keep the operating temperature between 5º C and 40º C (40º F and
104º F). Avoid conditions which would cause moisture condensation
on the outside cover.
4) There are no user serviceable components inside the box. Only a
qualified technician should perform servicing of the unit. Opening the
box may void the warranty.
5) Do not pour water or any other fluid over the box. Avoid the use of
sharp objects near the box as they may scratch the anodized
aluminum case or damage the DIP switch and board.
6) Clean only with water with a damp cloth.
7) CAUTION: Electrostatic Discharge (ESD) can damage components in
this product. Although HD-Connect MI™ has countermeasures to this
hazard installed inside, it is always best to avoid damage by using
extra caution when adjusting the DIP switch settings. Always ground
yourself (by touching a grounded metal object) to discharge any static
prior to adjusting the DIP switches.
8) Do not touch exposed connector pins and do not insert any metal
objects in the connectors.
9) Ensure that all connections made to the box (including at the “other
end of the cable”) are made in ESD safe environments.
10) Always transport and store the box in the static protected bag included
with the HD-Connect MI™
HD-Connect MI™ Guide and User’s Manual.
28
8 Specifications
8.1 Inputs
HDMI
Formats:
•
•
•
•
•
•
•
•
•
•
•
•
•
•
•
1920x1080i, 60Hz
1920x1080i, 59.94Hz
1920x1080i, 50Hz
1920x1080p, 30Hz
1920x1080p, 29.97Hz
1920x1080p, 25Hz
1920x1080p, 24Hz
1920x1080p, 23.98Hz
1280x720p, 60Hz
1280x720p, 59.94Hz
1280x720p, 50Hz
720x486i, 29.97Hz
720x576i, 25Hz
YUV 4:2:2 or RGB 4:4:4 for all formats
8-bit video, 24-bit audio at 48kHz (2 channel support now, 8 channel
coming soon)
8.2 Outputs
HD-SDI
Standards:
•
•
•
•
•
Video Format: SMPTE 274M (1080i), 296M (720p)
SDI Video: 4:2:2 SMPTE 292M
SMPTE High Def Color Bars RP-219
4 Channel Embedded Audio (8 channels added soon)
Audio: 24-bit, 48Khz, SMPTE 299M
Formats:
• Same as for Inputs above.
HD-Connect MI™ Guide and User’s Manual.
29
Connectors: 75 Ω BNC
SD-SDI
Standards:
•
•
•
•
•
Video Format: SMPTE 125M
SDI Video: 4:2:2 SMPTE 259M-C
SMPTE Standard Def Color Bars RP-178
4 Channel Embedded Audio
20-bit, 48Khz, SMPTE 272M-A
Formats:
• 720x480i, 29.97Hz, 4:3
• 720x576i, 25Hz, 4:3
Connectors: 75 Ω BNC
Embedded Time Code
Standards:
• SMPTE RP-188 (HD), VITC (SD)
• SD NTSC Lines: 14, 16, 277, 279
• SD PAL Lines: 14, 16, 327, 329
• HD 1080i Lines: 14, 16, 577, 579
8.3 Physical
Dimensions
• 4” (101 mm) deep X 1.75” (44 mm) high X 6” (152 mm) wide
Weight
• 1 lb. (0.5 kg)
8.4 Power
Range
• AC Power: 100 to 240 V AC (50/60 Hz)
• Unit Input Power: +3.6 to 5.25V, center positive, 2.5mm jack
Maximum Operating
• 3W
HD-Connect MI™ Guide and User’s Manual.
30
8.5 Temperature Ranges
Operating
• 40º F to 104º F (5º C to 40º C)
Storage
• -5ºF to 140ºF (-20º C to 60º C)
8.6 Humidity
Operating
• Less than 80% (non-condensing)
Storage
• Less than 90% (non-condensing)
HD-Connect MI™ Guide and User’s Manual.
31
9 RMA and Warranty
9.1 Conditions of the Warranty
Convergent Design reserves the right to determine if a repair is subject to the
warranty agreement. Damages caused by products being dropped or mishandled
is not covered by this warranty. Also damage caused by over-voltage conditions
on any of the I/O connectors is not covered by this warranty. Use of any power
supply other than the one provided automatically voids the warranty.
There are no user-serviceable parts inside the cabinet. Opening the cabinet
voids the warranty. Transit damage caused by inadequate packaging also
invalidates the warranty agreement. Please ship the unit in its original packaging,
if possible.
All products are shipped prepaid to Convergent Design. For insurance reasons,
Convergent Design cannot accept any product that is returned via U.S. Postal
Service. Returns will be accepted from Federal Express, UPS, DHL, or other
comparable freight carrier. Convergent Design returns the product via a prepaid
two-day delivery service within the continental United States, only if the product
is under warranty and subsequently found to be faulty. Out-of-warranty repaired
products are shipped at customer’s expense. Turnaround time for warranty
repairs normally will not exceed 48 hours (excluding shipping time), unless
extraordinary fault conditions exist. A failure analysis report is returned with each
product.
Labor and defects are covered for the warranty period stated on your original
invoice from the original date of purchase. Only the original purchaser of the
products is covered under this warranty. The warranty is non-transferable. If you
discover a defect, please refer to our Return Merchandise Policy below. The
warranty covers all Convergent Design hardware defective in material or
workmanship. Software is warranted in a separate written statement
accompanying the software. During the warranty period, Convergent Design, at
its option, will repair or replace product or product components, which in its
opinion prove defective. Parts and components used in the repair process may
be recycled or repaired, at Convergent Design’s discretion. This warranty service
will be performed at no charge to the registered owner, provided the product is
shipped prepaid to Convergent Design. Convergent Design will return the
repaired product via a like carrier, in the continental United States within 48
hours, shipping time excluded. Convergent Design reserves the right to
determine whether a needed repair is subject to the warranty as per its
provisions sated herein. Transit damage caused by inadequate packing violates
the warranty. The warranty will be void if, in the opinion of Convergent Design,
HD-Connect MI™ Guide and User’s Manual.
32
the product has been damages through accident, misuse, misapplication, or as a
result of service or modification performed not authorized in writing by
Convergent Design.
WARNING: The following are not covered under warranty:
•
Damage due to the use of a power supply other than that supplied with
HD-Connect MI™.
•
Damage caused by improper connections to external 1394 devices
supplying power over the 1394 cable.
9.2 Obtaining an RMA
It is our policy that all material and repair returns, whether in warranty or not, are
only accepted if an RMA (Return Merchandise Authorization) number has been
issued for the products being returned. Any unauthorized shipments will be
returned, un-repaired at the customer’s expense.
Damaged or defective Convergent Design products that are purchased from
Convergent Design may be returned for replacement only. Convergent Design
will not accept returns for any other reason. All eligible returns require a Return
Merchandise Authorization (RMA) number. E-mail Convergent Design, Inc. at
[email protected] to obtain an RMA number. Items must be
returned within 10 days of receiving your RMA number. Returned product must
be in its original packaging with all contents included and must have the RMA
number clearly marked on the outside of the package.
RMA numbers and return address may be obtained from Technical Support.
Convergent Design, Inc.
4465 Northpark Drive
Suite 201
Colorado Springs, CO 80907
EMAIL: [email protected]
WEBSITE: http://www.convergent-design.com
VOICE: (720) 221-3861 or (866) 654-0080
HD-Connect MI™ Guide and User’s Manual.
33
HD-Connect MI™ Guide and User’s Manual.
34