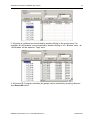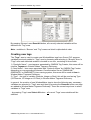
1
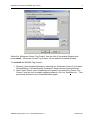
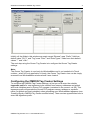
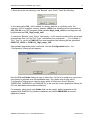
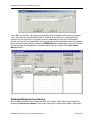
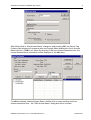
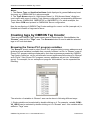
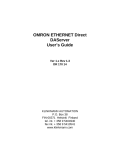
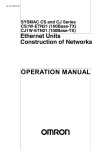
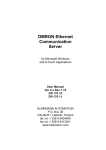
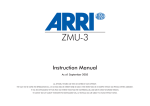
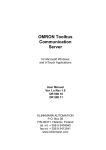
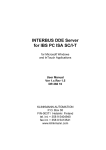
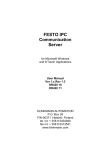
OMRON Tag Creator
for Wonderware InTouch
WindowMaker
User Manual
Ver 1.x Rev 1.0
PR 125 10
KLINKMANN AUTOMATION
P.O. Box 38
FIN-00371 Helsinki Finland
Tel. int. + 358 9 5404940
Fax int. + 358 9 5413541
www.klinkmann.com
Klinkmann Automation OMRON Tag Creator
i
Table Of Contents
Overview......................................................................................................................... 1
Installing the OMRON Tag Creator ................................................................................ 1
Setting up the OMRON Tag Creator .............................................................................. 4
Starting the OMRON TagCreator ............................................................................... 4
Configuring the OMRON Tag Creator Settings .......................................................... 5
Adding/editing Access Names.................................................................................... 7
Creating tags by OMRON Tag Creator........................................................................... 9
Browsing the Omron PLC program variables ............................................................. 9
Creating new tags ...................................................................................................... 11
OMRON Tag Creator Ver 1.x User Manual Rev 1.0
P12510m10
Klinkmann Automation OMRON Tag Creator
1
OMRON Tag Creator for Wonderware
InTouch WindowMaker
Overview
The Klinkmann OMRON Tag Creator is an add-on module for Wonderware InTouch
WindowMaker, used to expand the functionality and capability of InTouch at design time.
The Omron PLC programs created by the OMRON CX-Programmer Windows
Programming Software (CX-Programmer) can be saved as binary (.cxp) files or text (.cxt)
files. Based on information about all PLC program variables included in .cxt files, the
OMRON Tag Creator uses .cxt files created by CX-Programmer to help you create tags
within InTouch quickly and easily.
The Klinkmann OMRON Tag Creator supports the following types of OMRON PLCs:
- CS1/CJ1 Series PLCs,
- CV-Series PLCs,
- C/CPM2x PLCs,
- C200HX/C200HG/C200HE PLCs,
- CQM1 PLCs.
The following Klinkmann OMRON Communication Servers are supported by OMRON
Tag Creator:
-
-
Klinkmann OMRON Hostlink Communication Server (OMRHLINK), using the Host
Link protocol to communicate with OMRON PLCs directly via serial RS-232/RS422/RS-485 interface;
Klinkmann OMRON FINS Gateway Communication Server (OMRONFGV), using
FINS communications protocol to communicate with OMRON PLCs over Ethernet,
Controller Link, Sysmac Link, Sysmac Bus or Serial networks; the OMRON
FinsGateway software must be installed on MS Windows (NT, 2000 or XP) to run the
OMRONFGV Server;
Klinkmann OMRON Ethernet Communication Server (OMRONETH), using FINS
communications protocol to communicate with OMRON PLCs directly over Ethernet
network; the OMRONETH Server does not need the OMRON FinsGateway software
to be installed on computer where OMRONETH Server is running.
Installing the OMRON Tag Creator
The Klinkmann OMRON Tag Creator installation package can be supplied:
1. As a self-extracting archive (P12510xxx.EXE if downloaded from Klinkmann’s web site
(the xxx is the current (latest) version of the OMRON Tag Creator).
2. From installation on CD.
3. On two or three distribution disks (floppies).
OMRON Tag Creator Ver 1.x User Manual Rev1.0
P12510m10
Klinkmann Automation OMRON Tag Creator
2
To install the OMRON Tag Creator from the self-extracting archive, run the
P12510xxx.EXE and proceed as directed by the S7ETHMPI Server Setup program.
To install the OMRON Tag Creator from CD or distribution disks, on MS Windows:
1. Insert the CD with Klinkmann Software into CD drive or insert the OMRON Tag
Creator Disk1 into a floppy drive A: or B:.
2. Select the Run command under the Start menu.
3. Run STARTUP.EXE if installing from CD or SETUP.EXE if installing from
distribution disks (floppies).
4. If installing from CD: select “Protocol Servers (DDE, SuiteLink, OPC)”, find
“Additional and support software/OMRON Tag Creator” and click on “Setup…”.
5. Proceed as directed by the OMRON Tag Creator Setup program.
Note:
Omron Tag Creator needs the InTouch 7.11 Patch04 (or newer) to be installed on PC
where Wonderware WindowMaker is running. If InTouch 7.11 Patch04 is not installed,
the Omron Tag Creator installation will be rejected.
When installation is finished, the following files will be added to InTouch subdirectory
(e.g. C:\Program Files\FactorySuite\InTouch):
OMRONTAGC.WZU
The OMRON Tag Creator wizard (DLL) file. This file will be
renamed to OMRONTAGC.DLL by WindowMaker when
configuring/adding new OMRON Tag Creator wizard.
OMTAGCR.DLL
Dynamic Link Library necessary for OMRON Tag Creator.
SYSTAGS.DAT
Data file used by OMRON Tag Creator.
The subdirectory specified as a folder where to install the OMRON Tag Creator files will
contain the following files:
P12510Mxx.PDF
The OMRON Tag Creator User manual (this file), where xx is
the current (latest) version of manual.
EXAMPLE.CXT
Example OMRON CX-Programmer PLC program file.
LICENSE.TXT
Klinkmann Automation software license file.
When installation is finished, start WindowMaker, from WindowMaker Main Menu select
Special / Configure / Wizard/ActiveX Installation and open the “Wizard/ActiveX
Installation” dialog box:
OMRON Tag Creator Ver 1.x User Manual Rev1.0
P12510m10
Klinkmann Automation OMRON Tag Creator
3
Select the “Klinkmann Omron Tag Creator” from the List of Uninstalled Wizards and
press Install - “Klinkmann Omron Tag Creator” will be added to Installed Wizards.
To uninstall the OMRON Tag Creator:
1. Remove it from Installed Wizards by selecting the “Klinkmann Omron Tag Creator”
WindowMaker in “Wizard/ActiveX Installation” dialog box and clicking Remove.
2. Start Control Panel, select “Add/Remove Programs” and select the “Omron Tag
Creator” from the list of available software products. Click on “Add/Remove…” and
proceed as directed by the UnInstallShield program.
OMRON Tag Creator Ver 1.x User Manual Rev1.0
P12510m10
Klinkmann Automation OMRON Tag Creator
4
Setting up the OMRON Tag Creator
Starting the OMRON TagCreator
To start the OMRON Tag Creator, in WindowMaker:
1. Open the “Wizards/ActiveX Toolbar” (by clicking on “Wizards/ActiveX Toolbar” button)
from WindowMaker Toolbars (if “Wizards/ActiveX Toolbar” button is not visible, enable it
by selecting View / Wizards/ActiveX Toolbar from WindowMaker Main Menu) - the
“Wizard Selection” window displays:
Select “Omron Tag Creator” and press OK. The Omron Tag Creator icon will appear
somewhere on WindowMaker currently opened Window.
2. Locate the Omron Tag Creator icon by clicking on it and then double click on it to open
the Omron Tag Creator main window:
OMRON Tag Creator Ver 1.x User Manual Rev1.0
P12510m10
Klinkmann Automation OMRON Tag Creator
5
Initially, all the fields in this window are empty except “Browse” area “Prefix:” field has
default value “PLC1” and “Tag” area “Filter:” and “Data Types:” fields have their default
values “*” and “<All>”.
The next step using the Omron Tag Creator is to configure the Omron Tag Creator
settings.
Note:
The Omron Tag Creator is used only by WindowMaker and is not needed at InTouch
runtime – when InTouch application is ready, the Omron Tag Creator icon can be simply
removed from WindowMaker window where it was located.
Configuring the OMRON Tag Creator Settings
To configure the OMRON Tag Creator settings, at first you must enter the suitable
tagnames prefix for new tagnames to be created from memory addresses and global
and local variables used in Omron PLC program (contained in the current .cxt file). This
tagnames prefix will precede the Omron PLC program memory address or symbolic
name (for global and local variables) when generating new WindowMaker tagnames (see
Creating tags by OMRON Tag Creator section below). There are two opportunities how to
enter this tagnames prefix:
OMRON Tag Creator Ver 1.x User Manual Rev1.0
P12510m10
Klinkmann Automation OMRON Tag Creator
6
1) Enter the prefix text directly in the “Browse” area “Prefix:” field, like following:
In this case prefix CV2_ will be added to memory address or symbolic name. For
example, for PLC program memory address 168.02 new tagname will be generated as
CV2_168.02 or for PLC program global variable High_temp_val2 the new tagname will
be generated as CV2_ High_temp_val2.
2) Leave the “Browse” area “Prefix:” field empty - in this case the prefix will be generated
automatically from .cxt file “PLC Type” information plus underscore “_”. For example, if
“PLC Type” in .cxt file is CVM1-V2 then new tagnames like following will be generated:
CVM1-V2_168.02 or CVM1-V2_ High_temp_val2.
After suitable tagnames prefix is selected, click the Configuration button - the
“Configuration” dialog box will appear:
Here the File and Node fields are used to select the .cxt file to be used as a new source
from where to generate new WindowMaker tags. The combo box at right part of
“Configuration” dialog box is used to select some of Klinkmann Omron Servers
(OMRHLINK, OMRONFGV or OMRONETH) to be used as current Application Name (for
InTouch data base Access Name definition).
For example, select local node (Node field can be empty), default example.cxt file
supplied with OMRON Tag Creator installation and select OMRHLINK as current
Application Name:
OMRON Tag Creator Ver 1.x User Manual Rev1.0
P12510m10
Klinkmann Automation OMRON Tag Creator
7
Press OK - the Omron Tag Creator main window will re-appear now containing general
“Info” area and list of all variables filled in “Browse” area, based on information from
example.cxt file (Omron PLC program memory addresses are put into “AllVariables”
group). If in the InTouch application currently opened by WindowMaker there are already
some Access Names defined containing OMRHLINK as an Application Name then these
Access Names will be displayed in Access Names list box (below the Create Acess
Names button):
Adding/editing Access Names
New Access Names can be created directly from Omron Tag Creator main window by
pressing Create Acess Names button and invoking the “Add Access Name” dialog box:
OMRON Tag Creator Ver 1.x User Manual Rev1.0
P12510m10
Klinkmann Automation OMRON Tag Creator
8
After filling fields in “Add Access Name” dialog box and pressing OK, the Omron Tag
Creator main window will re-appear with new Access Name displayed in the in Access
Names list box - CVM in our case. By selecting CVM from Access Names list box, the
current Access Name information will be displayed in the Info area:
To edit the already existing Access Name, double click on some existing one from
Access Names list box – the “Edit Access Name” dialog box will be invoked.
OMRON Tag Creator Ver 1.x User Manual Rev1.0
P12510m10
Klinkmann Automation OMRON Tag Creator
9
Notes:
1. The Server Type and Application Name (both displayed in general Info area) must
be same, e.g. OMRHLINK as in above example.
2. The Topic Name entered in “Add Access Name” or “Edit Access Name” dialog box
must match with some of existing Topic Names configured for corresponding Klinkmann
Omron Server (OMRHLINK, OMRONFGV or OMRONETH). For above example, the
Topic Name CVM must present in OMRHLINK Server configuration.
Now the configuring of OMRON Tag Creator settings for current .cxt file (example.cxt) is
finished and creation of tags can be done.
Creating tags by OMRON Tag Creator
There are two OMRON Tag Creator areas used to create tags for WindowMaker: the
“Browse” area and the “Tags” area. The Generate button is used to add the selected
tags to InTouch data base.
Browsing the Omron PLC program variables
The “Browse” area is used to select Omron PLC program data (memory addresses and
global and local variables) available from currently selected .cxt file. In “Browse” area all
Omron PLC program data are displayed by their new tagnames generated by OMRON
Tag Creator, based on .cxt file contents and current tagnames prefix entered in “Browse”
area “Prefix:” field (Omron PLC program memory addresses are put into “AllVariables”
group). For example, for our example.cxt program “AllVariables” can be expanded like
following:
The selection of variables in “Browse” area can be done in following different ways:
1. Single variable can be selected by double-clicking on it. For example, variable CVM1V2_168.02 can be selected by double-clicking on it in “Browse” area - this variable will be
added to “Tags” area:
OMRON Tag Creator Ver 1.x User Manual Rev1.0
P12510m10
Klinkmann Automation OMRON Tag Creator
10
2. All group of variables can be selected by double-clicking on the group name. For
example, all “AllVariables” can be selected by double-clicking on it in “Browse” area – all
“AllVariables” will be added to “Tags” area:
3. All Omron PLC program variables (all groups) can be selected by pressing “Browse “
area Select All button:
OMRON Tag Creator Ver 1.x User Manual Rev1.0
P12510m10
Klinkmann Automation OMRON Tag Creator
11
By pressing “Browse“ area Reset All button, all currently selected variables will be
deleted from “Tag” area.
Note - variables in “Browse“ and “Tag” areas are listed in alphabetical order.
Creating new tags
The “Tags” area is used to create new WindowMaker tags from Omron PLC program
variables previously added to “Tags” area by browsing and selecting in “Browse” area. In
“Tags” area each selected variable is located in one row, consisting of three fields:
1) “Symbolic Name” - new tagname generated by OMRON Tag Creator; this name will be
used as Tagname in Window Maker Tagname Dictionary;
2) “Item Name” - item name associated with “Symbolic Name” by OMRON Tag Creator
depending on corresponding Klinkmann Communication Server (OMRHLINK,
OMRONFGV or OMRONETH) item naming system; this name will be used as Item in
Window Maker Tagname Dictionary;
3) “Type” - the type of variable (Discrete, Integer or Real); this will be used as tag Type
(I/O Discrete, I/O Integer or I/O Real) in Window Maker Tagname Dictionary.
In general, the creation of new WindowMaker tags is done the following way: necessary
variables are selected in “Tags” area and then by pressing the Generate button new tags
are added to Window Maker Tagname Dictionary. There are several ways how to select
variables in “Tags” area:
- by pressing “Tags“ area Select All button - all current “Tags“ area variables will be
selected:
OMRON Tag Creator Ver 1.x User Manual Rev1.0
P12510m10
Klinkmann Automation OMRON Tag Creator
12
- by selecting several consecutive variables (by holding Shift key and at first clicking
mouse left button on variable and then on last variable) or non-consecutive variables (by
holding Ctrl key and clicking mouse on variables to be selected):
- by using Filter feature: by entering the filtering mask in the Filter edit box and pressing
<Enter> - the variables matching the filtering mask will be selected, like following (the
filtering is performed on Symbolic Names):
OMRON Tag Creator Ver 1.x User Manual Rev1.0
P12510m10
Klinkmann Automation OMRON Tag Creator
13
- by using Data Types feature: by selecting some data types available (<All>, Discrete,
Integer, Real) from the Data Types combo box - all this data type variables will be
selected, like following:
By pressing “Tags“ area Reset All button, all currently selected variables will become
unselected.
OMRON Tag Creator Ver 1.x User Manual Rev1.0
P12510m10
Klinkmann Automation OMRON Tag Creator
14
KLINKMANN AUTOMATION
OMRON Tag Creator
Revision History
Feb 2003
Rev 1.0
First Release
OMRON Tag Creator Ver 1.x User Manual Rev1.0
P12510m10