1
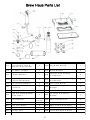
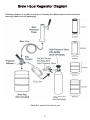
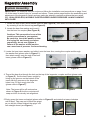
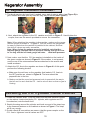
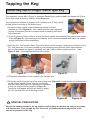
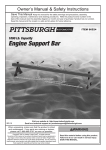
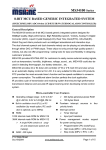
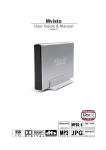
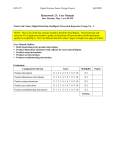
Brew Haus Kegerator
Model No. : CBH170
Safety First !
CO2 gas can be dangerous! Make sure to always use CO 2 in a
well-ventilated place.
Never exceed 40psi on your keg system.
Flush out Chemicals from your beer line completely before tapping keg.
Always thoroughly check for gas leaks once you have set up your system.
1
Specifications
Easy-pull beer dispenser
Easy setup and installation
Overall Dimensions: 54.1cmW x 67.5cmD x 84.3cmH
(with casters)
Weight: 38kgs
Refrigerant: R600A, 32g
Handy guardrail
Convenient drip tray
Dual-gauge CO regulator
Sturdy casters for extra mobility
220-240V~50Hz 0.85Amps
2
2
IMPORTANT : All persons operate this equipment must read this user
manual carefully and familiarize with all operating procedures and safety
precautions. Misuse this equipment may result in death, injury or property
damage.
GENERAL SAFETY PRECAUTIONS
1.Please reserve this manual for future reference.
10.Do not cover the power cord. DO NOT immerse
cord in water or use in high traffic areas. DO NOT
run cord over carpets or heating sources or
elements. Never use damaged cords or plugs.
2.All warnings, cautions and instructions mentioned
in this manual cannot cover all possible conditions
and situations that may occur. Users must use
common sense and pay extra cautions when use
this equipment.
11.INTENDED FOR UPRIGHT, FREESTANDING
USE ONLY. Do not install in cabinet or enclosed
space.
3. NEVER use this product for anything other than
its intended use. Never modify this product.
Failure to comply with the precautions, warnings
and recommendations in this manual will nullify
your warranty and may result in injury or even
death.
12.DO NOT operate with missing or broken parts.
13.This product is intended for INDOOR USE ONLY.
DO NOT USE IN OUTDOORS.
14.Only qualified personnel should perform
generator service. Service or maintenance
performed by unqualified personnel could result
in injury.
4. ALWAYS ensure this kegerator is plugged into
a grounded outlet with the proper power supply
available.
IMPORTANT - All persons that will operate this equipment must read
15.Do
not operate
this kegerator
5. DO NOT unplugand
the machine
pulling or competent with
become by
thoroughly
all operating
procedures
and in explosive
atmospheres,
such
as
in
tugging on the power
Firmly grasp
the of this equipment may result in death, the presence of
safetycord.
precautions.
Misuse
flammable liquids, gases, or dust.
plug and removepersonal
from outlet.
injury or property damage.
16. DO NOT tamper or modify the controls.
6. MAKE SURE that the power outlet plug and
power cords used are in good condition. Worn,
frayed or damaged plugs, cords and outlets
should be replaced or repaired by a certified
electrician who is properly qualified to meet local
safety and electrical codes. Power supply cords
should be replaced by the manufacturer. AVOID
using extension cords or 3-prong adaptors.
17. DO NOT roll a loaded kegerator over carpets.
Make sure your unit is empty before moving it.
18.KEEP UPRIGHT when transporting. DO NOT
ALLOW TO TILT PAST 45 DEGREE. DO NOT
UPEND OR TURN UPSIDE DOWN.
7. To reduce the risk of electrical shock or fire,
MAKE SURE your unit is properly grounded.
NEVER TAMPER WITH, REMOVE OR CUT
THE GROUNDING PIN!! The wall outlet used
with this kegerator MUST be properly grounded.
If you do not have a grounded outlet, have one
installed by a certified electrician who is properly
qualified to meet local safety and electrical codes.
CHILD SAFETY PRECAUTIONS
19. WARNING! Children must be supervised around
this machine. Make sure that children know that
this kegerator is NOT A TOY. Close door during
operation and leave closed at all time when
children are present.
8.Make sure your machine is unplugged when
conduct any maintenance or repair. A qualified
service technician should always perform service
or repair.
20.When dispose this machine, please remove
the door but leave the shelves to reduce the
risk of injury to children.
9. This product is not intended for commercial use.
3
IMPORTANT : All persons operate this equipment must read this
user manual carefully and familiarize with all operating procedures
and safety precautions. Misuse this equipment may result in death,
injury or property damage.
WARNINGS & DANGER NOTICES
WARNING: DO NOT use extension cords to avoid inherent dangers from faulty or inferior cords.
In case of not avoidable, be sure the cord is a 3-wire cord with a 3-prong grounded plug. The cord
should be rated for AT LEAST 1875 Watts and a No. 14 AWG minimun size.
DANGER! When dispose this machine, please remove the door but leave the shelves to reduce the
risk of injury to children. DO NOT LET CHILDREN TO BE TRAPPED.
ALWAYS supervise children when using this machine and be sure they are not playing with the unit.
LOCATION RECOMMENDATIONS
1. INDOOR USE ONLY, DO NOT ATTEMPT TO USE IN OUTDOOR.
IMPORTANT - All persons that will operate this equipment must read
2. INTENDED FOR
FREESTANDING
USE
ONLY.
Do not install
in cabinet
andUPRIGHT,
become thoroughly
competent
with
all operating
procedures
and or enclosed
space.
safety precautions. Misuse of this equipment may result in death,
personal injury or property damage.
3. Get the most out of your kegerator! To maximize efficiency and product life, use the nearest
proper electrical outlet and ensure there is adequate ventilation and clearance around the unit.
Allow at least 5 inches clearances around the kegerator.
4. Avoid locations where this unit will be in contact with heating elements or direct sunlight.
CO 2 SAFETY PRECAUTIONS, WARNINGS & DANGER NOTICES
1. DANGER! Carbon dioxide is a potentially dangerous gas. Canisters or cylinders are under
pressure and proper handling is essential for safety. Familiarize yourself with canister
installation and replacement before operating this unit. HANDLE WITH CARE. Never jostle,
toss or teat cylinders roughly. If you experience headache or difficulty breathing, a leak may
be occurring; open windows and doors to ventilate the area and leave immediately.
2.INTENDED FOR UPRIGHT, FREESTANDING USE ONLY. Do not install in cabinet or enclosed
space.
3.Store CO2 canisters away from heat or explosive gasses. Keep in a cool, dry space ( 21 degree)
and chain containers upright to avoid tipping or knocking. Always wear gloves and safety glasses
when around chemicals.
4.Review and follow instruction for changing CO2 cylinders. NEVER CONNECT A CO2 CANISTER
DIRECTLY TO THE UNIT to avoid potential explosion that could result in grave injury or even
death. ALWAYS in the regultor and safety valve in the CO2 canister. DO NOT REMOVE VALVES,
DO NOT EXCEED 60PSI.
5.DO NOT ATTEMPT TO REFILL CO2 CANISTERS! Refills are available where most canisters are
sold ( see page 10 for more information)
4
Brew Haus Parts List
R e f . D e s c r i p tio n
Qty
R e f. D e s c r ip t io n
Qty
#1
K e g C o u p le r (Fits D S h a n k e y K e g V a lve s)
1
#14
K e g B ase Bo ar d
1
#2
B a c k f lo w s t o p p e r
1
#15
M e tal W as he r
4
#3
R ub b e r W a sh er
1
#16
C a s t e r s w i t h l o c k in g
m e c h a n is m
2
#4
C O2 R ub b e r
D i r e c t io n a l W a s h e r
1
#17
C a st e r s w ith o u t lo c k in g
m e c h a n is m
2
#5
B ee r Tow e r W a sh er
1
#18
C O2 Ta nk Ba n d
1
#6
B e e r T a p /H o s e
A s s e m b ly
1
#19
A ir H o se W in g N u t
W ashe r
1
#7
C O2 R e g u la t o r
1
#20
A ir H o se
1
#8
H ig h P re ss u r e W a sh e r ,
W h i t e N y lo n
1
#21
A ir H o se C o n n e c to r
W ashe r
1
#9
C O2 C a n ist e r
Not
I n c lu d e d
#22
B ee r Tap W r en ch
1
#1 0
G u a r d R a il
1
#23
R e g u la t o r W re n c h
1
#1 1
D r ip T r a y G r a t e
1
#24
B e e r T o w e r H o le Plu g
1
#1 2
D r ip T r a y P a n
1
#25
B e e r T a p p e r & H a n d le
1
#1 3
R u b b e r Fo o t
4
#26
E xtr a W a sh er s & P ar ts
#2 7
2 B a t ta r ie s & U se r M a n u a l a r e p a c k e d in a b a g , d o n o t t h r o u g h it a w a y!
5
Brew Haus Kegerator Diagram
Following diagram is a guide to help you to identify the different parts of the unit when
removing them from the packaging.
Gas Cyliner
(Not Included)
Save this manual for future use
6
Unpacking the Brew Haus Kegerator
Note
1. Position the kegerator in an upright position and allow to sit for at least 8-10 hours before
plugging into an outlet. This will allow any refrigerant that has moved to settle back to
where it should be before operation.
2.The kegerator is shipped with a protective plastic lining on the door to protect it from
possible scratches and accidental blemishes. We recommend you to leave it till assembly
is completed.
3. The unit is shipped with shelves in place and ready for refrigerator use. To use as a
refrigerator, simply remove the package parts and keg board, insert the beer tower plug,
adjust the temperature settings, and after allowing ample time for refrigerant to settle after
shipping, plug in the unit. To use as a kegerator, please follow the assembly steps...
4. The unit is shipped with several extra washers; please save those washers together with
the manual for future use.
Kegerator Assembly
Parts Required
x 2pcs (WO/Locks
For assembly in the rear)
Assemble Casters
x 2pcs (W/Locks
For assembly in the front)
1. Lay down the unit on a dry and padded surface. Do not tilt the unit more than 30 degrees to
avoid jostling the kegerator.
2. Remove the 2 front feet than attach the 2 casters with locks onto the corresponding holes
on the bottom front of kegerator and the 2 casters without
locks to be attached to the bottom rear of the kegerator
as shown on the right hand side, then tighten them
with a 3/8” wrench (not included).
Cautions: Casters should be installed with wrench
to prevent breakage!
3.Once all casters are attached return the kegerator to
an upright position and allow to remain for at last 8-10
hours.
7
Kegerator Assembly
System Assembly
IMPORTANT! It is essential that you review and follow the installation and precautions on page 9 and
10 of the manul to avoid injury to yourself and others. These update pages outline the assembling and
adjustment of the kegerator system and pay particular attention common problems that may arise.
CO 2 IS AN ODORLESS, INVISIBLE GAS DELIVERED UNDER PRESSURE. ALWAYS HANDLE
WITH CARE!
1. Locate the beer tower, faucet handle and line (see Figure A), then attach the faucet handle
by screwing It into the faucet top(see Figure A).
2. Locate the beer line washer and insert it
into the beer line coupler (See Figure B).
Cautions: This connection is one of the
crucial connections in your system.
Be careful to insert the washer so that
it is laying flat and evenly, and when
connecting, do not over tighten it.
Failure of the washer at this junction
can cause loss of pressure and over-foaming.
Figure B
Figure A
3. Locate the beer tower washer, and slide it onto the beer line, running the coupler end through
the washer first (please refer to Figure C ),
then attach snugly onto the end of the beer
tower (please refer to Figure D).
STEP2-1
Figure C
Figure D
4. Thread the beer line through the hole on the top of the kegerator, coupler end first (please refer
to Figure E). Set the beer tower upright by
lining up the grooves on the bottom of the
tower with the grooves on the kegerator
holes’s top. Fit end snugly into hole
(please refer to Figure F).
Note: The tower will be off-centered as
shown in Figure G, but the next step will
snap and lock it correctly into alignment.
Figure F
Figure G
5.Firmly grasp the tower and spigot (please refer to Figure H) and rotate the tower clockwise
until it stops. Take care not to bend the spigot
as you do this. When finished the spigot will
face straight ahead (see Figure I).
8
Figure H
Figure I
Kegerator Assembly
CO Regulator Installation
2
Proper installation of your CO2 regulator
and a thorough understanding of CO2
canisters is essential to the safe use of
this product. Review and follow instruction
for handling CO2 cylinders and this section
in particular to ensure your safety and the
safety of others.
NEVER CONNECT A CO2 CANISTER
DIRECTLY TO THE UNIT! To avoid
potential explosion that could result
in grave injury or even death, ALWAYS
CONNECT
THE CANISTER TO
REGULATOR.
(Not Included)
DO NOT ATTEMPT TO REFILL CO2 CANISTER YOURSELF!!
DANGER! Carbon dioxide is a potentially dangerous gas. Canisters or cylinders are under
under pressure and proper handling is essential for safety. ALWAYS HANDLE WITH CARE!
SPECIAL PRECAUTION
Ensure the safety devices for your pressurized system are installed and remain installed. Once
installed, NEVER remove the rubber washers in the regulator attachment nut to the canister or
in the tap mechanism. NEVER bypass these safety features! Failure to comply will void your
warranty and could result in serious injury or death!
To install the dual-gauge regulator onto the CO 2 canister:
1. Ensure the white vinyl washer is in place within the CO 2 regulator fitting. This should already
be factory installed ( see Figure A ).
2. Next, loosen the pressure gauge on the regulator by turning the red knob all the way to the
left. You may need to use the Allen wrench provided to loosen the knob (see Figure B).
Figure A
Figure B
9
Kegerator Assembly
Co Regulator Installation Continued...
2
3. The knob may turn by hand, but if needed, use a pair of grips or pliers (see Figure D) to
get it started and then open by hand all they way to the left (see Figure E).
Figure D
Figure E
4. Next, attach the regulator to the CO canister
as shown in Figure F. Hand tighten the
2
coupler, then use the wrench provided to secure the connection.
Note: When attaching the regulator to the canister, make sure the gauge
remain upright as shown in Figure F. This will ensure the gauges will
be easy to read when the canister is installed in the cabinet, and that
the shut off valves are easily accessible.
Note: When facing the gauges securely installed, note that the
topmost gauge indicates the PSI pressure flowing through the line
to the keg and the left hand gauge indicates
total tank pressure.
Figure F
5. Next, make sure that the CO line
washer is installed on the inside of
2
the green coupler as shown in Figure G. If the washer is not present ,
remove one of the extra washers that are attached to the wrench and
install as shown.
6. Attach the CO 2line to the regulator as shown in Figure H. At this point
perform the following checks:
Figure G
a. Make sure the red lever on the regulator that leads to CO line2 is in
the OFF position as shown in Figure H. The lever should be
perpendicular to the line.
b. Make sure that the round red pressure knob is opened all the way to
’ that the CO 2 tank’s valve is shut so that no gas is
the left and be sure
flowing.
Figure H
Securing the CO Cylinder Inside Cabinet
2
1. Locate the canister strap . Loop the strap onto the back fastener located
2
on the cabinet interior and place CO cylinder,
with
regulator and CO
2
line attached, onto the back shelf.
2. Stretch the strap around the cylinder and hook one end of the strap loop
to the foremost fastener on the cabinet as shown in Figure I. The strap
will fit very snugly.
3. Double check all connections are secure, that the green coupler on the
CO 2 line is tightened and all valves are OFF.
10
Figure I
Tapping the Keg
Install keg tap on single barrel type keg
This kegerator comes with a D type or American Sankey keg coupler suitable for tapping all 50 litre
‘Euro Style’ kegs as used by Carlton United Breweries.
This kegerator is capable of holding a CO 2 canister up to 2.7kgs, which
should deliver in excess of 200 litres of beer.
1. Be sure the keg coupler’s black dispenser handle is closed
(pushed up, see Fingure N) . Also, make sure the tower dispenser
(on top of kegerator) handle is closed before proceeding with tap to
keg connection.
Figure N
2. Check the bottom of the cupler to ensure the black washer (pre-installed) are present and secure
in place(Figure O). If the seals are not installed, check the extra washers and insert it to ensure
a snug connection to the coupler/keg.
3.Insert the CO 2 line’s black rubber “Top Hat” washer into the coupler’s side-most connector for the
CO 2 line (there are 2 of these included in your packaging along with the other extra washers...
they are hat shaped and taper to a pointed end with a slit to better regulate gas flow... (see
Figure P & Q). Insert tapered end first into coupler.
Figure O
Figure P
Figure Q
4.Tht topmost connection on the coupler is for the beer line.
5.Fit the keg coupler into the top of the slots of keg neck (Figure R), being careful not to press down
on the coupler handle. Press down on the coupler
(not the handle) and perform a quarter turn clockwise
to lock the coupler and keg together (Figure S).
The keg is now tapped and you are ready to attach
the CO 2 line and beer line to the keg coupler.
Figure R
Figure S
SPECIAL PRECAUTION
Ensure the handle remains in the up position until all lines are hooked up and you are ready
to dispense beer. Even though the CO2 line is not yet hooked up there may still be a fair
amount of pressure in the keg.
11
Kegerator Operation
1. To begin using your kegerator, you will need to attach the CO 2 line
and the beer to the keg. After double-checked to ensure the silver
end of the CO 2 line has a washer installed and that the hat-shapped
washer of keg coupler’s CO 2 connection is in place, attach the silver
end of CO 2 line to the CO 2 connection on the keg coupler (Figure T).
Hand tighten securely.
Figure T
2.Connect the beer line to the top of keg coupler, making sure the beer
line coming down from the tower has a washer-gasket installed
(Figure U). If the washer is not already installed, use the extra washer
from the parts bag. Ensure the washer is lying flat within the connector
before install the beer line. Hand tighten securely.
Figure U
3. With both lines connected firmly to the keg coupler, finalize the connection by pulling
the black tap handle outwards (Figure V) then pushing down until it clicks securely
(Figure W). There will be an audible click, signaling the CO 2 and beer connections have
been opened and your keg is tapped.
Figure V
Figure W
4. Next, turn the red lever on the CO 2 regulator so that it is inline and parallel with the CO 2
line (Figure X). Open the CO2 tank valve 1/4 to ½ turn to the left, then engage slowly the
CO 2 by turning the red pressure gauge knob to the right until the regulator’s PSI gauge
reads between 8-15 PSI (Figure Y).
Figure X
Figure Y
NOTE: Too much pressure can cause foaming issues. Usually, it is better to start
at a lower pressure and gradually increase to where you get a good pour with
the most pressure.
5. Locate the white plastic raised bump “keg board” that removed
from the bottom floor of the kegerator during unpacking. Replace
the keg board in the bottom of the kegerator raised bump side
down ( Figure Z).
12
Figure Z
Kegerator Operation
6. Lift the keg atop the keg board carefully and slide all the way into the
kegerator (Figure AA). HANDLE CAREFULLY. Do not jostle or bang
keg! Make sure the kegerator door can be closed easily.
IMPORTANT!!
If you want to plug in your kegerator, be sure you are connecting
safely to proper power supply: a 240V, 10 Amp grounded AC
outlet. The cord should be rated for AT LEAST 1875 Watts.
Figure AA
7. Set the temperature to mid level and allow the keg to chill for 24-48 hours. Decrease
temperature as desired, but DO NOT allow the keg freeze. Freezing the keg will result
in flat beer once thawed.
NOTE: Beer pours best at cooler temperatures. It is best to get the beer as cold
as possible without freezing. A refrigerator thermometer is highly recommended
to monitor your kegerator temperature.
8. Before opening the tower spigot, slide the drip tray beneath the spigot to catch excess
beer, then pull the tower handle towards to your body to open the tap and dispense beer.
To pour a beer with a proper head of foam, tilt the glass at a 45 degree angle until
approximately 2/3 full, then straighten the glass and finish pouring beer.
Beer dispenses best at lower pressures. You will need to find the happy balance between
to much and too little in order to get a good pour without too much foam.
Note: If beer does not dispense, check previous sections on regulator
hookup and tapping the keg. If your beer is running too slow, adjust
the pressure on the regulator judiciously (DO NOT EXCEED 15PSI).
Condensation on the spigot or tap is normal. It may take as much
7-8 glasses of beer to reduce the amount of foam (Figure AB)
dispensed after first tapping a keg.
Figure AB
Storing your Kegerator
1. To prevent ice buildup on the inside of cabinet, set the temperature control to MID or LOW
if you live in a cold area. This unit does not self-defrost. The temperature control is located
inside the kegerator cabinet.
2. If you do not anticipate the use of your kegerator with a tapped keg for a period of two weeks
or longer, rinse the beer line to prevent mold or bacterial buildup, which could cause illness.
3. Never use sharp objects in your kegerator. If you are storing your machine, be sure to prevent
children from playing in or around the unit.
DANGER! Children can become trapped in an unsecured and unsupervised environment.
13
Maintenance & Storage
To clean the lines and tap, please follow bellow steps:
1. TURN OFF CO 2 .
2. Wipe the outside of kegerator, clean drip tray and around guardrail. Clean the inside of cabinet
by wiping with a damp cloth. Clean gasket on door to help eliminate trapped, spilled beer which
could produce mold and mildew.
3. Disconnect the beer hose from the tap coupler and twist dispenser faucet carefully off the top of
kegerator.
4. Set the dispenser handle to the open or down position before flushing, then position the faucet
over a sink and hold the beer line under running water for approximately 5 minutes, allowing the
water to flush out the faucet head. This will also help eliminate trapped, spilled beer which could
produce mold and mildew.
5. Reconnect beer line and dispenser faucet when done or leave disconnected if you plan to store
for a long period.
Battery for Display Screen
This keg provides the function of temperature display, simply
remove the display frame by hand (see Figure AC) to load the
2 button cell batteries (included) into position.
Remove
Figure AC
14
Brew Haus Kegerator Warranty Registration Form
Thank you for purchasing a Brew Haus Kegerator from Clever Home Products Pty Ltd. (CHP).
CHP provides a 1 year IN HOME warranty on the Brew Haus Kegerator.
To register your Brew Haus Kegerator NOW for warranty, and to allow us to provide you with the
best possible after-sales service, please fill out the following information and return this to,
Clever Home Products Pty Ltd, Level 5, 15-19 Claremont St, South Yarra, Victoria 3141.
To make a warranty claim, please email or mail (to the address above) your details and a brief
description of the fault to [email protected]
Customer’s Name:
Address:
State:
Tel: (Home)
Postcode:
(Mobile)
Email:
Model Purchased:
Serial No.:
Date of Purchase:
Invoice/Receipt No.:
This warranty does not cover the following:
1. Any damages caused from improper use or not used in accordance with the instruction manual.
2. Damage caused by connecting your product to the wrong power source/supply.
3. Incorrect installation or modifications made during installation or use of the products.
4. Removing screws or otherwise opening the outer case will void the warranty.
5. Any damages resulting from poor handling or moving of the product, misuse, fire or water
damage etc...
6. Failure to maintain the product as per the Instruction Manual.
15