1
143436-LLP-1-2008-FI-KA2-KA2MP
LAPROF
Teacher’s Guide
for Developing and Implementing
WebQuests
for Foreign Language Teaching
Deliverable number
D2.2.3
Dissemination level
Public
Delivery date 15 November 2010
Status Initial
Author(s)
Madalina Ungur, Nikos Manouselis, Kostas Kastrantas
With the support of the Lifelong Learning Programme of the European Union
Manual of Tools
-2-
Manual of Tools
TABLE OF CONTENTS
TABLE OF CONTENTS............................................................................................................................ 3
1
INTRODUCTION ........................................................................................................................... 5
2
LANGUAGE LEARNING ACTIVITIES USING WIKI PAGES ............................................................ 7
3
2.1
LOG IN/ CREATE ACCOUNT ...........................................................................................................7
2.2
NAVIGATION ................................................................................................................................8
2.2.1
The User Links .................................................................................................................... 8
2.2.2
The Tabs ............................................................................................................................ 9
2.2.3
The Sidebar..................................................................................................................... 11
2.3
EDITING THE WIKI .........................................................................................................................11
2.4
ALWAYS PREVIEW BEFORE SAVE....................................................................................................17
2.5
CREATING A TABLE ......................................................................................................................17
2.6
UPLOADING IMAGES....................................................................................................................18
INTERACTIVE LANGUAGE LEARNING EXERCISES..................................................................... 21
3.1
LOG IN/ REGISTER .......................................................................................................................21
3.2
CREATING EXERCISES ...................................................................................................................23
3.2.1
How to create Filling-station exercises ........................................................................ 26
3.2.2
How to create Polling-station exercises ...................................................................... 31
3.2.3
How to create Sorter exercises .................................................................................... 33
3.2.4
How to create Imaged-station exercises ................................................................... 35
3.3
4
HOW TO ACCESS LAPROF EXERCISES .............................................................................................38
LANGUAGE LEARNING RESOURCES ON THE LANGUAGE LEARNING PORTAL ....................... 39
4.1
LOG IN/ REGISTER .......................................................................................................................39
4.2
SEARCHING FOR RESOURCES ........................................................................................................41
4.3
UPLOADING RESOURCES ..............................................................................................................45
5
EXPLORE MORE RESOURCES..................................................................................................... 55
6
REFERENCES............................................................................................................................... 57
-3-
Manual of Tools
-4-
Manual of Tools
1 Introduction
The present Manual of Tools aims to provide guidelines for teachers and
trainers on the implementation of language learning activities with the help of
tools available on the Internet. More specifically, the Manual of Tools
introduces and explores the use of a Wiki page available at
http://wiki.agroknow.gr/laprof, Miksike Lefo, a platform for designing
interactive language learning exercises at http://www.lefo.net/ and a
Language Learning Portal available at http://www.language-learningportal.eu/.
Chapter 1 provides guidelines on how to edit content with the help of a Wiki
page. Chapter 2 explains how interactive exercises can be created on the
LeFo platform. Chapter 3 focuses on the searching and uploading of digital
educational resources on an educational Portal. Finally, the guide includes a
list of useful resources for further research.
The method presented in this Manual follows the LaProf1 project methodology
which focused on designing language learning activities such as WebQuests
and exercises and making them available on the Internet with the help of
some easy to use tools. The present Manual is complemented by the
Teacher’s Guide for the Development of Online WebQuests for Language
Learning, that focuses on the process of developing language learning
activities.
1 LaProf is a Multilateral Project financed by the European Commission that aims to promote language
awareness to immigrating workforces in two particular sectors, ICT and agriculture. It is a pilot project of 24month duration, which started in January 2009. The project is coordinated by the University of Jyväskylä and
involves 8 partners from 5 European countries. LaProf aims to assist and ease the cultural integration of the
user group and to encourage innovation and development of high quality language learning and teaching
tools. For further information you can visit the project's website www.laprof.eu.
-5-
Manual of Tools
-6-
Manual of Tools
2 Language Learning Activities Using Wiki Pages
The LaProf Wiki page has been developed in the context of the LaProf project
and is available at http://wiki.agroknow.gr/laprof/. The Wiki platform is
powered by MediaWiki (http://www.mediawiki.org/ wiki/MediaWiki).
2.1 Log in/ Create account
In order to start editing go to http://Wiki.agroknow.gr/laprof/
Figure 2.1: The LaProf Wiki page
Use the Log in / create
account button on the top
right side of the screen to
Log in, if you already have
an account on LaProf Wiki
page
Figure 2.2: The Log in menu on the Wiki page
-7-
Manual of Tools
By creating an account
and logging in, the Wiki page
enables you to use the Edit
function of the Wiki to edit
and modify content.
Figure 2.3: The Create account menu
2.2 Navigation
Any page on a MediaWiki includes three main navigation menus: the User
Links on the top right corner, the Sidebar on the left of the page and the Tabs
on top of the page.
2.2.1 The User Links
The User Links allow the logged-in user:
to edit their user page & Wiki preferences
to access their contributions to the Wiki
to log out
1
2
3
4
5
6
Figure 2.4: The User Links menu
If you are an anonymous user (without an account on the Wiki) you have here
access to the login option and links to your IP address.
-8-
Manual of Tools
The table below describes what each section of the User Links menu is used
for:
No
Option
1
„Mada”
2
„my talk”
Description
links to the user page where you can edit
information about yourself
links to the discussions page where other users
can leave messages
„preferences”
allows the modification of your site preferences:
profile, skin, files, date and time, editing, recent
changes, search and misc.
4
„my watchlist”
lists the pages you are „watching”. You can
add a page to this list by clicking „watch” in the
Tabs menu
5
„my
contributions”
lists your contributions to the Wiki page
6
„log out”
3
used to log out from the Wiki page
Table 2.1: The description of the User links menu
2.2.2 The Tabs
Figure 2.5: The Tabs menu
The Tabs allow you to view and edit the current Wiki page. Depending on
whether you are an anonymous user, a logged-in user or the administrator of
the Wiki page, the tabs available here will vary.
-9-
Manual of Tools
Options available for anonymous users
No
Option
1
„article”
Description
the actual content of the Wiki page
the „talk page” where users can leave comments
on the content of the Wiki page and
communicate with other users. If the tab is red it
means that no comments have been made
2
„discussion”
3
„view source”
4
shows the Wiki markup (the syntax and keywords
used by the Wiki software to format a page)
Wiki page's previous revisions, including the date
and time of each edit, the username or IP address
of the user and a summary of the edit. By clicking
on a previous version from the History list you can
revert the page to an older version with a click on
the Edit and Save buttons of the previous version
you want to keep
„history”
Extra option for logged-in users
No
Option
5
„edit”
6
„watch”
Description
the editing function of Wiki pages
can keep track of the changes made to the Wiki
pages you are interested in
Extra option for administrators (sysops)
No
Option
Description
7
„protect”
prevents other users to Edit a specific page. On a
protected page the „Edit” button appears as
„View source”
8
„delete”
the delete function of Wiki pages
Table 2.2: The description of the Tabs menu
Administrators can add or remove tabs, thus not all Wiki pages contain
the same tabs.
- 10 -
Manual of Tools
2.2.3 The Sidebar
The Sidebar gives access to the actual content of the Wiki page as well as
additional functions such as Search, Recent changes or Upload file. The
Sidebar can be configured by the administrator of the Wiki.
The learning resources
The page where teachers can edit
and upload their own teaching
materials
The search engine of the Wiki page
The link to other Wiki pages that
contain a link to the current Wiki
page
Special
functions
administration options
and
Figure 2.6: The Sidebar of the Wiki page
2.3 Editing the Wiki
Editing Wiki pages is easy. There are two basic „modes” available on a Wiki
page: the Reading mode and the Editing mode, generally available to
logged-in users only. This section explores the Editing mode and its functions.
In order to start editing a Wiki page you need to create an account and log
in. You can either create yourself and edit a new page on the Wiki, or you
can just edit Wiki pages created by other users.
In order to start editing go to http://Wiki.agroknow.gr/laprof/
- 11 -
Manual of Tools
Start typing here!
Figure 2.7: Editing a new Wiki page
If you want to edit a page that already exists...
Or click here to
EDIT only a
specific section
Click here to EDIT
the Wiki page
Figure 2.8: The two editing options on the Wiki page
- 12 -
Manual of Tools
By clicking the Edit button a new editable page will open
Use the EDIT TOOLBAR
to edit the text
Figure 2.9: Editing a Wiki page
Which are the Functions of the Edit Toolbar?
Editing a Wiki is easy due to the functions of the Edit Toolbar that
automatically formats the text for you. However, you can also learn the
symbols and manually edit the text without the help of the Edit Toolbar.
The table below illustrates the functions of the Edit Toolbar. The first and the
second columns represent the symbols on the Toolbar and their names, the
third column shows how text can be manually formatted and the last column
represents the text after editing.
- 13 -
Manual of Tools
Icon
Function
In Editing Mode
In Reading Mode
Bold
'''LaProf'''
LaProf
Italic
''LaProf''
LaProf
Internal link
[[LaProf]]
LaProf
External link
or
[http://www.example.com]
or
[http://www.laprof.eu/ Laprof]
Section
heading
== LaProf ==
[edit] LaProf
Insert media
[[Media:LaProf.ogg]]
Media:LaProf.ogg
Mathematical
formula
(LaTeX)
<math>abc</math>
abc
Ignore Wiki
formatting
<noWiki>LaProf '''[[Bold
text]]'''</noWiki>
LaProf '''[[Bold text]]'''
Sign talk
comments
(with time
stamp)
~~~~
Mada (talk) 21:21, 19 July 2010
(UTC)
Horizontal line
----
Insert image
Table 2.3: The description of the functions of the Edit toolbar
What is an Internal Link and how to create one?
Internal links are a very common feature of the Wiki pages. Internal links
represent a navigation element of a page to another page of the same web
site or domain.
- 14 -
Manual of Tools
In order to create a piece of
text into an internal link, select
the text and press the Internal
link button of the Edit toolbar.
Figure 2.10: Creating Internal links
After Saving the changes, you can
click on the Internal link and edit
the new empty page that opens.
Or just include the text between
double square brackets.
Figure 2.11: An Internal link of the Wiki page
It is IMPORTANT to remember that if you CHANGE the title of an Internal
link, the the content hoste don that page will be lost. In order to get the
conted back, you can either click „Back” in your browser or load a previous
version of the page.
How to Format text?
In order to edit text on a Wiki page and organize paragraphs, you need to
use some easy formatting. When you start writing on a Wiki page remember
not to leave empty spaces at the beginning of the line.
The table below illustrates how formatting in a Wiki page looks like and how
the results will appear after editing and saving the page.
- 15 -
Manual of Tools
Function
In Editing mode
=level 1=
Level 1
==level 2==
Heading of
different levels
In Reading mode
Level 2
===level 3===
====level 4====
Level 3
=====level 5=====
Level 4
======level 6======
Level 6
Level 5
Introducing four (4) or more headings automatically creates a table
of contents.
Horizontal rule
Bullet list
----
* Wikis
* blogs
* social networking
** Twitter
** MySpace
•
•
•
Wikis
blogs
social networking
o Twitter
o MySpace
1. dynamic content
Numbered list
# dynamic content
# metadata
# user participation
## freedom
## openness
2. metadata
3. user participation
1. freedom
2. openness
Mashup
Definition list
definition 1
;Mashup
: definition 1
;Folksonomy
: definition 2-1
: definition 2-2
Folksonomy
definition 2-1
definition 2-2
Definition list to
indent text
: Single indent
:: Double indent
::::: Multiple indent
Single indent
Double indent
Multiple indent
Table 2.4: The description of text formatting options
- 16 -
Manual of Tools
In order to start a new paragraph, leave an empty line. You can force a
line break within a paragraph by adding <br> at the end of the line.
2.4 Always Preview before Save
Before
After Saving
SAVING
the your
changes,
work, you
do can
not forget to
onSHOW
the Internal
link
and in
edit
click on
PREVIEW
button
order to see
the new
empty will
page
opens.
how
your article
lookthat
like. After
Previewing,
Or just
includetothe
textyour
between
do
not forget
Save
page. You can
click
double
SHOW
square
CHANGES
brackets.to see the differences
before and after your edits.
Figure 2.12: The Preview and Save functions
2.5 Creating a table
In Wiki formatting, the symbols „{|” and „|}” represent the start and the end
of a table, where rows are separated by the characters „|-”.
- 17 -
Manual of Tools
The elements of the same row can be included vertically and need to have
the single mark „|” in front.
The following table shows the necessary editing on a Wiki page in order to
create a simple table.
Editing mode
Reading mode
{|
|Radio
|Television
||Magazine
|Newspaper
||E-mail
|Chat
|}
Radio
Television
Magazine Newspaper
E-mail
Chat
Table 2.5: Editing a simple table
A table with 3 columns can be created with the following editing.
Editing mode
Reading mode
{|
|Radio || Television || Internet
||Magazine ||Newspaper || Brochure
||E-mail ||Chat || Browser
|}
Radio
Television
Internet
Magazine Newspaper
Brochure
E-mail
Browser
Chat
Table 2.6: Editing a table with 3 columns
2.6 Uploading images
Wiki pages can be enriched with the help of images. In order to insert an
image from your computer to the Wiki page, you need to follow the steps
described below:
- 18 -
Manual of Tools
Click on the Upload
file button of your
toolbox menu
Figure 2.13: The Toolbox menu
Browse the file, name it and be careful
to remember its exact name. You will
later need it when inserting the image
in your Wiki page. Click to upload the
file.
Figure 2.14: Uploading an image on the Wiki page
Go to the Wiki page where you want
to insert the image, click the Edit
button
and
type
the
formula:
[[Image:MAICH.jpg|right|]]
Figure 2.15: Inserting an image on the Wiki page
- 19 -
This will place the image on the right
side of the page.
Manual of Tools
After Saving the changes, the
picture will be displayed on
the Wiki page.
Figure 2.16: The image displayed on the Wiki page
- 20 -
Manual of Tools
3 Interactive Language Learning Exercises
Interactive language learning exercises can be implemented online with the
help of the Miksike LeFo platform http://www.lefo.net/. Four types of exercises
are introduced in this chapter: Polling-station. Filling-station, Imaged-station
and Sorter from the first steps – their development on paper to their final
interactive form.
3.1 Log in/ Register
To start creating exercises, go to http://www.lefo.net/.
The platform is available in 6 languages: English, Estonian, Russian, Lithuanian,
Latvian and Slovenian.
REGISTER to create
a new account
LOG IN here if you
already have an
account on LeFo
Figure 3.1: The LeFo Main page
When you register you have the possibility to choose:
the Class
the Region (your country)
the School name (you can either choose your organization if listed or
suggest it to be included through the „Contact” form)
- 21 -
Manual of Tools
If you would like to share exercises with others and get support during
the process, register under the special Region: LaProf, and School name:
LaProf Summer School. For any further information and support, send an email
to: [email protected].
Figure 3.2: The Register menu on LeFo
Figure 3.3: The Region and School name section in Register menu
After creating your account, the Miksike LeFo page administrator needs
to grant you Teacher Rights. Only logged-in users are able to create their own
exercises on the platform.
- 22 -
Manual of Tools
3.2 Creating exercises
Once you have registered and received the Teacher’s Rights you can log in
and start developing exercises on the platform. Follow the steps presented
below:
After logging-in, select Mental
Language option from the
Mainpage
Figure 3.4: The Mental Language option on the Main Page
Click on Create
exercise to start
Figure 3.5: The Create exercise option
- 23 -
Manual of Tools
The Mental Language menu includes the following sections:
Main page with lists of news such as competitions taking place
General rules of working with the exercises
Exercises with lists of the latest exercises created by other users and a
list of exercises organized by Themes
Statistics with lists of winners from past competitions
Create exercise with lists of the types of exercises available and
complete instructions on how to design them
List of all the types of
exercises with links to
instructions (Help)
Teacher’s
ListList
Listmenu
with
of of links
of
to
teaching
allall resources
all
the
the
the
Figure 3.6: The types of exercises available on LeFo
Exercises can be first created on paper and then transferred to the Miksike
LeFo platform, or developed directly on the Miksike LeFo platform.
In order to start developing exercises, you need to decide on the type of
exercise that you want to create and click on its name. For each type of
exercise, a list of Themes and Subthemes is available, as shown below. You
have the possibility to select from the list the Theme and Subtheme that best
characterize your exercise.
- 24 -
Manual of Tools
Figure 3.7: The Themes available for Polling-station exercises
You can select the „LaProf SUMMER SCHOOL” Theme to host your
exercises.
After selecting a Theme, you can start developing the exercises. A new
window will open with a number of sections that need to be completed. Most
of these sections are common for all the types of exercises:
Exercise name: choose a name to identify your exercise.
Exercise description: describe the exercise. Here you can also mention
the materials you have used to develop it or include extra instructions
for the users.
Select random groups: exercises can have more than one
groups/pages (for e.g an exercise with 3 groups will be displayed on 3
pages). If the exercise contains more groups, you have the possibility to
show the groups randomly (by selecting „yes”) or in order (by selecting
„no”).
Time limit or Speed: in some exercises you have the possibility to choose
both the duration of the exercise (time limit or the length of the exercise
in seconds) or different speeds (fast/slow/very slow).
Public flag: here the platform offers 3 options:
a) Not public: your exercise will not appear publicly on the Miksike
LeFo platform
- 25 -
Manual of Tools
b) Locally public - your exercise will be public to you and to all the
registered users from your school
c) Globally public candidate - your exercise will be public to all the
site users For this option, the administrator will check your exercise
and contact you if changes are required.
Closed: you can decide to close your exercise.
Hidden: you can decide to keep it invisible from other users.
3.2.1 How to create Filling-station exercises
This section presents step by step the creation of a filling-station type of
exercise.
In the case of Filling-station exercises, learners need to read a number of
statements and whether these are True or False by filling in the blank spaces
with the letters „T” or „F”.
The exercise below was first developed on paper:
Figure 3.8: A Filling-station exercise on paper
In order to create this exercise on Miksike LeFo, log in, click on „Mental
Language” section of the Mainpage, then choose „Create exercise” and
- 26 -
Manual of Tools
select „Filling-station”. Pick the „LaProf SUMMER SCHOOL” Theme and fill in the
form below:
You can have one or
more groups. Each
group will open on a
different sheet of the
exercise
Fill in all the fields and
click „Add Exercise”
Figure 3.9: The decription of a Filling-station exercise
To
continue
editing
the
exercise, click on the name of
the exercise that is listed in the
Exercises list
Figure 3.10: Editing a filling-station exercise
- 27 -
Manual of Tools
If you have selected to include more groups, these groups need to be edited
one after the other. In the case of this exercise, only one group was included.
Fill
in
the
information
describing the question group
and the number of questions
that it includes. Click Add
group
Figure 3.11: Editing the question groups
Click on the group name to
edit the questions
Figure 3.12: Adding questions to groups
In the new window that opens
you can edit your first
question. After clicking on
„Add question” you can
continue editing the next
questions
Figure 3.13: Editing questions in groups
- 28 -
Manual of Tools
After having edited all the questions in
your group, you can modify them if
needed, or continue adding more
question groups (until you reach the
number of groups stated in the exercise
description)
Figure 3.14: The list of questions
After finishingAfter
editing the
exercise, you can
finishing
access it by
its link. In orderediting
to get the
thelink
click on „Modify”
exercise,in the
exercise list, and
youthe link
canwill
appear on theaccess
bottomit of
bythe
page
its link. In
order to get
Figure 3.15: The Modify function and the link of the exercise
The link of the exercise is where the users/students can complete the exercise.
By accessing the link a new page will open:
- 29 -
Manual of Tools
Start the exercise
Figure 3.16: The Filling-station interactive exercise
A new interactive exercise page will open where
users can insert in the blank boxes „T” or „F”. If the
answer provided is correct the box turns green.
The
The score
score and
and the
the time
time are
are
displayed
displayed
onon
the
the
page
page
Figure 3.17: Completing a Filling-station exercise
All the questions of a group are displayed on the same page. If you
choose to include more groups, these will appear on different pages. Once
the exercises on a page are completed the exercise takes you automatically
to the next page.
- 30 -
Manual of Tools
3.2.2 How to create Polling-station exercises
The process of creating a polling-station exercise is similar to the one for the
filling-station type. While on the filling-station type the users need to decide
whether a statement id correct or not, in the case of polling-station exercises
users need to fill in the sentences with the correct missing word.
A polling-station exercises on paper looks like this:
Figure 3.18: A Polling-station exercise on paper
In the case of Polling-station exercises
you can include Wrong answers (it is
not mandatory) that will appear on
the page. If you include a word
twice (correct or wrong) in different
questions the word will show up twice
on the page.
Figure 3.19: Editing a question in the Polling-station exercise
Make sure you mark the place of the missing answer with 4 dots ( .... )
and not more, otherwise the empty box will be placed at the end of the
sentence and not inside the sentence.
- 31 -
Manual of Tools
The questions can be organized in one or more groups, thus
showing on one or more pages. After introducing all your
questions, click on the Exercise list and select „Modify” in
order to access the exercise link.
Figure 3.20: The list of Polling-station exercises
Select Modify next
Select
to the
name of your exercise
Modifyand
follow the link that
next
appears
to
thepage.
name
on the bottom of the
of
your
Figure 3.21: The Polling-station exercise link
Click
on
Start
to
complete the exercise.
Figure 3.22: The interface of the Polling-station exercise
- 32 -
Manual of Tools
Users have to click and
drag the correct answer
to the blank boxes. If
the answer if correct,
the box turns green.
Figure 3.23: Completing the Polling-station exercise
3.2.3 How to create Sorter exercises
In the Sorter type of exercises, users need to group the words given in different
categories.
Figure 3.24: A Sorter exercise on paper
- 33 -
Manual of Tools
In order to create the exercise above on the platform, you need to create
one group with 3 containers. Each container represents a grammatical
category: nouns, adjectives and verbs. In each container the corresponding
list of words will be included (e.g. the container „Nouns” with include the
words: food, industry, consumer etc.). All 3 containers will be displayed on the
same page.
Figure 3.25: Editing the Containers of the exercise
In order to start editing the Nouns container you need to click on „Nouns”.
Complete the „Inside” box with one noun from your list and click on „Modify
container. To add more nouns in the container you need to click on „Nouns”
again and repeat the process, as exemplified below.
1
4
2
5
3
6
Figure 3.26: Completing the Containers
After completing all the containers, the number of words included in each
one will appear between round brackets:
- 34 -
Manual of Tools
Figure 3.27: The list of Containers with number of elements
Figure 3.28: Completing the interactive Sorter exercise
At this point the editing of the exercise is completed.
On the interactive platform, the containers will appear as illustrated below. To
complete the exercise, the users need to first click on a container box and
then select the examples that fit there. If one word does not fit in a container,
the word will turn red.
3.2.4 How to create Imaged-station exercises
In this kind of exercise, users need to match images with words. The exercise
below was first created on paper and consists of 5 images. If you want each
image to appear on a different page if the interactive platform, you need to
create 5 groups. Each group will contain one image.
- 35 -
Manual of Tools
Figure 3.29: An Imaged-station exercise on paper
In order to upload an image on the platform you need to click the Browse
button and select an image form your computer. Each image can be
presented with a question, such as „What does this image represent?”. While
creating the exercise you can provide the correct answer to the question
together with 2 wrong answers. The users will have to select the correct one
and label the image.
If you select to have more than one groups you can either add all of them at
once and then start editing them one by one, or add a group and edit it,
then the second and repeat the process.
- 36 -
Manual of Tools
Figure 3.30: Adding questions in the exercise
The exercise in the example contains 4 groups with one question each.
Figure 3.31: The Question groups of the exercise
In order to visualize the exercise on the platform go back to Exercises, click on
Modify and access the link at the bottom of the page. The interactive
Imaged-station exercise will look like this:
Figure 3.32: The interactive Imaged-station exercise
- 37 -
Manual of Tools
3.3 How to access LaProf exercises
Generally, exercises on LeFo are available for users if their creator has
decided to make them Publicly available or Available in his/her school. There
is also the possibility to „hide” exercises and thus, keep them „invisible” from
other users.
All the exercises created under a school are available for users registered
under that school. If a user wants to access exercises from other schools
he/she needs to be granted access.
The exercises created by the LaProf project can be accessed either from the
LaProf Language Learning Portal (www.language-learning-portal.eu) or from
the LaProf Wiki page (http://wiki.agroknow.gr/laprof/).
1. On LaProf Portal
To access the LaProf exercises on the LaProf Portal (www.languagelearning-portal.eu) you can either search for them through the different
types of Searching options available or click directly on the LaProf
exercises option from the Operations menu. Multilingual descriptions of
all exercises are available together with links to the LeFo platform.
2. On LaProf Wiki
On the LaProf Wiki you have the possibility to complete the exercises by
follow the LaProf Learning Units (http://wiki.agroknow.gr/laprof/
index.php/Learning_Units ). These are organised in two modules (ICT
and Agriculture), with each module comprising of 5 Units.
The Wiki includes a wider variety of LaProf exercises, including Listening,
Writing and Speaking that are not supported by the Miksike Lefo
platform.
- 38 -
Manual of Tools
4 Language Learning Resources on the Language
Learning Portal
The Language Learning Portal (www.language-learning-portal.eu) represents
the main point of access to the LaProf project’s educational resources, such
as learning units, exercises, external language resources that have been
collected, described, categorized and stored as digital training content.
4.1 Log in/ Register
The Portal is available at www.language-learning-portal.eu.
Figure 4.1: The Main page of the LaProf Web Portal
The LaProf Portal is available in English, Greek, Romanian, Estonian, Finnish,
Hungarian and Polish.
Figure 4.2: Portal languages
- 39 -
Manual of Tools
To log-in type your
username and password
and click Login. If you do
not have an account
click Register.
Figure 4.3: The Log in menu of the Web Portal
In order to Register, you
need to fill in your name,
password and email and
a
language
of
preference. In the section
Role you can choose
between „Registed Visitor
and Content Provider”
Figure 4.4: The Register menu of the Web Portal
As a Registered Visitor you can search and browse for resources, add
annotations or rate resources. Additionally, Content Providers can upload
resources and describe them with metadata. If you register as a Content
Provider, the Administrator needs to validate your status before you can start
uploading content.
- 40 -
Manual of Tools
4.2 Searching for resources
The LaPorf content is organized under four main categories:
LaProf Units (lists of multilingual language learning units in the fields of
ICT and Agriculture)
LaProf Exercises (lists of multilingual language learning interactive
exercises in the fields of ICT and Agriculture)
Language Resources (lists of online language learning resources for
Greek and Finnish language learning)
Organizations (lists of language learning schools and institutions in
Greece and Finland that provide language training)
To facilitate easy searching and finding of resources, the LaProf Portal offers
the following options:
A. Browse by category
The resources are available on the
main menu.
Figure 4.5: Browsing by category option
- 41 -
Manual of Tools
B. Text based search
Include the search word,
select
the
type
of
resource
and
click
Search
Figure 4.6: The Text-based search
C. Browse by type
The resources are classified according to:
the mother tongue of the learner
the language that the resource teaches
the language level addressed
the field of the resources
the type of resource
- 42 -
Manual of Tools
In order to Browse for
resources, select Browse
from the Search option in
the Operations menu
Figure 4.7: Browsing by type option
D. Tag Cloud
The most popular
keywords are
displayed in the Tag
Cloud. Selecting a
term will guide you
to all the resources
that include the
respective keyword
Figure 4.8: The Cloud tag option
- 43 -
Manual of Tools
E. Customized search
Figure 4.9: The Customized search
To facilitate the finding of resources for the target groups of the LaProf
project, a customized search is available. Due to this type of search, users
can easily retrieve the resources from a specific field that are available in a
their own language and practice a specific language.
F. Latest resources from toolbar
On the
home page
of the
Portal, users
can access
the latest
resources
uploaded
on the
Portal
Figure 4.10: Browsing by the latest resources option
Accessing a resource, directs you to the actual resource short description, its
most important metadata set and a link to the resource's actual location:
- 44 -
Manual of Tools
The description of the
resources provides the
following:
title
The description
of the
resources
provides
the
screenshot of the
following:
resource
title
description
screenshot of the
language
resource
subject
description
resource type
language
keywords
subject
cost
resource type
copyright
keywords
The description
of the
the link to the
cost
resources
provides the
resource
following:
Users copyright
can:
title
the
to the
ratelink
a resource
The description
of the
resource
screenshot
of the
resources
provides
The description
of the
review its history
resource
following:
Users can:provides the
resources
add review
description
following:
title
rate a resource
Figure 4.11: A description of a resource
4.3 Uploading resources
When uploading a resource you need to provide a description of your
resource. These metadata categories and data elements are listed and
described below in detail. Some of these categories are mandatory, others
are optional, while others are automatically entered by the system itself.
- 45 -
Manual of Tools
On the
home page
of the
Portal, users
can access
the latest
resources
On the
uploaded
home page
on
the
of the
Portal
Portal, users
Figure 4.12: The Operations menu
Figure 4.13: Uploading resources
- 46 -
Manual of Tools
The medata categories that you need to fill in are described below:
General
This category includes the general information that describes the resources
as a whole.
Mother tongue of the learner
The „Mother tongue of the learner” element represents the language
used within the learning resource to communicate to the intended user.
Figure 4.14: The Mother tongue of the learner field
Language the resource helps you learn
This element describes the language that the resource helps you learn.
CEFR level
This element describes the level of the resource according to the
European CEFR (Common European Framework of Reference for
Langauges).
- 47 -
Manual of Tools
Figure 4.15: The CEFR level field
Coverage
This element describes the time, culture, geography or region to which
the resource applies.
Figure 4.16: The Coverage field
Title
This represents the name given to the resource.
Figure 4.17: The Title of the resource
Description
A textual description of the content of the resource. The description
should be in the language and terms appropriate for the users to
decide whether or not the learning object being described is
appropriate and relevant for them.
- 48 -
Manual of Tools
Figure 4.18: The Description of the resource
Keyword
This elements is a keyword or phrase describing the topic of the
resource.
Figure 4.19: The Keywords of the resource
Aggregation level (optional)
This elements describes the functional granularity of this learning object.
Figure 4.20: Aggregation level of the resource
Life cycle
The category groups the features related to the current state of the
resource and information about its creators.
- 49 -
Manual of Tools
Existing entity (new entity):
Here you can either select from a given list of entities or insert a new
entity. Once an entity is registered the system will memorize it and
include it in the list of existing ones. Characterize it by completing the
following categories, some of which are optional.
Name
Address (optional)
Country
Telephone (optional)
Email (optional)
Figure 4.21: The Creator of the resource
Technical
This category includes the technical characteristics of the resource.
Format (optional)
The format describes the technical datatype of the resource used to
identify the software needed to access the resource.
- 50 -
Manual of Tools
Figure 4.22: The Format of the resource
Size (optional)
The size describes the actual size of the resource in bytes, if known.
Educational
This category groups the educational characteristics of the resource.
Resource type
The Resource type describes the specific kind of the resource.
Figure 4.23: The Type of the resource
- 51 -
Manual of Tools
Context
The context refers to the principal environment within which the
learning and use of the resource is intended to take place.
Figure 4.24: The Context of the resource
Rights
The category describes the intellectual property rights and conditions of
use for the resource.
Cost
This category specifies whether the use of the resource requires
payment.
Figure 4.25: The Cost of the resource
Copyright
The Copyright category specifies whether copyright or other restrictions
apply to the use of the resource.
Figure 4.26: The Copyright of the resource
Description
This category comments on the conditions of use of the resource.
- 52 -
Manual of Tools
Figure 4.27: The description of the Rights of the resource
Classification
The category situates the resource in relation to a particular
classification system.
Classification
This category describes where the resource falls within a particular
classification system. For LaProf the following classification applies:
Figure 4.28: The Classification of the resource
To finalize and upload your
resource, click Register.
Figure 4.29: Registering the resource on the Web Portal
After uploading, resources need Administrator’s approval in order to be listed
among the other resources on the Portal.
- 53 -
Manual of Tools
- 54 -
Manual of Tools
5 Explore more resources
Web 2.0 and teaching
URL
Edublog Awards
http://edublogawards.com/
Elearn Magazine
http://elearnmag.org/subpage.cfm?section=
articles&article=29-1
Wikilingua
http://www.Wikilingua.ie/HelpGuides
Web 2.0 & Language Learning
http://www.youtube.com/watch?v=F1IRkqbU
oXY
Web 2.0 Activities in Secondary
School
http://jcal.info/web2/
Working the Web for Education
http://ozline.com/entry/
Center for History and New Media
http://chnm.gmu.edu/essays-on-history-newmedia/essays/
Wiki online tutorials
URL
MediaWiki
http://www.mediaWiki.org/Wiki/MediaWiki
Blogs, Wikis, Podcasts and other
powerful web tools for classrooms
http://bit.ly/booksgoogle
Examples of Educational Wikis
http://educationalWikis.Wikispaces.com/Exam
ples+of+educational+Wikis
Wikis and Learning – 60 Resources
http://elearningtech.blogspot.com/2010/07/W
ikis-and-learning-60-resources.html
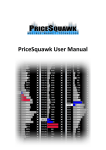
Miksike LeFo
URL
The User Manual:
http://www.lefo.net/en.html
Language Learning Portals
URL
MERLOT
http://www.merlot.org
- 55 -
Manual of Tools
Teachers’ Domain
http://www.teachersdomain.org/
English Portal
http://www.english-portal.de/
BabelLand
http://www.babelland.de/
Examples of good practices –
European Projects
URL
The "LeTSGo" Project
http://letsgo.pixel-online.org/info/index.php
ONENESS
http://www.oneness.vu.lt
E-Bridge to Mobility
http://2mobility.eu
European Modules and Mobility in
Agricultural education
http://emma.projects.tamk.fi/
You speak Greek already
http://www.bhc.gr
Glossa
http://www.action.gr
Fasten Seat Belts to the World
http://www.fastenseatbelts.eu/
Organic.Edunet
http://www.organic-edunet.eu
ICOPER
http://www.icoper.org
CerOrganic
http://www.cerorganic.eu
Lingu@net Europa
http://www.linguanet-europa.org
Be Multilingual
http://www.be-multilingual.com/
- 56 -
Manual of Tools
6 References
CELT Centre for Excellence in Learning & Teaching, 2008, Blogs and Wikis in
Teaching and Learning, http://www.Wikilingua.ie/HelpGuides, Retrieved
August 13, 2010
Hodgins, Wayne & Duval, Eric et all, (2002), Draft Standard for Learning
Object Metadata.
Konieczny, Piotr (2007), Wikis and Wikipedia as a Teaching Tool, International
Journal of Instructional Technology and Distance Learning, Vol. 4, No.1.,
January 2007.
Lamb, Brian. (2004). Wide Open Spaces: Wikis, Ready or Not. EDUCAUSE
Review. 39:36-48. http://www.educause.edu/pub/er/erm04/erm0452.asp,
Retrieved July 22, 2010.
LeFo.net, Help& Manual, http://www.lefo.net/en.html . Retrieved August 5,
2010
Maroudas, Axel (2010). LaProf Design of Web Portal. LaProf project document
- 57 -
Manual of Tools
This project has been funded with support from the European
Commission.
This publication reflects the views only of the author, and the
Commission cannot be held responsible for any use which may be
- 58 made of the information contained therein.