1
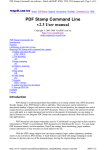
QC Mobile Mobile Access to HP Quality Center System Administrator Guide Genilogix LLC 3846 South Water Street Pittsburgh, PA 15203 (800) 780-5110 http://www.genilogix.com Document Number: XXXXXX[MLR1] Document Release Date: August 2010 Legal Notices Warranty The only warranties for Genilogix LLC products and services are set forth in the express warranty statements accompanying such products and services. Nothing herein should be construed as constituting an additional warranty. Genilogix LLC shall not be liable for technical or editorial errors or omissions contained herein. The information contained herein is subject to change without notice. Restricted rights legend Confidential computer software. Valid license from Genilogix LLC required for possession, use or copying. Consistent with FAR 12.211 and 12.212, Commercial Computer Software, Computer Software Documentation, and Technical Data for Commercial Items are licensed to the U.S. Government under vendor's standard commercial license. Third-party Web sites Genilogix LLC provides links to external third-party Web sites to help you find supplemental information. Site content and availability can change without notice. Genilogix LLC makes no representations or warranties whatsoever as to site content or availability. © 2010 Genilogix LLC. All rights reserved. iPad is a trademark of Apple, Inc. iPhone and iPod touch are registered trademarks of Apple, Inc. Internet Explorer is a registered trademark of Microsoft Corporation. QC Mobile System Administrator Guide Contents Welcome to QC Mobile ................................................................................................. 1 Requirements ................................................................................................................................................ 1 Overview of HP Quality Center and QC Mobile ............................................................................................ 1 QC Mobile Considerations ............................................................................................................................ 2 Logging in to QC Mobile Gateway ............................................................................... 4 Overview of QC Mobile Gateway .................................................................................................................. 5 Logging out of QC Mobile Gateway .............................................................................................................. 5 Working with QC Mobile Grids ...................................................................................................................... 6 Finding grid entries .................................................................................................................................. 6 Sorting grid data ....................................................................................................................................... 6 Selecting a specific grid page .................................................................................................................. 7 Viewing the grid page count..................................................................................................................... 7 Managing Licenses and Mobile Devices ..................................................................... 8 Managing licenses ........................................................................................................................................ 9 Adding a QC Mobile license..................................................................................................................... 9 Deleting a QC Mobile license ................................................................................................................ 10 Understanding the license Summary ..................................................................................................... 11 Managing mobile devices ........................................................................................................................... 11 Adding a mobile device using Auto Add ................................................................................................ 11 Adding a mobile device manually .......................................................................................................... 12 Editing a mobile device’s properties ...................................................................................................... 14 Deactivating a mobile device ................................................................................................................. 14 Activating a mobile device ..................................................................................................................... 15 Deleting a mobile device ........................................................................................................................ 15 Setting Policies for Device Behavior and Logging Preferences ............................. 17 Controlling mobile device behavior ............................................................................................................. 17 Setting logging preferences ........................................................................................................................ 19 Viewing the Event Log ................................................................................................ 21 Displaying the Event Log ............................................................................................................................ 21 Exporting log data ....................................................................................................................................... 22 Clearing log data ......................................................................................................................................... 22 Viewing Help Content ................................................................................................. 23 i QC Mobile System Administrator Guide Welcome to QC Mobile QC Mobile offers mobile access to HP Quality Center. Now you can download tests from Quality Center (version 10 or later) directly to your mobile device and then: Run manual tests Enter test data Create defects Attach pictures to defects and run steps (if the device is camera enabled) Upload test results and defects to Quality Center in a manner compliant with Title 21 CFR Part 11 Requirements Devices: QC Mobile is compatible with Apple iPad™, iPhone®, and iPod touch® mobile digital devices running 3.1 firmware or greater. Internet Browsers: QC Mobile Gateway is compatible with Internet Explorer® versions 6, 7, and 8. Overview of HP Quality Center and QC Mobile QC Mobile interfaces with the Quality Center server through the QC Gateway, an Internet portal where the system administrator manages the licenses and mobile devices associated with QC Mobile. This guide covers QC Mobile configuration; see the QC Mobile User Guide for information on using the QC Mobile application. 1 QC Mobile System Administrator Guide Figure 1: HP Quality Center and QC Mobile Overview QC Mobile Considerations When installing, configuring, and working with QC Mobile, both system administrators and users should consider the following best practices and concepts that define the relationship between the Quality Center server and QC Mobile devices: Create a QC Mobile Group with limited fields for a new defect Usability and productivity can be negatively affected by presenting a large number of fields on a mobile device. Best practices dictate that defect fields for the mobile group be confined to only those fields that are applicable to the users’ testing activities. Note that the implementation of a QC Mobile group requires QC Mobile device users to have two passwords – one for desktop access to the Quality Center server, and one for mobile device access to the Quality Center server. 2 QC Mobile System Administrator Guide Download manual tests only QC Mobile cannot run automated tests, thus, only manual tests and the Quality Center server tree structures that contain manual tests should be downloaded to QC Mobile. The type of tests that are downloaded to QC Mobile is determined by the system administrator. Understand QC Mobile’s role in the Quality Center testing program QC Mobile users cannot create test sets or tests. QC Mobile users can, however, run manual tests and create defects. Customize QC Mobile for your enterprise Several fields can help you customize QC Mobile for your enterprise. The fields are located within the web.config document in your gateway and are typically configured during installation. – adminQCServer: This is the administrator Quality Center server that is used for authentication of Gateway. – adminQCDomain: Default Quality Center domain solely used for authentication of Gateway. – adminQCProject: Default Quality Center project solely used for authentication of Gateway. – adminQCGroup: Group that is used to manage the gateway. Default value is TDAdmin. – showUnattached: This Boolean setting determines if the QC Mobile users will download the attached folder structure from the test lab. – imageUploadFolder: This is a folder on the Web server of the gateway that is used to upload images from the mobile devices. The IIS worker process must have read and write privileges to this folder. 3 QC Mobile System Administrator Guide Logging in to QC Mobile Gateway To start QC Mobile Gateway: 1. Browse to the QC Mobile Gateway log in page. The log in page is displayed. 2. Enter your user name in the Username field and your password in the Password field. 4 QC Mobile System Administrator Guide 3. Click LOGIN. The QC Mobile Gateway LICENSES tab is displayed. Overview of QC Mobile Gateway QC Mobile Gateway has three tabs. Use the: LICENSES tab to manage the QC Mobile licenses and mobile devices associated with the licenses. POLICIES tab offers to select options that control how the mobile device behaves when using QC Mobile, as well as to select options that control what information is logged during a QC Mobile session. LOG tab to view logged data. Logging out of QC Mobile Gateway You can log out from any page of QC Mobile Gateway. 5 QC Mobile System Administrator Guide To log out: Click LOGOUT on the menu bar. You are logged out of QC Mobile Gateway and returned to the log in page. Working with QC Mobile Grids Much of the information in QC Mobile is presented in a grid format. The following describes the common functions of the grids. Finding grid entries Entering a text string in the Find field allows you to display only those grid items that have data that corresponds to the text string. The Find field is located above the grid, to the right. For example, if you enter the text string Download in the Find field, the grid will display only those log items that contain the text string Download. To find a text string in grid items: Enter a text string in the Find field. QC Gateway dynamically filters the grid items and displays only those items that contain the text string. Sorting grid data You can change the order in which the information is presented in the grids by sorting the items by column. To sort grid data: Click once on a grid column heading to sort the column in ascending order. Click on a grid column heading a second time to sort the column in descending order. Once the grid has been sorted, clicking on the column head once again will toggle it to the opposite order. 6 QC Mobile System Administrator Guide Selecting a specific grid page Use the page control, which is located in the lower left of the grid, to select the grid page you wish to view. To view another page of the grid: Click the page number you wish to view (for example, click 2 to display page 2 of the grid). Click > to display the next five pages in the page range (for example, if the page range is 1, 2, 3, 4, 5, click > to display the 6, 7, 8, 9, 10 page range); when the page you wish to view is displayed, click the page number. Last to display the last page of the grid. Viewing the grid page count The page count indicator displays the number of pages in the grid. To view the grid page count: Look at the page count indicator, which is located in the lower right of the grid, to view the number of pages in the grid. In the example above, page 1 of 417 grid pages is currently displayed. The total number of grid items is listed in parentheses (4994 items).. 7 QC Mobile System Administrator Guide Managing Licenses and Mobile Devices QC Mobile licenses and the mobile devices associated with licenses are managed from the LICENSES tab. You cannot add a mobile device to QC Mobile Gateway unless an unused license is available. For example, if you purchase a license for eight users and enable eight mobile devices on QC Mobile Gateway, you will not be able to add additional mobile devices until you purchase an additional license to cover the additional mobile device(s) you wish to add. You may purchase additional licenses to increase mobile device capacity at any time. Display the LICENCES tab if it is not currently displayed. Displaying the LICENSES tab: Click LICENSES on the menu bar. The LICENSES tab is displayed. 8 QC Mobile System Administrator Guide Licenses are managed on the left side of the page; mobile devices are managed on the right side of the page. The information is presented in a grid format. Managing licenses Adding a QC Mobile license To add a license: 1. Click ADD. The Add License dialog is displayed. 2. Enter the license number (provided by Genilogix) in the License Number field. 3. Click OK. The Add License dialog closes and the license number is added to the grid. The quantity of mobile devices that can be associated with the license is listed in the Qty column; the license expiration date is listed in the Expires column. 9 QC Mobile System Administrator Guide Deleting a QC Mobile license To delete a license: 1. Select a license from the license grid. 2. Click DELETE. The Delete License confirmation dialog is displayed. The dialog asks you to confirm that you want to delete the license. 3. Click OK to delete the license or Cancel to cancel the delete action. Note: If you attempt to delete a license that has mobile devices already associated with it and you do not already have additional licenses listed in the license grid that have enough remaining quantity to cover the mobile devices, you will receive the following error message: To delete the license you must do one of the following: – Add another license with a quantity that will cover the associated mobile devices before you delete the original license. See Adding a QC Mobile license. – Delete or deactivate the associated mobile devices. See Deleting a mobile device or Deactivating a mobile device. 10 QC Mobile System Administrator Guide You must delete or deactivate a mobile device(s) until the remaining license quantities are equal to the associated mobile devices. Understanding the license Summary Beneath the license grid, QC Mobile Gateway presents a summary of the licenses. The data presented in the grid include: Bought: The number of mobile devices licensed to use QC Mobile. This number is the sum of the quantity licensed under each license. For example, if you purchase one license with a quantity of 8 and a second license with a quantity of 5, the number Bought is 13. Used: The number of mobile devices associated with the license(s). This number is the sum of quantity used under each license. Remaining: The number of additional mobile devices that can be associated with the license(s). This number is the sum of the remaining unused quantities under each license. Managing mobile devices Mobile devices can be added to the Mobile Device grid by either of the following methods: Adding a mobile device using Auto-Add This method automatically adds a mobile device to the Mobile Device grid if the device connects to the QC Mobile Gateway. This is the preferable method for adding a device because it eliminates the need for the system administrator to obtain and manually enter the device ID. Adding a mobile device manually This method requires the system administrator to obtain and manually enter the mobile device’s device ID, which is labor intensive than the Auto-Add method. Adding a mobile device using Auto Add A QC Mobile application user must enter the QC Mobile Gateway URL when configuring the mobile device. Once that URL is saved, the device connects with the QC Mobile Gateway and the mobile device is automatically added to the Mobile Device grid. 11 QC Mobile System Administrator Guide Users will not be able to access data on the QC Mobile Gateway or the Quality Center server until they enter a valid user name and password, as well as authenticate the Quality Center server domain and project. See the QC Mobile User Manual for instructions on configuring the Quality Center connection settings. Adding a mobile device manually Before adding a mobile device manually, you must gather the following information: Device type Device ID 12 QC Mobile System Administrator Guide To add a mobile device manually: 1. On the LICENSES tab in the Mobile Devices section, click ADD. The Add Mobile Device dialog is displayed. 2. Select the type of device you are adding from the Device Type menu. The options are: – iPad – iPhone – iPhone simulator – iPod touch 13 QC Mobile System Administrator Guide 3. Enter the device’s identification number in the Device ID field. 4. Leave the Enabled check box selected if you would like to associate this mobile device with a license (QC Mobile Gateway will automatically select a license that has a remaining quantity available). If you would like to add the mobile device now, but not associate it with a license at this time, deselect the Enabled option. 5. Click OK. The Add Mobile Device dialog closes and the mobile device is added to the mobile device grid. If the mobile device is enabled, the check box in the fourth column of the grid will have a check mark in it. If the mobile device was not enabled, the check box will be empty. Editing a mobile device’s properties You can edit the properties of a mobile device after it has been added to the mobile device grid. To edit a mobile device’s properties: 1. Click the pencil icon ( ) in the mobile device’s grid row. The Edit Mobile Device dialog opens. 2. Edit the properties of the device. 3. Click OK. The Edit Mobile Device dialog closes and the property changes you made are reflected in the mobile device grid. Deactivating a mobile device Deactivating a mobile device leaves the device and its settings in the Mobile Device grid, but it disassociates it from a license. You will not be able to run QC Mobile on a deactivated device. To deactivate a mobile device: 1. Click the pencil icon ( ) in the mobile device’s grid row. The Edit Mobile Device dialog opens. 2. Select the Active check box to deselect the option. 3. Click OK. The Edit Mobile Device dialog closes and the device is deactivated. 14 QC Mobile System Administrator Guide Activating a mobile device A mobile device that has been previously deactivated must be activated before it can connect to the Gateway again. To activate a deactivated mobile device: 1. Click the pencil icon ( ) in the mobile device’s grid row. The Edit Mobile Device dialog opens. 2. Select the Active check box to select the option. 3. Click OK. The Edit Mobile Device dialog closes and the device is activated. Deleting a mobile device To delete a mobile device: 1. Select a mobile device from the grid. Note: To select multiple devices, press and hold the SHIFT key while selecting the devices. 15 QC Mobile System Administrator Guide 2. Click DELETE. A confirmation message is displayed asking you if you are certain you want to delete the mobile device. 3. Click OK to delete the device; click Cancel to exit the dialog without deleting the mobile device. 16 QC Mobile System Administrator Guide Setting Policies for Device Behavior and Logging Preferences The policies associated with how mobile devices interact with the Quality Center server and logging preferences are set on the POLICIES tab. To display the POLICIES tab: Click POLICIES on the menu bar. The POLICIES tab is displayed. Controlling mobile device behavior QC Gateway offers the following policies that control how mobile devices running QC Mobile interact with the Quality Center server: Auto-add mobile device: Select this option to add automatically to the QC Mobile Gateway Mobile Device grid any device that connects to the QC Mobile Gateway. The auto-add mobile device feature is the recommended method for adding devices. 17 QC Mobile System Administrator Guide A valid Quality Center server log in is required, however, before the mobile device user will be able to access data from the QC Mobile Gateway or the Quality Center server. Prevent tests and defects from being deleted: Select this option if you want to prevent QC Mobile users from deleting tests and defects. Users will not be presented a test or defect delete option. Require actual results: Select this option if you want to require users to enter data in the Actual field for each step of a test. If this option is not selected, users can skip this field and continue testing. Require electronic signatures: Select this option if you want to require users to submit an electronic signature when uploading test data and defects to the Quality Center server. This feature is compatible with Genilogix’s QC eApprove, which provides controlled workflow and electronic signatures and is compliant with 21 CFR Part 11. Require photo for each step: Select this option if you to require users to take a photo and attach it to each test step. Note: Selecting this option will cause problems for QC Mobile users who do not have a camera-enabled device, that is, the users will not be able to complete tests without attaching an image file to the defect. A short-term solution or work around for this situation is to attach any photo from the photo album. While the image will not be correct, it will enable users of devices that are not camera enabled to continue testing. Long-term solutions are to change the policy to allow test steps/defects without images or to supply all users with camera-enabled devices. To select a mobile device behavior option: Click on the check box for the option you wish to select. A check mark appears in the check box, indicating that the option is selected. The policy change is enacted upon selection. To deselect a mobile device behavior option: Click on the check box for the option you wish to deselect. The check mark is no longer displayed, indicating that the option is no longer selected. The policy change is enacted upon deselection. 18 QC Mobile System Administrator Guide Setting logging preferences QC Gateway offers the options that control QC Mobile Gateway logging: Account modifications: Select this option if you want to log all account modifications (e.g., added accounts, deleted accounts, and account edits). License modifications: Select this option if you want to log all license modifications (e.g., added licenses and deleted licenses). Policy changes: Select this option if you want to log all policy changes (all changes made on the POLICIES tab). Prevent clearing of log: Select this option if you want to prevent any user from clearing the log (deleting all log items). When log items are cleared (by selecting CLEAR on the Log tab), they are cleared from the log file on the Quality Center server. Note: When selecting which log items to display, there is actually no change to the log file on the Quality Center server. However, when selecting Clear on the LOG tab, the server file is actually cleared, and the log items cannot be restored by changing the Log Retention setting. Usage: Select this option if you want to log QC Mobile usage; that is, all actions by mobile device users, such as downloading tests and uploading test data are logged. Log Retention: Select the policy for log retention from the Log Retention menu. The options are: – Past Day: Select this option if you want the log to display log items for the past 24 hours. – Past Week: Select this option if you want the log to display log items for the past seven days. – Past Month: Select this option if you want the log to display log items for the past 30 days. – Past Year: Select this option if you want the log to display log items for the past 365 days. – Forever: Select this option if you want to display all log entries. 19 QC Mobile System Administrator Guide Notes: – If you have enabled the Prevent clearing of log option, the Log Retention menu is not selectable. – Log retention settings affect Gateway log items of Gateway; there is actually no change to the log file on the Quality Center server. However, when selecting CLEAR on the LOG tab, the Gateway log file is actually cleared, and the log items cannot be restored by changing the Log Retention setting. To select a mobile device behavior option: Click on the check box for the option you wish to select. A check mark appears in the check box, indicating that the option is selected. The policy change is enacted upon selection. To deselect a mobile device behavior option: Click on the check box for the option you wish to deselect. The check mark is no longer displayed, indicating that the option is no longer selected. The policy change is enacted upon deselection. 20 QC Mobile System Administrator Guide Viewing the Event Log The data logged in the event log is determined by the logging preferences you selected on the POLICIES tab. See Setting Policies for Device Behavior and Logging Preferences for more information. Displaying the Event Log To display the Event Log: Select the LOG tab. The LOG tab is displayed. 21 QC Mobile System Administrator Guide This view presents the event log grid, which lists the following information for each logged event: – Type of event – Date of event – Description of event The events are listed in reverse chronological order (the most recent event is displayed first on page 1 of the log). The date range of logged items displayed in the grid is controlled by the logging policy settings selected on the POLICIES tab. Exporting log data You can export the log data to a Microsoft Excel file (.xls). To export log data: 1. Click Export. An operating system dialog opens and prompts you to open or save the .xls file. 2. Follow the dialog instructions to open or save the file. The log data is exported to the Excel file. Note: All log items are exported, even if they are not currently displayed in the log grid. While use of the Find feature may reduce the number of log items displayed in the log grid, it does not reduce the number of log items exported. Clearing log data If you elect to clear the Event Log, you will clear all Event Log items. When log items are cleared, they are cleared not only from the Event Log grid, but also from the log file on the Gateway. Once the log file on the Gateway is cleared, the log items cannot be restored. Note: If the Prevent clearing of log policy setting is selected on the POLICIES tab, the CLEAR button will not be displayed on the LOG tab. 22 QC Mobile System Administrator Guide Viewing Help Content QC Mobile Gateway help is context sensitive, that is, the help content displayed is specific to the tab you are currently viewing. For example, if you are viewing the POLICIES tab, the Help window will display information pertinent to the POLICIES tab only. To view QC Mobile Gateway Help content: Click Help on the menu bar. The Help window opens. To close the Help window: Click the Help window close icon ( ). The Help window closes. 23