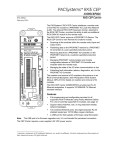
1
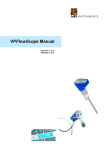
VPFlowMate User Manual
For VPFlowMate probe, and VPFlowMate in-line (with M12 8-pole connector)
With VPStudio 1.0.19
Revision: 25 May 2011
VPFlowMate is a registered trademark of Van Putten Instruments B.V.
Our product, technology and software are protected by various patents, trademarks and copyrights.
©2001-2011 Van Putten Instruments B.V. All rights reserved.
Van Putten Instruments
Buitenwatersloot 335
2614GS Delft
The Netherlands
T: +31 (0)15 213 1580
F: +31 (0)15 213 0669
[email protected]
www.vpinstruments.com
®
VPFlowMate user manual
rev 25 May 2011
2
WARNING – READ THIS FIRST
Congratulations! You have bought a state of the art insertion mass flow meter from VPInstruments!
The VPFlowScope and VPFlowMate are versatile and easy to use and can be very powerful tools
to monitor compressed air consumption. However, there are a few important issues you need to
know before using these kind of instruments. Please also see the instruction manual before use!
Insertion probes can be dangerous! Please familiarize yourself with the forces on
the probe under pressurized conditions and ALWAYS use the safety chain or an
additional safety belt when installing the instrument. Respect the local guidelines and
regulations for working with pressurized equipment.
P*V
T
Gas flow through pipes follows certain physical laws. These physical laws have
serious consequences for the installation requirements. Familiarize yourself with
these laws to make sure that the product is installed correctly. Always make sure that
upstream length, downstream length, flow, pressure, temperature and humidity
ranges are within specifications.
Precision instruments need maintenance. Check your flow meter regularly and
make sure it remains clean. When polluted, gently clean the sensor using
demineralised water or a light cleaning solvent.
Precision instruments need regular re-calibration. The VPFlowMate and
VPFlowScope are guaranteed for 24 months when used in clean, filtered, oil free and
dry compressed air. When any of these conditions is not met, the re-calibration
interval may become shorter than 24 months. VPInstruments offers service contracts
which cover a one year re-calibration, firmware upgrades and minor repairs.
€
Not intended for fiscal metering or billing. The VPFlowMate and VPFlowScope are
not intended for fiscal metering, as they can be shifted or turned during operation.
VPInstruments recommends using in-line flow meters or a special welded fixture for
these applications. Laws on fiscal metering and billing may vary per country or state.
%
Do not overestimate the results. The practical measurement uncertainty of an
insertion probe is +/- 5%. Do not expect less than 5% measurement uncertainty from
any insertion-based measurement as this is physically impossible due to the nature of
turbulent pipe flows. Our products are not intended to be used as a single means to
determine compressor capacity. Products are subject to improvement. VPInstruments
offers software and firmware releases. Please visit
www.vpinstruments.com/downloads for details.
Feedback leads to product improvement. Please share your experience with us, as
we are continuously improving our products in our commitment to quality, reliability
and ease of use.
Keep the above mentioned issues in mind and we are confident that you will enjoy using our
products over their complete lifetime.
®
VPFlowMate user manual
rev 25 May 2011
3
®
VPFlowMate user manual
rev 25 May 2011
4
Content
1. Introduction ........................................................................................................................................ 7
2. Product overview ............................................................................................................................... 8
3. Mechanical installation .................................................................................................................... 10
3.1 Gasses ....................................................................................................................................... 10
3.2 Selecting the right installation point ........................................................................................... 10
3.3 Installation of the VPFlowMate probe ........................................................................................ 13
3.4 Installation of the VPFlowMate in-line........................................................................................ 15
4. Electrical Connection ...................................................................................................................... 17
4.1 Plug and play (connection possibility to PC).............................................................................. 17
4.2 Stand alone ................................................................................................................................ 18
4.3 Using 4..20mA output ................................................................................................................ 18
4.4 Using pulse output .................................................................................................................... 19
4.5 Connection with VPFlowTerminal .............................................................................................. 20
5. VPStudio software ........................................................................................................................... 21
5.1 Installation of the VPStudio software ......................................................................................... 21
5.2 Adding your VPFlowMate .......................................................................................................... 22
5.3 Status and Specifications........................................................................................................... 23
5.4 Configurating your VPFlowMate ................................................................................................ 24
5.5 Real-time data............................................................................................................................ 25
6. Service............................................................................................................................................. 27
6.1 Cleaning the sensor ................................................................................................................... 27
6.2 Software and firmware updates ................................................................................................. 27
6.3 Recalibration .............................................................................................................................. 27
6.4 Service contract ......................................................................................................................... 27
6.5 First Aid Help.............................................................................................................................. 28
7. Specifications................................................................................................................................... 29
Appendix A:
Appendix B:
Appendix C.
Appendix D:
Appendix E:
Appendix F:
Mass flow and volume flow ............................................................................................. 31
Electrical installation........................................................................................................ 32
Extra tips for electrical connection .................................................................................. 33
Pulse output .................................................................................................................... 34
Do it yourself RS232 wiring............................................................................................ 35
Basic graphs in Excel ...................................................................................................... 36
Notes ..................................................................................................................................................... 39
®
VPFlowMate user manual
rev 25 May 2011
5
®
VPFlowMate user manual
rev 25 May 2011
6
1. Introduction
Thank you for choosing the VPFlowMate mass flow meter. The VPFlowMate probe and in-line are
easy to use mass flow meters for compressed air. They help you to find cost savings in the shortest
possible way. The VPFlowMate is the proven solution for mass flow measurements. The VPFlowMate
measures mass flow and the total consumption of your compressed air.
Besides compressed air, the VPFlowMate products can also be used in Nitrogen and technical
gasses. You can use your VPFlowMate directly in Nitrogen. For other gasses, ask VPInstruments for
their special gas calibration services.
Installation is very easy. This manual covers from mechanical installation to electrical installation to
configuration and read out. We help you each step of the way so you can work easily with your flow
meters.
Check the packaging box for any inconsistencies. Should there be any shipping damage, notify your
local carrier. At the same time a report should be submitted to Van Putten Instruments BV, PO BOX
151, 2600 AD DELFT, The Netherlands. VPInstruments ships ExWorks.
®
VPFlowMate user manual
rev 25 May 2011
7
2. Product overview
The VPFlowMate is available in two models:
VPFlowMate probe and VPFlowMate in-line.
Both are explained briefly below. This user
manual covers the installation, configuration
and read out of both types. For specifications
on both types, go to chapter 7.
Usage: The VPFlowMate probe is intended for
usage in pipe diameters above 2”. The in-line
flow meters are for usage in pipe diameters 2”
and below.
VPFlowMate probe
The VPFlowMate probe is an insertion mass flow meter. The insertion probe
is recommended for use for measurement in pipe diameters above 2”. The
VPFlowMate probe has the advantage that you can measure in different pipe
diameters with the same device; it only needs to know the inner pipe diameter
for read out in e.g. m3n/hr. Another advantage is that you can insert the flow
meter in pressurized piping by using a ball valve. See chapter 3 for making
installation points in pressurized conditions by hot tapping.
The VPFlowMate is available with and without display.
VPFlowMate in-line
The VPFlowMate in-line is available in three types: 0.5”, 1” and 2”.
The VPFlowMate in-line has to be mounted in between the pipe. You
can customize your own flow meter by choosing the options:
- In- and outlet tubes,
- ISO calibration certificate.
- Cable
The options have an influence on the accuracy of the VPFlowMate inline:
VPF.RXXX.MXX.D1.Base
VPF.RXX.MXX.D1.Base +
VPA.1200.0XX – Tubing kit
VPF.RXX.MXX.D1.Base +
VPA.1200.0XX – Tubing kit +
VPA.0009.001 ISO calibration report
5% accuracy
1% accuracy
0.5% accuracy
®
VPFlowMate user manual
rev 25 May 2011
8
Display option
The VPFlowMate in-line features a display. The display is
optional for the VPFlowMate probe. The display shows:
mass flow on the first line and total consumption on the
second line.
The mass flow meters of
VPInstruments measure mass
flow independent from
temperature and pressure; this is
indicated with the “n” in the units.
To learn more about mass flow,
please see appendix A.
The VPFlowMate probe shows default mass flow in
mn/sec. With VPStudio you have extra option of displaying
3
flow in m n/hr. A line in the display shows which unit is
selected; see pictures below.
The VPFlowMate in-line has fixed settings for displaying
the mass flow. There is an extra possibility to show flow in Euro/yr, ask our sales team.
Display options:
VPFlowMate probe
1. Mass flow options
ln/min
m3n/hr
mn /sec
x
x (default)
2. Total consumption
m3n
x
VPFlowMate in-line
0.5”
1”
2”
x
x
x
x
x
x
Unit indication:
Flow in mn/sec: Default for VPFlowMate probe
Flow in ln/min
3
Flow in m n/hr
®
VPFlowMate user manual
rev 25 May 2011
9
3. Mechanical installation
In this chapter we show you the installation of the VPFlowMate in your factory in the pipe line. Learn
how to select the right installation point and how to install your VPFlowMate in the pipe.
3.1 Gasses
Your VPFlowMate can be used for compressed air and Nitrogen. You can also use the VPFlowMate
for non-hazardous technical gasses; ask for our special gas calibration services.
3.2 Selecting the right installation point
First select the right installation point. In the field, additional errors are typically introduced. Sources of
error can be: installation effects, unknown flow profiles, swirl, pressure effects, temperature effects,
humidity effects, oscillations in the flow. The installation point is therefore crucial for an accurate
measurement. To ensure the highest possible accuracy of flow measurement, the installation and
piping instructions must be followed carefully. Therefore read this paragraph carefully.
Take into account:
•
ONLY for dry air! Never mount the VPFlowMate directly in the discharge of a compressor. The
high humidity and condensation will cause misreading.
•
When installing the instrument, choose a site which is accessible, which allows ease of wiring
and maintenance, and which allows you to still read and access the display if possible.
•
Meet the specifications of the VPFlowMate. When the specifications are not met, for instance
when the pressure or temperature level is too high, this will cause inaccurate measurement and
can even damage your flow meter.
Avoid:
• Excessive heat
• Potential water damage
• Condensation
• Vibrations
• Corrosive atmosphere
• Electrical problems (high voltage/ high power)
• Mechanical vibration and danger of impact (walking
bridges, fork lift trucks)
• Any source of potential error
Warning: These
devices are only for use
with air, nitrogen and
other non hazardous, or
non combustible gases.
The maximum working
pressure is 16 bar.
Different pressure
ratings are indicated on
the product.
VPInstruments takes no liability for any damages or malfunctioning of the flow meter
caused by pollution, dirt, water, oil or any other contamination of the medium in which you
are using the flow meter. Dirt, rust particles, sand, oil droplets, or dust might damage the
sensor, so make sure that all piping is clean and the air is dry and clean!
®
VPFlowMate user manual
rev 25 May 2011
10
Piping guidelines
DONT’S
DO’S
Like any flow meter, the VPFlowMate
requires
a
minimum
upand
downstream piping. The immediate upand downstream piping must be of
sufficient length, straight and free of
obstructions. Check de piping table on
the next page for details!
Weld beads on the internal wall of the
pipe before or after the VPFlowMate,
should be ground flush with the pipe wall
before the meter is installed.
Proper style and proper size gaskets
should always be used when installing
the VPFlowMate.
It is advised to install the VPFlowMate
probe of least at an angle of 15⁰
upwards. This is important to prevent the
built-up of water in or around the sensor,
or the connection tee. Water will have
effect on the measuring results.
If possible, you can always choose a longer upstream length, as these are minimum values. The
up- and downstream lengths are used industry wide as guidelines, and will never be a guarantee
for obtaining the “true value”. So always be careful and try to build up your own experience from
practical measurements.
See also to the ISO 14511:2001 (”Measurement of fluid flow in closed conduits- Thermal mass flow
meters”) international standard.
®
VPFlowMate user manual
rev 25 May 2011
11
Piping table
General rule: The VPFlowMate should be installed with at least 20 times the pipe diameter upstream
and at least 5 times the pipe diameter downstream, to avoid any distortion of the flow profile.
For some exceptions the upstream length needs to be longer, or can be shorter. Check the piping
table below for your application.
Upstream object
Description
Minimal length
Double elbow
These objects cause swirl and unequal
flow profiles.
40 *D
Diameter change
(small>>big)
Diameter changes can be abrupt or
sloped. These changes may cause jet
shaped flow profiles, which result in a high
reading.
40*D
Diameter change
(big >> small)
These objects have a positive effect. They
flatten the flow profile.
10 *D
Closed or open branch.
These objects generate vortices and flow
profile disturbance.
30*D
Communication with end-user
Sometimes you cannot meet all the installation guidelines and you have to install in non-perfect
conditions. In some cases: a measurement with higher uncertainty is better than no
measurement at all. Communicate this with your end-user, so they can take this uncertainty into
account.
®
VPFlowMate user manual
rev 25 May 2011
12
3.3 Installation of the VPFlowMate probe
Prepare the installation
The VPFlowMate probe can be inserted through a welding tap with
internal 1/2 inch thread (see picture) or through a hot tap saddle
(see below). We recommend using a 15..18 mm bore. The probe of
the VPFlowMate has a diameter of 12.7mm.
If possible, place a 1/2 inch full-bore ball valve or a 3/4 inch ball
valve, so that the VPFlowMate insertion probe can be inserted and
retracted under pressurized conditions.
Installation under pressure
By using hot tap saddles and a hot tap drill, installation points can be made in pressurized piping,
without any disruption of production. VPInstruments supplies also these tools.
The installation
The VPFlowMate has to be installed into the pipe line through a ball valve.
The bottom of the sensor must be in the middle of the pipe (see picture on
the right). Note that in small tubes, wrong insertion depth can result in large
measurement errors, because of the blockage effect. The arrow on the
VPFlowMate shows the flow direction. Alignment “by the eye” is sufficient.
Determining the inner pipe diameter
The inner diameter can be calculated by subtracting two times the wall
thickness of the outer pipe diameter. The pipe diameter is obtained by
measuring the perimeter of the tube and dividing this by Pi (3.14…). An
ultrasonic thickness gauge can be used for exact measurement of the wall
thickness. VPInstruments can supply an ultrasonic thickness gauge. In a depressurized pipe, the internal diameter can be measured using a calliper
gauge.
Follow the next steps for installation of the VPFlowMate insertion probe in
the pipeline.
SAFETY FIRST: START WITH MOUNTING THE SAFETY LINE!
Insertion sensors can become dangerous projectiles! The improper use of
insertion probes under high pressure (anything above ambient pressure) is very
dangerous. Use a safety chain under operating conditions. Please keep clear of
the meter when the line is being pressurized. Do not loosen the compression
fitting when the safety line is not secured.
The VPFlowMate is mounted with a 1/2 inch compression fitting. The probe is sealed
with a Teflon ferrule instead of a stainless steel ferrule. Teflon may become slippery. The
safety line will keep the sensor secure when it accidentally moves out of the compression fitting. NEVER over-tight the fitting, because it might damage the sensor tube.
®
VPFlowMate user manual
rev 25 May 2011
13
1. Insert the
compression fitting
in the welding tap.
Use Teflon tape or
liquid sealant.
2. Keep the ball
valve closed!
3. Insert the
VPFlowMate probe.
4. Mount the safety line. Hook the
safety line up in the ring of the
VPFlowMate. For extra safety, you
can add a luggage strap (like for
suitcases).
5. Place a mark on
the probe, to identify
the place where it is
safe to close the ball
valve when
retrieving the
VPFlowMate.
6. Open the ball valve
and slowly push the
VPFlowMate probe
completely in.
8. Retrieve the probe half the pipe diameter.
Adjust the safety line (and strap) to keep the
VPFlowMate in place. Keep in mind to align the
VPFlowMate with the flow direction.
®
VPFlowMate user manual
7. Push the probe in till it hits the
bottom of the pipe. Now place another
mark on the probe.
9. Gently tighten the
compression fitting. Do not over
tighten to prevent damage to
10. Now your
the probe. Pull the probe to
check if the compression fitting VPFlowMate probe is
installed.
is tight enough.
rev 25 May 2011
14
Pipe diameter vs. flow range
Insertion mass flow meters can be used in various pipe sizes. This is a great advantage, as you can
use one probe for many applications and installation is very easy. VPInstruments recommends the
VPFlowMate for usage in pipe diameters larger than 2”. Flow meters are spot measurement devices;
they calculate the flow from the measured mass flow velocity and the pipe area. They only need to
know the pipe diameter to calculate the flow for you. How to configure your VPFlowMate probe is
explained in the next chapters.
3
For you convenience we have included a table with calculation from mass flow range to m n/hr for
standard pipe diameters. You can also use our VPCalculator software that you can download, free of
charge, from our website www.vpinstruments.com.
Diameter
(mm)
55
80
100
160
200
250
Min flow
3
(m n/hr)
rounded down
3
to 5 m n/hr)
4
5
10
35
55
85
Max flow
3
(m n/hr)
rounded down
3
to 5 m n/hr)
1,245
2,705
4,235
10,855
16,955
26,500
3.4 Installation of the VPFlowMate in-line
Up- and downstream length
Also the VPFlowMate in-line requires a minimum up- and downstream length of at least 20 times the
pipe diameter at the inlet and 5 times the pipe diameter at the outlet. As you have read in chapter 3.2,
in some applications this distance has to be longer.
Installation of VPFlowMate in-line Base.
When you ordered your VPFlowMate in-line only as a base model, it is delivered without up-and
downstream piping. You can install it directly between two threaded pipe ends. Please be aware that
the connection between the pipe and the VPFlowMate Base is very important, any diameter mismatch
will result in higher inaccuracy. For example the inner diameter of the pipe may affect the reading.
Depending on the pipe wall thickness, the inner diameter can be smaller, which results in a higher
measurement value. If you want to be sure of the connection, ask us to supply you with the piping kit.
The connection is BSP inner straight thread; 0.5”, 1” or 2” depending on the VPFlowMate in-line
model.
®
VPFlowMate user manual
rev 25 May 2011
15
Installation of VPFlowmate in-line with tubing kit
When you ordered the tubing kit or a full start kit, the VPFlowMate in-line is delivered with an up and
downstream piping kit, to ensure at least 20 times the pipe diameter (for 0,5 inch and 1 inch) upstream
length. For economical reason, the 2 inch model is delivered with the pipe length of 15 times the pipe
diameter upstream. For optimum results, see the piping table and create additional upstream pipe
length when required.
Check the pipework and the O-ring. Apply a little O-ring grease to ease the mounting process. Screw
both pipes into the VPFlowMate. Gently screw the pipes into the flow meter inlet. Turn it all the way in,
until the end of the pipe reaches the bottom of the inlet hole.
You can install the VPFlowMate in-line directly between two threaded pipe ends. The connection is
BSP outer straight thread: 0.5”, 1” or 2” depending on the VPFlowMate in-line model. When necessary
you can ask our sales team to supply NPT thread on the tubing kit.
®
VPFlowMate user manual
rev 25 May 2011
16
4.
Electrical Connection
Familiarize yourself with the different connection possibilities of the VPFlowMate and their usage. (See
appendix B for electrical information and CE and UL guidelines.)
The VPFlowMate probe and in-line provide RS232, 4..20mA and pulse output. The cable wiring
connections shown here:
Always use a proper power supply. Refer to the specifications to make sure your power
supply is +12..24 Volt Class 2.
Wrong connection of the power supply may destroy the RS232 input of your laptop! Never
apply +12..24 Volt to any of the pins of the SUB D connector!
Connector lay out:
5
4
6
8
3
2
7
1
1 White
2 Brown
3 Green
4 Yellow
5 Green/black
6 Orange/pink
7 Blue
8 Red
RX
- VDC
TX
+ 4-20 mA
+ pulse
- pulse
- 4-20 mA
+ VDC
4.1 Plug and play (connection possibility to PC)
The plug and play connection is connection via interface box to
the power supply and via an RS232 cable to your computer.
VPA.0000.102 Interface box kit
®
VPFlowMate user manual
rev 25 May 2011
17
Usage:
- For connection to PC for configuration of your VPFlowMate.
•
The VPFlowMate probe needs to know the inner pipe diameter, to calculate the flow. The
pipe diameter needs to be entered with the VPStudio software. In the next chapter
VPStudio is explained. The VPFlowMate in-line is already equipped with the inner pipe
diameter and can be used directly.
3
•
For the VPFlowMate probe set the flow meter in mn/sec or m n/hr
•
Other configuration possibilities: set 4..20mA (for VPFlowMate probe only) change
reference conditions to match the output of the compressors in your installation, and reset
of the totalizer.
- For stand-alone: read out in the display of mass flow and total consumption.
•
For short time measurements this option is very useful. For permanent measurements,
we do not advice this option since the connection is not very solid.
Option real time read out in VPStudio
Via the interface box you can read out the flow real-time in VPStudio. This extra option also enables
real-time logging of the data on your computer. Check out the next chapter for this feature.
4.2 Stand alone
Usage: Read out of flow and total consumption in the display.
1. Directly connected to a power supply. All you have to do is plug the power supply in the wall socket.
VPA.0000.100
2. Another option for stand-alone is connection via cable with open wires and connecting the power to
the wires. This is a solid permanent connection.
VPA.0000.005
For your convenience we can also supply the cable with interface box with screw terminals inside.
4.3 Using 4..20mA output
Use the cable with open wires, apply power and connect the 4..20mA e.g. to the Central Building
System for further usage. The 4..20mA output is also available in the interface box or via the
VPFlowTerminal option.
Usage:
-
Read out of flow.
Control of equipment like valves.
Read out at Central Building Systems, read out in existing equipment.
Read out via the monitoring software of VPInstruments: VPVision or AirVision.
The 4..20mA output is passive, optical linear. See the connection scheme:
®
VPFlowMate user manual
rev 25 May 2011
18
VPFlowMate model
4 mA
20mA
Unit
VPF.R060.M050.D1
0
60
m n/hr
VPF.R200.M100.D1
0
200
m n/hr
3
500
ln/min
3
2000
ln/min
VPF.R01K.M200.D1
0
1000
3
m n/hr
VPP.R150.P400
0
150
mn/sec
Current output (4..20 mA)
+
A
4..20 mA
-
The 4..20mA output default is from 0..100% of the flow range. The default settings for the different
VPFlowMate models are:
3
For the VPFlowMate probe you can change the 4..20mA output. You can change it to the unit m n/hr
and you can set the maximum output.
4..20mA setting
The 4..20mA output default is from 0..100% of the flow range. For the VPFlowMate probe only, you
can lower the maximum flow with VPStudio to better fit your application for better accuracy.
In appendix C we show some extra tricks that you can do with the 4..20mA output.
4.4
Using pulse output
The VPFlowMate features a low-frequency pulse output, which is compatible with NAMUR (potential
free) relay outputs. For the in-line models, the pulse size is fixed. For the insertion probes, the pulse
size varies with the installation diameter, see appendix D. In VPStudio, the pulse output size can be
read out.
Use the cable with open wires, apply power and connect the pulse e.g. to the Central Building System
for further usage. The pulse output is also available in the interface box or via the VPFlowTerminal
option.
Usage: read out of total air consumption.
®
VPFlowMate user manual
rev 25 May 2011
19
Pulse output (opto isolated relay/ NAMUR compatible)
+ 12..24 Volt
+
-
Pulscounter
r
-
4.5 Connection with VPFlowTerminal
When you cannot read out the display of your VPFlowMate, e.g. because your flow meter is too high,
you can use the VPFlowTerminal; a remote display. For connection and further usage, we refer you to
the sales team of VPInstruments and the user manual of the VPFlowTerminal.
®
VPFlowMate user manual
rev 25 May 2011
20
5. VPStudio software
Learn in this chapter how to configure your VPFlowMate and how you can view real time data in
VPStudio.
IMPORTANT: Use your mouse when using VPStudio. Do not use the arrows of your keyboard for this!
Connection
You need to have the following to connect your VPFlowMate to the VPStudio software:
VPA.0000.102 Interface box kit
Or make your own RS232 connection, see appendix E.
Basic configuration
The VPFlowMate probe is a spot measurement device and needs to know the inner pipe diameter to
3
give read out of flow in m n/hr. Therefore you have to configure the VPFlowMate probe with this
diameter. The VPFlowMate in-line is already programmed with this diameter and can be used directly.
Advanced configuration
There are also advanced configuration possibilities for your VPFlowMate: set 4..20mA (VPFlowMate
probe only), change reference conditions to match the reference conditions of output of the
compressors in your installation, and reset of the totalizer.
Real time read out
You can view your real-time data in graphs in VPStudio. By exporting the data to a csv.file, you can
use the data for further analysis.
Menu
In the Menu of VPStudio you can find a direct link to CSV Studio: You can go directly to our program
CSV Studio. When you have exported data and you still want to change units, for instance change the
3
flow from mn/sec to m n/hr, you can do this by using CSV Studio.
5.1 Installation of the VPStudio software
Install VPStudio software
Insert the CD ROM delivered with your VPFlowMate. Install VPStudio by clicking the vpstudio.msi file
and follow the installation steps. All necessary drivers for later on can be found in the program folder of
VPStudio on your computer, subfolder ‘Drivers’.
Install the Serial-USB driver
Connect the RS232 converter to the interface split box. After
inserting the converter in the PC, the computer will recognize the
USB converter and it will install the driver. Note that every time
you put the RS232 converter in a different port, the computer
needs to install the driver again.
Set units
Open VPStudio. Always plug in the RS232 converter first and
then start up VPStudio. When you open VPStudio for the first
time, a pop up appears. SI Units and Imperial Units are both
implemented in VPStudio. The VPFlowMate works only with SI
Units.
®
VPFlowMate user manual
rev 25 May 2011
21
5.2 Adding your VPFlowMate
To read out the VPFlowMate and to configure the device, you first have to create your VPFlowMate in
the software. Click right mouse button in the explorer field and click ‘New device’.
The ‘Device properties’ window appears.
Write in the ‘Description’ field a name of your choosing (VPFlowMate here). Select ´VPFlowMate´ in
the drop down menu of ‘Type’. You have to define the right port number to which your VPFlowMate is
connected to the PC. Go to the ‘Connections’ tab to see which port number correspond with the
VPFlowMate. Here you can see there is a device in COM port 10. Go back to the ‘Device properties’
tab and type in 10 at port. Keep the default Baudrate and other communication settings default.
®
VPFlowMate user manual
rev 25 May 2011
22
Click OK to confirm. The VPFlowMate is added in the explorer field.
5.3 Status and Specifications
In the Status tab you see the specifications of your VPFlowMate. You can view for instance the serial
number and the specifications like flow range.
In current settings you can see the pipe diameter and the flow unit that are currently configured,
including a view of the display with real-time data.
In the right corner below you can see the connection status of your VPFlowMate. This should be green
and set to ‘connected’. When it is red and states ‘disconnected’, please check if you have wired and
connected the VPFlowMate correctly. You can also see in the right corner below that you are using SI
Units.
Sometimes the connection needs refreshing. When you do not get a connection, try to start VPStudio
again, or re-click on the icon in the tree in the Explorer field.
®
VPFlowMate user manual
rev 25 May 2011
23
5.4 Configurating your VPFlowMate
Go to the Installation tab to configure your VPFlowMate.
3
Default setting is measuring the velocity in mn/sec; a diameter is not necessary in this case. For m n/hr
3
read out, choose the unit m n/hr. You see fields light up yellow that are changing. Now you can enter
your pipe diameter. Choose the reference conditions of your application, to have immediately the right
flow output to match your application.
You can also reset the totalizer, by clicking ´Reset total´. For the VPFlowMate probe, you can lower
the 20mA output to better fit the flow range of your application.
Press ‘Program’ to store your settings in the VPFlowMate.
In-line flow meters
For the VPFlowMate in-line the unit and the pipe diameter is fixed, so you
cannot change this. Also the 4..20mA output is fixed and cannot be
changed.
Save settings
Settings are often the same for different applications or you might visit a site more than once.
Therefore we have implemented that you can save your settings, so you can use the same settings for
another VPFlowMate as well. This will save you time in configuration.
Enter your configurations, then press ‘Save Settings’. Enter a name
and click OK.
To load your settings, press ‘Load Settings’, choose your saved setting
and your settings appear in the ´installation´ tab.
Still press ‘Program’ to configure the VPFlowMate with
these settings.
®
VPFlowMate user manual
rev 25 May 2011
24
5.5 Real-time data
Click the + in front of your VPFlowMate in the ‘Explorer field’ to open the tree. Click on ‘Real-time
data’ to go to the graph. Go with your mouse in the graph, click right mouse button and ‘Acquire’ to
read in the real-time data of your flow meter.
The sample rate is fixed and is 1 sample/sec (every second a measurement is taken). The graph in
VPStudio is refreshed every 5 seconds.
Change graph
Click right mouse button on the graphs to change the layout of graphs.
3
- You can set flow to mn/sec or m n/hr
- Change the layout of the axis to automatic or a fixed scale
- Display markers
See some examples
®
VPFlowMate user manual
rev 25 May 2011
25
Export to csv.file
As long as you have the ´Real-time data´ selecting, the graph is reading in your flow data. Any time
you can export the data so far by clicking right mouse button and go to ‘Export’.
Choose a name and a place for your export file, click OK. The ‘Export Options’ dialog appears. Here
you can choose which data to export and in what matter. Click OK and you can use the csv.file for
further data processing.
In appendix F you can find additional information on how to make graphs from a csv.file in Office
Excel.
®
VPFlowMate user manual
rev 25 May 2011
26
6. Service
The VPFlowMate needs regular maintenance to ensure that the product is functioning properly.
Especially when the product is used for mobile air audits, we recommend inspecting the instrument
before and after every audit to ensure that the product has not been damaged.
For precision measurement equipment such as the VPFlowMate, a proper maintenance program is
key to reliable measurement results and a long product lifetime.
6.1 Cleaning the sensor
The sensor can be gently cleaned using cleaning alcohol or an ultrasonic cleaning bath. You can use
aluminium friendly electronics cleaning fluid. Damaged sensors need to be returned for re-calibration
or exchange.
6.2 Software and firmware updates
News on software and firmware updates can be found on www.vpinstruments.com, or are provided by
your local re-seller.
6.3 Recalibration
To keep your VPFlowMate in best shape, it needs recalibration. Calibrations are executed at the
calibration facility of VPInstruments. For optimum use of your equipment, we advise annual
recalibration.
6.4 Service contract
VPInstruments offers several Service Subscriptions. Enrolling in the Service Subscription Program
helps you get the most out of your measurement equipment. We keep your equipment in excellent
shape, as we offer an annual re-calibration on our state of the art calibration equipment. With the latest
software releases and expert technical support, you will save time and money. We offer the following
programs:
-
Standard Service Subscription; annual re-calibration of your flow meter and up to 5 years
warranty extension.
Full Service Subscription; annual exchange of your
flow meter. No service time! Have a fully calibrated
flow meter 24/7, 365 days a week!
Improved software performance, innovative new product
features, and technical support helps keep you focused on
what matters most for your company.
Benefits
- Annual calibrated and cleaned instruments
- Warranty extension
- Software- and firmware updates
- Live support and e-mail support by our skilled technicians
Consult your sales agent for information about our service
program.
®
VPFlowMate user manual
rev 25 May 2011
27
6.5 First Aid Help
Is your VPFlowMate not working correctly, please check the table below to perform the first diagnosis
and to see if you can fix the problem. Contact us when you have any other problem or if you continue
with having problems.
Table 6.1. Possible Solutions to common Basic Failures.
Symptom
No output signals
Possible causes
No power supply
Bad cable
Wrong connections
General failure
Wrong installation
Deviating output signal
Out of calibration
Extreme pollution
Wrong installation
Display shows 0&@*&-
Possible interference
RX line open
The VPFlowMate is stuck in a
routine and needs to reboot
Connection problems
with VPStudio and
Display shows
.00000000
E+00 :+1
®
VPFlowMate user manual
Action
Check power
Check cable
Check wiring diagram
Consult factory
The flow is too low to be detected or
the flow meter is mounted in a wrong
way
Consult factory
Consult factory
Check alignment of probe
Check up- and downstream lengths
Check for obstructions in flow pipe
Connect RX line (white) to ground
Re-connect the cable of the
VPFlowMate
rev 25 May 2011
28
7. Specifications
Please always check the label of your product for the specifications
VPFlowMate probe
Measurement
Flow sensor
Measuring principle:
Flow range:
VPFlowMate in-line
- Mass flow
- Total consumption
Thermal mass flow
0.5…150 mn/sec
0.5% of span.
See range table below
0.5% of full scale when with tubing kit and ISO
calibration report.
Other: 5% of full scale
Accuracy:
Please note that for insertion probes, the
field accuracy depends on installation
conditions.
Reference conditions:
Gases:
Gas temperature range:
Pressure range:
Humidity range:
0 degrees Celsius, 1013.25 mbar
Compressed air, Nitrogen and inert, non condensing gases
0....+50 deg C
0..16 bar gage
Up to 95% Relative Humidity, non condensing
Display:
Technology:
Back light:
Optional
Liquid Crystal (LCD)
Yellow
Standard
Mass
flow:
Read out of:
Mechanical:
Probe lengths:
Process connection:
Protection grade:
Housing material:
Wetted materials:
Corrosion resistance:
®
VPFlowMate user manual
3
m n/hr
- Mass flow in
or mn/sec
3
Total consumption in m n
Model
Unit
VPF.R060.M050
VPF.R200.M100
VPF.R01K.M200
3
Total consumption in m n
ln/min
ln/min
m3n/hr
400 mm (300, 600 mm)
Connected with 0.5”
See range table
compression fitting
IP65, avoid direct sunlight and rain
Aluminium, painted
Epoxy, glass, stainless steel 316
Highly corrosive or acid environments should be avoided
rev 25 May 2011
29
Electrical
Outputs:
Connection type:
RS232, 4..20mA (isolated), pulse (isolated)
12...24 VDC +/- 10 % Class 2 (UL)
Power consumption < 100mA. Peak power at start up 500mA
Multi pole connector
M12 connector
Approvals/conformity:
CE:
UL/ CUL:
EN 61326-1, EN 50082-1
14 AZ, Industrial Control Equipment
Power supply:
Range table VPFlowMate in-line and Lite
Model
Qmin
3
(m n/hr)
Qmax
3
(m n/hr)
Qmin
(ln/min)
Qmax
(ln/min)
DN (mm)
indicative
Process
connection
(NPT
adapters
available)
VPF.R060.M050.D1
0.32
60
5.3
1000
15
0.5” BSP
VPF.R200.M100.D1
0.88
200
14.7
3333
25
1” BSP
VPF.R01K.M200.D1
3.53
1000
58.9
16666
50
2” BSP
®
VPFlowMate user manual
rev 25 May 2011
30
Appendix A: Mass flow and volume flow
Definition of mass flow
Mass flow rate is the mass of substance which passes through a given surface per unit time. Its unit is
mass divided by time. This means: kilogram per second in SI units, and slug per second or pound per
second in US customary units.
Mass flow rate can be calculated from the density of the substance, the cross sectional area through
which the substance is flowing, and its velocity relative to the area of interest:
=ρ*v*A
where:
= mass flow rate
ρ = density
v = velocity
A = flow area
3
Definition of a Normal cubic meter (m n)
A normal cubic meter is used to relate mass flow to a volumetric unit. A normal cubic meter is the
3
3
volume of 1 m of air at temperature of 0°C and pressure of 1013, 25 mbar abs. The mass of 1 m n of
air is 1293 gram.
The normal cubic meter is officially indicated with a subscript “n” behind the volumetric unit. The
indication Nm is not correct.
Other common normal conditions:
•
20˚C reference (FAD): See ISO 1217
•
15˚ reference: See DIN 1533
VPFlowMate and mass flow
The VPFlowMate insertion probe is calibrated in normal meters per second (mn/sec). A normal
meter per second is a meter per second under the same reference conditions as a normal cubic meter.
This enables you to use the VPFlowMate in various pipe diameters. The VPFlowMate only needs to
know the inner tube diameter to calculate the mass flow rate.
Working principle of the VPFlowMate
The
VPFlowMate’s
thermal
sensor
measures mass flow. The sensor response
signal is directly related to the mass flow rate
and can be described by the following
formula:
Working principle
flow
Heat emission
warmteafgifte
Vout = k *λ* ρ * v * (Ts-Tg)
sensor
Vout = output voltage
k = sensor (geometrical) constant
λ = thermal conductivity of the gas
ρ = density of the gas
v = actual velocity in m / sec
Ts = sensor temperature
Tg = gas temperature
Tref
Heating
Verwarming
ρ * v: mass flow
®
VPFlowMate user manual
rev 25 May 2011
31
Appendix B: Electrical installation
The VPFlowMate complies with the CE requirements as stated in the CE declaration. CE compliance
can only be achieved when grounding and shielding directions are followed and proper cables and
connector assemblies are used.
Electrical connection guidelines- UL 508 Listing for USA & Canada
The VPFlowMate is intended to be used with a Class 2 power source or Class
2 transformer in accordance with UL1310 or UL1585. As an alternative a LVLC
(Low Voltage Limited Current) power source, with the following properties can
be used:
−
The device shall be used with a suitable isolating source such that the
maximum open circuit voltage potential available to the product is not more
than 24 V DC and the current is limited to a value not exceeding 8
amperes measured after 1 minute of operation;
−
A fuse in accordance with the UL248 series and rated max 4A, shall be installed in the 24V DC
power supply to the device in order to limit the available current.
Electrical connection guidelines: general remarks
Make sure that the following conditions are met:
−
For portable, non-critical applications, a switched mode 12 V DC, 1A power adapter may be used.
Switched mode power supplies that are of poor quality, might affect the accuracy.
®
VPFlowMate user manual
rev 25 May 2011
32
Appendix C. Extra tips for electrical connection
This appendix describes extra option for the output of the VPFlowMate.
Creating from the passive current output an active current output.
Power to 4-20 mA +
+ 12..24 Volt
+
A
4..20 mA
-
Creating voltage output from 4-20 mA output using a register
Power to 4-20 mA +
+ 12..24 Volt
+
4..20 mA
R
V
0 Volt
R
100 ohm
500 ohm
®
VPFlowMate user manual
V
0.4..2 Volt
2..10 Volt
rev 25 May 2011
33
Appendix D: Pulse output
For VPFlowMate in-line: pulse is fixed
Model
VPF-R060-M050
VPF-R200-M100
VPF-R01K-M200
Pulse size
10
Ln
50
Ln
3
1
mn
For VPFlowMate probe: dependent on pipe size:
Pipe diameter
In mm
110
150
160
200
300
400
500
®
Pulse size in m
R150
1
1
1
2
2
5
5
5
20
20
50
VPFlowMate user manual
3
n
rev 25 May 2011
34
Appendix E:
Do it yourself RS232 wiring
In this example, a SUBCON® connector of Phoenix Contact is used. The pin number is placed on the
terminal block, If you use an ordinary SUB-D connector, you will find the pin numbers imprinted in the
connector isolation material.
(ordinary female sub D)
Phoenix Contact SUBCON®
SUB-D connector
Easy to use SUBCON
(www.phoenixcontact.com)
To Power supply
0 Volt (brown)
+12..24 Volt (red)
1
2
3
4
TX
RX
5
0 Volt
To VPFlowMate
0 Volt (brown)
6
7
8
9
+12..24 Volt (red)
RX (White)
TX (green)
Cable shielding (metal)
®
VPFlowMate user manual
rev 25 May 2011
35
Appendix F: Basic graphs in Excel
Open your csv.file with Excel.
To convert the data to different columns,
select the first column, as seen above and
select in the menu bar ‘Data’ ‘Text to
columns’.
A wizard appears, select ‘Separated’ and
click
‘Next’.
Subsequently
select
‘Semicolon’ and click ‘Finish’ (see picture
below). Now the data is divided over
columns.
Select in the menu bar ‘Add’ ‘Graphic’.
®
VPFlowMate user manual
rev 25 May 2011
36
The wizard for making a graph appears. First select the type of graphic you’d like. I am choosing a
smooth line graphic:
Click “next”. Now select the
data you want to see in the
graph:
Go to the second tab to give the graph a name or to add more graphs in the same graphic. Click
‘Next’. Move through the different tabs to e.g. name the total graphic and the axes. You can also
change the axes, legend, etc. They can be useful to make the graphic clearer and better readable.
Click “next”
Choose where you want
to place your graphic, in
the current tab or in a
new tab and click
“complete”.
The graph appears.
®
VPFlowMate user manual
rev 25 May 2011
37
You can adjust the lay out of the graph, like colour or size, by clicking on the different features. To
change the range of the axes, place your mouse on an axis and click right mouse button.
You can use the graphs in your reports.
®
VPFlowMate user manual
rev 25 May 2011
38
Notes
®
VPFlowMate user manual
rev 25 May 2011
39
www.vpinstruments.com
®
VPFlowMate user manual
rev 25 May 2011
40