1
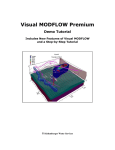
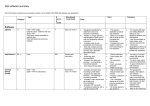
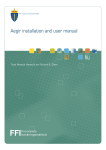
Technical Specifications SAR Change Detection and Feature Extraction SAR Change Detection and Feature Extraction Version: Geomatica 2012 and Up Last modified: April 2015 Technical Specifications SAR Change Detection and Feature Extraction Demonstration Overview Please note: The imagery used in this demonstration can be substituted with freely available RADARSAT-2 imagery – a suitable image pair is the Phoenix imagery, which is a similar dataset (two repeat pass images over the same location). Abstract This demonstration provides a complete end-to-end workflow for automating change detection information extraction from multi-temporal SAR imagery. The primary demonstration shows the audience the basics of building a model in Geomatica’s Modeler environment. Two repeat pass images collected over the same location, 24 days apart are analysed to determine the changes that have occurred on the ground. Required Software PCI’s Geomatica v2012 and up Demo Levels This demonstration includes two sections, a primary demonstration and an optional extended demonstration. Primary Demonstration – Automated change detection model in Modeler Phoenix U12, May 04, 2008 Phoenix U12, May 28, 2008 Be sure to credit any work you produce as “RADARSAT-2 imagery courtesy of MDA” and to respect the End User License Agreement (EULA) of the demonstration license provided with the imagery. Extended Demonstration (Optional) – Further statistical analysis to classify changes identified in imagery. Key Applications Change detection Monitoring Defence – feature identification Much more… Technical Specifications SAR Change Detection and Feature Extraction Pre-Demo Setup This section provides instructions regarding how to unpack the data for this demonstration. Generally, this only needs to be done once. Due to the number of files that are created during this demonstration, it is recommended that you delete the entire SAR_Change_Detection folder when you have completed the demonstration and then follow the steps below to set this demonstration up for another customer. 1. Navigate to where you downloaded SAR_Change_Detection.zip 2. Right click on the zip file and select (your zip utility) Extract Here Technical Specifications SAR Change Detection and Feature Extraction Primary Demonstration (SAR Change Detection and Feature Extraction) Back to: Demo Overview | General Overview | Table of Contents About the Modeler environment The Modeler environment provides access to PCI’s 550+ powerful processing algorithms in an easy to use, intuitive graphical workflow interface. To get familiar with the basics of Modeler, be sure to review the Geomatica II Coursebook, as well as the Modeler User Manual, which can be found in the C:\...\PCI Geomatics\Manuals folder of your Geomatica installation folder. Open & Review Modeler Project 1. Navigate to C:\...\SAR_Change_Detection\ 2. Double click on SAR_Change_Detection.mod The file opens in Modeler 3. Maximize the window to bring all elements into view . 4. Click on the Run button to execute the complete model. The complete workflow will execute, in 2-3 minutes or less. The final results can then be viewed in Focus. Technical Specifications SAR Change Detection and Feature Extraction Load and inspect the results of the model in Focus. Inspect results 1. Open SAR_Change_Detection.gpr from the C:\..\Precomputed folder RADARSAT-2 imagery used in this demonstration is located over Monterey, California – site of many world renowned golf courses including Cypress Point, and Pebble Beach. The second image in this series was collected on June 20, 2010 02:10 UTC, in an Ascending pass (south to north). The local time was 18:10 on Saturday, June 19th. As it turns out, the US Open (one of five major international golf tournaments) was held at Pebble Beach during this time – the new features that appear in the imagery are likely related to the increased traffic (private planes, vehicles, etc). The following layers are automatically loaded (from top): Layer Change Features SAR Change Detection Airphoto Reference Jun 20, 2010 May 27, 2010 Description Automatically extracted changes CCDINTEN analysis results (Intensity from test, intensity from reference, and change metric) Reference imagery (roughly 50 cm resolution) Ultrafine 14 RADARSAT-2 image Ultrafine 14 RADARSAT-2 image Technical Specifications Tips to layout the model in a fast, efficient manner: Under the Preferences menu of the Modeler window, select Snap to Grid. Be sure to save your preferences once you’ve made this change. SAR Change Detection and Feature Extraction Build Model to perform automated change detection Now, we will build the model to perform this analysis. The detailed steps are outlined below. 1. Open Modeler, starting with an empty canvas 2. Layout all of the required algorithms. To add the algorithms, click on the Module Librarian icon in the toolbar. For generic algorithms, such as IMPORTSAR, or EXPORT right click anywhere on the canvas and select them from the Common Modules menu. 3. You canvas should have all of the following elements prior to advancing to the next step. If you are using the same module more than once, you can right click on your first module, and select Duplicate to make a copy and drop it on the canvas. To load the modules on your canvas, you can select Add to Canvas from the menu or you can left click on the module icon, and then drop it on the canvas. Technical Specifications SAR Change Detection and Feature Extraction 4. Populate all parameters in the modules, starting from the left, working your way to the right. IMPORTSAR: Click on this module, and select the product.xml file from the June 20th image for the top SARINGEST module. For the bottom IMPORTSAR module, navigate to the May 27 product.xml file and select it. File names/selection for the two RADARSAT-2 images: Top IMPORTSAR Module: C:\..\Data\U14-HH-2010-06-20-SLC\product.xml Bottom SARIMPORT Module: C:\..\Data\U14-HH-2010-05-27-SLC\product.xml AUTOSHIFT: All parameters can be left on default values. EXPORT (left side): Double click and specify a filename for the Autoshifted June 20th image: C:\..\Output\U14_June20_shifted.pix IMPORT: Double click the Import module on the left side of the canvas, and select the vector file for the airport area to clip the analysis. The file is: C:\..\Data\Reference\airport_vec.pix CLIP (both CLIP modules): Double click the CLIP module and select Use a Clip Layer from the first drop down menu. TYPESPLIT: Double click the module and select Rasters as the Input Parameter. This will separate the clip vector and the raster layer for the next step in the processing workflow. CCDINTEN: Leave the options on default. EXPOLRAS: Set the Threshold Minimum to 95 – all changes detected which rank in the 95th percentile or higher will be kept. In addition, enter 25 for the Minimum Area (pixels), to limit the size of objects that are detected. You can experiment with this to detect certain types of objects (cars vs planes, etc). Technical Specifications SAR Change Detection and Feature Extraction EXPORT (right side of canvas): Specify an output filename:C:\..\Output\SAR_Change_Detection.pix Tip: Annotate your model with the COMMENT module, which is accessible from the Module Librarian. Be sure to insert useful comments such as the acquisition dates of your images, or other relevant information. 5. Now that you have properly configured the modules, you can connect them using the pipes within Modeler. Note as you connect the modules, there are different colors and thicknesses for pipes, which denote the type of data (raster, vector, bitmap, etc) they contain, the whether they contain single of multiple layers. Starting with the AUTOSHIFT, select the June 20th, 2010 image as the Input Complex SAR image (top port on the left of the module). Connect the two items together as shown below: Tip: When connecting modules, you can either click on respective output / input ports, or you can select an already connected pipe and connect it either to an input or output port. If your canvas becomes cluttered, these options can be helpful. In addition, the modules can be repositioned, which can result in reduced clutter as the pipes will automatically redraw based on the module’s new positions on the canvas. Repeat the step, this time connecting the Reference Complex SAR Image port on the Autoshift module to the May 27th, 2010 image. Next, connect the AUTOSHIFT to the top most CLIP Module. CLIP also needs the input vector layer, which you must connect to the Vector port. Technical Specifications SAR Change Detection and Feature Extraction Next, connect the IMPORTSAR module for the May 27th image to the second CLIP module. You canvas should look as follows. Note: Troubleshooting your model is made easier through the use of color coded pipes. Default colors include Green for Raster data, and Grey for vector data. Note below the vector file pipe that is connected to the CLIP module is grey, which the IMPORTSAR module pipes are green. To access the pipe colors and modify them, click on Preferences / Pipe Colors within the Modeler menu. Note: For viewing purposes, you should connect the June 20th AUTOSHIFT results to the export module, which will allow you to see the original image, properly positioned and aligned with the other SAR image. Technical Specifications Note: The selection of the ports for CCDINTEN (top, bottom) will only affect the default coloring of the result image through the default loading in focus. In this demonstration, the results will show new objects (appearing on June 20th) as BLUE and objects which are no longer present as MAGENTA. This closely resembles typical change analysis displays, where “Blue is new, and Red has Fled”. SAR Change Detection and Feature Extraction The clipped files must be split to retain only the Complex SAR images to be used in the CCDINTEN analysis. Connect the two CLIP modules to the TYPESPLIT modules – this will pass the Raster data that CCDINTEN requires to perform the change detection between the two layers. Next, connect the top image (June 20th, 2010) to the bottom port of the CCDINTEN module, and bottom image (May 27th, 2010) to the top port of CCDINTEN. In order to pass the correct layer to EXPOLRAS, connect the output port of CCDINTEN to the port on the left of the SPLIT Module. To pass the 4th channel (which is what EXPLORAS requires) through, connect the second port of the SPLIT module on the right to the input port of the EXPLORAS module. This will create a third connection below the original two output ports of the SPLIT module. Now, duplicate EXPLORAS (right click on the module and duplicate it) and drop it on the canvas. Connect the third port on the right of the SPLIT module to the new copy of EXPLORAS. Create another copy of the EXPLORAS module, and connect the fourth port on the right of the SPLIT module to the new EXPLORAS module. Delete all other copies of the EXPLORAS modules on your canvas. Your connection should look as follows: Technical Specifications SAR Change Detection and Feature Extraction The final connections include the output port of EXPLORAS to the EXPORT module Vector input port, and the output port of the CCDINTEN module to the input port of the EXPORT module. Tip: As you experiment with parameters and modify things in your model, you will likely want to quickly re-run the model. Be sure to select “Overwrite results” in modules such as EXPORT to ensure you are always looking at the latest results. Note also that bulges in the pipes indicate the data has passed through. You can right click on the pipes to View Pipe Contents which can be a useful way to troubleshoot your models. If you wish to remove all temporary files off disk and start anew, click on Edit / Clear all caches from the main Modeler menu. 6. Once you’ve verified all steps above, click on Run icon in the Modeler interface. The completed is shown above. 7. View your results in Focus by loading your layers. You can load the layers separately, or open the precomputed focus file under: C:\..\Precomputed\SAR_Change_Detection.gpr