1
United States
Environmental Protection
Agency
Environmental Monitoring
Systems Laboratory
Las Vegas NV 89193-3478
Research and Development
GEO - EAS 1.2.1
User's Guide
EPA/600/8-91/008
April 1991
EPA 600/4-88/033
MARCH 1991
GEO-EAS 1.2.1
GEOSTATISTICAL ENVIRONMENTAL
ASSESSMENT SOFTWARE
USER'S GUIDE
by
Evan Englund
U.S. Environmental Protection Agency
Environmental Monitoring Systems Laboratory
Las Vegas, Nevada 89193-3478
Allen Sparks
Computer Sciences Corporation
4220 S. Maryland Parkway
La Plaza B, Suite 408
Las Vegas, Nevada 89119
ENVIRONMENTAL MONITORING SYSTEMS LABORATORY
OFFICE OF RESEARCH AND DEVELOPMENT
U.S. ENVIRONMENTAL PROTECTION AGENCY
LAS VEGAS, NEVADA 89119
March 1991
ii
Notice/Disclaimer
NOTICE
The information in this document has been funded wholly or in part by the United States Environmental Protection Agency under
Contract #68-01-7325 to Computer Sciences Corporation. It has been subjected to the Agency’s peer and administrative review,
and it has been approved for publication as an EPA document. Mention of trade names or commercial products does not constitute
endorsement or recommendation for use.
DISCLAIMER
Geo-EAS software and documentation are provided “as is” without guarantee or warranty of any kind, expressed or implied. The
Environmental Monitoring Systems Laboratory, U. S. Environmental Protection Agency, Las Vegas, NV, and Computer Sciences
Corporation will not be liable for any damages, losses, or claims consequent to use of this software or documentation.
ABSTRACT
This report describes how to install and use the Geo-EAS (Geostatistical Environmental Assessment Software) software package
on an IBM-PC compatible computer system. A detailed example is provided showing how to use the software to conduct a
geostatistical analysis of a data set.
Thirteen Geo-EAS programs are documented. The principal functions of the package are the production of 2-dimensional grids
and contour maps of interpolated (kriged) estimates from sample data. Other functions include data preparation, data maps,
univariate statistics, scatter plots/linear regression, and variogram computation and model fitting. Extensive use of screen graphics
such as maps, histograms, scatter plots and variograms help the user search for patterns, correlations, and problems in a data set.
Data maps, contour maps, and scatter plots can be plotted on an HP compatible pen plotter. Individual programs can be run
independently; the statistics and graphics routines may prove useful even when a full geostatistical study is not appropriate. For
ease of use, the programs are controlled interactively through screen menus, and use simple ASCII data files.
Geo-EAS 1.2.1
ii
Notice/Disclaimer
Table of Contents
ABSTRACT . . . . . . . . . . . . . . . . . . . . . . . . . . . . . . . . . . . . . . . . . . . . . . . . . . . . . . . . . . . . . . . . . 3
TABLE OF CONTENTS . . . . . . . . . . . . . . . . . . . . . . . . . . . . . . . . . . . . . . . . . . . . . . . . . . . . . 4-5
GLOSSARY . . . . . . . . . . . . . . . . . . . . . . . . . . . . . . . . . . . . . . . . . . . . . . . . . . . . . . . . . . . . . . . 6-7
ABBREVIATIONS . . . . . . . . . . . . . . . . . . . . . . . . . . . . . . . . . . . . . . . . . . . . . . . . . . . . . . . . . . . . 8
ACKNOWLEDGEMENTS . . . . . . . . . . . . . . . . . . . . . . . . . . . . . . . . . . . . . . . . . . . . . . . . . . . .
9
SECTION 1 - INTRODUCTION
1.1
1.2
1.3
1.4
OVERVIEW . . . . . . . . . . . . . . . . . . . . . . . . . . . . . . . . . . . . . . . . . . . . . . . . . . . . . . . . . .
EQUIPMENT REQUIREMENTS . . . . . . . . . . . . . . . . . . . . . . . . . . . . . . . . . . . . . . . . . .
GEO-EAS AVAILABILITY . . . . . . . . . . . . . . . . . . . . . . . . . . . . . . . . . . . . . . . . . . . . . .
USER PROFILE . . . . . . . . . . . . . . . . . . . . . . . . . . . . . . . . . . . . . . . . . . . . . . . . . . . . . . .
10
10
10
11
SECTION 2 - SYSTEM SUMMARY
2.1
2.2
2.3
INSTALLING THE SYSTEM . . . . . . . . . . . . . . . . . . . . . . . . . . . . . . . . . . . . .
2.1.1
The Distribution Diskettes . . . . . . . . . . . . . . . . . . . . . . . . . . . . . . . . . .
2.1.2
Hard Disk Installation . . . . . . . . . . . . . . . . . . . . . . . . . . . . . . . . . . . . .
2.1.3
Using the Programs on Floppy Diskette . . . . . . . . . . . . . . . . . . . . . . . .
INITIATING THE SYSTEM . . . . . . . . . . . . . . . . . . . . . . . . . . . . . . . . . . . . . .
2.2.1
Using the Geo-EAS System Menu . . . . . . . . . . . . . . . . . . . . . . . . . . . .
2.2.2
Using the Programs From DOS . . . . . . . . . . . . . . . . . . . . . . . . . . . . . .
ANSWERS TO COMMON QUESTIONS ABOUT GEO-EAS . . . . . . . . . . . .
12
12
13
13
13
13
14
15
SECTION 3 - SYSTEM OPERATION
3.1
3.2
3.3
3.4
DATA . . . . . . . . . . . . . . . . . . . . . . . . . . . . . . . . . . . . . . . . . . . . . . . . . . . . . . . .
3.1.1
Geo-EAS Data Files . . . . . . . . . . . . . . . . . . . . . . . . . . . . . . . . . . . . . . .
3.1.2
File Naming Conventions . . . . . . . . . . . . . . . . . . . . . . . . . . . . . . . . . . .
3.1.3
System Defaults Option . . . . . . . . . . . . . . . . . . . . . . . . . . . . . . . . . . . .
INTERACTIVE SCREENS . . . . . . . . . . . . . . . . . . . . . . . . . . . . . . . . . . . . . . . .
3.2.1
Screen Format . . . . . . . . . . . . . . . . . . . . . . . . . . . . . . . . . . . . . . . . . . .
3.2.2
Types of Screen Input Fields . . . . . . . . . . . . . . . . . . . . . . . . . . . . . . . .
3.2.3
The Menu Tree . . . . . . . . . . . . . . . . . . . . . . . . . . . . . . . . . . . . . . . . . . .
3.2.4
Common Menu Options . . . . . . . . . . . . . . . . . . . . . . . . . . . . . . . . . . . .
GEO-EAS GRAPHICS . . . . . . . . . . . . . . . . . . . . . . . . . . . . . . . . . . . . . . . . . . .
3.3.1
On-Screen Graphics . . . . . . . . . . . . . . . . . . . . . . . . . . . . . . . . . . . . . . .
3.3.2
Metacode-Based Graphics . . . . . . . . . . . . . . . . . . . . . . . . . . . . . . . . . .
ERROR AND RECOVERY PROCEDURES . . . . . . . . . . . . . . . . . . . . . . . . . .
17
17
19
19
19
19
21
22
23
24
24
25
25
SECTION 4 - USING Geo-EAS IN A GEOSTATISTICAL STUDY: AN EXAMPLE
4.1
4.2
4.3
4.4
4.5
OVERVIEW . . . . . . . . . . . . . . . . . . . . . . . . . . . . . . . . . . . . . . . . . . . . . . . . . . .
EXPLORATORY DATA ANALYSIS . . . . . . . . . . . . . . . . . . . . . . . . . . . . . . .
VARIOGRAM ANALYSIS . . . . . . . . . . . . . . . . . . . . . . . . . . . . . . . . . . . . . . .
KRIGING AND CONTOURING . . . . . . . . . . . . . . . . . . . . . . . . . . . . . . . . . . .
SUMMARY AND EXERCISES . . . . . . . . . . . . . . . . . . . . . . . . . . . . . . . . . . . .
27
27
35
49
55
SECTION 5 - DATAPREP
5.1
WHAT DATAPREP DOES . . . . . . . . . . . . . . . . . . . . . . . . . . . . . . . . . . . . . . . 57
SECTION 6 - TRANS
6.1
Geo-EAS 1.2.1
WHAT TRANS DOES . . . . . . . . . . . . . . . . . . . . . . . . . . . . . . . . . . . . . . . . . . . 72
iii
Table of Contents
Table of Contents (CON’T)
SECTION 7 - STAT1
7.1
WHAT STAT1 DOES . . . . . . . . . . . . . . . . . . . . . . . . . . . . . . . . . . . . . . . . . . . . 81
SECTION 8 - SCATTER
8.1
WHAT SCATTER DOES . . . . . . . . . . . . . . . . . . . . . . . . . . . . . . . . . . . . . . . . . 93
SECTION 9 - PREVAR
9.1
WHAT PREVAR DOES . . . . . . . . . . . . . . . . . . . . . . . . . . . . . . . . . . . . . . . . . . 96
SECTION 10 - VARIO
10.1
WHAT VARIO DOES . . . . . . . . . . . . . . . . . . . . . . . . . . . . . . . . . . . . . . . . . . 100
SECTION 11 - XVALID
11.1
WHAT XVALID DOES . . . . . . . . . . . . . . . . . . . . . . . . . . . . . . . . . . . . . . . . . 116
SECTION 12 - KRIGE
12.1
WHAT KRIGE DOES . . . . . . . . . . . . . . . . . . . . . . . . . . . . . . . . . . . . . . . . . . . 130
SECTION 13 - POSTPLOT
13.1
WHAT POSTPLOT DOES . . . . . . . . . . . . . . . . . . . . . . . . . . . . . . . . . . . . . . . 145
SECTION 14 - XYGRAPH
14.1
WHAT XYGRAPH DOES . . . . . . . . . . . . . . . . . . . . . . . . . . . . . . . . . . . . . . . 153
SECTION 15 - CONREC
15.1
WHAT CONREC DOES . . . . . . . . . . . . . . . . . . . . . . . . . . . . . . . . . . . . . . . . . 162
SECTION 16 - VIEW
16.1
WHAT VIEW DOES . . . . . . . . . . . . . . . . . . . . . . . . . . . . . . . . . . . . . . . . . . . 172
SECTION 17 - HPPLOT
17.1
WHAT HPPLOT DOES . . . . . . . . . . . . . . . . . . . . . . . . . . . . . . . . . . . . . . . . . 174
APPENDICES
APPENDIX A - REFERENCES . . . . . . . . . . . . . . . . . . . . . . . . . . . . . . . . . . . . . . . . . .
APPENDIX B - NCAR GRAPH OPTIONS . . . . . . . . . . . . . . . . . . . . . . . . . . . . . . . . .
APPENDIX C - HERSHY CHARACTER FONT TABLES . . . . . . . . . . . . . . . . . . . . .
APPENDIX D - POLYGON FILE FORMAT . . . . . . . . . . . . . . . . . . . . . . . . . . . . . . . .
Geo-EAS 1.2.1
iv
177
178
181
184
March 1991
GLOSSARY OF GEOSTATISTICAL TERMS
Anisotropy
In geostatistics, the situation where a variogram exhibits a longer range (i.e., better correlation)
in one direction than another.
Block Kriging
Estimating the value of a block from a set of nearby sample values using kriging. In Geo-EAS,
the block area is approximated by a 2x2, 3x3, or 4x4 array of points centered on each specified
grid node.
Covariance
A statistical measure of the correlation between two variables. In geostatistics, covariance is
usually treated as the simple inverse of the variogram, computed as the overall sample variance
minus the variogram value. These covariance values, rather than variogram values, are actually
used in the Geo-EAS kriging matrix equations for greater computational efficiency.
Cross Validation
A technique for testing the validity of a variogram model by kriging each sampled location with
all of the other samples in the search neighborhood, and comparing the estimates with the true
sample values. Interpretation of results, however, can often be difficult. Unusually large
differences between estimated and true values may indicate the presence of “spatial outliers”, or
points which do not seem to belong with their surroundings.
Discretization
In kriging, the process of approximating the area of a block by a finite array of points.
Exponential Model
A function frequently used when fitting mathematical models to experimental variograms, often
in combination with a nugget model.
Gaussian Model
A function frequently used when fitting mathematical models to experimental variograms, often
in combination with a nugget model.
Geostatistics
A methodology for the analysis of spatially correlated data. The characteristic feature is the use
of variograms or related techniques to quantify and model the spatial correlation structure. Also
includes the various techniques such as kriging, which utilize spatial correlation models.
Inverted Covariance
(InvCov) Variogram
Kriging
Kriging Standard
Deviation
A variogram computed by subtracting lag covariances from the sample variance. This approach
compensates for cases where in directional variograms, the mean of the, say, west members of the
sample pairs is not the same as the mean of the east members. “InvCov” is a rather obscure term
referring to the fact that some probabilistic assumptions underlying the variogram computation
are no longer necessary. Inverted Covariance variograms may be modeled and used in kriging
in the same way as ordinary variograms.
A weighted-moving-average interpolation method where the set of weights assigned to samples
minimizes the estimation variance, which is computed as a function of the variogram model and
locations of the samples relative to each other, and to the point or block being estimated.
The standard error of estimation computed for a kriged estimate. By definition, kriging is the
weighted linear estimate with the particular set of weights which minimizes the computed
estimation variance (standard error squared). The relationship of the kriging standard deviation
to the actual error of estimation is very dependent on the variogram model used and the validity
of the underlying assumptions - therefore kriging standard deviations should be interpreted with
caution.
Lag
A distance class interval used for variogram computation.
Linear Model
A function frequently used when fitting mathematical models to experimental variograms, often
in combination with a nugget model.
Madogram
A plot of mean absolute difference of paired sample measurements as a function of distance and
direction. Madograms are not true variograms, and generally should not be used in kriging. If
used, the kriged estimates might be “reasonable”, but the kriging standard deviations will be
meaningless.
Geo-EAS 1.2.1
v
Glossary
Nested Variogram
Model
A model which is the sum of two or more component models such as nugget, spherical, etc.
Adding a nugget component to one of the other models is the most common nested model, but
more complex combinations are occasionally used.
Nugget Model
A constant variance model most often used in combination with one or more other functions when
fitting mathematical models to experimental variograms.
Octant Search
In Geo-EAS, the kriging search neighborhood ellipse may be divided into eight equal-angle
sectors, which may have minimum and maximum numbers of samples specified. A limit on the
number of consecutive empty sectors may also be specified. When the specified criteria are not
satisfied for a particular point or block then the kriged estimate is not produced.
Ordinary Kriging
A variety of kriging which assumes that local means are not necessarily closely related to the
population mean, and which therefore uses only the samples in the local neighborhood for the
estimate. Ordinary kriging is the most commonly used method for environmental situations.
Point Kriging
Estimating the value of a point from a set of nearby sample values using kriging. The kriged
estimate for a point will usually be quite similar to the kriged estimate for a relatively small block
centered on the point, but the computed kriging standard deviation will be higher. When a kriged
point happens to coincide with a sampled location, the kriged estimate will equal the sample value.
Quadrant Search
In Geo-EAS, the kriging search neighborhood ellipse may be divided into four equal-angle
sectors, which may have minimum and maximum numbers of samples specified. A limit on the
number of consecutive empty sectors may also be specified. When the specified criteria are not
satisfied for a particular point or block then the kriged estimate is not produced.
Range
For a spherical model, the distance at which the model reaches its maximum value, or sill. For
the exponential and gaussian models, which approach the sill asymptotically, Geo-EAS uses
range to mean the “practical”, or “effective” range, where the function reaches approximately
95% of the maximum. The nugget model effectively has a sill with a range of zero; the linear
model uses “sill/range” merely to define the slope.
Relative Variogram
A variogram in which the ordinary variogram value for each lag has been divided by the square
of the mean of the sample values used in computing the lag. This is sometimes useful when a
“proportional effect” is present; i.e., when areas of higher than average concentration also have
higher than average variance. When relative variogram models are used in kriging, the resulting
kriging standard deviations represent decimal fractions of the estimated values.
Search Neighborhood
In Geo-EAS, an elliptical area centered on a point or block being kriged. Only samples within
the ellipse will be used for kriging. When the next point is kriged, the ellipse will be re-centered,
and a different (perhaps) set of samples will be used.
Semi-variogram
Identical to the term “variogram” as defined in Geo-EAS. There is disagreement in the
geostatistical literature as to which term should be used. Geo-EAS uses “variogram” for
simplicity.
Sill
The upper limit of any variogram model which has such a limit, i.e., which tends to “level off”
at large distances. In Geo-EAS, the spherical, gaussian, exponential, and nugget models have
sills. For the linear model, “sill/range” is used merely to define the slope.
Simple Kriging
A variety of kriging which assumes that local means are relatively constant and equal to the
population mean, which is well-known. The population mean is used as a factor in each local
estimate, along with the samples in the local neighborhood. This is not usually the most
appropriate method for environmental situations.
Spherical Model
A function frequently used when fitting mathematical models to experimental variograms, often
in combination with a nugget model.
Variogram
A plot of the variance (one-half the mean squared difference) of paired sample measurements as
a function of the distance (and optionally of the direction) between samples. Typically, all
possible sample pairs are examined, and grouped into classes (lags) of approximately equal
distance and direction. Variograms provide a means of quantifying the commonly observed
relationship that samples close together will tend to have more similar values than samples far
apart.
Geo-EAS 1.2.1
vi
March 1991
ABBREVIATIONS
Throughout this manual, keyboard keys are expressed in lower case and enclosed in angle brackets. The following is
a list of commonly used keys:
Geo-EAS 1.2.1
SYMBOL
DESCRIPTION
<enter>
<esc>
<a>, ..., <z>
<0>, ..., <9>
<ins>, <del>
<home>, <end>, <pg up>, <pg dn>
<left>, <right>, <up>, <down>
<backspace>
<ctrl>, <alt>, <shift>
<caps lock>, <num lock>,
<scroll lock>
enter key
escape key
alphanumeric keys
numeric keys
insert, delete keys
page control keys
cursor control keys
backspace key
special purpose keys
vii
Abbreviations
ACKNOWLEDGEMENTS
This document is intended to serve both as an introduction to the Geo-EAS software package (see Geo-EAS Availability,
Section 1.3), and as a reference manual. The Geo-EAS software itself is, of course, the primary product, and deserves
a brief description of how it came about, along with an acknowledgement of the many people who contributed to its
development.
The ongoing USEPA research program in environmental geostatistics at the Environmental Monitoring Systems
Laboratory - Las Vegas (EMSL-LV) was begun about six years ago, largely through the efforts of George Flatman. As
an incidental result of various research projects conducted under Cooperative Agreements with Stanford University, the
University of Wyoming, and the University of Arizona, EMSL-LV acquired a miscelleneous collection of public domain
geostatistical and statistical software.
In the summer of 1986, as the authors were designing a relatively straightforward consolidation of this software involving
standardization of parameters and file structures, we were approached by Andre Journel and Roland Froidevaux of
Stanford, who enthusiastically demonstrated a prototype of a ‘user friendly’ PC-based geostatistical package written by
Froidevaux in Turbo Pascal, and recommended that we consider a similar approach. Although this would considerably
increase the scope of the effort, the potential ‘technology transfer’ value was very high, and we decided to proceed.
A team consisting of Nancy Fisher of the Computer Sciences Corporation (CSC), Journel, Froidevaux, Flatman, and the
authors, defined the philosophy and sketched the initial design for the system, drawing heavily on Froidevaux’s example
for the ‘look and feel’ of the menu-driven user interface and integrated graphics. It was decided, among other things,
to program in FORTRAN, to try to stay entirely in the public domain, to use a simple ASCII data file structure, and to
target a hypothetical user with an AT and EGA graphics.
Suleiman Lalani of CSC provided a major boost to the software development by contributing the screen management
software used throughout the package. Chris Nisi of CSC coded the Dataprep and Trans programs. Melissa Robinson,
of CSC converted public domain graphics routines from the National Center for Atmospheric Research (NCAR) and used
them to develop the Xygraph, and Postplot programs. Naser Heravi and Russell Peterson of CSC provide on-going
maintenance and upgrades. David Gonzales of EMSL-LV wrote routines for identifying PC hardware configurations,
and assisted with the metacode device drivers.
We gratefully acknowledge the advice and encouragement provided by Andre Journel throughout the development
process. We are also indebted to the many people who provided constructive reviews of the software and user’s guide,
including: Randal Barnes of the University of Minnesota, Dave Grundy of the U.S. Geological Survey, Stan Miller of
the University of Idaho, Brent Huntsman of Terran Corporation, John Rogers of Westat, and William P. Smith and James
C. Baker of the USEPA. Finally, we would like to thank the many users of version 1.1 who sent in the bug reports,
comments, and suggestions which made version 1.2.1 possible.
Evan J. Englund
Allen R. Sparks
Geo-EAS 1.2.1
viii
Acknowledgements
SECTION 1
1.1
INTRODUCTION
OVERVIEW
Geo-EAS (Geostatistical Environmental Assessment Software) is a collection of interactive software tools for
performing two-dimensional geostatistical analyses of spatially distributed data. Programs are provided for data file
management, data transformations, univariate statistics, variogram analysis, cross validation, kriging, contour mapping,
post plots, and line/scatter graphs. Features such as hierarchical menus, informative messages, full-screen data entry,
parameter files, and graphical displays are used to provide a high degree of interactivity, and an intimate view of results.
Users may easily alter parameters and re-calculate results or reproduce graphs, providing a “what if” analysis capability.
Geostatistical methods are useful for site assessment and monitoring situations where data are collected on a spatial
network of sampling locations, and are particularly suited to cases where contour maps of pollutant concentration (or
other variables) are desired. Examples of environmental applications include lead and cadmium concentrations in soils
surrounding smelter sites, outdoor atmospheric NO2 concentrations in metropolitan areas, and regional sulfate deposition
in rainfall. Kriging is a weighted moving average method used to interpolate values from a sample data set onto a grid
of points for contouring. The kriging weights are computed from a variogram, which measures the degree of correlation
among sample values in the area as a function of the distance and direction between samples.
Kriging has a number of advantages over most other interpolation methods:
Smoothing
Kriging smoothes, or regresses, estimates based on the proportion of total sample variance
accounted for by random “noise”. The noisier the data set, the less individual samples
represent their immediate vicinity, and the more they are smoothed.
Declustering
The kriging weight assigned to a sample is lowered to the degree that its information is
duplicated by nearby, highly correlated samples. This helps mitigate the impact of
oversampling “hot spots”.
Anisotropy
When samples are more highly correlated in a particular direction, kriging weights will be
greater for samples in that direction.
Precision
Given a variogram representative of the area to be estimated, kriging will compute the most
precise estimates possible from the available data. In practice, this is only approximated, as
the variogram must itself be estimated from the available data.
Estimation of the variogram from sample data is a critical part of a geostatistical study. The procedure involves
interpretation and judgment, and often requires a large number of “trial and error” computer runs. The lack of
inexpensive, easy-to-use software has prevented many people from acquiring the experience necessary to use
geostatistical methods effectively. This software is designed to make it easy for the novice to begin using geostatistical
methods and to learn by doing, as well as to provide sufficient power and flexibility for the experienced user to solve realworld problems.
1.2
EQUIPMENT REQUIREMENTS
This system was designed to run under DOS (Disk Operating System) on an IBM PC, XT, AT, PS2, or compatible
computer. Graphics capability is not required, but is highly recommended, as most programs will produce graphics
output. Graphics support is provided for the Hercules graphics card, the Color Graphics Adapter (CGA), and the
Enhanced Graphics Adapter (EGA). At least 512 kilobytes (Kb) of random access memory (RAM) is required, but 640
Kb is recommended. An arithmetic co-processor chip is strongly recommended due to the computationally intensive
nature of the programs, but is not required for use. Programs may be run from floppy diskette, however, a fixed disk is
required to use the programs from the system menu. The system storage requirement is approximately three megabytes.
For hardcopy of results, a graphics printer (IBM graphics compatible) is required. Support is provided for plotters which
accept HPGL plotting commands.
1.3
Geo-EAS DISTRIBUTION
Geo-EAS softwareand documentation are entirely in the public domain, and may be copied and distributed freely.
Geo-EAS 1.2.1
1-1
Introduction
1.4
USER PROFILE
To use this system, you should have some familiarity with personal computers, and DOS (Disk Operating System). You
should understand basic DOS commands such as DIR (Directory), CD (Change Directory), and how to insert and use
diskettes. For more information on these topics, consult a DOS user’s manual. It is assumed that you have a working
knowledge of Geostatistics, and that you understand the basic Geostatistical concepts. For a list of references on the
subject of geostatistics, refer to Appendix A, References.
Geo-EAS 1.2.1
1-2
March 1991
SECTION 2
SYSTEM SUMMARY
2.1 INSTALLING THE SYSTEM
2.1.1 The Distribution Diskettes
The distribution diskettes contain the files needed for system operation. Some programs
require the presence of a character font file in order to execute properly. Below is a list of
the files which are included on the distribution diskettes:
Program files:
GEOEAS.EXE
DATAPREP.EXE
TRANS.EXE
STAT1.EXE
SCATTER.EXE
PREVAR.EXE
VARIO.EXE
XVALID.EXE
KRIGE.EXE
CONREC.EXE
POSTPLOT.EXE
XYGRAPH.EXE
VIEW.EXE
HPPLOT.EXE
-
the system menu program
data management utilities
data transformations
basic univariate descriptive statistics
scatter plots, linear regression
pair comparison computations for VARIO
variogram analysis and modeling
cross validation of parameters for KRIGE
2 dimensional kriging
contouring of gridded data
graphs of sample locations and values
2 dimensional line/scatter graphs
plots graph files on the screen
creates plotter files from graphic metafiles
Miscellaneous files:
HERSHY.BAR
- character font file (required by CONREC,
POSTPLOT, XYGRAPH, VIEW, and HPPLOT.)
EXAMPLE.DAT - example data file
EXAMPLE.GRD - example gridded data file (for CONREC)
METACODE.MET - example graph file
HPGL.PLT
- example plotter instruction file
HPSETUP.BAT
- commands to set up plotter communications
READ.ME
- additional "last-minute" information
HPPS.COM
- screen-dump capability for HP Laserjet
HPPS.DOC
- document file for HPPS.COM
HPPS.ASM
- source file for HPPS.COM
HPPSREAD.ME
- information about HPPS.COM
HPPS.COM
HPPS.DOC
HPPS.ASM
HPPSREAD.ME
- screen-dump capability for HP Laserjet
- document file for HPPS.COM
- source file for HPPS.COM
- information about HPPS.COM
2.1.2 Hard Disk Installation
To install the system on a fixed disk, a subdirectory should first be created (for example,
GEOEAS). For information about creating subdirectories, refer to the DOS reference
manual. All files on the distribution diskettes should be copied into the subdirectory. For
more information on how to copy files from a diskette into a subdirectory, refer to your
DOS user's manual. Approximately three megabytes (3 million bytes) of storage is
required. If insufficient disk space is available for all files to reside together on fixed disk,
programs must be initiated from DOS and the system menu (GEOEAS.EXE) may not be
used.
2.1.3 Using the Programs on Floppy Diskette
The fact that all programs and support files cannot reside on one floppy diskette has several
implications. Since the system menu program requires that all files be present on the same
disk and subdirectory, the system menu may not be used to run the programs; they must be
initiated from DOS. Since several programs require the presence of HERSHY.BAR to
operate correctly, it is important that both the executable file and HERSHY.BAR reside on
the same diskette. Unfortunately, the size of the executable files for programs XYGRAPH,
POSTPLOT, and CONREC are too large to fit on the same 360 kilobyte diskette with
HERSHY.BAR. This means that if you only have 360 kilobyte disk drives (and no fixed
disk) you will not be able to use these programs. A separate working diskette may be
prepared for each program, subject to the restrictions mentioned above.
2.2
INITIATING THE SYSTEM
2.2.1 Using the Geo-EAS System Menu
A program has been provided on the distribution diskettes which allows access to all
programs from a common menu, called the System Menu. This file is named
GEOEAS.EXE. Use of the system menu program requires that all program and support
files reside on the same disk and subdirectory (e.g. C:\GEOEAS). To start the system menu
program, type: GEOEAS <enter>.
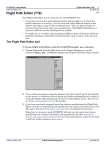
A screen will be presented with the program names as in Figure 2-1. A highlighted box
(cursor bar) will appear on the screen. The cursor bar may be moved around the screen by
using the <left>, <right>, <up>, or <down> keys. When the cursor bar is positioned over
a program name, a short description of the program will appear at the bottom of the screen.
To initiate the described program, press <enter>.
*** Note ***
The Geo-EAS system must have use of all available memory. No memory-resident
programs such as SideKick may be loaded, or the system menu program will not be able to
load some programs. If an error message occurs when using the system menu, try to initiate
the desired program from DOS. If the program will not load correctly, you must disable the
loading of such memory- resident programs, and re-start the computer. Programs in which
this is likely to happen are: Vario, Stat1, Xygraph, and Postplot.
FIG2-1 Geo-EAS System Menu
2.2.2
Using the Programs From DOS
To run the programs from DOS, type the program name at the DOS prompt. For example, to start
program Stat1 type: STAT1 <enter>
2.3 ANSWERS TO COMMON QUESTIONS ABOUT GEO-EAS
Q.
How do you pronounce Geo-EAS?
A.
Gee-oh-ease.
Q.
Then how come it's not spelled Geo-EASE?
A.
Next question.
Q.
I can't run all of the Geo-EAS programs from the main menu. What should I do?
A.
DOS 4.0 and higher version do not leave enough room in memory for some of the larger
Geo-EAS programs to run along with the menu. The only solution is to run them
directly from DOS. This problem may also occur with any version of DOS when
memory-resident programs are present. If executing from DOS doesn't work, you may
have to remove the memory-resident programs.
Q.
How can I print Geo-EAS graphics on my Laser Printer?
A.
We are now including a public domain utility on the Geo-EAS distribution diskettes
which provides screen-dump capability for HP Laserjet - compatible printers. Type the
command HPPS before executing any Geo-EAS programs, and you can then use the
<Print Scrn> key to obtain hardcopy of any Geo-EAS graphic. Alternate options for
obtaining hardcopy include screen capture utilities which are now part of many word
processing packages such as WordPerfect 5.1, or stand-alone screen capture programs
such as InSet. These provide device drivers for a variety of printers.
Q.
Is there a way to plot variograms, histograms and probability plots on my pen
plotter?
A.
No. Geo-EAS only provides plotter support for "metacode" files produced by three
programs: POSTPLOT, XYGRAPH, and CONREC.
Q.
How do I create my own Geo-EAS file?
A.
Geo-EAS does not provide any data entry or editing capability. Use your favorite text
editor or word processor. Retrieve an existing data file and edit it to match the
Geo-EAS format, or type in the file from scratch. Geo-EAS files contain several lines
of header information, followed by a data table. The basic rules are:
-
The first line is a title.
The second line contains the number (up to 48) of variables (columns).
The next n lines (one per variable) each contain the variable name and
-
-
(optionally) unit and format information.
The data table must contain one row per observation (usually up to 1000)
The data table must contain only numbers, in integer, decimal, or
exponential (e.g. 5.6E6) format, separated by blanks or commas.
Variable columns need not be aligned.
Missing values must be indicated by the code "1E31".
Q.
Geo-EAS won't read my data file. What should I do?
A.
Check to make sure that the number in line 2 is equal to the number of variable
name lines and the number of variables per row. Make sure that the data table
contains no characters other than the exponential "E". If you used a word
processor or editor, make sure that the file was saved as an ASCII (or "DOS
Text") file. If the file was created or modified by Geo-EAS programs, it is
possible that values were generated which are too large for the format
specifications, resulting in strings of "*" instead of the corresponding values.
To prevent this, expand the format specifications; or you can remove them
entirely - the default isn't pretty, but should always work. A final quirk-krige
will not read a file from a floppy disk when the drive is specified in the Prefix
field with a backslash (e.g., a:\).
Q.
KRIGE failed when I ran it using a Gaussian variogram model. What
happened?
A.
Unfortunately, the Gaussian model doesn't always work, particularily when you
have a low nugget and/or closely spaced data. The only solution is to use one
of the other models.
Q.
I have extra memory on my computer. Can I expand the data limits in
Geo-EAS?
A.
No. Not yet, anyway. Future releases of Geo-EAS will probably support more
memory on DOS systems.
SECTION 3
SYSTEM OPERATION
3.1 DATA
3.1.1 Geo-EAS Data Files
All programs in the system use a common format for data files. (Note: the term "Data
File" is used to denote a specific type of file used by Geo-EAS programs, as opposed to
Pair Comparison files, Parameter files, or Metacode files). Data files are simple ASCII
text files which may be created with any text editor. It is important to be familiar with this
format, and to make sure your data files are compatible, or the programs will not be able
to read them. An example data file has been included with the distribution diskettes. It
is called "Example.dat". Below is an explanation of the data file format.
Line 1 - Title
This line is a descriptive title which may contain up to 80 characters. Most programs
display the title on the screen when the file is read into memory. Some programs will use
the title as the default title for graphics screens.
Line 2 - Number of Variables (NVAR)
This line tells the programs how many variables are in the data file. The data are stored
in rows and columns, where each column contains a different variable, or measured
quantity, and each row represents a different sample location, time, etc. The data file may
hold up to 48 variables (columns). Different programs have different limits on the
number of samples (rows) which can be read. Typically, up to 1000 samples may be read.
If a program encounters more than its limit of samples, the remaining samples will not
be read into memory, and will not be used for computation.
Line 3 to NVAR+2 - Variable Names and Measurement Units
The lines following the number of variables must contain the names and the measurement
units for each variable (1 line per variable). The variable name must be the first 10
characters in the line, and the units (optional) must be characters 11-20. When a data file
is accessed by a program, the variable names are stored into toggle fields. This allows
one to select variables by name, and provides some internal documentation of data file
contents. Variable names will be used as default labels for graph axes, in graphic
displays.
Optional Fortan "F" format statements may be added in columns 21 to 30 in the Variable
name records in a Geo-EAS data file. Programs such as TRANS and KRIGE, which
create new Geo-EAS output files, can use these to provide easier-to-read files. The format
statement is in the form Fx.y, where x is the total number of columns required by the
variable, including decimal point and minus sign (if appropriate), and y is the number of
digits to be printed to the right of the decimal. TRANS will add a blank space between
variables. For example, F6.2 will allow printing of any number in the range -99.99 to
999.99.
Line NVAR+3 To End of File - the Data Matrix
This is where the data are stored. Columns represent variables, and rows represent
samples. The data may be in "free format", which means that in a given line in the file,
variable values must be separated by at least one space, or a single comma. For
readability, columns of numbers should line up, although this is not required. Variable
values must be numeric with no embedded blanks. In many cases, several variables may
be present in a data set, but for some reason a value could not be obtained for a particular
variable in a particular sample. A special value may be given to the variable in this
sample which will indicate to a program that the value is missing, so that it will not be
used in calculations. The special value reserved for this is 1.E31. This is "scientific
notation" for a 1 followed by 31 zeros. If your data set has missing values, be sure to type
a 1.E31 where the real value would have appeared. Below is a portion of the file
Example.dat. It contains 5 variables and 60 samples.
Example.dat - Geostatistical Environmental Assessment Software
5
Easting
feet
Northing
feet
Arsenic
ppm
Cadmium
ppm
Lead
ppm
288.0
311.0
.850
11.5
18.25
285.6
288.0
.630
8.50
30.25
273.6
269.0
1.02
7.00
20.00
280.8
249.0
1.02
10.7
19.25
273.6
231.0
1.01
11.2
151.5
276.0
206.0
1.47
11.6
37.50
285.6
182.0
.720
7.20
80.00
288.0
164.0
.300
5.70
46.00
292.8
137.0
.360
5.20
10.00
...
...
...
...
...
3.1.2 File Naming Conventions
Only valid DOS file names will be accepted by the programs. For more information on
DOS file names, refer to the DOS reference manual. All file names used by the Geo-EAS
programs are associated with a File Prefix. The File Prefix provides a means of
specifying a drive, or subdirectory where data files should be accessed. This option is
discussed in detail in the section below (Common Menu Options). Although the
programs place no restriction on file extensions, it is good practice to use consistent
naming conventions for file extensions. Below are the suggested extensions which are
used as defaults in Geo-EAS programs.
Geo-EAS File Extensions:
.TXT - an ASCII text file
.DAT - a Geo-EAS data file
.PCF - a pair comparison file, created by PREVAR, read by VARIO
.GRD - a gridded Geo-EAS data file (could be produced by KRIGE)
.CPF - CONREC parameter file
.KPF - KRIGE parameter file
.XPF - XYGRAPH parameter file
.POL - Polygon boundary file, used by KRIGE
.MET - metacode (graph) file, created by CONREC, POSTPLOT, and
XYGRAPH, and used by HPPLOT, and VIEW
.PLT - plotter instruction file, produced by HPPLOT
3.1.3 System Defaults Option
This option allows you to disable the introductory screens which appear when programs
are initiated. The System Defaults File (GEOEAS.DEF)contains defaults for the
programs to use at start up. The first record contains the most recently used File Prefix.
The second contains the most recently used data (.DAT) file name. These records are
automatically updated when a program is terminated, so that this information may be
passed to the next program used. If the file does not exist when a program is started, it
will be created when a program is finished. A third record has been added to
GEOEAS.DEF to allow you to disable the introductory screens. This record contains the
characters "INTRO=ON". To disable the introductory screens, use a text editor such as
IDLIN to change the "ON" to "OFF".
3.2 INTERACTIVE SCREENS
3.2.1 Screen Format
All Geo-EAS programs have similar interactive features. Each program uses interactive
screens for selection of program options and display of results. The screens are composed
of several common components. Figure 3-1 displays an example interactive screen from
program Stat1. Below is a description of the common components.
Figure 3-1
Example Interactive Screen
A. The Screen Frame
This is the large double-line rectangle which encloses each screen. Program inputs and results are
displayed in this area. Typically, the screen frame is subdivided into smaller single- line rectangles.
Each of these smaller rectangles contains a functionally-related group of one or more input parameters,
or program results.
B. The Message Line
This is the double line rectangle at the bottom of the screen frame. This area is used to display program
error messages, yes/no prompts, prompts for additional information, or instructions for using a program
option.
C. The Menu Line
This is the line of text located just below the screen frame. It contains a set of menu option names and
a highlighted box (cursor bar). The cursor bar can be moved along the menu line by using the <left>,
and <right> cursor control keys. As the cursor bar is moved over a menu option name, a short
description of the menu option is displayed on the line just below the menu line. This line is called the
menu description line. In addition, on the main screen for each program, more detailed descriptions of
the menu options are displayed. You may explore the possible choices in a program by moving the
cursor bar and reading the descriptive messages which accompany each menu option. To select a menu
option, move the cursor bar over the desired menu option name, and press <enter>. An alternative (and
faster) way to select menu options is to press the key which corresponds to the first letter in the menu
option name. The result is the same as using the cursor control keys, and pressing <enter>. In program
Stat1 for example, you would choose to enter the data file name by pressing <d> (for the Data option)
from the main menu.
D. Parameter Groups
Typically, a functionally-related group of program input parameters (fields) are enclosed together on the
screen by a single-line rectangle. These groups of parameters are accessed through the menu. When a
menu option is selected (as described above), a cursor bar appears at the screen field, and a message
describing what action to take appears on the message line. When such a group contains several fields,
the cursor control keys, or <enter> are used to move to subsequent fields. Exiting from the last field in
the group will return the cursor bar to the menu line. In some programs, parameter groups are arranged
in a tabular fashion (rows and columns). To return to the menu line from such a group, move the cursor
bar to the left or bottom of the group with the <left> or <down> keys.
3.2.2
Types of Screen Input Fields
Several types of input fields are provided to allow flexibility in program parameter specification. Below
is a list of these types, and an example of each field type in the Stat1 screen:
Alphanumeric Fields - These fields may contain character strings of alphabetic or numeric characters.
Any alphanumeric characters may be entered. The "Prefix", and "Data" menu options in Stat1 require
alphanumeric values to be entered. To specify a data file name, select the Data option on the menu, and
type the name of the input data file.
Numeric Fields - Only numeric data may be entered into numeric fields. Some numeric fields will only
accept integer (non- decimal) numbers. The programs will respond to any erroneous keystrokes (such
as alphabetic keys) with a low- pitched error tone. An example of numeric fields in program Stat1 are
the two fields accessed through the Limits option Only numeric values may be entered into these fields.
Values must be entered in the conventional manner (legal characters are <0> through <9>, and <.>,
exponential notation for numeric values is not allowed.)
Toggle Fields - A toggle field is a special type of field which contains a list of 2 or more preset choices.
Only one of these choices is displayed in the field. The <space> key is used to change the displayed
choice, and the <enter> key is used to make the selection. Two examples of toggle fields in program
Stat1 are the "Variable" field and the "Log" field. Once a file name has been specified, the "Variable"
toggle field will contain the names of all variables in the file. When the Variable option on the menu line
is selected, this field will be highlighted, and each time the <space> key is pressed, a new variable name
will appear in the field. When the desired variable name appears, press the <enter> key to select it. The
"Log" field is an example of a toggle field with only two choices ("On", or "Off"). If "On" is chosen,
then statistics will be calculated for the log of the selected variable.
Yes/No prompts, prompts for additional information - These prompts are for information which will
not be displayed permanently on the screen. They will appear temporarily on the message line. A
Yes/No prompt will typically have the form: "Question...<Y/N>?". To respond Yes, press the <Y> key,
to respond in the negative, press any other key. A typical Yes/No prompt is the "Do you really want to
Quit <Y/N> ?" prompt which is displayed after the "Quit" (terminate program) option is selected. Some
menu choices will result in prompts for additional information. These prompts for additional information
will appear on the message line and may be of the alphanumeric, numeric, or toggle type.
3.2.3 The Menu Tree
The programs in the Geo-EAS system require imput typically from data files and through interaction on
the screen. These program imputs are arranged in a hierarchy of functionally-related groups. Each
group, or individual program parameter value is accessed through a nenu of choices. Some choices will
lead to other nemus, while some will lead to prompts for groups of one or more imputs. Such an
arrangement can be represented in a "menu tree" as illustrated below for program Stat1.
Example menu tree
Stat1
____ Prefix
Data
Variable
Limits
Execute _________ Histogram ______ Type
Class Limits
Axes
Title
Results
View Graph
\ Quit
Probability Plot
Examine
\ Quit
Batch Statistics
\ Quit
In the Stat1 menu tree, as in other programs, some menu choices will lead to program inputs, and some
will produce numeric or graphical results. This hierarchy of options and results is a natural and
convenient way of providing choices for program use. The "menu tree" representation of program
options provides a "road map" for each program which summarizes the functional capabilities of a
program. You may explore the hierarchy of options by traversing the menu tree and reading the
descriptive messages which appear.
3.2.4
Common Menu Options
Many of the programs in the Geo-EAS system share common menu options. These will be discussed
in this section to avoid redundancy. Any minor differences which apply to a particular program will be
discussed later in detail. The following is a list of options common to many programs:
Prefix
This option is common to all Geo-EAS programs. It is used to specify a string of up to 50 alphanumeric
characters which are used as a prefix for all files accessed by a program. Typically, it is used to include
a disk drive and/or a directory specification. Before a file is accessed by a program, a file name is
constructed which consists of the File Prefix followed by the given file name. File name errors are not
caught by the programs until they have attempted to access a file. Consequently, "file not found" error
messages are not issued until an attempt to access the file has been made. This may be due to a mistake
in the file prefix or file name specified.
Data
This option is common to most Geo-EAS programs. It is used to indicate the Geo-EAS input data file
to be used by the program. File names consist of 14 alpha-numeric characters. Any valid DOS file name
may be used. The File Prefix (discussed above) is used to construct the entire file name when the file
is accessed by the program. If any errors occur while the programs are accessing or reading a data file
a message indicating the problem will be issued. If a "file not found" message is displayed, the problem
may be with the file prefix (see above). If no errors occur, the variable names are read from the data file
and stored into toggle fields for use by the Variables option.
Variable(s)
This option is common to all programs which use Geo-EAS data files. It allows you to specify the
variable (or variables) which the program will use. Some programs only use one variable (e.g. Stat1)
and others require three (e.g. CONREC). Typically, this option will provide access to one or more toggle
fields which contain the variable names. Some programs include additional fields for selection of other
parameters related to the choice of variables. These will be explained in the particular section which
describes the program.
Execute
This option is common to all Geo-EAS programs. It is used to initiate processing of data by the program.
Although the processing and interaction subsequent to the selection of this option is different for each
program, it shares the common function of initiation of processing. The individual differences in
processing will be described in more detail in the subsections which describe the programs.
Read Parameters, Save Parameters
These options are common to all Geo-EAS programs which make use of "Parameter Files". Parameter
Files are files which contain values for all parameter choices available in a particular program. If a
program provides this feature, you may save the values of parameters for later use, by using the Save
Parameters option. Selection of this option will result in a prompt for the output parameter file name.
The File Prefix is used to create or access the file. The Read Parameters option is used to load the
parameter values into the program. When this option is selected, an input parameter file name must be
entered. Typically, a program will attempt to load all data and set all parameter values based upon the
information in the input parameter file. It is assumed that the data file associated with the parameter file
is in the same location (subdirectory, etc.) as it was when the parameter file was saved. If any errors
occur while accessing or reading the parameter file or the associated data file, an error message will be
issued and the program will re-initialize all parameter values to their defaults. Conventions should be
used when naming parameter files so that they can be associated with the appropriate data files and
programs. A suggested convention for file extensions is given in a previous section (File Naming
Conventions). It is also suggested that the first part of the file name have some similarity to the
associated data file name.
Quit
This option is common to all Geo-EAS programs. It is used to exit from a menu, or program. Using the
analogy of the Menu Tree, the quit option allows you to "move up" one level in the tree. When the quit
option is used from the main menu of a particular program, a Yes/No prompt is issued: "Do you really
want to quit <Y/N> ?". The <q> key is typically used to select this option. The Yes/No prompt is a
means of ensuring that a series of <q> keystrokes will not cause inadvertent termination of the program.
3.3
Geo-EAS GRAPHICS
3.3.1
On-Screen Graphics
Many Geo-EAS programs have graphics capability. Each such program uses graphics in one of two
ways. Programs Stat1, Vario, Xvalid, and Krige plot graphics directly on the screen. This approach is
used to provide a quick look at data, or program results. Such graphics displays may be printed on a
dot-matrix printer, but may not otherwise be saved or modified. When a graphics screen is displayed,
the program will wait for a key to be pressed. Pressing <q> will cause an interactive screen and menu
to be displayed. Pressing <p> will produce a hard copy of the screen on a graphics printer. It is
important to make sure that a graphics printer is connected to your computer if you choose this option,
or the program will "lock-up". Also make sure that the printer is turned on and "online". If the program
"locks up", you will probably have to re-start the computer. (See the section on Error and Recovery
Procedures for more information).
3.3.2
Metacode-Based Graphics
Postplot, Xygraph, and Conrec also plot graphics on the screen, but only after writing a "metacode" file.
A metacode file is a file of device-independent plotting instructions. These files can be used later to
redisplay the graph on the screen, or to plot it on a pen plotter. Internally in these programs, the
metacode is written by a set of public-domain FORTRAN subroutines produced at the National Center
for Atmospheric Research (NCAR, in Boulder, CO.) by their Scientific Computing Division. These files
are used by special translator programs called "metacode translators", which convert the metacode into
device-specific graphics commands. Currently, only two metacode translators are provided. Program
View translates metacode into video graphics for EGA, CGA, and Hercules graphics hardware, and
program Hpplot will convert metacode into HPGL (Hewlett Packard Graphics Language) plotting
instructions. Each metacode-producing program uses a version of view to display the graphs during an
interactive session. Since producing and translating metacode takes longer than sending graphics
commands directly to the display, these programs take longer to draw graphs than the non- metacode
producing programs. The advantage to using metacode is the capability of obtaining higher-quality
graphic output on a pen plotter or other graphics device.
3.4
ERROR AND RECOVERY PROCEDURES
Known "bugs":
Xygraph or Postplot may fail when certain incompatible combinations of axis tickmark parameters are
chosen. This is dependent upon the data configuration and choice of parameters, and is due to internal
limitations in the NCAR graphics utilities which these program use.
Postplot may produce undesirable scaling in plots with certain sample data configurations. An attempt
is made by the software to produce "true-proportion" post plots. The underlying NCAR utilities which
produce the metacode files sometimes override the scaling specified by Postplot. This is an
unexplainable phenomenon which has not and unfortunately will not be corrected.
Trans may crash when an operation is chosen which would produce a very large or very small number.
An example would be the operation 1.0/X, or 10**X, when X is very small or very large (1.E-1000,
1.E1000). This type of program error cannot be trapped or handled by Trans. In such cases the result
cannot be produced due to hardware limitations in the precision of the numeric coprocessor (or floatingpoint emulation software). Since there is no remedy for this situation. The only solution is to avoid
such operations.
Avoiding User-Induced Errors:
There are several error conditions which the program was specifically not designed to check for. These
involve checking to see if disk or printer peripherals are connected and ready for data transfer. You are
reponsible for ensuring that printers are attached and online, or that disk drives have the correct density
media and are ready for read/write opeerations, when Read Save, or Write options are selected. The
following actions are guaranteed to create a "lock-up" situation.
Trying to print a text or graphics screen when the printer is not connected, or on-line. If a printer is
connected, make sure it is turned "on", and is ready to accept output from the computer (on-line). If no
printer is connected to your system you may have to "re-boot" the computer (in this case, you should
avoid trying to print a text or graphics screen in the first place).
Accessing a file on a floppy deskette drive when the disk drive door is open, or no diskette is present.
In some cases, DOS may respond with a message: Device no Ready (Abort, Retry, Ignore). Insert a
diskette and press <r> (for Retry). If this does not work, you must re-start the computer.
SECTION 4
USING Geo-EAS IN A GEOSTATISTICAL
STUDY: AN EXAMPLE
4.1
OVERVIEW
This section will demonstrate how to use Geo-EAS software to conduct a geostatistical study.
Starting with an example data set from a hypothetical pollution plume, you will work through a
complete study, using many of the Geo-EAS programs in the process. Of necessity, this exercise
will be somewhat abbreviated. We will conduct a relatively straightforward study, illustrating
the options which are likely to be most commonly used. The data set (example.dat) has been
included with the software, so that you may repeat the exercise as a tutorial, or to test the
software.
The scenario for the example is that data has been acquired from analyses of 60 soil samples at
a site contaminated with arsenic, cadmium, and lead. The basic objectives are to examine the
data set for possible errors or outliers, and to construct contour maps of each of the variables to
define the areas of highest concentration. In this example you will work primarily with the
variable Cadmium; you are encouraged to try out these procedures with the arsenic or lead data.
The Example Data Set
The Example.dat data set is an ASCII file in the Geo-EAS format. It contains data from 60
sample locations. The file structure is described in Section 3 above. The first few lines are as
follows:
Example.dat - Geostatistical Environmental Assessment Software
5
Easting
feet
Northing
feet
Arsenic
ppm
Cadmium
ppm
Lead
ppm
288.0
311.0
.850
11.5
18.25
285.6
288.0
.630
8.50
30.25
273.6
269.0
1.02
7.00
20.00
280.8
249.0
1.02
10.7
19.25
4.2
EXPLORATORY DATA ANALYSIS
The first order of business in any data analysis is to become familiar with the data set. You will
use a combination of statistics and graphical displays to look at the range and shape of the
frequency distribution, to look for data outliers which may be erroneous or unrepresentative, to
look at the "spatial coverage" of the data, and to look for spatial patterns in the data.
Begin by taking a look at a map of the data produced by the program Postplot. Assuming that
you have already copied the software and data into a directory called Geoeas on your hard disk,
and have used the command "CD \Geoeas" to access the directory, you can run Postplot either
by:
(1) using the DOS command C:\GEOEAS> Geoeas <enter> to enter the system menu, moving
the cursor to the Postplot option with the arrow keys, and pressing <Enter>, or by
(2) running the program directly from DOS by typing the command C:\GEOEAS> Postplot
<enter>.
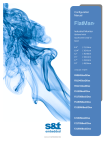
When the program begins execution, it first displays a screen with introductory information.
When you press a key to proceed, you will see the program main screen and menu, as displayed
in Figure 4-1.
The bottom line on the screen provides the list of available options. The first five move you to
an area on the screen (or to a new screen) where you can input or select program parameters. The
Execute option starts the actual processing portion of the program, and Quit moves you to the
preceding menu (or out of the program). All menus in the system operate in a similar way:
options are selected by moving the highlighted bar to the desired option name with the arrow
keys and pressing <enter>, or by typing the first character of the option name.
Figure 4-1
PostPlot Main Screen
*** NOTE *** Whenever feasible, the programs will use default options and values. These
may be preset, computed from the available data, or passed from a previously run
program. Be careful! The computer doesn't understand your problem or your data.
Defaults make it easy to get a result quickly, not necessarily to get an appropriate result.
In this example we will usually use the defaults to get quick results. Try other options to
get familiar with the full range of system capabilities.
In Postplot, the minimum that you MUST do to obtain a plot is:
1. Use the Data option to enter the name of a Geo-EAS data
if one is provided).
file (or accept the default name,
2. Use the Variable option to select the X and Y variables and the desired variable for posting (or
accept defaults).
3. Use the Execute option to enter a name for the metacode file (or accept the default), create the
metacode file, and display the map.
In this case you can skip the Prefix option because the data file is in the Geoeas directory, and
enter the file name Example.dat with the Data option. The program reads the data file, and
automatically executes the Variable option. The program assumes that the X and Y variables are
the first and second in the file, respectively. This is correct, so you should accept both by
pressing <enter> twice. The program also assumes that the third variable is the one we want to
post. This is incorrect - we want Cadmium, not Arsenic - so use the <space> key to toggle
through the list of variables until Cadmium is found, and then press <enter>. Now use the
Execute option; it will move you to the metacode file name field. Accept the default metacode
file name (Metacode.met is effectively a permanent scratch file) and wait for the plot to appear
on the screen. After examining the plot, hit <q> to return to the main menu, and use the Quit
option to return to the system menu (or DOS).
To simplify our explanations in the future, an abbreviated notation for the above sequence of
events will be used. A general formula exists for each option: initiate the option; then take one
or more actions, each of which may result in a screen field taking a particular value. The above
sequence thus becomes:
OPTION
ACTION
FIELD
VALUE
DATA
VARIABLE
Enter
Accept
Accept
Select
Accept
Data File
x
y
variable
metacode file
Example.dat
Easting
Northing
Cadmium
Mecode.met
EXECUTE
<Q>
QUIT
Answer
The resulting Post plot is shown in Figure 4-2.
Y
Figure 4-2
Post Plot of Cadmium
From this plot you can see that the samples fall in a rectangular area about 250 by 220 feet. The
sample locations are irregularly spaced, and although there are some gaps and clusters, they
provide relatively uniform coverage over the entire rectangle. The symbols/colors represent the
quartiles for the cadmium values, with */red as the upper quartile, and +/blue as the lower. A
general trend can be seen in the cadmium values: The highest values occur in a rough E-W band
through the center of the plot, while the lowest fall in parallel bands at the north and south
margins. The * in the northwest corner of the area seems to be an exception to the trend; it seems
too high compared to its surroundings. Such "spatial outliers" should be checked to confirm that
their coordinates and data values are valid. For this example, you will assume that this sample
is valid.
While the plot is on your screen, you will note that there is no menu line at the bottom. What do
you do now? Every graphics screen actually has two "invisible" options available - <p> (Print)
and <q> (Quit), which produces a screen dump on your printer, and returns you to the main
menu, respectively.
*** NOTE *** Don't try a screen dump if your printer is not connected and turned on the program will "hang up" and you will have to re-boot with <ctrl>-<alt>-<del>!
Now you should use program Stat1 to generate some statistics on the data. When Stat1 is
initiated, the Main screen will be displayed as in Figure 4-3.
Figure 4-3
Stat1 Main Screen
The option sequence below is the minimum required to compute univariate statistics and display
a histogram and a probability plot for the variable Cadmium. Note that a default file name
(Example.dat) has been carried forward from the previous program. When you finish examining
the histogram, you do not go directly back to the main menu; an intermediate menu lets you
select alternate options for replotting the histogram.
COMMAND
ACTION
DATA
VARIABLE
Accept
Select
Accept
Accept
EXECUTE
HISTOGRAM
<Q>
QUIT
PROB.PLOT
<Q>
FIELD
Data File
variable
weight
log option
VALUE
Example.dat
Cadmium
None
Off
The univariate statistics, histogram, and Probability plot are generated. Figure 4-4 displays the
univariate statistics for cadmium. Figures 4-5 and 4-6 display the histogram and probability plot
for cadmium.
Figure 4-4
Stat1 Results Screen
Figure 4-5
Histogram of Cadmium
Figure 4-6
Cadmium Probability Plot
From the histogram and the statistics, it can be seen that this data set is nearly symmetrical about
the mean value (the mean is close to the median, and approximately halfway between the
minimum and maximum values). There are no suspect outliers. The probability plot shows that
the data set approximates a normal distribution (a probability plot is a cumulative frequency plot
scaled so that a normal distribution plots as a straight line). Whether a distribution is normal,
log-normal, or something else has no particular geostatistical significance, except that it is often
more difficult to interpret variograms for highly skewed distributions such as the log-normal, and
in such cases it may be useful to also compute variograms on log-transformed data.
4.3
VARIOGRAM ANALYSIS
The computation, interpretation, and modeling of variograms is the "heart" of a geostatistical
study. The variogram model is your interpretation of the spatial correlation structure of the
sample data set. It controls the way that kriging weights are assigned to samples during
interpolation, and consequently controls the quality of the results.
All interpolation and contouring methods make the assumption that some type of spatial
correlation is present, that is, they assume that a measurement at any point represents nearby
locations better than locations farther away. Variogram analysis attempts to quantify this
relationship: How well can a measurement be expected to represent another location a specific
distance (and direction) away? Experimental variograms plot the average difference (actually,
one-half the squared difference, or variance) of pairs of measurements against the distances
separating the pairs. If you had measurements at all possible sample locations, you could
compute the "true variogram" for a site, i.e., the variance of all pairs of measurements which
satisfy each combination of distance and direction. In practice, with limited data, you compute
the variances for groups of pairs of measurements in class intervals of similar distance and
direction. You then plot a graph of the variances versus distance for a particular direction, and
fit a model curve to the graph; the model is assumed to be an approximation of the "true
variogram".
Continuing with the example, we will use Prevar to create an intermediate file of data pairs, and
Vario to compute, plot, and model variograms. No automatic model fitting is provided; we will
use Vario to superimpose plots of various model curves on the experimental variogram until we
find one that looks right.
Prevar is a simple program with only a few options to allow you to reduce the number of sample
pairs in the output file to the maximum allowed by Vario by setting minimum and maximum
limits on X and Y, and by setting a maximum distance for pairs. This is necessary when the
number of samples in the data set exceeds 181. Upon initiating Prevar, the main screen will be
displayed, as in Figure 4-7.
Figure 4-7
Prevar Main Screen
Tthe random seed may be different in what you actually observe on your screen. Select the
subset option and change the seed to 1951. The option sequence below creates the pair
comparison file Example.pcf.
OPTION
ACTION
FIELD
FILES
Accept
Accept
Data File
Pairs File
VALUE
Example.dat
Example.pcf
EXECUTE
Next, initiate Vario, and the Vario Main screen is displayed, as in Figure 4-8.
Figure 4-8
Vario Main Screen
The following option sequence reads the pair comparison file into memory, and moves to the next
menu:
OPTION
DATA
VARIABLE
ACTION
Accept
Toggle
Accept
OPTIONS/EXECUTE
FIELD
VALUE
Pairs File
Variable
Log Option
Example.pcf
Cadmium
Off
The Options/Execute menu allows us to specify how we want the experimental variogram to be
computed. This screen and menu is displayed in Figure 4-9.
Figure 4-9
Vario Options Screen
First, specify the distance class intervals (lags) and directional tolerances for computing the
variogram. Finding the "right" combination is a trial and error exercise, but a systematic
approach can be helpful:
To start, you will use the default direction, which is an "omnidirectional" variogram. The angular
tolerance of 90 degrees on either side of any specified direction line allows all pairs to be
included regardless of direction. This maximizes the number of pairs in each distance class,
which usually gives the "best" or smoothest variogram. See Figure 10-3 in Section 10 for an
more detailed illustration of the direction parameters. From this omnidirectional variogram we
can usually get the best estimate of the y-intercept (nugget) and maximum value (sill) parameters
for the variogram model, as well as the best idea of what type of model(s) should be fitted.
Next, try several different lag intervals for plotting the experimental variograms. You are trying
to obtain the maximum detail at small distances, (i.e., small lags) without being misled by
structural artifacts due to the particular class interval used. You will have more confidence in a
model if it fits experimental variograms computed at several different lag intervals.
The default lag intervals are computed from a rule-of-thumb which states that variograms are
generally not valid beyond one-half the maximum distance between samples. The maximum pair
distance is therefore divided by two, and then subdivided into ten equal distance classes. Round
these to the more convenient numbers of 150 and 15, and plot the resulting variogram (Figure
4-10), as follows:
OPTION
ACTION
FIELD
VALUE
NEW LAGS
Accept
Input
Input
Minimum
Maximum
Increment
0
150
15
EXECUTE
PLOT
<Q>
Figure 4-10
Variogram of Cadmium
This variogram shows a well defined structure. Except for the fifth point, which is too low, the
shape is typical of a "spherical" model variogram, i.e., an initial linear increase from the
Y-intercept curving relatively sharply into a horizontal constant value. The spherical type of
variogram is observed frequently in experimental variograms, and is one of the model options
available in Geo-EAS. To fit a spherical model to a variogram, you need to estimate the "nugget"
or Y-intercept, the "sill" or difference between the nugget and the maximum value, and the
"range" or distance at which the model reaches the maximum value. With a little practice, good
fits can usually be obtained within two or three tries.
Try an initial model with a nugget of 5, a sill of 11, and a range of 80, using the following option
sequence (Note that after variogram model parameters have been entered, the <Left> arrow key
can be used to exit the model option). The resulting graph is displayed in Figure 4-11.
OPTION
MODEL
MODEL
ACTION
Input
Toggle
Input
Input
FIELD
VALUE
Nugget
Type
Sill
Range
5
Spherical
11
80
PLOT
<Q>
Figure 4-11
Variogram with model: Nugget=5, Spherical, Sill=11, Range=80
This model fits reasonably well at the nugget and sill, but the initial slope is too steep, indicating
that the range is too low. It appears that the curve would fit well if it were shifted about 25% to
the right, so you should try again with a range of 100:
OPTION
ACTION
FIELD
VALUE
MODEL
Accept
Accept
Accept
Input
Nugget
Type
Sill
Range
5
Spherical
11
100
PLOT
<Q>
The resulting graph is displayed in Figure 4-12.
Figure 4-12
Variogram model: Nugget=5, Spherical, Sill=11, Range=100
This is an excellent fit; about as good as you can get with a spherical model. That low fifth point,
however, suggests that an exponential model which has a more gentle curvature may also provide
a good fit. (If you are unfamiliar with the four types of models available in VARIO, repeat the
option sequence above three more times, changing the model type each time.) A bit of trial and
error leads to an exponential model with a nugget of 4.5, sill of 13.5, and range of 160. This
graph is displayed in Figure 4-13.
OPTION
ACTION
FIELD
MODEL
Input
Toggle
Input
Input
Nugget
Type
Sill
Range
VALUE
4.5
Exponential
13.5
160
PLOT
<Q>
Some obvious questions that come up at this point are: Which one of these models is best? How
do you decide which one to use? What happens if you pick the wrong one? Unfortunately there
aren't any simple answers. The best model is the one which most closely matches the true
variogram for the site, but of course, you will never know what that is unless you exhaustively
sample the site. Although some form of least squares criteria could be used, in Geo-EAS the
selection must be made subjectively, simply by picking the model that looks like the best fit.
Sometimes the error distributions obtained from cross-validation can help you to decide which.
Fortunately, the differences between the spherical and exponential models above will only cause
minor differences in the kriged estimates, so that either one would be an acceptable choice.
If you look at variograms computed at different lags, it will become obvious that the
experimental variograms contain quite a bit of noise. The shape of the experimental variogram
changes as the lag spacing changes, and the model which appears to fit best at one lag spacing
may appear to be the worst at another. Try a lag spacing of ten units. The graph of Figure 4-14
will be displayed.
Figure 4-13
OPTION
QUIT
QUIT
Variogram with Exponential model: nugget=4.5, Sill=13.5, Range=160
ACTION
FIELD
VALUE
NEW LAGS
Accept
Accept
Input
Minimum
Maximum
Increment
0
150
10
EXECUTE
MODEL
PLOT
<Q>
Figure 4-14
Variogram with Exponential Model, Lag Spacing=10
Now repeat the above option sequence with a lag increment of 25. The resulting graph is
displayed in Figure 4-15.
Figure 4-15
Variogram with Exponential Model, Lag Spacing=25
As you can see, the ability to define the "true" variogram structure is limited by the particular set
of data available. The best you can do is to find a model which fits reasonably well over a range
of lag spacings. Both of the two models proposed earlier are satisfactory. In practice, kriging
estimates calculated with the two variogram models will be almost identical. Kriging standard
deviations however, are more sensitive than the estimates to changes in the variogram model, as
well as to differences between the "real world" and the assumptions underlying the kriging
equations. For this reason, it is generally not wise to interpret kriging standard deviations as a
true measure of the estimation error. For the remaining discussion of variograms the exponential
model will be used.
At this point in the structural analysis, anisotropy is the major remaining question. When you
looked at the post plot of the data, there appeared to be a tendency for similar values to form
elongated E-W bands. Now you want to see if directional variograms confirm this effect. Like
lag spacings, directions and angular tolerances require a trade-off between resolution and
precision. If you plot four directional variograms at angles of 0, 45, 90, and 135 degrees, with a
tolerance of 22.5 degrees, you have effectively divided the pairs in our omnidirectional variogram
into four subsets. This causes an increase in noise comparable to reducing the lag spacing by a
factor of four. It is therefore advisable to use a larger lag interval for computing directional
variograms. You should use a lag spacing of 25 to compute the four directional variograms listed
above, superimposing the omnidirectional exponential model on the plot. Run the option
sequence below four times, changing only the direction angle. Figures 4-16 through 4-19 display
the directional variograms for 0, 45, 90, and 135 degrees.
OPTION
QUIT
QUIT
DIRECTION
ACTION
Input
Input
Accept
FIELD
Direction
Tolerance
Bandwidth
VALUE
0
22.5
MAX
EXECUTE
MODEL
PLOT
<Q>
Figure 4-16
Variogram , Exponential Model, Direction = 0
Figure 4-17
Variogram, Exponential Model, Direction=45
Figure 4-18
Variogram, Exponential Model, Direction=90
Figure 4-19
Variogram, Exponential Model, Direction=135
These four variograms provide a good illustration of why you usually model the omnidirectional
variogram first. In the directional variograms, most of the definition of shape, nugget, and sill
has been obscured. You can see, however, a general confirmation of the assumption about the
anisotropy. The points on the 0 degree variogram all fall below the omnidirectional model,
suggesting the range in that direction should be longer. The opposite is true for the 90 degree
variogram, while the 45 and 135 degree variograms are reasonably well fitted by the
omnidirectional model. Obviously, one cannot be too precise about fitting ranges to these
directional variograms. Likewise, it would not be worthwhile to attempt a more precise definition
of the direction of maximum and minimum range.
The program Krige assumes that the directional variogram model ranges form an elliptical
pattern. It is therefore only necessary to fit models to the major and minor axis directions to
define the entire 2-D structure. One could make a case for the range of the major axis (0 degrees)
of the exponential model being anywhere between 250 and 400 units, and the minor axis (90
degrees) being between 60 and 120 units. We will settle on a model with major and minor axes
of 300 and 100 units, respectively, and move on to kriging.
A note on alternate types of variograms -- The Type option on the Variogram Results screen
allows you to select and plot any of three alternate estimators of spatial variability. These are
sometimes less sensitive to outliers, skewed distributions, or clustered data than ordinary
variograms and may help you recognize a structure when the ordinary variogram is too noisy.
The relative variogram is analogous to the relative standard deviation often used to measure
analytical variability. The "madogram" plots the mean absolute differences. They are not "true
variograms" because they are not based upon squared differences. The Inv-Cov variogram is a
relatively new method (Srivastiva, 1988) based on estimates of covariance rather than variance.
The Inv-Cov variograms have the same units (measurement units squared) as ordinary
variograms and may be modeled and used for kriging in the same way. Relative variograms are
unitless (decimal fraction squares). When modeled and used for kriging the relative kriging
standard deviations must be multiplied by the estimated values to be comparable with kriging
standard deviations produced with ordinary variogram models.
4.4
KRIGING AND CONTOURING
The program Krige produces a regular grid of interpolated point or block estimates using either
"Ordinary" or "Simple" kriging. The default option, ordinary block kriging, is recommended for
most environmental applications. Point kriging usually provides estimates very similar to those
from block kriging, but if a point being estimated happens to coincide with a sampled location,
the estimate is set equal to the sample value. This is not appropriate for contour mapping, which
implicitly requires a spatial estimator. Ordinary kriging estimates the point or block values with
a weighted average of the sample values within a local search neighborhood, or ellipse, centered
on the point or block. Simple kriging also assigns a weight to the population mean, and is in
effect making a strong assumption that the mean value is constant over the site; it also requires
that the available data be adequate to provide a good estimate of the mean.
In order to execute Krige we must provide the names of the data file and an output grid file, and
we must select a variable and enter a variogram model. The program computes a default 10x10
grid, which we will usually want to override with more convenient "round" numbers. The default
search ellipse is a circle with a radius about one fourth the maximum x or y dimension of the site,
which should be adequate for most cases. The purpose of the search is to reduce computation
time by eliminating from the kriging system of equations those samples which are unlikely to get
"significant weights". The default search strategy is to treat the search circle as a single "sector",
to examine all samples within it and use at least one, but not more than the closest eight. The
number of samples required for kriging is related to the value of the nugget term in the variogram
compared to the maximum variogram value possible within the search area. The higher the
nugget, the more likely that more distant samples will get significant weights. A rough rule of
thumb would be to use eight samples when the nugget is near zero, increasing to twenty when
the nugget is more than 50% of the maximum value. The more complex sector search options
may be useful when you have unusual patterns or clusters of data. We will accept the default
search for now, and check during kriging to see how well it works. Initiate program Krige, and
the main screen will be displayed (Figure 4-20).
The Krige main menu allows you to retrieve previously saved kriging parameters, or to save the
parameters you have just used before exiting the program. Because this is your first attempt with
this data set, you must use the Options/Execute option to go directly to the Options screen and
menu. This screen is displayed in Figure 4-21.
Figure 4-20
Krige Main Screen
Figure 4-21
Krige Options Screen
Use the following option sequence to specify the file names and grid parameters, and to proceed
to the next menu (Figure 4-22):
OPTION
ACTION
OPTIONS/EXECUTE
DATA
Accept
Accept
GRID
Accept
Accept
Input
Input
Input
Input
Input
Input
FIELD
Data File
Grid File
X variable
Y variable
X origin
Y origin
X cell size
Y cell size
X # cells
Y # cells
VALUE
Example.dat
Example.grd
Easting
Northing
260
120
20
20
13
11
VARIABLES/MODELS
Figure 4-22
Krige Variables/Models Screen
The following option sequence selects Cadmium as the variable to be kriged, enters the
variogram model, executes the kriging routine, and saves the parameter file:
OPTION
NEW VARIABLE
QUIT
EXECUTE
<Q>
QUIT
SAVE PARAM.
ACTION
FIELD
Toggle
Input
Toggle
Input
Input
Input
Accept
Variable
Nugget
Type
Sill value
Major range
Minor range
Angle
Accept
Parameter file
VALUE
Cadmium
4.5
Exponential
13.5
300
100
0
Example.kpf
Upon selection of the Execute option, the program first displays a color-coded sample location
map on the screen, and then overlays this with a color-coded/shaded grid cell as each kriged
estimate is computed. At the bottom of the screen, a summary line for each estimate is displayed.
As you watch this proceed, you may note that the number of samples being used is only less than
the specified 8 for the exterior blocks of the grid, indicating that the default search radii are
adequate to obtain 8 neighbors. You can use the "debug" options during the kriging
computations to help you understand what is actually happening in the program, and to decide
whether you need to change the search options. Activating <caps-lock> provides you with a map
showing the search ellipse and the samples selected for kriging the current block. The goal of
the search is to include all of the samples which are relevant to the estimate, while avoiding
spending a lot of time computing negligible weights for samples that do not matter. The
<num-lock> key lets you look at a list of the selected samples' coordinates, distances from the
block center, and kriging weights. Use <enter> to continue to subsequent displays.
Given that sample weights must sum to 1.0, it seems reasonable to conclude that samples with
weights of less than 0.01 can be neglected without significantly affecting the kriging results. The
goal of your search would therefore be to consistently find a set of samples such that the lowest
two or three weights would be at or just below 0.01. When you examine the lists of weights for
a number of blocks during this run, you find the lowest weights to generally be in the range of
0.02 or 0.03. This is not really bad, but it might have been better to raise the maximum number
of samples to 10 or 15 (and increase the search radii, if necessary).
The kriged results have been written to the file Example.grd. Proceed to contour this grid of
kriged values using the program Conrec. First initiate Conrec, and use the following option
sequence. The resulting graph is displayed in Figure 4-23.
OPTION
ACTION
OPTIONS/EXECUTE
DATA
Accept
Accept
Accept
Accept
Answer
EXECUTE
Accept
<Q>
QUIT
FIELD
VALUE
Data File
Example.grd
X variable
Easting
Y variable
Northing
Contour variable *Cadmium
Y
Metafile
Metacode.met
Figure 4-23
Contours for Cadmium Kriging Estimates
The final option sequence below plots a contour map of the kriging standard deviations or
estimation errors (Figure 4-24), and demonstrates some of the options in Conrec:
OPTION
ACTION
OPTIONS/EXECUTE
VARIABLES
Accept
Accept
Accept
Answer
CONTOUR OPTIONS
NEW LEVELS
Accept
Accept
Input
DASH PATTERN Input
Input
Accept
QUIT
EXECUTE
Accept
<Q>
QUIT
QUIT
FIELD
VALUE
X variable
Easting
Y variable
Northing
Contour variable KSDCadmium
Y
Starting Value
1
Maximum Value 3
Cont. Increment 0.25
Dash Pattern
-- -Dash Cutoff
1.9
# Rep/Label
5
Metafile
Metacode.met
Figure 4-24
Contours for Cadmium Kriging Standard Deviations
This map illustrates the reasonable result that the highest kriging errors are predicted in areas with
the lowest density of sample data.
4.5
SUMMARY AND EXERCISES
The example exercise just completed contained the basic elements of any geostatistical study.
You started with a sample data set, conducted an exploratory statistical analysis, interpreted the
spatial correlation structure of the data and inferred an underlying variogram model, and used the
model to interpolate a grid of kriged estimates. In the process you had to make a number of
"judgment calls" which affected the results. You treated the data set as representing a single
population. You chose not to delete any outliers. You chose to represent the spatial correlation
structure of the data with an anisotropic exponential model plus a nugget term. You accepted the
default kriging option of ordinary block kriging (with blocks approximated by a 2x2 grid of
points). Finally, a conclusion was drawn that the default maximum of 8 samples in the kriging
program should be increased.
Readers with little or no previous experience in geostatistical analysis may not feel comfortable
with this entire process. It is not always obvious which of these factors are most significant and
which if any can be ignored. Nor is it easy to define the point at which to conclude that you have
done the best you can, given the quality and quantity of data. The best remedy for this situation
is practice: Rerun KRIGE with Example.dat, using various combinations of the variogram
model, search strategy, kriging type, grid size, etc., until you get a feel for how these factors
interact. The two exercises below suggest ways of comparing the results from different kriging
options, and also utilize some of the other Geo-EAS programs.
EXERCISE 1 - Compare Anisotropic vs. Isotropic variograms
Step 1. Run Trans to read Example.dat and write a new file named Compare.dat. Use the Create
option to create a new variable Cd1 equal to the old variable Cadmium (by adding a constant 0
to the variable Cadmium). This step will help to avoid the problem of creating two kriged
variables with the same name. Repeat the process for another new variable Cd2. Delete the
variables Arsenic, Cadmium, and Lead, and save the result in Compare.dat.
Step 2. Run Krige with the data file Compare.dat to create a file of kriged estimates called
Compare.grd. Krige both variables Cd1 and Cd2 in the same run. Krige Cd1 with the anisotropic
exponential variogram model you just used in the example. Krige Cd2 with the equivalent
isotropic model (major and minor ranges both equal 160).
Step 3. Run Trans with the grid file Compare.grd to create a new variable called *Cd1-*Cd2.
Save the results back into Compare.grd.
Step 4. Run Conrec with the grid file Compare.grd to plot contour maps of *Cd1, *Cd2, and
*Cd1-*Cd2.
Step 5. Run Scatter with the grid file Compare.grd to plot *Cd1 vs. *Cd2.
Step 6. Run Stat1 with the grid file Compare.grd to plot histograms of *Cd1, *Cd2, and
*Cd1-*Cd2.
EXERCISE 2 - Compare Point vs. Block kriging
Step 1. Run Krige with the data file Compare.grd to create a grid file of kriged estimates called
Comp1.grd. Use the isotropic exponential model, and krige Cd1 with ordinary point kriging.
Step 2. Repeat Step 1 with a grid file called Comp2.grd. Krige Cd2 with ordinary block kriging
(2x2), keeping all other parameters the same.
Step 3. Run Dataprep to merge Comp2.grd into Comp1.grd.
Step 4. Repeat Steps 3-6 from Exercise 1, using Comp1.grd
These exercises can be repeated to make other interesting comparisons. For example, compare
the results of kriging with a variogram model consisting of only a nugget term vs. a spherical or
exponential model with zero nugget. Or compare kriging with a maximum of 4 samples vs. 20
samples, all other parameters being equal.
SECTION 5 DATAPREP
5.1
WHAT DATAPREP DOES
Dataprep provides utilities for Geo-EAS data files. Dataprep has two divisions, the DOS Utilities
and the File Operations. The DOS Utilities allows access to commonly used DOS commands.
The File Operations include utilities to manipulate Geo-EAS data files.
The Dataprep File Operations use temporary files called Scratch Files for storing data read from
a Geo-EAS data file and for processing. The Append and Merge operations require an additional
temporary file for processing. The temporary files are called ZZSCTCH1.FIL and
ZZSCTCH2.FIL. Each time an operation is executed the temporary files are generated and then
deleted after processing is complete.
5.2
DATA LIMITS
Dataprep reads and generates Geo-EAS data files containing a maximum of 48 variables and
10,000 samples. If a file should contain more than 10,000 samples then only the first 10,000
samples are read and a warning message is displayed. The file operations will generate output
data files containing up to 10,000 samples. If a file operation should generate an output data file
requiring more than 10,000 samples then only the first 10,000 samples are written. In such a case
no warning messages are displayed.
5.3
THE MENU HIERARCHY
Dataprep______ Prefix
DOS Utilities ____ Directory ________ Directory
| Execute
\ Quit
Print ____________ File
| Execute
\ Quit
List _____________ File
| Execute
\ Quit
Copy _____________ Files
| Execute
\ Quit
Rename ___________ Files
| Execute
\ Quit
Delete ___________ File
| Execute
\ Quit
DOS Command
\ Quit
File Operations
\ Quit
Append____________
|
\
Column Extract____ _
|
|
\
Row Extract_______
|
|
\
Compress__________
|
\
ID Variable_______ _
|
\
Merge_____________
|
\
Report____________
|
|
\
Sort______________
|
|
\ Quit
\
Files
Execute
Quit
Files
Variables
Execute
Quit
Files
Subsetting Condition
Execute
Quit
Files
Execute
Quit
Files
Execute
Quit
Files
Execute
Quit
Files
Variables
Execute
Quit
Files
Variable
Execute
Quit
5.4
THE MAIN MENU
Figure 5-1
Dataprep Main Screen
The Main screen and menu (Figure 5-1) provides options which allow you to access the DOS
Utilities and File Operations menus. The menu line appears as follows:
Prefix DOS Utilities File Operations Quit
Prefix
The Prefix option is used to enter the prefix strings for the data file and the scratch file.
DOS Utilities
The DOS Utilities option provides access to the DOS Utilities menu. The DOS Utilities menu
provides access to the DOS commands such as Directory, Print, List (same as the DOS "MORE"
command), Copy, Rename, and Delete. Refer to your DOS manual for further information on
these DOS commands. The DOS Utilities menu is discussed below.
File Operations
The File Operations option provides access to the File Operations menu. The File Operations
menu provides the following file operations: Append, Column (variable) extract, Row extract,
Compress, ID Variable, Merge, Report and Sort. The File Operations menu is discussed below.
5.5
THE DOS UTILITIES MENU
Figure 5-2
Dataprep DOS Utilities Screen
The DOS Utilities screen and menu (Figure 5-2) provides commonly used DOS commands.
These commands operate just as the DOS commands do. Refer to your DOS manual for further
information. To select an option from the vertical menu, use the <up> or <down> arrow key (not
the <left> or <right> arrow key) to position the cursor bar then press the <enter> key.
Directory
Upon selection of this option the Directory menu is displayed. The Directory menu provides the
options necessary to list all directory entries or only those for specified files. The directory option
is similar to the DOS command "Dir". The menu line appears as follows:
Directory Execute
Directory - This option results in a prompt for a character string. The string can be either a
directory or file name. The string is entered into an alphanumeric field that is 55 characters long.
If the field is left blank then the current directory is used by default.
Execute - Selection of this option causes the directory to be displayed on a new screen. An error
message appears if the directory is non-existent. After the directory is listed the message "Press
<enter> to return to menu" is displayed. The <enter> key returns control to the Directory menu.
Print
Upon selection of this option the Print menu is displayed. The Print menu provides the options
necessary to print a file.The Print option is similar to the DOS command "Print". The menu line
appears as follows:
Files Execute Quit
Files - Upon selecting this option, you are prompted for the name of the file that is to be printed.
Execute - Selection of this option causes the specified file to be printed. A yes/no prompt appears
asking if the printer is ready. If yes is indicated then the DOS Print command is executed.
When printing begins the Print menu screen is displayed and a message appears indicating that
the file is being printed.
List
Upon selection of this option the List menu is displayed. The List menu provides the options
necessary to list a file. The List option is similar to the DOS command "More". The menu line
appears as follows:
File Execute Quit
File - You will be prompted for the name of the file that is to be listed.
Execute - Upon selection of this option DOS executes the "More" command. The screen is
cleared and the contents of the file are displayed. When the screen is filled the message "More"
appears on the last line. The <enter> key causes another page of the file's contents to be
displayed. After the entire file has been listed, press <enter> to display the List menu screen and
control is returned to the List menu.
Copy
Upon selection of this option the Copy menu is displayed. The Copy menu provides the options
necessary to copy a file. The menu line appears as follows:
Files Execute Quit
Files - You are prompted for two file names. Upon execution, the contents of the first data file
are copied over to the second data file.
Execute - Upon selection of this option DOS executes the "Copy" command. When the file has
been copied a message is displayed. An error message appears whenever the "Copy " command
could not be successfully executed.
Rename
Upon selection of this option the Rename menu is displayed. The Rename menu provides the
options necessary to rename a file. The menu line appears as follows:
Files Execute Quit
Files - You are prompted for two file names. The name of the file specified first is renamed to
the second file name given. If a data file exists with the second file name, then an error message
appears.
Execute - Upon selection of this option, DOS executes the "Rename" command. A message
stating that the file has been renamed appears after the process is complete.
Delete
Upon selection of this option the Delete menu will be displayed. The Delete option uses the DOS
command "Del". The menu line appears as follows:
File Execute Quit
File - You will be prompted for the name of the file to be deleted.
Execute - Upon selection of this option, DOS executes the "Delete" command. After the file has
been deleted an informative message is displayed.
DOS Command
Upon selection of this option you will access DOS. To return to Dataprep type the command
"Exit <enter>".
5.6
THE FILE OPERATIONS MENU
Figure 5-3
Dataprep File Operations Screen
The File Operations screen and menu (Figure 5-3) provides a set of useful operations for
manipulating Geo-EAS data files. To select an option from the vertical menu, use <up> or
<down> (not <left> or <right>) to position the cursor, and press <enter> to select the option.
The two Geo-EAS input data files called Demo1.dat and Demo2.dat are used to demonstrate each
file operation discussed below.
Demo1.dat - ficticious data set 1
3
Easting
feet
Northing
feet
Arsenic
ppm
320.0
311.0
119.0
119.0
115.0
111.0
114.0
269.0
114.0
269.0
431.0
137.0
.850
.630
.560
1.020
1.20
.67
Demo2.dat - ficticious data set 2
3
Easting
feet
Northing
feet
Lead
ppm
102.0
164.0
.300
122.0
137.0
.360
116.0
119.0
.700
150.0
315.0
.500
148.0
291.0
.710
Append
Upon selection of this option the Append menu will be displayed. The Append menu provides
the options necessary to append two Geo- EAS data files. A discussion on the append operation
follows in the Execute option. The menu line appears as follows:
Files Execute Quit
Files - You are prompted for three Geo-EAS data file names. Upon execution the second file
name specified is appended to the first file name entered. The first and second file names cannot
be the same. If they are then an error message appears. The third file name entered is the name
of the output file.
Execute - Upon selection of this option, Dataprep will append the second file to the first file and
store the results in the output file. After the operation is complete the output variables are
displayed on the screen and a message is displayed. Upon pressing any key, control is returned
to the Append menu. A discussion of the Append operation follows:
Assume the first input file will be called File1 and the second input file called File2. Variables
that exist in both input files (i.e. have identical variable names) will be combined into one
variable with the records of File1 preceding those of File2. The difference is that for File1
variables the records normally occupied by File2 variables are filled with missing values(1.E+31).
For File2 variables the records normally occupied by File1 variables are filled with missing
values. As an example the output file Out1.dat was generated when Demo1.dat (above) as File1
and Demo2.dat (above) as File2 were appended. Out1.dat is shown below.
Out1.dat
Demo1.dat - ficticious data set 1
4
Easting
feet
Northing
feet
Arsenic
ppm
Lead
ppm
320.0
311.0
119.0
119.0
115.0
111.0
114.0
269.0
114.0
269.0
431.0
137.0
102.0
164.0
122.0
137.0
116.0
119.0
150.0
315.0
148.0
291.0
.850
.630
.560
1.02
1.02
.670
.10E+32
.10E+32
.10E+32
.10E+32
.10E+32
.10E+32
.10E+32
.10E+32
.10E+32
.10E+32
.10E+32
.300
.360
.700
.500
.710
Column Extract
Upon selection of this option the Column Extract menu is displayed. The Column Extract menu
provides the options necessary to create a Geo-EAS data file with variables extracted from an
input file. The menu line appears as follows:
Files Variables Execute Quit
Files - This option is used to specify two file names. The first, an input file, is a Geo-EAS data
file. The second file is a Geo-EAS output file.
Variables - This option is used to specify one or more variables which will be extracted and
written to the output file when the Execute option is selected. The variables are selected from a
toggle field. After each selection, the variable name is displayed on the screen and a yes/no
prompt appears asking if you want to select another variable. If yes is indicated then you are
prompted for another variable. If no is indicated then control is returned to the Column Extract
menu.
Execute - Upon selection of this option, the selected variables and related data are copied and
stored in the output file. When the operation is complete, a message is displayed. Upon pressing
any key, control is returned to the Column Extract menu.
Row Extract
Upon selection of this option the Row Extract menu is displayed. The Row Extract menu
provides the options necessary to perform row extraction. This operation extracts samples from
the specified input Geo-EAS data file based upon a test condition. The menu line appears as
follows:
Files Subsetting Condition Execute Quit
Files - This option is used to specify two files. The name of first file entered, an input file, is a
Geo-EAS data file. The name of the second file entered is an output file.
Subsetting Condition - This option is used to specify a test condition. The test condition is of
the form <Operand1> <Relation> <Operand2>, where <Operand1> is a variable and <Operand2>
can be a variable or a constant. <Relation> can be:
.LT., .LE. - Less than, Less than or equal to
.GT., .GE. - Grater than, Greater than or equal to
.EQ., .NE. - Equal to, Not equal to
Upon selection of the Subsetting Condition optionthe variable names stored in the input file are
displayed. You are prompted for a variable for the Operand1 from a toggle field. After the
selection you are prompted for a logical operator from the toggle field. After this selection,
control is passed to the Row Extract Operand menu. The Row Extract Operand menu is the next
menu discussed. After a selection is made for the second operand, control is returned to the Row
Extract menu.
The Row Extract Operand menu provides the options necessary to select a variable or enter a
constant for Operand2. The menu line appears as follows:
Constant Variable
Constant - This option is used to specify a constant(floating point) number for Operand2. The
constant is entered into a numeric field. If a constant causes a numeric overflow, then a message
appears informing you of the error (pressing any key returns control to the Row Extract Operand
menu). After a valid constant has been entered, pressing <enter> returns control to the Row
Extract menu.
Variable - This option is used to specify a variable for the Operand2. The variable is selected
from a toggle field. After the selection, pressing <enter> returns control to the Row Extract
menu.
Execute - When selecting the Execute option, the Row Extraction process is initiated. Each
sample of Operand1, described above, is checked to see if it satisfies the test condition. If so then
that entire line of data is extracted from the input data file and stored in a temporary file. After
this process is complete, the data from the temporary file are stored in the output file. When the
data have been stored to the output file and the execution complete, you are informed with a
message stating that the data has been sent to the output file. If no samples satisfy the test
condition, then a message appears and no data are stored. In both cases, pressing any key returns
control to the Row Extract menu.
As an example of the Row Extraction operation, the following output data file, Out2.dat, is
generated when Demo1.dat is the specified input file and the test condition is: Easting .LE.
Northing.
Out2.dat
Demo1.dat - ficticious data set 1
3
Easting
feet
Northing
feet
Arsenic
ppm
119.0
119.0
114.0
269.0
114.0
269.0
.630
1.02
1.02
Each data record in Demo1.dat is examined by the program. If the test condition is true, then that
line in the file is extracted and stored in the specified output file. Only those records satisfying
the specified logical expression will be extracted and stored in the output file.
Compress
Upon selection of this option the Compress menu is displayed. The Compress menu provides the
options necessary to compress a Geo-EAS data file. This operation eliminates any duplicate data
records that appear in a specified input Geo-EAS data file and stores the results in the specified
output Geo-EAS data file. An example is shown in the Execute option. The menu line appears
as follows:
Files Execute Quit
Files - This option is used to specify two data file names. The first, an input file, is a Geo-EAS
data file. The second is an output file. After the two files have been specified, the variable names
stored in the input file are displayed.
Execute - Upon selection of this option, the data from the input file are stored in a temporary file.
Duplicate records are deleted and the data are stored in the specified output file. When the entire
process is complete, a message stating that the data have been sent to the output file is displayed.
Upon pressing any key, control is returned to the Compress menu.
As an example of the Compress operation, the following output file, Out5.dat, was generated
when the input file, Demo1.dat, was compressed. Out5.dat follows.
Out5.dat
Demo1.dat - ficticious data set 1
3
Easting
feet
Northing
feet
Arsenic
ppm
320.0
311.0
119.0
119.0
115.0
111.0
114.0
269.0
431.0
137.0
.850
.630
.560
1.02
.670
***Note that all duplicate records have been deleted.***
ID Variable
Upon selection of this option the ID Variable menu is displayed. The ID Variable menu provides
the options to create the variable "Sequence #". The Sequence # denotes the sequential position
of the data in the input file. An example of this is shown in the Execute option. The menu line
appears as follows:
Files Execute Quit
Files - This option is used to specify two Geo-EAS data file names. The first is an input data file.
The second is an output file. After the two files have been specified, the variable names stored
in the input file are displayed.
Execute - This option appends a variable called "Sequence #" to the current listing of variables
displayed on the screen. The variable name "Sequence #" is appended to the variable names read
from the input file. These variable names are then stored in the specified output file. An example
of such an output file is Out6.dat.
Out6.dat
Demo1.dat - ficticious data set 1
4
Easting
feet
Northing
feet
Arsenic
ppm
Sequence
#
320.0
311.0
119.0
119.0
115.0
111.0
114.0
269.0
114.0
269.0
431.0
137.0
.850
.630
.560
1.02
1.02
.670
1.
2.
3.
4.
5.
6.
Merge
Upon selection of this option the Merge menu is displayed. The Merge menu provides the
options necessary to merge two Geo-EAS data files. The details of this operation are discussed
in the Execute option. The menu line appears as follows:
Files Execute Quit
Files - This option is used to specify the names of two Geo- EAS data files which are to be
merged, and the name of an output file, which will contain the results. The files to be merged
cannot have the same file name, or an error message appears.
Execute - When this option is selected, the Merge process is initiated. After this process is
complete the variables from the output file are displayed and a message indicating that the data
have been sent to the output file appears. Pressing any key returns control to the Merge menu.
To describe the merge process, assume that File1 is the first file name entered and File2 is the
second file name entered. If one input file is smaller than the other input file, then the smaller
file has missing values added to its variables. Variables that appear in both input File1 and input
File2 are combined with the samples of File1 preceding those of File2. The specified output file
stores the results of the merged files. An example best demonstrates the merge operation. The
output file, Out3.dat, which follows, displays the merging of input files Demo1.dat as File1 and
Demo2.dat as File2.
Out3.dat
Demo1.dat - ficticious data set 1
4
Easting
feet
Northing
feet
Arsenic
ppm
Lead
ppm
320.0
311.0
119.0
119.0
115.0
111.0
114.0
269.0
114.0
269.0
431.0
137.00
.850
.630
.560
1.02
1.020
.6700
.300
.360
.700
.500
.710
1.E31
*** NOTE *** The variables appearing in both input files are combined into one variable
(Easting and Northing), and these variables took on the values from the first file.
Report
Upon selection of this option the Report menu is displayed. The Report menu provides the
options necessary to generate a listing of specified variables in "Report" form. The "Report"
listing is described in the Execute option. The menu line appears as follows:
Files Variables Execute Quit
Files - This option is used to specify two file names, the input and output files. After the file
names have been entered, you are prompted for the sequence option from the toggle field. If "on"
is selected for the sequence option, then the observation (row) number is indicated on the
"Report" listing.
Variables - This option is used to specify those variables that are to be included in the "Report"
listing. You are prompted for a variable to be selected from a toggle field. A yes/no prompt
provides an opportunity to select another variable. Indicating no causes control to be returned to
the Report menu. The list of variables are displayed on the screen after each selection.
Execute - The "Report" listing will be generated upon selection of this option. This listing is then
stored in the specified output file. When this operation is complete a message appears indicating
that the data have been sent to the output file. Upon pressing any key, control is returned to the
Report menu. The following is a description of the "Report" listing.
The "Report" listing can be generated with or without the sequence option enabled. If the
sequence option is enabled then each data record will be preceded by an observation number
(record number). Each page lists up to four variables with 50 data records each. If more than
four variables are selected then all the data records for the first four variables are printed. The
page numbering is reset to one and the next four variables are printed. An example report with
the sequence option enabled follows.
Example output from the Report option:
Page
Demo1.dat - ficticious data set 1
Easting
Northing
Obs.
feet
feet
1.
320.0000
311.0000
2.
119.0000
119.0000
3.
115.0000
111.0000
.
.
.
.
.
.
.
.
.
Sort
Lead
ppm
.8500000
.6300000
.5600000
.
.
.
1
Arsenic
ppm
1.000000
2.000000
3.000000
.
.
.
Upon selection of this option the Sort menu is displayed. The Sort menu provides the options
necessary to sort a variable in ascending order. If a selected variable's sample has to be relocated,
then the entire record associated with that sample is also moved. An example of the Sort
operation is shown in the Execute option. The menu line appears as follows:
Files Variable Execute Quit
Files - This option is used to specify two Geo-EAS file names, the first is the input file and the
second is an output file.
Variable - This option is used to specify the variable to be sorted. You are prompted for a
variable which is selected from a toggle field. After the selection, pressing any key returns
control to the Sort menu.
Execute - Upon selection of this option, the specified variable is sorted in ascending order.
When the process is complete, the data are stored in the specified output file. A message appears
informing you that the data have been sent to the output file. Upon pressing any key, control is
returned to the Sort menu.
As an example the following output file, Out4.dat, was generated when the variable Easting of
the input file, Demo1.dat, was sorted.
Out4.dat
Demo1.dat - ficticious data set 1
3
Easting
feet
Northing
feet
Arsenic
ppm
114.0
269.0
114.0
269.0
115.0
111.0
119.0
119.0
320.0
311.0
431.0
137.0
1.02
1.02
.560
.630
.850
.670
The variable Easting appears in ascending order. Note that not only have the values of the
variable Easting been relocated, but all values (the line) associated with Easting has been moved.
SECTION 6 TRANS
6.1
WHAT TRANS DOES
Trans was designed to create, delete, or modify Geo-EAS data file variables. Refer to the section
on Geo-EAS data files for more information on input data. The operations may be unary (one
operand, one operator), binary (two operands, one operator), or a indicator transform operation,
described below. An operand may be either a variable or a constant. The operator maybe an
operation, such as addition or finding the square root. The results generated by the specified
operation may replace the contents of an existing variable or a new variable may be created. The
variable specified to accept the results is called the result variable. Missing values may be
generated in two circumstances: when an operand is a missing value, or when an operation is
undefined (as in division by zero).
Trans uses a temporary file called a Scratch File to store the data read from a Geo-EAS data file.
The temporary file is called ZZSCTCH1.FIL. The Read option in the Main menu (described
below) reads the Geo-EAS data file and stores the data in the temporary file. Each time an
operation is performed, the required data are retrieved from the temporary file and the newly
generated data are stored in the temporary file. A list of variable names is displayed on the screen
to indicate which variables reside in the scratch file. If a variable is deleted using the Delete
option from the Main menu, then that data are deleted from the temporary file. The variable
name is also deleted from the screen. The Save option from the Main menu is used to move the
data from the temporary file to the specified Geo-EAS output data file.
6.2
DATA LIMITS
Trans reads as well as generates Geo-EAS data files containing a maximum of 48 variables and
10,000 samples. If a file should contain more than 10,000 samples then only the first 10,000
samples are read and a warning message is displayed. If an attempt is made to create a 49th
variable then an error messageis displayed.
6.3
THE MENU HIERARCHY
Trans _________Prefix
Read
Title
Create _______ New Variable ________ Unary Operation
Old Variable
Binary Operation
Indicator Transform
\ Quit
\ Quit
Delete
Save
\ Quit
Unary Operation _______ Operation _____ Constant ____ _ Execute
| Variable
\ Quit
\ Quit
\ Quit
Binary Operation _____ Constant ____ __Operation _____ Constant ____ _ Execute
Variable
| Variable
\ Quit
\ Quit
\ Quit
\ Quit
Indicator Transform __ __Variable ______ Cutoff
| Execute
\ Quit
6.4
THE MAIN MENU
Figure 6-1
Trans Main Screen
The Main screen and menu (Figure 6-1) provide the options necessary to read and save Geo-EAS
data files and to create, delete, or modify variables. The menu line appears as follows:
Prefix Read Title Create Delete Save Quit
Prefix
The Prefix option is used to enter the prefix for the data file and scratch file.
Data
The Data option is used to enter the name of a Geo-EAS data file.
Title
The Title option is used to specify a descriptive title for the output Geo-EAS data file. The title
can be up to 66 alphanumeric characters. No error checking is performed.
Create
The Create option provides access to the Create menu. The Create menu (described below) is the
first in a series of menus that provide options used to specify a new or existing variable as the
result variable and to perform a specified operation (unary, binary, transform indicator).
Delete
The Delete option is used to select an existing variable that is to be deleted. The variable is
selected from a toggle field. Upon making the selection the message "Do you really want to
delete this variable?...(Y/N)" is displayed. If <Y> is pressed the variable is deleted from the
temporary file and from the list of variable names on the screen. Subsequent to entering your
choice, control is returned to the Main menu.
Save
When the Save option is selected, the data stored in the temporary file are written to a specified
data file. A prompt is issued for the output Geo-EAS data file name. If blanks are entered then
an error message is displayed. If the output file already exists then a Yes/No prompt will appear
asking if the file should be overwritten. The data in the temporary file is copied to the output
Geo-EAS data file. If an error should occur while opening the output file then an error message
is displayed. While the file is being saved the message "Writing data..." appears. After the data
has successfully been written a message is displayed (press any key to continue).
6.5
THE CREATE MENU
The Create menu provides the options necessary to perform transformations to a Geo-EAS data
file. The menu line appears as follows:
New Variable Old Variable Quit
New Variable
When the New Variable option is selected a new variable is created in the scratch file. The new
variable takes on values generated from the specified operation (unary, binary, indicator
transform). You are prompted for the new variable name. If the given variable name is blank
then a message to this effect appears (pressing any key returns control to the Create menu). If
the variable name already exists then a warning message appears (pressing any key passes control
to the Operation menu). If the variable name is unique to the scratch file then you are prompted
for a description of the measurements. The field for the measurements description can accept up
to 10 alphanumeric characters. After entering the measurements description, control is passed
to the Operation menu (described below).
Old Variable
This option is used to specify an existing variable whose contents are replaced by the results of
the specified operation (unary, binary, indicator transform). You are prompted for a variable
from the toggle field. After making the selection, you are asked if you wish to change the
variable's current name or measurements description. When indicating yes, you may retain or
change the name by entering up to 10 alphanumeric characters into the field. If blanks are
entered then an error message is displayed (you are then returned to the alphanumeric field and
prompted for another variable name). If the given variable name is the same as the existing
variable, then a message appears and you are prompted for a new variable name. You are then
prompted for a measurements description. The measurements description of the old variable is
displayed by default. You may retain or enter another description. Pressing<enter> causes the
Operation menu (described below) to be activated.
6.6
THE OPERATION MENU
The Operation menu provides a selection of transformation operations. The menu line appears
as follows:
Unary Operation Binary Operation Indicator Transform Quit
Unary Operation
This option provides access to the Unary Operation menu. The Unary Operation menu (described
below) is the first of three menus that provides options needed to complete a unary operation.
After a selection is made from one menu, control is passed to the succeeding menu. The Unary
Operation menu provides a selection of unary operators. Next, the Unary Operand menu
provides the choice of a constant or an existing variable for the operand. Finally, the Execute
menu provides the Execute option.
The unary operations perform an operation on one operand. The
operations are shown below as they would appear in the toggle
field:
sqrt - Computes the square root of an operand.
log
- Computes the base 10 logarithm of an operand.
ln
- Computes the natural logarithm of an operand.
truncate - Truncates the operand.
exp
- Computes e to the power of x (exp) where e is
2.71828... and x is the operand. Note that a
numeric overflow can result in using the exp
operation. In such a case the program will
abnormally terminate (crash).
rank - Determines the rank of an existing variable. This operation assigns an integer value
to the result variable based upon the rank of a specified existing variable in a sorted
list.
equals - Set the variable equal to the operand.
abs. val - Computes the absolute value of the operand.
sign
- Changes the sign of the operand.
The Unary Operation menu provides an option to select a unary operation. The menu line
appears as follows:
Operations Quit
Operation - This option is used to specify the unary operator. You are prompted for a unary
operator from the toggle field. Upon making the selection, control is passed to the Unary operand
menu (described below).
The Unary Operand menu provides the option to select an operand for the unary
operation. The menu line appears as follows:
Constant Variable Quit
Constant - This option is used to assign a constant value to the unary operand. You are are
prompted for the constant value. The constant value is entered into a numeric(floating point)
field. The default value is initially zero. If the value entered results in a numeric overflow then
a message is displayed. Upon pressing any key, control is returned to the Unary Operand menu.
If the constant value entered is acceptable then control is passed to the Execute menu (described
below).
Variable - This option is used to select an existing variable for use as the unary operand from a
toggle field. Upon making the selection, control is passed to the Execute menu (described
below).
The Execute menu provides the option necessary to initiate any unary operation. The menu line
appears as follows:
Execute Quit
Execute - This option is used to initiate the unary operation. During processing the message
"Processing data..." is displayed on the screen. After processing is complete the minimum and
maximum values of the variable will be displayed on the message line. After pressing any key,
you are asked for the number of significant digits for the output format. The range of digits is
1 through 12 inclusive. A FORTRAN format (which is the output format) is constructed based
on the expression Gx + 7.x where x is the digit entered by you, ie., significant digits. For
example, if 7 is entered then G14.7 is the output format. For more information on the FORTRAN
formats refer to a FORTRAN reference manual. If the digit for x is outside the acceptable range
then 9 will be used by default. If the given format is not appropriate for writing the variable to
the output file then a message is displayed and you are prompted for a new digit for x. You can
best select x by determining (using the minimum and maximum values displayed on the message
line) the maximum number of digits to the left of the decimal point. Then decide the maximum
number of digits to the right of the decimal point. The sum of the two values is x. Increase the
sum by one if the value is negative. If any missing values are generated then the number of
missing values and the name of the variable are displayed on the screen. After processing is
complete, control is returned to the Main menu. If an operand is a constant and contains a
missing value then the result of that operation will be a missing value.
If the operand is a variable as opposed to a constant, and a sample from that variable results in
an undefined operation, then a missing value is generated. Whenever an error message is
displayed, processing is halted and control is returned to the Operation menu. As noted
previously, the operation (exp) may result in a numeric overflow causing the program to
abnormally terminate (crash).
Binary Operation
This option provides access to the Binary Operation menu. The Binary Operation menu is the
first of four menus that provides options needed to complete a binary operation. After a selection
is made from one menu, control is passed to the succeeding menu. First, the Binary Operand One
menu (described below) provides a selection of a constant or an existing variable for operand one.
Second, the Binary Operation menu provides a selection of binary operators. Next, the Binary
Operand Two menu is similar to the Binary Operand One menu with the exception that the
selection is for operand two. Finally, the Execute menu provides the Execute option.
The binary operations perform an operation requiring two operands. The operations are shown
below as they would appear in the toggle field:
+ - Addition
/ - Division of the first operand by the second operand.
x - Multiplication
- - Subtraction
** - Exponentiation which raises the first operand to the power of the second operand.
MAX - Determines the maximum value of the operands.
MIN - Determines the minimum value of the operands.
Mean -Computes the means of the operands.
The Binary Operand One menu provides the options to select operand1 for the binary operation.
The menu line appears as follows:
Constant Variable Quit
Constant - This option is used to assign a constant value to the binary operand one. This option
is similar to the constant option noted in the Unary Operand menu section (described earlier).
The exceptions are that the wording in the messages refers to the binary operand one and not the
unary operand, and upon entering a valid constant value, control is passed to the Binary
Operation menu (described below). If the constant value is unacceptable then control is returned
to the Binary Operand one menu.
Variable - This option is used to assign an existing variable to the binary operand one. This
option is similar to the variable option noted in the Unary Operand menu section (described
earlier). The exceptions are that the wording refers to binary operand one and not the unary
operand, and upon making the selection, control is passed to the Binary Operation menu
(described below).
The Binary Operation menu provides the option to select a binary operator. The menu line
appears as follows:
Operations Quit
Operation - This option is used to specify the binary operator. You are prompted for a binary
operator from a toggle field. Upon making the selection control is passed to the Binary Operand
Two menu (described below).
The Binary Operand Two menu provides the options to select operand2 for the binary operation.
The menu line appears as follows:
Constant Variable Quit
Constant - This option is used to specify a constant for the binary operand two. This option is
similar to the binary operand one constant option described previously in the Binary Operand
One menu. The exceptions are that the wording refers to operand two and not operand one, and
upon entering an acceptable value, control is passed to the Execute menu (described below).
Variable - This option is used to specify an existing variable for binary operand two. It is similar
to the binary operand one variable option described previously in the Binary Operand One menu.
The exceptions are that the wording refers to operand two and not operand one, and upon making
a selection, control is passed to the Execute menu (described below).
The Execute menu provides the option needed to initiate the binary operation. The menu
line appears as follows:
Execute Quit
Execute - This option initiates the binary operation. During processing the message "Processing
data..." is displayed on the screen. The Execute(binary) option causes the same prompts as in the
Execute option of the unary operation. Refer to the Execute option of the Execute menu
discussed previously in the Unary operation section. As noted previously, the operation
exponentiation may result in a numeric overflow causing the program to abnormally
terminate(crash).
Indicator Transform
The indicator transform is an operation requiring two operands. The first operand is an existing
variable and the second operand is a constant called the threshold value. The result variable takes
on the value 1.0 if the input variable is greater than or equal to the threshold value. The result
variable takes on the value 0.0 if the input variable operand is less than the threshold value. The
Indicator Transform option provides access to the Indicator Transform menu.
The Indicator Transform menu provides the options to select the operands and to execute the
operation. The menu line appears as follows:
Variable Execute Quit
Variable - This option is used to specify two operands. The first operand is an existing variable
and the second operand is the threshold value which is a constant. The message "Select variable
for operation (use <space> bar)" prompts for the variable. After selection and pressing <enter>
the message "Enter constant value for threshold value" is displayed. If the constant entered
causes numeric overflow then an error message is displayed.
Execute - This option is used to initiate the indicator transform operation. During processing the
message "Processing data..." is displayed. If after processing any missing values were generated
then the number of missing values and the variable name are displayed on the message line.
After processing is complete the message "Processing is complete...(press any key)" is displayed.
Upon pressing any key control is returned to the Main menu.
SECTION 7
7.1
STAT1
WHAT STAT1 DOES
Stat1 is an interactive program which computes basic univariate statistics and displays histograms
or probability plots for variables in a Geo-EAS data set. Options are available for calculating
statistics on the natural log of the selected variable, for specifying a variable to be used as a
"weighting factor", and for performing calculations on subsets of the input data through the use
of upper and lower limits. A "Batch Statistics" option has been included which will produce a
report of statistics for all variables in the specified data file.
7.2
DATA LIMITS
Stat1 requires that the maximum number of variables in the input data file not exceed 48. The
data file may contain up to 10,000 samples. If the data file contains more than 10,000 samples,
then only 10,000 will be used by Stat1.
7.3
THE MENU HIERARCHY
Stat1 _______ Prefix
Data
Variable
Limits
Execute ____ Histogram ________Type
Class Limits
Axes
Titles
Results
View Graph
\ Quit
Probability
Examine
\ Quit
Batch Statistics
\ Quit
7.4
THE MAIN MENU
Figure 7-1
Stat1 Main Screen
The main menu and screen (Figure 7-1) has options to allow specification of the data file names,
the selection of the variable to be used, the selection of upper and lower limits for the variable,
calculation of statistics (univariate), and generation of a batch statistics report. The menu line
appears as follows:
Prefix Data Variable Limits Execute Batch Statistics Quit
Prefix
The prefix option is used to enter the prefix for the data file name.
Data
The Data option is used to enter the name of a Geo-EAS data file.
Variable
The variable option allows the selection of a variable for which univariate statistics are to be
generated. The "weighting factor" variable can be selected at this time. The choices available
for variables are the variable names specified in the data file. The natural log transform may be
chosen to compute log statistics. Both the weight and log parameters may be used
simultaneously. The screen fields accessed from this option are:
Variable - A toggle field for selecting the variable name whose values are to be used to compute
the univariate statistics. The default value is the first variable in the data set.
Weight - A toggle field for selecting an optional variable name whose values are to be used as
the weighting factor. If the weighting factor variable is chosen, then the resulting univariate
statistics are "weighted" (the statistics are calculated for Weight value multiplied by Variable
value). The default weighting factor variable is "None"(in which case the weighting factor is 1).
Log Option - A two valued toggle (On/Off) field to enable or disable the Log option. If the Log
option is enabled and a weighting factor variable selected then the statistics are calculated for the
Weight value multiplied by the (natural log of the Variable value). Whenever the Log option is
enabled sample values less than or equal to zero are counted but not used in the computation.
The default value is "Off".
Limits
The Limits option allows computation of statistics for a subset of the data which lie between the
specified minimum and maximum sample values. You may specify the upper and lower limits
placed on the values used for computing the basic statistics.
Minimum - A numeric field which contains the lower limit on the sample values used in the
computation. The default value is the minimum value of the selected variable.
Maximum - A numeric field which contains the upper limit on the sample values used in the
computation. The default value is the maximum value of the selected variable.
Execute
The Execute option provides access to the Results screen and menu. When the Log option is
enabled the number of samples less than or equal to zero is displayed. If this occurs, pressing any
key provides access to the Results screen. See the section on the Results menu below for more
information.
Batch Statistics
The Batch Statistics option allows generation of a report of univariate statistics for all variables
in the data set with no need for interaction. The statistics can be saved to a file or printed. A two
valued toggle field ("printer" or "file") is used to make this selection and appears on the message
line. If the selection is "printer" then the printer must be on and "online". If "file" is selected then
you are prompted for a file name. The field accepts up to 14 alphanumeric characters. If the file
exists then a yes/no prompt asks if you wish to overwrite. Indicating no will return you to the
menu. If the field is blank then an error message is displayed. In such a case pressing any key
returns you to the Main menu.
*** NOTE *** the file by produced by the Batch Statistics option is not a Geo-EAS data
file.
7.5
THE RESULTS MENU
Figure 7-2
Stat1 Results Screen
The Results screen and menu provides options to display a probability plot (described below),
to display a ranked listing of data values and order statistics (shown below as "Examine Data"),
and to display the Histogram screen and menu. The Results Screen displays univariate statistics
for the selected variable. The menu line appears as follows:
Histogram Probability Plot Examine Quit
Histogram
The Histogram option provides access to the Histogram screen and menu. First a default
histogram is displayed. See the section on the Histogram menu below for more information.
Probability Plot
When the Probability Plot option is selected a probability plot (Figure 7-3) is computed and
displayed on the screen. The plot is a graph of the ranked variable values, plotted against their
cumulative percentiles. The vertical axis is scaled in units of the variable and the horizontal axis
is scaled in units of cumulative percent. A boxplot appears at the right side of the plot area along
with univariate statistics, the quartiles, and the minimum and maximum values
Figure 7-3 Stat1 Probability Plot
Figure 7-3 Stat 1 Examine Screen
The boxplot (Figure 7-4) is a graph which depicts the limits, quartiles, median, and mean of a set
of values. Boxplots are used in the Probability Plot and Histogram displays. A Boxplot is
comprised of a rectangle containing an "X" and a dividing line. A line extends outward from each
end of the rectangle. The rectangle represents the interquartile range (the range of values
between the 1st and 3rd quartiles). The dividing line marks the position of the median in the
interquartile range, and the "X" marks the arithmetic mean. The endpoints of the outward
extending lines depict the minimum and the maximum values.
Figure 7-4
The Components of a Boxplot
The Examine option allows access to a screen that displays a ranked listing of data values and
order statistics. An example of this screen is displayed in Figure 7-5. The RecNo column
indicates the samples sequence in the data file. The <up>, <down>, <pg up>, <pg dn>, <home>,
and <end> keys may be used to scroll the display to the desired position. Pressing <q> will cause
the Results screen and menu to appear.
Figure 7-5
Stat1 Examine Screen
7.6
THE HISTOGRAM OPTIONS MENU
Figure 7-6
Stat1 Histogram Options Screen
The Histogram Options screen and menu (Figure 7-6) provides the options necessary to generate
a histogram (frequency distribution plot) of the data. You can examine the histogram results or
view the graph. A histogram is displayed before the Histogram menu is accessed. Pressing any
key will access the Histogram menu from the histogram display. The histogram plot is discussed
below in the View Graph option of the Histogram menu. The menu line appears as follows:
Type Class Limits Axes Titles Results View Graph Quit
Type
The Type option is used to select the Frequency type. The Frequency type is selected from a two
valued toggle field containing the choices "Absolute" and "Relative". The choice "Absolute" will
generate a traditional histogram; "Relative" will cause the frequencies to be displayed as a
percentage of the total number of samples (or weight of the samples) retained.
Class Limits
The Class Limits option allows the specification of the class upper and lower limits. You will be
prompted for the minimum value, the class width, and the number of classes. The upper limit of
the first class is the sum of the minimum value and the class width. The upper limit for all classes
is the sum of the minimum value and (class width multiplied by the number of classes). The
screen fields accessed from this option are:
Minimum - A numeric field whose default value is the minimum value which was specified in
the Limits option of the Main menu discussed earlier.
Class Width - A numeric field whose default value is calculated. This value must be greater than
zero. If it is not then an error message appears and you are prompted for a new value.
# Classes - A numeric field for which the value entered must be in the range of 1 to 100. If the
entry is erroneous then an error message appears and the default value is set to 100.
Axes
The Axes option allows the specification of the coordinate limits for the horizontal (X) and
vertical (Y) axes. Tic spacing for the X and Y axes is also specified at this time. The screen
fields accessed from this option are:
Minimum - Two numeric fields used for entering the minimum coordinate values to be used on
the X and Y axes. The default value for X is determined from the data file for the variable for
which univariate statistics are computed and from the upper and lower class limits. The default
value for Y is zero.
Maximum - Two numeric fields used for entering the maximum coordinate values to be used on
the X and Y axes. If the maximum value exceeds the minimum value then an error message is
displayed and the default value is the previous field entry. The default values displayed are
determined from the data file for the variable for which univariate statistics are computed and
from the upper and lower class limits.
Tic Spacing - Two numeric fields used for entering the tic spacing to be used on the X and Y
axes. The default values displayed are determined from the data file for the variable for which
univariate statistics are computed and from the upper and lower class limits.
Titles
The Titles option allows you to enter the title and labels for the graph. The Hershy character sets
of 33 fonts are used for plotting alphanumeric labels. The file HERSHY.BAR contains this
information and is included with the software.
Main Title - An alphanumeric field which may contain up to 60 characters for the title on the
graph. The default title is "Histogram". When a weighting factor has been selected then the title
is "Weighted Histogram".
Subtitle - An alphanumeric field which may contain up to 60 characters for the subtitle of the
graph. The default sub- title is "Data file: <input data file name>".
X Axis - An alphanumeric field which may contain up to 60 characters for the X axis. The
default label is "<variable name> (<units description>)" where the variable name and the
measurements description are taken from the variable selected for univariate statistics. If the Log
option is on then "LN" precedes the variable name.
Y Axis - An alphanumeric field which may contain up to 60 characters for the Y axis. The
default label is "Frequency".
Results
The Results option allows access to the Histogram Results screen and menu (Figure 7-7). This
screen displays the histogram results. The results are in tabular form. The display
may be scrolled as in the Examine option (described above).
View Graph
The View Graph option allows access to a screen that displays the histogram (Figure 7-8). The
resulting histogram is accompanied by a box plot (described in the Probability Plot Option of the
Results menu), and some univariate statistics.
Figure 7-7
Stat1 Histogram Results Screen
Figure 7-8
Stat1 Histogram
SECTION 8
8.1
SCATTER
WHAT SCATTER DOES
Scatter produces scatter plots of variable pairs in a Geo-EAS data file. Options allow for log and
semi-log plots and for a regression line to be calculated. Scaling and numeric tickmark labeling
for the axes, and titles are computed automatically.
8.2
DATA LIMITS
Scatter requires that the input data file contain at least three but not more than 48 variables.
These should consist of an X and Y coordinate and a third variable which will be posted. The data
file may contain up to 10000 samples. If the data file contains more than 10000 samples, only
10000 will be used by Scatter.
8.3
THE MENU HIERARCHY
Scatter ___ Prefix
Data
Variables
Options
Execute
\ Quit
8.4
THE MAIN MENU
The Main menu and screen (Figure 8-1) has the options to allow specification of the data file
name, the selection of the variables to be used and other program options. The menu line appears
as follows:
Prefix Data Variables Options Execute Quit
Prefix
The Prefix option is used to enter the prefix for file names.
Figure 8-1
Scatter Main Screen
Data
The Data option is used to enter the name of a Geo-Eas data file.
Variables
The Variables option allows the selection of variables that are to be used as the X and Y
coordinate values, and the sample values to post. The choices available are the variable names
as specified in the data file. The screen fields accessed from this option are:
X Variable - A toggle field for selecting the variable name whose values will be used as the
X-coordinates. The default X Variable is the first variable in the data file.
Y Variable - A toggle field for selecting the variable name whose values will be used as the
Y-coordinates. The default Y Variable is the second variable in the data file.
Log - Two two-valued toggle fields to enable or disable a logarithmic transformation of the X
and/or Y coordinate values. The choices available are "On" (use logarithmic scaling), and "Off".
If the log option is set and the number of missing data (data values less than zero, or the missing
value) is equal to the number of data records, an error message is displayed. The default value
is "Off"
Options
The Options option allows selection of linear regression, and a scaling option. The screen fields
accessed from this option are:
Regression - A two-valued (Yes/No) toggle field to enable or disable the calculation of a
regression line. The regression line and the coefficients are plotted on the graph. The
coefficients are the slope and intercept of the line represented by the equation Y = Slope * X +
Intercept. The Slope, Intercept and R Squared value (a measure of correlation) are displayed to
the right of the graph. The default value for Regression is "Yes".
Equal Scaling - A two-valued (Yes/No) toggle field to enable or
disable the use of equal
scaling on the plot. If Equal Scaling is selected the true X and Y proportions are maintained on
the screen. If this option is not enabled, the graph will be scaled to fill the screen. The default
value is "No" (disabled).
Execute
The Execute option is used to display the plot on the screen. After the graph has been displayed,
type <q> to clear the screen and return to the Main menu. Figure 8-2 displays an example scatter
plot.
Figure 8-2
Scatter Plot
SECTION 9
9.1
PREVAR
WHAT PREVAR DOES
Prevar is a preprocessor program for the program Vario. All variogram calculations use the
distance and relative direction between pairs of points in the sampled area. Prevar computes
these so that variogram parameters may be changed and variograms recalculated more quickly
in Vario. The output from Prevar is a "pair comparison file" (PCF). The pair comparison file
contains the input data file contents along with distances and relative directions between pairs of
sample points. This information is used by the program Vario to calculate variogram values.
Limits may be imposed on the X and Y coordinate values or on the distance between points in
a pair. If no limits are specified, all sample points are used for calculation. The pair comparison
file can become quite large if there are many points in the data file. If is recommended that some
limits on the distance between points be specified.
9.2
DATA LIMITS
Due to the storage requirements of Vario, Prevar must impose limits on the number of sample
points in the input file and on the number of pairs for which distances and directions are
computed. The input data file may contain up to 1000 samples and 48 variables. If more than
48 variables exist the data file may not be used. If more than 1000 samples exist only the first
1000 will be used. If there are N sample points in an input data file and no limits were imposed
(N2+N)/2 inter-pair distances and directions would be computed. A file with several hundred
samples would easily generate too many pairs for Vario. The Limits option is used to restrict the
number of pairs computed. Prevar will compute a maximum of 16384 pairs.
9.3
THE MENU HIERARCHY
Prevar ____ Prefix
Files
Variables
Limits
Execute
\ Quit
9.4
THE MAIN MENU
Figure 9-1
Prevar Main Screen
The Main screen and (Figure 9-1) menu has the options to allow specification of the input data
and the pair comparison file names, the selection of the variables to be used and the limits on
sample coordinates and the interpair distances. The menu line appears as follows:
Prefix Files Variables Limits Execute Quit
Prefix
The Prefix option is used to enter the prefix for file names.
Files
The Files option is used to enter the input data and the pair comparison file names. The screen
fields accessed from this option are:
Data File - An alphanumeric field that may be up to 14 characters used for entering the name of
a Geo-EAS data file.
Pair Comparison File - An alphanumeric field that may be up to 14
characters used to specify
the name of the pair comparison file. This file will contain the contents of the input data file, and
the information for each pair of samples, the distance between the two sample points and their
relative direction. The default Pair Comparison File is the name of the data file with a .pcf
extension. For example if the Data File is "Example.dat", the default Pair Comparison File would
be "Example.pcf". If the file already exists a Yes/No prompt provides alternatives to continue
or quit from the option.
Variable
The Variable option allows the selection of the variables that are to be used for the X and Y
coordinate values. The choices are determined by the variable names in the input data file. The
screen fields accessed from this option are:
X Variable - A toggle field used for selecting the variable name whose values will be used as the
X coordinates. The default X variable is the first variable in the data file.
Y Variable - A toggle field used for selecting the variable name whose values will be used as the
Y coordinates. The default Y variable is the second variable in the data file.
Limits
The Limits option is used to restrict the area and interpair distance for pairs retained in the pair
comparison file. The screen field accessed from this option are:
Minimum - Three numeric fields for entering the minimum X and Y coordinate values and the
minimum distance between pairs. The default values displayed are determined from the
coordinate variables in the data file.
Maximum - Three numeric fields for entering the maximum X and Y coordinate values and the
maximum distance between pairs. The default values displayed are determined from the
coordinate variables in the data file.
Subset
The subset option is used to permit sub-sample variograms to be computed from large data sets.
The data limit remains at 1000 records. The screen fields accessed from this option are:
Fraction
A numeric field for specifying the cutoff value. Acceptable values range
from 0 to 1. If the value entered is less than 1, a uniform random number
between 0 and 1 is generated for each pair, and the pair is retained only
if the random number is less than the value entered. The default is 1.
Seed
A numeric field used for entiring the seed to initialize the random number
generator. The default random seed is computed from the system clock.
If a Geo-EAS data file has 600 observations, for example, the number of possible pairs is
179,700. Specifying a fraction of 0.089 will result in a random subset of approximately 16,000
of these pairs in the ".Pcf" file, which may be analyzed with VARIO. If the subset option is used,
several subsets should be evaluated to ensure that they are giving consistent results. The user
must choose whether to use the limit or the subset option, or both.
Execute
The Execute option is used to initiate computation of pair comparison data and the creation of
the pair comparison file. Distances and pair directions for all pairs in the data file are computed
(subject to the limits criteria), sorted by distance, and saved in the pair comparison file. If the
limit of 16384 pairs is reached, a Yes/No prompt will allow an opportunity to quit or proceed.
If this occurs (and you choose to proceed) 16384 pairs will be written to the file, but it probable
that other important contributing pairs will not be included. The better approach would be to
<q>uit and to select an interpair distance limit or coordinate limits to restrict the number of pairs
computed.
SECTION 10
10.1
VARIO
WHAT VARIO DOES
Vario is a two-dimensional variogram analysis and modeling program. Vario uses a pair
comparison file (PCF) produced by Prevar to calculate variogram values and other statistics for
a specified set of pair distance intervals (lags). Tolerances may be specified for pair direction and
lag distance intervals. Plots of variogram values vs. distance may be displayed. Several graphs
of the individual lag results may also be viewed, such as lag-histograms, box plots, postplots and
lag-scatter plots. Variograms may be fitted with a model of up to 4 nested (additive) variogram
structures. Lag results for individual lags may be saved in a Geo-EAS data file for analysis.
10.2
DATA LIMITS
Vario requires that the pair comparison file contains no more than 48 variables, 1000 samples,
and 16384 pairs. If there are more than 48 variables the data file may not be used. If there are
more than 1000 samples only the first 1000 will be used. Up to 24 lag intervals may be defined.
As many as 2000 pairs may be used for an individual lag. If more than 2000 pairs exist per lag,
only the first 2000 are used.
10.3
THE MENU HIERARCHY
Vario ________ Prefix
Data
Variable
Limits
Options/Execute ______ Direction
New Lags
Change Lags
Post Plot
Execute ______Type
Plot
BoxPlot
Lag Results ____ Histogram
Scatter Plot
Examine
Write
\ Quit
Model ________ Model
Plot
Options _______ Titles
Tic Spacing
Limits
Quit
\ Quit
\ Quit
\ Quit
\ Quit
10.4
THE MAIN MENU
Figure 10-1
Vario Main Screen
The Main screen and menu (shown in Figure 10-1) has options to allow specification of the pair
comparison file, the selection of the variable to be used with associated options, and the variable
limits. The menu line appears as follows:
Prefix Data Variable Limits Options/Execute Quit
Prefix
The Prefix option is used to enter the prefix for file names.
Data
The Data option is used to enter the pair comparison file name. The pair comparison file contains
distances, directions and pair pointers for pairs of (2D) sample points in a Geo-EAS data file.
This file is produced by the program Prevar and is a binary (non-readable) file, to conserve disk
space.
Variable
The Variable option allows for the selection of the variable that is to be used to compute the
variogram. The choices available are the variable names as stored in the pair comparison file.
When the variables are selected the input data are read from the data file and defaults are
computed for sample value limits and lag spacing. If and error occurs while reading the file an
error message is displayed. The screen fields accessed from this option are:
Variable - A toggle field for selecting the variable whose values are used as the sample values.
The default Variable is the third variable in the pair comparison file.
Log Option - A two valued toggle field to enable or disable
a logarithmic transformation of
the samples. The choices available are "On" (use logarithmic scaling), and "Off". The default
is "Off".
Limits
The Limits option allows you to enter the values that specify the limits for the sample values.
The screen fields accessed from this option are:
Minimum - A numeric field for entering the minimum variable value to use in computation. The
default value is the minimum value of the variable selected.
Maximum - A numeric field for entering the maximum variable value to use in computation. The
default value is the maximum value of the variable selected.
Options/Execute
The Options/Execute option provides access to the Options screen and menu (Figure 10-2),
described below.
10.5
THE OPTIONS MENU
Figure 10-2
Vario Options Screen
The Options screen and menu (Figure 10-2) provides a means to specify variogram options, view
a post plot of the data and compute the variogram results. The menu line appears as follows:
Direction New Lags Change Lags Post Plot Execute Quit
Direction
The Direction option allows you to specify the pair orientation (selection) criteria. Figure 10-3
illustrates how these parameters affect the grouping of pairs within a lag interval. The screen
fields accessed from this option are:
Direction - A numeric field for entering the pair direction in trigonometric degrees. Acceptable
values range from 0 to 180 degrees (excluding 180). The default is zero degrees, which a
direction parallel to the X axis.
Tolerance - A numeric field for entering the direction tolerance in trigonometric degrees.
Acceptable value range from zero to 90 degrees inclusive. The default is 90 degrees. The
tolerance is plus or minus. For example, a variogram computed with a direction of 90 degrees
and a tolerance of 10 degrees will include all pairs with an orientation between 80 and 100
degrees.
Max Bandwidth - A numeric field for entering the maximum bandwidth. The maximum
bandwidth is the maximum perpendicular distance from the direction centerline to the second
point in a pair. The default value is MAX, meaning that no such constraint is imposed.
Figure 10-3
An Illustration of the Direction Parameters
New Lags
The New Lags option allows you to choose new pair distance intervals. Pairs are included in a
lag if the distance for the pair is greater than the previous cutoff value and less than the cutoff
value for that lag. The screen fields accessed from this option are:
Minimum - A numeric field for entering the minimum inter-pair distance. The first lag will
contain pairs strictly greater than this value.
Maximum - A numeric field for entering the maximum inter-pair distance.
Increment - A numeric field for entering the increment between lag cutoff values.
The defaults for these fields are calculated as: Minimum = 0.0, Maximum = one half the
maximum interpair distance, and Increment = Maximum divided by 10.0. These values may not
be appropriate for the data configuration. Once these parameters are specified, the lag cutoff
distances are displayed in columns on the Options screen
Change Lags
The Change Lags option allows you to change the lag cutoff distances on the Options screen.
This provides a means of specifying unequal lag intervals. The screen fields accessed from this
option are a group of numeric fields for entering new lag cutoff values. After these have been
entered the program will sort the values by increasing distance and re-display them, if necessary.
Post Plot
The Post Plot option allows you to view a post plot of the data. This plot shows the actual
locations of the sample points. Each point is labeled with a "+" character. The X and Y axes are
automatically scaled and labeled. This graph is useful in determining the lag cutoff distances for
the New Lags option. Figure 10-4 displays an example post plot for Example.dat.
Figure 10-4
Vario Post Plot
Execute
When the Execute option is selected the program displays the
Results screen and computes the lag results before providing access to the Results screen and
menu (Figure 10-5). This menu is described below.
10.6
THE RESULTS MENU
Figure 10-5
Vario Results Screen
The Results screen and menu (Figure 10-5) has options to select the type of estimator to be
computed, to view a variogram and box plots, to recompute detailed results for a specific lag, and
to display the Modeling screen and menu. The menu line appears as follows:
Type Plot Box Plot Lag Results Model Quit
Type
The Type option allows for the selection of the type of estimator to display and model. The
screen field accessed from this option is a toggle field. The choices available are: "Variogram",
"Relative", "Madogram", and "Non-Ergodic". The default is "Variogram". See the glossary for
a definition of these terms.
Plot
The Plot option allows you to view a variogram plot of the selected estimator. The distance (h)
is plotted along the horizontal axis, and the variogram is plotted on the vertical axis. The type
of estimator and the variable name are displayed as the graph title. Vertical and horizontal axes
scaling and the tick mark spacing are calculated by the program. Displayed on the right side of
the graph are the number of pairs, the lag minimum and maximum, the direction, tolerance and
maximum bandwidth, the sample limits, and the mean and variance of the sample values. An
example graph is displayed in Figure 10-12 near the Plot option in the Modeling screen.
Box Plot
The Box Plot option allows you to view a variogram boxplot, displayed in Figure 10-6. This is
a plot which displays statistical information about each lag. The vertical lines represent the range
of values in the lag, with the minimum value at the bottom and the maximum value at the top.
The rectangle superimposed over the vertical range line is the inter-quartile range. The bottom
on this rectangle is the first quartile, and the top is the third quartile. Therefore, 50% of the data
falls within the range represented by the rectangle. The mean is represented by "x" and the
median is represented by the horizontal line through the rectangle. The distance (h) is plotted
along the horizontal axis, and the difference squared is plotted on the vertical axis. The variable
name is displayed in the title of the graph. Vertical and horizontal axes scaling and the tick mark
spacing are calculated by the program. Displayed on the right side of the graph is the number of
pairs, the lag minimum and maximum, the direction, tolerance and max bandwidth, the variable
minimum and maximum, and the mean and variance of the data.
Figure 10-6
Vario Box Plot
Lag Results
When Lag Results option is selected you will be prompted to select a lag number before access
is provided to the Lag Results screen and menu. This is accomplished by using the <up> and
<down> keys to move the cursor bar to the desired lag number and pressing <enter>. See the
section on the Lag Results menu below for more information.
Model
The Model option provides access to the Model screen and menu. See the section on the
Modeling menu below for more information.
10.7
THE LAG RESULTS MENU
Figure 10-7
Vario Lag Results Screen
The Lag Results screen and menu has options to allow you to view detailed results for a specific
lag. The menu line appears as follows:
Histogram Scatter Examine Write Quit
Histogram
The Histogram option allows you to view a lag-histogram plot. Thebars on the histogram
represent the number of squared differences (increments Z(x)-Z(x+h)) in each histogram class.
A box plot is appears at the top of the graph to display the frequency distribution of the entire set
of differences. The variable name is displayed in the title of the graph. Vertical and horizontal
axes scaling and the tick mark spacing are calculated automatically by the program. Displayed
on the right side of the graph is the lag number, the number of pairs, the variogram value, the
minimum and maximum distance used in computing the lag, the direction, tolerance and
maximum bandwidth, and the sample value limits. An example lag-histogram plot is displayed
in Figure 10-8.
Scatter
The Scatter option allows you to view a lag-scattergram. This is a plot of pairs of sample values.
Every pair of sample values is represented as a point in the scatter plot, where the X coordinate
is the value of the first point in the pair and the Y coordinate is the value of the second point in
the pair. Points are plotted for all pairs in the lag, subject to the limits criteria (direction,
tolerance, bandwidth, sample value limits and interpair distance) which have been specified.
Displayed on the right side of the graph is the lag number, the number of pairs, the variogram
value, the minimum and maximum distance, the direction, tolerance, and maximum bandwidth,
and the sample value limits. Figure 10-9 displays an example lag-scattergram.
Figure 10-8
Vario Lag-Histogram
Figure 10-9
Vario Lag-Scattergram
Examine
The Examine provides access to the Examine Lag Results screen, displayed in Figure 10-10. The
Examine Results screen displays in a tabular form a pair index number, the first and second
values, the distance, the direction, and the difference squared for each pair in the lag. These are
sorted in order of difference squared. You can use the arrow keys or the <1> to <9> keys to
scroll to a position on the screen. Press <End> to position the list at the largest squared difference
and <home> to view the smallest. Type <q> to clear the screen and return to the Lag Results
menu.
Figure 10-10 Vario Examine Lag Results Screen
Write
The Write option allows you to save the lag results in a Geo-EAS data file. The Variable,
From___, To___ Distance, Direction, Difference and Difference^2 will saved in a file. The file
name is entered on the message line, when the Write option is selected. The default file name is
"LagResult.dat". If the file already exists, a Yes/No prompt provides an alternative to quit or
proceed. The lag results file may be used with other Geo-EAS programs for a more detailed
analysis of the pair information.
10.8
THE VARIOGRAM MODELING MENU
The Variogram Modeling screen and menu has options to allow you to specify the variogram
model to display, the graph options, and to plot the variogram estimates and the specified model.
This screen is displayed in Figure 10-11. The menu line appears as follows:
Model Plot Options Quit
Figure 10-11 Variogram Modeling Screen
Model
The Model option allows you to edit or enter the parameters for the variogram model. Up to four
nested variogram structures and a "nugget" component can be included in the model. The screen
fields access from this option are:
Nugget
A numeric field for entering the nugget effect. The value entered must be greater
than or equal to 0.
Type
Four toggle fields used for selecting the type of
variogram structure. The
choices available for each are "Spherical", "Gaussian", "Exponent", "Linear", and
"
"
If "
" is selected the structure will be ignored.
Sill
Four numeric fields for entering the sill for each structure.
Range
Four numeric fields for entering the range of influence of the structure. The range
of the variogram structure. The range in a spherical model is the distance at which
the model curve becomes horizontal. In a gaussian and exponential model the
range parameter entered is a "practical range" at which the model attains 95% of
its maximum value. In the linear model, the range and sill are used to define the
slope of a linear structure. The practical effect of this is that the model type can
be changed without changing the "apparent range" of the model curve
Plot
The Plot option allows you to view a plot of the estimates with specified model superimposed.
An example plot is displayed in Figure 10-12. The distance is plotted along the horizontal axis,
and the variogram is plotted against the vertical axis. The type of estimator and the variable name
is displayed as the graph title. Vertical and horizontal axis scaling and tick mark spacing are
calculated by the program. Displayed on the right side of the graph are the total number of pairs,
the minimum and maximum distances, the direction, tolerance and maximum bandwidth, the
sample value limits, and the mean and variance of the sample values. Press <q> to clear the
screen and access the Variogram Modeling menu.
Figure 10-12 Plot of Variogram with Model Curve
Options
The Options option provides access to the Graph Options screen and menu, displayed in Figure
10-13.
10.9
THE GRAPH OPTIONS MENU
The Graph Options screen and menu (Figure 10-13) has options to select the graph titles and
labels, the spacing of the tick marks, and the graph limits for the graph produced with the Plot
option of the Variogram Modeling menu. The menu line appears as follows:
Titles Tic Spacing Limits Qui
Figure 10-13 Variogram Graph Options Screen
Titles
The Titles option allows you to enter the title and labels for the graph. The screen fields accessed
from this option are:
Title
An alphanumeric field which may contain up to 60 characters each, for the title on
the graph. The default title contains the type of estimator and the variable name.
Subtitle
An alphanumeric field which may contain up to 60 characters for the graph
subtitle.
X Label
An alphanumeric field which may contain up to 60 characters for the X axis
label. The default label is "Distance".
Y Label
An alphanumeric field which may contain up to 60 characters for the Y axis
label. The default label is the type of estimator selected.
Tic Spacing
The Tic Spacing option allows the specification of the spacing of tick marks on the X and Y axes.
The screen fields accessed from this option are:
X Tickmark Spacing
A numeric field for entering the spacing between the X axis
tickmarks.
Y Tickmark Spacing
A numeric field for entering the spacing between the Y axis
tickmarks.
Limits
The Limit option allows you to specify the limits for the X and Y axes. The screen fields
accessed from this option are:
X Axis Minimum
A numeric field for entering the minimum coordinate value to be
used on the X axis. The default value is zero.
X Axis Maximum
A numeric field for entering the maximum coordinate value to be
used on the X axis. The default value is the maximum distance
calculated by the program.
Y Axis Minimum
A numeric field for entering the minimum coordinate value to be
used on the Y axis. The default value is zero.
Y Axis Maximum
A numeric field for entering the maximum coordinate value to be
used on the Y axis. The default value is the maximum variogram
value calculated by the program.
SECTION 11
11.1
XVALID
WHAT XVALID DOES
The name Xvalid stands for "cross-validation". Cross- validation involves estimating values at
each sampled location in an area by kriging with the neighboring sample values (excluding the
value of the point being estimated). The estimates are compared to the original observations in
order to test if the hypothetical variogram model and neighborhood search parameters will
accurately reproduce the spatial variability of the sampled observations. The estimated values,
associated kriging errors, residuals, and other useful statistics are displayed on a summary screen.
Scatter plots and histograms may be obtained for a quick summary of these results. Results may
be stored in a Geo-EAS data file for further analysis.
11.2
DATA LIMITS
Xvalid requires that the input data file contains at least 3 but no more than 48 variables. Two of
these variables must represent the coordinates of sample locations. No more than 1000 samples
may reside in the data file. If more than this number are encountered, only the first 1000 values
will be used for cross-validation.
11.3
THE MENU HIERARCHY
Xvalid _____ Prefix
Data
Variables
Options/Execute ___ Type
\ Quit
Search
Model
Execute ____ Error Map
Debug
Scatter Plot
\ Quit
Histogram
Write
Examine
\ Quit
11.4
THE MAIN MENU
Figure 11-1
Xvalid Main Screen
The Main screen and menu for Xvalid, shown in Figure 11-1, provides options to specify the file
prefix, the input data file and variables, and to access the Options/Execute menu. The menu line
appears as follows:
Prefix Data Variables Options/Execute Quit
Prefix
The Prefix option is used to enter the prefix for the data file name.
Data
The Data option is used to specify the name of the Geo-EAS data file to be used for
cross-validation. This file must contain at least three variables consisting of two coordinates and
a sampled value.
Variables
The Variables option is used to select the coordinate and sample value variables. They are
selected from toggle fields which contain the variable names from the specified data file. The
data file is accessed when these variables are selected. If an error occurs while reading the data
file an error message will be generated. The screen fields accessed from this option are:
X Coordinate
A toggle field for selecting the variable whose values represent the
X coordinates for sample points. The default X Coordinate is the
first variable in the data file.
Y Coordinate
A toggle field for selecting the variable whose values will be used
as the Y coordinates for sample points. The default Y Coordinate
is the second variable in the file.
Variable to Krige
A toggle field for selecting the variable to be estimated. The
default is the third variable in the data file.
Log Option
A two-valued (On/Off) toggle field for enabling or disabling the
Log Option. If the Log Option is set to "On", kriging will be
performed on the natural log of the sample values. If it is set to
"Off", no log transformation will occur. The default value for the
Log Option is "Off".
Options/Execute
The Options/Execute option provides access to the Options screen and menu. See the section
below for more information.
11.5
THE OPTIONS MENU
Figure 11-2
Xvalid Options Screen
The Options screen and menu, shown in Figure 11-2, has the options to specify the parameters
to be used for kriging, and to initiate the cross-validation process. The menu line appears as
follows:
Type Search Model Execute Debug Quit
Type
The Type field is a toggle field used for selecting the type of kriging used in cross-validation.
The choices are "Ordinary", and "Simple". If "Ordinary" is chosen, ordinary point kriging will
be performed. If "Simple" kriging is chosen, simple kriging is performed and a value must be
entered for the Global Mean when the Model option is selected.
Search
The Search option provides a means of controlling the neighborhood search used during kriging.
Parameters may be specified to define an elliptical search area. Constraints may be placed upon
the number of sectors and the number of samples to be retained in each sector of the search area,
and the type of distance measure to use when eliminating neighbors from a search sector. Figure
11-3 depicts the search parameters which define the shape of the search ellipse.
Search Ellipse and Variogram Anistropy Ellipse Parameters
R Minor
R Major
Angle
X Coordinate Axis
Figure 11-3
Search (and Variogram) Ellipse Parameters
The screen fields accessed from this option are:
R Major
a numeric field for indicating the length of the major radius (half
the length of the longest axis) of the search ellipse.
R Minor
a numeric field for indicating the length of the minor (shortest)
radius of the search ellipse. This value must be less than or equal
to R Major, non-zero, and non-negative. The default value is the
value given for R Major. If R Major is equal to R Minor, the
search area will be a circle.
Angle
a numeric field for indicating the orientation of the search ellipse.
It is given in trigonometric degrees in the range from zero up to
(but not including) 180, and indicates the angle between the longest
axis of the ellipse (specified by R Major) and the sample coordinate
X axis. If R Minor is equal to R Major, a circle search is used and
the Angle parameter is ignored.
Min. Dist.
a numeric field for specifying the minimum distance from the
estimated sample location to the nearest neighbor sample. If a
minimum distance of zero (the default) is specified, then any
neighboring sample will be used, subject to the complete set of
search constraints.
Distance Type
a two valued toggle field for selecting the type of distance measure
to use when eliminating neighbors. The choices available are
"Euclidean" (the default), and "Variogram". Neighboring samples
are eliminated from consideration when the Max Pts/Sector
(Maximum points per sector) criterion is exceeded in a given
sector. If this should occur, only the "closest" neighbors are kept.
If "Euclidean" distance type is chosen, neighbors are eliminated
based upon the euclidean distance from the point to be estimated
ellipse center. If "Variogram" distance is chosen, the variogram
function value (as specified by the Model parameters) for the
computed distance is used as the criterion for elimination of
neighbors.
Num. Sectors
a toggle field for selecting how many sectors in which to divide the
search ellipse. The choices available are "1" (the default), "4", and
"8". The combination of the Number of Sectors, and the Max
Points per Sector parameters indicate the maximum number of
samples to be used for kriging. This parameter also serves to
indicate the number of groups to use for classification of neighbors.
The search ellipse is divided into the chosen number of equallysized sectors. If a sample is found to be within the search ellipse,
it is flagged with a sector number. These sector numbers and
sample distances are used for elimination of samples which exceed
the Max Points per Sector criterion.
Max. Pts/Sector
a toggle field for selecting the maximum number of points which
a sector may contain. The choices range from "1" to a maximum
which depends on the number of sectors chosen. If one sector is
specified, up to 24 neighboring points may be used. If four or eight
sectors are selected, the choices are constrained such that a
maximum of 64 neighbors may be retained. If the number of
neighbors in a sector exceeds the specified value, the "farthest"
samples (as determined by Distance Type) are eliminated from
consideration.
Min Pts. to Use
a toggle field for selecting the minimum number of neighboring
samples to use for kriging. The default value or this parameter is
"1". If fewer than the specified number are found kriging is not
performed and a missing value is generated for the estimate and
kriging standard deviation.
Empty Sectors
a toggle field for selecting the maximum allowable number of
consecutive sectors with no neighbors. The choices available are
determined by the Number of Sectors parameter. If one sector is
chosen, then this field is disabled. If more than the specified
number of consecutive sectors are empty, no value is kriged;
missing values are generated in place of an estimate and kriging
standard deviation.
Model
The Model option allows specification of the variogram model to use when kriging. Screen fields
are provided for a nugget effect value and up to four nested variogram structures. Each structure
is specified with a structure type, a sill value, and an ellipse of influence. If simple kriging is
chosen an additional field is provided for entering the Global Mean. Each of the four structures
has five associated screen fields. Selecting the Model option will cause a cursor bar to appear
in the upper left corner of the models area. The arrow keys may be used to move the cursor bar
to fields in the Model area. To exit the Model area, move the cursor bar out of the top or off to
the left of the area, using <left>, or <up>. If any errors are made when entering variogram model
parameters an error message will be displayed and the cursor bar will be placed at the problem
field. The major and minor ranges, and the angles for the additive variogram structures defined
in this parameter group are similar to the search ellipse ranges and angles. Figure 11-3 illustrates
how these parameters define the shape of the ellipse. The screen fields accessed from this option
are:
Nugget
a numeric field for entering the nugget value for the variogram model.
Only values greater than or equal to zero may be entered. The default
value is zero.
Global Mean a numeric field for specifying the global mean for simple kriging. If
ordinary kriging is chosen this field is disabled and cannot be accessed.
The default value for the global mean is zero.
The following five fields are present for each of the four nested variogram structures:
Type
a toggle field for indicating the type of the structure. The toggle field
choices for type are " " (none), "Spherical", "Gaussian", "Exponential",
"Linear". The default type for all four structures is "none". If a structure
is entered and the type is subsequently changed to "none" the structure will
be deleted from the variogram model. The order of the variogram
structures on the screen is unimportant; neither do they need to be in a
contiguous order on the screen.
Sill
a numeric field for entering the sill value for a variogram structure. A
non-zero, non-negative value is required here. In a linear variogram
structure the "sill" must be chosen so that the corresponding "range"
parameter value(s) will result in the desired slope(s); the actual model
continues to increase indefinitely with distance.
Major Range a numeric value for entering the longest range of influence of the
variogram structure. The Major Range must be non-zero, and
non-negative. This may be thought of as similar to the R Major parameter
described in the Search option above. In fact, the variogram ellipse of
influence is defined exactly as the search ellipse: with two ranges (radii)
and an angle. Note that the second ellipse is used to select a reasonable
subset of neighbors for efficient kriging - it has no relationship to the
variogram model ellipse(s).
Minor Range a numeric field for indicating the length of the minor (shorter) range of the
variogram ellipse. This value must be less than or equal to the Major
Range, non-zero, and non-negative. The default value is the Major Range
value. If the two ranges are equal, an isotropic variogram structure is
defined. If they are not equal, the two ranges are used to determine the
anisotropy ratio.
Ellipse Angle a numeric field for indicating the orientation of the ellipse for the
variogram structure. It is given in trigonometric degrees in the range from
zero up to (but not including) 180, and indicates the angle between the
longest axis of the ellipse (specified by the Major Range) and the sample
coordinate X axis. If the two ranges are equal (isotropic structure) then the
angle is ignored.
Execute
The Execute option is used to initiate kriging. All parameters must be specified before kriging
may begin. Several "Debug Options" (described below) are enabled or disabled with the
<caps-lock>, the <num-lock>, and the <scroll-lock> keys. These keys are used to toggle the
debug displays on or off. If your keyboard has status lights for the keys, it is easy to determine
the state of each key. It is important to disable all three Debug Options prior to using the Execute
option, or intermediate results screens will be generated and kriging will proceed more slowly.
If your personal computer is equipped with the proper graphics hardware, a graphics display is
generated (Figure 11-4) when the Execute option is selected. In this display the original sample
locations are represented by symbols. The symbol coding is used to classify the input data into
their respective quartiles. As each point is kriged the estimates and associated results are
displayed at the bottom of the screen and the original symbols are over-plotted by symbols which
represent the value of the estimate. On EGA equipped computer systems, the symbols are also
color coded. If your computer system has no graphics capability or has a Hercules graphics card,
no graph is displayed, and the results are displayed at the bottom of the Options screen. During
the kriging process the debug displays (described below) may be activated or de-activated to view
intermediate kriging results. Once all sample values have been kriged, a tone signals that the
kriging has been completed. Pressing <q> at this time will cause the Results screen and menu
(described below) to be displayed.
Figure 11-4
Xvalid Kriging Display
Debug
The Debug option is provided on the menu as a means of identifying the keys used for enabling
or disabling the Debug displays. This option does not actually do anything, but moving the
cursor bar to this menu option will display the Debug display names, and the corresponding
<____-lock> keys which are used to activate them. These displays provide a means of looking
at intermediate kriging results during the cross-validation process. If the <num-lock>,
<caps-lock>, or <scroll-lock> keys are activated during kriging, the corresponding displays will
be generated on the screen. To continue to the next display, <q> is pressed. To disable the
generation of such screens, the corresponding keys should be de-activated. On an IBM AT- style
keyboard, these three keys are accompanied by status lights which indicate that the key is "on",
or "off". Refer to the section on program Krige for a detailed discussion of the debug displays.
How to Cancel Kriging
At any time during the kriging process, kriging may be cancelled by pressing the <ctrl> and <alt>
keys, the <ctrl> and <shift> keys, or the <left shft> and <right shft> keys simultaneously and
holding them down until the next point has been kriged. If this is done a message is displayed
indicating that kriging has been terminated. This is useful when the debug screens reveal a
problem with the search or variogram parameters and you wish to change them and re-start. It
is important to remember that the "terminate kriging" keys will not work when any of the three
debug display keys is active.
11.6
THE RESULTS MENU
Figure 11-5
Xvalid Results Screen
The Results menu and screen, shown in Figure 11-5, is displayed when kriging has been
completed. The Results screen contains information about the data file, variables, and the type
of kriging used. Additionally, descriptive statistics are provided for the original sample values,
the kriged estimates, the kriging standard deviations, the differences (between estimate and
observed), and the zscore. The "zscore" is computed as the ratio of the difference to the kriging
standard deviation. The Results menu appears at the bottom of the screen, and provides options
to display several graphs, to examine the individual results, and to save the results to a Geo-EAS
data file. Graph scaling, titles, and labeling are performed automatically. On a non-graphics
computer system the graphs are not generated. The menu line appears as follows:
Error Map Scatter Plot Histogram Write Examine Quit
Error Map
The Error Map option provides a graph of the kriging error, or "Differences". An example plot
is displayed in Figure 11-6. Sample locations are marked with a "+" symbol for over-estimation
(Estimate-Observed > 0), and an "x" symbol for negative differences. The size of the symbol is
proportional to the error, so that large positive or negative differences are easily noticed.
Descriptive statistics for the differences are displayed to the right of the graph.
Figure 11-6
Xvalid Error Map
Scatter Plot
The Scatter Plot option provides a choice of displaying one of two possible scatter plots. When
this option is chosen a two- valued toggle field containing the choices "Observed vs. Estimate",
and "Estimate vs. Error" is displayed on the message line. It is used to select the type of scatter
plot to be displayed. Once this choice has been made the appropriate graph will be displayed.
Box plots are drawn opposite to each coordinate axis to convey information about the frequency
distributions of the observed values and estimates, or estimates and differences. In both types
of graph "+" and "x" symbols are used to indicate positive and negative estimation errors (same
as the Error Map option described above). An example plot is displayed in Figure 11-7.
Figure 11-7
Xvalid Scatter Plot
Histogram
The Histogram option provides a histogram (frequency distribution graph) of the estimation error.
An example plot is shown in Figure 11-8. Histogram class intervals are computed automatically
by the program. A box plot of the differences appears at the top of the graph. Descriptive
statistics are displayed to the right of the histogram.
Figure 11-8
Xvalid Error Histogram
Write
The Write option is used to store the result to a Geo-EAS data file. When this option is chosen
a prompt for the file name appears on the message line. If the specified file exists, a Yes/No
prompt will provide an option to overwrite, or quit. If any errors occur while saving the results
to the file, appropriate error messages will be displayed on the message line. If results were
successfully saved, a message will be displayed, and pressing any key will re-activate the Results
menu. The file created by this option contains seven variables. The first three are the two sample
coordinate variables and the sample value variable chosen for kriging. The remaining four
variables are named "Zstar", "Zsdev", "Zstar-Z", and "Zscore". They contain, respectively, the
estimate, the kriging standard deviation, the estimation error, and the zscore (estimation error
divided by the kriging standard deviation). This file may be used with other Geo-EAS programs
for further analysis.
Examine
The Examine option provides a means of directly examining individual results of kriging on a
scrolling display, called the Examine Results screen. This screen is shown in Figure 11-9. The
observed values, estimates, errors, kriging standard deviations, and zscores are displayed in
columns on this screen. These values are ranked in order of estimation error, so that the largest
negative difference is at the top of the list, and the largest positive difference is at the bottom of
the list. The leftmost column contains the sample sequence number in the input data file. The
<up>, <down>, <pgup>, <pgdn>, <home>, and <end> keys may be used to position the list on
the screen. The numeric keys <1> through <9> are used to scroll the list in increments of 10%
(e.g. pressing <5> would position the middle of the list on the screen). The <q> key is used to
exit the Examine Results screen and return to the Results screen and menu.
Figure 11-9
Xvalid Examine Results Screen
SECTION 12
12.1
KRIGE
WHAT KRIGE DOES
Krige is an interactive program which performs two- dimensional kriging. A rectangular grid of
kriged estimates is created and stored in a Geo-EAS data file. Contour plots may be generated
from these gridded estimates with the program Conrec. Options are provided to control the type
of kriging, the neighborhood search area, the grid spacing and extents, and the variogram model
for each variable kriged. Up to ten variables may be kriged in each program execution. The
program parameters may be stored in a parameter file and retrieved for later use. During the
kriging process, debug displays may be activated or de-activated for the purpose of viewing
intermediate kriging results.
12.2
DATA LIMITS
Krige requires that the input data file contains at least three but no more than 48 variables. Two
of these variables must represent the coordinates of sample locations. Up to ten variables may
be selected for kriging. No more than 1000 samples may reside in the data file. If more than this
number are encountered only the first 1000 values will be used for kriging.
12.3
THE MENU HIERARCHY
Krige ______ Prefix
Read Parameters
Options/Execute ____ Data
Save Parameters
Polygon
\ Quit
Type
Grid
Search
Variables/Models __ New Variable
Title
Edit
Execute
Delete
\ Quit
\ Quit
12.4
THE MAIN MENU
Figure 12-1
Krige Main Screen
The Main screen and menu for Krige, shown in Figure 12-1, provides options to specify the file
prefix, to read or save program parameter values in a parameter file, and to access the Krige
Options menu, where program parameter values are specified and kriging is initiated. The menu
line appears as follows:
Prefix Read Parameters Options/Execute Save Parameters Quit
Prefix
The Prefix option is used to enter the prefix for the data file name.
Read Parameters
The Read Parameters option provides a means of loading program parameter values from a
parameter file. When this option is selected a prompt is issued for the Input Parameter File name.
A default name is constructed from the most recently used Geo-EAS data file name using the file
extension "kpf" (krige parameter file). Once the name has been specified the parameter file is
accessed and the parameters are retrieved from the file. The data file is also accessed at this time
so that the coordinate variable values may be loaded by the program. If an error occurs while
trying to access or read the parameter or data file, a message will be displayed indicating the
problem, and any key may be pressed to return to the Main menu. If parameters and data are
successfully loaded a message will be displayed, and pressing any key will cause the Krige
Options screen and menu to be displayed.
Options/Execute
The Options/Execute option provides access to the Krige Options screen and menu. See the
section below for more information.
Save Parameters
The Save Parameters options provides a means of storing program parameter values in a
parameter file for later use. When this option is selected a prompt is issued for the Output
Parameter File name. A default name is constructed with a "kpf" file extension as described
above for the Read Parameters option. If the named file already resides on disk, a Yes/No prompt
provides a means of overwriting the old file or exiting the option. If an error occurs while trying
to create or write to the Output Parameter File a message will be displayed, and pressing any key
causes re-activation of the Main menu. If the parameters are successfully stored in the file, a
message is displayed and a keystroke re-activates the Main menu.
12.5
THE OPTIONS MENU
Figure 12-2
Krige Options Screen
The Options screen and menu (Figure 12-2) has the options to specify the parameters to be used
for kriging, and to initiate the kriging process. The menu line appears as follows:
Data Polygon Type Grid Search Variables/Models Title Execute Quit
Data
The Data option is used to specify the name of the Geo-EAS data file whose values will be used
for kriging, and the name of the Geo-EAS output file of gridded estimates. The screen fields
accessed through the Data option are:
Data File
A 14 character alphanumeric field in which the name of the input data file
is entered. The most recently used Geo-EAS data file name is the default.
Once the name is given the program reads the variable names from the file
into several toggle fields used for selecting the coordinate variables and the
variables to krige. If the data file cannot be located or an error occurs
while accessing the file an error message is generated. If the variable
names are loaded successfully the Krige Options menu will be reactivated.
Output File
A 14 character alpha-numeric field for entering the name of the output file
of gridded estimates. A default name is constructed which consists of the
input data file name with a ".grd" extension (signifying gridded data). If
the specified file already resides on disk, a Yes/No prompt provides the
alternative of overwriting the file or exiting the option.
Polygon
The Polygon option is used to specify the name of a file containing polygonal boundaries which
limit the area in which estimates are produced. This file should contain one or more lists of
polygon vertices which form closed polygons.
For each block (or point) in the grid, a "FLAG" is kept which indicates if the block estimate is
to be excluded from computation. When no polygon files is specified, KRIGE sets all the flags
to INCLUDE. If a polygon file is specified, all flags are initially reset ot EXCLUDE, and then
modidied sequentially by the coded polygons in the file. The codes result in the following
operations:
IF Code= 0
Flags are set to INCLUDE blocks INSSIDE the current polygon.
Blocks outside remain unchaged.
IF Code= 1
flags are set to EXCLUDE blocks INDIDE the current polygon.
Blocks outside remain unchanged.
IF Code= 2
The flag settings are REVERSED for blocks INSIDE the current
polygon. Blocks outside remain unchanged.
IF Code= 3
the flag settings are REVERSED for blocks OUTSIDE the current
polygon. Blocks inside remain unchanged.
The new Sample Select option can be set to YES or NO, resulting in operation as follows:
IF Sample Select= NO
(the default)
IF Sample Select= YES
the polygon option operates only on points or blocks to be kriged-all
samples in the data file are used fo Kriging.
the polygon option operates on bothe the points or blocks to be
Kriged AND on the samples. Only samples winthin areas flagged
INCLUDE are used for kriging.
The polygon file is read when the Execute option is used to initiate kriging. If an error occurs
while reading the Polygon file, a message will be generated, the file will be ignored and an
attempt to krige all grid cells will be made. See the appendices for a detailed description of the
polygon file format.
Type
The Type option is used to select the type of kriging to use and whether to krige point or block
estimates. The screen fields accessed from this option are:
Type of Kriging - A toggle field containing the choices "Ordinary", and "Simple" which is used
to specify the type of kriging to perform. If "Ordinary" is chosen, ordinary kriging will be
performed. If "Simple" kriging is chosen, simple kriging is performed and a value must be
specified for the Global Mean when entering the variogram model parameters on the
Variables/Models screen.
Point or Block - A toggle field containing the choices "Point", "Block 2x2", "Block 3x3", and
"Block 4x4", which is used to indicate point or block kriging. If one of the "Block NxN" choices
is selected, block estimates will be produced. The "N" refers to the number of discretization
points used to approximate the area of the block. Large "N" values give somewhat better
approximations of the blocks at the expense of increased computing time. The choice of point
or block also determines the meaning of the Grid Origin parameters. If block kriging is chosen
these parameters refer to the center of the lower left-hand block in the grid.
Grid
The Grid option is used to specify the variables to use as coordinate values, the origin of the grid,
the size of grid cells, and the number of cells in the X and Y directions. These are specified with
four screen fields for each of the two directions. The screen fields for the X and Y directions are:
Variable
Two toggle fields containing the variables names from the specified input
data file which are used to specify the variables to be used as the sample
coordinate values when kriging. The default values for the X and Y
variables are the first and second variables in the data file. Once the
variables have been chosen the coordinate values are retrieved from the
data file. If an error occurs during the retrieval of data, a message is
displayed, and pressing any key will re-activate the Krige Options menu,
but it is assumed that the file is corrupted and cannot be used. A new data
file name must be specified. If no grid parameter values have been
previously specified, default values for the Origin, Cell Size, and Number
of Cells parameters are computed.
Origin
Two numeric fields used for entering the X and Y coordinate values for the
origin of the kriging grid. If block kriging (the default) were selected the
origin is taken as the center of the lower left-hand grid block.
Cell Size
Two numeric fields for specifying the grid cell size. For point kriging
these values will indicate the distance between points in the grid. For
block kriging these parameters will indicate the size of the blocks to be
kriged (the distance between block centers in each direction). Both values
must be non-zero, and non-negative.
# Cells
Two numeric fields for selecting the number of points or blocks to be
produced in each of the two directions. These values must be non-zero,
non-negative, and may not exceed 100.
Search
The Search option provides a means of controlling the neighborhood search used during kriging.
Parameters may be specified to define an elliptical search area. Constraints may be placed upon
the number of sectors and the number of samples to be retained in each sector of the search area,
and the type of distance measure to use when eliminating neighbors from a search sector. The
screen fields accessed from this option are:
R Major
A numeric field for indicating the length of the major radius (half the
length of the longest axis) of the search ellipse.
R Minor
A numeric field for indicating the length of the minor (shortest) radius of
the search ellipse. This value must be less than or equal to R Major,
non-zero, and non-negative. The default value is the value given for R
Major. If R Major is equal to R Minor, the search area will be a circle.
Angle
A numeric field for indicating the orientation of the search ellipse. It is
given in trigonometric degrees in the range from zero up to (but not
including) 180, and indicates the angle between the longest axis of the
ellipse (specified by R Major) and the sample coordinate X axis. If R
Minor is equal to R Major, a circle search is used and the Angle parameter
is ignored.
Distance Type
A two valued toggle field for selecting the type of distance measure
to use when eliminating neighbors. The choices available are
"Euclidean" (the default), and "Variogram". Neighboring samples
are eliminated from consideration when the Max Pts/Sector
(Maximum points per sector) criterion is exceeded in a given
sector. If this should occur, only the "closest" neighbors are kept.
If the "Euclidean" distance type is chosen, neighbors are eliminated
based upon the euclidean distance from the point to be estimated
ellipse center. If "Variogram" distance is chosen, the variogram
function value (as specified by the Model parameters) for the
computed distance is used as the criterion for elimination of
neighbors.
Num. Sectors
A toggle field for selecting how many sectors in which to divide
the search ellipse. The choices available are "1" (the default), "4",
and "8". The combination of the Number of Sectors, and the Max
Points per Sector parameters indicate the maximum number of
samples to be used for kriging. This parameter also serves to
indicate the number of groups to use for classification of neighbors.
The search ellipse is divided into the chosen number of equallysized sectors. If a sample is found to be within the search ellipse,
its' sector number is stored. These sector numbers and sample
distances are used for elimination of samples which exceed the
Max Pts/Sector value.
Max. Pts/Sector
A toggle field for selecting the maximum number of points which
a sector may contain. The choices range from "1" to a maximum
which depends on the number of sectors chosen. If one sector is
specified, up to 24 points neighbors may be used. If four or eight
sectors are selected, the choices are constrained such that a
maximum of 64 neighbors may be retained. If the number of
neighbors in a sector exceeds the specified value, the "farthest"
samples (as determined by Distance Type) are eliminated from
consideration.
Min Pts. to Use
A toggle field for selecting the minimum number of neighboring
samples to use for kriging. The default value or this parameter is
"1". If fewer than the specified number of samples are found then
kriging is not performed and a missing value is generated for the
estimate and kriging standard deviation.
Empty Sectors
A toggle field for selecting the maximum number of consecutive
sectors with no neighbors. The choices available are determined by
the Number of Sectors parameter. If one sector is chosen, then this
input is ignored. If more than the specified number of consecutive
sectors are empty, no value is kriged and missing values are
generated in place of an estimate and kriging standard deviation.
Variables/Models
The Variables/Models option is used to access the Variables/ Models screen and menu. This
screen and menu are used for selecting the variables to krige and the variogram model to use for
each variable. Up to ten variables may be selected for kriging. At least one must be specified
prior to selection of the Execute option. The Variables/Models screen and menu is discussed
below.
Title
The Title option is used to indicate the descriptive title to store in the output file of gridded
estimates. It provides access to a 60 character alphanumeric field for storing the title. A default
title is constructed from the data file name and the output file name. Any valid alphanumeric
character string may be entered.
Execute
The Execute option is used to initiate kriging. All parameters must be specified before kriging
may begin. Several "Debug Options" (described below) are enabled or disabled with the
<caps-lock>, the <num-lock>, and the <scroll-lock> keys. These keys are used to toggle the
debug displays on or off. It is important to disable all three Debug Options prior to using the
Execute option, or intermediate results screens will be generated and kriging will proceed more
slowly.
Figure 12-3 Kriging Display
If your personal computer is equipped with the proper graphics hardware, a graphics display
(shown in Figure 12-3) is generated when the Execute option is selected. In this display the
original sample locations are represented by the "x" symbol. As each point is kriged, the
estimates and associated results are displayed at the bottom of the screen (except in Herculesequipped systems) and the point or block estimates are plotted with a symbol which indicates the
quartile of the estimate. On EGA equipped computer systems, these symbols and the sample
values are also color coded. A legend is displayed at the right of the screen showing the symbols
and corresponding quartile cutoff values. If your computer system has no graphics capability, no
graph is displayed, and the results are displayed at the bottom of the Krige Options screen.
During the kriging process the debug displays (described below) may be activated or de-activated
to view intermediate kriging results. Once all grid cells have been kriged, a tone signals that the
kriging has been completed. Pressing <q> will cause the Krige Options screen and menu to be
displayed and a message will be generated to indicate that the results were successfully written
to the output file. If an error occurs while attempting to write to the file, kriging will be halted
and an error message will be displayed.
How to Cancel Kriging
At any time during the kriging process, kriging may be canceled by pressing the <ctrl> and <alt>
keys, the <ctrl> and <shift> keys, or the <left shft> and <right shft> keys simultaneously and
holding them down until the next point or block has been kriged. If this is done a message is
displayed indicating that kriging has been terminated. This is useful when the debug screens
reveal a problem with the search or variogram parameters and you wish to change them and
re-start. Note that in this situation the output file will not contain a completed grid of estimates
and probably cannot be used by the program Conrec. It is important to remember that the
"terminate kriging" keys will not work when any of the three debug display keys is active.
12.6
THE VARIABLES/MODELS MENU
Figure 12-4
Krige Variables/Models Screen
The Variables/Models screen and menu (Figure 12-4) is provided for selection of the variables
to krige and to specify the variogram model for each of the selected variables. The
Variables/Models screen is divided into three areas. The area on the left of the screen is used to
display the list of variables selected for kriging, called the Kriging List. This list is used as a
menu from which to select a variable when deleting or editing a variable/model specification.
On the right, the top area is for selecting new variables to add to the Kriging List and the bottom
area is for entering variogram model parameters. The Variables/Models menu provides options
to add or delete a variable and model to the Kriging List, and to edit a set of variogram model
parameters. The menu line appears as follows:
New Variable Edit Delete Quit
New Variable
The New Variable option is used to select a variable to add to the Kriging List. A toggle field
is displayed in the top portion of the screen which contains the variable names from the input file.
The default value for this field is the third variable name in the file. Once this selection is made
the variable name is added to the Kriging List and the variogram model parameters (described
below) must be entered.
*** Note *** it is possible to krige the same variable more than once; the output file will
then contain duplicate variable names.
Edit
The Edit option allows you to edit the specified variogram model for the specified variable.
When this option is selected the Kriging List menu is activated. A cursor may be moved to the
appropriate member of the list with the <up> or <down> keys and selected for editing with
<enter>. Once the variable has been specified the parameters will be loaded onto the screen and
the Variogram Model Parameters area will be activated. In this screen area fields are provided
for a nugget effect value and up to 4 additive variogram structures. Each structure is specified
with a structure type, a sill value, and an ellipse of influence. If simple kriging is chosen an
additional field is provided for entering the Global Mean. Each of the four structures has five
associated screen fields. Selecting the Model option will cause a cursor bar to appear in the upper
left corner of the models area. The arrow keys may be used to move the cursor bar to fields in
the Model area. To exit the Model area, move the cursor bar out of the top or off to the left of
the area, using the <left>, or <up> keys. If any errors are made when entering variogram model
parameters an error message will be displayed and the cursor bar will be placed at the problem
field. The screen fields accessed from this option are:
Nugget
A numeric field for entering the nugget value for the variogram model.
Only values greater than or equal to zero may be entered. The default
value is zero.
Global Mean A numeric field for specifying the global mean for simple kriging. If
ordinary kriging is chosen this field is disabled and cannot be accessed.
The default value for the global mean is zero.
The following five fields are present for each of the four additive variogram structures:
Type
A toggle field for indicating the type of the structure. The toggle field
choices for type are " " (none), "Spherical", "Gaussian", "Exponential",
"Linear". The default type for all four structures is "none". If a structure
is entered and the type is subsequently changed to "none" the structure will
be deleted from the variogram model. The order of the variogram
structures on the screen is unimportant; neither do they need to be in a
contiguous order on the screen.
Sill
A numeric field for entering the sill value for a variogram structure. A
non-zero, non-negative value is required here. If a linear variogram type
is selected the sill value is used together with the variogram ellipse ranges
to determine a slope for a given direction. In a linear variogram structure
the sill must be chosen so that the corresponding range parameter values
will result in the desired slope.
Major Range A numeric value for entering the longest range of influence of the
variogram structure.
The Major Range must be non-zero, and
non-negative. This may be thought of as similar to the R Major parameter
described in the Search option above. In fact, the variogram ellipse of
influence is defined exactly as the search ellipse: with two ranges (radii)
and an angle. Note however that the two ellipses have fundamentally
different purposes, although the parameters which describe them are the
same
Minor Range A numeric field for indicating the length of the minor (shorter) range of the
variogram ellipse. This value must be non-zero, non-negative, and less
than or equal to the Major Range. The default value is the Major Range
value. If the two ranges are equal, an isotropic variogram structure is
defined. If they are not equal, the two ranges are used to determine the
ratio of anisotropy.
Ellipse Angle A numeric field for indicating the orientation of the ellipse for the
variogram structure. It is given in trigonometric degrees in the range from
zero up to (but not including) 180, and indicates the angle between the
longest axis of the ellipse (specified by the Major Range) and the sample
coordinate X axis. If the two ranges are equal (isotropic structure) then the
angle is ignored.
Delete
The Delete option is used to delete a variable and model from the kriging list. When this option
is selected, the Kriging List menu will be activated, and the variable to delete may be selected as
described in the Edit option. Once this selection is made, a Yes/No prompt provides the
alternative of canceling the deletion. If <y> is chosen, the variable and model will be deleted and
the Kriging List and screen will be regenerated. This option is disabled when the Kriging List
is empty.
Figure 12-5
12.7
Krige Debug: Search Area Display
THE DEBUG DISPLAYS
The debug displays are provided as a means of viewing intermediate kriging results during the
kriging process. Since such displays slow the kriging process, the displays may be activated, or
de-activated at any time during kriging. If the <num-lock>, <caps-lock>, or <scroll-lock> keys
are activated during kriging, the corresponding displays will be generated on the screen. To
continue to the next display, the <q> key is pressed. To disable the generation of these displays,
the corresponding keys should be de-activated. On an IBM AT-style keyboard, these three keys
are accompanied by status lights which indicate that the key is "on", or "off". The following is
an explanation of each display, and the key which activates it:
Figure 12-6
Krige Debug: System of Equations Display
<caps lock> - This activates the Search Area display, shown in Figure 12-5. For each estimate,
the search ellipse is displayed along with all sample locations in the sampled area. The neighbors
which were chosen for the estimate are marked. The coordinates of the estimated point (center
of the search ellipse) is displayed at the top of the screen. If more than one sector was chosen,
the sector boundaries will be plotted. This display may be used to check if the search ellipse is
of the proper size and orientation, and that the desired number of samples are used as neighbors.
On a non-graphics system this display is a text display showing the list of neighbors, the sample
locations, and the sector number for each neighbor.
Figure 12-7
Krige Debug: Kriging Weights Display
<scroll lock> - This key activates a display (Figure 12-6) which shows the system of equations
used to produce the estimate. A one-dimensional array of values on the left of the screen shows
the covariances between the estimate location and the neighbors, and the matrix of values in the
remaining portion of the screen shows the covariances between neighboring samples. If the
number of neighbors used in the system of equations is more than eight, each row of the matrix
will "wrap-around" to the next line and produce an undesirable results. This display allows you
to see the actual covariance values used for kriging, for comparison with other programs or for
verification of results.
<num lock> - This key activates the Kriging Weights display, shown in Figure 12-7. This
display provides information about the neighboring samples used for kriging each estimate. This
includes the coordinate values, the sample values, the distances from the estimated point, and the
kriging weights assigned to each neighbor. Also displayed are the kriging estimate, the kriging
standard deviation, and several related statistics, including the sum of the kriging weights, the
kriging variance, and the Lagrange parameter value.
SECTION 13
13.1
POSTPLOT
WHAT POSTPLOT DOES
Postplot produces a plot of (2D) sample locations and values for a variable in a Geo-EAS data file.
Sample locations may be marked with a symbol, value, or both. The format for the value to be plotted
may be specified by setting a scaling factor and the number of decimal places to be used in the plotted
value. Options allow control of axes parameters, and titles. A file called a "metacode" file is created for
redisplay or to produce a hardcopy.
Note: Postplot attempts to produce "true-scale" graphs on the screen, but for some data configurations,
an internal NCAR routine overrides true scaling and produces a somewhat distorted graph.
13.2
DATA LIMITS
Postplot requires that the input data file contain at least 3 but not more than 48 variables. These should
consist of an X and Y coordinate and a third variable which will be posted. The data file may contain up
to 1000 samples. If the data file contains more than 1000 samples, only 1000 will be used by Postplot.
13.3
THE MENU HIERARCHY
Postplot ____ Prefix
Data
Variables
Options
Graph Options _____Axis Parameters
Tick Parameters
Graph Limits
Titles/Labels
Reset
\ Quit
Execute
\ Quit
13.4
THE MAIN MENU
The Main screen and menu, shown in Figure 13-1, has the options to allow specification of the data and
metacode file names, the selection of the variables to be used and the options for displaying the posted
variable. The menu line appears as follows:
Prefix Data Variables Options Graph Options Execute Quit
Figure 13-1
Postplot Main Screen
Prefix
The Prefix option is used to enter the prefix for file names.
Data
The Data option is used to enter the name of a Geo-Eas data file.
Variables
The Variables option allows the selection of variables that are to be used as the X and Y coordinate
values, and the sample values to post. The choices available are the variable names as specified in the
data file. The screen fields accessed from this option are:
X Coordinate Variable
A toggle field for selecting the variable name whose values will be
used as the X coordinates. The default X variable is the first
variable in the data file.
Y Coordinate Variable
A toggle field for selecting the variable whose values will be used
as the Y coordinates. The default Y variable is the second variable
in the data file.
Variable to post
A toggle field for selecting the variable whose values will be posted
on the plot. The default variable to post is the third variable in the
data file.
Options
The Options option allows the specification of how the sample locations are to be marked on the graph.
The screen fields accessed from this option are:
Include Values
A two-valued (Yes/No) toggle field to enable or disable the
labeling of samples with their numeric values. The choices
available are "Yes" - plot values, "No" - do not plot values. The
default value is "No".
Size
Two toggle fields for selecting the character size to use when
plotting the values or symbols. The choices available are "0" to
"10", where "0" is the smallest and "10" is the largest character
size. The default size for plotting values is "5", and the default for
plotting symbols is "4". These choices work well on the screen,
however a smaller size might be more suitable for output to a
plotter.
Scale Factor
A toggle field for selecting the scaling factor to apply to the values
to be plotted. The choices available range from "10^-4" to "10^4".
The scaling factor shifts the decimal place left or right in the plotted
value. For example a scale factor of 10^4 applied to a value of
7.208 would result in the value 72080 being plotted. If the Include
Values field is set to "No", this choice is ignored. If the default of
"10^0 "is used the decimal place will not be shifted.
# Decimals
A toggle field for selecting the number of digits to display. The
choices available range from "0" to "3". For example, selecting "2"
with a value of 72.208 would result in the value 72.21 (round up
does occur) being plotted. The default is "1" (one digit to the right
of the decimal place).
Include Symbols
A two-valued (Yes/No) toggle field to enable or disable the plotting
of symbols at the sample locations. The choices available are
"Yes" - plot symbols, "No" - do not plot symbols. If the value is
"Yes" (the default) four different symbols in four different colors
will be plotted to represent the values within their quartiles. A
legend is also plotted to show the quartile cutoff values, the
symbols, and their corresponding colors. If the value is "1" only
one symbol, a "+" in one color (yellow) will be used to plot the
values. No legend will be plotted.
Graph Options
The Graph Options option provides access to the Graph Options screen and menu, described below.
Execute
When the Execute option is selected, you will be prompted for a metacode file name. The metacode file
is then created and the graph is displayed. The metacode file name entered may be up to 14 characters.
The default value is "Metacode.met". If the default value is not used and the file specified already exists,
a Yes/No prompt for whether or not to overwrite the file is displayed. This file contains the metacode
instructions produced by the program. It will be saved for future viewing. A hard copy of the graph can
be obtained by using the program Hpplot and an HPGL compatible plotter. After the graph has been
displayed, type <q> to clear the screen and return to the Main menu. An example post plot is shown in
Figure 13-2.
Figure 13-2
Example Post Plot
13.5
THE GRAPH OPTIONS MENU
Figure 13-3
Postplot Graph Options Screen
The Graph Options screen and menu, displayed in Figure 13-3, provides control over the "graph
background" parameters. These parameters are used to specify the axis style, the graph limits, titles and
axis labels, and the tickmark labeling and spacing. The menu line appears as follows:
Axis Parameters Tick Parameters Graph Limits Title/Labels Reset Quit
Axis Parameters
The Axis Parameters option allows the selection of the type of axis style for the background of the plot.
The screen field accessed from this option is a toggle field. Choices available are "Half" (left and bottom
axes only), "Full" (left, right, top, and bottom axes) and "Grid" (the same as "Full", but the major
tickmarks extend across to the opposite axis). The default axis style is "Full".
Tick Parameters
The Tick Parameters option allows specification of the nature of the numeric tickmark labels to be placed
along each axis. This is accomplished with a set of closely inter-related parameters which control the
format of the labels. The default values are initially set to "Auto", and provide adequate labels for most
data. With the appropriate selection of parameter values, however, many useful labels may be
constructed, including fractions and superscripted powers of ten. An excerpt from the NCAR
documentation on tickmark parameters is included in the appendices. Certain incompatible combinations
of parameter choices will result in no labels being plotted or error messages generated by the NCAR
Autograph utility. These errors will cause the program to terminate. To recover, restart and change the
parameters. A menu option is provided to "reset" these parameters to "Auto", so that the default values
may be used. The screen fields accessed from this option are:
Base Two numeric fields used for the computation of major tick marks along the X and Y axes.
The user may accept the default value of "Auto" which allows the system to select the
appropriate value, or enter a value appropriate for the variable selected.
Type Two toggle fields for selecting a formula for computing (using Base, entered above) the
spacing of the tick marks along the X and Y axes. Choices available are:
Auto (System will select appropriate computation)
None (No tick marks on axis)
Base * k
Base * 10^k
Base^k
Note: "k" is an arbitrary integer computed by the program. The default value is "Auto" for both
axes.
Label
Exponent
Two toggle fields for selecting the format of numeric tickmark labels along the X
and Y axes. Choices available are:
Auto
None
Scien.
Expon.
No-Exp.
System will select appropriate format
No tick marks on axis
Scientific notation
Exponential notation
Non-exponential notation
Fraction
Two numeric fields for entering the number of significant digits to
display in the numeric axis labels.
Two numeric fields for entering the value of the exponent in the numeric axis
labels.
Table 13-1 shows examples of the types of numeric tick mark labels that can be produced, using
combinations of choices for the Base, Type, Label, Fraction, and Exponent parameters. The labels were
produced using the Example.dat data file with Easting as the X variable and Northing as the Y variable.
Remember that certain combinations of parameter values are incompatible, and will result in unexpected
results, or a lack of tickmark labeling. The Reset option may be used to set parameter values back to
their defaults if this occurs.
Base
Type
Label
Fraction
Exponent
Results
Auto
Base*k
Scien.
Auto
Auto
2.50 x 10²
Auto
Base*10^k
Expon.
Auto
Auto
102
2.
Base*10^k
Scien.
1.
2.
Base^k
No-Exp.
-1.
Auto
Base^k
Expon.
1.
3.
Base*10^k
No-Exp.
1.
Auto
Auto
Base^k
Scien.
2.
1.
5.
Base^k
Expon.
3.
Auto
3.6
Table 13-1
Auto
Auto
2 x 10³
64
2 x 10³
30
100.01 x 100
5.02
Numeric Tickmark Label Examples
Graph Limits
The Graph Limits option allows you to enter values that specify the coordinate limits for the X and Y
axes. Certain combinations of the Tick Parameters will cause these values to be overridden by the
program. The screen fields accessed from this option are:
Min
Two numeric fields for entering the minimum coordinate value to be used on the X and
Y axes. The default values displayed are determined from the variables selected as the
X and Y coordinate values.
Max
Two numeric fields for entering the maximum coordinate value to be used on the X and
Y axes. The default values displayed are determined from the variables selected as the
X and Y coordinate values.
Titles/Labels
The Titles/Labels option allows you to enter the title and labels for the graph. The Hershy character sets
of 33 fonts are used for plotting alphanumeric labels. Also, certain "special characters" may be
embedded in the title or label which control selection of alternate fonts or other aspects of the plotted
text. These special characters are not plotted, but are interpreted as commands by the metacode
translator software. The appendices contain information on font selection codes. The screen fields
accessed from this menu option are:
Main title
An alphanumeric field which may contain up to 60
characters for the main title
of the graph. The default title contains the variable name selected as the post
variable and the name of the data file.
Subtitles
Two alphanumeric fields which may contain up to 60 characters each for the
subtitles on the graph. The subtitles appear below the main title.
X Label
An alphanumeric field which may contain up to 60 characters for the X axis label.
The default label is composed of the X variable name followed by its units in
parentheses.
Y Label
An alphanumeric field which may contain up to 60 characters, for the label on the
Y axis. The default label is composed of the Y variable name followed by its units
in parentheses.
Reset
The Reset option allows the user to reset the graph options parameters to their default values.
SECTION 14
14.1
XYGRAPH
WHAT XYGRAPH DOES
Xygraph produces line and/or scatter plots for up to six variables in a Geo-EAS data file. Plots
of up to six dependent variables with one independent variable can be obtained. Up to six
colors, symbols, and line types may be used to identify the data. Options allow a regression
line to be calculated and axes parameters and graph labeling to be controlled. A file called a
"metacode" file is created for redisplay or to produce a hardcopy.
14.2
DATA LIMITS
Xygraph requires that the input data file contain at least two but not more than 48 variables.
The data file may contain up to 500 samples. If the data file contains more than 500 samples,
only 500 will be used by Xygraph.
14.3
THE MENU HIERARCHY
Xygraph ___ Prefix
Read Parameters
Options/Execute ___ Data
Variables
Symbol/Line
Regression
Legend
Graph Options _____ Axis Parameters
Tick Parameters
Graph Limits
Titles/Labels
Reset
\ Quit
Execute
\ Quit
Save Parameters
\ Quit
14.4
THE MAIN MENU
The Main screen and menu ( Figure 14-1) has the options to allow specification of the input and
output parameter file names. The menu line appears as follows:
Prefix Read Parameters Options/Execute Save Parameters Quit
Figure 14-1
Xygraph Main Screen
Prefix
The Prefix option is used to enter the prefix for file names.
Read Parameters
The Read Parameters option is used to enter the input parameter file name.
Options/Execute
The Options/Execute option provides access to the Options screen and menu. See the section
on Options below for more information.
Save Parameters
The Save Parameters option is used to enter the name of the output parameter file. If the
specified file already exists, a Yes/No prompt is provided to quit or proceed. The parameter
file will contain the current parameter values. It will be saved for future use as an input
parameter file.
14.5
THE OPTIONS MENU
The Options screen and menu (Figure 14-2) has options to allow specification of the data and
metacode file names, the selection of variables to be used, the options for displaying the
variable, to compute a regression line, and the position of a graph legend. The menu line
appears as follows:
Data Variables Symbol/Line Regression Legend Graph Options Execute Quit
Figure 14-2
Xygraph Options Screen
Data
The Data option is used to enter the name of a Geo-EAS data file.
Variables
The Variables option allows the selection of variables that are to be used as the X and Y
coordinate values. The choices available are the variable names as specified in the data file.
The screen fields accessed from this option are:
X Variable
A toggle field used for selecting the variable name whose values will be
used as the independent variable on the graph. The default X Variable is
the first variable in the data file.
Y Variables
Six toggle fields used for selecting the variables whose values will be used
as the dependent variables in the graph. The default Y Variable is the
second variable in the data file.
Symbol/Line
The Symbol/Line option allows the specification symbols and/or lines and color to mark the
data on the graph. The symbols and line types are displayed in Figure 14-3. The screen fields
access from this option are:
Figure 14-3
Xygraph Symbols and Line Types
Figure 14-3
Xygraph Symbols
and Line Types
0
-
No symbol
0
-
No symbol
1
-
+
1
-
_______
2
-
o
2
-
__ __ __
3
-
x
3
-
__ __ _
4
-
>
4
-
---------
5
-
5
-
___ ___
6
-
6
-
_____ _
x/x
Symbol Type Six toggle fields for selecting the type of symbol to plot. There are six
choices available ("0" to "6"). A value of "0" indicates that no symbols
are to be plotted. The default Symbol Types for the six variables are "1"
through "6".
Line Type
Six toggle fields for selecting the type of line to plot for each variable.
There are six choices available ("0" through "6"). A value of "0"
indicates that no line is to be plotted. The default Line Type for all six
variables is "0".
Color Six toggle fields for selecting the color to plot the symbol and/or line pattern.
The choices available are "Black", "Blue", "Red", "Yellow", "Green", "Brown".
The default color is unique for each variable.
Regression
The Regression option provides access to a two-valued (Yes/No) toggle field to enable or
disable the calculation of linear regression. If the value is "Yes" linear regression is only
calculated for the first Y variable. The regression line and the regression coefficients are
plotted on the graph. The coefficients are the slope and intercept of the line represented by
the equation Y = Slope * X + Intercept. The R Squared value (a measure of correlation) is
also plotted. The default is "No".
Legend
The Legend option provides access to a toggle field that is used for selecting the position of
the graph legend. The choices available are "None" (no graph legend), "Bottom" (at the
bottom of the graph), and "Right" (at the upper right-hand corner of the graph). The default
position is "None" (no legend).
Graph Options
The Graph Options option provides access to the Graph Options screen and menu, described
below.
Execute
When the Execute option is selected you are prompted for a metacode file name. The
metacode file is then created and the graph is displayed. The metacode file name entered
may contain up to 14 characters. The default value is "METACODE.MET", or the name
specified in the input parameter file. If the file name is not "METACODE.MET" and the
file specified already exists, a Yes/No prompt provides the option to quit or proceed. The
metacode file is saved on disk for future viewing. An example plot is displayed in Figure
14-4. A hard copy of the graph can be obtained by using the program Hpplot and an HPGL
compatible plotter. After the graph has been displayed, type <q> to clear the screen and
return to the Options menu
Figure 14-4
Example Xygraph Plot
Figure 14-5
Xygraph Graph Options Screen
14.6
THE GRAPH OPTIONS MENU
The Graph Options screen and menu (shown in Figure 14-5) provides control over the
"graph background" parameters. These include parameters which allow control of the axis
style, the graph limits, titles and axis labels, and the numeric tickmark labeling and spacing.
The menu line appears as follows:
Axis Parameters Tick Parameters Graph Limits Title/Labels Reset Quit
Axis Parameters
The Axis Parameters option allows the selection of the type of axis style for the plot. The
screen field accessed from this option is a toggle field. The choices available are "Half"
(left and bottom axes only) , "Full" ( left, right, top, and bottom axes) and "Grid" (the same
as "Full" but major tick marks are extended across to the opposite axis). The default is
"Full".
Tick Parameters
The Tick Parameters option allows specification of the nature of the numeric tickmark
labels to be placed along each axis. This is accomplished with a set of closely inter-related
parameters which control the format of the labels. The default values are initially set to
"Auto", and provide adequate labels for most data. With the appropriate selection of
parameter values, however, many useful labels may be constructed, including fractions and
superscripted powers of ten. An excerpt from the NCAR documentation on tick parameters
is included in the appendices. Certain incompatible combinations of parameter choices will
result in no labels being plotted or error messages generated by the NCAR Autograph
utility. These errors will cause the program to terminate. To recover, restart and change the
parameters. A menu option is provided to "reset" these parameters to "Auto", so that the
default values may be used. Refer to Section 5.9 (Postplot) for several examples of numeric
tickmark labels. The Screen fields accessed from this option are:
Base Two numeric fields for the computation of major tick marks along the X and
Y axes. The user may accept the default value of "Auto" which allows the
system to select the appropriate value, or enter a value appropriate for the
variable selected.
Type Two toggle fields for selecting a formula for computing (using Base, entered
above) the spacing of the tick marks along the X and Y axes. The available
choices are:
Auto (System will select appropriate computation)
None (No tick marks on axis)
Base * k
Base * 10^k
Base^k
Note: "k" is an arbitrary integer computed by the program. The default value is
"Auto" for both axes.
Label
Two toggle fields for selecting the format of numeric label to be used at
the major tick marks along the X and Y axes. The available choices are:
Auto
None
Scien.
Expon.
No-Exp.
System will select appropriate format
No tick marks on axis
Scientific notation
Exponential notation
Non-exponential notation
Fraction
Two numeric fields for entering the number of significant digits to
display in the numeric labels along the X and Y axes.
Exponent
Two numeric fields for entering the value of the exponent in the
numeric labels along the X and Y axes.
Graph Limits
The Graph Limits option allows you to enter values that specify the coordinate limits and
the type of scaling for the X and Y axes. Certain combinations of the Tick Parameters will
cause these values to be overridden. The screen fields accessed from this option are:
Min
Two numeric fields for entering the minimum coordinate value to be used on
the X and Y axes. The default values displayed are determined from the data
file for the variable selected as the X and Y variables.
Max
Two numeric fields for entering the maximum coordinate value to be used on
the X and Y axes. The default values displayed are determined from the data
file for the variable selected as the X and Y variables.
Scale Two toggle fields for selecting the type of scaling to be used on the X and Y
axes. The choices available are "Linear" and "Log" (natural log) scaling. If
"Log" scaling is selected and any data values are negative or zero, an error
message is displayed and the Scale field is reset to "Linear". The default is
"Linear".
Titles/Labels
The Titles/Labels option allows you to enter the title and labels for the graph. The Hershy
character sets of 33 fonts are used for plotting alphanumeric labels. Also, certain "special
characters" may be embedded in the title or label which control selection of alternate fonts
or other aspects of the plotted text. These special characters are not plotted, but are
interpreted as commands by the metacode translator software. The file HERSHY.BAR
(included with the software) contains the font information. See the appendices for more
information on font selection codes.
The screen fields accessed from this menu option are:
Main title
An alphanumeric field which may contain up to 60 characters for the
main title of the graph. The default title contains the variable name
selected as the post variable and the name of the data file.
Subtitles
Two alphanumeric fields which may contain up to 60 characters each
for the subtitles on the graph. The subtitles appear below the main title.
X Label
An alphanumeric field which may contain up to 60 characters for the X
axis label. The default label is composed of the X variable name
followed by its units in parentheses.
Y Label
An alphanumeric field which may contain up to 60 characters, for the
label on the Y axis. The default label is composed of the Y variable
name followed by its units in parentheses.
Reset
The Reset option allows the user to reset the parameters to their default values.
SECTION 15
15.1
CONREC
WHAT CONREC DOES
Conrec produces contour maps of variables with gridded coordinates in a Geo-EAS data file. The
data must form a complete grid. A grid is a a set of values with equally spaced X and Y
coordinates which form a rectangle. Individual grid cells may contain missing values. Default
parameter values can be computed for all options, providing instant results. Options allow
control of contour levels, labeling, and smoothing. Options to control axes labeling and titles are
also available. A file called a "metacode" file is created for redisplay or producing a hardcopy.
15.2
DATA LIMITS
Conrec requires that the input data file contains at least three but not more than 48 variables.
These should consist of (at minimum) an X and Y coordinate, and a third variable for which
contour lines will be drawn. The data file may contain up to 10000 samples. These must form
a grid with no more than 100 elements in each direction. If these limits are exceeded the grid
cannot be formed and the data file cannot be used by Conrec.
15.3
THE MENU HIERARCHY
Conrec _____ Prefix
Read Parameters
Option/Execute ____ Data
Variables
Graph Options _____Axes Parameters
Tick Parameters
Titles/Labels
Annotation
\ Quit
Save Parameters
\ Quit
Contour Options____New Levels
Edit Levels
Labeling
Dash Pattern
Annotation
Execute
Spline
\ Quit
\ Quit
15.4
THE MAIN MENU
Figure 15-1
Conrec Main Screen
The Main screen and menu (Figure 15-1) has the options to allow specification of the input and
output parameter file names. The menu line appears as follows:
Prefix Read Parameters Options/Execute Save Parameters Quit
Prefix
The Prefix option is used to enter the prefix for file names.
Read Parameters
The Read Parameters option is used to enter the input parameter file name.
Options/Execute
The Options/Execute option provides access to the Options menu. See the section on Options
below for more information.
Save Parameters
The Save Parameters option is used to enter the name of the output parameter file. The default
output parameter file name is the data file name with a ".cpf" extension. If the file specified
already exists, a Yes/No prompt for whether or not to overwrite the file is displayed. This file
will contain the current parameter values. It will be saved for future use as an input parameter
file.
15.5
THE OPTIONS MENU
Figure 15-2
Conrec Options Screen
The Options screen and menu, shown in Figure 15-2, has the options to allow specification of the
data file name and the selection of variables to be used. The menu line is as follows:
Data Variables Graph Options Contour Options Execute Quit
Data
The Data option is used to enter the data file name. The file must have coordinate variables with
values that form a complete grid. An example of such a file is the file of kriged estimates
produced by the program Krige. Krige creates a file with a .grd extension by default. This is a
Geo-EAS data file which contains gridded data.
Variables
The Variables option allows selection of the variables that are to be used as the X and Y
coordinate values and the variable to be contoured. The choices available are the variable names
as specified in the data file. If a grid could not be formed from the data an error message is
displayed. After the grid is formed a Yes/No prompt is displayed which allows computation of
defaults for the Graph Options and Contour Options screens. If the response is "Yes" default
values for Contour Options and Graph Options options will replace any previous entered values
on these screens. If the response is "No" and no contour levels have been set, an error message
will occur when the Execute option is selected. The screen fields accessed from this option are:
X Variable
A toggle field for selecting the variable name whose values will be
used as the X coordinates. The default X variable is the first
variable in the data file.
Y Variable
A toggle field for selecting the variable name whose values will be
used as the Y coordinates. The default Y variable is the second
variable in the data file.
Contour Variable
A toggle field for selecting the variable name whose values will be
used as the contour values. The default Contour Variable is the
third variable in the data file.
Graph Options
The Graph Options option provides access to the Graph Options screen and menu, described
below.
Contour Options
The Contour Options option provides access to the Contour Options screen and menu, described
below.
Execute
When the Execute option is selected, you will be prompted for a metacode file name. The
metacode file is then created and the graph is displayed. The metacode file name may be up to
14 characters. The default name is "METACODE.MET". If the default value is not used and the
file already exists, a Yes/No prompt provides an option to proceed or quit. The metacode file is
stored on disk for later use. A hard copy of the graph can be obtained by using the program
Hpplot and an HPGL compatible plotter. If the number of contour levels is set to zero an error
message is displayed. The user must set the number of contour levels before the graph can be
produced. Contour lines will not be plotted across a grid cell which contains a missing value.
After the graph (see Figure 15-3) has been displayed, type <q> to clear the screen and return to
the Options menu.
Figure 15-3
15.6
Example Contour Plot
THE GRAPH OPTIONS MENU
Figure 15-4
Conrec Graph Options Screen
The Graph Options screen and menu (Figure 15-4) provides control over the "graph background".
Options are available to select the axis style, the format for tickmark labeling and spacing, and
the character size and orientation of the graph titles and axis labels. The menu line appears as
follows:
Axis Parameters Tick Parameters Titles/Labels Annotation Quit
Axis Parameters
The Axis Parameters option allows selection of the type of axis style for the X and Y axes. The
screen field accessed from this option is Axis Style which consists of two toggle fields. The
choices available are "Half" (left and bottom axes only), "Full" (left, right, top, and bottom axes)
and "Grid" (the same as "Full", but the major tickmarks extend across to the opposite axis). The
Axis Style for the axes are independent of each other: for example if the Axis Style is "Half" for
the X axis and "Full" for the Y axis, the Bottom, Left, and Right axes would be drawn. The
default value is "Full" for both the X and Y axes.
Tick Parameters
The Tick Parameters option allows the specification of the spacing and format of the numeric
tickmark labels on the X and Y axes. The screen fields accessed from this option are:
# Major Tickmark Divisions
Two numeric fields for entering the number of
major tickmark divisions along the X and Y axes.
The default may be calculated by the program when
the Variables option is selected.
# Minor Division/Major
Two numeric fields for entering the number of
minor tickmark divisions per major division along
the X and Y axes. The default may be calculated by
the program when the Variables option is selected.
Tickmark Label Format
An alphanumeric field which may contain up to 10
characters for entering a FORTRAN format
specifier which describes how the label is to be
printed. The format must a valid FORTRAN format
for a REAL value with a format width no greater
that 10. A default format is constructed from the
grid coordinate values. This format should be
adequate for most purposes. If an invalid or
unsuitable format specifier is entered an error
message is displayed. For more information on
FORTRAN format specifiers, refer to a FORTRAN
reference manual.
Tickmark Label Size
A toggle field used for selecting the character size of
the tickmark labels. The choices available are "1" to
"10". The default size is "3". This value works well
on the screen, however a smaller size might be more
suitable for output to a plotter.
Titles/Labels
The Titles/Labels option allows you to enter the title and labels for the graph. The Hershey
character sets of 33 fonts are used for plotting alphanumeric labels. Also, certain "special
characters" may be embedded in the title or label which control selection of alternate fonts or
other aspects of the plotted text. These special characters are not plotted, but are interpreted as
commands by the metacode translator software. The file HERSHY.BAR (included with the
software) contains the font information. See the appendices for more information on font
selection codes.
The screen fields accessed from this menu option are:
Title Position Two toggle fields for selecting the position of the main title and the
subtitles. The choices available are "Left" (at the left edge), "Center"
(centered on the line), or "Right" (at the right edge). The default is
"Center".
Main Title
An alphanumeric field which may contain up to 60 characters, for entering
the title of the graph. The default title is the title from the data file.
Subtitles
Three alphanumeric fields which may contain up to 60 characters each for
entering the graph subtitles. The default for the first subtitle is the name
of the contour variable.
X Axis
An alphanumeric field which may contain up to 60 characters for entering
the X axis label. The default X axis label is the X coordinate variable
name.
Y Axis
An alphanumeric field which may contain up to 60 characters for entering
the Y axis label. The default Y axis label is the Y coordinate variable
name.
Size
Six toggle fields for selecting the character size for the labels. The choices
available are "0" to "10" where "0" is the smallest and "10" is the largest
character size. The default for the Main Title is "6". The default for the
first and second subtitles and the X and Y axes is "5". The default for the
third subtitle is "4". These choices work well on the screen, however
smaller sizes might be more suitable for output to a plotter.
Annotation
The Annotation option allows the user to suppress the axes, titles, and labels for the graph. The
screen field accessed from this option is a toggle field that is displayed on the message line. The
choices available are "Plot axes and titles", or "No annotation" (do not plot axes and titles) . The
default is "Plot axes and titles".
15.7
THE CONTOUR OPTIONS MENU
Figure 15-5
Conrec Contour Options Screen
The Contour Options screen and menu (Figure 15-5) has options to allow specification of the
contour levels, labels, the skip factor , label size and the selection of a dashed line pattern. The
menu line appears as follows:
New Levels Edit Levels Labeling Dash Pattern Annotation Spline Quit
New Levels
The New Levels options allow you create a list of equally spaced contour values and labels. The
defaults for these screen fields may be calculated by the program when the Variables option is
selected. The program calculates the contour levels and the corresponding labels based on the
values from these fields. The screen fields accessed from this option are:
Starting Contour Value - A numeric field for entering the lowest contour level.
Maximum Contour Value - A numeric field for entering the highest contour level.
Contour Level Increment - A numeric field for entering the increment value between the contour
levels.
Edit Levels
The Edit Levels option allow you to change the contour labels or specify unequal contour level
spacing. The screen fields accessed from this option are:
Contour Level - A column of numeric fields for entering the contour levels.
Contour Label - An column of 16 character alphanumeric fields for entering the contour labels.
Labeling
The Labeling option allow you to select the contour labeling options. The screen fields accessed
from this option are:
Labeling Option
A two valued toggle field to enable or disablethe labeling of
contour lines. The choices available are "On" (label contours) or
"Off" (do not label contours). If the Labeling Option is "Off" the
other screen fields in this group are ignored. The default is "On".
Label Skip Factor
A toggle field for selecting the skip factor for the contour labels.
The Label Skip Factor is the frequency at which to label the
contour lines. For example if the Label Skip Factor is two and the
First Level to Label is 1 then contour levels 1, 3, 5 ... would be
labeled. The choices available are "1" to "5". The default is "2".
First Level to Label A ten-valued ("1" .. "10") toggle field for selecting the first contour
level to label. The default is "1".
Label Size
A ten-valued toggle field ("1".."10") for selecting the contour label
character size. The default is "6".
Dash Pattern
The Dash Pattern option allows specification of the Dash Pattern and the Dash Cutoff level. The
screen fields accessed from this option are:
Dash Pattern An alphanumeric field which may contain up to 12 characters, for entering
the line pattern to use for the contour line below the Dash Cutoff. The
Dash Pattern is a combination of characters and spaces with each
non-blank character representing a solid line segment in the Dash Pattern.
The default is "--- --- ". The pattern "------------" would cause a solid
line to be plotted.
Dash Cutoff A numeric field for entering the Dash Cutoff value. If a contour level is
below this value then the line is plotted using the specified Dash Pattern.
# Rep/Label A toggle field for selecting the number of repetitions of the dash pattern
between contour labels to plot. Choices available are "2" to "10". The
default is "5".
Annotation
The Annotation option allows the specification of the graph annotation. The screen fields
accessed from this option are:
Annotation Option
A toggle field for selecting the type of graph annotation for the
graph. The available choices are "Plot Min/Max" and "No
Annotation" ( do not plot the minimum and maximums. The
default is "Plot Min/Max". If "Plot Min/Max" is chosen the
minima and maxima of the surface represented by the contour map
will be plotted. An "H" denotes a local maximum and an "L"
denotes a local minimum.
Character Size
A toggle field for selecting the character size to plot the graph
annotation. Choices available are "1" to "10". The default is "8".
This value works well on the screen, however a smaller size may
be better suitable for output to a plotter. This field is ignored if the
Annotation option "No Annotation" is chosen.
Spline
The Spline option allows the specification of the amount of smoothing of the line segments. The
screen field accessed from this option is a numeric field. Acceptable values range from 2.5 to
30. The larger the Spline Tension value the less smoothing of the line. A value of 30 disables
smoothing. Smooth contours generally look better; but because the contour lines are smoothed
independently, smoothing results in contour lines which may intersect. The default value is 15.0.
SECTION 16
16.1
VIEW
WHAT VIEW DOES
View displays on the screen the graphs contained in metacode files. The graphs can be displayed
on a EGA, CGA, or Hercules graphics system. Color graphs are viewed on EGA systems. On
CGA and Hercules systems monochrome graphs are displayed.
16.2
THE MENU HIERARCHY
View ______ Prefix
File
Scale
Execute
\ Quit
16.3
THE MAIN MENU
The Main screen and menu, shown in Figure 16-1, has the options to allow specification of the
metacode file name and the plotting area. The menu line appears as follows:
Prefix File Scale Execute Quit
Prefix
The Prefix option is used to enter the prefix for file names.
File
The File option is used to enter the metacode file name. The screen field accessed from this
option is an alphanumeric field and may contain up to 14 characters. This character string
combined with the file prefix should form the name of a valid metacode file, or an error is
displayed. This file contains the metacode instructions produced by the programs, Conrec,
Xygraph, and Postplot.
Figure 16-1
View Main Screen
Scale
The Scale option is used to select the type of plotting area to use when displaying the graph. The
screen field accessed from this option is a toggle field. The choices available are "Square" (the
original scaling of the graph), and "Rectangle" (the graph will be stretched to fit the entire
screen). The default is "Rectangle".
Execute
The Execute option is used to display the graph on the screen. When this option is selected the
metacode file is read and translated into graphic output for the type of graphic system in use. If
a problem is encountered while trying to read the metacode file an error message will be
displayed. This can occur if the specified file is not in the correct format. The metacode file can
contain more than one graph (frame). To View subsequent frames press <enter>. After the graph
has been displayed, type <q> to clear the screen to return to the Main menu.
SECTION 17
17.1
HPPLOT
WHAT HPPLOT DOES
Hpplot translates the device independent plotting instructions in metacode files into a file of
HPGL plotting commands. The output file can be routed to a HP plotter by setting up the serial
port (COM1) by running the batch file HPSETUP.BAT and then using the DOS PRINT
command to send the file to the plotter. The HP plotters supported are:
HP 7470 - 2 pen plotter
HP 7475 - 6 pen plotter
HP 7450 - 8 pen plotter
If the HP 7470 is used for plotting the graph will be plotted in two pen colors, the program does
not prompt for pen changes.
17.2
THE MENU HIERARCHY
Hpplot _____ Prefix
File
Scale
Execute
\ Quit
17.3
THE MAIN MENU
The Main screen and menu (Figure 17-1) has the options to allow specification of the metacode
and output file names, and the plotting area. The menu line appears as follows:
Prefix File Scale Execute Quit
Prefix
The Prefix option is used to enter the prefix for file names.
Figure 17-1
Hpplot Main Screen
File
The File option is used to enter the metacode file name. The screen field accessed from this
option is an alphanumeric field and may contain up to 14 characters. This character string
combined with the file prefix should form the name of a valid metacode file, or an error is
displayed. This file contains the metacode instructions produced by the programs Conrec,
Xygraph, or Postplot.
Scale
The Scale option is used to select the type of plotting area to use when displaying the graph. The
screen field accessed from this option is a toggle field. The choices available are "Square" (the
true scale of the graph), and "Rectangle" (the entire screen). The default is "Rectangle".
Execute
When the Execute option is selected, you will be prompted for a output file name before the
output file is created. The output file name entered must be up to 14 characters. This file
contains the instruction generated by translating the metacode file into HPGL plotting
instructions. If a problem occurs while accessing the metacode file an error message is displayed.
When execution is complete, the plot instruction file produced by Hpplot may be sent to an HP
plotter or compatible. This is accomplished by first running the DOS command file
HPSETUP.BAT (provided with the software distribution) to configure the COM1: serial port, and
redirect printer output to COM1:. Type: HPSETUP <enter>. The file may then be sent to the
plotter by using the DOS command: PRINT {Filename} <enter>.
APPENDIX A
REFERENCES
Clark, I., 1979, Practical Geostatistics, Applied Science Publishers, London.
David, M., 1984, Geostatistical Ore Reserve Estiimation, Elsevier, Amsterdam.
Isaaks, E.H and Srevastava, R.M., 1989, An Introduction to Applied Geostatistics, Oxford
University Press, Inc. New York.
Journel, A.H. and C.H. Huijbregts, 1978, Mining Geostatistics, Academic Press, London.
Rendu, J.M., 1981, An Introduction to Geostatistical Methods of Mineral Evaluation, South
African Institute of Mining and Matalurgy, Johannesburg.
Srivastava, R.M., 1988, "A Non-ergodic Framework for Variograms and Covariance
Functions", SIMS Technical Report No. 114, Dept. of Applied Earth Sciences, Stanford
University.
APPENDIX B
NCAR GRAPH OPTIONS
The following is an excerpt from the NCAR Autograph Manual. It has been slightly modified
to include the Tickmark parameter names used in programs Xygraph and Postplot. This
explanation may help to explain how these parameters work together to produce numeric
tickmark labels. Acceptable actual values for the screen fields are as follows:
No Labeling
Setting label to ‘None’ turns off the numeric labels on the axis specified. The other
parameters, are then ignored.
Scientific Labeling
Setting Label to ‘Scien.’ selects scientific notation. Each numeric label is written in the form:
[-] [i] [.] [f] * 10 e
Where brackets enclose portions which may be independently present or absent and
‘e’ is a superscricpt exponent.
The value of the parameter Type is immaterial when scientific notation is selected.
The parameter Exponent specifies the number of character of ‘I’ thus also specifying
the value of the exponent ‘e’. IF Exponent has a value less than or equal to zero ‘I’ is
omitted. If Exponent is less than zero and has the integral absolute value ‘n’, the
fraction ‘f’ is forced to have ‘n’ leading zeroes.
The parameter fraction specifies the number of characters in ‘f’. If Fraction is less or
equal to zero, ‘f’ is omitted. If Fraction is less than zero, the decimal point is omitted.
If “[i] [.] [f]” has the value ‘1.’, the first part of the label is omitted, leaving only ‘10e’.
If the entire label has the value ‘0.’ is used.
Exponent Labeling
Setting Label to ‘Expon.’ selects exponential notation.
If the parameter Type has the value_Base*k. Each numeric label is written in the form:
[-] [i] [.] [f] * 10e
Where brackets enclose portions which may be independently present or absent and
‘e’ is a superscript exponent.
The parameter Exponent specifies the integral value of the exponent ‘e’.
The parameter Fraction specifies the number of characters in ‘f’. If Fraction is less
than or equal to zero, ‘f’ is omitted. If Fraction is less than zero, the decimal point is
omitted.
If the label is exactly zero, the single character ‘0.’ is used.
If the parameter type has the value_Base*10^k. Each numeric label is written in the form:
[-] [i] [.] [f] * 10e
The parameter Exponent specified the integral value of the exponent ‘e’ when ‘k’
equals ‘0.’. The value of ‘e’ is Exponent plus ‘k’.
The parameter Fraction specifies the number of characters in ‘f’. If Fraction is less
than or equal to zero, ‘f’ is omitted. If Fraction is less than zero, the decimal point is
omitted.
If the label is exactly zero, the single character ‘0’ is used.
If the parameter type has the value Base^k. Each numeric label is written in the form:
[-] [i] [.] [f] e
The parameter exponent is ignored. The value of ‘e’ is ‘k’.
The parameter Fraction specifies the number of characters in ‘f’. If Fraction is less
than or equal to zero, ‘f’ is omitted. If Fraction is negative, the decimal is omitted.
(Note that ‘[i] [.] [f]’ expresses the value of Base.)
Non exponent Labeling
Setting label to ‘No-Exp.’ selects non-exponent notation. The parameter exponent is ignored.
If the parameter Type has the value -Base*k. Each numeric label is written in the
form:
[-] [i] [.] [f]
The parameter Fraction specifies the number of characters in ‘f’. If Fraction is less
than or equal to zero, ‘f’ is omitted. If Fraction is less than zero, the decimal point is
omitted. If the label is exactly zero, the single character ‘0.’ is used.
If the parameter Type has the value _Base*10^k. Each numeric label is written in the
form:
[-] [i] [.] [f]
The parameter Fraction specifies the number of characters in ‘f’ when ‘k’ is zero. If
Fraction is less than or equal to zero, ‘f’ is omitted. If Fraction is less than zero, the
decimal point is omitted.
For example, if Fraction = 1., Base = 3.6 and k ranges from -3 to +3; The labels
produces are .0036, .036, .36, 3.6, 36. 360., and 3600.
If the parameter Type has the value _Base^k. Each numeric label is written in the
form:
[-] [i] [.] [f]
If ‘k’ is greater than or equal to zero, and in the form
[-] 1/ [i] [.] [f]
if ‘k’ is less than zero.
The parameter Fraction specifies the number of characters in ‘f’ when ‘k’ is equal to
1.. If Fraction is less than or equal to zero, ‘f’ is omitted. If Fraction is less than zero,
the decimal point is omitted. For example, if Fraction = -1., Base= 2,. And k ranges
from -4 to +4; the labels produced are:
1/16, 1/8, 1/4, ½, 1, 2, 4, 8, 16
APPENDIX C HERSHY CHARACTER FONT
TABLES
The Hershy character set consists of 33 different character fonts, numbered 0 through 32.
This information is stored in a machine-readable file called 'HERSHY.BAR' which is included
with the software distribution. The font descriptions indicate the extent to which the
characters contain tapered segments (simplex, duplex, complex, triplex, or gothic), and the
size of the characters (cartographic, indexical, or centered symbol). The following table lists
available fonts and font codes.
FONT
0
1
2
3
4
5-6
7
8
9
10-11
12
13
14
15-17
18-19
20-21
22-23
24-25
26-27
28
29
30
31
32
DESCRIPTION
Cartographic Roman
Cartographic Greek
Simplex Roman
Simplex Greek
Simplex Script
Simplex Special Characters
Complex Roman
Complex Greek
Complex Italic
Complex Special Characters
Complex Roman
Complex Greek
Complex Italic
Complex Special Characters
Duplex Roman
Complex Script
Complex Cyrillic
Triplex Roman
Triplex Italic
Gothic German
Gothic English
Gothic Italian
Gothic Special Characters
Centered Symbols
Certain 'special characters' are used to inform the graphics software that this font information
is to be used for plotting. These characters may be embedded in graph titles or labels, and
will allow selection of alternate font types, and other special features. These special
characters are not plotted, but are instead interpreted as commands by the metacode translator
software. The special characters and their meanings are:
"
#
%
<
>
-
backspace one character position
indicates a three-digit font selection code follows
selects the default font
subscript the next character
superscript the next character
The figure below illustrates the results of using the following five characters strings:
#004Geostatistical Environmental Assessment Software%
#027Geostatistical Environmental Assessment Software%
#007Geostatistical Environmental Assessment Software%
_Geostatistical Environmental Assessment Software_
Special characters - #003k%, #010Q%, #010t%, #008p%
Easting (M>2]
Figure C-1 Example font selection codes
APPENDIX D POLYGON FILE FORMAT
This section describes the format of a polygon file. They are used by program KRIGE to
include or exclude computation of estimates within specified polygon areas. Polygon files are
text files comprised of lists of X,Y coordinate pairs (vertices) which form closed polygonal
boundaries. These boundaries may be defined as inclusive or exclusive, meaning that
estimates should be excluded outside of inclusive boundaries, and included when outside of
exclusive boundaries.
The polygon file is processed in the following manner: Krige reads the specified polygon file
before kriging and builds a matrix of flags to indicate if point or block estimates are to be
included or excluded. This matrix corresponds to the grid defined be the user in the Krige
Options Screen. Polygon files must be constructed with these grid boundaries in mind,
because the grid and polygon boundaries are related. As krige reads each polygon from the
polygon file, each grid cell center is tested. If the cell center (point or block center) is inside
an inclusive polygon, (or outside an exclusive one) the corresponding flag is set to include the
estimate. Conversely, if a cell center is outside and inclusive (or inside an exclusive)
polygon, the flag is set to exclude computation of an estimate at that location. The rule which
governs processing of multiple polygons is this: No flag may be changed to include an
estimate which has been Excluded by a previous polygon. (for additional information see the
Polygon option of Section 12).
Polygon files may contain an unlimited number of polygons. The first record (line) in the file
should contain the number of polygons contained in the file. Each polygon may be specified
as an inclusive (Code 0), or exclusive (Code 1) polygon. A polygon is specified by placing a
polygon header record in the file, followed by no more than 100 polygon vertex records. A
polygon header record consists of two integers: The Include/Exclude Code (0, or 1), followed
by a comma, and the number of vertices <Nv> in the polygon. Exactly <Nv> vertex records
must follow. Each vertex record consists of two floating point (REAL) numbers separated by
a comma. These should be listed in an order such that straight lines connecting successive
vertices would form a closed polygonal boundary (if a final line were drawn from the last
vertex to the first).
Polygon files may be created by any simple text editor such as the DOS editor EDLIN, or any
word processor using non-document mode. All lines in the file must be terminated with a
CRLF (carriage-return line-feed). Below is an example of a polygon file containing an
inclusive square polygon, with an exclusive triangular polygon in the center.
2
0,4
0., 0.
0., 100.
Number of polygons
Inclusive, 4 vertices
1st vertex
2nd vertex
100., 100.
100., 0.
1,3
25., 25.
75., 25.
50., 75.
END OF FILE
3rd vertex
Last Vertex
Exclusive, 3 vertices
1st vertex
2nd vertex
3rd vertex
***Note*** No blank lines may be embedded in the file.