1
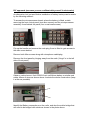
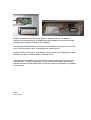
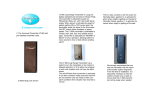
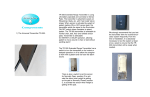
Memory Backup battery details (on microprocessor board)
These pages have been put together to assist in identifying/modifying the
Ascom radio with regards to battery backup used for memory retention.
Only a few of the radio’s are already fitted with a lithium battery already inside,
however as the radio was previously used in a trunked radio system, most do
not. It is possible to install a battery if you are confident in soldering /
electronics.
The following pictures, show the radio’s microprocessor board with and
without the factory installed battery backup:-
The above illustrates a radio without memory backup battery fitted
The above illustrates a radio with memory backup battery fitted
A lithium battery, Sonneshine 3.6v SL-340, or similar, must be fitted in the
radio to ensure that the data stays in the RAM when the main 12v supply
voltage is switched off.
DIY approach (assumes you are confident with yourself in electronics)
An alternative, but just as effective installation of battery backup can be made
by the following method:To access the microprocessor board, where the battery is fitted, entails
removing the front control panel (two allen screws) and the microprocessor
assembly found behind the panel (four cross-head screws).
Flip up the handle and remove the code plug if one is fitted to gain access to
the allen screw behind.
Remove both Allen screws along with microphone cable/plug.
Remove the front panel by hinging away from the radio (“hinge” is to the left
side of front panel)
Obtain a vertical mount 3volt CR2032 coin cell lithium battery or similar and
solder 40mm of wires as shown above. Insulate the whole construction (keep
it at thin as possible)
Identify the Battery connections on the radio, and also the solder bridge that
will need to be bridged with solder as shown in the photo above.
Solder the battery wires as shown above. Ensure that the –ve battery
terminal is connected so as to bridge the solder bridge as without the bridge
being in place, battery backup is not enabled.
Locate the insulated battery in the front of the chassis, ensuring it is not in the
way of the front panel upon re-assembly as shown above.
Finally re-fit the front panel, microphone, allen screws, and code plug (if used)
and test the radio to ensure battery backup works.
If the above is successful, you now have a working memory backup for your
Ascom radio. The life of the battery is not known at this stage, but should
provide several months backup as a minimum, assuming the radio is regularly
used as well.
G0BEQ
29 August 2004