1
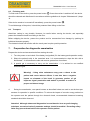
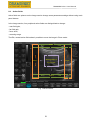
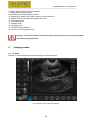
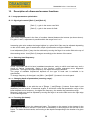
DRAMIŃSKI 4Vet
diagnostic ultrasound scanner
with a touch panel
User Manual
0197
Version 2.0 19/11/2013
DRAMIŃSKI 4Vet User Manual
_____________________________________________________________________ ____________________
Manufactured by:
DRAMIŃSKI
Owocowa 17
10-860 Olsztyn
Poland
Phone: +48 89 527 11 30
Fax: +48 89 527 84 44
e-mail: [email protected]
www.draminski.com
Dramiński company established and maintains a full quality management system meeting the
requirements of the EN ISO 9001:2008 standard. The system is periodically audited by a notified
authority TUV Rheinland LGA Products GmbH, Tillystrasse 2, 90431 Nuremberg, Germany, which
participates in the conformity assessment.
Declaration of conformity is available in the Sales Department:
Phone: 89 524 11 30,
Fax: 089 527 84 44
e-mail: [email protected]
We wish you every success in providing care to your patients. We are confident that with our
product you will be able to offer them the best service.
DRAMIŃSKI company will be happy to hear any comments from our clients with regard to the device
and this instruction.
Contact us by phone: + 48 89 527 11 30
E-mail address: [email protected]
Developed by DRAMIŃSKI
All rights reserved.
Copying without the consent of DRAMIŃSKI is prohibited.4
2
DRAMIŃSKI 4Vet User Manual
_____________________________________________________________________ ____________________
Table of contentsS5
1.
2.
3.
4.
5.
6.
7.
8.
Introduction .....................................................................................................................................................5
1.1.
Information on the user manual for the device .......................................................................................5
1.2.
Warnings and comments used in this manual .......................................................................................5
1.3.
Brief information on ultrasonography .....................................................................................................5
1.4.
Basic information about the ultrasound scanner ....................................................................................6
Safety of use ...................................................................................................................................................6
List of DRAMIŃSKI 4Vet ultrasound scanner elements and equipment ........................................................8
Construction of DRAMIŃSKI 4Vet ultrasound scanner ..................................................................................8
4.1.
Device body ............................................................................................................................................8
4.2.
Ultrasonic probe. ..................................................................................................................................11
4.3.
DRAMIŃSKI BATTERY PACK Batteries..............................................................................................12
4.4.
Battery pack charger ............................................................................................................................13
4.5.
Power supply ........................................................................................................................................14
Technical data ...............................................................................................................................................15
Preparing the device for operation and how to finish work. ..........................................................................16
6.1.
General principles of using the touch panel .........................................................................................16
6.2.
Connecting the probe. ..........................................................................................................................16
6.3.
Starting the device in power supply mode ...........................................................................................17
6.4.
Starting the device in battery operation mode .....................................................................................17
6.5.
Finishing work ......................................................................................................................................18
6.6.
Transport ..............................................................................................................................................18
Preparation for diagnostic examination ........................................................................................................18
Description of user panel and its available functions ....................................................................................19
8.1.
Basic panel (B, B+B, B+M modes).......................................................................................................19
8.2.
Active fields ..........................................................................................................................................21
8.3.
Panel in Colour Doppler mode .............................................................................................................22
8.4.
Panel in Power Doppler mode .............................................................................................................23
8.5. Panel in Pulse Wave Doppler mode ........................................................................................................25
9.
Imaging modes..............................................................................................................................................25
9.1.
B mode .................................................................................................................................................25
9.2.
B+B mode.............................................................................................................................................26
9.2.1.
Enabling B+B mode .....................................................................................................................26
9.2.2.
Switching windows in B+B mode.................................................................................................26
9.3.
B+M mode ............................................................................................................................................27
9.3.1.
Enabling B+M mode ....................................................................................................................27
9.4.
Doppler mode .......................................................................................................................................28
10.
Description of ultrasound scanner functions ............................................................................................29
10.1. Image parameters optimisation ............................................................................................................29
10.1.1.
Signal gain control [Gain 1] and [Gain 2].....................................................................................29
10.1.2.
Selecting head frequency: ...........................................................................................................29
10.1.3.
Changing depth of penetration (scanning range): .......................................................................29
10.1.4.
Focusing (the beam):...................................................................................................................29
10.1.5.
Zoom:...........................................................................................................................................30
10.1.6.
Adjusting the Gamma level..........................................................................................................30
10.1.7.
Invert colour: ................................................................................................................................31
10.2. Image freeze: .......................................................................................................................................31
10.3. Dimensioning........................................................................................................................................32
10.3.1.
Grid. .............................................................................................................................................33
10.3.2.
Narrowing ....................................................................................................................................34
10.3.3.
Volume.........................................................................................................................................35
10.3.4.
Length ..........................................................................................................................................36
10.3.5.
Surface area ................................................................................................................................37
10.3.6.
Ellipse surface area .....................................................................................................................38
10.3.7.
Editing measurements .................................................................................................................39
10.3.8.
Clear ............................................................................................................................................39
10.4. Colour Doppler imaging........................................................................................................................40
10.4.1.
Enabling colour Doppler imaging.................................................................................................40
3
DRAMIŃSKI 4Vet User Manual
_____________________________________________________________________ ____________________
3.
The shape of the frame imposed on the examination sector depends on the used probe. In the case of: ..40
10.4.2. Setting parameters in Doppler mode ................................................................................................41
10.4.3. Rules of conduct for setting parameters in Doppler mode ...............................................................41
10.5. Power Doppler (Doppler with a colour-coded flow power) ..................................................................43
10.5.1. Pulse Wave Doppler (Measurement of flow speed in vessels) .......................................................43
10.5.2.
Rules of conduct for setting parameters in Pulse Wave Doppler mode ......................................43
10.6. Saving and loading images and cine loops to the screen ....................................................................44
10.6.1.
Load image ..................................................................................................................................45
10.6.2.
Load cine .....................................................................................................................................45
10.6.3.
Save image ..................................................................................................................................46
10.6.4.
Save cine .....................................................................................................................................47
10.7. Printing .................................................................................................................................................47
10.8. Exporting data to external storage media ............................................................................................48
10.9. Patient function.....................................................................................................................................48
10.10.
Presets .............................................................................................................................................48
10.11.
Advanced settings............................................................................................................................49
11.
Charging and using batteries....................................................................................................................52
11.5. Charging DRAMIŃSKI BATTERY PACK .............................................................................................52
12.
Software update........................................................................................................................................53
13.
Touch panel calibration ............................................................................................................................53
14.
Maintenance .............................................................................................................................................55
15.
Use instructions ........................................................................................................................................56
16.
Symbols and signs used on the labels .....................................................................................................58
17.
Guarantee .................................................................................................................................................59
4
DRAMIŃSKI 4Vet User Manual
_____________________________________________________________________ ____________________
1. Introduction
1.1. Information on the user manual for the device
Individual chapters of the manual describe the construction, all accessories, preparation for work as
well as functions and operation of the ultrasound scanner.
In no way will reading the manual substitute even a basic ultrasound course. It is advised that the
user of the device completed appropriate training during authorised ultrasound courses.
1.2. Warnings and comments used in this manual
Due to the need of emphasizing important content in this manual, the following ways of highlighting
were applied:
Warning! - when necessary to draw special attention due to safety of
the patient or the user of the device.
Attention! - when necessary to draw attention to the protection of the device or its proper operation.
Bold text - to draw attention to more important fragments in the manual or to make them more
distinct or legible.
Descriptions to diagrams and drawings - to make it easier to spot the details.
Since symbols used in the manual do not fully inform about safety tips, you should read the
tips first (chapter 2) and follow them!
1.3. Brief information on ultrasonography
Ultrasound devices are widely used in veterinary diagnostics. Particularly useful and commonly used
is the method of real-time imaging, which offers a two-dimensional graphical presentation of tissue
sections in 256 shades of grey, in the so called B-Mode (Brightness-Mode). Moreover, a colour
Doppler ultrasound scan, used to assess vascular flows, is increasingly important for diagnostics.
Diagnostic effectiveness of ultrasonography is considered high, but effects of working with this
method are significantly impacted by the quality of the device and the user's individual experience
and knowledge as well as following ultrasound standards and reading this manual.
5
DRAMIŃSKI 4Vet User Manual
_____________________________________________________________________ ____________________
1.4. Basic information about the ultrasound scanner
DRAMIŃSKI 4Vet is a modern device, which may be powered by a battery pack or directly by a 110230 V electrical power supply. The ultrasound scanner operates based on a small-sized computer
system. Special functions of the computer include: touch panel controlled functions, small size and
weight as well as a strong aluminium casing which hides high-tech electronics to guarantee top
quality image.
DRAMIŃSKI 4Vet is an exceptional diagnostic tool. Small size and a battery power supply option
make this ultrasound scanner a modern and ergonomic tool. May be used as a stationary or portable
device. Top quality flat LCD LED monitor provides clear image with high resolution to facilitate work
in any lighting conditions.
According to the manufacturer, DRAMIŃSKI 4Vet is an ultrasound scanner that should be used for
diagnostic purposes, to monitor illnesses and assess physiological condition of organs. The device is
used mainly for the following diagnostic purposes:
- abdominal cavity organs
- gynaecology
- cardiology
- vascular flows
- motor system
The user may choose between black and white real-time examination modes and colour Doppler
function modes.
2. Safety of use
Warning! – Safe use and the patient's safety depend on following the
guidelines outlined below!
1. DRAMIŃSKI 4Vet is a device that should be used for diagnostic purposes in animals only by a
qualified personnel – a physician who completed an ultrasound diagnostics training.
2.
It's
necessary
to
disinfect
the
abdominal
probe
before
each
examination.
The remaining ultrasound scanner elements should be disinfected whenever it's justified to do
so, e.g when they could be exposed to infectious substances.
3. The ultrasound scanner must not be used simultaneously with high frequency (HF)
technology.
4. The ultrasound scanner must not be used for TEE examinations.
6
DRAMIŃSKI 4Vet User Manual
_____________________________________________________________________ ____________________
5. In places where explosive and anesthetic gases are used the ultrasound scanner must not be
used for safety reasons.
6. The product may be used only in closed spaces.
7. It is advised that the ultrasound scanner users have regular technical inspections carried out
by the producer every two years. It will help to ensure the highest level of patients' safety.
8. Ultrasound diagnostics must not accompany defibrillation.
9. Disassembly of the device and carrying out independent repairs and regulations is prohibited,
except for activities described in this manual.
10. Ultrasound scanner users are advised to carry out periodic checks of the head cable and
connector for any mechanical damage.
11. Should any mechanical damage be identified on the head, cable or connectors, the device
must be handed over to the service centre.
12. Despite very strong construction of the ultrasound scanner, guidelines provided in this manual
must be followed in order to avoid mechanical damage.
13. The device must not be exposed to strong solar radiation, and it's best to stick to temperatures
recommended on the device's labels and elements.
14. The user must not modify the device in any way.
15. DRAMIŃSKI 4Vet is an electrical device which may be the source of electromagnetic
radiation. Its operation may be disrupted by other electrical devices, so it is advised to reduce
to the minimum the number of electrical devices working in its vicinity.
16. After the service life, due to environmental risk, the device with its accessories should be
utilized by qualified entities, in accordance with applicable provisions or sent back to the
manufacturer.
17. During examinations the device must not be connected to the ETHERNET network (via LAN
connection).
18. It is advised that the ultrasound scanner be connected to the external monitors and printers
that meet medical standards.
19. To avoid the risk of electrocution, the device must be connected solely to the power supply
network with protective grounding.
7
DRAMIŃSKI 4Vet User Manual
_____________________________________________________________________ ____________________
3. List of DRAMIŃSKI 4Vet ultrasound scanner elements and equipment
No.
1
2
3
4
5
6
7
8
9
10
11
12
quantity
Name and description
4Vet ultrasound scanner
Ultrasound probe - an option to select one from the list of compatible
probes
DRAMIŃSKI BATTERY PACK – Li-ion battery 14,4 V / 6,2 Ah
Battery charger with a 230 V power cable
Power supply Model AFM45US15 with connecting cables
Table stand
Scriber to operate a touch panel
User manual and guarantee card
Roller stand
Transport bag
Thermal printer
External monitor
1
1
2
1
1
1
1
1
option
option
option
option
4. Construction of DRAMIŃSKI 4Vet ultrasound scanner
The device comprises:
1. Device body.
2. Ultrasound probe.
3. Battery pack for recharging - external power supply pack.
4. Battery pack charger.
5. Power supply for the ultrasound scanner.
6. Table stand
4.1. Device body
The casing is made of high quality aluminium.
On the front side there's a power on button and a high quality LCD monitor with a 10.4” LED display.
The monitor has a wide viewing angle and a resolution that guarantees very good display of the
ultrasound image. It has a touch panel to control the ultrasound functions.
Functions and location of user panel buttons with their description are shown in the drawings below.
On the back side of the casing, a socket for connecting probes is installed with a system to mount the
battery pack or hang the ultrasound scanner on the stand or the table stand.
On the left and right side of the casing there is: a mechanical of the probe connector, power socket
and a set of multimedia connectors (USB 2.0, LAN and VGA), hidden under a cover.
On the back edge of the casing there are ventilation inlets and outlets of an active ventilation system
necessary for the device system to operate properly for many hours.
Attention!
The ultrasound scanner has a strong construction, however it should be operated and
transported with due care in order not to expose the device to shocks or impacts. It will help to
avoid potential damage.
The user should avoid any small objects entering ventilation holes in the casing.
8
DRAMIŃSKI 4Vet User Manual
_____________________________________________________________________ ____________________
Casing elements
LCD monitor with a touch panel
power socket
head connector
lock
power on button
handle
Fig. 1Casing elements. Front view.
1
magnet to mount a
connector cover
2
3
set of connectors:
1. VGA used to connect the external
monitor
2. USB 2.0 used to connect a secondary
storage or a printer
3. LAN used to connect with a local
computer network
Fig.2 Casing elements. Right side view.
9
DRAMIŃSKI 4Vet User Manual
_____________________________________________________________________ ____________________
Attention!
The ultrasound scanner may be connected only to a printer and a monitor which meet the
standards and have relevant medical certificants.
Warning!
For safety reasons, external devices should be connected to the ultrasound
scanner outside the patient's environment.
During the examination the ultrasound scanner must not be connected to the
ETHERNET network via LAN.
power socket
ultrasonic head connector
socket (port)
head connector lock
ventilation outlets
battery contacts
battery mounting system and
stand mounting system
ventilation inlets
Fig. 3 Casing elements. Back view.
10
handle
DRAMIŃSKI 4Vet User Manual
_____________________________________________________________________ ____________________
4.2. Ultrasonic probe.
DRAMIŃSKI 4Vet ultrasound scanner can operate with multiple types of electronic probes. The ones
that are used most often in clinical practice include:
Fig. 4 Micro-convex probe:
- 6.5 MHz ( 4-9 MHz),
- 10 mm radius,
- 128 elements.
Fig. 5 Convex probe:
- 5.0 MHz ( 2-8 MHz),
- 50 mm radius,
- 128 elements.
Fig. 6 Abdominal linear probe:
- 10 MHz ( 6-14 MHz),
- width 40 mm,
- 128 elements.
Fig. 7 Rectal linear probe:
- 7.5 MHz ( 4-9 MHz),
- width 60mm,
- 96 elements.
Attention!
It's possible to use other types of electronic probes. Users interested in other types of ultrasound
probes should contact the manufacturer of DRAMIŃSKI 4Vet ultrasound scanner.
11
DRAMIŃSKI 4Vet User Manual
_____________________________________________________________________ ____________________
4.3. DRAMIŃSKI BATTERY PACK Batteries
These are Li-ion type cells. They are equipped in a thermal fuse
protecting against overheat while charging. There are two sockets with
contacts in the battery's casing. One socket is for connecting the battery
to the device, and the other for connecting the charger cable.
The battery is connected at the back of the device, using the mounting
system (see the drawing below).
Fig. 9 Connecting the battery.
12
Fig. 8 DRAMIŃSKI
BATTERY PACK
with a charger
socket.
DRAMIŃSKI 4Vet User Manual
_____________________________________________________________________ ____________________
Batteries are expected to last for about 500 charging cycles. Owing to the use of high capacity
batteries, it's possible to work up to 2 hours with one battery. To charge the battery a special
charger should be used, which guarantees proper charging of packs. Charging one pack takes
about 2 hours.
For more information on charging and using the batteries see the manual chapters below.
4.4. Battery pack charger
Attention! The charger is an independent device used solely
for the purpose of charging the batteries. It must not be
used as a source of power supply for DRAMINSKI 4Vet
device.
Fig. 10 Battery
charger.
Attention! Only use the original charger supplied with the
device (Type: 2840 LI). The charger plug is compatible with the
battery pack socket and it cannot be connected to the power
socket in the device.
13
DRAMIŃSKI 4Vet User Manual
_____________________________________________________________________ ____________________
4.5. Power supply
The power supply can only be used to supply DRAMIŃSKI 4Vet device. Power supply
parameters guarantee safe operation for the user, patient and the device itself.
Fig. 11 Power supply
XP Power - AFM45US 15 model
Input: 110-240V/ 50-60Hz max 1.1 A
Output: 15.0V, 3.2A
Warning!
The device may be electrically powered only with the use of the
certified power supply provided upon purchase. Using any other
power supply may pose a threat for the user or cause permanent
damage to the device.
All maintenance work and repairs must be carried out with power off.
If it's necessary to stop the device from working, press the power on
button or pull out the power unit cable plug from the socket.
Warning!
To avoid the risk of electrocution, the device must be connected solely
to the power supply network with protective grounding.
14
DRAMIŃSKI 4Vet User Manual
_____________________________________________________________________ ____________________
5. Technical data
application veterinary ultrasound diagnostics
imaging modes B
B+B
B+M
Color Doppler - option
Power Doppler - option
Pulse Wave Doppler – option
image management Freeze (image freezing)
Zoom
60 - 300% of output image at a 20% interval
Full screen
Image saving and cine loop (256 frames)
monitor 10.4” LCD LED display
function control resistance touch panel
Image storage and cine loop memory storage for 200 images and 50 cine
loops with description, patient data and date
transmission of data to external media via USB 2.0
source of power 1. power supply; input: 100-240V AC , 50-60Hz, max
1.1A; output: 15V DC / 3.2A 2. Li-Ion battery pack,
14.4V, 6,2Ah
continuous operation time when battery up to 2 hours
powered
Charging time of one pack about 2 hours (charger type: 2840 LI)
battery wear out indicator graphical indication of the wear out level
external measurements width 32.5 cm, height 21 cm, depth 8.0 cm
Weight 3 520 g without the probe and batteries
battery weight 480 g
operating temperature + 10°C to + 45°C
storage temperature + 5°C to + 45°C
electricity consumption about 2.2 A
15
DRAMIŃSKI 4Vet User Manual
_____________________________________________________________________ ____________________
6. Preparing the device for operation and how to finish work.
Attention!
All the ultrasound scanner functions are controlled via a touch panel. The device is only
turned on and off with the use of the button on the front side of the casing.
6.1.
General principles of using the touch panel
The resistance touch panel may be used with gloves on the hands.
Use products in spray or foam to clean and disinfect the panel.
Soft cloths are recommended for dry cleaning the panel.
The panel should be cleaned thoroughly with power off.
To perform precise operations on the touch panel (e.g. taking measurements), it is advised to
use the attached scriber, which guarantees comfort of work and panel cleanliness.
DRAMIŃSKI 4Vet ultrasound scanner can be used in two ways - as a portable device (powered by
the battery pack) or a stationary device (mounted on a stand / table stand).
To use the scanner as a stationary device, it should be mounted on the stand / table stand, using the
mounting system located at the back of the device. After fitting the mounting elements of the scanner
and the stand, move the protection lock upwards. Then connect the probe.
6.2. Connecting the probe.
Attention!
The probe connector is a high-tech mechanism. It should be protected against mechanical damage,
dirt and moisture. The probe cable should be protected from excessive loads, strong and repeated
bending and shaking.
After fitting the probe connector tightly in the socket, adjust the lock to stop the probe from being
released and ensure that the probe connector fits tightly in the socket.
DRAMIŃSKI 4Vet ultrasound scanner is equipped in one port for connecting the probes. In order to
change the probe, there is no need to turn the device off, but it's enough to release - turn into a
horizontal position - the connector lock on the side of the casing. Next, unclip the head put on a new
one, and then turn the lock to a vertical position to stop the connector from being released from the
socket. During this operation the following messages will be displayed on the device's monitor:
"Probe OFF” – head unlocked (lock released, switch in horizontal position)
and
16
DRAMIŃSKI 4Vet User Manual
_____________________________________________________________________ ____________________
"Probe ON” – head locked (lock on, switch in vertical position)
Fig. 12 Probe socket (port)
at the back of the device
Fig. 13 Probe connector
lock
Horizontal position =
connector unlocked
Fig. 14 Probe connector
properly connected to the
port
Warning!
Due to a complex structure of probes, they should be used with due
care and protected from falling or hitting. An active surface (tip of the
probe) must be protected against mechanical damage, e.g. must not be
scrubbed.
The probe is the ultrasound scanner element which should be
disinfected before each use.
6.3. Starting the device in power supply mode
1. Put the power supply in the 230V / 50-60Hz socket
2. Connect the power unit plug to the power socket in the casing
3. Turn the device on by pressing the power button
on the front side of the casing
4. Wait until the ultrasound scanner system is automatically loaded, until a user panel is displayed on
the monitor.
5. Check if the connected probe has the same symbol as the one displayed on the monitor and check
if the image reacts after touching the tip of the probe.
6.4. Starting the device in battery operation mode
1. Connect and lock the pack on the back side of the casing, using the lock system (the one used for
mounting the device on the stand). The pack is electrically connected to the system with the use of
two contacts on the back side of the casing, which are fitted into slots in the pack casing.
2. Turn the device on by pressing the power button
on the front side of the casing.
3. Wait until the ultrasound scanner system is automatically loaded, until a user panel is displayed on
the monitor.
4. Check if the connected probe has the same symbol as the one displayed on the monitor and check
if the image reacts after touching the tip of the probe.
Attention! Power from the pack is automatically cut off after connecting the power supply to the
device.
17
DRAMIŃSKI 4Vet User Manual
_____________________________________________________________________ ____________________
6.5. Finishing work
To finish work of the device, press the power button
. Once the monitor is switched off, the device
should be cleaned and disinfected in accordance with the guidelines in chapter "Maintenance” (chapt.
14.
If the device needs to be turned off immediately, press the power button
.
To avoid damage of the probe, it should be protected from falling on the floor.
6.6. Transport
Aluminium casing is very durable. However, be careful when moving the device, and especially
protect the ultrasonic head from falling to the floor.
Before shipping the device, protect the product and its accessories from damage by packing its
individual elements properly.
The ultrasonic head and monitor with the touch panel require special protection.
7.
Preparation for diagnostic examination
Prepare the device and accessories before starting the work.
1. Turn the power on and check if low battery is signalled (if in the battery pack operation mode).
2. Shave the patient's skin in the examined area. It is recommended to wipe the skin with a
disinfectant – it will sterilize the skin and remove grease from its surface.
3. A special gel is necessary to carry out the examination – it is advised to use certified
ultrasound gels.
Warning! - Using other substances may pose a threat to the
patient and cause adverse effects. It can also have a negative
impact on elements of the head. A generous portion of gel
improves signal penetration and makes it possible to achieve a
proper and clearer image.
4.
During the examination, user panel buttons as described below are used to set the best parameters for operation in specific conditions. To reduce the impact of acoustic energy emitted on
the operator and the patient through the ultrasonic head, recommended ultrasound scanning
standards should be observed.
Attention! Although ultrasound diagnostics is considered to be a very safe imaging
technique, excessive levels of parameter settings should be avoided. Exceeding safety
limits may pose a threat both for the operator and the patient.
18
DRAMIŃSKI 4Vet User Manual
_____________________________________________________________________ ____________________
The device has ranges of parameters limited by the manufacturer to guarantee safety of the
user and the patient.
5. Examinations should be carried out by a qualified and properly trained medical personnel. It is
recommended that the ultrasound scanner operator regularly take part in training and
specialist courses. Reading this manual will not be sufficient to make correct diagnoses.
8.
Description of user panel and its available functions
Basic panel (B, B+B, B+M modes)
8.1.
1
2
3
4
6
5
7
8
9
1
10
11
12
13
14
15
16
17
18
19
20
21
22
2
23
24
25
26
Fig. 15 Basic panel elements.
1. Tools panel
2. Greyscale indicator / positive - negative switch
3. Indicator corresponding with the marker on the probe
4. Ruler
5. Focus level indicator
6. Gamma settings button
19
27
28
29
DRAMIŃSKI 4Vet User Manual
_____________________________________________________________________ ____________________
7. Practice or user name / currently used preset
8. List of current operation parameters
9. Used probe symbol
10. Date and time
11. Gain control: [Gain 1] - in near field; [gain 2] - in far field
12. Head frequency control
13. Scan depth control
14. Focus level control
15. Zoom level control
16. Post-processing on/off
17. Post-processing level setting
18. Battery charge level indicator
19. Mode panel
20. Freeze button (image freezing / unfreezing)
21. Select imaging mode: B - mode
22. Select imaging mode: B+B - mode
23. Select imaging mode: B+M - mode
24. Select imaging mode: Doppler function
25. Image management menu
26. Restoring factory settings
27. Measurement menu
28. A function to enter the patient's data before the examination
29. A button opening a panel with additional settings and presets, i.e. device settings specific to a
user or examined field.
20
DRAMIŃSKI 4Vet User Manual
_____________________________________________________________________ ____________________
8.2. Active fields
Active fields are spheres on the image used to change some parameters settings without using tools
panel buttons.
In the image section, four peripheral active fields are distinguished to change:
- near field gain,
- far field gain,
- focus level,
- scanning range.
The fifth, central active field makes it possible to move the image in Zoom mode.
Gain 1
Focus
Moving image in
Scope
zoom mode
Gain 2
Range
Focus
Fig. 16 Active fields.
21
DRAMIŃSKI 4Vet User Manual
_____________________________________________________________________ ____________________
8.3. Panel in Colour Doppler mode
1
2
4
3
5
6
7
8
9
10
11
12
13
14
15
16
Fig. 17 User panel elements in Colour Doppler mode
1. Colour scale indicator / colour reversal / display of Colour threshold and Colour range tools
2. Colour threshold settings
3. Colour range control
4. Doppler frame ready to introduce changes in position and size
5. Frame size settings panel
6. Current parameters for the Doppler mode
7. Pulse Repetition Frequency (PRF) setting
8. Doppler signal frequency setting
9. Doppler signal gain setting (Colour Gain)
10. Gate angle (option visible only for linear probes)
11. Frame averaging for the Doppler signal
12. Enabling Colour Doppler function
13. Enabling Power Doppler function
14. Enabling Pulse Wave Doppler function
15. Disabling Doppler function
22
DRAMIŃSKI 4Vet User Manual
_____________________________________________________________________ ____________________
16. Enabling Doppler mode
The remaining keys and information displayed on the monitor are the same as in the B mode.
8.4. Panel in Power Doppler mode
1
2
3
4
Fig. 18 User panel elements in Power Doppler mode
1. Colour scale / colour threshold / colour range
2. Doppler frame
3. Enabling and disabling post-processing for imaging in Power Doppler mode
4. Slider for setting the frame averaging level for Power Doppler mode
23
DRAMIŃSKI 4Vet User Manual
_____________________________________________________________________ ____________________
8.5
Panel in Pulse Wave Doppler mode
A
B
1
2
3
4
5
6
7
8
9
B
A
13
10
14
15
11
16
12
Fig. 19 User panel elements in Pulse Wave Doppler mode
A. Enlarged section of the window with hemodynamic parameters chart.
B. Enlarged Doppler frame view.
1. Enabling and disabling recording of flow parameters
2. Setting pulse repetition frequency (PRF)
3. Setting sampling gate width
4. Setting Doppler signal gain value for Pulse Wave Doppler
5. Insonation angle control
24
DRAMIŃSKI 4Vet User Manual
_____________________________________________________________________ ____________________
6. Setting proper depth of the gate position
7. Setting the base line position
8. Enabling Pulse Wave Doppler function
9. Changing the speed chart position below or above base line
10. Speed scale for hemodynamic parameters chart
11. Flow speed chart
12. Chart leading line
13. Doppler frame
14. Sampling gate
15. Insonation angle indicator
16. Central line of a Doppler frame
Warning! - The system should be operated and the ultrasound exams carried out by a qualified
and properly trained personnel.
9.
Imaging modes
9.1. B mode
Enables to user to obtain tissue sections image in two dimensions.
Fig. 20 Screen shot for B-mode imaging
25
DRAMIŃSKI 4Vet User Manual
_____________________________________________________________________ ____________________
9.2. B+B mode
This option enables the user to compare 2 images displayed at the same time.
Fig. 21 Screen shot for B+B mode (Dual Display Mode) imaging.
9.2.1. Enabling B+B mode
To enable B+B mode, press [B+B mode] button on the mode panel. The screen will be divided
vertically into two parts, and the image will be frozen and transferred to the right window.
The left window will remain active, which is indicated by the blue line on its perimeter.
9.2.2. Switching windows in B+B mode
To activate the second window, double click on its field. If this is done during the examination, the
image in the old window will be frozen, and the image in the new window will be unfrozen. If,
however, this is done when images in both windows are frozen, the only thing that will be changed is
the location of the blue frame indicating an active field. To unfreeze the image in an active window,
use [Freeze] button.
26
DRAMIŃSKI 4Vet User Manual
_____________________________________________________________________ ____________________
9.3. B+M mode
9.3.1. Enabling B+M mode
To enable B+M mode, press [B+M mode] button on the mode panel.
The screen will be divided vertically into two parts. The left window corresponds to B mode, and the
right one to M mode.
When this mode is activated, post-processing is automatically disabled.
Fig. 22 Screen shot for B+M mode imaging which enables the user
to combine the image from presentation B with the M-Mode presentation
27
DRAMIŃSKI 4Vet User Manual
_____________________________________________________________________ ____________________
9.4. Doppler mode
To enable Doppler mode, press [Doppler] button on the mode bar. A detailed description of parameter
controls for this mode is included in chapter 10, point 10.5.
Fig. 23 Screen shot for Colour Doppler imaging.
(Applies only to the model with the installed Doppler imaging function)
28
DRAMIŃSKI 4Vet User Manual
_____________________________________________________________________ ____________________
10.
Description of ultrasound scanner functions
10.1. Image parameters optimisation
10.1.1. Signal gain control [Gain 1] and [Gain 2].
[Gain 1] = gain in the sector near field.
[Gain 2] = gain in the sector far field.
Gain levels are presented in the form of numbers situated between the buttons (as shown above).
For gains 1 and 2, adjustment is possible within the range from 1 to 8.
Increasing gain value makes the image brighter in a given field. Gain may be adjusted depending
on the user's needs, type of examination, depth of penetration and light conditions.
Level adjustment [Gain 1] may also be achieved by moving the finger in an active field at the top of
the scanning sector. Level [Gain 2] changes accordingly at the bottom of the sector.
10.1.2. Selecting head frequency:
Heads compatible with 4Vet have broadband transducers, owing to which one head may emit a
signal of various frequencies. Owing to this function, probes guarantee more diagnostic
possibilities. The higher the signal frequency, the higher the image resolution.
The range of available frequencies depends on the type of head and is available in its
specification.
To change frequency of the signal, use [MHz –] and [MHZ +] buttons in the tools panel.
10.1.3. Changing depth of penetration (scanning range):
Range of penetration is set with the use of [Range –] and [Range +] buttons. Scan depth is set
depending on the location of examined organs. It should be noted that penetration range of the
beam depends on its frequency - the higher the frequency, the smaller the penetration range.
Moreover, depth may also be adjusted by moving the finger in an active field next to the right edge
of the scanning sector.
10.1.4. Focusing (the beam):
Buttons are used to focus the ultrasound beam. The image on the screen is the clearest in the
place where the beam is focused. Focus level is indicated by a red triangle on the left side of the
sector. To obtain the best results, set focusing to the depth corresponding to the location of a given
object.
29
DRAMIŃSKI 4Vet User Manual
_____________________________________________________________________ ____________________
Focus may also be adjusted, using a vertical field on the left side of the sector (in a similar way as
in the case of depth).
Additionally, the device has an automatic focusing function, which sharpens the image within a full
scan range.
10.1.5. Zoom:
This function is used to enlarge the image in real time and after freezing. The user can select the
following zoom levels: 120, 140, 160, 180, 200, 220, 240, 260, 280, 300%. The sector can also be
reduced in size to 60% and 80% of the standard size.
10.1.6. Adjusting the Gamma level
Fig. 24 Screen shot after clicking the Gamma curve.
Gamma adjustment enables the user to change the level of on the greyscale in real time as well as
after freezing or loading a saved image and cine loop to the screen.
After clicking [Gamma] button a list of available greyscale settings will be displayed. They can be
selected by clicking any graphic element. The current greyscale is presented in the form of a
column located above [Gamma] button.
30
DRAMIŃSKI 4Vet User Manual
_____________________________________________________________________ ____________________
10.1.7. Invert colour:
To invert colours from positive to negative view, double click on the greyscale column.
10.2. Image freeze:
To freeze the image, use [Freeze] button. After pressing this button, the image is frozen in a
fraction of a second and the button changes its colour. To defreeze the view and return to
scanning, press [Freeze] button again.
When the image is frozen, at the bottom of the creen a set of buttons is displayed, which enable
the user to manage cine loop consisting of a sequence of 256 frames (about 13 seconds). [>>]
button enables the user to edit cine loops continuously and to freeze the image at any frame. [<I]
and [I>] buttons are used to scroll the loop forward and backwards frame by frame. The buttons
enable the user to choose the most relevant frame, for instance, for dimensioning or saving the
image in the device's memory.
Fig. 25 Screen shot after freezing the image - a button for managing cine loop is displayed
31
DRAMIŃSKI 4Vet User Manual
_____________________________________________________________________ ____________________
10.3. Dimensioning
All the time, next to the imaging sector, a ruler with a centimetre scale is displayed, which facilitates
orientation in the size of the image in real-time.
After freezing the image, the displayed object may be dimensioned using different methods available
after clicking [Measurements] button on the mode panel.
Dimensioning buttons:
1. Grid - approximate dimensioning based on the grid with a 1 cm
resolution imposed on the image.
2. Narrowing - dimensioning which determines percentage value of the
narrowing
3. Volume - volume measurement (calculated based on 3 measurements)
4. Length - measurement of the distance between indicators
5. Surface area - measurement of surface area of the examined object of
any shape
6. Ellipse surface area - surface area measurement taken by imposing
an ellipse
7. Clear - removing dimensioning elements from the screen
Measurement results marked with consecutive numbers are shown under the imaging sector.
Measurements are given in mm to the nearest 0.1 mm.
32
DRAMIŃSKI 4Vet User Manual
_____________________________________________________________________ ____________________
10.3.1. Grid.
Select Grid from the Measurements menu. "Display grids" selection window will be displayed. After
checking this option, an approximate dimensioning grid will be imposed on the imaging sector (grid
scale is 1 cm).
Fig. 27 Measurement grid.
33
DRAMIŃSKI 4Vet User Manual
_____________________________________________________________________ ____________________
10.3.2. Narrowing
To determine the narrowing, obtain a longitudinal section of a narrowing object. Then, take two
measurements in its transverse planes. The result is displayed automatically as a percentage value
[#] Stenosis(1,2). This option is used, for instance, when assessing images of blood vessels.
Fig. 28 Stenosis measurement
34
DRAMIŃSKI 4Vet User Manual
_____________________________________________________________________ ____________________
10.3.3. Volume
To take a correct volume measurement, measure the length, depth and width of an object. To do this,
it is necessary to obtain longitudinal and cross sections. To obtain two places in one image B+B
mode can be used. The device automatically calculates volume of the object based on taken
measurements. The result is shown as [#] Volume value (1,2,3) in cm3.
Fig. 29 Gall-bladder volume measurement
35
DRAMIŃSKI 4Vet User Manual
_____________________________________________________________________ ____________________
10.3.4. Length
It is the most common dimensioning method. 5 different measurements can be taken in one image.
After pressing point A and then point B, a line connecting both points is displayed with the
measurement value.
Measurement results marked with consecutive numbers are shown under the imaging sector.
Measurements are given in mm to the nearest 0.1 mm.
Fig. 30 Length measurement.
36
DRAMIŃSKI 4Vet User Manual
_____________________________________________________________________ ____________________
10.3.5. Surface area
Surface area is measured by outlining an object in a touch panel without taking away a scriber or
finger, until the ring is closed. To finish outlining, click the point in which you started drawing. A result
is displayed in square cm under the image sector.
Fig. 31 Surface area measurement taken by hand.
37
DRAMIŃSKI 4Vet User Manual
_____________________________________________________________________ ____________________
10.3.6. Ellipse surface area
The measurement is taken by imposing ellipse on the object in three points (as shown below). First
two points should be located at the poles of the object's long axis, and the third one on one of the
short axis poles. A result is displayed in square cm under the image sector.
Fig. 32 Surface area measurement taken by imposing the ellipse.
38
DRAMIŃSKI 4Vet User Manual
_____________________________________________________________________ ____________________
10.3.7. Editing measurements
The user can change the location of applied measurement points. When setting the points on the
right hand side of the screen, a window with navigation buttons will be displayed. Using direction
buttons, location of the point marked with a red cross can be changed. To switch into another
measurement point, use +/- keys.
Fig. 33 Editing a measurement.
To disable navigation keys, click any place outside the image sector.
10.3.8. Clear
After pressing this button all dimensioning elements and results are removed from the screen.
Dimensioning elements are also removed after unfreezing the image and switching to active
scanning.
39
DRAMIŃSKI 4Vet User Manual
_____________________________________________________________________ ____________________
10.4. Colour Doppler imaging
Colour Doppler function enables the user to visualize vascular flows against the image in B-mode in real time.
Blood flow is coded with a colour depending on the direction. Red corresponds to the stream flowing towards
the tip of the probe. Blue marks the opposite direction.
10.4.1. Enabling colour Doppler imaging
1. Before enabling Doppler function, you should visualize an organ as clearly as possible in
the B-Mode, showing the blood vessels. The B-Mode image should be purposefully darker - lower
settings of signal and Gamma gains. It will enable the user to minimize artefacts inside the vessel.
Setting these parameters too high for the B-Mode image will have negative effect on the quality of
Doppler imaging.
2. To enable this mode, click [Doppler] button on the mode panel.
An active Colour Doppler control panel with a Doppler frame will be displayed on the screen.
During Doppler examination, the user can choose one of the available options by clicking the relevant
button:
Colour Doppler = Doppler with a colour-coded vascular flow
Power Doppler = Doppler with a colour-coded flow power
Pulse Doppler = pulse Doppler for measuring flow speed
3.
Enabling Doppler mode = exiting the mode and removing all control tools from the screen
The shape of the frame imposed on the examination sector depends on the used
probe. In the case of:
- a convex probe - the frame resembles a trapezium,
- a linear probe – the frame has a rectangular shape (rhombus if the angle is not 0°).
4. To set the frame in a selected point, press on its centre. The edge of the frame will turn
green and a navigation key will be displayed. Next, press on the place to which the frame is to be
moved. Frame re-location mode remains active until the navigation key disappears.
The frame may also be positioned by dragging it across the screen with the finger.
40
DRAMIŃSKI 4Vet User Manual
_____________________________________________________________________ ____________________
5. Adjusting the frame size.
When the frame is touched, in the right upper corner of the screen a panel with frame size settings is
displayed.
Keys used to change the frame size:
enlarging the frame vertically
enlarging the frame horizontally
reducing the frame size
horizontally
reducing the frame size
vertically
Fig. 34 Frame size settings panel.
6. Frame angle settings for a linear probe.
For the linear probe, it's possible to have the frame angle of +/- 15°. It helps to achieve a Doppler
spectrum during examination of vessels that are perpendicular to the ultrasound beam.
10.4.2. Setting parameters in Doppler mode
On the user panel, there are tool buttons with Doppler mode settings:
[PRF] – Pulse Repetition Frequency
[MHz] – Doppler frequency - scope of adjustment depends on the probe
type.
[Gain] – gaining Doppler signal within the range from 1 to 8
[Angle] – adjusting the angle of Doppler frame – only for linear heads, the
range from -15 to + 15°
[Averaging Doppler] – averaging colour image frames in Doppler mode. For
low speed flows, settings should be minimal (1), and they should be higher
for high speed flows (2,4,8).
Fig. 35 Colour Doppler panel buttons
10.4.3. Rules of conduct for setting parameters in Doppler mode
1. PRF (Pulse Repetition Frequency - frequency of sending impulses).
PRF setting depends on the flow speed. To visualize all the flows, set PRF at a high value. The higher
the PRF, the more frequently the image is refreshed.
To visualize blood flowing with lower speed, set PRF to a lower value. At the same time, image
refreshing time will become longer - the flow of a black and white image may deteriorate.
Thus, when examining small vessels with lower flow speeds, reduce PRF value to the minimum.
Otherwise, it will not be possible to visualize flows in such vessels.
41
DRAMIŃSKI 4Vet User Manual
_____________________________________________________________________ ____________________
2. [MHz] (Doppler frequency)
Is set in a similar way to MHz frequency for a black and white image. The deeper the examined
structure is situated, the lower frequency settings.
3. [Gain] ( colour gain)
It should be set high enough not to see 'holes' in the colour that fills the vessel, and at the same time
low enough not to see the colour pouring out of the vessel wall.
4. [Averaging Doppler] (frame averaging) – this function enables the user to average the value of
displayed colour-coded frames. Increasing the value decreases the number of artefacts and makes
the vessels more filled up.
To examine small vessels, set the frame averaging parameter to 1. This will facilitate the observation
of the flow. With higher values, imaging ability in such vessels will be limited.
5. Precision of the examination depends on the beam focusing point. Before a Doppler examination,
set the focus precisely on the level of observed vessels.
6. For linear heads, it is important to place the tip of the head at an angle with relation to the vessel.
Flows in vessels that are perpendicular to the ultrasound beam will not be recorded (due to Doppler
effect –> cos 90° = 0). To facilitate capturing the flow in the observed vessel, the user can adjust the
frame angle within a range of +/- 15°. For beginners, the recommended angle is max. 10°. The
function is used in longitudinal projections.
7. Colour bar – shows the colour scale and the range of colour-coded speeds.
Double clicking the colour-bar enables colour invert function (the flow towards the head will be coded
in blue, and the opposite flow in red).
Clicking the colour bar enables a colour scale modification window with the following options:
- Colour Threshold – enables the user to omit low speed flows (marked with a darker shade) in the
displayed image. When the colour threshold is increased only the flows coded with a colour typical for
high speeds will be displayed.
- Colour range – enables the user to visualise a specific speed range in a wider colour range. It is
done by determining the maximum speed (within a range from 1.5 to 11.7 cm/s), which will be coded
with the brighter shade.
It should be noted that preparing the patient has a significant impact on the sensitivity of the
examination. Coat or fur in the examined place or ultrasound gel deficiency may be the source of
difficulties during the examination.
42
DRAMIŃSKI 4Vet User Manual
_____________________________________________________________________ ____________________
10.5. Power Doppler (Doppler with a colour-coded flow power)
In Power Doppler mode, the device counts the total number of flows in a specific place and shows an
overall vessel arrangement in an organ without showing the speed and direction of the flow. This
function enables the user to visualise blood supply in an organ, even with very slow flows.
In addition to the basic Doppler mode settings, as described above, the user can enable / disable the
post-processing for the displayed colour. In both cases, the user may adjust frame averaging of the
displayed image.
Keys and functions available in Power Doppler mode are shown in Figure 18.
10.5.1. Pulse Wave Doppler (Measurement of flow speed in vessels)
Pulse Wave Doppler enables the user to measure blood flow speed in a selected vessel.
To enable this function, select Doppler mode and then press [Pulse Doppler] button.
Keys and functions available in Pulse Wave Doppler mode are shown in Figure 19.
10.5.2. Rules of conduct for setting parameters in Pulse Wave Doppler mode
1. Access to the vessel should be obtained at the most acute angle possible.
2. Set the examination parameters in Colour Doppler mode to achieve an optimum Doppler spectrum.
The examined vessel should be displayed over the widest area of the screen possible.
3. After selecting Pulse Wave Doppler mode, adjust:
a) depth of the sampling gate – so that it overlaps with the flow spectrum. To do this, the user can
move the entire Doppler frame across the screen with the finger or use Depth +/- function;
b) measurement adjustment angle (Insonation Angle) – as parallel to the inside diameter of the vessel
as possible, but not exceeding 60°.
c) gate width – not to go beyond the vessel walls.
4. To record hemodynamic parameters, press [Gate enable] button.
In the bottom window, the leading line will start moving, followed with a chart of hemodynamic blood
parameters. At this stage, it is important to keep the probe in its original position, until the parameter
chart reaches the end.
To modify the chart, the following function may be used:
- Depth – enables the user to adjust the depth of the sampling gate, if the head changed its position
when a measurement was taken. After depth adjustment, the device will calculate parameter values
depending on the recorded spectrum, and the leading line will mark a new chart.
- Gain – enhances the signal,
- Invert - to set the flow direction over the base line and
43
DRAMIŃSKI 4Vet User Manual
_____________________________________________________________________ ____________________
- Base line – to change location of the base line.
5. To measure recorded parameters, select one of the options from the Measurements menu:
- Doppler Point – calculates flow speed in a given point
- AT – acceleration time
- PSV, EDV, RI, PI – calculates peak systolic velocity (PSV), end diastolic velocity (EDV),
average velocity (AVG), pulsatility index (PI), resistance index (RI) in a given section.
To change location of measurement points, press the measurement result. A tool will be displayed,
which enables to relocate measurement points. <10.3.7>
10.6. Saving and loading images and cine loops to the screen
This function enables the user to save frozen images and cine loop sequences onto internal memory.
The user may attach patient data and a case report to the saved image.
To save or load an image / cine loop, press [Save Load] button on the mode panel. Image
management menu will open.
1. Load image - option which enables the user to load a
saved image from the list to the screen.
2. Load cine - option which enables the user to load
saved cine loops from the list to the screen.
3. Save Cine - option which enables the user to save a
sequence of 256 frames (cine loops) in the memory
4. Save image - option which enables to save a frozen
image in the memory.
5. Print – option preparing from 1 to 4 images for printing.
Printing is possible after connecting an external printer to
the device.
Fig. 36 "Save/Load” sub-menu keys
44
DRAMIŃSKI 4Vet User Manual
_____________________________________________________________________ ____________________
10.6.1. Load image
After selecting this option, a list of images saved in the device's memory is displayed: To display an
image, click on its name (it will become highlighted), and then click [Load image] button.
Browse images:
Fig. 37 List of saved images.
The user can manage saved images, using the following buttons:
- [Check all] - selects all images from the list
- [Uncheck all] - unchecks all images from the list
- [Edit] - enables the user to edit the patient's report and data in a saved image
- [Delete] - removes the checked image from the computer's memory
- [Close] - back to scanning.
[Send USB] button becomes active only when an external memory is connected to the device.
10.6.2. Load cine
Cine loop is a video loop which consists of 256 frames. It enables to play back 13 seconds of an
examination.
After selecting this option, a list of cine loops saved in the device's memory is displayed. To display a
cine loop, click on its name (it will become highlighted), and then click [Load cine] button.
45
DRAMIŃSKI 4Vet User Manual
_____________________________________________________________________ ____________________
Active buttons at the bottom of the screen enable the user to manage the saved cine sequences, and
their functions are analogous to the list of saved images. <10.7.1.>
Fig. 38 List of saved cine loops.
10.6.3. Save image
After freezing the image (or selecting a frame from the played cine loop), the user can
save the image in the device's memory. After pressing [Save image] button, a dialogue box will be
displayed at the bottom.
"Clear data" button clears the fields that are always filled with data copied from the previous record.
A virtual keyboard enables the user to enter data in relevant fields, and [Save] and [Cancel] buttons
enables the user to save data or cancel saving data.
After checking the option [Always ask for the patient's data] will cause this dialogue box to be
displayed at each attempt to save an image. If this option is unchecked, saved images will be
assigned to previously entered data, excluding this dialogue box. To enter patient data before
examination, use Patient function. <10.10.>
46
DRAMIŃSKI 4Vet User Manual
_____________________________________________________________________ ____________________
Fig. 39 Entering patient data in "Save image”, "Save cine” and "Patient” functions.
10.6.4. Save cine
After freezing the image, the user can save in the device's memory a cine loop comprising 256
consecutive frames recorded before pressing [Freeze] button. Cine loop covers about13 seconds of
the examination.
To save cine loop, proceed similarly to the image saving scheme <10.7.3.>
10.7. Printing
The device enables the user to print diagnostic images after connecting an optional thermal printer.
A list of compatible printers can be provided by the Producer.
The user can print: a saved image, any frame from the saved cine loop, an image frozen during the
examination.
To print a photo, display a selected image on the screen. It can be done by loading a saved image,
cine loop or freezing an image during the examination. Next, press [Print] in [Save Load] menu. In the
window displayed on the right side of the monitor, a print preview will appear, showing the number of
images to be printed.
Fig. 40 Print preview
47
DRAMIŃSKI 4Vet User Manual
_____________________________________________________________________ ____________________
To add another image to the printed photo, display it on the screen and again click Print in [Save
Load] menu. Up to 4 photos can be printed on one sheet of paper.
To print a photo, just press [Print] button in the print preview window.
To cancel printing, press [Clear] button in the print preview window.
10.8. Exporting data to external storage media
Data are exported to the computer with the use of external storage media with a USB connection.
To prepare data, connect the medium to USB slot. Next, select Load image or Load cine from [Save
Load] menu. To export an image, double click its name. In a selection field, next to the name, a 'v'
symbol will be displayed. Next, press [Send USB] button. A window showing the progress will appear.
When sending is completed, the window will close.
This function enables the user to send any number of images.
Fig. 41 Selecting files to be sent to the external memory.
10.9. Patient function
This function enables the user to enter patient data in the device's memory before starting the
examination. All the entered data will be automatically assigned to saved images and cine loops. After
clicking [Save image] or [Save cine] buttons, the system will no longer ask for patient's data. A case
report can be edited later, using the saved image and cine loop function <10.7.1.>
10.10. Presets
This option enables the user to save favourite device settings under a user's name. In the same way,
it can be used to save optimum settings used to examine a given organ.
To add a new preset, first optimise device settings (gain 1 and 2, frequency, scan depth, focus, zoom
and Gamma). Next, click [Settings and Presets] button and select [Manage presets] option. A
dialogue window will be displayed which enables adding, removing, editing and enabling presets.
48
DRAMIŃSKI 4Vet User Manual
_____________________________________________________________________ ____________________
Fig. 42 "Preset” selection window.
On the right side of the window, current settings will be displayed, which will then be saved. After
ensuring that they correspond with settings selected by the user, choose "New preset". A window for
a preset name will be displayed. Enter the name and press OK. Preset will be saved and listed in the
preset management window,
To delete the preset, open the preset management window and check a given preset, clicking on its
name. The name will become highlighted. Next, select "Delete preset".
To enable a preset, click "Settings and Presets" key. A list of available presets will be displayed above
"Settings"and "Manage presets" keys. Click on a selected name, and the preset will be enabled.
A preset can also be enabled from the preset management window, using [Load preset] button.
10.11. Advanced settings
To enter advanced settings menu, click [Settings] button in the Settings and Presets menu. Advance
settings menu comprises six sections described below.
In [View] section, there are tools used to modify user panel.
49
DRAMIŃSKI 4Vet User Manual
_____________________________________________________________________ ____________________
Available options include:
- change location of the tools panel
- change up-down, left-right orientation of the image. Changed orientation of the image is signalled by
moving the indicator corresponding with the marker on the probe (Fig. 15, no. 3).
- show / hide mouse cursor
- change background colour
- select skin
- change language.
Fig. 43 "View” section.
In "Clinic" section, the user can enter the name of his or her practice or a physician's name. The
name will be displayed on upper information bar above the examination sector.
50
DRAMIŃSKI 4Vet User Manual
_____________________________________________________________________ ____________________
Fig. 44 "Clinic” section.
In "Information" section, the user can check the software and equipment versions and update them.
Also here, if necessary, the user can restart the application.
"Time" section is used for updating the date and time for the system.
In "Display" section there are options for setting brightness of the display and calibrating the touch
panel.
"Audio" section iis used for setting the volume levels.
51
DRAMIŃSKI 4Vet User Manual
_____________________________________________________________________ ____________________
11. Charging and using batteries
DRAMIŃSKI BATTERT PACK is an efficient, rechargeable Li-Ion pack.
Battery life depends on the manner of use. Ideally, it should work in full cycles, i.e. fully charged - fully
discharged. The battery connected to the electrically powered device is not being charged. Such a
solution allows for extending the battery's life.
Attention! In order to charge the pack, use a special charger with
properly selected current parameters. Use only the chargers
recommended by the ultrasound scanner manufacturer.
Attention! A charger is an auxiliary device used solely for the
purpose of battery charging. It is not an integral part of
Fig. 45 Battery charger
DRAMIŃSKI 4Vet ultrsound scanner, used during operation of
the device.
DRAMINSKI 4Vet has a low battery signalling function. In the bottom left corner of the screen, there
is a graphic indication of battery charge level. A fully charged pack powers the ultrasound scanner for
about 2 hours.
Observation of this indicator will help to monitor a battery charge level:
1. When the colour of the indicator changes from green to yellow, it means that the battery will work
for about 45 minutes.
2. When the colour changes from yellow to red, it means that the battery will work for about 10
minutes.
"Low battery" message displayed in the middle of the screen, accompanied with a sound signal,
means that the battery needs recharging. If the device is still switched on, the pack will be discharged
and the device will turn off automatically.
11.5. Charging DRAMIŃSKI BATTERY PACK
In order to charge the battery:
a) turn the device off with [ON/OFF] button (if the system was not switched off automatically),
b) disconnect the pack from the device,
c) connect the charger to a 110-240 V / 60 Hz socket,
d) connect the charger cable to the pack slot,
e) observe the diode on the charger - if the colour changes to green, the battery is fully charged.
Charging a fully discharged battery takes about 1,5 hour. When fully loaded, the charger stops
charging automatically.
52
DRAMIŃSKI 4Vet User Manual
_____________________________________________________________________ ____________________
Warning! - When the pack is fully discharged, the charger will charge batteries first and
the charger diode will remain orange, and then the diode changes its colour to yellow
on the fast charging state. The battery is fully charged, when the diode turns green.
DRAMIŃSKI BATTERY PACK batteries are expected to last for about 500 charging cycles. If the
battery last for a much shorter time, it indicates a high degree of wear and a need to replace it with a
new one.
12. Software update
To update the software, connect the device to the Internet with the use of Ethernet cable. When the
cable is connected, select Information section in the advance settings panel. Next, click [Update via
Internet] button.
In the displayed dialogue box, confirm the intention to update, by clicking [Next]. At this stage, update
is downloaded. When downloaded, the new version will be installed automatically. Wait until the
programme is restarted.
If the device will not start downloading, check the Internet connection.
Attention! Before updating the software, always check the hardware version. This information
is provided on the right side of the screen under Information. Any new software version is
strictly linked to the hardware version. Only compatible updates must be downloaded.
13. Touch panel calibration
Dramiński 4Vet device has a touch panel calibrated by the manufacturer.
In case of a system breakdown, the panel may automatically become discalibrated. It is manifested by
the panel being less sensitive to touch.
To calibrate the panel, select Display section in the advance settings menu. Next, press Touch panel
calibration key.
A calibration program window will be displayed. To start the calibration, press Calibration key.
53
DRAMIŃSKI 4Vet User Manual
_____________________________________________________________________ ____________________
Fig. 46 Program used to calibrate the touch panel.
The screen will turn white. In the corners, four red points will appear one after another, in which you
have to press the panel. Calibration accurateness depends on the precision of pressing. To make
things easier, the points are situated between two blue lines located perpendicularly to each other.
Fig. 47 Program used to calibrate the touch panel.
The points are displayed in the following order: left upper corner, left bottom corner, right upper
corner, right bottom corner.
After pressing the last point, press OK to confirm calibration.
Calibration is completed by pressing Close key in the calibration program window.
54
DRAMIŃSKI 4Vet User Manual
_____________________________________________________________________ ____________________
14. Maintenance
During use, the device may be contaminated, also with infectious agents. When you finish work,
clean the device with a soft cloth or paper towel, using a mild detergent. When cleaning, protect slots
in the casing from moisture.
The surface of the device should be disinfected with a special agent for disinfecting medical
equipment. Products in spray or foam are recommended.
Attention! Ultrasonic probe must be carefully disinfected after each use.
After cleaning with a damp cloth, the ultrasound scanner should be wipe dry with a paper towel, if
necessary.
The personnel carrying out disinfection procedure should wear protective clothing.
Touch panel requires regular cleaning. For this purpose, use mild detergents (foams, aerosols, touch
screen cleaning wipes), which ensure gentle cleansing and protect the panel surface against
mechanical damage.
Warning! - Do not use heavily concentrated, aggressive agents and
abrasives. Such agents may cause permanent damage of the panel
surface and casing.
When wet cleaning, protect plugs, slots and holes in the casing
against moisture.
The expected operating life of the device is 10 years, but it may be exceeded by the producer after
performing a periodic review and issuing an appropriate statement.
It is advised that the ultrasound scanner users have regular technical inspections carried out by the
producer every two years. It will help to ensure the highest level of patients' safety.
55
DRAMIŃSKI 4Vet User Manual
_____________________________________________________________________ ____________________
15. Use instructions
Atypical symptoms
The device won't turn off
Basic action to check the problem
1. Check if the power supply cable is properly
connected.
2. If battery operated, check operation with a charged
Dramiński Battery Pack, as it may indicate that the
batteries are fully discharged.
The device turns on, but no
1. Check if an external carrier is connected to USB port.
operating system starts
If yes, disconnect it and then restart the device.
Lack of proper image or image
1. Check connection of the head – disconnect and re-
noises
connect the probe.
2. Check if the probe's lock is twisted to the end.
3. Check if the probe symbol is displayed on the
information bar and corresponds to the symbol of
connected probe.
Image is too dark or too bright.
1. See if gain and Gamma levels are set at the optimum
levels.
Strips are moving over the image
Possible disruptions of power supply.
1. Turn to battery operation.
2. Plug the power supply to another socket.
No charging signal in the charger. 1. Check connection and condition of all cables.
2. Check the power supply in the 110-240 V / 60Hz
socket,
Short battery operating time
1. Battery is low
2. Low temperature in the room
3. Battery is worn (a normal symptom resulting from the
baterry's operating life) and needs changing to a new
one.
56
DRAMIŃSKI 4Vet User Manual
_____________________________________________________________________ ____________________
"Probe OFF” message on the
1. Check if ultrasonic probe is properly connected.
screen which makes it impossible Disconnect and re-connect the head. Make sure that the
to carry out an examination
head lock is twisted to the end ("Probe ON" message will
be displayed and will soon automatically disappear).
Screen messages which make it
1. Restart the device. If the device fails to work in a
impossible to carry out an
normal mode, contact the manufacturer or authorized
examination
service centre.
Mechanical damage of the
1. Inspect the device and after contacting authorized
casing, its elements or connecting service or manufacturer, act as advised.
cables.
If none of the basic actions helps or another problem occurs, please contact DRAMIŃSKI
service centre, tel. 0–89 527–11–30 or e-mail to: [email protected]
57
DRAMIŃSKI 4Vet User Manual
_____________________________________________________________________ ____________________
16. Symbols and signs used on the labels
CE sign points out that the product complies with applicable Directives
Attention, read the user manual
A warning related to user safety risk
2013
DRAMIŃSKI
Date of production
Name and address of the product manufacturer
Utilize separately from other household waste, pursuant to Directive 93/86/EEC
of the Commission or local provisions.
IP30
SNMAX
40°C
The level of casing resistance to external factors - penetration of small objects
and dust as well as water resistance level.
Product batch number for identification purposes
Product storage temperature
MIN
10°C
Be careful, a fragile product
58
DRAMIŃSKI 4Vet User Manual
_____________________________________________________________________ ____________________
17. Guarantee
The manufacturer hereby grants the buyer a 24-month guarantee for a trouble-free operation of the
product used in accordance with the attached user manual.
The battery has a 6-month guarantee.
In case of any failure occurring at no fault of the user, the manufacturer undertakes to repair the
product not later than within working 14 days from the date of receiving the device at the service
centre (ul. Owocowa 17, 10-860 Olsztyn) and to return the device in good working order at the
manufacturer's cost.
The guarantee excludes mechanical damage, damage resulting from improper operation, storage and
independent repairs.
The guarantee is processed based on a proof of purchase (invoice). To make a complaint, the user
should advice Dramiński immediately after identifying it.
To make a claim under the guarantee, the user must submit:
1. Product
2. A copy of the proof of purchase clearly identifying the name and address of the seller, date and
place of purchase, type of product and product serial number.
The Guarantor is DRAMIŃSKI Company:
ul. Owocowa 17, 10-860 Olsztyn
Phone: +48 89 527 11 30, fax +48 89 527 84 44
e-mail: [email protected], www.draminski.com
59