1
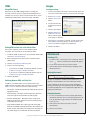
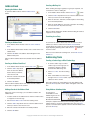
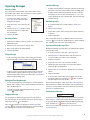
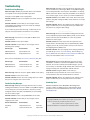
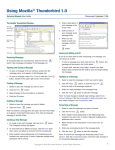
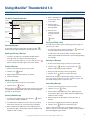
Using Mozilla® Thunderbird 1.0
Technical Manual: User Guide
Document Updated: 1/06
The Mozilla Thunderbird Window
4. Enter a description of
your message in the
Subject box.
Menu Bar
Mail Toolbar
5. Enter the text of
your message in the
message body.
Search Bar
Message List
6. When you are
ready to send your
message, click the
Send
Mail Folders
Pane
Message Pane
button.
Status Bar
Saving and Editing a Draft
Receiving Messages
If you do not have time to finish composing your message, you
can save it as a draft.
To manually check for incoming mail, click the Get Mail
button. New messages will appear in the Message List.
Opening and Closing a Message
•
To open a message in its own window, double-click the
message name, as it appears in the Message List.
•
To close a message, select File / Close or click the Close
button, located in the upper right corner of the window.
Printing a Message
To save a message as a draft, click the Save
message will be saved in the Drafts folder.
•
To edit a draft, click the Drafts folder, located in the Mail
Folders pane. Double-click the draft to open and begin editing
the message.
button. The
Replying to a Message
1. Select or open the message to which you want to reply.
2. Click the Reply
button, or click the Reply All
button to reply to all message recipients.
1. Select or open the message you want to print.
2. Click the Print
•
3. Enter your reply message in the message body.
button.
3. Make changes to the print options, as desired.
4. Click the Send
4. Click the OK button.
Note: To make changes to default reply settings, select Tools /
Account Settings. Click the Composition & Addressing link, and
then make changes in the Composition area.
Deleting a Message
1. Select or open the message you want to delete.
2. Click the Delete
button to send the message.
Forwarding a Message
button.
1. Select or open the message you want to forward.
Note: To retrieve a message from the trash, click the Trash folder,
as it appears in the Mail Folders pane. Then click and drag the
message to another folder.
Creating a New Message
1. To create a new mail message, click the Write
The Compose window will appear.
button.
2. Click the Forward
button.
3. Enter recipient email address(es) in the Addressing area,
located to the right of the To button. Separate multiple email
addresses with a comma.
4. Make changes to the description in the Subject box, as
desired.
2. To send mail from a different account, click the From dropdown menu and select an account from the resulting list.
5. Enter any accompanying text in the message body.
3. Enter recipient email address(es) in the Addressing area,
located to the right of the To button. Separate multiple email
addresses with a comma.
Note: To control how messages are forwarded, select Tools /
Options. Click the Composition button, and then make changes in
the Forwarding Messages section.
6. Click the Send
button to send the message.
Copyright © 2006 Document Authors. Some Rights Reserved.
1
HTML
Images
Using HTML Format
Inserting an Image
When you use the HTML editing format for creating your
message, you have access to advanced formatting tools. For
example, you can use a variety of fonts and font colors, create
bulleted and numbered lists, and insert images and tables.
1. To insert an image into the body of your message, place your
text cursor in the location where you want to insert the image.
2. Select Insert / Image.
3. Click the Choose File
button.
4. Locate and select the
image file you want to
insert.
5. Click the Open button.
6. Click the Dimensions,
Appearance, or Link
tabs to make changes
to the image, as desired.
7. If the Alternate text button is selected, you will need to enter
a description of the image. Or you can click the Don’t use
alternate text button to bypass this requirement.
Setting HTML or Plain Text as the Default Editor
Since some recipients cannot receive HTML-formatted
messages, you may prefer to use the plain-text editor.
1. To indicate HTML or plain text as your preferred default editor,
select Tools / Account Settings.
2. Select and expand your mail account, located in the left
sidebar pane.
3. Click the Composition & Addressing link.
4. Choose one of the following:
•
If you want to use HTML formatting by default, check the
Compose messages in HTML format box.
•
If you want to use plain-text editing by default, clear the
Compose messages in HTML format box.
8. Click the OK button.
Attachments
Attaching a File
1. To attach a file to a message you are composing, click the
Attach
button. The Attach Files window will appear.
2. Locate and select the file(s) you want to attach.
3. Click the Open button. The filename(s) will appear in the
Attachments area.
Opening Attachments
5. Click the OK button.
Switching Between HTML and Plain-Text
If HTML is your default editor, you can switch between the
HTML and plain-text editors while creating your message. Select
Options / Format, and then select one of the following:
•
Auto Detect – Mozilla Thunderbird will automatically select an
appropriate format.
•
Plain Text Only – Messages will be composed as plain text
and can be opened and read with any mail program.
•
Rich Text (HTML) Only – Messages will be composed as
HTML text only. Some recipients may have trouble opening
and reading the message.
•
Plain and Rich (HTML) Text – Messages will contain both
plain-text and HTML formatting information. All recipients will
be able to open and read the message, but the message file
size will be larger to accommodate the extra information.
To open an attachment, double-click the attachment as it
appears in the Attachments area of the Message window.
If your computer has the necessary software installed for
opening the attachment, the attachment will open. Otherwise,
you will be prompted to select an appropriate application for
opening the attachment.
Saving Attachments
1. To save an attachment you have received, right-click the
attachment and select Save As from the pop-up menu. To
save all attachments, right-click the first attachment and
select Save All.
2. Select the location where you want to save the
attachment(s).
3. Click the Save button.
Copyright © 2006 Document Authors. Some Rights Reserved.
2
Address Book
Creating a Mailing List
Opening the Address Book
When sending messages regularly to a group of recipients, it is
convenient to create a mailing list.
To open the Address Book, click the Address Book
button.
1. In the Address Book window, click the New List
button.
2. Click the Add to drop-down menu to select the address book
where you want to store the mailing list.
3. Enter the list name, nickname, and description of the mailing
list in the fields provided.
4. Enter the email addresses you want to include in the mailing
list. Press the Enter key after each entry.
5. Click the OK button.
Note: To edit the mailing list, double-click the mailing list name as
it appears in the card list.
Searching for an Entry
Creating an Address Book
1. In the Address Book window, select File / New / Address
Book.
2. In the Address Book Name window, enter a name for the new
address book.
3. Click the OK button. The address book will appear in the
Address Book pane.
Note: To edit the address book name, double-click the address
book.
Creating an Address Book Card
1. In the Address Book window, click the New Card
button.
2. Click the Add to drop-down
menu to select the address
book in which you want to
store the new card.
To search for an address book card, enter the name or email
address you want to search for in the Name or Email field,
located above the card list. As you type, Mozilla Thunderbird will
begin displaying matching items. Click the Close
button to
clear the search.
Note: For more advanced searching tools, select Edit / Search
Addresses.
Addressing Tools
Sending a Carbon Copy or Blind Carbon Copy
1. To send a carbon copy or a blind
carbon copy of a message you are
composing, click the To button,
located in the Addressing area.
2. Select Cc: or Bcc: from the resulting
menu.
3. Enter email addresses in the area to
the right of the Cc: or Bcc: button, separating multiple email
addresses with a comma.
3. Enter the contact’s information
in the fields provided.
4. Click the OK button.
Note: To edit the address book card, double-click the address
book card as it appears in the card list.
Note: After entering an email address in the first address field,
press the Enter key and a new To button will appear on the next
line.
Adding a Sender to the Address Book
Using Address AutoCompletion
When you receive a message, you can add the sender to the
address book.
As you type an
email address in the
Addressing area of the
Composition window,
Mozilla Thunderbird will
attempt to complete the address with a matching address in your
address book. To accept the suggested match, press the Enter
key. Or, if several matches appear, select the desired address and
press the Enter key.
1. To add a sender to the address book, click the sender’s name,
as it appears in the message.
2. Select Add to Address Book from the resulting menu.
3. Click the Add to drop-down menu to select the address book
where you want to store the new card.
4. Enter the contact’s information in the fields provided.
5. Click the OK button.
Copyright © 2006 Document Authors. Some Rights Reserved.
3
Organizing Messages
Labeling a Message
Creating a Folder
Your mail account will, by default, have several folders: Inbox,
Unsent Messages, Drafts, Sent, and Trash. To further organize
your email, you can create new folders.
•
To apply a priority label to a message, right-click the message
and select Label. Then select a label from the resulting menu.
•
To apply a priority label using keyboard shortcuts, select the
message(s) you want to label, and then press 1, 2, 3, 4, or 5
on your keyboard. To clear a priority label, select the message
and then press 0.
1. To create a new folder, select File /
New / New Folder. The New Folder
dialog box will appear.
Customizing Labels
2. In the Name box, enter a name for the
folder.
1. To customize label colors and descriptions, select Tools /
Options.
3. Click the Create as a subfolder of dropdown menu and select a folder from
the resulting list.
2. Click the Display button.
4. Click the OK button.
3. In the Labels section, make changes to the labels and colors,
as desired.
4. Click the OK button.
Renaming a Folder
1. Right-click the folder you want to rename, as it appears in the
Mail Folders pane.
Note: If the Label column is not displayed, click the Show/Hide
Columns
icon, located on the Message List column headings
bar, and then select Label from the resulting menu.
2. Select Rename Folder from the pop-up menu.
Creating and Using Message Filters
3. Enter a new name in the field provided.
Mozilla Thunderbird’s message filters can automatically organize
your incoming email.
4. Click the OK button.
1. To create a new filter, select Tools / Message Filters.
Filing a Message
•
To file a message into a folder, click and drag the message
from the Message List into a folder in the Mail Folders pane.
2. Click the Filters for drop-down menu and select the mail
account for which you want to create a mail filter.
3. Click the New button.
4. In the Filter name box, enter a name for the filter.
5. Indicate the types of messages you want to filter and the
actions the filter should perform.
•
To place a copy of a message into another folder, leaving the
original in place, right-click the message and select Copy To
from the pop-up menu. Then select a destination account and
folder from the resulting menu.
Sorting and Threading Messages
•
To sort the messages in your Message List, click the Subject,
Sender, Date, Priority, or other column heading, located at the
top of the Message List.
•
To group or ungroup related message threads, click the
Thread
column heading.
6. Click the More or Fewer button to display more or fewer filter
options.
7. Click the OK button.
8. To run the filter, click the filter name and then click the Run
Now button. Otherwise, click the Close
button, located in
the upper right corner of the window.
Note: To make changes to a filter, select Tools / Message Filters.
Select the filter you want to edit, and then click the Edit button. If
necessary, you may need to first select a different account from
the Filters for drop-down menu.
Searching for a Message
Flagging a Message
Use the Flag tool to mark messages that need your attention.
For each message you want to flag, click once in the message’s
Flag column. A Flag
icon will appear.
Note: If the Flag column is not displayed, click the Show/Hide
Columns
icon, located on the Message List column headings
bar, and then select Flag from the resulting menu.
To search for a message, enter the words you want to search for
in the Subject or Sender field, located above the Message List.
As you type, Mozilla Thunderbird will begin displaying matching
items. Click the Close
button to clear the search.
Note: For more advanced searching tools, select Edit / Find /
Search Messages.
Copyright © 2006 Document Authors. Some Rights Reserved.
4
Tools
Requesting Receipt Confirmation
Using Sending Features
When you are composing a message, you can make changes
to the default sending options. For example, you can request a
Return Receipt or assign a priority level. In the Compose window,
select one of the following from the Options menu.
•
Check Spelling – Checks the spelling of the text in your
message.
•
Quote Message – Places quote
markings around the original text when
you are replying to a message.
•
Return Receipt – Attaches a return
receipt to the message.
•
Format – Allows you to control the
editing format of your message.
•
Priority – Assigns a priority label to your message, marking
the message as Highest, High, Normal, Low, or Lowest
priority.
•
Character Encoding – Enables you to select from a variety of
language character sets.
•
Send a Copy To – Sends a copy of the sent message to a
folder other than your default Sent folder.
•
Security – Provides various security options for sending your
message, including encryption and digital signatures.
Return Receipts display a confirmation request when recipients
open your message. You will receive an email message as each
recipient opens and confirms receipt of your message.
To attach a Return Receipt to a message you are composing,
select Options / Return Receipt. A check mark will appear next to
the Return Receipt line in the Options menu.
Note: Not all mail programs accept this feature, and recipients
can also ignore or refuse to send a confirmation receipt.
Using the Thunderbird Junk Mail Filter
Mozilla Thunderbird will detect incoming junk mail and mark the
message with a small Junk Mail
icon.
You can train Mozilla Thunderbird to recognize items that are
truly junk mail by adding or removing the Junk Mail
label, as
needed. Click once in the message’s Junk Mail column to add or
remove the label.
Assigning Preferences
To assign your preferences to Mozilla Thunderbird, select Tools /
Options. Click the buttons along the left to make changes to your
general settings—including display, composition, attachment, and
font settings, as well as advanced settings. When you are done,
click the OK button.
Shortcuts
Move to Search Bar
Ctrl/Cmd + K
The following are keyboard shortcuts for Windows, Linux, and
Mac users. Mac uses a Cmd key instead of Ctrl, and also Return
instead of Enter. Shortcuts below display Cmd/Ctrl and Enter/
Return to accommodate all users.
Increase Text Size
Ctrl/Cmd + + (plus)
Decrease Text Size
Ctrl/Cmd + - (minus)
Restore Text Size
Ctrl/Cmd + 0
Mark Message as Read/Unread
M
Mark Message as Read
R
Mark All Read
Ctrl/Cmd + Shift + C
Mark All Read By Date
C
Mark As Junk
J
Mark as Not Junk
Shift + J
Message Source
Ctrl/Cmd + U
Reply to Message
Ctrl/Cmd + R
Save Message as File
Ctrl/Cmd + S
Search Messages
Ctrl/Cmd + Shift + F
Send Message Now
Ctrl/Cmd + Enter/
Command
Shortcut
New Message
Ctrl/Cmd + M or N
Open Message (in new window)
Ctrl/Cmd + O
Close Window
Ctrl/Cmd + W
Edit as New
Ctrl/Cmd + E
Expand All Threads
*
Collapse All Threads
\
Find Again
Ctrl/Cmd + G or F3
Find Previous
Ctrl/Cmd + Shift + G
Find Text in Message
Ctrl/Cmd + F
Forward Message
Ctrl/Cmd + L
Go To Next Message
F
Go to Next Unread Message
N
Go to Next Unread Thread
T
Go to Previous Message
B
Go to Previous Unread Message
P
Return
Send Message Later
Ctrl/Cmd + Shift +
Enter/Return
Send and Receive All Messages
Ctrl/Cmd + T
Stop
Esc
Copyright © 2006 Document Authors. Some Rights Reserved.
5
Troubleshooting
.....................................
Trouble Receiving Messages
Alert messages: Sending of password did not succeed. Mail
server [POP server name] responded: Login failed.
Or Login to server [IMAP server name] failed.
Possible causes: Incorrect or incomplete user name; incorrect
password.
Possible solution: Confirm that you are using the correct
and complete email address as the user name (for example,
[email protected]).
Alert message: Sending of message failed. The message could
not be sent because connecting to SMTP server [SMTP outgoing
server name] failed. The server may be unavailable or is refusing
SMTP connections. Please verify that your SMTP server setting is
correct and try again, or else contact your network administrator.
Possible causes: Correct SMTP server name, but incorrect port
number; using SSL settings for SMTP server that does not accept
SSL settings.
Possible solution: Refer to the outgoing server settings on this
page to confirm that you are using the correct port number. You
may want to try using non-SSL settings.
If you continue to get the alert message, confirm that you are
using the correct password. Passwords are case sensitive.
.....................................
Alert message: Connection to server [POP or IMAP server
name] timed out.
Possible cause: Incorrect port number.
Possible solution: Confirm that you are using the correct
incoming server settings:
Server Type
Server Name
Port
POP Mail Server
pop.emailsrvr.com
110
IMAP Mail Server
imap.emailsrvr.com
143
.....................................
Alert message: An error occurred while sending mail. The mail
server responded: [recipient email address]: Relay access denied.
Please verify that your email address is correct in your Mail
preferences and try again.
Possible causes: You may receive this message when your
Internet Service Provider (ISP) does not allow third-party SMTP
outgoing servers. Or, you may need to enter your user name in
the Outgoing Server (SMTP) area.
Possible solution: Use the outgoing server settings provided by
your ISP. Or, go to Tools / Account Settings, click the Outgoing
Server (SMTP) link, check the Use name and password box and
enter your email address in the User Name box.
.....................................
Or, if you have checked the Use secure connection (SSL) box:
Server Type
Server Name
Port
POP Mail Server
secure.emailsrvr.com
995
IMAP Mail Server
secure.emailsrvr.com
993
.....................................
Security Error: Domain Name Mismatch message: You have
attempted to establish a connection with [SMTP server name].
However, the security certificate presented belongs to [secure
server name]. It is possible, though unlikely, that someone may be
trying to intercept your communication with this web site.
Possible cause: Incorrect server name.
Possible cause: Using the SMTP server name (i.e.,
smtp.emailsrvr.com) instead of the secure server name (i.e.,
secure.emailsrvr.com) when the SSL button is selected.
Possible solution: Refer to the server settings above to confirm
that you are using the correct server name.
Possible solution: Refer to the outgoing server settings on this
page to confirm that you are using the correct server name.
Trouble Sending Messages
Knowledge Base
Alert message: Sending of message failed. An error occurred
sending mail: Unable to connect to SMTP server [SMTP outgoing
server name]. The server may be down or may be incorrectly
configured. Please verify that your Mail/News account settings
are correct and try again.
Mozilla Thunderbird’s online MozillaZine Knowledge Base
contains solutions to additional issues and frequently asked
questions. To access Thunderbird help, select Help / Mozilla
Thunderbird Help.
Alert message: Failed to connect to [POP or IMAP server name].
Possible cause: Incorrect / misspelled SMTP server name.
Possible solution: Confirm that you are using the correct
outgoing server name:
Secure Connection
Server Name
Port
Copyright © 2006 Document Authors. Some rights reserved. This
work is licensed under a Creative Commons License:
http://creativecommons.org/licenses/by-nc-sa/2.0/
No (None)
smtp.emailsrvr.com
25 or 587
Mozilla Thunderbird is a trademark of the Mozilla Foundation.
SSL
secure.emailsrvr.com
465 or 587
Copyright © 2006 Document Authors. Some Rights Reserved.
6