1
I N S TA L L AT I O N M A N U A L
= Steel & Aluminium
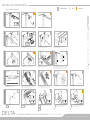
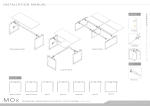
Beginning - follow basic frame for each Delta installation
1a
Allen Key
M5
M8 x 16mm
x2
Cap Screw
x2
For Aluminium Beam - Mount connector to endlegs with cap screws.
For Steel Beam - Mount beam to endlegs with JCBC screws.
For Aluminium Beam - Slide connector into beam.
2
1a
Bracket
x1
CSK Screw
x2
M6 x 12mm
Allen Key
M5
3
M5 x 20mm
C OMBI DE SK FR A ME
1
CSK Screw
x4
x4
Allen Key
M3
M6 x 10mm
Cap Screw
For Steel & Aluminium Beam - Mount bracket on the H leg support
to be fixed with cap screws.
1
1a
Allen Key
M4
For Steel & Aluminium Beam - Attach middle beam on top of the
bracket, fix CSK screws into the beam with allen key
For Steel & Aluminium Beam (bottom view) - Fix CSK screws from
bottom of the bracket with allen key.
3
1b
Allen Key
M5
HI VERSION
CORNER FRAME
For Steel & Aluminium Beam - Attach middle beam on the H leg
support.
x4
For Aluminium Beam - Attach return beam on the main beam.
1
For Steel Beam
4. Axis
1.Set Screws to adjust length
2.Axis
For Aluminium Beam (view up-side-down) - Fix cap screws into
main beam.
2
3. Hexagon
Shaft
For Aluminium Beam
x2
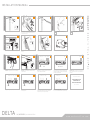
For Steel Beam - Assemble this 5 steps from 1 to 5.
For Aluminium Beam - Further instruction in 2a.
WO RK TOP
Cap Screw
x4
3.
For Steel & Aluminium Beam - Insert crank handle into the round hole.
4
Allen Key
M5
5
Allen Key
M5
Allen Key
M5
x 16
JCBC Screw
Combidesk (view up-side-down)- Attach 2 worktops
with JCBC screws from bottom of top support.
x 24
For Steel Beam, Corner (view up-side-down) Attach 3 worktops with stabiplates, extra steel top
support T-frames between worktops.
RECTANGULAR, COMBIDESK, CORNER, HI (CLICK) & HV (CRANK) - STEEL & ALUMINIUM BEAM
JCBC Screw
x 16
M8 x 16mm
JCBC Screw
M8 x 16mm
Rectangular (bottom view) - For Steel Beam, assemble
this 4 steps from 1 to 4. For Aluminium Beam, assemble
from 1 to 6.
Side Crank Explode View
For Aluminium Beam - Assemble this 10 steps from 1 to 10.
M8 x 16mm
x8
M8 x 16mm
JCBC Screw
1.
D E LTA
3
M6 x 12mm
Allen Key
M5
Rectangular - Place main worktop on frame.
For Aluminium Beam (view up-side-down)- a. Push plastic stopper (a) away
from leg. b. Push down stopperhead (d) into centre gutter. c. Fit round axis over
hexagon shaft inside connector. d. Pull stopper head out of gutter.
2
1.
8.
9.
Front Crank Explode View
5.
4.
3.
4.
c.
6.
2.
7.
10.
5.
For Steel Beam (view up-side-down) - a. Place hexagon rod into (b)
gearboxes at both endlegs, c. Adjust length of rod to fit in the gearboxes
with set screws. d. Mount brackets in both sides of beam.
1
6.
a.
Allen Key
M3
Bracket
3a
3
1.
2.
a.
d.
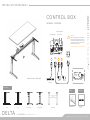
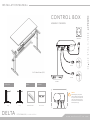
For Steel & Aluminium Beam - Adjust (pull) endlegs height consistently
before beam is attached. To adjust higher, pull up top supports.To adjust
lower, click on button, pull top support slightly, push top support down.
b.
c.
Hexagon
RodAssembly
Assembly (Completed
Look)
Hexagon
Rod
(Completed
Look)
Min. height
= 62 cm
2a
d.
a.
Set
Screws
b.
Max. height
= 85 cm
M6 x 12mm
Cap Screw
For Steel Beam - Hook return beam on the main beam.
H V VERSIO N
1b
Allen Key
M6
JCBC Screw
5. Hexagon
Shaft
= Aluminium
M8 x 25mm
BA SI C FR A ME
1
= Steel
For Aluminium Beam, Corner (view up-side-down) -
Attach 3 worktops with stabiplates, aluminium top
supports between worktops.
www.markantoffice.com