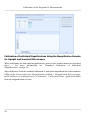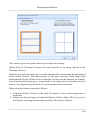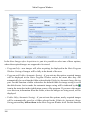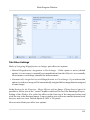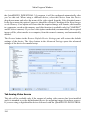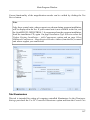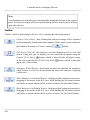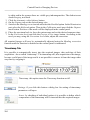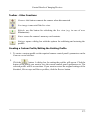
1
QuickPHOTO INDUSTRIAL
3.0
User Guide
QuickPHOTO INDUSTRIAL 3.0
QuickPHOTO INDUSTRIAL 3.0
Copyright © 2012 PROMICRA, s.r.o. All rights reserved
Table of Contents
Introduction .................................................................................................. 7
Installation .................................................................................................... 9
1. Installation of Imaging Devices ................................................................ 10
1.1. Installation of Digital Cameras and Other Imaging Devices ..................... 10
1.2. Installation of OLYMPUS® Digital Cameras (E-system, CAMEDIA® and
SP series) ............................................................................................ 11
2. Installation of the Dongle ........................................................................ 17
3. Installation of the QuickPHOTO INDUSTRIAL 3.0 Program ........................ 17
4. Installation Completion .......................................................................... 18
4.1. Completing the Installation when Using the Lumenera® INFINITY Digital
Cameras ............................................................................................. 18
4.2. Completing the Installation when Using the IDS uEye® Digital
Cameras ............................................................................................. 19
4.3. Completing the Installation when Using the PathScan Enabler IV Digital
Microscope ......................................................................................... 20
4.4. Completing the Installation when Using the ARTRAY ARTCAM Digital
Cameras ............................................................................................. 21
4.5. Completing the Installation when Using the OLYMPUS® E-330 SLR Digital
Camera ............................................................................................... 21
4.6. Completing the Installation when Using the OLYMPUS® CAMEDIA® and
SP Series Digital Cameras ...................................................................... 22
5. Adding the Support of a New Device ........................................................ 22
5.1. Adding the Support of a New Imaging Device ...................................... 22
5.2. Change of the OLYMPUS® Camera Type (CAMEDIA® and SP series) ..... 23
5.3. Adding the Support of Magnification Encoder or a PC Controlled
Illuminator .......................................................................................... 23
Initial Configuration of the Application ............................................................. 25
1. Configuration Wizard ............................................................................. 25
Calibration of the Program for Measurements .................................................... 33
1. Opening Information about Calibrations .................................................... 33
2. Calibration Manager .............................................................................. 34
3. Creating a New Calibration ..................................................................... 35
3.1. Creating a New Standard Calibration (Manual Magnification Assignment
Mode) ................................................................................................ 35
3
QuickPHOTO INDUSTRIAL 3.0
3.2. Creating a New Calibration Using the Magnification Encoder for Upright
and Inverted Microscopes ...................................................................... 46
3.3. Creating a New Calibration Using the Magnification Encoder for
Stereomicroscopes ................................................................................ 52
4. Setting an Active Calibration ................................................................... 58
Main Program Window .................................................................................. 61
1. Description of the Graphical User Interface ................................................ 62
1.1. Menu Bar ...................................................................................... 64
1.2. Toolbar ......................................................................................... 71
1.3. Thumbnail Browser ......................................................................... 76
1.4. Navigator ...................................................................................... 78
1.5. Display Window ............................................................................. 79
1.6. Table of Measured Values ................................................................. 79
1.7. Status Bar ..................................................................................... 80
2. Acquiring of New Images ....................................................................... 80
2.1. Selection of the Imaging Device ........................................................ 80
2.2. Opening of the Imaging Device's Control Panel .................................... 81
2.3. Acquiring an Image ......................................................................... 82
3. Work with Images ................................................................................. 82
3.1. Image Opening ............................................................................... 82
3.2. Image Editing ................................................................................ 83
3.3. Indication and Annotation of Interesting Areas ..................................... 90
3.4. Image Saving ................................................................................. 97
3.5. Image Printing .............................................................................. 108
4. Measurements ..................................................................................... 114
4.1. Preparing for Measuring ................................................................. 115
4.2. Scale Bar ..................................................................................... 117
4.3. Standard Measuring Tools .............................................................. 118
4.4. Displaying a Grid of Defined Dimensions .......................................... 123
4.5. Phase Analysis ............................................................................. 125
4.6. Hardness Test ............................................................................... 133
4.7. Editing of the Measuring Objects ..................................................... 136
4.8. Work with the Table of Measured Values ........................................... 139
4.9. Exporting Measured Values ............................................................. 144
5. Reports .............................................................................................. 148
5.1. Creating New Report Template ........................................................ 149
5.2. Creating a New Report ................................................................... 155
4
QuickPHOTO INDUSTRIAL 3.0
5.3. Report Template Manager ...............................................................
6. Other Functions ...................................................................................
6.1. Image Information .........................................................................
6.2. Compose New Image from Layout of Displayed Images .......................
6.3. Slideshow ....................................................................................
6.4. Display in Full Screen Mode ...........................................................
7. Options ..............................................................................................
7.1. Section General ............................................................................
7.2. Section Measurements ...................................................................
7.3. Section Hardware ..........................................................................
Control Panels of Imaging Devices .................................................................
1. Lumenera® INFINITY Digital Cameras ...................................................
2. Canon® EOS Digital SLR Cameras .........................................................
3. IDS uEye® Digital Cameras ...................................................................
4. ARTRAY ARTCAM Digital Cameras .....................................................
5. PathScan Enabler IV Digital Microscope ..................................................
6. OLYMPUS® E-system Digital SLR Cameras ............................................
7. OLYMPUS® DP72 Digital Camera .........................................................
8. OLYMPUS® Consumer Digital Cameras (SP and CAMEDIA® series) ..........
9. Analog Video Source ...........................................................................
Modules ....................................................................................................
1. Timer - Built-in Module for Time-Lapse Image Capturing ...........................
1.1. Tab Capturing ..............................................................................
1.2. Tab Illumination ...........................................................................
1.3. Recommendations for the Time-Lapse Image Capturing .......................
1.4. Time-Lapse Image Capturing from the Imaging Devices Controlled via
TWAIN Interface ................................................................................
2. Time-Lapse Video - Built-in Module .......................................................
3. Deep Focus (optional) ..........................................................................
4. RECORD IT (optional) .........................................................................
5. FLUO+ (optional) ................................................................................
Adding of Modules and Upgrading .................................................................
List of Key Shortcuts ...................................................................................
Troubleshooting - FAQ ................................................................................
System Requirements ..................................................................................
Index ........................................................................................................
158
159
159
161
163
164
164
164
174
182
189
189
217
221
233
239
242
255
268
275
283
283
283
286
287
288
288
293
294
294
295
297
301
313
315
5
QuickPHOTO INDUSTRIAL 3.0
6
Introduction
QuickPHOTO INDUSTRIAL 3.0 program is designed for acquiring of digital images from
microscopes equipped with digital cameras, for editing and saving of acquired images and
measurements. This program is designed for use especially in the industry and materials
research.
QuickPHOTO INDUSTRIAL 3.0 program is equipped with a number of measuring
functions, for example measuring of lengths, perimeters, areas, angles, distances of parallel
lines, counting of objects, phase analysis, and measuring of hardness and microhardness.
Warning
QuickPHOTO INDUSTRIAL 3.0 program is not designed for diagnosis and
determining of medical procedures!
7
Introduction
8
Installation
Important
It is necessary to have the administrator's privileges for installation. If you do not
have administrator's privileges, contact your administrator.
When installing the QuickPHOTO INDUSTRIAL 3.0 program proceed according to the
following steps:
1. Installation of imaging devices - for more information see “Installation of Imaging
Devices“ on page 10.
▪ Installation of digital cameras and other imaging device - for more information
see “Installation of Digital Cameras and Other Imaging Devices“ on page 10.
▪ Installation of OLYMPUS® cameras (E-system, CAMEDIA® and SP series)
• Installation of a device for displaying of live view - for more information see the
section called “Installation of a Device for Displaying of Life View” on page 11.
• Installation of OLYMPUS® digital camera - for more information see the section
called “Installation of OLYMPUS® Digital Camera” on page 13.
2. Installation of the dongle - for more information see “Installation of the
Dongle“ on page 17.
3. Installation of the program - for more information see “Installation of the
QuickPHOTO INDUSTRIAL 3.0 Program“ on page 17.
4. Installation completion
Completion“ on page 18.
-
for
more
information
see
“Installation
Individual steps are described in the following chapters.
9
Installation
1. Installation of Imaging Devices
1.1. Installation of Digital Cameras and Other Imaging
Devices
®
Installation of the Lumenera INFINITY Digital Cameras
1. For now, do not connect the Lumenera® INFINITY camera to the computer. If it is
connected, disconnect it.
2. Continue with steps Installation of the QuickPHOTO INDUSTRIAL 3.0 Program for more information see “Installation of the QuickPHOTO INDUSTRIAL 3.0
Program“ on page 17 and Installation Completion - for more information see
“Installation Completion“ on page 18.
®
Installation of the Canon EOS Digital SLR Cameras
1. Connect the Canon® EOS digital SLR camera to your running computer, turn it on
and switch the mode dial to the Av (automatic mode) or M (manual mode) position.
2. Wait until the camera's device drivers will be automatically installed.
3. Continue with step Installation of the QuickPHOTO INDUSTRIAL 3.0 Program - for
more information see “Installation of the QuickPHOTO INDUSTRIAL 3.0
Program“ on page 17.
®
Installation of the IDS uEye Digital Cameras
Important
IDS uEye® UI-1440 camera is not compatible with Microsoft® Windows® 7/8
operating systems.
1. For now, do not connect the IDS uEye® camera to the computer. If it is connected,
disconnect it.
2. Continue with steps Installation of the QuickPHOTO INDUSTRIAL 3.0 Program for more information see “Installation of the QuickPHOTO INDUSTRIAL 3.0
Program“ on page 17 and Installation Completion - for more information see
“Installation Completion“ on page 18.
10
Installation
Installation of the PathScan Enabler IV Digital Microscope
1. For now, do not connect the PathScan Enabler IV device to the computer. If it is
connected, disconnect it.
2. Continue with steps Installation of the QuickPHOTO INDUSTRIAL 3.0 Program for more information see “Installation of the QuickPHOTO INDUSTRIAL 3.0
Program“ on page 17 and Installation Completion - for more information see
“Installation Completion“ on page 18.
Installation of the ARTRAY ARTCAM Digital Cameras
1. For now, do not connect the ARTRAY ARTCAM camera to the computer. If it is
connected, disconnect it.
2. Continue with steps Installation of the QuickPHOTO INDUSTRIAL 3.0 Program for more information see “Installation of the QuickPHOTO INDUSTRIAL 3.0
Program“ on page 17 and Installation Completion - for more information see
“Installation Completion“ on page 18.
®
1.2. Installation of OLYMPUS Digital Cameras
®
(E-system, CAMEDIA and SP series)
Installation of OLYMPUS® cameras consists of two steps:
• Installation of a device for displaying of life view.
• Installation of OLYMPUS® digital camera.
These steps are described in the following chapters.
Installation of a Device for Displaying of Life View
Program QuickPHOTO INDUSTRIAL 3.0 can be, for the use with OLYMPUS® digital
cameras (E-system, CAMEDIA® and SP series), used with one of these devices for
displaying of life view on a PC monitor:
1. External USB 2.0 device AV USB 2.0 PRO
2. Internal PCI card Leadtek WinFast VC100 XP
11
Installation
Important
For correct displaying of life view, it is necessary to have set, in the Microsoft®
Windows® operating system, displaying of 24 or 32bit color depth.
Installation of an External Device AV USB 2.0 PRO
1. Connect the AV USB 2.0 PRO device to the USB 2.0 port of your turned on computer.
2. If a Found New Hardware wizard opens up, terminate it. Installation of the AV USB
2.0 PRO device drivers will take place during installation of the QuickPHOTO
INDUSTRIAL 3.0 program.
Installation of the PCI Card Leadtek WinFast VC100 XP
Important
If you are installing the Leadtek WinFast VC100 XP card into your computer in
which is or has been installed the ATI TV Wonder card, it is necessary, for proper
functionality, to remove the ATI card and insert the Leadtek card into another PCI
slot. In case you do not follow this procedure, it is possible that your computer
will not work properly.
Important
Leadtek WinFast VC100 XP card is not compatible with Microsoft® Windows®
7/8 operating systems.
1. Turn off your computer and unplug it.
2. Insert the card into an empty PCI slot (as far as possible from all other cards) and
screw it in.
3. Plug in the computer and turn it on.
4. If a Found New Hardware wizard opens up, terminate it. Installation of the Leadtek
WinFast VC100 XP device drivers will take place during the installation of the
QuickPHOTO INDUSTRIAL 3.0 program.
12
Installation
®
Installation of OLYMPUS Digital Camera
When installing the OLYMPUS® digital camera, proceed according to the following steps:
•
•
•
•
Inspection/update of the camera's firmware (only OLYMPUS® E-330 SLR).
Switching the camera to a PC control mode.
Connecting the camera with the computer.
Installation of the digital camera device drivers.
Individual steps are described in the following chapters.
®
Inspection/Update of the Camera's Firmware (only OLYMPUS E-330
SLR camera)
Note
Other types of cameras do not need firmware updates.
To control the OLYMPUS® E-330 SLR camera from the QuickPHOTO INDUSTRIAL
3.0 program it is necessary to have, the firmware version 1.2 or newer, installed in the
camera. Current version of firmware can be detected the following way: turn on the camera,
unplug the USB cable, press the MENU button, and go to Settings 2 menu (symbol of a
key with the number 2), here select the Firmware item (the very last item). Firmware Body
1.2 or newer is required. If you have an older version of firmware, load a new firmware
into your camera, using the OLYMPUS MASTER program (internet connection is necessary
for update) or contact an authorized OLYMPUS®service.
How to Load a New Firmware:
1. Make sure the camera's battery is fully charged and the USB cable is not connected.
2. In the Settings 2 menu (symbol of a key with the number 2) find the USB MODE item.
In this submenu, select the STORAGE option.
3. Install the OLYMPUS MASTER program from a CD delivered with the camera.
4. Connect the camera to your PC using a standard USB cable delivered with the camera.
5. If you are connecting the camera to your computer for the first time, wait for
installation of the camera device drivers contained in the operating system.
6. Run the OLYMPUS MASTER program. It is recommended to terminate all other
programs.
13
Installation
7. Click the Update Camera/Language icon. Click the OK button.
8. Select the newest firmware and click the Update button. Click the OK button.
9. Wait until loading of the firmware to your camera is complete.
Switching the Camera to the PC Control Mode
To control the OLYMPUS® cameras from the QuickPHOTO INDUSTRIAL 3.0 program,
it is necessary to switch them to the PC control mode. Proceed as follows:
• OLYMPUS® E-system SLR Digital Cameras:
Make sure the USB cable is disconnected from the camera. Switch the mode dial to
the P position and turn the camera on.
Note
In the camera's menu, make sure the Live View Boost function is turned off.
▪ OLYMPUS® E-330, E-510, E-410 SLR Digital Cameras
In the camera's menu, in the Settings 2 menu (symbol of a key with the number 2)
move the cursor to the USB MODE item. Press the right arrow button and select the
CONTROL option. Confirm by pressing the OK button.
▪ OLYMPUS® E-3, E-30, E-620, E-520, E-450, E-420 SLR Digital Cameras
In the camera's menu, in the Settings 1 menu (symbol of a key with the number 1)
or for the type E-620, the User Menu (cogwheel symbol), move the cursor to the
DISP/sound/PC item and press the right arrow button. Move the cursor to the USB
MODE item, press the right arrow button and select the CONTROL option. Confirm
by pressing the OK button.
▪ OLYMPUS® E-600 SLR Digital Camera
In the camera's menu, in the Settings menu (symbol of a key) move the cursor to the
MENU DISPLAY item and press the right arrow button. Using the arrow buttons set
the value ON. Confirm by pressing the OK button. Further on, in the camera's menu,
in the User Menu (cogwheels symbol) move the cursor to the DISP/PC item and
14
Installation
press the right arrow button. Move the cursor to the USB MODE item, press the right
arrow button and select the CONTROL option. Confirm by pressing the OK button.
• OLYMPUS® CAMEDIA® and SP Series Digital Cameras:
Make sure the USB cable as well as the TV output cable is disconnected from the
camera. Switch the camera to the P mode using the mode dial, turn it on and open the
memory card cover. Card cover open warning will appear. Then first press the OK/menu
(1) button and along with it the Quick View button (with older types turn on/off the
LCD screen) (2). Hold both buttons for about 3 seconds. Menu CAMERA/SDK SETUP
will appear. In the USB part, select the CONTROL option (with older types the option
On), confirm by pressing the OK button and close the memory card cover.
15
Installation
Camera should be now ready for computer control. The camera will not be accessible as
a Mass Storage disk drive after switching to the PC control mode. If you want to download
images from the camera like from a disc unit, the camera must be switched back to the
STORAGE mode (with older types OFF).
®
Connecting the OLYMPUS Camera with the Computer
Note
AV USB 2.0 PRO device is equipped with the following connectors:
•
•
•
•
Yellow CINCH for connection of life view output from the camera.
Red CINCH for connection of the right channel of the audio signal source.
White CINCH for connection of the left channel of the audio signal source.
Black S-Video for connection of S-Video analog video signal source.
To connect the OLYMPUS® camera, use the yellow CINCH connector.
1. To control OLYMPUS® (E-system and SP series) cameras from the computer, it is
necessary to use a special dual cable (USB+live view). CINCH connector of this cable
should be connected with the CINCH connector of the device for life view display.
Connect the USB connector of the dual cable to the USB port of the computer. In case
of need, use extension cables.
2. Make sure the camera's mode dial is set to the P position and the camera is on.
Installation of the Digital Camera Device Drivers
• OLYMPUS® E-system SLR Digital Cameras:
Device drivers of the OLYMPUS® E-system SLR cameras will be installed during
program installation.
• OLYMPUS® CAMEDIA® and SP Series Digital Cameras:
16
Installation
Device drivers of the OLYMPUS® CAMEDIA® and SP series cameras will be installed
automatically after connecting of the camera to the computer and turning it on.
2. Installation of the Dongle
Connect the dongle (included in the delivery) to the USB port of your computer. If a Found
New Hardware wizard appears, terminate it. Dongle device drivers will be installed during
program installation.
3. Installation of the QuickPHOTO INDUSTRIAL
3.0 Program
Note
Installation of the QuickPHOTO INDUSTRIAL 3.0 program must be done from
the administrator's account (signed in user must have the administrator's privileges).
If you do not have the administrator's privileges, contact your administrator.
Important
Do not install, into the operating system, any codec packs, e.g. All In 1, K-Lite
Mega Codec Pack and so on. These packages may cause incorrect function of the
program. If you do have some of these packages installed in your system, we
strongly recommend to uninstall such packages. If you need to install some codec,
use the particular codec installer, instead of installing the whole codec pack.
After signing in with the administrator's privileges, proceed as follows:
1. Insert the installation CD and run the installation of the QuickPHOTO INDUSTRIAL
3.0 program by clicking the Install QuickPHOTO INDUSTRIAL 3.0 button from the
home screen of the installation CD. If the home screen does not show automatically,
run, from the installation CD, program autorun.exe.
2. Setup Wizard of the QuickPHOTO INDUSTRIAL 3.0 program will open. Continue
according to the wizard's guidelines. On page Select Components - Imaging Devices
select the support of the desired imaging devices. If you want to use an imaging device
17
Installation
controlled via the TWAIN interface, select the Imaging Devices Controlled via TWAIN
Interface option. Continue according to the wizard's guidelines.
3. If you want to use some of the magnification encoders, select the corresponding control
unit(s) on page Select Additional Components - Magnification Encoders. Continue
according to the wizard's guidelines.
4. If you want to use some of the computer controlled illuminators, select the
corresponding control unit(s) on page Select Additional Components - PC Controlled
Illuminators. Continue according to the wizard's guidelines.
5. On page Select Additional Tasks in the Device Drivers Installation part leave checked
the options for installation of the drivers.
6. On page Select Additional Tasks - File Types Associations it is possible to set
association of the QuickPHOTO INDUSTRIAL 3.0 program for opening of files of
the BMP, JPEG, PNG or TIFF types. If you check one or more of the mentioned
options, the QuickPHOTO INDUSTRIAL 3.0 program will always be used for opening
of the corresponding file types.
7. If you have selected, on page Select Components - Imaging Devices, the support of
IDS uEye® digital cameras, installation wizard for IDS uEye® cameras will open
during installation. Continue by clicking the Next button and click the Install driver
button. Select the 3. USB option and continue according to the wizard's guidelines.
Finish the installation by clicking the Finish button. When prompted, restart your computer.
4. Installation Completion
4.1. Completing the Installation when Using the
®
Lumenera INFINITY Digital Cameras
1. If you have restarted your computer, sign in again to the administrator's account.
2. Connect the Lumenera® INFINITY camera to the USB 2.0 port of your computer
using the enclosed USB cable.
3. Continue with device drivers installation as follows:
• Microsoft® Windows® Vista/7/8
18
Installation
Installation and commissioning of the camera device drivers will take place
automatically.
• Microsoft® Windows® XP
Found New Hardware window will appear. You will be asked whether you want
to search for the driver on the internet. Select No, not this time. Continue by clicking
the Next button.
On the next tab, leave marked the Install the software automatically (recommended)
option and click the Next button.
System will find appropriate device drivers and will ask you if you want to install
them. Click the Continue button.
Camera device drivers will be installed. This process must be repeated one more
time for installation of the second driver. First time there will be installed the
INFINITY Unconfigured device and for the second time a device named INFINITY
X-X USB 2.0 Camera.
4.2. Completing the Installation when Using the IDS
®
uEye Digital Cameras
1. If you have restarted your computer, sign in again to the administrator's account.
2. Connect the IDS uEye® camera to the USB 2.0 port of your computer using the
enclosed USB cable.
3. Continue with device drivers installation as follows:
• Microsoft® Windows® 7/8
Installation and commissioning of the camera device drivers will take place
automatically.
• Microsoft® Windows® Vista
Found New Hardware window will appear. Select Locate and install driver software
(recommended) option.
User Account Control window will appear. Select Continue option.
Windows Security window will appear. Select Install this driver software anyway
option. Camera device drivers will be installed.
19
Installation
• Microsoft® Windows® XP
Found New Hardware window will appear. You will be asked whether you want
to search for the driver on the internet. Select No, not this time. Continue by clicking
the Next button.
On the next tab, leave marked the Install the software automatically (recommended)
option and click the Next button.
System will find appropriate device drivers and will ask you if you want to install
them. Click the Continue button.
Camera device drivers will be installed. This process must be repeated one more
time for installation of the second driver. First time there will be installed the uEye
boot device and for the second time a device named uEye UI-xxxx Series.
When you finish the above described process a green LED should light up on the camera
(if the camera is equipped with this LED). This LED signals that the camera has been
properly installed and is ready to use. If the LED light remains red, the camera probably
is not connected to the USB 2.0 port or there has been a problem with the device drivers
installation.
4.3. Completing the Installation when Using the
PathScan Enabler IV Digital Microscope
1. If you have restarted your computer, sign in again to the administrator's account.
2. Connect the PathScan Enabler IV digital microscope to the USB 2.0 port of your
computer using the enclosed USB cable and turn it on.
3. Continue with device drivers installation as follows:
• Microsoft® Windows® Vista/7/8
Installation and commissioning of the device drivers will take place automatically.
• Microsoft® Windows® XP
Found New Hardware window will appear. You will be asked whether you want
to search for the driver on the internet. Select No, not this time. Continue by clicking
the Next button.
On the next tab, leave marked the Install the software automatically (recommended)
option and click the Next button.
20
Installation
System will find appropriate device drivers and will ask you if you want to install
them. Click the Continue anyway button.
The device drivers will be installed. Click the Finish button.
4.4. Completing the Installation when Using the ARTRAY
ARTCAM Digital Cameras
1. If you have restarted your computer, sign in again to the administrator's account.
2. Connect the ARTRAY ARTCAM camera to the USB 2.0 port of your computer using
the enclosed USB cable.
3. Continue with device drivers installation as follows:
• Microsoft® Windows® Vista/7/8
Installation and commissioning of the camera device drivers will take place
automatically.
• Microsoft® Windows® XP
Found New Hardware window will appear. You will be asked whether you want
to search for the driver on the internet. Select No, not this time. Continue by clicking
the Next button.
On the next tab, leave marked the Install the software automatically (recommended)
option and click the Next button.
System will find appropriate device drivers and will ask you if you want to install
them. Click the Continue button.
Camera device drivers will be installed. This process must be repeated one more
time for installation of the second driver.
4.5. Completing the Installation when Using the
®
OLYMPUS E-330 SLR Digital Camera
1. If you have restarted your computer, sign in again to the administrator's account from
which the program has been installed. Program Camera Setup will run automatically.
Continue according to the wizard's guidelines. If the Camera Setup will not run
automatically, run it manually using the icon on the desktop or run it from the system
drive from the folder Program Files\Common Files\OLYMPUS\service\setupcam.exe.
21
Installation
2. Continue according to the wizard's guidelines. You will be asked to turn the camera
off and back on.
4.6. Completing the Installation when Using the
®
®
OLYMPUS CAMEDIA and SP Series Digital Cameras
Note
OLYMPUS® CAMEDIA® and SP series cameras cannot be used from the Guest
account.
If you want to use the program from the administrator's account, all you have to do is turn
on the camera and then run the QuickPHOTO INDUSTRIAL 3.0 program.
If you want to use the program from common user accounts, it is necessary to obey the
following procedure after program installation (we are speaking only about the very first
run of the program):
1. Turn off the camera, and sign off from the administrator's account.
2. Sign in to your user account, and turn on the camera. Wait until communication
between the camera and the operating system is established (an icon will appear in
the right bottom part of the screen).
3. Then run the QuickPHOTO INDUSTRIAL 3.0 program.
5. Adding the Support of a New Device
5.1. Adding the Support of a New Imaging Device
If you want to install the support of a new imaging device into an already installed
QuickPHOTO INDUSTRIAL 3.0 program, insert the program installation CD to the
CD-ROM drive and run the installation. On page Installation Type Selection select the
Update Existing Installation - Add Components option and select, from the list, desired
devices whose support would you like to add. Continue according to the wizard's guidelines.
22
Installation
®
®
5.2. Change of the OLYMPUS Camera Type (CAMEDIA
and SP series)
If the program QuickPHOTO INDUSTRIAL 3.0 has already been installed with one of
the supported OLYMPUS® cameras and you want to start using a different OLYMPUS®
camera (of a new type or a different device of the original type) from the standard user
account it is necessary to obey the following procedure:
1. Sign in to the account with the administrator's privileges.
2. Connect the new camera switched to the PC control mode - for more information see
the section called “Installation of OLYMPUS® Digital Camera” on page 14, turn it
on and turn the mode dial to the P position.
3. Wait until the camera device drivers have been installed.
4. Run the tool OLYMPUS® SP and CAMEDIA® Series Camera Change Utility from
the Start → Programs → QuickPHOTO → QuickPHOTO INDUSTRIAL 3.0 →
OLYMPUS® CAMEDIA® and SP Series Camera Change.
5. Click the OK button in the OLYMPUS® SP and CAMEDIA® Series Camera Change
Utility window.
6. When asked, turn the camera off and back on.
7. Finish the change by clicking the OK button.
8. Sign off from the administrator's account.
9. After you have signed in to your standard user account the QuickPHOTO
INDUSTRIAL 3.0 program should be ready to work with the new camera.
The whole procedure (change of camera) must be repeated each time before the first use
of the new camera. If you decide to use the original camera you do not need to repeat the
above mentioned procedure.
5.3. Adding the Support of Magnification Encoder or
a PC Controlled Illuminator
If you want to install the support of a new device into an already installed QuickPHOTO
INDUSTRIAL 3.0 program, insert the program installation CD to the CD-ROM driver
and run the installation. On page Installation Type Selection select the Update Existing
Installation - Add Components option and select, from the list, the desired devices whose
support would you like to add. Continue according to the wizard's guidelines.
23
Installation
24
Initial Configuration of the
Application
First Run of the Program
When you run the QuickPHOTO INDUSTRIAL 3.0 program for the first time a wizard
will open which will help you to configure the program correctly. Settings can be later
changed manually by the option from the menu Edit → Options... or by repeated running
of the wizard from the Edit → Configuration Wizard... menu.
Important
Full completion of the configuration using the Configuration Wizard is, in case
of the first run of the QuickPHOTO INDUSTRIAL 3.0 program necessary. When
you finish the Configuration Wizard, the QuickPHOTO INDUSTRIAL 3.0 will
run automatically.
1. Configuration Wizard
This wizard consists of several pages through which you can browse using the Next and
Back buttons. When configuring, proceed according to the wizard's guidelines.
Imaging Device Selection
Second page of the wizard offers the choice of imaging device which will be used for
image acquiring. You can make your selection among only those devices whose support
was selected during program installation. Select the desired imaging device and click the
Next button.
TWAIN Device Selection
If you have selected the TWAIN Device option, a list of available TWAIN devices will
appear. Select the device which you want to use for image acquiring and click the Select
button.
25
Initial Configuration of the Application
®
OLYMPUS Digital Cameras (all types)
This page will appear only in case the support of OLYMPUS® CAMEDIA® and SP series
or OLYMPUS® E-system SLR cameras has been installed and it is intended to set the
device for display of life view from these cameras. If you are using a device delivered with
the QuickPHOTO INDUSTRIAL 3.0 program, it will be configured automatically after
you see this page. When using a different device, select this device from the Device
drop-down menu and select the norm of the video signal from the Video Standard menu.
In the Input menu the option Composite should be selected. Checking of the Keep Images
on the Memory Card option will cause that the acquired image will remain, after transfer
to a computer, saved on the memory card (this function is available only for CAMEDIA®
and SP series cameras). If you leave this option unchecked (recommended), the acquired
image will be, after transfer to a computer, from the camera's memory card automatically
deleted. To continue click the Next button.
Analog Video Sources
This page will appear only if the support of analog video sources has been installed and it
is intended to set the digitalization device for acquiring images from these sources. If you
26
Initial Configuration of the Application
are using a digitalization device delivered with the QuickPHOTO INDUSTRIAL 3.0
program, it will be configured automatically after you see this page. When using a different
digitalization device, select the device from the Device drop-down menu and select the
norm of the video signal from the Video Standard menu. In the Input part you may select
the desired type of the used connector. To continue click the Next button.
Default Folders
Next page of the wizard enables to set the folders, which will be offered as default when
saving images, exporting measured values, and saving reports. This way you will not have
to browse the whole directory structure of the computer to select the desired folder, where
you want to save the files. To continue, click the Next button.
27
Initial Configuration of the Application
Scale Bar and Units
On this page of the wizard you may select the type and size of the calibrated scale bar. In
the part Scale Bar Type you may set the type of the scale bar: Ruler, Line Segment, Staple
and Stripe. In the part Scale Bar Size you may select one of the two automatic sizes (Small,
Large) or you may select the Custom option and type in your own desired length of the
scale bar into the field Custom Size. In the part Preview you will see what the scale bar
will look like when using the current settings. In the part Units select units in which the
measured values will be displayed: micrometers or millimeters. To continue click the Next
button.
28
Initial Configuration of the Application
Measurands
Next page of the wizard is used to select the measurands which will be measured by
individual measuring tools (length, diameter, radius, perimeter, area, angle) and the text
label of individual measurands (row Label). Select the measurands which are supposed to
be measured by checking them. To change the label, rewrite the appropriate text in the line
Label. If the option Display Measurement Numbers in Images is checked, corresponding
serial number of the measurement will be displayed by each measured value in the image.
These settings will become default for the whole program and they will be valid for all
newly acquired images. To continue, click the Next button.
29
Initial Configuration of the Application
Remote Trigger
This page is used for setting and verification of the remote trigger's functionality. Remote
trigger is an optional accessory which can be connected via serial or USB port. If you want
to use the remote trigger, check the Use Remote Trigger option and select the COM port
to which it is connected (in case of the USB trigger we are talking about the USB Serial
Port (COM#)). In the part Remote Trigger Type select the type of the used remote trigger.
Trigger with two buttons (for example the two-button foot switch) is designed for image
acquiring and for capturing of video recordings using the optional module for video
recording. Functionality of the remote trigger can be verified by pressing its button(s). If
the small square(s) change color to green after you press the button(s) and they turn back
to black after you release the button(s), the remote trigger is set correctly and it is ready
to be used. Click the Next button.
30
Initial Configuration of the Application
Finish the configuration by clicking the Finish button. Then QuickPHOTO INDUSTRIAL
3.0 program will run automatically.
31
Initial Configuration of the Application
32
Calibration of the Program for
Measurements
1. Opening Information about Calibrations
Before it is possible to start measuring in the QuickPHOTO INDUSTRIAL 3.0 program
it is necessary to calibrate the program for a particular microscope–imaging device set.
Calibration is necessary for all available magnifications of the microscope which you plan
to use for your measuring. What is meant by magnification of the microscope in this
program, is a combination of the objective's magnification and the zoom's or the
magnification changer's magnification. If you are using an upright or inverted microscope
without the magnification changer, the number of magnifications for calibration is given
by the number of used objectives (value of the zoom equals 1 for all objectives). If you
are using an upright or inverted microscope with the magnification changer, the number
of magnifications for calibration equals the number of objectives x the number of
magnifications of the magnification changer. When using a stereomicroscope with a zoom,
the number of magnifications for calibration equals the number of objectives x the number
of magnifications (click-stop positions) of the zooming unit.
Important
You will need a calibration scale (a stage micrometer) for the calibration.
33
Calibration of the Program for Measurements
2. Calibration Manager
Note
What is meant by calibration in this program is the process of calibration as well
as the set of calibration values for individual magnifications of the
microscope–imaging device sets marked by Calibration Name. If you want to
use various types of imaging devices or microscopes for your measurements, it
is necessary to calibrate (create a calibration for) each used set of
microscope–imaging device. It is possible to switch between the created
calibrations according to the actual set in use.
There is a program function named Calibration Manager, for creating of and subsequent
administration of calibrations, which can be found in the menu Measurements → Calibration
Manager... [Ctrl+Alt+C]. Calibration Manager is used for creating and administrating of
all calibrations created for individual microscope–imaging device measuring sets.
To create a new calibration click the Add Calibration button in the Calibration Manager
dialog box. To delete a chosen calibration from the list, click the Remove Calibration
button. To change the name of a created calibration, click the Rename Calibration button.
If there is more than one listed calibration, calibration chosen for measuring can be activated
by clicking the Set as Active button - for more information see “Setting an Active
Calibration“ on page 58.
34
Calibration of the Program for Measurements
After a calibration is marked by the mouse click and you click the Table of Magnifications
button a Table of Magnifications - Calibration: “Calibration Name“ dialog box, containing
calibration values for each magnification of the microscope–imaging device set opens.
It is possible to lock all the calibrations from unauthorized changes with password
protection. For locking click the Lock Calibration button and enter the password. After
locking, it will not be possible to make any changes in calibrations until calibrations are
unlocked again by clicking the Unlock Calibration button and entering the password, which
was used for locking.
It is possible to export all the created calibrations into a backup file (format xml) by clicking
the Backup Calibrations button. If calibrations need to be restored, it is possible to load
the saved calibrations from the backup file by clicking the Load Calibrations button and
choosing the particular file containing calibration backup.
In the bottom left part of the Calibration Manager dialog box there is a date and time of
the last change made.
3. Creating a New Calibration
3.1. Creating a New Standard Calibration (Manual
Magnification Assignment Mode)
Before creating a new calibration put the stage micrometer under the microscope, set the
lowest magnification and focus the microscope.
The process of creating a new calibration consists of two main steps:
• adding a new standard calibration.
• standard calibration of the individual magnifications.
Adding a New Standard Calibration
To add a new calibration use the following procedure:
1. Open the Calibration Manager dialog box by activating the Measurements →
Calibration Manager... [Ctrl+Alt+C] option.
35
Calibration of the Program for Measurements
2. After clicking the Add Calibration button a guide Add Calibration opens, where, in
the first step, you choose the name of the calibration being created. The name of
a calibration consists of two parts: from the name of the imaging device and from the
microscope type. At first, choose the type of the used imaging device from the
drop-down list in the Imaging Device part or click Custom option and enter your own
name of the imaging device. In the Microscope part enter the type of the used
microscope. Continue by clicking the Next button.
36
Calibration of the Program for Measurements
3. Next page of the guide Magnification Encoder Selection will have only one active
option - No Magnification Encoder (Manual Magnification Assignment Mode).
Continue by clicking the Next button.
4. Next page of the guide Zoom/Magnification Changer Selection asks about the
microscope equipment, zooming unit or the magnification changer. If the microscope
in use is equipped with a zoom or a magnification changer, check the corresponding
option Zooming Unit or Magnification Changer Unit. If the microscope is not equipped
with either of these elements, check the No Zoom/Magnification Changer option. In
this case the value of zoom/magnification changer in this calibration will automatically
be set for all objectives on the value 1. Continue by clicking the Next button. A dialog
box Table of Magnifications - Calibration: “Calibration Name“ will open. This step
will finish adding of a new calibration and you may continue with the actual calibration
of particular magnifications.
37
Calibration of the Program for Measurements
Standard Calibration of Individual Magnifications
In the next step calibration of individual magnifications will be done. Proceed according
to the following instructions:
1. In the open dialog box Table of Magnifications - Calibration: “Calibration Name“
the actual process of calibration will be done. In the Table of Calibration Values part
you will find columns named Objective, Position and Zoom/Magnification Changer
Magnification. If you have chosen the No Zoom/Magnification Changer option in
step 4 while adding a calibration, there will automatically be given the value 1 in the
last column. If you have chosen, in step 4, one of the options Zooming Unit or
Magnification Changer Unit, this column will be empty and individual values of the
zoom/magnification changer will be gradually added to the table during the process
of calibration of the particular magnifications. Column Position is not used in this
case. In the right part of the dialog box there is only one active button in this moment
- Calibrate New Magnification. There is a Graph of Calibration Values in the bottom
part of the dialog box, which is used for checking the correctness of the calibration
procedure. To continue, click the Calibrate New Magnification button.
38
Calibration of the Program for Measurements
2. Calibrate New Magnification - Calibration: “Calibration Name“ guide will open on
the first page 1. Magnification Selection. In the Magnification for Calibration part
type in to the Current Objective Magnification field the value of objective
magnification of the objective currently in use. If you have chosen the No
Zoom/Magnification Changer option in step 4 while adding a calibration, there will
be an automatically given value 1 in the Zoom/Magnification Changer Magnification
part and you will not be able to change this value. If you have chosen, in step 4, one
of the options Zooming Unit or Magnification Changer Unit, the Zoom/Magnification
Changer Magnification field will be empty. In this case fill in the value of the currently
used zooming unit's magnification or the magnification changer's. Continue by clicking
the Next button.
39
Calibration of the Program for Measurements
Calibration of the new magnification – upright microscope without the magnification
changer
Calibration of the new magnification – stereomicroscope with a zooming unit
3. Next page of the guide 2. Image Source Selection offers a choice whether to acquire
the calibration image from the active imaging device or whether to use the already
existing image opened in Display Window. In the Image Source part choose Acquire
a New Image from the Imaging Device. Continue by clicking the Next button.
40
Calibration of the Program for Measurements
4. Control panel of the active imaging device with a live view of the stage micrometer
opens. Place the micrometer horizontally to the center of the imaging device's field
of view and focus the microscope. Click the Capture button. Next page of the guide
3. Calibration will open with the image of the stage micrometer. If the quality of the
calibration image is not satisfactory, it is possible to open the imaging device control
panel again, to acquire a new calibration image, using the icon. In the displayed
image, mark the highest possible number of the stage micrometer segments with a
line segment (by dragging the mouse while holding the left button or by clicking the
left mouse button on the beginning and end point). Insertion of a precisely horizontal
or vertical line segment can be done by holding the [Shift] key while inserting the
line segment. To achieve the highest possible accuracy, it is good to enlarge the image
using icons in the upper left part of the dialog box or by using the mouse wheel before
inserting the calibration line segment. Lead the line segment from the left edge of the
initial guideline to the left edge of the ending guideline of the calibration scale.
Incorrect insertion of the line segment can be corrected by inserting a new calibration
line segment. Calculate the real length of the marked part of the calibration scale
according to the number of marked segments and type the value in the Actual Length
of the Line Segment field according to the measuring units chosen in the Units section.
To save the calibration value, click the Finish button. Value for new magnification
will be added in the Table of Calibration Values and Graph of Calibration Values.
41
Calibration of the Program for Measurements
5. Set another magnification for calibration on the microscope. (Change the objective
in use, or set a different value of magnification of the zooming unit/magnification
changer).
6. Complete calibration of the microscope - imaging device set for all available
microscope magnifications is done by repeating this procedure (steps 1 to 5). The
result of this procedure should be a situation when all the points in the Graph of
Calibration Values in the Table of Magnifications - Calibration: “Calibration Name“
dialog box will lay on a straight line, respectively on straight lines. If some of the
graph points significantly stand out from the line, it means that there has been a mistake
in the calibration process. In this case, choose the deviating magnification by clicking
the relevant value in Table of Calibration Values or by clicking the deviating point
in the Graph of Calibration Values and click the Recalibrate Selected Magnification
button. Then, in a similar manner as in steps 2 to 4, recalibrate the chosen magnification
to the correct value.
Table of Magnifications after a correctly done calibration might, for an upright microscope
without the magnification changer, look, for example, like this one:
42
Calibration of the Program for Measurements
Table of Magnifications after a correctly done calibration might, for an upright microscope
with the magnification changer, look, for example, like this one:
43
Calibration of the Program for Measurements
Table of Magnification after a correctly done calibration might, for a stereomicroscope
with one objective and a zooming unit, look, for example, like this one:
Table of Magnifications after a correctly done calibration might, for a stereomicroscope
with two objectives and a zooming unit, look, for example, like this one:
44
Calibration of the Program for Measurements
If there has been a mistake in the calibration process, all values in the Graph of Calibration
Values will not lay on a straight line. On the following image, there has been an incorrect
calibration of the zoom magnification 2.5. This particular value must be recalibrated.
45
Calibration of the Program for Measurements
3.2. Creating a New Calibration Using the Magnification
Encoder for Upright and Inverted Microscopes
To make measurements in the QuickPHOTO INDUSTRIAL 3.0 program more comfortable,
it is possible to, for upright and inverted microscopes, use the so called magnification
encoder. It is an optional equipment connectible to the computer, which automatically
determines current position of the encoded nosepiece with objectives. When acquiring an
image, corresponding magnification is automatically assigned to the newly acquired image.
Therefore it is not necessary to assign the microscope's magnification, used for obtaining
of every image, manually before measuring.
Before creating a new calibration, put the stage micrometer under the microscope, set the
lowest magnification and focus the microscope.
The process of creating a new calibration using the magnification encoder consists of three
main steps:
• setting of the magnification encoder
• adding a new calibration with the magnification encoder for upright and inverted
microscopes
• calibration of individual magnifications using the magnification encoder for upright
and inverted microscopes
Setting the Magnification Encoder
1. Connect the magnification encoder to the control unit, connect it to the computer, and
install its drivers according to the manual supplied with this device.
2. Run the QuickPHOTO INDUSTRIAL 3.0 program and activate Options of the program
(Edit → Options...). In the Hardware part, activate the Magnification Encoders tab.
In the Upright/Inverted Microscopes part check the Use Objective Encoder option
and in the Control Unit drop-down menu choose the control unit of the magnification
encoder. Correct function of the magnification encoder can be verified by clicking
the Test Device button. In case of a successful verification of the device's functionality
close the Options window by clicking the OK button.
46
Calibration of the Program for Measurements
Note
Only those control units, whose support was chosen during program installation,
will appear in the list. If your control unit is not available in the list, exit the
QuickPHOTO INDUSTRIAL 3.0 program and run the program installation, from
the installation CD, again. On page Installation Type Selection choose the Update
Existing Installation - Add Components option and on page Select Additional
Components - Magnification Encoders choose, from the list, a control unit whose
support would you like to add.
Adding a New Calibration with the Magnification Encoder for Upright
and Inverted Microscopes
Adding of a new calibration shall be done in a similar manner as described above - for
more information see “Adding a New Standard Calibration“ on page 35, with the following
differences:
47
Calibration of the Program for Measurements
• In point 3. of the guide named Add Calibration “Calibration Name“ on Magnification
Encoder Selection page check the Objective Encoder for Upright/Inverted Microscopes
option and continue by clicking the Next button.
• On page Assignments of Objective Magnifications to Nosepiece Positions set the
corresponding magnifications of objectives in use to individual nosepiece positions.
Continue as follows: by turning of the nosepiece, choose gradually all available positions
and assign them, from the drop-down menus, with the corresponding magnification of
the objectives in use. Mark empty positions with “-“. Continue by clicking the Next
button.
48
Calibration of the Program for Measurements
• Dialog box named Table of Magnifications - Calibration: “Calibration Name“ will
open and in the Table of Calibration Values part magnifications of the objectives in
use, and their corresponding positions of the magnification encoder, will be filled in.
In this dialog box will now also be active the Change Objective Positions button, which
opens the Assignments of Objective Magnifications to Nosepiece Positions dialog box,
which enables you to make changes in the assignment of the objectives to the positions
of the magnification encoder.
49
Calibration of the Program for Measurements
Calibration of Individual Magnifications Using the Magnification Encoder
for Upright and Inverted Microscopes
When calibrating the individual magnifications, proceed in a similar manner as described
above - for more information see “Standard Calibration of Individual
Magnifications“ on page 38.
Major difference from the standard calibration of individual magnifications is the automatic
filling of the Current Objective Magnifications field on 1. Magnification Selection page
in the Calibrate New Magnification - Calibration: “Calibration Name“ guide with values
from the magnification encoder.
50
Calibration of the Program for Measurements
Table of Magnifications, after a correctly done calibration, might, for an upright microscope
with the magnification encoder without the magnification changer, look, for example, like
this one:
51
Calibration of the Program for Measurements
3.3. Creating a New Calibration Using the Magnification
Encoder for Stereomicroscopes
To make measurements in the QuickPHOTO INDUSTRIAL 3.0 program more comfortable,
it is possible to use stereomicroscopes with the so called magnification encoder. It is
a device connectible to the computer, which detects the current zooming unit's magnification
and also the position of the encoded nosepiece with objectives. When acquiring an image,
corresponding magnification is automatically assigned to the newly acquired image.
Therefore it is not necessary to assign the microscope's magnification, used for obtaining
of every image, manually before measuring.
Before you create a new calibration, put the stage micrometer under the microscope, set
the lowest magnification and focus the microscope.
The process of creating a new calibration using the magnification encoder consists of three
main steps:
• setting of the magnification encoder
• adding of a new calibration with the magnification encoder for stereomicroscopes
• calibration of individual magnifications using the magnification encoder for
stereomicroscopes
Setting the Magnification Encoder
1. Connect the AC adapter and the connecting cable to the control unit and connect it to
the computer.
2. Run the QuickPHOTO INDUSTRIAL 3.0 program and activate Options of the program
(Edit → Options...). In the Hardware part, activate the Magnification Encoders tab.
In the Stereomicroscopes part check the Use Zoom/Objective Encoder option and in
the Control Unit drop-down menu choose the control unit of the magnification encoder.
If you also have connected the magnification encoder for objectives, choose it from
the Objective Encoder Device drop-down menu. Correct function of the magnification
encoder can be verified by clicking the Test Device button. If case of successful
verification of the device's functionality close the Options dialog box by clicking the
OK button. You will be asked to set the zooming unit to the 0.8 position to calibrate
the zoom encoder. Set the required zoom value and continue by clicking the OK
button.
52
Calibration of the Program for Measurements
Note
Only those control units, whose support was chosen during program installation,
will appear in the list. If your control unit is not available in the list, exit the
QuickPHOTO INDUSTRIAL 3.0 program and run the program installation, from
the installation CD, again. On page Installation Type Selection choose the Update
Existing Installation - Add Components option and on page Select Additional
Components - Magnification Encoders choose, from the list, a control unit whose
support would you like to add.
Adding a New Calibration with the Magnification Encoder for
Stereomicroscopes
Adding of a new calibration shall be done in a similar manner as described above - for
more information see “Adding a New Standard Calibration“ on page 35, with the following
differences:
• In point 3. of the guide named Add Calibration “Calibration Name“ on Magnification
Encoder Selection page check the Zoom and Objective Encoder for Stereomicroscopes
53
Calibration of the Program for Measurements
option (if you have installed only the zoom encoder without the objective encoder, the
option Zoom Encoder for Stereomicroscopes will be displayed). From the Microscope
Type drop-down menu choose the corresponding type of the stereomicroscope in use,
and continue by clicking the Next button. You will be prompted to set the zooming unit
to the 0.8 position to calibrate the zoom encoder. Set the required zoom value and
continue by clicking the OK button.
• If you have installed, and also activated the objective encoder for stereomicroscopes
in the program Options, a page First Objective - Position and Magnification Assignment
will be displayed. Continue according to the displayed instructions for assigning of the
first objective magnification with the corresponding position of the objective encoder.
In the next step do the assigning for the second objective in a similar manner. If you
have not installed or activated the objective encoder, these pages will not be displayed
at all. Continue by clicking the Next button.
Note
If you have the objective encoder active, you must assign the corresponding
nosepiece position to at least the first objective. The second objective may remain
unassigned.
54
Calibration of the Program for Measurements
Dialog box named Table of magnifications - Calibrations: “Calibration Name“, which
will have in the Table of Calibration Values part filled in the zoom magnifications, will
open. If you have also activated the objective encoder, magnifications of the used
objectives, and their corresponding encoder positions, will also be filled in. There will
now be also active the Change Objective Positions button in this dialog box, which
opens the Change Objective Positions dialog box, which enables to make changes in
assigning of the objectives to the positions of the magnification encoder.
55
Calibration of the Program for Measurements
Calibration of Individual Magnifications Using the Magnification Encoder
for Stereomicroscopes
When calibrating the individual magnifications, proceed in a similar manner as described
above - for more information see “Standard Calibration of Individual
Magnifications“ on page 38.
Major difference from the standard calibration of individual magnifications is the automatic
filling of the Zoom/Magnification Changer Magnification field. If you have also activated
the objective encoder, values of the objective magnification will also be automatically
filled in the Current Objective Magnification field on 1. Magnification Selection page in
the Calibrate New Magnification - Calibration: “Calibration name“ guide.
56
Calibration of the Program for Measurements
Note
Recalibrate Zoom Encoder button is intended for correction of the zoom encoder's
calibration. Use this button only if the zoom encoder's values are not correct.
Table of Magnification, after a correctly done calibration, might for stereomicroscope with
the zoom and objective magnification encoder look, for example, like this one:
57
Calibration of the Program for Measurements
4. Setting an Active Calibration
If you are using QuickPHOTO INDUSTRIAL 3.0 program with multiple
microscope-imaging device sets and you have created, in the Calibration Manager, more
than one calibration, it is important to set the corresponding calibration as active, when
you change the active imaging device. This particular calibration will be used for newly
acquired images. Setting an active calibration can be done three different ways:
• In the Calibration Manager choose the requested calibration from the list and click the
Set as Active button. Next to the name of the active calibration will appear a sign:
(Active).
• From the menu bar using the Measurements → Set Active Calibration option. Calibration
will be set as active if you choose it from the displayed list. This listed calibration will
be marked by the check mark.
• If you activate another imaging device in the Imaging Devices menu, dialog box Select
Active Calibration for: “Imaging Devices Name“ will be displayed. In this dialog box
choose, from the Available Calibrations drop-down menu, calibration which you would
58
Calibration of the Program for Measurements
like to set as active for the newly selected imaging device and confirm it by clicking
the OK button.
59
Calibration of the Program for Measurements
60
Main Program Window
Main Program Window of QuickPHOTO INDUSTRIAL 3.0 program is an image editor
in which images are displayed right after they were acquired or opened. This editor is
equipped with functions for measuring, editing, and saving of images. Main Program
Window is designed for working with more than one image at the same time. It is possible
to display 1, 2 or 4 images next to each other at the same time. All opened images are
displayed in the Thumbnail Browser. The Navigator field makes orientation in the enlarged
image easier.
The following functions for editing of images are available in the QuickPHOTO
INDUSTRIAL 3.0 program:
•
•
•
•
•
•
•
•
•
crop
clockwise and counter clockwise rotation
rolling along the axes
resize
brightness adjustment, contrast adjustment, color balance and gamma correction
adjustment
histogram adjustment
using filters (sharpen, blur, negative, grey scale, median filter, black and white balance)
adding text annotations to an image
labeling with drawings (tools: line, arrow, rectangle, circle, ellipse, polygon, freehand
drawing)
QuickPHOTO INDUSTRIAL 3.0 program is also equipped with a number of measuring
functions:
• inserting a calibrated scale bar (with the option to define the look and position of the
scale bar)
• distance measurement (line segment, polyline, distance between two parallel lines)
• measuring of perimeters and areas of objects (tools: ellipse, rectangle, circle, polygon)
• measuring of circle diameters
• angle measurement (arbitrary angle, angle from the horizontal axis, angle from the
vertical axis, angle defined by two line segments)
• radius, angle and length measurement of an arc
• display of the calibrated grid (orthogonal, circular)
61
Main Program Window
•
•
•
•
counting of objects
Brinell hardness test (according to the norm EN ISO 6505-1:1999)
Vickers microhardness test (according to the norm EN ISO 4516:2002)
phase analysis
All inserted objects (drawings, annotations, measurements) are displayed in a separate
layer “above the image“ and it is possible to modify (change of the line's color and thickness,
change of size, change of position), delete, or hide them at any time. It is also possible to
delete a whole layer with inserted objects or it is possible to merge this layer with the
image.
1. Description of the Graphical User Interface
Main Program Window is divided into several parts:
•
•
•
•
•
•
•
62
Menu Bar - contains options with individual functions
Toolbar - contains tool icons
Thumbnail Browser - displays all opened images
Navigator - is used for orientation in the enlarged image
Display Window - is used for image editing
Table of Measured Values - contains results of measurements
Status Bar - contains information about the current program status
Main Program Window
Size ratios of individual parts of the Main Program Window described above can be
changed. This change can be done in the following way: shift your mouse over the border
separating individual parts. Mouse cursor will change to . Click and hold the left mouse
button and define the new size by moving the mouse. Then release the button.
Note
The default program layout can be restored using the Restore Default Program
Layout option in the Window menu.
63
Main Program Window
1.1. Menu Bar
Menu File
File menu contains the following functions: Open... opens images in the Main Program
Window. In the opened Open dialog box you may select one or more images and load them
at once. Option Open Recent offers up to ten lately used images for opening.
Options Save and Save All save images selected in the Thumbnail Browser respectively
all opened images. If the images being saved, have already been saved before, they will
be saved again into their original locations. If we are speaking about newly acquired images,
a dialog box Save As..., will be displayed and you may choose the location, name, and type
of the files being saved. Options Save As... and Save All As... will open the Save As dialog
box, which enables you to choose the location, name, and type of the files being saved.
For more information about image saving see “Image Saving“ on page 97.
Options Export Measured Values from Selected Images... and Export Measured Values
from All Images... will export the measured values from the images selected in the
Thumbnail Browser, respectively from all opened images. Measured values can be exported
into a file of the Microsoft® Excel® (*.xls) format or of the text file (*.txt) format. For
more information about export of the measured values see “Exporting Values from the
Table of Measured Values“ on page 144.
Options Close Selected Images and Close All Images will close images selected in the
Thumbnail Browser, respectively all opened images.
Option Open Imaging Device Control Panel... will open a separate window for acquiring
images using the imaging device. For more information about work with control panels
of the imaging devices see “Control Panels of Imaging Devices“ on page 189.
Option Print... will open a dialog box for image printing. For more information about print
see “Image Printing“ on page 108.
Option Exit will end the program.
64
Main Program Window
Menu Edit
The following options are available in the Edit menu: Undo will take back the last performed
action. It is possible to take back as many consecutively performed actions as you wish.
Option Redo will again perform the action taken back using the Undo function.
Option Copy inserts an image or its chosen part into a clipboard. Option Paste will insert
the content of the clipboard as a new image. Option Select Region is used for selection of
a part of an image to be copied into a clipboard.
Change of color and thickness of the lines of the objects being inserted can be done using
the options Object Line Color... and Object Line Thickness.
Option Compose New Image from Layout of Displayed Images... will compose the images
displayed in the Display Window (for layout of 2 or 4 images next to each other) and the
result will be inserted as a new image. For a more detailed description see “Compose New
Image from Layout of Displayed Images“ on page 161.
Option Restore Original Image will restore the original form of the image in which it was
opened or acquired (all inserted objects will be deleted). Option Delete Selected Objects
will delete all selected objects from the current image. Option Delete All Objects will delete
all inserted objects from the current image. Option Merge Objects with an Image (Flatten
Layers) will merge layers containing inserted objects with the image. After merging it will
no longer be possible to edit the inserted objects – they will become a fixed part of the
image.
65
Main Program Window
Option Configuration Wizard... will open a guide for basic program setup. For detailed
description of work with Configuration Wizard see “Configuration Wizard“ on page 25.
Option Options... will open a dialog box for setting of program parameters. For detailed
description of the setting options see “Options“ on page 164.
Menu Image
In the menu Image it is possible to display Image Information... There are also available
the following options for image editing – crop, rotation, flip, mirror, resize, automatic
white balance, white balance defined by point, sharpen, blur, median filter, negative, grey
scale, black balance defined by point and functions for brightness adjustment, contrast
adjustment, gamma correction, color balance adjustment, and histogram adjustment. For
detailed description of individual functions see “Image Editing“ on page 83.
66
Main Program Window
Menu View
In the View menu there are the following options: Layout - Single Image, Layout - Two
Images, Layout - Four Images. These options switch between the modes for displaying of
1, 2, or 4 images in the Display Window.
Option Display Objects in the Current Image will display/hide all objects inserted into the
current image. Option Display Labels with Measured Values in the Current Image will
display/hide labels with measured values in the current image. Option Display Table of
Measured Values will display/hide Table of Measured Values in the bottom part of the
Main Program Window.
Option Best Fit Zoom will display the current image in such a size so it would fit into the
Display Window. Options Zoom In and Zoom Out will enlarge/reduce display of the current
image by one step. Option Zoom - Actual Size (100%) will display the current image
zoomed in by 100 % so that one image pixel corresponds with one pixel of the monitor.
Option Start Slideshow will activate full screen view of all the opened images (in case only
one image is selected) or images selected in the Thumbnail Browser. Display of all or only
of selected images will take place successively in a time interval which can be chosen in
the program options.
67
Main Program Window
Option Display in Full Screen Mode will display an image/images opened in the Display
Window full screen. You may return to the standard mode by pressing any key.
Menu Measurements
Menu Measurements contains the following tools for measuring: calibrated scale bar
insertion, measuring of the line segment and polyline length, measuring of the perimeter
and area of an ellipse, rectangle, and polygon, measuring of the perimeter, diameter, and
the circle area, counting of objects, measuring of angles, measuring of the distance between
two parallel lines, and measuring of the length, angle, and diameter of an arc. Option Phase
Analysis... activates the Phase Analysis control panel. For a more detailed description see
“Phase Analysis“ on page 125. Submenu Hardness contains options Brinell Hardness Test
and Vickers Hardness Test. For more detailed description see “Hardness Test“ on page 133.
Options Display Orthogonal Grid... and Display Circular Grid... is used for
displaying/hiding of the calibrated grid in the current image. For description of work with
the grid see “Displaying a Grid of Defined Dimensions“ on page 123.
Option Export Measured values to Microsoft® Excel®Continuously turns on/off the function
of continuous export of measured values - for more detailed description see “Exporting
Measured Values“ on page 147.
Using the option Units you may set the units used for measuring: micrometers or
millimeters.
Option Set Active Calibration enables quick switching between the active calibrations used
for measuring, if you have created more than one calibration for various microscope -
68
Main Program Window
imaging device sets. Option Calibration Manager... opens a dialog box with functions for
calibrations’ managing. For more information see “Calibration Manager“ on page 34.
For more information about measurements see “Measurements“ on page 114.
Menu Annotations
Menu Annotations contains tools for indication of interesting areas in the image. These
are the tools available: Text..., Line, Arrow, Rectangle, Circle, Ellipse, Polygon and
Freehand.
Menu Imaging Devices
Menu Imaging Devices is used for the choice of an active imaging device. Only those
devices, whose support was chosen during program installation, are on the list.
69
Main Program Window
Menu Modules
Menu Modules is used for activation of the modules, e.g. built-in Time-Lapse Video and
Timer modules or other optional modules.
Menu Reports
Menu Reports contains functions for creating reports in the Microsoft® Word. Option
Create Report... will export images selected in the Thumbnail Browser and measured
values into a new report. Option Template Manager... opens the Report Template Manager
dialog box, which enables creating of new report templates and management of the already
existing templates - for more information see “Reports“ on page 148.
Menu Window
Option Restore Default Program Layout is used for setting of the original layout of all
parts of the Main Program Window.
Menu Help
Menu Help contains the following items: Help... opens an electronic user manual. You can
also use the [F1] key. Option What Is New... displays a file containing a list of all new
functions of the current program version. Option Send Dongle Number... is used for
displaying and sending off of the dongle number via e-mail to obtain new modules or
70
Main Program Window
program upgrades. Option Licence... opens a document with the description of licence
conditions. Option About... displays information about QuickPHOTO INDUSTRIAL 3.0
program.
1.2. Toolbar
Individual program functions can also be activated using the following icons from the
Toolbar:
Open: displays a dialog box for opening of images from the available disc drives (for
example HDD, DVD/CD-ROM, connected network drives, flash memory and so
on). [Ctrl+O]
Save: saves an image/images selected in the Thumbnail Browser. [Ctrl+S]
Print: initiates printing of selected images. [Ctrl+P]
Image Information: displays information about the current image. [Ctrl+I]
Undo: undoes the last performed image editing. [Ctrl+Z]
Redo: does again the last undone image editing. [Ctrl+Y]
Copy: inserts a selected area or a whole image displayed in the Display Window into
a clipboard. [Ctrl+C]
71
Main Program Window
Paste: inserts the clipboard content as a new image. [Ctrl+V]
Select region: after clicking on this icon, you may select an area of the image by
clicking and dragging the mouse while holding the left mouse button.
Objective: drop-down menu for the choice of the objective which was
used to acquire the image. It is used to assign the correct calibration
for measurements.
Zoom: drop-down menu for the choice of zooming unit/magnification
changer magnification, which was used for acquiring of the image. It is
used for assigning of the correct calibration for measurements. If you
are not using either the zooming unit or the magnification changer, value
1 will automatically be filled in this field after you choose an objective.
Insert Horizontal Scale Bar: inserts a calibrated horizontal scale bar into the right
bottom corner of the image.
Insert Vertical Scale Bar: inserts a calibrated vertical scale bar into the right upper
corner of the image.
Measure Line Segment: activates a tool for measuring of the length of a line segment.
Measure Ellipse: activates a tool for measuring of the perimeter and area of an ellipse.
Measure Rectangle: activates a tool for measuring of the perimeter and area of
a rectangle.
Measure Circle: click on the arrow offering a drop-down menu, and choose one of
the options: Circle Defined by Radius, Circle Defined by Diameter or Circle Defined
by 3 Points. After you choose one of the options a tool for measuring of the diameter,
perimeter, and the area of a circle will be activated.
72
Main Program Window
Measure Polygon/Polyline: click on the arrow offering a drop-down menu, and choose
one of the options: Polygon or Polyline. After you choose one of the options a tool
for measuring of the polygon's perimeter and area or for measuring of the polyline's
length will be activated.
Count Objects: after clicking on the arrow offering the drop-down menu, you may
choose one of the options: Count Objects (New Group) to initiate counting of the
new group of objects, or Add Objects to the Current Group for adding of further
objects to an already existing group.
Measure Angle: after clicking on the arrow offering the drop-down menu, choose
one of the options: Arbitrary Angle, Angle from the X Axis, Angle from the Y Axis or
Angle Defined by 2 Line Segments. After you choose one of the options a tool for
angle measuring will be activated.
Measure Distance Between 2 Parallel Lines: activates a tool for measuring of the
distance between two parallel lines.
Measure Arc: activates a tool for measuring of the angle, diameter, and perimeter of
an arc.
Brinell Hardness Test: activates a tool for the Brinell hardness test.
Vickers Hardness Test: activates a tool for the Vickers microhardness test.
Phase Analysis: opens a dialog box of the Phase Analysis function.
Display Orthogonal Grid: displays/hides an orthogonal grid of defined dimensions.
Display Circular Grid: displays/hides a circular grid of defined dimensions.
Display Table of Measured Values: displays/hides a Table of Measured Values. [F12]
73
Main Program Window
Export Measured Values to Microsoft® Excel®Continuously: turns on/off the function
of continuous export of measured values.
Layout - Single Image: switches the Display Window to a display mode for one image.
Layout - Two Images: switches the Display Window to a display mode for two images
next to each other.
Layout - Four Images: switches the Display Window to a display mode for four images
next to each other.
Open Imaging Device Control Panel: opens a control panel of the active imaging
device (device chosen in the Imaging Devices menu). An arrow in the right part of
the icon is used for a quick choice of the imaging device. [F4]
Time-Lapse Video: activates a built-in Time-Lapse Video module, designed for creating
of video files from the acquired time-lapse images.
Timer: activates a built-in Timer module designed for an automatic acquiring of
images in an adjustable time interval.
Best Fit Zoom: displays the current image in such a size, so it fits into the Display
Window.
Zoom In: increases the size of display, of the current image, by one step.
Zoom Out: decreases the size of display, of the current image, by one step.
Zoom - Actual Size (100%): displays the current image in its real size (100 %).
Display Size: this field indicates current displayed image size. It enables you
to pick your desired size from the drop-down menu of various values, or you
can, using the keyboard, type in a new value.
74
Main Program Window
Crop: after clicking on this icon, you may select an area of the image, which should
be preserved. Remaining part of the image will be removed.
Rotate Clockwise by 90°: rotates the image to the right.
Rotate Counter Clockwise by 90°: rotates the image to he left.
Flip: flips the image around the horizontal axis.
Mirror: mirrors the image around the vertical axis.
Resize: opens a dialog box used for a change of the image size.
Adjust Brightness/Contrast/Gamma: opens a dialog box for brightness, contrast and
gamma correction adjustment.
Adjust Colors: opens a dialog box for color balance adjustment. It is possible to
independently adjust the red, green and blue channel.
Adjust Histogram: opens a dialog box for the histogram adjustment.
Object Line Color/Thickness: is used for a change of color, and thickness of the
lines of inserted objects. Left part of the icon enables a change of color, right part
with an arrow enables change of the line's thickness.
Select: is used for selection of inserted objects.
Delete Selected Objects: deletes objects selected with the Select tool. [Del]
Delete All Objects: deletes all objects inserted in the image.
75
Main Program Window
Insert Text Annotation: activates a dialog box for inserting of a text annotation.
Draw Line: activates a tool for drawing of a line.
Draw Arrow: activates a tool for drawing of an arrow.
Draw Rectangle: activates a tool for drawing of a rectangle.
Draw Circle: activates a tool for drawing of a circle.
Draw Ellipse: activates a tool for drawing of an ellipse.
Draw Polygon: activates a tool for drawing of a polygon.
Draw Freehand: activates a tool for freehand drawing.
1.3. Thumbnail Browser
Thumbnails of the opened images are displayed in the Thumbnail Browser together with
their names and sizes. Image opened in the Thumbnail Browser can be displayed in the
Display Window by clicking the left mouse button on the thumbnail or by dragging of the
thumbnail (drag-and-drop) into the Display Window. If you have set a display of more
than one image next to each other in the Display Window, use the method of dragging
(drag-and-drop) or select a field in the Display Window at first, in which would you like
the image to be displayed, and then click the left mouse button on the thumbnail of the
desired image.
If you move the mouse over the thumbnail of one of the opened images, several buttons
will appear in its right upper part. These buttons activate functions only for this particular
image.
76
Main Program Window
Save Image
button will save the image. Print
button will print the image. Image
Information
button displays information about the image including meta data (if those
are available), description, and possible assigned calibration. If measurements have been
done in the image, Export Measured Values button will also be active for export of the
measured values into a file. Mark as Important
button will frame the thumbnail with
a red frame for its highlighting. Image can be closed using the Close
button.
If some changes have been done to the image, you will be asked whether you want to save
these changes before you close this image. New images that have not yet been saved, and
images that have been edited will have an asterisk displayed in front of their name, for
example:
. If measurements have been done in the image, there will be an
indicator - Image contains unsaved measured values displayed by the thumbnail. This
indicator will disappear after the image is saved or measured values are exported into a file.
If the description of an image is filled-in, there will be an indicator
description displayed by the thumbnail.
- Image contains
Selection of one image in the Thumbnail Browser can be done by one click of the left
mouse button on the corresponding thumbnail. Continuous selection of several images in
the Thumbnail Browser is possible by clicking the mouse on the first thumbnail and then
on the very last one of your selection, while holding the [Shift] key. Discontinuous selection
of images in the Thumbnail Browser can be done by selection of desired thumbnails with
the left mouse button, while holding the [Ctrl] key. Selection of all images at the same
time can be done by the [Ctrl+A] key shortcut. Canceling of the selection of more
thumbnails can be done by clicking the left mouse button on a random thumbnail. Order
of thumbnails may be changed by dragging them with a mouse (drag-and-drop).
To gain a larger work area, you may hide (slip in to the left) the Thumbnail Browser by
clicking the button, in its right upper corner. This button then will change to button.
This way the Thumbnail Browser will free up and if you move the mouse cursor outside
of the Thumbnail Browser it will be slipped in to the left. In this case, you may work with
Thumbnail Browser by moving the mouse onto the vertically oriented Thumbnail Browser
tab on the left side of the Main Program Window -Thumbnail Browser will be pulled out.
Its anchoring may be done by clicking the
button.
77
Main Program Window
1.4. Navigator
In the left bottom part of the Main Program Window there is a Navigator displayed with
the current image. In the Navigator window, there is a framed area of the image, which is
visible in the Display Window at the current display size. Display of the current image can
be enlarged or reduced with the mouse wheel, slider, or with the
or
buttons under
the Navigator window. It is possible to move the frame by clicking the left mouse button
inside the frame and by moving the mouse while holding the left button. By moving with
the frame, you will achieve the desired display of a particular image area in the Display
Window.
78
Main Program Window
1.5. Display Window
Display Window is designed for work with images. In case you need to work with more
than one image, this window may be divided into two or four parts using the Layout - Two
Images
or Layout - Four Images
options. Switching to the default mode for one
image is possible by the Layout - Single Image
option. These functions can also be
activated by the corresponding options from the View menu.
1.6. Table of Measured Values
In the bottom part of the Main Program Window there is the Table of Measured Values.
This table contains a tab/tabs with values measured in the image/images displayed in the
Display Window (number of these tabs corresponds with the set layout of the Display
Window) and a tab with the name Measurement Settings - “Current Image Name“. For
a more detailed description see “Work with the Table of Measured Values“ on page 139.
79
Main Program Window
1.7. Status Bar
Status bar placed in the bottom part of the Main Program Window displays the following
information:
• size of the current image in pixels, and if the current image has an assigned calibration,
real size of the image in mm or µm
• if the magnification encoder is being used, magnification of the current objective or
possibly the zoom
• currently selected imaging device
• if you have set the automatic saving of images to a folder, there will be an
icon in
the right corner of the status bar. If you move the mouse over this icon, a hint will be
displayed with currently set folder for automatic saving of images.
2. Acquiring of New Images
To acquire new images, proceed according to the following steps:
1. Select the imaging device.
2. Open the control panel of the imaging device.
3. Perform the image acquisition.
2.1. Selection of the Imaging Device
In the Imaging Devices menu choose the imaging device, which you want to use for image
acquisition. In this menu you will find those imaging devices whose support was selected
during the program installation. If you want to add another device to this list, proceed
according to the following chapter - see “Adding the Support of a New Imaging
Device“ on page 22. Below is given the list of all imaging devices being currently
supported:
• LUMENERA® Infinity Digital Camera - option for LUMENERA® Infinity digital
cameras. Type of the camera in use will be detected automatically.
• Canon® EOS Digital SLR Camera - option for Canon® EOS series digital SLR cameras.
80
Main Program Window
• uEye digital camera - option for IDS uEye® digital cameras. Type of the camera in use
will be detected automatically.
• OLYMPUS Digital Camera - option for OLYMPUS® CAMEDIA® and SP series
cameras. Type of the camera in use will be detected automatically.
• OLYMPUS E-system SLR camera - option for OLYMPUS® E-system SLR cameras.
Type of the camera in use will be detected automatically.
• ARTRAY ARTCAM camera - option for ARTRAY ARTCAM digital cameras. Type of
the camera in use will be detected automatically.
• OLYMPUS® DP72 camera
• OLYMPUS DP20 camera
• OLYMPUS DP70/DP71/DP30BW
• PathScan Enabler IV Digital Microscope
• Basler A601fc
• JVC KY-F1030
• PixeLINK PL-A662
• Analog video source - option for acquiring images from analog video cameras or other
devices with analog video output (video-endoscopic systems, ultrasonographs, video
recorders, DVDs and so on).
• TWAIN Device - option for acquiring images from devices supporting TWAIN standard.
Using this interface, it is possible to acquire images from a number of digital devices,
which are not natively supported by the program, for example from digital video
cameras, scanners, and many others.
2.2. Opening of the Imaging Device's Control Panel
To open control panel of the selected imaging device, click the
icon, activate the Open
Imaging Device Control Panel... option from the File menu or use a [F4] key shortcut.
81
Main Program Window
2.3. Acquiring an Image
In the open control panel of imaging device set the required parameters of exposition and
acquire an image using the Capture button. Acquired image will be immediately transferred
to the computer and displayed in the Display Window.
For more detailed information about imaging devices' control panels see “Control Panels
of Imaging Devices“ on page 189.
3. Work with Images
Description of work with images is divided into the following chapters:
1.
2.
3.
4.
5.
Image Opening
Image Editing
Indication and Annotating of Interesting Areas
Image Saving
Image Printing
3.1. Image Opening
It is possible to open images using the File → Open... option, by clicking the
icon, or
by a [Ctrl+O] key shortcut. In the opened Open dialog box you may select one or more
images and open them all at the same time. Another possibility for opening of images is
to drag them with a mouse into the Display Window (drag-and-drop) for example from the
Windows® Explorer or another file manager. Thumbnails of the opened images will appear
in the Thumbnail Browser together with their names, types, and sizes.
Menu File → Open Recent offers up to ten last used images on a list for opening.
82
Main Program Window
3.2. Image Editing
Note
All editing is always done to the currently displayed image in the Display Window.
Options for image editing may be activated from the Image menu. Some of these options
may also be activated using the icons in the Toolbar. Menu Image contains the following
options for image editing:
•
•
•
•
•
•
•
•
•
Crop
Rotate Clockwise and Counter Clockwise by 90°
Flip Vertically and Mirror Horizontally
Resize
Automatic White Balance
White Balance Defined by Point
Filters: Sharpen, Blur, Median Filter, Negative, Grey Scale
Black Balance Defined by Point
Adjust Brightness/Contrast/Gama, Adjust Colors, Adjust Histogram
Detailed description of individual functions is in the following paragraphs:
Cropping Image
Function Crop is used for removal of undesirable image areas. Activate Crop function
from the Image → Crop menu or by clicking the icon. Drag your mouse, while holding
the left button, over the area which shall be preserved – the rest of the image will be cropped.
In the left upper corner of the selected area will appear a field showing its size. Size is
displayed in pixels, and if there has been a calibration assigned, also in length units.
83
Main Program Window
Clicking on the field, displaying size, will switch it to a mode in which it is possible to
type in the values, and to define precisely the desired size of the chosen area.
Right from the field displaying size values is a lock icon. If an open lock is displayed
(default state) it is possible to enter both dimensions of the area independently. After
clicking on this icon a closed lock will be displayed. This way the program will remember
(lock) the ratio of the area's dimensions. Then after you have entered one dimension the
second one will automatically be calculated in the locked ratio. If the image has an assigned
calibration, it is possible to, after selection of units from the drop-down menu on the right
from the lock icon, define the area dimensions in units of length. New size can be confirmed
by the OK button. Recalculation of the area size will take place according to the entered
values. Field displaying the size can be, for better clarity, hidden using the button. To
display the area size values again, use the button.
It is also possible to change the area size using the green grasp points. When dragging the
corner grasp points with a mouse while holding the [Shift] key, ratio of the area dimensions
will be preserved.
84
Main Program Window
It is possible to move the chosen area by dragging the mouse while holding the left mouse
button by the inside of the chosen area.
In case of need, it is possible to cancel the Crop function by pressing the [Esc] key or by
clicking the right mouse button (rectangle defining the area will disappear).
Cropping itself is done by a mouse double-click on the inside of the chosen area or by
clicking on the
be removed.
icon. Only the chosen part of the image will remain. The rest of it will
Copying Image, or its Part, to the Clipboard
To copy the whole image displayed in the Display Window to the clipboard, activate the
Edit → Copy option, click the
icon, or you may use the [Ctrl+C] key shortcut.
If you want to copy only a part of the image displayed in the Display Window to the
clipboard, activate the Edit → Select Region option, or click the
icon first, select the
desired area for copying to the clipboard (same way as was described in the previous
paragraph Image Cropping). To copy the chosen area to the clipboard, activate the Edit
→ Copy option, click the
icon, or use the [Ctrl+C] key shortcut.
Pasting Image from the Clipboard
Content of the clipboard (if it contains image information) can be pasted into the
QuickPHOTO INDUSTRIAL 3.0 program as a new image. This way you may paste an
image from a different program or an image (or its chosen area) from the QuickPHOTO
INDUSTRIAL 3.0 program. When you paste an image from the QuickPHOTO
INDUSTRIAL 3.0 program, the new image will be pasted with merged layers. To activate
the paste function use the Edit → Paste option, click the
shortcut.
icon or use the [Ctrl+V] key
Flipping and Rotating the Image
It is possible to rotate the image by 90° clockwise or counter clockwise using the options
Image → Rotate Clockwise by 90° and Image → Rotate Counter Clockwise by 90° or using
the
and
icons.
85
Main Program Window
For vertical flipping or horizontal image mirroring, use one of the options Image → Flip
or Image → Mirror or one of the
and
icons.
Resizing Image
To change the image size, activate the Image → Resize... option or click the
icon.
A Resize dialog box will open. Type in one new image dimension, second dimension will
be calculated automatically in the original aspect ratio. Ratio of the dimensions is always
kept the same to maintain accuracy of measurements. Confirm the new image size by
clicking the OK button.
Automatic White Balance
After you have activated the Image → Auto White Balance option, automatic balancing
of the white color will take place in the whole image.
White Balance Defined by Point
After you have activated the Image → White Balance Defined by Point option, click the
left mouse button to such a point in the image, which will define the reference white color
for the whole image. White balance based on the chosen reference value will take place
in the whole image.
86
Main Program Window
Sharpen
After you have activated the Image → Sharpen option, the whole image will be sharpened.
Blur
After you have activated the Image → Blur option, the whole image will be blurred.
Median Filter
After you have activated the Image → Median Filter option, median filter will be applied
to the whole image. This function will remove some point defects, such as the so called
“hot pixels“ or some types of image noise, from the image. This function is suitable
especially for fluorescence applications.
Negative
After you have activated the Image → Negative option, the image will be transferred to
a negative. If you repeat this function, image will be brought to its original state.
Grey Scale
After you have activated the Image → Grey Scale option, the image will be transferred to
a grey scale image.
Black Balance Defined by Point
After you have activated the Image → Black Balance Defined by Point option, click the
left mouse button on such a point of the image, which will define the reference black color
for the whole image. Black balance will take place in the whole image, based on the defined
reference value. This function is designed for fluorescence applications.
Adjust Brightness/Contrast/Gamma, Adjust Colors
Options Image → Adjust Brightness/Contrast/Gamma... and Image → Adjust Colors... or
corresponding icons
and
open an Image Adjustment dialog box with tabs
Brightness/Contrast/Gamma and Red/Green/Blue. In the top part of both tabs, there are
sliders for individual options and in the bottom part, there are previews of the image before
any changes and after changes have been made. Buttons and between both previews
are there for the change of display size of both previews. After previews have been zoomed
87
Main Program Window
in, it is possible to, by dragging the mouse while holding the left mouse button, move both
previews. Using sliders of individual functions, it is possible to adjust the desired image
parameters. Changes will immediately be visible in the right hand side preview. Default
Values button in the bottom part of the window will bring all settings in this dialog box to
the original state. Changes made can be applied to the whole image by clicking the OK
button.
88
Main Program Window
Histogram Adjustment
Option Image → Adjust Histogram... and the
box.
icon open a Histogram Adjustment dialog
89
Main Program Window
This dialog box consists of several parts:
In the Channel part you can choose in which color channel of the image will the histogram
adjustment take place. Option Luminosity effects the whole image (all color channels at
the same time). If you check the option Color Channels, it is possible to adjust individual
color channels independently.
In the Input Values part actual histogram adjustments take place. Displayed graph represents
a histogram for a channel selected in the Channel part. Histogram scale can be changed
using the vertical Scaling slider. Under the histogram graph, there are small triangles
displayed on the edges. These small triangles can be moved and thus set the border
histogram values, the so called black point (left triangle), and the so called white point
(right triangle). Set values are displayed in editable fields under the histogram.
In the bottom part of the window, there are image previews before and after changes have
been made. Buttons
and
between both previews are there for the change of display
size of both previews. After previews have been zoomed in, it is possible to, by dragging
the mouse while holding the left mouse button, move both previews. Default Values button
in the bottom part of the window will bring all settings in this dialog box to the original
state. Changes made can be applied to the whole image by clicking the OK button.
3.3. Indication and Annotation of Interesting Areas
Program QuickPHOTO INDUSTRIAL 3.0 is equipped with functions for indication of
interesting areas in the image using drawings and text labels. You may use the following
tools:
•
•
•
•
•
•
•
•
Text Annotation
Draw Line
Draw Arrow
Draw Rectangle
Draw Circle
Draw Ellipse
Draw Polygon
Draw Freehand
The use of individual tools is described in the following paragraphs.
90
Main Program Window
Note
The use of the above mentioned tools can be canceled anytime by the right mouse
button click or by the [Esc] key.
Annotations Insertion Mode
Program QuickPHOTO INDUSTRIAL 3.0 offers two modes of annotations inserting.
Make your selection in Options of the program in section General at the Annotations tab
(Edit → Options... → General → Annotations), in the part Annotations Insertion Mode.
There are two options available:
• Continuous Inserting Mode - if this option is active, the selected tool will remain active,
for the current image, until it is deactivated. This way you may repeat inserting of the
same type of object into the image without the need to activate the same tool over
manually.
• Single Insertion Mode - if you activate this option, the selected tool will be automatically
deactivated after one object has been inserted.
Setting the Line Color and Thickness
To set the line color and thickness of the drawn objects use the Edit → Object Line Color...
and Edit → Object Line Thickness options or corresponding icon
in the Toolbar.
After the option Edit → Object Line Color... was activated or after clicking the left part
of the
icon, select the desired color from the displayed color palette.
After the option Edit → Object Line Thickness was activated or after clicking the right
part of the
icon, select the desired line thickness from the displayed list.
Icon
also serves as an indicator of the currently set line color and thickness. Selected
line color and thickness will be used for inserting of all new objects.
Draw Line
Tool Draw Line can be activated by the Annotations → Line option or by clicking the
icon. Then by clicking into the image and by dragging the mouse, while holding the left
91
Main Program Window
mouse button, or by clicking the left mouse button into the starting point and then the
endpoint, a line may be drawn. Precisely horizontal or vertical line may be drawn if you
hold the [Shift] key while drawing it.
Draw Arrow
Tool Draw Arrow can be activated by the Annotations → Arrow option or by clicking the
icon. Then by clicking into the image and dragging the mouse, while holding the left
mouse button, or by clicking the left mouse button into the starting point and then into the
endpoint, an arrow may be drawn. The arrowhead will be placed to the endpoint. Precisely
horizontal or vertical arrow may be drawn if you hold the [Shift] key while drawing it.
Draw Rectangle
Tool Draw Rectangle is activated by the Annotations → Rectangle option or by clicking
the
icon. Then by clicking into the image and by dragging the mouse, while holding
the left mouse button, draw a rectangle.
Draw Circle
Tool Draw Circle is activated by the Annotations → Circle option or by clicking the
icon. Then by clicking into the image and by dragging the mouse, while holding the left
mouse button, draw a circle.
Draw Ellipse
Tool Draw Ellipse is activated by the Annotations → Ellipse option or by clicking the
icon. Then by clicking into the image and by dragging the mouse, while holding the left
mouse button, draw an ellipse. It is possible to rotate the ellipse by dragging the green
grasp point displayed inside the ellipse.
Draw Polygon
Tool Draw Polygon is activated by the Annotations → Polygon option or by clicking the
icon. Then by clicking the left mouse button, into the selected area in the image, insert
the first polygon's vertex. Repeated mouse clicks of the left mouse button will insert other
vertexes of the polygon. Precisely horizontal or vertical edges can be drawn if you hold
92
Main Program Window
the [Shift] key. To finish drawing of the polygon, click the right mouse button – the last
vertex will be connected with the first one and that way the polygon will be closed.
Draw Freehand
Tool Draw Freehand is activated by the Annotations → Freehand option or by clicking
the
icon. Then by clicking into the image and by dragging the mouse, while holding
the left mouse button, draw the desired curve.
Insert Text Annotation
Tool Insert Text Annotation is activated by the Annotations → Text... option or by clicking
the
icon. Cursor will change into a cross with the letter A. Then click the left mouse
button into the image to the spot, where the text annotation should be placed. A Text
Annotation dialog box will open.
Type the text content into the bottom field. Setting of the font properties can be done using
the: Bold
, Italic
or Underline
buttons. Font color can be chosen from the color
palette, which will show after clicking the Text Color
be selected from the
button. Font size and type can
drop-down menus. To align a multiline text
93
Main Program Window
use the following buttons: Align Multiline Text Left, Center Multiline Text and Align
Multiline Text Right
.
Orientation of the text can be chosen in the Orientation part by clicking the corresponding
button with the Abc text on it.
Background of the text annotation can be set in the Background Color and Background
Area parts. If you, in the Background Area part, check the Transparent option, text
annotation will be inserted into the image with a see-through background. If you check
the Custom Color option it will be possible, after clicking the
button, to choose the
annotation's background color from the displayed color palette. After checking the Custom
Color option, the Background Area part with two choices will be made available. Option
Rectangle will fill-in the whole rectangle area defined by the text annotation with the set
background color. Option Behind Text Only will fill-in only the area behind text with the
set background color.
To insert a text annotation click the OK button.
Note
Text writing and all above mentioned editing are continuously displayed directly
in the image. Parameters of the text annotation can be selected interactively. If
the window Text Annotation covers the inserted text annotation in the image, we
recommend to move this window to a different area by dragging it by its upper
strip.
Inserted text annotation can be easily moved around in the image. Click on the text
annotation with the left mouse button and move the text by dragging the mouse, while
holding the left mouse button, to the desired area.
94
Main Program Window
To edit an already inserted text annotation, double-click on it with the left mouse button.
A Text Annotation dialog box will open again and you will be able to edit the text as you
wish.
Selection of the Inserted Objects for Editing
If you want to edit objects that have already been inserted into the image, it is necessary
to select those objects first. Proceed according to the following instructions:
Activate the Select
tool and by clicking the contour line of the desired object, select it.
Selected object will be highlighted with a green dash line and on its perimeter, green grasp
points will be activated (except for an object created with the Draw Freehand tool). Object
selected this way is ready for editing.
To select more objects at the same time, press and hold the [Shift] key and select all objects,
which you want to edit, with the left mouse button.
To cancel the object selection, click the left mouse button anywhere outside the objects or
click the right mouse button. Selection of objects will be canceled.
Note
Select tool
is automatically activated every time no other tool is active.
Change of Line Color and Thickness of the Drawn Objects
In order to edit inserted objects, select them first - for more information see “Selection of
the Inserted Objects for Editing“ on page 95.
The color and line thickness of selected objects may be changed. For these purposes use
the following options Edit → Object Line Color..., Edit → Object Line Thickness or the
corresponding icon
in the Toolbar.
New line color of the selected objects can be chosen from the displayed palette after the
option Edit → Object Line Color... was activated or after clicking the left part of the
icon.
95
Main Program Window
New line thickness of the selected objects can be chosen from the displayed list after the
option Edit → Object Line Thickness was activated or after clicking on the right part of
the
icon.
Relocation, Change of Size and Shape of the Drawn Objects/Relocation
of Text Annotations
In order to edit inserted objects, select them first - for more information see “Selection of
the Inserted Objects for Editing“ on page 95.
If you want to move the selected object in the image, move the mouse cursor to its contour
line. Cursor will change to . By clicking on the object's outline and by dragging the
mouse, while holding the left mouse button, the object can be moved to the desired area.
In the middle of selected objects of the ellipse, rectangle, and circle types, there is a cross.
Using this cross you may also move these objects in the above mentioned way. Use a similar
process to move text annotations.
In the ellipse there is also a green grasp point connected, by a dash line, with its center.
Using this point you can rotate the ellipse any way you wish.
To change the size/shape of the selected object, proceed as follows: move the mouse cursor
to one of the green grasp points. Cursor will change to . By clicking on the grasp point
and by dragging the mouse, while holding the left mouse button, you can change the
size/shape of the object.
Deleting of Inserted Objects and Text Annotations
In order to edit inserted objects, select them first - for more information see “Selection of
the Inserted Objects for Editing“ on page 95.
96
Main Program Window
To delete a selected object from the image, press the [Del] key, activate the Edit → Delete
Selected Objects option or click the
icon. To delete all (not only selected objects) inserted
objects from the image, activate the Edit → Delete All Objects option or click the
icon.
3.4. Image Saving
Information about Work with Layers
Program QuickPHOTO INDUSTRIAL 3.0 uses, for work with inserted objects (drawings,
text annotations, measurements, grid, scale bar), an independent layer “above the image“.
Thanks to this function, it is possible to edit, hide, or delete all inserted objects. There are
two possible ways to save the images: with layers kept as they are or with flattened (merged)
layers. The saving option named Flattening Layers is available in the Saving Parameters
and Save As windows and contains the following options:
1. Keep Inserted Objects in a Separate Layer
2. Merge Objects with an Image (Flatten Layers)
Both saving options have their specifics:
1. Keep Inserted Objects in a Separate Layer
It is possible to keep the layers separate only when saving images as the JPEG or TIFF
type. Images of the BMP and PNG type do not support saving of layers. If you save the
image as a JPEG or TIFF type with the layers kept, all its functions will be available next
time you open it in the QuickPHOTO INDUSTRIAL 3.0 program. Which means that the
image will have an assigned calibration which was used for measurements, it will be
possible to edit all inserted objects, description of the image will be maintained, the table
of measured values will contain measurement results with possibly added comments. Image
saved in such a way will (in case a calibration was assigned to this image before saving)
contain complete information about the calibration, and it will be possible to continue with
measurements in the image also at a different workstation equipped with the QuickPHOTO
INDUSTRIAL 3.0 program, even if this workstation does not have the calibration, which
was used for acquiring of the image, available for the used microscope-imaging device
set.
97
Main Program Window
Important is the fact that after opening of an image saved in such a way in other programs
for work with images, the layer containing inserted objects will not be visible – only the
image without inserted objects will be displayed.
2. Merge Objects with an Image (Flatten Layers)
If you need the inserted objects in the image to be visible also in other programs for work
with images (for example if you need to insert the image to a text document or
a presentation), it is necessary to save the image with flattened layers. In such case, the
layer “above the image“ containing inserted objects will be merged with the image. When
you flatten layers, all additional information (image calibration, the content of the table of
measured values, description of the image) will be removed from the image. When you
open an image, saved in such a way, in other programs for work with images, the image
will be displayed with all inserted objects.
If you open such an image in the QuickPHOTO INDUSTRIAL 3.0 program, it will no
longer be possible to edit the inserted objects in any way. The image will not contain
information about the used calibration, table of the measured values will be empty, and
the image's description will not be available.
To save images with flattened layers, you can use all supported image types: JPEG, TIFF,
PNG as well as BMP.
Types of Files Supported by the QuickPHOTO INDUSTRIAL 3.0
Program
Program QuickPHOTO INDUSTRIAL 3.0 works with images of the JPEG, TIFF, PNG
and BMP types. The following paragraphs contain basic information about these file types:
• Information about JPEG File Type/JPEG Quality
The JPEG (Joint Photographic Experts Group - suffix .jpg) file type is the most
commonly used type of file for saving photomicrographic images. This is a file type
utilizing the so called lossy compression. Result of this is a relatively small data file
size at the expense of a loss of image quality. This loss of quality however, means no
problems for most photomicrographic applications. Quality of the saved image can be
affected by a parameter named JPEG quality. This parameter has influence on the level
of JPEG compression that way it affects the quantity of information (details) which
98
Main Program Window
will be preserved in the image. Higher JPEG quality means lower level of compression
that way a larger saved file and vice versa.
JPEG type enables you to save, besides the actual image data, additional information
- metadata (for example sensor sensitivity, aperture number, exposure time, focal length,
information about the use of flash, and other data) thanks to the Exif extension. Exif
extension enables the QuickPHOTO INDUSTRIAL 3.0 program to use this file type
for saving of images with the layers kept as they are.
Note
Default value of the JPEG quality is in the QuickPHOTO INDUSTRIAL 3.0
program set at the value 95. You can set the default value by the Default JPEG
Quality parameter in the Edit → Options... → General → Image Names & Saving
program setting.
Note
JPEG type file is not very suitable for saving of images with measured phases.
We recommend to use the TIFF file type for such images.
99
Main Program Window
• Information about TIFF File Type
TIFF file type (Tag Image File Format - suffix .tif) represents a commonly used option
for image saving using a lossless compression. There is no decline in quality of the
saved file which makes this type of file very suitable for the need of high quality print.
Disadvantage of this file type is its large data size. This file type does not allow the
user to set the quality. TIFF type enables to save not only the image information but
also additional data. Thanks to this it is possible to use the TIFF type to save images,
in the QuickPHOTO INDUSTRIAL 3.0 program, with the layers kept as they are.
• Information about PNG File Type
PNG file type (Portable Network Graphics - suffix .png) also uses the lossless
compression for saving image data. PNG type produces, unlike the TIFF type
significantly smaller files but it does not allow, in the QuickPHOTO INDUSTRIAL
3.0 program, to save images with the layers kept as they are. PNG type is especially
suitable for publishing of smaller images on the internet.
• Information about BMP File Type
BMP file type (Windows Bitmap – suffix .bmp) represents, in terms of how to save
image data, the most primitive way of saving images to a file. BMP type saves image
information to a file without compression because of that the result is a very large file.
BMP type does not allow, in the QuickPHOTO INDUSTRIAL 3.0 program, saving of
images with the layers kept as they are.
Note
Program QuickPHOTO INDUSTRIAL 3.0 saves images to files in the 24bit RGB
mode, and saved images have the DPI parameter set at the value 300.
Image Saving
There are several options for saving images in the File menu. These are the following
options: Save, Save As.., Save All, Save All As... You can also use key shortcuts to activate
individual options.
100
Main Program Window
Option Save
Option File → Save or the
icon in the Toolbar will save only those images selected in
the Thumbnail Browser. If the images being saved have already been saved before, they
will be saved again into their original locations. If the JPEG or TIFF types of images are
being re-saved into their original locations, a Saving Parameters dialog box will be
displayed. Other types of images (BMP and PNG) will be re-saved automatically. If you
are saving newly acquired images a Save As dialog box will be displayed, which will enable
you to choose the location, names and types of the files being saved. If all selected images
have already been saved, this option will be inactive.
Option Save All
Option File → Save All saves all images displayed in the Thumbnail Browser. If the images
being saved have already been saved before, they will be saved again into their original
locations. If the JPEG or TIFF types of images are being re-saved into their original locations
a Saving Parameters dialog box will be displayed. Other types of images (BMP a PNG)
will be re-saved automatically. If you are saving newly acquired images a Save As dialog
box will be displayed, which will enable you to choose the location, names and types of
files being saved. If all images have already been saved, this option will be inactive.
Saving Parameters Window
Saving Parameters window will be displayed after one of these functions File → Save or
File → Save All has been activated while re-saving the JPEG or TIFF type images into
their original locations.
101
Main Program Window
In the top part of the window there is a list JPEG and TIFF Images to Be Saved, which
contains names of images, which will be involved in the settings. The same settings will
be used for all images on this list.
In the middle part of the window there is a Flattening Layers option available - for more
information see “Information about Work with Layers“ on page 97.
If there is at least one JPEG type image in the list, there is a JPEG Quality section in the
bottom part of the window. Controls in this section enable setting of quality for the JPEG
type images. (This option has no influence on other types of images.) Calculate and Preview
buttons are available only if there is only one JPEG type image on the list of images to
be saved. Calculate button calculates the resulting image size at the set JPEG quality.
Preview button displays a window with the image preview as it will look at the chosen
JPEG quality.
102
Main Program Window
Option Save As...
Option File → Save As... saves images selected in the Thumbnail Browser using the Save
As window, which enables to choose the location, names and types of files being saved.
Option Save All As...
Option File → Save All As... saves all images displayed in the Thumbnail Browser using
the Save As window, which enables you to choose the location, names and types of files
being saved.
Window Save As
Window Save As replaces the standard Windows® dialog box for saving files into a chosen
location. This window contains an expanded functionality, and it enables saving of more
images at the same time. This window consists of several parts:
•
•
•
•
•
•
•
Thumbnails of Images for Saving
Location
File Name and Type
Additional File Name Tags
Numbering
Flattening Layers
Information
103
Main Program Window
Part Thumbnails of Images for Saving
This part contains thumbnails of all images to be saved. After the Save As dialog box has
been opened all thumbnails of the images to be saved will be selected with an orange frame.
Thumbnails can be selected/deselected in a similar way as the thumbnails in the Thumbnail
Browser in the Main Program Window - for more information see “Thumbnail
Browser“ on page 76. Settings done in the File Name and Type and Additional File Name
Tags parts will always be applied to selected images from this list. So you can set, in bulk,
the name, type, and quality for more images at the same time.
Order of thumbnails on the list can be changed by dragging them with a mouse
(drag-and-drop). Information about the number of images for saving, and the number of
selected images are displayed in the bar above the thumbnails.
If you move the mouse over one of the thumbnails, several buttons will be displayed on
the right side next to the particular thumbnail. These buttons call for functions for a specific
image. Image preview in the full size can be displayed by clicking the Preview
104
button
Main Program Window
(for JPEG image types the quality of the preview will be influenced by the set JPEG Quality
parameter), information about the image can be displayed using the Image Information
button. This function is useful, for example, if you want to add a description to the image
before you save it. Images can be removed from the saving list by clicking the Close
button (thumbnail will disappear from the list).
Two indicators may be displayed in the thumbnail area according to the current situation.
If there is an already existing image with the same name and type in the folder chosen in
the Location part, an indicator
will be displayed by the thumbnail. Unless you change
the name or type of the image, the already existing image in the folder will be overwritten.
If the
indicator is displayed by some of the thumbnails, it means that there has been
a collision of the names as well as the types of the images on the list. In such a case saving
of the images cannot take place unless you change the name or type of these images. Legend
for the displayed indicators will be displayed in the Information part.
Location Part
In this part it is possible to select a folder into which all images displayed in the Thumbnails
of Images for Saving part will actually be saved. Control in this part is similar to the standard
Windows® dialog box for saving files.
105
Main Program Window
Part File Name and Type
In this part it is possible to choose the names and types of images selected in the Thumbnails
of Images for Saving part. If you have selected more than one thumbnail and you type in
a new name to the File Name field, the name of all selected images will be changed at the
same time and the _Numbering function will also be activated. This function will ensure
distinction of individual images. Changes will immediately appear in Thumbnails of Images
for Saving part. If you want to restore the original names of the selected images, click the
Restore button.
Save as Type drop-down menu enables to select the type (format) of the images selected
in the Thumbnails of Images for Saving part. If you leave the default option Original Type
active, images will be saved in the same format in which they were opened/acquired in the
program. If you choose one of the available types from this menu, the selected type will
be set to the images selected in the Thumbnails of Images for Saving part. If you choose
the JPEG type, indicator of the set JPEG quality will also be displayed by the corresponding
thumbnails (for example JPEG Quality: 95) and at the same time JPEG Quality link will
be made available right from the Save as Type drop-down menu. This link will open
a window in which it will be possible to set the desired quality of the JPEG type images.
106
Main Program Window
Part Additional File Name Tags
In the part Additional File Name Tags there are two buttons. Button _Date will add the
current date to the image names selected in the Thumbnails of Images for Saving part.
Button _Time will add the current time to the image names selected in the Thumbnails of
Images for Saving part. You can combine the use of both of these buttons.
Part Numbering
Part Numbering contains the _Numbering button, which adds a serial number to the names
of all images in Thumbnails of Images for Saving part. Images will always be numbered
from the number 00001. The use of the _Numbering button can be freely combined with
the use of _Date and _Time buttons. This function is useful, for example, in case you want
to save several images from the same series with the same name and you want to distinguish
them with a serial number.
Part Flattening Layers
In this part of the window there is the Flattening Layers option available - for more
information see “Information about Work with Layers“ on page 97. Setting of this option
will affect all images to be saved. The first option, Keep Inserted Objects in a Separate
Layer, is valid only for JPEG and TIFF type images. With the BMP and PNG types layers
will always be merged automatically.
Part Information
In the Information part explanatory notes are displayed for indicators and warnings about
important facts about saving of images.
Saving of Images When Exiting the Program
When exiting the QuickPHOTO INDUSTRIAL 3.0 program you will be asked whether
you wish to save the not yet saved images. Option Save called from the displayed message
window works the same way as the option File → Save All.
107
Main Program Window
3.5. Image Printing
Program QuickPHOTO INDUSTRIAL 3.0 enables to print 1-4 images next to each other
on one page. Select images for printing (max 4) in the Thumbnail Browser and activate
the File → Print... option or click the
icon.
Function Print can also be activated for a particular image by clicking the Print
in the controls of the corresponding thumbnail.
button
Note
If you select more than 4 images in the Thumbnail Browser and you activate the
Print function only the first four images of the selection will be printed.
If there are 2 or 4 images displayed next to each other in the Display Window and you have
selected only one thumbnail in the Thumbnail Browser, first a window Selecting the Source
of Images for Print will open when activating the print function.
108
Main Program Window
This window gives two options where to get images for printing:
Option Selected Thumbnail activates the print function for an image selected in the
Thumbnail Browser.
Option Layout of Displayed Images is used for printing of the current image layout displayed
in the Display Window. This option prints, on one page, currently visible image parts
displayed in the Display Window next to each other. You may use this function, for example,
if you want to print, on one page, various details of one image next to each other, or if you
want to, for comparison, print details of various images next to each other.
When using this function proceed as follows:
1. Switch the Display Window to the mode for display of two or four images next to
each other.
2. Display the desired images in individual Display Window fields. This way you can
also display one image in more than one field of the Display Window.
109
Main Program Window
3. Set the display size in individual fields according to your need and display the desired
details.
4. Activate the Print function, in the Selecting the Source of Images for Print window,
choose the Layout of Displayed Images option and click the Next button.
After you click the Next button a Print window will open.
The resulting print layout may, for two images displayed next to each other in the Display
Window look, for example, like this one:
Print Window
Print window consists of several parts:
•
•
•
•
Preview
Printer tab
Page Layout tab
buttons in the bottom part
110
Main Program Window
Part Preview
In the right part of the Print window is displayed the page Preview as it will be printed
out. Settings made are continuously updated in the Preview field. It is then possible to
make required print settings interactively.
Under the Preview there are displayed information about the currently selected paper format
and the set print quality (units DPI - Dots Per Inch).
Printer Tab
In the Printer part choose the desired printer from the Name drop-down menu which
contains the list of available printers. Properties button opens a dialog box with advanced
settings for the chosen printer.
111
Main Program Window
Orientation part contains two options of the page orientation: Portrait and Landscape. To
print one and four images next to each other, the default orientation will be landscape, to
print two images next to each other, the default orientation will be portrait.
Color Mode part contains two options of the print mode: Color and Grey Scale.
Set the number of copies in the Copies part.
In the Units part choose units for setting of margins and the print size. You can choose
between cm or inches.
In the Margins part set the desired page margins for printing. Minimal Margins button will
set the minimal margin size, which the currently selected printer allows.
Page Layout Tab
112
Main Program Window
Image Size part contains the following options:
• Original Size (from Image DPI) - this option sets the original print size according to
the image DPI. QuickPHOTO INDUSTRIAL 3.0 program assigns to the acquired
images the 300 DPI quality.
• Fit to Page (Keep Aspect Ratio) - this option uses the whole page area for printing and
it keeps the original aspect ratio of the image.
• Stretch to Page (No Aspect Ratio) - this option uses the whole page area for printing.
Original aspect ratio will not be preserved.
• Custom - options in this part enable to set custom image print size in length units. If
the Constrain Proportions option is checked and you will type in the first dimension,
the second dimension will be calculated automatically in the original aspect ratio of
the image. This option is available only for print of one image on a page.
• Scale - options in this part enable to set custom image print size in percents compared
to the original size. If the Constrain Proportions option is checked and you will type
in the first dimension, the second dimension will be automatically calculated in the
original aspect ratio of the image. This option is available only for print of one image
on a page.
In the Image Alignment part you can set the alignment of the images on the page by clicking
one of the 9 buttons.
Part Image Information sets print of additional information about the image. Along with
the image it is possible to print, after checking the corresponding options: Image Name,
Date and Time of Image Origin and Description - for more information see “Image
Information“ on page 159. Buttons in the Position part determine the position towards the
image, where additional information will be located. Information is, for better orientation,
highlighted with a green color in the Preview. This highlight will not show in the final
print.
In the Image Borders part select whether the printed images should have a black frame.
When printing more images on one page, it is possible to set the Image Spacing in the
chosen length units.
113
Main Program Window
Buttons in the Bottom Part
Default Settings button returns all settings in the Print window to the original values.
Print button will begin print on the selected printer, it will close the Print window and it
will also store the set parameters for further opening of the Print window.
Cancel button will close the Print window without storing the set parameters.
Apply button will store the set parameters for further opening of the Print window (actual
print will not take place).
Note
Print parameters are always stored only within the current QuickPHOTO
INDUSTRIAL 3.0 program run.
4. Measurements
QuickPHOTO INDUSTRIAL 3.0 program is equipped with many functions for
measurements in the image. These functions can be found in the Measurements menu.
Corresponding icons are located in the Toolbar. There are the following functions available:
inserting a calibrated scale bar
, measuring of the line segment length
of the perimeter and area of an ellipse
, measuring of the perimeter and area of a rectangle
, measuring of the diameter, perimeter and area of a circle
and area of a polygon
, measuring of the polyline's length
measuring of arbitrary angle
defined by two line segments
, angle from the X axis
a rectangular
114
or circular
, measuring of the perimeter
, counting of objects
, angle from the Y axis
,
, angle
, measuring of the distance between two parallel lines
measuring of the length, diameter and angle of an arc
, Brinell hardness test
, measuring
,
, measuring of the phase analysis
and Vickers microhardness test
. It is also possible to insert
grid of defined dimensions into the image.
Main Program Window
Note
To use the functions for measurements it is necessary to calibrate the QuickPHOTO
INDUSTRIAL 3.0 program first - for more information see “Opening Information
about Calibrations“ on page 33.
To achieve correct measuring results it is necessary to have set the corresponding
active calibration for the microscope-imaging device set in use - for more
information see “Setting an Active Calibration“ on page 58.
4.1. Preparing for Measuring
Selecting Magnification which Was Used for Acquiring of the Image
Before you begin measuring, first you must assign the corresponding microscope
magnification, which was used when acquiring the image intended for measuring. Proceed
as follows:
1. Display the desired image in the Display Window.
2. In the Toolbar choose from the Objective or eventually Zoom menu the corresponding
magnification. In the list you can only choose from those values for which calibration
was created. If your microscope is not equipped with a magnification changer or
a zooming unit, there will be, after you choose an objective, in the Zoom menu
automatically set the value 1.
After this step functions for measuring will be activated:
Mode of Assigning Magnifications to Images
If the same microscope magnification is being used frequently, manual assigning of the
used magnification to each new image might be uncomfortable. For such cases offers the
QuickPHOTO INDUSTRIAL 3.0 program, in the Options dialog box, in section
Measurements on the Other Setting tab (Edit → Options... → Measurements → Other
Setting), the option Mode of Assigning Magnifications to Images. This option offers two
possibilities:
115
Main Program Window
• Manual Magnification Assignment to Each Image – if this option is active (default
option), it is necessary to manually set magnification from the Objective or eventually
Zoom menu to each image intended for measurements.
• Automatically Assign the Last Used Magnification to a New Image – if you activate
this option, to each new image will automatically be assigned the last magnification
assigned to some image.
Note
If you are using one of the magnification encoders, values of magnifications in
the Objective or eventually Zoom menu will be automatically filled in when the
image is acquired, and values completed in such a way cannot be changed
manually.
Setting the Line Color and Thickness of the Measuring Objects
To set the line color and thickness of the measuring objects use the Edit → Object Line
Color... and Edit → Object Line Thickness options or corresponding icon
Toolbar.
in the
After the Edit → Object Line Color... option was activated or after clicking the left part
of the
icon, select the desired color from the displayed color palette.
After the Edit → Object Line Thickness option was activated or after clicking the right
part of the
icon, select the desired line thickness from the displayed list.
The icon
also serves as an indicator of the currently set line color and thickness.
Selected line color and thickness will be used for inserting of all new objects.
Measurement Settings
For all newly acquired images and for all opened images which have not yet been saved
(with the layers kept including some measurements or a scale bar) by the QuickPHOTO
INDUSTRIAL 3.0 program, default settings selected in the Sizes/Colors and Measurands
tabs in Options of the program (Edit → Options... → Measurements → Sizes/Colors;
Measurands) will be used automatically.
116
Main Program Window
For the current image displayed in the Display Window, these settings can be changed,
after the first measuring has been done, in the Table of Measured Values on the
Measurement Settings - “Image Name“ tab. Changes done on this tab will only relate to
the current image. For detailed description see “Work with the Table of Measured
Values“ on page 139.
When saving the image, containing some measurements or a scale bar, with the layers kept
the above mentioned settings are saved as a part of the file and when you open it in the
QuickPHOTO INDUSTRIAL 3.0 program next time, they will be applied for this image.
4.2. Scale Bar
Inserting of the Calibrated Scale Bar
For a basic idea about the dimensions, you can insert into the current image a calibrated
scale bar.
Option Measurements → Insert Horizontal Scale Bar or the
bottom corner a horizontal scale bar.
icon inserts into the right
Option Measurements → Insert Vertical Scale Bar or the
upper corner of the image a vertical scale bar.
icon inserts into the right
By clicking again on the corresponding icon, you can remove the scale bar which was
inserted into the image.
The value displayed above the scale bar shows its full length. Scale bar is inserted in a layer
“above the image“ and if you change the display size of the image, scale bar size and value
will continuously recalculate.
Scale Bar Settings
If you want to change the properties of the inserted scale bar, click on the scale bar with
the right mouse button. A context menu with several choices will appear:
117
Main Program Window
Option Scale Bar Options... opens an Options dialog box on the Scale Bar tab (Edit →
Options... → Measurements → Scale Bar). This tab contains number of choices for type,
size and the appearance settings of the scale bar. Created settings can be saved into one of
the four available profiles with the option to choose your own name. If you activate the
option Insert Scale Bar into Image Automatically after Magnification Assignment a scale
bar will be automatically inserted into images after you select magnification (in Objective
and Zoom menus in the Toolbar) which was used for their acquisition. For more information
about the scale bar settings see “Tab Scale Bar“ on page 175.
Further in the context menu there are four preset scale bar profiles. These items correspond
to the user definable profiles described in previous paragraph. Activation of the selected
scale bar profile can be done by selecting a profile name with a mouse.
Scale bar modifications will be reflected in all images.
4.3. Standard Measuring Tools
Measuring Mode Selection
QuickPHOTO INDUSTRIAL 3.0 program offers two measuring modes. Make your choice
in Options of the program in section Measurements on the Other Settings tab (Edit →
Options... → Measurements → Other Settings) in the Measurement Mode part. Select one
of the options:
• Continuous Measurement Mode - if this option is active (default option), the selected
measuring tool will remain active for the current image until turned off. That way you
can proceed with repeated measurements in the image without the necessity to manually
activate the same measuring tool for each measurement.
• Single Measurement Mode - if you activate this option, the measuring tool will be, after
one performed measurement, automatically deactivated.
118
Main Program Window
Note
Active measuring tool can always be terminated by clicking the right mouse
button, by repeated clicking on its icon or by the [Esc] key.
Measure Line Segment
Tool Measure Line Segment can be activated by the Measurements → Line Segment option
or by clicking the
icon. Then by clicking into the image and by dragging the mouse
while holding the left mouse button or by clicking the left mouse button into the beginning
and then the end point, a measuring line segment can be inserted. Precisely horizontal or
vertical line can be created if you hold the [Shift] key while inserting the line segment.
The length of the inserted line segment will be measured.
Measure Ellipse
Tool Measure Ellipse can be activated by the Measurements → Ellipse option or by clicking
the icon. Then by clicking into the image and by dragging the mouse while holding the
left mouse button, insert the measuring ellipse. You can rotate the ellipse, after you have
selected it, by dragging the green grasp point displayed inside the ellipse. You can measure
a perimeter and area of an ellipse.
Measure Rectangle
Tool Measure Rectangle can be activated by the Measurements → Rectangle option or by
clicking the
icon. Then by clicking into the image and by dragging the mouse while
holding the left mouse button, insert the measuring rectangle. You can measure a perimeter
and area of a rectangle.
Measure Circle
Tool Measure Circle can be activated be one of the options from Measurements → Circle
menu or by clicking on the arrow on the right from the
icon and by selecting the
corresponding type of measurement from the displayed menu. There are following options
available:
119
Main Program Window
• Circle Defined by Radius
- by clicking and dragging the mouse while holding the
left mouse button, you can define the radius of the measuring circle.
• Circle Defined by Diameter - by clicking and dragging the mouse while holding the
left mouse button, you can define the diameter of the measuring circle.
• Circle Defined by 3 Points
- click the left mouse button gradually on three points
in the image through which the measuring circle will be interspaced.
You can measure a diameter, perimeter and area of a circle.
Measure Polygon
Tool Measure Polygon can be activated by the Measurements → Polygon option or by
clicking the icon. Then by clicking the left mouse button on a chosen point in the image,
insert the first polygon's apex. Repeated clicking of the left mouse button will define further
apexes of the polygon. Precisely horizontal or vertical edge can be created if you hold the
[Shift] key while inserting the apex. To finish inserting of a polygon, click the right mouse
button - the last apex will be connected with the first one and a polygon will be closed.
You can measure a perimeter and area of a polygon.
Note
If the edges of the inserted polygon will cross each other in a certain point, value
of the area will equal 0. Only the polygon's perimeter will be calculated.
Measure Polyline
Tool Measure Polyline can be activated by the Measurements → Polyline option or by
clicking on an arrow on the right next to the icon and by selecting the Polyline option.
Then by clicking the left mouse button on a chosen point in the image, insert the beginning
point of a polyline. Repeated clicking on the left mouse button will define the break points.
Precisely horizontal or vertical line can be created by holding the [Shift] key while creating
it. To finish inserting of the polyline, click the right mouse button. There will be measured
the length of the polyline.
120
Main Program Window
Count Objects
This function can be activated by the Measurements → Count Objects → Count Objects
(New Group) option or by clicking the icon. Click the left mouse button on every object
which you want to include in the counting. Each counted object will be indicated with
a cross and the number of counted objects will be displayed in the Table of Measured
Values. Counting can be terminated by clicking the right mouse button, repeated clicking
the
icon or by pressing the [Esc] key. All objects of the same group will be indicated
with a cross of the same color. The same color will be used for the corresponding row in
the Table of Measured Values. If you activate the function Count Objects (New Group)
again in the same image, further counted objects will be indicated with a cross of a different
color and in the Table of Measured Values there will be another line displayed with the
number of elements of another group of objects. If you want to add further objects to one
of the already existing groups of objects, mark one of the elements from this group using
the Select tool or mark the corresponding row in the Table of Measured Values by clicking
on it and activate the option Measurements → Count Objects → Add Objects to the Current
Group or click on the arrow on the right next to the
icon and select the option
Add
Objects to the Current Group. Now you can continue in counting of objects from the
selected group.
If you want to change the color or size of the crosses of the whole group of objects, mark
one of the elements of this group using the Select tool or select it by clicking the
corresponding row in the Table of Measured Values and using the options Edit → Object
Line Color... and Edit → Object Line Thickness or using the
parameters.
icon select the desired
Measure Angle
Tools for angle measurement can be activated by the options Measurements → Angle →
Arbitrary Angle, Angle from the X Axis, Angle from the Y Axis, Angle Defined by 2 Line
Segments or by clicking on the arrow on the right from the
icon and by selecting the
corresponding type of measurement from the displayed menu.
In the Measure Arbitrary Angle mode by clicking and dragging the mouse while holding
the left mouse button or by clicking the left mouse button into the beginning and then the
end point, insert the first arm of an angle. Then by clicking the left mouse button, insert
the second arm of an angle. If you want to create precisely horizontal or vertical arm of
121
Main Program Window
an angle, hold the [Shift] key while creating it. Convex angle will be measured. If you
want to measure an angle of more than 180°, drag, with a mouse, the label with the measured
value to the second half-plane.
In the Measure Angle from the X Axis
or Measure Angle from the Y Axis
mode by
clicking and dragging the mouse while holding the left mouse button or by clicking the
left mouse button into the beginning and then the end point, insert the first arm of an angle.
This arm of an angle will automatically be completed with the corresponding axis and an
angle defined in such a way will be calculated. If you want to measure the side angle to
the given axis, drag, with a mouse, the label with the measured value to the second
half-plane.
In the Measure Angle Defined by 2 Line Segments
mode by clicking and dragging the
mouse while holding the left mouse button or by clicking the left mouse button into the
beginning and then the end point, insert a line segment defining the first arm of an angle.
Then, in a similar way, insert a line segment defining the second arm of an angle. The arms
of an angle will be created from both of the line segments by elongation using auxiliary
lines. Convex angle will be measured. If you want to measure an angle of more than 180°,
drag, with a mouse, the label with the measured value to the second half-plane.
Measure Distance Between 2 Parallel Lines
Activate a tool for measurement of two parallel lines by the Measurements → Distance
Between 2 Parallel Lines option or by clicking the
icon. By clicking and dragging the
mouse while holding the left mouse button or by clicking the left mouse button into the
beginning and then the end point, insert the first line. Then by clicking the left mouse
button to the desired point, insert the second parallel line. Distance between both lines will
be measured. Precisely horizontal or vertical line can be created, if you, while inserting it,
hold the [Shift] key.
Measure Arc
Activate a tool for arc measurement by the Measurements → Arc option or by clicking the
icon. Using the left mouse button gradually insert three points which will define the
arc. You can measure the length (measured along its perimeter), diameter and an angle
created by the arms of an arc.
122
Main Program Window
4.4. Displaying a Grid of Defined Dimensions
You can choose from two types of grids of defined dimensions, which can be inserted into
the current image displayed in the Display Window:
• orthogonal grid
• circular grid
Displaying an Orthogonal Grid
Tool for displaying an orthogonal grid can be activated by the Measurements → Display
Orthogonal Grid... option or by clicking the
icon. In the displayed Orthogonal Grid
dialog box in the Spacing part enter the desired grid spacing for the X or Y axis. Spacing
can be defined in pixels and in current length units (μm or mm). Color and thickness of
the grid's lines can be set in the Line Options part. Grid can be displayed in the image by
clicking the OK button. You can move the grid freely by dragging it by the cross in the
middle of it. Another activation of the Measurements → Display Orthogonal Grid... option
or repeated clicking the
icon will cancel displaying of the grid in the image.
Note
Orthogonal grid is, same as other objects being inserted into the image, displayed
in the layer “above the image“ and if you save the image with the layers kept, its
full functionality will be preserved.
123
Main Program Window
Default values of the grid can be selected in Options of the program (Edit → Options... →
Measurements → Grid).
Displaying a Circular Grid
Tool for displaying a circular grid can be activated by the Measurements → Display
Circular Grid... option or by clicking the
icon. In the displayed Circular Grid dialog
box in the Spacing part enter the desired grid spacing. Spacing can be defined in pixels
and in current length units (μm or mm). Color and thickness of the grid's lines can be set
in the Line Options part. Grid can be displayed in the image by clicking the OK button.
You can move the grid freely by dragging it by the cross in the middle of it. Another
activation of the Measurements → Display Circular Grid... option or repeated clicking
the
icon will cancel displaying of the grid in the image.
Note
Circular grid is, same as other objects being inserted into the image, displayed in
a layer “above the image“ and if you save the image with the layers kept its full
functionality will be preserved.
Default values of the grid can be selected in Options of the program (Edit → Options... →
Measurements → Grid).
124
Main Program Window
4.5. Phase Analysis
Phase Analysis function enables to measure percentage amount of a particular color/shade
of grey – the so called phase – in the image. It is possible to measure up to four phases in
one image.
Important
If you want to edit the image (for example adjust the brightness, contrast, color
balance, histogram and so on) it is important to make these adjustments before
you begin with the phase analysis. Above mentioned adjustments may have affect
on the results of phase analysis.
Note
You can, in case of need, convert a color image to a grey scale image using the
function Image → Grey Scale.
Phase Analysis function can be activated by the Measurements → Phase Analysis... option
or by clicking the
appear.
icon. In the right part of the monitor a Phase Analysis dialog box will
125
Main Program Window
Description of the Phase Analysis Dialog Box
Phase Analysis dialog box consists of the following parts:
•
•
•
•
•
Measurement Area
Tools
Active Phase Selection
Active Phase Controls
Preview
126
Main Program Window
• Overlapping of Phases
• Calculate the Phase Proportion Relative to:
Part Measurement Area
In the Measurement Area part you may choose one of the three options:
• Use the Whole Image Area for Phase Analysis
analysis in the whole image area.
• Phase Analysis Inside Defined Region(s) of the Image
- this option activates phase
- after you have activated
this option, you can define one or more regions in the image in which phase analysis
will take place. Remaining image area will not be considered for phase analysis.
• Exclude Unwanted Region(s) of the Image from Phase Analysis
- after you have
activated this option, it is possible to define one or more regions in the image which
will be excluded from the whole image area determined for phase analysis. This option
is useful for example for elimination of darker corners or local defects.
Part Tools
This part contains several buttons:
• Measure Phase - Pick Color from Image
- after you have activated this tool, move
the mouse cursor (cursor in the shape of a dropper) into the image and click on the
desired color/shade of grey whose percentage amount in the image would you like to
measure. You may include more than one color/shade of grey into each phase by
consecutive clicking. This tool is available for all modes from the Measurement Area
part.
• Select Region
- after you have activated this tool you can select one or more (when
holding the [Shift] key) regions defined in the image. The regions will be framed in
green color after you have selected them. If you select the polygonal region there will
be green grasp points displayed in its vertexes. Using these grasp points you may change
the shape/size of the region. Selected region can be erased at any time. This tool is
active only for the second and third mode from the Measurement Area part.
• Define Region - Polygonal Area
- after you have activated this tool, define, by
clicking the left mouse button, vertexes of the polygonal region in the image. Region
will be closed by clicking the right mouse button. This way you may define more than
127
Main Program Window
one region in the image. This tool is active only for the second and third mode from
the Measurement Area part.
• Define Region - Freehand Area
- after you have activated this tool, define one or
more regions in the image using freehand drawing. If you draw several discontinuous
lines, individual segments will automatically be connected with a straight line. Clicking
the right mouse button will close the region. This way you may define more than one
region in the image. This tool is active only for the second and third mode from the
Measurement Area part.
• Delete Selected Regions
- activation of this tool will delete regions selected using
the Select Region tool. This tool is active only for the second and third mode from the
Measurement Area part.
• Region Border Color/Thickness
- left part of this icon is used for setting of the
line's color of all regions. Right part of this icon is used for setting of the line's thickness.
This tool is active only for the second and third mode from the Measurement Area part.
Important
For work with regions for phase analysis you must always have the Phase Analysis
dialog box open.
Note
Regions for phase measuring are, for clear differentiation from other types of
objects in the image, indicated with dashed lines.
Part Active Phase Selection
In this part select the active phase which you want to measure in the image. It is possible
to measure up to 4 phases. Colored rectangles indicate colors for marking of individual
phases in the image. To change the color, click the colored rectangle and from the opened
palette select a new color. Numerical values next to the colored rectangles represent
measured values of the percentage amount of individual phases. These values are also
displayed in the Table of Measured Values. Buttons with crosses on the right hand side
are there for removing of a specific phase from the image.
Part Active Phase Controls
128
Main Program Window
This part contains controls for a phase selected in the Active Phase Selection part.
If the Display Phase button is pressed (color-coded), a phase measured in the image, will
be indicated with the selected color. If you want to, for better clarity, hide the phase
indication undo the pressing of this button. Indication of the phase will be hidden but the
phase itself will remain included in the image. This setting does not affect the measured
values.
Invert Phase button will invert the phase.
If the Add Hue button is pressed (color-coded), after marking of another color/shade of
grey in the image, by the Measure Phase - Pick Color from Image tool (cursor in the shape
of a dropper), selected color/shade of grey will be added to the active phase.
If you click the Remove Hue button, after marking of another color/shade of grey in the
image, by the Measure Phase - Pick Color from Image tool (cursor in the shape of
a dropper), the particular color/shade of grey will be removed from the active phase.
Using a Threshold slider you can set the accuracy with which should the color/shade of
grey, to be included in the phase, correspond to the color/shade of grey picked by the
Measure Phase - Pick Color from Image tool. For finer setting of accuracy, you can use
a field with a numerical value next to the slider. All phases will be, after change of threshold,
recalculated and the change will then show in the image.
Part Preview
Preview field displays enlarged part of an image around the cursor. This enlarged preview
helps to refine the choice of color/shade of grey using the Measure Phase - Pick Color
from Image tool.
Part Overlapping of Phases
In this part you can define whether individual phases may have common areas (intersections)
or not. If you choose the Disabled option, then the area which was already calculated in
one phase cannot be calculated in any other phase. If you choose the Enable - Use Color:
option, any image area can be calculated in any number of phases. Common areas will be
indicated in the image with a color which is defined by a rectangle next to the Enable Use Color: option. After clicking the colored rectangle, you can choose a different color
for the common areas from the color palette.
129
Main Program Window
Part Calculate the Phase Proportion Relative to:
In this part you may choose how you would like to count the proportions of individual
phases.
If the mode Use the Whole Image Area for Phase Analysis is active there are two options
available:
• Whole Image Area - as a base (100 %) for the calculation of the phase amount will be
used the whole image area.
• Overall Area of All Phases - as a base (100 %) for calculation of the phase amount will
be used an area indicated by all phases together. Area which will not be indicated in
the image will not be reflected in the calculation.
If the mode Phase Analysis Inside Defined Region(s) of the Image is active there are two
options available:
• Area of Defined Regions in the Image - as a base (100 %) for the calculation of the
phase amount will be used the area of unification of all defined regions.
• Overall Area of All Phases - as a base (100 %) for the calculation of the phase amount
will be used the area indicated with all phases together. Neither unmarked area inside
regions nor area outside regions will be reflected in the calculation.
If the mode Exclude Unwanted Region(s) of the Image from Phase Analysis is active there
are three options available:
• Whole Image Area - as a base (100 %) for the calculation of the phase amount will be
used the whole image area.
• Whole Image Area Excluding Def. Regions - as a base (100 %) for calculation of the
phase amount will be used the whole image area without all defined regions.
• Overall Area of All Phases - as a base (100 %) for calculation of the phase amount will
be used an area indicated by all phases together. Unmarked image areas will not be
reflected in the calculation.
130
Main Program Window
Note
If the Phase Analysis function is active, it is not possible to work with other
measuring objects in the image.
How to Use Phase Analysis Function
To perform the Phase Analysis function proceed as follows:
1. Select an Image for Phase Analysis
Display the image, in which you want to perform the phase analysis, in the Display
Window.
2. Activate the Phase Analysis Function
Activate the Phase Analysis function by the Measurements → Phase Analysis... option
or by clicking the
icon.
3. Select Measurement Area
In the Measurement Area part select one of the three available modes.
4. Define Region(s)
If you select the second or third mode in the Measurement Area part, define the desired
image region(s) for phase analysis respectively region(s) to be excluded from phase
analysis.
5. Measure the Phase
Using the Measure Phase - Pick Color from Image tool (cursor in the shape of
a dropper) pick the desired color/shade of grey in the image. For a more precise
determination of the desired color/shade of grey use the enlarged Preview.
6. Adjust the Threshold, Set the Phase Color
131
Main Program Window
In the Active Phase Controls part select the desired Threshold and possibly select
a different phase color.
7. Measuring of Other Phases
If you want to measure other phases in the image, select, in the Active Phase Selection
part, another phase and repeat steps 5 and 6.
8. Set Overlapping of Phases
In the part Overlapping of Phases part select the desired mode of overlapping.
9. Choose the Method of Calculation of Phase Amount
In the Calculate the Phase Proportion Relative to: part select the desired method of
calculation of the phase amount.
Measured values will be displayed in the Phase Analysis dialog box in the Active Phase
Selection part, and also in the Table of Measured Values.
Recommendation for Saving of Images with Measured Phases
To preserve the measuring accuracy it is recommended to save images with measured
phases, with the layers kept, as TIFF type. Images of the JPEG type are being saved using
a lossy compression and because of that a certain loss of information takes place. As a result
of this loss of information, slight variations may appear in the phase analysis results when
you open the image again.
132
Main Program Window
4.6. Hardness Test
QuickPHOTO INDUSTRIAL 3.0 program is equipped with functions for evaluation of
the hardness test of materials by Brinell method (according to the standard EN ISO
6505-1:1999) and by Vickers method (according to the standard EN ISO 4516:2002).
Brinell Hardness Test
Brinell hardness test uses, to determine hardness, indentation of a ball of a known diameter
using a defined force into the material being tested. A testing machine, the so called hardness
tester is used for this purpose. Imprint can be scanned either directly by the hardness tester
with a camera-output or by a microscope-imaging device set and it can be evaluated using
the Brinell Hardness Test function. Value of the material's hardness will be calculated after
you enter the values of the operating load, the size of the ball being indented and the
duration time.
To evaluate Brinell hardness test proceed as follows:
1. Acquire or open the image of the imprint in the Display Window and assign it
a magnification which was used to acquire this image.
2. Activate the function Brinell Hardness Test by the Measurements → Hardness →
Brinell Hardness Test... option or by clicking the
icon. The mouse cursor will
change to a cross with a vertical line. By clicking into the image place the line so it
touches precisely the edge of the imprint. Then place another line opposite to the first
one. Then in the same way place another two lines perpendicular to the first two line.
After the last line is placed they will be interspaced with a measuring tetragon. This
tetragon can be, in case of need, using the green grasp points modified so it precisely
corresponds the imprint.
133
Main Program Window
3. Brinell Hardness Test dialog box will appear and the measured size of the imprint's
diameter will be displayed in it. Select the corresponding option according to the type
of the used ball from the Test Type drop-down menu. From the Ball Diameter (D)
menu select the corresponding size of the used ball and from the Mass (m) menu select
the value of the used load in kilograms. Enter the corresponding value to the Time (t)
field. In the Brinell Hardness field will be displayed the calculated material's hardness.
If the value has a red background it means the measured dimensions of the imprint
do not comply the criteria defined by the standard EN ISO 6505-1:1999 and this
measurement is not valid.
Note
Ball Diameter (D) and Mass (m) menus contain only values corresponding with
the standard EN ISO 6505-1:1999. If you want to enter different values, write
those values into the relevant fields using the keyboard.
Clicking the OK button will finish the measurement and the measured value will be
displayed in the Table of Measured Values.
Double-click on the inserted measuring tetragon will anytime bring about the Brinell
Hardness Test dialog box for adjustment of the measuring parameters.
134
Main Program Window
Vickers Hardness Test
Vickers microhardness test uses, for determination of hardness, impression of a regular
tetrahedral pyramid of a known vertex angle between the opposite walls by a defined force
into the tested material. A testing machine, the so called microhardness tester is used for
this purpose. Imprint can be scanned either directly by the microhardness tester with
a camera-output or by a microscope-imaging device set and evaluated by the Vickers
Hardness Test function. After entering of values of the operating load, and the duration
time, the value of the material's hardness will be calculated.
To evaluate the Vickers hardness test proceed as follows:
1. Acquire or open image of the imprint in the Display Window and assign it
a magnification which was used to acquire this image.
2. Activate the Vickers Hardness Test function by the Measurements → Hardness →
Vickers Hardness Test... option or by clicking the
icon. Mouse cursor will change
to a cross. By clicking into the image, place the cross so its center is precisely placed
over one of the corners of the imprint. Then place 3 more crosses, in the same way,
on the remaining corners of the imprint. After you have placed all four crosses
a measuring tetragon will be interspaced through their centers. This measuring tetragon
can be, in case of need, using the green grasp points adjusted so it exactly matches
the imprint.
3. Vickers Hardness Test dialog box, in which the measured sizes of both imprint
diagonals, and the deviation of their difference from the average length of both
diagonals, will be displayed. From the Mass (m) drop-down menu select the used load
in kilograms and into the Time (t) field enter the corresponding duration time value
135
Main Program Window
in seconds. In the Vickers Hardness field the calculated material's hardness will be
displayed. If the value has a red background, it means that the difference in sizes of
both diagonals is greater than is allowed by EN ISO 4516:2002 standard and the
measurement is not valid.
Note
Mass (m) menu contains only values corresponding with the EN ISO 4516:2002
standard. If you want to enter a different value, type it in using the keyboard.
Clicking the OK button will finish the measurement and the measured value will be
displayed in the Table of Measured Values.
Double-click on the inserted measuring tetragon will anytime bring about the Vickers
Hardness Test dialog box for adjustment of the measuring parameters.
4.7. Editing of the Measuring Objects
Selection of the Measuring Objects for Editing
If you want to edit some of the already inserted measuring objects in the image, it is
necessary to make their selection first. Proceed as follows:
Activate the Select tool and make the selection by clicking the contour line or the label
with the measured value of the desired object. Selected object will be highlighted with
136
Main Program Window
a green dash line and on its perimeter green grasp points will be activated. Object selected
this way is ready for editing.
To select more objects at the same time, press and hold the [Shift] key while making your
selection and select all objects, which you want to edit, with the left mouse button.
To cancel the object selection, click the left mouse button anywhere outside the objects or
click the right mouse button. Selection of the objects will be canceled.
Note
Select
tool is automatically activated every time no other tool is active.
Change of Line Color and Thickness of the Measuring Objects
In order to edit inserted objects, select them first - for more information see “Selection of
the Measuring Objects for Editing“ on page 136.
The color and line thickness of selected measuring objects may be changed. For these
purposes use the following options Edit → Object Line Color..., Edit → Object Line
Thickness or the corresponding icon
in the Toolbar.
New line color of the selected objects can be chosen from the displayed color palette after
the option Edit → Object Line Color... was activated or after clicking the left part of the
icon.
New line thickness of the selected objects can be chosen from the displayed list after the
option Edit → Object Line Thickness was activated or after clicking the right part of the
icon.
Relocation, Change of Size and Shape of the Measuring Objects
In order to edit inserted objects, select them first - for more information see “Selection of
the Measuring Objects for Editing“ on page 136.
If you want to move the selected measuring object in the image, move the mouse cursor
to its contour line. Cursor will change to . Clicking on the object's outline and by dragging
the mouse, while holding the left mouse button, the object can be moved to the desired
137
Main Program Window
area. In the middle of selected objects of the ellipse, rectangle, and circle types, there is
a cross. Using this cross you may also move these objects in the above mentioned way.
In the ellipse there is also a green grasp point connected, by a dash line, with its center.
Using this point you can rotate the ellipse any way you wish.
To change the size/shape of the selected object, proceed as follows: move the mouse cursor
to one of the green grasp points. Cursor will change to . By clicking on the grasp point
and by dragging the mouse, while holding the left mouse button, you can change the
size/shape of the object. Measured values will be recalculated.
Relocating the Label with the Measured Value(s) in the Image
In order to edit inserted objects, select them first - for more information see “Selection of
the Measuring Objects for Editing“ on page 136.
You can relocate labels with measured values in the image as you please. Move the mouse
cursor over the label with the measured value(s) of the selected object. Cursor will change
to . In this moment you can, by dragging the mouse while holding the left mouse button,
relocate the label with measured value(s) to the desired area in the image. Label with the
measured value(s) will be connected with the measuring object by an auxiliary line. Type
and shape of the auxiliary lines will be automatically set depending on the current label
with the measured value(s) position due to the location of the measuring object.
138
Main Program Window
Default color and thickness of the dimension and extension lines and leaders is predefined
on the Sizes/Colors tab in Options of the program (Edit → Options... → Measurements →
Sizes/Colors).
You may change the color and thickness of these lines for a specific image in the Table of
Measured Values on the Measurement Settings - “Image Name“ tab in the Dimension and
Extension Lines, and Leaders part.
Deleting Measuring Objects
In order to edit inserted objects, select them first - for more information see “Selection of
the Measuring Objects for Editing“ on page 136.
To delete selected objects from the image press the [Del] key, activate the Edit → Delete
Selected Objects option or click the
icon.
To delete all (not only the selected objects) objects from the image activate the Edit →
Delete All Objects option or click the
icon.
4.8. Work with the Table of Measured Values
Measured values are continuously being displayed in a well-arranged table named Table
of Measured Values in the bottom part of the Main Program Window. The table contains
1-4 tabs with the measured values for individual images displayed in the Display Window
(number of tabs corresponds with the set layout mode of the Display Window) and a tab
named Measurements Settings - “Image Name“.
Measured values of other opened images (displayed in the Thumbnail Browser) can be
displayed in the Table of Measured Values by opening of the desired images in the Display
Window.
Tabs with Names of Images
Tabs with names of images contain the measured values for the corresponding images
displayed in the Display Window. Individual tabs contain the following elements:
• table of measured values
• statistics
• toolbar buttons
139
Main Program Window
Note
If the tab with the image name contains measured values which have not yet been
saved or exported, symbol # will be displayed in front of the image name.
Table of Measured Values
Table of Measured Values contains values measured in the current image. Individual rows
are, for better orientation, displayed in a color which corresponds with the color of the
measured value displayed in the image. If the number of rows in the table exceeds the
visible part of the window, you can browse the table using the scrollbar on the right hand
side, the mouse wheel, or the [Page Up] and [Page Down] keys. If you select a row in the
table using the mouse, the corresponding measuring object in the image will be selected
and vice versa – if you select a measuring object in the image, corresponding row will be
highlighted in the Table of Measured Values.
You may enter a short comment for each measurement into a column named Description.
To enter your comment use a mouse to select the appropriate field, type in your text into
the Description column and confirm it by pressing the [Enter] key. Proceed in the same
way to edit an already inserted comment.
Statistics
On the right hand side next to the table of measured values are displayed statistics calculated
from the measured values. Statistics are always calculated only from measurands of the
140
Main Program Window
same type, for example only dimensions, perimeters and so on. Selected measurand, from
which statistics should be calculated (in case of more types of measurands measured in
the image), can be selected by selecting the desired row in the table.
Toolbar Buttons
Measured values displayed in the table can be exported into the Microsoft® Excel® file or
a text file using the Export Values
button. A dialog box Export Measured Values
will open, after you click this button, offering options for location, name, and type of the
file.
Table of Measured Values can be, to gain more working space, hidden by the Hide
button. To display the hidden Table of Measured Values again use the
icon in the
Toolbar, activate the View → Display Table of Measured Values option or use the [F12]
key shortcut.
If there is a greater number of measured values in the table, it might be useful to, for a better
clarity, undock the Table of Measured Values as a separate window using the Undock
button. The Table of Measured Values will be displayed in a separate window and the
Undock button will change to the Dock
table to the original position.
button. Clicking this button will return the
Buttons in the right hand part of the toolbar act as filters and they display, in the Table of
Measured Values, from all measured values only the corresponding measurands. Other
measurands contained in the table will be hidden.
All
button will display, in the Table of Measured Values, all values measured in the
image. The only exception are hardness values which are displayed only in a stand-alone
mode after clicking the Hardness
button.
141
Main Program Window
Dimensions
button will leave displayed, in the Table of Measured Values, only
values of measured dimensions.
Perimeters
button will leave displayed, in the Table of Measured Values, only values
of the measured perimeters.
Areas
button will leave displayed, in the Table of Measured Values, only values of
the measured areas.
Angles
button will leave displayed, in the Table of Measured Values, only values of
the measured angles.
Objects
counts.
button will leave displayed, in the Table of Measured Values, only the object
Phases
button will leave displayed, in the Table of Measured Values, only values of
measured phases.
Hardness
values.
button will display, in the Table of Measured Values, the measured hardness
Tab Measurement Settings - “Image Name“
Measurement Settings - “Image Name“ tab contains control elements for changes of settings
for measuring in the current image displayed in the Display Window. Control elements on
this tab are activated after the first measuring has been done in the image or after inserting
of the scale bar.
142
Main Program Window
Note
All changes of settings done on this tab apply only to the current image. Other
images opened in the program will remain without changes. If you want to change
the settings for all new images, use settings in Options of the program on the tabs
Sizes/Colors and Measurands (Edit → Options... → Measurements →
Sizes/Colors; Measurands).
In the Labels with Measured Values part you may change Font Size, set the Display
Measurement Numbers in the Image option and select the Background Color of labels with
measured values in the current image. After you click the Measurands button in the left
bottom part of this tab, Measurands dialog box will open. In this dialog box you can, using
the checkboxes, select which measurands should be measured by individual measuring
tools and their text labels.
143
Main Program Window
In the Font Size of Scale Bar Value part it is possible to select the font size of the scale bar
value, and in the Dimension and Extension Lines, and Leaders part thickness and color of
these lines.
Performed changes are interactively being displayed in the current image.
Change Image Calibration button opens a Change Image Calibration dialog box, in which
you may change the calibration and the magnification assigned to the current image.
Calibration can also be removed from the image by clicking the Remove Calibration button.
4.9. Exporting Measured Values
Exporting Values from the Table of Measured Values
Measured values with eventual descriptions can be exported into a file in the xls format
for further elaboration in the Microsoft® Excel® program or into the form of a text file for
import to other spreadsheet programs (values are separated with a tab symbol).
Important
For exporting of measured values into the xls format, it is necessary to have, on
your computer, installed the Microsoft® Excel® program.
To export measured values from the current image displayed in the Display Window, click
the Export Values
button in the bottom part of the Table of Measured Values or
activate the File → Export Measured Values from Selected Image... option. For exporting
of measured values from the image you may also use the
icon in the controls of the
thumbnail in the Thumbnail Browser.
144
Main Program Window
For exporting of the measured values from all opened images, activate the File → Export
Measured Values from All Images... option.
Export Measured Values dialog box, which replaces the standard Windows® dialog box
for saving of files, will open. This dialog box contains expanded functionality and enables
saving of more files at the same time. This dialog box is very similar to the dialog box for
saving of images and it consists of the following parts:
•
•
•
•
•
•
Files for Export
Location
File Name and Type
Additional File Name Tags
Numbering
Information
Part Files for Export
This part contains a list of all files intended for export. All files intended for export will
be indicated with a frame after you have opened the Export Measured Values dialog box.
Files can be selected/deselected in a similar way as thumbnails in the Thumbnail Browser
145
Main Program Window
in the Main Program Window - for more information see “Thumbnail Browser“ on page 76.
Settings done in the File Name and Type and Additional File Name Tags parts will always
be applied on the files selected in this list. That way you may set the name and type for
more files at the same time.
Besides the file names, according to the current situation, two indicators may be displayed.
If some of the files already exist in the folder selected in the Location part, there will be
an
indicator displayed next to the file names. If you do not rename the files or if you
do not select another type the already existing files in the folder will be overwritten. In
case there is an
indicator displayed next to some of the file names, it means that there
has been a collision in the names and types of the files from the list. In this case it will not
be possible to save these files without a change of their name or type. Legend for the
displayed indicators will be displayed in the Information part.
Part Location
In this part it is possible to select a folder into which will all the files intended for export
be saved. Control in this part is similar as for the standard Windows® dialog for saving of
files.
Part File Name and Type
In this part it is possible to choose the names and types of files intended for export. If you
have selected more than one file in the Files for Export list and you will enter a new file
146
Main Program Window
name into the File Name field, the name of all selected files will be changed at the same
time and the Numbering function, which will ensure resolution of individual files, will also
be activated. Changes will immediately be visible in the Files for Export list. If you want
to restore the original file names of selected images, click the Restore button.
Save as Type drop-down menu enables to select the type (format) of files being exported.
There are two options available: Microsoft® Excel® Document (*.xls) and Text file (*.txt).
Part Additional File Name Tags
In the Additional File Name Tags part there are two buttons. Button _Date adds the current
date to the names of files selected in the list of Files for Export. Button _Time adds the
current time to the names of files selected in the list of Files for Export. The use of both
buttons can be combined.
Part Numbering
Part Numbering contains the _Numbering button, which adds a serial number to all file
names on the Files for Export list. Files will always be numbered beginning with the
number 00001. This function is useful for example if you want to save several files with
the same name and distinguish them with a serial number. The use of the _Numbering
button can be freely combined with the use of _Date and _Time buttons.
Part Information
In the Information part the explanatory notes for indicators are displayed.
Export Measured values to Microsoft
®
®
Excel Continuously
QuickPHOTO INDUSTRIAL 3.0 program is equipped with a function for continuous
exporting of measured values to the Microsoft ® Excel® program. If this function is active
the measured values will be displayed not only in the Table of Measured Values, but they
will be also immediately inserted into the open workbook of the Microsoft® Excel® program
to the position of the cursor. The cursor will then automatically move to the next cell (Enter
will be inserted). Values will be exported without units and labels. This function can be
used for example for continuous, automatic evaluation of measurements, when the opened
workbook in the Microsoft ®Excel® contains suitable formulas.
Before you activate the continuous exporting, the Microsoft ® Excel® program must be
running and a workbook with permissions for writing must be opened in it. To make the
147
Main Program Window
opened document accessible for continuous exporting, the Microsoft ® Excel® program
must be running with the same privileges as the QuickPHOTO INDUSTRIAL 3.0 program
(for example both programs with the standard user's privileges or both with administrator's
privileges). If each of the programs will be running with different privileges, a warning
message will be displayed and this function will not be activated.
This function can be activated by the Measurements → Export Measured values to
Microsoft®Excel®Continuously option or by clicking the
icon in the Toolbar. When
the function is successfully activated the
icon in the Toolbar will be color coded and
pressed and in the Measurements menu the Export Measured values to
Microsoft®Excel®Continuously option will be checked. If more workbooks are opened in
the Microsoft ® Excel® program or multiple instances of the Microsoft ® Excel® program
are running, a dialog box with a list of available workbooks will be displayed during
activation of this function. Continuous exporting function will be activated after selection
of one of the workbooks from the list.
To deactivate this function use the Measurements → Export Measured values to
Microsoft®Excel® option or click the
icon in the Toolbar again.
5. Reports
Program QuickPHOTO INDUSTRIAL 3.0 enables export of images with measured values
to reports in the Microsoft® Word format. Created reports are in the form of a standard
Microsoft® Word document and you may edit them in Microsoft® Word program as you
please.
Important
To use the function for creating reports, it is necessary to have the Microsoft®
Word program installed on your computer in the XP or higher version.
QuickPHOTO INDUSTRIAL 3.0 program uses the predefined templates for creating of
reports. These templates are files in the Microsoft® Word format and they contain
information about the header, structure, the number of images, and tables of measured
values of the resultant report. They may also contain texts or images (for example a logo)
which will be contained in the resultant report. In the QuickPHOTO INDUSTRIAL 3.0
program, numerous different templates can be created and those can be used for creating
148
Main Program Window
of reports according to your current need. Creating a report template is a one-act action.
Once you have created the template, it will be saved in the program and you will be able
to use it for creating of reports at any time.
5.1. Creating New Report Template
Necessary preparatory step for using of the function for creating reports is creating of the
report template. To create a new report template use the Template Manager (Reports →
Template Manager...) function. New template is created in the QuickPHOTO INDUSTRIAL
3.0 program based on the previously created Microsoft® Word document, the so called
“pattern document“. Creating of a template consists of two steps:
1. Creating of a pattern document in the Microsoft® Word.
2. Creating of a report template in the QuickPHOTO INDUSTRIAL 3.0 program based
on the pattern document.
®
1. Creating of a Pattern Document in the Microsoft Word
First step in creating of a new template is creating of a pattern document, in the Document
Word 97-2003 (.doc) format, which will define the layout and structure of the report
template. This document may contain a header with texts and logos, images, tables and
texts.
Create a new pattern document in the Microsoft® Word program which will correspond
with your layout and structure requirements for the resultant report according to the
following rules.
Pattern document should contain:
• at least one image in whose place, in the report, will be placed an image from the
QuickPHOTO INDUSTRIAL 3.0 program,
• at least one table in whose place, in the report, will be exported a table of the measured
values.
Images inserted to the pattern document may have two different purposes. They may be:
• images which are supposed to be, in an unchanged form, a part of the resultant report,
for example a company logo,
149
Main Program Window
• substitute images which will, in the template, represent the so called “marks“ which
means they will define the location and size of the images which will be exported to
the report from the QuickPHOTO INDUSTRIAL 3.0 program. Any images may be
used as substitute images. Important is only their size and location. Their graphic content
is not relevant because these images will not be a part of the resultant report, they only
serve as “marks“ for placement of images from the QuickPHOTO INDUSTRIAL 3.0
program.
Tables inserted to the sample document may have two different purposes. These may be:
• tables which shall be preserved in the resultant report, for example tables defining the
format and layout of the document,
• substitute tables which will, in the template, represent the so called “marks“ which
means they will define the location of tables with measured values which will be
exported to the report from the QuickPHOTO INDUSTRIAL 3.0 program. Table format
(number of columns, rows, formatting) can be of one's own choice because the resulting
format of the exported tables will be adjusted to the measured values from the
QuickPHOTO INDUSTRIAL 3.0 program.
Note
To achieve proper functionality of report creation, it is necessary, to the tables
and images in the pattern document, set the text wrapping style to “square“ or
“in line with text“.
Pattern document may also contain any amount of texts. These texts will be, in an unchanged
form, preserved in the resultant report.
Save the pattern document as Document Word 97-2003 (.doc) type and close the
Microsoft® Word program.
Important
QuickPHOTO INDUSTRIAL 3.0 program is not compatible with documents in
the Document Word (.docx) format. Pattern document for the template must be
saved as the Document Word 97-2003 (*.doc) type.
150
Main Program Window
Decision about the purpose of individual images and tables contained in the pattern
document, will be done by the user in the second step - Creating a New Template in the
QuickPHOTO INDUSTRIAL 3.0 program.
QuickPHOTO INDUSTRIAL 3.0 program contains several beforehand predefined pattern
documents. They can be found in the ...\QuickPHOTO INDUSTRIAL 3.0\Reports folder.
Individual sample pattern documents are prepared for 1-4 exported images including tables
of measured values.
Above described instructions are clearly marked on the following picture of a sample
pattern document example_1_image.doc:
151
Main Program Window
2. Creating a New Template
If you have created and saved the pattern document in the (.doc) format, activate the Report
Template Manager (Reports → Template Manager...) function. Report Template Manager
dialog box will open.
Important
While creating a template, Microsoft® Word program must not be running.
Click the Create New Template button. The New Report Template Wizard will open.
Continue in the following way:
1. First page of the wizard informs in sum about the steps which will take place. Click
the Next button.
2. On the next page of the wizard named Pattern Document Selection and Typing of
a New Template Name click the Browse... button and in the opened dialog box select
the saved pattern document. Type in the template name into the Type in a new report
template name field. Under this name the template will be available in the Template
Manager. Continue by clicking the Next button.
152
Main Program Window
3. After clicking the Next button a pattern document will be loaded by the QuickPHOTO
INDUSTRIAL 3.0 program. On Processing Image # of # page all images found in
the pattern document will be gradually displayed. The wizard will give you a chance
to decide, with each image, what shall be the purpose of the currently displayed image
in the template. If the image is supposed to be a fixed part of the report (for example
a logo), check the first option No, this image is a fixed part of the report (e. g. logo)
and should be retained. If the displayed image serves as a “mark“ for inserting of
images from the QuickPHOTO INDUSTRIAL 3.0 program, check the option Yes,
this image is a mark, where the image, from the program, should be inserted when
creating a new report. If you check the second option, it is possible to change the
image size in the template. To preserve the original layout of the pattern document,
it is recommended to keep the original image sizes. Continue by clicking the Next
button.
153
Main Program Window
4. In the next step all tables found in the pattern document will gradually be evaluated,
on the Processing Table # from # page, in a similar way. The wizard will give you a
chance to decide, with every found table, what shall be the purpose of each currently
displayed table in the template. If the table is supposed to be a fixed part of the report,
check the first option No, this table is a part of the report and should be retained. If
the displayed table serves as a “mark“ for determination of the place for inserting of
the table of measured values from the QuickPHOTO INDUSTRIAL 3.0 program,
check the option Yes, link this table with measured values from image number: and
from the drop-down menu select an image number with which the table should be
linked. In the bottom part of this page, it is possible to select the measurands and
columns which the table should contain. In the default state, all measurands and
columns are checked. If you do not want to have some of the measurands or columns
in the table, uncheck them. In the right bottom part a preview of the final table is
displayed.
If you want the report to contain the measured values of the Brinell or Vickers hardness
tests, check the Hardness option. But in this case, other measurands cannot be displayed
in the table.
154
Main Program Window
Continue by clicking the Next button.
5. After elaboration of the tables is finished, a page of the wizard containing a summary
will be displayed. After clicking the Finish button, template will be created and saved
into the ...\QuickPHOTO INDUSTRIAL 3.0\Templates folder.
Note
All report templates are saved in the ...\QuickPHOTO INDUSTRIAL 3.0\Templates
folder. Possible backup/restoration of templates can be done by simple copying
of these files from/to this folder.
5.2. Creating a New Report
Important
Microsoft® Word must not be running while creating a report.
155
Main Program Window
To create new reports proceed as follows:
1. Select images in the Thumbnail Browser which you want to insert into a new report.
2. Activate the Reports → Create Report... function.
3. Create Report dialog box will open containing a list of available report templates.
Select a template which you want to use for creating of a new report and click the
Create Report button.
4. Save New Report As dialog box will open. Select the desired location, enter the name
of a new report, and click the Save button.
5. Select Output Image Quality dialog box will open. In this dialog box select the desired
quality which will be used for insertion of images into the report. Quality of the
inserted images will affect the final size of the report file. Following image quality
options are available:
• Low Quality (Small File Size - for E-mail) - images will be inserted to the report in
a low quality. The result will be a small report file suitable for sending via e-mail.
• Medium Quality (Medium File Size - for Standard Printing) - images will be inserted
to the report in a medium quality. The result will be a medium size report file suitable
for standard print.
• High Quality (Large File Size - for High Quality Printing) - images will be inserted
to the report in a high quality. The result will be a large report file suitable for high
quality print.
Warning
If you insert several images into the report in high quality, the resulting file can
be up to several tens of megabytes large.
156
Main Program Window
Continue by clicking the Continue button.
6. Creating of a new report will begin. You will be informed about the process by the
progress bar displayed in the status bar of the program. You may not work with the
QuickPHOTO INDUSTRIAL 3.0 program while creating a report. Duration time of
creation of the report depends on the number and size of the images being inserted
and on the performance of the used computer. After a report has been created an option
to open it in the Microsoft® Word program will appear. You will be able to continue
with standard work with the document in the Microsoft® Word program.
Note
If you select more images in the Thumbnail Browser than the selected template
can contain, a reduced number of images will be inserted to the report.
Created report based on the sample pattern document example_1_image.doc may look, for
example, like this one:
157
Main Program Window
5.3. Report Template Manager
Report Template Manager (Reports → Template Manager...) dialog box is designed for
managing of all of the already existing templates. Selected template can be renamed or
deleted.
158
Main Program Window
6. Other Functions
6.1. Image Information
Information about the current image can be displayed by activating the Image → Image
Information... option, by clicking the
Information
Browser.
icon in the Toolbar or by clicking the Image
button in the controls of the corresponding thumbnail in the Thumbnail
Image Information: “Image Name“ dialog box, which can have up to three tabs - Image,
Metadata and Calibration will open.
Image Tab
This tab gives the following information:
•
•
•
•
Path - displays information about the image's location.
Name - corresponds with the image's name.
Size - shows the size of the saved image file.
Width and Height - show the image size in pixels.
159
Main Program Window
• Actual Width and Actual Height - show the real size of the image in length units, if the
image has an assigned calibration.
• You may enter a text comment for the image to the Description field. If the description
field is filled in for the image, an indicator
- Image contains description will be
displayed next to the image thumbnail in the Thumbnail Browser. If the image is saved
with the layers kept, description will be saved as a part of the image file.
Metadata Tab
Some imaging devices save into JPEG type images additional information about image
acquisition, the so called metadata (for example sensor's sensitivity, aperture number,
exposure time, focal length, information about the use of flash and so on). This tab will
display metadata of the image if they are available.
Calibration Tab
This tab will only be displayed if the image has an assigned calibration. On this tab,
information about the assigned calibration and the microscope magnification which was
used for acquiring of the image, are displayed.
Change Image Calibration button opens a Change Image Calibration - “Image Name“
dialog box, in which you can change calibration and magnification assigned to the image.
Calibration may also be removed from the image by clicking the Remove Calibration
button.
160
Main Program Window
6.2. Compose New Image from Layout of Displayed
Images
QuickPHOTO INDUSTRIAL 3.0 program is equipped with a function which enables us
to compose, two to four images displayed next to each other in the Display Window into
one new image. Composed image will contain those parts of the images which are currently
visible in the Display Window. To compose a new image proceed as follows:
1. Switch the Display Window to a mode for displaying of two or four images next to
each other.
2. Display the desired images intended for composing in the individual fields of the
Display Window and set the desired display size.
3. Activate the Edit → Compose New Image from Layout of Displayed Images... [Ctrl+L]
option.
Note
Edit → Compose New Image from Layout of Displayed Images... option is
available only when the Display Window is switched to the mode for displaying
of two or four images next to each other.
Compose New Image from Layout of Displayed Images dialog box will open.
161
Main Program Window
This dialog box consists of the following parts:
• Composed Image part contains two options. In the Image Size drop-down menu there
are the available sizes of the composed image. By the Background Color option you
can choose the background color of the space between the images and the color of the
borders around them.
• In the Space among Images part you can choose whether the individual composed
images should be offset from each other and you can define the size of the space between
them. The space will have the color selected in the Background Color part.
• In the Borders of Particular Images part you can select the width of the black frame
around individual images.
• In the Margins of Composed Image part you can select the size of borders which will
be added around the inserted images. The borders will have the color selected in the
Background Color part.
162
Main Program Window
After setting of all desired parameters of the new image, click the OK button for creation
of the new image.
Composed image will be inserted as a new image. In the composed image most of the
functions for measuring will not be available.
Image composed from two images displayed next to each other can look, for example, like
this one:
6.3. Slideshow
Option View → Start Slideshow runs a full-screen presentation of the opened images. If
only one thumbnail is selected in the Thumbnail Browser all opened images will gradually
be displayed. If you select more images in the Thumbnail Browser, the presentation will
contain only these selected images. Display of images in the presentation will be gradual
in a regular time interval.
During the presentation, you may browse through individual images using the keys [Page
Up] – previous image and [Page Down] – next image. While you browse through images,
gradual projection of images will be suspended. To continue the presentation press the
[Space] key.
Parameters of the presentation can be adjusted in the Options of the program (Edit →
Options... → General → Miscellaneous). For the presentation you can set the delay between
images and the way of its termination.
163
Main Program Window
6.4. Display in Full Screen Mode
Option View → Display in Full Screen Mode displays the content of the Display Window
full screen. You may return back to the original way of display by pressing any key, by
a mouse double-click or a right mouse button click.
7. Options
Edit → Options... [F11] option opens an Options dialog box with three main sections:
General, Measurements and Hardware and it contains all options for settings of the program.
For application of the made settings, click the OK button. After clicking the Cancel button,
made settings will not be applied.
The whole setting of the QuickPHOTO INDUSTRIAL 3.0 program can be backed up into
a file of the xml format by the Backup Settings button in the bottom part of the Options
window. If you need to restore the program settings, you can do so by loading of the backup
file, after clicking the Load Settings button.
Configuration Wizard... button opens the Configuration Wizard - for more information
see “Configuration Wizard“ on page 25.
Individual sections of the Options window will be described in the following chapters.
7.1. Section General
This section contains the following tabs:
Tab Default Folders
This tab enables to set the folders which, will be offered as default when saving images,
exporting measured values, and saving reports. This way you will not have to browse the
whole directory structure of the computer to select the desired folder, where you want to
save the files.
Default folders can be changed anytime. Standard dialog box for folder selection will open
after clicking the Change button. Change of the folder can also be done by typing in of
164
Main Program Window
the desired path into the corresponding field. If the selected folder does not exist, it will
be created.
Tab Image Names & Saving
This tab contains the following parts:
Names of New Images part contains preferences for naming of new images.
Default name of all new images acquired by the imaging device can be determined by
typing in of a text string into the Acquired Images field. Serial number will automatically
be attached to the selected string for each new image. Current date can also be attached
next to the serial number when acquiring an image – using the _Date button, or possibly
current time – using the _Time button. Preview of the set name is displayed in the Example
field. Default button renews the default settings of the name.
Images from Time-Lapse Capturing part contains identical elements for setting of names
of the time-lapse images, such as the Acquired Images part. Settings will take effect for
images acquired by the Timer module directly into the program.
165
Main Program Window
In the Store Images after Acquisition in: part it is possible to select one of three options,
where the acquired images are supposed to be stored.
• Program Only - new images will, after acquiring, be displayed in the Main Program
Window. Saving of images will be fully in the hands of the user.
• Program and Folder (Automatic Saving) - if you activate this option, acquired images
will be displayed in the Main Program Window and at the same time they will
automatically be saved into the folder selected in the Folder for Automatic Image Saving
part. For this function a folder selected as the default folder for image saving is set in
the default state. Active mode for automatic image saving will be indicated by the
icon in the status bar in the right bottom corner of the program. If you move the mouse
over this icon, information about the folder, where the images are being saved, will be
displayed.
• Folder Only (Automatic Saving) - if you activate this options, newly acquired images
will be automatically saved to a folder selected in the Folder for Automatic Image
Saving part and they will not show in the Main Program Window at all. For this function
166
Main Program Window
a folder selected as the default folder for image saving is set in the default state. Active
mode for automatic image saving will be indicated by the
icon in the status bar in
the right bottom corner of the program. If you move the mouse over this icon,
information about the folder, where images are being saved, will be displayed.
In the Type of New Images part it is possible to select the type (format) which shall have
the newly acquired images. Original Type option preserves the image type which is provided
by the active imaging device. If you select one of the JPEG, BMP, TIFF or PNG types
from the list, all newly acquired images will be converted to the selected type. This option
is valid even for automatic image saving.
If automatic image saving is set, you may set or change the folder, into which the acquired
images will be saved, in the Folder for Automatic Image Saving part.
If the option Program Only is active in the Store Images after Acquisition in: part, it is
possible to, in the Numbering of Acquired Images part, select the Always Begin Numbering
from 00001 after Program Start-up mode. When this mode is active, numbering of acquired
images will begin with 00001 after each start of the QuickPHOTO INDUSTRIAL 3.0
program. If you select the Build on Previous Numbering: option, numbering of acquired
images will start from the last used number. QuickPHOTO INDUSTRIAL 3.0 program
will remember the last number of the acquired image when being terminated and when
you run the program again, numbering of the acquired images will continue.
When automatic image saving is set, only the Build on Previous Numbering: option will
be available. At the same time the How to Solve Name Conflicts (Automatic Saving) part
will be made available. This option defines the program behavior in cases when a conflict
appears, during automatic image saving, in the names of the newly saved and previously
saved images. There are two options available: Increase the Image Number Automatically
- newly saved image will be labeled with a one step higher number than the number of the
image with the highest number in the folder. Further on the program will, for newly acquired
images, pick up where this numbering has ended. Overwrite Existing Images option will
cause automatic overwriting of already saved images by the newly acquired ones without
displaying any warning!
For automatic saving of new images is also available a Flattering Layers during Automatic
Image Saving part. If you activate the Keep Layers option, acquired images being saved
as JPEG or TIFF type with be saved with layers kept. This option is suitable for example
for applications when a microscope is equipped with a magnification encoder and, on the
167
Main Program Window
Measurements → Scale Bar tab, the Automatic Scale Bar Insertion function is active. If
the Automatically Flatten Layers options is active, images of all types will be saved with
the flattened layers.
For images of the PNG and BMP type will the layers always be automatically flattened
during automatic image saving.
In the Default JPEG Quality part it is possible to preset the default quality for saving of
images of the JPEG type. This setting will be used for the automatic saving of JPEG type
images and it will also be used as the default setting for manual image saving.
Tab Sound
This tab offers the option of setting the sound played during acquiring of images. If the
Play a Sound when Image Has Been Acquired (*.wav file) option is checked a sound file
of the wav type will be played when acquiring an image. To choose the sound file click
the Change button and select the desired file. After clicking the
will be played.
168
button the selected file
Main Program Window
Tab Language
This tab offers the option to choose a language of the QuickPHOTO INDUSTRIAL 3.0
program. To change the language select the desired language from the list and click the
Change Language button. This operation may take a while.
Tab Do Not Show This Window...
Some dialog boxes in the QuickPHOTO INDUSTRIAL 3.0 program contain the Do Not
Show This Window... option. If you check this option in some of the dialog boxes, this
dialog will not be displayed during the next activation of the corresponding function and
the default action will be automatically done. The corresponding option on this tab will be
unchecked. This setting will be remembered for the next run of the QuickPHOTO
INDUSTRIAL 3.0 program. If you want to restore displaying of some of the dialog boxes,
check its corresponding option on this tab.
169
Main Program Window
Tab Annotations
On this tab you may set the mode of inserting annotations and drawings. If the Continuous
Inserting Mode option is active, the selected tool for annotating or drawings will be active
until its manual deactivation. If you activate the Single Insertion Mode option, selected
tool will be, after inserting of one object, automatically deactivated.
170
Main Program Window
Tab Appearance and Layout
On this tab you may select the program's color theme, size of the thumbnails in the
Thumbnail Browser, and the appearance and layout of the Toolbar. In the Color Theme
part select one of the options and click the Change Theme button. In the Thumbnail Browser
part it is possible to select the Thumbnails Size by selection from the drop-down menu.
171
Main Program Window
In the Toolbar part there are two options available:
If you check the Display Toolbar Buttons with Captions option, all icons in the toolbar
will change into buttons containing also their names. If all buttons do not fit on the monitor,
arrows , which will offer the remaining buttons in the drop-down menus, will also be
displayed in the Toolbar. Example of the displayed buttons is on the following picture:
If you want to change the arrangement of the Toolbar, uncheck the Lock Toolbar and
Menus option. Toolbar (as well as Menu bar) will switch to the mode, when it is possible
to hide or change the location individual items. This way it is possible to set your own user
defined interface of the program. When you finish arrangements in the Toolbar or menus,
lock them again by checking the Lock Toolbar and Menus option.
172
Main Program Window
Tab Miscellaneous
In the Slideshow part it is possible to set Delay Between Images in seconds. Default delay
is set at three seconds. If the Terminate Slideshow after the Last Image Display option is
not checked, the last image of the presentation will remain displayed on the monitor.
Maximum image size, which can be opened in the QuickPHOTO INDUSTRIAL 3.0
program or which can be acquired, is set in the Maximal Image Size part.
Default setting is 32 megapixels. If you want to work with larger images, change the settings
of this parameter.
Important
Opening of images larger than 32 megapixels can, in older operating systems
(such as Windows® XP), cause unexpected behavior of the QuickPHOTO
INDUSTRIAL 3.0 program.
173
Main Program Window
7.2. Section Measurements
Tab Units
On this tab you may choose units which will be used for measuring – micrometers or
millimeters. For the chosen units you may also choose the number of decimal places for
displaying of the measured values.
Important
The use of measuring accuracy in tenths of micrometers will only be relevant
when the used microscope-imaging device set provides such accuracy.
Way of expressing of the measured angle values can be set in the Display Measured Angle
Values part. Values can be displayed in Decimal form or In Degrees and Minutes.
Note
Measured angle values will always be exported into Microsoft® Excel®program
in decimal form irrespective of the settings of this option.
174
Main Program Window
Tab Scale Bar
This tab contains options for setting of the calibrated scale bar.
In the Scale Bar Type you may set the type of the scale bar: Ruler, Line Segment, Staple
and Stripe.
In the Scale Bar Size you may select one of the two automatic sizes (Small, Large) or you
may select the Custom option and type in your own desired length of the scale bar into the
Custom Size field.
Color of the scale bar and its value can be chosen in the Scale Bar Options part by the
Color of Scale Bar and its Value option.
Options Background Area and Background Color can change the area and color of the
scale bar's background.
In the Preview part you can immediately see what will the scale bar look like when using
the current settings.
175
Main Program Window
User defined settings of the scale bar can be saved into one of the four profiles. To save
the user defined settings to a profile proceed as follows:
1. Make all the desired scale bar settings.
2. Click the Save button in the Profiles part. Save Profile dialog box will open.
3. Select one of the four profiles, you want to save the settings to, from the Save Settings
to Profile drop-down menu.
4. Enter the new profile name into the New Profile Name field.
5. Save the settings by clicking the OK button.
If you check the Insert Scale Bar into Image Automatically after Magnification Assignment
option in the Automatic Scale Bar Insertion part, a scale bar will be inserted into images
automatically after magnification, which was used for image acquisition, has been assigned.
You can select whether to insert the Horizontal Scale Bar or the Vertical Scale Bar.
Note
Font size of the scale bar's values is set on the Measurements → Sizes/Colors tab.
176
Main Program Window
Tab Sizes/Colors
On this tab you may set the default properties for all newly acquired images.
In the Font Size of Scale Bar Value part you may set the font size of the scale bar's value
by selecting it from the Font Size drop-down menu.
In the Dimension and Extension Lines, and Leaders part it is possible to set the color and
thickness of these lines.
In the Font Color of Measured Values part you may set two modes for the font color of
the measured values: Cycle Colors in the Following Order option will cause that individual
measurements performed in the image will cyclically have font colors assigned in the
displayed order. There are 10 colors set on the list which can be changed by the user. To
change some of the colors, make its selection, click the Change button and select a new
color from the opened color palette. If you activate the Use Custom Color for All
Measurements option, all measurements will have the same font color which can be selected
after clicking the Change button.
Background of Labels with Measured Values part provides following options: Transparent
or Custom Color.
In the Font Size of Measured Values Displayed in Images part it is possible to select the
font size which will have the measured values displayed in the image.
177
Main Program Window
Tab Grid
On this tab it is possible to select the default parameters of the grid. It is possible to set the
default Spacing and Default Grid Line Parameters: Line Color and Line Thickness.
178
Main Program Window
Tab Measurands
This tab serves for selection of measurands, which will be measured by individual measuring
tools, and for text labeling of individual measurands. Measurands to be measured should
be checked. To change the label rewrite the appropriate field in the Label row.
Display Measurement Numbers in the Image option determines whether each measured
value in the image will have the appropriate serial measuring number displayed by it.
179
Main Program Window
Tab Hardness
On this tab it is possible to set the default values for the Brinell hardness test and for the
Vickers microhardness test.
180
Main Program Window
Tab Other Settings
Mode of Assigning Magnifications to Images part offers two options:
• Manual Magnification Assignment to Each Image - if this option is active (default
option), it is necessary to manually set magnification from the Objective or eventually
Zoom menu to each image intended for measurements.
• Automatically Assign the Last used Magnification to a New Image - if you activate this
option, to each new image will be automatically assigned the last magnification assigned
to some image.
In the Settings for the Function - Merge Objects with an Image (Flatten Layers) part it is
possible to set the size of the “virtual“ window which will be used for flattening of layers.
Setting of the Window Size value has affect on the font size of the measured values and
scale bar size in the flattened image. Larger window size will cause smaller font and scale
bar size, and vice versa. Default option is 1024 x 768 pixels.
Measurement Mode part offers two options:
181
Main Program Window
• Continuous Measurement Mode - if this option is active (default option), the selected
measuring tool will remain active for the current image until manually deactivated.
That way you can proceed with repeated measurements in the image without the
necessity to manually activate the same measuring tools for each measurement.
• Single Measurement Mode - if you activate this option, the measuring tool will be, after
one performed measurement, automatically deactivated.
7.3. Section Hardware
Tab Imaging Devices
Properties of the Imaging Device's Control Panels part contains the following options
(these options do not apply to imaging devices controlled via the TWAIN interface):
• Minimize Imaging Device Control Panel after Image Acquisition - if this option is
checked, control panel of the imaging device will be minimized after acquiring of a new
image.
182
Main Program Window
• Display Imaging Device Control Panel on the Second Monitor (for Dual-Monitor
Workstations) - if you check this option, control panel of the imaging device will be
displayed on the second monitor.
• Display Imaging Device Control Panel after Program Start-up - if this option is checked,
control panel of the imaging device will be automatically activated after launching of
the QuickPHOTO INDUSTRIAL 3.0 program.
If you check the Close Twain Control Panel after Image Acquisition option in the Properties
of TWAIN Imaging Devices Control Panels part, control panel of the imaging device
controlled via TWAIN interface will be automatically terminated after acquisition of an
image. If you leave this option unchecked, TWAIN control panel will be active until
terminated manually.
®
Tab Olympus SLR/Consumer Cameras
This tab is available only in case the support of OLYMPUS® CAMEDIA® and SP series
or OLYMPUS® E-system SLR cameras has been installed and it is intended to set the
device for display of life view from these cameras. If you are using a device delivered with
183
Main Program Window
the QuickPHOTO INDUSTRIAL 3.0 program, it will be configured automatically after
you see this tab. When using a different device, select this device from the Device
drop-down menu and select the norm of the video signal from the Video Standard menu.
In the Input menu the option Composite should be selected. Checking of the Keep Images
on the Memory Card option will cause that the acquired image will remain, after transfer
to a computer, saved on the memory card (this function is available only for CAMEDIA®
and SP series cameras). If you leave this option unchecked (recommended), the acquired
image will be, after transfer to a computer, from the camera's memory card automatically
deleted.
The Restore button in the Restore Default Device Settings part will restore the default
settings of the device. The Open button in the Advanced Settings opens the advanced
settings of the device for manual setup.
Tab Analog Video Source
This tab will be available only if the support of analog video sources has been installed
and it is intended to set the digitalization device for acquiring images from these sources.
If you are using a digitalization device delivered with the QuickPHOTO INDUSTRIAL
184
Main Program Window
3.0 program, it will be configured automatically after you see this tab. When using
a different digitalization device, select the device from the Device drop-down menu and
select the norm of the video signal from the Video Standard menu. In the Input part select
the desired type of the used connector.
The Restore button in the Restore Default Device Settings part will restore the default
settings of the device. The Open button in the Advanced Settings opens the advanced
settings of the device for manual setup.
Tab Remote Trigger
This page is used for setting and verification of the remote trigger's functionality. Remote
trigger is an optional accessory which can be connected via serial or USB port. If you want
to use the remote trigger, check the Use Remote Trigger option and select the COM port
to which it is connected (in case of the USB trigger we are talking about the USB Serial
Port (COM#)). In the Remote Trigger Type part select the type of the used remote trigger.
Trigger with two buttons (for example the two-button foot switch) is designed for image
acquiring and for capturing of video recordings using the optional module for video
recording. Functionality of the remote trigger can be verified by pressing its button(s). If
185
Main Program Window
the small square(s) change color to green after you press the button(s) and they turn back
to black after you release the button(s), the remote trigger is set correctly and it is ready
to be used.
Tab Magnification Encoders
This tab is intended for setting of the magnification encoders.
To set the magnification encoder for upright and inverted microscopes check, in the
Upright/Inverted Microscopes part the Use Objective Encoder option and from the Control
Unit drop-down menu select the desired control unit of the magnification encoder. Correct
functionality of the magnification encoder can be verified by clicking the Test Device
button.
To set the magnification encoder for stereomicroscopes check, in the Stereomicroscopes
part the Use Zoom/Objective Encoder option and from the Control Unit drop-down menu
select the control unit of the magnification encoder. If the magnification encoder for
objectives is also connected, select it from the Objective Encoder Device drop-down menu.
186
Main Program Window
Correct functionality of the magnification encoder can be verified by clicking the Test
Device button.
Note
Only those control units, whose support was chosen during program installation,
will be displayed in the list. If your control unit is not available in the list, exit
the QuickPHOTO INDUSTRIAL 3.0 program and run the program installation,
from the installation CD, again. On page Installation Type Selection select the
Update Existing Installation - Add Components option and on page Select
Additional Components - Magnification Encoders choose, from the list, a control
unit whose support you want to add.
Tab Illuminators
This tab is intended for setting of computer controlled illuminators. In the Illuminator
Settings part check the Use PC Controlled Illuminator option and from the Control Unit
187
Main Program Window
drop-down menu select the control unit of the used illuminator. Correct functionality of
the illuminator can be verified by clicking the Test Device button.
Note
Only those control units, whose support was chosen during program installation,
will be displayed in the list. If your control unit is not available in the list, exit
the QuickPHOTO INDUSTRIAL 3.0 program and run the program installation,
from the installation CD, again. On page Installation Type Selection select the
Update Existing Installation - Add Components option and on page Select
Additional Components - PC Controlled Illuminators choose, from the list,
a control unit whose support you want to add.
188
Control Panels of Imaging Devices
QuickPHOTO INDUSTRIAL 3.0 program is able to capture images from several types
of imaging devices. These devices can be controlled via dedicated control panels.
®
1. Lumenera INFINITY Digital Cameras
Control panel of Lumenera® INFINITY digital cameras enables to work with several types
of digital cameras from the Lumenera Corp. Type of the connected camera is determined
automatically at the startup of the control panel. If more than one Lumenera® INFINITY
camera is connected to the computer, a dialog box will be displayed, at the startup of the
control panel, for selection of a camera which is supposed to be connected.
Control panel of the Lumenera® INFINITY cameras is designed for control of camera
functions, displaying of the live view and image acquisition. It consists of a toolbar, tabs
with control elements and the live view.
189
Control Panels of Imaging Devices
Note
A performance test will take place automatically during the first run of the control
panel. Several test images will be acquired, during the test, which can be deleted
right after the test.
Toolbar
Toolbar, which is placed above the live view, contains the following buttons:
Capture [Ctrl+Enter]: after clicking this button, an image will be acquired
and automatically transferred to the computer. If the camera is not connected,
the button will change to Connect camera
button.
Full Screen [Ctrl+F]: this button is used for displaying of live view full
screen. Using this type of display you can control the program using the
Capture [Ctrl+Enter]
button, which is placed in the left upper corner
of the screen and the Exit Full Screen Mode
button, placed in the right
upper part of the screen.
Automatic White Balance: this button activates the function for automatic
white balance. It is best to do this balancing when the camera is capturing
a white area.
White Balance on a Defined Region: clicking on this button and successive
dragging of the mouse in the live view, while holding the left mouse button,
will define a region which will be used as reference for the white balance.
Black Balance on a Defined Region: clicking on this button and successive
dragging of the mouse in the live view, while holding the left mouse button,
will define a region which will be used as reference for the black balance.
190
Control Panels of Imaging Devices
Display/Hide Table of Measured Values: if you click this button,
the Table of Measured Values will be displayed in the bottom part
of the control panel. If you click the button again, the table will be
hidden again.
Image Tab
This tab contains control elements for setting of main camera's parameters. Settings will
apply to the live view as well as to the acquired images.
Image Size: from this menu you may select the size in which
the images will be acquired.
191
Control Panels of Imaging Devices
Exposure Mode: if the exposure mode is set to the Auto option, exposure
time is automatically set according to the illumination of the camera's
field of view. SFL - Auto option represents automatic exposure mode for
fluorescence imaging. When using the Auto and SFL - Auto modes, the
button (Auto Exposure Lock) will also be active. This button “locks“
the exposure time on the current value. If the Manual option is active,
value of the exposure time is set by user, using the control elements in
the Exposure Time part.
Exp. Correct: this function enables you to lighten or darken the images
when using the Auto and SFL-Auto modes.
Exposure Time: if a manual exposure mode is active, you
may, using the arrow buttons or by dragging of the slider,
manually set the desired value of the exposure time. To
change the exposure time you may also use the [+] and [-]
keys on the numerical keyboard or the [Page Up] and
[Page Down] keys. Value of the exposure time can also be set directly in minutes, seconds,
milliseconds and microseconds using the corresponding editable fields under the slider.
This way is especially useful for setting of long exposure times. When longer exposure
times are manually set by the editable fields, the live view may not correspond to the
acquired images. In such cases the value of the exposure time displayed above the slider
will change its color to blue.
Exposure Region: this control element is designed for defining
of an area of the live view which will be used for measuring
of exposition in the Auto and SFL-Auto modes. You may
select one of the predefined exposure region sizes (100% the whole area of the live view, 30% and 1%) or you may
select your own size of the region. If you select the 30% or 1% option, a frame will be
displayed in the middle of the live view, which will define the exposure region. The frame
can be moved to the desired area in the image: move the mouse into the region and by
dragging the mouse while holding the left mouse button relocate the frame to the desired
192
Control Panels of Imaging Devices
position. If you place the cursor above the frame's edge or above one of its corners, the
cursor will change shape, and by dragging the mouse while holding the left mouse button,
you may change the size of the frame as you please. By clicking the Center button, you
may place the frame to the center of the camera's field of view. Using the Display/Hide
button, it is possible to hide or display the frame. If the frame is hidden, the selected region
is still being used for measuring of exposition. The frame is only not visible, in order not
to disturb in the live view. To define your own exposure region, click the Custom button,
move the cursor to the live view and then by dragging the mouse while holding the left
mouse button, insert the frame of a desired size.
Note
If the frame of the exposure region will change its color to red, it means that the
camera's automatics have reached the limit value of the exposure time. The range
of exposure times is in the automatic mode smaller than in the manual mode.
White Balance: using this function you may adjust the white balance.
Clicking the Auto WB button will activate the automatic white balance
function. This function uses the whole image area for white balancing. It
is best to perform the white balance when the camera is capturing a white
area. If you click the Region WB button, and then drag the mouse in the
live view while holding the left mouse button, you may define a region,
which will be used as reference for the white balance. The Default WB button is designed
for renewal of the default white balance. Manual setting of the white balance can be done
using the White Balance sliders on the Colors tab.
Focus Region: this function makes it easier to focus the selected area of
the image. To use this function proceed as follows:
1. Using the focus knob, roughly focus the microscope. Click the Custom button in the
Focus Region part. Move the cursor into the live view and insert the frame in the live
view, by dragging the mouse, while holding the left mouse button, to a place, where
you want to do the focusing.
193
Control Panels of Imaging Devices
2. Focus indicator will be displayed next to the frame. Blue strip represents the current
focus value and the red guideline maximum reached focus value. Both values are at
the same level at the beginning. Both values are also displayed in a numerical form
in the title of the frame in the current value/maximal reached value form.
3. If you start rotating the microscope focus knob now, the blue strip will start to decline
respectively rise according to the fact, whether the focus level in the framed area will
decrease or rise. Select such a direction so the strip starts to rise. Continue rotating
the focus knob until the blue strip starts to decline. Red guideline will remain on the
position of the maximum reached focus value. Gently rotate the focus knob in the
opposite direction, now achieve that the blue strip reaches as closely as possible to
the red guideline – in this position, image of the selected area will be as sharp as
possible. You can use numerical values, in a similar way, for focusing.
Note
Focus level is measured relatively. That means the indicator shows, whether the
focus value is rising or declining towards the default value which is calculated
after the frame is positioned. If the focus value exceeds the indicator's range, it
is initialized again to about three quarters of the range. That does not mean that
the focus value would decline rapidly. If you continue rotating the knob in the
same direction and the strip rises again, it means that the focus level continues to
rise.
Reset button initializes the focus indicator again into the default state. That means the
maximum reached value of focus level is set along with the current value approximately
to three quarters of the range.
Using the Display/Hide button you can hide or display the frame of the focus region.
Note
If you relocate or change the size of the focus region, automatic reset of the focus
indicator will take place (see, Reset button).
Black Balance: using this function you may adjust the black
balance. By clicking the Region BB button and successive
dragging of the mouse in the live view, while holding the left
194
Control Panels of Imaging Devices
mouse button, you may define an area which will be used as reference for black balance.
Default BB button is used for restoration of the default black balance. This function is
designed primarily for fluorescence imaging.
Measurements Tab
Control panel of Lumenera® INFINITY camera is equipped with functions for measuring
in live view. Thanks to this function it is not necessary to acquire the image before
measuring. This tab contains control elements for measuring in the live view.
Active Calibration: in this part the name of a calibration
which is set as active, and is used for measuring in the
QuickPHOTO INDUSTRIAL 3.0 program is displayed. To
activate functions for measuring in the live view, first select
value of the current microscope magnification from the
Objective and Zoom menus. If you are using a magnification
encoder, these values will be filled in automatically.
In the Measuring Tools part the following measuring tools are available:
195
Control Panels of Imaging Devices
Insert Horizontal Scale Bar: after you click this button a horizontal scale will be
inserted into the right bottom corner of the live view.
Insert Vertical Scale Bar: after you click this button a vertical scale will be inserted
into the right upper corner of the live view.
Display Orthogonal Grid: after you click this button, an Orthogonal Grid dialog
box will be displayed. In this window in the Spacing part, enter the desired spacing
of the grid for the X and Y axis. Color and thickness of the grid lines can be set in
the Line Options part. Grid settings can be confirmed by clicking the OK button.
Display Circular Grid: after you click this button, a Circular Grid dialog box will
be displayed. In this window in the Spacing part, enter the desired grid spacing.
Color and thickness of the grid lines can be set in the Line Options part. Grid settings
can be confirmed by clicking the OK button.
Measure Line Segment: after you click this button, the function for line segment
measuring will be activated. Then by clicking into the live view and dragging the
mouse, while holding the left mouse button or by clicking the left mouse button
into the beginning and then the end point, insert the measuring line segment.
Precisely horizontal or vertical line segment can be created if you hold the [Shift]
key when inserting it. Length of the inserted line segment will be measured.
Measure Rectangle: after you click this button, function for rectangle measuring
will be activated. Then by clicking into the live view and dragging the mouse, while
holding the left mouse button, insert a rectangle. You can measure the rectangle's
perimeter and area.
196
Control Panels of Imaging Devices
Measure Polygon: after you click this button, function for measuring of a polygon
will be activated. Then by clicking the left mouse button into the selected point in
the live view, insert the first vertex of the polygon. Repeated clicking of the left
mouse button will define other vertexes of the polygon. Precisely horizontal or
vertical edge can be created if you, while inserting the vertex, hold the [Shift] key.
To finish inserting of the polygon, click the right mouse button – the last vertex
will be connected with the first one and a polygon will be created. You can measure
the polygon's perimeter and area.
Note
If the edges of the inserted polygon will cross each other somewhere, the
value of the calculated area will equal 0. Only the polygon's perimeter
will be calculated.
Measure Polyline: after you click this button, function for measuring of a polyline
will be activated. Then by clicking the left mouse button into the selected point in
the live view, insert the beginning point of the polyline. Repeated clicking of the
left mouse button will define the break points. Precisely horizontal or vertical line
can be created if you hold the [Shift] key while inserting it. To finish inserting of
the polyline, click the right mouse button. Length of the polyline will be measured.
Measure Distance Between 2 Parallel Lines: after you click this button, function
for measuring of a distance between two parallel lines, will be activated. By clicking
and dragging the mouse, while holding the left mouse button or by clicking the left
mouse button into the beginning and then the end point, insert the first line. Then
by clicking the left mouse button into the desired point, insert the second parallel
line. Distance between both parallel lines will be measured. Precisely horizontal
or vertical line can be created if you hold the [Shift] key while inserting it.
Measure Circle Defined by Radius: after you click this button, function for
measuring of a circle will be activated. Then by clicking and dragging the mouse,
while holding the left mouse button, select the circle's radius. You can measure the
circle's diameter, perimeter and area.
197
Control Panels of Imaging Devices
Measure Circle Defined by Diameter: after you click this button, function for
measuring of a circle will be activated. Then by clicking and dragging the mouse,
while holding the left mouse button, select the circle's diameter. You can measure
the circle's diameter, perimeter and area.
Measure Circle Defined by 3 Points: after you click this button, function for
measuring of a circle will be activated. Then click the left mouse button gradually
into three points in the live view through which the circle will be interspaced. You
can measure the circle's diameter, perimeter and area.
Measure Arc: after you click this button, function for measuring of an arc will be
activated. Then click the left mouse button gradually into three points in the live
view through which the arc will be interspaced. You can measure the arc's length
(measured on the perimeter), diameter, and the angle between the arc's arms.
Measure Ellipse Defined by 5 Points: after you click this button, function for
measuring of an ellipse will be activated. Then click the left mouse button gradually
into five points in the live view through which the ellipse will be interspaced. You
can measure ellipse's perimeter and area.
Measure Arbitrary Angle: after you click this button, function for measuring of an
angle will be activated. Clicking and dragging the mouse, while holding the left
mouse button or by clicking the left mouse button into the beginning and the end
point, insert the first arm of an angle. Then by clicking the left mouse button, insert
the second arm of an angle. If you want to create a precisely horizontal or vertical
arm, hold the [Shift] key while creating it.
Measure Angle from the X Axis: after you click this button, function for measuring
of an angle from the X axis will be activated. By clicking and dragging the mouse
while holding the left mouse button or by clicking the left mouse button into the
beginning and the end point, insert the first arm of an angle. This arm will
automatically be completed with a horizontal axis and this way defined angle will
be calculated.
198
Control Panels of Imaging Devices
Measure Angle from the Y Axis: after you click this button, function for measuring
of an angle from the Y axis will be activated. By clicking and dragging the left
mouse button or by clicking the left mouse button into the beginning and the end
point, insert the first arm of an angle. This arm will automatically be completed
with the vertical axis and this way defined angle will be calculated.
Measure Angle Defined by 2 Line Segments: after you click this button, function
for measuring of an angle defined by two line segments will be activated. By clicking
and dragging the mouse while holding the left mouse button or by clicking the left
mouse button into the beginning and the end point, insert the line segment defining
the first arm of an angle. Then in a similar way insert line segment for the second
arm of an angle. The arms of an angle will be created from both of the line segments
by elongation using auxiliary lines. If you want to create a precisely horizontal or
vertical arm of an angle, hold the [Shift] key while creating it. The inserted line
segments should not cross each other.
In this part, it is possible to select units in which measured
values will be displayed/exported.
If you want to measure the convex or acute angle, check in
the Measured Angle part the option Convex/Acute Angle. If
you want to measure convergent or obtuse angle, check the
Convergent/Obtuse Angle option. This option will be applied
to the last measured angle and all other newly measured
angles.
Delete All Measuring Objects from Live View: this button will erase all measuring
objects from the live view. Values in the Table of Measured Values will not be
affected by this function.
Undo Last Measurement [Ctrl+Z]: this button will undo the last done measurement
from the live view and at the same time it will remove the corresponding measured
value from the Table of Measured Values.
199
Control Panels of Imaging Devices
Export Measured Values Continuously to Microsoft®Excel®: this button activates
function of continuous exporting of measured values to the Microsoft® Excel®
program.
Settings: this button opens a dialog box for settings of measurements in the
live view.
Table of Measured Values
Values measured in the live view are continuously being displayed in the Table of Measured
Values in the bottom part of the control panel. Measuring objects in the live view and
measured values displayed in the Table of Measured Values behave independently –
meaning that the measuring objects can be deleted from the live view without having any
effect on the values in the Table of Measured Values and vice versa. It is possible to write
a short description to each measurement in the Table of Measured Values.
Display/Hide Table of Measured Values
button in the Toolbar enables
to hide or display again the Table of Measured Values. If the Table of Measured Values
is hidden, a Table of Measured Values
tab will appear in the bottom part
of the control panel. If you move the mouse over this tab, the table will be temporarily
displayed. If you move the mouse to a different area, the table will automatically be hidden
again. It is possible to display the table permanently also by clicking the button in its
right upper corner.
In the bottom part of the Table of Measured Values there is a toolbar with buttons, which
are enabled immediately after the first done measurement.
200
Control Panels of Imaging Devices
Export Values: this button enables to export all measured values from the
Table of Measured Values to the Microsoft® Excel® file or text file.
Important
For export of measured values to the file of the xls format, it is necessary to have
the Microsoft® Excel® program installed in your computer.
Clear All Measured Values: this button clears the Table of Measured
Values and deletes all measuring objects from the live view.
Delete Selected Value(s): this button deletes selected (by mouse click)
value(s) from the Table of Measured Values.
Continuous Export of Measured Values to Microsoft®Excel®
Measured values can be continuously exported to an open Microsoft® Excel® workbook.
To activate this function, click the Export Measured Values Continuously to
Microsoft®Excel®
button on the Measurements tab. After activation of this function,
measured values will be displayed not only in the Table of Measured Values, but they will
also be immediately inserted into the open workbook of the Microsoft® Excel® program
to the position of the cursor. The cursor will then automatically move to the next cell (Enter
will be inserted). Values will be exported without units and labels. This function can be
used for example for continuous, automatic evaluation of measurements, when the opened
workbook in the Microsoft® Excel® contains suitable formulas.
Before you activate the function of continuous exporting, the Microsoft® Excel® program
must be running and a workbook with the permissions for writing must be opened in it.
To make the opened document accessible for continuous exporting, the Microsoft® Excel®
program must be running with the same privileges as the QuickPHOTO INDUSTRIAL
3.0 program (for example both programs with the standard user's privileges or both with
administrator's privileges). If each of the programs will be running with different privileges,
a warning message will be displayed and this function will not be activated. If more
workbooks are opened in the Microsoft® Excel® program or multiple instances of the
Microsoft® Excel® program are running, a dialog box with a list of available workbooks
201
Control Panels of Imaging Devices
will be displayed during activation of this function. Continuous exporting function will be
activated after selection of one of the workbooks from the list.
Function for continuous export can be turned off by another clicking the Export Measured
Values Continuously to Microsoft®Excel®
button.
Settings
Click the Settings
button to open a dialog box with the measurement settings.
Note
Original values of all parameters of the Settings dialog box can be restored anytime
by clicking the Restore Default Settings button.
Font/Colors Tab
202
Control Panels of Imaging Devices
On the Font/Colors tab it is possible to set the lines of measuring objects, color of the
labels with measured values, and the font size of measured values displayed in the live
view.
Scale Bar Tab
Scale Bar tab contains the options for settings of the calibrated scale bar displayed in the
live view.
In the Scale Bar Type part there are the following options available: Bar, Line Segment,
Staple and Stripe.
In the Scale Bar Size part you may select one out of two automatic sizes: Small or Large.
Option Custom enables to define custom scale bar size. After activation of this option
a Custom Size field will be available with the option to set the desired scale bar length.
Color of the scale bar and its value can be selected in the Scale Bar Options part by the
Color of Scale Bar and its Value option.
203
Control Panels of Imaging Devices
Background Area and Background Color options enable you to set the area and color of
the scale bar's background. If the Display Scale Bar Value option is checked, the scale
bar's value will also be displayed by the scale bar in the live view. Font Size option enables
to set the font size of scale bar's value.
Units Tab
On this tab you may choose units which will be used for measuring/exporting – micrometers
or millimeters. For the chosen units you may also choose the number of decimal places
for displaying of the measured values.
Important
The use of measuring accuracy in tenths of micrometers will only be relevant
when the used microscope-imaging device set provides such accuracy.
Way of expressing of the measured angle values can be set in the Display Measured Angle
Values: part. Values can be displayed in Decimal form or In Degrees and Minutes.
204
Control Panels of Imaging Devices
Note
Measured angle values will always be exported into Microsoft® Excel® program
in decimal form irrespective of the settings of this option.
Measurements Tab
Control elements in the top part of this tab are designed for selection of measurands, which
will be measured by individual measuring tools and for text labeling of individual
measurands. Measurands to be measured should be checked. To change the label rewrite
the appropriate field in the Label row.
Measurement Mode part offers two possibilities:
• Continuous Measurement Mode: if this option is active (default option), the selected
measuring tool will remain active until turned off. That way you can proceed with
repeated measurements in the live view without the necessity to manually activate the
same measuring tool for each measurement.
205
Control Panels of Imaging Devices
• Single Measurement Mode: if you activate this option, the measuring tool will be, after
one performed measurement, automatically deactivated.
In the Display Mode - Measuring Objects part there are two options available:
• Keep Displayed Only the Last Measuring Object: if this option is active (default option),
only the last measuring object will always be displayed in the live view. When new
measuring is being performed, the previous measuring object will always be deleted
from the live view.
• Keep Displayed All Measuring Objects: this option will leave all measuring objects
displayed in the live view.
Live View Tab
This tab is designed for setting of live view parameters.
Live View Resolution: from this drop-down menu, you may select the size, in which the
live view will be displayed.
206
Control Panels of Imaging Devices
Frame Rate: displays how many images per second (Frames per Second, FPS) is the camera
currently displaying in the live view.
Image Quality: Standard - High Frame Rate option displays the live view with the highest
possible frame rate. High - Lower Frame Rate option improves the quality of the live view
at the cost of possible frame rate decrease. Use the Special - Remove Moire option in case
disruptive stripes or possibly squares on the background are visible in the live view. This
phenomenon can appear with some types of illumination.
Live View Size: here select whether you want to display the live view in the original size
(1:1) - Original (1:1) option, or if you want to fit its size to the control panel's window. If
the Fit to Window option is active, a decrease in the frame rate may appear.
Orientation option enables to select the following options of orientation of the live view
(this option will also apply to acquired images):
Default: sets the default orientation of the live view.
Mirror: mirrors the live view along the vertical axis.
Flip: flips the live view along the horizontal axis.
Rotate by 180°: rotates the live view by 180 degrees.
Cross: displays/hides the central cross.
Grey Scale: turns on/off the grey scale mode.
Performance Test: after clicking the
button, several test images will
be acquired, to determine the minimum reachable time interval between images. Several
test images will be acquired, during the test, which can be deleted right after the test. This
207
Control Panels of Imaging Devices
test is automatically done during the first run of the control panel and normally, there is
no need to run this test again.
Colors Tab
This tab contains control elements which are intended for adjustment of the parameters of
the live view. Changes in the settings will apply to the live view as well as to the acquired
images.
Image Settings part:
Gain: the slider affects the signal's strength coming from the camera. With higher gain
values, noise in the image may be more visible.
Brightness: the slider sets camera's brightness.
Contrast: the slider sets camera's contrast.
208
Control Panels of Imaging Devices
Gamma: the slider is used to set gamma correction (combination of the brightness and
contrast adjustment).
Hue: the slider enables to change image hue.
Saturation: the slider is used for setting the color saturation.
Illumination Compensation: the color balancing of the image
can be adjusted according to the used type of illumination.
Restore Default Settings: clicking this button sets all values of the control elements
in the Image Settings part to the default values.
White Balance: sliders enable to manually adjust the level
of each of the three color channels (R-red, G-green and
B-blue).
Restore Default White Balance Settings: clicking this button sets all values of the
sliders in the White Balance part to the default values.
Black Balance: sliders R, G, B (R-red, G-green, and B-blue)
enable to manually set the black balance. In case the camera
is set to grey scale mode or if you are using a monochromatic
camera, only one slider is available.
Restore Default Black Balance Settings: clicking this button sets all values of the
sliders in the Black Balance part to the default values.
209
Control Panels of Imaging Devices
Shading Correction Tab
This tab contains control elements of the shading correction function. This function may
be used to remove deficiencies in the image caused by inhomogeneous illumination (removal
of the darker corners of the image) or by dust on the sensor.
Shading Correction: this option is used for turning the
Shading Correction function on/off.
Illumination Type: in dependence on the type of the used
illumination select Reflected or Transmitted option. The
correction method is different for each illumination type.
210
Control Panels of Imaging Devices
Calibration Mask: if you click the Capture Mask button, an
image, which will be used as a calibration mask for shading
correction function, will be acquired. In the field above the
button will be displayed the preview of the captured mask
and information about its size.
Correction Level: using this slider you may set the strength
with which will be the shading correction applied. If you
click the Preview in Live View button, you will see the effect
of the shading correction function reflecting the current
settings. Using the slider you may set the level of correction
interactively.
Using the Shading Correction Function
Important
Shading correction gives good results only if all the settings of the microscope
and the camera are the same, while acquiring images, as when capturing
a calibration mask. If you change the conditions: change of magnification, change
of illumination, change of image size, and so on, it is necessary to acquire the
calibration mask again.
To use the Shading Correction function it is necessary to create a calibration image (the
so called mask) first. Proceed as follows:
Transmitted Light
1. Focus the microscope using the desired microscope's magnification, switch the camera's
exposure mode to manual, and manually set the exposure time.
2. Remove the specimen and adjust (shorten) the exposure time so the inhomogeneities
of the illumination are visible. Optimal setting is such, the center of the field of view
211
Control Panels of Imaging Devices
3.
4.
5.
6.
7.
is white and in the corners there are visible grey inhomogeneities. The darkest areas
should be grey, not black.
Click the Auto WB button (automatic white balance).
On the Image tab set the desired image size.
Switch to the Shading Correction tab and select the Enabled option. In the Illumination
Type part select the Transmitted option. Then in the Calibration Mask part click the
Capture Mask button. Preview of the mask will be displayed in the control panel.
Place the specimen back in and set the desired exposure time.
In the Correction Level part click the Preview in Live View button. According to the
need you may, using the Correction Level slider, adjust the correction.
Reflected Light
1. Set the desired microscope's magnification, switch the camera's exposure mode to
manual, and manually set the exposure time.
2. Place a white sheet under the microscope, (for example a sheet of white paper). Do
not focus the microscope and adjust (shorten) the exposure time so the inhomogeneities
of the illumination are visible. Optimal setting is such, the center of the field of view
is white and in the corners there are visible grey inhomogeneities. The darkest areas
should be grey, not black.
3. Click the Auto WB button (automatic white balance).
4. On the Image tab set the desired image size.
5. Switch to the Shading Correction tab and select the Enabled option. In the Illumination
Type part select the Reflected option. Then in the Calibration Mask part click the
Capture Mask button. Preview of the mask will be displayed in the control panel.
6. Place the specimen back in, focus the microscope and set the desired exposure time.
7. In the Correction Level part click the Preview in Live View button. According to the
need you may, using the Correction Level slider, adjust the correction.
All acquired images will now be automatically adjusted using the Shading Correction
function until the function is disabled or the control panel is terminated.
Timestamp Tab
It is possible to automatically insert, into the acquired images, date and time of their
acquisition – the so called “timestamp“. The timestamp will, after acquisition of the image,
become a solid part of the image and it is not possible to remove it from the image other
way than by cropping it.
212
Control Panels of Imaging Devices
Timestamp: this option turns the Timestamp function on/off.
Insert: by checking of individual options it is possible to
define which components of the timestamp will be inserted
into the acquired images.
Orientation: this field serves as an indicator of the set
orientation of the timestamp. If you double-click into this
field, a Timestamp Settings dialog box will open.
Options: if you click this button a dialog box for setting of timestamp
parameters will open.
Timestamp Settings
If you click the Options button, or if you double-click into the Orientation field, a dialog
box for setting of the timestamp will open.
213
Control Panels of Imaging Devices
Format: using the options in this part, it is possible to set the appearance of the timestamp.
Position: this option enables to select into which corner of the acquired images should the
timestamp be inserted.
Orientation: using this option, it is possible to select the orientation of the timestamp's
text.
Preview: in this field, preview of the timestamp is
displayed the way it will be inserted into the acquired
images, except for the orientation option.
Profiles Tab
All settings of the control panel (except for the settings of the Shading Correction function)
can be saved into one of the four profiles and at any time loaded again.
214
Control Panels of Imaging Devices
Profiles: buttons in the Profiles part are used for loading of the saved profiles.
Save to Profile: if you click this button, a dialog box will be displayed
for saving of the current control panel's settings into one of the profiles.
Default Profile: if you click this button, all elements of the control panel
will be set to the default values. Saved profiles will not be affected in
any way by this action.
Saving of the Control Panel's Settings into the Profile
To save the settings into the profile proceed as follows:
1. Set the desired parameters of the control panel.
2. On the Profiles tab click the Save to Profile button. Save Profile dialog box will open:
215
Control Panels of Imaging Devices
3. In the Available Profiles part select, by clicking the corresponding button, one of the
profiles you want to save the current control panel's settings to.
4. Type in a new profile name into the Profile Name field.
5. Confirm by clicking the OK button.
Loading a Profile
Loading of a desired profile can be done by clicking the corresponding button of the profile
on the Profiles tab. Automatic adjustment of the control panel's elements will take place.
216
Control Panels of Imaging Devices
®
2. Canon EOS Digital SLR Cameras
The control panel works with Canon® EOS series digital SLR cameras. Control panel of
the Canon® EOS digital SLR cameras is designed for control of camera functions, displaying
of the live view and image acquisition. It consists of two tabs with control elements and
the live view.
Image Tab
This tab contains control elements for setting of main camera's parameters. Settings will
apply to the live view as well as to the acquired images.
217
Control Panels of Imaging Devices
Capture [Ctrl+Enter]: after clicking this button, an image will be acquired
and automatically transferred to the computer. If the camera is not connected,
the button will change to Connect
button.
Full Screen [Ctrl+F]: this button is used for displaying of live view in full
screen mode. Using this type of display you can control the program using the
Capture [Ctrl+Enter] button, which is placed in the left upper corner of the
screen and the Exit Full Screen Mode button, placed in the right upper part of
the screen.
Image Size: from this menu you may select the size in which the
images will be acquired. The available sizes will be affected by a
potential use of the Crop Borders function from the Settings tab.
218
Control Panels of Imaging Devices
Exposure: this part contains control elements for setting the camera's
exposure. The Mode indicator displays the current camera's mode
set by its mode dial. To acquire images from a microscope set the
mode dial to Av - automatic mode or M - manual mode. The
Exposure Correction drop-down menu enables you to lighten or
darken the images when the automatic exposure mode is set. The
Sensitivity (ISO) drop-down menu sets the sensitivity of the sensor.
The Exposure Time drop down menu is enabled only when the
manual exposure mode is set. You can set the required exposure
time by this menu.
White Balance: the white balance can be done in two ways. If you click the
Auto button, the white balance will be performed automatically continuously
by the camera. Use this function in case you want the digital image to have
the same color balancing as the image visible in the eyepieces. If you click
the One Point button, click the left mouse button to the desired point of the
live view, which will define the reference white color. The white balancing
will be performed according to the selected reference color.
Exposure Region: in case of automatic exposure mode is set, the area defined
by the rectangular region displayed in the live view is used for exposure
measurement. The region's size cannot be changed, however the frame can
be moved by a mouse. Using the Display/Hide button, it is possible to hide
or display the frame. If the frame is hidden, the selected region is still being
used for measuring of exposition. The frame is only not visible, in order not
to disturb in the live view. By clicking the Center button, you may place the
frame to the center of the camera's field of view. The Zoom In button zooms
in the area defined by the frame. This functions facilitates the microscope
focusing. The zooming in of the area defined by the frame can be achieved
also by double-clicking into the frame. To return to the standard display mode
click the Zoom In button again or double-click in the zoomed live view.
Power Supply: this indicator displays the camera's battery status or
the use of the AC power supply.
219
Control Panels of Imaging Devices
Settings Tab
This tab is designed for setting of live view parameters.
Crop Borders: this slider enables to crop the unwanted borders from
the image (symmetrically from all sides). Use this function in case
the darker corners are visible in the live view. This phenomenon
(called vignetting) may appear when using smaller magnifications
on some types of microscopes. The performed setting is interactively
displayed in the live view and it will apply also to the acquired
images. This function does not have any effect on measurement
accuracy.
Frame Rate: displays how many images per second (Frames Per
Second, FPS) is the camera currently displaying in the live view.
Orientation: in this part you may set the orientation of the live view.
The performed setting is interactively displayed in the live view and
it will apply also to the acquired images.
Cross: displays/hides the central cross. The displayed cross will not be visible
in the acquired images.
220
Control Panels of Imaging Devices
Grey Scale: turns on/off the grey scale mode.
®
3. IDS uEye Digital Cameras
The control panel is able to control several models of IDS uEye® digital cameras. Type of
the connected camera is determined automatically at the startup of the control panel. If
more than one IDS uEye® digital camera is connected to the computer, a dialog box will
be displayed, at the startup of the control panel, for selection of a camera which is supposed
to be connected.
The control elements are located in five tabs:
221
Control Panels of Imaging Devices
Speed Adjustment
At the very first run of the control panel, a performance test will be launched and the
camera's frame rate (FPS) will be adjusted according to the computer's performance. This
performance test is performed only once and it will not be launched at next run of the
control panel. If needed, the performance test can be launched manually by clicking the
Speed adjustment button on the Options tab.
Note
There should be no other application with high demand on computer's performance
running during the performance test, otherwise the camera will work slower than
it could.
Image Tab
This tab contains control elements for setting of main camera's parameters. Settings will
apply to the live view as well as to the acquired images.
Capture [Ctrl+Enter]: after clicking this button, an image will be acquired and
automatically transferred to the computer.
Full Screen: this button is used for displaying of the live view full screen.
Using this type of display you can control the program using the Capture
[Ctrl+Enter] and the Exit Full Screen Mode buttons, placed in the upper
part of the screen.
Connect: this button is enabled only when the camera is not correctly
connected. Click this button to re-establish communication with the camera.
222
Control Panels of Imaging Devices
Auto WB: this button activates the function for automatic white balance. It is
best to do this balancing when the camera is capturing a white area.
Live View Quality: here select the desired resolution of the live view.
Exposure Mode: if the exposure mode is set to the Auto option, exposure
time is automatically set according to the illumination of the camera's
field of view. When using the Auto mode, the AEL button (Auto
Exposure Lock) will also be active. This button “locks“ the exposure
time on the current value. If the Manual option is active, value of the
exposure time is set by user, using the control elements in the Exposure
Time part.
Exposure Region: this control element is designed for defining of an
area of the live view which will be used for measuring of exposition
in the Auto exposure mode. You may select one of the predefined
exposure region sizes (100% - the whole area of the live view, 30%
and 1%) or you may select your own size of the region. If you select
the 30% or 1% option, a frame will be displayed in the middle of the
live view, which will define the exposure region. The frame can be moved to the desired
area in the image: move the mouse into the region and by dragging the mouse while holding
the left mouse button relocate the frame to the desired position. If you place the cursor
above the frame's edge or above one of its corners, the cursor will change shape, and by
dragging the mouse while holding the left mouse button, you may change the size of the
frame as you please. By clicking the Center button, you may place the frame to the center
of the camera's field of view. Using the Show/Hide button, it is possible to hide or display
the frame. If the frame is hidden, the selected region is still being used for measuring of
exposition. The frame is only not visible, so it does not disturb in the live view. To define
your own exposure region, click the Custom button, move the cursor to the live view and
then by dragging the mouse while holding the left mouse button, insert the frame of a desired
size.
223
Control Panels of Imaging Devices
Note
If the frame of the exposure region will change its color to red, it means that the
camera's automatics have reached the limit value of the exposure time. The range
of exposure times is in the automatic mode smaller than in the manual mode.
Exposure Time: if a Manual exposure mode is active, you
may, using the arrow buttons or by dragging of the slider,
manually set the desired value of the exposure time. To
change the exposure time you may also use the [+] and [-] keys on the numerical keyboard
or the [Page Up] and [Page Down] keys.
Exposure Correction: this function enables you to lighten or darken the images
when using the Auto exposure mode.
Capture Images in: here you can select, whether
the images should be captured in the resolution of
the live view or in full camera's resolution. This
option is active only when using certain types of IDS uEye® cameras.
Color Mode: you can switch between Color or Grey Scale modes.
Cross: displays/hides the central cross.
Focus Region: this function makes it easier to focus the selected area of
the image. To use this function proceed as follows:
1. Using the focus knob, roughly focus the microscope. Click the Custom button in the
Focus Region part. Move the cursor into the live view and insert the frame in the live
224
Control Panels of Imaging Devices
view, by dragging the mouse, while holding the left mouse button, to a place, where
you want to do the focusing.
2. Focus indicator will be displayed next to the frame. Blue strip represents the current
focus value and the red guideline maximum reached focus value. Both values are at
the same level at the beginning. Both values are also displayed in a numerical form
in the title of the frame in the current value/maximal reached value form.
3. If you start rotating the microscope focus knob now, the blue strip will start to decline
respectively rise according to the fact, whether the focus level in the framed area will
decrease or rise. Select such a direction so the strip starts to rise. Continue rotating
the focus knob until the blue strip starts to decline. Red guideline will remain on the
position of the maximum reached focus value. Gently rotate the focus knob in the
opposite direction, now achieve that the blue strip reaches as closely as possible to
the red guideline – in this position, image of the selected area will be as sharp as
possible. You can use numerical values, in a similar way, for focusing.
Note
Focus level is measured relatively. That means the indicator shows, whether the
focus value is rising or declining towards the default value which is calculated
after the frame is positioned. If the focus value exceeds the indicator's range, it
is initialized again to about three quarters of the range. That does not mean that
the focus value would decline rapidly. If you continue rotating the knob in the
same direction and the strip rises again, it means that the focus level continues to
rise.
Reset button initializes the indicator again into the default state. That means the maximum
reached value of focus level is set along with the current value approximately to three
quarters of the range.
Using the Show/Hide button you can hide or display the frame of the focus region.
Note
If you relocate or change the size of the focus region, automatic reset of the focus
indicator will take place (see, Reset button).
225
Control Panels of Imaging Devices
Options Tab
This tab contains control elements which are intended for adjustment of the parameters of
the live view. Changes in the settings will apply to the live view as well as to the acquired
images.
Gain: the slider affects the signal's strength coming from the camera. With higher gain
values, noise in the image may be more visible.
Brightness: the slider sets camera's brightness.
Contrast: the slider sets camera's contrast.
Black Level: the slider controls the black color level.
Gamma: the slider is used to set gamma correction (combination of the brightness and
contrast adjustment).
Manual White Balance: sliders enable to manually adjust
the level of each of the three color channels (R-red, G-green
and B-blue).
Edge Enhance: this option enables the enhancing of edges. There are three
levels available: None, Weak and Strong enhancement.
Frame Rate: displays how many images per second (Frames per Second,
FPS) is the camera currently displaying in the live view.
226
Control Panels of Imaging Devices
Default: use this button to restore all the settings on the Options tab to the
default values.
Speed Adjustment: starts the performance test to adjust the camera's
speed according to the computer's performance.
Shading Correction Tab
This tab contains control elements for the shading correction function. This function may
be used to remove deficiencies in the image caused by inhomogeneous illumination (removal
of the darker corners of the image) or by dust on the sensor.
Shading Correction: this option turns the Shading Correction function
on/off.
Illumination Type: in dependence on the type of the used illumination
select Reflected or Transmitted option. The correction method is different
for each illumination type.
Calibration Mask: if you click the Capture Mask button, an
image, which will be used as a calibration mask for shading
correction function, will be acquired. In the field next to the
button will be displayed the preview of the captured mask and
information about its size.
227
Control Panels of Imaging Devices
Correction Level: using this slider you may set the
strength, with which will be the shading correction
applied. If you click the Preview in Live View button,
you will see the effect of the shading correction function
reflecting the current settings. Using the slider you may
set the level of correction interactively.
Using the Shading Correction Function
Important
Shading correction gives good results only if all the settings of the microscope
and the camera are the same, while acquiring images, as when capturing
a calibration mask. If you change the conditions: change of magnification, change
of illumination, change of image size, and so on, it is necessary to acquire the
calibration mask again.
To use the Shading Correction function it is necessary to create a calibration image (the
so called mask) first. Proceed as follows:
Transmitted Light
1. Focus the microscope using the desired microscope's magnification, switch the camera's
exposure mode to manual, and manually set the exposure time.
2. Remove the specimen and adjust (shorten) the exposure time so the inhomogeneities
of the illumination are visible. Optimal setting is such, the center of the field of view
is white and in the corners there are visible grey inhomogeneities. The darkest areas
should be grey, not black.
3. Click the Auto WB button (automatic white balance) on the Image tab.
4. On the Image tab set the desired image resolution.
5. Switch to the Shading Correction tab and select the Enabled option. In the Illumination
Type part select the Transmitted option. Then in the Calibration Mask part click the
Capture Mask button. Preview of the mask will be displayed in the control panel.
6. Place the specimen back in and set the desired exposure time.
7. In the Correction Level part click the Preview in Live View button. According to the
need you may, using the Correction Level slider, adjust the correction.
228
Control Panels of Imaging Devices
Reflected Light
1. Set the desired microscope's magnification, switch the camera's exposure mode to
manual, and manually set the exposure time.
2. Place a white sheet under the microscope, (for example a sheet of white paper). Do
not focus the microscope and adjust (shorten) the exposure time so the inhomogeneities
of the illumination are visible. Optimal setting is such, the center of the field of view
is white and in the corners there are visible grey inhomogeneities. The darkest areas
should be grey, not black.
3. Click the Auto WB button (automatic white balance) on the Image tab.
4. On the Image tab set the desired image resolution.
5. Switch to the Shading Correction tab and select the Enabled option. In the Illumination
Type part select the Reflected option. Then in the Calibration Mask part click the
Capture Mask button. Preview of the mask will be displayed in the control panel.
6. Place the specimen back in, focus the microscope and set the desired exposure time.
7. In the Correction Level part click the Preview in Live View button. According to the
need you may, using the Correction Level slider, adjust the correction.
All acquired images will now be automatically adjusted using the Shading Correction
function until the function is disabled or the control panel is terminated.
Timestamp Tab
It is possible to automatically insert, into the acquired images, date and time of their
acquisition – the so called “timestamp“. The timestamp will, after acquisition of the image,
become a solid part of the image and it is not possible to remove it from the image other
way than by cropping it.
Timestamp: this option turns the Timestamp function on/off.
229
Control Panels of Imaging Devices
Options: if you click this button a dialog box for setting of timestamp
parameters will open.
Insert: by checking of individual options it is possible to define which
components of the timestamp will be inserted into the acquired images.
Orientation: this field serves as an indicator of the set orientation of the
timestamp. If you double-click into this field, a Timestamp Settings dialog
box will open.
Preview: in this field, preview of the timestamp
is displayed the way it will be inserted into the
acquired images, except for the orientation
option. The text size is the same as will be
displayed in the acquired images in the 100 %
(1:1) display size.
Position: the indicator shows the position,
where the timestamp will be inserted in the
acquired images.
Timestamp Settings
If you click the Options button or if you double-click into the Orientation field, a dialog
box for setting of the timestamp will open.
230
Control Panels of Imaging Devices
Format: using the options in this part, it is possible to set the appearance of the timestamp.
Position: this option enables to select into which corner of the acquired images should the
timestamp be inserted.
Orientation: using this option, it is possible to select the orientation of the timestamp's
text.
Profiles Tab
All settings of the control panel (except for the settings of the Shading Correction function)
can be saved into one of the four profiles and at any time loaded again.
231
Control Panels of Imaging Devices
Save to Profile: if you click this button, a dialog box will be
displayed for saving of the current control panel's settings into one
of the profiles.
Default Profile: if you click this button, all elements of the control
panel will be set to the default values. Saved profiles will not be
affected in any way by this action.
Saving of the Control Panel's Settings into the Profile
To save the settings into the profile proceed as follows:
1. Set the desired parameters of the control panel.
2. On the Profiles tab click the Save to Profile button. Save Profile dialog box will open:
3. In the Available Profiles part select, by clicking the corresponding button, one of the
profiles you want to save the current control panel's settings to.
4. Type in a new profile name into the Profile Name field.
5. Confirm by clicking the OK button.
232
Control Panels of Imaging Devices
Loading a Profile
Loading of a desired profile can be done by clicking the corresponding button of the profile
on the Profiles tab. Automatic adjustment of the control panel's elements will take place.
4. ARTRAY ARTCAM Digital Cameras
Control panel of ARTRAY ARTCAM digital cameras enables to work with several types
of digital cameras from the ARTRAY Inc. Type of the connected camera is determined
automatically at the startup of the control panel.
The control elements are located in three tabs.
Image Tab
This tab contains control elements for setting of the main camera's parameters. Settings
will apply to the live view as well as to the acquired images.
233
Control Panels of Imaging Devices
Capture [Ctrl+Enter]: after clicking this button, an image will be acquired
and automatically transferred to the computer.
Full screen: this button is used for displaying of live view full screen. Using
this type of display you can control the program using the Capture
[Ctrl+Enter] button and the Exit full screen mode button, placed in the upper
part of the screen.
Connect: this button is enabled only when the camera is not correctly
connected. Click the button to attempt to re-establish the communication.
Auto WB: this button activates the function for automatic white balance. It
is best to do this balancing when the camera is capturing a white area.
Image quality: here select the resolution in which the images should
be acquired.
Profiles: the control panel's settings can be saved into one of four
available profiles and loaded again any time. If you want to save
the current control panel's settings into a profile, click the Save
button in the Profiles part. From the Save as menu choose the profile you want to save the
settings to and enter the name of the profile in the New name field. Confirm by clicking
the OK button. To load a saved profile, just select the profile name from the list.
Exposure mode: if the exposure mode is set to the Auto option, exposure
time is automatically set according to the illumination of the camera's
field of view. When using the Auto mode, the AEL button (Auto Exposure
Lock) will also be active. This button “locks“ the exposure time on the current value. If
234
Control Panels of Imaging Devices
the Manual option is active, value of the exposure time is set by user, using the control
elements in the Exposure time part.
Note
Auto exposure mode is not available when the camera displays the live view in
the highest resolution.
Exposure time: if a manual exposure mode
is active, you may, using the arrow buttons
or by dragging of the slider, manually set
the desired value of the exposure time. To change the exposure time you may also use the
[+] and [-] keys on the numerical keyboard or the [Page Up] and [Page Down] keys.
Cross: displays/hides the central cross.
Settings Tab
This tab contains control elements which are intended for adjustment of the parameters of
the live view. Changes in the settings will apply to the live view as well as to the acquired
images.
Live image quality: here select the resolution of the live view. When
the highest resolution is set, the Auto exposure mode will not be
available.
Bayer mode: each of these options differently balances the RGB
color levels.
Brightness: the slider sets camera's brightness.
235
Control Panels of Imaging Devices
Contrast: the slider sets camera's contrast.
Hue: the slider sets camera's hue.
Sharpness: the slider sets camera's sharpness.
Gain: the slider affects the signal's strength coming from the camera. With higher gain
values, noise in the image may be more visible.
Gamma: the slider is used to set gamma correction (combination of the brightness and
contrast adjustment).
Manual white balance: sliders enable to manually adjust
the levels of the red and the blue channel.
Saturation: the slider sets camera's saturation.
Default: use this button to restore all the settings on the Settings tab to the default
values.
Shading Correction Tab
This tab contains control elements for the shading correction function. This function may
be used to remove deficiencies in the image caused by inhomogeneous illumination (removal
of the darker corners of the image) or by dust on the sensor.
236
Control Panels of Imaging Devices
Shading correction: this option turns the Shading correction function
on/off.
Light type: in dependence on the type of the used illumination select
Reflected or Transmitted option. The correction method is different for
each illumination type.
Calibration mask: if you click the Capture mask button,
an image, which will be used as a calibration mask for
shading correction function, will be acquired. In the field
next to the button will be displayed the preview of the
captured mask and information about its size.
Correction level: using this slider you may set the
strength, with which will be the shading correction
applied. If you click the Preview in live image button,
you will see the effect of the shading correction function
reflecting the current settings. Using the slider you may
set the level of correction interactively.
237
Control Panels of Imaging Devices
Using the Shading Correction Function
Important
Shading correction gives good results only if all the settings of the microscope
and the camera are the same, while acquiring images, as when capturing
a calibration mask. If you change the conditions: change of magnification, change
of illumination, change of image quality, and so on, it is necessary to acquire the
calibration mask again.
To use the Shading correction function it is necessary to create a calibration image (the
so called mask) first. Proceed as follows:
Transmitted Light
1. Focus the microscope using the desired microscope's magnification, switch the camera's
exposure mode to manual, and manually set the exposure time.
2. Remove the specimen and adjust (shorten) the exposure time so the inhomogeneities
of the illumination are visible. Optimal setting is such, the center of the field of view
is white and in the corners there are visible grey inhomogeneities. The darkest areas
should be grey, not black.
3. Click the Auto WB button (automatic white balance) on the Image tab.
4. On the Image tab set the desired image quality.
5. Switch to the Shading correction tab and select the Enabled option. In the Light type
part select the Transmitted option. Then click the Capture mask button. Preview of
the mask will be displayed in the control panel.
6. Place the specimen back in and set the desired exposure time.
7. In the Correction level part click the Preview in live view button. According to the
need you may, using the Correction level slider, adjust the correction.
Reflected light
1. Set the desired microscope's magnification, switch the camera's exposure mode to
manual, and manually set the exposure time.
2. Place a white sheet under the microscope, (for example a sheet of white paper). Do
not focus the microscope and adjust (shorten) the exposure time so the inhomogeneities
of the illumination are visible. Optimal setting is such, the center of the field of view
238
Control Panels of Imaging Devices
3.
4.
5.
6.
7.
is white and in the corners there are visible grey inhomogeneities. The darkest areas
should be grey, not black.
Click the Auto WB button (automatic white balance) on the Image tab.
On the Image tab set the desired image quality.
Switch to the Shading correction tab and select the Enabled option. In the Light type
part select the Reflected option. Then click the Capture mask button. Preview of the
mask will be displayed in the control panel.
Place the specimen back in, focus the microscope and set the desired exposure time.
In the Correction level part click the Preview in live view button. According to the
need you may, using the Correction level slider, adjust the correction.
5. PathScan Enabler IV Digital Microscope
PathScan Enabler IV digital microscope enables to acquire images of whole microscopic
slides.
239
Control Panels of Imaging Devices
Important
The images from PathScan Enabler IV device may have the size up to 63
Megapixels. For work with images of this size it is necessary to perform the
following settings of the QuickPHOTO INDUSTRIAL 3.0 program: open the
program Options and on the Miscellaneous tab (Edit → Options... → General →
Miscellaneous) in the Maximal Image Size part in the Maximal Image Size in
Megapixels drop-down menu set the 64 or Unlimited value and confirm by clicking
the OK button. For scanning images from PathScan Enabler IV device it is
necessary to have at least 2 GB of RAM installed in your computer. Furthermore
it is recommended to use the Microsoft® Windows® 7 or 8 operating system.
QuickPHOTO INDUSTRIAL 3.0 program may in the Microsoft® Windows® XP
operating system behave unstable when scanning full size images from PathScan
Enabler IV device in the highest resolution.
Note
After turning the device on, it needs to warm up before first scanning. This takes
60s.
Settings: the Image Resolution (DPI) drop-down menu enables
to set the required scanning resolution of images. The Brightness,
Contrast and Gamma sliders enable to adjust the corresponding
parameters of the preview and scanned images. The performed
settings will apply to the preview during next preview acquisition.
These settings will also apply to the scanned images. The button
resets all the control panel's parameters to the default values.
Acquire Preview: after clicking this button a preview of the whole
slide will be acquired and displayed in the Preview part.
Scan Image: after clicking this button an image of the area defined
by a rectangle displayed in the Preview part, according to
parameters set in the Settings part, will be scanned and transferred
to the computer.
240
Control Panels of Imaging Devices
Connect: this button is displayed instead of the Scan Image button
in case the device is not properly connected. Click this button to
connect the device.
Preview: in this part the preview of the slide is
displayed after clicking the Acquire Preview
button, respecting the settings of Brightness,
Contrast and Gamma sliders in the Settings part.
The green-black frame will be displayed in the
preview. This frame defines the area, which will
be scanned, in resolution set by the Image
Resolution (DPI) option, after clicking the Scan
Image button. The size of the frame can be
modified by mouse using the green grasp points
in its corners. The default frame's size can be
set by double-clicking into the preview area.
The next double-click will set the last used
frame size.
241
Control Panels of Imaging Devices
®
6. OLYMPUS E-system Digital SLR Cameras
The control panel is intended for displaying a live image, controlling the camera functions
and capturing images from OLYMPUS® E-system SLR cameras. The controls are located
in seven tabs.
Important
Control panel of OLYMPUS® E-330 SLR camera is not equipped with several
functions described below. The E-330 SLR camera can be controlled only from
the accounts with administrator's privileges in Microsoft® Windows® XP operating
system. This camera can not be controlled from the Microsoft® Windows®
Vista/7/8 operating systems.
242
Control Panels of Imaging Devices
Capture Tab
The tab contains the controls for setting the camera parameters, setting the exposure and
acquiring images.
Capture: after clicking this button, an image will be acquired and
automatically transferred to the computer. You can also use the [Ctrl+Enter]
key shortcut.
Full screen: the button is used for displaying the live view full screen. In
this mode, you can control the application using the Capture and Exit full
screen mode buttons in the upper part of the live view.
Connect: the button is enabled only when the camera is not correctly
connected. Click the button to re-establish the communication.
Quality: the image quality can be selected in this menu. For some quality options
the image resolution can be selected in the Resolution drop-down menu.
Program: in this drop-down menu you can set the exposure mode. The
Manual option: aperture and shutter speed can be set manually from
Shutter speed and Aperture drop-down menus. The Aperture drop-down
menu is enabled only when the lens is attached to the camera body. The
Auto option: exposure parameters (aperture and shutter speed) are
calculated automatically by the camera. The shutter speed can be “locked“ by clicking the
AEL (Auto Exposure Lock) button. The Aperture priority option: the aperture value can
be selected from the drop-down menu and the shutter speed will be calculated automatically.
This option is available only when the lens is attached to the camera body. The Shutter
243
Control Panels of Imaging Devices
priority option: the shutter speed can be selected and the aperture will be automatically
calculated.
Metering mode: here you can select one of several exposure metering
modes. See the user's guide of the camera for more details.
Resolution: for some quality options, the image resolution can be selected
from this drop-down menu.
Sequence: here you can set the number of images to be captured in the sequence.
Sensitivity: sets sensitivity of the sensor. The options conform to the sensitivity
of traditional photo materials in the ISO scale. When Auto option is selected,
the camera changes the sensitivity automatically depending on the current
illumination conditions.
Shutter speed: when capturing images in the Manual or Shutter priority mode,
here you can set the required shutter speed.
Aperture: when capturing images with the lens attached in the Manual or
Aperture priority mode, here you can set the required aperture value.
White balance: this option can be used for setting the white balance for
various kinds of illumination.
244
Control Panels of Imaging Devices
Anti-Shock time: delay between opening the mirror and the image
acquisition can be set to avoid capturing of blurred images caused by
vibrations.
Exposure compensation: this option allows to lighten or darken the
images when the automatic exposure mode is set.
Warning
When the battery indicator in the right upper corner of the tab changes its color
to red, replace the battery as soon as possible. Low battery can cause unstable
behavior of the camera.
Macro Tab
This tab is visible only when a lens is attached to the camera body.
Auxiliary light: auxiliary light helps the camera to focus correctly in
dark illumination conditions.
245
Control Panels of Imaging Devices
Flash compensation: it is possible to amplify or suppress the flash
intensity by selecting the required value from this menu.
Flash mode: here you can set the flash mode. See the user's
guide of the camera for more details.
Focus metering mode: here the area, which will be used for
evaluating the focus, can be selected. When using the E-330
SLR camera, this menu is accessible only, if there is the A
mode selected in the Live view mode menu. See the user's
guide of the camera for more details.
Live view mode (E-330 SLR only): the E-330 SLR camera is equipped
with two sensors. In the B mode, the same sensor is used for capturing
images and also for displaying the live view (sensor with higher
resolution) but automatic focusing is not available due to the construction
of the camera.
Colors Tab
On this tab, you can set several parameters influencing the quality of images.
246
Control Panels of Imaging Devices
Color mode: here you can set the color mode. Changes will reflect
interactively in the live view. The default option is VIVID.
Contrast: contrast of images can be adjusted by this menu.
Shading compensation: shading compensation can be activated in this
menu. See the user's guide of the camera for more details.
Sharpness: sharpness enhancement can be set in this menu.
Gradation: color gradation mode can be selected in this menu. Changes
will reflect only in the captured images.
Saturation: value of color saturation can be set in this menu.
Live View Tab
This tab contains the controls intended for setting the live view. The available parameters
are: Brightness, Contrast, Saturation, Hue, Crop borders. These settings do not influence
the captured images. Performed changes will apply to the live view only.
247
Control Panels of Imaging Devices
Using the sliders, you can set the properties of the live view. The recommended procedure
is:
1. Open the control panel of the OLYMPUS® E-System digital camera, capture the
image and display it in the Display Window.
2. In the control panel of the OLYMPUS® E-System digital camera activate the Live
image tab. Move the control panel to see the live view and the captured image at once.
3. Using the sliders, set the live view parameters so that it looks as similar as possible
to the captured image.
By clicking the Default button you can restore the default settings of all the sliders in the
Live image settings part.
Using the controls in the Crop borders part the unwanted borders of the live view can be
cropped.
Displayed area: this indicator shows current size of the live view in pixels.
Select: click this button to display a dialog box for interactive selection of
borders to be cropped from the live view.
Reset: click this button to display the full size of the live view - cropping
of the borders will be deactivated.
Restart live view: click this button in case the live view display fails (this
may happen sometimes e.g. after returning from the screen saver mode).
Setting up the Borders to Crop
After clicking the Select button there will appear a dialog box with static image from the
live view, in which you can select interactively the borders to be cropped. Select the area
of the image, you want to retain, by the green rectangle. The rest will be cropped. Borders
can also be defined manually by the fields at the bottom of the dialog box. Confirm the
settings by clicking the OK button. The settings will apply to the live view only.
248
Control Panels of Imaging Devices
Shading Correction Tab
This tab contains control elements for the shading correction function. This function may
be used to remove deficiencies in the image caused by inhomogeneous illumination (removal
of the darker corners of the image) or by dust on the sensor.
Shading correction: this option turns the Shading Correction function
on/off.
249
Control Panels of Imaging Devices
Illumination: in dependence on the type of the used illumination select
Reflected or Transmitted option. The correction method is different for
each illumination type.
Calibration mask: if you click the Capture mask button,
an image, which will be used as a calibration mask for
shading correction function, will be acquired. In the field
next to the button will be displayed the preview of the
captured mask and information about its size.
Correction level: using this slider you may set the
strength with which will be the shading correction
applied.
Using the Shading Correction Function
Important
Shading correction function gives good results only if all the settings of the
microscope and the camera are the same, while acquiring images, as when
capturing a calibration mask. If you change the conditions: change of
magnification, change of illumination, change of image size, and so on, it is
necessary to acquire the calibration mask again.
To use the Shading correction function it is necessary to create a calibration image (the
so called mask) first. Proceed as follows:
Transmitted Light
1. Focus the microscope using the desired microscope's magnification.
2. Remove the specimen and on the Capture tab set the desired image Quality, Resolution
and White balance.
3. Switch to the Shading correction tab and select Enabled option. In the Illumination
part select the Transmitted option. Then click the Capture mask button. A thumbnail
of the mask will be displayed in the control panel.
250
Control Panels of Imaging Devices
4. Place the specimen back in.
5. In the Correction level part adjust the correction level using the slider. Acquire an
image to check the settings. According to the need you may, using the Correction
level slider, adjust the correction.
Reflected Light
1. Set the desired microscope's magnification.
2. Place a white sheet under the microscope (for example a sheet of white paper). Do
not focus the microscope. On the Capture tab set the desired image Quality, Resolution
and White balance.
3. Switch to the Shading correction tab and select Enabled option. In the Illumination
part select the Reflected option. Then click the Capture mask button. A thumbnail of
the mask will be displayed in the control panel.
4. Insert the specimen under the microscope and focus it.
5. In the Correction level part adjust the correction level using the slider. Acquire an
image to check the settings. According to the need you may, using the Correction
level slider, adjust the correction.
All acquired images will now be automatically adjusted using the Shading correction
function until the function is disabled or the control panel is terminated.
Timestamp Tab
It is possible to automatically insert, into the acquired images, date and time of their
acquisition – the so called “timestamp“. The timestamp will, after acquisition of the image,
become a solid part of the image and it is not possible to remove it from the image other
way than by cropping it.
Timestamp: this option turns the Timestamp function on/off.
251
Control Panels of Imaging Devices
Settings: if you click this button a dialog box for setting of timestamp
parameters will open.
Insert: by checking of individual options it is possible to define which
components of the timestamp will be inserted into the acquired images.
Orientation: this field serves as an indicator of the set orientation of the
timestamp. If you double-click into this field, a Timestamp settings dialog
box will open.
Preview: in this field, preview of the timestamp
is displayed the way it will be inserted into the
acquired images, except for the orientation
option. The text size is the same as will be
displayed in the acquired images in the 100 %
(1:1) display size.
Position: the indicator shows the position, where
the timestamp will be inserted in the acquired
images.
Timestamp Settings
After clicking the Settings button or double-click to the Orientation field the Timestamp
settings dialog box will open.
252
Control Panels of Imaging Devices
Format: using the options in this part, it is possible to set the appearance of the timestamp.
Position: this option enables to select into which corner of the acquired images should the
timestamp be inserted.
Orientation: using this option, it is possible to select the orientation of the timestamp's
text.
Profiles Tab
All settings of the control panel (except for the settings of the Shading correction function)
can be saved into one of the four profiles and at any time loaded again.
253
Control Panels of Imaging Devices
Save to profile: if you click this button, a dialog box will be
displayed for saving of the current control panel's settings into one
of the profiles.
Default profile: if you click this button, all elements of the control
panel will be set to the default values. Saved profiles will not be
affected in any way by this action.
Saving of the Control Panel's Settings into the Profile
To save the settings into the profile proceed as follows:
1. Set the desired parameters of the control panel.
2. On the Profiles tab click the Save to profile button. Save Profile dialog box will open:
3. In the Available profiles part select, by clicking the corresponding button, one of the
profiles you want to save the current control panel's settings to.
4. Type in a new profile name into the Profile name field.
5. Confirm by clicking the OK button.
254
Control Panels of Imaging Devices
Loading a Profile
Loading of a desired profile can be done by clicking the corresponding button of the profile
on the Profiles tab. Automatic adjustment of the control panel's elements will take place.
®
7. OLYMPUS DP72 Digital Camera
OLYMPUS® DP72 is a digital camera with the 2/3" CCD chip. The chip, which incorporates
1.45 million effective pixels, can be piezo-shifted during image acquisition to obtain
a maximum effective resolution of 12.8 million pixels. Peltier cooling of the chip to the
temperature 10°C lower than is the temperature of the environment, provides significant
reduction of noise level and high sensitivity. OLYMPUS® DP72 camera is suitable for
low signal intensity fluorescence microscopy.
255
Control Panels of Imaging Devices
The control elements are located in the toolbar and on six tabs.
OLYMPUS® DP72 camera control panel is intended to control the camera functions, live
view displaying and image acquisition. It consists of a toolbar, six tabs and the live view.
Toolbar
The toolbar is located above the live view. The toolbar contains tools that control the
camera's parameters and adjust the parameters of the live view.
Standard view: displays the live view in a standard mode (disables a zoomed view
if active).
Zoomed view: activate this tool and click in the live view to zoom the live view to
100 %. This option does not influence the acquired images. This button is inactive,
when the resolution of the live view is set to 1360 x 1024 pixels.
Rotate by 180°: rotates the image by 180°.
Flip vertically: flips the live view along the horizontal axis.
Flip horizontally: mirrors the live view along the vertical axis.
Color/Grey scale mode: switches between color and grey scale mode.
Focus region (Bar graph
, Numbers
): this function makes it easier to focus the
selected area of the image. To use this function proceed as follows:
1. Using the focus knob, roughly focus the microscope. Activate the Focus region tool.
Move the cursor into the live view and insert the frame in the live view, by dragging
the mouse, while holding the left mouse button, to a place, where you want to do the
focusing.
256
Control Panels of Imaging Devices
2. Focus indicator will be displayed next to the frame. Blue strip represents the current
focus value and the red guideline maximum reached focus value. Both values are at
the same level at the beginning.
3. If you start rotating the microscope focus knob now, the blue strip will start to decline
respectively rise according to the fact, whether the focus level in the framed area will
decrease or rise. Select such a direction so the strip starts to rise. Continue rotating
the focus knob until the blue strip starts to decline. Red guideline will remain on the
position of the maximum reached focus value. Gently rotate the focus knob in the
opposite direction, now achieve that the blue strip reaches as closely as possible to
the red guideline – in this position, image of the selected area will be as sharp as
possible. You can use numerical values, in a similar way, for focusing when activating
the Focus region tool by the Numbers
icon. In this mode both focus level values
are displayed in the current value/maximal reached value form.
Focus region - reset: initializes the indicator again into the default state.
Minimum sharpness: sets the minimum level of sharpness.
Standard sharpness: sets the normal level of sharpness.
Maximum sharpness: sets the maximum level of sharpness.
Low contrast: reduces the level of image contrast.
Standard contrast: sets the standard contrast value.
High contrast: increases the level of image contrast.
257
Control Panels of Imaging Devices
Linear contrast: sets the contrast to linear value.
White balance on defined region: after clicking this icon, you can define, by
dragging the mouse in the live view, while holding the left mouse button, the area
for white balance.
Black balance on defined region: after clicking this icon, you can define, by
dragging the mouse in the live view, while holding the left mouse button, the area
for black balance.
Automatic white balance: by clicking this button the white balance will be set
automatically.
Automatic black balance: by clicking this button the black balance will be set
automatically.
Show/hide automatic exposure region indicator: shows or hides the exposure
region.
Capture Tab
This tab contains camera controls for setting the exposure parameters and acquiring the
images. These settings apply to the live view as well as to the acquired images.
Capture: captures the image and transfers it to the computer. You can also use
the [Ctrl+Enter] key shortcut.
258
Control Panels of Imaging Devices
Full screen: the button is used for displaying the live view full screen. In this
mode, you can control the program using the Capture and Exit full screen
mode buttons in the upper part of the screen.
Size: here select the resolution of acquired images.
Binning: this option enables the binning function. You can select from Off,
2x2, and 4x4 modes.
Accumulation: after you turn on the accumulation mode
and click the Capture button, the camera will capture
defined number of images. From these images one
image will be created and transferred to the computer. You can select from the Integral or
Average modes. Integral mode creates the resulting image by summing the partial images.
Average mode creates the resulting image by averaging the partial images.
Exposure time: if a manual exposure mode is
active, you may, using the arrow buttons or by
dragging of the slider, manually set the desired
value of the exposure time. When Auto or SFL
- Auto mode is active, you can lighten or darken
the image using the Correction option.
ISO sensitivity: sets the sensitivity of the sensor. The options conform to the
sensitivity of traditional photo materials in the ISO scale.
259
Control Panels of Imaging Devices
Exposure mode: if the exposure mode is set to the Auto option,
exposure time is automatically set according to the illumination of the
camera's field of view. SFL - Auto option represents automatic exposure
mode for fluorescence imaging. When using the Auto and SFL - Auto
modes, the
button (Auto Exposure Lock) will also be active. This
button “locks“ the exposure time on the current value. If the Manual
mode is active, value of the exposure time is set by user, using the
control elements in the Exposure time part.
Exposure region: the controls in this part are designed for defining of
an area of the live view which will be used for measuring of exposition
in the Auto and SFL-Auto modes. You may select one of the predefined
exposure region sizes (30%, 1% or 0,1%) or you may select your own
size of the region. After selecting one of the options, a frame will be displayed in the middle
of the live view, which will define the exposure region. The frame can be moved to the
desired area in the image - move the mouse into the region and by dragging the mouse
while holding the left mouse button relocate the frame to the desired position. If you place
the cursor above the frame's edge or above one of its corners, the cursor will change shape,
and by dragging the mouse while holding the left mouse button, you may change the size
of the frame as you please. By clicking the Center button, you may place the frame to the
center of the camera's field of view. To define your own exposure region, click the Custom
button, move the cursor to the live view and then by dragging the mouse while holding
the left mouse button, insert the frame of a desired size.
Live View Tab
Live image quality: from this drop-down menu, you may select the
size, in which the live view will be displayed.
260
Control Panels of Imaging Devices
Cross: displays/hides the central cross.
Color Balance Tab
This tab contains control elements which are intended for adjustment of the parameters of
the live view. Changes in the settings will apply to the live view as well as to the acquired
images.
White balance: this part contains control elements for white balance function. The Auto
WB button activates the automatic white balance function. After clicking the Region WB,
drag the mouse in the live view, while holding the left mouse button, to define a region
which will be used as reference for the white balance. The Red, Green and Blue sliders
enables to adjust the white balance manually.
Black balance: this part contains control elements for black balance function. The Auto
BB button activates the automatic black balance function. After clicking the Region BB,
drag the mouse in the live view, while holding the left mouse button, to define a region
which will be used as reference for the black balance. The Red, Green and Blue sliders
enables to adjust the black balance manually.
Shading Correction Tab
This tab contains control elements for the shading correction function. This function may
be used to remove deficiencies in the image caused by inhomogeneous illumination (removal
of the darker corners of the image) or by dust on the sensor.
261
Control Panels of Imaging Devices
Shading correction: this option turns the Shading correction function
on/off.
Illumination: in dependence on the type of the used illumination select
Reflected or Transmitted option. The correction method is different for
each illumination type.
Calibration mask: if you click the Capture mask
button, an image, which will be used as
a calibration mask for shading correction function,
will be acquired. In the field next to the button will
be displayed the preview of the captured mask and
information about its size.
Correction level: using this slider you may set the strength,
with which will be the shading correction applied. If you
click the Preview in Live View button, you will see the effect
of the shading correction function reflecting the current
settings. Using the slider you may set the level of correction
interactively.
262
Control Panels of Imaging Devices
Using the Shading Correction Function
Important
Shading correction gives good results only if all the settings of the microscope
and the camera are the same, while acquiring images, as when capturing
a calibration mask. If you change the conditions: change of magnification, change
of illumination, change of image size, and so on, it is necessary to acquire the
calibration mask again.
To use the Shading correction function it is necessary to create a calibration image (the
so called mask) first. Proceed as follows:
Transmitted Light
1. Focus the microscope using the desired microscope's magnification, switch the camera's
exposure mode to manual, and manually set the exposure time.
2. Remove the specimen and adjust (shorten) the exposure time so the inhomogeneities
of the illumination are visible. Optimal setting is such, the center of the field of view
is white and in the corners there are visible grey inhomogeneities. The darkest areas
should be grey, not black.
3. Click the Automatic white balance button.
4. On the Capture tab set the desired image size.
5. Switch to the Shading correction tab and select the Enabled option. In the Illumination
part select the Transmitted option. Then in the Calibration mask part click the Capture
mask button. Preview of the mask will be displayed in the control panel.
6. Place the specimen back in and set the desired exposure time.
7. In the Correction level part click the Preview in live image button. According to the
need you may, using the Correction level slider, adjust the correction.
Reflected light
1. Set the desired microscope's magnification, switch the camera's exposure mode to
manual, and manually set the exposure time.
2. Place a white sheet under the microscope, (for example a sheet of white paper). Do
not focus the microscope and adjust (shorten) the exposure time so the inhomogeneities
of the illumination are visible. Optimal setting is such, the center of the field of view
263
Control Panels of Imaging Devices
3.
4.
5.
6.
7.
is white and in the corners there are visible grey inhomogeneities. The darkest areas
should be grey, not black.
Click the Automatic white balance button.
On the Capture tab set the desired image size.
Switch to the Shading correction tab and select the Enabled option. In the Illumination
part select the Reflected option. Then in the Calibration mask part click the Capture
mask button. Preview of the mask will be displayed in the control panel.
Place the specimen back in, focus the microscope and set the desired exposure time.
In the Correction level part click the Preview in live image button. According to the
need you may, using the Correction level slider, adjust the correction.
All acquired images will now be automatically adjusted using the Shading correction
function until the function is disabled or the control panel is terminated.
Timestamp Tab
It is possible to automatically insert, into the acquired images, date and time of their
acquisition – the so called “timestamp“. The timestamp will, after acquisition of the image,
become a solid part of the image and it is not possible to remove it from the image other
way than by cropping it.
Timestamp: this option turns the Timestamp function on/off.
Settings: if you click this button a dialog box for setting of timestamp
parameters will open.
Insert: by checking of individual options it is possible to define which
components of the timestamp will be inserted into the acquired images.
264
Control Panels of Imaging Devices
Orientation: this field serves as an indicator of the set orientation of the
timestamp. If you double-click into this field, a Timestamp settings dialog
box will open.
Preview: in this field, preview of the timestamp is
displayed the way it will be inserted into the acquired
images.
Position: the indicator shows the position, where the
timestamp will be inserted in the acquired images.
Timestamp Settings
If you click the Settings button or if you double-click into the Orientation field, a dialog
box for setting of the timestamp will open.
Format: using the options in this part, it is possible to set the appearance of the timestamp.
265
Control Panels of Imaging Devices
Position: this option enables to select into which corner of the acquired images should the
timestamp be inserted.
Orientation: using this option, it is possible to select the orientation of the timestamp's
text.
Profiles Tab
All settings of the control panel (except for the settings of the Shading correction function)
can be saved into one of the four profiles and at any time loaded again.
Save to profile: if you click this button, a dialog box will be
displayed for saving of the current control panel's settings into one
of the profiles.
Default profile: if you click this button, all elements of the control
panel will be set to the default values. Saved profiles will not be
affected in any way by this action.
Saving of the Control Panel's Settings into the Profile
To save the settings into the profile proceed as follows:
1. Set the desired parameters of the control panel.
2. On the Profiles tab click the Save to profile button. Save Profile dialog box will open:
266
Control Panels of Imaging Devices
3. In the Available profiles part select, by clicking the corresponding button, one of the
profiles you want to save the current control panel's settings to.
4. Type in a new profile name into the Profile name field.
5. Confirm by clicking the OK button.
Loading a Profile
Loading of a desired profile can be done by clicking the corresponding button of the profile
on the Profiles tab. Automatic adjustment of the control panel's elements will take place.
267
Control Panels of Imaging Devices
®
8. OLYMPUS Consumer Digital Cameras (SP
®
and CAMEDIA series)
The control panel is intended for displaying a live image, controlling the camera functions
and capturing images from OLYMPUS® SP and CAMEDIA series digital cameras. The
controls are located in the toolbar and two tabs.
Camera Control Tab
The tab contains the controls for setting the camera parameters, setting the exposure and
capturing images.
268
Control Panels of Imaging Devices
Capture: after clicking this button, an image will be acquired and
automatically transferred to the computer. You can also use the [Ctrl+Enter]
key shortcut.
Full screen: the button is used for displaying the live view full screen. In
this mode, you can control the application using the Capture, Refresh live
image and Exit full screen buttons in the upper part of the live view.
Quality: you can select from five quality levels (Super High Quality, High
Quality and Standard Quality 1 and 2 and TIFF). The SHQ and HQ modes
capture images in full camera resolution in JPEG format with different
compression ratios. SQ1 and SQ2 modes capture images with lower camera
resolution in JPEG format. TIFF mode captures images in full camera resolution
in TIFF format. When using OLYMPUS® SP-350 and SP-500UZ cameras the
TIFF option is not available.
Sensitivity: sets sensitivity of the sensor. The options conform to the sensitivity
of traditional photo materials in the ISO scale. When Auto option is selected,
the camera changes the sensitivity automatically depending on the current
illumination conditions.
White balance: this option can be used for setting the white balance
for various kinds of illumination.
269
Control Panels of Imaging Devices
Flash mode: here you can set the flash mode. If you are acquiring the
images from a microscope turn the flash off.
Focus mode: this drop-down menu offers three options: Auto,
Manual and Macro mode. If you select the Manual mode, you
can manually focus by the Focus slider.
Warning
Turning the automatic focusing off is necessary to obtain the correct measurement
results. To achieve this, select the Manual focus mode and move the Focus slider
to infinity value.
Metering system: here you can select the metering mode. Digital ESP
and Spot modes represent two automatic modes. The Manual option
enables to set your own exposure parameters using the Shutter speed
slider and Aperture drop-down menu. If you select the Shutter priority
option you can set the Shutter speed by a slider and the corresponding
aperture value will be set automatically. If you select Aperture priority, you can set the
required Aperture value and the corresponding shutter speed will be set automatically.
Exposure compensation: this option allows to lighten or darken the
images when the automatic exposure mode is set.
Zoom: this slider controls the focal length of the camera's lens. When using
certain types of digital cameras, a stop will be indicated at the Zoom slider.
This stop represents the value, to which the slider should be set for
270
Control Panels of Imaging Devices
acquiring images from a microscope. If the stop is not indicated, set the Zoom slider to its
maximum value.
Warning
It is necessary to maintain the fixed Zoom slider value in order to achieve correct
measurements results.
Shutter speed and Aperture: these options enable manual settings of exposure parameters
if Manual, Shutter priority or Aperture priority modes are selected in Metering system
menu.
Live Image Tab
This tab contains the controls intended for setting the live view. The available parameters
are: Brightness, Contrast, Saturation, Hue, Borders. These settings do not influence the
captured images. Performed changes will apply to the live view only.
Using the sliders, you can set the properties of the live view. The recommended procedure
is:
1. Open the control panel of the OLYMPUS® SP and CAMEDIA series digital cameras,
capture the image and display it in the Display Window.
2. In the control panel of the OLYMPUS® SP and CAMEDIA series digital cameras
activate the Live image tab. Move the control panel to see the live view and the captured
image at once.
3. Using the sliders, set the live view parameters so that it looks as similar as possible
to the captured image.
Borders slider can be used for setting the optimal size of the live view. Move the slider,
so that the live view fills the whole control panel's window and black borders are eliminated.
Click the Default button to restore the default settings of all the control elements on the
Live image tab.
271
Control Panels of Imaging Devices
Profiles
Profiles are intended for quick and easy settings of the camera functions. Each profile may
contain settings for all the functions of the Camera control tab. The Standard, Microscope
and Macro profiles are predefined and may be redefined at any time. The Custom profile
is intended for saving of user settings.
Standard: preset profile for standard digital photography (e.g. using tripod).
SHQ resolution is set as well as automatic exposure mode, automatic white
balance, automatic flash and focusing and ESP exposure mode.
Microscope: the following parameters of the digital camera will be set for
acquiring images from microscopes: maximum zoom, flash switched off, manual
focusing mode set to infinity value. The other parameters are identical to the
Standard profile.
Macro: this is a predefined profile for macro imaging. The camera will be set
to macro focusing mode with the spot exposure metering mode.
Custom: this profile is prepared for storing your personal settings.
Note
Upon activation of one of the profiles, a test image will be automatically captured,
to set the camera correctly. It is then deleted immediately.
272
Control Panels of Imaging Devices
Toolbar - Other Functions
Connect: this button connects the camera when disconnected.
Live image: turns on/off the live view.
Refresh: use this button for refreshing the live view (e.g. in case of over
illumination).
Erase: erases the camera's memory card contents.
Settings: opens a dialog box with the options for redefining and restoring the
profiles.
Creating a Custom Profile/Editing the Existing Profile
1. To create a custom profile set the required camera control panel's parameters on the
Camera control tab first.
2.
Click the
button. A dialog box for setting the profiles will appear. Click the
button of the profile you want to save the current control panel's parameters to. The
selected profile will be overwritten. If you want to restore the original settings of the
Standard, Microscope and Macro profiles, click the Restore button.
273
Control Panels of Imaging Devices
274
Control Panels of Imaging Devices
9. Analog Video Source
The control panel allows acquiring of images from analog video sources. The images can
be acquired e.g. from analog cameras, video-endoscopic systems, ultrasonographs, or DVD
players.
Capturing Tab
Capture: captures an image and transfers it to the computer.
Full Screen [Ctrl+F]: this button is used for displaying of live view full
screen. Using this type of display you can control the program using the
Capture and In window buttons.
275
Control Panels of Imaging Devices
Image Settings Tab
Adjust: Brightness, Contrast, Hue and Saturation sliders can be used for setting the
corresponding image parameters. Click the Default button to restore the default values of
all sliders.
Using controls in the Crop borders part there can be set the optimal size of the live view.
This way e.g. the unwanted black borders can be cropped from the image.
Displayed area: this indicator shows current size of the live view in pixels.
Select: click this button to display a dialog box for interactive selection of
borders to be cropped from the live view.
Reset: click this button to display the full size of the live view - cropping of
the borders will be deactivated.
Restart live image: click this button in case the live view display fails (this
may happen sometimes e.g. after returning from the screen saver mode).
Setting up the Borders to Crop
After clicking the Select button there will appear a dialog box with static image from the
live view, in which you can select interactively the borders to be cropped. Select the area
of the image, you want to retain, by the green rectangle. The rest will be cropped. Borders
can also be defined manually by the fields at the bottom of the dialog box. Confirm the
settings by clicking the OK button.
276
Control Panels of Imaging Devices
Device Settings Tab
Input: select the input type of the analog signal depending on the currently
used input connector. You can select S-Video or Composite (see figure)
options.
Timestamp Tab
It is possible to automatically insert, into the acquired images, date and time of their
acquisition – the so called “timestamp“. The timestamp will, after acquisition of the image,
277
Control Panels of Imaging Devices
become a solid part of the image and it is not possible to remove it from the image other
way than by cropping it.
Timestamp: this option turns the Timestamp function on/off.
Settings: if you click this button a dialog box for setting of timestamp
parameters will open.
Insert: by checking of individual options it is possible to define which
components of the timestamp will be inserted into the acquired images.
Orientation: this field serves as an indicator of the set orientation of the
timestamp. If you double-click into this field, a Timestamp settings dialog
box will open.
Preview: in this field, preview of the timestamp is
displayed the way it will be inserted into the acquired
images, except for the orientation option. The text size is
the same as will be displayed in the acquired images in
the 100 % (1:1) display size.
Position: the indicator shows the position, where the
timestamp will be inserted in the acquired images.
Timestamp Settings
After clicking the Settings button or double-click to the Orientation field the Timestamp
settings dialog box will open.
278
Control Panels of Imaging Devices
Format: using the options in this part, it is possible to set the appearance of the timestamp.
Position: this option enables to select into which corner of the acquired images should the
timestamp be inserted.
Orientation: using this option, it is possible to select the orientation of the timestamp's
text.
Profiles Tab
All settings of the control panel can be saved into one of the four profiles and at any time
loaded again.
279
Control Panels of Imaging Devices
Save to profile: if you click this button, a dialog box will be displayed
for saving of the current control panel's settings into one of the
profiles.
Default profile: if you click this button, all elements of the control
panel will be set to the default values. Saved profiles will not be
affected in any way by this action.
Saving of the Control Panel's Settings into the Profile
To save the settings into the profile proceed as follows:
1. Set the desired parameters of the control panel.
2. On the Profiles tab click the Save to profile button. Save Profile dialog box will open:
3. In the Available profiles part select, by clicking the corresponding button, one of the
profiles you want to save the current control panel's settings to.
4. Type in a new profile name into the Profile name field.
5. Confirm by clicking the OK button.
280
Control Panels of Imaging Devices
Loading a Profile
Loading of a desired profile can be done by clicking the corresponding button of the profile
on the Profiles tab. Automatic adjustment of the control panel's elements will take place.
281
Control Panels of Imaging Devices
282
Modules
Program QuickPHOTO INDUSTRIAL 3.0 contains extensive functions in the form of
built-in modules. Other optional modules can be added to the program.
1. Timer - Built-in Module for Time-Lapse Image
Capturing
QuickPHOTO INDUSTRIAL 3.0 is equipped with the Timer module, which is designed
for automatic image capturing in the defined time interval, the so called time-lapse image
acquisition. This module can be activated by the Modules → Timer option or by clicking
the icon in the Toolbar. Timer dialog box will be displayed along with the control panel
of the active imaging device. Timer dialog box contains a Capturing tab only in a default
state. If you have activated a computer controlled illuminator (in Edit → Options... →
Hardware → Illuminators), the Timer dialog box will also contain a second tab Illumination.
After setting of the desired parameters described in the following chapters, run the time-lapse
image capturing by clicking the
button. Time-lapse image capturing can be terminated
at any time by clicking the
button. In the bottom part of the Timer dialog box, there
are the following information displayed: Time until Next Capturing, Number of Captured
Images and Number of Remaining Images.
Note
If the Timer module, for some reason, will not be able to capture images in the
defined time interval, the Time until Next Capturing label will be red. In such
case, a text file containing information about the delay or possibly omission of
the concerned images, will be created.
1.1. Tab Capturing
Capturing tab contains control elements for the setting of parameters of the time-lapse
image capturing. You may select from two modes:
283
Modules
• Number of Images
• Time Interval
Image Capturing in the Number of Images Mode
After you select the Number of Images mode, set the number of images you want to capture
in the Number field. In the Interval between Images part set the desired time interval in
hours, minutes and seconds.
Image Capturing in the Time Interval Mode
After you select the Time Interval option, set the Beginning and End of the time interval
intended for time-lapse image capturing. Beginning and end of the interval is defined by
the date and time. The beginning and end date can be defined by typing in from the
keyboard, or by selecting it from a calendar, which can be displayed by clicking the arrow
on the right from the displayed date. Time values can be entered from the keyboard or
using the arrows on the right hand side next to the corresponding time fields. Then in the
Interval between Images part set the desired time interval in hours, minutes and seconds.
Note
Minimal interval between images depends on the size of the images being captured
and the set exposure time of the active imaging device. If you set an interval
shorter than is the time necessary for image capturing and its transfer to the
computer, you will be warned about this fact and the time interval for image
capturing will be set at a minimum applicable value.
Location of the Captured Images
Location of the captured images can be selected in the Store Images: part. There are two
options available:
• in the Main Program Window - images will be displayed after capturing in the Main
Program Window (this option is suitable for capturing of a smaller number of images).
• in Folder: this option is recommended for capturing of larger number of images. Images
will be, after capturing, automatically saved into the selected folder and they will not
be displayed in the Main Program Window. To select the folder, click the
button
284
Modules
and select the desired location. Enter the file name of the sequence being captured into
the File Name field. Individual images will be automatically differentiated using the
five digit serial number attached after the selected name.
In the bottom part of the dialog box there are displayed information about the process of
time-lapse image capturing. In the Time until Next Capturing part the time remaining until
next image capturing will always be displayed. Further you will have information about
how many images have already been captured in the current sequence - in the Number of
Captured Images part, and how many images remain to be captured - in the Number of
Remaining Images part.
285
Modules
1.2. Tab Illumination
If you have activated control of the computer controlled illuminator (in Edit → Options...
→ Hardware → Illuminators), the Timer dialog box will contain also the Illumination tab.
This tab enables to set turning off the illumination between capturing images in order to
avoid undesirable long-term effect of the illumination on the specimen. The illumination
will always be turned on only for the time period necessary for the image capturing and
then it will be turned off. To turn off the illumination between individual image capturing,
check in the Control during Capturing part the Turn off Illumination between Captures
option.
The following information are valid for the checked option Turn off Illumination between
Captures:
Turn on Illumination before Capturing option sets an advance for turning on the illumination
before capturing each image. It is recommended to set the advance of at least couple of
seconds for illumination stabilization before capturing.
If you check the Turn off Illumination when Finished option, the illumination will be turned
off when the whole process of time-lapse image capturing is finished.
In the Illumination Control part set the desired illumination intensity. After the beginning
of the time-lapse image capturing, the Current Illumination Intensity will be set as the
Intensity Set for Capturing. During the time-lapse capturing it is possible to, in the time
when the illumination is turned off, turn the illumination on (for example for the control
of the ongoing experiment) using the control elements directly on the illuminator or using
the Turn on button in the Illumination Control part. Change of illumination settings will
have no effect on the previously made settings for image capturing. Time-lapse image
capturing will continue with the illumination intensity set in the Intensity Set for Capturing
part.
If you want to, during the time-lapse image capturing, change the illumination intensity
set for capturing, change the value in the Intensity Set for Capturing part or in the
Illumination Control part set, while having the illumination turned on, the desired intensity
and click the Use Current button in the Intensity Set for Capturing part. The new
illumination intensity value will be set for time-lapse image capturing.
286
Modules
1.3. Recommendations for the Time-Lapse Image
Capturing
To achieve optimal results during time-lapse image capturing, we recommend the following:
• Use manual exposure mode of the imaging device for image capturing.
• Turn off the screen saver of the Microsoft® Windows® operating system. Switch the
automatic updates function to the manual installation mode.
• Use the computer's UPS.
• Before you start capturing images into the folder, make sure that you are authorized to
write into the folder, and there is enough free space on the target drive.
287
Modules
• Because with most illuminators, the illumination intensity decreases after turning on,
until temperature stabilization, let the illuminator warm up and thermally equilibrate
before you start the time-lapse capturing.
1.4. Time-Lapse Image Capturing from the Imaging
Devices Controlled via TWAIN Interface
Timer module enables time-lapse image capturing also from imaging devices controlled
via TWAIN interface. These control panels are controlled externally by the Timer module,
which implies minor limitations.
After you begin the time-lapse image capturing (by clicking the Start button) using the
TWAIN control panel an informative dialog box will be displayed, which will ask you to
click the button for image capturing in the control panel of the imaging device. After you
click the corresponding button, initialization image will be captured (which will not be
included in the time-lapse sequence), which will enable the Timer module to identify the
position of the button for image capturing in the TWAIN control panel. Information dialog
box will automatically disappear after capturing of this image and the time-lapse image
capturing will begin. To ensure successful process of time-lapse image capturing, do not
move or click the mouse anymore until the whole time-lapse image capturing process is
finished.
2. Time-Lapse Video - Built-in Module
Time-Lapse Video module, which is a standard component of the QuickPHOTO
INDUSTRIAL 3.0 program, is designed for creating of video files from the acquired
time-lapse images. For example if you acquire a series of images of a slowly changing
sample with the Timer module, you can then easily create, using the Time-Lapse Video
module, a video file in which the movement will be displayed in an accelerated form.
How to Create a Time-Lapse Video
To create a video file, proceed according to the following steps:
1. If you intend to create a video file from images currently opened in the QuickPHOTO
INDUSTRIAL 3.0 program, select them in the Thumbnail Browser.
288
Modules
2. Run the Time-Lapse Video module from the Modules → Time-Lapse Video menu or
click the
icon in the Toolbar. The Time-Lapse Video wizard will open.
3. On the Selection of Image Source tab, select the source of images from which the
resulting video file is supposed to be created. There are three options available:
• Process Images Selected in the Thumbnail Browser - select this option if the video
file is going to be created from a smaller number of images which are opened in
the Main Program Window of QuickPHOTO INDUSTRIAL 3.0 program. Images
which were, in the time of running of the Time-Lapse Video module, selected in the
Thumbnail Browser, will be processed.
• Select Saved Files for Processing (Up to 2000 Files) - select this option if the images
intended for processing are saved on a hard drive. After clicking the Next button a
dialog box for files selection will open. Select all files from which you want to
create the video file. Maximum number of files is affected by the length of their
names and it may reach the maximum value of 2000. In case of long file names,
this number may be smaller.
• Select the Whole Folder for Processing - select this option if the images intended
for processing are saved in a folder, which does not contain any other images.
Processed will be all images from the selected folder, therefore be careful not to
forget any unwanted images among the images intended for processing. This option
enables processing of virtually any number of images.
Click the Next button.
289
Modules
4. Next page of the wizard Video Properties enables to set parameters of a new video
file. There are two options affecting the speed of the captured action available:
• Interval between Frames - this option enables to set the time interval between
images. This option is useful, for example, if you want to have control over the
speed of the projected action compared to reality.
• Frame Rate - this option enables to create a video file with the desired length or
fluency. To create a fluent video file, the minimum value of 25 images per second
(FPS) is recommended.
According to the set parameters the Video Duration will be calculated.
In the Video Resolution part you may select the size of the resulting video file in
pixels. The larger size you select, the larger will be the resulting video file.
290
Modules
In the Timestamp part you may set the insertion of a timestamp into a video file – into
each image of the video file will be inserted the information about the date and time
of image acquisition. This setting will be visible in the video file in such a way that
the time will be running in it. It is possible to insert Date and Time. Appearance of
the timestamp may be set after clicking the Timestamp Settings link.
Timestamp Settings
When at least one of the Date and Time checkboxes is checked, if you click the
Timestamp Settings link, a dialog box for setting of the timestamp will open.
Format: using the options in this part, it is possible to set the appearance of the
timestamp.
Position: this option enables to select into which corner of the video file should the
timestamp be inserted.
Orientation: using this option, it is possible to select the orientation of the timestamp's
text.
291
Modules
5. To begin creating a video file, click the Start button. A dialog box for saving of the
file with the .avi extension will be displayed. Select the desired location and enter the
file name. By clicking the Save button you will run the video file creation itself.
6. You may watch the process of creating of the video file on the Video Rendering page.
Using the Rendering Priority option, it is possible to select how busy will the computer
be with creating of the video file. If you want to work with another programs during
creation of the video file, you may select the Low option. You may pause creating of
the video file by clicking the Pause button and you may run it again by clicking the
Resume button.
292
Modules
3. Deep Focus (optional)
Deep Focus module is designed for creating of images with much higher depth of field
than the standard use of optical microscopes can provide (so called focus stacking or
z-stacking). This module can be used with stereomicroscopes as well as other types of
optical microscopes for observation in transmitted or reflected light. This module can also
be used for macro-imaging.
Principle is in the capturing of a sequence of images with a different focus plane. From
each of these images is, by the module, automatically selected and used only the focused
area. From these focused areas is composed the resulting, completely focused image.
293
Modules
4. RECORD IT (optional)
RECORD IT module is an additional module which enables, in the real time, record digital
video from digital and analog cameras and other devices. Using the RECORD IT module,
you may easily record for example a microscopic experiment, growth of cell colonies and
so on.
5. FLUO+ (optional)
FLUO+ is designed for composing of images acquired using a fluorescence microscope.
Up to eight images acquired using various fluorescence filters can be composed into one
resulting image.
294
Adding of Modules and Upgrading
QuickPHOTO INDUSTRIAL 3.0 program can be extended with additional modules (for
example: Deep Focus, RECORD IT, FLUO+) or upgraded to higher version (if available).
The first step towards getting a new module or upgrade for your QuickPHOTO
INDUSTRIAL 3.0 program is sending of the dongle identification number via e-mail or
its communication to your supplier by another way.
In order to send the dongle number via e-mail proceed as follows:
1. In the Help menu activate the Send Dongle Number... option.
2. In the open dialog box there will be displayed the identification number of your dongle
and a [email protected] e-mail address.
If you are using one of the e-mail programs (for example Microsoft® Outlook®), click the
Send button. New e-mail will automatically be opened with the number of your dongle in
it. Fill in your contact data and the name of a product you want to purchase and send the
e-mail.
If you do not use an e-mail program, create an e-mail the regular way (for example using
your internet browser), copy your dongle number into it, write your contact data and the
name of a product you want to purchase and send it to the following address:
[email protected].
295
Adding of Modules and Upgrading
296
List of Key Shortcuts
Key shortcuts used in the Main Window of the QuickPHOTO INDUSTRIAL 3.0 program:
Key Shortcut
Action
Ctrl+O
Open images from available disc units
Ctrl+S
Save images selected in the Thumbnail Browser
Shift+Ctrl+S
Save As... - saves images selected in the Thumbnail Browser
into the selected location
Ctrl+Alt+S
Save All - saves all opened images
Shift+Ctrl+Alt+S
Save All As... - saves all opened images into the selected
location
Ctrl+M
Export Measured Values from selected images
Ctrl+Alt+M
Export Measured Values from all images
Ctrl+W
Close selected images
Ctrl+Alt+W
Close all images
Ctrl+P
Print
Ctrl+Z
Undo
Ctrl+Y
Redo
Ctrl+C
Copy
Ctrl+V
Paste
Ctrl+L
Compose New Image from Layout of Displayed Images
Del
Delete selected objects
Ctrl+E
Flattening Layers
Ctrl+I
Image Information
Ctrl+T
White Balance Defined by Point
297
List of Key Shortcuts
Key Shortcut
Action
F1
Help
F4
Open imaging device control panel
F11
Options of the program
F12
Display/Hide Table of Measured Values
Alt+S
Start Slideshow
Ctrl+F
Display in Full Screen Mode
Ctrl+Alt+C
Calibration Manager
Alt+X
Exit program
Ctrl+A
Select all thumbnails in the Thumbnail Browser
Ctrl+selection with a mouse Selecting discontinuous selection of thumbnails in the
Thumbnail Browser
Shift+selection with
a mouse
Selecting of more inserted object or a continuous selection
of thumbnails in the Thumbnail Browser
Shift during object insertion Inserting a horizontal or vertical line
Page UP
Display the previous image in the presentation mode
Page Down
Display the following image in the presentation mode
Space Bar
Continue the slideshow
Key shortcuts used in imaging device control panels:
298
List of Key Shortcuts
Key Shortcut
Action
Ctrl+Enter
Capture image
Ctrl+F
Display in Full Screen Mode
[+] on the numeric keyboard Extension of the exposure time while using the manual
exposure mode
Page Up
Extension of the exposure time while using the manual
exposure mode
[-] on the numeric keyboard Shortening of the exposure time while using the manual
exposure mode
Page Down
Shortening of the exposure time while using the manual
exposure mode
299
List of Key Shortcuts
300
Troubleshooting - FAQ
QuickPHOTO INDUSTRIAL 3.0 Program
How can I get the latest version of the program?
To get the latest version of the program, go to the www.promicra.com/downloads.php
website, select the desired product and proceed according to the guidelines.
Which imaging devices are supported by the QuickPHOTO INDUSTRIAL 3.0 program?
List of supported imaging devices in the latest version of the QuickPHOTO INDUSTRIAL
3.0 program can be found on www.promicra.com/cameras.php website.
There appears an error message “Unable to access rn.xml“ or “Unable to access
config.xml“ when terminating the QuickPHOTO INDUSTRIAL 3.0 program.
If you are using McAfee VirusScan virus protection program, try to temporarily deactivate
it. If the problem disappears, it will be necessary to create an exception, in the virus
protection program, for the QuickPHOTO INDUSTRIAL 3.0 program.
®
®
OLYMPUS Digital Cameras (E-system, CAMEDIA and SP
series)
How to switch the OLYMPUS® digital camera to the mode for PC control?
Proceed according to the instructions in the section called “Installation of OLYMPUS®
Digital Camera” on page 14.
The camera cannot be connected in the QuickPHOTO INDUSTRIAL 3.0 program.
1. In the QuickPHOTO INDUSTRIAL 3.0 program, in the Imaging Devices menu make
sure that you have selected the corresponding control panel for the used camera type:
301
Troubleshooting - FAQ
• for OLYMPUS® E-3, E-30, E-620, E-520, E-450, E-420, E-510, E-410 digital
SLR cameras:
select the OLYMPUS® E-system SLR camera v.2 option
• for OLYMPUS® E-600 digital SLR camera:
select the OLYMPUS® E-system SLR camera option
Note: after opening the control panel the text: OLYMPUS® E-system SLR camera
v.2 will be displayed in its title.
• for OLYMPUS® E-330 digital SLR camera:
select the OLYMPUS® E-system SLR camera option
• for OLYMPUS® CAMEDIA® and SP series consumer digital cameras:
select the OLYMPUS® digital camera option
If you do not see the desired item on the list, run the installation of the QuickPHOTO
INDUSTRIAL 3.0 program and install the support for your type of camera.
2. Make sure the camera is turned on and connected to your computer by the USB cable.
If you are using a battery, make sure it is fully charged.
3. Make sure the camera is switched to the PC control mode - for more information see
the section called “Installation of OLYMPUS® Digital Camera” on page 14.
4. Make sure the memory card is inserted in the camera (only in case of OLYMPUS®
CAMEDIA® and SP series consumer digital cameras).
5. Make sure the memory card cover is closed.
6. Make sure, in the Device manager of the Microsoft® Windows®, the camera device
drivers have been properly installed. See examples on the following pictures:
• OLYMPUS® E-3, E-30, E-620, E-520, E-450, E-420, E-510, E-410 Digital SLR
Cameras:
302
Troubleshooting - FAQ
• OLYMPUS® E-330 Digital SLR Camera:
• OLYMPUS® CAMEDIA® and SP Series Consumer Digital Cameras:
If there is displayed an exclamation mark, next to the device's name in the Device
manager, click the right mouse button on the name of the device and select the
Uninstall option. Turn the camera off and back on. The drivers should automatically
reinstall.
7. Make sure the device for displaying of live view is correctly installed and set. For
more detailed description see the section called “Installation of a Device for Displaying
of Life View” on page 11.
Camera is not responding and it is not possible to turn it off. How do I make the camera
work again?
Before you turn the camera off, it is necessary to always close its control panel first. Only
then it is possible to turn off and eventually disconnect the camera. If you turn off the
camera while running the control panel or if you disconnect the USB cable, it may cause
the above mentioned “getting stuck“ of the camera. In this case disconnect the USB cable
and the mains if it is connected, and take the battery out of the camera. Wait a few seconds,
insert the battery back in and turn the camera back on. After all these steps, the camera
should work correctly again.
Camera is not available as a Mass Storage device. Is this a standard situation?
303
Troubleshooting - FAQ
Yes, if you switch the camera to the PC CONTROL mode, it is not possible to access it as
a Mass Storage device. If you want to work with the camera like with a removable disc,
it is necessary to turn off the PC CONTROL mode – for more information see the section
called “Installation of OLYMPUS® Digital Camera” on page 14. The necessity to switch
the mode of the camera will drop out if you use the USB card reader.
The possibilities to control the OLYMPUS® digital cameras from the QuickPHOTO
INDUSTRIAL 3.0 program from the standard user accounts (without administrator's
privileges) in the Microsoft® Windows® XP/Vista/7/8 operating systems.
• OLYMPUS® E-330 Digital SLR Camera:
This camera cannot be used in the Microsoft® Windows® Vista/7/8 operating systems
at all. To use this camera in the Microsoft® Windows® XP operating system, it is
necessary to use an account with the administrator's privileges.
• OLYMPUS® E-3, E-30, E-620, E-520, E-450, E-420, E-510, E-410 Digital SLR
Cameras:
These cameras can be used from the standard user accounts in the Microsoft® Windows®
XP/Vista/7/8 operating systems.
• OLYMPUS® CAMEDIA® and SP Series Consumer Digital Cameras:
These cameras can be used from standard user accounts in the 32bit versions of
Microsoft® Windows® XP/Vista/7/8 operating systems.
To use those cameras in the 64bit versions of Microsoft® Windows® 7/8 operating
systems, it is necessary to use the account with administrator's privileges.
Note
To run the program with administrator's privileges, click the right mouse button
on the program shortcut and select the Run as administrator option.
304
Troubleshooting - FAQ
®
OLYMPUS E-330 Digital SLR Camera
Important
OLYMPUS® E-330 Digital SLR Camera cannot be controlled from the Microsoft®
Windows® Vista/7/8 operating systems. In order to control it from the Microsoft®
Windows® XP operating system, it is necessary to use an account with
administrator's privileges.
OLYMPUS® E-330 digital SLR camera cannot be connected by the QuickPHOTO
INDUSTRIAL 3.0 program. How to solve this problem?
1. Make sure the camera is turned on and switched to the PC CONTROL mode. For
more information see the section called “Installation of OLYMPUS® Digital
Camera” on page 13.
2. Make sure your Microsoft® Windows® XP operating system has installed the Service
Pack 3.
3. Make sure you are signed in to an account with administrator's privileges.
4. Make sure the camera is connected to the computer using the USB cable.
5. Make sure you have selected the correct device for live view displaying, in the
QuickPHOTO INDUSTRIAL 3.0 program's Options.
6. Make sure you have selected, in the QuickPHOTO INDUSTRIAL 3.0 program in
Imaging Devices menu the OLYMPUS® E-system SLR camera option.
7. Make sure the battery in the camera is fully charged.
8. Make sure the firmware version 1.2 or newer is loaded in the camera. Current version
of the firmware can be found out the following way: turn on the camera, disconnect
the USB cable, press the MENU button, go to the Settings 2 (symbol of a key with
the number 2), and here select the item Firmware (the last item). Firmware Body: 1.2
or newer is necessary. If your firmware version is lower, load a new firmware into
your camera using the OLYMPUS MASTER 2 program (internet connection is necessary
for the update) or you can contact the authorized OLYMPUS® service.
9. Run the Camera Setup wizard again (...\Program Files\Common
Files\OLYMPUS\service\setupcam.exe) and proceed according to the wizard's
instructions.
10. Turn the camera off and back on.
305
Troubleshooting - FAQ
®
®
Live view from OLYMPUS Digital Cameras (E-System, CAMEDIA and
SP series)
Important
Neither the Leadtek WinFast VC100 XP device nor the Grand AV USB 2.0 device
(white USB device delivered with the previous versions of the program) is
compatible with the Microsoft® Windows® 7/8 operating systems. In these
operating systems use the AV USB 2.0 Pro device.
Note
When using the AV USB 2.0 Pro device with the control panel of OLYMPUS®
CAMEDIA® and SP series digital cameras on the computer where the Grand AV
USB 2.0 device has been installed (white USB device delivered with the previous
versions of the program) an error message may be displayed because of the
cresprop.ax file. In this case use the AV USB 2.0 Driver Cleaner tool for removing
of the Grand AV USB 2.0 device drivers from the operating system. This tool
can be found on the QuickPHOTO INDUSTRIAL 3.0 installation CD in the
Utilities folder.
In the control panel of the OLYMPUS® digital camera it is not possible to see the live
view, it is black and white or it has improper hue.
1. Make sure in the Device manager of the Microsoft® Windows® whether the device
for displaying of live view has properly installed drivers.
• AV USB 2.0 Pro Device:
• Leadtek WinFast VC100 XP Device:
306
Troubleshooting - FAQ
2. Make sure the video output of the camera is connected to the device for live view
displaying. Into the yellow CINCH connector of the device for displaying of live
view, should be connected the CINCH connector of the cable of the TV output of the
camera.
3. Make sure in the QuickPHOTO INDUSTRIAL 3.0 program Options (Edit → Options...
→ Hardware → OLYMPUS SLR/Consumer Cameras) the Video Standard is set to
PAL or PAL-B value and the Input is set to Composite. To restore the default settings
of the device for live view displaying, you may use the Restore button on this tab.
4. Make sure the video output of the OLYMPUS®camera is set on PAL. Proceed as
follows:
• OLYMPUS® E-system Series Digital SLR Cameras
Disconnect all cables from the camera. Activate the camera's menu. In the Settings
2 submenu (symbol of a key with the number 2 on it) find the VIDEO OUT option
and make sure the PAL option is active.
• OLYMPUS® CAMEDIA® and SP Series Consumer Digital Cameras
Disconnect all cables from the camera except for the power cable. Activate the
camera's menu. In the Set submenu find the VIDEO OUT option and make sure the
PAL option is active. Further on find the ALL RESET option and set it to OFF value.
5. Make sure, on the Live image tab in the control panel, the values of brightness, contrast,
saturation, and hue has proper values. For setting of the default values use the Default
button.
6. Make sure in your operating system is not installed any of the codec packages, for
example: K-Lite Codec Pack, Codec Pack All in 1, ACE Mega CoDecS Pack, Vobsub,
ffdshow and so on. If you have some of these packages installed in your computer,
uninstall it.
307
Troubleshooting - FAQ
7. In case of using the OLYMPUS® E-system series digital SLR camera and the Grand
AV USB 2.0 device for displaying of live view (white USB device delivered with the
previous versions of the program) make sure the USB cables of the camera and the
Grand AV USB 2.0 device for displaying of live view are not connected into the same
USB controller.
Live view from the OLYMPUS® digital camera on the computer monitor has a low quality
(it is checkered or snatchy).
If you use, for displaying of the live view on the computer monitor, an external USB device,
proceed as follows:
1. Make sure the USB device is connected to the USB 2.0 port of your computer. If your
computer does not have any USB 2.0 ports, install an additional USB 2.0 controller
into your computer.
2. Make sure your computer's performance corresponds with the minimal system
requirements listed in the program specifications.
3. Disconnect all cables from the camera, except for the power cable.
4. Activate the camera's menu. In the SET submenu find the VIDEO OUT option and
make sure the PAL option is active. Further find the ALL RESET option and set it to
OFF value.
When running the OLYMPUS® digital camera control panel a message: “No video device
is selected. Live view won't be available.“ pops up.
Device for live view displaying is probably not correctly configured in the QuickPHOTO
INDUSTRIAL 3.0 program. Configure your device in the program Options (Edit →
Options... → Hardware → OLYMPUS SLR/Consumer Cameras) or by the Configuration
Wizard... of the program (Edit → Configuration Wizard...).
308
Troubleshooting - FAQ
Live View from Analog Video Sources
There is no live view displayed in the control panel of the analog video source.
1. Make sure the video output of the analog video signal source is connected to the device
for live view displaying.
2. Make sure in the QuickPHOTO INDUSTRIAL 3.0 program in the Options (Edit →
Options... → Hardware → Analog Video Source) there is set the Video Standard
option corresponding with the analog video source used video standard and the selected
Input option corresponds with the live view displaying device used input connector.
To restore the default settings of live view you may, on this tab use the Restore button.
3. Make sure in your operating system is not installed any of the codec packages, for
example: K-Lite Codec Pack, Codec Pack All in 1, ACE Mega CoDecS Pack, Vobsub,
ffdshow and so on. If you have some of the packages installed in your computer,
uninstall it.
Live view from the analog video source on the computer monitor has a low quality (it is
checkered or snatchy).
If you are using, for displaying of live view on your computer monitor, an external USB
device, proceed as follows:
1. Make sure the USB device is connected to the USB 2.0 port. If your computer does
not have any USB 2.0 ports, install an additional USB 2.0 controller into your
computer.
2. Make sure the performance of your computer corresponds with the minimal system
requirements listed in the program specifications.
ARTRAY ARTCAM Digital Cameras
The camera's device drivers cannot be installed.
Make sure the camera is connected to the USB 2.0 port of your computer. Do not connect
the camera to the USB hub.
309
Troubleshooting - FAQ
Live view does not display or it is broken.
The camera is most likely having a compatibility issue with the USB controller. Do not
use an extension USB cable for connecting the camera. Use an additional USB 2.0 controller
for connecting the camera.
Disconnecting of the camera takes place after running of the control panel.
When using automatic exposure mode, make sure the specimen in the camera's field of
view is constantly sufficiently illuminated.
®
IDS uEye Digital Cameras
When running the camera's control panel an error message about unsuccessful attempt to
connect the digital camera appears.
1. Make sure the camera is connected to the USB 2.0 port of your computer.
2. Make sure the LED on the top part of the camera is light up with a green light (if the
camera is equipped with such a LED). If the LED is not light up or if the red light is
on, the camera's drivers have not most likely been installed properly. In this case,
reinstall the camera's drivers. Proceed as follows:
• IDS uEye® UI-1440-C Digital Camera
Run the uEye.exe program from the Drivers>IDS uEye>UI-1440-C folder of the
QuickPHOTO INDUSTRIAL 3.0 program installation CD.
• IDS uEye® - Other Supported Digital Cameras
Run the uEye32.exe program (for 32bit operating systems) or uEye64.exe program
(for 64bit operating systems) from the Drivers>IDS uEye>Others folder of the
QuickPHOTO INDUSTRIAL 3.0 program installation CD.
Further on, proceed according to the wizard's instructions.
310
Troubleshooting - FAQ
Important
Install the device drivers from the QuickPHOTO INDUSTRIAL 3.0 program
installation CD. If you install newer device drivers delivered with the camera or
downloaded from the internet, the camera may not be working properly.
Live view is not visible or it is snatchy in the IDS uEye® digital camera control panel.
1. Make sure the performance of your computer corresponds with the minimal system
requirements listed in the program's specifications.
2. Make sure no computationally demanding program is running on your computer. If
such a program is running, terminate it or wait until it is finished.
3. In the control panel of IDS uEye® digital cameras go to the Settings tab. Click the
Speed Adjustment button. Readjustment of the IDS uEye® digital camera's speed (the
number of displayed frames per second) to correspond with your computer's
performance, will take place.
QuickPHOTO INDUSTRIAL 3.0 Program - Other
The dongle is flashing and the QuickPHOTO INDUSTRIAL 3.0 program, when run,
announces that the dongle was not found.
Properly working USB dongle is supposed to lit at all times. After you have installed new
device drivers of the dongle, it may start flashing for about one minute. Do not run the
QuickPHOTO INDUSTRIAL 3.0 program during this time. If you do not follow these
instructions, the dongle may not stop flashing after one minute is over. In this case
disconnect the dongle and connect it again or possibly restart the computer. If the procedure
does not help, it is necessary to connect the dongle to a different computer with installed
dongle device drivers. Wait about one minute. During this time do not run any programs.
After this time period is over, the dongle should stop flashing and it should lit again. Then
you may connect the dongle to the original computer and start using it with the
QuickPHOTO INDUSTRIAL 3.0 program.
311
Troubleshooting - FAQ
It is not possible to play the video file created using the Time-Lapse Video module.
Install a codec from the QuickPHOTO INDUSTRIAL 3.0 program installation CD, from
the Codec folder, to the computer on which you are not able to play the created video file.
You may also download the codec for free from the website:
www.promicra.com/downloads.php.
I have not found an answer to my question. Where can I get more information?
Try to look for your question in the FAQ section on the: www.promicra.com website, or
possibly contact our technical support department using the following e-mail address:
[email protected]
312
System Requirements
Minimal System Requirements
•
•
•
•
Single-core 2.4 GHz or multi-core processor
1GB RAM
CD-ROM
2x USB 2.0/3.0 port
Supported Operating Systems
• Microsoft® Windows® XP(SP3)/Vista/7/8
Minimal Monitor Resolution:
• 1024 x 768 pixels
• 24 or 32bit color depth
Supported Imaging Devices:
You can find the list of currently
www.promicra.com/cameras.php website.
supported
imaging
devices
on
the
Microsoft®, Windows®, Excel®, Outlook® are registered trademarks of Microsoft Corp.
OLYMPUS®, CAMEDIA® are registered trademarks of OLYMPUS Corp.
uEye® is a registered trademark of IDS Imaging Development Systems Inc.
Lumenera® is a registered trademark of Lumenera Corp.
Canon® is a registered trademark of Canon Corp.
QuickPHOTO® is a registered trademark of PROMICRA, s.r.o.
v.1561-III.
313
System Requirements
314
Olympus® Consumer Digital Cameras,
268
Olympus® DP72 Digital Camera, 255
Olympus® E-system Digital SLR
Cameras, 242
PathScan Enabler IV Digital Microscope,
239
Index
A
Acquiring of New Images, 80
Acquiring an Image, 82
Opening of the Imaging Device's Control
Panel, 81
Selection of the Imaging Device, 80
Adding of Modules and Upgrading, 295
C
Calibration
of
the
Program
for
Measurements, 33
Calibration Manager, 34
Creating a New Calibration, 35
Creating a New Calibration Using the
Magnification
Encoder
for
Stereomicroscopes, 52
Creating a New Calibration Using the
Magnification Encoder for Upright and
Inverted Microscopes, 46
Creating a New Standard Calibration, 35
Opening Information about Calibrations,
33
Setting an Active Calibration, 58
Configuration Wizard, 25
Control Panels of Imaging Devices, 189
Analog Video Source, 275
ARTRAY ARTCAM Digital Cameras,
233
Canon® EOS Digital SLR Cameras, 217
IDS uEye® Digital Cameras, 221
Lumenera® INFINITY Digital Cameras,
189
I
Indication and Annotation of Interesting
Areas
Draw Arrow, 92
Draw Circle, 92
Draw Ellipse, 92
Draw Freehand, 93
Draw Line, 91
Draw Polygon, 92
Draw Rectangle, 92
Insert Text Annotation, 93
Initial Configuration of the Application, 25
Installation, 9
Adding the Support of a New Imaging
Device, 22
Adding the Support of Magnification
Encoder or a PC Controlled Illuminator,
23
ARTRAY ARTCAM Digital Cameras,
11
AV USB 2.0 PRO Device, 12
Canon® EOS Digital SLR Cameras, 10
Change of OLYMPUS® Digital Camera
Type (CAMEDIA® and SP series), 23
Connecting the OLYMPUS® Camera
with the Computer, 16
Device for Displaying of Life View, 11
Dongle, 17
315
Index
Firmware Update - OLYMPUS® E-330
Digital SLR Camera), 13
IDS uEye® Digital Cameras, 10
Installation Completion - ARTRAY
ARTCAM Digital Cameras, 21
Installation Completion - IDS uEye®
Digital Cameras, 19
Installation Completion - Lumenera®
INFINITY Digital Cameras, 18
Installation Completion - OLYMPUS®
CAMEDIA® and SP Series Digital
Cameras, 22
Installation Completion - OLYMPUS®
E-330 SLR Digital Camera, 21
Installation Completion - PathScan
Enabler IV Digital Microscope, 20
Leadtek WinFast VC100 XP Device, 12
Lumenera® INFINITY Digital Cameras,
10
OLYMPUS® Digital Camera Device
Drivers, 16
OLYMPUS®
Digital
Cameras
(E-system, CAMEDIA® and SP series),
11
PathScan Enabler IV Digital Microscope,
11
QuickPHOTO INDUSTRIAL 3.0
Program, 17
Switching the Camera to the PC Control
Mode, 14
L
List of Key Shortcuts, 297
M
Main Program Window, 61
316
Description of the Graphical User
Interface, 62
Display Window, 79
Menu Bar, 64
Navigator, 78
Status Bar, 80
Table of Measured Values, 79
Thumbnail Browser, 76
Toolbar, 71
Measurements, 114
Brinell Hardness Test, 133
Count Objects, 121
Displaying a Grid of Defined
Dimensions, 123
Editing of the Measuring Objects, 136
Export Measured Values to Microsoft®
Excel® Continuously, 147
Exporting Values from the Table of
Measured Values, 144
Measure Angle, 121
Measure Arc, 122
Measure Circle, 119
Measure Distance Between 2 Parallel
Lines, 122
Measure Ellipse, 119
Measure Line Segment, 119
Measure Polygon, 120
Measure Polyline, 120
Measure Rectangle, 119
Phase Analysis, 125
Preparing for Measuring, 115
Scale Bar, 117
Standard Measuring Tools, 118
Vickers Hardness Test, 135
Work with the Table of Measured
Values, 139
Menu Bar
Index
Menu Annotations, 69
Menu Edit, 65
Menu File, 64
Menu Help, 70
Menu Image, 66
Menu Imaging Devices, 69
Menu Measurements, 68
Menu Modules, 70
Menu Reports, 70
Menu View, 67
Menu Window, 70
Modules, 283
Deep Focus (optional), 293
FLUO+ (optional), 294
RECORD IT (optional), 294
Time-Lapse Video - Built-in Module,
288
Timer - Built-in Module for Time-Lapse
Image Capturing, 283
O
Options, 164
Section General, 164
Section Hardware, 182
Section Measurements, 174
Other Functions, 159
Compose New Image from Layout of
Displayed Images, 161
Display in Full Screen Mode, 164
Image Information, 159
Slideshow, 163
P
Phase Analysis, 125
Description of the Phase Analysis Dialog
Box, 126
How to Use Phase Analysis Function,
131
Recommendation for Saving of Images
with Measured Phases, 132
R
Reports, 148
Creating a New Report, 155
Creating New Report Template, 149
Report Template Manager, 158
S
System Requirements, 313
T
Troubleshooting - FAQ, 301
ARTRAY ARTCAM Digital Cameras,
309
IDS uEye® Digital Cameras, 310
Live View from OLYMPUS® Digital
Cameras, 306
Live View from the Analog Video
Sources, 309
OLYMPUS® Digital Cameras, 301
OLYMPUS® E-330 Digital SLR
Camera, 305
Other, 311
QuickPHOTO INDUSTRIAL 3.0
Program, 301
W
Work with Images, 82
Image Editing, 83
Image Opening, 82
Image Printing, 108
317
Index
Image Saving, 97
Indication and Annotation of Interesting
Areas, 90
318