1
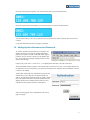
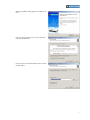
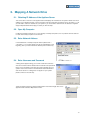
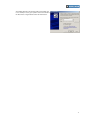
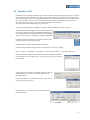
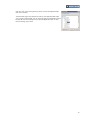
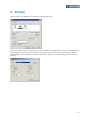
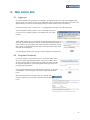
Applianz System
User Manual
1.
2.
3.
4.
5.
6.
7.
8.
9.
10.
Getting Started
1.1.
1.2.
1.3.
1.4.
1.5.
1.6.
1.7.
1.8.
Unpack Your Applianz System
Situate Your Applianz System In A Suitable Area
Connecting Cables Starting The Applianz System Setting The IP Address Adding Applianz Usernames And Passwords
Installing Applianz Client
Allowing Remote Users 2.1.
2.2.
2.3.
2.4.
Obtaining IP Address of the Applianz Server
Open My Computer
Enter Network Address Enter Username and Password
3.1.
3.2.
3.3.
3.4.
Applianz Automatic Backup Service
Microsoft Backup and Restore Wizard
Symantec Backup Exec (Veritas)
SonicWALL CDP
4.1.
4.2.
Local Drive Sharing
Secure FTP
7.1.
7.2.
7.3.
Server Session
Admin Session
Application Session
8.1.
8.2.
8.3.
8.4.
8.5.
8.6.
8.7.
8.8.
8.9.
8.10.
8.11.
8.12.
8.13.
8.14.
8.15.
Logging In
Forgotten Passwords Change IP Address Proxy Settings Rebooting
Shutting Down
Adding Users
Modifying Existing Users
Deleting Users
Emailing Product Keys and Instructions
Changing Maintenance Schedule
Applying Changes To The Admin Session
Displaying Users Currently Logged Into The System Resetting A User's Session
Starting Sessions Manually
9.1.
9.2.
9.3.
Transferring The Font
Installing The Font
Rebooting The Applianz System 10.1.
10.2.
10.3.
10.4.
10.5.
10.6.
10.7.
10.8.
What Is Covered By This Limited Warranty? What Is Not Covered By This Limited Warranty? How Long Does This Limited Warranty Last? What Do I Do If I Need Warranty Service? What Will Applianz Do?
What If I Purchased A Service Contract? How Will You Fix My Product? Total Satisfaction Return Policy (U.S. Only) 3
3
3
3
3
3
5
6
9
Mapping A Network Drive
10
Backing Up Your Data
12
Transfer Data To The Applianz Server
19
Getting Support
Printing
Applianz Session Overview
21
22
23
Web Admin Site
24
Installing Custom Fonts
29
Limited Warranties and Return Policy (V.6)
31
10
10
10
10
12
12
14
17
19
19
23
23
23
24
24
25
25
25
25
25
26
26
27
27
27
28
28
28
29
29
30
31
31
32
32
32
32
33
33
2
1. Getting Started
1.1. Unpack Your Applianz System
Verify that you have unpacked all of the components of the Applianz System
•Applianz System
•User Guide
•Network Cable
•Power Cord
1.1. Situate Your Applianz System In A Suitable Area
Your Applianz System may be mounted on a server rack by attaching standard sliding rails to the side of the
Applianz System. Feet have been included on the bottom of the Applianz System should you wish to set it on a
flat surface. A climate controlled location with good ventilation is required.
1.2. Connecting Cables
Connect the included Power Cord into the back of the Applianz System. It is preferable to connect the power
cord to a UPS power supply. This will prevent the Applianz System from losing power during brief power outages. If a UPS power supply is not available the applianz system should be plugged into a surge protected
power supply.
1.3. Starting The Applianz System
If the Applianz System did not start when you connected the Power Cord, then flip the Power Switch on the
back of the System to the On position.
1.4. Setting The IP Address
Applianz Systems are shipped with DHCP mode enabled. In this mode the Applianz System will automatically
obtain an IP address if your network supports DHCP. If you need to set up a static IP address please perform
the following steps, otherwise skip to step 1.6.
Setting a static IP address is done by using the LCD screen on the front of the Applianz System. The following
is how the interface keys are used:
3
Press the Up or Down keys until the following option is displayed on the LCD screen.
Press the Check-mark key to configure the IP Address.
Press the Up or Down key to change the IP type until the screen reads Static.
Press the Check-mark key to accept the changes.
The next screen will allow you to enter the static IP address. Pressing the up and down arrows will change the
digit that the cursor is currently on, and pressing the left and right arrows will move the cursor to the left or the
right.
After you have entered your IP address press the Check-mark key.
The next screen allows you to enter your Subnet. The controls are the same as the previous IP Address screen.
Next enter your Gateway. The controls are the same as the IP Address screen.
4
Next enter the Primary DNS (DNS1). The controls are the same as the IP Address Screen.
Next enter the Secondary DNS (DNS2). The controls are the same as the IP Address Screen.
The next screen asks you if it is OK to reset the users connected to the system. Press the Check-mark key to
continue.
It may take several minutes for the changes to take effect.
1.5. Adding Applianz Usernames And Passwords
To create a username and password for connecting to the
Applianz System you must visit the Applianz Web Admin
page for your system. The URL for the Web Admin page is
printed on the LCD screen on the front of the Applianz System. You should see a message scrolling across the screen
similar to the following:
Press any key to see menu -- DHCP: True -- To configure please visit https://192.168.0.199:30010
The actual address varies per system. Enter the URL that was printed on the front of your Applianz System into
the address bar of your web browser. If you receive a warning about the website’s security certificate, choose to
continue to the website.
The first Web Admin page is an authentication page that will
authenticate you as a valid user. The default username is
“Admin”, and the default password varies per system. Please
look at the System Information document included with your
Applianz System for the default password. After you have
entered the Admin password click the LOGIN button.
After you have logged in click the USERS link near the top
right of the page.
5
At the User Management page click the ADD
NEW USER button.
Enter the user information and click the ADD button. The user
is now able to be used by the Applianz Client for connecting
to the Applianz System. If you want the password to be generated automatically leave the field blank. After you click the
ADD button the password and product keys for the Applianz
System will be e-mailed to the user automatically.
The Admin checkbox controls certain actions the user is allowed to perform from the web page. If you want this user to
be able to perform actions such as rebooting the applianz
server, managing other users, or see users logged into the
system then place a check-mark in this field. If you are unsure
do not place a check-mark in the box.
The E-mail Usage Statistics field allows you to enter a person's e-mail address that wants to receive a usage notification e-mail every time this user logs into the applianz server. If
you are unsure leave the field blank.
1.6. Installing Applianz Client
The Applianz Client is used by your workstation to connect to the Applianz System. To install you will need your
Applianz Product Keys provided to you on the System Information sheet included with the Applianz System, or
in an e-mail that was sent with your username and password.
Double-click Internet Explorer, or web browser of your choice.
Type http://www.applianz.com/client into the address bar.
If the download does not start automatically click the
Download link on the page.
Double-click ApplianzSetup.exe on your Desktop.
6
When the installation dialog appears, click Next to continue.
Click the I accept check box if you accept the EULA
and click the Next button.
Enter a location to install the Applianz Client, and click
the Next button.
7
Select the appropriate option for installation. Install for
anyone who uses this computer will allow everyone that
uses the computer to be able to run ApplianzClient.
Install for only me will install the application where only
you will be able to execute it. Click Install when done.
After the installation is complete check the Run Applianz
Client checkmark and click Finish to run ApplianzClient
for the first time.
For Product Key enter the product key that was provided to you on
the System Information sheet included with the Applianz System, or
in an e-mail that was sent with your username and password. For
Username and Password enter the values that you created in step
1.6, or the Admin username and password.
The next screen is asking where you want shortcuts to be created on your
system. The name field will be the name of the shortcut. For default shortcuts, just click the OK Button.
8
1.7. Allowing Remote Users
In order for users outside your intranet to be able to access the Applianz System you will need to open ports
30000-30060 in your firewall or router. Without these ports open remote users will not be able to use the Applianz Client, and Applianz Support staff will not be able to provide a full range of support.
9
2. Mapping A Network Drive
2.1. Obtaining IP Address of the Applianz Server
The LCD screen on the front of the Applianz Server will display the IP address of the system. Please note the IP
address of your Applianz System. For the purposes of this documentation we will use the IP 192.168.0.171, but
you will need to use the IP address for your system. If you are unable to determine the IP address an Applianz
Support Representative will be happy to assist you with this step.
2.2. Open My Computer
Double click the My Computer icon on your desktop. If the My Computer icon is not present click the Start button and click the My Computer icon from there.
2.3. Enter Network Address
In the Address bar of the My Computer window please enter “\
\192.168.0.171” in the bar. Please note the two backslashes at the
beginning. After you have entered the address press the Enter key.
2.4. Enter Username and Password
A dialog should appear asking you to enter a Username and Password for the network drive. Please enter the username and password
that is on the the System Information document included with your
system. Place a check-mark in the Remember Password field and
click the OK button. If a dialog does not appear for your system
please continue to the next step.
There should be at least two network folders listed in the window. Right click on the
AppData folder and select Map Network Drive.
10
At the Map Network Drive window select a drive letter that
is not currently in use by your system. Place a checkmark in
the Reconnect at logon field and click the Finish button.
11
3. Backing Up Your Data
Data backups are not provided by the Applianz Server by default, you are responsible for backing up your company's
data from the Applianz System. The following are four common methods for data backup, but other solutions available
may fit your company's needs.
3.1. Applianz Automatic Backup Service
30 Full Days of History. Your Applianz system will keep the last 30 days of the system state on itself. In the
event of a bad upgrade, major data entry snafu or other mistake, your system can be rolled back to a previous
day.
Full System State. While traditional backups only preserve the data, Applianz's backups preserve the data,
the version of your accounting software installed, the state of Windows at the time, and even the list of users on
the system on that day.
Backup is Offsite. Traditional backup tapes are no good if they stay in the building, in the case of a fire or
flood. Applianz's solution transmits each day's version of the system to Applianz's datacenter for safekeeping.
Full System Replacement. In the event of a system failure, fire, earthquake or hurricane, Applianz can restore
your entire system to a new Series II system and ship it out to you overnight so you can get back to work with
minimal business disruption.
For more information on the Applianz Automatic Backup Service please contact the sales department by e-mail
at [email protected] or by phone at (316) 263-4800 x4.
3.2. Microsoft Backup and Restore Wizard
One solution for backing up your data is to use the Microsft Backup and Restore Wizard to schedule a nightly
backup. The Microsoft Backup Wizard is available by default on most installs of Windows XP. Windows Vista no
longer includes this application, and the included "Backup and Restore Center" will not back up certain kinds of
files, so is typically not ideal for backups. The following instructions are an example of how to configure backups
for Windows XP systems.
To open the Backup Wizard click the Start button, point to All Programs, point to Accessories, point to System
Tools, and then click Backup
At the Welcome screen click the Next > button.
At the "Backup or Restore" screen select the "Back up files and settings" radio box and click the Next > button
At the "What to Back Up" screen select the "Let me choose what to back up" radio box and click the Next >
button
12
At the "Items to Back Up" screen expand the "My
Network Places" item, then expand the "Entire Network" item, then expand "Microsoft Windows Network", then the "Applianz" workgroup (This may
take some time). There should be a server listed
similar to "SVR04029-1" (Actual number may vary).
This is the Applianz Server, click this server to list
available shares. If you are prompted for a username
and password please enter the username and
password that is provided on the the System Information document included with your system. Place
a checkmark in the Remember Password field and
click the OK button. There should now be an AppData folder listed in the right hand side of the
screen. Place a checkmark on this folder and click
the Next > button.
If there is not an Applianz Server or Applianz Workgroup listed in your My Network Places, please follow steps
in Chapter 2 of this manual to map a drive to the Applianz System, you can then select the mapped network
drive to backup. Please be aware that a mapped network drive is only available if the user that maps the drive is
logged into the system.
At the "Backup Type, Destination, and Name" screen click the
"Browse..." button and select your backup drive or folder (This is
the location where data will be copied to). Next enter a name for
this backup. When done click the Next > button.
At the "Completing the Backup or Restore Wizard" screen click
the "Advanced..." button.
At the "Type of Backup" screen select the Normal backup type (this is the default) and click the Next > button.
At the "How to Back Up" screen place a checkmark in the "Verify data after backup" checkbox and click the
Next > button.
At the "Backup Options" screen select the "Append this backup to the existing backups" radio box and click
the Next > button.
At the "When to Back Up" screen select the "Later" radio box, enter a name for "Job name", and click the "Set
Schedule" button.
13
Select the "Daily" option from the "Schedule Task" drop down, set
the start time to 8:00 PM. If you would like the scheduled start
time to be later please be aware that by default the Applianz System reboots nightly at 2:00 AM. If the backup is running during the
system reboot then the backup will be corrupt. To change the
Maintenance Schedule, please see chapter 8.11 of this manual.
When you are done with the scedule click the "OK" button to continue.
Some systems may prompt for the password of the user, enter the
password for the system that you are using.
Verify the data is correct on the "When to Back Up" screen and
click the Next > button to continue.
At the "Completing the Backup or Restore Wizard" screen verify
the information and click the Finish button.
3.3. Symantec Backup Exec (Veritas)
Symantec Backup Exec, or Veritas is a 3rd party solution created by Symantec. The installation and maintenance of this software is beyond the scope of this manual, however the following steps are an example of how
to configure an existing installation of Veritas to backup data from the Applianz System. For further information
about setup and maintenance please see your Veritas user manual. To learn more about Veritas please visit
http://www.veritas.com.
On your backup server, open "My Computer" from your
desktop or the Start menu. Browse to the following location: C:\Program Files\VERITAS\Backup Exec\NT\Agents.
The location may vary depending on your installation of
Veritas.
Copy the RANT32 directory to the Applianz System by
following the instructions in chapter 2 or chapter 4 of this
manual.
Open the File Server session of the Applianz System by using the Applianz Client (See chapter 1.7).
Open "My Computer" from the Start Menu and locate the RANT32 directory that you transferred to the Applianz
System. If you transferred the data using the instructions in chapter 2 it will either be in the D:\AppData directory or the G:\ directory. If you transferred the files using the instructions in chapter 4 it will be in the
D:\AppData directory.
Open the RANT32 directory and double click the setupaa.bat file. This will open a black
DOS window which installs the Veritas service on the Applianz System. When the installation is complete the DOS window will close and no further windows are displayed.
Verify the Veritas service is installed by opening Control Panel from the Start Menu. Double
click "Administrative Tools", then double click "Services". There should be a service listed
called "Backup Exec Remote Agent for Windows Servers". This service should be in a
"Started" status and the Startup Type should be "Automatic".
14
To configure the backup job go back to your backup server and open the Symantec Backup Exec management
program.
Next open the Options menu by clicking the Tools menu at the top and selecting
Options.
In the Properties section on the left hand side of the dialog click the
"Network and Firewall" entry. On the right hand side place a checkmark
in the "Enable selection of user shares" checkbox.
On the same screen place a checkmark in the
"Enable media server TCP dynamic port range"
and "Enable remote agent TCP dynamic port
range" checkboxes. For the value enter the range
21025-21050 for both lines. Click the OK button when finished to save the changes.
Start a new backup job by clicking File at the top, click new to expand
the selection, and then select "Backup Job..." .
At the "Backup Job Properties" window right click the "User-defined Selections" entry and click "User-defined Selections..."
At the bottom of the User-defined Selections dialog enter the UNC Name for your applianz system. The UNC name is usually \\SVR00000-1 where 00000 is the serial number
of your applianz system. See the System Information document included with your Applianz System for the serial number of your system.
After the UNC Name has been entered click the Add button. The UNC Name should now appear in the "Selections defined" area of the dialog. Click the Close button to close the dialog.
The server name should now appear under the User-defined Selections entry in the
Backup Job Properties dialog. You may need to click the + sign next to User-defined
selections to see the server listed.
15
Click the server name, this should open a dialog asking for a
logon account. A logon account for the Applianz Server must
be created, so click the New... button on the lower left of the
dialog.
At the "Add Logon Creditials" dialog enter the username "ApplianzUser"
and the password that is listed on the System Information document
included with your system. Re-enter your password in the confirm
password field, and enter ApplianzUser for the Account Name. When
finished click the OK button.
An ApplianzUser entry should now be listed in the "Logon Account Selection" dialog. Highlight the ApplianzUser account by clicking on it and click the OK button.
Now that a logon account has been selected for the Applianz System, you should be
able to click the + sign next to the server and see a listing of network shares that are
available for backup. The AppData directory is typically where your companies data is
stored on the server, so place a checkmark next to AppData.
You may now set up your backup job according to the schedule and options that fits
you the best. The schedule options for Veritas is on the Properties panel on the left
side near the bottom. Please consult your Vertias Manual for additional information on scheduling the backup
job to your backup media. When scheduling your backup please be aware that by default the Applianz System
reboots nightly at 2:00 AM. If the backup is running during the system reboot then the backup may become
incomplete or corrupt. To change the Maintenance Schedule, please see chapter 8.11 of this manual.
16
3.4. SonicWALL CDP
SonicWALL CDP is a backup appliance which provides automatic, real-time data backup for servers. The setup
and maintenance of the SonicWALL CDP appliance is beyond the scope of this manual, however the following
steps are an example of how to configure the SonicWALL CDP software to backup data from the Applianz System to the SonicWALL CDP server. For further information about setup and maintenance please see your
SonicWALL CDP user manual. To learn more about SonicWALL CDP please visit
http://www.sonicwall.com/us/backup_and_recovery.html.
Open the File Server session of the Applianz System by using the Applianz Client (See chapter 1.7).
To download the SonicWall Agent Tool open Internet Explorer and
enter "http://software.sonicwall.com/Applications/DataProtect/"
in the Address Bar. After the page loads click the "CDP Software
Tools" link. Save the file to the Desktop of the File Server session.
Double click the downloaded file on the desktop and launch the
setup.exe program in the folder that opens.
Install the software with the default settings and locations.
Double click the SonicWALL Agent Tool icon on the desktop, or launch it by clicking
Start -> Programs -> SonicWALL -> SonicWALL Continuous Data Protection -> SonicWALL Agent Tool.
When the SonicWALL Agent Tool first opens it will ask you to select a SonicWALL
CDP Appliance, but the list will be empty. Click the "Cancel" button to continue to
the next screen.
In the Appliance Name section of the Agent Tool screen click the
"Manual Connection" button to enter the IP address of your
SonicWALL Server.
Enter the IP address of your SonicWALL server on your network
and click the "Connect" button.
Once the Agent Tool software has connected click the "Add
New Folder" button.
17
Click the + sign next to the AppData (D:) drive, and click the AppData folder.
Click OK to continue.
The SonicWALL Agent Tool should now back up your AppData folder where
your company's data resides. You can close the Agent Tool application and the
backup will occur in the background, or leave the application open to verify
that it is backing up your data.
18
4. Transfer Data To The Applianz Server
4.1. Local Drive Sharing
Your local drives can be shared to the applianz session by enabling an advanced feature of the Applianz Client.
This method is best for transferring small files, for transferring large amounts of data please see the next section.
To enable the Applianz Client drive sharing, click Start -> Programs -> Applianz -> Advanced Configuration
When the Advanced Configuration screen opens place a check-mark next to the Connect
drives option.
Click the Save button to enable the feature. If you are connected to your session you will need to re-connect.
After connecting to your session open My Computer on the desktop and you should be able to see your local
drives appear as network drives on the Applianz session.
WARNING -- Drives shared with this method may be accessible by other users of the Applianz System.
4.2. Secure FTP
Transferring large amounts of data to or from the Applianz Server can be accomplished by using a Secure FTP
connection (SFTP). The Applianz System supports most SFTP programs, however we recommend WinSCP if
you do not already have a preferred SFTP program.
Open Internet Explorer or the web browser of your choice and enter http://www.applianz.com/reseller/ in the
address bar.
Download the WinSCP setup file from the web page, and open the setup file.
The WinSCP setup will take you through several screens for installation options. For most users the default options are correct. Continue clicking Next > until the installation is complete. The installation will install a shortcut
on your desktop for WinSCP3.
19
When WinSCP is opened it will ask for connection information. For the “Host Name” field
enter the IP address of the Applianz System.
For “Port number” enter 30008. For “User
name” and “Password” enter the user name
and password provided to you on the System
Information sheet included with your system.
When the information has been entered, click
the Login button.
A security message may appear the first time
you connect to the Applianz System. Click the Yes button to continue.
After the main WinSCP screen opens you can
transfer files from your computer to the Applianz
System by dragging files from the left window to
the right window. To transfer files from the Applianz System to your computer drag files from
the right to the left.
20
5. Getting Support
Support is available through e-mail at [email protected] or by phone at (316) 263-4800.
21
6. Printing
When you print in your application your should see a screen similar to this:
There are two different printers to choose from, the “Choose Printer” and “Default Printer”. If you pick “Default Printer” the
print job will go to your local machine, and print on your default printer. If you choose the “Choose Printer” printer the
print job will go to your local machine, and open up another print dialog on your machine asking which printer to send
the job to:
22
7. Applianz Session Overview
A typical Applianz System consists of 3 different types of sessions. They are the application session, the admin session,
and the server session.
7.1. Server Session
The server session is the session that should be used for storing application data that is needed by all workstations. If your application has server specific software this is the place where it should be installed.
Your application data and server software should be put in the D:\AppData directory. Files placed in this directory will be accessible to the admin and application sessions.
7.2. Admin Session
The admin session can be thought of as a template. Any changes made to this session will be seen by all users
of the application session. Application software should be installed on this session. Changes made to this session will not take effect in the application sessions until they are applied using the Web Admin site (See section
8.11), or rebooting the system. If changes are made to this session that you do not want to have cloned you
can discard the changes using the Web Admin site.
7.3. Application Session
The application session is the session that the end-user will connect to. There is no need to install any software
in this session, as it is a clone of the admin session. When the user logs out of this session it is discarded, and
another clone is made to take it's place.
23
8. Web Admin Site
8.1. Logging In
To create a username and password for connecting to the Applianz System you must visit the Applianz Web
Admin page for your system. The URL for the Web Admin page is printed on the LCD screen on the front of the
Applianz System. You should see a message scrolling across the screen similar to the following:
Press any key to see menu -- DHCP: True -- To configure please visit https://192.168.0.199:30010
The actual address varies per system. Enter the URL that was printed
on the front of your applianz system into the Address bar of your web
browser.
The first Web Admin page is an authentication page that will authenticate you as a
valid user. The default username is “Admin”, and the default password varies per
system. Please look at the System Information document included with your Applianz System for the default password. After you have entered the Admin password click the LOGIN button.
Any valid Applianz System users may log in with their Username and Password.
8.2. Forgotten Passwords
If a user has forgotten their password they can use the Web Admin Site to
reset it to a randomly generated password, and have it e-mailed to them.
To reset a password go to the login page of the Web Admin Site, and click
the forgotten password link, or from the Applianz Client login screen click
the forgot your password link.
At the Password Recovery screen enter the user's username, or the user's
e-mail address. It is not necessary to enter both values. Click the SEND
button.
After a few minutes the user should receive an e-mail with their
username, password, and the product keys they are authorized
to use.
24
8.3. Change IP Address
To change the IP Address of the Applianz System click the SYSTEM link on the
menu bar at the top of the page. When the System Configuration page loads
click the CHANGE IP button.
Enter the new IP Address Information for the Applianz System. The Dynamic
checkbox indicates whether the Applianz System should automatically request
an IP address from your network. If you uncheck Dynamic then an IP, Subnet,
and Gateway fields will appear for a static IP address configuration. After you
have finished entering IP information then click the CHANGE button to save the
changes. The Remote Access Address field is only used if your network has
multiple external IP addresses and you want to use a specific one for external
users of the Applianz Client.
8.4. Proxy Settings
A proxy server is a computer network service that allows clients to make indirect
network connections to other network services. If your network requires a proxy
server to communicate to a server on the Internet you will need to configure it
with the Web Admin Site.
To change the Proxy Settings of the Applianz System click the SYSTEM link on
the menu bar at the top of the page. When the System Configuration page
loads click the PROXY SETTINGS button.
Enter your proxy information in the fields provided, and click the CHANGE button to save them.
8.5. Rebooting
To reboot the Applianz System click the SYSTEM link on the menu bar at the top of the page. When the System
Configuration page loads click the REBOOT button.
All users will be logged out of the Applianz System and it will be rebooted.
8.6. Shutting Down
To shut down the Applianz System click the SYSTEM link on the menu bar at the top of the page. When the
System Configuration page loads click the SHUTDOWN button.
WARNING – The system will not come back up until someone physically presses the power button on the front
of the Applianz System.
8.7. Adding Users
To add a user click the USERS link on the menu bar at the top of the page
At the User Management page click the ADD NEW USER
button.
25
Enter the user information and click the ADD button. The user
is now able to be used by the Applianz Client for connecting
to the Applianz System. If you want the password to be generated automatically leave the field blank. After you click the
ADD button the password and product keys for the Applianz
System will be e-mailed to the user automatically.
The Admin checkbox controls certain actions the user is allowed to perform from the web page. If you want this user to
be able to perform actions such as rebooting the applianz
server, managing other users, or see users logged into the
system then place a check-mark in this field. If you are unsure
do not place a check-mark in the box.
The E-mail Usage Statistics checkbox allows you to enter a
person's e-mail address that wants to receive a usage notification e-mail every time this user logs into the applianz server.
If you are unsure leave the field blank.
8.8. Modifying Existing Users
To modify an existing user of the Applianz System click the
USERS link on the menu bar at the top of the page.
At the User Management page locate the user
you wish to modify and click the MODIFY button.
After you have finished changing the user's information click the SAVE button.
8.9. Deleting Users
To delete a user of the Applianz System click the
USERS link on the menu bar at the top of the
page.
At the User Management page locate the user
you wish to delete and click the DELETE button.
A dialog will appear asking you if you are sure you want to delete the user.
Click the OK button to confirm.
26
8.10. Emailing Product Keys and Instructions
If a user loses their product keys you can e-mail them their
username and all of the product keys they are authorized to
use from the Web Admin Site. Click the USERS link on the
menu bar at the top of the page.
Locate the user that you with to e-mail the product keys to
and click the Modify button. This will open the the User Configuration screen for that user. Now click the Email Instructions button next to the user's e-mail address. This automatically generate an e-mail for the user containing their
product keys, and a URL to download the Applianz Client.
However, for security reasons this does not send the user's
current password. If the user has lost their password it can
be reset it using the Modify User page described in section
8.8.
8.11. Changing Maintenance Schedule
To change the Maintenance Schedule time of the Applianz System click the
SYSTEM link on the menu bar at the top of the page. When the System
Configuration page loads click the MAINTENANCE SCHEDULE button.
The default maintenance time is 2:00 am. To change the scheduled time
click the half-hour time increment drop down box and select the desired
time. To disable maintenance select the "Never" option at the bottom of the
available times (This is not recommended).
The default day of the week for maintenance is Daily. This will run maintenance each day of the week. To
schedule maintenance to run on a particular day of the week click the day of the week drop down box and select the desired day.
8.12. Applying Changes To The Admin Session
If you have made changes to the Admin session that you want to have applied to all of the user sessions click
the STATUS link on the menu bar at the top of the page.
WARNING – This will disconnect all remote users
Locate the "Applianz Admin" line and click the APPLY button. This will shut down all user sessions, apply the
changes, then start them back up.
27
8.13. Displaying Users Currently Logged Into The System
To see users currently logged into the Applianz System click the STATUS link on the menu bar at the top of the
page.
The USER column on the Current Sessions section lists the users currently logged into the system.
8.14. Resetting A User's Session
To see reset a user's session click the STATUS link on the menu bar at the top of the page.
Locate the User's name in the USER column and click the STOP button on the right.
8.15. Starting Sessions Manually
To see start a session manually click the STATUS link on the menu bar at the top of the page.
Find the line where the STATE column is "Not Started". If the count is more than 0 you can click the START
button to start more sessions.
28
9. Installing Custom Fonts
Custom fonts should be installed on the admin session of your Applianz System. Once the font is installed on the admin
session it will be available to all of the application sessions after the next reboot.
9.1. Transferring The Font
The font should be transferred somewhere it is accessible to the admin session. The simplest way may be to
transfer the font to the file server through either the shared drive on the Applianz server, or using sftp. Other
alternatives are downloading the font from a website into the admin session, or putting the font on a shared
drive on your network and accessing it from the admin session. In the following example the font has been
transferred to the shared drive on the Applianz System.
9.2. Installing The Font
Installing fonts is accomplished through the Control Panel in Windows. Click the start button, and select Control Panel.
Double click the Fonts icon in the Control Panel
Drag and drop the font into the Fonts window. If you copied the
font to the shared drive of the Applianz System it should be available in the N: drive on the admin session.
29
A progress bar will appear indicating the installation percentage.
When this window closes the font is installed.
9.3. Rebooting The Applianz System
After the font is installed it will not take effect for users until they are applied using the Web Admin site (See section 8.11) or the Applianz System is rebooted.
30
10. Limited Warranties and Return Policy (V.6)
Applianz -branded hardware products purchased in the U.S. come with either a 1-year, or 3-year limited warranty, depending on the product support services agreement purchased. To determine which warranty came with your hardware
product(s), see your packing slip or invoice. The following sections describe the limited warranties and return policy for
the U.S.
10.1. What Is Covered By This Limited Warranty?
This limited warranty covers defects in materials and workmanship in your — our end-user customer's — Applianz -branded hardware products. This limited warranty will be voided if at anytime during the set up, installation and operation of the Applianz Data Vault System protection with an uninterruptible power supply (UPS) is
not utilized. Any damage caused by power related issues will not be covered under this warranty or service
support agreement.
10.2. What Is Not Covered By This Limited Warranty?
This limited warranty does not cover:
•
Software, including the operating system and software added to the Applianz -branded hardware products through our factory-integration system, third-party software, or the reloading of software. Data loss or
any and all time related for retrieval and or reconstruction of loss data
•
Non-Applianz branded and Solution Provider Direct products and accessories
•
Products with missing or altered Service Tags or serial numbers
•
Products for which Applianz has not received payment
•
Problems that result from:
•
External causes such as accident, abuse, misuse, or problems with electrical power
•
Servicing not authorized by Applianz
•
Usage that is not in accordance with product instructions
•
Failure to follow the product instructions or failure to perform preventive maintenance
•
Problems caused by accessories, parts, or components not supplied by Applianz
THIS WARRANTY GIVES YOU SPECIFIC LEGAL RIGHTS, AND YOU MAY ALSO HAVE OTHER RIGHTS,
WHICH VARY FROM STATE TO STATE (OR JURISDICTION TO JURISDICTION). APPLIANZ 'S RESPONSIBILITY FOR MALFUNCTIONS AND DEFECTS IN HARDWARE IS LIMITED TO REPAIR AND REPLACEMENT AS
SET FORTH IN THIS WARRANTY STATEMENT. ALL EXPRESS AND IMPLIED WARRANTIES FOR THE PRODUCT, INCLUDING BUT NOT LIMITED TO ANY IMPLIED WARRANTIES AND CONDITIONS OF MERCHANTABILITY AND FITNESS FOR A PARTICULAR PURPOSE, ARE LIMITED IN TIME TO THE TERM OF THE LIMITED WARRANTY PERIOD REFLECTED ON YOUR PACKING SLIP OR INVOICE. NO WARRANTIES,
WHETHER EXPRESS OR IMPLIED, WILL APPLY AFTER THE LIMITED WARRANTY PERIOD HAS EXPIRED.
SOME STATES DO NOT ALLOW LIMITATIONS ON HOW LONG A IMPLIED WARRANTY LASTS, SO THIS
LIMITATION MAY NOT APPLY TO YOU.
WE DO NOT ACCEPT LIABILITY BEYOND THE REMEDIES PROVIDED FOR IN THIS LIMITED WARRANTY OR
FOR CONSEQUENTIAL OR INCIDENTAL DAMAGES, INCLUDING, WITHOUT LIMITATION, ANY LIABILITY FOR
THIRD-PARTY CLAIMS AGAINST YOU FOR DAMAGES, FOR PRODUCTS NOT BEING AVAILABLE FOR USE,
31
OR FOR LOST DATA OR LOST SOFTWARE. OUR LIABILITY WILL BE NO MORE THAN THE AMOUNT YOU
PAID FOR THE PRODUCT THAT IS THE SUBJECT OF A CLAIM. THIS IS THE MAXIMUM AMOUNT FOR
WHICH WE ARE RESPONSIBLE.
SOME STATES DO NOT ALLOW THE EXCLUSION OR LIMITATION OF INCIDENTAL OR CONSEQUENTIAL
DAMAGES, SO THE ABOVE LIMITATION OR EXCLUSION MAY NOT APPLY TO YOU.
10.3. How Long Does This Limited Warranty Last?
The limited warranty on all Applianz -branded products begins on the date of the Support Services Agreement
or Invoice. The warranty period is not extended if we repair or replace a warranted product or any parts. Applianz may change the availability of limited warranties, at its discretion, but any changes will not be retroactive.
10.4. What Do I Do If I Need Warranty Service?
Before the warranty expires, please call or email us using the information in the following table. Please also have
your Applianz serial number or order number available.
Technical Support: 1-316-263-4800
Email: [email protected]
10.5. What Will Applianz Do?
During the 90 days of the 90-day limited warranty: During the 90 days of the 90-day limited warranty, we will
repair any Applianz -branded hardware products returned to us that prove to be defective in materials or workmanship. If we are not able to repair the product, we will replace it with a comparable product that is new or
refurbished.
When you contact us, we will issue a Return Material Authorization Number for you to include with your return.
You must return the products to us in their original packaging, prepay shipping charges, and insure the shipment or accept the risk if the product is lost or damaged in shipment. All returns must be in a resalable condition including original packaging and packaging materials, all cords, cables, documentation and warranty materials. We will return the repaired or replacement products to you. We will pay to ship the repaired or replaced
products to you if you use an address in the United States (excluding Puerto Rico and U.S. possessions and
territories). Otherwise, we will ship the product to you freight collect.
If we determine that the problem is not covered under this warranty, we will notify you and inform you of service
alternatives that are available to you on a fee basis.
NOTE: Before you ship the product(s) to us, make sure to back up the data on the hard drive(s) and any other
storage device(s) in the product(s). Remove any confidential, proprietary, or personal information and removable
media. We are not responsible for any of your confidential, proprietary, or personal information; lost or corrupted
data; or damaged or lost removable media.
10.6. What If I Purchased A Service Contract?
During the extended period covered by the purchase of the Support Service Agreement limited warranty, we will
repair any Applianz -branded hardware products returned to us that prove to be defective in materials or workmanship. If we are not able to repair the product, we will replace it with a comparable product that is new or
refurbished.
When you contact us, we will issue a Return Material Authorization Number for you to include with your return.
You must return the products to us in their original or equivalent packaging, prepay shipping charges, and insure the shipment or accept the risk if the product is lost or damaged in shipment. We will return the repaired or
replacement products to you. We will pay to ship the repaired or replaced products to you if you use an address
32
in the United States (excluding Puerto Rico and U.S. possessions and territories). Otherwise, we will ship the
product to you freight collect.
If we determine that the problem is not covered under this warranty, we will notify you and inform you of service
alternatives that are available to you on a fee basis.
NOTE: Before you ship the product(s) to us, make sure to back up the data on the hard drive(s) and any other
storage device(s) in the product(s). Remove any confidential, proprietary, or personal information and removable
media. We are not responsible for any of your confidential, proprietary, or personal information; lost or corrupted
data; or damaged or lost removable media.
If your service contract is with Applianz, service will be provided to you under the terms of the service agreement. Please refer to that contract for details on how to obtain service.
10.7. How Will You Fix My Product?
We use new and refurbished parts made by various manufacturers in performing warranty repairs and in building replacement parts and systems. Refurbished parts and systems are parts or systems that have been returned to Applianz, some of which were never used by a customer. All parts and systems are inspected and
tested for quality. Replacement parts and systems are covered for the remaining period of the limited warranty
for the product you bought. Applianz owns all parts removed from repaired products.
10.8. Total Satisfaction Return Policy (U.S. Only)
We value our relationship with you and want to make sure that you're satisfied with your purchases. That's why
we offer a "Total Satisfaction" return policy for most products that you, the end-user customer, purchase directly
from Applianz. Under this policy, you may return to Applianz products that you purchased directly from Applianz
for a credit or a refund of the purchase price paid, less shipping and handling and applicable return fees as follows:
New Hardware Products and Accessories: Unless you have a separate agreement with Applianz, all hardware,
accessories, peripherals, parts and unopened software still in its sealed package, may be returned within thirty
(30) days from the date on the packing slip or invoice. Applianz must receive the unit on or prior to the 30 day
limited period.
How to Return: To return products, e-mail or call Applianz customer service to receive a Return Material
Authorization Number (RMA) within the return policy period applicable to the product you want to return. You
must obtain a Return Material Authorization Number in order to return the product. See "Contacting Applianz "
or "Getting Help" in your customer documentation to find the appropriate contact information for obtaining customer assistance.
You must ship the products to Applianz within five (5) days of the date that Applianz issues the Return Material
Authorization Number. You must also return the products to Applianz in their original packaging, in as-new condition along with any media, documentation, and all other items that were included in the original shipment,
prepay shipping charges, and insure the shipment or accept the risk of loss or damage during shipment.
Note: Before you ship the product(s) to us, make sure to back up the data on the hard drive(s) and any other
storage device(s) in the product(s). Remove any confidential, proprietary or personal information, removable
media, such as floppy disks, CDs, or PC Cards. We are not responsible for any of your confidential, proprietary
or personal information; lost or corrupted data; or damaged or lost removable media.
33