1
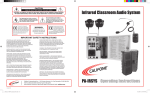
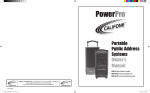
CAUTION
RISK OF ELECTRIC SHOCK - DO NOT OPEN
!
CAUTION: TO REDUCE THE RISK OF ELECTRIC SHOCK, DO NOT REMOVE COVER OR BACK.
NO USER SERVICEABLE PARTS INSIDE. REFER SERVICING TO QAULIFIED PERSONNEL.
The lightening flash with arrowhead
within a triangle is intended to tell
the user that parts inside the product
are a risk of electric shock to persons.
This product is not designed to
function normally in strong electromagnetic fields. Consequently, the
audio quality may degrade while
the product is exposed to strong electromagnetic
fields. Normal audio quality operation will be
recovered when the strong electromagnetic field
is no longer present.
!
The exclamation point within a
triangle is intended to tell the user
that important operating and servicing
instructions are in the papers with
the appliance.
WARNING:
TO REDUCE THE RISK OF
FIRE OR ELECTRIC SHOCK, SO
NOT EXPOSE THIS APPLIANCE
TO RAIN OR MOISTURE.
Ce produit n’est pas conçu pour
un fonctionnement dans de forts
champs électromagnétiques. Par
conséquent, la qualité sonore peut
diminuer si ce produit est exposé
à un fort champ életromagnétique. La qualité
sonore redeviendra normale après affaib-lissement du champ électromagnétique.
IMPORTANT SAFETY INSTRUCTIONS
ATTENTION: ALL SAFETY AND OPERATING INSTRUCTIONS
SHOULD BE READ BEFORE OPERATING APPLIANCE. ALL
OPERATING AND USE INSTRUCTIONS SHOULD BE FOLLOWED
WHEN OPERATING THE APPLIANCE. HEED AND ADHERE
TO ALL WARNINGS ON THE APPLIANCE AND IN THE OPERATING
INSTRUCTIONS. RETAIN ALL SAFETY AND OPERATING
INSTRUCTIONS FOR FUTURE REFERENCE.
WATER & MOISTURE - DO NOT USE THE APPLIANCE NEAR
WATER; IE. BATHTUB, WASHBOWL, KITCHEN SINK, LAUNDRY
TUB, WET BASEMENT OR SWIMMING POOL.
VENTILATION - DO NOT SITUATE THE APPLIANCE SO THAT
ITS LOCATION OR POSITION INTERFERES WITH ITS PROPER
VENTILATION. FOR EXAMPLE, THE APPLIANCE SHOULD NOT
BE SITUATED ON A BED, SOFA, RUG OR SIMILAR SURFACE THAT
MAY BLOCK THE VENTILATION OPENINGS. THE
APPLIANCE SHOULD NOT BE PLACED IN A BUILT-IN
INSTALLATION, SUCH AS A BOOKCASE OR CABINET, THAT
MAY IMPEDE THE FLOW OF AIR THROUGH THE VENTILATION
OPENINGS.
HEAT - SITUATE THE APPLIANCE AWAY FROM HEAT SOURCES
SUCH AS RADIATORS, HEAT REGISTERS, STOVES OR OTHER
APPLIANCES (INCLUDING AMPLIFIERS) THAT PRODUCE HEAT.
POWER SOURCES - CONNECT THE APPLIANCE ONLY TO
A POWER SUPPLY TYPE DESCRIBED IN THE OPERATING
INSTRUCTIONS OR MARKED ON THE APPLIANCE.
GROUNDING OR POLARIZATION - PRECAUTIONS SHOULD BE
TAKEN SO THAT THE GROUNDING OR POLARIZATION MEANS OF
THE APPLIANCE ARE NOT DEFEATED.
PA159 Manual - JH 2010.03.18.indd 2-3
POWER CORD PROTECTION - POWER SUPPLY CORDS
SHOULD BE ROUTED SO THAT THEY ARE NOT LIKELY TO BE WALKED
ON OR PINCHED BY ITEMS PLACED UPON OR AGAINST THEM, PAYING PARTICULAR ATTENTION TO CORDS
AT PLUGS, CONVENIENCE RECEPTACLES, AND THE POINT WHERE
THEY EXIT FROM THE APPLIANCE.
PresentationPro™
PA159
Wireless Portable PA System
CLEANING - THE APPLIANCE SHOULD BE CLEANED ONLY AS
RECOMMENDED BY CALIFONE.
NON USE PERIODS - UNPLUG THE APPLIANCE POWER
CORD FROM THE OUTLET / REMOVE ANY BATTERIES WHEN LEFT
UNUSED FOR A LONG PERIOD OF TIME.
OBJECT & LIQUID ENTRY - CARE SHOULD BE TAKEN SO THAT OBJECTS DO NOT FALL AND LIQUIDS ARE NOT SPILLED INTO
THE ENCLOSURE THROUGH OPENINGS.
DAMAGE REQUIRING SERVICE - THE APPLIANCE SHOULD BE
SERVICED BY QUALIFIED SERVICE PERSONNEL WHEN: (A) THE
POWER SUPPLY CORD OR THE PLUG HAS BEEN DAMAGED (B)
OBJECTS HAVE FALLEN OR LIQUID HAS BEEN SPILLED INTO THE
APPLIANCE (C) THE APPLIANCE HAS BEEN EXPOSED TO RAIN (D)
THE APPLIANCE DOES NOT APPEAR TO BE OPERATING NORMALLY
OR EXHIBITS A MARKED CHANGE IN PERFORMANCE (E) THE
APPLIANCE HAS BEEN DROPPED OR THE ENCLOSURE DAMAGED.
SERVICING - THE USER SHOULD NOT ATTEMPT TO SERVICE THE
APPLIANCE BEYOND THAT DESCRIBED INTHE OPERATING
INSTRUCTIONS. ALL OTHER SERVICING REFER TO A QUALIFIED
SERVICE PERSONNEL.
TP-30 tripod sold
seperately
User Manual
3/19/2010 9:58:49 AM
PresentationPro™ User Manual
Thank you for purchasing the Califone® PA159 Wireless Portable PA System.
We encourage you to visit our website www.califone.com to register your product for its warranty
coverage, to sign up to receive our newsletter, download our catalog, and learn more about the
complete line of Califone® audio visual products, including portable and installed wireless PA
systems, multimedia players and recorders, headphones and headsets, computer peripheral
equipment, visual presentation products and language learning materials.
Returning your unit for service or repairs
Unpacking the Unit
Inspection and inventory of your system. Check
unit carefully for damage that may have occurred
during transit. Each PresentationPro™ product
is carefully inspected at the factory and packed
in a special carton for safe transport.
Should your unit require service, contact your
dealer or our Customer Service Department at
(800) 722-0500 to obtain a Return Authorization
(RA) number. All shipments to Califone must
include an RA number on the carton and must
shipped prepaid. C.O.D. shipments will be refused
and returned at your cost.
ALL DAMAGE CLAIMS MUST BE MADE
WITH THE FREIGHT CARRIER
Contents
Notify the freight carrier immediately if you
observe any damage the shipping carton or
product. Repack the unit in the carton and
await inspection by the carrier’s claim agent.
Notify your dealer of the pending freight claim.
•
•
•
•
•
Warranty Registration
Connections and Functions
Please visit the Califone website to register
your PresentationPro™ for warranty coverage.
NOTE: When first connecting other equipment to
“aux in” or “line” in make certain that their power is
off and volume control at minimum.
1
PA159 Manual - JH 2010.03.18.indd 4-5
PA159 Powered Amplifier
MB-350 Mounting Bracket
RC-300 Remote Control and (2) AAA Batteries
Universal Power Adapter with AC Power Cord
User Manual
Charging the Battery
1. Before using your new PresentationPro PA159, charge the battery for at least 10 hours.
2. The indicator light above the power jack will be off if the battery is fully charged.
3. The indicator light above the power jack will light green if the battery has a low charge.
4. The battery should be fully recharged after several hours use to prolong the life of the battery.
The battery will deteriorate if stored in a discharged state for more than 30 days.
Recommended Set-up Procedure
1. Ideally volume on the unit should be set at maximum before the microphone volume is adjusted
to the desired level.
2. Turn on the main power switch and use either a wireless microphone or cabled microphone to
adjust the volume.
Operating the Sound System
1. Place the PresentationPro at its desired location.
2. CAUTION: Assure the 120/240 switch is in the correct position.
3. Plug the power cord into a grounded 90-240 volts AC, 50-60Hz.
4. Connect and audio source. Plug a microphone into either the XLR MIC input jack or the ¼” phone
mic input or a wireless Califone microphone. An audio source can be plugged into the AUX or
LINE IN jacks.
5. Turn the power switch “ON” (the red LED on the rear panel should light).
6. Adjust volume (press the Vol+/Vol- on the rear panel or keys on RC-300 remote control), bass/treble
controls for desired sound.
7. Point the remote control at the speaker grill).
2
3/19/2010 9:58:50 AM
Wireless Receiver
1. Set the volume controls on both the UHF receiver and the mic to 10 o’clock.
2. If using only neckband or clip on mics, it is recommended that the mic volume on the M319
Belt Pack Transmitter (not the UHF receiver) is turned to maximum. The volume control on the
Belt Pack Transmitter can then be used to adjust the mic volume.
3. If using mics which DO NOT have individual volume controls it is recommended that the
microphone volume control be set at 10 o’clock and then re-adjusted to the desired volume
as required.
4. It is very important to ensure that the channel number selected on the PA159 is the same as
the channel number selected on the mic. The channel indicator can be found on the Belt Pack
Transmitter (M319) in the case of neckband & clip on wireless mics & on the handle of the
wireless handheld mic.
5. It is advisable to ALWAYS have spare batteries handy for the Belt Pack Transmitters and
Handheld radio mic.
6. Nothing is more embarrassing than to have them wear out during a presentation & not having
spares on hand.
7. If a mic is being used within 4 to 6 feet from the front of the speaker this will produce what is
known as “feedback “ - a shrill screeching sound. Ensure the operator is far enough away to
prevent this (read more on page 4).
8. The wireless microphones can be used up to 150 feet from the main unit. N.B. The channel
numbers are preset at the factory so unless anyone tampers with them there is no need to
worry.
9. If using the wireless receiver, make sure the frequency is set on the Califone wireless mic or
transmitter to the same matching frequency on the PA159.
Volume Control
1. When the main power switch is turned on, the Volume Control is at the lowest level to
prevent accidental damage to the amplifier.
2. The volume can be controlled by using the Vol+/Vol- buttons on the rear panel or the RC-300
Infrared remote volume control. Volume is adjusted (+/- 4.5dB) with each push of one of the
volume control buttons. Maximum volume is reached after approximately ten pushes.
NOTE: The remote control must be used in front of the speaker as the sensor is behind the
speaker grill. The volume control effects the loudness of both wired and wireless microphones.
Line Inputs
The line-level RCA input jacks can be used with audio sources such as computers, DVD players,
LCD projectors, CD players or connecting another wired PresentationPro. (The L+R stereo outputs
to a mono signal without the need for adapters.)
Line Out
The ¼” line out is used to connect to the input of another piece of equipment such as a another
amplified speaker. The outputs are monaural and volume level will depend on the volume of the
source. For example, the tape or CD player level is controlled by the tape/CD volume control. Line out
is independent of the Volume Control.
Tone Controls
The separate base and treble controls provide a wide range of adjustment for increasing or decreasing
either the bass or treble from “flat” frequency response. The center or “12 o’clock” position is flat.
Mic Input (Unbalanced)
An unbalanced, low impedance microphone input. For use with standard dynamic microphones that have
a 1/4” phone plug.
Mic Input (Balanced)
Use this input for a dynamic (low impedance) microphone with an XLR plug or condenser/electret
(high impedance) microphones which may need phantom (polarizing) voltage.
Mic Impedance Switch
This switch is used to compensate for mic impedance differences. It assures full amplifier output
regardless of the microphone used. Note: All connections must be made with shielded cable to avoid
hum, buzzing, or radio interference.
LED
There are 3 LED indicator lights behind the speaker grill to give visual assurance of power, RF and
audio reception.
Feedback Information
What is Feedback? Feedback is a ringing, howling, or shrill sound that is self-generated by the sound
system when using a microphone. It is the result of sound from the speakers being picked up by the
microphone(s) in use and then re-amplified by the system. This can form a self-sustaining loop that
can damage the sound system if allowed to continue, not to mention annoyance to persons nearby.
How to prevent feedback
ALWAYS STAND BEHIND THE SPEAKER WHEN USING A MICROPHONE. If feedback does occur,
immediately reduce the volume. Always plug in the microphone before turning on the power.
Reducing the “treble” control may also help.
NOTE: For wireless microphone operation, the wireless receiver audio output can be plugged
into “Line-In”.
3
PA159 Manual - JH 2010.03.18.indd 6-7
4
3/19/2010 9:58:50 AM
Specifications
Troubleshooting Guide
Conditions
Possible Solution
No sound (power LED not lit):
Turn POWER switch on plug in power cord
Rated power output: 15 watts RMS
at 2% THD
No sound (power LED lit):
Check for output from audio source make sure all cables are completely plugged in mic switch on increase volume control
Sensitivity for rated output:
Line:
Microphone::
Auxiliary:
125 mVrms
4 mVrms
250 mVrms
Distorted sound:
Check input cable connection lower input signal level reduce bass and/or treble
Excessive hum or noise:
Use shielded input cable
RC-300 Remote Control does not function:
Replace batteries
Frequency response:
Treble:
Bass:
Speakers:
Crossover:
Volume control: 60 Hz – 20 kHz+ 3dB
+dB, -10dB, 10kHz
+5dB, -4.5dB 70Hz
Woofer:
6” High efficiency 4oHms, with non inductive external shield
Tweeter:
2” mylar dome, with crossover capacitor
L/C – 6dB/Octave @ 4kHz
Steps up/down 4.5 dB per step. 10 steps to maximum volume
Inputs
Line inputs (2):
Hi-Z, RCA (summing L+R)
Balanced mic:
Hi or lo-Z, with phantom power (+15 volts D.C.)
Unbalanced mic:
Lo-Z, ¼” –phone
Auxiliary:
Hi-Z Mono ¼” –phone
Line output (2):
250mv at 15 watts RMS 2 - RCA, 1 - ¼”
Remote Control distance:30 Feet
UHF Receiver:
16 selectable channels with switching antennas 902-928MHz
Battery:
Usage: 8 hours (constant max music power:100dB SPL at 1 meter)
12 volt sealed lead acid, 4.7 Ah, 8 hour recharge
AC Power requirements: 90-240 volts AC, 50-60Hz via universal power adapter
Dimensions (HWD):
6-1/4” x 10” x 8-1/2” (159mm x 250mm x 216mm)
Weight:
Actual weight: 10 lbs
Shipping weight: 14 lbs
Specifications subject to change without notice.
5
PA159 Manual - JH 2010.03.18.indd 8-9
6
3/19/2010 9:58:50 AM