1
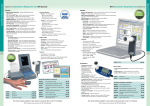
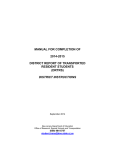
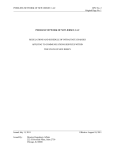
piCO+ Smokerlyzer®
Issue 9- December 2010. Part No: LAB220
Operating manual
breath analysis is the new blood test
www.covita.net | tel (800)707-5751
piCO+ Operating Manual
English
Contents
2
1
Introduction and intended use
3
2
Quick start guide
4
3
Pack contents and specification
5
4
Instrument layout
6
5
Display symbols
7
6
Warnings and maintenance
8
7
Operation
9-10
8
Calibration
11-12
9
Set-up – User profiles
13
10
Set-up – Sounder operation
14
11
Troubleshooting
15
12
COdata+ software
16
13
Frequently asked questions (FAQ)
17
14
Returns procedure
18
15
Spares and warranty
19
www.covita.net | tel (800)707-5751
Introduction
Carbon monoxide is a toxic, odourless,
colourless, tasteless gas. It is formed by
incomplete combustion of organic material
at high temperatures, with an insufficient
oxygen supply.
When inhaled, CO displaces oxygen in the
bloodstream to form carboxyhaemoglobin
(COHb). This starves the body tissues of
the oxygen vital to repair, regeneration
and general living. CO can remain in the
bloodstream for up to 24 hours, depending
on factors such as physical activity, sex,
and inhalation intensity. The half life is about
5 hours.
CO (ppm) and carboxyhaemoglobin
(%COHb) correlation:
Breath carbon monoxide is measured
in parts per million (ppm) and blood
carboxyhaemoglobin is measured in
percentages (%COHb). The two are
compatible and convertible: the CO reading
relates to gas in the lungs and on the
breath (i.e. the amount of poisonous CO
that has been inhaled), and the COHb
reading relates to the percentage of vital
oxygen that has been replaced in the
bloodstream. The piCO+ Smokerlyzer®
displays both measurements. Clinical
research has demonstrated that a useful
relationship between carbon monoxide and
carboxyhaemoglobin is obtained after a
short period of breath-holding.
The cut-off point between smoker and
non-smoker has been found to be 6ppm
CO. The piCO+ Smokerlyzer® defines a
non-smoker as 0-6ppm, a low-dependence
smoker as 7-15ppm and strongly addicted
smokers as over 15ppm.
The piCO+ Smokerlyzer® has been designed
so that it can be used with young smokers.
As their smoking habits and views are
generally different from adult smokers,
the cut-off points have changed: 0-4ppm
represents a non-smoker, 5-6ppm a light
or casual smoker, and over 7ppm a more
frequent young smoker.
Other cut-off points can be adopted as
well as smoking classification at higher
CO levels. The piCO+ has a third profile
which can be set by the user with COdata+
software to achieve complete flexibility in
most circumstances
Intended use
The piCO+ Smokerlyzer® is a breath carbon
monoxide monitor intended for multipatient use by healthcare professionals
in smoking cessation programmes and
research. It can also be used as an
indicator of carbon monoxide poisoning in a
healthcare environment.
3
English
piCO+ Operating Manual
piCO+ Operating Manual
English
Quick start guide
1
Turn on the monitor by holding down
the button for three seconds.
2
Attach a breath sampling D-piece and
new mouthpiece.
3
Inhale and double click button to start a
breath test.
4
Hold breath for the 15-second
countdown. If unable to hold breath
for full 15 seconds, see ‘Operation’,
page 9.
5
A beep will sound during the last three
seconds of the countdown.
6
Blow slowly into mouthpiece, aiming to
empty lungs completely.
7
The ppm and equivalent %
carboxyhaemoglobin (COHb) levels will
rise and hold. The coloured LEDs will
light accordingly. See the table on page
10 for an interpretation of the reading.
8
Remove the D-piece between tests to
purge the sensor with fresh air.
9
To repeat the breath test, double click the
button to return to main display and continue
from step two, above.
10 To switch off, hold button for 3 seconds.
Unit will auto power off after 5 minutes
of inactivity.
4
www.covita.net | tel (800)707-5751
English
piCO+ Operating Manual
Pack contents
1
Instrument
2 Carry pouch
2
3 User manual
4 Breath sampling D-piece
5 Disposable cardboard mouthpiece
3
6 2 × AA batteries
Infection control and maintenance guidelines
5
1
4
6
0086
Specification
Concentration range:
0-100ppm
Display:
LCD with 1ppm increments
Detection principle:
Electrochemical sensor
Accuracy (repeatability of readings):
±2%
H2 cross-interference:
<10%
Power:
2 × AA (LR6 or equivalent) alkaline batteries
Response time:
Typically <30 seconden to 90% FSD
Operating temperature range:
0-40°C (storage 0-50°C)
Operating humidity:
10-90% (storage 0-95%) non-condensing
Sensor operating life:
Approximately 5 years (2-year warranty)
Sensor sensitivity:
1ppm
Dimensions:
Approximately 45 × 75 × 120 mm
Weight:
Approximately 200g (including batteries)
Monitor construction:
Body: Polycarbonate/ABS blend with elastomeric overmould
D-piece: Polypropylene
5
piCO+ Operating Manual
1
Display
7
Exhaust port for breath sample
2
Coloured LEDs
8
Sounder
3
Button
9
USB connector
4
Aperture for D-piece
10 Cardboard mouthpiece
5
Breath sampling D-piece
11 Battery compartment
6
Securing lug on D-piece
12 Reset button
9
13 Battery cover
11
13
12
10
Reset
English
Instrument layout
8
0086
Bedfont Scientific Ltd
ME1 3QX, England
T: +44(0)1634 673720
F: +44(0)1634 673721
E: [email protected]
www.bedfont.com
3V
2
2
1
3
4
6
20
2 x AA/LR6
7
5
6
www.covita.net | tel (800)707-5751
English
piCO+ Operating Manual
Display symbols
1
Start up screens:
2 Battery condition: OK: Flat:
Dead:
3 User profile: Adult:
Adolescent: Custom:
4 Sounder:
On:
Mute:
5 Pointer:
6 Start breath test:
7 Enter calibration mode:
8 Enter set-up mode:
9 Inhale:
10 Breath-hold and countdown:
11 Exhale for breath test:
12 Peak CO reading (ppm and %COHb):
9.2
13 Set instrument zero in fresh air:
14 Apply calibration gas at 20ppm:
15 Calibration pass/fail:
Pass:
Fail:
16 Calibration reminder:
17 User profile selection:
18 Select adult user profile:
19 Select adolescent user profile:
20 Select custom user profile (if set via COdata+ software on PC):
21 Contact Bedfont or distributor for help:
22 D-piece reminder
23 Return:
7
piCO+ Operating Manual
English
Warnings and maintenance
Warnings
Routine maintenance
People with lung disease or chest ailments
may not be able to achieve the 15-second
breath-hold. In such cases, the user should
inhale and hold their breath when the breath
test is started, and exhale, if necessary,
before the countdown has completed.
Calibrate the monitor using Bedfont 20ppm
CO in air calibration gas when prompted by
the calibration reminder on the piCO+ (see
page 11). Once calibration has been carried
out a reminder will reoccur in 6 months.
Mouthpieces should be replaced after
every use.
Hands should be washed regularly in
accordance with infection control practice.
Cleaning
Wipe the instrument and D-piece external
surfaces with a product specifically
developed for this purpose. Bedfont
provides instrument cleansing wipes.
NEVER use alcohol or cleaning agents
containing alcohol or other organic solvents
as long term exposure to these vapours will
damage the CO sensor inside.
Under no circumstances should the
instrument be immersed in liquid or
splashed with liquid.
8
Replace batteries when indicated – battery
or
.
symbol either
Replace breath sampling
D-piece when prompted
by the unit every 30
days or if visibly soiled or
contaminated.
The D-piece cannot be
cleaned or sterilised.
Batteries
Batteries should be removed if the
instrument is not likely to be used for some
time.
Additional technical information can be made
available on request; please contact Bedfont
or its distributor.
www.covita.net | tel (800)707-5751
English
piCO+ Operating Manual
Operation
Ensure that two AA batteries are correctly
located in battery compartment.
•The single button controls all functions:
•One long press of the button (at least
three seconds) turns the unit on.
•A single click scrolls the pointer through
the list of options.
Attach a breath sampling D-piece and a
new cardboard mouthpiece to the piCO+.
Check that all connections are pushed
firmly together.
To start a breath test, the patient should
inhale and hold their breath, then a quick
double click of the button will initiate a
15-second countdown display.
•A quick double click selects the required
option.
•One long press of the button (at least
three seconds) turns the unit off.
Press and hold the button
for three seconds until the
display becomes active.
Release the button. After a
10-second warm-up period,
during which a start-up
screen is displayed, the main
menu will appear.
is shown rather than the main
If a
menu, it means that the instrument has
failed to set a fresh air zero during start-up.
This may be because the ambient air was
not clear of carbon monoxide. Ensure that
the instrument is in fresh air, then double
click the button to repeat the start-up test.
If it fails again, see ‘Troubleshooting’,
page 15.
When the pointer is opposite the picture
of an exhaling face, the piCO+ is ready to
start a breath test. The green LEDs will
double flash to indicate that the instrument
is ready.
9
piCO+ Operating Manual
English
Operation (continued)
Ensure that the breath is held
throughout the countdown. An audio
beep will sound during the last
three seconds of the countdown.
Once the countdown reaches zero, exhale
slowly but gently into the mouthpiece. Aim
to empty the lungs as much as possible.
If the patient cannot hold their breath for
the full 15 seconds, they should commence
exhalation at a comfortable point, but
exhale completely.
The display will show a rising ppm value,
and an equivalent %COHb reading. The
coloured LEDs will illuminate, according to
the selected user profile.
The sounder will beep at an increasing
frequency, according to the concentration
of CO measured. To temporarily mute the
sounder, press the button once.
The highest level detected during the
exhalation will remain on the
display. The test is complete
when the pointer and ‘return’
symbols appear at the bottom
of the display.
At this point, a single click of the button will
temporarily silence the sounder, if it is on.
To start another breath test, double click the
button to return to the main display. A new
mouthpiece should be used with every test.
Removing the D-piece between tests will
allow fresh air to purge the sensor. It is good
practice to wash your hands after removing
the D-piece.
If no further tests are required, the piCO+
should be turned off by holding the button
for three seconds. If left on, the piCO+ will
automatically turn off after five minutes of
inactivity.
To re-calibrate the instrument, follow the
instructions on page 11.
To change the user profile from adult to
adolescent (or a custom profile, if one has
been set using COdata+ software), see
page 3.
To permanently silence the sounder during
the breath-test, follow the instructions on
page 14.
LED colour
Description
Green
Non-smoker
0-6
0-4
Yellow
Danger zone
7 10
5-6
1 Red
Smoker
11-15
7-10
2 Reds
Frequent smoker
16-25
11-15
3 Reds
Addicted smoker
26-35
16-25
4 Reds
Heavily addicted smoker
36-50
26-35
4 Reds flashing
Dangerously addicted smoker
51+
36+
10
User profile 1:
Adult (ppm)
User profile 2:
Adolescent (ppm)
www.covita.net | tel (800)707-5751
English
piCO+ Operating Manual
1
Calibration
2
Bedfont calibration kit
1. Fine control valve
1.5 l/m
1
1.0 l/m
0.5 l/m
2
3
2. Flow indicator
3. Gas cylinder, 20ppm
CO in air
4. Calibration adapter and
tube
●● Instruments are calibrated before leaving
Bedfont.
●● Calibration reminders
will prompt the user to
calibrate the unit every
six months
●● The calibration gas
required is Bedfont 20ppm carbon
monoxide in air.
●● Ensure that the fine control valve is in the
off position.
4
●● Ensure that the instrument is surrounded
by fresh air. With the pointer opposite
the ‘zeroing’ symbol, double click the
button to set the instrument to zero. If
the zeroing has been successful, a tick
will be displayed. If the zeroing fails,
will be displayed
a
(see ‘Troubleshooting’,
page 15, if this happens).
Double click the
button to return to the
calibration menu.
●● Screw the fine control valve and flow
indicator assembly to the gas can. This
is best done by screwing the gas can
into the valve.
●● Turn the instrument on in
the normal way. When the
main menu appears, scroll
down to the symbol of
the gas cylinder by single
clicking the button. Double
click to select that symbol.
11
piCO+ Operating Manual
English
Calibration (continued)
●● Single click the button to
scroll down to the 20ppm
gas cylinder symbol.
Double click to select the
symbol.
●● Immediately open the fine
control valve and allow
the gas to flow at 1 litre per minute.
●● To maintain this, adjust the flow so the
ball in the flow indicator remains at the
middle line.
●● Allow the gas to flow through the
instrument for up to 1.5 minutes to
ensure accurate calibration, again
monitoring the rate of flow.
●● As the 20ppm CO
calibration gas is applied,
the displayed ppm
reading will climb. After
1.5 minutes, or until no
further increase in the
reading is obtained, the
final measured value will
be shown and sampling
will cease.
12
●● If the displayed reading is between 15
and 25ppm, the calibration value will be
automatically set in the instrument as
will be displayed
20ppm and a tick
to show a successful calibration. If
the displayed reading is outside these
limits, the calibration fails, and a
will be displayed (see ‘Troubleshooting’,
page 15, if this happens).
●● The pointer and ‘return’ symbols reappear at the bottom of the display to
indicate that the process is complete
and to allow the user to double click the
button to return to the previous menu.
●● Turn off the gas flow, remove the D-piece
sampling system, and disconnect the
calibration adapter from the D-piece
sampling system.
●● Unscrew the fine control valve and flow
indicator from the gas can and store
safely. If the valve is left attached to the
can, the gas could escape.
●● The piCO+ is now calibrated and ready
for use.
●● The piCO+ will prompt the user to
calibrate the unit again in six months.
www.covita.net | tel (800)707-5751
English
piCO+ Operating Manual
Set-up – User profiles
In the set-up mode, the user can change the
selected user profile from adult to adolescent
(or to a third custom profile, if one has been
set).
The user profiles determine which coloured
LEDs are lit during a breath test. The default
values for adults and adolescents are shown
in the table in ‘Operation’, page 10. The
selected user profile is indicated by the small
symbol on the top line of the display:
To change the selected profile, scroll the
on the
pointer to the set-up symbol
main display, using single clicks of the
button. Double click to select the set-up
mode.
Scroll the pointer until it is opposite the
. Double click to
‘User Profile’ symbol
select this function.
Move the pointer until it is opposite the
desired profile, then double click to select.
Adult 1
The symbol on the top line of the display will
change to show the selected profile.
Adolescent 2
The custom profile will only be available
on the display if it has been previously set
using the COdata+ software on a PC.
Custom 3
Exit this function by pointing at the ‘return’
symbol and double clicking. This returns
you to the previous page of the menu.
13
piCO+ Operating Manual
English
Set-up – Sounder operation
The set-up mode allows the sounder to be
turned off during the breath test, although
it will still operate during the breath-hold
countdown.
●● Even if the sounder has been turned
off, it will continue to operate during the
last three seconds of the breath hold
countdown.
The operation of the sounder during
the exhalation phase of a breath test is
indicated by the small
symbol on the top
line of the display.
●● Exit this function by pointing at the
and double clicking.
‘return’ symbol
This returns you to the previous page of
the menu.
●● To turn the sounder settings on or off,
scroll the pointer to the set-up symbol
on the main display using single
clicks of the button. Double click to select
the set-up mode – see previous page.
●● Single click the button to temporarily
silence the sounder during or
immediately after the breath test, if
required.
●● Scroll the pointer until it is opposite the
sounder symbol ( ) then double click
to switch the sounder on ( ) or off ( ).
The large sounder symbol and the small
symbol on the top line of the display will
change to show whether the sounder is
on or off.
14
www.covita.net | tel (800)707-5751
English
piCO+ Operating Manual
Troubleshooting
●● If the unit fails to turn on properly, or if
or
either low battery symbols
are shown, replace both AA batteries.
Ensure that the batteries are inserted
the correct way around, matching the
symbols moulded into the plastic.
●● If a breath test on a non-smoker gives
an indication of CO being present, it
may indicate a high ambient level of
CO (possibly due to a faulty combustion
appliance or exhaust fumes), or
the effects of passive smoking. A
false reading can, under certain
circumstances, be caused by alcohol
on a person’s breath, or the presence of
hydrogen, which can be generated in the
human digestive system.
after zeroing,
●● If the display shows a
a second attempt can be made to zero
the unit in fresh air. Check that the unit
is in fresh air and double click the button
to restart the zeroing process. If, after a
third zeroing attempt, the display shows
a
again, the unit will have to be
reset or restored using the reset button
located in the battery bay. If the problem
persists, return the monitor to Bedfont or
your local distributor for investigation and
repair. In this case, the display will show
a telephone and envelope symbol. The
unit can be turned off by pressing the
button for three seconds. It is possible to
re-start the unit and attempt the zeroing
process again.
●● If, after an attempted calibration with
20ppm CO gas, the display shows a
, the gas value was not within the
permitted limits. The achieved reading
is displayed underneath the . If the
value is much lower than 20ppm, there
may have been a problem with the
supply of gas from the cylinder during
the calibration process. If the displayed
value is much higher than 20ppm, it is
possible that the wrong concentration of
calibration gas is being used. In either
case, check the cylinder, connections
and flow rate before double clicking the
button to repeat the calibration process.
If, after a third repeated attempt to
calibrate the instrument, the display
again, the unit will have
shows a
to be reset or restored using the reset
button located in the battery bay. If the
problem persists, please return the unit
to Bedfont or your local distributor for
investigation and repair. In this case, the
display shows a telephone and envelope
symbol. The unit can be turned off by
pressing the button for three seconds.
It is possible to re-start the unit and use
it with the previous calibration settings,
or to attempt the complete calibration
process again.
15
piCO+ Operating Manual
English
COdata+ software
Connecting to the PC
●● Place one end of the connection lead into
the mini USB socket on the top of the
piCO+. Connect the other end to the USB
port on the PC.
●● Before starting the software, ensure
that the piCO+ is connected to the PC
and switched on. Once the sensor has
stabilised, double click the COdata+ icon
on the PC to start the programme.
●● Refer to the supplied documentation for
how to operate COdata+ software.
●● The custom user profile can only be
accessed from COdata+.
16
www.covita.net | tel (800)707-5751
English
piCO+ Operating Manual
Frequently asked questions (FAQ)
Frequently asked questions about breath carbon monoxide (CO) monitoring in smoking
cessation
QQWhat is carbon monoxide?
AACarbon monoxide (CO) is a poisonous
gas that you cannot smell or see. When
a smoker inhales smoke from a cigarette,
CO is absorbed into their blood through
their lungs. CO is dangerous because
it binds to haemoglobin in red blood
cells about 200 times more readily
than oxygen, depriving the body of
vital oxygen.
QQWhat does a breath CO test show?
AAIt shows the amount of carbon monoxide
in a person’s breath (ppm CO), which is
a measure of blood carboxyhaemoglobin
(%COHb). It also acts as an indicator of
the possible level of around 4,000 toxic
substances in cigarette smoke, 60 of
which can cause cancer.
QQWhat does ppm and COHb mean?
AAParts per million; in this case, one part
of CO in one million parts of air (breath).
This might not seem like very much, but
ppm has a direct correlation with %COHb
(the percentage of CO combined with
haemoglobin in the blood).
LED Colour
Description
If a patient gives a reading of 20ppm (that
of a frequent adult smoker), it means that
their oxygen carrying capacity is reduced
by 5%. It also indicates a high level of
addiction to nicotine.
QQHow quickly does CO disappear from the
body when a person stops smoking?
AAIt takes about 5-6 hours to reduce the
original level by half. Usually, after a
maximum period of 48 hours, an exsmoker will have the same level of CO as
a non-smoker in the same environment.
QQHow long after having a cigarette
should the test be conducted?
AAAfter a minimum of 10 minutes.
QQWhen is the best time to take a CO
reading?
AAThe best time to take a CO reading is as
late as possible in the day.
QQWhat level of breath CO do you expect
to see?
AAClinical research has shown that the
popular guidelines are:
User profile 1:
Adult (ppm)
User profile 2:
Adolescent (ppm)
Green
Non smoker
0-6
0-4
Yellow
Danger zone
7-10
5-6
1 Red
Smoker
11-15
7-10
2 Reds
Frequent smoker
16-25
11-15
3 Reds
Addicted smoker
26-35
16-25
4 Reds
Heavily addicted smoker
36-50
26-35
4 Reds flashing
Dangerously addicted smoker
51+
36+
17
piCO+ Operating Manual
English
Returns procedure
If your equipment requires servicing, please contact Bedfont’s Customer Repairs Depatment
before returning any goods. If you did not purchase your monitor directly from Bedfont,
please contact your local distributor or supplier.
●● When you have supplied the Customer
Repairs Department with the monitor
serial number and description of the
fault, you will be issued with a returns
number.
●● Please state the returns number on a
compliment slip or headed paper when
returning the monitor, and ensure that
your full details, including telephone and
fax numbers, are clearly stated.
●● Bedfont advise that you use a courier
service when returning monitors. This
enables you to insure goods for loss or
damage in transit.
●● When your goods are received, you will
be sent an ‘order acknowledgement’.
●● The monitor will then be examined and
you will be sent an ‘Engineer’s Report’
and a quotation for the repair, which will
include an authorisation form.
●● If the monitor is out of warranty and
you wish to proceed with the repair or
calibration, complete the authorisation
form within the quotation, and ensure
that you include the ‘Official Purchase
Order Number’. Return the unit to
Bedfont. Please contact the Customer
Repairs Department if you are unable
to supply an ‘Official Purchase Order
Number’.
●● If you choose not to proceed with the
repair, a handling fee will be charged.
Ensure that you return the completed
authorisation form with an ‘Official
Purchase Order Number’.
●● The equipment will be returned to you
as soon as Bedfont has received all
relevant paperwork. A carriage fee will
be charged if the monitor is no longer in
warranty.
●● If your monitor is still in warranty, Bedfont
will repair it and return it to you with an
‘Engineer’s Report’, free of charge. If
the monitor is found to simply require
calibrating, you will be charged a fee for
this service if you wish to proceed.
18
www.covita.net | tel (800)707-5751
English
piCO+ Operating Manual
Spares and warranty
Spares:
D-pieces
Disposable cardboard mouthpieces
Calibration gas and kits
Instrument cleansing wipes
AA alkaline batteries
Warranty:
Bedfont Scientific Limited warrants the
piCO+ (excluding batteries) to be free of
defects in materials and workmanship
for a period of two years from the date of
shipment. Bedfont’s sole obligation under
this warranty is limited to repairing or
replacing, at its choice, any item covered
under this warranty when such an item is
returned, intact and prepaid, to Bedfont
Scientific Limited or the local representative.
These warranties are automatically
invalidated if the products are repaired,
altered, or otherwise tampered with by
unauthorised personnel, or have been
subject to misuse, neglect or accident.
Never dispose of any electronic instrument
in domestic waste. At the end of the
product’s life, contact Bedfont or its
distributor for disposal instructions.
coVita
30 Washington Ave Suite B
Haddonfield, NJ 08033
Tel:
(800) 707-5751
Fax:
(800) 721-2377
Email:
[email protected]
19
coVita
30 Washington Ave Suite B
Haddonfield, NJ 08033
Tel: (800) 707-5751
Fax: (800) 721-2377
Email: [email protected]
www.covita.net
Issue 9- December 2010. Part No: LAB220
© Bedfont Scientific Ltd
Bedfont Scientific Limited reserves the right to change or update this literature without prior notice.
Registered office: England and Wales. Registered No: 1289798
ISO 9001:2008
Cert No. FM 31664
ISO 13485:2003
Cert No. MD 502905