1
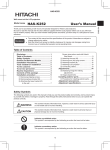
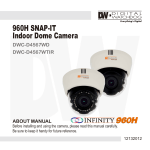
MINI PROJECTOR USER MANUAL NO.:1
1. Product Features
MINI PROJECTOR USER MANUAL NO.:2
2. Remarks
2.0 Notice: Read the manual carefully before operating projector.
2.1 To ensure stable power supply, please use the power supply which comes in the box.
1.0 White color with impressive arc design.
1.1 Well structured allowing for perfect ventilation and steadier use.
1.2 LED lamp life can be extended up to 50,000 hours.
1.3 Multi-function interface: HDMI /SD/USB/VGA/AV/AUDIO OUT.
1.4 Manual lens adjustment, viewing picture extends from 20 to 100 inch.
2.2 Use accessories as indicated on the projector or the manual.
2.3 The projector should be kept away from cloth ,sofa or anything that may block
ventilation. Keep way from flammable and explosive material(s).
2.4 Do not disassemble projector by yourself, otherwise we will not be able to service under
warranty.
2.5 To protect your eye, do not watch directly into the lens when projector is ON.
2.6 The projector should be kept way from water, and should not be placed around vases,
cups and other items containing liquid.
1.5 Professional trouble shooting and protection measures.
1.6 Due to small size and light weight, easy to carry.
2.7 To prevent electric shock, please don't put the projector under rain or moisture.
2.8 We recommend turning power off when projector has been in continuous play for over 6
hours.
2.9 Recommend to use original foam and cushioning material provided when transporting
projector.
2.10 If the projector does not work, please contact the retailer for further assistance.
1.7 Switch aspect ratio between 16:9 and 4:3.
1.8 Low power consumption, ultra quiet isolation.
1.9 Can be charged using vehicle power.
3. Accessories List
AV signal cable 1pc
Remote control 1pc
Power adapter
1pc
User Manual
1pc
MINI PROJECTOR USER MANUAL NO.:3
MINI PROJECTOR USER MANUAL NO.:4
6. Function structure diagram
4. Specification
5. Multimedia support files
SD card reader
Model
Mini projector
Image system
LCD
480*320
Support
Resolution
Max 1920*1080
Lamp
LED
Input voltage
DC 12V/2A
Language
English,
23 languages
Brightness
60lumen
Contrast
1,000:1
Lens
F=90
20-100inch
Projection
distance
1.2-3.6 m
Front
projection
Native
Resolution
Image size
Color
18000K
Projection
mode
Power waster
25W
Speaker
2.0W*1
0.27KG
Size
170*115*70mm
Weight
Operation
mode
Output
Manual/Remote
control
Headphone
Working temp
Input
SD
USB HDMI
Infrared port
10~38°C
HDMI/USB/SD
VGA/AV
VGA
USB HDMI
IR
AV(3 in 1)
Audio output
DC 12V Adapter
AV
VGA
DC-IN
MINI PROJECTOR USER MANUAL NO.:5
MINI PROJECTOR USER MANUAL NO.:6
7. Button function
8. Function Operation
1
3
4
7
8
11
2
6
5
AUD.LANG
Source
PVR
EPG
10
9
12
Signal light
Power button
14
13
Menu
Left Right Down UP Menu Source
Left: move left or volume down;
Confirm the signal input source.
Right: move right or volume up.
Up: move up.
Down: move down.
Menu: operate multiple functions.
Source: choose the input signal source.
Power Button: power on or off.
Exit
15
17
16
-/--
1. Power
2. Mute
3. Backward
4. Forward
5. Previous
6. Next
7. Play
8. Stop
9.Audio Language
(Only apply for European DVB-T)
10. Record digital TV channel and
playback
(Only apply for European DVB-T)
11. Source
12. Electronic Menu
(Only apply for European DVB-T)
13. Confirm
14. Up/down/left/right
15. Menu
16. Exit
17. Numbers
MINI PROJECTOR USER MANUAL NO.:7
10. Menu Setting
9. Function Operation
Power on/off
Once projector is powered through adapter, it goes into stand-by status.
Power on: Press the power button on the projector or remote control once, the projector starts working. Power
off: Press the power button on the projector or remote control once, the projector is off.
Focus/ Viewing
Place projector at a proper distance where the projector lens is perpendicular to the projection screen,
then rotate the lens until the image is clear. During this step, you can broadcast a program or the
menu image to support focus.
!
While using the projector, please connect the power adapter to the projector first, then connect the
power adapter with the power socket.
! For more product function and application, please consult with retailer.
Menu Operation
Signal Source Selection
Press “SOURCE” button on the remote control to get the source menu, repeat pressing “source”
button to move the cursor to the input signal source required, then press “OK” button to confirm.
Or press “SOURCE” button on the projector to get the source menu, and then press “OK”.
MINI PROJECTOR USER MANUAL NO.:8
11. Multimedia Player
Insert the USB or SD card first, and choose Multimedia from source menu, then the main interface comes up as the
picture below. Through this interface, you can choose the corresponding "pictures", "music", "video", "text" icon to play
the file. Remarks: You can only insert the USB or SD on at a time, or the projector cannot recognize any of them.
Press "MENU" key to enter the main menu, then press“ / ”
key to each sub-menu.
Press up-down key to select the sub-menu, then adjust the
parameters as per your need, and press the "OK" key to confirm.
Function of Sub-menu
Image Sub-menu:
Available adjustment: picture mode, color temperature, aspect ratio, noise reduction, computer settings.
Sound Sub-menu:
Available adjustment: sound mode, balance, auto volume, surround sound, SPDIF mode, EQ.
Time Sub-menu
Available adjustment: clock, off time, on time, automatic shutdown time, auto sleep.
Setting Sub-menu
Available adjustment: OSD Language, restore factory setting, blending, OSD Duration, image flip, zoom.