1
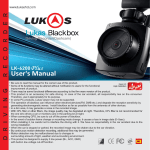
The excellent performance automobile Drive Recorder equipped with a function of the precise “Vehicle Number tracing system”. User Manual (For Two Channel Model) A800 / S800 / X1000 / K1000 Words of Thanks Thank you for purchasing the vehicular Drive Recorder, A800HD / K1000HD / S800HD / X1000HD, of ALLION Inc. DSGLOBAL CO.,Ltd Our X800HD is developed in house by the company technology research center to have the best performance and specification in the industry. As to the main features, the data processing speed, the system stability and the stability against heat are strengthened by adopting 800 Mhz CPU; and clear picture quality is provided in a bright place as well as a dark place by using a HD sensor and an ultra-low light (F1.5) lens. Also, the precision of the accident analysis is enhanced by providing high definition (1280x720) clear quality pictures from both the front and rear cameras. As to the vehicle number precision tracking function, we have materialized the technology of analyzing and expanding the vehicle number when the vehicle number location is touched while the recorded video is replayed. The vehicle protection function during parking is strengthened by adopting a police light on the front and an impact sensor of the best specification which detects even a minute impact. It is the best premium product which additionally includes even the functions difficult to be easily found in the products of other companies such as 2.8 inch 16:9 TFT LCD, state-of-the-art precision GPS, automatic motion detector, digital camera function, vehicular battery protection function, and DC 12 – 24 V free voltage for the main body and the rear camera. Please read the user manual carefully and utilize the functions of the products to the maximum. Also, if you have any inconvenience in or any question about using the product, please contact our customer center at +82)70.4334.5789. Thank you. 1. Product Composition Main Body Mount Cigar Jack Micro SD Card and Adapter Rear Camera Rear Camera Cable User Manual DC fuse power cable for constant power supply 1 2. Name of Each Part Using X1000 model for understanding. (A800 / S800 / K1000 / X100) All products are same. ① Front camera: 2 million pixels, 120˚(D) optical angle ② Microphone: Mono, C-Mic ③ Speaker: 1 W ⑨ LCD : 2.8 inch TFT LCD, 240x400 wide, touch panel ⑩ CAM : Input terminal of the rear camera ⑪ AV Out: Output terminal of external device (video image, voice) ④ Blue LED: Police Light LED ⑫ DC In : DC 12 – 24 V ⑤ Red LED: Police light LED ⑬ O : Photo shooting ⑥ Micro SD card slot ⑭ R : Manual recording ⑦ Green LED: Recording in progress. ⑮ Rear camera: 2 million pixels, 120˚(D) optical angle ⑧ Red LED: Power is supplied 2 3. Description of Menus ① ② ③ ④ ⑤ ⑥ ⑦ ⑧ ⑨ ⑩ When the screen is touched on the recorded video image, the menu screen appears. (Recording is still in progress.) 3 ① Date and Time ② Battery State &KDUJLQJ&RPSOHWHG Charging ③ ~ ⑤9LHZWKHUHFRUGHG)URQW5HDU)URQW5HDU6FHQHV ⑥7XUQRIIWKH6FUHHQ7KH/&'VFUHHQDXWRPDWLFDOO\WXUQVRIIPLQXWHVDIWHUWKHSRZHU LVFRQQHFWHG :KHQWKH/&'LVWRXFKHGZLWKWKHVFUHHQWXUQHGRIIWKHSUHYLRXVVFUHHQDSSHDUV ⑦9LHZWKHUHFRUGHG9LGHR,PDJH9LGHRLPDJHVRIFRQWLQXRXVUHFRUGLQJLPSDFWUHFRUGLQJ DQGSDUNLQJUHFRUGLQJVDUHFKHFNHG ⑧9LHZWKH3KRWRV*HQHUDOSKRWRVFRQWLQXRXVSKRWRVDQGDQDO\WLFSKRWRVDUHYLHZHG ⑨6DIH5HPRYDORIWKH0LFUR6'&DUG7KLVIXQFWLRQLVWRSUHYHQWGDPDJHIURPWKH PLFUR6'FDUGFDXVHGE\DUELWUDU\UHPRYDORIWKHPLFUR6'FDUGGXULQJUHFRUGLQJ ⑩&RQILJXUDWLRQ&KDQJHLQWKHFRQILJXUDWLRQRISKRWRJUDSKWLPHUHFRUGLQJYROXPH VKRFNVHQVRUDQGYRLFHLQIRUPDWLRQDQGFRQILUPDWLRQRIILUPZDUHLQIRUPDWLRQ IRUPDWWLQJRIPLFUR6'FDUGDQGWRXJKFRUUHFWLRQDUHFDUULHGRXW 4 4. Description of Screens When the system is booted, the front scene recording screen appears on the LCD as shown in the following figure after a voice guide, “Continuous recording starts.” Continuous Video Recording ① ② ③ ④ ⑤ ⑥ ⑦ ⑧ ⑨ ⑩ 5 Sound Recording Continuous/Impact/Parking Recording Indication Sound Recording On/Sound Recording Off Photograph (1 Frame, 10 Frames) Indication Residual Memory Capacity Battery Charging State Date and Time Shock Sensor Value Vehicle Speed (only for the model equipped with a GPS module) Firmware Version Name of manufacturer 5. Connection of Power When the vehicle power (DC 12 – 24 V) is connected to the product, the booting image shown in the following figure is shown. When the booting is completed, the black box is converted into continuous recording (front scene) mode after giving a voice guide, “ Please drive carefully today as well. Continuous recording starts.” 6 6. Number precision tracing When the license plate of the desired vehicle is touched on the recorded video image, the license plate recognition algorithm works to automatically extract the number and display it on the screen. ※ Number plates within a distance of about 10 meters and an angle of 45 degrees to the left and right respectively are recognized. ※ The number recognition rate may differ depending on the surrounding environment such as snow, rain or fog. ※ Recognizing the number on the recorded video image of the rear camera may have a lower recognition rate than that of the front camera due to tinting on the glass of the vehicle, etc. The path ‘Car license Plare number is >9LHZWKHUHFRUGHG9LGHR,PDJHĺ6HOHFWD9LGHR,PDJHĺ6HOHFWD)LOH@ ①6HOHFWWKHYLGHRLPDJHWREHWUDFHGDQGWKHQUHSOD\LW Touch the screen being replayed to have the control box at the bottom. ② The screen stops when the icon Number Precision Tracing is touched 7 ③ Touch the vehicle number plate after checking the message at the top. ④ When the vehicle number plate is touched, the number is extracted with the recognition radar displayed. ⑤ When the number is recognized, the number is displayed at the center of the screen. 8 7. Video Image Precision Analysis Function The function to precisely analyze a specific part of the recorded original video image is loaded. If the icon “Video Image Analysis” is touched at the part that needs to be precisely analyzed, the accident situation can be more precisely checked using the image extracted and saved as photo images at the speed of 30 fps. ※ After the icon Video Image Analysis is touched, the image is extracted and saved for 3 seconds at the speed of 30 fps. ※ Please keep the saved analytical photos separately in a PC, if required. When the image analysis function is executed again, the analytical photos saved before are deleted and the new analytical photos are saved. The path to ‘Video Image Analysis’ is >9LHZWKHUHFRUGHG9LGHR,PDJHĺ6HOHFWDQ,PDJHĺ6HOHFWD)LOH@ ①6HOHFWWKHYLGHRLPDJHWREHDQDO\]HGDQGWKHQUHSOD\LW Touch the screen being replayed to have the control box at the bottom. ② Touch the icon Video Image Analysis. 9 Image Analysis ③ A phrase reading, “Video image is being analyzed. Please wait a moment,” appears at the top of the screen while the video image is analyzed. ④ When the video image analysis is completed, a phrase reading, “The video image analysis is completed,” appears on the screen. Ninety photos analyzed after the icon Video Image Analysis is touched are saved in the folder of analytical photos. ⑤ The file to be used for video image analysis should be at least for 5 seconds. For files with shorter replay time, a message appears which reads, “The image replay time is insufficient for analysis.” 10 8. Digital Camera Function This function is to take the photos of the accident scene when an accident occurs and present the saved photos as evidences. A photo is (photos are) taken when the camera button (O) at the top of the product is pressed. One photo or 10 photos can be taken in accordance with the set value. 6LQJOHIUDPHPRGHWLPHIUDPH It is the function similar to that of a general digital camera. When the camera button at the top is pressed, a photo can be taken. &RQWLQXRXVVKRRWLQJPRGHWLPHIUDPHV The digital camera function is further strengthened to enable precise analysis by continuously shooting moving objects such as vehicles and persons at the accident scene. When the number of photos is set, the relevant set value is displayed at the top center of the front screen. When the number of photos is set, the relevant set value is displayed at the top center of the front screen. 11 Single shooting (1 frame) or continuous shooting (10 frames) can be set in >&RQILJXUDWLRQĺ3KRWR6HWWLQJ@ The photos taken are saved in the picture folder DQGFDQEHFKHFNHGLQWKHµ9LHZWKH3KRWRV¶ ① ② ③ ① General photos: View the single shots ② Continuous photos: View the continuously shot photos ③ Analytical photos: View the photos generated in video image analysis * Detailed explanation about the Control Box ¢ ① £ ¤ ¥ ¦ Reverse the continuous slide: at an interval of 2 seconds ②9LHZWKHSUHYLRXVSKRWRV ③ 5HSOD\6WRSWKHFRQWLQXRXVVOLGH ④9LHZWKHQH[WSKRWRV ⑤ Forward the continuous slide: at an interval of 2 seconds 12 9. Recording Mode Types 1RWDVLQJOHPRPHQWLVPLVVHG&RQWLQXRXV5HFRUGLQJ0RGH ,WLVWKHUHFRUGLQJPRGHXVHGGXULQJJHQHUDOGULYLQJZKHQWKHUHFRUGHGYLGHRLPDJHLVVDYHG LQWKHXQLWRIPLQXWHV,IWKHFDSDFLW\RIWKHPHPRU\FDUGUXQVVKRUWWKHLPDJHVIURPWKH ROGHVWRQHVDUHDXWRPDWLFDOO\GHOHWHGZKLOHQHZLPDJHVDUHVDYHG 5HFRUGLQJVWDUWVULJKWDIWHUDQLPSDFWKDSSHQV,PSDFW5HFRUGLQJ0RGH ,IWKHUHLVDQLPSDFWRQWKHYHKLFOHVXFKDVDQDFFLGHQWTXLFNEUDNLQJVXGGHQDFFHOHUDWLRQRU DQREVWDFOHWKHHPEHGGHG*VHQVRUZLOODFFXUDWHO\GHWHFWLWDQGWKHYLGHRLPDJHIURP VHFRQGVEHIRUHWKHLPSDFWWRVHFRQGVDIWHUWKHLPSDFWZLOOEHVHSDUDWHO\VWRUHGLQWKH HYHQWIROGHU ,WZLOOLPPHGLDWHO\UHDFWWRHYHQDPLQXWHPRWLRQ3DUNLQJ5HFRUGLQJ0RGH 7KHYHKLFOHFDQEHVDIHO\PDQDJHGE\UHFRUGLQJWKHVXUURXQGLQJVLWXDWLRQLPPHGLDWHO\UHDFWLQJ WRWKHDPRXQWRIWKHOLJKWFRPLQJLQWRWKHFDPHUDVHQVRURUVPDOOFKDQJHLQWKHPRWLRQ ,IWKHHQJLQHLVVWDUWHGRUWKHYHKLFOHPRYHVWKHPRGHLVDXWRPDWLFDOO\FRQYHUWHGLQWR FRQWLQXRXVUHFRUGLQJPRGH ※7KHUHDUFDPHUDLVDOVRHTXLSSHGZLWKWKHIXQFWLRQWRGHWHFWPRWLRQ 0RVWRIWKHSURGXFWVRIRWKHUFRPSDQLHVGRQRWKDYHWKLVGHWHFWLRQIXQFWLRQ 13 Touch the icon [View the recorded Video Image] on the main menu screen. ① ② ③ ① Continuous Recording - The recorded video image is saved in the Micro SD card (normal folder) - If the normal folder is full, the files from the oldest ones are automatically deleted. (As to detailed explanation about the folder and file names, please refer to the page 35.) ② Impact Recording - When there is an impact on the vehicle during driving or parking, the impact sensor will detect it and the video image from 10 seconds before the impact to 10 seconds after the impact will be stored in the event folder. - If the event folder is full, the files from the oldest ones are automatically deleted. ③ Recording at car parking (Parking Monitoring) - In 10 minutes after the vehicle is parked, the system will automatically enter into recording mode. - If motion of an object is detected during parking recording mode, recording will start and, if no further motion is detected, the recording will stop. If the vehicle moves, the system will automatically enter into Continuous Recording Mode. - If an impact on the parked vehicle is detected, the video image from 10 seconds before the impact to 10 seconds after the impact will be stored in the event folder, and the video image recorded after detecting a motion will be saved in the parking folder 14 * View the recorded Video Image ① Touch ‘View the recorded Video Image’ and then select among Continuous Recording, Impact Recording and Parking Recording. ② Select the desired video image, front or rear. ③ When the desired file is selected, the video image is replayed 15 - The selected replay screen will be executed. - When the screen is touched, the control window appears, and, when it is touched one more time, the control window will disappear. - If not touched, it will automatically disappear after 10 seconds. * Detailed explanation about the Control Box ¢ ① £ ¥ ¤ Replay the previous image ③ Stop the image ②Stop the image temporarily ④ Replay the next image ⑤ Replay the image 10. Manual Recording If forceful recording is required during driving, stopping or parking, press the manual recording button (R) at the top, when the desired image will be saved in the impact recording (event) folder. When the manual recording button (R) at the top of the product is pressed, manual recording starts. 16 11. Display of Speed ① The vehicle speed is displayed when GPS satellite signal is stably received. (Example) 77 km/h(48mile/h) ② The vehicle speed may not be displayed when the vehicle is in an underground parking lot or a tunnel as GPS satellite signal is blocked. It will take about a minute to receive GPS satellite signal after starting the engine on the ground. ※ The vehicle speed is displayed only when the model is equipped with GPS. 12. Display of Speed Touch the icon [Time Setting] on the Configuration screen Touch the desired year, month, day, o’clock, minute and second, and select or before pressing save. When saving is completed, the system enters into configuration screen. However, in the case of a model equipped with GPS, the time is automatically set. 17 13. Voice Recording and Speaker Volume Touch the icon [Sound Recording/Volume Setting] on the configuration screen. ① ② ① As voice can be recorded together with video using the embedded subminiature microphone, it is helpful to grasp the situation when an accident occurs. Also, the sound recording can be selectively turned off for protection of privacy. ② The speaker volume is set to 3 as default. Adjust the value using the icons, or before using the product. 18 13. Voice Recording and Speaker Volume ① Tough the icon [Safe Removal of SD Card] on the main menu screen When the Micro SD Card is removed When the SD Card is removed, the system enters into Front Screen. (Recording cannot be done after the SD Card is removed.) 19 ② Remove the SD Card after the prompt appears which reads, “Remove the SD Card.” When the Micro SD Card is not removed If the SD Card is not removed, the system enters into front scene recording screen after 5 seconds. 15. Micro SD Card Format Cycle Informing The Micro SD Card can be more safely used for a long period of time by formatting it once every 2 weeks (recommended). :KHQWKH0LFUR6'FDUGIRUPDWF\FOHFRPHVDPHVVDJHDSSHDUVZKLFKUHDGV “Format the SD Card.” $WWKHVWGD\DQGWKRIHYHU\PRQWKWZLFHDPRQWKWKHIRUPDWF\FOHLQIRUPLQJ message is displayed. 8QWLOWKH6'&DUGIRUPDWWLQJLVGRQHWKLVPHVVDJHDSSHDUVHYHU\WLPHWKHHQJLQHVWDUWV ※ Save important video images and photos separately before formatting the SD Card as all the video images and photos will be deleted during formatting. 20 16. Micro SD Card Formatting When the icon [Format] is touched on the configuration screen, a prompt appears which reads, “The SD Card will be formatted. Will you go on with it?” ① Proceed with the formatting by selecting the icon “Yes.” (If “No” is selected, the system enters into configuration menu.) ② Formatting is carried on with a message reading, “The SD Card is being formatted.” 21 ③ The system is rebooted with a message which reads, “Formatting is completed.” ④ If there is any problem with the Micro SD card, a guide message appears. 22 17. Configuration ① ② ③ ⑤ ⑥ ⑦ ④ ① Refer to Photo Setting (12 P). ② Refer to Time Setting (17 P). ③ Refer to Sound Recording/Volume Setting (18 P). ④ The firmware version, brief update method and the telephone number of the customer support center are provided. 23 17. Configuration ⑤ Refer to Format (21 P). ⑥ Change the impact sensor settings of the driving and parking modes. Select driving mode/parking mode impact sensor setting and then touch it. It will be automatically saved when the Back or Home ( ) key is pressed. ⑦ Change the setting of the voice guide Set Voice Guide to On or Off. It will be automatically saved when the Back or Home ( ) key is pressed. 24 18. Rear Camera High definition video image of 2 million pixels, 1280 x 720 and 140 degree optical angle is provided, and the rear camera also is equipped with the function to detect motion. 4GCT (TQPV ※ When connecting the rear camera, do not pull out the cable until the message, “Rear video image is being synchronized,” disappears. 19. Initialization of Hardware This function is to initialize the system when the product is stopped or malfunctioning. When the manual recording button (R) and the photo shooting button (O) are pressed at the same time for about 2 seconds, initialization is executed. 25 20. AV Out Connection Method ¢ ① Connect the AV cable to the AV Out Terminal of the Black Box. ② Connect the AV cable to the TV. ③ Select the file desired to be replayed through the LCD of the Black Box and check the video image and sound using the TV. ※ The menu screen is not displayed on the TV. £ <TV Connection Terminal> Plug OD: Ø2.5, 4 electrodes AV Cable Pin Definition No. GND No. 1:GND No. 2: Red [Voice_R] No. 2:Voice R No. 3:Voice L No. 3: White [Voice_L] No. 4:Video No. 4: Yellow [Image] Video image and sound can be checked connecting the product with an external device (a product separately sold). 21 . PC Viewer The recorded video image (mp4 file) can be freely checked using not only the LCD of the product itself but also a general player such as the dedicated PC viewer or Daum Pot. The dedicated PC viewer can be downloaded from the Web Site of YURIDIGICOM, Inc., DSGLOBAL Co.,Ltd www.yuridigil.com / www.dshq.co.kr 26 22. Micro SD Card Formatting Method using a PC ① Connect the SD Card to the PC. (Connect it directly to the PC or using an adapter depending on the specification of the PC.) ② Click the right button of the mouth after selecting YURIDIGICOM or Mobile Disk in My Computer. ③ Select “Format”. ④ Deactivate the item Quick Format and then click “Start” ⑤ The card can be used after checking the phrase that formatting is completed 27 23. Update of Firmware ① Download the firmware from the Web Site, www.DSHQ.co.kr ② Save the latest firmware file in the Micro SD Card. Locate the firmware file at the top of the folder. ③ Insert the Micro SD Card in which the latest firmware is saved into the product, and connect the power. If the power is already connected, execute reset. ※ The files saved are not deleted even when update of the firmware is carried out. ④ Carry out the update in the following sequence: The phrase that firmware update is in progress and the same prompt appear. 28 When the update of the firmware is completed, restart the system after the update completion message appears on the screen 29 24. When an Error occurs during Initial Booting ① If the SD Card is missing : Insert the SD Card. Recording cannot be proceeded with. ☞ If the SD Card is missing, a phrase which reads, “Insert the SD Card. Recording cannot be proceeded with,” appears, and continuous recording starts when the SD Card is normally inserted. ② When an error occurs in recognizing the SD Card: Error in recognizing the SD Card! Entering into format mode to correct the error. Touch the screen. ☞ When “Yes” is selected after touching the screen and checking the phrase asking whether the user wants to proceed with formatting, formatting will be carried out. 30 ③ If the SD Card is defective: The SD Card cannot be formatted as it is defective. Replace the SD Card. ☞ If a message as shown above appears because the SD Card is defective, replace the SD Card. 31 25. Connection of Continuous Power Power Power ※ The shape and the location of the fuse box may differ depending on the vehicle. ① Wiring method Connect the + power connection line to the fuse box and then the – power connection line to the screw of the vehicle body. ② Parking monitoring voltage Classification Passenger Car (DC 12 V) Cargo Truck (DC 24 V) Parking Mode Change Voltage DC 13 V or lower DC 26 V or lower Vehicle Battery Cutoff Voltage DC 11.95 V DC 23.9 V ※ The voltage of some of foreign made vehicles such as BMW may be different. Be sure to install the product in a specialized installation shop. 32 26. Product Installation Method ① Insert the product with the serial label part facing downward. ② When the position is set, remove the double side tape film of the mount and attach it on the front glass. ③ After the product is attached, readjust the position up/down and right/left and fix it. ④ Connect the cigar jack or the firm power, and then the rear camera jack. ⑤ Attach the rear camera in an appropriate space and connect the 33 rear camera jack. ⑥ Adjust the camera angle checking the rear screen. 27. Names of Folders and Files AA+OR ¢ £ ¤¥ ¦ )LOH1DPH)RUPDQG&ODVVLILFDWLRQ ①'DWH<HDU0RQWK'D\ ②7LPH+RXU0LQXWH6HFRQG ③)URQW5HDU ④0RGH,QGLFDWLRQ,&RQWLQXRXVUHFRUGLQJLPDJH (,PSDFWUHFRUGLQJPDQXDOUHFRUGLQJLPDJH 33DUNLQJUHFRUGLQJLPDJH 16LQJOHVKRWV &&RQWLQXRXVVKRRWLQJSKRWRV $,PDJH$QDO\VLVSKRWRV ⑤([WHQVLRQ1DPH PS9LGHRLPDJHILOH -SJ3KRWRILOH 34 27. Names of Folders and Files G:/ SD CARD (The top folder when inserting the Micro SD Card) 0QTOCN (Continuous recording files are saved.) BB,PS BB,PS 'XGPV 0: Front, I: Continuous recording 1: Rear, I: Continuous recording (Impact recording and manual recording files are saved. BB(PS BB(PS BB3(PS BB3(PS 0: Front, E: Impact recording 1: Rear, E: Impact recording 0: Front, P: Parking, E: Impact 1: Rear, P: Parking, E: Impact 2CTMKPI (Parking recording files are saved.) BB30PS 0: Front, P: Parking, M: Motion BB30PS 1: Rear, P: Parking, M: Motion 2KEVWTG (Photo files are saved.) BB1-3* BB&-3* BB$-3* 35 N: General photos C: Continuous photos, 01~10 Photo No. A: Analytical photos, 01~90 Photo No. 28. Memory Allocation The capacity of the SD memory allocated for each recording mode. Mode Capacity Continuous Recording Impact Recording Parking Recording *% *% *% *% *% *% *% *% 36 29. Product Specification Z] 37 CPU Cortex-A5 800 Mhz RAM DDR3 2Gb (Front) Camera 2 million pixels HD class (140 degree optical angle) (Rear) Camera 2 million pixels HD class (140 degree optical angle) Video Image Resolution 1280 x 720p Recording Frame Front 30 fps, Rear 30 fps Video Image Storage Type MPEG-4 Photo Storage Type JPG Memory Card Micro SD Card 16 GB (Max. 64 GB supported) Display 2.8 inch TFT LCD, 400 X 240 wide touch panel Speaker 1W Microphone Mono C-Mic Impact Sensor Impact detection (driving mode, parking mode) GPS U-blox6 LED Lamps (Front) Security LED (red, blue), police light LED Lamps (Rear) Motion LED, REC (green), power (red) Port CAM (rear camera), AV Out (external device voice, sound) Embedded Battery 350 mAh lithium polymer Operating Temperature 10 ℃ ~ 60 ℃ Size/Weight W 82 mm x L 53 mm x T 26 mm (body only)/100 g Power DC 12 V ~24 V 30. Matters to refer to when using the Product ① If the product malfunctions or has a problem, initialize the hardware. (Refer to the page 25.) ② If the speed display and time are not correct, check whether GPS is received or not. ☞ Initialize the hardware or reconnect the power after disconnecting. ③ If there is a problem with the power of the product: ☞ Check whether the product is correctly connected with the cigar jack or the firm power cable. ☞ Check the power connection by seeing whether the power indication LED on the back of the product is on or off. ☞ Check whether only the screen is not turned on during operation. (When the screen is touched, the screen is turned on.) Z] [LED Operation Checking] REC (Green LED): At all times during recording Power (Red LED): On at all times when the power is applied. ④ The double tape of the mount is strongly adhesive to prevent it from moving or falling down. When detaching it from the glass, be careful to avoid the tinting film from being peeled off. ☞ Make a gap between the double tape and the vehicle glass and then detach the product slowly turning it. ⑤ The time the embedded battery can be used is about 15 minutes after the power is disconnected, if the battery is fully charged. 38 ⑥ Micro SD Card Insertion Method and State Checking ☞ Insert it in the direction shown in the figure below. ☞ When removing it, do not pull it out forcefully as it will automatically come out when pressed slightly. ☞ It may be damaged if an excessive force is applied or it is inserted in the opposite direction. ☞ When removing the SD card during operation, check the SD Card Safe Removal message before removing it. ☞ When a Micro SD Card individually purchased is used, the Company does not take any responsibility for the Micro SD Card. Micro SD Z] 31. Matters to refer to when using the Product ① For correct use of the product, be sure to fully read the user manual and be aware of the contents before using the product. ② When attaching the product, adjust the camera angle by checking the recorded video image. The video image may differ depending on the camera angle. ③ Avoid excessive tinting and maintain the state of the glass and the lens of the product clean. ④ The Micro SD Card can be used more safely for a longer period of time if it is formatted once every two weeks (recommended). ⑤ As the product continues recording when it is in operation and saves new video images deleting old ones, manage accident video images or important video images and photos by separately keep them in a PC. ⑥ Separate the Micro SD Card from the black box using the SD Safe Removal Function. (Refer to the page 19.) 39 32. Cautions ① Excessive rise in the temperature inside the vehicle may cause malfunction of the product in summer time. Park the vehicle in a shady place, if possible. ② Use only the specified power for the product. ③ Do not arbitrarily remodel or disassemble the product or apply a strong impact. ④ Do not clean the product with water or a chemical substance, and use a dry fabric. ⑤ Do not operate the product while driving. ⑥ Install the product at a position not interfering with the sight of the driver. ⑦ When there is a problem with the product, do not neglect it and contact the customer center. ⑧ When a Micro SD Card individually purchased is used, the Company does not take any responsibility for the Micro SD Card. Z] 33. Matters to pay Attention to during Use ① In accordance with Personal Information Protection Act and the related laws, this product is prohibited from being used for a purpose other than that intended at the time of installation, and from being handled arbitrarily. Be careful to use the product as, if voices or video images of other people are illegally saved using the recording function, the legal responsibility is with the user. ② X1000HD is a trademark of YURIDIGICOM, Inc. All the contents of this manual are protected by Copyright Act. ③ YURIDIGICOM, Inc. has all the rights for the program, which are protected by Copyright Act. If this program is illegally copied, corrected or produced/distributed without a prior written consent of YURIDIGICOM, Inc., note that the violator may be subject to a criminal penalty in accordance with Software Copyright Act. 40 ④ Product change for performance improvement may be carried out without notifying the users. ⑤ The Company shall not take any responsibility for failures and data loss caused by a mistake of the user (flooding, disassembly of the product, change or intentional damage). ⑥ The Micro SD Card requires continuous management and caution of the user. All the damages to recording/saving of video image caused by not periodically formatting the SD Card once every two weeks shall not be compensated. ⑦ The Company does not take any responsibility for breakage of the product and other damage caused by natural disaster such as flood and lightning. ⑧ The Company shall not take any responsibility for the cost incurred for installation of the product related to use of firm power as the cost incurs due to the application of the user. Z] ⑨ When a Micro SD Card individually purchased is used, the Company does not take any responsibility for the Micro SD Card. ⑩ The product may feel hot as it discharges some heat. In particular, be careful when handing the product as much heat is generated on and around the lens. ⑪ Do not save any private files other than the system files in the Micro SD Card. ⑫ As a battery protection circuit is included in this product, no external battery protection device is required when connecting the firm power. 41 34. Warranty ⓐ Quality Assurance - ALLION Inc. guarantees the quality of the product for a period of 1 year in accordance with Consumer Damage Compensation Regulation. The product of which the warranty period is over shall be repaired at actual cost. However, if the failure of the product is caused by carelessness of the user (excessive voltage, or arbitrary change by the user such as circuit change or remodeling), it will be excluded from the compensation. Product Name Model No. Date of Purchase Product No. Place Purchased Z] ⓑ Consumer Complaint Handling - The Company will notify the consumer whether any compensation will be made together with the content of compensation within 10 days after receipt of the complaint, and the damage compensation will be made without 20 days after the notification. Requests for after sale service can be sent to the customer service center of the Company or to the shop from which the product is purchased. ⓒ Free After Sale Service - If the product is out of order within 1 year after purchase, the product will be serviced at no cost. However, the warranty period for the embedded battery is 6 months and that of the Micro SD is 3 months. - Be sure to contact the customer service center via phone to allow the service center worker to take an advance action before you request for after sale service. - When after sale service is requested for a product which has a problem due to a mistake of the user, a cost may be charged. ⓓ Charged After Sale Service - If service is requested for a product with no failure, an expense will be charged. Be fully aware of the user manual. - If the failure is caused by carelessness in handling the product, or arbitrary repair or remodeling of the product by the user; - If the failure is caused by a wrong voltage connected without being aware of the manual; - If the failure is caused by natural disaster such as flood or lightning; or - If the failure is caused by flooding. 42 Manufacturer Distributor Z] Manufacturer : 2nd Fl., 1060, Jung-d-dong, Wonmi-gu, Bucheon-si,Gyeonggi-do, Korea Distributor : B-1001 Daewoo Technopark 261 Doyak St. Wonmi-gu, Bucheon-si Gyeonggi-Do. Korea Tel.+82)70.4334.5789 / Fax.+82)32.670.7290 E-mail:[email protected]