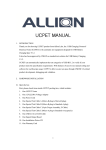
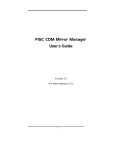
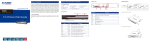
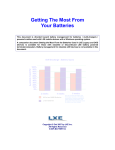
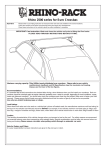
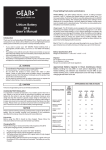
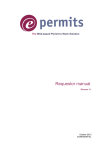
1
Allion – Ingrasys Europe
NAStorage
Hot swap functionalities
Administrator Guide
Version 2.01
1. What is hot swap?
With the hot-swappable module MR432I (patent pending) the NAStorage allows you to “hot swap” a failed disk while the
array continues to operate. A hot swap is the replacement of a hard drive while the server system is still in operation. Hot
swapping functions are available by providing a rack or enclosure for the device and giving the appearance to the I/O
controller that the device is still there while it's being removed and replaced with another one.
A hot swap arrangement is provided and mostly recommended where multiple devices are shared on a local area
network. RAID hot swap versions are commonly used under these circumstances.
The NAStorage server together with the MR-423I mobile rack provides hot swap and other related functions for all
brands and capacity of hard disk drives. The MR-423I mobile rack is an optional accessory, if you do not use the
MR-423I mobile rack in conjunction with the NAStorage, all existing hot swap functions will not be available. Hot swap
features are sensitive and complex. If the storage server does not support the hot swap function you should reconsider
many advantages of the system such as software\kernel, hardware\controller, hot swap IDE cradles, etc.. These
components are necessary for a storage server with hot swap function, none should be ignored.
1.
Start
Power Off
Enabling of the hot swap function of the NAStorage controller
Set the pins of the J11 jumper of the MR-423I mobile rack back-plane
A. Master/Slave mode
Short pins 1 & 2
B. Alll Master mode
Short pins 2 & 3
Cable connection sequence
a. Master/Slave mode
Cable connection sequence
b. All Master mode
Power On
The NAStorage server’s hot swap features are active
Removal and insertion of hot-swap drives
1
1. Enabling of the hot swap function of the NAStorage controller.
You can get the benefits of the full-range data protection such as hot-swappable hard disks and RAID hot-expansion only
by installing the MR-423I hot swappable rack with the NAStorage server controller.
Following conditions are required:
- Use the provided IDE tubular cables (blue colored) to connect the mobile rack onto the NAStorage controller.
- The NAStorage IDE controller has a special designed circuitry for the hot swap features. If you use the MR-423I hot
swappable mobile rack, you need to configure the DIP switches at the rear of your NAStorage server main board to:
1: OFF, 2: OFF and 3: OFF.
ON
1
-
2
3
Configure the jumpers on your hard disk using the Cable Select (CS) position before installing the HDD into the hard
disk tray of the MR-423I mobile rack (refer to your hard disk’s user manual for the instructions how to do).
2. Setting the jumper J11 of the MR-423I mobile rack back-plane
The MR-423I mobile rack back-plane has a specific circuitry designed for the hot swap features. You first need to short
correctly the pins of jumper J11 on the back-plane. The jumper J11 setting has two modes, Master/Slave and All Master.
a. Master/Slave mode: Jumper J11 => short pins 1 & 2
The NAStorage supports two or four IDE channels (allowing 4 or 8 HDDs).
In the case of 8 HDDs you need two MR-423I mobile racks and you have to set the pins of the jumper J11 into the
Master/Slave mode for each MR432I back-plane as explained further on.
b. All Master Mode: Jumper J11 => short pins 2 & 3
In this mode, each IDE channel connector in the mobile rack can only support one type of hard disk drive => master
drive.
It is recommended to configure the MR-423I into the “All Master” mode on the back plane when you have only one
MR-423I hooked up onto the NAStorage controller.
2
3 . Cable sequence for the MR-423I mobile rack.
The NAStorage does not support any standard PC IDE cable, you have to use the bundled round cable (blue colored).
This cable has been especially designed for the MR-423I mobile rack back-plane. Depending on the J11 jumper
setting modes, the cable sequence will be different.
Important note: The hard disk drives must be set into the “Cable Select” mode allowing the MR-423I mobile rack
back-plane to switch automatically into the Master/Slave mode.
Note that if you set the Master/Slave mode for the hard disk drives by yourself and when you plug in them into the
NAStorage server, the system will probably not correctly detect the Master/Slave mode.
a. Master/Slave mode: Jumper J11 => short pins 1 & 2
Example when using 8 HDDs with two MR-423I mobile racks and their round cable (blue color) connection modes
onto the NAStorage controller.
3
b. All Master mode: Jumper J11 => short pins 2 & 3
Hereunder is an example using only 4 HDDs with only one MR-423I mobile rack hooked up onto the NAStorage
controller and its connection mode.
Please remember :
- Make sure that all mobile racks and the NAStorage server controller are linked by the provided blue I-C cables.
- Two power connectors from the ATX power supply are required for each MR-423I mobile rack.
4. Removal and insertion of the hot-swap drives
You may have to change a hard disk in case of hard disk failure or a degraded RAID volume.
Hereunder are the instructions for replacing hard disks when using the HDD drives (also called: canister or tray).
Removal:
1. Turn off the failed HDD by pressing the red button on the HDD tray.
2. When the amber LED is steady ON, you are ready to unplug the tray.
3. Unlatch the drive using the gray latch and gently unseat and remove the tray from the MR-423I mobile rack.
Insertion:
1. Slowly insert the HDD tray into the MR-423I mobile rack untill you feel a slight resistance.
2. Pull down the gray latch while pushing it and gently seat the tray completely into the back-plane connector.
3. Wait until the green LED is steady ON.
4