1
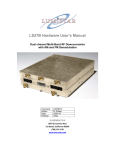
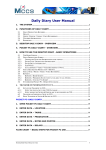
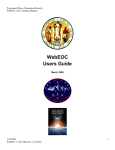
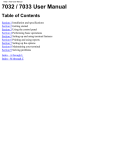
Reserve Reporting: Seller/Servicer User Guide April 2015 1 Reserve Reporting: Seller/Servicer User Guide Table of contents Introduction ................................................................................................................................... 3 Welcome .................................................................................................................................. 3 Workflow Process .................................................................................................................... 4 Getting Started ............................................................................................................................. 5 System requirements ............................................................................................................... 5 Log In....................................................................................................................................... 6 Upload Files .................................................................................................................................. 7 How to Upload an Individual RR File ........................................................................................ 7 Reports ......................................................................................................................................... 9 My Account ................................................................................................................................. 10 Change Password.................................................................................................................. 10 Forgotten Password ............................................................................................................... 10 Home .......................................................................................................................................... 11 S/S Overview ......................................................................................................................... 11 Sales Data Summary ............................................................................................................. 11 Reserve Reporting Summary ................................................................................................. 11 User Management ................................................................................................................. 12 Role Assignment .................................................................................................................... 13 RR Upload Failures ................................................................................................................ 14 RR Validation Failures ........................................................................................................... 14 Sales Data Update Queue .......................................................................................................... 15 S/S Under Review.................................................................................................................. 15 FM Under Review .................................................................................................................. 17 FM Final Approval .................................................................................................................. 17 View All .................................................................................................................................. 18 Due ........................................................................................................................................ 19 Accepted ................................................................................................................................ 19 Reserve Reporting Queue .......................................................................................................... 20 S/S Under Review.................................................................................................................. 20 FM Under Review .................................................................................................................. 22 FM Final Approval .................................................................................................................. 23 View All .................................................................................................................................. 23 Due ........................................................................................................................................ 24 Accepted ................................................................................................................................ 24 Loan Details................................................................................................................................ 25 Loan Details ........................................................................................................................... 25 Data Warnings ....................................................................................................................... 25 Common Controls ....................................................................................................................... 26 Grids ...................................................................................................................................... 26 Sorting .............................................................................................................................. 26 Filtering ............................................................................................................................. 26 Grouping ........................................................................................................................... 27 Row Selection ................................................................................................................... 28 Selecting a Row with a Click......................................................................................... 28 Selecting a Row with a Checkbox ................................................................................ 28 Context Menu .................................................................................................................... 29 Grid Menu ......................................................................................................................... 29 April 2015 2 Reserve Reporting: Seller/Servicer User Guide Introduction Welcome Freddie Mac's Reserve Reporting (RR) functionality within the Property Reporting System (PRS) has been developed to facilitate the workflow process of collecting and validating each of the following escrow and loan/bond terms data from Sellers/Servicers: HFS & HFI and Bond loans. RR will enable Sellers/Servicers to view key data about their active FreddieMac loans online, electronically upload escrow and loan terms data in bulk, view discrepancies, update individual data elements online and add comments relative to discrepancies. Warnings move through the Queues S/S Under Review, FM Under Review and FM Final Approval. Loans move through the Due and Accepted. 1. 2. 3. 4. 5. 6. S/S Under Review: Warnings under review by Seller/Servicer FM Under Review: Warnings under review by Freddie Mac FM Final Approval: Warnings awaiting Final Approval by Freddie Mac View All: All of the above warnings Due: Loans due from Seller/Servicer or Under Review Accepted: All loans when all warnings associated with a loan has been Accepted and/or Approved or when a loan does not have any discrepancies. April 2015 3 Reserve Reporting: Seller/Servicer User Guide Workflow Process The chart below represents the flow of Assessments and Attachments through PRS. April 2015 4 Reserve Reporting: Seller/Servicer User Guide Getting Started System requirements Computer/Processor Computer with a 233 megahertz (MHz) processor or higher (Pentium processor recommended) Operating System Windows 7 Windows XP 32-bit with Service Pack 2 (SP2) or higher Windows XP Professional x64 Edition Windows Vista 32-bit Windows Vista 64-bit Windows Vista with Service Pack 1 (SP1) or higher Windows Server 2003 32-bit with Service Pack 2 (SP2) or higher Windows Server 2003 64-bit with Service Pack 2 (SP2) or higher Windows Server 2008 32-bit or higher Windows Server 2008 64-bit or higher Memory Windows 7 - 128MB Windows XP 32-bit with Service Pack 2 (SP2) or higher—64 MB Windows XP Professional x64 Edition—128 MB Windows Vista 32-bit—512 MB Windows Vista 64-bit—512 MB Windows Server 2003 32-bit with Service Pack 2 (SP2) or higher—64 MB Windows Server 2003 64-bit with Service Pack 2 (SP2) or higher—128 MB Windows Server 2008 32-bit—512 MB Windows Server 2008 64-bit—512 MB Hard Disk Space Windows 7 - 150MB Windows XP 32-bit with Service Pack 2 (SP2) or higher—150 MB Windows XP Professional x64 Edition—200 MB Windows Vista 32-bit—70 MB Windows Vista 64-bit—120 MB Windows Server 2003 32-bit with Service Pack 2 (SP2) or higher—150 MB April 2015 5 Reserve Reporting: Seller/Servicer User Guide Windows Server 2003 64-bit with Service Pack 2 (SP2) or higher—200 MB Windows Server 2008 32-bit—150 MB Windows Server 2008 64-bit—200 MB Drive CD-ROM drive (if installation is done from a CD-ROM) Display Super VGA (800 x 600) or higher-resolution monitor with 256 colors Peripherals Modem or Internet connection Microsoft Mouse, Microsoft IntelliMouse, or compatible pointing device Log In You must have a valid user account to access the application. The login is located at https://multifamily-prs.covius.com. On the sign-in screen, enter your supplied Username and Password. April 2015 6 Reserve Reporting: Seller/Servicer User Guide Upload Files How to Upload an Individual RR File ® To upload a bulk RR file (Excel format), perform the following functions: 1. On the Main Menu, go to the Upload drop down menu and select "Upload Individual RR File". 2. This will take you to the Upload Individual RR File page. 3. Either enter the file path or click Select and locate your Excel file that is ready for upload. Once you have entered the path, click Submit. The filename of any bulk file must begin with one of the following file naming convention prefixes: o SalesDataUpdatev1 [Submission Month: MM-YYYY]-[6-digit-Servicer-Number] e.g. SalesDataUpdatev1 04-2015-321654 o ReserveReportingv1 [Submission Quarter] Q [N]-YYYY]-[6-digit-Servicer-Number] e.g. ReserveReportingv1 Q1-2015-654321 4. The bulk file will upload and you will be provided with a notification outlining any errors. o If successful, the warnings will be generated in the S/S Under Review page. o If unsuccessful, the uploaded file failed File or Loan validation. The type of failure will guide user's to Upload Failures or Validation Failures (accessible by clicking the "RR Upload Failures" or "RR Validation Failures" link on the left navigation, which provides feedback on the reason for failure. Failures must be corrected and file must be re-uploaded. April 2015 7 Reserve Reporting: Seller/Servicer User Guide The Validation Failures screen shows each individual field-level validation that failed while attempting to upload the file. Users can look at each validation failure and address each one in their source file, or click the "Output to Excel" button at the top of the Validation Failures display grid to export all validation failures to Microsoft Excel. Once in Excel, users can sort/filter as desired, while still addressing each validation failure in their source file. Once all validation failures are addressed, the file can be re-uploaded via the same procedures as described above. April 2015 8 Reserve Reporting: Seller/Servicer User Guide Reports The reports menu shows the list of available reports that can be previewed/printed. April 2015 9 Reserve Reporting: Seller/Servicer User Guide My Account Change Password To view or update your User Profile, perform the following functions: 1. On the Main Menu, go to the "My Account" drop down menu and select "Change Password." 2. Enter your current password, and new password twice. Click "Change Password." Forgotten Password 1. 2. 3. 4. 5. 6. Go to the Login page. Click Forgot your password? Enter your username. Click Change Forgotten Password. An email will be sent to the address associated with your account that includes a temporary password. Use this temporary password to log into the system. If the temporary password is accepted, you will be immediately asked to provide a new password. If you have forgotten your username or are unable to access your login page, please contact your administrator. April 2015 10 Reserve Reporting: Seller/Servicer User Guide Home S/S Overview The Seller/Servicer Overview provides a summary of information regarding the Seller/Servicer, including any current/meaningful system notifications. Click Add New on the respective grid to add new Office Locations or Contacts. Sales Data Summary The Sales Data Summary Dashboard provides a summary of the Sales Data Loan and Warning summary status by portfolio for the current month. History pipelines can be accessed via reports. Reserve Reporting Summary The Reserve Reporting Summary Dashboard provides a summary of the Reserve Reporting Loan and Warning summary status by portfolio for the current month. History pipelines can be accessed via reports. April 2015 11 Reserve Reporting: Seller/Servicer User Guide User Management The Users screen allows users under RR S/S Admin role to be able to add/edit users, and manage their relationship to their parent company. Upon clicking the Add New (or Edit) button, users are presented with the edit screen that allows them to manage the user name, display name, parent Company, e-mail address, and "Active" flag. The asterisk indicates required field before saving. Note: Users cannot be permanently deleted, but can be statused as Active or Inactive by setting the "Active?" check-box accordingly. April 2015 12 Reserve Reporting: Seller/Servicer User Guide Manage RR Portfolios context menu option lets administrations to assign portfolios to users. The portfolios that are available in the pop-up window are portfolios that are under parent company selected when creating or editing a user. Role Assignment The Role Assignment screen allows users under the RR S/S Admin role to be able to add/edit users to a particular Role. Edit the Role you wish to add a user too and click the Add New Button. Then select the User from the Drop Down Box you wish to add and slick Save. Only a single role may be assigned to a User at any time. April 2015 13 Reserve Reporting: Seller/Servicer User Guide RR Upload Failures The Upload Failures page provides a list of uploads that have failed during the upload process, and includes a description of the error. RR Validation Failures The Validation Failures page provides a list of field-level validations that failed during the upload process, and includes a description each validation failure. April 2015 14 Reserve Reporting: Seller/Servicer User Guide Sales Data Update Queue All Warning and Loan Queues in the system use the Grid control. Basic functionality of the Grids is described in the Common Controls section of this User Manual. Functionality specific to each page is described below. Warnings move through the Queues S/S Under Review, FM Under Review and FM Final Approval. Loans move through the Due and Accepted Queues. Loans with one or more warnings Under Review will be in the Due Queue until warnings have been accepted and/or approved and then will be moved to the Accepted Queue by the system. 1. 2. 3. 4. 5. 6. S/S Under Review: Warnings under review by Seller/Servicer. FM Under Review: Warnings under review by Freddie Mac. FM Final Approval: Warnings awaiting Final Approval by Freddie Mac. View All: All of the above warnings. Due: Loan is due from Seller/Servicer or Under Review. Accepted: All loans when all warnings associated with a loan has been Accepted and/or Approved or when a loan does not have any discrepancies. S/S Under Review The S/S Under Review Queue is populated with warnings for loans within the uploaded file upon passing the warning validations and a loan has one or many warnings. Warnings can also be moved to S/S Under Review Queue when warnings are returned by Freddie Mac. The warning status for warnings in this queue is "S/S Under Review". Command Bar Menu Items (these apply to items selected on the Grid): 1. Accept FM Value: Allows user to accept the Freddie Mac value displayed in the grid and change warning status to "Accepted." This action can be performed in bulk by selecting multiple warnings. 2. Send to Freddie Mac Under Review: Allows user to send warning to Freddie Mac to review the data by changing warning status to "FM Under Review" and requires to comment. This action can be performed in bulk by selecting multiple warnings. April 2015 15 Reserve Reporting: Seller/Servicer User Guide 3. Add a Bulk Comment: Allows user to insert bulk comments into warnings by selecting multiple warnings from the grid. Context Menu Items (these apply to items selected on the Grid): 1. View / Add Comments: Allows user to add custom comments to warnings individually. This action cannot be performed in bulk. April 2015 16 Reserve Reporting: Seller/Servicer User Guide FM Under Review The FM Under Review Queue is populated by warnings returned by the S/S Under Review Queue. The warning status for warnings in this queue is "FM Under Review." Context Menu Items (these apply to items selected on the Grid): 1. View Comments: Allows user to view comments on warnings individually. This action cannot be performed in bulk. FM Final Approval The FM Final Approval Queue is populated by warnings Preliminarily accepted by FM to accept the Seller/Servicer Value or warnings that have updated value. The warning status for warnings in this queue is "FM Preliminary Approved.” Context Menu Items (these apply to items selected on the Grid): 1. View Comments: Allows user to view comments on warnings individually. This action cannot be performed in bulk. April 2015 17 Reserve Reporting: Seller/Servicer User Guide View All View All Queue displays all warnings for the current month. This is a read-only queue displaying warnings that are currently in S/S Under Review, FM Under Review, and FM Final Approval. Context Menu Items (these apply to items selected on the Grid): 1. View Comments: Allows user to view comments on warnings individually. This action cannot be performed in bulk. April 2015 18 Reserve Reporting: Seller/Servicer User Guide Due The Due Queue includes all loans that are Due and currently Under Review. Context Menu Items (these apply only to a single selected Assessment): 1. View Loan Details: Opens a new page with uploaded tape details with which this Loan is associated, including data warnings if any. Accepted The Accepted Queue includes Loans that were reviewed by Freddie Mac and Seller/Servicer. This queue also includes Loans that have no data warnings and were accepted immediately during upload. Context Menu Items (these apply only to a single selected Assessment): 1. View Loan Details: Opens a new page with uploaded tape details with which this Loan is associated, including data warnings if any. April 2015 19 Reserve Reporting: Seller/Servicer User Guide Reserve Reporting Queue All Warning and Loan Queues in the system use the Grid control. Basic functionality of the Grids is described in the Common Controls section of this User Manual. Functionality specific to each page is described below. Warnings move through the Queues S/S Under Review, FM Under Review and FM Final Approval. Loans move through the Due and Accepted Queue. Loans with one or more warnings Under Review will be in the Due Queue until warnings have been accepted and/or approved and then will be moved to the Accepted Queue by the system. 1. 2. 3. 4. 5. 6. S/S Under Review: Warnings under review by Seller/Servicer. FM Under Review: Warnings under review by Freddie Mac. FM Final Approval: Warnings awaiting Final Approval by Freddie Mac. View All: All of the above warnings. Due: Loan is due from Seller/Servicer or Under Review. Accepted: All loans when all warnings associated with a loan has been Accepted and/or Approved or when a loan does not have any discrepancies. S/S Under Review The S/S Under Review Queue is populated with warnings for loans within the uploaded file upon passing the warning validations and a loan has one or many warnings. Warnings can also be moved to S/S Under Review Queue when warnings are returned by Freddie Mac. The warning status for warnings in this queue is "S/S Under Review." Command Bar Menu Items (these apply to items selected on the Grid): 1. Accept FM Value: Allows user to accept the Freddie Mac value displayed in the grid and change warning status to "Accepted." This action can be performed in bulk by selecting multiple warnings. 2. Send to Freddie Mac Under Review: Allows user to send warning to Freddie Mac to review the data by changing warning status to "FM Under Review" and requires to comment. This action can be performed in bulk by April 2015 20 Reserve Reporting: Seller/Servicer User Guide selecting multiple warnings. 3. Add a Bulk Comment: Allows user to insert bulk comments into warnings by selecting multiple warnings from the grid. Context Menu Items (these apply to items selected on the Grid): 1. View / Add Comments: Allows user to add custom comments to warnings individually. This action cannot be performed in bulk. April 2015 21 Reserve Reporting: Seller/Servicer User Guide FM Under Review The FM Under Review Queue is populated by warnings returned by the S/S Under Review Queue. The warning status for warnings in this queue is "FM Under Review." Context Menu Items (these apply to items selected on the Grid): 1. View Comments: Allows user to view comments on warnings individually. This action cannot be performed in bulk. April 2015 22 Reserve Reporting: Seller/Servicer User Guide FM Final Approval The FM Final Approval Queue is populated by warnings Preliminarily accepted by FM to accept the Seller/Servicer Value or warnings that have updated value. The warning status for warnings in this queue is "FM Preliminary Approved." Context Menu Items (these apply to items selected on the Grid): 1. View Comments: Allows user to view comments on warnings individually. This action cannot be performed in bulk. View All View All Queue displays all warnings for the current month. This is a read-only queue displaying warnings that are currently in S/S Under Review, FM Under Review, and FM Final Approval. Context Menu Items (these apply to items selected on the Grid): 1. View Comments: Allows user to view comments on warnings individually. This action cannot be performed in bulk. April 2015 23 Reserve Reporting: Seller/Servicer User Guide Due The Due Queue includes all loans that are Due and currently Under Review. Context Menu Items (these apply only to a single selected Assessment): 1. View Loan Details: Opens a new page with uploaded tape details with which this Loan is associated, including data warnings if any. Accepted The Accepted Queue includes Loans that were reviewed by Freddie Mac and Seller/Servicer. This queue also includes Loans that have no data warnings and were accepted immediately during upload. Context Menu Items (these apply only to a single selected Assessment): 1. View Loan Details: Opens a new page with uploaded tape details with which this Loan is associated, including data warnings if any. April 2015 24 Reserve Reporting: Seller/Servicer User Guide Loan Details Loan Details Loan Details Overview provides information regarding the loan. Data on this section is being populated from the Population File. In the Loan Details section, users can view details of the Seller/Servicer tape, Population Tape and Final Value. In addition, users can compare the data discrepancies by comparing the three columns of data. If Seller/Servicer tape value column appears blank a tape has not yet been uploaded or if the Fields in the Final Value column are blank there is an outstanding warning waiting to be accepted and/or approved. Data Warnings Data Warnings section on Loan Details displays all warnings associated with a particular loan for the current month. Example: April 2015 25 Reserve Reporting: Seller/Servicer User Guide Common Controls Grids Many screens in PRS are grid based that include similar functionality. This functionality is enabled as needed on each grid and is not be available on all pages depending on required functionality. This section reviews the basic functionality of the grids that applies across the system. Sorting If sorting is enabled, users are able to sort the grid by any column by clicking on the column header. The sorting function toggles between three modes: ascending descending no sort Some grids have a default sort enabled and the user is able to override this default by clicking the header to sort by a different column. If the user leaves the page and returns, the grid will return to the default sort. Filtering When filtering is enabled, a filtering item appears below the column header. The user can enter a filter criterion in the filter box. A drop-down list allows the user to select a filter expression that is applied to the criterion for the column. When the user presses the filter button (next to the filter box), the grid displays only the records matching the filter criteria specified using the filter boxes: All filters in a single table are applied using AND operator. That is, only items (grid rows) that comply with all filters are displayed. Note: When you have more than one value to filter on, values should be entered separated by a space. April 2015 26 Reserve Reporting: Seller/Servicer User Guide Grouping If enabled on the grid, the grid can be grouped based on the value of a particular column. Users can also have multilevel grouping based on different criteria. To facilitate grouping, a special area called the GridGroupPanel will be displayed at the top of the grid to display the grouping options. When a table is grouped, all group fields appear in this group panel as elements with an icon that indicates the sort order. To remove a field from the grouping, click the "X." To change the sort order of the grouping, click the downarrow in the GridGroupPanel for that item. To add fields to the grouping, drag the header into the GridGroupPanel: April 2015 27 Reserve Reporting: Seller/Servicer User Guide Some grids have a default grouping enabled and the user is able to override this default by adding or removing items to the GridGroupPanel. If the user leaves the page and returns, the grid will return to the default grouping. Row Selection Selecting a Row with a Click Users can select a single data row in the grid by left clicking anywhere within the row: Selecting a Row with a Checkbox If available, users can select one or more data rows in the grid by clicking the check-box within the row: April 2015 28 Reserve Reporting: Seller/Servicer User Guide Context Menu The Context Menu or Right-click Menu is used to perform an action on a single record. While hovering over a row on a grid, click the right button on the mouse to bring up the Context menu. The Context Menu offers a limited set of choices that are available in the current state, or context, of the items on the grid. Grid Menu The Grid Menu is used to perform an action on multiple records. To select multiple rows, check the box on the left side of each row. To perform an action on these rows, click the appropriate button on the Grid Menu. April 2015 29