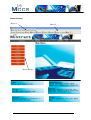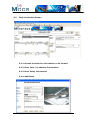
1
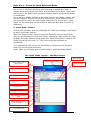
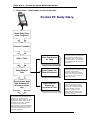
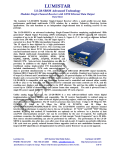
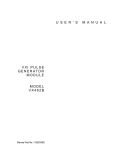
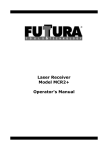
Daily Diary User Manual
1. THE SYSTEM ..............................................................................................................................2
2. FUNCTIONS OF DAILY DIARY.........................................................................................2
2.1
2.2
2.3
2.4
2.5
DAILY PRODUCTION RECORDS ..................................................................................................2
DELAYS .....................................................................................................................................2
NOTES / PHOTOS / VIDEOS / VOICE RECORDINGS......................................................................2
WEATHER INFORMATION ..........................................................................................................2
REPORTING................................................................................................................................2
3. DESKTOP DAILY DIARY - OVERVIEW ........................................................................3
4. POCKET PC DAILY DIARY - OVERVIEW.....................................................................3
5. HOW TO USE THE DESKTOP DIARY - BASIC OPERATIONS ...........................3
5.1
5.2
5.2.1
5.2.2
5.2.3
5.2.4
5.2.5
5.3
5.4
5.5
5.5.1
5.5.2
5.5.3
5.6
6.
THE HOME SCREEN ...................................................................................................................3
DAILY PRODUCTION SCREEN ....................................................................................................5
CHOOSE THE DATE FOR INFORMATION TO BE VIEWED...........................................................5
ENTER TASK / PRODUCTION INFORMATION ...........................................................................5
ENTER DELAY INFORMATION ................................................................................................5
ADD NOTES ...........................................................................................................................5
ATTACH PHOTO / VIDEO / VOICE RECORDING TO NOTE........................................................6
FIND A RECORD FOR PRODUCTION - BROWSE ...........................................................................6
FIND A NOTE / PHOTO / VIDEO / VOICE RECORDING .................................................................7
REPORTS ...................................................................................................................................7
REPORTS - HOME SCREEN .....................................................................................................8
REPORTS - 'PROGRESS STATUS' (NOT AVAILABLE TO ALL USERS) .........................................9
REPORTS - 'CUM ACT VS SCHED' ........................................................................................10
SYNCHRONISE POCKET PC - DESKTOP DATABASE..................................................................12
TRANSFER OF INFORMATION TO CCS..............................................................................12
6.1
SET-UP FOR TRANSFER TO CCS...............................................................................................12
6.1.1
SETUP THE FILE PATH TO THE CCS DATABASE....................................................................12
6.1.2
SETUP WHERE THE NOTES & PHOTOS ARE TO BE EXPORTED IN CCS...................................13
6.2
TRANSFER AN INDIVIDUAL NOTE TO CCS...............................................................................13
6.2
BULK TRANSFER OF NOTES & PHOTOS TO CCS......................................................................14
POCKET PC–DAILY DIARY ......................................................................................................15
1. OPEN POCKET PC DAILY DIARY ..................................................................................15
2. ENTER DATA – LOCATION...............................................................................................15
3. ENTER DATA – TASKS........................................................................................................15
4. ENTER DATA – PRODUCTION........................................................................................15
5. ENTER DATA – NOTES AND PHOTOS ........................................................................15
6. ENTER DATA – DELAYS.....................................................................................................16
FLOW CHART – BASIC STEPS FOR POCKET PC USE.................................................17
Desktop Daily Diary Manual rev5.doc
1
1. The System
The Daily Diary software is a database replacement for the hardcopy
record of daily information on a project. Daily Diary captures the daily
events on a project. It has two components.
•
The Desktop Daily Diary database - on a PC or Notebook computer
•
The Pocket PC Daily Diary - on a pda Pocket PC
2. Functions of Daily Diary
The Daily Diary performs the following:
2.1
Daily Production Records
•
What was produced by Task & Location
•
What was scheduled to be produced by Task & Location
•
What plant and resources worked, what tasks they performed &
their productivity.
2.2
Delays
•
What delays occurred to a resource by Task & Location.
•
Delays are categorised by a predetermined type.
2.3
Notes / Photos / Videos / Voice Recordings
•
Notes on key work items and occurrences by Task & Location.
•
Photos and videos with explanatory additional notes recorded
•
Voice recordings with explanatory written notes.
2.4
•
2.5
Weather Information
Recording key weather information for the day.
Reporting
•
Information is exported in a spreadsheet format including graph of
'Scheduled versus Actual' performance of resources on tasks.
•
A schematic progress chart showing each task by its location and its
status against scheduled production.
•
A user defined report on daily activities.
•
A listing of all notes and photos / videos / voice recordings
Desktop Daily Diary Manual rev5.doc
2
3. Desktop Daily Diary - Overview
The Desktop Daily Diary is the central database to which data collected by
Pocket PCs is uploaded. It has the following functions:
•
Entry of daily data separate to that imported from the Pocket PC.
•
Setup of the project information such as Tasks, Resources,
Locations and Schedules is done in the Daily Diary and exported to
the Pocket PC for data collection.
•
Quick and easy access to all information.
•
Reports on Daily information.
4. Pocket PC Daily Diary - Overview
The Pocket PC's primary function is to collect data easily out on the site
where work is occurring. It holds a maximum of one week's information at
any one time. It has the following functions:
•
Import new tasks, resources, schedules from the Desktop database.
•
Record data for production
•
Record resources on site
•
Record delays
•
Record notes on key issues
•
Record photos & videos with notes amplifying the record
•
Voice recording
5. How to Use the Desktop Diary - Basic Operations
5.1
The Home Screen
The Main Menu is located on the Home screen. All functions can be
accessed from the Home screen or alternatively from the two menus
located at the top of each screen.
Each Menu item has a description of the menu contents by placing the
mouse over the Menu item.
Desktop Daily Diary Manual rev5.doc
3
Home Screen
Menu 1
Menu 2
Menu Items
Desktop Daily Diary Manual rev5.doc
4
5.2
Daily Production Screen
5.2.1 Choose the Date for Information to be viewed.
5.2.2 Enter Task / Production Information
5.2.3 Enter Delay Information
5.2.4 Add Notes
Desktop Daily Diary Manual rev5.doc
5
5.2.5 Attach Photo / Video / Voice Recording to Note
Use the 'Attach" button to find and attach the photo file to the Note.
5.3
Find a Record for Production - Browse
Click 'Search' and then 'Browse'. Select the desired filters / criteria. Then
press 'Display'. The results can then be sorted by any of the headings. ie
by clicking on the Date once it will sort from earliest date to latest and by
pressing Date again it will sort the results from latest to earliest. Double
click on the required item to go to the Daily production.
BROWSER Screen
Sort by
Headers
Desktop Daily Diary Manual rev5.doc
6
5.4
Find a Note / Photo / Video / Voice Recording
Click 'Search' and 'Notes Search' and select the desired filters / categories
and press 'Display'. The results can then be sorted by any of the
headings. Double click on the desired Note to go to the Note details and
attached photo / video / voice recording.
5.5
Reports
On the Home screen select Reports.
Reports exported to MS Excel. The 'Progress Actual' and 'Cum Act Vs
Sched' reports export directly to an Excel spreadsheet.
The other reports can be printed and can separately be exported to an MS
Word file or an MS Excel spreadsheet through the 'Office Links' button on
Menu 2.
Desktop Daily Diary Manual rev5.doc
7
5.5.1 Reports - Home Screen
Export to Excel or MS
Word - Office Links
Button
Desktop Daily Diary Manual rev5.doc
8
Daily Diary – Pocket PC Quick Reference Guide
5.5.2 Reports - 'Progress Status' (not available to all Users)
a)
Choose the required date for the report by selecting the date from
the calendar.
b)
From the 'Reports Menu' select 'Progress Status'
c)
On the 'Proforma Reports Selection' screen leave the 'From location'
'To location' fields blank and click the 'Report' button. This will give a
report across all the entire project. (Note: If a specific location or
from one location to another is required fill in these fields.)
Desktop Daily Diary Manual rev5.doc
9
Daily Diary – Pocket PC Quick Reference Guide
d) Progress Status Report
5.5.3 Reports - 'Cum Act Vs Sched'
This report provides graphs of actual performance against scheduled
performance, together with pie graph of delays broken down into various
categories. All the information is exported to an Excel spreadsheet where
the data can be further analysed.
a)
From the 'Reports' Menu select the 'Cum Act Vs Sched' button.
Desktop Daily Diary Manual rev5.doc
10
Daily Diary – Pocket PC Quick Reference Guide
b)
Select the Criteria as required (and as shown in the example above).
Desktop Daily Diary Manual rev5.doc
11
Daily Diary – Pocket PC Quick Reference Guide
5.6
Synchronise Pocket PC - Desktop Database
Information is uploaded from the Pocket PC to the Desktop and new
information from the Desktop Diary is downloaded to the Pocket PC by
selecting 'Transfer' and then 'Synchronise'. This includes resources, tasks,
production, delays, notes and photos.
6. Transfer of Information to CCS
Notes and Photos can be exported to CCS and automatically registered in
CCS. This can be done on an individual note by note basis or as a bulk
export of all notes.
6.1
Set-up for Transfer to CCS
6.1.1 Setup the file path to the CCS Database
a)
Select 'Tools' - 'Setup' and place the exact file path and CCS file
name into the field 'CCSPath'.
Desktop Daily Diary Manual rev5.doc
12
Daily Diary – Pocket PC Quick Reference Guide
6.1.2 Setup where the Notes & Photos are to be exported in CCS.
a)
Select 'Transfer' - 'SetUp Export' & choose the 'Category' & 'Type'
6.2
Transfer an Individual Note to CCS
a)
Select the Note to be exported & Select 'Send to CCS'
b)
Select the 'Category' and 'Type' in CCS for the exported Note
c)
Press 'Export to CCS'
Desktop Daily Diary Manual rev5.doc
13
Daily Diary – Pocket PC Quick Reference Guide
6.2
Bulk Transfer of Notes & Photos to CCS
a)
b)
Select 'Transfer' - 'Export to CCS'
This will export all the Notes and attached files (photos, videos,
voice recording etc) to CCS.
All Notes without an Attachment will be registered in CCS as the
'Type' nominated in the 'SetUp Export' field.
All Notes with an Attachment will be registered in CCS as a 'Type' 'Photo-Video'.
c)
d)
Desktop Daily Diary Manual rev5.doc
14
Daily Diary – Pocket PC Quick Reference Guide
Pocket PC–Daily Diary
This Quick Reference Guide provides quick easy steps
to start using ‘Daily Diary’ on your Pocket PC to record
data out in the field and to transfer that data to the
‘Daily Diary’ software located on your desktop PC.
1. Open Pocket PC Daily Diary
From ‘Programs’ click on ‘Daily Diary’ to open. The current date should be
shown at the top of the screen when open. If the date is incorrect or you
need to change the date click on ‘Cal’ tab and choose the date from the
Calendar.
2. Enter Data – Location
The ‘Location’ of the work activity must be chosen from the drop down
‘Location’ box prior to entering any data. The ‘Location’ specifies where
the actual work to be statused is located on the project.
3. Enter Data – Tasks
There may be tasks listed for the chosen ‘Location’ on the Daily Diary
screen. If the required Task isn’t listed click the Tab ‘Add Task’. From the
‘Task’ screen select the required ‘Task’ and the ‘Start’ and ‘Finish’ times.
Click the ‘Save’ tab at the bottom of the screen to add the Task to the
main (today’s) screen.
4. Enter Data – Production
‘Production’ is the amount of work a resource or combined resources
performed on a task. For example an excavator may have dug 2500 cubic
metres for the 8 hour period and this maybe 50% of the excavation to be
performed.
Highlight the Task that you are going to input Production on and click on
the ‘Prodn’ tab located on the side of the screen. When the ‘Production
Screen’ opens select the ‘Resource’ from the drop down box (second field
on the screen) Then fill in the number of hours worked, the Quantity, the
measurement units and the percent complete (if required). Click on the
‘Save’ tab located at the bottom of the screen to save the Production.
5. Enter Data – Notes and Photos
Choose the Location associated with the ‘Note / Photo’. If you want the
Note associated with a Task then highlight the applicable Task. Click on
the tab ‘Notes / Photos’. On the Notes screen type a ‘Subject’ by placing
Desktop Daily Diary Manual rev5.doc
15
Daily Diary – Pocket PC Quick Reference Guide
the cursor in this field and using the keyboard or transcriber enter a
subject description which should be a brief precis of the Note. Then place
the cursor in the Notes field and enter further details using the keyboard
or transcriber.
If you want to attach a photo to the Note click on the ‘Attach’ button and
use the ‘explore’ function to find the required file. Once located click on
the required file which will then attach the photo file to the Note. Press
‘Save’ on the lower part of the screen to save the Note and its photo (if
attached).
6. Enter Data – Delays
Choose the ‘Location’ and then highlight the Task (by clicking on the Task)
to which the Delay applies.
When the Delay screen opens choose the Resource (second drop down
box) for the Resource to which the Delay is assigned. Next select the type
of Delay from the ‘Reason’ drop down box. Enter the extent in time of the
Delay by placing the cursor in ‘Time’ and using the keyboard or
transcriber.
Then choose the unit of time for the Delay by selecting from the drop
down box on the right hand side.
Press ‘Save’ on the lower part of the screen to save the Delay details.
The ‘Daily Tasks’ Screen – the Main Screen
Open Calendar
Today’s date or the
selected date
Move to the next day’s
date
Choose Location
Move to the Day before
Enter Weather
Enter Production
Enter Delays
Enter Notes & Photos
Add a Task to the list for
Today
Enter a New Task not in
the Desktop list
Enter a New Resource not
in the Desktop list
Desktop Daily Diary Manual rev5.doc
16
Daily Diary – Pocket PC Quick Reference Guide
7. Flow Chart – Basic Steps for Pocket PC Use
Pocket PC Daily Diary
Open Daily Diary
from Programs
Choose 'Location'
Add a 'Task'
Enter 'Production'
for Task
Enter Data for
Task
Enter Delays for
Task & Resource
Synchronise data
with Desktop PC
at least once per
day
Enter Notes &
Photos by
Location & Task
Ensure Location and Task are
selected & click on ‘Prodn’ Tab.
In Production screen select
Resource, fill in Hours worked,
Quantity, Units, % Complete
(if reqd) & press Save to save
the record.
Ensure Location and Task are
selected & click on ‘Delay’ Tab.
In Delay screen select
Resource, Reason and fill in
extent of time (Time), choose
unit of Time. Press Save to
save the record.
Ensure Location and Task are
selected & click on ‘Notes /
Photo’ Tab. In Notes / Photo
screen fill in Subject & then
further amplify in Notes
section. I photo is to be
associated click Attach and
choose photo. Press Save to
save the record.
Ensure Daily Diary on the Pocket
PC is closed prior to transfer and
that you are on the correct
Desktop PC. Place Pocket PC in the
cradle. Open Daily Diary on the
Desktop PC and select Transfer
and Synchronise This will
automatically upload information
from the Pocket PC and download
the latest information from the
Desktop Daily Diary.
Desktop Daily Diary Manual rev5.doc
17