1
Code Wire Tagging Protocol at Caswell State Park
2 Turn on MKIV. Power MKIV by pressing rubber-covered on/
off button on back of MKIV. The MKIV will show the message
“NO QCD OK?” Press [OK] on keyboard to confirm and clear
message, as we are using a T4 Detector instead of a in-line QCD.
The “READY V7.0” message.
3. Inspect tagging needle. Press [SHOW] on keypad and examine
needle with magnifier. Make sure it is sharp and smooth, and the
needle position is correct with bevel angled up. After inspection,
retract needle by hitting [ESC] on keypad.
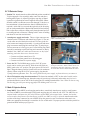
4. Engage rollers. Open latch on front of MKIV and swing open
door. Find lower drive roller arm and move lever to engage
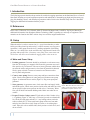
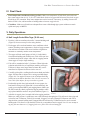
Figure 6. Headmold positioned on Mark IV
rollers (Figure 7). Note: Rollers should always be left disengaged tag injector.
after use.
5. Load tag wire. Put the MKIV in Load mode by pressing
[LOAD] on keypad. This will disengage motor drive. Remove
the label on one side of the tag wire and attach to datasheet for
sampling week. Add spool and thread tag wire through rear wire
guide until it reaches drive rollers. Rotate roller clockwise by
hand to feed wire into front wire guide. Use hemostats from tool
kit to start wire into forward guide. Re-engage rollers and turn
top roller clockwise until tag wire extends slightly beyond top
of the head mold. Press the [ESC] key. The MKIV will be in Tag
mode. Press [TAG] on keypad once to cut extra tag wire. MKIV
is now ready to operate.
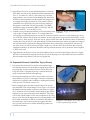
Figure 7. Internal parts of the Mark IV injec-
tor including the green drive rollers and drive
6. Check tag placement. To set penetration put MKIV in
roller arm (red arrow).
[SHOW] mode which will move needle to its fully extended
position. Loosen set screws on head mold and slide head mold in or out to adjust distance needle will extend
into specimen. Gently tighten set screws to hold head mold in place. Note: Correct placement for the commonly used head molds will be marked by pencil or waterproof marker. Tag placement can be confirmed (in
very small fish, 35–40 mm) by opening the mouth and looking ventrally through the nose.
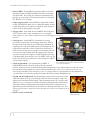
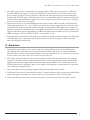
7. Tag fish and check placement. Tag should appear centered in the sinus cavity of the
small fish (Figure 8). If tag is too deep move the head mold out slightly. If tag is too
shallow move the head mold in slightly. These movements need to be very fine; small
differences (e.g., 0.5 mm) can be extreme in small fry. Repeat procedure until ideal tag
placement is achieved. Mark position on head mold with pencil or waterproof pen, so
approximate position of head mold is known the next time tag placement is set. Note:
Setting tag placement in larger fish is done the same way, however the margin for error
is larger.
8. MKIV is ready to mark fish.
Figure 8. CWT in Chinook salmon fry
3