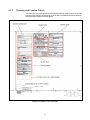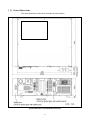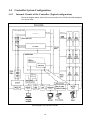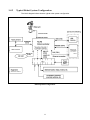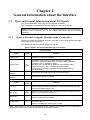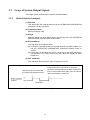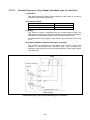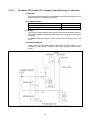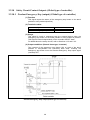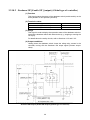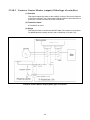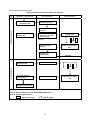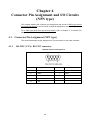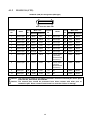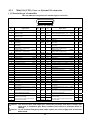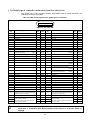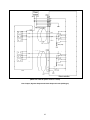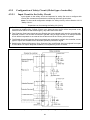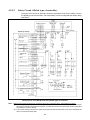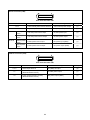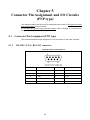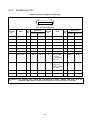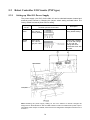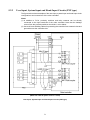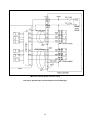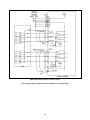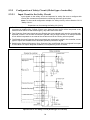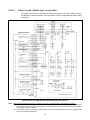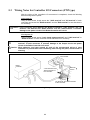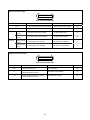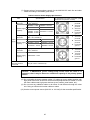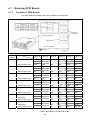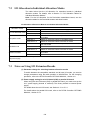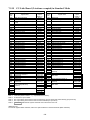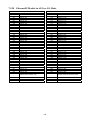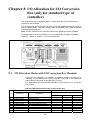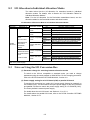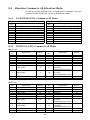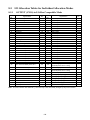
1
ROBOT RC7M CONTROLLER MANUAL Copyright © DENSO WAVE INCORPORATED, 2005-2010 All rights reserved. No part of this publication may be reproduced in any form or by any means without permission in writing from the publisher. Specifications are subject to change without prior notice. All products and company names mentioned are trademarks or registered trademarks of their respective holders. Preface Thank you for purchasing this high-speed, high-accuracy assembly robot. This manual describes the RC7M controller configured in the **-G robot system. It also covers interfacing required when you integrate your robot system into your facilities, as well as providing the maintenance & inspection procedures. Before use, read this manual carefully together with related manuals to safely get the maximum benefit from your robot in your assembling operations. Note: The name of this manual has changed from the "RC7M Controller INTERFACE MANUAL" to the "RC7M CONTROLLER MANUAL." Robot controller covered by this manual RC7M controller Caution in connecting/disconnecting the motor & encoder cable The CN7 (MOTOR) connector for the motor & encoder cable on the RC7M controller uses a rigid structure. Connection: Lock the connector properly. Disconnection: Release the lock carefully and safely. It cannot be easily released. Connection Disconnection Release the lock carefully and safely. Important To ensure operator safety, be sure to read the precautions and instructions in "SAFETY PRECAUTIONS." i How the documentation set is organized The documentation set consists of the following books. If you are unfamiliar with this robot and option(s), please read all books and understand them fully before operating your robot and option(s). GENERAL INFORMATION ABOUT ROBOT Provides the packing list of the robot and outlines of the robot system, robot unit, and robot controller. INSTALLATION & MAINTENANCE GUIDE Provides instructions for installing the robot components and customizing your robot, and maintenance & inspection procedures. STARTUP HANDBOOK Introduces you to the DENSO robot system and guides you through connecting the robot unit and controller with each other, running the robot with the teach pendant, and making and verifying a program. This manual is a comprehensive guide to starting up your robot system. SETTING-UP MANUAL Describes how to set up or teach your robot with the teach pendant or mini-pendant. For the panel designer functions, refer to the Panel Designer User's Manual (SUPPLEMENT). WINCAPSIII GUIDE Provides instructions on how to use the programming support tool WINCAPSIII which runs on the PC connected to the robot controller for developing and managing programs. PROGRAMMER'S MANUAL I, Program Design and Commands Describes the PAC programming language, program development, and command specifications in PAC. This manual consists of two parts; Part 1 provides the basic programming knowledge, and Part 2, details of individual commands. PROGRAMMER'S MANUAL II, PAC Library Describes the program libraries that come with WINCAPSIII as standard. RC7M CONTROLLER MANUAL - this book Provides the specifications, installation and maintenance of the RC7M controller. It also describes interfacing with external devices, system- and user-input/output signals, and I/O circuits. ERROR CODE TABLES List error codes that will appear on the teach pendant or mini-pendant if an error occurs in the robot system. These tables also provide detailed description and recovery ways. OPTIONS MANUAL Describes the specifications, installation, and use of optional devices. For the extension board "conveyer tracking board," refer to the OPTIONS MANUAL (SUPPLEMENT). ii How this book is organized This book is just one part of the robot documentation set. This book consists of SAFETY PRECAUTIONS and chapters one through eight. SAFETY PRECAUTIONS Defines safety terms and related symbols and provides precautions that should be observed. Be sure to read this section before operating your robot. Chapter 1 Outline of the RC7M Controller Provides an outline of the RC7M controller. The robot controller is available in several models that will differ in detailed specifications to match robot models to be connected. Chapter 2 General Information about the Interface Introduces you to the interface required for connecting the robot controller with a PLC or other external equipment. Chapter 3 System I/O Signals Describes system I/O signals, and describes I/O signals that execute I/O commands. Chapter 4 I/O Circuits and Connectors (NPN type) Describes the I/O circuits and connector pin layout of an NPN I/O board (source input and sink output). The NPN I/O board is designed for the use in Japan. Chapter 5 I/O Circuits and Connectors (PNP type) Describes the I/O circuits and connector pin layout of a PNP I/O board (sink input and source output). Chapter 6 Installation & Maintenance for the RC7M controller Provides instructions for installing the robot controller, and maintenance & inspection procedures. Chapter 7 I/O Allocation for I/O Extension Board(s) Lists the I/O allocation tables to apply when I/O extension boards are mounted. Chapter 8 I/O Allocation for I/O Conversion Box (only for standard type of controller) Lists the I/O allocation tables to apply when the I/O conversion box is mounted. Using the I/O conversion box on the RC7M controller with an optional parallel I/O board mounted allows the "INPUT (CN8)," "OUTPUT (CN10)," and "I/O POWER (CN7)" used on the RC5 controller to be used on the RC7M controller as is. Note: The I/O conversion box cannot be used for the global type of the controller. iii SAFETY PRECAUTIONS SAFETY PRECAUTIONS Be sure to observe all of the following safety precautions. Strict observance of these warning and caution indications are a MUST for preventing accidents, which could result in bodily injury and substantial property damage. Make sure you fully understand all definitions of these terms and related symbols given below, before you proceed to the text itself. WARNING Alerts you to those conditions, which could result in serious bodily injury or death if the instructions are not followed correctly. CAUTION Alerts you to those conditions, which could result in minor bodily injury or substantial property damage if the instructions are not followed correctly. Terminology and Definitions Maximum space: Refers to the space which can be swept by the moving parts of the robot as defined by the manufacturer, plus the space which can be swept by the end-effector and the workpiece. (Quoted from the ISO 10218-1:2006.) Restricted space: Refers to the portion of the maximum space restricted by limiting devices (i.e., mechanical stops) that establish limits which will not be exceeded. (Quoted from the ISO 10218-1:2006.) Motion space: Refers to the portion of the restricted space to which a robot is restricted by software motion limits. The maximum distance that the robot, end-effector, and workpiece can travel after the software motion limits are set defines the boundaries of the motion space of the robot. (The "motion space" is DENSO WAVE-proprietary terminology.) Operating space: Refers to the portion of the restricted space that is actually used while performing all motions commanded by the task program. (Quoted from the ISO 10218-1:2006.) Task program: Refers to a set of instructions for motion and auxiliary functions that define the specific intended task of the robot system. (Quoted from the ISO 10218-1:2006.) 1. Introduction This section provides safety precautions to be observed for the robot system. The installation shall be made by qualified personal and should confirm to all national and local codes. 2. Warning Labels The robot unit and controller have warning labels. These labels alert the user to the danger of the areas on which they are pasted. Be sure to observe the instructions printed on those labels. Warning label Instructions printed on the label Risk of injury. Never enter the restricted space. Label (1) <Except HM> For UL-Listed robot units only Risk of injury. This label alerts the user that pressing the brake release switch could drop the arm. (Example: Location of labels) <HM> Label (2) Risk of electrical shock. Never open the controller cover when the power is on. Label (3) Never touch the inside of the controller for at least 3 minutes even after turning the power off and disconnecting the power cable. Risk of injury. Label (4) Be sure to perform lockout/tagout before starting servicing. Turning the power ON when a person is inside the safety fence may move the arm, causing injuries. SAFETY PRECAUTIONS 3. Installation Precautions 3.1 Insuring the proper installation environment For standard type and cleanroom type The standard and cleanroom types have not been designed to withstand explosions, dust-proof, nor is it splash-proof. Therefore, it should not be installed in any environment where: (1) there are flammable gases or liquids, (2) there are any shavings from metal processing or other conductive material flying about, (3) there are any acidic, alkaline or other corrosive material, (4) there is a mist, (5) there are any large-sized inverters, high output/high frequency transmitters, large contactors, welders, or other sources of electrical noise. For dust- & splash-proof type The dust- & splash-proof type has an IP54-equivalent structure, but it has not been designed to withstand explosions. (The HM/HS-G-W and the wrist of the VM/VS-G-W are an IP65-equivalent dust- and splash-proof structure.) Note that the robot controller is not a dust- or splash-proof structure. Therefore, when using the robot controller in an environment exposed to mist, put it in an optional protective box. The dust- & splash-proof type should not be installed in any environment where: (1) there are any flammable gases or liquids, (2) there are any acidic, alkaline or other corrosive material, (3) there are any large-sized inverters, high output/high frequency transmitters, large contactors, welders, or other sources of electrical noise, (4) it may likely be submerged in fluid, (5) there are any grinding or machining chips or shavings, (6) any machining oil not specified in this manual is in use, or Note: Yushiron Oil No. 4C (non-soluble) is specified. (7) there is sulfuric cutting or grinding oil mist. 3.2 Service space The robot and peripheral equipment should be installed so that sufficient service space is maintained for safe teaching, maintenance, and inspection. 3.3 Control devices outside the robot's restricted space The robot controller, teach pendant and mini-pendant should be installed outside the robot's restricted space and in a place where you can observe all of the robot’s movements and operate the robot easily. 3.4 Positioning of gauges Pressure gauges, oil pressure gauges and other gauges should be installed in an easy-to-check location. 3.5 Protection of electrical wiring and hydraulic/pneumatic piping If there is any possibility of the electrical wiring or hydraulic/pneumatic piping being damaged, protect them with a cover or similar item. 3.6 Grounding resistance The protective grounding resistance of the robot power supply should not be more than 100Ω. 3.7 Positioning of emergency stop switches Emergency stop switches should be provided in a position where they can be reached easily should it be necessary to stop the robot immediately. (1) The emergency stop switches should be red. (2) Emergency stop switches should be designed so that they will not be released after pressed, automatically or mistakenly by any other person. (3) Emergency stop switches should be separate from the power switch. 3.8 Positioning of operating status indicators Operating status indicators should be positioned in such a way where workers can easily see whether the robot is on a temporary halt or on an emergency or abnormal stop. Note: The UL-Listed robot units have motor ON lamps on their robot arms. SAFETY PRECAUTIONS 3.9 Setting-up a safety fence A safety fence should be set up so that no one can easily enter the robot's restricted space. (1) The fence should be constructed so that it cannot be easily moved or removed. (2) The fence should be constructed so that it cannot be easily damaged or deformed through external force. (3) Establish the exit/entrance to the fence. Construct the fence so that no one can easily get past it by climbing over the fence. (4) The fence should be constructed to ensure that it is not possible for hands or any other parts of the body to get through it. (5) Take any one of the following protections for the entrance/ exit of the fence: 1) Place a door, rope or chain across the entrance/exit of the fence, and fit it with an interlock that ensures the emergency stop device operates automatically if it is opened or removed. 2) Post a warning notice at the entrance/exit of the fence stating "In operation--Entry forbidden" or "Work in progress--Do not operate" and ensure that workers follow these instructions at all times. When making a test run, before setting up the fence, place an overseer in a position outside the robot’s restricted space and one in which he/she can see all of the robot’s movements. The overseer should prevent workers from entering the robot's restricted space and be devoted solely to that task. 3.10 Setting the robot's motion space The area required for the robot to work is called the robot's operating space. If the robot’s motion space is greater than the operating space, it is recommended that you set a smaller motion space to prevent the robot from interfering or disrupting other equipment. Refer to the INSTALLATION & MAINTENANCE GUIDE, Chapter 2. 3.11 No robot modification allowed Never modify the robot unit, robot controller, teach pendant or other devices. 3.12 Cleaning of tools If your robot uses welding guns, paint spray nozzles, or other end-effectors requiring cleaning, it is recommended that the cleaning process be carried out automatically. 3.13 Lighting Sufficient illumination should be assured for safe robot operation. 3.14 Protection from objects thrown by the end-effector If there is any risk of workers being injured in the event that the object being held by the end-effector is dropped or thrown by the end-effector, consider the size, weight, temperature and chemical nature of the object and take appropriate safeguards to ensure safety. 3.15 Affixing the warning label Place the warning label packaged with the robot on the exit/entrance of the safety fence or in a position where it is easy to see. 3.16 Posting the moving directions of all axes Post a notice showing axes names and moving directions in a visible location on the robot unit. The posted moving directions should match the actual directions. No posting or wrong direction posting may result in bodily injuries or property damages due to incorrect operation. SAFETY PRECAUTIONS 4. Precautions while Robot is Running Warning Touching the robot while it is in operation can lead to serious injury. Please ensure the following conditions are maintained and that the cautions listed from Section 4.1 and onwards are followed when any work is being performed. 1) Do not enter the robot's restricted space when the robot is in operation or when the motor power is on. 2) As a precaution against malfunction, ensure that an emergency stop device is activated to cut the power to the robot motor upon entry into the robot's restricted space. 3) When it is necessary to enter the robot's restricted space to perform teaching or maintenance work while the robot is running, ensure that the steps described in Section 4.3 "Ensuring safety of workers performing jobs within the robot's restricted space" are taken. 4.1 Creation of working regulations and assuring worker adherence When entering the robot’s restricted space to perform teaching or maintenance inspections, set "working regulations" for the following items and ensure workers adhere to them. (1) Operating procedures required to run the robot. (2) Robot speed when performing teaching. (3) Signaling methods to be used when more than one worker is to perform work. (4) Steps that must be taken by the worker in the event of a malfunction, according to the contents of the malfunction. (5) The necessary steps for checking release and safety of the malfunction status, in order to restart the robot after robot movement has been stopped due to activation of the emergency stop device (6) Apart from the above, any steps below necessary to prevent danger from unexpected robot movement or malfunction of the robot. 1) Display of the control panel (See Section 4.2 on the next page.) 2) Assuring the safety of workers performing jobs within the robot's restricted space (See Section 4.3 on the next page.) 3) Maintaining worker position and stance Position and stance that enables the worker to confirm normal robot operation and to take immediate refuge if a malfunction occurs. 4) Implementation of measures for noise prevention 5) Signaling methods for workers of related equipment 6) Types of malfunctions and how to distinguish them Please ensure "working regulations" are appropriate to the robot type, the place of installation and to the content of the work. Be sure to consult the opinions of related workers, engineers at the equipment manufacturer and that of a labor safety consultant when creating these "working regulations". 4.2 Display of operation panel To prevent anyone other than the worker from accessing the start switch or the changeover switch by accident during operation, display something to indicate it is in operation on the operation panel or teach pendant. Take any other steps as appropriate, such as locking the cover. 4.3 Ensuring safety of workers performing jobs within the robot's restricted space When performing jobs within the robot’s restricted space, take any of the following steps to ensure that robot operation can be stopped immediately upon a malfunction. (1) Ensure an overseer is placed in a position outside the robot’s restricted space and one in which he/she can see all robot movements, and that he/she is devoted solely to that task. c An emergency stop device should be activated immediately upon a malfunction. d Do not permit anyone other than the worker engaged for that job to enter the robot’s restricted space. (2) Ensure a worker within the robot's restricted space carries the portable emergency stop switch so he/she can press it (the emergency button on the teach pendant) immediately if it should be necessary to do so. 4.4 Inspections before commencing work such as teaching Before starting work such as teaching, inspect the following items, carry out any repairs immediately upon detection of a malfunction and perform any other necessary measures. (1) Check for any damage to the sheath or cover of the external wiring or to the external devices. (2) Check that the robot is functioning normally or not (any unusual noise or vibration during operation). (3) Check the functioning of the emergency stop device. (4) Check there is no leakage of air or oil from any pipes. (5) Check there are no obstructive objects in or near the robot’s restricted space. SAFETY PRECAUTIONS 4.5 Release of residual air pressure Before disassembling or replacing pneumatic parts, first release any residual air pressure in the drive cylinder. 4.6 Precautions for test runs Whenever possible, have the worker stay outside of the robot's restricted space when performing test runs. 4.7 Precautions for automatic operation (1) At start-up Stay out of the safeguarded space with a safety fence when starting the robot; in particular, take extra caution in Internal automatic operation. Before starting the robot, check the following items as well as setting the signals to be used and perform signaling practice with all related workers. 1) Check that there is no one inside the safeguarded space (with a safety fence). 2) Check that the teach pendant and tools are in their designated places. 3) Check that no lamps indicating a malfunction on the robot or related equipment are lit. (2) Check that the display lamp indicating automatic operation is lit during automatic operation. (3) Steps to be taken when a malfunction occurs Stop the robot's operation by activating the emergency stop device when it is necessary to enter the safeguarded space with a safety fence to perform emergency maintenance in the case of malfunction of the robots or related equipment. Take any necessary steps such as posting a notice on the start switch to indicate work is in progress to prevent anyone from accessing the robot. 4.8 Precautions in repairs (1) Do not perform repairs outside of the designated range. (2) Under no circumstances should the interlock mechanism be removed. (3) When opening the robot controller's cover for battery replacement or any other reasons, always turn the robot controller power off and disconnect the power cable. (4) Use only spare tools specified in this manual. 5. Daily and Periodical Inspections (1) Be sure to perform daily and periodical inspections. Before starting jobs, always check that there is no problem with the robot and related equipment. If any problems are found, take any necessary measures to correct them. (2) When carrying out periodical inspections or any repairs, maintain records and keep them for at least 3 years. 6. Management of Floppy Disks (1) Carefully handle and store the "Initial settings" floppy disks packaged with the robot, which store special data exclusively prepared for your robot. (2) After finishing teaching or making any changes, always save the programs and data onto floppy disks. Making back-ups will help you recover if data stored in the robot controller is lost due to the expired life of the back-up battery. (3) Write the names of each of the floppy disks used for storing task programs to prevent incorrect disks from loading into the robot controller. (4) Store the floppy disks where they will not be exposed to dust, humidity and magnetic field, which could corrupt the disks or data stored on them. 7. Safety Codes The safety standards relating to robot systems are listed below. As well as observing the safety precautions given in this manual, ensure compliance with all local and national safety and electrical codes for the installation and operation of the robot system. Standards ANSI/RIA R15.06-1999 ANSI/UL1740: 1998 CAN/CSA Z434-03 ISO10218-1: 2006 NFPA 79: 2002 8. Battery Recycling Title Industrial Robots and Robot Systems--Safety Requirements Safety for Robots and Robotic Equipment Industrial Robots and Robot Systems--General Safety Requirements Robots for industrial environments--Safety requirements--Part 1: Robot Electrical Standard for Industrial Machinery DENSO Robot uses lithium batteries. Discard batteries according to your local and national recycling law. Contents Preface ................................................................................................................................................................................ i How the documentation set is organized ........................................................................................................................ii How this book is organized .............................................................................................................................................iii SAFETY PRECAUTIONS Chapter 1 General Information about RC7M Controller............................................................................................. 1 1.1 Controller Model Name on Nameplate ................................................................................................................... 1 1.2 Names of the Controller Components ..................................................................................................................... 4 1.2.1 Controller Components.............................................................................................................................. 4 1.2.2 Warning and Caution Labels...................................................................................................................... 5 1.3 Controller Specifications ......................................................................................................................................... 7 1.4 Controller System Configuration .......................................................................................................................... 10 1.4.1 Internal Circuits of the Controller (Typical configuration) ...................................................................... 10 1.4.2 Typical Robot System Configuration....................................................................................................... 11 Chapter 2 General Information about the Interface ................................................................................................... 12 2.1 Types and General Information about I/O Signals ................................................................................................ 12 2.1.1 Types of System I/O Signals (Standard type of controller)...................................................................... 12 2.1.2 Types of System I/O Signals (Global type of controller) ......................................................................... 13 2.2 Usage of User I/O Signals ..................................................................................................................................... 14 2.2.1 I/O Type Variable Declaration.................................................................................................................. 14 2.2.2 I/O Type Global Variables........................................................................................................................ 14 2.2.3 I/O Type Local Variables ......................................................................................................................... 14 2.2.4 User Input Commands ............................................................................................................................. 14 2.2.5 User Output Commands........................................................................................................................... 15 Chapter 3 System I/O Signals ........................................................................................................................................ 16 3.1 Types and Functions of System Output Signals .................................................................................................... 16 3.2 Usage of System Output Signals ........................................................................................................................... 17 3.2.1 Robot Initialized (output) ......................................................................................................................... 17 3.2.2 Auto Mode (output) .................................................................................................................................. 18 3.2.3 Operation Preparation Completed (output)............................................................................................. 19 3.2.4 Robot Running (output)............................................................................................................................ 20 3.2.5 CPU Normal (output) .............................................................................................................................. 21 3.2.6 Robot Error (output) ................................................................................................................................ 22 3.2.7 Battery Warning (output) ......................................................................................................................... 23 3.2.8 Continue Start Permission (output): Selectable by I/O hardware setting................................................. 24 3.2.9 Emergency Stop Circuit Contact Outputs (Standard type of controller) .................................................. 25 3.2.10 Safety Circuit Contact Outputs (Global type of controller) ..................................................................... 28 3.3 Types and Functions of System Input Signals ....................................................................................................... 31 3.4 Usage of System Input Signals.............................................................................................................................. 32 3.4.1 Step Stop (All tasks) (input)...................................................................................................................... 32 3.4.2 External Emergency Stop (input) ............................................................................................................. 33 3.4.3 Enable Auto (input) (Standard type of controller).................................................................................... 34 3.4.4 Enable Auto (input) (Global type of controller)....................................................................................... 35 3.4.5 Protective Stop (input): Global type of controller .................................................................................... 36 3.5 3.6 Command Execution I/O Signals .......................................................................................................................... 37 3.5.1 General Information about Commands.................................................................................................... 37 3.5.2 Processing I/O Commands....................................................................................................................... 38 3.5.3 I/O Commands Details............................................................................................................................. 41 Example of Using System I/O Signals .................................................................................................................. 44 Chapter 4 Connector Pin Assignment and I/O Circuits (NPN type) .......................................................................... 48 4.1 Connector Pin Assignment (NPN type)................................................................................................................. 48 4.1.1 RS-232C (CN1): RS-232C connector...................................................................................................... 48 4.1.2 HAND I/O (CN9) .................................................................................................................................... 49 4.1.3 Mini I/O (CN5): User- or System-I/O connector ..................................................................................... 50 4.1.4 Safety I/O (CN10):System-I/O connecter (Global type of controller) .................................................. 52 4.2 Robot Controller I/O Circuits (NPN type)............................................................................................................. 53 4.2.1 Setting up Mini I/O Power Supply........................................................................................................... 53 4.2.2 User-Input, System-Input and Hand-Input Circuits (NPN type).............................................................. 54 4.2.3 User-Output, System-Output, and Hand-Output Circuits (NPN type)..................................................... 56 4.2.4 Configuration of Emergency Stop Circuitry (Standard type of controller) ............................................. 59 4.2.5 Configuration of Safety Circuit (Global type of controller)..................................................................... 61 4.3 Wiring Notes for Controller I/O Connectors (NPN type)...................................................................................... 63 Chapter 5 Connector Pin Assignment and I/O Circuits (PNP type)........................................................................... 65 5.1 Connector Pin Assignment (PNP type).................................................................................................................. 65 5.1.1 RS-232C (CN1): RS-232C connector...................................................................................................... 65 5.1.2 HAND I/O (CN9) .................................................................................................................................... 66 5.1.3 Mini I/O (CN5): User- or System-I/O connector ..................................................................................... 67 5.1.4 Safety I/O (CN10):System-I/O connecter (Global type of controller) .................................................. 69 5.2 Robot Controller I/O Circuits (PNP type) ............................................................................................................. 70 5.2.1 Setting up Mini I/O Power Supply........................................................................................................... 70 5.2.2 User-Input, System-Input and Hand-Input Circuits (PNP type)............................................................... 71 5.2.3 User-Output, System-Output, and Hand-Output Circuits (PNP type)...................................................... 73 5.2.4 Configuration of Emergency Stop Circuitry (Standard type of controller) ............................................. 76 5.2.5 Configuration of Safety Circuit (Global type of controller)..................................................................... 78 5.3 Wiring Notes for Controller I/O Connectors (PNP type)....................................................................................... 80 Chapter 6 Installation and Maintenance of the RC7M Controller ............................................................................ 82 6.1 Supplies for the Controller .................................................................................................................................... 82 6.2 Mounting the Controller ........................................................................................................................................ 82 6.2.1 Installation Requirements for the Controller............................................................................................ 82 6.2.2 Mounting the Robot Controller................................................................................................................ 83 6.3 I/O and AC Input Wiring ....................................................................................................................................... 85 6.3.1 Multi-core Cables with Connectors ......................................................................................................... 85 6.3.2 Wiring of Primary Power Source ............................................................................................................. 86 6.3.3 Disconnecting the Robot from the Power Source .................................................................................... 88 6.4 Cleaning the Air Intake Filters .............................................................................................................................. 89 6.5 Replacing the Memory Backup Battery ................................................................................................................ 91 6.5.1 Replacing procedures............................................................................................................................... 91 6.5.2 Setting the Next Battery Replacement Date............................................................................................. 94 6.6 6.7 Replacing Fuses and Output ICs ........................................................................................................................... 95 6.6.1 Positions of Fuses and Output ICs ........................................................................................................... 95 6.6.2 Replacing procedures............................................................................................................................... 97 Replacing IPM Boards ........................................................................................................................................ 100 6.7.1 Location of IPM Boards......................................................................................................................... 100 6.7.2 Replacing the IPM board ....................................................................................................................... 101 Chapter 7 I/O Allocation for I/O Extension Board(s)................................................................................................ 103 7.1 Combination of I/O Extension Boards and Allocation Modes ............................................................................ 103 7.2 I/O Allocation in Individual Allocation Modes ................................................................................................... 104 7.3 Notes on Using I/O Extension Boards................................................................................................................. 104 7.4 Hand I/O (CN9): Common to All Allocation Modes........................................................................................... 105 7.5 I/O Allocation Tables for Individual Allocation Modes ...................................................................................... 106 7.5.1 Mini I/O Board (CN5 on standard type of controller) in Mini I/O Dedicated Mode ............................. 106 7.5.2 Mini I/O Board (CN5 on global type of controller) in Mini I/O Dedicated Mode................................. 107 7.5.3 Mini I/O Board (CN5 on standard type of controller) in Compatible, Standard and All User I/O Modes .......................................................................................................... 108 7.5.4 Mini I/O Board (CN5 on global type of controller) in Compatible, Standard, and All User I/O Modes ......................................................................................................................... 109 7.5.5 Parallel I/O Board in Compatible Mode ................................................................................................ 110 7.5.6 Parallel I/O Board in Standard Mode..................................................................................................... 111 7.5.7 Parallel I/O Board (1st) in All User I/O Mode ....................................................................................... 112 7.5.8 Parallel I/O Board (2nd) in All User I/O Mode...................................................................................... 113 7.5.9 DeviceNet Slave Board in Compatible Mode ........................................................................................ 114 7.5.10 DeviceNet Slave Board in Standard Mode ............................................................................................ 115 7.5.11 DeviceNet Slave Board in All User I/O Mode....................................................................................... 116 7.5.12 CC-Link Board (2 stations occupied) in Compatible Mode................................................................... 117 7.5.13 CC-Link Board (3 stations occupied) in Compatible Mode................................................................... 118 7.5.14 CC-Link Board (4 stations occupied) in Compatible Mode................................................................... 119 7.5.15 CC-Link Board (2 stations occupied) in Standard Mode ....................................................................... 120 7.5.16 CC-Link Board (3 stations occupied) in Standard Mode ....................................................................... 121 7.5.17 CC-Link Board (4 stations occupied) in Standard Mode ....................................................................... 122 7.5.18 CC-Link Board (2 stations occupied) in All User I/O Mode ................................................................. 123 7.5.19 CC-Link Board (3 stations occupied) in All User I/O Mode ................................................................. 124 7.5.20 CC-Link Board (4 stations occupied) in All User I/O Mode ................................................................. 125 7.5.21 PROFIBUS-DP Slave Board in Compatible Mode................................................................................ 126 7.5.22 PROFIBUS-DP Slave Board in Standard Mode .................................................................................... 127 7.5.23 PROFIBUS-DP Slave Board in All User I/O Mode............................................................................... 128 7.5.24 DeviceNet Master Board in All User I/O Mode..................................................................................... 129 7.5.25 S-Link V Master Board in All User I/O Mode....................................................................................... 130 7.5.26 Ethernet/IP Module in Standard Mode................................................................................................... 131 7.5.27 Ethernet/IP Module in Compatible Mode .............................................................................................. 133 7.5.28 Ethernet/IP Module in All User I/O Mode ............................................................................................. 135 Chapter 8 I/O Allocation for I/O Conversion Box (only for standard type of controller) ...................................... 136 8.1 I/O Allocation Modes with I/O Conversion Box Mounted.................................................................................. 136 8.2 I/O Allocation in Individual Allocation Modes ................................................................................................... 137 8.3 8.4 8.5 Notes on Using the I/O Conversion Box ............................................................................................................. 137 Allocation Common to All Allocation Modes ..................................................................................................... 138 8.4.1 I/O POWER (CN9): Common to All Modes ......................................................................................... 138 8.4.2 HAND I/O (CN9): Common to All Modes............................................................................................ 138 I/O Allocation Tables for Individual Allocation Modes ...................................................................................... 139 8.5.1 OUTPUT (CN10) in I/O-Box Compatible Mode................................................................................... 139 8.5.2 INPUT (CN8) in I/O-Box Compatible Mode ........................................................................................ 140 8.5.3 OUTPUT (CN10) in I/O-Box Standard Mode ....................................................................................... 141 8.5.4 INPUT (CN8) in I/O-Box Standard Mode ............................................................................................. 142 8.5.5 OUTPUT (CN10) in I/O-Box All User I/O Mode ................................................................................. 143 8.5.6 INPUT (CN8) in I/O-Box All User I/O Mode ....................................................................................... 144 8.5.7 DeviceNet Slave Board in I/O-Box Compatible Mode.......................................................................... 145 8.5.8 DeviceNet Slave Board in I/O-Box Standard Mode .............................................................................. 146 8.5.9 CC-Link Board (2 stations occupied) in I/O-Box Compatible Mode .................................................... 147 8.5.10 CC-Link Board (3 stations occupied) in I/O-Box Compatible Mode .................................................... 148 8.5.11 CC-Link Board (4 stations occupied) in I/O-Box Compatible Mode .................................................... 149 8.5.12 CC-Link Board (2 stations occupied) in I/O-Box Standard Mode......................................................... 150 8.5.13 CC-Link Board (3 stations occupied) in I/O-Box Standard Mode......................................................... 151 8.5.14 CC-Link Board (4 stations occupied) in I/O-Box Standard Mode......................................................... 152 8.5.15 PROFIBUS-DP Slave Board in I/O-Box Compatible Mode.................................................................. 153 8.5.16 PROFIBUS-DP Slave Board in I/O-Box Standard Mode ...................................................................... 154 8.5.17 Parallel I/O Board in I/O-Box Al User I/O Mode .................................................................................. 155 8.5.18 DeviceNet Master Board in I/O-Box All User I/O Mode ...................................................................... 156 8.5.19 S-Link V Master Board in I/O-Box All User I/O Mode......................................................................... 157 8.5.20 Ethernet/IP Module in I/O-Box Compatible Mode ................................................................................ 158 8.5.21 Ethernet/IP Module in I/O-Box Standard Mode .................................................................................... 160 Chapter 1 General Information about RC7M Controller The RC7M controller is available in several models which differ in detailed specifications to match robot models. 1.1 Controller Model Name on Nameplate The model name of the controller is printed on the nameplate attached to the rear side of the controller as shown below. The model name is coded as listed below. Coding of Controller Model Name RC7M - VSG 6 B A (a) Position Code sample (a) VSG (b) (b) (c) - B P (d) (e) (f) (g) Denotes: Coding Robot model name VMG: VM-G series, VSG: VS-G series, VPG: VP-G series, HMG: HM-G series, HSG: HS-G series, XRG: XR-G series , XYCG: XYC-4G series 6 No. of controllable axes 4: 4 axes, 5/6: 5 or 6 axes, 6: 6 axes (c) B Engineering symbol 1 A: Encoder A B: Encoder B C: Encoder C (d) A Engineering symbol 2 A: 24V brake Engineering symbol 3 Blank: 200 VAC power A: 100 VAC power (e) (f) B Controller type (Note) Blank: B: C: D: E: Standard type Global type (with safety board) Global type (with safety box) Global type, UL-Listed (with safety board) Global type, UL-Listed (with safety box) (g) P I/O type Blank or N: P: NPN I/O PNP I/O (Note) For the differences between the global and standard types, see the next page. 1 Differences between Global and Standard Types of Robot Controllers The global type of the robot controller has either a safety board or safety box which the standard type has not. Described below are the functional differences between the global and standard types. [ 1 ] Deadman switch function (Enable switch function) The global type controls the deadman switch provided on the teach pendant or mini-pendant in a partially different way than the standard type does. When reading the instruction manuals that are prepared for the standard type, be careful with the following differences. (1) Location of deadman switches (enable switches) on the teach pendant and mini-pendant Deadman switch (Enable switch) Deadman switch (Enable switch) Teach pendant Mini-pendant (2) Difference in deadman switch operation The table below lists the functional differences of the teach pendant and mini-pendant between the global and standard types in Manual mode and Teach check mode. Standard type (described in the instruction manuals) Global type (1) Unless the deadman switch is held down, you can neither operate the robot nor turn the motor power ON. (1) Unless the deadman switch is held down, you cannot operate the robot, but you can turn the motor power ON. (2) When the robot is in operation, releasing the deadman switch will stop not only the robot but also turn the motor power OFF. (2) When the robot is in operation, releasing the deadman switch will stop the robot but not turn the motor power OFF (servo lock). 2 [ 2 ] "Single point of control" function The global type of the robot controller supports the "single point of control" function, while other types do not. (1) Single point of control The "single point of control" function, which is one of the robot safety functions, limits the robot control sources (command sources) to only one. This function is specified by the parameter "Single point of control" that limits the control to either "Internal Auto" or "External Auto" limited mode. Internal Auto limited mode The "Auto mode" is limited to the "Internal Auto" limited mode in which a program start can be triggered from the teach pendant, but cannot from external equipment. External Auto limited mode The "Auto mode" is limited to the "External Auto" limited mode in which a program start can be triggered from external equipment, but cannot from the teach pendant. Note: In this mode, the controller running software version 2.801 or earlier cannot use the teach pendant operation panel editor "Panel Designer" in External Auto. (2) Setting the Internal/External Auto Limited Mode Parameters Using the teach pendant, set the parameters with the following access. Note 1: The "Internal Auto Limited Mode" is the factory default. Note 2: The global type displays letter "A" following the robot type on the teach pendant screen. Access: [Top screen]—[F4 I/O]—[F6 Aux.]—[F1 Set H/W]—[F3 Jump To]—"31" In Ver. 2.3 or later: Access: [Top screen]—[F4 I/O]—[F6 Aux.]—[F4 Int/Ext] "A" displayed "A" displayed Setting on the "I/O Hardware Settings" window Setting on the "Single point of control" window (Ver. 2.3 or later) 3 1.2 1.2.1 Names of the Controller Components Controller Components The following figures show the names of the robot controller components. Front Panel Connector No. CN1 CN2 CN3 CN4 CN5 CN6 CN7 CN9 CN10 Marking RS-232C USB PENDANT LAN Mini I/O INPUT AC MOTOR HAND I/O SAFETY I/O Names of RC7M Robot Controller 4 Name Serial interface connector USB connector (2 lines) Teach pendant connector Ethernet connector User/system I/O connector Power supply connector Motor/encoder connector Hand I/O connector Safety I/O connector (only on the global type) 1.2.2 Warning and Caution Labels The robot unit has warning and caution labels pasted as shown below. They alert the user to the dangers of the areas on which they are pasted. Be sure to observe the instructions printed on those labels. Location of Labels on the Controller 5 Warning and Caution Labels on the Robot Controller Warning and caution labels on the controller Contents Warning label 1 (For maintenance of the controller) Risk of electrical shock. Never open the controller cover when the power is ON. Never touch the inside of the controller for at least 3 minutes even after turning the power OFF and disconnecting the power cable. Warning label 2 (For controller power switch) Risk of injury. Be sure to perform lockout/tagout before starting servicing. Turning the power ON may move the arm, causing injuries if a person is inside the safety fence. Caution label (For cooling fans) Risk of injury. Do not insert fingers, sticks or other foreign objects through the openings. Caution label The controller is not designed to be dust-, splash-, or explosion-proof. Before installation, be sure to read the user's manual. Do not put anything on the controller or apply any impact or shock to it. Caution label When using an external power source, never apply the voltage not specified. Doing so can result in a controller failure. Caution label After turning the power switch OFF, do not turn it ON for at least six seconds. 6 1.3 Controller Specifications [ 1 ] Specifications The table below lists the robot controller specifications. RC7M Robot Controller Specifications Item Specifications Robot series VM-G series VS-G series VMG 6∗∗∗-∗∗ Model (RC7M-) Controllable axes VSG 6∗∗∗-∗∗ 6 axes VP-G series VPG 5/6∗∗∗-∗∗ HM-G series HS-G series HMG 4∗∗∗-∗∗ 5 or 6 axes PTP, CP 3-dimensional linear, 3-dimensional circular Drive system All axes: Full-digital AC servo Language used DENSO robot language (conforming to SLIM) Memory capacity 3.25 MB (equivalent to 10,000 steps, 30,000 points) Standard I/O Mini I/O HAND I/O SAFETY I/O (only on global type) Slave External communication 1) Direct teaching 1) Remote teaching 2) Numerical input 2) Remote teaching (MDI) 3) Numerical input (MDI) 1) Remote teaching 2) Numerical input (MDI) Input: 8 user open points + 11 fixed system points Output: 8 user open points + 14 fixed system points (Note: The global type of the controller cannot use system-fixed emergency stop I/Os.) Input: 8 user open points Output: 8 fixed system points Input: 6 fixed system points Output: 5 fixed system points 2 boards Input: Parallel I/O mounted Output: extension Single External boards Input: board signals (option) Output: mounted (I/O) Master/ Input: Slave Output: DeviceNet Input: board Master Output: (option) Input: Slave Output: CC-Link board (option) 80 user open points 96 user open points (addition possible) 40 user open points 48 user open points (addition possible) 1024 points (master) + 256 points (slave) 1024 points (master) + 256 points (slave) 1024 points 1024 points 256 points 256 points Input: 384 points Output: 384 points (including remote registers RWw and RWr) RS-232C: 1 line Ethernet: 1 line USB: 2 lines (Supporting flash memory) Extension slots 3 (For optional boards) Self-diagnosis function Overrun, servo error, memory error, input error, etc. Timer function 0.02 to 10 sec. (in units of 1/60 sec.) Error display Error codes will be outputted on the external I/O. Error messages will be displayed in English on the teach pendant (option). Error codes will be displayed on the mini-pendant (option). Cables Robot control cable (option) XR-G series XRG 4∗∗∗-∗∗ 4 axes Control system Teaching system HSG 4∗∗∗-∗∗ XYC-4G series XYCG 4∗∗∗-∗∗ 2 m, 4 m, 6 m, 12 m, 20 m (Standard type/ splash-proof type) 2 m, 4 m, 6 m, 2 m, 4 m, 6 m, 12 m, 12 m, 20 m 20 m (Standard (Standard) type/splash-proof type) 2 m, 4 m, 4 m, 6 m 6 m, 12m, (Standard) 20 m (Standard) I/O cable (option) 8 m, 15 m (for Mini I/O, HAND I/O, parallel I/O extension boards, safety I/O board) Power cable 5m 7 Item Specifications Environmental conditions (in operation) Temperature: 0 to 40°C Humidity: 90% RH or less (no condensation allowed) Altitude: 1,000m or less VM-G series Three-phase, 200 VAC -15% to 230 VAC +10%, 50/60 Hz, 3.3 kVA Three-phase, 200 VAC -15% to 230 VAC +10%, 50/60 Hz, 1.85 kVA VS-G series Single-phase, 230 VAC -10% to 230 VAC +10%, 50/60 Hz, 1.85 kVA Three-phase, 200 VAC -15% to 230 VAC +10%, 50/60 Hz, 1 kVA VP-G 200 VAC type Single-phase, 230 VAC -10% to 230 VAC +10%, 50/60 Hz, 1 kVA series 100 VAC type Single-phase, 100 VAC -10% to 110 VAC +10%, 50/60 Hz, 1 kVA Power Three-phase, 200 VAC -15% to 230 VAC +10%, 50/60 Hz, 2.45 kVA HM-G series source Single-phase, 230 VAC -10% to 230 VAC +10%, 50/60 Hz, 2.45 kVA Three-phase, 200 VAC -15% to 230 VAC +10%, 50/60 Hz, 1.8 kVA HS-G series Single-phase, 230 VAC -10% to 230 VAC +10%, 50/60 Hz, 1.8 kVA Three-phase, 200 VAC -15% to 230 VAC +10%, 50/60 Hz, 1.15 kVA XYC-4G series Single-phase, 230 VAC -10% to 230 VAC +10%, 50/60 Hz, 1.15 kVA Three-phase, 200 VAC -15% to 230 VAC +10%, 50/60 Hz, 1.8 kVA XR-G series Single-phase, 230 VAC -10% to 230 VAC +10%, 50/60 Hz, 1.8 kVA External power A 24 VDC ±10% should be supplied from external equipment. Note: Refer to Sections I/O power source 4.2.1 and 5.2.1 "Setting up Mini I/O Power source A 24 VDC ±10% should be supplied internally in the robot Internal power Supply." source controller. Rated output current Safety category Degree of protection Weight (Mass) VM-G series: Approx. 20 A , VS-G series: Approx. 11 A , VP-G series: Approx. 5 A , HM-G series: Approx. 19 A , HS-G series: Approx. 14 A, XR-G series:Approx. 10A , XYC-4G series: Approx. 8 A With safety board: Compliant with safety category 3 With safety box: Compliant with safety category 4 (Only the controller with safety box is available to the XYC-4G series of robots.) IP20 4-axis standard type: Approx. 17 kg 6-axis standard type: Approx. 18 kg 4-axis global type, UL-Listed (w/ safety board): Approx. 18 kg 6-axis global type, UL-Listed (w/ safety board): Approx. 19 kg 4-axis global type, UL-Listed (w/ safety box): Approx. 21 kg 6-axis global type, UL-Listed (w/ safety box): Approx. 22 kg Controller Handling Notes WARNING - DO NOT touch fins. Their hot surfaces may cause severe burns. - DO NOT insert fingers or foreign objects into openings. Doing so may cause bodily injury. - Before opening the controller cover and accessing the inside of the controller for maintenance, be sure to turn off the power switch, disconnect the power cable, and wait 3 minutes or more. This is for protecting you from electric shock. - DO NOT connect or disconnect connectors to/from the controller when the AC power or the 24 VDC power for I/O is being supplied. Doing so may cause electric shock or controller failure. CAUTION IN INSTALLATION - This controller is not designed to be dust-, splash-, or explosion-proof. - Read operation manuals before installation. - Do not place anything on the controller or apply an impact or shock to the controller. - Avoid mounting the controller in an environment where excessive vibration is applied to the controller. CAUTION: The robot controller connectors are of a screw-lock type or ring-lock type. Lock the connectors securely. If even one of the connectors is not locked, weak contact may result thereby causing an error. Be sure to turn the robot controller OFF before connecting/ disconnecting the power connector or motor connector. Otherwise, the internal circuits of the robot controller may be damaged. 8 [ 2 ] Outer Dimensions The outer dimensions of the robot controller are shown below. Outer Dimensions of RC7M Robot Controller 9 1.4 1.4.1 Controller System Configuration Internal Circuits of the Controller (Typical configuration) The block diagram below shows the internal circuits of the RC7M controller designed for a 6-joint robot. Block Diagram of the RC7M Controller 10 1.4.2 Typical Robot System Configuration The block diagram below shows a typical robot system configuration. Robot System Configuration 11 Chapter 2 General Information about the Interface 2.1 Types and General Information about I/O Signals This section describes the I/O signals for the Robot Controller. The I/O signals are grouped into user I/O signals and system I/O signals. Note: For the interface to apply when an I/O extension board or I/O conversion box is mounted, refer to Chapter 7 or 8 in this manual, respectively, and the OPTIONS MANUAL. 2.1.1 Types of System I/O Signals (Standard type of controller) Seven input points for command execution are used to direct program start and other instructions as I/O commands. The table below lists the types of system I/O signals. Types of System I/O Signals (Standard type of controller) Fixed by system Type System input System output Input for command execution Output for command execution No. of points 4 13 (Note) Function External Emergency Stop 1, External Emergency Stop 2, Enable Auto, Step Stop (All tasks) Auto Mode, Robot Initialized, Robot Running, CPU Normal, Robot Error, Operation Preparation Completed, Battery Warning, Emergency Stop 1, Emergency Stop 2, Deadman SW 1 [Enable SW 1], Deadman SW 2 [Enable SW 2], Pendant Emergency Stop 1, Pendant Emergency Stop 2, Continue Start Permission (selectable by I/O hardware setting) (See Note below.) 7 Command (3 bits), data area (3 bits), and Strobe Signal 1 Command Processing Completed Controlled by user program Type User input No. of points Function 8 Inputs to read the external I/O status with an IN command or IO [ ] variable. Used for analysis condition identification, condition satisfaction wait, data input from the external device, etc. User output 8 (Note) Outputs to issue a signal to the external device during program execution with SET and RESET commands, etc. HAND input 8 Inputs to read the external I/O status with an IN command or IO [ ] variable. Used for checking the hand status. HAND output 8 Outputs to issue signals to the external devices with SET and RESET commands, etc. Used for controlling the hand to open or close. Note: Terminal #53 on CN5 (port 24) is assigned a user output by factory default. It can be assigned the Continue Start Permission output signal with the I/O hardware setting. 12 2.1.2 Types of System I/O Signals (Global type of controller) The global type of the controller concentrates emergency stop related system I/Os on the safety I/O (CN10), so it does not use the Mini I/O (CN5). (Refer to Sections 4.1.3, 4.1.4, 5.1.3, and 5.1.4.) It issues PROGRAM START commands as I/O commands by using seven command execution inputs. The table below lists the types of system I/O signals. Types of System I/O Signals (Global type of controller) Fixed by system Type System input System output No. of points Function 7 External Emergency Stop 1, External Emergency Stop 2, Enable Auto 1, Enable Auto 2, Step Stop (All tasks), Protective Stop 1, Protective Stop 2 12 (Note) Auto Mode, Robot Initialized, Robot Running, CPU Normal, Robot Error, Operation Preparation Completed, Battery Warning, Pendant Emergency Stop 1, Pendant Emergency Stop 2, Deadman SW 1 [Enable SW 1], Deadman SW 2 [Enable SW 2], Contactor Contact Monitor, Continue Start Permission (selectable by I/O hardware setting) (Note) Input for command execution 7 Command (3 bits), data area (3 bits), and Strobe Signal Output for command execution 1 Command Processing Completed Controlled by user program Type User input No. of points Function 8 Inputs to read the external I/O status with an IN command or IO [ ] variable. Used for analysis condition identification, condition satisfaction wait, data input from the external device, etc. User output 7 (Note) HAND input 8 HAND output 8 Outputs to issue a signal to the external device during program execution with SET and RESET commands, etc. Inputs to read the external I/O status with an IN command or IO [ ] variable. Used for checking the hand status. Outputs to issue signals to the external devices with SET and RESET commands, etc. Used for controlling the hand to open or close. Note: Terminal #53 on CN5 (port 24) is assigned a user output by factory default. It can be assigned the Continue Start Permission output signal with the I/O hardware setting. 13 2.2 Usage of User I/O Signals User I/O signals are used as I/O type variables. Access the user I/O by writing it to the I/O type variables or reading it. 2.2.1 I/O Type Variable Declaration I/O type variables are classified into I/O type global variables that are available without any declaration, and I/O type local variables that are not available without a declaration. 2.2.2 I/O Type Global Variables I/O type global variables are used to refer to or change user I/O signals bit by bit. Since they are global variables, they can be used without any declaration. I/O type global variables are expressed in either of the following two ways: IO [nn] (nn denotes I/O port number) Example: IO [104] IOnn (nn denotes I/O port number) Example: IO104 2.2.3 I/O Type Local Variables I/O type local variables are used to collectively refer to or change 1-bit, 8-bit, 16-bit or 32-bit user I/O signals starting from a specified terminal number. I/O type local variables require a declaration, which will be made with a DEFIO command, before they are used. For further information about declarations with a DEFIO command, refer to the PROGRAMMER'S MANUAL (I), Chapter 9, Section 9.7 "DEFIO (Statement) [Conforms to SLIM]." 2.2.4 User Input Commands There are two types of user input commands, IN and WAIT. The IN command substitutes the input result for a variable. The WAIT command waits until the input result meets specified conditions. • IN Command The IN command inputs a signal from the user input specified by an IO type variable and substitutes it for an arithmetic variable. For further information about the IN command, refer to the PROGRAMMER'S MANUAL (I), Chapter 13, Section 13.1 "IN." • WAIT Command The WAIT command suspends the execution of the program until specified conditions are met. If an I/O type variable is used for the conditional statement, this command suspends the execution of the program until the status of the signal from a specified user input is checked and meets the specified conditions. For further information about the WAIT command, refer to the PROGRAMMER'S MANUAL (I), Chapter 12, Section 12.5 "WAIT." 14 2.2.5 User Output Commands There are three types of user output commands, SET, RESET and OUT. The SET and RESET commands turn ON and OFF all user outputs specified by I/O type variables. The OUT command outputs data to a specified user output. • SET Command The SET command turns ON all user outputs specified by I/O type variables. For further information about the SET command, refer to the PROGRAMMER'S MANUAL (I), Chapter 13, Section 13.1 "SET." • RESET Command The RESET command turns OFF all user outputs specified by I/O type variables. For further information about the RESET command, refer to the PROGRAMMER'S MANUAL (I), Chapter 13, Section 13.1 "RESET." • OUT Command The OUT command outputs data to the user output specified by an I/O type variable. For further information about the OUT command, refer to the PROGRAMMER'S MANUAL (I), Chapter 13, Section 13.1 "OUT." 15 Chapter 3 System I/O Signals 3.1 Types and Functions of System Output Signals The table below lists the system output signals. Types and Functions of System Output Signals Application Start-up Program execution Error/Warning Output signal name Function Robot Initialized Outputs to the external device that the OPERATION PREPARATION command is executable. Auto Mode Outputs when the robot is in Auto mode. Operation Preparation Completed Outputs when the motor power is turned on and the robot is in External auto mode. Robot Running Outputs when the robot is in operation (one or more tasks are being executed). CPU Normal Outputs when the CPU of the robot controller is normal. Robot Error Outputs when a servo error, program error, or any other serious error occurs. Battery Warning Outputs when the voltage of the encoder or memory backup battery drops below the specified level. Continue Start Permission Continue Emergency stop circuit (Standard type of controller) Safety circuit (Global type of controller) Note: It is necessary to specify this output signal by I/O hardware setting beforehand. Outputs when Continue Start is permitted. Emergency Stop (dual line) Outputs when the robot is emergency-stopped. Pendant Emergency Stop (dual line) Outputs the status of the emergency stop button on the teach pendant or mini-pendant. Deadman SW [Enable SW] (dual line) Outputs the status of the deadman switch (enable switch) on the teach pendant or mini-pendant. Pendant Emergency Stop (dual line) Outputs the status of the emergency stop button on the teach pendant or mini-pendant. Deadman SW [Enable SW] (dual line) Outputs the status of the deadman switch (enable switch) on the teach pendant or mini-pendant. Contactor Contact Monitor Outputs the status of the auxiliary contact of the motor contactor in the robot controller. This signal comes on when the motor is turned on; it comes off when the motor is turned off. 16 3.2 Usage of System Output Signals The usage of each system output signal is described below: 3.2.1 Robot Initialized (output) (1) Function This signal tells the external device that the OPERATION PREPARATION command is ready to execute. (2) Terminal number #48 on connector CN5 (3) Usage With this signal and Auto Mode output signal being ON, the OPERATION PREPARATION command must be executed. (4) ON conditions This signal will be turned ON when: (a) Turning the controller power on normally starts the system program in it and the OPERATION PREPARATION command becomes ready to execute. (b) A robot error is cleared by the OK or Cancel key on the teach pendant or mini-pendant or by Clear Robot Error (001) after this signal has been turned OFF. (5) OFF condition This signal will be turned OFF when a robot error occurs. - Pressing the OK or Cancel key on the teach pendant of mini-pendant has cleared a robot error. After the power was turned ON, the system has started normally. - Entry of Clear Robot Error (001) from an external device has cleared a robot error. Robot error Robot Initialized Output 17 3.2.2 Auto Mode (output) (1) Function This signal tells the external device that the robot is in Auto mode. (2) Terminal number #49 on connector CN5 (3) Usage With this signal being ON, the OPERATION PREPARATION or PROGRAM START command must be executed. (4) ON condition This signal will be turned ON when the robot controller enters Auto mode by turning the mode selector switch on the teach pendant or mini-pendant to AUTO with the Enable Auto input signal being ON. (5) OFF conditions This signal will be turned OFF under the following conditions. (a) The operation mode is switched to the Manual or Teach check mode by using the teach pendant or mini-pendant. (b) The Enable Auto input signal is OFF. Note: The Enable Auto input signal will not be turned OFF in the pendantless state described in the OPTIONS MANUAL, Chapter 1, Section 1.3.3. Caution: The Auto Mode output signal will not be turned OFF with INSTANTANEOUS STOP, STEP STOP or CYCLE STOP commands. - The mode selector switch on the teach pendant or mini-pendant is set to MANUAL or TEACH CHECK. - Enable Auto OFF Auto Mode Output 18 3.2.3 Operation Preparation Completed (output) (1) Function This signal tells that the motor power is ON and the robot is in External auto mode. (2) Terminal number #50 on connector CN5 (3) Usage With this signal being ON, the robot must be in External auto mode and the motor power must be ON to run the robot from the external device. (4) ON conditions The signal will be turned ON under the External auto mode and motor ON. Operation to switch to External auto mode (a) When the External mode is selected on the teach pendant or mini-pendant. (b) When the External mode is turned ON by the OPERATION PREPARATION command from the external device. Operation to switch the motor ON (a) When the motor key is pushed on the teach pendant or mini-pendant. (b) When the motor is turned ON by the OPERATION PREPARATION command from the external device. (5) OFF conditions The signal will be turned OFF under the following conditions; - Out of the External auto mode - Under the motor OFF. Operation to exit External auto mode (a) When internal mode is selected on the teach pendant or mini-pendant. (b) When the mode selector switch of the teach pendant or mini-pendant is set to MANUAL or TEACH CHECK in External mode. (c) When an Emergency Stop input signal is turned ON. (d) When a Robot Error output signal is turned ON. (Except level 2 error) (e) When an Enable Auto input signal is turned OFF. (f) When a Protective Stop input signal is turned OFF. (Only for the global type of controller) Operation to switch the motor OFF (a) When the motor power is turned off with the MOTOR key or the emergency stop button is pressed on the teach pendant or mini-pendant. (b) When a Robot Error output signal is turned ON. Note: If any of ERROR 6071 to 607B, 6671 to 667B and 607F occurs in the Manual mode or Teach check mode, the motor power will not be turned OFF. (6) Note for software version 2.00 or later To get the Operation Preparation Completed signal status using an SYSSTATE command, AND Bit 2 "Servo ON" and Bit 5 "External Mode" to use the result of the logical operation. 19 Operation Preparation Completed Output 3.2.4 Robot Running (output) (1) Function This signal tells the external device that the robot is in operation (that is, one or more tasks are being executed). (2) Terminal number #46 on connector CN5 (3) Usage This signal is used to light the robot operating indicator lamp of an external operating panel. Performing the "Stop all programs" operation* turns this signal OFF, allowing you to check that all programs are stopped. (4) ON conditions This signal will be turned ON during execution of the program and also in the WAIT STATE with a conditional branch or timer command. (5) OFF conditions This signal will be turned OFF with the "Stop all programs" operation*. * "Stop all programs" operation This operation includes the following: Depression of the emergency stop button and STOP key and input of Step Stop (All task) and External Emergency Stop signals. Robot Running (output) ON OFF Robot Running Output 20 3.2.5 CPU Normal (output) (1) Function This signal tells the external device that the CPU of the robot controller is normal. (2) Terminal number #45 on connector CN5 (3) Usage (a) This signal is used to light the robot controller error indicator lamp on the external operating panel. (b) If this signal is turned OFF, perform the error recovery with the PLC. (4) ON conditions This signal will be turned ON by the hardware when the CPU of the robot controller operates normally. (5) OFF conditions This signal will be turned OFF by the hardware when the CPU does not operate normally. Caution: The OFF state of this signal indicates that the robot controller internal arithmetic circuit may be damaged. Therefore, ROBOT ERROR, ERROR NUMBER, and other outputs may not be correct. CPU Normal Output 21 3.2.6 Robot Error (output) (1) Function This signal tells the external device that a servo error, program error, or any other serious error has occurred in the robot. (2) Terminal number #47 on connector CN5 (3) Usage (a) This signal is used to light the robot error indicator lamp on the external operating panel. (b) If this signal is turned ON, perform the error recovery with the PLC. (4) ON conditions When a level 2 error or higher one occurs. Note: Except the error caused by the wrong operation of the teach pendant or mini-pendant. (5) OFF conditions As shown below, the signal will be turned OFF under the following conditions. (a) When a Clear Robot Error (001) signal is inputted and the existing error is cleared. (b) When the existing error is cleared by operating the OK or Cancel key on the teach pendant or the mini-pendant. Robot Error (output) ON OFF - Input of Clear Robot Error (001) - OK or CANCEL key operation on the teach pendant or mini-pendant Robot Error Output 22 3.2.7 Battery Warning (output) (1) Function This signal tells the external device that the voltage of the encoder or memory backup battery has dropped below the specified level. (2) Terminal number #51 on connector CN5 (3) Usage This signal is used to check the timing for battery replacement (to check when the battery voltage drops below the specified lower level). (4) Output condition This signal will be issued when the voltage of the encoder or memory backup battery has dropped below the specified level. Note: The teach pendant or mini-pendant shows any of ERROR64A1 to 64A6 when the encoder backup battery voltage is low. Meanwhile, the teach pendant shows ERROR6103 when the memory backup battery voltage is low. (5) OFF condition The signal will be turned OFF when the power is turned ON after the dead battery was replaced. Battery Warning Output 23 3.2.8 Continue Start Permission (output): Selectable by I/O hardware setting Terminal #53 on CN5 (port 24) is assigned a user output by factory default. It can be assigned the Continue Start Permission output signal with the I/O hardware setting. When the "Continue Start Permission" is set: (1) Function The controller will output this signal when Continue Start is permitted. (2) Terminal number #53 on connector CN5 (3) Usage Use this signal when you want to know whether Continue Start is permitted. (4) ON condition This signal comes on when Continue Start is permitted. For details, refer to the SETTING-UP MANUAL, Chapter 3, Section 3.4.5 "Continue Function." (5) OFF condition This signal goes off by carrying out the "Task Status Change Operation." 24 3.2.9 Emergency Stop Circuit Contact Outputs (Standard type of controller) 3.2.9.1 Emergency Stop (output) (Standard type of controller) (1) Function This signal outputs the emergency stop status (dual line). (2) Terminal number Signal name Emergency Stop 1 Emergency Stop 2 Terminal number #6 and #40 on CN5 #7 and #41 on CN5 (3) Usage This signal is used to confirm that an Emergency Stop input has been entered. For details about the emergency stop circuits, refer to Sections 4.2.4 and 5.2.4. This signal can emergency-stop the external device when the emergency stop button on the teach pendant or mini-pendant is pressed. Turning the controller power OFF is functionally equivalent to the Emergency Stop output. Note: Do not enter this signal into the controller's External Emergency Stop input circuit. Doing so makes it impossible to reset the emergency stop state. (4) Output conditions Turning an External Emergency Stop input signal OFF or pressing the emergency stop button on the teach pendant or mini-pendant turns OFF the Emergency Stop output signal (mini relay contact in the controller). Emergency Stop Output (Standard type of controller) 25 3.2.9.2 Pendant Emergency Stop Output (Standard type of controller) (1) Function This signal outputs the status of the emergency stop button on the teach pendant or mini-pendant (dual line). (2) Terminal number Signal name Pendant Emergency Stop 1 Pendant Emergency Stop 2 Terminal number #28 and #62 on CN5 #29 and #63 on CN5 (3) Usage This signal is used to emergency-stop the external device when the emergency stop button on the teach pendant or mini-pendant is pressed. This signal is issued independently of the controller ON/OFF state. For details about the emergency stop circuits, refer to Sections 4.2.4 and 5.2.4. (4) Output conditions (Normal close type, b contact) Two contacts of the emergency stop button (4b) on each of the teach pendant or mini-pendant are connected each other. Pressing the emergency stop button turns the Pendant Emergency Stop output signal (contacts) OFF. Pendant Emergency Stop Output (Standard type of controller) 26 3.2.9.3 Deadman SW [Enable SW] (output) (Standard type of controller) (1) Function This signal outputs the status of the deadman switch (enable switch) on the teach pendant or mini-pendant (dual line). (2) Terminal number Signal name Deadman SW 1 [Enable SW 1] Deadman SW 2 [Enable SW 2] Terminal number #8 and #42 on CN5 #9 and #43 on CN5 (3) Usage This signal is used to display the operation status of the deadman switch or interlock the deadman switch with other device (e.g., stopping or running the conveyor). For details about the emergency stop circuits, refer to Sections 4.2.4 and 5.2.4. (4) Output conditions Holding down the deadman switch closes the mini relay contact in the controller, turning ON the Deadman SW output signal (Contact output: close). Deadman SW Output (Enable SW Output) (Standard type of controller) 27 3.2.10 Safety Circuit Contact Outputs (Global type of controller) 3.2.10.1 Pendant Emergency Stop (output) (Global type of controller) (1) Function This signal outputs the status of the emergency stop button on the teach pendant or mini-pendant (dual line). (2) Terminal number Signal name Pendant Emergency Stop 1 Pendant Emergency Stop 2 Terminal number #13 and #31 on CN10 #14 and #32 on CN10 (3) Usage This signal is used to emergency-stop the external device when the emergency stop button on the teach pendant or mini-pendant is pressed. This signal is issued independently of the controller ON/OFF state. For details about the safety circuits, refer to Sections 4.2.5 and 5.2.5. (4) Output conditions (Normal close type, b contact) Two contacts of the emergency stop button (4b) on each of the teach pendant or mini-pendant are connected each other. Pressing the emergency stop button turns the Pendant Emergency Stop output signal (contacts) OFF. Pendant Emergency Stop Output (Global type of controller) 28 3.2.10.2 Deadman SW [Enable SW] (output) (Global type of controller) (1) Function This signal outputs the status of the deadman switch (enable switch) on the teach pendant or mini-pendant (dual line). (2) Terminal number Signal name Deadman SW 1 [Enable SW 1] Deadman SW 2 [Enable SW 2] Terminal number #15 and #33 on CN10 #16 and #34 on CN10 (3) Usage This signal is used to display the operation status of the deadman switch or interlock the deadman switch with other device (e.g., stopping or running the conveyor). For details about the safety circuits, refer to Sections 4.2.5 and 5.2.5. (4) Output conditions Holding down the deadman switch closes the safety relay contact in the controller, turning ON the Deadman SW output signal (Contact output: close). Deadman SW Output (Enable SW Output) (Global type of controller) 29 3.2.10.3 Contactor Contact Monitor (output) (Global type of controller) (1) Function This signal outputs the status of the auxiliary contact of the motor contactor in the robot controller. The contact output signal comes on when the motor is turned on; it comes off when the motor is turned off. (2) Terminal number #17 and #35 on CN10 (3) Usage This signal is used to confirm the ON/OFF state of the motor on the monitor. For details about the safety circuits, refer to Sections 4.2.5 and 5.2.5. Contactor Contact Monitor Output (Global type of controller) 30 3.3 Types and Functions of System Input Signals The table below lists the system input signals. Types and Functions of System Input Signals Use to: Stop Applicable controller type Any type Signal name Function Step Stop (All tasks) (Note 1) Select mode Prepare for operation Start program Clear error Releasing the signal step-stops all programs being executed. Instantaneous Stop (All tasks) (Note 2) Releasing this signal instantaneously stops all programs being executed. Standard type External Emergency Stop (dual line) Releasing this signal stops the robot in an emergency. Global type External Emergency Stop (dual line) Releasing this signal stops the robot in an emergency. Standard type Enable Auto Short-circuiting this signal enables switching to Auto mode. Global type Enable Auto (dual line) Short-circuiting this signal enables switching to Auto mode. Protective Stop (dual line) The Enable Auto and Protective Stop input signal circuits are connected in series in the controller, so two types of inputs are available as an automatic operation permission signal. Strobe Signal This signal initiates the processing of the I/O commands set in the data and command areas. Data areas (3 bits) These areas are used to specify I/O commands that enable the following: Command areas (3 bits) - Start/stop each task program. - Prepare for operation - Clear robot errors. Any type Note: For details, refer to Section 3.5.3 "I/O Commands Details (Note 1) In External automatic operation, be careful with the following: - The moment each of these signals is released, the corresponding stop processing starts. - As long as it is not necessary to stop the robot, these stop signals should be short-circuited. (Note 2) The Instantaneous Stop signal becomes available only when an I/O extension board is used and the allocation mode is changed to Standard or Compatible mode. Like other stop signals, this signal should be short-circuited as long as it is not necessary to stop the robot. 31 3.4 Usage of System Input Signals The usage of each system input signal is described below. 3.4.1 Step Stop (All tasks) (input) (1) Function This signal allows the external device to step-stop all tasks being executed, except supervisory tasks. (2) Terminal #11 on connector CN5 (3) Input conditions and operation (a) Turning (opening) this signal OFF stops all tasks upon completion of the on-going step and turns OFF the Robot Running output signal. (b) For resuming the program after a step stop, see Chapter 3, Section 3.5.3.2 "OPERATION PREPARATION (000)." Step Stop (All tasks) Input 32 3.4.2 External Emergency Stop (input) (1) Function This signal allows the external device to emergency-stop the robot. (2) Terminal number Controller type Standard type Global type* Signal name External Emergency Stop 1 External Emergency Stop 2 External Emergency Stop 1 External Emergency Stop 2 Terminal number #2 and #36 on CN5 #3 and #37 on CN5 #1 and #19 on CN10 #2 and #20 on CN10 * The global type of controller must use two separate contacts to control two External Emergency Stop input signals. Two circuits connected in parallel using a single contact or an always-shorted circuit will be interpreted as an external circuit failure so that the circuitry will not operate. (3) Input conditions and operation (a) Turning (opening) this signal OFF emergency-stops the robot. 1) The OFF signal turns the motor power OFF irrespective of whether the robot is in Manual, Internal auto, or External auto mode. 2) During execution of programs (Robot Running signal ON), the OFF signal turns the motor power OFF and places the robot in internal mode after decelerating the robot to a stop. It also resets programs so as not to execute the subsequent and the following steps. 3) When the program is stopped in Manual or Auto mode, the OFF signal produces nothing except it turns the power to the motor OFF. (b) This signal must be turned ON (shorted) in order to turn the motor power ON and run the robot in Manual or Auto mode. (c) Opening the External Emergency Stop input is functionally equivalent to pressing the emergency stop button on the teach pendant or mini-pendant. (4) Input timing This input signal will be processed prior to all commands and input signals. Notes (1) The different status between two emergency stop circuits, if kept for at least approx. one second, will be interpreted as an occurrence of trouble, triggering an error "279E: Inconsistent robot stop input" and shutting down the motor power. (2) The global type of controller should control two external emergency stop inputs with separate contacts. Two circuits connected in parallel with a single contact or either one circuit always short-circuited will be interpreted as an external circuit error, producing no circuit operation. 33 3.4.3 Enable Auto (input) (Standard type of controller) (1) Function (a) Turning this signal ON (shorting) enables switching to Auto mode. (b) Turning this signal OFF (opening) enables switching to Manual or Teach check mode. (2) Terminal number #1 and #35 on connector CN5 (3) Usage This signal is used to connect the Auto/Teaching selector switch of an external operating panel. (4) Input conditions and operation (a) As shown below, the selectable operation mode depends on whether this input is shorted or open. (b) If the input becomes open during automatic operation, the mode will be switched to Manual mode and ERROR21FC will be displayed. (c) If manual operation or a teach check is conducted with this input shorted, ERROR21F2 will be displayed. (d) With this signal being opened, turning the mode selector switch on the teach pendant or mini-pendant from the MANUAL or TEACH CHECK to AUTO position triggers ERROR21F3. Since this state is shown as × in the table below, this error will remain displayed until the robot exits this state. (e) Although ERROR21FD or ERROR21FC will be displayed when the state is changed from to Δ or ×, they will not be displayed when the state is changed from Δ or × to . (f) Turning this signal OFF (open) in External mode switches to the internal mode and turns the Operation Preparation Completed output signal OFF. Relationship Between Enable Auto Input and Selectable Mode Operation mode Application Enable Auto ON (shorted) OFF (open) Manual operation with the teach pendant or mini-pendant. Δ Teach check mode Program check with the teach pendant or mini-pendant. Δ Internal auto mode Automatic operation with the teach pendant or mini-pendant. × External auto mode Automatic operation with the external device. × Manual mode Note: = Mode selectable × = Mode not selectable Δ = Mode selectable but manual operation program not executable Caution: In the pendantless state, auto mode is valid even if the Enable Auto input is open. (The External mode cannot be switched and the program cannot begin execution.) Perform the following when operating the robot in the pendantless state: (a) Set the robot so that it will not start to operate when the Enable Auto input is open. (b) Enable Auto input open state and Auto Mode output (See Section 3.2.2 "Auto Mode (output).") Set the equipment to make an emergency stop in an AND state. 34 3.4.4 Enable Auto (input) (Global type of controller) (1) Function (a) Turning this signal ON (shorting) enables switching to Auto mode. (Dual line) Note: The Enable Auto and Protective Stop input signal circuits are connected in series in the controller and those signals are used as an automatic operation permission signal when turned ON (closed). (b) Turning this signal OFF (opening) enables switching to Manual or Teach check mode. (2) Terminal number Signal name Terminal number Enable Auto input 1 #7 and #25 on CN10 Enable Auto input 2 #8 and #26 on CN10 Note: For the circuit configuration, refer to Sections 4.2.5 and 5.2.5. Two Enable Auto input signal circuits must be controlled with two separate contacts each. Two circuits connected in parallel using a single contact or an always-shorted circuit will be interpreted as an external circuit error so that the circuitry will not operate. (3) Usage This signal is used to connect the AUTO/TEACHING selector switch of an external operating panel. (4) Input conditions and operation (with Protective Stop input signal ON) (a) As shown below, the selectable operation mode depends on whether this input is shorted or open. (b) Turning this signal OFF (open) during automatic operation turns the motor power OFF (Continue stop) and displays ERROR21FC. (c) If manual operation or a teach check is conducted with this input shorted, ERROR21F2 will be displayed. (d) With this signal being opened, turning the mode selector switch on the teach pendant or mini-pendant from the MANUAL or TEACH CHECK to AUTO position triggers ERROR21F3. Since this state is shown as × in the table below, this error will remain displayed until the robot exits this state. (e) Although ERROR21FD or ERROR21FC will be displayed when the state is changed from to Δ or ×, they will not be displayed when the state is changed from Δ or × to . (f) Turning this signal OFF (open) in External mode turns the motor and the Operation Preparation Completed output signal OFF. Relationship Between Enable Auto Input and Selectable Mode (With Protective Stop input signal ON) Operation mode Manual mode Teach check mode Internal auto mode External auto mode Note: Application Manual operation with the teach pendant or mini-pendant. Program check with the teach pendant or mini-pendant. Automatic operation with the teach pendant or mini-pendant. Automatic operation with the external device. = Mode selectable × = Mode not selectable Δ = Mode selectable but manual operation program not executable 35 Enable Auto ON (shorted) OFF (open) Δ Δ × × Caution: In the pendantless state, Auto mode is valid even if the Enable Auto input is open. (The External mode cannot be switched and the program cannot begin execution.) Perform the following when operating the robot in the pendantless state: (a) Set the robot so that it will not start to operate when the Enable Auto input is open. (b) Enable Auto input open state and Auto Mode output (See Section 3.2.2 "Auto Mode (output).") Set the equipment to make an emergency stop in an AND state. 3.4.5 Protective Stop (input): Global type of controller (1) Function Opening this input signal circuit in Auto mode allows the external device to continue-stop the robot. (dual line) Note: The Enable Auto and Protective Stop input signal circuits are connected in series in the controller and those signals are used as an automatic operation permission signal when turned ON (closed). (2) Terminal number Signal name Terminal number Protective Stop input 1 #5 and #23 on CN10 Protective Stop input 2 #6 and #24 on CN10 (3) Usage This signal is used for a safety door switch and other safety devices. (4) Input conditions and operation (with Enable Auto input signal ON) Note: The Enable Auto and Protective Stop input signal circuits are connected in series in the controller and have the same function. (See Section 3.4.4.) (a) Turning this signal OFF (open) in Auto mode turns the motor power OFF and continue-stops the robot. (b) Turning this signal OFF (open) in Manual mode turns the motor power OFF. Note: For the circuit configuration, refer to Sections 4.2.5 and 5.2.5. Two Protective Stop input signal circuits must be controlled with two separate contacts each. Two circuits connected in parallel using a single contact or an always-shorted circuit will be interpreted as an external circuit error so that the circuitry will not operate. (5) Input timing In Auto mode, this signal will be processed prior to other input signals and all commands. Note: Switching the Protective Stop and Enable Auto input signals from open to close does not require temporal conditions, but requires any action to switch. 36 3.5 Command Execution I/O Signals The I/O commands can be executed using command execution I/O signals. I/O commands execute the following. ⋅ Start/stop each task program. ⋅ Enable running the robot from the external device. ⋅ Clear robot errors. 3.5.1 General Information about Commands The table below shows the I/O commands functions. I/O Command Functions Command Description of function ⋅ Starts the program cycle (specified program). Program Operation ⋅ Step-stops the program (specified program/all programs). ⋅ Resets the program (specified program/all programs). Operation Preparation ⋅ Enables running the robot from the external device. Clear Robot Error ⋅ Clears a robot error from the external device. 37 3.5.2 3.5.2.1 Processing I/O Commands General Information about Processing I/O commands to be executed are processed as shown below. Outline of I/O Command Processing (1) Set a command area and a data area (if necessary) for the command execution I/O signal from the external device to the robot controller. Note: The data to be set must be defined at least 1 ms before the Strobe Signal is turned ON (2) After completion of setting, turn the Strobe Signal ON. Note: The command input with a Strobe Signal should be preceded by the output of the Robot Initialized. If a Robot Error signal has been issued, however, execute a Clear Robot Error (001) since no Robot Initialized will be issued. 38 (3) The controller reads the command area and the data area according to the input of Strobe Signal. (4) The controller starts processing based on the command read. (5) After completion of command processing, the controller turns ON the Command Processing Completed signal. If an error has occurred during processing, a Robot Error signal will be outputted together with the Command Processing Completed signal. Note: If the Strobe Signal is turned OFF before the Command Processing Completed signal is turned ON, the Command Processing Completed signal will be output and then turned OFF within 100 ms (6) The PLC waits until the Command Processing Completed signal is input. In this case, confirm that no error exists with the robot. (7) The PLC turns OFF the command and data areas and the Strobe Signal. (8) As soon as the Strobe Signal is turned OFF, the controller turns OFF the Command Processing Completed signal. The Robot Error signal, which is outputted due to a command processing error, remains ON until Clear Robot Error (001) is executed. Note: The maximum allowable time from when the Strobe Signal is turned OFF until the Command Processing Completed signal is turned OFF, is 100 ms. 3.5.2.2 Using Each Signal Line [ 1 ] Command and Data Areas This section describes the usage of the command area (3 bits, input) and data area (3 bits, input). (1) Function Specifies the commands to be executed by the Robot Controller. Sets the command area at all times, and data area if necessary. (2) Terminal numbers Command area: #16 to #18 on connector CN5. Data area: #13 to #15 on connector CN5. (3) Input conditions and operation (a) Set the command area whenever I/O commands are to be executed. Set data for data area if commands require them. (b) "Shorted" represents the bit value = 1. "Open" represents the bit value = 0. (c) Input the command area and data area before the Strobe Signal (1 ms or more). Retain the status until the Command Processing Completed signal is output. 39 [ 2 ] Strobe Signal (input) (1) Function This signal informs the Robot Controller that the command area and data area have been set. Additionally it directs the start of command processing. Caution: Perform command (Except Clear Robot Error (001)) input with a Strobe Signal after the system output signal "Robot Initialized" is output. (2) Terminal number #12 on connector CN5. (3) Input conditions and operation By turning ON this input in Auto or External mode, the robot controller reads the command area and data area, and starts processing. [ 3 ] Command Processing Completed (output) (1) Function This signal outputs to the external device that I/O command processing is completed. (2) Terminal number #52 on connector CN5. (3) Usage The signal is used to confirm that I/O command processing is complete, or as a timing signal for obtaining the result of I/O command processing. (4) ON conditions (a) The signal will be turned ON upon completion of processing the I/O command given. (b) If an error occurs as a result of executing an I/O command, the Robot Error signal and the Command Processing Completed signal will be turned simultaneously ON. (5) OFF conditions (a) The signal will be turned OFF when the Strobe Signal is turned OFF. (b) If the Strobe Signal is turned OFF before command processing is completed, the Command Processing Completed signal will be output and then turned OFF within 100 ms. 40 3.5.3 3.5.3.1 I/O Commands Details List of I/O Commands The table below lists I/O commands. List of I/O Commands Command area Data area 001 010 100 111 Motor Power ON, CAL Execution External speed 100 External Mode switching Execution of all above (Motor Power ON→CAL→SP100→External) 000 Operation Preparation 001 Clear Robot Error ⎯ 010 Program Start Program number 011 Continue Start ⎯ 100 Specified Program Reset Program number 101 All Programs Reset 3.5.3.2 ⎯ OPERATION PREPARATION (000) (1) Function Prepares to operate the robot by switching the operation mode from the external devices. (2) Format Command area (3 bits, input) 000 Data area (3 bits, input) 0 bit: Motor Power ON, CAL Execution 1 bit: External speed 100 2 bit: External mode switching These bits can be set at the same time and can be executed. If plural bits are set, the commands are executed in order. For example: If the 0 bit, 1 bit and 2 bit are set, commands are executed as follows; Motor Power ON, CAL Execution, External speed 100 and External mode switching (3) Description This command can be executed in Auto mode. In other modes, an error occurs at execution. When executing this command, select the Internal auto mode on the teach pendant or mini-pendant beforehand. 41 3.5.3.3 CLEAR ROBOT ERROR (001) (1) Function This command clears a robot error that has been caused. (2) Format Command area (3 bits, input) 001 Data area (3 bits, input): Nothing will be input. (3) Description If a robot error occurs, this command clears it. When there is no failure, no processing will take place When an error is displayed, the same processing as when the OK or Cancel key of the teach pendant or the mini-pendant is operated will be performed. 3.5.3.4 PROGRAM START (010) (1) Function This command starts the specified program in the data area. (2) Format Command area (3 bits, input) 010 Data area (3 bits, input) Program number: Program number to be started. If the specified number is "n", PRO n starts. (3) Description This command is executable only in External mode. An error will occur in other modes. This command starts the program of the program number specified in data area. PRO 0 to PRO 7 can be started. One of the following operations takes place according to the operating status of the program. ⋅ If the specified program is terminated (stopped), it will start from the beginning. ⋅ If the specified program is step-stopped, it will resume from the step following the suspended step. ⋅ If the specified program is instantaneously stopped (Halt), it will resume from the step following the suspended step. When the program is instantaneously stopped in while in execution of an operation command, it will resume from the operation still undone. ⋅ If the specified program is running, an error (ERROR21F5) will be displayed, and the program will stop. 42 3.5.3.5 CONTINUE START (011) (1) Function This command starts Continue Start. (2) Format Command area (3 bits, input) 011 Data area (3 bits, input): Nothing will be input. (3) Description This command is executable only in External mode. An error will occur in other modes. An attempt to execute this command when the Continue Start Permission signal is off, will cause an error (ERROR 27A8). 3.5.3.6 SPECIFIED PROGRAM RESET (100) (1) Function This command immediately stops and also initializes the program of the program number specified in data area. (2) Format Command area (3 bits, input) 100 Data area (3 bits, input): Program number: The program number to be reset. If the number "n" is specified in data area, resets PRO n. (3) Description This command can reset the programs for PRO 0 to PRO 7. One of the following operations takes place according to the operating status of the program. ⋅ When the specified program is terminated (stopped), nothing will happen. ⋅ When the specified program is step-stopped or immediately stopped (halt), it will be initialized. The initialized program will resume from the beginning. ⋅ When the specified program is running, it will immediately stop (halt) and also be initialized. If started after the stop, the stopped program will resume from the beginning. 43 3.5.3.7 ALL PROGRAMS RESET (101) (1) Function This command immediately stops all programs and also initializes them. (2) Format Command area (3 bits, input) 101 Data area (3 bits, input): Nothing will be input. (3) Description This command can reset all programs. One of the following operations takes place according to the operating status of the program. ⋅ When the specified program is terminated (stopped), nothing will happen. ⋅ When the specified program is step-stopped or immediately stopped (halt), it will be initialized. The initialized program will resume from the beginning. ⋅ When the specified program is running, it will immediately stop (halt) and also be initialized. If started after the stop, the stopped program will resume from the beginning. 3.6 Example of Using System I/O Signals This section illustrates an example of starting and stopping the robot using system I/O signals. (1) Equipment setup example This example shown below assumes an equipment setup which allows you to run the robot by operating an external equipment’s operation panel connected via the PLC to the robot controller. It is assumed that the operating panel has a display, lamps and switches listed on the next page. Example of Equipment Setup Using a Robot 44 Function Example of External Equipment Operating Panel Classification Part Application Display Display Displays messages, such as ROBOT PREPARATION OK. (1) Automatic operation indicator - Lights during automatic operation. - Turned OFF when the robot is not in automatic operation. (2) Robot external running OK indicator - Lights when the Operation Preparation Completed signal is ON. - Turned OFF when the Operation Preparation Completed signal is OFF. (3) Operation OK indicator - Lights when the Enable Auto input signal is ON. - Turned OFF when the Enable Auto input signal is OFF. (4) Robot home position indicator - Lights when the robot is in the home position for working. - Turned OFF when the robot is out of the home position for working. (By programming with an user-output) (1) Robot preparation button Starts the preparation of the robot. (2) Automatic start button Starts the operation of the equipment. (3) Cycle stop button Stops the equipment after a cycle of operations is completed. (4) Operation/ Adjustment selector switch Automatic operation of the robot possible when OPERATION is selected. Manual operation or teach check of the robot possible when ADJUSTMENT is selected. Lamp Switch Caution: Actual equipment requires emergency stop, interlock and other functions; however, described here are the necessary functions. (2) Outline of procedure Described below is the outline of the procedure for using the equipment taken as an example shown on the previous page. Follow steps (a) to (d). (a) Operation preparation The OPERATION PREPARATION command brings to be able to operate the robot into external automatic operation mode. This operation will be completed when the Operation Preparation Completed signal is turned ON. (b) Operation start area check When the robot arm is in the home position for working, the robot home position indicator lights and "ROBOT PREPARATION OK" displays. (c) Automatic operation Start the program by which the robot starts from the home position for working, performs operations, and returns to the home position. (d) Operation end Terminate the day’s operations with a cycle stop, and turn OFF the power. (3) Start and stop procedure, and system I/O signals The following pages show the relationship between the system I/O signals for start and stop, worker’s operation, display on the equipment operation panel, PLC proceeding, and robot motion. 45 Start and Stop Procedure and System I/O Signals-1 Step Worker’s operation and display on equipment’s operation panel PLC processing Robot operation Enable Auto ON (Internal processing) Equipment power ON Setting operation/adjustment selector switch to operation (a) Operation preparation Operation OK indicator ON Setting Mode selector switch of the teach pendant or the mini-pendant to AUTO (Note 1) Robot preparation button ON Command area input ON Executing Operation Preparation command Motor power ON Setting SP100 Switching mode to external mode (b) Operation start area check Robot external running OK indicator ON (Internal processing) Operation Preparation Completed signal ON Robot home position indicator ON (Internal processing) User output signal ON (for robot home position) Robot preparation OK display When both are ON (Internal processing) Robot external running OK indicator Run the user program for moving robot arm close to the home position, when the robot home position indicator is OFF. (Continued on following page) 46 (Continued from preceding page) Start and Stop Procedure and System I/O Signals-2 Step Worker’s operation and display on equipment’s operation panel (c) Automatic operation Equipment’s Automatic Start Button ON PLC processing Robot operation Data area input ON Program Number selection Automatic Operation indicator ON Executing Program Operation Command (Program start) Program start (Note 2) END Program Number selection Program start command ON Equipment’s Cycle Stop button ON Cycle Stop ON Robot Running signal OFF Repeated Executing 1-cycle (d) Operation end END Automatic operation indicator OFF (Internal processing) Equipment power OFF Note 1: Refer to Section 3.5.3.2, "OPERATION PREPARATION (000)." Note 2: Refer to Section 3.5.3.4, "PROGRAM START (010)." Note 3: Symbol signification : System I/O signal : Flow of signal 47 Robot Running signal OFF Chapter 4 Connector Pin Assignment and I/O Circuits (NPN type) This chapter explains the connector pin assignment and circuits of NPN type (source input and sink output) on an I/O board. I/O boards designed for the use in Japan are of an NPN type. For a PNP type (sink input and source output), refer to Chapter 5, "Connector Pin Assignment and I/O Circuits (PNP type)." 4.1 Connector Pin Assignment (NPN type) This section describes the pin assignment of I/O connectors on the robot controller. 4.1.1 RS-232C (CN1): RS-232C connector RS-232C (CN1) Pin Assignment Terminal No. Name 1 ⎯ Terminal No. Name 6 DSR 2 RXD 7 RTS 3 TXD 8 CTS 4 DTR 9 5 SG 48 ⎯ 4.1.2 HAND I/O (CN9) HAND I/O (CN9) Pin Assignment (NPN type) View from the cable side Terminal No. Name Port No. Wire color Standard Reinforced Terminal No. Name Port No. Wire color Standard Reinforced 1 Hand output 64 Black Blue 11 Hand input 50 Pink White 2 Hand output 65 Brown Yellow 12 Hand input 51 Pink White 3 Hand output 66 Black Green 13 Hand input 52 White White 4 Hand output 67 Brown Red 14 Hand input 53 White White 5 Hand output 68 Red Violet 15 Hand input 54 White White 6 Hand output 69 Orange Blue 16 Hand input 55 White Brown 7 Hand output 70 Yellow Yellow 17 Power output (+24 VDC) (External/inter nal source) ⎯ White Brown 8 Hand output 71 Green Green 18 Power output (+0 VDC) (External/inter nal source) ⎯ White Brown 9 Hand input 48 Blue Red 19 NC ⎯ White Brown 10 Hand input 49 Violet Violet 20 NC ⎯ White Brown Caution: The optional I/O cable for the above connector consists of twisted pair wires--pairs of #1 and #11, #2 and #12, #10 and #20. Caution: The unused pins should be prevented from direct contact with other pins or conductive part. Direct contact could result in a controller failure or damage. 49 4.1.3 Mini I/O (CN5): User- or System-I/O connector [ 1 ] Standard type of controller Mini I/O (CN5) Pin Assignment (For standard type of controller) View from the cable side Terminal No. Signal name Port No. Wire color Terminal No. Signal name Port No. Wire color 1 Enable Auto (Internal +24V) (input) ⎯ Black 35 Enable Auto (input) ⎯ Pink 2 External Emergency Stop 1, b-1 (input) (Internal +24V) ⎯ Brown 36 External Emergency Stop 1, b-2 (input) ⎯ Pink 3 External Emergency Stop 2, b-1 (input) (Internal +24V) ⎯ Red 37 External Emergency Stop 2, b-2 (input) ⎯ Pink 4 Reserved. ⎯ Orange 38 Reserved. ⎯ Pink 5 Reserved. ⎯ Yellow 39 Reserved. ⎯ Pink 6 Emergency Stop 1, -1 (Mini relay) (output) ⎯ Black 40 Emergency Stop 1, -2 (Mini relay) (output) ⎯ White 7 Emergency Stop 2, -1 (Mini relay) (output) ⎯ Brown 41 Emergency Stop 2, -2 (Mini relay) (output) ⎯ White 8 Deadman SW 1, -1 [Enable SW 1, -1] (Mini relay) (output) ⎯ Red 42 Deadman SW 1, -2 [Enable SW 1, -2] (Mini relay) (output) ⎯ White 9 Deadman SW 2, -1 [Enable SW 2, -1] (Mini relay) (output) ⎯ Orange 43 Deadman SW 2, -2 [Enable SW 2, -2] (Mini relay) (output) ⎯ White 10 ⎯ ⎯ Yellow 44 ⎯ ⎯ White 11 Step Stop (All tasks) (input) 0 Green 45 CPU Normal (No monitor allowed) (output) 16 White 12 Strobe Signal (input) 1 Blue 46 Robot Running (output) 17 White 13 Data area bit 0 (input) 2 Violet 47 Robot Error (output) 18 White 14 Data area bit 1 (input) 3 Gray 48 Robot Initialized (output) 19 White 15 Data area bit 2 (input) 4 Pink 49 Auto Mode (output) 20 White 16 Command area bit 0 (input) 5 Black 50 Operation Preparation Completed (output) 21 Gray 17 Command area bit 1 (input) 6 Black 51 Battery Warning (output) 22 Violet 18 Command area bit 2 (input) 7 Brown 52 Command Processing Completed (output) 23 Violet 24 Violet Violet 8 Red 53 User output/ Continue Start Permission User input 9 Orange 54 User output 25 User input 10 Yellow 55 User output 26 Violet 22 User input 11 Green 56 User output 27 Violet 23 User input 12 Blue 57 User output 28 Violet 24 User input 13 Gray 58 User output 29 Violet 25 User input 14 Pink 59 User output 30 Violet 26 User input 15 Brown 60 User output 31 Gray 27 ⎯ ⎯ Red 61 ⎯ ⎯ Gray 28 Pendant Emergency Stop 1, b-1 (output) (Dry output) ⎯ Orange 62 Pendant Emergency Stop 1, b-2 (Dry output) (output) ⎯ Gray 29 Pendant Emergency Stop 2, b-1 (output) (Dry output) ⎯ Yellow 63 Pendant Emergency Stop 2, b-2 (Dry output) (output) ⎯ Gray 30 Dedicated to conveyor tracking board (when JP12 on mini I/O board is shorted. Internal power source +24V) ⎯ Green 64 Dedicated to conveyor tracking board (when JP13 on mini I/O board is shorted. Internal power source 0V) ⎯ Gray 31 ⎯ ⎯ Blue 65 ⎯ ⎯ Gray 32 DC power input +24V (when external power source is used) DC power output +24V (when internal power source is used) ⎯ Pink 66 DC power input 0V (when external power source is used) DC power output 0V (when internal power source is used) ⎯ Gray ⎯ Blue ⎯ Blue 19 User input 20 21 33 34 ⎯ Black 67 ⎯ Brown 68 (output) Note 1: The optional I/O cable for the above connector consists of twisted pair wires--pairs of #1 and #35, #2 and #36, #34 and #68. Caution: The reserved pins and output pins should be prevented from direct contact with other pins or conductive part. Direct contact could result in a controller failure or damage. Caution: To use Pendant Emergency Stop output signals, be sure to supply 24 V to terminals #28 and #29. 50 [ 2 ] Global type of controller (with safety board or safety box) The global type of the controller handles stop-related I/Os by using the safety I/O (CN10) given on the next page. Mini I/O (CN5) Pin Assignment (For global type of controller) View from the cable side Terminal No. Port No. Signal name Wire color Terminal No. Signal name Port No. Wire color 1 Reserved. ⎯ Black 35 Reserved. ⎯ Pink 2 Reserved. ⎯ Brown 36 Reserved. ⎯ Pink 3 Reserved. ⎯ Red 37 Reserved. ⎯ Pink 4 Reserved. ⎯ Orange 38 Reserved. ⎯ Pink 5 Reserved. ⎯ Yellow 39 Reserved. ⎯ Pink 6 Reserved. ⎯ Black 40 Reserved. ⎯ White 7 Reserved. ⎯ Brown 41 Reserved. ⎯ White 8 Reserved. ⎯ Red 42 Reserved. ⎯ White 9 Reserved. ⎯ Orange 43 Reserved. ⎯ White 10 ⎯ ⎯ Yellow 44 ⎯ ⎯ White Green 45 CPU Normal (No monitor allowed) (output) 16 White 11 Step Stop (All tasks) (input) 0 12 Strobe Signal (input) 1 Blue 46 Robot Running (output) 17 White 13 Data area bit 0 (input) 2 Violet 47 Robot Error (output) 18 White 14 Data area bit 1 (input) 3 Gray 48 Robot Initialized (output) 19 White 15 Data area bit 2 (input) 4 Pink 49 Auto Mode (output) 20 White 21 Gray Operation Preparation Completed 16 Command area bit 0 (input) 5 Black 50 17 Command area bit 1 (input) 6 Black 51 Battery Warning (output) 22 Violet 18 Command area bit 2 (input) 7 Brown 52 Command Processing Completed (output) 23 Violet 19 User input 8 Red 53 User output / Continue Start Permission 24 Violet 20 User input 9 Orange 54 User output 25 Violet 21 User input 10 Yellow 55 User output 26 Violet 22 User input 11 Green 56 User output 27 Violet 23 User input 12 Blue 57 User output 28 Violet 24 User input 13 Gray 58 User output 29 Violet 25 User input 14 Pink 59 User output 30 Violet 26 User input 15 Brown 60 Reserved. 31 Gray 27 ⎯ ⎯ Red 61 ⎯ ⎯ Gray 28 Reserved. ⎯ Orange 62 Reserved. ⎯ Gray 29 Reserved. ⎯ Yellow 63 Reserved. ⎯ Gray 30 Dedicated to conveyor tracking board (when JP12 on mini I/O board is shorted. Internal power source +24V) ⎯ Green 64 Dedicated to conveyor tracking board (when JP13 on mini I/O board is shorted. Internal power source 0V) ⎯ Gray 31 ⎯ ⎯ Blue 65 ⎯ ⎯ Gray 32 DC power input +24V (when external power source is used) ⎯ Pink 66 ⎯ Gray ⎯ Black 67 DC power input 0V (when external power source is used) ⎯ Blue ⎯ Brown 68 ⎯ Blue 33 34 DC power output +24V (when internal power source is used) (output) (output) DC power output 0V (when internal power source is used) Note 1: The optional I/O cable for the above connector consists of twisted pair wires--pairs of #1 and #35, #2 and #36, #34 and #68. Caution: The reserved pins and output pins should be prevented from direct contact with other pins or conductive part. Direct contact could result in a controller failure or damage. 51 4.1.4 Safety I/O (CN10):System-I/O connecter (Global type of controller) Safety I/O (CN10) Pin Assignment View from the cable side Terminal No. Signal name 1 Port No. Wire color Terminal No. Signal name External Emergency Stop 1, b-1 (input) Black 19 External Emergency Stop 1, b-2 (input) Pink 2 External Emergency Stop 2, b-1 (input) Brown 20 External Emergency Stop 2, b-2 (input) Pink 3 Reserved. Red 21 Reserved. Pink 4 Reserved. Orange 22 Reserved. Pink 5 Protective Stop 1, -1 (input) Yellow 23 Protective Stop 1, -2 (input) Pink 6 Protective Stop 2, -1 (input) Green 24 Protective Stop 2, -2 (input) Pink 7 Enable Auto 1, -1 (input) Blue 25 Enable Auto 1, -2 (input) Pink 8 Enable Auto 2, -1 (input) Black 26 Enable Auto 2, -2 (input) Gray 9 ⎯ Brown 27 ⎯ Gray 10 Reserved. Red 28 Reserved. Gray 11 Reserved. Orange 29 Reserved. Gray 12 Reserved. Yellow 30 Reserved. Gray 13 Pendant Emergency Stop 1, b-1 Green 31 Pendant Emergency Stop 1, b-2 (output) 14 Pendant Emergency Stop 2, b-1 16 17 Deadman SW 1, -1 (output) Blue 32 Pendant Emergency Stop 2, b-2 Violet 33 Deadman SW 1, -2 [Enable SW 1, -2] (Safety relay) (Safety relay) (output) Black 34 Deadman SW 2, -2 [Enable SW 2, -1] [Enable SW 2, -2] (Safety relay) (Safety relay) Contactor Contact Monitor 1, -1 Brown 35 Reserved. Gray (output) Gray (output) White Contactor Contact Monitor 1, -2 (output) 18 Gray (output) [Enable SW 1, -1] Deadman SW 2, -1 Wire color (output) (output) 15 Port No. White (output) Red 36 Reserved. White Note 1: The optional I/O cable for the above connector consists of twisted pair wires--pairs of #1 and #19, #2 and #20, #18 and #36. Caution: The reserved pins and output pins should be prevented from direct contact with other pins or conductive part. Direct contact could result in a controller failure or damage. Caution: To use Pendant Emergency Stop output signals, be sure to supply 24 V to terminals #13 and #14. 52 4.2 4.2.1 Robot Controller I/O Circuits (NPN type) Setting up Mini I/O Power Supply The power supply (+24 VDC) for the Mini I/O can be switched between internal and external power sources by changing the jumper switch setting as listed below. The factory default is external power source setting. Power supply for I/O Jumper switches JP1 and JP3 on the controller printed circuit board Description External source Short-circuit pins 2 and 3 (factory default) Do not change the factory default setting. Internal source Short-circuit pins 1 and 2, and pins 3 and 4 Remove the controller top cover and change the JP1 and JP3 settings with short sockets that come with the robot. Note: Switching the power supply setting for I/O from external to internal changes the assignment to terminals #32 to #34 and #66 to #68 on CN5 from external DC power input to internal DC power output. For details, refer to the circuit configuration examples in Sections 4.2.2 and 4.2.3. 53 4.2.2 User-Input, System-Input and Hand-Input Circuits (NPN type) The figure below shows examples of the user-input, system-input and hand-input circuit configurations and connections of the robot controller. Notes (1) In addition to PLCs, proximity switches and relay contacts can be directly connected to the input terminals of the robot controller. Note that the leakage current from the proximity switches should be 1 mA or below. (2) Use multi-core shielding cables for protecting the controller from external noise and ground them at the controller side. (When the external power source is used) User-Input, System-Input and Hand-Input Circuits (NPN type) 54 (When the internal power source is used) User-Input, System-Input and Hand-Input Circuits (NPN type) 55 4.2.3 User-Output, System-Output, and Hand-Output Circuits (NPN type) The following pages show examples of the configuration and connection of the robot controller's user-output, system-output and hand-output circuits. (1) The User-Output, System-Output and Hand-Output Circuits are open collector output circuits. (2) The maximum allowable source current is 70 mA. Keep the current consumption of a device to be connected to the Robot Controller, such as a PLC and a relay coil, below the allowable current. (3) Select an induction load, such as a relay coil, which has a built-in diode (for absorbing inverse electromotive force). To use an induction load without a built-in diode, add a diode equivalent to the 1S1888 (Toshiba) in close vicinity to the coil. Caution: When externally attaching a diode, connect it with correct polarity. Incorrect polarity may damage the Output circuit. (4) Connecting a lamp requires a circuit through which dark current flows and use a lamp whose rating is 0.5W or less. Caution: Since the initial resistance of a lamp is small, the output circuit may be damaged by rush current that flows when the lamp lights. To reduce rush current, select and connect a resistor R that allows dark current 1/3 or less of the rated current to flow when the lamp goes OFF. Refer to next page. (5) Use a multi-core shielding cable for the purpose of protecting the devices from external noise. Ground it to the robot controller. (6) +24V internal power source of the robot controller must not be grounded. Caution: If the output terminal +24V of internal power source is grounded, there may be a case where the controller is damaged. (7) For three seconds after the controller power is turned on, the I/O board will be in a transient state, so do not use its output as valid signals. 56 (When the external power source is used) User-Output, System-Output and Hand-Output Circuits (NPN type) 57 (When the internal power source is used) User-Output, System-Output and Hand-Output Circuits (NPN type) Example of Circuit with Lamp (NPN type) 58 4.2.4 Configuration of Emergency Stop Circuitry (Standard type of controller) 4.2.4.1 External Emergency Stop and Enable Auto Input Circuits (Standard type of controller) The External Emergency Stop and Enable Auto input signals are important for safety. Be sure to configure their circuits with contacts as shown below. Note: For the overall configuration sample of an emergency stop circuit, refer to Section 4.2.4.2 "Emergency Stop Circuit." External Emergency Stop and Enable Auto Input Circuits (Standard type of controller) 59 4.2.4.2 Emergency Stop Circuit (Standard type of controller) The following figure shows the example of configuration and connection of emergency stop circuit on the standard type of the controller. In the RC7M controller, the emergency stop circuit consists of dual safety circuits. The emergency stop button on the teach pendant can be used also as an emergency stop switch of the equipment. Emergency Stop and Pendant Emergency Stop output signals (1) Emergency Stop output signal The internal relay receives the External Emergency Stop input signal and the emergency stop input from the teach pendant to output this signal. When the power is turned OFF, the controller is in the emergency stop state. (2) Pendant Emergency Stop output signal (Dry output) The two contacts on the emergency stop button (4b) on the teach pendant are connected. This signal will be issued independent of the ON/OFF state of the controller power. Emergency Stop Circuit in the RC7M Controller (Standard type of controller) 60 4.2.5 4.2.5.1 Configuration of Safety Circuit (Global type of controller) Input Circuit to the Safety Circuit Input signals to the safety circuit are important for safety. Be sure to configure their circuits with contacts as shown below, observing the notes given below. Note: For the overall configuration sample of a safety circuitry, refer to Section 4.2.5.2 "Safety Circuit." Precautions on Connecting the Safety I/O (CN10) (1) Two External Emergency Stop input signals must be controlled with separate contacts. Two circuits connected in parallel using a single contact or an always-shorted circuit will be interpreted as an external circuit failure so that the emergency stop state cannot be reset. (2) Two Protective Stop input signals and two Enable Auto input signals each must be controlled with separate contacts. Two circuits connected in parallel using a single contact or an always-shorted circuit will be interpreted as an external circuit failure so that the circuitry will not operate. (3) The Enable Auto and Protective Stop input signals are connected in series in the controller, so two types of inputs are available as an automatic operation permission signal. (4) Switching the External Emergency Stop, Protective Stop, and Enable Auto input signals from open to close does not require temporal conditions, but requires any action to switch. Input Circuits to the Safety Circuits (Global type of controller) 61 4.2.5.2 Safety Circuit (Global type of controller) The figure below shows an internal connection equivalent circuit for the safety circuit in the global type of the controller. The actual safety circuit is configured with safety relays and others. Safety Circuit in the RC7M Controller (Global type of controller) Note: Different stop states resulting from emergency stop input, Protective Stop, and Enable Auto (OFF) (1) The emergency stop input (External Emergency Stop or teach pendant/mini-pendant input) shuts down the power to the motor and resets the program, provided that the Continue parameter is set to the default (0: Disable) in Continue setting. (2) The Protective Stop or Enable Auto (OFF) input signal shuts down the power to the motor and places the robot in the Continue Stop state. 62 4.3 Wiring Notes for Controller I/O Connectors (NPN type) After the wiring of the controller's I/O connectors is completed, check the following before turning ON the power: Check point (1) Using a circuit tester, check across the "+24V terminal" and "0V terminal" of each connector and across the "E24V terminal" and the "E0V terminal" to see that there is no continuity. Caution: If the connector wiring between the Robot Controller's "+24V terminal" and "0V terminal" and between the "E24V terminal" and the "E0V terminal" is shorted, damage to the power circuit of the Robot Controller will result. Check point (2) Using a circuit tester, check across "each signal output terminal" and "+24V terminal" or "E24V terminal" of each connector to see that there is no continuity. Caution: If the wiring between "each signal output terminal" and "+24V terminal" or "E24V terminal" of each connector is shorted, damage to the output circuit and power circuit of the Robot Controller will result. Caution: Wind adhesive vinyl tape around all ends of the unconnected wiring of each connector to prevent them from contacting other wiring and parts, which results in shorting. Circuit tester Robot controller "+24V terminal" and "E24V terminal" of the controller External device "0V terminal" and "E0V terminal" of the controller Checking Example 63 Mini I/O connector (CN5) View from the cable side Terminal Number Name Meaning Check point 1 to 3 +24V internal power source terminal +24V internal power output (1) Signal output terminal 0V (GND) at output (2) External power source +24 VDC power source input 24 VDC power input (1) Internal power source +24 VDC power source output 24 VDC power output (1) External power source 0 VDC power source input DC power input (GND) (1) Internal power source 0 VDC power source output DC power output (GND) (1) 45 to 60 32 to 34 66 to 68 HAND I/O connector (CN9) View from the cable side Terminal Number 1 to 8 Name Meaning Check point Hand output terminal 0V (GND) at output (2) 17 Power output terminal (+24 VDC) (External/internal source) 24 VDC power output (1) 18 Power output terminal (+0 VDC) (External/internal source) DC power output (GND) (1) 64 Chapter 5 Connector Pin Assignment and I/O Circuits (PNP type) This chapter explains the connector pin assignment and circuits of PNP type (sink input and source output) on an I/O board. For an NPN type (source input and sink output), refer to Chapter 4, "Connector Pin Assignment and I/O Circuits (NPN type)." 5.1 Connector Pin Assignment (PNP type) This section describes the pin assignment of I/O connectors on the robot controller. 5.1.1 RS-232C (CN1): RS-232C connector RS-232C (CN1) Pin Assignment Terminal No. Name 1 ⎯ Terminal No. Name 6 DSR 2 RXD 7 RTS 3 TXD 8 CTS 4 DTR 9 5 SG 65 ⎯ 5.1.2 HAND I/O (CN9) HAND I/O (CN9) Pin Assignment (PNP type) View from the cable side Terminal No. Name Port No. Wire color Standard Reinforced Terminal No. Name Port No. Wire color Standard Reinforced 1 Hand output 64 Black Blue 11 Hand input 50 Pink White 2 Hand output 65 Brown Yellow 12 Hand input 51 Pink White 3 Hand output 66 Black Green 13 Hand input 52 White White 4 Hand output 67 Brown Red 14 Hand input 53 White White 5 Hand output 68 Red Violet 15 Hand input 54 White White 6 Hand output 69 Orange Blue 16 Hand input 55 White Brown 7 Hand output 70 Yellow Yellow 17 Power output (+0 VDC) (External/intern al source) ⎯ White Brown 8 Hand output 71 Green Green 18 Power output (+24 VDC) (External/intern al source) ⎯ White Brown 9 Hand input 48 Blue Red 19 NC ⎯ White Brown 10 Hand input 49 Violet Violet 20 NC ⎯ White Brown Note 1: The optional I/O cable for the above connector consists of twisted pair wires--pairs of #1 and #11, #2 and #12, #10 and #20. Caution: The unused pins should be prevented from direct contact with other pins or conductive part. Direct contact could result in a controller failure or damage. 66 5.1.3 Mini I/O (CN5): User- or System-I/O connector [ 1 ] Standard type of controller Mini I/O (CN5) Pin Assignment (For standard type of controller) View from the cable side Terminal No. Signal name Port No. Wire color Terminal No. Signal name Port No. Wire color 1 Enable Auto (Internal +24V) (input) ⎯ Black 35 Enable Auto (input) ⎯ Pink 2 External Emergency Stop 1, b-1 (input) (Internal +24V) ⎯ Brown 36 External Emergency Stop 1, b-2 (input) ⎯ Pink 3 External Emergency Stop 2, b-1 (input) (Internal +24V) ⎯ Red 37 External Emergency Stop 2, b-2 (input) ⎯ Pink 4 Reserved. ⎯ Orange 38 Reserved. ⎯ Pink 5 Reserved. ⎯ Yellow 39 Reserved. ⎯ Pink 6 Emergency Stop 1, -1 (Mini relay) (output) ⎯ Black 40 Emergency Stop 1, -2 (Mini relay) (output) ⎯ White 7 Emergency Stop 2, -1 (Mini relay) (output) ⎯ Brown 41 Emergency Stop 2, -2 (Mini relay) (output) ⎯ White 8 Deadman SW 1, -1 [Enable SW 1, -1] (Mini relay) (output) ⎯ Red 42 Deadman SW 1, -2 [Enable SW 1, -2] (Mini relay) (output) ⎯ White 9 Deadman SW 2, -1 [Enable SW 2, -1] (Mini relay) (output) ⎯ Orange 43 Deadman SW 2, -2 [Enable SW 2, -2] (Mini relay) (output) ⎯ White 10 ⎯ ⎯ Yellow 44 ⎯ ⎯ White 11 Step Stop (All tasks) (input) 0 Green 45 CPU Normal (No monitor allowed) (output) 16 White 12 Strobe Signal (input) 1 Blue 46 Robot Running (output) 17 White 13 Data area bit 0 (input) 2 Violet 47 Robot Error (output) 18 White 14 Data area bit 1 (input) 3 Gray 48 Robot Initialized (output) 19 White 15 Data area bit 2 (input) 4 Pink 49 Auto Mode (output) 20 White 16 Command area bit 0 (input) 5 Black 50 Operation Preparation Completed (output) 21 Gray 17 Command area bit 1 (input) 6 Black 51 Battery Warning (output) 22 Violet 18 Command area bit 2 (input) 7 Brown 52 Command Processing Completed (output) 23 Violet 24 Violet 19 User input 8 Red 53 User output/ Continue Start Permission (output) 20 User input 9 Orange 54 User output 25 Violet 21 User input 10 Yellow 55 User output 26 Violet 22 User input 11 Green 56 User output 27 Violet 23 User input 12 Blue 57 User output 28 Violet 24 User input 13 Gray 58 User output 29 Violet 25 User input 14 Pink 59 User output 30 Violet 26 User input 15 Brown 60 User output 31 Gray 27 ⎯ ⎯ Red 61 ⎯ ⎯ Gray 28 Pendant Emergency Stop 1, b-1 (output) (Dry output) ⎯ Orange 62 Pendant Emergency Stop 1, b-2 (Dry output) (output) ⎯ Gray 29 Pendant Emergency Stop 2, b-1 (output) (Dry output) ⎯ Yellow 63 Pendant Emergency Stop 2, b-2 (Dry output) (output) ⎯ Gray ⎯ Green 64 ⎯ Gray ⎯ Blue 65 ⎯ Gray ⎯ Pink 66 ⎯ Gray ⎯ Black 67 ⎯ Blue ⎯ Brown 68 ⎯ Blue 30 31 32 33 34 Dedicated to conveyor tracking board (when JP12 on mini I/O board is shorted. Internal power source output +24V) ⎯ DC power input +24V (when external power source is used) DC power output +24V (when internal power source is used) Dedicated to conveyor tracking board (when JP13 on mini I/O board is shorted. Internal power source output 0V) ⎯ DC power input 0V (when external power source is used) DC power output 0V (when internal power source is used) Note 1: The optional I/O cable for the above connector consists of twisted pair wires--pairs of #1 and #35, #2 and #36, #34 and #68. Caution: The reserved pins and output pins should be prevented from direct contact with other pins or conductive part. Direct contact could result in a controller failure or damage. Caution: To use Pendant Emergency Stop output signals, be sure to supply 24 V to terminals #28 and #29. 67 [ 2 ] Global type of controller (with safety board or safety box) The global type of the controller handles stop-related I/Os by using the safety I/O (CN10) given on the next page. Mini I/O (CN5) Pin Assignment (For global type of controller) View from the cable side Terminal No. Signal name Port No. Wire color Terminal No. Signal name Port No. Wire color 1 Reserved. ⎯ Black 35 Reserved. ⎯ Pink 2 Reserved. ⎯ Brown 36 Reserved. ⎯ Pink 3 Reserved. ⎯ Red 37 Reserved. ⎯ Pink 4 Reserved. ⎯ Orange 38 Reserved. ⎯ Pink 5 Reserved. ⎯ Yellow 39 Reserved. ⎯ Pink 6 Reserved. ⎯ Black 40 Reserved. ⎯ White 7 Reserved. ⎯ Brown 41 Reserved. ⎯ White 8 Reserved. ⎯ Red 42 Reserved. ⎯ White 9 Reserved. ⎯ Orange 43 Reserved. ⎯ White 10 ⎯ ⎯ Yellow 44 ⎯ ⎯ White Green 45 CPU Normal (No monitor allowed) (output) 16 White 11 Step Stop (All tasks) (input) 0 12 Strobe Signal (input) 1 Blue 46 Robot Running (output) 17 White 13 Data area bit 0 (input) 2 Violet 47 Robot Error (output) 18 White 14 Data area bit 1 (input) 3 Gray 48 Robot Initialized (output) 19 White 15 Data area bit 2 (input) 4 Pink 49 Auto Mode (output) 20 White 16 Command area bit 0 (input) 5 Black 50 Operation Preparation Completed (output) 21 Gray 17 Command area bit 1 (input) 6 Black 51 Battery Warning (output) 22 Violet 23 Violet 24 Violet 18 Command area bit 2 19 User input (input) 7 Brown 52 Command Processing Completed (output) 8 Red 53 User output / Continue Start Permission (output) 20 User input 9 Orange 54 User output 25 Violet 21 User input 10 Yellow 55 User output 26 Violet 22 User input 11 Green 56 User output 27 Violet 23 User input 12 Blue 57 User output 28 Violet 24 User input 13 Gray 58 User output 29 Violet 25 User input 14 Pink 59 User output 30 Violet 26 User input 15 Brown 60 Reserved. 31 Gray 27 ⎯ ⎯ Red 61 ⎯ ⎯ Gray 28 Reserved. ⎯ Orange 62 Reserved. ⎯ Gray 29 Reserved. ⎯ Yellow 63 Reserved. ⎯ Gray 30 Dedicated to conveyor tracking board (when JP12 on mini I/O board is shorted. Internal power source output +24V) 64 Dedicated to conveyor tracking board (when JP13 on mini I/O board is shorted. Internal power source output 0V) ⎯ Gray 31 32 33 34 ⎯ Green ⎯ ⎯ Blue 65 ⎯ ⎯ Gray DC power input +24V (when external power source is used) ⎯ Pink 66 ⎯ Gray ⎯ Black 67 DC power input 0V (when external power source is used) ⎯ Blue ⎯ Brown 68 ⎯ Blue DC power output +24V (when internal power source is used) DC power output 0V (when internal power source is used) Note 1: The optional I/O cable for the above connector consists of twisted pair wires--pairs of #1 and #35, #2 and #36, #34 and #68. Caution: The reserved pins and output pins should be prevented from direct contact with other pins or conductive part. Direct contact could result in a controller failure or damage. 68 5.1.4 Safety I/O (CN10):System-I/O connecter (Global type of controller) Safety I/O (CN10) Pin Assignment View from the cable side Terminal No. Signal name 1 Wire color Terminal No. Signal name External Emergency Stop 1, b-1 (input) Black 19 External Emergency Stop 1, b-2 (input) Pink 2 External Emergency Stop 2, b-1 (input) Brown 20 External Emergency Stop 2, b-2 (input) Pink 3 Reserved. Red 21 Reserved. Pink 4 Reserved. Orange 22 Reserved. Pink 5 Protective Stop 1, -1 (input) Yellow 23 Protective Stop 1, -2 (input) Pink 6 Protective Stop 2, -1 (input) Green 24 Protective Stop 2, -2 (input) Pink 7 Enable Auto 1, -1 (input) Blue 25 Enable Auto 1, -2 (input) Pink 8 Enable Auto 2, -1 (input) Black 26 Enable Auto 2, -2 (input) Gray 9 ⎯ Brown 27 ― Gray 10 Reserved. Red 28 Reserved. Gray 11 Reserved. Orange 29 Reserved. Gray 12 Reserved. Yellow 30 Reserved. Gray Green 31 Blue 32 Violet 33 13 14 Pendant Emergency Stop 1, b-1 (output) Pendant Emergency Stop 2, b-1 (output) Deadman SW 1, -1 15 Port No. (output) [Enable SW 1, -1] Deadman SW 2, -1 16 18 (output) Pendant Emergency Stop 2, b-2 (output) Gray Gray (output) Gray [Enable SW 1, -2] Deadman SW 2, -2 Black [Enable SW 2, -1] 34 (output) White [Enable SW 2, -2] (Safety relay) Contactor Contact Monitor 1, -1 (output) Reserved. (output) Wire color (Safety relay) (Safety relay) 17 Pendant Emergency Stop 1, b-2 Deadman SW 1, -2 (Safety relay) Port No. Brown 35 Red 36 Contactor Contact Monitor 1, -2 (output) Reserved. White White Note 1: The optional I/O cable for the above connector consists of twisted pair wires--pairs of #1 and #19, #2 and #20, #18 and #36. Caution: The reserved pins and output pins should be prevented from direct contact with other pins or conductive part. Direct contact could result in a controller failure or damage. Caution: To use Pendant Emergency Stop output signals, be sure to supply 24 V to terminals #13 and #14. 69 5.2 5.2.1 Robot Controller I/O Circuits (PNP type) Setting up Mini I/O Power Supply The power supply (+24 VDC) for the Mini I/O can be switched between internal and external power sources by changing the jumper switch setting as listed below. The factory default is external power source setting. Power supply for I/O Jumper switches JP1 and JP3 on the controller printed circuit board Description External source Short-circuit pins 2 and 3 (factory default) Do not change the factory default setting. Internal source Short-circuit pins 1 and 2, and pins 3 and 4 Remove the controller top cover and change the JP1 and JP3 settings with short sockets that come with the robot. Note: Switching the power supply setting for I/O from external to internal changes the assignment to terminals #32 to #34 and #66 to #68 on CN5 from external DC power input to internal DC power output. For details, refer to the circuit configuration examples in Sections 5.2.2 and 5.2.3. 70 5.2.2 User-Input, System-Input and Hand-Input Circuits (PNP type) The figure below shows examples of the user-input, system-input and hand-input circuit configurations and connections of the robot controller. Notes (1) In addition to PLCs, proximity switches and relay contacts can be directly connected to the input terminals of the robot controller. Note that the leakage current from the proximity switches should be 1 mA or below. (2) Use multi-core shielding cables for protecting the controller from external noise and ground them at the controller side. (When the external power source is used) User-Input, System-Input and Hand-Input Circuits (PNP type) 71 (When the internal power source is used) User-Input, System-Input and Hand-Input Circuits (PNP type) 72 5.2.3 User-Output, System-Output, and Hand-Output Circuits (PNP type) The following pages show examples of the configuration and connection of the robot controller's user-output, system-output and hand-output circuit. (1) The User-Output, System-Output and Hand-Output Circuits are open collector output circuits. (2) The maximum allowable source current is 70 mA. Keep the current consumption of a device to be connected to the Robot Controller, such as a PLC and a relay coil, below the allowable current. (3) Select an induction load, such as a relay coil, which has a built-in diode (for absorbing inverse electromotive force). To use an induction load without a built-in diode, add a diode equivalent to the 1S1888 (Toshiba) in close vicinity to the coil. Caution: When externally attaching a diode, connect it with correct polarity. Incorrect polarity may damage the output circuit. (4) Connecting a lamp requires a circuit through which dark current flows and use a lamp whose rating is 0.5W or less. Caution: Since the initial resistance of a lamp is small, the output circuit may be damaged by rush current that flows when the lamp lights. To reduce rush current, select and connect a resistor R that allows dark current 1/3 or less of the rated current to flow when the lamp goes OFF. Refer to next page. (5) Use a multi-core shielding cable for the purpose of protecting the devices from external noise. Ground it to the robot controller. (6) +24V internal power source of the robot controller must not be grounded. Caution: If the output terminal +24V of internal power source is grounded, there may be a case where the controller is damaged. (7) For three seconds after the controller power is turned on, the I/O board will be in a transient state, so do not use its output as valid signals. 73 (When the external power source is used) User-Output, System-Output and Hand-Output Circuits (PNP type) 74 (When the internal power source is used) User-Output, System-Output and Hand-Output Circuits (PNP type) Example of Circuit with Lamp (PNP type) 75 5.2.4 Configuration of Emergency Stop Circuitry (Standard type of controller) 5.2.4.1 External Emergency Stop and Enable Auto Input Circuits (Standard type of controller) The External Emergency Stop and Enable Auto input signals are important for safety. Be sure to configure their circuits with contacts as shown below. TIP: For the overall configuration sample of an emergency stop circuitry, refer to Section 5.2.4.2 "Emergency Stop Circuit." External Emergency Stop and Enable Auto Input Circuits (Standard type of controller) 76 5.2.4.2 Emergency Stop Circuit (Standard type of controller) The following figure shows the example of configuration and connection of emergency stop circuit on the standard type of the controller. In the RC7M controller, the emergency stop circuit consists of dual safety circuits. The emergency stop button on the teach pendant can be used also as an emergency stop switch of the equipment. Emergency Stop and Pendant Emergency Stop output signals (1) Emergency Stop output signal The internal relay receives the External Emergency Stop input signal and the emergency stop input from the teach pendant to output this signal. When the power is turned OFF, the controller is in the emergency stop state. (2) Pendant Emergency Stop output signal (Dry output) The two contacts on the emergency stop button (4b) on the teach pendant are connected. This signal will be issued independent of the ON/OFF state of the controller power. Emergency Stop Circuit in the RC7M Controller (Standard type of controller) 77 5.2.5 5.2.5.1 Configuration of Safety Circuit (Global type of controller) Input Circuit to the Safety Circuit Input signals to the safety circuit are important for safety. Be sure to configure their circuits with contacts as shown below, observing the notes given below. Note: For the overall configuration sample of a safety circuitry, refer to Section 5.2.5.2 "Safety Circuit." Precautions on Connecting the Safety I/O (CN10) (1) Two External Emergency Stop input signals must be controlled with separate contacts. Two circuits connected in parallel using a single contact or an always-shorted circuit will be interpreted as an external circuit failure so that the emergency stop state cannot be reset. (2) Two Protective Stop input signals and two Enable Auto input signals each must be controlled with separate contacts. Two circuits connected in parallel using a single contact or an always-shorted circuit will be interpreted as an external circuit failure so that the circuitry will not operate. (3) The Enable Auto and Protective Stop input signals are connected in series in the controller, so two types of inputs are available as an automatic operation permission signal. (4) Switching the External Emergency Stop, Protective Stop, and Enable Auto input signals from open to close does not require temporal conditions, but requires any action to switch. Input Circuits to the Safety Circuits (Global type of controller) 78 5.2.5.2 Safety Circuit (Global type of controller) The figure below shows an internal connection equivalent circuit for the safety circuit in the global type of the controller. The actual safety circuit is configured with safety relays and others. Safety Circuit in the RC7M Controller (Global type of controller) Note: Different stop states resulting from emergency stop input, Protective Stop, and Enable Auto (OFF) (1) The emergency stop input (External Emergency Stop or teach pendant/mini-pendant input) shuts down the power to the motor and resets the program, provided that the Continue parameter is set to the default (0: Disable) in Continue setting. (2) The Protective Stop or Enable Auto (OFF) input signal shuts down the power to the motor and places the robot in the Continue Stop state. 79 5.3 Wiring Notes for Controller I/O Connectors (PNP type) After the wiring of the controller's I/O connectors is completed, check the following before turning ON the power: Check point (1) Using a circuit tester, check across the "+24V terminal" and "0V terminal" of each connector and across the "E24V terminal" and the "E0V terminal" to see that there is no continuity. Caution: If the connector wiring between the Robot Controller's "+24V terminal" and "0V terminal" and between the "E24V terminal" and the "E0V terminal" is shorted, damage to the power circuit of the Robot Controller will result. Check point (2) Using a tester, check across "each signal output terminal" and "+24V terminal" or "E24V terminal" of each connector to see that there is no continuity. Caution: If the wiring between "each signal output terminal" and "+24V terminal" or "E24V terminal" of each connector is shorted, damage to the Output circuit and power circuit of the Robot Controller will result. Caution: Wind adhesive vinyl tape around all ends of the unconnected wiring of each connector to prevent them from contacting other wiring and parts, which results in shorting. Circuit tester Robot controller "+24V terminal" and "E24V terminal" of the controller External device "0V terminal" and "E0V terminal" of the controller Checking Example 80 Mini I/O connector (CN5) View from the cable side Terminal Number Name Meaning Check point 1 to 3 +24V internal power source terminal +24V internal power output (1) Signal output terminal 24 V at output (2) External power source +24 VDC power source input 24 VDC power input (1) Internal power source +24 VDC power source output 24 VDC power output (1) External power source 0 VDC power source input DC power input (GND) (1) Internal power source 0 VDC power source output DC power output (GND) (1) 45 to 60 32 to 34 66 to 68 HAND I/O connector (CN9) View from the cable side Terminal Number 1 to 8 Name Meaning Check point Hand output terminal 24 V at output (2) 17 Power output terminal (+0 VDC) (External/internal source) DC power output (GND) (1) 18 Power output terminal (+24 VDC) (External/internal source) 24 VDC power output (1) 81 Chapter 6 Installation and Maintenance of the RC7M Controller 6.1 Supplies for the Controller The table below lists the supplies for the RC7M controller. List of Supplies for the RC7M Controller No. 1 6.2 6.2.1 Name Part Number Remarks Air inlet filter set 410053-0100 For standard type (FS-1705W) 410053-0110 For global type (FS-1705) 2 Memory backup battery 410076-0260 For backup of the controller memory 3 Fuse (1.3A) 410054-0230 Fuse (LM13) for controller I/O 4 IC for output (NPN) 410077-0010 IC (M54522P) for controller output 5 IC for output (PNP) 410077-0020 IC (M54564P) for controller output Mounting the Controller Installation Requirements for the Controller The table below lists the installation requirements for the RC7M controller. Installation Requirements for the RC7M Controller Item Environmental Requirements Installation type Stand-alone and Wall-mount Ambient temperature In operation: 0 to 40°C In storage or during transportation: -10 to 60°C Humidity In operation: 90% or less (No dew condensation is allowed.) In storage or during transportation: 75% or less (No dew condensation is allowed.) Safe installation environment The robot should not be installed in an environment where: • there are flammable gases or liquids, • there are any acidic, alkaline or other corrosive material, • there is a mist, or • there are any large-sized inverters, high output/high frequency transmitters, large contactors, welders, or other sources of electrical noise. Working space Sufficient service space must be available for inspection and disassembly. Grounding conditions Grounding resistance (protective ground): 100Ω or less 82 6.2.2 Mounting the Robot Controller Before mounting the robot controller to the target position, you need to secure the robot controller to the controller mounting panel. The robot controller supported by the mounting panel may be either stand-alone or wall-mounted. Caution When using the robot controller in any environment where there is mist, put the controller in an optional robot controller protective box. The robot controller is not dust-proof, splash-proof, or explosion-proof. Set up the controller at the place where it is easy to replace the memory backup battery and air filters. [ 1 ] Securing the Robot Controller to the Controller Mounting Panel (1) The figure below shows the bottom view of the robot controller. Five M4-nut welded holes may be used for securing the robot controller to the mounting panel. (2) Prepare a mounting panel large enough for mounting the robot controller and secure the robot controller onto the mounting panel using five screws. Caution (1) The controller mounting screws must not be more than the thickness of the mounting panel plus 4 mm in length. If their length is out of the specified range, the nut welded holes may be damaged. (2) Fix the robot controller at all of the five nut-welded holes. Location of Mounting Screw Holes (on the bottom of the robot controller) 83 [ 2 ] Installing the Robot Controller The robot controller can be installed stand-alone or on the wall. Set up the robot controller as shown in the figure below. Caution Do not place anything within 200 mm from the air inlet and outlet of the robot controller. Caution The robot controller has no air filter on the air outlet side. In wall-mounted installation, therefore, to prevent free-fall dust or dirt from getting into the controller, set up the controller with the air outlet side not facing upward as shown below. Stand-alone installation Wall-mounted installation Setting up the Robot Controller 84 6.3 I/O and AC Input Wiring 6.3.1 Multi-core Cables with Connectors Multi-core cables with connectors to be used for the I/O wiring of the Robot Controller are options. Select an appropriate cable from the table given below if necessary. I/O Cables (Options) No. 1 Name Part Number Remarks Standard I/O cable set (8m) 410149-0940 Including Nos. 1-1 and 1-2 1-1 Mini I/O cable set (8m) 410141-2700 Connector set: 410159-0190 1-2 Hand I/O cable set (8m) 410141-1740 2 Standard I/O cable set (15m) 410149-0950 Including Nos. 2-1 and 2-2 2-1 Mini I/O cable set (15m) 410141-2710 Connector set: 410159-0190 2-2 Hand I/O cable set (15m) 410141-1750 If you do not use optional cables listed above, use the recommended connectors and cables listed below. Recommended Connectors for I/O Cables and Cable Standards Connector name Connector model/manufacturer Cable Standards UL2789 - With shield Mini I/O PCR-E68FS connector PCS-E68LPA-1E cover (HONDA TSUSHIN KOGYO Co., LTD) UL2789 - With shield HAND I/O PCR-E20FS connector PCS-E20LA cover (HONDA TSUSHIN KOGYO Co., LTD) Equivalent to AWG28x34P Remarks Caution: Be sure to modify the shielding wire at the end of the cable to be used, as shown below. Without this modification, the robot may malfunction due to noise. Equivalent to AWG28x20P Crimp terminal Vinyl tube Braided shielding wire Shielding wire I/O cable The connector shell should be made of conductive metal. Fasten to the connector I/O power connector Modifying the Shielding Wire (Example) 85 Vinyl tube Wiring of Primary Power Source Observe the following precautions when wiring the primary power source of the robot controller: (1) Connect the robot power cable to a power source separate from the welder power source. (2) Ground the protective grounding wire (green/yellow) of the robot power cable. (3) Ground the functional grounding terminal of the robot controller using a wire of 1.25 mm2 or more in size. (4) For the robot power supply, use a protective grounding wire with grounding resistance of 100Ω or less. (5) If the supply power source for the robot controller requires a leakage breaker, use a high frequency-proof leakage breaker for inverters. (6) When inserting a circuit breaker between the robot and the AC input power supply, select the circuit breaker with breaking capacity higher than the following specification. Recommended circuit breaker example: CP33V/20 (Fuji Electric FA Components & Systems Co., Ltd.) Caution: Using a circuit breaker with breaking capacity lower than the following specification may cause the circuit breaker to be shut down due to robot operation. Breaking characteristics curve Breaking time (s) 6.3.2 Breaking current (Arms) Circuit Breaker Characteristics 86 (7) Prepare wires of an appropriate capacity for the 200/100 VAC main line and other cables according to the tables given below. Robot Controller Power Supply Specifications Item Specifications Three-phase, 200 VAC Power supply capacity Three-phase, 200 VAC -15% to 230 VAC +10%, 50/60 Hz A: 200 VAC, phase R VMG6BA: 3.3 kVA VSG6BA: 1.85 kVA B: VPG5/6CA: 1 kVA HMG4BA: 2.45 kVA 200 VAC, phase S C: HSG4BA: 1.8 kVA XRG4BA: 1.8 kVA 200 VAC, phase T XYCG4AA: 1.15 kVA D: Protective ground A: 200 VAC, phase R B: 200 VAC, phase S D: Protective ground A: 100 VAC, phase R B: 100 VAC, phase S D: Protective ground Single-phase, Single-phase, 230 VAC -10% to 230 VAC +10%, 50/60 Hz 200 VAC Power supply Power supply capacity VSG6BA: 1.85 kVA VPG5/6CA: 1 kVA HMG4BA: 2.45 kVA HSG4BA: 1.8 kVA XYCG4AA: 1.15 kVA XRG4BA: 1.8 kVA Single-phase, Single-phase, 100 VAC -10% to 110 VAC 100 VAC +10%, 50/60 Hz Power supply capacity Max. rush current when the power is turned ON Pin assignment on power connector (CN6) (View from the pin face of cable) VPG5/6CAA: 1 kVA 40 A (for 1/50 or 1/60 second) Caution: If ERROR6102 (power voltage drop) occurs when the robot is in operation, then it may be due to an insufficient capacity of the primary power source. (8) Do not bundle the teach pendant cables, I/O cables or motor cables together with high power lines such as 200/100 VAC lines and peripheral device cables, or route the motor cables near high power devices (motor, welder, parts feeder, etc.). (9) Do not route any additional cables or air tubes of end-effectors through the robot unit. Doing so will result in broken cables or tubes. (10) Use the correct power source (200 VAC or 100 VAC) for the controller specification. 87 6.3.3 Disconnecting the Robot from the Power Source If you need to cut off the power supply from the robot unit for maintenance or transportation purpose, follow the steps below for safety. Step 1 Turn OFF the power switch of the robot controller. Step 2 Check that the motor ON lamp is OFF. Step 3 Disconnect the power cable from connector CN6 on the robot controller. 88 6.4 Cleaning the Air Intake Filters The robot controller has three air intake filters. If those filters are clogged, the robot controller becomes insufficiently ventilated so that the internal electronic devices may be damaged due to heat. If a power module error appears, it may be caused by clogged filter, so clean the filter. <Cleaning Procedures> Step 1 Turn the controller power OFF. Step 2 Remove the four filter covers from the front panel by loosening the screw each. 89 Step 3 Blow compressed air to the filter in the direction opposite to the regular air- flow. Note: Use dehumidified, oil-free, pure compressed air for cleaning. If the filter is excessively dirty, wash it with water or warm water (40°C or lower). A neutral detergent is most effective. Notes (1) Dry the washed filter completely before mounting it. (2) If the filter is still dirty after air blowing or washing, replace it with new one. Step 4 Set the filters back into place in the reverse order of removal. 90 6.5 Replacing the Memory Backup Battery Programs, parameters, CAL data, etc. are stored in the internal memory of the robot controller. The memory backup battery retains the above data while the power to the robot controller is turned OFF. However, the battery has a limited lifetime and must, therefore, be replaced regularly. Note: If two years elapse from replacement of backup battery, the "Time to change controller backup battery" message will appear on the teach pendant. Caution: Without replacing the memory backup battery, important robot-specific data held in the memory will be lost. This caution applies ONLY in CALIFORNIA, USA. Perchlorate Material – special handling may apply, See www.dtsc.ca.gov/hazardouswaste/perchlorate 6.5.1 Replacing procedures This section gives an example of replacing the memory backup battery. Caution: Before replacing the memory backup battery, be sure to save the memory data in the robot controller to the PC. Step 1 Save the memory data held in the controller to the PC. Step 2 Make a new memory backup battery ready for use. Step 3 Turn the controller power ON, wait at least one minute, and then turn it OFF again. 91 Step 4 Remove two screws from the battery cover and pull them out together with the backup battery. Step 5 Disconnect the backup battery harness. Caution Complete Steps 5 through 7 within three minutes. Taking more time will lose the memory data. 92 Step 6 Set the new memory backup battery ready for use in Step 2 on the battery cover. Step 7 Connect the backup battery harness to the controller. Step 8 Mount the battery cover with the new backup battery into the controller and secure the cover with the screw. Caution Take care not to pinch the battery lead wires between covers or internal parts. Shorting may occur, resulting in an unexpected failure. 93 6.5.2 Setting the Next Battery Replacement Date After replacing the memory backup battery, set the next battery replacement date from the teach pendant, according to the following procedure. Note: Check that the system clock of the robot controller shows the correct date beforehand. If it is incorrect, the next replacement date will also become incorrect. Step 1 On the top screen of the teach pendant, press [F6 Set]. The Settings (Main) window appears. Step 2 Press [F6 Maint.] in the Settings (Main) window. The Maintenance menu appears. Step 3 Press [F4 Battery] in the Maintenance menu. The Next Battery Replacement Date window appears. In the top of the window, the current setting is displayed. The date entry areas show the default replacement date that is two years later the current data at which you open this window, assuming that the battery service life is two years. Step 4 Press OK. Note: If you do not want to change the replacement date, press Cancel. The message "Are you sure you want to set the next battery replacement date?" appears. Step 5 Press OK. The screen returns to the Settings (Main) window. 94 6.6 Replacing Fuses and Output ICs 6.6.1 Positions of Fuses and Output ICs The robot controller is equipped with fuses to protect it from external wiring shorted. If any fuse is blown, replace it according to the following procedure. If an output signal error persists even after replacement of the output fuse, the related output IC needs to be replaced. Fuses and output ICs are located in the robot controller as shown in the figure below. Mini I/O board (Front panel side) IPM board Positions of Fuses (with the controller top cover removed) Fuse Capacity F2 F3 F4 3.2 A 1.3 A 1.3 A Corresponding output connector and terminal No. Mini I/O, terminals 66 to 68 Mini I/O, terminals 32 to 34 Mini I/O, terminals 66 to 68 Mini I/O, terminal 1 F5 1.3 A Mini I/O, terminal 2 Mini I/O, terminal 3 F6 F7 F8 1.3 A 1.3 A 1.3 A Mini I/O, terminals 45 to 60 Hand I/O, terminals 1 to 8 Hand I/O, terminal 17 Signal name DC power input 0V (E0V) DC power input +24V(E24V) DC power input 0V (E0V) Power supply for Enable auto (Internal +24V) External emergency stop 1b-1 (Internal +24V) External emergency stop 2b-1 (Internal +24V) System output/User output Hand output Power supply for hand E24V I/O port No. ------------16 to 31 64 to 70 --- Caution F2 fuse is provided for protecting the circuitry from getting damaged if a voltage of 30V or above is applied to the 24V external power source terminals. F2 fuse is not mounted on a Mini I/O board in controllers whose product number is 02H018 or later (short-circuited instead). 95 The table below lists the output ICs and fuses for the Mini I/O (CN5) and HAND I/O (CN9). If an output signal error occurs, check the corresponding fuse. Note: The Emergency Stop and Deadman output circuits use PolySwitches (resettable fuses) that trip in an overcurrent condition to open the circuits. If a PolySwitch trips, turn the power off and check the related circuit. (As long as the power is on, a PolySwitch keeps tripping. After checking, therefore, turn the controller power off and on, then check the circuit again. Output ICs and Fuses Connector Name HAND I/O CN9 Application For output For power output For output Mini I/O CN5 For 24 VDC Reference: PolySwitch Emergency stop on Mini I/O and Deadman output (CN5) Pin No. I/O Port No. 1 2 3 4 5 6 7 8 17, 18 45 46 47 48 49 50 51 52 53 54 55 56 57 58 59 60 32 33 34 66 67 68 1, 35 2, 36 3, 37 6, 40 7, 41 8, 42 9, 43 96 64 65 66 67 68 69 70 71 – 16 17 18 19 20 21 22 23 24 25 26 27 28 29 30 31 – – – – – – – – – – – – – Output IC Fuse IC10 F7 (1.3A) – F8 (1.3A) IC6 F6 (1.3A) IC8 External power supply Internal power supply – – F3 (1.3A) – – F4 (1.3A) – – – – – – – F5 (1.3A) PS5 (0.15A) PS6 (0.15A) PS3 (0.15A) PS4 (0.15A) 6.6.2 Replacing procedures Replace fuses and output ICs according to the following procedure: Warning Do not touch the inside of controller before turning off the power switch and waiting 3 minutes or more, or you can easily receive an electric shock. Caution (1) Wear a wristband and connect its terminal to a grounded portion before starting work. (2) Do not touch elements or their terminals on any printed circuit board with bare hand (elements could be destroyed by static electricity). <Replacing fuses> Step 1 Turn the controller power OFF. Step 2 Remove the controller upper cover by unscrewing eight screws. Warning Do not touch the inside of controller before turning off the power switch and waiting 3 minutes or more, or you can easily receive an electric shock. 97 Step 3 Pull out the fuse to check. Step 4 Using a circuit tester, check the removed fuse for continuity. Step 5 If no continuity is observed with the fuse in Step 4: (1) Check the wiring of the corresponding output connector and remove the cause of the blown fuse. (2) Insert a new fuse into place in the controller. If continuity is observed with the fuse in Step 4, set the removed fuse back into place in the controller. Step 6 Set the controller upper cover back into place and restart the controller in the reverse order of Steps 1 through 3. 98 Proceed to the following steps when replacing output ICs Step 7 If an output signal error persists even after replacement of the output fuse, the related output IC needs to be replaced. Caution (1) When replacing a damaged output IC, fix the cause that damages the IC before replacement. (2) Do not directly touch the electronic devices and their terminals on printed circuit boards by hand. Remove the three screws and take the Mini I/O board out of the controller. Step 8 Check the IC No. on the printed circuit board and pull out the target output IC with an IC pull-out jig. Mount a new output IC. 99 6.7 6.7.1 Replacing IPM Boards Location of IPM Boards The IPM boards are located in the robot controller as shown below. SLOT Robot series VM-G VS-G VP-G HM-G HS-G XYC-G XR-G SLOT 6 SLOT 5 SLOT 4 SLOT 3 SLOT 2 SLOT 1 Joint # 6 5 4 3 1 2 IPM model SS SS SS S L M Motor capacity (W) 100 200 200 400 1500 750 Joint # 6 5 4 3 2 1 IPM model SS SS SS S S M Motor capacity (W) 50 80 100 200 400 750 Joint # 6 5 4 3 2 1 IPM model SS SS SS SS SS SS Motor capacity (W) 30 30 30 50 80 80 Joint # -- -- 4 3 2 1 IPM model -- -- M M L LL Motor capacity (W) -- -- 300 300 600 1000 Joint # -- -- 4 3 2 1 IPM model -- -- S S M L Motor capacity (W) -- -- 150 200 400 750 Joint # -- -- 4 3 2 1 IPM model -- -- SS S S S Motor capacity (W) -- -- 100 200 200 400 Joint # -- -- 4 3 2 1 IPM model -- -- SS S S M (S) * Motor capacity (W) -- -- 50 400 400 750 (400) * Note: The "--" in the above table denotes no board installed. * Differs depending on the controller model. 100 6.7.2 Replacing the IPM board Replace the IPM board with the procedure below. Step 1 Turn the controller power OFF. Step 2 Remove the eight screws and take off the top cover of the controller. Warning Do not touch the inside of controller before turning off the power switch and waiting 3 minutes or more, or you can easily receive an electric shock. 101 Step 3 Remove the two screws from the IPM board to be replaced. Disconnect the board from its two connectors and connect a new one. Step 4 Secure the top cover of the controller with eight screws. Tightening torque: 1.35 to 1.45 Nm 102 Chapter 7 I/O Allocation for I/O Extension Board(s) This chapter lists the I/O allocation tables to apply when I/O extension boards are mounted on the controller. For details about I/O extension boards, refer to the RC7M CONTROLLER OPTIONS MANUAL. 7.1 Combination of I/O Extension Boards and Allocation Modes The table below lists the permitted combination of I/O extension boards and selectable allocation modes. Combination # Combination of I/O Extension Boards 0 1 2 3 4 5 6 7 8 9 10 11 12 13 14 15 16 17 18 19 20 21 22 23 24 25 I/O extension boards (Max. 2 boards) Extension 1 Extension 2 – – – – – Parallel I/O board Parallel I/O board Parallel I/O board DeviceNet slave board DeviceNet slave board DeviceNet slave board DeviceNet master/slave board DeviceNet master/slave board DeviceNet master/slave board CC-Link board CC-Link board CC-Link board CC-Link board PROFIBUS-DP slave board PROFIBUS-DP slave board PROFIBUS-DP slave board PROFIBUS-DP slave board EtherNet/IP Adapter EtherNet/IP Adapter EtherNet/IP Adapter EtherNet/IP Adapter – S-LINK V board DeviceNet master board DeviceNet master board DeviceNet master board – Parallel I/O board S-LINK V board – Parallel I/O board S-LINK V board – Parallel I/O board S-LINK V board – Parallel I/O board DeviceNet master board S-LINK V board – Parallel I/O board DeviceNet master board S-LINK V board – Parallel I/O board DeviceNet master board S-LINK V board Allocation modes Extension 3 – – – Parallel I/O board S-LINK V board – – – – – – – – – – – – – – – – – – – – – Mini I/O dedicated Allocated to Extension 1 Compatible Standard √ √ √ √ √ All user I/O √ √ √ √ √ √ √ √ √ √ √ √ √ √ √ √ √ √ √ √ √ √ √ √ √ √ √ √ √ √ √ √ √ √ √ √ √ √ √ √ √ √ √ √ √ √ √ √ √ √ √ √ √ √ √ √ √ Note 1: Out of check-marked modes in the "Allocation modes" column, only one mode can be selected. Note 2: Up to two I/O extension boards can be mounted on the controller. There are no restrictions on the choice of extension slots or the mounting order. Note 3: When two I/O extension boards are mounted, the controller recognizes the one inserted in the left-hand extension slot as Extension 1. The allocation I/O port numbers on Extension 1 and 2 boards differ with each other. 103 7.2 I/O Allocation in Individual Allocation Modes The table below lists the I/O allocation for extension boards in individual allocation modes. For details, refer to Section 7.5 "I/O Allocation Tables for Individual Allocation Modes." Note: For the I/O allocation for the DeviceNet master/slave board, see the allocation tables for the DeviceNet master and slave boards. I/O Allocation of Extension Boards in Individual Allocation Modes Allocation for CN5 and extension boards Allocation tables to apply CN5 Tables for mini I/O board in mini I/O dedicated mode Mini I/O dedicated mode Extensions 1, 2, 3 Tables for extension boards in all user I/O mode CN5 Tables for mini I/O board in compatible, standard and all user I/O modes Compatible mode Extension 1 Tables for extension boards in compatible mode Extensions 2, 3 Tables for extension boards in all user I/O mode CN5 Tables for mini I/O boards in compatible, standard and all user I/O modes Standard mode Extension 1 Tables for extension boards in standard mode Allocation modes I/O Extensions 2, 3 CN5 All user I/O mode Extensions 1, 2, 3 Tables for extension boards in all user I/O mode Tables for mini I/O board in compatible, standard and all user I/O modes Tables for extension boards in all user I/O mode Note: Extensions 1, 2, and 3 correspond to the ones listed in the "Combination of I/O Extension Boards" table on the previous page. 7.3 Notes on Using I/O Extension Boards (1) Parameter change for switching between allocation modes To switch between the compatible, standard, and all user I/O modes, you need to change parameters using the teach pendant or WINCAPSIII. For the changing procedure, refer to the RC7M Controller OPTIONS MANUAL, Section 4.6. (2) Power supply setting for mini I/O board (CN5) or parallel I/O board When using the mini I/O board (CN5) or parallel I/O board, you need to set up the 24 V power supply (internal or external). The factory default is external power supply. For details about the mini I/O board, see Section 4.2.1 or 5.2.1. For details about the parallel I/O board, refer to the RC7M Controller OPTIONS MANUAL, Section 5.2.2. 104 7.4 Hand I/O (CN9): Common to All Allocation Modes The RC7M controller supports hand I/O signals (CN9) as standard. This hand I/O is common to all allocation modes. HAND I/O (CN9): NPN type Terminal Signal name No. 1 Hand output 2 Hand output 3 Hand output 4 Hand output 5 Hand output 6 Hand output 64 65 66 67 68 69 Terminal No. 11 12 13 14 15 16 Port No. Signal name Port No. Hand input Hand input Hand input Hand input Hand input Hand input 50 51 52 53 54 55 7 Hand output 70 17 Power output for hand (+24 VDC) (External/internal source) ⎯ 8 Hand output 71 18 Power output for hand (+0 VDC) (External/internal source) ⎯ 9 10 Hand input Hand input 48 49 19 20 No connection No connection ⎯ ⎯ HAND I/O (CN9): PNP type Terminal Signal name No. 1 Hand output 2 Hand output 3 Hand output 4 Hand output 5 Hand output 6 Hand output 64 65 66 67 68 69 Terminal No. 11 12 13 14 15 16 Port No. Signal name Port No. Hand input Hand input Hand input Hand input Hand input Hand input 50 51 52 53 54 55 7 Hand output 70 17 Power output for hand (+0 VDC) (External/internal source) ⎯ 8 Hand output 71 18 Power output for hand (+24 VDC) (External/internal source) ⎯ 9 10 Hand input Hand input 48 49 19 20 No connection No connection ⎯ ⎯ 105 7.5 7.5.1 I/O Allocation Tables for Individual Allocation Modes Mini I/O Board (CN5 on standard type of controller) in Mini I/O Dedicated Mode Terminal Signal Name No. Enable Auto (Internal +24V) 1 2 3 4 5 Port No. Terminal Signal Name No. Enable Auto 35 (input) ⎯ External Emergency Stop 1, b-1 (Internal +24V) (input) ⎯ 36 ⎯ 37 ⎯ ⎯ 38 39 ⎯ Port No. (input) ⎯ External Emergency Stop 1, b-2 (input) ⎯ External Emergency Stop 2, b-2 (input) Reserved. Reserved. ⎯ 40 Emergency Stop 1, -2 (Mini relay) (output) ⎯ ⎯ 41 Emergency Stop 2, -2 (Mini relay) (output) ⎯ ⎯ 42 Deadman SW 1, -2 (output) [Enable SW 1, -2] (Mini relay) ⎯ ⎯ 43 ⎯ (input) (input) (input) (input) (input) ⎯ 0 1 2 3 4 44 45 46 47 48 49 Deadman SW 2, -2 (output) [Enable SW 2, -2] (Mini relay) ⎯ CPU Normal (No monitor allowed) (output) Robot Running (output) Robot Error (output) Robot Initialized (output) Auto Mode (output) Operation Preparation Completed (output) Battery Warning (output) Command Processing Completed (output) User output/ Continue Start Permission (output) User output User output User output User output User output User output User output ⎯ External Emergency Stop 2, b-1 (Internal +24V) (input) Reserved. Reserved. 6 Emergency Stop 1, -1 (Mini relay) (output) 7 Emergency Stop 2, -1 (Mini relay) (output) 8 Deadman SW 1, -1 (output) [Enable SW 1, -1] (Mini relay) 10 11 12 13 14 15 Deadman SW 2, -1 [Enable SW 2, -1] (Mini relay) ⎯ Step Stop (All tasks) Strobe Signal Data area bit 0 Data area bit 1 Data area bit 2 16 Command area bit 0 (input) 5 50 17 Command area bit 1 (input) 6 51 18 Command area bit 2 (input) 7 52 19 User input 8 53 20 21 22 23 24 25 26 27 User input User input User input User input User input User input User input ⎯ 9 10 11 12 13 14 15 ⎯ 54 55 56 57 58 59 60 61 28 Pendant Emergency Stop 1, b-1 (Dry output) (output) ⎯ 62 Pendant Emergency Stop 1, b-2 (Dry output) (output) ⎯ 29 Pendant Emergency Stop 2, b-1 (Dry output) (output) ⎯ 63 Pendant Emergency Stop 2, b-2 (Dry output) (output) ⎯ ⎯ 64 ⎯ ⎯ ⎯ 65 66 67 ⎯ 68 9 30 31 32 33 34 (output) ⎯ ⎯ Dedicated to conveyor tracking board (when JP12 on mini I/O board is shorted. Internal power source +24V) ⎯ DC power input +24V (when external power source is used) DC power output +24V (when internal power source is used) 106 Dedicated to conveyor tracking board (when JP13 on mini I/O board is shorted. Internal power source 0V) ⎯ DC power input 0V (when external power source is used) DC power output 0V (when internal power source is used) ⎯ 16 17 18 19 20 21 22 23 24 25 26 27 28 29 30 31 ⎯ ⎯ ⎯ ⎯ ⎯ ⎯ 7.5.2 Mini I/O Board (CN5 on global type of controller) in Mini I/O Dedicated Mode Terminal No. Reserved. 1 Reserved. 2 ⎯ Terminal No. Reserved. 35 Reserved. 36 3 Reserved. ⎯ 37 Reserved. ⎯ 4 Reserved. ⎯ 38 Reserved. ⎯ 5 Reserved. ⎯ 39 Reserved. ⎯ 6 Reserved. ⎯ 40 Reserved. ⎯ 7 Reserved. ⎯ 41 Reserved. ⎯ 8 Reserved. ⎯ 42 Reserved. ⎯ 9 Reserved. ⎯ 43 Reserved. ⎯ 10 ⎯ ⎯ 44 ⎯ ⎯ 11 Step Stop (All tasks) (input) 0 45 CPU Normal (No monitor allowed) (output) 16 12 Strobe Signal (input) 1 46 Robot Running (output) 17 13 Data area bit 0 (input) 2 47 Robot Error (output) 18 14 Data area bit 1 (input) 3 48 Robot Initialized (output) 19 15 Data area bit 2 (input) 4 49 Auto Mode (output) 20 21 Signal Name Port No. ⎯ Signal Name Port No. ⎯ ⎯ 16 Command area bit 0 (input) 5 50 Operation Preparation Completed (output) 17 Command area bit 1 (input) 6 51 Battery Warning (output) 22 7 52 Command Processing Completed (output) 23 8 53 User output/ Continue Start Permission 24 18 Command area bit 2 19 User input 20 User input 9 54 User output 25 21 User input 10 55 User output 26 22 User input 11 56 User output 27 23 User input 12 57 User output 28 24 User input 13 58 User output 29 25 User input 14 59 User output 30 26 User input 15 60 Reserved. 31 27 ⎯ ⎯ 61 ⎯ ⎯ 28 Reserved. ⎯ 62 Reserved. ⎯ 29 Reserved. ⎯ 63 Reserved. ⎯ 30 Dedicated to conveyor tracking board (when JP12 on mini I/O board is shorted. Internal power source +24V) ⎯ 64 Dedicated to conveyor tracking board (when JP13 on mini I/O board is shorted. Internal power source 0V) ⎯ 31 ⎯ ⎯ 65 ⎯ ⎯ DC power input +24V (when external power source is used) ⎯ 66 ⎯ 33 ⎯ 67 DC power input 0V (when external power source is used) 34 DC power output +24V (when internal power source is used) 68 DC power output 0V (when internal power source is used) 32 (input) ⎯ 107 (output) ⎯ ⎯ 7.5.3 Mini I/O Board (CN5 on standard type of controller) in Compatible, Standard and All User I/O Modes Terminal Signal Name No. Enable Auto (Internal +24V) 1 2 3 4 5 Port No. (input) External Emergency Stop 1, b-1 (Internal +24V) (input) External Emergency Stop 2, b-1 (Internal +24V) (input) Reserved. Reserved. 6 Emergency Stop 1, -1 (Mini relay) (output) 7 Emergency Stop 2, -1 (Mini relay) (output) 8 Deadman SW 1, -1 (output) [Enable SW 1, -1] (Mini relay) ⎯ Terminal Signal Name No. Enable Auto 35 Port No. (input) ⎯ External Emergency Stop 1, b-2 (input) ⎯ ⎯ 36 ⎯ 37 ⎯ ⎯ 38 39 ⎯ 40 Emergency Stop 1, -2 (Mini relay) (output) ⎯ 41 Emergency Stop 2, -2 (Mini relay) (output) ⎯ 42 Deadman SW 1, -2 (output) [Enable SW 1, -2] (Mini relay) ⎯ 43 ⎯ 0 44 45 Deadman SW 2, -2 (output) [Enable SW 2, -2] (Mini relay) ⎯ CPU Normal (No monitor allowed) (output) External Emergency Stop 2, b-2 (input) Reserved. Reserved. ⎯ ⎯ ⎯ ⎯ ⎯ ⎯ 10 11 Deadman SW 2, -1 (output) [Enable SW 2, -1] (Mini relay) ⎯ User input 12 User input 1 46 User output 13 User input 2 47 User output 14 User input 3 48 User output 15 User input 4 49 User output 16 User input 5 50 User output 17 User input 6 51 User output 18 User input 7 52 User output 19 User input 8 53 User output 20 User input 9 54 User output 21 User input 10 55 User output 22 User input 11 56 User output 23 User input 12 57 User output 24 User input 13 58 User output 25 User input 14 59 User output 26 User input 15 60 User output 20 21 22 23 24 25 26 27 28 29 30 31 27 ⎯ ⎯ 61 ⎯ ⎯ 28 Pendant Emergency Stop 1, b-1 (Dry output) (output) ⎯ 62 Pendant Emergency Stop 1, b-2 (Dry output) (output) ⎯ 29 Pendant Emergency Stop 2, b-1 (Dry output) (output) ⎯ 63 Pendant Emergency Stop 2, b-2 (Dry output) (output) ⎯ 30 Dedicated to conveyor tracking board (when JP12 on mini I/O board is shorted. Internal power source +24V) ⎯ 64 Dedicated to conveyor tracking board (when JP13 on mini I/O board is shorted. Internal power source 0V) ⎯ ⎯ ⎯ ⎯ 65 66 67 ⎯ 68 9 31 32 33 34 ⎯ DC power input +24V (when external power source is used) DC power output +24V (when internal power source is used) 108 ⎯ DC power input 0V (when external power source is used) DC power output 0V (when internal power source is used) ⎯ ⎯ 16 17 18 19 ⎯ ⎯ ⎯ ⎯ 7.5.4 Mini I/O Board (CN5 on global type of controller) in Compatible, Standard, and All User I/O Modes Terminal No. 1 Reserved. Signal Name Port No. ⎯ Terminal No. 35 Reserved. Signal Name Port No. ⎯ 2 Reserved. ⎯ 36 Reserved. ⎯ 3 Reserved. ⎯ 37 Reserved. ⎯ 4 Reserved. ⎯ 38 Reserved. ⎯ 5 Reserved. ⎯ 39 Reserved. ⎯ 6 Reserved. ⎯ 40 Reserved. ⎯ 7 Reserved. ⎯ 41 Reserved. ⎯ 8 Reserved. ⎯ 42 Reserved. ⎯ 9 Reserved. ⎯ 43 Reserved. ⎯ 10 ⎯ ⎯ 44 ⎯ 11 User input 0 45 CPU Normal (No monitor allowed) 12 User input 1 46 User output 17 13 User input 2 47 User output 18 14 User input 3 48 User output 19 15 User input 4 49 User output 20 16 User input 5 50 User output 21 17 User input 6 51 User output 22 18 User input 7 52 User output 23 19 User input 8 53 User output 24 20 User input 9 54 User output 25 21 User input 10 55 User output 26 22 User input 11 56 User output 27 23 User input 12 57 User output 28 24 User input 13 58 User output 29 25 User input 14 59 User output 30 26 User input 15 60 Reserved. 31 27 ⎯ ⎯ 61 ⎯ ⎯ 28 Reserved. ⎯ 62 Reserved. ⎯ 29 Reserved. ⎯ 63 Reserved. ⎯ 30 Dedicated to conveyor tracking board (when JP12 on mini I/O board is shorted. Internal power source +24V) ⎯ 64 Dedicated to conveyor tracking board (when JP13 on mini I/O board is shorted. Internal power source 0V) ⎯ 31 ⎯ (output) 16 ⎯ ⎯ 65 ⎯ ⎯ 32 33 DC power input +24V (when external power source is used) ⎯ ⎯ 66 67 DC power input 0V (when external power source is used) ⎯ ⎯ 34 DC power output +24V (when internal power source is used) ⎯ 68 DC power output 0V (when internal power source is used) ⎯ 109 7.5.5 Terminal No. Parallel I/O Board in Compatible Mode Signal Name Port No. Direction Terminal No. Signal Name Error in the hundreds place, bit 0 Error in the hundreds place, bit 1 Error in the hundreds place, bit 2 Error in the hundreds place, bit 3 SS Mode Reserved. Reserved. Reserved. Port No. Direction 3864 OUT 3865 OUT 3866 OUT 3867 OUT 3868 3869 3870 3871 3872 3873 3874 3875 3876 3877 3878 3879 3880 3881 3882 3883 3884 3885 3886 3887 3604 3605 OUT OUT OUT OUT OUT OUT OUT OUT OUT OUT OUT OUT OUT OUT OUT OUT OUT OUT OUT OUT IN IN 1 Reserved. 3840 OUT 49 2 Robot Running 3841 OUT 50 3 Robot Error 3842 OUT 51 4 Auto Mode 3843 OUT 52 5 6 7 8 9 10 11 12 13 14 15 16 17 18 19 20 21 22 23 24 25 26 3844 3845 3846 3847 3848 3849 3850 3851 3852 3853 3854 3855 3856 3857 3858 3859 3860 3861 3862 3863 3584 3585 OUT OUT OUT OUT OUT OUT OUT OUT OUT OUT OUT OUT OUT OUT OUT OUT OUT OUT OUT OUT IN IN 53 54 55 56 57 58 59 60 61 62 63 64 65 66 67 68 69 70 71 72 73 74 3586 IN 75 3606 IN 28 29 30 31 32 33 34 35 36 37 38 39 40 41 42 43 44 45 External Mode Program Start Reset Reserved. Reserved. Robot Power ON Completed Servo ON CAL Completed Teaching ON 1 Cycle End Battery Warning Robot Warning Continue Start Permission Error in the units place, bit 0 Error in the units place, bit 1 Error in the units place, bit 2 Error in the units place, bit 3 Error in the tens place, bit 0 Error in the tens place, bit 1 Error in the tens place, bit 2 Error in the tens place, bit 3 Step Stop (All tasks) Continue Start Instantaneous Stop (All tasks) [Halt] Operation Preparation Start Interruption Skip Program Start Program No. selection bit 0 Program No. selection bit 1 Program No. selection bit 2 Program No. selection bit 3 Program No. selection bit 4 Program No. selection bit 5 Program No. selection bit 6 Program No. selection parity bit Motor Power ON CAL Execution Reserved. SP100 External Mode Change Program Reset Power +24V 3587 3588 3589 3590 3591 3592 3593 3594 3595 3596 3597 3598 3599 3600 3601 3602 3603 76 77 78 79 80 81 82 83 84 85 86 87 88 89 90 91 92 93 3607 3608 3609 3610 3611 3612 3613 3614 3615 3616 3617 3618 3619 3620 3621 3622 3623 ⎯ IN IN IN IN IN IN IN IN IN IN IN IN IN IN IN IN IN IN Power 0V ⎯ IN IN IN IN IN IN IN IN IN IN IN IN IN IN IN IN IN IN 46 Power +24V ⎯ IN 94 Power 0V ⎯ IN 47 Power +24V ⎯ IN 95 Power 0V ⎯ IN 48 Power +24V ⎯ IN 96 Power 0V ⎯ IN 27 110 User output Clear Robot Error User input 7.5.6 Terminal No. 1 2 3 4 5 6 7 8 9 10 11 12 13 14 15 16 17 18 19 20 21 22 23 24 25 26 27 28 29 30 31 32 33 34 35 36 37 38 39 40 41 42 43 44 45 46 47 48 Parallel I/O Board in Standard Mode Signal Name Port No. Direction Reserved. Robot Running Robot Error Servo ON Robot Initialized Auto Mode External Mode Battery Warning Robot Warning Continue Start Permission SS Mode Reserved. Reserved. Reserved. Command Processing Completed Status area odd parity Status area bit 0 Status area bit 1 Status area bit 2 Status area bit 3 Status area bit 4 Status area bit 5 Status area bit 6 Status area bit 7 Step Stop (All tasks) Reserved. Instantaneous Stop (All tasks) [Halt] Strobe Signal Interruption Skip Command data area odd parity Data area 1 bit 0 Data area 1 bit 1 Data area 1 bit 2 Data area 1 bit 3 Data area 1 bit 4 Data area 1 bit 5 Data area 1 bit 6 Data area 1 bit 7 Data area 2 bit 0 Data area 2 bit 1 Data area 2 bit 2 Data area 2 bit 3 Data area 2 bit 4 Data area 2 bit 5 Power +24V Power +24V Power +24V Power +24V 3840 3841 3842 3843 3844 3845 3846 3847 3848 3849 3850 3851 3852 3853 OUT OUT OUT OUT OUT OUT OUT OUT OUT OUT OUT OUT OUT OUT Terminal No. 49 50 51 52 53 54 55 56 57 58 59 60 61 62 3854 OUT 63 3855 3856 3857 3858 3859 3860 3861 3862 3863 3584 3585 OUT OUT OUT OUT OUT OUT OUT OUT OUT IN IN 64 65 66 67 68 69 70 71 72 73 74 3586 IN 3587 3588 Port No. Direction 3864 3865 3866 3867 3868 3869 3870 3871 3872 3873 3874 3875 3876 3877 OUT OUT OUT OUT OUT OUT OUT OUT OUT OUT OUT OUT OUT OUT 3878 OUT Data area 2 bit 6 Data area 2 bit 7 3879 3880 3881 3882 3883 3884 3885 3886 3887 3604 3605 OUT OUT OUT OUT OUT OUT OUT OUT OUT IN IN 75 Data area 2 bit 8 3606 IN IN IN 76 77 Data area 2 bit 9 Data area 2 bit 10 3607 3608 IN IN 3589 IN 78 Data area 2 bit 11 3609 IN 3590 3591 3592 3593 3594 3595 3596 3597 3598 3599 3600 3601 3602 3603 ⎯ ⎯ ⎯ ⎯ IN IN IN IN IN IN IN IN IN IN IN IN IN IN IN IN IN IN 79 80 81 82 83 84 85 86 87 88 89 90 91 92 93 94 95 96 Data area 2 bit 12 Data area 2 bit 13 Data area 2 bit 14 Data area 2 bit 15 Command area bit 0 Command area bit 1 Command area bit 2 Command area bit 3 3610 3611 3612 3613 3614 3615 3616 3617 3618 3619 3620 3621 3622 3623 ⎯ ⎯ ⎯ ⎯ IN IN IN IN IN IN IN IN IN IN IN IN IN IN IN IN IN IN 111 Signal Name Status area bit 8 Status area bit 9 Status area bit 10 Status area bit 11 Status area bit 12 Status area bit 13 Status area bit 14 Status area bit 15 User output User input Power 0V Power 0V Power 0V Power 0V 7.5.7 Terminal No. 1 2 3 4 5 6 7 8 9 10 11 12 13 14 15 16 17 18 19 20 21 22 23 24 25 26 27 28 29 30 31 32 33 34 35 36 37 38 39 40 41 42 43 44 45 46 47 48 Parallel I/O Board (1st) in All User I/O Mode Signal Name User output User input Power +24V Power +24V Power +24V Power +24V Port No. 3840 3841 3842 3843 3844 3845 3846 3847 3848 3849 3850 3851 3852 3853 3854 3855 3856 3857 3858 3859 3860 3861 3862 3863 3584 3585 3586 3587 3588 3589 3590 3591 3592 3593 3594 3595 3596 3597 3598 3599 3600 3601 3602 3603 ⎯ ⎯ ⎯ ⎯ Direction OUT OUT OUT OUT OUT OUT OUT OUT OUT OUT OUT OUT OUT OUT OUT OUT OUT OUT OUT OUT OUT OUT OUT OUT IN IN IN IN IN IN IN IN IN IN IN IN IN IN IN IN IN IN IN IN IN IN IN IN Terminal No. 49 50 51 52 53 54 55 56 57 58 59 60 61 62 63 64 65 66 67 68 69 70 71 72 73 74 75 76 77 78 79 80 81 82 83 84 85 86 87 88 89 90 91 92 93 94 95 96 112 Signal Name User output User input Power 0V Power 0V Power 0V Power 0V Port No. Direction 3864 OUT 3865 OUT 3866 OUT 3867 OUT 3868 OUT 3869 OUT 3870 OUT 3871 OUT 3872 OUT 3873 OUT 3874 OUT 3875 OUT 3876 OUT 3877 OUT 3878 OUT 3879 OUT 3880 OUT 3881 OUT 3882 OUT 3883 OUT 3884 OUT 3885 OUT 3886 OUT 3887 OUT 3604 IN 3605 IN 3606 IN 3607 IN 3608 IN 3609 IN 3610 IN 3611 IN 3612 IN 3613 IN 3614 IN 3615 IN 3616 IN 3617 IN 3618 IN 3619 IN 3620 IN 3621 IN 3622 IN 3623 IN ⎯ IN ⎯ IN ⎯ IN ⎯ IN 7.5.8 Terminal No. 1 2 3 4 5 6 7 8 9 10 11 12 13 14 15 16 17 18 19 20 21 22 23 24 25 26 27 28 29 30 31 32 33 34 35 36 37 38 39 40 41 42 43 44 45 46 47 48 Parallel I/O Board (2nd) in All User I/O Mode Signal Name User output User input Power +24V Power +24V Power +24V Power +24V Port No. 3888 3889 3890 3891 3892 3893 3894 3895 3896 3897 3898 3899 3900 3901 3902 3903 3904 3905 3906 3907 3908 3909 3910 3911 3624 3625 3626 3627 3628 3629 3630 3631 3632 3633 3634 3635 3636 3637 3638 3639 3640 3641 3642 3643 ⎯ ⎯ ⎯ ⎯ Direction OUT OUT OUT OUT OUT OUT OUT OUT OUT OUT OUT OUT OUT OUT OUT OUT OUT OUT OUT OUT OUT OUT OUT OUT IN IN IN IN IN IN IN IN IN IN IN IN IN IN IN IN IN IN IN IN IN IN IN IN Terminal No. 49 50 51 52 53 54 55 56 57 58 59 60 61 62 63 64 65 66 67 68 69 70 71 72 73 74 75 76 77 78 79 80 81 82 83 84 85 86 87 88 89 90 91 92 93 94 95 96 113 Signal Name User output User input Power 0V Power 0V Power 0V Power 0V Port No Direction 3912 OUT 3913 OUT 3914 OUT 3915 OUT 3916 OUT 3917 OUT 3918 OUT 3919 OUT 3920 OUT 3921 OUT 3922 OUT 3923 OUT 3924 OUT 3925 OUT 3926 OUT 3927 OUT 3928 OUT 3929 OUT 3930 OUT 3931 OUT 3932 OUT 3933 OUT 3934 OUT 3935 OUT 3644 IN 3645 IN 3646 IN 3647 IN 3648 IN 3649 IN 3650 IN 3651 IN 3652 IN 3653 IN 3654 IN 3655 IN 3656 IN 3657 IN 3658 IN 3659 IN 3660 IN 3661 IN 3662 IN 3663 IN ⎯ IN ⎯ IN ⎯ IN ⎯ IN 7.5.9 DeviceNet Slave Board in Compatible Mode Note: The table below applies also to the allocation of the slave area on the DeviceNet master/slave board. Input data Port No. Output data Signal name Port No. Signal name 512 Step Stop (All tasks) 768 Reserved. 513 Continue Start 769 Robot Running 514 Instantaneous Stop (All tasks) [Halt] 770 Robot Error 515 Operation Preparation Start 771 Auto Mode 516 Interruption Skip 772 External Mode 517 Program Start 773 Program Start Reset 518 ⎯ 774 Reserved. 519 ⎯ 775 Reserved. 520 Program No. selection bit 0 776 Robot Power ON Completed 521 Program No. selection bit 1 777 Servo ON 522 Program No. selection bit 2 778 CAL Completed 523 Program No. selection bit 3 779 Teaching ON 524 Program No. selection bit 4 780 1 Cycle End 525 Program No. selection bit 5 781 Battery Warning 526 Program No. selection bit 6 782 Robot Warning 527 Program selection parity 783 Continue Start Permission 528 Motor Power ON 784 Error in the units place, bit 0 529 CAL Execution 785 Error in the units place, bit 1 530 Reserved. 786 Error in the units place, bit 2 531 SP100 787 Error in the units place, bit 3 532 External Mode Change 788 Error in the tens place, bit 0 533 Program Reset 789 Error in the tens place, bit 1 534 Clear Robot Error 790 Error in the tens place, bit 2 535 ⎯ 791 Error in the tens place, bit 3 536 INPUT 536 792 Error in the hundreds place, bit 0 537 INPUT 537 793 Error in the hundreds place, bit 1 538 INPUT 538 794 Error in the hundreds place, bit 2 539 INPUT 539 795 Error in the hundreds place, bit 3 540 INPUT 540 796 SS Mode 541 INPUT 541 797 Reserved. 542 INPUT 542 798 Reserved. 543 INPUT 543 799 Reserved. 544 INPUT 544 800 OUTPUT 800 545 INPUT 545 801 OUTPUT 801 546 INPUT 546 802 OUTPUT 802 547 INPUT 547 803 OUTPUT 803 548 INPUT 548 804 OUTPUT 804 549 INPUT 549 805 : : (INPUT 550 to INPUT 764) (OUTPUT 806 to OUTPUT 1020) 765 INPUT 765 1021 OUTPUT 1021 766 INPUT 766 1022 OUTPUT 1022 767 INPUT 767 1023 OUTPUT 1023 114 7.5.10 DeviceNet Slave Board in Standard Mode Note: The table below applies also to the allocation of the slave area on the DeviceNet master/slave board. Port No. 512 513 514 515 516 517 518 519 520 521 522 523 524 525 526 527 528 529 530 531 532 533 534 535 536 537 538 539 540 541 542 543 544 545 546 547 548 to 551 552 553 : 766 767 Input data Signal name Step Stop (All tasks) Reserved. Instantaneous Stop (All tasks) [Halt] Strobe Signal Interruption Skip ⎯ Port No. 768 769 770 771 772 773 774 775 776 777 778 779 780 781 782 783 784 785 786 787 788 789 790 791 792 793 794 795 796 797 798 799 800 801 802 803 804 805 806 : 1022 1023 ⎯ Command data odd parity Data area 1 bit 0 Data area 1 bit 1 Data area 1 bit 2 Data area 1 bit 3 Data area 1 bit 4 Data area 1 bit 5 Data area 1 bit 6 Data area 1 bit 7 Data area 2 bit 0 Data area 2 bit 1 Data area 2 bit 2 Data area 2 bit 3 Data area 2 bit 4 Data area 2 bit 5 Data area 2 bit 6 Data area 2 bit 7 Data area 2 bit 8 Data area 2 bit 9 Data area 2 bit 10 Data area 2 bit 11 Data area 2 bit 12 Data area 2 bit 13 Data area 2 bit 14 Data area 2 bit 15 Command area bit 0 Command area bit 1 Command area bit 2 Command area bit 3 ⎯ INPUT 552 INPUT 553 (INPUT 554 to INPUT 765) INPUT 766 INPUT 767 115 Output data Signal name Reserved. Robot Running Robot Error Servo ON Robot Initialized Auto Mode External Mode Battery Warning Robot Warning Continue Start Permission SS Mode Reserved. Reserved. Reserved. Command Processing Completed Status area odd parity Status area bit 0 Status area bit 1 Status area bit 2 Status area bit 3 Status area bit 4 Status area bit 5 Status area bit 6 Status area bit 7 Status area bit 8 Status area bit 9 Status area bit 10 Status area bit 11 Status area bit 12 Status area bit 13 Status area bit 14 Status area bit 15 OUTPUT 800 OUTPUT 801 OUTPUT 802 OUTPUT 803 OUTPUT 804 OUTPUT 805 OUTPUT 806 (OUTPUT 807 to OUTPUT 1021) OUTPUT 1022 OUTPUT 1023 7.5.11 DeviceNet Slave Board in All User I/O Mode Note: The table below applies also to the allocation of the slave area on the DeviceNet master/slave board. Port No. 512 513 514 515 516 517 518 519 520 521 522 523 524 525 526 527 528 529 530 531 532 533 534 535 536 537 538 539 540 541 542 543 544 545 546 547 548 549 : 765 766 767 Input data Signal name INPUT 512 INPUT 513 INPUT 514 INPUT 515 INPUT 516 INPUT 517 INPUT 518 INPUT 519 INPUT 520 INPUT 521 INPUT 522 INPUT 523 INPUT 524 INPUT 525 INPUT 526 INPUT 527 INPUT 528 INPUT 529 INPUT 530 INPUT 531 INPUT 532 INPUT 533 INPUT 534 INPUT 535 INPUT 536 INPUT 537 INPUT 538 INPUT 539 INPUT 540 INPUT 541 INPUT 542 INPUT 543 INPUT 544 INPUT 545 INPUT 546 INPUT 547 INPUT 548 INPUT 549 (INPUT 550 to INPUT 764) INPUT 765 INPUT 766 INPUT 767 Port No. 768 769 770 771 772 773 774 775 776 777 778 779 780 781 782 783 784 785 786 787 788 789 790 791 792 793 794 795 796 797 798 799 800 801 802 803 804 805 : 1021 1022 1023 116 Output data Signal name OUTPUT 768 OUTPUT 769 OUTPUT 770 OUTPUT 771 OUTPUT 772 OUTPUT 773 OUTPUT 774 OUTPUT 775 OUTPUT 776 OUTPUT 777 OUTPUT 778 OUTPUT 779 OUTPUT 780 OUTPUT 781 OUTPUT 782 OUTPUT 783 OUTPUT 784 OUTPUT 785 OUTPUT 786 OUTPUT 787 OUTPUT 788 OUTPUT 789 OUTPUT 790 OUTPUT 791 OUTPUT 792 OUTPUT 793 OUTPUT 794 OUTPUT 795 OUTPUT 796 OUTPUT 797 OUTPUT 798 OUTPUT 799 OUTPUT 800 OUTPUT 801 OUTPUT 802 OUTPUT 803 OUTPUT 804 OUTPUT 805 (OUTPUT 806 to OUTPUT 1020) OUTPUT 1021 OUTPUT 1022 OUTPUT 1023 7.5.12 CC-Link Board (2 stations occupied) in Compatible Mode Input data Port No. 512 513 514 515 516 517 518 519 520 521 522 523 524 525 526 527 528 529 530 531 532 533 534 535 536 : 559 560 : 575 Signal name Step Stop (All tasks) Continue Start Instantaneous Stop (All tasks) [Halt] Operation Preparation Start Interruption Skip Program Start ⎯ ⎯ Program No. selection bit 0 Program No. selection bit 1 Program No. selection bit 2 Program No. selection bit 3 Program No. selection bit 4 Program No. selection bit 5 Program No. selection bit 6 Program No. selection parity bit Motor Power ON CAL Execution Reserved. SP100 External Mode Change Program Reset Clear Robot Error Reserved. User input (INPUT m) (Note 2) Not used. Output data Remote output (Note 1) RYn0 RYn1 Port No. Remote input (Note 1) RXn0 RXn1 768 769 Reserved. Robot Running RYn2 770 Robot Error RYn3 RYn4 RYn5 RYn6 RYn7 RYn8 RYn9 RYnA RYnB RYnC RYnD RYnE RYnF RY(n+1)0 RY(n+1)1 RY(n+1)2 RY(n+1)3 RY(n+1)4 RY(n+1)5 RY(n+1)6 RY(n+1)7 RY(n+1)8 : RY(n+2)F 771 772 773 774 775 776 777 778 779 780 781 782 783 784 785 786 787 788 789 790 791 792 793 794 Auto Mode External Mode Program Start Reset Reserved. Reserved. Robot Power ON Completed Servo ON CAL Completed Teaching ON 1 Cycle End Battery Warning Robot Warning Continue Start Permission Error in the units place, bit 0 Error in the units place, bit 1 Error in the units place, bit 2 Error in the units place, bit 3 Error in the tens place, bit 0 Error in the tens place, bit 1 Error in the tens place, bit 2 Error in the tens place, bit 3 Error in the hundreds place, bit 0 Error in the hundreds place, bit 1 Error in the hundreds place, bit 2 RXn3 RXn4 RXn5 RXn6 RXn7 RXn8 RXn9 RXnA RXnB RXnC RXnD RXnE RXnF RX(n+1)0 RX(n+1)1 RX(n+1)2 RX(n+1)3 RX(n+1)4 RX(n+1)5 RX(n+1)6 RX(n+1)7 RX(n+1)8 RX(n+1)9 RX(n+1)A RY(n+3)0 : RY(n+3)F 795 796 797 Error in the hundreds place, bit 3 SS Mode Reserved. RX(n+1)B RX(n+1)C RX(n+1)D 798 799 800 : 815 Reserved. Reserved. RX(n+1)E RX(n+1)F RX(n+2)0 : RX(n+2)F 816 : 825 826 827 828 : 831 Note 1: Note 2: Note 3: Note 4: Note 5: Signal name User output (OUTPUT m) (Note 2) Not used. Error status flag (Note 3) Remote station ready (Note 4) Not used. RXn2 RX(n+3)0 : RX(n+3)9 RX(n+3)A RX(n+3)B RX(n+3)C : RX(n+3)F n denotes (station number − 1) × 2 (hexadecimal notation). m denotes I/O port number. The output timing is the same as that of Robot Error (I/O port #770) and Robot Warning (I/O port #782). The output timing is the same as that of Robot Power ON Completed (I/O port #776). indicates the system area that cannot be used for user I/O. Additional note For remote registers RWw and RWr, refer to the Options Manual " Remote Resistors (RWw and RWr)" 117 7.5.13 CC-Link Board (3 stations occupied) in Compatible Mode Input data Port No. 512 513 514 515 516 517 518 519 520 521 522 523 524 525 526 527 528 529 530 531 532 533 534 535 536 : 591 592 : 607 Signal name Step Stop (All tasks) Continue Start Instantaneous Stop (All tasks) [Halt] Operation Preparation Start Interruption Skip Program Start ⎯ ⎯ Program No. selection bit 0 Program No. selection bit 1 Program No. selection bit 2 Program No. selection bit 3 Program No. selection bit 4 Program No. selection bit 5 Program No. selection bit 6 Program No. selection parity bit Motor Power ON CAL Execution Reserved. SP100 External Mode Change Program Reset Clear Robot Error Reserved. User input (INPUT m) (Note 2) Not used. Output data Remote output (Note 1) RYn0 RYn1 Port No. Remote input (Note 1) RXn0 RXn1 768 769 Reserved. Robot Running RYn2 770 Robot Error RYn3 RYn4 RYn5 RYn6 RYn7 RYn8 RYn9 RYnA RYnB RYnC RYnD RYnE RYnF RY(n+1)0 RY(n+1)1 RY(n+1)2 RY(n+1)3 RY(n+1)4 RY(n+1)5 RY(n+1)6 RY(n+1)7 RY(n+1)8 : RY(n+4)F 771 772 773 774 775 776 777 778 779 780 781 782 783 784 785 786 787 788 789 790 791 792 793 794 Auto Mode External Mode Program Start Reset Reserved. Reserved. Robot Power ON Completed Servo ON CAL Completed Teaching ON 1 Cycle End Battery Warning Robot Warning Continue Start Permission Error in the units place, bit 0 Error in the units place, bit 1 Error in the units place, bit 2 Error in the units place, bit 3 Error in the tens place, bit 0 Error in the tens place, bit 1 Error in the tens place, bit 2 Error in the tens place, bit 3 Error in the hundreds place, bit 0 Error in the hundreds place, bit 1 Error in the hundreds place, bit 2 RXn3 RXn4 RXn5 RXn6 RXn7 RXn8 RXn9 RxnA RXnB RXnC RXnD RxnE RXnF RX(n+1)0 RX(n+1)1 RX(n+1)2 RX(n+1)3 RX(n+1)4 RX(n+1)5 RX(n+1)6 RX(n+1)7 RX(n+1)8 RX(n+1)9 RX(n+1)A RY(n+5)0 : RY(n+5)F 795 796 797 Error in the hundreds place, bit 3 SS Mode Reserved. RX(n+1)B RX(n+1)C RX(n+1)D 798 799 800 : 847 Reserved. Reserved. RX(n+1)E RX(n+1)F RX(n+2)0 : RX(n+4)F 848 : 857 858 859 860 : 863 Note 1: Note 2: Note 3: Note 4: Note 5: Signal name User output (OUTPUT m) (Note 2) Not used. Error status flag (Note 3) Remote station ready (Note 4) Not used. RXn2 RX(n+5)0 : RX(n+5)9 RX(n+5)A RX(n+5)B RX(n+5)C : RX(n+5)F n denotes (station number − 1) × 2 (hexadecimal notation). m denotes I/O port number. The output timing is the same as that of Robot Error (I/O port #770) and Robot Warning (I/O port #782). The output timing is the same as that of Robot Power ON Completed (I/O port #776). indicates the system area that cannot be used for user I/O. Additional note For remote registers RWw and RWr, refer to the Options Manual " Remote Resistors (RWw and RWr)" 118 7.5.14 CC-Link Board (4 stations occupied) in Compatible Mode Input data Port No. 512 513 514 515 516 517 518 519 520 521 522 523 524 525 526 527 528 529 530 531 532 533 534 535 536 : 623 624 : 639 Signal name Step Stop (All tasks) Continue Start Instantaneous Stop (All tasks) [Halt] Operation Preparation Start Interruption Skip Program Start ⎯ ⎯ Program No. selection bit 0 Program No. selection bit 1 Program No. selection bit 2 Program No. selection bit 3 Program No. selection bit 4 Program No. selection bit 5 Program No. selection bit 6 Program No. selection parity bit Motor Power ON CAL Execution Reserved. SP100 External Mode Change Program Reset Clear Robot Error Reserved. User input (INPUT m) (Note 2) Not used. Output data Remote output (Note 1) RYn0 RYn1 Port No. Remote input (Note 1) RXn0 RXn1 768 769 Reserved. Robot Running RYn2 770 Robot Error RYn3 RYn4 RYn5 RYn6 RYn7 RYn8 RYn9 RYnA RYnB RYnC RYnD RYnE RYnF RY(n+1)0 RY(n+1)1 RY(n+1)2 RY(n+1)3 RY(n+1)4 RY(n+1)5 RY(n+1)6 RY(n+1)7 RY(n+1)8 : RY(n+6)F 771 772 773 774 775 776 777 778 779 780 781 782 783 784 785 786 787 788 789 790 791 792 793 794 Auto Mode External Mode Program Start Reset Reserved. Reserved. Robot Power ON Completed Servo ON CAL Completed Teaching ON 1 Cycle End Battery Warning Robot Warning Continue Start Permission Error in the units place, bit 0 Error in the units place, bit 1 Error in the units place, bit 2 Error in the units place, bit 3 Error in the tens place, bit 0 Error in the tens place, bit 1 Error in the tens place, bit 2 Error in the tens place, bit 3 Error in the hundreds place, bit 0 Error in the hundreds place, bit 1 Error in the hundreds place, bit 2 RXn3 RXn4 RXn5 RXn6 RXn7 RXn8 RXn9 RxnA RXnB RXnC RXnD RxnE RXnF RX(n+1)0 RX(n+1)1 RX(n+1)2 RX(n+1)3 RX(n+1)4 RX(n+1)5 RX(n+1)6 RX(n+1)7 RX(n+1)8 RX(n+1)9 RX(n+1)A RY(n+7)0 : RY(n+7)F 795 796 797 Error in the hundreds place, bit 3 SS Mode Reserved. RX(n+1)B RX(n+1)C RX(n+1)D 798 799 800 : 879 Reserved. Reserved. RX(n+1)E RX(n+1)F RX(n+2)0 : RX(n+6)F 880 : 889 890 891 892 : 895 Note 1: Note 2: Note 3: Note 4: Note 5: Signal name User output (OUTPUT m) (Note 2) Not used. Error status flag (Note 3) Remote station ready (Note 4) Not used. RXn2 RX(n+7)0 : RX(n+7)9 RX(n+7)A RX(n+7)B RX(n+7)C : RX(n+7)F n denotes (station number − 1) × 2 (hexadecimal notation). m denotes I/O port number. The output timing is the same as that of Robot Error (I/O port #770) and Robot Warning (I/O port #782). The output timing is the same as that of Robot Power ON Completed (I/O port #776). indicates the system area that cannot be used for user I/O. Additional note For remote registers RWw and RWr, refer to the Options Manual " Remote Resistors (RWw and RWr)" 119 7.5.15 CC-Link Board (2 stations occupied) in Standard Mode Input data Port No. 512 513 Signal name Output data Remote output (Note 1) RYn0 RYn1 Port No. Signal name 768 769 Reserved. Robot Running RYn2 770 Robot Error RYn3 RYn4 RYn5 RYn6 RYn7 RYn8 RYn9 RYnA RYnB RYnC RYnD RYnE RYnF RY(n+1)0 RY(n+1)1 RY(n+1)2 RY(n+1)3 RY(n+1)4 RY(n+1)5 RY(n+1)6 RY(n+1)7 RY(n+1)8 RY(n+1)9 RY(n+1)A RY(n+1)B RY(n+1)C RY(n+1)D RY(n+1)E RY(n+1)F RY(n+2)0 RY(n+2)1 RY(n+2)2 771 772 773 774 775 776 777 778 779 780 781 782 783 784 785 786 787 788 789 790 791 792 793 794 795 796 797 798 799 800 : 815 Servo ON Robot Initialized Auto Mode External Mode Battery Warning Robot Warning Continue Start Permission SS Mode Reserved. Reserved. Reserved. Command Processing Completed Status area odd parity Status area bit 0 Status area bit 1 Status area bit 2 Status area bit 3 Status area bit 4 Status area bit 5 Status area bit 6 Status area bit 7 Status area bit 8 Status area bit 9 Status area bit 10 Status area bit 11 Status area bit 12 Status area bit 13 Status area bit 14 Status area bit 15 Command area bit 3 Reserved. Reserved. Reserved. RY(n+2)3 RY(n+2)4 RY(n+2)5 RY(n+2)6 816 : 825 826 551 Reserved. RY(n+2)7 827 552 : 559 User input (INPUT m) (Note 2) RY(n+2)8 : RY(n+2)F 828 : 829 560 : 575 Not used. RY(n+3)0 : RY(n+3)F 515 516 517 518 519 520 521 522 523 524 525 526 527 528 529 530 531 532 533 534 535 536 537 538 539 540 541 542 543 544 545 546 Step Stop (All tasks) Reserved. Instantaneous Stop (All tasks) [Halt] Strobe Signal Interruption Skip ⎯ ⎯ Command data area odd parity Data area 1 bit 0 Data area 1 bit 1 Data area 1 bit 2 Data area 1 bit 3 Data area 1 bit 4 Data area 1 bit 5 Data area 1 bit 6 Data area 1 bit 7 Data area 2 bit 0 Data area 2 bit 1 Data area 2 bit 2 Data area 2 bit 3 Data area 2 bit 4 Data area 2 bit 5 Data area 2 bit 6 Data area 2 bit 7 Data area 2 bit 8 Data area 2 bit 9 Data area 2 bit 10 Data area 2 bit 11 Data area 2 bit 12 Data area 2 bit 13 Data area 2 bit 14 Data area 2 bit 15 Command area bit 0 Command area bit 1 Command area bit 2 547 548 549 550 514 Note 1: Note 2: Note 3: Note 4: Note 5: User output (OUTPUT m) (Note 2) Not used. Error status flag (Note 3) Remote station ready (Note 4) Not used. Remote input (Note 1) RXn0 RXn1 RXn2 RXn3 RXn4 RXn5 RXn6 RXn7 RXn8 RXn9 RXnA RXnB RXnC RXnD RXnE RXnF RX(n+1)0 RX(n+1)1 RX(n+1)2 RX(n+1)3 RX(n+1)4 RX(n+1)5 RX(n+1)6 RX(n+1)7 RX(n+1)8 RX(n+1)9 RX(n+1)A RX(n+1)B RX(n+1)C RX(n+1)D RX(n+1)E RX(n+1)F RX(n+2)0 : RX(n+2)F RX(n+3)0 : RX(n+3)9 RX(n+3)A RX(n+3)B RX(n+3)C : RX(n+3)F n denotes (station number − 1) × 2 (hexadecimal notation). m denotes I/O port number. The output timing is the same as that of Robot Error (I/O port #770) and Robot Warning (I/O port #776). The output timing is the same as that of Robot Initialized (I/O port #772). indicates the system area that cannot be used for user I/O. Additional note For remote registers RWw and RWr, refer to the Options Manual " Remote Resistors (RWw and RWr)" 120 7.5.16 CC-Link Board (3 stations occupied) in Standard Mode Input data Port No. 512 513 Signal name Output data Remote output. (Note 1) RYn0 RYn1 Port No. Signal name 768 769 Reserved. Robot Running RYn2 770 Robot Error RYn3 RYn4 RYn5 RYn6 RYn7 RYn8 RYn9 RYnA RYnB RYnC RYnD RYnE RYnF RY(n+1)0 RY(n+1)1 RY(n+1)2 RY(n+1)3 RY(n+1)4 RY(n+1)5 RY(n+1)6 RY(n+1)7 RY(n+1)8 RY(n+1)9 RY(n+1)A RY(n+1)B RY(n+1)C RY(n+1)D RY(n+1)E RY(n+1)F RY(n+2)0 RY(n+2)1 RY(n+2)2 771 772 773 774 775 776 777 778 779 780 781 782 783 784 785 786 787 788 789 790 791 792 793 794 795 796 797 798 799 800 : 847 Servo ON Robot Initialized Auto Mode External Mode Battery Warning Robot Warning Continue Start Permission SS Mode Reserved. Reserved. Reserved. Command Processing Completed Status area odd parity Status area bit 0 Status area bit 1 Status area bit 2 Status area bit 3 Status area bit 4 Status area bit 5 Status area bit 6 Status area bit 7 Status area bit 8 Status area bit 9 Status area bit 10 Status area bit 11 Status area bit 12 Status area bit 13 Status area bit 14 Status area bit 15 Command area bit 3 Reserved. Reserved. Reserved. RY(n+2)3 RY(n+2)4 RY(n+2)5 RY(n+2)6 848 : 857 858 551 Reserved. RY(n+2)7 859 552 : 591 User input (INPUT m) (Note 2) RY(n+2)8 : RY(n+4)F 860 : 863 592 : 607 Not used. RY(n+5)0 : RY(n+5)F 515 516 517 518 519 520 521 522 523 524 525 526 527 528 529 530 531 532 533 534 535 536 537 538 539 540 541 542 543 544 545 546 Step Stop (All tasks) Reserved. Instantaneous Stop (All tasks) [Halt] Strobe Signal Interruption Skip ⎯ ⎯ Command data area odd parity Data area 1 bit 0 Data area 1 bit 1 Data area 1 bit 2 Data area 1 bit 3 Data area 1 bit 4 Data area 1 bit 5 Data area 1 bit 6 Data area 1 bit 7 Data area 2 bit 0 Data area 2 bit 1 Data area 2 bit 2 Data area 2 bit 3 Data area 2 bit 4 Data area 2 bit 5 Data area 2 bit 6 Data area 2 bit 7 Data area 2 bit 8 Data area 2 bit 9 Data area 2 bit 10 Data area 2 bit 11 Data area 2 bit 12 Data area 2 bit 13 Data area 2 bit 14 Data area 2 bit 15 Command area bit 0 Command area bit 1 Command area bit 2 547 548 549 550 514 Note 1: Note 2: Note 3: Note 4: Note 5: User output (OUTPUT m) (Note 2) Not used. Error status flag (Note 3) Remote station ready (Note 4) Not used. Remote input (Note 1) RXn0 RXn1 RXn2 RXn3 RXn4 RXn5 RXn6 RXn7 RXn8 RXn9 RxnA RXnB RXnC RXnD RxnE RXnF RX(n+1)0 RX(n+1)1 RX(n+1)2 RX(n+1)3 RX(n+1)4 RX(n+1)5 RX(n+1)6 RX(n+1)7 RX(n+1)8 RX(n+1)9 RX(n+1)A RX(n+1)B RX(n+1)C RX(n+1)D RX(n+1)E RX(n+1)F RX(n+2)0 : RX(n+4)F RX(n+5)0 : RX(n+5)9 RX(n+5)A RX(n+5)B RX(n+5)C : RX(n+5)F n denotes (station number − 1) × 2 (hexadecimal notation). m denotes I/O port number. The output timing is the same as that of Robot Error (I/O port #770) and Robot Warning (I/O port #776). The output timing is the same as that of Robot Initialized (I/O port #772). indicates the system area that cannot be used for user I/O. Additional note For remote registers RWw and RWr, refer to the Options Manual " Remote Resistors (RWw and RWr)" 121 7.5.17 CC-Link Board (4 stations occupied) in Standard Mode Input data Port No. 512 513 Signal name Output data Remote output. (Note 1) RYn0 RYn1 Port No. Signal name 768 769 Reserved. Robot Running RYn2 770 Robot Error RYn3 RYn4 RYn5 RYn6 RYn7 RYn8 RYn9 RYnA RYnB RYnC RYnD RYnE RYnF RY(n+1)0 RY(n+1)1 RY(n+1)2 RY(n+1)3 RY(n+1)4 RY(n+1)5 RY(n+1)6 RY(n+1)7 RY(n+1)8 RY(n+1)9 RY(n+1)A RY(n+1)B RY(n+1)C RY(n+1)D RY(n+1)E RY(n+1)F RY(n+2)0 RY(n+2)1 RY(n+2)2 771 772 773 774 775 776 777 778 779 780 781 782 783 784 785 786 787 788 789 790 791 792 793 794 795 796 797 798 799 800 : 879 Servo ON Robot Initialized Auto Mode External Mode Battery Warning Robot Warning Continue Start Permission SS Mode Reserved. Reserved. Reserved. Command Processing Completed Status area odd parity Status area bit 0 Status area bit 1 Status area bit 2 Status area bit 3 Status area bit 4 Status area bit 5 Status area bit 6 Status area bit 7 Status area bit 8 Status area bit 9 Status area bit 10 Status area bit 11 Status area bit 12 Status area bit 13 Status area bit 14 Status area bit 15 Command area bit 3 Reserved. Reserved. Reserved. RY(n+2)3 RY(n+2)4 RY(n+2)5 RY(n+2)6 880 : 889 890 551 Reserved. RY(n+2)7 891 552 : 623 User input (INPUT m) (Note 2) RY(n+2)8 : RY(n+6)F 892 : 895 624 : 639 Not used. RY(n+7)0 : RY(n+7)F 515 516 517 518 519 520 521 522 523 524 525 526 527 528 529 530 531 532 533 534 535 536 537 538 539 540 541 542 543 544 545 546 Step Stop (All tasks) Reserved. Instantaneous Stop (All tasks) [Halt] Strobe Signal Interruption Skip ⎯ ⎯ Command data area odd parity Data area 1 bit 0 Data area 1 bit 1 Data area 1 bit 2 Data area 1 bit 3 Data area 1 bit 4 Data area 1 bit 5 Data area 1 bit 6 Data area 1 bit 7 Data area 2 bit 0 Data area 2 bit 1 Data area 2 bit 2 Data area 2 bit 3 Data area 2 bit 4 Data area 2 bit 5 Data area 2 bit 6 Data area 2 bit 7 Data area 2 bit 8 Data area 2 bit 9 Data area 2 bit 10 Data area 2 bit 11 Data area 2 bit 12 Data area 2 bit 13 Data area 2 bit 14 Data area 2 bit 15 Command area bit 0 Command area bit 1 Command area bit 2 547 548 549 550 514 Note 1: Note 2: Note 3: Note 4: Note 5: User output (OUTPUT m) (Note 2) Not used. Error status flag (Note 3) Remote station ready (Note 4) Not used. Remote input (Note 1) RXn0 RXn1 RXn2 RXn3 RXn4 RXn5 RXn6 RXn7 RXn8 RXn9 RxnA RXnB RXnC RXnD RxnE RXnF RX(n+1)0 RX(n+1)1 RX(n+1)2 RX(n+1)3 RX(n+1)4 RX(n+1)5 RX(n+1)6 RX(n+1)7 RX(n+1)8 RX(n+1)9 RX(n+1)A RX(n+1)B RX(n+1)C RX(n+1)D RX(n+1)E RX(n+1)F RX(n+2)0 : RX(n+6)F RX(n+7)0 : RX(n+7)9 RX(n+7)A RX(n+7)B RX(n+7)C : RX(n+7)F n denotes (station number − 1) × 2 (hexadecimal notation). m denotes I/O port number. The output timing is the same as that of Robot Error (I/O port #770) and Robot Warning (I/O port #776). The output timing is the same as that of Robot Initialized (I/O port #772). indicates the system area that cannot be used for user I/O. Additional note For remote registers RWw and RWr, refer to the Options Manual " Remote Resistors (RWw and RWr)" 122 7.5.18 CC-Link Board (2 stations occupied) in All User I/O Mode Input data Port No. 512 513 514 515 516 517 518 519 520 521 522 523 524 525 526 527 528 529 530 531 532 533 534 535 536 : 559 560 : 575 Signal name INPUT 512 INPUT 513 INPUT 514 INPUT 515 INPUT 516 INPUT 517 INPUT 518 INPUT 519 INPUT 520 INPUT 521 INPUT 522 INPUT 523 INPUT 524 INPUT 525 INPUT 526 INPUT 527 INPUT 528 INPUT 529 INPUT 530 INPUT 531 INPUT 532 INPUT 533 INPUT 534 INPUT 535 User input (INPUT m) (Note 2) Not used. Output data Remote output. (Note 1) RYn0 RYn1 RYn2 RYn3 RYn4 RYn5 RYn6 RYn7 RYn8 RYn9 RYnA RYnB RYnC RYnD RYnE RYnF RY(n+1)0 RY(n+1)1 RY(n+1)2 RY(n+1)3 RY(n+1)4 RY(n+1)5 RY(n+1)6 RY(n+1)7 RY(n+1)8 : RY(n+2)F 768 769 770 771 772 773 774 775 776 777 778 779 780 781 782 783 784 785 786 787 788 789 790 791 792 793 794 OUTPUT 768 OUTPUT 769 OUTPUT 770 OUTPUT 771 OUTPUT 772 OUTPUT 773 OUTPUT 774 OUTPUT 775 OUTPUT 776 OUTPUT 777 OUTPUT 778 OUTPUT 779 OUTPUT 780 OUTPUT 781 OUTPUT 782 OUTPUT 783 OUTPUT 784 OUTPUT 785 OUTPUT 786 OUTPUT 787 OUTPUT 788 OUTPUT 789 OUTPUT 790 OUTPUT 791 OUTPUT 792 OUTPUT 793 OUTPUT 794 Remote input (Note 1) RXn0 RXn1 RXn2 RXn3 RXn4 RXn5 RXn6 RXn7 RXn8 RXn9 RXnA RXnB RXnC RXnD RXnE RXnF RX(n+1)0 RX(n+1)1 RX(n+1)2 RX(n+1)3 RX(n+1)4 RX(n+1)5 RX(n+1)6 RX(n+1)7 RX(n+1)8 RX(n+1)9 RX(n+1)A 795 796 797 OUTPUT 795 OUTPUT 796 OUTPUT 797 RX(n+1)B RX(n+1)C RX(n+1)D 798 799 800 : 815 OUTPUT 798 OUTPUT 799 RX(n+1)E RX(n+1)F RX(n+2)0 : RX(n+2)F Port No. RY(n+3)0 : RY(n+3)F 816 : 825 826 827 828 : 831 Signal name User output (OUTPUT m) (Note 2) Not used. Error status flag Remote station ready Not used. Note 1: n denotes (station number − 1) × 2 (hexadecimal notation). Note 2: m denotes I/O port number. Note 3: indicates the system area that cannot be used for user I/O. Additional note For remote registers RWw and RWr, refer to the Options Manual " Remote Resistors (RWw and RWr)" 123 RX(n+3)0 : RX(n+3)9 RX(n+3)A RX(n+3)B RX(n+3)C : RX(n+3)F 7.5.19 CC-Link Board (3 stations occupied) in All User I/O Mode Input data Port No. 512 513 514 515 516 517 518 519 520 521 522 523 524 525 526 527 528 529 530 531 532 533 534 535 536 : 591 592 : 607 Signal name INPUT 512 INPUT 513 INPUT 514 INPUT 515 INPUT 516 INPUT 517 INPUT 518 INPUT 519 INPUT 520 INPUT 521 INPUT 522 INPUT 523 INPUT 524 INPUT 525 INPUT 526 INPUT 527 INPUT 528 INPUT 529 INPUT 530 INPUT 531 INPUT 532 INPUT 533 INPUT 534 INPUT 535 User input (INPUT m) (Note 2) Not used. Output data Remote output. (Note 1) RYn0 RYn1 RYn2 RYn3 RYn4 RYn5 RYn6 RYn7 RYn8 RYn9 RYnA RYnB RYnC RYnD RYnE RYnF RY(n+1)0 RY(n+1)1 RY(n+1)2 RY(n+1)3 RY(n+1)4 RY(n+1)5 RY(n+1)6 RY(n+1)7 RY(n+1)8 : RY(n+4)F 768 769 770 771 772 773 774 775 776 777 778 779 780 781 782 783 784 785 786 787 788 789 790 791 792 793 794 OUTPUT 768 OUTPUT 769 OUTPUT 770 OUTPUT 771 OUTPUT 772 OUTPUT 773 OUTPUT 774 OUTPUT 775 OUTPUT 776 OUTPUT 777 OUTPUT 778 OUTPUT 779 OUTPUT 780 OUTPUT 781 OUTPUT 782 OUTPUT 783 OUTPUT 784 OUTPUT 785 OUTPUT 786 OUTPUT 787 OUTPUT 788 OUTPUT 789 OUTPUT 790 OUTPUT 791 OUTPUT 792 OUTPUT 793 OUTPUT 794 Remote input (Note 1) RXn0 RXn1 RXn2 RXn3 RXn4 RXn5 RXn6 RXn7 RXn8 RXn9 RXnA RXnB RXnC RXnD RXnE RXnF RX(n+1)0 RX(n+1)1 RX(n+1)2 RX(n+1)3 RX(n+1)4 RX(n+1)5 RX(n+1)6 RX(n+1)7 RX(n+1)8 RX(n+1)9 RX(n+1)A 795 796 797 OUTPUT 795 OUTPUT 796 OUTPUT 797 RX(n+1)B RX(n+1)C RX(n+1)D 798 799 800 : 847 OUTPUT 798 OUTPUT 799 RX(n+1)E RX(n+1)F RX(n+2)0 : RX(n+4)F Port No. RY(n+5)0 : RY(n+5)F 848 : 857 858 859 860 : 863 Signal name User output (OUTPUT m) (Note 2) Not used. Error status flag Remote station ready Not used. Note 1: n denotes (station number − 1) × 2 (hexadecimal notation). Note 2: m denotes I/O port number. Note 3: indicates the system area that cannot be used for user I/O. Additional note For remote registers RWw and RWr, refer to the Options Manual " Remote Resistors (RWw and RWr)" 124 RX(n+5)0 : RX(n+5)9 RX(n+5)A RX(n+5)B RX(n+5)C : RX(n+5)F 7.5.20 CC-Link Board (4 stations occupied) in All User I/O Mode Input data Port No. 512 513 514 515 516 517 518 519 520 521 522 523 524 525 526 527 528 529 530 531 532 533 534 535 536 : 623 624 : 639 Signal name INPUT 512 INPUT 513 INPUT 514 INPUT 515 INPUT 516 INPUT 517 INPUT 518 INPUT 519 INPUT 520 INPUT 521 INPUT 522 INPUT 523 INPUT 524 INPUT 525 INPUT 526 INPUT 527 INPUT 528 INPUT 529 INPUT 530 INPUT 531 INPUT 532 INPUT 533 INPUT 534 INPUT 535 User input (INPUT m) (Note 2) Not used. Output data Remote output. (Note 1) RYn0 RYn1 RYn2 RYn3 RYn4 RYn5 RYn6 RYn7 RYn8 RYn9 RYnA RYnB RYnC RYnD RYnE RYnF RY(n+1)0 RY(n+1)1 RY(n+1)2 RY(n+1)3 RY(n+1)4 RY(n+1)5 RY(n+1)6 RY(n+1)7 RY(n+1)8 : RY(n+6)F 768 769 770 771 772 773 774 775 776 777 778 779 780 781 782 783 784 785 786 787 788 789 790 791 792 793 794 OUTPUT 768 OUTPUT 769 OUTPUT 770 OUTPUT 771 OUTPUT 772 OUTPUT 773 OUTPUT 774 OUTPUT 775 OUTPUT 776 OUTPUT 777 OUTPUT 778 OUTPUT 779 OUTPUT 780 OUTPUT 781 OUTPUT 782 OUTPUT 783 OUTPUT 784 OUTPUT 785 OUTPUT 786 OUTPUT 787 OUTPUT 788 OUTPUT 789 OUTPUT 790 OUTPUT 791 OUTPUT 792 OUTPUT 793 OUTPUT 794 Remote input (Note 1) RXn0 RXn1 RXn2 RXn3 RXn4 RXn5 RXn6 RXn7 RXn8 RXn9 RXnA RXnB RXnC RXnD RXnE RXnF RX(n+1)0 RX(n+1)1 RX(n+1)2 RX(n+1)3 RX(n+1)4 RX(n+1)5 RX(n+1)6 RX(n+1)7 RX(n+1)8 RX(n+1)9 RX(n+1)A 795 796 797 OUTPUT 795 OUTPUT 796 OUTPUT 797 RX(n+1)B RX(n+1)C RX(n+1)D 798 799 800 : 879 OUTPUT 798 OUTPUT 799 RX(n+1)E RX(n+1)F RX(n+2)0 : RX(n+6)F Port No. RY(n+7)0 : RY(n+7)F 880 : 889 890 891 892 : 895 Signal name User output (OUTPUT m) (Note 2) Not used. Error status flag Remote station ready Not used. Note 1: n denotes (station number − 1) × 2 (hexadecimal notation). Note 2: m denotes I/O port number. Note 3: indicates the system area that cannot be used for user I/O. Additional note For remote registers RWw and RWr, refer to the Options Manual " Remote Resistors (RWw and RWr)" 125 RX(n+7)0 : RX(n+7)9 RX(n+7)A RX(n+7)B RX(n+7)C : RX(n+7)F 7.5.21 PROFIBUS-DP Slave Board in Compatible Mode Port No. 512 513 514 515 516 517 518 519 520 521 522 523 524 525 526 527 528 529 530 531 532 533 534 535 536 537 538 539 540 541 542 543 544 545 546 547 548 549 : : 765 766 767 Input data Signal name Step Stop (All tasks) Continue Start Instantaneous Stop (All tasks) [Halt] Operation Preparation Start Interruption Skip Program Start ⎯ ⎯ Program No. selection bit 0 Program No. selection bit 1 Program No. selection bit 2 Program No. selection bit 3 Program No. selection bit 4 Program No. selection bit 5 Program No. selection bit 6 Program No. selection parity bit Motor power ON CAL Execution Reserved. SP100 External Mode Change Program Reset Clear Robot Error Reserved. INPUT 536 INPUT 537 INPUT 538 INPUT 539 INPUT 540 INPUT 541 INPUT 542 INPUT 543 INPUT 544 INPUT 545 INPUT 546 INPUT 547 INPUT 548 INPUT 549 Port No. 768 769 770 771 772 773 774 775 776 777 778 779 780 781 782 783 784 785 786 787 788 789 790 791 792 793 794 795 796 797 798 799 800 801 802 803 804 805 : : 1021 1022 1023 (INPUT 550 to INPUT 764) INPUT 765 INPUT 766 INPUT 767 Output data Signal name Reserved. Robot Running Robot Error Auto Mode External Mode Program Start Reset Reserved. Reserved. Robot Power ON Completed Servo ON CAL Completed Teaching ON 1 Cycle End Battery Warning Robot Warning Continue Start Permission Error in the units place, bit 0 Error in the units place, bit 1 Error in the units place, bit 2 Error in the units place, bit 3 Error in the tens place, bit 0 Error in the tens place, bit 1 Error in the tens place, bit 2 Error in the tens place, bit 3 Error in the hundreds place, bit 0 Error in the hundreds place, bit 1 Error in the hundreds place, bit 2 Error in the hundreds place, bit 3 SS Mode Reserved. Reserved. Reserved. OUTPUT 800 OUTPUT 801 OUTPUT 802 OUTPUT 803 OUTPUT 804 OUTPUT 805 (OUTPUT 806 to OUTPUT 1020) OUTPUT 1021 OUTPUT 1022 OUTPUT 1023 Note 1: n denotes (station number − 1) × 2 (hexadecimal notation). Note 2: m denotes I/O port number. Note 3: indicates the system area that cannot be used for user I/O. Additional note For remote registers RWw and RWr, refer to the Options Manual " Remote Resistors (RWw and RWr)" 126 7.5.22 PROFIBUS-DP Slave Board in Standard Mode Port No. 512 513 514 515 516 517 518 519 520 521 522 523 524 525 526 527 528 529 530 531 532 533 534 535 536 537 538 539 540 541 542 543 544 545 546 547 548 to 551 552 553 : : 766 767 Input data Signal name Step Stop (All tasks) Reserved. Instantaneous Stop (All tasks) [Halt] Strobe Signal Interruption Skip ⎯ ⎯ Command data area odd parity Data area 1 bit 0 Data area 1 bit 1 Data area 1 bit 2 Data area 1 bit 3 Data area 1 bit 4 Data area 1 bit 5 Data area 1 bit 6 Data area 1 bit 7 Data area 2 bit 0 Data area 2 bit 1 Data area 2 bit 2 Data area 2 bit 3 Data area 2 bit 4 Data area 2 bit 5 Data area 2 bit 6 Data area 2 bit 7 Data area 2 bit 8 Data area 2 bit 9 Data area 2 bit 10 Data area 2 bit 11 Data area 2 bit 12 Data area 2 bit 13 Data area 2 bit 14 Data area 2 bit 15 Command area bit 0 Command area bit 1 Command area bit 2 Command area bit 3 ⎯ INPUT 552 INPUT 553 Port No. 768 769 770 771 772 773 774 775 776 777 778 779 780 781 782 783 784 785 786 787 788 789 790 791 792 793 794 795 796 797 798 799 800 801 802 803 804 805 806 : : 1022 1023 (INPUT 554 to INPUT 765) INPUT 766 INPUT 767 127 Output data Signal name Reserved. Robot Running Robot Error Servo ON Robot Initialized Auto Mode External Mode Battery Warning Robot Warning Continue Start Permission SS Mode Reserved. Reserved. Reserved. Command Processing Completed Status area odd parity Status area bit 0 Status area bit 1 Status area bit 2 Status area bit 3 Status area bit 4 Status area bit 5 Status area bit 6 Status area bit 7 Status area bit 8 Status area bit 9 Status area bit 10 Status area bit 11 Status area bit 12 Status area bit 13 Status area bit 14 Status area bit 15 OUTPUT 800 OUTPUT 801 OUTPUT 802 OUTPUT 803 OUTPUT 804 OUTPUT 805 OUTPUT 806 (OUTPUT 807 to OUTPUT 1021) OUTPUT 1022 OUTPUT 1023 7.5.23 PROFIBUS-DP Slave Board in All User I/O Mode Port No. 512 513 514 515 516 517 518 519 520 521 522 523 524 525 526 527 528 529 530 531 532 533 534 535 536 537 538 539 540 541 542 543 544 545 546 547 548 549 : 765 766 767 Input data Signal name INPUT 512 INPUT 513 INPUT 514 INPUT 515 INPUT 516 INPUT 517 INPUT 518 INPUT 519 INPUT 520 INPUT 521 INPUT 522 INPUT 523 INPUT 524 INPUT 525 INPUT 526 INPUT 527 INPUT 528 INPUT 529 INPUT 530 INPUT 531 INPUT 532 INPUT 533 INPUT 534 INPUT 535 INPUT 536 INPUT 537 INPUT 538 INPUT 539 INPUT 540 INPUT 541 INPUT 542 INPUT 543 INPUT 544 INPUT 545 INPUT 546 INPUT 547 INPUT 548 INPUT 549 Port No. 768 769 770 771 772 773 774 775 776 777 778 779 780 781 782 783 784 785 786 787 788 789 790 791 792 793 794 795 796 797 798 799 800 801 802 803 804 805 (INPUT 550 to INPUT 764) : INPUT 765 INPUT 766 INPUT 767 1021 1022 1023 128 Output data Signal name OUTPUT 768 OUTPUT 769 OUTPUT 770 OUTPUT 771 OUTPUT 772 OUTPUT 773 OUTPUT 774 OUTPUT 775 OUTPUT 776 OUTPUT 777 OUTPUT 778 OUTPUT 779 OUTPUT 780 OUTPUT 781 OUTPUT 782 OUTPUT 783 OUTPUT 784 OUTPUT 785 OUTPUT 786 OUTPUT 787 OUTPUT 788 OUTPUT 789 OUTPUT 790 OUTPUT 791 OUTPUT 792 OUTPUT 793 OUTPUT 794 OUTPUT 795 OUTPUT 796 OUTPUT 797 OUTPUT 798 OUTPUT 799 OUTPUT 800 OUTPUT 801 OUTPUT 802 OUTPUT 803 OUTPUT 804 OUTPUT 805 (OUTPUT 806 to OUTPUT 1020) OUTPUT 1021 OUTPUT 1022 OUTPUT 1023 7.5.24 DeviceNet Master Board in All User I/O Mode Note: The table below applies also to the allocation of the master area on the DeviceNet master/slave board. Port No. 1024 1025 1026 1027 1028 1029 1030 1031 1032 1033 1034 1035 1036 1037 1038 1039 1040 1041 1042 1043 1044 1045 1046 1047 1048 1049 1050 1051 1052 1053 1054 1055 1056 1057 1058 1059 1060 1061 : 2045 2046 2047 Input data Signal name INPUT 1024 INPUT 1025 INPUT 1026 INPUT 1027 INPUT 1028 INPUT 1029 INPUT 1030 INPUT 1031 INPUT 1032 INPUT 1033 INPUT 1034 INPUT 1035 INPUT 1036 INPUT 1037 INPUT 1038 INPUT 1039 INPUT 1040 INPUT 1041 INPUT 1042 INPUT 1043 INPUT 1044 INPUT 1045 INPUT 1046 INPUT 1047 INPUT 1048 INPUT 1049 INPUT 1050 INPUT 1051 INPUT 1052 INPUT 1053 INPUT 1054 INPUT 1055 INPUT 1056 INPUT 1057 INPUT 1058 INPUT 1059 INPUT 1060 INPUT 1061 (INPUT 1062 to INPUT 2044) INPUT 2045 INPUT 2046 INPUT 2047 Port No. 2048 2049 2050 2051 2052 2053 2054 2055 2056 2057 2058 2059 2060 2061 2062 2063 2064 2065 2066 2067 2068 2069 2070 2071 2072 2073 2074 2075 2076 2077 2078 2079 2080 2081 2082 2083 2084 2085 : 3069 3070 3071 129 Output data Signal name OUTPUT 2048 OUTPUT 2049 OUTPUT 2050 OUTPUT 2051 OUTPUT 2052 OUTPUT 2053 OUTPUT 2054 OUTPUT 2055 OUTPUT 2056 OUTPUT 2057 OUTPUT 2058 OUTPUT 2059 OUTPUT 2060 OUTPUT 2061 OUTPUT 2062 OUTPUT 2063 OUTPUT 2064 OUTPUT 2065 OUTPUT 2066 OUTPUT 2067 OUTPUT 2068 OUTPUT 2069 OUTPUT 2070 OUTPUT 2071 OUTPUT 2072 OUTPUT 2073 OUTPUT 2074 OUTPUT 2075 OUTPUT 2076 OUTPUT 2077 OUTPUT 2078 OUTPUT 2079 OUTPUT 2080 OUTPUT 2081 OUTPUT 2082 OUTPUT 2083 OUTPUT 2084 OUTPUT 2085 (OUTPUT 2086 to OUTPUT 3068) OUTPUT 3069 OUTPUT 3070 OUTPUT 3071 7.5.25 S-Link V Master Board in All User I/O Mode Port No. 3072 3073 3074 3075 3076 3077 3078 3079 3080 3081 3082 3083 3084 3085 3086 3087 3088 3089 3090 3091 3092 3093 3094 3095 3096 3097 3098 3099 3100 3101 3102 3103 3104 3105 3106 3107 3108 3109 : 3325 3326 3327 Input data Signal name INPUT 3072 INPUT 3073 INPUT 3074 INPUT 3075 INPUT 3076 INPUT 3077 INPUT 3078 INPUT 3079 INPUT 3080 INPUT 3081 INPUT 3082 INPUT 3083 INPUT 3084 INPUT 3085 INPUT 3086 INPUT 3087 INPUT 3088 INPUT 3089 INPUT 3090 INPUT 3091 INPUT 3092 INPUT 3093 INPUT 3094 INPUT 3095 INPUT 3096 INPUT 3097 INPUT 3098 INPUT 3099 INPUT 3100 INPUT 3101 INPUT 3102 INPUT 3103 INPUT 3104 INPUT 3105 INPUT 3106 INPUT 3107 INPUT 3108 INPUT 3109 (INPUT 3110 to INPUT 3324) INPUT 3325 INPUT 3326 INPUT 3327 Port No. 3328 3329 3330 3331 3332 3333 3334 3335 3336 3337 3338 3339 3340 3341 3342 3343 3344 3345 3346 3347 3348 3349 3350 3351 3352 3353 3354 3355 3356 3357 3358 3359 3360 3361 3362 3363 3364 3365 : 3581 3582 3583 130 Output data Signal name OUTPUT 3328 OUTPUT 3329 OUTPUT 3330 OUTPUT 3331 OUTPUT 3332 OUTPUT 3333 OUTPUT 3334 OUTPUT 3335 OUTPUT 3336 OUTPUT 3337 OUTPUT 3338 OUTPUT 3339 OUTPUT 3340 OUTPUT 3341 OUTPUT 3342 OUTPUT 3343 OUTPUT 3344 OUTPUT 3345 OUTPUT 3346 OUTPUT 3347 OUTPUT 3348 OUTPUT 3349 OUTPUT 3350 OUTPUT 3351 OUTPUT 3352 OUTPUT 3353 OUTPUT 3354 OUTPUT 3355 OUTPUT 3356 OUTPUT 3357 OUTPUT 3358 OUTPUT 3359 OUTPUT 3360 OUTPUT 3361 OUTPUT 3362 OUTPUT 3363 OUTPUT 3364 OUTPUT 3365 (OUTPUT 3366 to OUTPUT 3580) OUTPUT 3581 OUTPUT 3582 OUTPUT 3583 7.5.26 Ethernet/IP Module in Standard Mode Port No. 512 513 514 515 516 517 518 519 520 521 522 523 524 525 526 527 528 529 530 531 532 533 534 535 536 537 538 539 540 541 542 543 Input data Signal name Step Stop (All tasks) ⎯ Halt (All tasks) Strobe Signal Interruption Skip ⎯ ⎯ Command data area odd parity Data area 1, bit 0 Data area 1, bit 1 Data area 1, bit 2 Data area 1, bit 3 Data area 1, bit 4 Data area 1, bit 5 Data area 1, bit 6 Data area 1, bit 7 Data area 2, bit 0 Data area 2, bit 1 Data area 2, bit 2 Data area 2, bit 3 Data area 2, bit 4 Data area 2, bit 5 Data area 2, bit 6 Data area 2, bit 7 Data area 2, bit 8 Data area 2, bit 9 Data area 2, bit 10 Data area 2, bit 11 Data area 2, bit 12 Data area 2, bit 13 Data area 2, bit 14 Data area 2, bit 15 Port No. 544 545 546 547 548 549 550 551 552 553 554 555 556 557 558 559 : 760 761 762 763 764 765 766 767 131 Input data Signal name Command area, bit 0 Command area, bit 1 Command area, bit 2 Command area, bit 3 ⎯ ⎯ ⎯ ⎯ INPUT 552 INPUT 553 INPUT 554 INPUT 555 INPUT 556 INPUT 557 INPUT 558 INPUT 559 (INPUT 560 to INPUT 759) INPUT 760 INPUT 761 INPUT 762 INPUT 763 INPUT 764 INPUT 765 INPUT 766 INPUT 767 Port No. 768 769 770 771 772 773 774 775 776 777 778 779 780 781 782 783 784 785 786 787 788 789 790 791 792 793 794 795 796 797 798 799 Output data Signal name Port No. 800 801 802 803 804 805 806 807 808 809 810 811 812 813 814 815 : 1016 1017 1018 1019 1020 1021 1022 1023 ⎯ Robot Running Robot Error Servo ON Robot Initialized Auto Mode External Mode Battery Warning Robot Warning Continue Start Permission SS Mode ⎯ ⎯ ⎯ Command Processing Completed Status area, odd parity Status area, bit 0 Status area, bit 1 Status area, bit 2 Status area, bit 3 Status area, bit 4 Status area, bit 5 Status area, bit 6 Status area, bit 7 Status area, bit 8 Status area, bit 9 Status area, bit 10 Status area, bit 11 Status area, bit 12 Status area, bit 13 Status area, bit 14 Status area, bit 15 132 Output data Signal name OUTPUT 800 OUTPUT 801 OUTPUT 802 OUTPUT 803 OUTPUT 804 OUTPUT 805 OUTPUT 806 OUTPUT 807 OUTPUT 808 OUTPUT 809 OUTPUT 810 OUTPUT 811 OUTPUT 812 OUTPUT 813 OUTPUT 814 OUTPUT 815 (OUTPUT 816 to OUTPUT 1015) OUTPUT 1016 OUTPUT 1017 OUTPUT 1018 OUTPUT 1019 OUTPUT 1020 OUTPUT 1021 OUTPUT 1022 OUTPUT 1023 7.5.27 Ethernet/IP Module in Compatible Mode Port No. 512 513 514 515 516 517 518 519 520 521 522 523 524 525 526 527 528 529 530 531 532 533 534 535 Input data Signal name Step Stop (All tasks) Continue Start Halt (All tasks) Operation Preparation Start Interruption Skip Program Start ⎯ ⎯ Program No. selection bit 0 Program No. selection bit 1 Program No. selection bit 2 Program No. selection bit 3 Program No. selection bit 4 Program No. selection bit 5 Program No. selection bit 6 Program No. selection parity bit Motor Power ON CAL Execution ⎯ SP100 External Mode Change Program Reset Clear Robot Error ⎯ Port No. 536 537 538 539 540 541 542 543 544 545 546 547 548 549 550 551 552 553 554 555 556 557 558 559 : 760 761 762 763 764 765 766 767 133 Input data Signal name INPUT 536 INPUT 537 INPUT 538 INPUT 539 INPUT 540 INPUT 541 INPUT 542 INPUT 543 INPUT 544 INPUT 545 INPUT 546 INPUT 547 INPUT 548 INPUT 549 INPUT 550 INPUT 551 INPUT 552 INPUT 553 INPUT 554 INPUT 555 INPUT 556 INPUT 557 INPUT 558 INPUT 559 (INPUT 560 to INPUT 759) INPUT 760 INPUT 761 INPUT 762 INPUT 763 INPUT 764 INPUT 765 INPUT 766 INPUT 767 Port No. 768 769 770 771 772 773 774 775 776 777 778 779 780 781 782 783 784 785 786 787 788 789 790 791 792 793 794 795 796 797 798 799 Output data Signal name Port No. 800 801 802 803 804 805 806 807 808 809 810 811 812 813 814 815 : 1016 1017 1018 1019 1020 1021 1022 1023 ⎯ Robot Running Robot Error Auto Mode External Mode Program Start Reset ⎯ ⎯ Robot Power ON Completed Servo ON CAL Completed Teaching ON 1 Cycle End Battery Warning Robot Warning Continue Start Permission Error in the units place, bit 0 Error in the units place, bit 1 Error in the units place, bit 2 Error in the units place, bit 3 Error in the tens place, bit 0 Error in the tens place, bit 1 Error in the tens place, bit 2 Error in the tens place, bit 3 Error in the hundreds place, bit 0 Error in the hundreds place, bit 1 Error in the hundreds place, bit 2 Error in the hundreds place, bit 3 ⎯ ⎯ ⎯ ⎯ 134 Output data Signal name OUTPUT 800 OUTPUT 801 OUTPUT 802 OUTPUT 803 OUTPUT 804 OUTPUT 805 OUTPUT 806 OUTPUT 807 OUTPUT 808 OUTPUT 809 OUTPUT 810 OUTPUT 811 OUTPUT 812 OUTPUT 813 OUTPUT 814 OUTPUT 815 (OUTPUT 816 to OUTPUT 1015) OUTPUT 1016 OUTPUT 1017 OUTPUT 1018 OUTPUT 1019 OUTPUT 1020 OUTPUT 1021 OUTPUT 1022 OUTPUT 1023 7.5.28 Ethernet/IP Module in All User I/O Mode Port No. 512 513 514 515 516 517 518 519 520 521 522 523 524 525 526 527 528 529 530 531 532 533 534 535 536 537 538 539 540 541 542 543 544 545 546 547 548 549 : 765 766 767 Input data Signal name INPUT 512 INPUT 513 INPUT 514 INPUT 515 INPUT 516 INPUT 517 INPUT 518 INPUT 519 INPUT 520 INPUT 521 INPUT 522 INPUT 523 INPUT 524 INPUT 525 INPUT 526 INPUT 527 INPUT 528 INPUT 529 INPUT 530 INPUT 531 INPUT 532 INPUT 533 INPUT 534 INPUT 535 INPUT 536 INPUT 537 INPUT 538 INPUT 539 INPUT 540 INPUT 541 INPUT 542 INPUT 543 INPUT 544 INPUT 545 INPUT 546 INPUT 547 INPUT 548 INPUT 549 Port No. 768 769 770 771 772 773 774 775 776 777 778 779 780 781 782 783 784 785 786 787 788 789 790 791 792 793 794 795 796 797 798 799 800 801 802 803 804 805 (INPUT 550 to INPUT 764) : INPUT 765 INPUT 766 INPUT 767 1021 1022 1023 135 Output data Signal name OUTPUT 768 OUTPUT 769 OUTPUT 770 OUTPUT 771 OUTPUT 772 OUTPUT 773 OUTPUT 774 OUTPUT 775 OUTPUT 776 OUTPUT 777 OUTPUT 778 OUTPUT 779 OUTPUT 780 OUTPUT 781 OUTPUT 782 OUTPUT 783 OUTPUT 784 OUTPUT 785 OUTPUT 786 OUTPUT 787 OUTPUT 788 OUTPUT 789 OUTPUT 790 OUTPUT 791 OUTPUT 792 OUTPUT 793 OUTPUT 794 OUTPUT 795 OUTPUT 796 OUTPUT 797 OUTPUT 798 OUTPUT 799 OUTPUT 800 OUTPUT 801 OUTPUT 802 OUTPUT 803 OUTPUT 804 OUTPUT 805 (OUTPUT 806 to OUTPUT 1020) OUTPUT 1021 OUTPUT 1022 OUTPUT 1023 Chapter 8 I/O Allocation for I/O Conversion Box (only for standard type of controller) This chapter lists the I/O allocation tables to apply when the I/O conversion box is mounted on the controller. The I/O conversion box should be used with an optional parallel I/O board mounted so that the "INPUT (CN8)," "OUTPUT (CN10)," and "I/O POWER (CN7)" used on the RC5 controller can be used as is. Note: The I/O conversion box cannot be used for the global type of the controller. For details about the I/O conversion box, refer to the RC7M Controller OPTIONS MANUAL, Chapter 4, Section 4.7 "I/O Conversion Box." 8.1 I/O Allocation Modes with I/O Conversion Box Mounted Using the I/O conversion box requires an optional parallel I/O board to be mounted, for compatibility with the RC5 controller. The ports on the parallel I/O board offset the shortage of standard mini I/O ports. The table below lists the selectable allocation modes when the I/O conversion box is used. Allocation Mode Available with the I/O Conversion Box I/O extension boards No. 1 2 3 4 5 6 7 8 9 Extension 1 Parallel I/O board Parallel I/O board Parallel I/O board Parallel I/O board Parallel I/O board Parallel I/O board Parallel I/O board Parallel I/O board Parallel I/O board Allocation modes I/O conversion box Extension 2 – Parallel I/O board DeviceNet slave board DeviceNet master board DeviceNet master/slave board CC-Link board PROFIBUS-DP slave board S-LINK V board Ethernet/IP adapter 136 Compatible Standard √ √ √ √ √ √ √ √ √ √ √ √ √ √ √ √ All user I/O √ √ √ 8.2 I/O Allocation in Individual Allocation Modes The table below lists the I/O allocation for extension boards in individual allocation modes. For details, refer to Section 8.5 "I/O Allocation Tables for Individual Allocation Modes." Note: For the I/O allocation for the DeviceNet master/slave board, see the allocation tables for the DeviceNet master and slave boards. I/O Allocation of Extension Boards in Individual Allocation Modes I/O extension boards Extension 1 Extension 2 – DeviceNet slave board CC-Link board Parallel I/O board PROFIBUS-DP slave board EtherNet/IP Adapter Allocation for CN8, CN10, and extension boards I/O Allocation tables to apply CN8 INPUT (CN8) in I/O-box compatible mode I/O-box compatible mode CN10 OUTPUT (CN10) in I/O-box compatible mode CN8 INPUT (CN8) in I/O-box standard mode I/O-box standard mode CN10 OUTPUT (CN10) in I/O-box standard mode CN8 INPUT (CN8) in I/O-box all user I/O mode I/O-box compatible CN10 OUTPUT (CN10) in I/O-box all user I/O mode mode Extension 2 Extension boards in I/O-box compatible mode CN8 INPUT (CN8) in I/O-box all user I/O mode CN10 OUTPUT (CN10) in I/O-box all user I/O mode I/O-box standard mode Extension 2 Extension boards in I/O-box standard mode Allocation modes CN8 I/O-box compatible CN10 mode Extension 2 DeviceNet master board CN8 I/O-box standard S-LINK V board CN10 mode Extension 2 Parallel I/O board INPUT (CN8) in I/O-box compatible mode OUTPUT (CN10) in I/O-box compatible mode Extension boards in I/O-box all user I/O mode INPUT (CN8) in I/O-box standard mode OUTPUT (CN10) in I/O-box standard mode Extension boards in I/O-box all user I/O mode Note: Extensions 1 and 2 correspond to the ones listed in the "Allocation Mode Available with the I/O Conversion Box" table on the previous page. 8.3 Notes on Using the I/O Conversion Box (1) Parameter change for switching between allocation modes To switch to the I/O-box compatible or standard mode, you need to change parameters using the teach pendant or WINCAPSIII. For the changing procedure, refer to the RC7M Controller OPTIONS MANUAL, Section 4.6. (2) Power supply setting for mini I/O board (CN5) or parallel I/O board To use the I/O conversion box, select 24 V power supply (internal or external) on I/O POWER (CN7). You also need to set up the power supply for the mini I/O board and parallel I/O board to match the power supply setting on I/O POWER (CN7). The factory default is external power supply. For details about the mini I/O board, see Section 4.2.1 or 5.2.1. For details about the parallel I/O board, refer to the RC7M Controller OPTIONS MANUAL, Section 5.2.2. 137 8.4 Allocation Common to All Allocation Modes The RC7M controller supports hand I/O signals (CN9) as standard. This hand I/O and I/O POWER (CN7) are common to all allocation modes. 8.4.1 I/O POWER (CN9): Common to All Modes NPN type I/O PNP type I/O Terminal No. 1 2 3 4 5 6 7 8 9 Internal power source output (+24V) Internal power source output (+24V) Internal power source output (0V) Internal power source output (0V) FG Power input +24V Power input +24V Power input 0V Power input 0V 8.4.2 HAND I/O (CN9): Common to All Modes Signal name NPN type Terminal Signal name No. 1 Hand output 2 Hand output 3 Hand output 4 Hand output 5 Hand output 6 Hand output Terminal No. 1 2 3 4 5 6 7 8 9 64 65 66 67 68 69 Terminal No. 11 12 13 14 15 16 Port No. 7 Hand output 70 17 8 Hand output 71 18 9 10 Hand input Hand input 48 49 19 20 PNP type Terminal Signal name No. 1 Hand output 2 Hand output 3 Hand output 4 Hand output 5 Hand output 6 Hand output 64 65 66 67 68 69 Terminal No. 11 12 13 14 15 16 Port No. 7 Hand output 70 17 8 Hand output 71 18 9 10 Hand input Hand input 48 49 19 20 138 Signal name Internal power source output (+24V) Internal power source output (+24V) Internal power source output (0V) Internal power source output (0V) FG Power input 0V Power input 0V Power input +24V Power input +24V Signal name Port No. Hand input Hand input Hand input Hand input Hand input Hand input Power output for hand (+24 VDC) (External/internal source) Power output for hand (+0 VDC) (External/internal source) No connection No connection 50 51 52 53 54 55 Signal name Port No. Hand input Hand input Hand input Hand input Hand input Hand input Power output for hand (+0 VDC) (External/internal source) Power output for hand (+24 VDC) (External/internal source) No connection No connection 50 51 52 53 54 55 ⎯ ⎯ ⎯ ⎯ ⎯ ⎯ ⎯ ⎯ 8.5 8.5.1 Terminal No. 1 2 3 4 5 6 7 8 9 10 11 12 13 14 15 16 17 18 19 20 21 22 23 I/O Allocation Tables for Individual Allocation Modes OUTPUT (CN10) in I/O-Box Compatible Mode Auto Mode External Mode Program Start Reset Reserved. Reserved. Robot Power ON Completed Servo ON CAL Completed Teaching ON 1 Cycle End Battery Warning Robot Warning Continue Start Permission Error in the units place, bit 0 Error in the units place, bit 1 Error in the units place, bit 2 Error in the units place, bit 3 Error in the tens place, bit 0 Error in the tens place, bit 1 Error in the tens place, bit 2 72 73 74 75 76 77 78 79 80 81 82 83 84 85 86 87 88 89 90 91 92 93 94 Terminal No. 35 36 37 38 39 40 41 42 43 44 45 46 47 48 49 50 51 52 53 54 55 56 57 24 Error in the tens place, bit 3 95 58 25 Error in the hundreds place, bit 0 96 59* 26 Error in the hundreds place, bit 1 97 60* 27 Error in the hundreds place, bit 2 98 61* 28 Error in the hundreds place, bit 3 99 62* Not used. (Power supply for Robot Stop 1 (Internal power source +24V)) (Robot Stop 1) (Power supply for Robot Stop 2 (Internal power source +24V)) (Robot Stop 2) 29 SS Mode 100 63* (Emergency Stop 1 (+)) ⎯ 30 Reserved. 101 64* (Emergency Stop 1 (-)) ⎯ 31 Reserved. 102 65 Emergency Stop 2 (+) ⎯ 32 Reserved. 103 66 Emergency Stop 2 (-) ⎯ ⎯ ⎯ Signal Name CPU Normal (No monitor allowed) Robot Running Robot Error Port No. Signal Name User output User output User output User output User output User output User output User output User output User output User output User output User output User output User output User output User output User output User output User output User output User output Not used. 33 User output 104 67* (Deadman SW (+)) 34 User output 105 68* (Deadman SW (-)) Note: Terminal numbers with asterisks (*) are used only in the dual-safety emergency stop circuit version. 139 Port No. 106 107 108 109 110 111 112 113 114 115 116 117 118 119 120 121 122 123 124 125 126 127 ⎯ ⎯ ⎯ ⎯ ⎯ ⎯ 8.5.2 Terminal No. 1* 2* 3 4 5 6 7 8 9 10 11 12 13 14 15 16 17 18 19 20 21 22 23 24 25 INPUT (CN8) in I/O-Box Compatible Mode Signal Name Power supply for Robot Stop (Internal +24V) Robot Stop Power supply for Enable Auto (Internal +24V) Enable Auto Step Stop (All tasks) Continue Start Instantaneous Stop (All tasks) [Halt] Operation Preparation Start Interruption Skip Program Start Program No. selection bit 0 Program No. selection bit 1 Program No. selection bit 2 Program No. selection bit 3 Program No. selection bit 4 Program No. selection bit 5 Program No. selection bit 6 Program No. selection parity bit Motor Power ON CAL Execution Reserved. SP100 External Mode Change Program Reset Clear Robot Error Port No. Terminal No. ⎯ 26 User input 21 ⎯ 27 User input 22 ⎯ 28 User input 23 ⎯ 0 1 2 3 4 5 6 7 8 9 10 11 12 13 14 15 16 17 18 19 20 29 30 31 32 33 34 35 36 37 38 39 40 41 42 43 44 45 46 47 48 49 50 User input User input User input User input User input User input User input User input User input User input User input User input User input User input User input User input User input User input User input User input User input User input 24 25 26 27 28 29 30 31 32 33 34 35 36 37 38 39 40 41 42 43 44 45 Signal Name Note: Terminal numbers with asterisks (*) are NOT used in the dual-safety emergency stop circuit version. 140 Port No. 8.5.3 Terminal No. 1 2 3 4 5 6 7 8 9 10 11 12 13 14 15 16 17 18 19 20 21 22 23 OUTPUT (CN10) in I/O-Box Standard Mode External Mode Battery Warning Robot Warning Continue Start Permission SS Mode Reserved. Reserved. Reserved. Command Processing Completed Status area odd parity Status area bit 0 Status area bit 1 Status area bit 2 Status area bit 3 Status area bit 4 Status area bit 5 Status area bit 6 72 73 74 75 76 77 78 79 80 81 82 83 84 85 86 87 88 89 90 91 92 93 94 Terminal No. 35 36 37 38 39 40 41 42 43 44 45 46 47 48 49 50 51 52 53 54 55 56 57 24 Status area bit 7 95 58 25 Status area bit 8 96 59* 26 Status area bit 9 97 60* 27 Status area bit 10 98 61* Signal Name CPU Normal (No monitor allowed) Robot Running Robot Error Servo ON Robot Initialized Auto Mode Port No. Signal Name User output User output User output User output User output User output User output User output User output User output User output User output User output User output User output User output User output User output User output User output User output User output Not used. Port No. 106 107 108 109 110 111 112 113 114 115 116 117 118 119 120 121 122 123 124 125 126 127 ⎯ ⎯ 28 Status area bit 11 99 62* Not used. (Power supply for Robot Stop 1 (Internal power source +24V)) (Robot Stop 1) (Power supply for Robot Stop 2 (Internal power source +24V)) (Robot Stop 2) 29 Status area bit 12 100 63* (Emergency Stop 1 (+)) 30 Status area bit 13 101 64* (Emergency Stop 1 (-)) ⎯ 31 Status area bit 14 102 65 Emergency Stop 2 (+) ⎯ 32 Status area bit 15 103 66 Emergency Stop 2 (-) ⎯ 33 User output 104 67* (Deadman SW (+)) ⎯ 34 User output 105 68* (Deadman SW (-)) ⎯ Note: Terminal numbers with asterisks (*) are used only in the dual-safety emergency stop circuit version. 141 ⎯ ⎯ ⎯ ⎯ ⎯ 8.5.4 Terminal No. 1* 2* 3 4 5 6 7 8 9 10 11 12 13 14 15 16 17 18 19 20 21 22 23 24 25 INPUT (CN8) in I/O-Box Standard Mode Signal Name Power supply for Robot Stop (Internal +24V) Robot Stop Power supply for Enable Auto (Internal +24V) Enable Auto Step Stop (All tasks) Reserved. Instantaneous Stop (All tasks) [Halt] Strobe Signal Interruption Skip Command data area odd parity Data area 1 bit 0 Data area 1 bit 1 Data area 1 bit 2 Data area 1 bit 3 Data area 1 bit 4 Data area 1 bit 5 Data area 1 bit 6 Data area 1 bit 7 Data area 2 bit 0 Data area 2 bit 1 Data area 2 bit 2 Data area 2 bit 3 Data area 2 bit 4 Data area 2 bit 5 Data area 2 bit 6 Port No. Terminal No. ⎯ 26 Data area 2 bit 7 21 ⎯ 27 Data area 2 bit 8 22 ⎯ 28 Data area 2 bit 9 23 ⎯ 0 1 2 3 4 5 6 7 8 9 10 11 12 13 14 15 16 17 18 19 20 29 30 31 32 33 34 35 36 37 38 39 40 41 42 43 44 45 46 47 48 49 50 Data area 2 bit 10 Data area 2 bit 11 Data area 2 bit 12 Data area 2 bit 13 Data area 2 bit 14 Data area 2 bit 15 Command area bit 0 Command area bit 1 Command area bit 2 Command area bit 3 User input User input User input User input User input User input User input User input User input User input User input User input 24 25 26 27 28 29 30 31 32 33 34 35 36 37 38 39 40 41 42 43 44 45 Signal Name Note: Terminal numbers with asterisks (*) are NOT used in the dual-safety emergency stop circuit version. 142 Port No. 8.5.5 Terminal No. 1 2 3 4 5 6 7 8 9 10 11 12 13 14 15 16 17 18 19 20 21 22 23 OUTPUT (CN10) in I/O-Box All User I/O Mode CPU Normal (No monitor allowed) Robot Running Robot Error User output User output User output User output User output User output User output User output User output User output User output User output User output User output User output User output User output User output User output User output 72 73 74 75 76 77 78 79 80 81 82 83 84 85 86 87 88 89 90 91 92 93 94 Terminal No. 35 36 37 38 39 40 41 42 43 44 45 46 47 48 49 50 51 52 53 54 55 56 57 24 User output 95 58 25 User output 96 59* 26 User output 97 60* 27 User output 98 61* Signal Name Port No. Signal Name User output User output User output User output User output User output User output User output User output User output User output User output User output User output User output User output User output User output User output User output User output User output Not used. Port No. 106 107 108 109 110 111 112 113 114 115 116 117 118 119 120 121 122 123 124 125 126 127 ⎯ ⎯ 28 User output 99 62* Not used. (Power supply for Robot Stop 1 (Internal power source +24V)) (Robot Stop 1) (Power supply for Robot Stop 2 (Internal power source +24V)) (Robot Stop 2) 29 User output 100 63* (Emergency Stop 1 (+)) 30 User output 101 64* (Emergency Stop 1 (-)) ⎯ 31 User output 102 65 Emergency Stop 2 (+) ⎯ 32 User output 103 66 Emergency Stop 2 (-) ⎯ 33 User output 104 67* (Deadman SW (+)) ⎯ 34 User output 105 68* (Deadman SW (-)) ⎯ Note: Terminal numbers with asterisks (*) are used only in the dual-safety emergency stop circuit version. 143 ⎯ ⎯ ⎯ ⎯ ⎯ 8.5.6 Terminal No. 1* 2* 3 4 5 6 7 8 9 10 11 12 13 14 15 16 17 18 19 20 21 22 23 24 25 INPUT (CN8) in I/O-Box All User I/O Mode Signal Name Power supply for Robot stop (Internal +24V) Robot stop Power supply for Enable Auto (Internal +24V) Enable Auto User input User input User input User input User input User input User input User input User input User input User input User input User input User input User input User input User input User input User input User input User input Port No. Terminal No. ⎯ 26 User input 21 ⎯ 27 User input 22 ⎯ 28 User input 23 ⎯ 0 1 2 3 4 5 6 7 8 9 10 11 12 13 14 15 16 17 18 19 20 29 30 31 32 33 34 35 36 37 38 39 40 41 42 43 44 45 46 47 48 49 50 User input User input User input User input User input User input User input User input User input User input User input User input User input User input User input User input User input User input User input User input User input User input 24 25 26 27 28 29 30 31 32 33 34 35 36 37 38 39 40 41 42 43 44 45 Signal Name Note: Terminal numbers with asterisks (*) are NOT used in the dual-safety emergency stop circuit version. 144 Port No. 8.5.7 DeviceNet Slave Board in I/O-Box Compatible Mode Port No. 512 513 514 515 516 517 518 519 520 521 522 523 524 525 526 527 528 529 530 531 532 533 534 535 536 537 538 539 540 541 542 543 544 545 546 547 548 549 to 763 764 765 766 767 Input data Signal name Step Stop (All tasks) Continue Start Instantaneous Stop (All tasks) [Halt] Operation Preparation Start Interruption Skip Program Start Not used. Not used. Program No. selection bit 0 Program No. selection bit 1 Program No. selection bit 2 Program No. selection bit 3 Program No. selection bit 4 Program No. selection bit 5 Program No. selection bit 6 Program No. selection parity bit Motor Power ON CAL Execution Reserved. SP100 External Mode Change Program Reset Clear Robot Error Not used. INPUT 536 INPUT 537 INPUT 538 INPUT 539 INPUT 540 INPUT 541 INPUT 542 INPUT 543 INPUT 544 INPUT 545 INPUT 546 INPUT 547 INPUT 539 INPUT 549 to INPUT 763 INPUT 764 INPUT 765 INPUT 766 INPUT 767 Port No. 768 769 770 771 772 773 774 775 776 777 778 779 780 781 782 783 784 785 786 787 788 789 790 791 792 793 794 795 796 797 798 799 800 801 802 803 804 805 to 1019 1020 1021 1022 1023 145 Output data Signal name Reserved. Robot Running Robot Error Auto Mode External Mode Program Start Reset Reserved. Reserved. Robot Power ON Completed Servo ON CAL Completed Teaching ON 1 Cycle End Battery Warning Robot Warning Continue Start Permission Error in the units place, bit 0 Error in the units place, bit 1 Error in the units place, bit 2 Error in the units place, bit 3 Error in the tens place, bit 0 Error in the tens place, bit 1 Error in the tens place, bit 2 Error in the tens place, bit 3 Error in the hundreds place, bit 0 Error in the hundreds place, bit 1 Error in the hundreds place, bit 2 Error in the hundreds place, bit 3 SS Mode Reserved. Reserved. Reserved. OUTPUT 800 OUTPUT 801 OUTPUT 802 OUTPUT 803 OUTPUT 804 OUTPUT 805 to OUTPUT 1019 OUTPUT 1020 OUTPUT 1021 OUTPUT 1022 OUTPUT 1023 8.5.8 DeviceNet Slave Board in I/O-Box Standard Mode Port No. 512 513 514 515 516 517 518 519 520 521 522 523 524 525 526 527 528 529 530 531 532 533~540 541 542 543 544 545 546 547 548 549 550 551 552 553 554 555 556 to 763 764 765 766 767 Input data Signal name Step Stop (All tasks) Reserved. Instantaneous Stop (All tasks) [Halt] Strobe Signal Interruption Skip Not used. Not used. Command data area odd parity Data area 1 bit 0 Data area 1 bit 1 Data area 1 bit 2 Data area 1 bit 3 Data area 1 bit 4 Data area 1 bit 5 Data area 1 bit 6 Data area 1 bit 7 Data area 2 bit 0 Data area 2 bit 1 Data area 2 bit 2 Data area 2 bit 3 Data area 2 bit 4 Data area 2 bit 5 to Data area 2 bit 12 Data area 2 bit 13 Data area 2 bit 14 Data area 2 bit 15 Command area bit 0 Command area bit 1 Command area bit 2 Command area bit 3 Not used. Not used. Not used. Not used. INPUT 552 INPUT 553 INPUT 554 INPUT 555 INPUT 556 to INPUT 763 INPUT 764 INPUT 765 INPUT 766 INPUT 767 Port No. 768 769 770 771 772 773 774 775 776 777 778 779 780 781 782 783 784 785 786 787 788 789 790 791 792 793 794 795 796 797 798 799 800 801 802 803 804 805 to 1019 1020 1021 1022 1023 146 Output data Signal name Reserved. Robot Running Robot Error Servo ON Robot Initialized Auto Mode External Mode Battery Warning Robot Warning Continue Start Permission SS Mode Reserved. Reserved. Reserved. Command Processing Completed Status area odd parity Status area bit 0 Status area bit 1 Status area bit 2 Status area bit 3 Status area bit 4 Status area bit 5 Status area bit 6 Status area bit 7 Status area bit 8 Status area bit 9 Status area bit 10 Status area bit 11 Status area bit 12 Status area bit 13 Status area bit 14 Status area bit 15 OUTPUT 800 OUTPUT 801 OUTPUT 802 OUTPUT 803 OUTPUT 804 OUTPUT 805 to OUTPUT 1019 OUTPUT 1020 OUTPUT 1021 OUTPUT 1022 OUTPUT 1023 8.5.9 CC-Link Board (2 stations occupied) in I/O-Box Compatible Mode Input data Port No. 512 513 514 515 516 517 518 519 520 521 522 523 524 525 526 527 528 529 530 531 532 533 534 535 Signal name Step Stop (All tasks) Continue Start Instantaneous Stop (All tasks) [Halt] Operation Preparation Start Interruption Skip Program Start Reserved. Reserved. Program No. selection bit 0 Program No. selection bit 1 Program No. selection bit 2 Program No. selection bit 3 Program No. selection bit 4 Program No. selection bit 5 Program No. selection bit 6 Program No. selection parity bit Motor Power ON CAL Execution Reserved. SP100 External Mode Change Program Reset Clear Robot Error Reserved. 536 : User input (INPUT m) (Note 2) 559 560 : 575 Not used. Output data Remote output. (Note 1) RYn0 RYn1 Port No. Remote input (Note 1) 768 769 ⎯ Robot Running RXn0 RXn1 RYn2 770 Robot Error RXn2 RYn3 RYn4 RYn5 RYn6 RYn7 RYn8 RYn9 RYnA RYnB RYnC RYnD RYnE 771 772 773 774 775 776 777 778 779 780 781 782 Auto Mode External Mode Program Start Reset Reserved. Reserved. Robot Power ON Completed Servo ON CAL Completed Teaching ON 1 Cycle End Battery Warning Robot Warning RXn3 RXn4 RXn5 RXn6 RXn7 RXn8 RXn9 RXnA RXnB RXnC RXnD RXnE RYnF 783 Continue Start Permission RXnF RY(n+1)0 RY(n+1)1 RY(n+1)2 RY(n+1)3 RY(n+1)4 RY(n+1)5 RY(n+1)6 RY(n+1)7 784 785 786 787 788 789 790 791 RY(n+1)8 792 : 793 RY(n+2)F 794 Error in the units place, bit 0 Error in the units place, bit 1 Error in the units place, bit 2 Error in the units place, bit 3 Error in the tens place, bit 0 Error in the tens place, bit 1 Error in the tens place, bit 2 Error in the tens place, bit 3 Error in the hundreds place, bit 0 Error in the hundreds place, bit 1 Error in the hundreds place, bit 2 RY(n+3)0 795 : RY(n+3)F 796 797 798 799 800 : 815 816 : 825 826 827 828 : 831 Note 1: Note 2: Note 3: Note 4: Note 5: Signal name Error in the hundreds place, bit 3 SS Mode Reserved. Reserved. Reserved. User output (OUTPUT m) (Note 2) Not used. Error status flag (Note 3) Remote station ready (Note 4) Not used. RX(n+1)0 RX(n+1)1 RX(n+1)2 RX(n+1)3 RX(n+1)4 RX(n+1)5 RX(n+1)6 RX(n+1)7 RX(n+1)8 RX(n+1)9 RX(n+1)A RX(n+1)B RX(n+1)C RX(n+1)D RX(n+1)E RX(n+1)F RX(n+2)0 : RX(n+2)F RX(n+3)0 : RX(n+3)9 RX(n+3)A RX(n+3)B RX(n+3)C : RX(n+3)F n denotes (station number − 1) × 2 (hexadecimal notation). m denotes I/O port number. The output timing is the same as that of Robot Error (I/O port #770) and Robot Warning (I/O port #782). The output timing is the same as that of Robot Power ON Completed (I/O port #776). indicates the system area that cannot be used for user I/O. Additional note For remote registers RWw and RWr, refer to the Options Manual " Remote Resistors (RWw and RWr)" 147 8.5.10 CC-Link Board (3 stations occupied) in I/O-Box Compatible Mode Input data Port No. Signal name Output data Remote output. (Note 1) RYn0 RYn1 Port No. Signal name Remote input. (Note 1) 768 769 ⎯ Robot Running RXn0 RXn1 RYn2 770 Robot Error RXn2 RYn3 RYn4 RYn5 RYn6 RYn7 RYn8 RYn9 RYnA RYnB RYnC RYnD RYnE 771 772 773 774 775 776 777 778 779 780 781 782 Auto Mode External Mode Program Start Reset Not used. Not used. Robot Power ON Completed Servo ON CAL Completed Teaching ON 1 Cycle End Battery Warning Robot Warning RXn3 RXn4 RXn5 RXn6 RXn7 RXn8 RXn9 RxnA RXnB RXnC RXnD RxnE RYnF 783 Continue Start Permission RXnF RY(n+1)0 RY(n+1)1 RY(n+1)2 RY(n+1)3 RY(n+1)4 RY(n+1)5 RY(n+1)6 RY(n+1)7 784 785 786 787 788 789 790 791 RY(n+1)8 792 : 793 591 RY(n+4)F 794 Error in the units place, bit 0 Error in the units place, bit 1 Error in the units place, bit 2 Error in the units place, bit 3 Error in the tens place, bit 0 Error in the tens place, bit 1 Error in the tens place, bit 2 Error in the tens place, bit 3 Error in the hundreds place, bit 0 Error in the hundreds place, bit 1 Error in the hundreds place, bit 2 592 RY(n+5)0 795 : RY(n+5)F 796 797 512 513 514 515 516 517 518 519 520 521 522 523 524 525 526 527 528 529 530 531 532 533 534 535 Step Stop (All tasks) Continue Start Instantaneous Stop (All tasks) [Halt] Operation Preparation Start Interruption Skip Program Start Reserved. Reserved. Program No. selection bit 0 Program No. selection bit 1 Program No. selection bit 2 Program No. selection bit 3 Program No. selection bit 4 Program No. selection bit 5 Program No. selection bit 6 Program No. selection parity bit Motor Power ON CAL Execution Reserved. SP100 External Mode Change Program Reset Clear Robot Error Reserved. 536 : : 607 User input (INPUT m) (Note 2) Not used. 798 799 800 : 847 848 : 857 858 859 860 : 863 Note 1: Note 2: Note 3: Note 4: Note 5: Error in the hundreds place, bit 3 SS Mode Reserved. Reserved. Reserved. User output (OUTPUT m) (Note 2) Not used. Error status flag (Note 3) Remote station ready (Note 4) Not used. RX(n+1)0 RX(n+1)1 RX(n+1)2 RX(n+1)3 RX(n+1)4 RX(n+1)5 RX(n+1)6 RX(n+1)7 RX(n+1)8 RX(n+1)9 RX(n+1)A RX(n+1)B RX(n+1)C RX(n+1)D RX(n+1)E RX(n+1)F RX(n+2)0 : RX(n+4)F RX(n+5)0 : RX(n+5)9 RX(n+5)A RX(n+5)B RX(n+5)C : RX(n+5)F n denotes (station number − 1) × 2 (hexadecimal notation). m denotes I/O port number. The output timing is the same as that of Robot Error (I/O port #770) and Robot Warning (I/O port #782). The output timing is the same as that of Robot Power ON Completed (I/O port #776). indicates the system area that cannot be used for user I/O. Additional note For remote registers RWw and RWr, refer to the Options Manual " Remote Resistors (RWw and RWr)" 148 8.5.11 CC-Link Board (4 stations occupied) in I/O-Box Compatible Mode Input data I/O port number 512 513 514 515 516 517 518 519 520 521 522 523 524 525 526 527 528 529 530 531 532 533 534 535 Signal number Step Stop (All tasks) Continue Start Instantaneous Stop (All tasks) [Halt] Operation Preparation Start Interruption Skip Program Start Reserved. Reserved. Program No. selection bit 0 Program No. selection bit 1 Program No. selection bit 2 Program No. selection bit 3 Program No. selection bit 4 Program No. selection bit 5 Program No. selection bit 6 Program No. selection parity bit Motor Power ON CAL Execution Reserved. SP100 External Mode Change Program Reset Clear Robot Error Reserved. 536 : User input (INPUT m) (Note 2) 623 624 : 639 Not used. Output data Remote output. (Note 1) RYn0 RYn1 I/O port number Remote input. (Note 1) 768 769 ⎯ Robot Running RXn0 RXn1 RYn2 770 Robot Error RXn2 RYn3 RYn4 RYn5 RYn6 RYn7 RYn8 RYn9 RYnA RYnB RYnC RYnD RYnE 771 772 773 774 775 776 777 778 779 780 781 782 Auto Mode External Mode Program Start Reset Reserved. Reserved. Robot Power ON Completed Servo ON CAL Completed Teaching ON 1 Cycle End Battery Warning Robot Warning RXn3 RXn4 RXn5 RXn6 RXn7 RXn8 RXn9 RxnA RXnB RXnC RXnD RxnE RYnF 783 Continue Start Permission RXnF RY(n+1)0 RY(n+1)1 RY(n+1)2 RY(n+1)3 RY(n+1)4 RY(n+1)5 RY(n+1)6 RY(n+1)7 784 785 786 787 788 789 790 791 RY(n+1)8 792 : 793 RY(n+6)F 794 Error in the units place, bit 0 Error in the units place, bit 1 Error in the units place, bit 2 Error in the units place, bit 3 Error in the tens place, bit 0 Error in the tens place, bit 1 Error in the tens place, bit 2 Error in the tens place, bit 3 Error in the hundreds place, bit 0 Error in the hundreds place, bit 1 Error in the hundreds place, bit 2 RY(n+7)0 795 : RY(n+7)F 796 797 798 799 800 : 879 880 : 889 890 891 892 : 895 Note 1: Note 2: Note 3: Note 4: Note 5: Signal number Error in the hundreds place, bit 3 SS Mode Reserved. Reserved. Reserved. User output (OUTPUT m) (Note 2) Not used. Error status flag (Note 3) Remote station ready (Note 4) Not used. RX(n+1)0 RX(n+1)1 RX(n+1)2 RX(n+1)3 RX(n+1)4 RX(n+1)5 RX(n+1)6 RX(n+1)7 RX(n+1)8 RX(n+1)9 RX(n+1)A RX(n+1)B RX(n+1)C RX(n+1)D RX(n+1)E RX(n+1)F RX(n+2)0 : RX(n+6)F RX(n+7)0 : RX(n+7)9 RX(n+7)A RX(n+7)B RX(n+7)C : RX(n+7)F n denotes (station number − 1) × 2 (hexadecimal notation). m denotes I/O port number. The output timing is the same as that of Robot Error (I/O port #770) and Robot Warning (I/O port #782). The output timing is the same as that of Robot Power ON Completed (I/O port #776). indicates the system area that cannot be used for user I/O. Additional note For remote registers RWw and RWr, refer to the Options Manual " Remote Resistors (RWw and RWr)" 149 8.5.12 CC-Link Board (2 stations occupied) in I/O-Box Standard Mode Input data Port No. 512 513 Signal name Output data Remote output. (Note 1) RYn0 RYn1 Port No. Reserved. Robot Running RXn0 RXn1 RYn2 770 Robot Error RXn2 RYn3 RYn4 RYn5 RYn6 771 772 773 774 Servo ON Robot Initialized Auto Mode External Mode RXn3 RXn4 RXn5 RXn6 RYn7 775 Battery Warning RXn7 RYn8 RYn9 RYnA RYnB RYnC RYnD 776 777 778 779 780 781 RXn8 RXn9 RXnA RXnB RXnC RXnD RYnE 782 Robot Warning Continue Start Permission SS Mode Reserved. Reserved. Reserved. Command Processing Completed Status area odd parity Status area bit 0 Status area bit 1 Status area bit 2 Status area bit 3 Status area bit 4 Status area bit 5 Status area bit 6 Status area bit 7 Status area bit 8 Status area bit 9 Status area bit 10 Status area bit 11 Status area bit 12 Status area bit 13 Status area bit 14 Status area bit 15 520 521 522 523 524 525 526 Data area 1 bit 6 527 528 529 530 531 532 533 534 535 536 537 538 539 540 541 542 543 544 545 546 Data area 1 bit 7 Data area 2 bit 0 Data area 2 bit 1 Data area 2 bit 2 Data area 2 bit 3 Data area 2 bit 4 Data area 2 bit 5 Data area 2 bit 6 Data area 2 bit 7 Data area 2 bit 8 Data area 2 bit 9 Data area 2 bit 10 Data area 2 bit 11 Data area 2 bit 12 Data area 2 bit 13 Data area 2 bit 14 Data area 2 bit 15 Command area bit 0 Command area bit 1 Command area bit 2 RYnF RY(n+1)0 RY(n+1)1 RY(n+1)2 RY(n+1)3 RY(n+1)4 RY(n+1)5 RY(n+1)6 RY(n+1)7 RY(n+1)8 RY(n+1)9 RY(n+1)A RY(n+1)B RY(n+1)C RY(n+1)D RY(n+1)E RY(n+1)F RY(n+2)0 RY(n+2)1 RY(n+2)2 783 784 785 786 787 788 789 790 791 792 793 794 795 796 797 798 799 800 : 815 547 548 549 550 Command area bit 3 Reserved. Reserved. Reserved. RY(n+2)3 RY(n+2)4 RY(n+2)5 RY(n+2)6 816 : 825 826 551 Reserved. RY(n+2)7 827 552 : 559 User input (INPUT m) (Note 2) RY(n+2)8 : RY(n+2)F 828 : 829 560 : 575 Not used. RY(n+3)0 : RY(n+3)F 515 516 517 518 519 Note 1: Note 2: Note 3: Note 4: Note 5: Remote input (Note 1) 768 769 Step Stop (All tasks) Reserved. Instantaneous Stop (All tasks) [Halt] Strobe Signal Interruption Skip ⎯ ⎯ Command data area odd parity Data area 1 bit 0 Data area 1 bit 1 Data area 1 bit 2 Data area 1 bit 3 Data area 1 bit 4 Data area 1 bit 5 514 Signal name User output (OUTPUT m) (Note 2) Not used. Error status flag (Note 3) Remote station ready (Note 4) Not used. RXnE RXnF RX(n+1)0 RX(n+1)1 RX(n+1)2 RX(n+1)3 RX(n+1)4 RX(n+1)5 RX(n+1)6 RX(n+1)7 RX(n+1)8 RX(n+1)9 RX(n+1)A RX(n+1)B RX(n+1)C RX(n+1)D RX(n+1)E RX(n+1)F RX(n+2)0 : RX(n+2)F RX(n+3)0 : RX(n+3)9 RX(n+3)A RX(n+3)B RX(n+3)C : RX(n+3)F n denotes (station number − 1) × 2 (hexadecimal notation). m denotes I/O port number. The output timing is the same as that of Robot Error (I/O port #770) and Robot Warning (I/O port #776). The output timing is the same as that of Robot Initialized (I/O port #772). indicates the system area that cannot be used for user I/O. Additional note For remote registers RWw and RWr, refer to the Options Manual " Remote Resistors (RWw and RWr)" 150 8.5.13 CC-Link Board (3 stations occupied) in I/O-Box Standard Mode Input data Port No. 512 513 Signal name Output data Remote output (Note 1) RYn0 RYn1 Port No. Reserved. Robot Running RYn2 770 Robot Error RXn2 RYn3 RYn4 RYn5 RYn6 771 772 773 774 Servo ON Robot Initialized Auto Mode External Mode RXn3 RXn4 RXn5 RXn6 RYn7 775 Battery Warning RXn7 RYn8 RYn9 RYnA RYnB RYnC RYnD 776 777 778 779 780 781 RXn8 RXn9 RxnA RXnB RXnC RXnD RYnE 782 Robot Warning Continue Start Permission SS Mode Reserved. Reserved. Reserved. Command Processing Completed Status area odd parity Status area bit 0 Status area bit 1 Status area bit 2 Status area bit 3 Status area bit 4 Status area bit 5 Status area bit 6 Status area bit 7 Status area bit 8 Status area bit 9 Status area bit 10 Status area bit 11 Status area bit 12 Status area bit 13 Status area bit 14 Status area bit 15 520 521 522 523 524 525 526 Data area 1 bit 6 527 528 529 530 531 532 533 534 535 536 537 538 539 540 541 542 543 544 545 546 Data area 1 bit 7 Data area 2 bit 0 Data area 2 bit 1 Data area 2 bit 2 Data area 2 bit 3 Data area 2 bit 4 Data area 2 bit 5 Data area 2 bit 6 Data area 2 bit 7 Data area 2 bit 8 Data area 2 bit 9 Data area 2 bit 10 Data area 2 bit 11 Data area 2 bit 12 Data area 2 bit 13 Data area 2 bit 14 Data area 2 bit 15 Command area bit 0 Command area bit 1 Command area bit 2 RYnF RY(n+1)0 RY(n+1)1 RY(n+1)2 RY(n+1)3 RY(n+1)4 RY(n+1)5 RY(n+1)6 RY(n+1)7 RY(n+1)8 RY(n+1)9 RY(n+1)A RY(n+1)B RY(n+1)C RY(n+1)D RY(n+1)E RY(n+1)F RY(n+2)0 RY(n+2)1 RY(n+2)2 783 784 785 786 787 788 789 790 791 792 793 794 795 796 797 798 799 800 : 847 547 548 549 550 Command area bit 3 Reserved. Reserved. Reserved. RY(n+2)3 RY(n+2)4 RY(n+2)5 RY(n+2)6 848 : 857 858 551 Reserved. RY(n+2)7 859 552 : 591 User input (INPUT m) (Note 2) RY(n+2)8 : RY(n+4)F 860 : 863 592 : 607 Not used. RY(n+5)0 : RY(n+5)F 515 516 517 518 519 Note 1: Note 2: Note 3: Note 4: Note 5: Remote output (Note 1) RXn0 RXn1 768 769 Step Stop (All tasks) Reserved. Instantaneous Stop (All tasks) [Halt] Strobe Signal Interruption Skip ⎯ ⎯ Command data area odd parity Data area 1 bit 0 Data area 1 bit 1 Data area 1 bit 2 Data area 1 bit 3 Data area 1 bit 4 Data area 1 bit 5 514 Signal name User output (OUTPUT m) (Note 2) Not used. Error status flag (Note 3) Remote station ready (Note 4) Not used. RxnE RXnF RX(n+1)0 RX(n+1)1 RX(n+1)2 RX(n+1)3 RX(n+1)4 RX(n+1)5 RX(n+1)6 RX(n+1)7 RX(n+1)8 RX(n+1)9 RX(n+1)A RX(n+1)B RX(n+1)C RX(n+1)D RX(n+1)E RX(n+1)F RX(n+2)0 : RX(n+4)F RX(n+5)0 : RX(n+5)9 RX(n+5)A RX(n+5)B RX(n+5)C : RX(n+5)F n denotes (station number − 1) × 2 (hexadecimal notation). m denotes I/O port number. The output timing is the same as that of Robot Error (I/O port #770) and Robot Warning (I/O port #776). The output timing is the same as that of Robot Initialized (I/O port #772). indicates the system area that cannot be used for user I/O. Additional note For remote registers RWw and RWr, refer to the Options Manual " Remote Resistors (RWw and RWr)" 151 8.5.14 CC-Link Board (4 stations occupied) in I/O-Box Standard Mode Input data Port No. 512 513 Signal name Output data Remote output. (Note 1) RYn0 RYn1 Port No. Reserved. Robot Running RXn0 RXn1 RYn2 770 Robot Error RXn2 RYn3 RYn4 RYn5 RYn6 771 772 773 774 Servo ON Robot Initialized Auto Mode External Mode RXn3 RXn4 RXn5 RXn6 RYn7 775 Battery Warning RXn7 RYn8 RYn9 RYnA RYnB RYnC RYnD 776 777 778 779 780 781 RXn8 RXn9 RxnA RXnB RXnC RXnD RYnE 782 Robot Warning Continue Start Permission SS Mode Reserved. Reserved. Reserved. Command Processing Completed Status area odd parity Status area bit 0 Status area bit 1 Status area bit 2 Status area bit 3 Status area bit 4 Status area bit 5 Status area bit 6 Status area bit 7 Status area bit 8 Status area bit 9 Status area bit 10 Status area bit 11 Status area bit 12 Status area bit 13 Status area bit 14 Status area bit 15 520 521 522 523 524 525 526 Data area 1 bit 6 527 528 529 530 531 532 533 534 535 536 537 538 539 540 541 542 543 544 545 546 Data area 1 bit 7 Data area 2 bit 0 Data area 2 bit 1 Data area 2 bit 2 Data area 2 bit 3 Data area 2 bit 4 Data area 2 bit 5 Data area 2 bit 6 Data area 2 bit 7 Data area 2 bit 8 Data area 2 bit 9 Data area 2 bit 10 Data area 2 bit 11 Data area 2 bit 12 Data area 2 bit 13 Data area 2 bit 14 Data area 2 bit 15 Command area bit 0 Command area bit 1 Command area bit 2 RYnF RY(n+1)0 RY(n+1)1 RY(n+1)2 RY(n+1)3 RY(n+1)4 RY(n+1)5 RY(n+1)6 RY(n+1)7 RY(n+1)8 RY(n+1)9 RY(n+1)A RY(n+1)B RY(n+1)C RY(n+1)D RY(n+1)E RY(n+1)F RY(n+2)0 RY(n+2)1 RY(n+2)2 783 784 785 786 787 788 789 790 791 792 793 794 795 796 797 798 799 800 : 879 547 548 549 550 Command area bit 3 Reserved. Reserved. Reserved. RY(n+2)3 RY(n+2)4 RY(n+2)5 RY(n+2)6 880 : 889 890 551 Reserved. RY(n+2)7 891 552 : 623 User input (INPUT m) (Note 2) RY(n+2)8 : RY(n+6)F 892 : 895 624 : 639 Not used. RY(n+7)0 : RY(n+7)F 515 516 517 518 519 Note 1: Note 2: Note 3: Note 4: Note 5: Remote input (Note 1) 768 769 Step Stop (All tasks) Reserved. Instantaneous Stop (All tasks) [Halt] Strobe Signal Interruption Skip ⎯ ⎯ Command data area odd parity Data area 1 bit 0 Data area 1 bit 1 Data area 1 bit 2 Data area 1 bit 3 Data area 1 bit 4 Data area 1 bit 5 514 Signal name User output (OUTPUT m) (Note 2) Not used. Error status flag (Note 3) Remote station ready (Note 4) Not used. RxnE RXnF RX(n+1)0 RX(n+1)1 RX(n+1)2 RX(n+1)3 RX(n+1)4 RX(n+1)5 RX(n+1)6 RX(n+1)7 RX(n+1)8 RX(n+1)9 RX(n+1)A RX(n+1)B RX(n+1)C RX(n+1)D RX(n+1)E RX(n+1)F RX(n+2)0 : RX(n+6)F RX(n+7)0 : RX(n+7)9 RX(n+7)A RX(n+7)B RX(n+7)C : RX(n+7)F n denotes (station number − 1) × 2 (hexadecimal notation). m denotes I/O port number. The output timing is the same as that of Robot Error (I/O port #770) and Robot Warning (I/O port #776). The output timing is the same as that of Robot Initialized (I/O port #772). indicates the system area that cannot be used for user I/O. Additional note For remote registers RWw and RWr, refer to the Options Manual " Remote Resistors (RWw and RWr)" 152 8.5.15 PROFIBUS-DP Slave Board in I/O-Box Compatible Mode Port No. 512 513 514 515 516 517 518 519 520 521 522 523 524 525 526 527 528 529 530 531 532 533 534 535 536 537 538 539 540 541 542 543 544 545 546 547 548 549 : : 765 766 767 Input data Signal name Step Stop (All tasks) Continue Start Instantaneous Stop (All tasks) [Halt] Operation Preparation Start Interruption Skip Program Start Reserved. Reserved. Program No. selection bit 0 Program No. selection bit 1 Program No. selection bit 2 Program No. selection bit 3 Program No. selection bit 4 Program No. selection bit 5 Program No. selection bit 6 Program No. selection parity bit Motor power ON CAL Execution Reserved. SP100 External Mode Change Program Reset Clear Robot Error Reserved. INPUT 536 INPUT 537 INPUT 538 INPUT 539 INPUT 540 INPUT 541 INPUT 542 INPUT 543 INPUT 544 INPUT 545 INPUT 546 INPUT 547 INPUT 548 INPUT 549 Port No. 768 769 770 771 772 773 774 775 776 777 778 779 780 781 782 783 784 785 786 787 788 789 790 791 792 793 794 795 796 797 798 799 800 801 802 803 804 805 : : 1021 1022 1023 (INPUT 550 to INPUT 764) INPUT 765 INPUT 766 INPUT 767 153 Output data Signal name ⎯ Robot Running Robot Error Auto Mode External Mode Program Start Reset Reserved. Reserved. Robot Power ON Completed Servo ON CAL Completed Teaching ON 1 Cycle End Battery Warning Robot Warning Continue Start Permission Error in the units place, bit 0 Error in the units place, bit 1 Error in the units place, bit 2 Error in the units place, bit 3 Error in the tens place, bit 0 Error in the tens place, bit 1 Error in the tens place, bit 2 Error in the tens place, bit 3 Error in the hundreds place, bit 0 Error in the hundreds place, bit 1 Error in the hundreds place, bit 2 Error in the hundreds place, bit 3 SS Mode Reserved. Reserved. Reserved. OUTPUT 800 OUTPUT 801 OUTPUT 802 OUTPUT 803 OUTPUT 804 OUTPUT 805 (OUTPUT 806 to OUTPUT 1020) OUTPUT 1021 OUTPUT 1022 OUTPUT 1023 8.5.16 PROFIBUS-DP Slave Board in I/O-Box Standard Mode Port No. 512 513 514 515 516 517 518 519 520 521 522 523 524 525 526 527 528 529 530 531 532 533 534 535 536 537 538 539 540 541 542 543 544 545 546 547 548 to 551 552 553 : : 766 767 Input data Signal name Step Stop (All tasks) Reserved. Instantaneous Stop (All tasks) [Halt] Strobe Signal Interruption Skip ⎯ ⎯ Command data area odd parity Data area 1 bit 0 Data area 1 bit 1 Data area 1 bit 2 Data area 1 bit 3 Data area 1 bit 4 Data area 1 bit 5 Data area 1 bit 6 Data area 1 bit 7 Data area 2 bit 0 Data area 2 bit 1 Data area 2 bit 2 Data area 2 bit 3 Data area 2 bit 4 Data area 2 bit 5 Data area 2 bit 6 Data area 2 bit 7 Data area 2 bit 8 Data area 2 bit 9 Data area 2 bit 10 Data area 2 bit 11 Data area 2 bit 12 Data area 2 bit 13 Data area 2 bit 14 Data area 2 bit 15 Command area bit 0 Command area bit 1 Command area bit 2 Command area bit 3 Reserved. INPUT 552 INPUT 553 Port No. 768 769 770 771 772 773 774 775 776 777 778 779 780 781 782 783 784 785 786 787 788 789 790 791 792 793 794 795 796 797 798 799 800 801 802 803 804 805 806 : : 1022 1023 (INPUT 554 to INPUT 765) INPUT 766 INPUT 767 154 Output data Signal name Reserved. Robot Running Robot Error Servo ON Robot Initialized Auto Mode External Mode Battery Warning Robot Warning Continue Start Permission SS Mode Reserved. Reserved. Reserved. Command Processing Completed Status area odd parity Status area bit 0 Status area bit 1 Status area bit 2 Status area bit 3 Status area bit 4 Status area bit 5 Status area bit 6 Status area bit 7 Status area bit 8 Status area bit 9 Status area bit 10 Status area bit 11 Status area bit 12 Status area bit 13 Status area bit 14 Status area bit 15 OUTPUT 800 OUTPUT 801 OUTPUT 802 OUTPUT 803 OUTPUT 804 OUTPUT 805 OUTPUT 806 (OUTPUT 807 to OUTPUT 1021) OUTPUT 1022 OUTPUT 1023 8.5.17 Parallel I/O Board in I/O-Box Al User I/O Mode Terminal No. 1 2 3 4 5 6 7 8 9 10 11 12 13 14 15 16 17 18 19 20 21 22 23 24 25 26 27 28 29 30 31 32 33 34 35 36 37 38 39 40 41 42 43 44 45 46 47 48 Signal name User output User input Power +24V Power +24V Power +24V Power +24V Port No. Direction 3840 3841 3842 3843 3844 3845 3846 3847 3848 3849 3850 3851 3852 3853 3854 3855 3856 3857 3858 3859 3860 3861 3862 3863 3584 3585 3586 3587 3588 3589 3590 3591 3592 3593 3594 3595 3596 3597 3598 3599 3600 3601 3602 3603 ⎯ ⎯ ⎯ ⎯ OUT OUT OUT OUT OUT OUT OUT OUT OUT OUT OUT OUT OUT OUT OUT OUT OUT OUT OUT OUT OUT OUT OUT OUT IN IN IN IN IN IN IN IN IN IN IN IN IN IN IN IN IN IN IN IN IN IN IN IN Terminal No. 49 50 51 52 53 54 55 56 57 58 59 60 61 62 63 64 65 66 67 68 69 70 71 72 73 74 75 76 77 78 79 80 81 82 83 84 85 86 87 88 89 90 91 92 93 94 95 96 155 Signal name User output User input Power 0V Power 0V Power 0V Power 0V Port No. Direction 3864 3865 3866 3867 3868 3869 3870 3871 3872 3873 3874 3875 3876 3877 3878 3879 3880 3881 3882 3883 3884 3885 3886 3887 3604 3605 3606 3607 3608 3609 3610 3611 3612 3613 3614 3615 3616 3617 3618 3619 3620 3621 3622 3623 ⎯ ⎯ ⎯ ⎯ OUT OUT OUT OUT OUT OUT OUT OUT OUT OUT OUT OUT OUT OUT OUT OUT OUT OUT OUT OUT OUT OUT OUT OUT IN IN IN IN IN IN IN IN IN IN IN IN IN IN IN IN IN IN IN IN IN IN IN IN 8.5.18 DeviceNet Master Board in I/O-Box All User I/O Mode Note: The table below applies also to the allocation of the master area on the DeviceNet master/slave board. Port No. 1024 1025 1026 1027 1028 1029 1030 1031 1032 1033 1034 1035 1036 1037 1038 1039 1040 1041 1042 1043 1044 1045 1046 1047 1048 1049 1050 1051 1052 1053 1054 1055 1056 1057 1058 1059 1060 1061 : 2045 2046 2047 Input data Signal name INPUT 1024 INPUT 1025 INPUT 1026 INPUT 1027 INPUT 1028 INPUT 1029 INPUT 1030 INPUT 1031 INPUT 1032 INPUT 1033 INPUT 1034 INPUT 1035 INPUT 1036 INPUT 1037 INPUT 1038 INPUT 1039 INPUT 1040 INPUT 1041 INPUT 1042 INPUT 1043 INPUT 1044 INPUT 1045 INPUT 1046 INPUT 1047 INPUT 1048 INPUT 1049 INPUT 1050 INPUT 1051 INPUT 1052 INPUT 1053 INPUT 1054 INPUT 1055 INPUT 1056 INPUT 1057 INPUT 1058 INPUT 1059 INPUT 1060 INPUT 1061 (INPUT 1062 to INPUT 2044) INPUT 2045 INPUT 2046 INPUT 2047 Port No. 2048 2049 2050 2051 2052 2053 2054 2055 2056 2057 2058 2059 2060 2061 2062 2063 2064 2065 2066 2067 2068 2069 2070 2071 2072 2073 2074 2075 2076 2077 2078 2079 2080 2081 2082 2083 2084 2085 : 3069 3070 3071 156 Output data Signal name OUTPUT 2048 OUTPUT 2049 OUTPUT 2050 OUTPUT 2051 OUTPUT 2052 OUTPUT 2053 OUTPUT 2054 OUTPUT 2055 OUTPUT 2056 OUTPUT 2057 OUTPUT 2058 OUTPUT 2059 OUTPUT 2060 OUTPUT 2061 OUTPUT 2062 OUTPUT 2063 OUTPUT 2064 OUTPUT 2065 OUTPUT 2066 OUTPUT 2067 OUTPUT 2068 OUTPUT 2069 OUTPUT 2070 OUTPUT 2071 OUTPUT 2072 OUTPUT 2073 OUTPUT 2074 OUTPUT 2075 OUTPUT 2076 OUTPUT 2077 OUTPUT 2078 OUTPUT 2079 OUTPUT 2080 OUTPUT 2081 OUTPUT 2082 OUTPUT 2083 OUTPUT 2084 OUTPUT 2085 (OUTPUT 2086 to OUTPUT 3068) OUTPUT 3069 OUTPUT 3070 OUTPUT 3071 8.5.19 S-Link V Master Board in I/O-Box All User I/O Mode Port No. 3072 3073 3074 3075 3076 3077 3078 3079 3080 3081 3082 3083 3084 3085 3086 3087 3088 3089 3090 3091 3092 3093 3094 3095 3096 3097 3098 3099 3100 3101 3102 3103 3104 3105 3106 3107 3108 3109 : 3325 3326 3327 Input data Signal name INPUT 3072 INPUT 3073 INPUT 3074 INPUT 3075 INPUT 3076 INPUT 3077 INPUT 3078 INPUT 3079 INPUT 3080 INPUT 3081 INPUT 3082 INPUT 3083 INPUT 3084 INPUT 3085 INPUT 3086 INPUT 3087 INPUT 3088 INPUT 3089 INPUT 3090 INPUT 3091 INPUT 3092 INPUT 3093 INPUT 3094 INPUT 3095 INPUT 3096 INPUT 3097 INPUT 3098 INPUT 3099 INPUT 3100 INPUT 3101 INPUT 3102 INPUT 3103 INPUT 3104 INPUT 3105 INPUT 3106 INPUT 3107 INPUT 3108 INPUT 3109 (INPUT 3110 to INPUT 3324) INPUT 3325 INPUT 3326 INPUT 3327 Port No. 3328 3329 3330 3331 3332 3333 3334 3335 3336 3337 3338 3339 3340 3341 3342 3343 3344 3345 3346 3347 3348 3349 3350 3351 3352 3353 3354 3355 3356 3357 3358 3359 3360 3361 3362 3363 3364 3365 : 3581 3582 3583 157 Output data Signal name OUTPUT 3328 OUTPUT 3329 OUTPUT 3330 OUTPUT 3331 OUTPUT 3332 OUTPUT 3333 OUTPUT 3334 OUTPUT 3335 OUTPUT 3336 OUTPUT 3337 OUTPUT 3338 OUTPUT 3339 OUTPUT 3340 OUTPUT 3341 OUTPUT 3342 OUTPUT 3343 OUTPUT 3344 OUTPUT 3345 OUTPUT 3346 OUTPUT 3347 OUTPUT 3348 OUTPUT 3349 OUTPUT 3350 OUTPUT 3351 OUTPUT 3352 OUTPUT 3353 OUTPUT 3354 OUTPUT 3355 OUTPUT 3356 OUTPUT 3357 OUTPUT 3358 OUTPUT 3359 OUTPUT 3360 OUTPUT 3361 OUTPUT 3362 OUTPUT 3363 OUTPUT 3364 OUTPUT 3365 (OUTPUT 3366 to OUTPUT 3580) OUTPUT 3581 OUTPUT 3582 OUTPUT 3583 8.5.20 Ethernet/IP Module in I/O-Box Compatible Mode Port No. 512 513 514 515 516 517 518 519 520 521 522 523 524 525 526 527 528 529 530 531 532 533 534 535 Input data Signal name Step Stop (All tasks) Continue Start Halt (All tasks) Operation Preparation Start Interruption Skip Program Start ⎯ ⎯ Program No. selection bit 0 Program No. selection bit 1 Program No. selection bit 2 Program No. selection bit 3 Program No. selection bit 4 Program No. selection bit 5 Program No. selection bit 6 Program No. selection parity bit Motor Power ON CAL Execution ⎯ SP100 External Mode Change Program Reset Clear Robot Error ⎯ Port No. 536 537 538 539 540 541 542 543 544 545 546 547 548 549 550 551 552 553 554 555 556 557 558 559 : 760 761 762 763 764 765 766 767 158 Input data Signal name INPUT 536 INPUT 537 INPUT 538 INPUT 539 INPUT 540 INPUT 541 INPUT 542 INPUT 543 INPUT 544 INPUT 545 INPUT 546 INPUT 547 INPUT 548 INPUT 549 INPUT 550 INPUT 551 INPUT 552 INPUT 553 INPUT 554 INPUT 555 INPUT 556 INPUT 557 INPUT 558 INPUT 559 (INPUT 560 to INPUT 759) INPUT 760 INPUT 761 INPUT 762 INPUT 763 INPUT 764 INPUT 765 INPUT 766 INPUT 767 Port No. 768 769 770 771 772 773 774 775 776 777 778 779 780 781 782 783 784 785 786 787 788 789 790 791 792 793 794 795 796 797 798 799 Output data Signal name Port No. 800 801 802 803 804 805 806 807 808 809 810 811 812 813 814 815 : 1016 1017 1018 1019 1020 1021 1022 1023 ⎯ Robot Running Robot Error Auto Mode External Mode Program Start Reset ⎯ ⎯ Robot Power ON Completed Servo ON CAL Completed Teaching ON 1 Cycle End Battery Warning Robot Warning Continue Start Permission Error in the units place, bit 0 Error in the units place, bit 1 Error in the units place, bit 2 Error in the units place, bit 3 Error in the tens place, bit 0 Error in the tens place, bit 1 Error in the tens place, bit 2 Error in the tens place, bit 3 Error in the hundreds place, bit 0 Error in the hundreds place, bit 1 Error in the hundreds place, bit 2 Error in the hundreds place, bit 3 ⎯ ⎯ ⎯ ⎯ 159 Output data Signal name OUTPUT 800 OUTPUT 801 OUTPUT 802 OUTPUT 803 OUTPUT 804 OUTPUT 805 OUTPUT 806 OUTPUT 807 OUTPUT 808 OUTPUT 809 OUTPUT 810 OUTPUT 811 OUTPUT 812 OUTPUT 813 OUTPUT 814 OUTPUT 815 (OUTPUT 816 to OUTPUT 1015) OUTPUT 1016 OUTPUT 1017 OUTPUT 1018 OUTPUT 1019 OUTPUT 1020 OUTPUT 1021 OUTPUT 1022 OUTPUT 1023 8.5.21 Ethernet/IP Module in I/O-Box Standard Mode Port No. 512 513 514 515 516 517 518 519 520 521 522 523 524 525 526 527 528 529 530 531 532 533 534 535 536 537 538 539 540 541 542 543 Input data Signal name Step Stop (All tasks) ⎯ Halt (All tasks) Strobe Signal Interruption Skip ⎯ ⎯ Command data area odd parity Data area 1, bit 0 Data area 1, bit 1 Data area 1, bit 2 Data area 1, bit 3 Data area 1, bit 4 Data area 1, bit 5 Data area 1, bit 6 Data area 1, bit 7 Data area 2, bit 0 Data area 2, bit 1 Data area 2, bit 2 Data area 2, bit 3 Data area 2, bit 4 Data area 2, bit 5 Data area 2, bit 6 Data area 2, bit 7 Data area 2, bit 8 Data area 2, bit 9 Data area 2, bit 10 Data area 2, bit 11 Data area 2, bit 12 Data area 2, bit 13 Data area 2, bit 14 Data area 2, bit 15 Port No. 544 545 546 547 548 549 550 551 552 553 554 555 556 557 558 559 : 760 761 762 763 764 765 766 767 160 Input data Signal name Command area, bit 0 Command area, bit 1 Command area, bit 2 Command area, bit 3 ⎯ ⎯ ⎯ ⎯ INPUT 552 INPUT 553 INPUT 554 INPUT 555 INPUT 556 INPUT 557 INPUT 558 INPUT 559 (INPUT 560 to INPUT 759) INPUT 760 INPUT 761 INPUT 762 INPUT 763 INPUT 764 INPUT 765 INPUT 766 INPUT 767 Port No. 768 769 770 771 772 773 774 775 776 777 778 779 780 781 782 783 784 785 786 787 788 789 790 791 792 793 794 795 796 797 798 799 Output data Signal name Port No. 800 801 802 803 804 805 806 807 808 809 810 811 812 813 814 815 : 1016 1017 1018 1019 1020 1021 1022 1023 ⎯ Robot Running Robot Error Servo ON Robot Initialized Auto Mode External Mode Battery Warning Robot Warning Continue Start Permission SS Mode ⎯ ⎯ ⎯ Command Processing Completed Status area, odd parity Status area, bit 0 Status area, bit 1 Status area, bit 2 Status area, bit 3 Status area, bit 4 Status area, bit 5 Status area, bit 6 Status area, bit 7 Status area, bit 8 Status area, bit 9 Status area, bit 10 Status area, bit 11 Status area, bit 12 Status area, bit 13 Status area, bit 14 Status area, bit 15 161 Output data Signal name OUTPUT 800 OUTPUT 801 OUTPUT 802 OUTPUT 803 OUTPUT 804 OUTPUT 805 OUTPUT 806 OUTPUT 807 OUTPUT 808 OUTPUT 809 OUTPUT 810 OUTPUT 811 OUTPUT 812 OUTPUT 813 OUTPUT 814 OUTPUT 815 (OUTPUT 816 to OUTPUT 1015) OUTPUT 1016 OUTPUT 1017 OUTPUT 1018 OUTPUT 1019 OUTPUT 1020 OUTPUT 1021 OUTPUT 1022 OUTPUT 1023 RC7M CONTROLLER INTERFACE MANUAL First Edition Tenth Edition Eleventh Edition July 2005 April 2009 March 2010 DENSO WAVE INCORPORATED 3M**C The purpose of this manual is to provide accurate information in the handling and operating of the robot. Please feel free to send your comments regarding any errors or omissions you may have found, or any suggestions you may have for generally improving the manual. In no event will DENSO WAVE INCORPORATED be liable for any direct or indirect damages resulting from the application of the information in this manual.