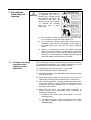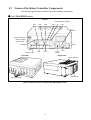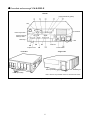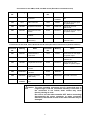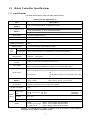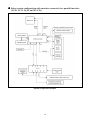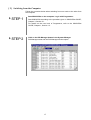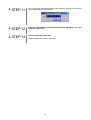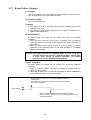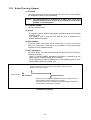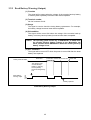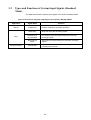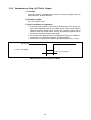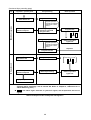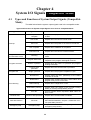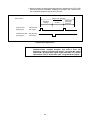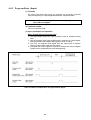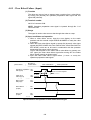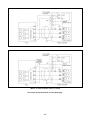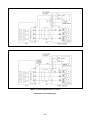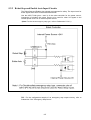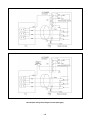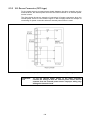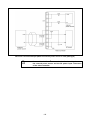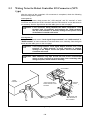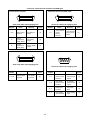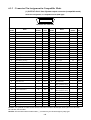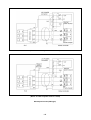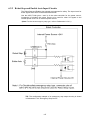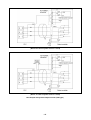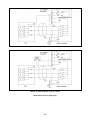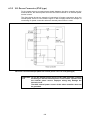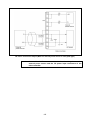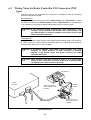
1
ROBOT RC5 CONTROLLER INTERFACE MANUAL Copyright © DENSO WAVE INCORPORATED, 2002 All rights reserved. No part of this publication may be reproduced in any form or by any means without permission in writing from the publisher. Specifications are subject to change without prior notice. All products and company names mentioned are trademarks or registered trademarks of their respective holders. Preface Thank you for purchasing this high-speed, high-accuracy assembly robot. This manual covers interfacing required when you integrate your robot system configured with the RC5 robot controller into your facilities. Before use, read this manual carefully together with related manuals to safely get the maximum benefit from your robot in your assembling operations. Robot models covered by this manual All robot models configured with RC5 controller Important To ensure operator safety, be sure to read the precautions and instructions in "SAFETY PRECAUTIONS." i How the documentation set is organized The documentation set consists of the following books. If you are unfamiliar with this robot and option(s), please read all books and understand them fully before operating your robot and option(s). GENERAL INFORMATION ABOUT ROBOT Provides the packing list of the robot and outlines of the robot system, robot unit, and robot controller. INSTALLATION & MAINTENANCE GUIDE Provides instructions for installing the robot components and customizing your robot, and maintenance & inspection procedures. BEGINNER'S GUIDE Introduces you to the DENSO robot. Taking an equipment setup example, this book guides you through running your robot with the teach pendant, making a program in WINCAPSII, and running your robot automatically. SETTING-UP MANUAL Describes how to set-up or teach your robot with the teach pendant, operating panel, or minipendant. WINCAPSII GUIDE Provides instructions on how to use the teaching system WINCAPSII which runs on the PC connected to the robot controller for developing and managing programs. PROGRAMMER'S MANUAL (I), (II) Describes the PAC programming language, program development, and command specifications in PAC. RC5 CONTROLLER INTERFACE MANUAL - this book Describes the RC5 controller, interfacing with external devices, system- and user-input/output signals, and I/O circuits. ERROR CODE TABLES List error codes that will appear on the teach pendant, operating panel, or PC screen if an error occurs in the robot series or WINCAPSII. These tables provide detailed description and recovery ways. OPTIONS MANUAL Describes the specifications, installation, and use of optional devices. ii How this book is organized This book is just one part of the robot documentation set. This book consists of SAFETY PRECAUTIONS and chapters one through nine. SAFETY PRECAUTIONS Defines safety terms and related symbols and provides precautions that should be observed. Be sure to read this section before operating your robot. Chapter 1 Outline of the RC5 Controller Provides an outline of the RC5 controller. The robot controller is available in several models that will differ in detailed specifications to match robot models to be connected. Chapter 2 General Information about the Interface Introduces you to the interface required for connecting the robot controller with a PLC or other external equipment. It describes two I/O allocation modes available--standard mode and compatible mode, and the switching procedure between those modes. Describes declaration of I/O variables and user I/O signals. Chapter 3 System I/O Signals in Standard Mode Describes system I/O signals available in standard mode, and describes I/O signals that execute I/O commands. Chapter 4 System I/O Signals in Compatible Mode Describes the functions, terminal numbers, and on/off conditions of system I/O signals in compatible mode. Chapter 5 I/O Circuits and Connectors (NPN type) Describes the I/O circuits and connector pin layout of an NPN I/O board (source input and sink output). The NPN I/O board is designed for the use in Japan. Chapter 6 I/O Circuits and Connectors (PNP type) Describes the I/O circuits and connector pin layout of a PNP I/O board (sink input and source output). Chapter 7 I/O Wiring Describes I/O cables and wiring. iii SAFETY PRECAUTIONS SAFETY PRECAUTIONS Be sure to observe all of the following safety precautions. Strict observance of these warning and caution indications are a MUST for preventing accidents, which could result in bodily injury and substantial property damage. Make sure you fully understand all definitions of these terms and related symbols given below, before you proceed to the text itself. WARNING Alerts you to those conditions, which could result in serious bodily injury or death if the instructions are not followed correctly. CAUTION Alerts you to those conditions, which could result in minor bodily injury or substantial property damage if the instructions are not followed correctly. Terminology and Definitions Maximum space: Refers to the volume of space encompassing the maximum designed movements of all robot parts including the end-effector, workpiece and attachments. (Quoted from the RIA* Committee Draft.) Restricted space: Refers to the portion of the maximum space to which a robot is restricted by limiting devices (i.e., mechanical stops). The maximum distance that the robot, end-effector, and workpiece can travel after the limiting device is actuated defines the boundaries of the restricted space of the robot. (Quoted from the RIA Committee Draft.) Motion space: Refers to the portion of the restricted space to which a robot is restricted by software motion limits. The maximum distance that the robot, end-effector, and workpiece can travel after the software motion limits are set defines the boundaries of the motion space of the robot. (The "motion space" is DENSO WAVE-proprietary terminology.) Operating space: Refers to the portion of the restricted space (or motion space in Denso robot) that is actually used by the robot while performing its task program. (Quoted from the RIA Committee Draft.) Task program: Refers to a set of instructions for motion and auxiliary functions that define the specific intended task of the robot system. (Quoted from the RIA Committee Draft.) (*RIA: Robotic Industries Association) 1. Introduction This section provides safety precautions to be observed during installation, teaching, inspection, adjustment, and maintenance of the robot. 2. Installation Precautions 2.1 Insuring the proper installation environment 2.1.1 For standard type The standard type has not been designed to withstand explosions, dust-proof, nor is it splash-proof. Therefore, it should not be installed in any environment where: (1) there are flammable gases or liquids, (2) there are any shavings from metal processing or other conductive material flying about, (3) there are any acidic, alkaline or other corrosive gases, (4) there is cutting or grinding oil mist, (5) it may likely be submerged in fluid, (6) there is sulfuric cutting or grinding oil mist, or (7) there are any large-sized inverters, high output/high frequency transmitters, large contactors, welders, or other sources of electrical noise. 2.1.2 For dust-proof, splashproof type The dust-proof, splash-proof type is an IP54-equivalent structure, but it has not been designed to withstand explosions. (The HS-E-W and the wrist of the VM-D-W/VS-E-W are an IP65-equivalent dust-proof and splash-proof structure.) Note that the robot controller is not a dust- or splash-proof structure. Therefore, when using the robot controller in an environment exposed to mist, put it in an optional protective box. The dust-proof, splash-proof type should not be installed in any environment where: (1) there are any flammable gases or liquids, (2) there are any acidic, alkaline or other corrosive gases, (3) there are any large-sized inverters, high output/high frequency transmitters, large contactors, welders, or other sources of electrical noise, (4) it may likely be submerged in fluid, (5) there are any grinding or machining chips or shavings, (6) any machining oil not specified in this manual is in use, or Note: Yushiron Oil No. 4C (non-soluble) is specified. (7) there is sulfuric cutting or grinding oil mist. 2.2 Service space The robot and peripheral equipment should be installed so that sufficient service space is maintained for safe teaching, maintenance, and inspection. SAFETY PRECAUTIONS 2.3 Control devices outside the robot's restricted space The robot controller, teach pendant, and operating panel should be installed outside the robot's restricted space and in a place where you can observe all of the robot’s movements when operating the robot controller, teach pendant, or operating panel. 2.4 Positioning of gauges Pressure gauges, oil pressure gauges and other gauges should be installed in an easy-to-check location. 2.5 Protection of electrical wiring and hydraulic/pneumatic piping If there is any possibility of the electrical wiring or hydraulic/pneumatic piping being damaged, protect them with a cover or similar item. 2.6 Positioning of emergency stop switches Emergency stop switches should be provided in a position where they can be reached easily should it be necessary to stop the robot immediately. (1) The emergency stop switches should be red. (2) Emergency stop switches should be designed so that they will not be released after pressed, automatically or mistakenly by any other person. (3) Emergency stop switches should be separate from the power switch. 2.7 Positioning of operating status indicators Operating status indicators should be positioned in such a way where workers can easily see whether the robot is on temporary halt or on an emergency or abnormal stop. 2.8 Setting-up the safety fence or enclosure A safety fence or enclosure should be set up so that no one can easily enter the robot's restricted space. If it is impossible, utilize other protectors as described in Section 2.9. (1) The fence or enclosure should be constructed so that it cannot be easily moved or removed. (2) The fence or enclosure should be constructed so that it cannot be easily damaged or deformed through external force. (3) Establish the exit/entrance to the fence or enclosure. Construct the fence or enclosure so that no one can easily get past it by climbing over the fence or enclosure. (4) The fence or enclosure should be constructed to ensure that it is not possible for hands or any other parts of the body to get through it. (5) Take any one of the following protections for the entrance/ exit of the fence or enclosure: 1) Place a door, rope or chain across the entrance/exit of the fence or enclosure, and fit it with an interlock that ensures the emergency stop device operates automatically if it is opened or removed. 2) Post a warning notice at the entrance/exit of the fence or enclosure stating "In operation--Entry forbidden" or "Work in progress--Do not operate" and ensure that workers follow these instructions at all times. When making a test run, before setting up the fence or enclosure, place an overseer in a position outside the robot’s restricted space and one in which he/she can see all of the robot’s movements. The overseer should prevent workers from entering the robot's restricted space and be devoted solely to that task. 2.9 Positioning of rope or chain If it is not possible to set up the safety fence or enclosure described in Section 2.8, hang a rope or chain around the perimeter of the robot’s restricted space to ensure that no one can enter the restricted space. (1) Ensure the support posts cannot be moved easily. (2) Ensure that the rope or chain’s color or material can easily be discerned from the surrounds. (3) Post a warning notice in a position where it is easy to see stating "In operation--Entry forbidden" or "Work in progress --Do not operate" and ensure that workers follow these instructions at all times. (4) Set the exit/entrance, and follow the instructions given in Section 2.8, (3) through (5). SAFETY PRECAUTIONS 2.10 Setting the robot's motion space The area required for the robot to work is called the robot's operating space. If the robot’s motion space is greater than the operating space, it is recommended that you set a smaller motion space to prevent the robot from interfering or disrupting other equipment. Refer to the "INSTALLATION & MAINTENANCE GUIDE." 2.11 No robot modification allowed Never modify the robot unit, robot controller, teach pendant or other devices. 2.12 Cleaning of tools If your robot uses welding guns, paint spray nozzles, or other end-effectors requiring cleaning, it is recommended that the cleaning process be carried out automatically. 2.13 Lighting Sufficient illumination should be assured for safe robot operation. 2.14 Protection from objects thrown by the endeffector If there is any risk of workers being injured in the event that the object being held by the end-effector is dropped or thrown by the end-effector, consider the size, weight, temperature and chemical nature of the object and take appropriate safeguards to ensure safety. 2.15 Affixing the warning label Place the warning label packaged with the robot on the exit/entrance of the safety fence or in a position where it is easy to see. 3. Precautions while robot is running Warning Touching the robot while it is in operation can lead to serious injury. Please ensure the following conditions are maintained and that the cautions listed from Section 3.1 onwards are followed when any work is being performed. 1) Do not enter the robot's restricted space when the robot is in operation or when the motor power is on. 2) As a precaution against malfunction, ensure that an emergency stop device is activated to cut the power to the robot motor upon entry into the robot's restricted space. 3) When it is necessary to enter the robot's restricted space to perform teaching or maintenance work while the robot is running, ensure that the steps described in Section 3.3 "Ensuring safety of workers performing jobs within the robot's restricted space" are taken. 3.1 Creation of working regulations and assuring worker adherence When entering the robot’s restricted space to perform teaching or maintenance inspections, set "working regulations" for the following items and ensure workers adhere to them. (1) Operating procedures required to run the robot. (2) Robot speed when performing teaching. (3) Signaling methods to be used when more than one worker is to perform work. (4) Steps that must be taken by the worker in the event of a malfunction, according to the contents of the malfunction. (5) The necessary steps for checking release and safety of the malfunction status, in order to restart the robot after robot movement has been stopped due to activation of the emergency stop device (6) Apart from the above, any steps below necessary to prevent danger from unexpected robot movement or malfunction of the robot. 1) Display of the control panel (See Section 3.2 on the following page) 2) Assuring the safety of workers performing jobs within the robot's restricted space (See Section 3.3 on the following page) SAFETY PRECAUTIONS 3) Maintaining worker position and stance Position and stance that enables the worker to confirm normal robot operation and to take immediate refuge if a malfunction occurs. 4) Implementation of measures for noise prevention 5) Signaling methods for workers of related equipment 6) Types of malfunctions and how to distinguish them Please ensure "working regulations" are appropriate to the robot type, the place of installation and to the content of the work. Be sure to consult the opinions of related workers, engineers at the equipment manufacturer and that of a labor safety consultant when creating these "working regulations". 3.2 Display of operation panel To prevent anyone other than the worker from accessing the start switch or the changeover switch by accident during operation, display something to indicate it is in operation on the operating panel or teach pendant. Take any other steps as appropriate, such as locking the cover. 3.3 Ensuring safety of workers performing jobs within the robot's restricted space When performing jobs within the robot’s restricted space, take any of the following steps to ensure that robot operation can be stopped immediately upon a malfunction. (1) Ensure an overseer is placed in a position outside the robot’s restricted space and one in which he/she can see all robot movements, and that he/she is devoted solely to that task. Q An emergency stop device should be activated immediately upon a malfunction. R Do not permit anyone other than the worker engaged for that job to enter the robot’s restricted space. (2) Ensure a worker within the robot's restricted space carries the portable emergency stop switch so he/she can press it (the robot stop button on the teach pendant) immediately if it should be necessary to do so. 3.4 Inspections before commencing work such as teaching Before starting work such as teaching, inspect the following items, carry out any repairs immediately upon detection of a malfunction and perform any other necessary measures. (1) Check for any damage to the sheath or cover of the external wiring or to the external devices. (2) Check that the robot is functioning normally or not (any unusual noise or vibration during operation). (3) Check the functioning of the emergency stop device. (4) Check there is no leakage of air or oil from any pipes. (5) Check there are no obstructive objects in or near the robot’s restricted space. 3.5 Release of residual air pressure Before disassembling or replacing pneumatic parts, first release any residual air pressure in the drive cylinder. 3.6 Precautions for test runs Whenever possible, have the worker stay outside of the robot's restricted space when performing test runs. 3.7 Precautions for automatic operation (1) At start-up Before the robot is to be started up, first check the following items as well as setting the signals to be used and perform signaling practice with all related workers. 1) Check that there is no one inside the robot’s restricted space. 2) Check that the teach pendant and tools are in their designated places. 3) Check that no lamps indicating a malfunction on the robot or related equipment are lit. (2) Check that the display lamp indicating automatic operation is lit during automatic operation. (3) Steps to be taken when a malfunction occurs Should a malfunction occur with the robot or related equipment and it is necessary to enter the robot's restricted space to perform emergency maintenance, stop the robot’s operation by activating the emergency stop device. Take any necessary steps such as placing a display on the starter switch to indicate work is in progress to prevent anyone from accessing the robot. SAFETY PRECAUTIONS 3.8 Precautions in repairs (1) Do not perform repairs outside of the designated range. (2) Under no circumstances should the interlock mechanism be removed. (3) When opening the robot controller's cover for battery replacement or any other reasons, always turn the robot controller power off and disconnect the power cable. (4) Use only spare tools specified in this manual. 4. Daily and periodical inspections (1) Be sure to perform daily and periodical inspections. Before starting jobs, always check that there is no problem with the robot and related equipment. If any problems are found, take any necessary measures to correct them. (2) When carrying out periodical inspections or any repairs, maintain records and keep them for at least 3 years. 5. Management of floppy disks (1) Carefully handle and store the "Initial settings" floppy disks packaged with the robot, which store special data exclusively prepared for your robot. (2) After finishing teaching or making any changes, always save the programs and data onto floppy disks. Making back-ups will help you recover if data stored in the robot controller is lost due to the expired life of the back-up battery. (3) Write the names of each of the floppy disks used for storing task programs to prevent incorrect disks from loading into the robot controller. (4) Store the floppy disks where they will not be exposed to dust, humidity and magnetic field, which could corrupt the disks or data stored on them. Contents Preface.................................................................................................................................................................................i How the documentation set is organized........................................................................................................................ ii How this book is organized............................................................................................................................................. iii SAFETY PRECAUTIONS Chapter 1 General Information about RC5 Controller........................................................................................ 1 1.1 Controller Model Name on Nameplate ........................................................................................................... 1 1.2 Names of the Robot Controller Components .................................................................................................. 4 1.3 Robot Controller Specifications ...................................................................................................................... 7 1.4 Controller System Configuration .................................................................................................................. 11 1.4.1 Internal Circuits of the Controller (Typical configuration) .............................................................. 11 1.4.2 Typical Robot System Configurations.............................................................................................. 12 Chapter 2 General Information about the Interface .......................................................................................... 14 2.1 Standard Mode and Compatible Mode.......................................................................................................... 14 2.2 Switching between Modes ............................................................................................................................ 14 2.3 Types and General Information about I/O Signals ........................................................................................ 22 2.3.1 Standard Mode ................................................................................................................................. 22 2.3.2 Compatible Mode ............................................................................................................................. 23 2.4 Using User I/O Signals (common to both modes)......................................................................................... 24 2.4.1 I/O Type Variable Declaration .......................................................................................................... 24 2.4.2 I/O Type Global Variables ................................................................................................................ 24 2.4.3 I/O Type Local Variables.................................................................................................................. 24 2.4.4 User Input Commands...................................................................................................................... 24 2.4.5 User Output Commands ................................................................................................................... 25 Chapter 3 System I/O Signals Standard Mode ................................................................................................... 26 3.1 Types and Functions of System Output Signals (Standard Mode) ................................................................ 26 3.2 Usage of System Output Signals (Standard Mode) ....................................................................................... 27 3.2.1 Robot Initialization Complete (Output)............................................................................................ 27 3.2.2 Auto Mode (Output)......................................................................................................................... 28 3.2.3 External Mode (Output) ................................................................................................................... 29 3.2.4 Servo ON (Output) ........................................................................................................................... 30 3.2.5 Robot-in-operation (Output)............................................................................................................. 31 3.2.6 Normal CPU (Output) ...................................................................................................................... 32 3.2.7 Robot Failure (Output) ..................................................................................................................... 33 3.2.8 Robot Warning (Output)................................................................................................................... 34 3.2.9 Dead Battery Warning (Output) ....................................................................................................... 35 3.2.10 Continue Start Permitted (Output).................................................................................................... 36 3.2.11 SS mode (Output)............................................................................................................................. 36 3.2.12 Emergency Stop (Output from a contact)......................................................................................... 37 3.3 Types and Functions of System Input Signals (Standard Mode)................................................................... 38 3.4 3.5 3.6 Usage of System Input Signals (Standard Mode).......................................................................................... 39 3.4.1 Enable Auto (Input) .......................................................................................................................... 39 3.4.2 Robot Stop (Input)............................................................................................................................ 40 3.4.3 Step Stop (All Tasks) (Input)............................................................................................................ 41 3.4.4 Instantaneous Stop (All Tasks) (Input) ............................................................................................. 42 3.4.5 Interrupt Skip (Input)........................................................................................................................ 43 Command Execution I/O Signals Dedicated to Standard Mode ................................................................... 45 3.5.1 General Information about Commands ............................................................................................ 45 3.5.2 Processing I/O Commands ............................................................................................................... 46 3.5.3 I/O Commands Details ..................................................................................................................... 52 Example of Using System I/O Signals in Standard Mode............................................................................. 65 Chapter 4 System I/O Signals Compatible Mode ............................................................................................... 69 4.1 Types and Functions of System Output Signals (Compatible Mode)............................................................ 69 4.2 Usage of System Output Signals in the Compatible Mode ........................................................................... 70 4.2.1 Robot Power ON Complete.............................................................................................................. 70 4.2.2 Auto Mode (Output)......................................................................................................................... 71 4.2.3 Servo ON (Output) ........................................................................................................................... 72 4.2.4 CAL Complete (Output)................................................................................................................... 73 4.2.5 External Mode (Output) ................................................................................................................... 74 4.2.6 Teaching (Output)............................................................................................................................. 75 4.2.7 Program Start Reset (Output) ........................................................................................................... 76 4.2.8 Robot-in-operation (Output)............................................................................................................. 77 4.2.9 Single-Cycle End (Output)............................................................................................................... 78 4.2.10 Normal CPU (Output) ...................................................................................................................... 79 4.2.11 Robot Failure (Output) ..................................................................................................................... 80 4.2.12 Robot Warning (Output)................................................................................................................... 81 4.2.13 Dead Battery Warning (Output) ....................................................................................................... 82 4.2.14 Error No. (Output)............................................................................................................................ 83 4.2.15 Continue Start Permitted (Output).................................................................................................... 84 4.2.16 SS mode (Output)............................................................................................................................. 84 4.2.17 Emergency Stop (Output from a contact)......................................................................................... 85 4.3 Types and Functions of System Input Signals (Compatible Mode) ............................................................. 86 4.4 Usage of System Input Signals in Compatible Mode.................................................................................... 87 4.4.1 Enable Auto (Input) .......................................................................................................................... 87 4.4.2 Operation Preparation Start (Input) .................................................................................................. 88 4.4.3 Program No. Select (Input)............................................................................................................... 90 4.4.4 Program Start (Input)........................................................................................................................ 92 4.4.5 Program Reset (Input) ...................................................................................................................... 98 4.4.6 Robot Stop (Input).......................................................................................................................... 100 4.4.7 Step Stop (All Tasks) (Input).......................................................................................................... 101 4.4.8 Instantaneous Stop (All Tasks) (Input) ........................................................................................... 102 4.4.9 Clear Robot Failure (Input) ............................................................................................................ 103 4.4.10 Interrupt Skip (Input)...................................................................................................................... 104 4.4.11 Continue Start (Input)..................................................................................................................... 105 4.5 4.6 Example of Using System I/O Signals in Compatible Mode ...................................................................... 106 Selectable I/O Mode [Ver 1.95 or later] ...................................................................................................... 110 4.6.1 What is a selectable I/O mode? ...................................................................................................... 110 4.6.2 Setting up the selectable I/O mode................................................................................................. 111 4.6.3 System input signal lines that can serve as user I/O signal lines.................................................... 113 4.6.4 System output signal lines that can serve as user I/O signal lines.................................................. 115 4.6.5 Sample usage of selectable I/O mode............................................................................................. 117 Chapter 5 Connector Pin Assignment and I/O Circuits (NPN type) ............................................................... 118 5.1 Connector Pin Assignment (NPN type)....................................................................................................... 118 5.1.1 Connector Pin Assignment Common to Both Modes (NPN type) ................................................. 118 5.1.2 Connector Pin Assignment in Standard Mode................................................................................ 120 5.1.3 Connector Pin Assignment in Compatible Mode ........................................................................... 122 5.2 Robot Controller I/O Circuits (NPN type) .................................................................................................. 124 5.2.1 User-Input, System-Input and Hand-Input Circuits (NPN type) .................................................... 124 5.2.2 Robot Stop and Enable Auto Input Circuits ................................................................................... 127 5.2.3 User-Output, System-Output, and Hand-Output Circuits (NPN type) ........................................... 128 5.2.4 Emergency Stop Circuit.................................................................................................................. 132 5.2.5 I/O Power Connector (NPN type) .................................................................................................. 134 5.3 Wiring Notes for Robot Controller I/O Connectors (NPN type)................................................................. 136 Chapter 6 Connector Pin Assignment and I/O Circuits (PNP type)................................................................ 138 6.1 Connector Pin Assignment (PNP type) ....................................................................................................... 138 6.1.1 Connector Pin Assignment Common to Both Modes (PNP type) .................................................. 138 6.1.2 Connector Pin Assignment in Standard Mode................................................................................ 140 6.1.3 Connector Pin Assignment in Compatible Mode ........................................................................... 142 6.2 Robot Controller I/O Circuits (PNP type) ................................................................................................... 144 6.2.1 User-Input, System-Input and Hand-Input Circuits (PNP type) ..................................................... 144 6.2.2 Robot Stop and Enable Auto Input Circuits ................................................................................... 147 6.2.3 User-Output, System-Output, and Hand-Output Circuits (PNP type) ............................................ 148 6.2.4 Emergency Stop Circuit.................................................................................................................. 152 6.2.5 I/O Power Connector (PNP type) ................................................................................................... 154 6.3 Wiring Notes for Robot Controller I/O Connectors (PNP type).................................................................. 156 Chapter 7 I/O Wiring........................................................................................................................................... 158 7.1 Multi-core Cables with Connectors............................................................................................................. 158 7.2 Wiring of Primary Power Source ................................................................................................................ 160 Chapter 1 General Information about RC5 Controller The RC5 controller is available in several models which differ in detailed specifications to match robot models of **-D/-E series. 1.1 Controller Model Name on Nameplate The model name of the controller is printed on the nameplate attached to the side of the controller as shown below. The model name is coded as listed below. Nameplate (Sample) Coding of Controller Model Name RC5 - VSE 6 B A - P (a) Position (a) Code sample VSE (b) (c) (d) Denotes: Robot model name (e) Coding VM: VM-D, VS: VS-D, VSE: VS-E, VC: VC-E, H: HM/HS-D, HSE: HS-E, HME: HM-E, HC: HC-D, XYC:XYC-D EAH: EAHC: EAXYC: EAVS: HM/HS-D with extended-joint support HC-D with extended-joint support XYC-D with extended-joint support VS-D with extended-joint support (b) 6 No. of controllable axes 4: 4 axes, 5: 5 axes, 6: 6 axes (c) B Engineering symbol 1 A: Encoders connected via parallel interface to CN13 B: Encoders connected via bus to CN12 (d) A Engineering symbol 2 Blank or A (e) P Types Blank: I/O of NPN type P: I/O of PNP type AN: Robot System "Type A" and I/O of NPN type (Note: For Robot System "Type A, refer to next page.) AP: Robot System "Type A" and I/O of PNP type BN: Global type (:Dual emergency stop type + Robot System "Type A" ) and I/O of NPN type BP: Global type (:Dual emergency stop type + Robot System "Type A" ) and I/O of PNP type 1 <Notes for Robot System “ Type A”> 1 Modified Deadman Switch Functions in Robot System "Type A" In Robot System "Type A" designed for the RC5 controller, the functions of the deadman switches provided on the optional devices have been partially modified regarding the motor power ON/OFF control. Accordingly, the description given in the instruction manuals that come with "Type A" is different from the actual functions. When reading the deadman switch related sections, be careful with the following modification. 1.1 Deadman switches on optional devices (Teach pendant, operating panel, and mini-pendant) Deadman switches are located as shown below. Deadman switch Deadman switches Deadman switch Teach pendant Operating panel Mini-pendant 1.2 Modified deadman switch functions When you operate the teach pendant, operating panel, or mini-pendant in Manual mode or Teach check mode, the deadman switch controls the motor power ON/OFF function in Robot System "Type A," while it does not in the description given in the instruction manuals. Robot System "Type A" Description given in the instruction manuals (1) Unless the deadman switch is held down, you may neither operate the robot nor turn the motor power ON. (1) Unless the deadman switch is held down, you may not operate the robot, but you may turn the motor power ON. (2) When the robot is in operation, releasing the deadman switch will stop not only the robot but also turn the motor power OFF. (2) When the robot is in operation, releasing the deadman switch will stop the robot but not turn the motor power OFF (servo lock). How to identify your robot system as "Type A" Check the controller model on the nameplate located on the side of the robot controller or the robot model shown on the status bar of the teach pendant screen. The model name of "Type A" contains letter "A" as shown below. Robot controller example: RC5-H4A-A N Robot example: HM-40702D A Symbol denoting "Type A" 2 2 “Single point of control” function The “Single point of control” function is added only for Robot System “Type A”. This function limits the robot-start that other equipments except specified one device (for example: Teach Pendant) cannot enable to start the robot. The “Auto mode” of this function is usable in either “Internal Auto Limited Mode” or “External Auto Limited Mode” by setting the parameter. 2.1 Internal Auto Limited Mode The operational permit of “Internal Auto Limited Mode” is the same range as the “Internal Auto Mode”. Program Start can be executed from the teach pendant, but cannot be executed from the external device. The switching between Internal Auto and External Auto cannot be operated by the teach pendant. 2.2 External Auto Limited Mode The operational permit of “External Auto Limited Mode” is the same range as the “External Auto Mode”. Program Start can be executed from the external device, but cannot be executed from the teach pendant. The switching between Internal Auto and External Auto cannot be operated by the teach pendant. 2.3 Setting the parameter Access: [Top screen] - [F4 I/O] - [F6 Aux.] - [F1 Set H/W] - [F3 Jump To] - “31” Select the Internal Auto Limited Mode (Int:0) or the External Auto Limited Mode (Ext:1). TIP: Before shipping from the factory, the single point of control is set to 0 (Internal Auto Limited Mode) by default. Type A Setting parameter 3 1.2 Names of the Robot Controller Components The following figures show the names of the robot controller components. n For VM-D/HM-E series <Front> Floppy disk drive (option) CN1 CN2 CN3 CN4 CN5 FG terminal Robot stop button Memory backup battery holder Pilot lamp CN12 CN8 Output IC box CN6 CN7 CN9 Fuse box CN10 <Left side> Power switch CN11 <Right side> Filters (exhaust) Radiating fin Filters (air intake) Names of Robot Controller Components (VM-D/HM-E series) 4 n For robot series except VM-D/HM-E <Front> Floppy disk drive (option) FG terminal Robot stop button Memory backup battery holder Pilot lamp Fuse box Power switch Output IC box <Right side> <Left side> Filters (exhaust) Radiating fin Filters (air intake) Note: CN13 is not provided on the VS-E and HS-E series. Names of Robot Controller Components (Robot series except VM-D/HM-E) 5 Connectors for the VM-D, VS-E, and H∗ ∗-E series (Encoders connected via bus) Connector No. Marking CN1 RS232C CN2 CRT CN3 Name Connector No. Marking Name Serial interface connector CN7 I/O POWER CRT connector CN8 INPUT KEYBD Keyboard connector CN9 HAND I/O Connector for endeffector I/O CN4 MOUSE Connector for PS/2 mouse CN10 OUTPUT Connector for user output or system output CN5 PENDANT Connector for teach pendant CN11 INPUT AC Power connector CN6 PRINTER Printer connector (Not used.) CN12 MOTOR Power connector for I/O Connector for user input or system input Connector for motor/encoder Connectors for the VS-D, VC-E, H∗ ∗-D and XYC-D series (Encoders connected via parallel interface) Connector No. Marking CN1 RS232C CN2 CRT CN3 Name Connector No. Marking Name Serial interface connector CN8 INPUT Connector for user input or system input CRT connector CN9 HAND I/O Connector for endeffector I/O KEYBD Keyboard connector CN10 OUTPUT Connector for user output or system output CN4 MOUSE Connector for PS/2 mouse CN11 INPUT AC Power connector CN5 PENDANT Connector for teach pendant CN12 MOTOR Motor connector CN6 PRINTER Printer connector (Not used.) CN13 ENCODER CN7 I/O POWER Power connector for I/O Encoder connector Caution: The robot controller connectors are of a screw-lock type or ring-lock type. Lock the connectors securely. If even one of the connectors is not locked, weak contact may result thereby causing an error. Be sure to turn the robot controller OFF before connecting/ disconnecting the power connector or motor connector. Otherwise, the internal circuits of the robot controller may be damaged. 6 1.3 Robot Controller Specifications [ 1 ] Specifications The table below lists the robot controller specifications. Robot Controller Specifications Item Specifications Control system (NOTE 1) PTP, CP 3-dimensional linear, 3-dimensional circular H∗-D/-E, XYC-D: No. of controllable axes (NOTE 1) VC-E (5-axis models): Up to five axes simultaneously V∗-D/-E: Drive system Up to six axes simultaneously All axes: Full-digital AC servo Memory capacity Language used No. of teach programs loadable to the memory Teaching system External signals (I/O) Up to four axes simultaneously Input signal Output signal 1.25 MB (equivalent to 5000 steps, 13,000 points) DENSO robot language (conforming to SLIM) 255 1) Remote teaching 2) Numerical input (MDI) 20 user open points (PLC 12, hand input 8) + 36 fixed system points 32 user open points (PLC 24, hand output 8) + 33 fixed system points External communication RS-232C: 1 line Ethernet: 1 line (option) Timer function 0.02 to 10 sec. (in units of 1/60 sec.) Self-diagnosis function Overrun, servo error, memory error, input error, etc. Error codes will be displayed on the external I/O or the operating panel (option). Error messages will be displayed in English on the teach pendant (option). Error display All RC5 models: 3-phase, 200 VAC-15% to 230 VAC+10%, 50/60 Hz RC5 for VS-D/-E, H∗-D/-E, XYC-D: Single-phase, 230 VAC-10% to 230 VAC+10%, 50/60 Hz Power source RC5 for VC-E: Power capacity (NOTE 1) Environmental conditions (in operation) Degree of protection Cables (option) Single-phase, 200 VAC-10% to 230 VAC+10%, 50/60 Hz VM-D: 3.3 kVA HS-E: 1.8 kVA HM-E: 2.5 kVA H∗-D: 2.0 kVA VS-E: 1.9 kVA VS-D, XYC-D: 1.5 kVA VC-E: 0.6 kVA Temperature: 0 to 40°C Humidity: 90% RH or less (no condensation allowed) IP20 Robot control cable VM-D, VS-E, H∗-E: Standard: 4 m, 6 m VS-D, H∗-D, XYC-D: 3 m, 6 m VC-E: 4 m, 6 m I/O cable 8 m, 15 m Power cable 5m Weight VM-D: VS-D/-E, VC-E, HS-E: H∗-D/E, XYC-D: High strength: 6 m, 12 m (selectable) (selectable) (selectable) Approx. 19 kg (excluding attached cables) Approx. 17 kg (excluding attached cables) Approx. 16 kg (excluding attached cables) NOTE 1: For extended-joint support controllers, refer to the manual "SUPPLEMENT Extended-Joints Support" separately issued. 7 WARNING ⋅ DO NOT touch fins. Their hot surfaces may cause severe burns. ⋅ DO NOT insert fingers or foreign objects into openings. Doing so may cause bodily injury. ⋅ Before opening the controller cover and accessing the inside of the controller for maintenance, be sure to turn off the power switch, disconnect the power cable, and wait 3 minutes or more. This is for protecting you from electric shock. ⋅ DO NOT connect or disconnect connectors to/from the controller while the power switch is on. Doing so may cause electric shock or controller failure. CAUTION IN INSTALLATION ⋅ This controller is not designed to be dust-proof, splashproof, or explosion-proof. ⋅ Read operation manuals before installation. ⋅ Do not place anything on the controller. 8 [ 2 ] Outer Dimensions The outer dimensions of the robot controller are shown below. Outer Dimensions of Robot Controller (for VM-D/HM-E series and extended-joint support) Outer Dimensions of Robot Controller (for robot series except VM-D/HM-E) 9 n Location of IPM boards The table below shows the location of IPM boards for robot series or models. Rear view of the controller Series & models VM-6070D VM-6083D/ VM-60B1D VS-D VS-E VC-E HM/HS-D HM-E HS-E HC-D XYC-D Location (8) (7) (6) (5) (4) (3) (2) (1) Joints - 1 6 5 4 3 2 - IPM model - M SS SS SS S L - Motor capacity (W) - 750 100 200 200 400 1500 - Joints - 2 6 5 4 3 1 - IPM model - M SS SS SS S L - Motor capacity (W) - 750 100 200 200 400 1500 - Joints - - 6 5 4 3 2 1 IPM model - - SS SS SS S S S Motor capacity (W) - - 50 50 50 200 400 400 Joints - - 6 5 4 3 2 1 IPM model - - SS SS SS S S M Motor capacity (W) - - 50 80 100 200 400 750 Joints - - 6 5 4 3 2 1 IPM model - - SS SS SS SS SS SS Motor capacity (W) - - 30 30 30 80 80 80 Joints - - - - 4 3 2 1 IPM model - - - - SS S M M Motor capacity (W) - - - - 200 200 750 750 Joints - - 4 3 2 1 IPM model - - M M LL LL Motor capacity (W) - - 300 300 600 1000 Joints - - - - 4 3 2 1 IPM model - - - - S S M L Motor capacity (W) - - - - 150 200 400 750 Joints - - - - 4 3 2 1 IPM model - - - - SS SS S M Motor capacity (W) - - - - 50 100 400 750 Joints - - - - 4 3 2 1 IPM model - - - - SS S S S Motor capacity (W) - - - - 50 200 400 200 Item NOTE 1: No IPM board are installed to locations marked with "-." Those locations are covered with blank caps. NOTE 2: For details about extended-joint support controllers, refer to the manual "SUPPLEMENT Extended-Joints Support." 10 1.4 Controller System Configuration 1.4.1 Internal Circuits of the Controller (Typical configuration) The block diagram below shows the internal circuits of an RC5 controller designed for a 6-joint robot. 11 1.4.2 Typical Robot System Configurations The block diagrams below show typical robot system configurations. To connect encoders via a time-division multiplexed bus: Connect the robot controller (CN12) to the robot unit with a motor/encoder cable (see below). To connect encoders via parallel interface: Connect the robot controller (CN12 and CN13) to the robot unit with a motor cable and encoder cable, respectively. n Robot system configuration with encoders connected via a multiplexed bus (VM-D, VS-E, HS-E, and HM-E) Robot System Configuration 12 n Robot system configuration with encoders connected via a parallel interface (VS-D, VC-E, H*-D, and XYC-D) System Configuration Example 13 Chapter 2 General Information about the Interface 2.1 Standard Mode and Compatible Mode The robot controller can be operated in two different modes – standard mode and compatible mode. The default is standard mode. Select either mode before operating the robot controller. In the standard mode, all of the advantages can be expected from the new model of the robot controller by simultaneously running two or more programs with multitasking. The compatible mode focuses on compatibility with conventional DENSO robots. Use this mode whenever compatibility is required. For example, when replacing a conventional robot with a new model. However, there are some restrictions on the use of new functions, such as multitasking, in this mode. 2.2 Switching between Modes Switch from one mode to the other using the teach pendant or the PC teaching system. Caution: After switching between those modes, restart the robot controller to make the new setting go into effect. 14 [ 1 ] Switching from the Teach Pendant Follow the procedure below when switching from one mode to the other from the teach pendant: "STEP 1 On the top screen, press [F4 I/O]. The I/O Monitor window appears. F6 Press [F6 Aux.]. "STEP 2 The Auxiliary Functions (I/O) window appears as shown below. F2 Press [F2 I/O Assign]. (For Version 1.6 or later) NOTE: For Version 1.5 or earlier, press [F1 Set H/W] and select the Allocation mode field in the I/O Hardware Settings window. 15 "STEP 3 The Choose allocation window appears as shown below. NOTE: If your robot controller has a built-in DeviceNet master, the Select Port Assignment window will appear instead of the Select I/O Assignment Mode window. Refer to the DeviceNet Master Unit user's manual, Chapter 3, "I/O Assignment." Using the jog dial or cursor keys, select the desired assignment mode. Then press OK. "STEP 4 The following system message appears. Press OK. "STEP 5 The screen returns to the Auxiliary Functions (I/O) window. "STEP 6 Turn the controller power ON again. Turn the controller power OFF. The I/O assignment mode is switched. 16 [ 2 ] Switching from the Computer Follow the procedure below when switching from one mode to the other from the computer. "STEP 1 Start WINCAPSII on the computer. Log in with Programmer. Start WINCAPSII according to the procedure given in WINCAPSII GUIDE, Chapter 3, Section 3.1. For details on the user level of Programmer, refer to the WINCAPSII GUIDE, Chapter 1, Section 1.3. "STEP 2 Click on the DIO Manager button in the System Manager. DIO Manager starts and the DIO Manager window opens. 17 "STEP 3 Select the SETTING command from the Tools menu of DIO Manager. "STEP 4 Click on the Hardware tab in the Options window. The Options window will appear as shown below. The hardware settings will appear. 18 "STEP 5 Select the desired assignment mode from the right-hand popup menu in the I/O Allocation frame (Ver. 1.6 or later). "STEP 6 Click on OK in the Options window. "STEP 7 Click on the Connect button controller. The Options window closes. to connect the computer to the robot The Connect button appears in a pressed state. 19 "STEP 8 Click on the Transfer button. "STEP 9 Check off the check box by clicking on the Hard setting field. The Transfer Environment Table window appears. Click on the Transfer button. "STEP 10 The following message window appears confirming that you are sure to update the data. Click on the Yes button. 20 "STEP 11 The Transmitting hard setting table window appears displaying a bar graph that indicates the transfer progress. "STEP 12 After the Transmitting hard setting table window disappears, turn the controller power OFF. "STEP 13 Turn the controller power ON. The I/O assignment mode is switched. 21 2.3 Types and General Information about I/O Signals This section describes the I/O signals for the Robot Controller. The I/O signals are grouped into user I/O signals and system I/O signals. User I/O signals are compatible with conventional signals, including the pin pattern, in compatible mode. Note that the connector pin meanings are different between standard mode and compatible mode. Some of the signal lines used for user I/O in compatible mode are used for system input in standard mode. Additionally, part of the signal lines used for system I/O in compatible mode is used for command execution I/O signals in standard mode. 2.3.1 Standard Mode In standard mode, 30 input points for command execution are used to direct program start and other instructions as I/O commands. The table below lists the types of I/O signals used in standard mode. Types of System I/O Signals Used in Standard Mode Fixed by system Type No. of points Function 5 Robot stop, Enable Auto, interrupt skip, instantaneous stop (all tasks), step stop (all tasks) System output 12 Robot initialization complete, automatic operation mode, external mode, servo ON, robot-in-operation, normal CPU, robot failure, robot warning, dead battery warning, continue start permitted, SS mode, emergency stop Input for command execution 30 Command (4 bits) data area 1 (8 bits), data area 2 (16 bits), odd parity bit, strobe signal Output for command execution 18 Command processing complete, status area (16 bits), odd parity bit System input Controlled by user program No. of points Function User input 12 Inputs to read the external I/O status with an IN command or IO [ ] variable. Used for analysis condition identification, condition satisfaction wait, data input from the external device, etc. User output 24 Outputs to issue a signal to the external device during program execution with a SET command, RESET command, etc. Hand input 8 Inputs to read the external I/O status with an IN command or IO [ ] variable. Used to confirm the end-effector check status, etc. Hand output 8 Outputs to issue a signal to the external device with a SET command, RESET command, etc. Used to control the opening and closing of the end-effector. Type 22 2.3.2 Compatible Mode In the compatible mode, the input and output points are arranged in disregard of compatibility with conventional VS series robots. The table below lists the types of I/O signals used in compatible mode. Types of I/O Signals Used in Compatible Mode Fixed by system Type No. of points Function System input 22 Inputs to turn ON the power to the robot from the external device (PLC), start CAL or select and start a program instead of operations by the operating panel or teach pendant. System output 27 Outputs to inform the external device (PLC) of the robot status, such as robot-in-operation or occurrence of an error. Controlled by user program No. of points Function User input 25 Inputs to read the external I/O status with an IN command or IO [ ] variable. Used for analysis condition identification, condition satisfaction wait, data input from the external device, etc. User output 24 Outputs to issue a signal to the external device during program execution with a SET command, RESET command, etc. Hand input 8 Inputs to read the external I/O status with an IN command or IO [ ] variable. Used to confirm the end-effector check status, etc. Hand output 8 Outputs to issue a signal to the external device (valve) with a SET command, RESET command, etc. Used to control the opening and closing of the end-effector. Type 23 2.4 Using User I/O Signals (common to both modes) To use user I/O signals you need to first declare, in the program, the use of user I/O as I/O type variables with a DEFIO command. Next, access the user I/O by writing it to the I/O type variables or reading it. 2.4.1 I/O Type Variable Declaration I/O type variables are classified into I/O type global variables that are available without any declaration, and I/O type local variables that are not available without a declaration. 2.4.2 I/O Type Global Variables I/O type global variables are used to refer to or change user I/O signals bit by bit. Since they are global variables, they can be used without any declaration. I/O type global variables are expressed in either of the following two ways: IO[nn] (nn: terminal number) IOnn (nn: terminal number) Example: IO[104] Example: IO104 2.4.3 I/O Type Local Variables I/O type local variables are used to collectively refer to or change 1-bit, 8-bit, 16-bit or 32-bit user I/O signals starting from a specified terminal number. I/O type local variables require a declaration, which will be made with a DEFIO command, before they are used. For further information about declarations with a DEFIO command, refer to the PROGRAMMER'S MANUAL (I), Chapter 9, Section 9.7 "DEFIO (Statement) [Conforms to SLIM]." 2.4.4 User Input Commands There are two types of user input commands, IN and WAIT. The IN command substitutes the input result for a variable. The WAIT command waits until the input result meets specified conditions. • IN Command The IN command inputs a signal from the user input specified by an IO type variable and substitutes it for an arithmetic variable. For further information about the IN command, refer to the PROGRAMMER'S MANUAL (I), Chapter 13, Section 13.1 "IN." • WAIT Command The WAIT command suspends the execution of the program until specified conditions are met. If an I/O type variable is used for the conditional statement, this command suspends the execution of the program until the status of the signal from a specified user input is checked and meets the specified conditions. For further information about the WAIT command, refer to the PROGRAMMER'S MANUAL (I), Chapter 12, Section 12.5 "WAIT." 24 2.4.5 User Output Commands There are three types of user output commands, SET, RESET and OUT. The SET and RESET commands turn ON and OFF all user outputs specified by I/O type variables. The OUT command outputs data to a specified user output. • SET Command The SET command turns ON all user outputs specified by I/O type variables. For further information about the SET command, refer to the PROGRAMMER'S MANUAL (I), Chapter 13, Section 13.1 "SET." • RESET Command The RESET command turns OFF all user outputs specified by I/O type variables. For further information about the RESET command, refer to the PROGRAMMER'S MANUAL (I), Chapter 13, Section 13.1 "RESET." • OUT Command The OUT command outputs data to the user output specified by an I/O type variable. For further information about the OUT command, refer to the PROGRAMMER'S MANUAL (I), Chapter 13, Section 13.1 "OUT." 25 Chapter 3 System I/O Signals Standard Mode 3.1 Types and Functions of System Output Signals (Standard Mode) The table below lists the system output signals used in standard mode. Types and Functions of System Output Signals to be Used in Standard Mode Application Signal name Function Robot initialization complete Outputs when preparations for operation are ready to start. Auto mode Outputs when the robot is in Auto mode. Start-up External mode Servo ON Program execution Robot-in-operation Outputs when the robot is in external mode. Outputs when the power to the motor is turned ON. Outputs when the robot is in operation (the program is being executed). Normal CPU Outputs when the CPU (hardware) of the Robot Controller is normal. Robot failure Outputs when a serious error, such as a servo error and a program error, occurs. Error/Warning Robot warning Dead battery warning Continue start Safe start function Emergency stop Continue start permitted SS mode Emergency stop Outputs when a slight error occurs. Outputs when the voltage of the encoder back-up battery or memory back-up battery dangerously low. Outputs when Continue Start is enabled. Outputs when the robot is in SS mode. Refer to the SETTING-UP MANUAL, Chapter 3, Subsection 3.4.6 "SS (Safe Start) Function." Outputs from a contact exclusively designed for an emergency stop circuitry. 26 3.2 Usage of System Output Signals (Standard Mode) The usage of each system output signal in standard mode is described below: 3.2.1 Robot Initialization Complete (Output) (1) Function The signal outputs to the external device that a MODE SWITCHING COMMAND is ready to execute from the device. (2) Terminal number No.5 of connector CN10. (3) Usage The "mode switching command" will be executed as soon as this signal and the auto mode signal are turned ON, after the power is turned ON. (4) ON conditions The signal will be turned ON when the system program for the Robot Controller normally starts, after the power, is turned ON and the mode switching command is ready to execute. The signal will be turned ON when a robot failure is cleared by the CANCEL key of the operating panel or teach pendant or by a CLEAR ROBOT FAILURE command, after the power is turned OFF. (5) OFF condition The signal will be turned OFF when a robot failure or robot warning signal is turned ON. ⋅ The system properly started to operate after the power was turned ON. ⋅ A robot error is cleared with the OK or CANCEL key of the operating panel or teach pendant. ⋅ A robot error is cleared with a CLEAR ROBOT FAILURE command from an external device. ROBOT POWER ON COMPLETE output ⋅ Robot error or robot warning Robot Power ON Complete Output 27 3.2.2 Auto Mode (Output) (1) Function The signal outputs to the external device that the robot is in auto mode. (2) Terminal number No.6 of connector CN10. (3) Usage Starting the program from the external device requires an EXTERNAL MODE SWITCHING BY MODE SWITCHING COMMAND input and a PROGRAM START BY PROGRAM OPERATION COMMAND input. The signal is used to monitor the auto mode output signal and determine whether to execute the command. (4) ON condition The signal will be output when the robot enters auto mode by setting the mode selector switch of the operating panel or teach pendant to AUTO. (5) OFF conditions The signal will be turned OFF under the following conditions. The mode selector switch of the operating panel is set to MANUAL or the teach pendant is set to MANUAL or TEACH CHECK. The Enable Auto OFF is input.. (Note: The signal will not be turned OFF in the pendantless state described in the OPTIONS MANUAL, Chapter 1, Subsection 1.3.3.) Caution: The signal will not be turned OFF with INSTANTANEOUS STOP, STEP STOP or CYCLE STOP commands. ⋅ When the mode selector switch of the operating panel or teach pendant is set to AUTO. Auto mode output ⋅ When the mode selector switch of the operating panel is set to MANUAL or that of the teach pendant is set to MANUAL or TEACH CHECK. ⋅ When Enable Auto OFF is input Auto mode Output 28 3.2.3 External Mode (Output) (1) Function The signal outputs to the external device that the robot is in external mode. (2) Terminal number No.7 of connector CN10. (3) Usage Starting the program from the external device requires an EXTERNAL MODE SWITCHING BY MODE SWITCHING COMMAND input and a PROGRAM START BY PROGRAM OPERATION COMMAND input. The signal is used to confirm that the robot is in external mode. (4) ON conditions The signal will be turned ON under the following conditions. The external mode is selected on the teach pendant. The EXTERNAL/INTERNAL is input on the operating panel in AUTO MODE and in the INTERNAL CONTROL ON state. The EXTERNAL MODE SWITCHING BY MODE SWITCHING COMMAND is input from the external device. (5) OFF conditions The signal will be turned ON under the following conditions. When internal mode is selected on the teach pendant. When the mode selector switch of the teach pendant is set to MANUAL or TEACH CHECK in external mode. When EXTERNAL/INTERNAL is input on the operating panel in AUTO MODE and in the INTERNAL CONTROL OFF state. When ROBOT STOP is input. When ROBOT FAILURE is outputted. Caution: The signal will not be turned OFF with INSTANTANEOUS STOP, STEP STOP or CYCLE STOP. When an Enable Auto input is turned OFF. ⋅ When the mode is switched to external mode on the teach pendant. ⋅ When EXTERNAL/INTERNAL is input on the operating panel. ⋅ When a MODE SWITCHING COMMAND (EXTERNAL MODE SWITCHING) is input from an external device. External mode output ⋅ When internal mode is selected on the teach pendant. ⋅ When the mode selector switch of the teaching pendant is set to MANUAL or TEACH CHECK. ⋅ When EXTERNAL/INTERNAL is input on the operating panel. ⋅ ROBOT STOP or ROBOT ERROR ⋅ When an Enable Auto input is turned OFF. External Mode Output 29 3.2.4 Servo ON (Output) (1) Function The signal outputs to the external device that the power to the motor of the robot is turned ON. (2) Terminal number No.4 of connector CN10. (3) Usage Starting the program requires the power to the motor to be turned ON. This signal is used to light the motor power ON indicator lamp on an external operating panel. (4) ON conditions The signal will be turned ON when the power to the motor is turned ON. When the MOTOR key of the operating panel or teach pendant is activated; or When the motor runs with a MOTOR ON AND CAL EXECUTION BY MODE SWITCHING COMMAND input from the external device. (5) OFF conditions The signal will be turned OFF when the power to the motor is turned OFF. When the MOTOR key of the operating panel or teach pendant is deactivated and the ROBOT STOP button is operated; When ROBOT STOP is input from the external device; or When a ROBOT FAILURE is outputted. If errors 0 × 6071 to 607B, 0 × 6671 to 667B, 0 × 607F occur, the servo will be turned OFF in automatic or external mode but will not be turned OFF in the manual or the teach check mode. ⋅ When the MOTOR key of the operating panel or teach pendant is activated. ⋅ When MOTOR ON AND CAL EXECUTION WITH MODE SWITCHING COMMAND is input from an external device. ON Servo ON output OFF ⋅ When the MOTOR key of the operating panel or teach pendant is deactivated and the ROBOT STOP button is operated. ⋅ When ROBOT STOP is input from an external device. ⋅ When a ROBOT FAILURE occurs. Servo ON Output 30 3.2.5 Robot-in-operation (Output) (1) Function This signal outputs to the external device that the robot is in operation. (2) Terminal number No.2 of connector CN10. (3) Usage The signal is used to light the robot operating indicator lamp of an external operating panel. Since the signal is turned OFF with STOP ALL PROGRAMS, outputs to the external device that all programs are stopped. (4) ON conditions The signal will be turned ON during execution of the program and also while in the WAIT STATE with a condition branch or timer command. (5) OFF conditions The signal will be turned OFF with STOP ALL PROGRAMS. Caution: STOP ALL PROGRAMS means the operation of the ROBOT STOP or STOP button of the operating panel or teach pendant and INSTANTANEOUS STOP (ALL TASKS), STEP STOP (ALL TASKS) and ROBOT STOP inputs. 31 3.2.6 Normal CPU (Output) (1) Function The signal outputs to the external device that the Robot Controller CPU (hardware) is normal. (2) Terminal number No.1 of connector CN10. (3) Usage The signal is used to light the Robot Controller external operating panel error indicator lamp. The signal is used when a normal CPU SIGNAL is turned OFF because of an error and the PLC corrects it. (4) ON conditions The signal will be turned ON by the hardware when the Robot Controller CPU operates normally with the power turned ON. (5) OFF conditions The signal will be turned OFF by the hardware when the CPU does not operate normally. Caution: The OFF state of this signal indicates that the Robot Controller internal arithmetic circuit may be damaged. Therefore, ROBOT ERROR, ERROR NUMBER, and other outputs may not be correct. ⋅ Power ON (CPU operating properly) Normal CPU output Abnormal CPU (hardware error) Normal CPU Output 32 3.2.7 Robot Failure (Output) (1) Function The signal outputs to the external device that a problem (such as a servo error or a program error) occurs with the robot. (2) Terminal number No.3 of connector CN10. (3) Usage The signal is used to light the robot external operating panel error indicator lamp of an. The signal is used to help the PLC clear an error in response to a ROBOT FAILURE signal. (4) ON conditions As shown below, the signal will be turned ON under the following conditions. When an error, such as a servo error, a program error or program undefined, occurs at the start of the program and during execution of the program. When an error occurs during execution of the program in internal operation by the operating panel or the teach pendant or in external operation by the PLC. Caution: The signal will not be outputted when an error, such as a program input error occurs in manual operation, except when a servo error occurs in manual operation. For further information, see the "ERROR CODE TABLES." (5) OFF conditions As shown below, the signal will be turned OFF under the following conditions. When a CLEAR ROBOT FAILURE command is inputted and the existing error is cleared. When the existing error is cleared by operating the OK or Cancel key on the operating panel or the teach pendant. ⋅ Program number, parity error, or undefined ƒp ƒŠ ƒprogram ƒ B [ e ƒ number, ƒ ‰ [ Aat G external start. ⋅ Robot failure during automatic operation (both internal operation and external operation) Robot failure ⋅ When a CLEAR ROBOT FAILURE command is inputted. ⋅ When the OK or Cancel key of the operating panel or teach pendant is operated. Robot Failure Output 33 3.2.8 Robot Warning (Output) (1) Function The signal outputs to the external device that a minor error occurs with an I/O command or during servo processing. Caution: The signal will not be outputted if a minor error, such as a program selection error occurs by the operation of the teach pendant or operating panel. (2) Terminal number No.9 of connector CN10. (3) Usage ⋅ The signal is used to light the robot warning indicator lamp of the external operating panel. ⋅ The signal is used to help the PLC clear an error in response to a ROBOT WARNING signal. (4) ON condition As shown below, the signal will be turned ON if a minor error occurs during I/O processing, execution of the program or servo processing, irrespective of the operation mode. (5) OFF conditions As shown below, the robot-warning signal will be turned OFF under the following conditions. ⋅ When a CLEAR ROBOT WARNING command is inputted from the external device and the existing error is cleared. ⋅ When operating the OK or Cancel key on the operating panel or the teach pendant clears the existing error. ⋅ When a slight error occurs during I/O processing, execution of the program or servo processing. Robot warning ⋅ When a CLEAR ROBOT WARNING command is inputted from an external device and the existing error is cleared . ⋅ When the existing error is cleared by operating the OK or Cancel key of the operating panel or teach pendant. Robot Warning Output 34 3.2.9 Dead Battery Warning (Output) (1) Function The signal will be output when the voltage of the encoder back-up battery or memory back-up battery becomes lower than acceptable. (2) Terminal number No.8 of connector CN10. (3) Usage The signal is used to check the timing battery replacement. For example, the battery voltage becomes lower than acceptable. (4) ON condition The signal will be turned ON when the voltage of the encoder back-up battery or memory back-up battery becomes lower than acceptable. Caution: The operating panel shows any of ERROR64A1 to 64A6 when the encoder back-up battery voltage is low. Meanwhile, the teach pendant shows ERROR6103 when the memory back-up battery voltage is low. (5) OFF condition The signal will be turned OFF when the power is turned ON after the dead battery was replaced. Power OFF Power ON Power OFF Power ON Power ON Robot power ON state ⋅ The voltage of the encoder backup battery or memory back-up battery becomes dangerously low. Dead battery warning output ⋅ Battery replaced Dead Battery Warning Output 35 3.2.10 Continue Start Permitted (Output) (1) Function The controller will output this signal when the continue start is permitted. (2) Terminal number No.10 of connector CN10. (3) Usage Use this signal when you want to know whether the continue start is permitted. (4) ON condition This signal comes on when the continue start is permitted. For details, refer to the SETTING-UP MANUAL. (5) OFF condition This signal goes off by carrying out the "Task Status Change Operation." 3.2.11 SS mode (Output) (1) Function The controller will output this signal during the SS mode. This mode is effective when the slow mode is selected. (2) Terminal number No.11 of connector CN10 (3) Usage This signal is used to warn workers that the robot is in the SS mode by beeping or lighting the lamp. (4) ON condition This signal comes on when the SS mode is selected. (5) OFF condition The signal goes off when the TS time passes so as to cancel SS mode. This function is effective when the slow mode is selected. Note: If the TS time passes, this signal goes off even when the robot is operation in the slow mode. After this signal goes off, the robot runs at the original speed. 36 3.2.12 Emergency Stop (Output from a contact) (1) Function This signal outputs from a contact exclusively designed for an emergency stop circuitry you may configure. It allows red mushroom buttons provided on the front panel of the robot controller, on the teach pendant, and on the operating panel to be used as emergency stop buttons of the facilities. A 0.3A fuse is built in the contact. (2) Terminal number No. 65 of connector CN10: Emergency stop (+) No. 66 of connector CN10: Emergency stop (-) (3) Usage This signal is used to stop the facilities or robot in an emergency. (Refer to Subsection 5.2.4 "Emergency Stop Circuit.") (4) Contact This contact is a normal close one (b contact). If any of the emergency stop buttons is pressed, then the contact turns off to output an emergency stop signal. 37 3.3 Types and Functions of System Input Signals (Standard Mode) The table below lists the system input signals to be used in standard mode: Types and Functions of System Input Signals to be Used in Standard Mode Application Signal Name Start-up Enable Auto Enables switching to automatic operation. Robot stop Stops the robot with canceling signals. Stop Program interrupt Instantaneous stop (all tasks) Function Immediately stops all programs being executed with canceling signals. Step stop (all tasks) Step-stops all programs being executed with canceling signals. Interrupt skip Interrupts the execution of the current step and starts executing the next step. 38 3.4 Usage of System Input Signals (Standard Mode) The usage of each system input signal in standard mode is described below. 3.4.1 Enable Auto (Input) (1) Function The signal enables switching of the robot mode to auto mode (shorted state). The signal enables switching of the robot mode to manual mode or teach check mode (open state). (2) Terminal number No. 4 of connector CN8. (3) Usage The signal is used for the AUTO/TEACHING selector switch of an external operating panel and can be combined with a safety fence switch. (4) Input conditions and operation As shown below, the selectable operation mode depends on whether this input is shorted or open. If the input becomes open during automatic operation, the mode will be switched to manual mode and ERROR21FC will be displayed. If manual operation or a teach check is conducted with this input shorted, ERROR21F2 will be displayed. If the mode selector switch of the teach pendant or operating panel is set to AUTO with this input open, ERROR21F3 will be displayed. Since this state is shown as × in the table below, this error will remain displayed until the robot exits this state. Although ERROR21FD or ERROR21FC will be displayed when the state is changed from ¡ to ∆ or ×, they will not be displayed when the state is changed from ∆ or × to ¡. When the input is turned OFF (open) in external mode, the external mode output will also be turned OFF. Relationship Between Enable Auto Input and Selectable Mode Enable Auto Operation mode Application ON (shorted) OFF (open) Manual operation with the operating panel or the teach pendant. ∆ ¡ Teach check mode Program check with the teach pendant. ∆ ¡ Internal auto mode Automatic operation with the operating panel or teach pendant. ¡ × External auto mode Automatic operation with the external device. ¡ × Manual mode Note: ¡ = Mode selectable × = Mode not selectable ∆ = Mode selectable but manual operation program not executable Caution: In the pendantless state, auto mode is valid even if the Enable Auto input is open. (The external mode cannot be switched and the program cannot begin execution.) Perform the following when operating the robot in the pendantless state: Q Set the robot so that it will not start to operate when the Enable Auto input is open. R Enable Auto input open state and auto mode output (See Subsections 4.2.2 and 6.2.2 "Auto Mode".) Set the equipment to make an emergency stop in an AND state. Add Q and R with the external sequence circuit. 39 3.4.2 Robot Stop (Input) (1) Function The signal stops the robot from the external device by opening the robot stop input. The signal readies the power to the robot motor to be turned ON by shorting the robot stop input. (2) Terminal number No.2 of connector CN8. (3) Input conditions and operation The robot stops with this input OFF (open). The power to the robot motor is made ready to be turned ON with this input ON (shorted). Irrespective of whether internal mode, operation by the teach pendant, or external mode, remote operation by the external device, is selected, the power to the robot motor cannot be turned ON with this input OFF (open) and neither manual nor automatic operation can be performed until this input is turned ON (shorted). (ERROR2008 will be displayed.) By turning OFF (open) this input the following conditions may result. 1) The power to the motor will be turned OFF irrespective of whether manual, automatic, internal or external mode is selected. 2) During execution of the program (Robot-in-operation signal ON), the power to the motor will be turned OFF and the mode will be switched to internal mode after the robot decelerates to a stop; 3) When the program is not executed in manual and auto modes in manual and auto modes, everything will be the same except the power to the motor will be turned OFF. The power to the motor can be turned ON and the suspended operation can, therefore, be resumed by shorting the ROBOT STOP input. (However, the program will be executed from the beginning.) Opening the ROBOT STOP input and pressing the ROBOT STOP button of the operating panel or the teach pendant function is the same. (4) Timing of the input This input will be processed prior to all commands and input signals. 40 3.4.3 Step Stop (All Tasks) (Input) (1) Function Input this signal to step-stop the program being executed from the external device. All tasks will be step-stopped. (2) Terminal No.5 of connector CN8. (3) Input conditions and operation If the state of this signal is changed from ON (shorted) to OFF (open), the robot will stop all tasks as soon as the ongoing step is completed, and the Robot-in-operation signal will be turned OFF. However, auto mode or external mode will remain valid, and the suspended program will be resumed by inputting a program operation command (start). See the figure given below. For resuming the program after a step stop, see Chapter 5, Subsection 5.3.2 "Program Operation Command (0001)". Robot status 1-cycle operation Operating halfway Program start signal (input) ON (shorted) OFF (open) Step-stop signal (input) ON (shorted) OFF (open) Robot-in-operation (output) ON (shorted) OFF (open) Step Stop Signal 41 At step-stop Performing Remaining operation 3.4.4 Instantaneous Stop (All Tasks) (Input) (1) Function Input this signal to instantaneously stop the running programs from an external device. All tasks will stop. (2) Terminal number No.7 of connector CN8. (3) Input conditions and operation If the state of this signal is turned from ON (shorted) to OFF (open), the robot will immediately stop in the middle of the ongoing step, and the Robot-in-operation signal will be turned OFF. However, auto mode or external mode will remain valid, and the suspended programs will be resumed by inputting Program start signal. For resuming the program after an instantaneous stop, see Chapter 5, Subsection 5.3.2 "Program Operation Command (0001)". The minimum required pulse width is 50 milliseconds (msec.) or more. ON (shorted) Halt OFF (open) 50 ms. or more required Minimum Instantaneous Stop Pulse Width 42 3.4.5 Interrupt Skip (Input) (1) Function If this signal is turned ON (shorted) during execution of the robot operation command, within the range between INTERRUPT ON and INTERRUPT OFF in the program, the correct step operation will immediately stop and the next step will start. Caution: For further information about the INTERRUPT ON and OFF commands, see the PROGRAMMER'S MANUAL (I), Chapter 12, "12.3 INTERRUPT ON/OFF (Statement)." For further information about the robot operation command, see the PROGRAMMER'S MANUAL (I), Chapter 12, "Robot Control Statements." (2) Terminal number No.9 of connector CN8. (3) Usage See the PROGRAMMER'S MANUAL (I), Chapter 12, "12.3 INTERRUPT ON/OFF." (4) Input conditions and operation If this signal is turned ON (shorted), the robot will immediately stop the current operation and start executing the next step. Robot status INTERRUPT ON Command Operating halfway Next operation 50 ms. or more required Interrupt skip signal (input) ON (shorted) OFF (open) Input Conditions and Operation of Interrupt Skip 43 Caution: When turning ON (shorting) the interrupt skip signal, at a minimum either the program reset signal or the program start signal must be turned OFF (open). If the interrupt skip signal is turned ON, the robot interprets the program start signal as immediately turned OFF (open). Consequently, the program selected with the program No. selection signal will be executed from the beginning. (See the figure given below.) Robot status Executing cycle halfway Interrupt skip signal (input) ON (shorted) OFF (open) Program start signal (input) ON (shorted) OFF (open) Program reset signal (input) ON (shorted) OFF (open) Executing cycle from beginning WRONG Program No. select signal (input) ON (shorted) OFF (open) Example of Operation When an Interrupt Skip is Input 44 3.5 Command Execution I/O Signals Dedicated to Standard Mode In standard mode the I/O commands can be executed using command execution I/O signals. I/O commands execute the following. ⋅ Operate (start and stop) a program for each task. ⋅ Refer to or change variables from the external device. ⋅ Refer to or change inputs and outputs from the external device. 3.5.1 General Information about Commands The table below shows the I/O commands functions. I/O Command Functions Command Description of function ⋅ Starts the program cycle (specified program). ⋅ Step-stops the program (specified program/all programs). Program operation ⋅ Immediately stops the program (specified program/all programs). ⋅ Resets the program (specified program/all programs). ⋅ Sets the external speed. Speed setting ⋅ Sets the external acceleration. ⋅ Sets the external deceleration. Error number read ⋅ Outputs the error number to the system I/O area. Type I variable write ⋅ Reads a value from the system I/O area and substitutes it for a Type I variable. Type I variable read ⋅ Outputs a Type I variable to the system I/O area. Mode switching Clear robot failure ⋅ Switches the robot operation mode. ⋅ Clears a robot failure from the external device. Internal I/O write ⋅ Sets the state of internal inputs and outputs. Internal I/O read ⋅ Outputs the state of internal inputs and outputs to the system I/O area. 45 3.5.2 Processing I/O Commands 3.5.2.1 General Information about Processing I/O commands to be executed are processed as shown below. ⋅ Command Area (input) ⋅ Data Area (input) ⋅ Command and Data Area Odd Parity (input) X Q S X R ⋅ Strobe Signal (input) U Note 1 ms or more Y ⋅ Status Area (output) ⋅ Status Parity (output) Y ⋅ Command processing complete (output) V ⋅ Robot Error (output) V Outline of I/O Command Processing 46 Note 100 ms. or less Set a command area, a data area (if necessary) and command and data area odd parity for the command execution I/O signal from the external device to the Robot Controller. After the setting is completed, turn ON the strobe signal. Caution: Q The data to be set in Q must be defined more at least 1 msec. before the strobe signal is turned ON. R Perform command input with a strobe signal after the system output signal ROBOT INITIALIZATION COMPLETE is output. The controller reads the command area, the data area and the command and data area odd parity as the strobe signal is input. The controller starts processing based on the command it read. If the command is one that outputs a status, the controller sets the status area and status parity. After command processing has been completed and a status area has been set, the controller turns ON the command processing complete signal. If an error occurs in the while processing, a robot failure signal will be outputted together with the command processing complete signal. The PLC waits until the command processing complete signal is input, and receives the status of the status area, if necessary. In this case, confirmation that no error exists with the robot. After the PLC has read the status, it turns OFF the command and data areas and the strobe signal. As soon as the strobe signal is turned OFF, the controller turns OFF the status area and the command processing complete signal. The robot failure signal, which is outputted due to a command processing error, remains ON until a CLEAR ROBOT FAILURE command is executed. Caution: S The maximum time taken until the status area and the command processing complete signal are turned OFF, after the strobe signal is turned OFF in X, is 100 msec. T If the strobe signal is turned OFF before the command processing complete signal is turned ON in V, the command processing complete signal and the status area will be output and then turned OFF within 100 msec. 47 3.5.2.2 Using Each Signal Line [ 1 ] Command and Data Areas This section describes the usage of the command area (4 bits, input), data area 1 (8 bits, input), data area 2 (16 bits, input) and command and data area odd parity (input). (1) Function Specifies the commands to be executed by the Robot Controller. Sets the command area at all times, and data areas 1 and 2, if necessary. (2) Terminal numbers Command area: No.35 to No.38 of connector CN8. Data area 1: No.11 to No.18 of connector CN8. Data area 2: No.19 to No.34 of connector CN8. Command and data area odd parity: No.10 of connector CN8. (3) Input conditions and operation Set the command area whenever I/O commands are to be executed. Set data for data areas 1 and 2 if commands require them. "Shorted" represents the bit value = 1. "Open" represents the bit value = 0. "Parity bit " is odd parity. Input the command area, data areas 1 and 2, and command and data area odd parity before the strobe signal (1 msec. or more). Retain the status until the command processing complete signal is output. Input 1 or 0 as the parity bit so that the total of 1s existing in the command area, data areas 1 and 2 and the command and data area odd parity will be odd The data areas count even commands, which do not require any data area, in a check sum calculation. Checksum can be set valid or invalid using a parameter. When checksum is invalid, no checksum check will be performed. 48 [ 2 ] Strobe Signal (Input) (1) Function This signal informs the Robot Controller that the command area, data areas 1 and 2, and the command and data area odd parity bit have been set. Additionally it directs the start of command processing. Caution: Perform command input with a strobe signal after the system output signal ROBOT INITIALIZATION COMPLETE is output. (2) Terminal number No. 8 of connector CN8. (3) Input conditions and operation By turning ON this input in automatic or external mode, the Robot Controller reads the command area, data areas 1 and 2, and the command and data area odd parity bit starts processing. Retain the status until a command processing complete signal is output and the necessary status data is read. If the strobe signal is turned OFF before a command processing complete signal is output, the status area will not be output. By turning OFF this input after the status is read, the command processing complete output, the status area and the status parity will be turned OFF. 49 [ 3 ] Command Processing Complete (Output) (1) Function The signal outputs to the external device that I/O command processing is completed. (2) Terminal number No. 15 of connector CN10. (3) Usage The signal is used to confirm that I/O command processing is complete, or as a timing signal for obtaining the result of I/O command processing. (4) ON conditions The signal will be turned ON upon completion of processing the I/O command given and determination of outputting the status area. If an error occurs as a result of executing an I/O command, the result will not be output to the status area, but the robot failure signal and the command processing complete signal will be turned simultaneously ON. (5) OFF conditions The signal will be turned OFF when the strobe signal is turned OFF. If the strobe signal is turned OFF, before command processing is completed, the command processing complete signal will be output and then turned OFF within 100 msec. 50 [ 4 ] Status Area This section describes the usage of the status area (16 bits, output) and of status area odd parity (output). (1) Function The signal outputs the result of I/O command processing to the external device. (2) Terminal numbers Nos. 17 to 32 of connector CN10. (3) Usage The signal is used to execute an I/O command and obtain the result of the PLC. (4) ON conditions When processing of the I/O given is completed, the status corresponding to the command will be set. "ON" represents the bit value = 1. "OFF" represents the bit value = 0. "Parity bit" is odd parity. Input 1 or 0 as the parity bit so that the total of 1s existing in the command area and status area parity will be odd. The status area counts even commands, which do not require any data area, in a parity calculation. Parity can be set valid or invalid with a parameter. When parity is invalid, no parity check will be performed. (5) OFF conditions The signal will be turned OFF when the strobe signal is turned OFF. If the strobe signal is turned OFF, before command processing is completed, the status signal will be output and then turned OFF within 100 msec. 51 3.5.3 I/O Commands Details 3.5.3.1 List of I/O Commands The table below lists I/O commands. List of I/O Commands Command area 0001 Program operation 0010 External speed and acceleration setting 0100 Error read 0101 Type I variable write 0110 Type I variable read 0111 Mode switching 1000 Clear robot failure 1001 I/O write 1010 I/O read Data area 1 Data area 2 00000001 Program reset start 00000010 Program start 00000100 Continue start 00010000 Step stop 00100000 Instantaneous stop 01000000 Reset 00000001 Speed setting 00000010 Acceleration setting 00000100 Deceleration setting Type I variable number Program number Program number (Note) Program number Program number Program number Set speed value Set acceleration value Set deceleration value Status area Error number Set variable value (lower 16 bits) Type I variable number 00000001 Motor ON, CAL execution 00000010 External speed 100 10000000 External mode switching 10000011 Execution of all above (Motor ON→CAL→SP100→External) Variable value (lower 16 bits) First internal I/O port address Set I/O value First internal I/O port address I/O (Note) In execution of Continue Start command, program numbers will be ignored. 52 3.5.3.2 Program Operation Command (0001) (1) Function This command controls the operating state of the program specified in data area 2 based on the setting of data area 1. (2) Format Command area (4 bits, input) 0001 Data area 1 (8 bits, input) 00000001: Program reset start 00000010: Program start 00000100: Continue start 00010000: Step stop 00100000: Instantaneous stop 01000000: Reset An error (ERROR2032) will occur if data is other than the above is set. Data area 2 (16 bits, input) Program number: Program number to start When the number given in data area 2 is nn, the operating state of PR0nn will be controlled as given in data area 1. If the program number is negative in the case of a step stop, instantaneous stop or reset command, all programs will stop or be reset. If the program number is negative with a program reset start or program start command, ERROR73E4 will result. Status area (16 bits, output) Nothing will be output. (3) Description Program reset start This command is executable only in external mode. If executed in other mode an error will occur. This command initializes and starts the program of the program number specified in data area 2. PRO0 to PRO32767 can be started. If the program number specified in data area 2 is negative, an error (ERROR73E4) will occur. Either of the following operations takes place according to the operating status of the program: ⋅ If the specified program is terminated (stopped), step-stopped or immediately stopped, it will start from the beginning. ⋅ If the specified program is running, an error (ERROR21F5) will be displayed, and the program will stop. 53 Program start This command is executable only in external mode. An error (ERROR2032) will occur in other modes. This command starts the program of the program number specified in data area 2. PRO0 to PRO32767 can be started. If the program number specified in data area 2 is negative, an error (ERROR73E4) will occur. One of the following operations takes place according to the operating status of the program. ⋅ If the specified program is terminated (stopped), it will start from the beginning. ⋅ If the specified program is step-stopped, it will resume from the step following the suspended step. ⋅ If the specified program is immediately stopped, it will resume from the step following the suspended step. When the program is instantaneously stopped in while in execution of an operation command, it will resume from the operation still undone. ⋅ If the specified program is running, an error (ERROR21F5) will be displayed, and the program will stop. Continue start This command is executable only in external mode when the Continue Start Permitted signal is on. The data area will be ignored. Step stop This command step-stops the program of the program number specified in data area 2. PRO0 to PR032767 can be step-stopped. If the program number specified in data area 2 is negative, all programs being executed will step-stop. Either of the following operations takes place according to the operating status of the program. ⋅ If the specified program is terminated (stopped), step-stopped or immediately stopped, nothing will happen. ⋅ If the specified program is running, it will step-stop. If started after a step stop, the stopped program will resume from the step following the suspended step. Instantaneous top This command immediately stops the program of the program number specified in data area 2. PRO0 to PR032767 can be stopped immediately. If the program number specified in data area 2 is negative, all programs being executed will step-stop. Either of the following operations takes place according to the operating status of the program: ⋅ If the specified program is terminated (stopped), step-stopped or immediately stopped, nothing will happen. ⋅ If the specified program is running, it will immediately stop. If started after an instantaneous stop, the stopped program will resume from the suspended step. If the program is immediately stopped in the middle of execution of an operation command, it will resume, starting from the last uncompleted operation. 54 Reset This command immediately stops and also initializes the program of the program number specified in data area 2. PRO0 to PR032767 can be stopped. This command cannot be used together with the program start command. To start a step-stopped or cycle-stopped program from the beginning, use the program reset start command. If the program number specified in data area 2 is negative, all programs being executed will be reset. One of the following operations takes place according to the operating status of the program. ⋅ When the specified program is terminated (stopped), nothing will happen. ⋅ When the specified program is step-stopped or immediately stopped, it will be initialized. The initialized program will resume from the beginning. ⋅ When the specified program is running, it will immediately stop and also be initialized. If started after an instantaneous stop, the stopped program will resume from the beginning. 55 3.5.3.3 External Speed and Acceleration Setting (0010) (1) Function This command sets the external speed, acceleration and deceleration values selected in data area 1 to the values specified in data area 2. This command is executable only in external mode. An error will occur in other modes. (2) Format Command area (4 bits, input) 0010 Data area 1 (8 bits, input) 00000001: Speed setting 00000010: Acceleration setting 00000100: Deceleration setting An error (ERROR2032) will occur if data other than the above is set. Data area 2 (16 bits, input) Set values: Speed, acceleration and deceleration to be set Enter any of the external speed, acceleration and deceleration values specified in data area 1. The values must be between 1 and 100. If they are out of this range, an error (ERROR2003) will occur. Status area (16 bits, output) Nothing will be output. (3) Description Speed setting The external speed is set to the value specified in data area 2. The value must be between 1 and 100. An error (ERROR2003) will occur if the value is out of this range. The external acceleration and deceleration will be set simultaneously as shown below by setting the external speed: External acceleration and external deceleration = External speed2/100 (minimum value: 1) Acceleration setting The external acceleration is set to the value specified in data area 2. The value must be between 1 and 100. An error (ERROR2003) will occur if the value is out of this range. Deceleration setting The external deceleration is set to the value specified in data area 2. The value must be between 1 and 100. An error (ERROR2003) will occur if the value is out of this range. 56 3.5.3.4 Error Read (0100) (1) Function This command outputs the existing error number to the status area. This command is output to the status area only when the strobe signal remains ON. Caution: This command will not be output if a minor error occurs, such as a program selection error, caused by the operation of the teach pendant or the operating panel. (2) Format Command area (4 bits, input) 0100 Data area 1 (8 bits, input) Nothing will be input. Data area 2 (16 bits, input) Nothing will be input. Status area (16 bits, output) The existing error code will be output. (3) Hexadecimal codes Refer to the figure given below. ×××× →0 סס → 5 ¡×¡× →A ××ס →1 ס¡× → 6 ¡×¡¡ → B ××¡× →2 ס¡¡ → 7 ¡¡×× ×ס¡ →3 ¡××× →8 ¡¡×¡ → D ס×× →4 ¡×ס → 8 ¡¡¡× → E ¡⋅⋅⋅ON ¡¡¡¡ → F ×⋅⋅⋅⋅OFF →C The following figure shows an example of error number output when ERROR6174 (overload error with the fourth axis) occurs. Thousands of error Hundreds of error No. 28 27 26 25 32 31 30 29 × ¡ ¡ × × × × ¡ Tens of error No. Units of error No. 24 23 22 21 20 19 18 17 × ¡ ¡ ¡ × ¡ × × 7 4 Terminal No. (Connector CN10) ERROR 6 1 Example of Error Number Output (4) Description If a command is executed when a robot failure or the robot warning signal is output, the error number, which caused the robot failure or robot warning signal to be output, will be output to the status area. If no error exists after an error has been cleared, 0 will be output to the status area. Also, when there is an error that does not output any robot failure or robot warning signal, 0 will be outputted. 57 3.5.3.5 Type I Variable Write (0101) (1) Function This command substitutes the value specified in data area 2 for the Type I (integer type) global variable of the number specified in data area 1. (2) Format Command area (4 bits, input) 0101 Data area 1 (8 bits, input) The number of the Type I variable for which a value will be substituted. Any number between I[0] and I[255] can be specified. When the input data in data area 1 is nn, the value specified in data area 2 will be substituted for the Type I variable I [nn]. Data area 2 (16 bits, input) The value to be substituted for the Type I variable specified in data area 1. Any value between -32768 and 32767 can be set. Status area (16 bits, output) Nothing will be output. (3) Description The value specified in data area 2 is substituted for the Type I variable specified in data area 1. Although the type I variable has a storage area of 32 bits, the 16-bit data in data area 2 will be substituted for the lower 16 bits. Zero will be substituted for the upper 16 bits of the Type I variable. 58 3.5.3.6 Type I Variable Read (0110) (1) Function This command outputs to the status area the value of the Type Ι (integer type) global variable of the number specified in data area 1. (2) Format Command area (4 bits, input) 0110 Data area 1 (8 bits, input) The number of the Type I variable for which a value will be substituted. Any number between I [0] and I [255] can be specified. When the input data in data area 1 is nn, the value specified in data area 2 will be substituted for the Type I variable I [nn]. Data area 2 (16 bits, input) Nothing will be input. Status area (16 bits, output) The lower 16 bit value of the Type I variable specified in data area 1 will be output. (3) Description The value of the Type I variable specified in data area 1 is output to the status area. Although the Type I variable has a storage area of 32 bits, the lower 16 bits will be output to the status area. Therefore, any value between -32768 and 32767 can be output properly. However, if the value is out of this range, only the lower 16 bits of the data will be output. 59 3.5.3.7 Mode Switching (0111) (1) Function This command switches the robot mode from the external device to prepare the robot for operation. This command is executable only in auto mode. An error will occur in other modes. Before executing this command, select auto mode on the operating panel or the teach pendant. (2) Format Command area (4 bits, input) 0111 Data area 1 (8 bits, input) Bit 0 (00000001): Motor ON, CAL execution Bit 1 (00000010): External speed 100 Bit 7 (10000000): External mode switching These bits can be set together to execute commands. When two or more bits are set, commands will be executed one after another. For example, when bits 0, 1 and 7 are set, motor ON, CAL execution, external speed 100 and external mode will be executed in this order. If bits other than the above are set, an error will result. Data area 2 (16 bits, input) Nothing will be input. Status area (16 bits, output) Nothing will be output. (3) Description This command is used for equipment using the robot to switch the operation mode of the robot to external mode from the external device The processing operations to be executed are specified by the bits set in data area 1 and will be executed from bit 0 to bit 7. Motor ON, CAL execution (bit 0) When this bit is set, the power to the Robot Controller motor will be turned ON and CAL will be executed. If CAL is executed once after the power is turned ON, no processing will take place. 60 External speed 100 (bit 1) When this bit is set, the external speed, external acceleration and external deceleration of the Robot Controller will be set to 100. External mode switching (bit 7) When this bit is set, the mode of the Robot Controller will be switched from automatic to external. 61 3.5.3.8 Clear Robot Failure (1000) (1) Function This command clears a robot failure that has been caused. (2) Format Command area (4 bits, input) 1000 Data area 1 (8 bits, input) Nothing will be input. Data area 2 (16 bits, input) Nothing will be input. Status area (16 bits, output) Nothing will be output. (3) Description If a robot failure occurs, this command clears it. When there is no failure, no processing will take place When an error is displayed, the same processing as when the OK or Cancel key of the operating panel or the teach pendant is operated will be performed. 62 3.5.3.9 I/O Write (1001) (1) Function This command substitutes the status specified in data area 1 for the 8-bit internal I/O area starting from the number specified in data area 2. (2) Format Command area (4 bits, input) 1001 Data area 1 (8 bits, input) The status to be set will be specified in the internal I/O area starting from the number specified in data area 2. Data area 2 (16 bits, input) This is first number of the internal I/O (8-bit) area for which the status will be substituted. The number can be set between 128 and 504. If the number is out of this range, an error (ERROR2034) will occur. Status area (16 bits, output) Nothing will be output. (3) Description This command substitutes the status specified in data area 1 for the 8-bit internal I/O area starting from the number specified in data area 2. 63 3.5.3.10 I/O Read (1010) (1) Function This command outputs to the lower 8 bits of the status area the status of the 8-bit internal I/O area starting from the number specified in data area 2. (2) Format Command area (4 bits, input) 1010 Data area 1 (8 bits, input) Nothing will be input. Data area 2 (16 bits, input) This is the first number of the internal I/O (8-bit) area whose status will be output. The number can be set between 128 and 504. If the number is out of this range, an error (ERROR2034) will occur. Status area (16 bits, output) The status of the 8-bit internal I/O area starting from the number specified in data area 2 will be output to the lower 8 bits of this area. (3) Description This command outputs to the lower 8 bits of the status area the status of the 8-bit internal I/O area starting from the number specified in data area 2. Zero will be output to the upper 8 bits. 64 3.6 Example of Using System I/O Signals in Standard Mode This section illustrates an example of starting and stopping the robot using system I/O signals. (1) Equipment setup example This example shown below assumes an equipment setup which allows you to run the robot by operating an external equipment’s operation panel connected via the PLC to the robot controller. It is assumed that the operation panel has a display, lamps and switches listed on the next page. Robot Robot controller PLC Other equipment (e.g. conveyor) Operating panel Example of Equipment Setup Using a Robot 65 Function Example of Equipment Operating Panel Classificati on Display Lamp Switch Part Application Display Displays messages, such as ROBOT PREPARATION OK. Q Automatic operation indicator lamp ⋅ Lights during automatic operation. ⋅ Turned OFF when the robot is not in automatic operation. R Robot external mode indicator lamp ⋅ Lights when the robot is in external mode. ⋅ Turned OFF when the robot is not in external mode. S Operation OK indicator lamp ⋅ Lights when the Enable Auto signal is ON. ⋅ Turned OFF when the Enable Auto signal is OFF. Q Robot preparation button Starts the preparation of the robot. R Automatic start button Starts the operation of the equipment. S Cycle stop button Stops the equipment after a cycle of operations is completed. T Operation/Adjustment selector switch Automatic operation of the robot possible when OPERATION is selected. Manual operation or teach check of the robot possible when ADJUSTMENT is selected. Caution: Actual equipment requires emergency stop, interlock and other functions; however, described here are the necessary functions. (2) Outline of procedure Described below is the outline of the procedure when using the equipment taken as an example shown on the previous page. Follow steps to . Operation preparation start After setting the MOTOR ON, CAL EXECUTION, EXTERNAL SPEED 100 and EXTERNAL MODE SWITCHING bits, execute the mode switching command to bring the robot into external automatic operation mode. This operation will be completed when the EXTERNAL MODE output signal is turned ON. Automatic operation Start the program by which the robot starts from the operation origin, performs operations, and returns to the operation origin. Operation end Terminate the day’s operations with a cycle stop, and turn OFF the power. (3) Start and stop procedure, and system I/O signals The following pages show the relationship between the system I/O signals for start and stop, worker’s operation, display on the equipment operation panel, PLC proceeding, and robot motion. 66 Step Worker’s operation and display on equipment’s operation panel PLC processing Robot operation Enable Auto ON (Internal processing) Equipment power ON Setting operation/adjustment selector switch to operation Q Operation preparation start Operation OK indicator lamp ON Setting Mode selector switch of the operating panel or the teach pendant to AUTO (Note ) Robot preparation button ON Data area 1 input ON Executing mode switching command Motor power ON Executing CAL Setting SP 100 Switching mode to external mode R Operation start area check Robot external mode indicator lamp ON (Internal processing) External mode ON Robot operation origin indicator lamp ON (Internal processing) Operation position 1 ON Robot preparation OK display When both are ON (Internal processing) Moving robot arm close to operation origin, when external mode indicator lamp is ON and operation position 1 indicator lamp is OFF. Start and Stop Procedure and System I/O Signals-1 (Continued on following page) 67 (Continued from preceding page) Worker’s operation and display on equipment’s operation panel PLC processing Equipment’s Automatic Start Button ON Program No. Select ON Robot operation Regular operation program is selected and output to data area 2. S Automatic operation Step Automatic Operation indicator lamp ON Executing Program Operation Command (Program start) Program start END Program No. select ON Robot-in-operation signal OFF Regular operation program is selected and output to data area 2. Repeated Program start ON Equipment’s Cycle Stop button ON Cycle Stop ON Executing 1-cycle T Operation end END Automatic operation indicator lamp OFF (Internal processing) Robot-in-operation signal OFF Equipment power OFF Note S In data area 1, the bit to each of "motor ON, CAL execution," "external speed 100" and "External Mode switching" will be turned ON. Refer to Chapter 5, Subsection 5.3.7 "Mode Switching (0111)". T in the above figure indicates a system I/O signal, and ←represents the flow of signals. Start and Stop Procedure and System I/O Signals-2 68 Chapter 4 System I/O Signals Compatible Mode 4.1 Types and Functions of System Output Signals (Compatible Mode) The table below lists the system output signals used in the compatible mode. Types and Functions of System Output Signals to be Used in Compatible Mode Application Start-up Program pre-execution check Program execution Program end Error/warning Continue start Safe start function Emergency stop Signal name Function Robot power ON complete Outputs when preparations for operation are ready to start. Auto mode Outputs when the robot is in auto mode. Servo ON Outputs when the power to the motor is turned ON. CAL complete Outputs when calibration is completed. External mode Outputs when the robot is in external mode. Teaching Outputs when the robot is in manual or teach check mode. Program start reset Outputs when execution of the program starts in response to the program start signal received. Robot-in-operation Outputs when the robot is in operation (the program is being executed). Continue start permitted Outputs when the continue start is permitted. Single cycle end Outputs when the program completes a cycle. Normal CPU Outputs when the CPU (hardware) of the Robot Controller is normal. Robot failure Outputs when a failure (such as a servo failure and program error) occurs in the robot. Robot warning Outputs when a slight error occurs. Dead battery warning Outputs when the voltage of the encoder backup battery or memory backup battery lowers. Error No. An error number will be outputted in BCD code if an error occurs. Continue start permitted SS mode Emergency stop Outputs when Continue Start is enabled. Outputs when the robot is in SS mode. Refer to the SETTING-UP MANUAL, Chapter 3, Subsection 3.4.6 "SS (Safe Start) Function." Outputs from a contact exclusively designed for an emergency stop circuitry. 69 4.2 Usage of System Output Signals in the Compatible Mode The usage of each system output signal in the compatible mode is described below. 4.2.1 Robot Power ON Complete (1) Function The signal outputs to the external PREPARATION START is possible. device that OPERATION (2) Terminal number No.9 of connector CN10. (3) Usage OPERATION PREPARATION START will be executed after this signal and the auto mode signal are turned ON after the power was turned ON. (4) ON conditions The signal will be turned ON when the Robot Controller system program properly starts. Preparations for operation can be started after the power was turned ON. The signal will be turned ON when the robot failure is cleared by the OK or Cancel key of the operating panel or the teach pendant or by CLEAR ROBOT FAILURE and OPERATION PREPARATION START signals, after the power was turned OFF. (5) OFF conditions The signal will be turned OFF when a robot failure or robot warning signal is turned ON. ⋅ The system properly starts to operate after the power is turned ON. ⋅ A robot error is cleared by the OK or Cancel key of the operating panel or teach pendant. ⋅ When a robot error was cleared with CLEAR ROBOT FAILURE and OPERATION PREPARATION START signals from the external device. ROBOT POWER ON COMPLETE output ⋅ Robot error Robot Power ON Complete Output 70 4.2.2 Auto Mode (Output) (1) Function The signal outputs to the external device that the robot is in the auto mode. (2) Terminal number No.4 of connector CN10. (3) Usage Starting the program from the external device requires an SWITCH EXT MODE input, a PROGRAM NO. SELECT input and a PROGRAM START input. The signal is used to confirm that the robot is in the auto mode. (4) ON conditions The signal will be output when the robot enters the auto mode under the following conditions. The mode selector switch of the operating panel or the teach pendant is set to AUTO. (5) OFF conditions The signal will be turned OFF under the following conditions. When the mode selector switch of the operating panel is set to MANUAL or the teach pendant is set to MANUAL or TEACH CHECK. When Enable Auto OFF is input. (Caution: The signal will not be turned OFF in the pendantless state described in the OPTIONS MANUAL, Chapter 1, Subsection 1.3.3.) Caution: The signal will not be turned OFF with INSTANTANEOUS STOP, STEP STOP or CYCLE STOP. ⋅ The Mode selector switch of the operating panel or the teach pendant is set to AUTO. ⋅ SWITCH AUTO MODE and OPERATION PREPARATION START are input from the external device. Auto mode output ⋅ The mode selector switch of the operating panel is set to MANUAL or that of the teach pendant is set to MANUAL or TEACH CHECK. ⋅ Enable Auto OFF is input. Auto Mode Output 71 4.2.3 Servo ON (Output) (1) Function The signal outputs to the external device that the power to the robot motor is turned ON. (2) Terminal number No. 10 of connector CN10. (3) Usage Executing CAL from the external device or starting the program requires the power to the motor to be turned ON. This signal is used to confirm that the power to the motor is turned ON and to light the motor power ON indicator lamp on an external operating panel. (4) ON conditions The signal will be turned ON when the power to the motor is turned ON under the following conditions. The MOTOR switch on the operating panel or the teach pendant is activated. MOTOR POWER ON + OPERATION PREPARATION START signals are input from the external device. (5) OFF conditions The signal will be turned OFF when the power to the motor is turned OFF under the following conditions. The MOTOR switch of the operating panel or the teach pendant is deactivated and the ROBOT STOP button is operated. ROBOT STOP is input from the external device. ROBOT FAILURE is outputted. If any of errors 0 × 6071 to 607B, 0 × 6671 to 667B, 0 × 607F occurs, the servo ON signal will be turned OFF in External Auto mode but will not be turned OFF in manual or teach check mode. ⋅ When the MOTOR button of the operating panel or the teach pendant is turned ON.v MOTOR u ON ‘ € ì ⋅ When MOTOR POWER ON and OPERATION PREPARATION START signals are input from the external device. Servo ON output ⋅ When the MOTOR button of the operating panel or the teach pendant is turned OFF and the ROBOT STOP button is operated. MOTOR v u OFF ⋅ When a ROBOT STOP signal is input from an external device. ⋅ When a ROBOT FAILURE occurs. Servo ON Output 72 4.2.4 CAL Complete (Output) (1) Function The signal outputs to the external device that CAL is completed. (2) Terminal number No. 11 of connector CN10. (3) Usage This signal is used to determine whether to execute CAL. Once CAL is completed, it does not need to be executed again as long as the power to the Robot Controller is turned ON. (4) ON conditions The signal will be turned ON upon proper completion of CAL under the following conditions. When CAL is performed by the operating panel or teach pendant. When CAL EXECUTION and OPERATION PREPARATION START signals are input from the external device. (5) OFF conditions The signal will be turned OFF when CAL is not properly completed as shown below. It will remain OFF until CAL is performed again and properly completed. ⋅ CAL is performed by the teach pendant. ⋅ CAL EXECUTION and OPERATION PREPARATION START commands are input from the external device. (Prerequisite: MOTOR POWER ON) ⋅ CAL is executed again. When CAL has properly ended CAL complete ⋅ Normal CAL end CAL Complete Output 73 When a CAL error occurs. 4.2.5 External Mode (Output) (1) Function The signal outputs to the external device that the robot is in the external mode. (2) Terminal number No. 5 of connector CN10. (3) Usage Starting the program from the external device requires an SWITCH EXT MODE input, PROGRAM NO. SELECT input and a PROGRAM START input. The signal is used to confirm to the external device that the robot is in external mode. (4) ON conditions The signal will be turned ON under the following conditions. When INTERNAL/EXTERNAL is input on the teach pendant and the external mode is selected. When EXTERNAL/INTERNAL is input on the operating panel in AUTO MODE and in the INTERNAL CONTROL ON state. When SWITCH EXT MODE and OPERATION PREPARATION START signals are input from the external device. (5) OFF conditions The signal will be turned OFF under the following conditions. When the mode selector switch of the teach pendant is set to MANUAL or TEACH CHECK in external mode. When EXTERNAL/INTERNAL is input on the teach pendant and external mode is selected. When EXTERNAL/INTERNAL is input on the operating panel in AUTO MODE and in the INTERNAL CONTROL OFF state. When ROBOT STOP is input. When ROBOT FAILURE is outputted. Caution: The signal will not be turned OFF with STEP STOP. When an Enable Auto input is turned OFF. ⋅ When INTERNAL/EXTERNAL is input on the teach pendant and external mode is selected. ⋅ When INTERNAL/EXTERNAL is input on the operating panel in AUTO MODE and in the INTERNAL CONTROL ON state. ⋅ When EXTERNAL MODE SWITCHING and OPERATION PREPARATION START signals are input from the external device. External mode output ON OFF ⋅ When internal mode is selected on the teach pendant. ⋅ When INTERNAL/EXTERNAL is input on the teach pendant and external mode is selected. ⋅ When INTERNAL/EXTERNAL is input on the operating panel in AUTO MODE and in the INTERNAL CONTROL ON state. ⋅ When ROBOT STOP is input. ⋅ When ROBOT ERROR is output. ⋅ When an Enable Auto input is turned OFF. External Mode Output 74 4.2.6 Teaching (Output) (1) Function The signal outputs to the external device that the robot is in the manual mode or teaches check mode. (2) Terminal number No. 12 of connector CN10. (3) Usage This signal is used to inform an external operating panel that the robot is teaching when they are installed separately from each other. (4) ON conditions The signal will be turned ON when the mode selector switch of the operating panel or the teach pendant is set to MANUAL or TEACH CHECK, as shown below. (5) OFF conditions The signal will be turned OFF when the mode selector switch of the operating panel or teach pendant is set to AUTO and the Enable Auto input is turned ON. E ƒƒ Iy ƒ Œ [ ƒe ƒB ƒ “ ƒO ƒp ƒ l ƒ‹ ‚Åu Manual v ‘€ì ⋅ When mode is set to E ƒ e ƒ the B [ ƒ ƒ̀ ƒ “selector ƒ y O ƒ ƒ “switch ƒ “ _ ƒ ofg ‚ the Å operating MANUAL vpanel u Eu Teach MANUAL. Check v ‘€ ì ⋅ When the mode selector switch of the teach pendant is set to MANUAL or TEACH CHECK. Teaching ⋅ When the mode operating ƒ I E ƒ ƒ y Œselector ƒ e [ ƒ B ƒ switch ƒ O “ ƒ p ƒofl ƒthe ‚ Ü ‹ ‚ ‚ Í ½ ƒ e ƒ panel B [ ƒ ƒ̀or“ ƒthe teach pendant AUTO Enable input Š O  • ” ‚ æ ‚ è Žis ƒ y ƒ “ ƒ is_ ƒ set ƒ g “ ‚to Å Autoandv u ‘the € ì ‚ © A ‚ Auto turned ON from the external device. “® ‰^ “] ƒ C ƒl [ ƒ u ƒ‹ “ü — Í ‚ ª ON Teaching Output 75 4.2.7 Program Start Reset (Output) (1) Function This signal is output to the external device when the robot receives a start signal from the external device and starts to operate. (2) Terminal number No. 6 of connector CN10. (3) Usage The signal is used to prompt the external device to receive information that the robot program has started to run, and to process subsequent sequence programs. The signal is used as a condition to turn OFF the PROGRAM START signal sent from the external device to the robot. (4) ON conditions The signal will be turned ON immediately after the robot program starts to run, as shown below. (5) OFF conditions The signal will be turned OFF automatically when the PROGRAM START signal sent to the robot is turned OFF. Robot status Program start signal (input) Single-cycle operation Single-cycle operation ON (shorted) OFF (open) Program start Reset (output) Program Start Reset Output ON Condition 76 4.2.8 Robot-in-operation (Output) (1) Function The signal outputs to the external device that the robot is in operation (executing more than one task ). (2) Terminal number No. 2 of connector CN10. (3) Usage The signal is used to light the robot operating indicator lamp of the external operating panel. Since the signal is turned OFF with STOP ALL PROGRAMS, it outputs to the external device that all programs are stopped. (4) ON conditions The signal will be turned ON while executing the program and also in the Wait State with a condition branch or timer command. (5) OFF conditions The program will be turned OFF with STOP ALL PROGRAMS. Caution: STOP ALL PROGRAMS means the operation of the ROBOT STOP or STOP button of the operating panel or the teach pendant and INSTANTANEOUS TOP (ALL TASKS), STEP STOP (ALL TASKS) and ROBOT STOP inputs. 77 4.2.9 Single-Cycle End (Output) (1) Function The signal outputs to the external device that a single-cycle of the program is completed. Caution Q The single-cycle end signal will be output upon reading END of the program. However, it will be output earlier than the end of the actual robot operation because the Robot Controller pre-reads the program. R The single-cycle end signal will be output on the premise that only one program is executed at a time. If two or more programs are executed simultaneously (multi-tasks), the single-cycle end signal will be turned ON immediately after any of the programs reads an END command. (2) Terminal number No. 13 of connector CN10. (3) Usage The signal is used to operate another equipment in synchronization with a single-cycle end of the program. (4) ON conditions The signal will be turned ON when the program is read to the end. (5) OFF conditions The signal will be turned OFF immediately after the program starts to run. Robot status Single-cycle operation Wait for start PROGRAM START input 1-CYCLE END Single-Cycle End Output 78 Single-cycle operation 4.2.10 Normal CPU (Output) (1) Function The signal outputs to the external device that the CPU (hardware) of the Robot Controller is normal. (2) Terminal number No. 1 of connector CN10. (3) Usage The signal is used to light the Robot Controller error indicator lamp of an external operating panel. The signal is used when the NORMAL CPU signal is turned OFF because of an error and the PLC corrects it. (4) ON conditions The signal will be turned ON by the hardware when the CPU of the Robot Controller operates normally with the power turned ON. (5) OFF conditions The signal will be turned OFF by the hardware when the CPU does not operate normally. Caution: The OFF state of this signal indicates that the internal arithmetic circuit of the Robot Controller may be damaged and ROBOT ERROR, ERROR NUMBER and other outputs may not be correct. ⋅ Power ON (CPU operates properly) Normal CPU output ⋅ CPU error (hardware error) Normal CPU Output 79 4.2.11 Robot Failure (Output) (1) Function The signal outputs to the external device that a problem, such as a servo error and a program error, occurs with the robot. (2) Terminal number No. 3 of connector CN10. (3) Usage The signal is used to light the robot failure indicator lamp of an external operating panel. The signal is used to help the PLC clear an error in response to a ROBOT FAILURE signal. (4) ON conditions As shown below, the signal will be turned ON under the following conditions. When an error, such as a servo error, a program error and undefined program, occurs at the start of the program and during execution of the program. When an error occurs during execution of the program in internal operation by the operating panel or the teach pendant or in external operation by the PLC. When an error, such as undefined program, occurs at the start of the program only in external operation. Caution: The signal will not be output when an error, such as a program input error occurs in manual operation, except when a servo error occurs in manual operation. For further information, see "ERROR CODE TABLES." (5) OFF conditions As shown below, the signal will be turned OFF under the following conditions. When a CLEAR ROBOT FAILURE command is input from the external device and the existing error is cleared. When the existing error is cleared by operating the Cancel key of the operating panel or the teach pendant. ⋅ Program number, parity error, or an undefined program number at ƒo ƒŠ ƒe ƒ B [ ƒG ƒ ‰ [A external start. ⋅ The robot errors during automatic operation (both internal operation and external operation). Robot failure ⋅ When CLEAR ROBOT FAILURE and OPERATION PREPARATION START signals are input. ⋅ When the Cancel key of v Cancel u ƒtheL operating ‘ € ì panel or the teach pendant is [ operated. Robot Failure Output 80 4.2.12 Robot Warning (Output) (1) Function The signal outputs to the external device that a minor error has occurred with an I/O command or during servo processing. Caution: The signal will not be output in case of a minor error, such as a program selection error, caused by the operation of the teach pendant or operating panel. (2) Terminal number No. 15 of connector CN10. (3) Usage The signal is used to light the robot warning indicator lamp of an external operating panel. The signal is used to help the PLC clear an error in response to a ROBOT WARNING signal. (4) ON conditions As shown below, the signal will be turned ON when a minor error occurs during I/O processing, execution of the program or servo processing, irrespective of the operation mode. (5) OFF conditions As shown below, the robot-warning signal will be turned OFF under the following conditions. When CLEAR ROBOT FAILURE and OPERATION PREPARATION START signals are input from the external device and the existing error is cleared. When the existing error is cleared by operating the OK or Cancel key of the operating panel or the teach pendant. ⋅ When a slight error occurs during I/O processing, execution of the program or servo processing. Robot warning ⋅ When a CLEAR ROBOT FAILURE command is inputted from the external device and the existing error is cleared. ⋅ When the existing error is cleared by operating the OK or Cancel key of the operating panel or teach pendant. Robot Warning Output 81 4.2.13 Dead Battery Warning (Output) (1) Function The signal will be output when the voltage of the encoder back-up battery or memory back-up battery becomes dangerously low. (2) Terminal number No. 14 of connector CN10. (3) Usage The signal is used to check the timing of battery replacement (lowering of the battery voltage). (4) ON conditions The signal will be turned ON when the voltage of the encoder back-up battery or memory backup battery becomes dangerously low. Caution: Any error of ERROR64A1 to 64A6 indicating the dead encoder back-up battery or ERROR6103 informing the dead memory back-up battery will be displayed on the operating panel and the teach pendant. (5) OFF conditions The signal will be turned OFF when the power is turned ON after the dead battery was replaced. Robot power ON state Power OFF Power ON Power OFF Power ON Power ON ⋅ The voltage of the encoder backup battery or memory back-up battery becomes dangerously low. Dead battery warning output ⋅ Battery replaced Dead Battery Warning Output 82 4.2.14 Error No. (Output) (1) Function When an error occurs, the signal outputs the error number in a 3-digit (12bit) hexadecimal code. (2) Terminal numbers No.17 to No.28 of connector CN10. (3) Usage The signal is used to display an error number on the external device. (4) Output conditions The signal will be output when an error occurs. (5) Clear conditions The signal will be cleared when CLEAR ROBOT FAILURE and OPERATION PREPARATION START signals are inputted or by operating the Cancel key of the operating panel or the teach pendant. When this signal is cleared, all states will become OFF (0). (6) Hexadecimal codes See the following figure. ×××× ××ס ××¡× ×ס¡ ס×× →0 →1 →2 →3 →4 סס ס¡× ס¡¡ ¡××× ¡×ס →5 →6 →7 →8 →9 ¡×¡× → A ¡×¡¡ → B ¡¡×× → C ¡¡×¡ → D ¡¡¡× → E ¡¡¡¡ → F ¡⋅⋅⋅ON ×⋅⋅⋅⋅OFF Hexadecimal Codes The figure below shows an example of error number output, when ERROR174 (overload error with the fourth axis) occurs. Tens of error No. Hundreds of error No. Terminal No. (connector CN10) 28 27 26 25 24 23 22 21 Example of Error Number Output 83 Units of error No. 20 19 18 17 4.2.15 Continue Start Permitted (Output) (1) Function The controller will output this signal when the continue start is permitted. (2) Terminal number No.16 of connector CN10. (3) Usage Use this signal when you want to know whether the continue start is permitted. (4) ON condition This signal comes on when the continue start is permitted. For details, refer to the SETTING-UP MANUAL. (5) OFF condition This signal goes off by carrying out the "Task Status Change Operation." 4.2.16 SS mode (Output) (1) Function The controller will output this signal during the SS mode. This mode is effective when the slow mode is selected. (2) Terminal number No. 29 of connector CN10 (3) Usage This signal is used to warn workers that the robot is in the SS mode by beeping or lighting the lamp. (4) ON condition This signal comes on when the SS mode is selected. (5) OFF condition The signal goes off when the TS time passes so as to cancel SS mode. This function is effective when the slow mode is selected. Note: If the TS time passes, this signal goes off even when the robot is operation in the slow mode. After this signal goes off, the robot runs at the original speed. 84 4.2.17 Emergency Stop (Output from a contact) (1) Function This signal outputs from a contact exclusively designed for an emergency stop circuitry you may configure. It allows red mushroom buttons provided on the front panel of the robot controller, on the teach pendant, and on the operating panel to be used as emergency stop buttons of the facilities. A 0.3A fuse is built in the contact. (2) Terminal number No. 10 of connector CN10: Emergency stop (+) No. 10 of connector CN10: Emergency stop (-) (3) Usage This signal is used to stop the facilities or robot in an emergency. (Refer to Subsection 5.2.4 "Emergency Stop Circuit.") (4) Contact This contact is a normal close one (b contact). If any of the emergency stop buttons is pressed, then the contact turns off to output an emergency stop signal. 85 4.3 Types and Functions of System Input Signals (Compatible Mode) The table below lists the system input signals to be used in compatible mode. Types and Functions of System Input Signals to be Used in Compatible Mode Application Signal name Function Enable Auto Enables switching to Auto mode. Motor power ON + operation preparation start Turns ON the power to the motor. CAL execution + operation preparation start Executes calibration. SP100 + operation preparation start Sets the speed to 100%. Switch Ext Mode + operation preparation start Switches the mode to external mode. Program reset + operation preparation start Initializes all programs on halt. Starting a program after initialization will execute the program from the beginning. Program No. select + program start Executes a specified program. Program reset + program No. select + program start Cancels the current program and starts executing a specified program from the beginning. Robot stop Stops the robot by opening signals. Robot stop Stops the robot by canceling signals. Step stop Step-stops all programs by opening signals. Instantaneous stop Instantaneously stops all programs by opening signals. Error clear Clear robot failure + operation preparation start Clears an error. Program interrupt Interrupt skip Interrupts the execution of the current step and starts the next step. Continue start Continue start + program start Executes continue start. Start-up Program execution Stop Caution: Two or more signal names listed in the signal name field indicate that they should be used in combination. 86 4.4 Usage of System Input Signals in Compatible Mode The usage of each system input signal in compatible mode is described below: 4.4.1 Enable Auto (Input) (1) Function The signal enables switching of the robot mode to the Auto mode (shorted state). The signal enables switching of the robot mode to the manual mode or the teach check mode (open state). (2) Terminal number No.4 of connector CN8. (3) Usage The signal is used for the AUTO/TEACHING selector switch of the external operating panel and can be combined with the safety fence switch. (4) Input conditions and operation As shown below, the selectable operation mode depends on whether this input is shorted or open. If the input becomes open during automatic operation, the mode will be switched to manual mode and ERROR21FC will be displayed. If manual operation or a teach check is conducted with this input shorted, ERROR21F2 will be displayed. If the mode selector switch of the teach pendant or the operating panel is set to AUTO with this input open, ERROR21F3 will be displayed. Since this state is × in the table below, this error will remain displayed until the robot leaves this state. Although ERROR21FD or ERROR21FC will be displayed when the state is changed from ¡ to ∆ or × shown in the table below, they will not be displayed when the state is changed from ∆ or × to ¡. When the input is turned OFF (open) in external mode, the external mode output will also be turned OFF. Relationship Between Enable Auto Input and Selectable Mode Enable Auto Operation Mode Application ON (shorted) OFF (open) Manual mode Manual operation with the operating panel or teach pendant ∆ ¡ Teach check mode Program check with the teach pendant ∆ ¡ Internal Auto mode Automatic operation with the operating panel or teach pendant ¡ × External Auto mode Automatic operation with the external device ¡ × Note:¡ = Mode selectable × = Mode not selectable ∆ = Mode selectable, but manual operation and program execution impossible Caution: In the pendantless state, auto mode is valid even if the Enable Auto input is open (external mode cannot be switched and the program cannot start to run). Perform the following when operating the robot in the pendantless state: Set the robot not to start to operate when the Enable Auto input is open. Enable Auto input open state and auto mode output (See Subsections 4.2.2 and 6.2.2 "Auto Mode ".) Set the equipment to make an emergency stop in an AND state. Add and with the external sequence circuit. 87 4.4.2 Operation Preparation Start (Input) (1) Function ⋅ By turning ON (short) this signal, input signals to described in (3), input conditions and operation will be detected and the robot will automatically start to operate. Input these signals with the system output ROBOT POWER ON COMPLETE turned ON. ⋅ By turning ON (short) CLEAR ROBOT FAILURE, an error that has occurred will be cleared. (2) Terminal number No.8 of connector CN8. (3) Input conditions and operation Before inputting an operation preparation start signal, turn ON (short) inputs to below: Q Motor power ON (input) ⋅ Terminal number: No.19 of connector CN8 ⋅ By turning ON (short) the operation preparation start signal with this signal turned ON (shorted), the power to the motor will be turned ON. However, this signal can be used only in the Auto mode. R CAL execution (input) ⋅ Terminal number: No.20 of connector CN8 ⋅ By turning ON (short) the operation preparation start signal with this signal turned ON (shorted), calibration takes place. However, this signal cannot be used when the power to the motor is turned OFF ( not executed). S SP100 (input) ⋅ Terminal number: No.22 of connector CN8 ⋅ By turning ON (short) the operation preparation start signal with this signal turned ON (shorted), SP100% will be set. T Switch Ext Mode (input) ⋅ Terminal number: No.23 of connector CN8 ⋅ By turning ON (short) the operation preparation start signal with this signal turned ON (shorted), the mode will be set to the external mode. However, this signal cannot be used when the power to the motor is turned OFF and CAL is not completed. U Program reset (input) ⋅ Terminal number: No.24 of connector CN8 ⋅ By turning ON (short) the operation preparation start signal with this signal turned ON (shorted), all programs will be initialized. NOTE: By turning ON (short) the operation preparation start signal with all inputs Q to U turned ON (shorted), Q to U will be executed one by one. Input R cannot be executed until input Q is completed. Inputs Q to U will also become valid when part of them are executed by the operating panel or teach pendant. 88 For the input timing of the operation preparation start signal and to , see the figure given below. Caution: The operation preparation start signal and each input signal, except the Enable Auto signal, will be turned OFF (falling) upon turning ON of the external mode output is turned ON. Although the robot is made to execute all items at start-up, execute only necessary items at the time of recovery from suspension during operation to reduce recovery time. The required time to execute all items may be about 5 seconds depending on CAL time. The time is about 1.3 seconds without CAL. (Once CAL is completed, it does not need to be executed again as long as the power to the Robot Controller is turned ON.) Determine whether to execute CAL according to the CAL complete output. Automatic operation enable ON (shorted) OFF (open) 1 ms. or more Operation preparation start ON (shorted) OFF (open) Motor power ON ON (shorted) OFF (open) CAL execution ON (shorted) OFF (open) SP100 ON (shorted) OFF (open) Input The power to the motor is turned ON. CAL starts CAL ends Output SP is set to 100. External mode switching ON (shorted) OFF (open) Automatic mode output ON (shorted) OFF (open) Servo ON ON (shorted) OFF (open) CAL complete ON (shorted) OFF (open) External mode output ON (shorted) OFF (open) Note The mode is switched to external mode. Approx.2.0s Approx. 2.5s CAL time Approx. 0.5s indicates the input or output of the signal, and indicates robot operation. Example of Operation Preparation Start Signal Timing Chart 89 4.4.3 Program No. Select (Input) (1) Function The program number to be executed can be specified from the external device by inputting this signal. (2) Terminal numbers No.11 to No.18 of connector CN8. (3) Input conditions and operation This signal is executable only in the external mode. In other modes, an error (ERROR21E2, 21E4, 21E6) will be displayed, and the terminal motor power will be turned OFF. As shown in the table given on the next page, the program No. select signal is made up of eight bits of 20 to 26 and the parity bit. Input a decimal program number by converting it into binary 20 to 26 and parity bit. "Short" represents the bit value = 1, "open" represents the bit value = 0, and the parity bit is odd parity. As shown below, input the program No. select signal before the program start signal (1 msec. or more), and hold the state until the robot starts to operate. If this condition is not met, ERROR2031 or ERROR2033 will be displayed, the power to the motor will be turned OFF, and the mode will be switched to the Auto mode. Robot status Program start (input) Wait for start or preceding cycle Single-cycle operation ON (shorted) OFF (open) 1 ms. or more required Program No. select signal 20 to 26 ON (shorted) Parity OFF (open) Program No. Select Signal Input 1 or 0 as the parity bit so that the total of 1’s existing in the eight bits of 20 to 26 and the parity bit will be odd. Example: When the program number is 15, the bit status of 20 to 26 is (001111), and the total number of 1s is four, an even number. Set 1 as the parity bit to make the total number of 1s five, an odd number. Caution Q The bit value =1 represents short, and the bit value =0 represents open. R The program numbers executable from the external device are limited to Pro0 to Pro127. 90 Example of Program No. Select Signals Input signal Program No. (decimal) 1 15 26 65 1 1 1 0 1 = 2 0 1 1 0 = 4 0 1 0 0 = 8 0 1 1 0 = 16 0 0 1 0 = 32 0 0 0 0 = 64 0 0 0 1 0 1 0 1 2 0 = 2 1 2 2 2 3 2 4 2 5 2 6 Parity The figure below shows an example of a program No. select signal sequence circuit considering parity. Lower 4-bit, odd Upper 3-bit, odd Program No. select Example of Program No. Select Signal Sequence Circuit 91 4.4.4 Program Start (Input) (1) Function This signal starts the program specified with the program No. select signal from the external device. (2) Terminal number No.10 of connector CN8. (3) Input conditions and operation By switching the status of this signal from ON (open) to ON (shorted) in external mode, operations , and described below will take place. (The status of the signal must be switched from OFF to ON.) If the program start signal is input (switched from OFF to ON) when the robot has not yet completed the program or is at rest after it has completed a cycle of the program, the program No. select signal will be read, the program will execute a cycle, and the robot will come to a stop. 1-cycle Operation Robot status Program start signal Wait for start Single-cycle operation Wait for start Single-cycle operation ON (shorted) OFF (open) 50 ms. or more required Program Start Operation-1 Caution: The program start signal requires program start preparation time (50 msec. or more) before input from OFF (open) to ON (shorted). The program start signal must remain OFF (open) during the program start preparation time. If it is turned ON (shorted) during that time, the next cycle will not start to run. To start a new cycle, the status of the external start signal must be switched from OFF to ON before each cycle. 92 When the status of the program start signal is switched from OFF to ON with the program step-stopped, the program will resume from the step following the suspended step and stop at the cycle end. Single-cycle operation Robot status Operating halfway Program start signal (input) ON (shorted) OFF (open) Step-stop signal (input) ON (shorted) OFF (open) At step-stop Performing remaining operation Program Start Operation-2 Caution: To cancel the execution of the remaining steps of a stepstopped program and start it from the beginning, input a program reset signal, a program No. select signal and a program start signal at the same time. For further information, refer to Subsection 6.4.5 "Program Reset (Input)". 93 When the status of the program start signal is switched from OFF to ON with the program immediately stopped, the program will resume from the suspended step and stop at the cycle end. Single-cycle operation Robot status Operating halfway Program start signal (input) ON (shorted) OFF (open) Instantaneous stop signal (input) ON (shorted) OFF (open) On halt Performing remaining operation Program Start Operation-3 Caution: To cancel the execution of the remaining steps of an instantaneously stopped program and start it from the beginning, input a program reset signal, a program No. select signal and a program start signal at the same time. For further information, refer to Subsection 6.4.5 "Program Reset (Input)". 94 (4) Example of program start signal (rise) ON and (fall) OFF timing Q Example of program start signal rise (ON) timing The figure below shows how to make the program start signal rise with robot system outputs (external mode output and single-cycle end output). Wait for start Robot status External mode (output) ON OFF 1-cycle end (output) ON OFF Single-cycle operation Next cycle operation 200 ms. or more required Program start signal (input) ON (shorted) OFF (open) Example of Program Start Signal Rise Timing Caution: The program start signal for the first cycle rises as soon as the external mode becomes valid and the conditions of the peripheral devices are met. The program start signal for subsequent cycles rises after output of a single-cycle end signal. 95 R Example of program start signal fall (OFF) timing a) The following figure shows how to make the program start signal fall with a robot system output (program start reset output). When the robot program starts to run, a program start reset signal is output. The external device receives it and makes the program start signal fall (OFF). Wait for start or preceding cycle Robot status Program start reset (output) ON OFF Program start signal (input) ON (shorted) OFF (open) Single-cycle operation Example of Program Start Signal Fall Timing-1 b) The figure below shows how to make the program start signal fall with the simplified method (1 shot method using a timer). Robot status Wait for start Single-cycle operation 50 ms. or more required Program start signal (input) ON (shorted) OFF (open) Example of Program Start Signal Fall Timing-2 Caution Q Although the 1 shot method is easy, the timer setting for falling to raise the program start signal in the middle of the preceding cycle is difficult. Use this method only to raise the program start signal after the robot stops at the end of each cycle. R The status of the robot-in-operation, program start reset and single cycle end output signals changes in sequence after the program start signal is input (T1→T2→T3 in the figure given on the next page). The change of the status of these signals takes place within 100 msec. after the program start signal rises (ON). See the next page. 96 T1, T2, T3: within 100 ms. Program start signal (input) ON (shorted) OFF (open) Robot in operation (output) Program start reset (output) Single-cycle end (output) Program Start Signal Rise Output Signal Timing 97 4.4.5 Program Reset (Input) (1) Function By turning ON (short) this signal, any program can be forcibly executed from the beginning in a step-stopped state and a suspended state. Caution: Generally, a step-stopped or suspended program resumes from where it stopped. (2) Terminal number No.24 of connector CN8. (3) Input conditions and operation When issued with the Program Start The figure below shows the input conditions and an operation timing chart. Use the program reset signal together with a program No. select signal, and input it before the program start signal (1 msec. or more). Turn OFF the program reset signal after the robot starts to operate (after a program start reset signal is output). A program No. select signal is required to execute the same program number as the suspended one from the beginning. Input Conditions and Operation of Program Reset Signal 98 When issued with the Operation Preparation Start The figure below shows the input conditions and an operation timing chart. Input Program Reset before Operation Preparation Start (1 msec. or more). After turned ON, this signal may take a maximum of one second for initializing all programs. During the period, do not input signals to the robot. Input Conditions and Operation of Program Reset Signal 99 4.4.6 Robot Stop (Input) (2) Function The signal stops the robot with the external device by opening the robot stop input The signal readies the power to the robot motor to be turned ON by shorting the robot stop input. (2) Terminal number No.2 of connector CN8. (3) Input conditions and operation The robot stops with this signal OFF (open). The power to the robot motor is ready to be turned ON with this signal ON (shorted). Irrespective of whether internal mode (operation with the teach pendant) or external mode (remote operation by the external device) is selected, the power to the robot motor cannot be turned ON with this signal OFF (open). Neither manual nor automatic operation can be performed until this signal is turned ON (shorted). (ERROR2008 will be displayed.) By turning OFF (open) this signal under the following conditions. 1) The power to the motor will be turned OFF, irrespective of whether Manual, Internal Auto, or External Auto mode is selected. 2) During execution of the program (Robot-in-operation signal ON), the power to the motor will be turned OFF and the mode will be switched to internal mode after the robot decelerates to a stop. 3) When the program is at a stop in the Manual and the Auto mode the power to the motor will be turned OFF. The suspended operation can be resumed by turning ON the power to the motor and shorting the ROBOT STOP signal. Opening the ROBOT STOP signal and pressing the ROBOT STOP button of the operating panel or the teach pendant function the same. (4) Input timing This signal will be processed prior to all commands and input signals. 100 4.4.7 Step Stop (All Tasks) (Input) (1) Function Input this signal to step-stop the program being executed from the external device. All tasks will be step-stopped. (2) Terminal number No.5 of connector CN8. (3) Input conditions and operation If the status of this signal is changed from ON (shorted) to OFF (open), the robot will stop all tasks immediately after the ongoing step is completed, and the Robot-in-operation signal will be turned OFF. However, External Auto mode will remain valid, and the suspended program will be resumed by inputting a program start signal. See the figure given below. Turning OFF (open) this signal when inputting a program start signal makes the robot stop step by step. Internal operation with the teach pendant is valid only when the status of this signal is changed from ON (shorted) to OFF (open). For resuming the program after a step stop, refer to Subsection 4.4.4 "Program Start (Input)". Single-cycle operation Robot status Operating halfway Program start signal (input) ON (shorted) OFF (open) Step-stop signal (input) ON (shorted) OFF (open) Robot-in-operation (output) ON OFF Step Stop Signal 101 Step-stop Performing remaining operation 4.4.8 Instantaneous Stop (All Tasks) (Input) (1) Function Input this signal to instantaneously stop the program being executed from the external device. All tasks will instantaneously stop. (2) Terminal number No.7 of connector CN8. (3) Input conditions and operation If the status of this signal is changed from ON (shorted) to OFF (open), the robot will instantaneously stop in the middle of the ongoing step, and the Robot-in-operation signal will be turned OFF. However, Auto mode or external mode will remain valid, and the suspended program will be resumed by inputting a program start signal. Internal operation by the teach pendant is valid only when the status of this signal is changed from ON (shorted) to OFF (open). For resuming the program after an instantaneous stop, refer to Subsection 4.4.4 "Program Start (Input)". The minimum required pulse width is 50 msec. or more. ON (shorted) Instantaneous stop OFF (open) 50 ms. or more required Minimum Instantaneous Stop Pulse Width 102 4.4.9 Clear Robot Failure (Input) (1) Function The robot can recover from a stopped state, resulting from a robot failure by turning ON (shorted) the operation preparation start signal with this signal ON (shorted). (2) Terminal number No.25 of connector CN8. NOTE: Operation preparation start signal is inputted through No. 8 of connector CN8. (3) Usage The signal is used to clear an error that brought the robot to a stop. (4) Input conditions and operation When a robot failure occurs, clear the error display on the teach pendant and the external output ERROR NUMBER to ready the robot to operate. When the Clear robot failure signal is turned ON (shorted), other input signals (MOTOR POWER ON, CAL EXECUTION, SP100 and SWITCH EXT MODE), which are to be used in combination with the operation preparation start signal, will be ignored. To turn ON the power to the motor after a robot failure is cleared, turn OFF (open) the Clear robot failure signal after turning OFF the Robot failure signal (output) as shown below. Input the Clear robot failure signal before (1 msec. or more) the operation preparation start signal. Stop due to a robot failure Robot status Clear robot failure Motor power ON Operation preparation ON start (input) OFF 50 ms. or more required Clear robot failure (input) ON OFF Motor power ON (input) ON OFF Robot failure (output) ON OFF Servo ON (output) ON OFF 1 ms. or more required Input Conditions and Operation of Clear Robot Failure Signal 103 4.4.10 Interrupt Skip (Input) (1) Function If this signal is turned ON (shorted) during execution of the robot operation command within the range between INTERRUPT ON and INTERRUPT OFF in the program, the operation of the ongoing step will stop and the next step will start. Note: For further information about the INTERRUPT ON and OFF commands, refer to the PROGRAMMER'S MANUAL (I), Chapter 12 "12.3 INTERRUPT ON/OFF (Statement)." For further information about robot motion commands, refer to the PROGRAMMER'S MANUAL (I), Chapter 12, "Robot Control Statements." (2) Terminal number No.9 of connector CN8. (3) Usage Refer to the PROGRAMMER'S MANUAL (I), Chapter 12 "12.3 INTERRUPT ON/OFF." (4) Input conditions and operation If this signal is turned ON (shorted), the robot will immediately stop the ongoing operation and start executing the next step. INTERRUPT ON command Operating halfway Robot status Next operation 50 ms. or more required Interrupt skip signal (input) ON (shorted) OFF (open) Input Conditions and Operation of Interrupt Skip 104 Caution: When turning ON (shorted) the interrupt skip signal, at least either the program reset signal or the program start signal must be turned OFF (open). If the interrupt skip signal is turned ON, the robot interprets the program start signal as instantaneously turned OFF (open). Consequently, the program selected with the program No. select signal will be executed from the beginning. (See the figure given below.) Robot status Executing cycle halfway Interrupt skip signal (input) ON (shorted) OFF (open) Program start signal (input) ON (shorted) OFF (open) Program reset signal (input) ON (shorted) OFF (open) Executing cycle from beginning WRONG Program No. select ON (shorted) signal (input) OFF (open) Example of Operation When an Interrupt Skip Signal is Input 4.4.11 Continue Start (Input) (1) Function Turning the program start signal ON when this continue start signal is ON will resume the current program being on halt. (2) Terminal number No.6 of connector CN8. (3) Input conditions and operation This signal is executable only in external mode. If this signal is on, program numbers will be ignored at execution of Program start and the current program being on halt will be resumed. If Continue Start Permitted signal is not ON, the controller will issue ERROR27A8. 105 4.5 Example of Using System I/O Signals in Compatible Mode This section describes an example of starting and stopping the robot using system I/O signals. (1) Equipment setup example The example shown below assumes an equipment setup which allows you to run the robot by operating an external equipment’s operation panel connected via the PLC to the robot controller. It is assumed that the operation panel has a display, lamps and switches listed on the next page. Robot Robot controller PLC Other equipment (e.g., conveyor) External equipment’s operation panel Example of Equipment Setup Using a Robot 106 Function Example of Equipment Operating Panel Classification Display Lamp Switch Part Application Display Displays messages, such as ROBOT PREPARATION OK. Q Automatic operation indicator lamp ⋅ Lights during automatic operation. ⋅ Not illuminated when the robot is not in automatic operation. R Robot external mode indicator lamp ⋅ Lights when the robot is in external mode. ⋅ Turned OFF when the robot is not in external mode. S Operation OK indicator lamp ⋅ Lights when the Enable Auto signal is ON. ⋅ Turned OFF when the Enable Auto signal is OFF. Q Robot operation button Starts the robot preparation. R Automatic start button Starts the operation of the equipment. S Cycle stop button Stops the equipment after a cycle of operations is completed. T Operation/Adjustment selector switch Automatic operation of the robot possible when OPERATION is selected. Manual operation or teach check of the robot possible when ADJUSTMENT is selected. Note: Actual equipment requires emergency stop, interlock and other functions. However, described here are only necessary functions and others are omitted. (2) Outline of procedure Described below is the outline of the procedure when using the equipment, as shown on the previous page. Follow steps to . Operation preparation start Setting the MOTOR POWER ON, CAL EXECUTION, SP100 and SWITCH EXT MODE bits, brings the robot into the External Auto mode. This operation will be completed when the EXTERNAL MODE output signal is turned ON. Automatic operation Start the program by which the robot starts from the operation origin, performs operations, and returns to the operation origin. Operation end Terminate the day’s operations with a cycle stop, and turn OFF the power. (3) Start and stop procedure and system I/O signals The following pages show the relationship between the system I/O signals for start and stop, worker’s operation, display on the equipment operation panel, PLC proceeding, and robot motion. 107 Step Worker’s operation and display on equipment’s operation panel PLC processing Robot operation Enable Auto ON (Internal processing) Equipment power ON Q Operation preparation start Setting operation/adjustment selector switch to operation Operation OK indicator lamp ON (Note ) Robot preparation button ON System input for start-up ON Operation Preparation Start ON Motor power ON Executing CAL Setting SP 100 Switching mode to external mode R Operation start area check Robot external mode indicator lamp ON (Internal processing) Motor power ON Robot operation origin indicator lamp ON (Internal processing) Operation position 1 ON Robot preparation OK display When both are ON (Internal processing) Moving robot arm close to operation origin, when external mode indicator lamp is ON and operation position 1 indicator lamp is OFF. Start and Stop Procedure and System I/O Signals-1 (Continued on the next page) 108 (Continued from preceding page) Step Worker’s operation and display on equipment’s operation panel Equipment’s Automatic Start PLC processing Robot operation Program No. Select ON S Automatic operation Regular Operation Program is selected. Automatic Operation indicator lamp ON Program start Program start ON END Program No. select ON Single-cycle End ON Regular Operation Program is selected. Repeated Program start ON Equipment’s Cycle Stop button ON Executing single-cycle Cycle Stop ON T Operation end END Automatic operation indicator lamp OFF (Internal processing) Single-cycle End ON Equipment power OFF Note Q The system inputs for startup here are four types of system inputs – "motor power ON," "CAL execution," "SP100" and "External Mode switching." Refer to Subsection 6.4.2 "Operation Preparation Start (Input)". R: in the above figure indicates a system I/O signal, and ← represents the flow of the signal. Start and Stop Procedure and System I/O Signals-2 109 4.6 4.6.1 Selectable I/O Mode [Ver 1.95 or later] What is a selectable I/O mode? Version 1.95 has added a selectable I/O mode, a mode that allows you to release system I/O signal lines not used in compatible mode and make them serve as user I/O signal lines. To extend user I/O signal lines in the selectable I/O mode, you need to choose or set up the following parameters with the teach pendant or in WINCAPSII: (1) Selectable I/O mode (0: disable, 1: enable) (2) Step Stop (0: enable, 1: change) (3) Interrupt Skip (0: enable, 1: new, 2: change) (4) Program Select (0: enable, 1: new, 2: change) (5) Run Ready (0: enable, 1: new, 2: change) (6) State Output (0: enable, 1: new, 2: change) (7) Run Ready Output (0: enable, 1: new, 2: change) (8) Run Program (0: enable, 1: new, 2: change) (9) Error Output (0: enable, 1: new, 2: change) (10)Start Program No. (0: enable, 1: new, 2: change) You may make one of three choices (0: enable, 1: new, 2: change). 0: enable 1: new 2: change Enable this signal line as is; that is, as a system I/O signal line. Release this signal line and make it serve as a user I/O signal line. The user I/O area will be reconfigured so that port addresses and line numbers will be newly assigned--Continuous assignment. Release this signal line and make it serve as a user I/O signal line. The port address and line number of the released signal line will be used as is and just relocated in the user I/O area--Discrete assignment. Enable the selectable I/O mode (1) and set up parameters (2) through (10) above as you want. Then reboot the robot controller to make those settings go into effect. In the selectable I/O mode, you may make those released I/O signal lines serve as user I/O signal lines. The reconfigured or relocated hardware I/O assignment will be listed in I/O manager of WINCAPSII. 110 4.6.2 Setting up the selectable I/O mode [ 1 ] From the teach pendant (1) In the Choose allocation window, choose "Compatible Allocation." Access: [F4 I/O.]—[F6 Aux.]—[F2 AlocMode] (2) In the I/O Hardware Settings window, modify parameters as you want. Access: [F4 I/O.]—[F6 Aux.]—[F1 Set H/W] (3) Reboot the robot controller to make new settings go into effect. 111 [ 2 ] In WINCAPSII (1) From the Tool menu of DIO Manager, select the Options command. (2) Click on the Hardware tab in the Options window. (3) In the I/O Allocation, choose the Parallel and Selectable. 112 (4) In the Selectable I/O Setting window, select the I/O allocation type (New or Modify) and check off the check boxes as you want. (5) To fix your settings, click on the OK button. (6) Transmit the hardware allocation to the robot controller. (7) Reboot the robot controller to make new settings go into effect. 4.6.3 System input signal lines that can serve as user I/O signal lines In the selectable I/O mode, you may modify the following parameters to make system input signal lines serve as user I/O signal lines. Parameters Signal lines that can serve as user ones Step Stop Step Stop (All tasks) Interrupt Skip Interrupt Skip Program No. select bit 0 Program No. select bit 1 Program No. select bit 2 Program Select Program No. select bit 3 Program No. select bit 4 Program No. select bit 5 Program No. select bit 6 Program No. select odd parity bit Motor power ON Run Ready CAL execution SP100 Switch to Ext Mode 113 Parameter details No. 1 2 3 Parameters Step Stop Interrupt Skip Program Select Function If you will not use the Step Stop function in running your robot, you may set this parameter to any choice other than "enable." Then the Step Stop input port may serve as a user I/O port. Note that this parameter provides no "new" choice, so port addresses or line numbers in the user I/O area will not be continuously assigned. If you will not use the Interrupt Skip function in running your robot, you may set this parameter to any choice other than "enable." Then the Interrupt Skip input port may serve as a user I/O port. If you will predetermine a particular program to be driven by external equipment and run your robot with the single program, then you may set this parameter to any choice other than "enable." Then the Program Select input port may serve as a user I/O port. If initiated by the Program Start signal, the particular program you have predetermined with the Start Program No. will run. If it is possible to set up all of these four functions--Motor power ON, CAL execution, SP100, and Switch to Ext Mode--at one time (not to set them individually), then you may set this parameter to any choice other than "enable." Those input ports may serve as user I/O ports. 4 Run Ready When those ports serve as user I/O ports, receiving the Operation preparation start signal will carry out the above four functions independently of the current input states. Note that when the robot is in machine lock, no Motor power ON or CAL execution will be carried out. 5 Start Program No. If the Program Select parameter is set to any choice other than "enable," a program specified by this Start Program No. parameter will be initiated by the Program Start signal. 114 4.6.4 System output signal lines that can serve as user I/O signal lines In the selectable I/O mode, you may modify the following parameters to make system output signal lines serve as user I/O signal lines. Parameters State Output Signal lines that can serve as user ones Robot power ON complete External mode Run Ready Output CAL complete Teaching Program start reset Run Program Output Single-cycle complete Continue start permit Error units bit 0 Error units bit 1 Error units bit 2 Error units bit 3 Error tens bit 0 Error tens bit 1 Error Output Error tens bit 2 Error tens bit 3 Error hundreds bit 0 Error hundreds bit 1 Error hundreds bit 2 Error hundreds bit 3 115 Parameter details No. 1 Parameters State Output Function If you do not need to confirm the Robot power ON complete signal with the external equipment (e.g., when using the robot controller standalone in running your robot), then you may set this parameter to any choice other than "enable." The Robot power ON complete port may serve as a user I/O port. You may set this parameter to any choice other than "enable" if: - it is possible to set up all of the Motor power ON, CAL execution, SP100, and Switch to Ext Mode functions at one time so that you do not need to manage those signal lines individually or - if the system can treat the Auto mode output being OFF as a condition required for teaching. 2 Run Ready Output The External mode, CAL complete, and Teaching signal lines may serve as user I/O signal lines. When those signal lines serve as user I/O signal lines, the ON conditions of the Servo ON output signal (displayed as Run Ready) are: Servo ON + CAL complete + External mode. If one or more of those three signal lines are turned OFF, the Servo ON output signal goes OFF. And when the Auto mode output signal is OFF, the system will interpret it as in teaching. If you will not run more than one programs concurrently or use the Continue function, then you may set this parameter to any choice other than "enable." The Program start reset, Singlecycle complete, and Continue start permit ports may serve as user I/O ports. 3 Run Program Output When those ports serve as user I/O ports, the system may use the Robot running signal instead of Program start reset signal for starting a program from the external equipment. And the system may use the Robot running signal being OFF instead of a Single-cycle complete signal. Note that the above signal substitution may be allowed only when you will not run programs concurrently. 4 Error Output If you do not need to get error codes from the external equipment (e.g., when using the robot controller standalone in running your robot), then you may set this parameter to any choice other than "enable." The error code output ports may serve as user I/O ports. 116 4.6.5 Sample usage of selectable I/O mode The sample below gives instructions on how to add user I/O signal lines. (1) From the teach pendant, choose "Compatible Allocation" in the Choose allocation window. Access: [F4 I/O.]—[F6 Aux.]—[F2 AlocMode] (2) In the I/O Hardware Settings window, modify parameters as shown below. Access: [F4 I/O.]—[F6 Aux.]—[F1 Set H/W] 21: Selectable IO mode 24: Selectable IO--Program Select 1 2 (3) Reboot the robot controller to make new settings go into effect. You may check that #6 through #13 signal lines may serve as user input signal lines as shown below. User I/O signal lines reconfigured 117 Chapter 5 Connector Pin Assignment and I/O Circuits (NPN type) This chapter explains the connector pin assignment and circuits of NPN type (source input and sink output) on an I/O board. I/O boards designed for the use in Japan are of an NPN type. For a PNP type (sink input and source output), refer to Chapter 6, "Connector Pin Assignment and I/O Circuits (PNP type)." 5.1 Connector Pin Assignment (NPN type) This section describes the pin assignment of connectors on the robot controller. The signals and pin assignments of output connector CN10 and input connector CN8 are differently defined in standard mode and compatible mode. As for other connectors, the definitions of pins are common to standard mode and compatible mode. 5.1.1 Connector Pin Assignment Common to Both Modes (NPN type) (1) HAND I/O CN9: Connector for end-effector I/O (common to both modes) CN9 Pin Assignment, common to both modes (NPN type) View from the cable side Wire color Terminal No. Name 1 Hand output 2 Port number Wire color Terminal No. Name Port number Standard High strength 50 Pink White Hand Input 51 Pink White 13 Hand Input 52 White White Red 14 Hand Input 53 White White Red Violet 15 Hand Input 54 White White 69 Orange Blue 16 Hand Input 55 White Brown Hand output 70 Yellow Yellow 17 Power E24V for Hand White Brown 8 Hand output 71 Green Green 18 Power E0V for Hand White Brown 9 Hand input 48 Blue Red 19 Not connected White Brown 10 Hand input 49 Violet Violet 20 Not connected White Brown Standard High strength 64 Black Blue 11 Hand Input Hand output 65 Brown Yellow 12 3 Hand output 66 Black Green 4 Hand output 67 Brown 5 Hand output 68 6 Hand output 7 NOTE: The optional I/O cable for the above connector consists of twisted pair wires--pairs of #1 and #11, #2 and #12,…#10 and #20. 118 (2) I/O POWER CN7: Power connector for I/O (common to both modes) CN7 Pin Assignment, common to both modes (NPN type) View from the cable side Terminal No. Name 1 Internal power source output +24V 2 Internal power source output +24V 3 Internal power source output 0V 4 Internal power source output 0V 5 FG 6 Power input E24V 7 Power input E24V 8 Power input E0V 9 Power input E0V Caution: When using the internal power source, keep the total current capacity below 1.3 A. To use the internal power source of the robot controller, connect the wiring so that the internal power source will be separated from the external power source. Improper wiring may damage the internal circuit. (3) RS232C CN1: RS232C connector CN1 Pin Assignment Terminal No. Name 1 Terminal No. Name 6 DSR 2 RXD 7 RTS 3 TXD 8 CTS 4 DTR 9 5 SG 119 5.1.2 Connector Pin Assignment in Standard Mode (1) OUTPUT CN10: User-/System-output connector (standard mode) CN10 Pin Assignment, in standard mode (NPN type) View from the cable side Terminal number Name Port number Wire color Terminal number Name Port number Wire color 1 Normal CPU 72 Black 35 User output 106 Pink 2 Robot in operation 73 Brown 36 User output 107 Pink 3 Robot failure 74 Red 37 User output 108 Pink 4 Servo ON 75 Orange 38 User output 109 Pink 5 Robot initialization complete 76 Yellow 39 User output 110 Pink 6 Automatic mode 77 Black 40 User output 111 White 7 External mode 78 Brown 41 User output 112 White 8 Dead battery warning 79 Red 42 User output 113 White 9 Robot warning 80 Orange 43 User output 114 White 10 Continue start permitted 81 Yellow 44 User output 115 White 11 SS mode 82 Green 45 User output 116 White 12 Reserved 83 Blue 46 User output 117 White 13 Reserved 84 Violet 47 User output 118 White 14 Reserved 85 Gray 48 User output 119 White 15 Command processing complete 86 Pink 49 User output 120 White 16 Status area odd parity 87 Black 50 User output 121 Gray 17 Status area bit 0 88 Black 51 User output 122 Violet 18 Status area bit 1 89 Brown 52 User output 123 Violet 19 Status area bit 2 90 Red 53 User output 124 Violet 20 Status area bit 3 91 Orange 54 User output 125 Violet 21 Status area bit 4 92 Yellow 55 User output 126 Violet 22 Status area bit 5 93 Green 56 User output 127 Violet 23 Status area bit 6 94 Blue 57 Not used. Violet 24 Status area bit 7 95 Gray 58 Not used. Violet 25 Status area bit 8 96 Pink *59 [ Power supply for Robot stop 1 (Internal +24V) ] Violet 26 Status area bit 9 97 Brown *60 [ Robot stop 1 ] Gray Gray 27 Status area bit 10 98 Red *61 [ Power supply for Robot stop 2 (Internal +24V) ] 28 Status area bit 11 99 Orange *62 [ Robot stop 2 ] Gray 29 Status area bit 12 100 Yellow *63 [ Emergency stop (+) ] Gray 30 Status area bit 13 101 Green *64 [ Emergency stop (-) ] Gray 31 Status area bit 14 102 Blue 65 Emergency stop 2 (+) Gray 32 Status area bit 15 103 Pink 66 Emergency stop 2 (-) Gray 33 User output 104 Black *67 [ Deadman switch (+) ] Blue 34 User output 105 Brown *68 [ Deadman switch (-) ] Blue NOTE 1: The optional I/O cable for the above connector consists of twisted pair wires--pairs of #1 and #35, #2 and #36, #34 and #68. NOTE 2: The terminal number marked with ( * ) is used only for “Dual emergency stop type”. 120 (2) INPUT CN8: User-/System-input connector (standard mode) CN8 Pin Assignment, in standard mode (NPN type) View from the cable side Terminal number Name Port number Wire color Terminal number Name Port number Wire color *1 Power for robot stop (internal +24V) Black 26 Data area 2 bit 7 21 Pink *2 Robot stop Brown 27 Data area 2 bit 8 22 Pink 3 Power for Enable Auto (internal +24V) Red 28 Data area 2 bit 9 23 Pink 4 Enable Auto Black 29 Data area 2 bit 10 24 White 5 Step-stop (all tasks) 0 Brown 30 Data area 2 bit 11 25 White 6 Not used. 1 Red 31 Data area 2 bit 12 26 White 7 Instantaneous stop (all tasks) 2 Orange 32 Data area 2 bit 13 27 White 8 Strobe signal 3 Yellow 33 Data area 2 bit 14 28 White 9 Interrupt skip 4 Green 34 Data area 2 bit 15 29 White 10 Command and data odd parity 5 Blue 35 Command area 0 bit 0 30 White 11 Data area 1 bit 0 6 Violet 36 Command area 0 bit 1 31 White 12 Data area 1 bit 1 7 Black 37 Command area 0 bit 2 32 Gray 13 Data area 1 bit 2 8 Brown 38 Command area 0 bit 3 33 Gray 14 Data area 1 bit 3 9 Red 39 User input 34 Gray 15 Data area 1 bit 4 10 Orange 40 User input 35 Gray 16 Data area 1 bit 5 11 Yellow 41 User input 36 Gray 17 Data area 1 bit 6 12 Green 42 User input 37 Gray 18 Data area 1 bit 7 13 Blue 43 User input 38 Gray 19 Data area 2 bit 0 14 Violet 44 User input 39 Gray 20 Data area 2 bit 1 15 White 45 User input 40 Gray 21 Data area 2 bit 2 16 Pink 46 User input 41 Gray 22 Data area 2 bit 3 17 Black 47 User input 42 Violet 23 Data area 2 bit 4 18 Brown 48 User input 43 Violet 24 Data area 2 bit 5 19 Red 49 User input 44 Violet 25 Data area 2 bit 6 20 Orange 50 User input 45 Violet NOTE 1: The optional I/O cable for the above connector consists of twisted pair wires--pairs of #1 and #26, #2 and #27,…#25 and #50. NOTE 2: The terminal number marked with ( * ) is not used for “Dual emergency stop type”. 121 5.1.3 Connector Pin Assignment in Compatible Mode (1) OUTPUT CN10: User-/System-output connector (compatible mode) CN10 Pin Assignment, in compatible mode (NPN type) View from the cable side Terminal number Name Port number Wire color Terminal number Name Port number Wire color 1 Normal CPU 72 Black 35 User output 106 Pink 2 Robot-in-operation 73 Brown 36 User output 107 Pink 3 Robot failure 74 Red 37 User output 108 Pink 4 Auto mode 75 Orange 38 User output 109 Pink 5 External mode 76 Yellow 39 User output 110 Pink 6 Program start reset 77 Black 40 User output 111 White 7 Not used. 78 Brown 41 User output 112 White 8 Not used. 79 Red 42 User output 113 White 9 Robot power ON complete 80 Orange 43 User output 114 White 10 Servo ON 81 Yellow 44 User output 115 White 11 CAL complete 82 Green 45 User output 116 White 12 Teaching 83 Blue 46 User output 117 White 13 Single-cycle complete 84 Violet 47 User output 118 White 14 Dead battery warning 85 Gray 48 User output 119 White 15 Robot warning 86 Pink 49 User output 120 White 16 Continue start permitted 87 Black 50 User output 121 Gray 17 Error units bit 0 88 Black 51 User output 122 Violet 18 Error units bit 1 89 Brown 52 User output 123 Violet 19 Error units bit 2 90 Red 53 User output 124 Violet 20 Error units bit 3 91 Orange 54 User output 125 Violet 21 Error tens bit 0 92 Yellow 55 User output 126 Violet 22 Error tens bit 1 93 Green 56 User output 127 Violet 23 Error tens bit 2 94 Blue 57 Not connected Violet 24 Error tens bit 3 95 Gray 58 Not connected Violet 25 Error hundreds bit 0 96 Pink *59 [ Power supply for Robot stop 1 (Internal +24V) ] Violet 26 Error hundreds bit 1 97 Brown *60 [ Robot stop 1 ] Gray 27 Error hundreds bit 2 98 Red *61 [ Power supply for Robot stop 2 (Internal +24V) ] Gray 28 Error hundreds bit 3 99 Orange *62 [ Robot stop 2 ] Gray 29 SS mode 100 Yellow *63 [ Emergency stop (+) ] Gray 30 Not used. 101 Green *64 [ Emergency stop (-) ] Gray 31 Not used. 102 Blue 65 Emergency stop 2 (+) Gray 32 Not used. 103 Pink 66 Emergency stop 2 (-) Gray 33 User output 104 Black *67 [ Deadman switch (+) ] Blue 34 User output 105 Brown *68 [ Deadman switch (-) ] Blue NOTE 1: The optional I/O cable for the above connector consists of twisted pair wires--pairs of #1 and #35, #2 and #36, #34 and #68. NOTE 2: The terminal number marked with ( * ) is used only for “Dual emergency stop type”. 122 (2) INPUT CN8: User-/System-input connector (compatible mode) CN8 Pin Assignment, in compatible mode (NPN type) View from the cable side Terminal number Name Port number Wire Terminal color number Name Port number Wire color *1 Power for robot stop (internal +24V) - Black 26 User input 21 Pink *2 Robot stop - Brown 27 User input 22 Pink 3 Power for Enable Auto (internal +24V) - Red 28 User input 23 Pink 4 Enable Auto - Black 29 User input 24 White 5 Step-stop (all tasks) 0 Brown 30 User input 25 White 6 Continue start 1 Red 31 User input 26 White 7 Instantaneous stop (all tasks) 2 Orange 32 User input 27 White 8 Operation preparation start 3 Yellow 33 User input 28 White 9 Interrupt skip 4 Green 34 User input 29 White 10 Program start 5 Blue 35 User input 30 White 11 Program No. select bit 0 6 Violet 36 User input 31 White 12 Program No. select bit 1 7 Black 37 User input 32 Gray 13 Program No. select bit 2 8 Brown 38 User input 33 Gray 14 Program No. select bit 3 9 Red 39 User input 34 Gray 15 Program No. select bit 4 10 Orange 40 User input 35 Gray 16 Program No. select bit 5 11 Yellow 41 User input 36 Gray 17 Program No. select bit 6 12 Green 42 User input 37 Gray 18 Program No. select odd parity bit 13 Blue 43 User input 38 Gray 19 Motor power ON 14 Violet 44 User input 39 Gray 20 CAL execution 15 White 45 User input 40 Gray 21 Reserved 16 Pink 46 User input 41 Gray 22 SP100 17 Black 47 User input 42 Violet 23 Switch Ext Mode 18 Brown 48 User input 43 Violet 24 Program reset 19 Red 49 User input 44 Violet 25 Clear robot failure 20 Orange 50 User input 45 Violet NOTE 1: The optional I/O cable for the above connector consists of twisted pair wires--pairs of #1 and #26, #2 and #27,…#25 and #50. NOTE 2: The terminal number marked with ( * ) is not used for “Dual emergency stop type”. 123 5.2 Robot Controller I/O Circuits (NPN type) 5.2.1 User-Input, System-Input and Hand-Input Circuits (NPN type) The following two pages show examples of the user-input, system-input, and handinput circuit configurations and connections of the robot controller. The maximum allowable capacity of the robot controller's internal power source is 1.3 A. Use the internal power source within this range. Caution Q R S T Either an external power supply type or built-in power type Output card is available for the PLC. However, an external power supply type requires an additional power source (24V) to be installed. The power capacity is 15W or more. When controlling two or more robots with a single PLC using the internal power source of the Robot Controller, set a PLC Output card for each robot. Other than a PLC, a proximity switch, or a relay contact may be connected directly to the input terminal of the Robot Controller. In such a case, use the power input to pins 6 to 9 of the I/O power connector. A two-wire photoelectric switch or proximity switch can be connected if its leakage current is 1 mA or less. Use a multi-core shielding cable for the purpose of protecting the Robot Controller from noise. Ground it to the Robot Controller. 124 (When the internal power source is used) (When an external power source is used) User-Input and System-Input Circuits (NPN type) 125 (When the internal power source is used) (When an external power source is used) Hand-Input Circuits (NPN type) 126 5.2.2 Robot Stop and Enable Auto Input Circuits The Robot Stop and Enable Auto signals are important for safety. The input circuit for these signals must have contacts as shown below. Use the INPUT CN8 (pins 1 and 3) of the robot controller for the power source, irrespective of whether the power source to be used for other I/O signals is the internal power source or an external power source. (Note: For the “Dual emergency stop type”, refer to Subsection 5.2.4.2.) Robot Stop and Enable Auto Input Circuits TIP: For the configuration sample of an emergency stop output circuitry, refer to Subsection 5.2.4 "Emergency Stop Circuit." 127 5.2.3 User-Output, System-Output, and Hand-Output Circuits (NPN type) The following two pages show an example of the configuration and connection of the Robot Controller's user-input output, system-output and hand-output circuit. Since the initial resistance of a lamp is small, the output circuit may be damaged by rush current that flows when the lamp lights. When directly turning ON and OFF a lamp, use a lamp whose rating is 0.5W or less. To reduce rush current, select and connect a resistor R that allows dark current 1/3 or less of the rated current to flow when the lamp goes OFF. An example of connecting a lamp is shown on page 121. (1) The User-Output, System-Output and Hand-Output Circuit are open collector output circuits. (2) The maximum allowable source current is 70 mA. Keep the current consumption of a device to be connected to the Robot Controller, such as a PLC and a relay coil, below the allowable current. (3) Select an induction load, such as a relay coil, which has a built-in diode (for absorbing inverse electromotive force). To use an induction load without a built-in diode, add a diode equivalent to the 1S1888 (Toshiba) in close vicinity to the coil. Caution: When externally attaching a diode, connect it with correct polarity. Incorrect polarity may damage the Output circuit. (4) Connecting a lamp requires a circuit through which dark current flows. Caution: Since the initial resistance of a lamp is small, the output circuit may be damaged by rush current that flows when the lamp lights. Refer to page 121. (5) When using the internal power source, prepare a PLC input circuit unit that does not contain a power source. Caution: Keep the total current capacity of the internal power source below 1.3A. (6) Use a multi-core shielding cable for the purpose of protecting the devices from external noise. Ground it to the robot controller. (7) +24V internal power source of the robot controller must not be grounded. Caution: If the output terminal +24V of internal power source is grounded, there may be a case where the controller is damaged. 128 (When the internal power source is used) (When an external power source is used) User-Output and System-Output Circuits (NPN type) 129 (When the internal power source is used) (When an external power source is used) Hand-Output Circuits (NPN type) 130 Supplied from the I/O power connector when the internal power source is used Lamp Transistor array Controller Example of Circuit with Lamp (NPN type) 131 5.2.4 Emergency Stop Circuit The following figures show the examples of configuration and connection of emergency stop circuit for the robot controller. The red mushroom-shaped switch provided on the robot controller front panel, on the teach pendant, or on the operating panel can be used as a switch for stopping the equipment in case of emergency. 5.2.4.1 Standard type Robot controller F1 Internal 24V Fuse (1.3A) CN7 Fuse (1.3A) Internal 0V F2 F9 Emergency CN10 Fuse (0.3A) Stop + Emergency Stop + Emergency stop circuit (prepared by customers) Output Internal F8 24V Fuse (1.3A) CN8 Robot stop switch circuit (prepared by customers) Emergency stop switch on the front panel of the controller Input Teach pendant CN5 Emergency stop switch on teach pendant Internal 0V (When the internal power source is used) Robot controller Emergency stop circuit (prepared by customers) F9 Fuse (0.3A) Emergency Stop + Emergency Stop - CN10 External 24V Output External 0V Internal F8 24V Fuse (1.3A) CN8 Robot stop switch circuit (prepared by customers) Emergency stop switch on the front panel of the controller Input CN5 Teach pendant Emergency stop switch on teach pendant Internal 0V (When an external power source is used) Emergency Stop Circuit (Standard type) 132 5.2.4.2 Dual emergency stop type Emergency Stop Circuit (“Dual emergency stop type”) 133 5.2.5 I/O Power Connector (NPN type) For the power source to communicate signals between the robot controller and the external device, the internal power source of the robot controller or an external power source is used. The figure below shows an example of connecting I/O power connectors when the internal power source is used, and the figure on the next page shows an example of connecting I/O power connectors when an external power source is used. I/O Power Connection Sample (When the internal power source is used) (NPN type) Caution: To use the internal power source of the robot controller, connect the wiring so that the internal power source will be separate from the external power source. Improper wiring may damage the internal circuit. 134 I/O Power Connection Sample (When an external power source is used) (NPN type) Caution: Use a cable of 0.5 mm2 or more in size for the wiring between the external power source and the I/O power input connectors of the robot controller. 135 5.3 Wiring Notes for Robot Controller I/O Connectors (NPN type) After the wiring of the controller's I/O connectors is completed, check the following before turning ON the power: Check point (1) Using a circuit tester, check across the "+24V terminal" and "0V terminal" of each connector and across the "E24V terminal" and the "E0V terminal" to see that there is no continuity. See the figure below and the table given on the next page. Caution: If the connector wiring between the Robot Controller's "+24V terminal" and "0V terminal" and between the "E24V terminal" and the "E0V terminal" is shorted, damage to the power circuit of the Robot Controller will result. Check point (2) Using a tester, check across "each signal Output terminal" and "+24V terminal" or "E24V terminal" of each connector to see that there is no continuity. See the figure below and the table given on the next page. Caution: If the wiring between "each signal Output terminal" and "+24V terminal" or "E24V terminal" of each connector is shorted, damage to the Output circuit and power circuit of the Robot Controller will result. Caution: Wind adhesive vinyl tape around all ends of the unconnected wiring of each connector to prevent them from contacting other wiring and parts, which results in shorting. Circuit tester Robot controller “+24V terminal” and “E24V terminal” of the controller External device “0V terminal” and “E0V terminal” of the controller Checking Example 136 Connector Terminals and Check Points (NPN type) Connector for hand I/O Connector for user/system input View from cable side engaging face View from cable side engaging face Terminal Number Name 1 to 8 Hand output terminal 0V (GND) at output (2) 17 Power terminal for hand (E24V) 24V power output (1) 18 Power terminal for hand (E0V) Power (GND) output (1) Meaning Check point Terminal Number Name Meaning Check point 1, 3 +24V internal power source terminal +24V internal power source output (1) Connector for I/O power source Connector for user/system output View from cable side engaging face View from cable side engaging face Terminal number Name Meaning Check point Terminal number Name Meaning Check point 1 to 56 Signal output terminal 0V (GND) at output (2) 1, 2 +24V internal power source terminal +24V internal power source output (1) 3, 4 0V internal power source terminal 0V internal power source output (1) 6, 7 E24V input terminal 24V power input (1) 8, 9 E0V (GND) input terminal Power (GND) input (1) 137 Chapter 6 Connector Pin Assignment and I/O Circuits (PNP type) This chapter explains the connector pin assignment and circuits of PNP type (sink input and source output) on an I/O board. For an NPN type (source input and sink output), refer to Chapter 5, "Connector Pin Assignment and I/O Circuits (NPN type)." 6.1 Connector Pin Assignment (PNP type) This section describes the pin assignment of connectors on the robot controller. The signals and pin assignments of output connector CN10 and input connector CN8 are differently defined in standard mode and compatible mode. As for other connectors, the definitions of pins are common to standard mode and compatible mode. 6.1.1 Connector Pin Assignment Common to Both Modes (PNP type) (1) HAND I/O CN9: Connector for end-effector I/O (common to both modes) CN9 Pin Assignment, common to both modes (PNP type) View from the cable side Terminal No. Name 1 Port Wire color Terminal No. Name Port Wire color number Standard High strength Hand Input 50 Pink White 12 Hand Input 51 Pink White Green 13 Hand Input 52 White White Brown Red 14 Hand Input 53 White White 68 Red Violet 15 Hand Input 54 White White Hand output 69 Orange Blue 16 Hand Input 55 White Brown 7 Hand output 70 Yellow Yellow 17 Power E0V for Hand White Brown 8 Hand output 71 Green Green 18 Power E24V for Hand White Brown 9 Hand input 48 Blue Red 19 Not connected White Brown 10 Hand input 49 Violet Violet 20 Not connected White Brown number Standard High strength Hand output 64 Black Blue 11 2 Hand output 65 Brown Yellow 3 Hand output 66 Black 4 Hand output 67 5 Hand output 6 NOTE: The optional I/O cable for the above connector consists of twisted pair wires--pairs of #1 and #11, #2 and #12,…#10 and #20. 138 (2) I/O POWER CN7: Power connector for I/O (common to both modes) CN7 Pin Assignment, common to both modes (PNP type) View from the cable side Terminal No. Name 1 Internal power source output +24V 2 Internal power source output +24V 3 Internal power source output 0V 4 Internal power source output 0V 5 FG 6 Power input E0V 7 Power input E0V 8 Power input E24V 9 Power input E24V Caution: When using the internal power source, keep the total current capacity below 1.3 A. To use the internal power source of the robot controller, connect the wiring so that the internal power source will be separated from the external power source. Improper wiring may damage the internal circuit. (3) RS232C CN1: RS232C connector CN1 Pin Assignment Terminal No. Name 1 Terminal No. Name 6 DSR 2 RXD 7 RTS 3 TXD 8 CTS 4 DTR 9 5 SG 139 6.1.2 Connector Pin Assignment in Standard Mode (1) OUTPUT CN10: User-/System-output connector (standard mode) CN10 Pin Assignment, in standard mode (PNP type) View from the cable side Terminal number Name Port number Wire color Terminal number Name Port number Wire color 1 Normal CPU 72 Black 35 User output 106 Pink 2 Robot in operation 73 Brown 36 User output 107 Pink 3 Robot failure 74 Red 37 User output 108 Pink 4 Servo ON 75 Orange 38 User output 109 Pink 5 Robot initialization complete 76 Yellow 39 User output 110 Pink 6 Automatic mode 77 Black 40 User output 111 White 7 External mode 78 Brown 41 User output 112 White 8 Dead battery warning 79 Red 42 User output 113 White 9 Robot warning 80 Orange 43 User output 114 White 10 Continue start permitted 81 Yellow 44 User output 115 White 11 SS mode 82 Green 45 User output 116 White 12 Reserved 83 Blue 46 User output 117 White 13 Reserved 84 Violet 47 User output 118 White 14 Reserved 85 Gray 48 User output 119 White 15 Command processing complete 86 Pink 49 User output 120 White 16 Status area odd parity 87 Black 50 User output 121 Gray 17 Status area bit 0 88 Black 51 User output 122 Violet 18 Status area bit 1 89 Brown 52 User output 123 Violet 19 Status area bit 2 90 Red 53 User output 124 Violet 20 Status area bit 3 91 Orange 54 User output 125 Violet 21 Status area bit 4 92 Yellow 55 User output 126 Violet 22 Status area bit 5 93 Green 56 User output 127 Violet 23 Status area bit 6 94 Blue 57 Not used. Violet 24 Status area bit 7 95 Gray 58 Not used. Violet 25 Status area bit 8 96 Pink *59 [ Power supply for Robot stop 1 (Internal +24V) ] Violet 26 Status area bit 9 97 Brown *60 [ Robot stop 1 ] Gray 27 Status area bit 10 98 Red *61 [ Power supply for Robot stop 2 (Internal +24V) ] Gray 28 Status area bit 11 99 Orange *62 [ Robot stop 2 ] Gray 29 Status area bit 12 100 Yellow *63 [ Emergency stop (+) ] Gray 30 Status area bit 13 101 Green *64 [ Emergency stop (-) ] Gray 31 Status area bit 14 102 Blue 65 Emergency stop 2 (+) Gray 32 Status area bit 15 103 Pink 66 Emergency stop 2 (-) Gray 33 User output 104 Black *67 [ Deadman switch (+) ] Blue 34 User output 105 Brown *68 [ Deadman switch (-) ] Blue NOTE 1: The optional I/O cable for the above connector consists of twisted pair wires--pairs of #1 and #35, #2 and #36, #34 and #68. NOTE 2: The terminal number marked with ( * ) is used only for “Dual emergency stop type”. 140 (2) INPUT CN8: User-/System-input connector (standard mode) CN8 Pin Assignment, in standard mode (PNP type) View from the cable side Terminal number Name Port number Wire color Terminal number Name Port number Wire color *1 Power for robot stop (internal +24V) Black 26 Data area 2 bit 7 21 Pink *2 Robot stop Brown 27 Data area 2 bit 8 22 Pink 3 Power for Enable Auto (internal +24V) Red 28 Data area 2 bit 9 23 Pink 4 Enable Auto Black 29 Data area 2 bit 10 24 White 5 Step-stop (all tasks) 0 Brown 30 Data area 2 bit 11 25 White 6 Not used. 1 Red 31 Data area 2 bit 12 26 White 7 Instantaneous stop (all tasks) 2 Orange 32 Data area 2 bit 13 27 White 8 Strobe signal 3 Yellow 33 Data area 2 bit 14 28 White 9 Interrupt skip 4 Green 34 Data area 2 bit 15 29 White 10 Command and data odd parity 5 Blue 35 Command area 0 bit 0 30 White 11 Data area 1 bit 0 6 Violet 36 Command area 0 bit 1 31 White 12 Data area 1 bit 1 7 Black 37 Command area 0 bit 2 32 Gray 13 Data area 1 bit 2 8 Brown 38 Command area 0 bit 3 33 Gray 14 Data area 1 bit 3 9 Red 39 User input 34 Gray 15 Data area 1 bit 4 10 Orange 40 User input 35 Gray 16 Data area 1 bit 5 11 Yellow 41 User input 36 Gray 17 Data area 1 bit 6 12 Green 42 User input 37 Gray 18 Data area 1 bit 7 13 Blue 43 User input 38 Gray 19 Data area 2 bit 0 14 Violet 44 User input 39 Gray 20 Data area 2 bit 1 15 White 45 User input 40 Gray 21 Data area 2 bit 2 16 Pink 46 User input 41 Gray 22 Data area 2 bit 3 17 Black 47 User input 42 Violet 23 Data area 2 bit 4 18 Brown 48 User input 43 Violet 24 Data area 2 bit 5 19 Red 49 User input 44 Violet 25 Data area 2 bit 6 20 Orange 50 User input 45 Violet NOTE 1: The optional I/O cable for the above connector consists of twisted pair wires--pairs of #1 and #26, #2 and #27,…#25 and #50. NOTE 2: The terminal number marked with ( * ) is not used for “Dual emergency stop type”. 141 6.1.3 Connector Pin Assignment in Compatible Mode (1) OUTPUT CN10: User-/System-output connector (compatible mode) CN10 Pin Assignment, in compatible mode (PNP type) View from the cable side Terminal number Name Port number Wire color Terminal number Name Port number Wire color 1 Normal CPU 72 Black 35 User output 106 Pink 2 Robot-in-operation 73 Brown 36 User output 107 Pink 3 Robot failure 74 Red 37 User output 108 Pink 4 Auto mode 75 Orange 38 User output 109 Pink 5 External mode 76 Yellow 39 User output 110 Pink 6 Program start reset 77 Black 40 User output 111 White 7 Not used. 78 Brown 41 User output 112 White 8 Not used. 79 Red 42 User output 113 White 9 Robot power ON complete 80 Orange 43 User output 114 White 10 Servo ON 81 Yellow 44 User output 115 White 11 CAL complete 82 Green 45 User output 116 White 12 Teaching 83 Blue 46 User output 117 White 13 Single-cycle complete 84 Violet 47 User output 118 White 14 Dead battery warning 85 Gray 48 User output 119 White 15 Robot warning 86 Pink 49 User output 120 White 16 Continue start permitted 87 Black 50 User output 121 Gray 17 Error units bit 0 88 Black 51 User output 122 Violet 18 Error units bit 1 89 Brown 52 User output 123 Violet 19 Error units bit 2 90 Red 53 User output 124 Violet 20 Error units bit 3 91 Orange 54 User output 125 Violet 21 Error tens bit 0 92 Yellow 55 User output 126 Violet 22 Error tens bit 1 93 Green 56 User output 127 Violet 23 Error tens bit 2 94 Blue 57 Not connected Violet 24 Error tens bit 3 95 Gray 58 Not connected Violet 25 Error hundreds bit 0 96 Pink *59 [ Power supply for Robot stop 1 (Internal +24V) ] Violet 26 Error hundreds bit 1 97 Brown *60 [ Robot stop 1 ] Gray 27 Error hundreds bit 2 98 Red *61 [ Power supply for Robot stop 2 (Internal +24V) ] Gray 28 Error hundreds bit 3 99 Orange *62 [ Robot stop 2 ] Gray 29 SS mode 100 Yellow *63 [ Emergency stop (+) ] Gray 30 Not used. 101 Green *64 [ Emergency stop (-) ] Gray 31 Not used. 102 Blue 65 Emergency stop 2 (+) Gray 32 Not used. 103 Pink 66 Emergency stop 2 (-) Gray 33 User output 104 Black *67 [ Deadman switch (+) ] Blue 34 User output 105 Brown *68 [ Deadman switch (-) ] Blue NOTE 1: The optional I/O cable for the above connector consists of twisted pair wires--pairs of #1 and #35, #2 and #36, #34 and #68. NOTE 2: The terminal number marked with ( * ) is used only for “Dual emergency stop type”. 142 (2) INPUT CN8: User-/System-input connector (compatible mode) CN8 Pin Assignment, in compatible mode (PNP type) View from the cable side Terminal number Name Port number Wire Terminal color number Name Port number Wire color *1 Power for robot stop (internal +24V) - Black 26 User input 21 Pink *2 Robot stop - Brown 27 User input 22 Pink 3 Power for Enable Auto (internal +24V) - Red 28 User input 23 Pink 4 Enable Auto - Black 29 User input 24 White 5 Step-stop (all tasks) 0 Brown 30 User input 25 White 6 Continue start 1 Red 31 User input 26 White 7 Instantaneous stop (all tasks) 2 Orange 32 User input 27 White 8 Operation preparation start 3 Yellow 33 User input 28 White 9 Interrupt skip 4 Green 34 User input 29 White 10 Program start 5 Blue 35 User input 30 White 11 Program No. select bit 0 6 Violet 36 User input 31 White 12 Program No. select bit 1 7 Black 37 User input 32 Gray 13 Program No. select bit 2 8 Brown 38 User input 33 Gray 14 Program No. select bit 3 9 Red 39 User input 34 Gray 15 Program No. select bit 4 10 Orange 40 User input 35 Gray 16 Program No. select bit 5 11 Yellow 41 User input 36 Gray 17 Program No. select bit 6 12 Green 42 User input 37 Gray 18 Program No. select odd parity bit 13 Blue 43 User input 38 Gray 19 Motor power ON 14 Violet 44 User input 39 Gray 20 CAL execution 15 White 45 User input 40 Gray 21 Reserved 16 Pink 46 User input 41 Gray 22 SP100 17 Black 47 User input 42 Violet 23 Switch Ext Mode 18 Brown 48 User input 43 Violet 24 Program reset 19 Red 49 User input 44 Violet 25 Clear robot failure 20 Orange 50 User input 45 Violet NOTE 1: The optional I/O cable for the above connector consists of twisted pair wires--pairs of #1 and #26, #2 and #27,…#25 and #50. NOTE 2: The terminal number marked with ( * ) is not used for “Dual emergency stop type”. 143 6.2 Robot Controller I/O Circuits (PNP type) 6.2.1 User-Input, System-Input and Hand-Input Circuits (PNP type) The following two pages show examples of the user-input, system-input and handinput circuit configurations and connections of the robot controller. The maximum allowable capacity of the robot controller's internal power source is 1.3 A. Use the internal power source within this allowable range. Caution Q Either an external power supply type or built-in power type Output card is available for the PLC. However, an external power supply type requires an additional power source (24V) to be installed. The power capacity is 15W or more. R When controlling two or more robots with a single PLC using the internal power source of the robot controller, set a PLC Output card for each robot. S Other than a PLC, a proximity switch, or a relay contact may be connected directly to the input terminal of the Robot Controller. In such a case, use the power input to pins 6 to 9 of the I/O power connector. A two-wire photoelectric switch or proximity switch can be connected if its leakage current is 1 mA or less. T Use a multi-core shielding cable for the purpose of protecting the robot controller from noise. Ground it to the robot controller. 144 (When the internal power source is used) (When an external power source is used) User-Input and System-Input Circuits (PNP type) 145 (When the internal power source is used) (When an external power source is used) Hand-Input Circuits (PNP type) 146 6.2.2 Robot Stop and Enable Auto Input Circuits The Robot Stop and Enable Auto signals are important for safety. The input circuit for these signals must have contacts as shown below. Use the INPUT CN8 (pins 1 and 3) of the robot controller for the power source, irrespective of whether the power source to be used for other I/O signals is the internal power source or an external power source. (Note: For the “Dual emergency stop type”, refer to Subsection 6.2.4.2.) Robot Stop and Enable Auto Input Circuits TIP: The configuration sample of an emergency stop output circuitry is shown in Subsection 6.2.4 "Emergency Stop Circuit." 147 6.2.3 User-Output, System-Output, and Hand-Output Circuits (PNP type) The following two pages show an example of the configuration and connection of the Robot Controller's user-input output, system-output and hand-output circuit. Since the initial resistance of a lamp is small, the output circuit may be damaged by rush current that flows when the lamp lights. When directly turning a lamp ON or OFF, use a lamp whose rating is 0.5W or less. To reduce rush current, connect a resistor R that allows dark current 1/3 or less of the rated current to flow when the lamp goes OFF. An example of connecting a lamp is shown on page 140. (1) The User-Output, System-Output and Hand-Output Circuit are open collector output circuits. (2) The maximum allowable sink current is 70 mA. Keep the current consumption of a device to be connected to the Robot Controller, such as a PLC and a relay coil, below the allowable current. (3) Select an induction load, such as a relay coil, which has a built-in diode (for absorbing inverse electromotive force). To use an induction load without a built-in diode, add a diode equivalent to the 1S1888 (Toshiba) in close vicinity to the coil. Caution: When externally attaching a diode, connect it with correct polarity. Incorrect polarity may damage the Output circuit. (4) Connecting a lamp requires a circuit through which dark current flows. Caution: Since the initial resistance of a lamp is small, the output circuit may be damaged by rush current that flows when the lamp lights. Refer to page 140. (5) When using the internal power source, prepare a PLC input circuit unit that does not contain a power source. Caution: Keep the total current capacity of the internal power source below 1.3A. (6) Use a multi-core shielding cable for the purpose of protecting the devices from external noise. Ground it to the robot controller. (7) 24V internal power source of the robot controller must not be grounded. Caution: If the output terminal +24V of internal power source is grounded, there may be a case where the controller is damaged. 148 (When the internal power source is used) (When an external power source is used) User-Output and System-Output Circuits (PNP type) 149 (When the internal power source is used) (When an external power source is used) Hand-Output Circuits (PNP type) 150 Supplied from the II/O power connector when the internal power source is used Lamp Transistor array Controller Example of Circuit with Lamp (PNP type) 151 6.2.4 Emergency Stop Circuit The following figures show the examples of configuration and connection of emergency stop circuit for the robot controller. The red mushroom-shaped switch provided on the robot controller front panel, on the teach pendant, or on the operating panel can be used as a switch for stopping the equipment in case of emergency. 6.2.4.1 Standard type Robot controller F1 Internal 24V Fuse (1.3A) CN7 Fuse (1.3A) Internal 0V F2 F9 Emergency CN10 Fuse (0.3A) Stop + Emergency Stop + Emergency stop circuit (prepared by customers) Output Internal F8 24V Fuse (1.3A) CN8 Robot stop switch circuit (prepared by customers) Emergency stop switch on the front panel of the controller Input Teach pendant CN5 Emergency stop switch on teach pendant Internal 0V (When the internal power source is used) Robot controller Emergency stop circuit (prepared by customers) F9 Fuse (0.3A) Emergency Stop + Emergency Stop - CN10 External 24V Output External 0V Internal F8 24V Fuse (1.3A) CN8 Robot stop switch circuit (prepared by customers) Emergency stop switch on the front panel of the controller Input CN5 Teach pendant Emergency stop switch on teach pendant Internal 0V (When an external power source is used) Emergency Stop Circuit (Standard type) 152 6.2.4.2 Dual emergency stop type Emergency Stop Circuit (“Dual emergency stop type”) 153 6.2.5 I/O Power Connector (PNP type) For the power source to communicate signals between the robot controller and the external device, the internal power source of the robot controller or an external power source is used. The figure below shows an example of connecting I/O power connectors when the internal power source is used, and the figure on the next page shows an example of connecting I/O power connectors when an external power source is used. I/O Power Connection Sample (When the internal power source is used) (PNP type) Caution: To use the internal power source of the robot controller, connect the wiring so that the internal power source will be separate from the external power source. Improper wiring may damage the internal circuit. The +24V + internal power source of the robot controller must not be grounded. 154 I/O Power Connection Sample (When an external power source is used) (PNP type) Caution: Use a cable of 0.5 mm2 or more in size for the wiring between the external power source and the I/O power input connectors of the robot controller. 155 6.3 Wiring Notes for Robot Controller I/O Connectors (PNP type) After the wiring of the controller's I/O connectors is completed, check the following before turning ON the power: Check point (1) Using a circuit tester, check across the "+24V terminal" and "0V terminal" of each connector and across the "E24V terminal" and the "E0V terminal" to see that there is no continuity. See the figure below and the table given on the next page. Caution: If the connector wiring between the robot controller's "+24V terminal" and "0V terminal" and between the "E24V terminal" and the "E0V terminal" is shorted, damage to the power circuit of the Robot Controller will result. Check point (2) Using a circuit tester, check across "each signal Output terminal" and "+24V terminal" or "E24V terminal" of each connector to see that there is no continuity. See the figure below and the table given on the next page. Caution: If the wiring between "each signal Output terminal" and "+24V terminal" or "E24V terminal" of each connector is shorted, damage to the Output circuit and power circuit of the robot controller will result. Caution: Wind adhesive vinyl tape around all ends of the unconnected wiring of each connector to prevent them from contacting other wiring and parts, which results in shorting. Circuit tester Robot controller “+24V terminal” and “E24V terminal” of the controller External device “0V terminal” and “E0V terminal” of the controller Checking Example 156 Connector Terminals and Check Points (PNP type) Connector for hand I/O Connector for user/system input View from cable side engaging face View from cable side engaging face Terminal Number Name 1 to 8 Hand output terminal 24V at output (2) 17 Power terminal for hand (E0V) Power (GND) output (1) 18 Power terminal for hand (E24V) 24V power output (1) Meaning Check point Terminal Number Name Meaning Check point 1, 3 +24V internal power source terminal +24V internal power source output (1) Connector for I/O power source Connector for user/system output View from cable side engaging face View from cable side engaging face Terminal number Name 1 to 56 Signal output terminal Meaning 24V at output Check point Terminal number Name Meaning Check point (2) 1, 2 +24V internal power source terminal +24V internal power source output (1) 3, 4 0V internal power source terminal 0V internal power source output (1) 6, 7 E0V (GND) input terminal Power (GND) input (1) 8, 9 E24V input terminal 24V power input (1) 157 Chapter 7 I/O Wiring 7.1 Multi-core Cables with Connectors Multi-core cables with connectors to be used for the I/O wiring of the Robot Controller are options. Select an appropriate cable from the table given below if necessary. I/O Cables (Optional items) Classification No. 1 I/O Cable Remarks Part Number I/O Cable Set (8m) (3-cable set of Nos. 1-1 to 1-3) 410149-0330 1-1 Input Cable (8m) 410141-1630 1-2 Output Cable (8m) 410141-1650 1-3 Hand I/O Cable (8m) 410141-1740 I/O Cable Set (hand I/O cable: high strength type) (8m) (3-cable set of Nos. 2-1 to 2-3) 410149-0350 2-1 Input Cable (8m) 410141-1630 2-2 Output Cable (8m) 410141-1650 2-3 Hand I/O Cable (high strength type) (8m) 410141-1670 I/O Cable Set (15m) (3-cable set of Nos. 3-1 to 3-3) 410149-0340 3-1 Input Cable (15m) 410141-1640 3-2 Output Cable (15m) 410141-1660 3-3 Hand I/O Cable (15m) 410141-1750 I/O Cable Set (hand I/O cable: high strength type) (15m) (3-cable set of Nos. 4-1 to 4-3) 410149-0360 4-1 Input Cable (15m) 410141-1640 4-2 Output Cable (15m) 410141-1660 4-3 Hand I/O Cable (high strength type) (15m) 410141-1680 2 3 I/O Cable Name 4 158 If you do not use optional cables listed on the previous page, use the recommended connectors and cables listed below. Recommended Connectors for I/O Cables and Cable Standards Connector name OUTPUT Connector model/manufacturer Cable Standards PCR-E68FS connector UL2789 - With shield PCS-E68LA cover Equivalent to AWG28-68P Honda Communications Industry Co., Ltd. HAND I/O PCR-E20FS connector UL2789 - With shield PCS-E20LA cover Equivalent to AWG28-20P Remarks Caution: Be sure to modify the shielding wire at the end of the cable to be used, as shown below. Without this modification, the robot may malfunction due to noise. Honda Communications Industry Co., Ltd. INPUT PCR-E50FS connector UL2789 - With shield PCS-E50LA cover Equivalent to AWG28-50P Honda Communications Industry Co., Ltd. I/O POWER DE-9P connector UL2405 - With shield DE-C4-J6 cover Equivalent to AWG20-2P Japan Aviation Electronics Industry, Ltd. Crimp terminal Vinyl tube Braided shielding wire Shielding wire I/O cable The connector shell should be made of conductive metal. Fasten to the connector I/O power connector Modifying the Shielding Wire (Example) 159 Vinyl tube 7.2 Wiring of Primary Power Source Observe the following precautions when wiring the primary power source of the robot controller: (1) Connect the robot power cable to a power source separate from the welder power source. (2) Ground the grounding wire (green) of the robot power cable. (3) Ground the grounding terminal of the robot controller using a wire of 1.25 mm2 or more in size. (4) For the robot power supply, use a grounding wire with grounding resistance of 100 Ω or less. (5) If the supply power source for the robot controller requires a leakage breaker, use a high frequency-proof leakage breaker for inverters. (6) Prepare wires of an appropriate capacity for the 200 VAC main line and other cables according to the tables given below. Robot Controller Power Supply Specifications Specifications Item 3-phase power supply 3-phase, 200 VAC -15% to 230 VAC + 10%, 50/60 Hz (RC5 all models) Single-phase power supply (RC5 for VS-D/-E, H∗-/-D, XYC-D) Single-phase power supply Singe-phase, 230 VAC -10% to 230 VAC + 10%, 50/60 Hz (RC5 for VC-E) Singe-phase, 200 VAC -10% to 230 VAC + 10%, 50/60 Hz Max. rush current when the power is turned ON 50 A (for 1/50 or 1/60 second) Power consumption of robot 3.3 kVA 2.5 kVA 2.0 kVA 1.9 kVA 1.8 kVA 1.5 kVA 0.6 kVA Pin assignment on power connector (CN11) (View from the pin face of cable) A: 200 VAC, phase R B: 200 VAC, phase S C: 200 VAC, phase T D: Ground A: 230 VAC, phase R B: 230 VAC, phase S C: Not used. D: Ground (VM-D/HM-E) (HM-E) (H∗-D) (VS-E) (HS-E) (VS-D, XYC-D) (VC-E) Caution: If ERROR6102 (power voltage drop) occurs when the robot is in operation, then it may be due to an insufficient capacity of the primary power source. (7) Do not bundle the teach pendant cables, I/O cables or motor cables together with high power lines such as 200 VAC lines and peripheral device cables, or route the motor cables near high power devices (motor, welder, parts feeder, etc.). (8) Do not route any additional cables or air tubes of end-effectors through the robot unit. Doing so will result in broken cables or tubes. 160 Index A Auto Mode (Output)............................................. 28, 71 C CAL Complete (Output).............................................73 Clear Robot Failure (Input) ......................................103 Command and Data Areas..........................................48 Command Execution I/O Signals Dedicated to Standard Mode ...........................................................45 Command Processing Complete (Output)..................50 Compatible Mode........................................... 14, 23, 69 Connector Pin Assignment and I/O Circuits (PNP type) ................................................................................. 138 Connector Pin Assignment I/O Circuits (NPN type) 118 Continue Start (Input) .............................................. 105 Continue Start Permitted (Output) ....................... 36, 84 Control System Configuration ................................... 12 Controller I/O Circuits ..................................... 124, 144 Controller I/O Connectors................................ 136, 156 Controller Specifications..............................................7 D Dead Battery Warning (Output) ........................... 35, 82 E Emergency Stop (Output from a contact)............. 37, 85 Emergency Stop Output Circuit ....................... 132, 152 Enable Auto (Input).............................................. 39, 87 Error No. (Output)...................................................... 83 Error Read..................................................................57 External Mode (Output) ....................................... 29, 74 External Speed and Acceleration Setting ...................56 H HAND I/O CN9: Connector for end-effector I/O (common to both modes) ................................. 118, 138 Hand-Input Circuits.......................................... 126, 146 Hand-Output Circuits ....................................... 130, 150 I I/O Commands ........................................................... 52 I/O POWER CN7: Power connector for I/O (common to both modes) ................................ 119, 139 I/O Power Connector........................................ 134, 154 I/O Read ..................................................................... 64 I/O Signals..................................................................22 I/O Type Variable ....................................................... 24 I/O Wiring ................................................................158 I/O Write .................................................................... 63 INPUT CN8: User-/System-input connector (compatible mode)............................................123, 143 INPUT CN8: User-/System-input connector (standard mode)................................................121, 141 Instantaneous Stop (All Tasks) (Input) ...............42, 102 Interface......................................................................14 Interrupt Skip (Input)..........................................43, 104 M Mode Switching .........................................................60 N Normal CPU (Output) ..........................................32, 79 NPN type ..................................................................118 O Operation Preparation Start (Input) ............................88 OUTPUT CN10: User-/System-output connector (compatible mode)............................................122, 142 OUTPUT CN10: User-/System-output connector (standard mode)................................................120, 140 P PNP type...................................................................138 Processing I/O Commands .........................................46 Program No. Select (Input) ........................................90 Program Operation Command....................................53 Program Reset (Input) ................................................98 Program Start (Input)..................................................92 Program Start Reset (Output) .....................................76 R Robot Controller Components......................................4 Robot Controller I/O Connectors .............................156 Robot Failure (Output) .........................................33, 80 Robot Initialization Complete (Output)......................27 Robot Power ON Complete........................................70 Robot Stop (Input)......................................................40 Robot Stop and Enable Auto Input Circuits .....127, 147 Robot Warning (Output).......................................34, 81 Robot-in-operation (Output).................................31, 77 RS232C ....................................................................119 RS232C CN1: RS232C connector............................139 S Servo ON (Output)............................................... 30, 72 Single-Cycle End (Output).........................................78 SS mode (Output)................................................. 36, 84 Standard Mode ............................................... 14, 22, 26 Status Area ................................................................. 51 Step Stop (All Tasks) (Input).............................. 41, 101 Strobe Signal (Input) ..................................................49 System I/O Signals Compatible Mode .......................69 System I/O Signals Standard Mode ...........................26 System Input Signals (Compatible Mode) .................86 System Input Signals (Standard Mode)......................38 T Teaching (Output) ......................................................75 Type I Variable Read .................................................. 59 Type I Variable Write ................................................. 58 U User I/O Signals .........................................................24 User Input Commands................................................ 24 User Output Commands............................................. 25 User-Input and System-Input Circuits.............. 125, 145 User-Output and System-Output Circuits ........ 129, 149 W Wiring ......................................................................160 Wiring Notes for Robot Controller I/O Connectors ....... ......................................................................... 136, 156 RC5 CONTROLLER INTERFACE MANUAL First Edition Second Edition Third Edition February 2002 June 2002 September 2002 DENSO WAVE INCORPORATED Factory Automation Division 9D15C The purpose of this manual is to provide accurate information in the handling and operating of the robot. Please feel free to send your comments regarding any errors or omissions you may have found, or any suggestions you may have for generally improving the manual. In no event will DENSO WAVE INCORPORATED be liable for any direct or indirect damages resulting from the application of the information in this manual.