1
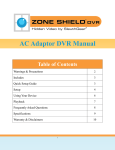
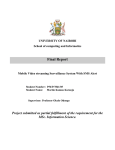
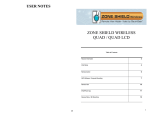
Manufacturer’s Limited Warranty
Manufacturer warrants all Covert Video and Sleuth Gear Hidden Video Products (Product)
assembled and sold by Manufacturer to be free of defects in material and workmanship, subject to
the following conditions. The duration of Manufacturer's warranty with respect to the Product is
limited to one (1) year from the date of sale to the original consumer purchaser only for Products
delivered within the fifty (50) states of the United States, District of Columbia, or the possessions
and territories of the United States
No other express warranties are made with respect to any Product. All implied
warranties, including warranties of merchantability and fitness for a particular purpose
are limited to the warranty period set forth above. This warranty is not transferable and
applies only to the original consumer purchaser of the Product.
Manufacturer will, as its sole obligation under this warranty, replace or repair, at its option,
any Product that does not conform to this warranty. Under no circumstances will the Manufacturer
issue credit or give a refund for Product covered by this warranty. Furthermore, under no circumstances will Manufacturer be liable for any incidental or consequential damages under this warranty or any implied warranties.
What Is Not Covered. This limited warranty does not cover Products that in Manufacturer’s judgment have damage resulting from any (i) deviation from Manufacturer's operating
instructions as printed in Manufacturer's catalog or on any packaging, labels or other literature
provided with a Product, (ii) installation of a Product in a manner which is inconsistent with Manufacturer's written instructions, (iii) alteration, modification of or tempering with a Product, (iv)
misuse, (v) neglect, (vi) abuse, (vii) accident, (viii) power surge, static electricity or other electrical discharge, (ix) normal wear and tear, (x) commercial use, (xi) service by anyone other than a
Manufacturer authorized repair facility, or (xii) other improper application, installation or operation
of the Product. Or, (xiii) have been purchased from inventory clearance or liquidation sales or
other sales in which Manufacturer expressly disclaims its warranty obligation pertaining to the
Product.
How you (the Customer) can get service: To obtain warranty service during the warranty period, you must return the defective Product with the original receipt to the original place
of purchase. Contact them for return instructions.
If warranty service is needed at any time during the warranty period, the purchaser will be
required to furnish a sales receipt/proof of purchase indicating the date of purchase, amount paid
and place of purchase. Customers who fail to provide such proof of purchase will be charged for
the repair of any Product.
How state law relates to the warranty: Some states do not allow limitations on how long
implied warranties last, or the exclusion or the limitation of incidental or consequential damages.
So the above limitations or exclusions may not apply to you. This warranty gives you specific legal
rights. You may also have other rights that may vary from state to state.
NO PERSON IS AUTHORIZED BY MANUFACTURER TO MODIFY OR ADD TO THIS
LIMITED WARRANTY.
For warranty information on Products delivered outside the United States please contact the original place of purchase.
IT IS THE USER’S RESPONSIBILITY TO ENSURE THAT THIS EQUIPMENT IS USED IN ACCORDANCE WITH
THE LAW(S) OF THE JURISDICTION IN WHICH THIS EQUIPMENT IS UTILIZED.
DO NOT ATTEMPT TO RETURN PRODUCT TO ORIGINAL MANUFACTURER, AS THIS PRODUCT HAS BEEN
MODIFIED AND IS NO LONGER SUBJECT TO ORIGINAL MANUFACTURER’S WARRANTY. IN THE CASE OF
A DEFECTIVE PRODUCT, CONTACT PLACE OF PURCHASE FOR RETURN PROCEDURE.
THIS EQUIPMENT HAS BEEN TESTED AND HAS BEEN FOUND TO BE IN COMPLIANCE WITH THE LIMITS
FOR A CLASS B DIGITAL DEVICE, PURSUANT TO PART 15 OF THE FCC RULES. THESE LIMITS ARE DESIGNED TO PROVIDE REASONABLE PROTECTIONS AGAINST HARMFUL INTERFERENCE IN A RESIDENTIAL INSTALLATION. THIS EQUIPMENT USES, GENERATES AND CAN RADIATE RADIO FREQUENCY ENERGY AND IF NOT INSTALLED AND USED IN ACCORDANCE WITH INSTRUCTIONS, MAY CAUSE HARMFUL
INTERFERENCE TO RADIO COMMUNICATIONS.
Part 15 Low Power:
ANY CHANGES OR MODIFICATIONS TO THIS EQUIPMENT WITHOUT THE EXPRESS AUTHORIZATION OF
THE MANUFACTURER COULD VOID THE USER’S AUTHORITY TO OPERATE THIS EQUIPMENT. (RULE 15.21
OF THE FCC)
16
SLEUTHGEAR COVERT DIGITAL
MANTLE CLOCK
USB RECEIVER & REMOTE VIEW
1
This Digital Hidden Camera includes a USB receiver with Remote View, which
allows you to stream your wireless signal over the internet, so you can remotely
view your video feed anywhere in the world!
Please follow the set up guide to ensure software is properly installed and
your new Digital Hidden Camera works correctly.
1 Insert the supplied CD into your computer & install the software “Secure Xpress
2”. Be sure to write down the Serial Number that is on the CD you will need this
for the installation. (Operational system Windows XP (sp2) or Windows Vista)
1
Frequently Asked Questions and Trouble Shooting
I do not get a picture what do I do?
Be sure that the Hidden Camera unit is plugged into a 110V power outlet.
See pairing instructions on page 14 and re “pair” the receiver with the transmitter.
My USB device is not working what can I do?
Be sure you have installed the ActiveX on the enclosed CD.
Try another USB port.
Reboot your PC, keep the USB receiver plugged in, then Open the program again.
I can not get remote monitoring to work what can I do?
Contact your ISP provider Have them help you set up your router to bypass the
fire wall. You will, if you have a fire wall set up, need to open 1 port to forward the
video so it can be viewed remotely.
See the manual on the CD it has more details on remote viewing.
2
How do I find my IP address?
Go to www.whatismyip.com
Why do my preferences not stay set?
Simply check the last recording and detection state in the preferences dialog box
to save the recording and detection state, see page 11
3
4
**Please note that plugging this unit into any electrical outlet other than a 110V
will cause the unit to not function and voids the warranty on this unit, Please use
correct adapters for your voltage.
This will create a desk
top Icon
6
5
2
15
Pairing the Wireless USB Receiver with the Hidden Camera Transmitter
Setup continued
Your Receiver and camera have already been “paired”, in the event you
need to re pair the units follow this guide.
Make sure the camera is powered on. Press the (1) Pairing Button on the
hidden camera unit, see diagram below to locate the button the LED will
begin blinking fast on the unit (see diagram below for location of the
LED’s) Immediately press the button on the receiver as indicated in the
diagram below. Your receiver and transmitter are now paired and should
work properly.
7
8
After the setup wizard has finished you will get the following box, you will need to
put in the serial number that is located on the CD in Box 1 and then type in the
Secure code that shows up on the screen in Box 2, select Activate.
1
2
Box 1
LED’s
Box 2
The next box will say Activation successful. Select OK, If you get the following
error select “Install Microsoft DirectX 9 and follow the prompts.
Includes:
Digital Wireless Hidden Camera Unit
USB receiver
CD
14
3
Setup Continued
Preferences and options settings continued
Control Bar
After setup is complete plug the USB receiver in a USB port on your computer,
Plug the hidden camera unit into a 110V electrical wall outlet. The receiver and the
Transmitter inside the unit have already been paired, the LED’s on the USB
receiver and the LED on the **unit should blink constantly.
**unit see illustration on page 14 for location
Info Bar
Select the “Watcher Icon” on your desk top to open the
program and view the video, you will have a picture
in the video player window as demonstrated below.
Place the hidden camera in the desired location
to be monitored and within 300 ft of the receiver for best results.
Watcher video window overview
System Bar
4
13
Preferences and options settings continued
Watcher video window overview continued
Watching live video in Internet browser
SecuExpress Watcher allows you to view the live video by using Internet browser.
To set the appropriate settings, select Options: Remote Access… to open the
dialog box.
Check Enable web server in the dialog box and specify the TCP port number
(use 80 as default) in Remote Access dialog box. Choose the video size for
transmission.
Then, you can type http:// <your IP address> : <TCP port number> (for example:
http://192.2.30.92:81) of the computer running SecuExpress Watcher in your
Internet browser to view the live video. ( Note: if your TCP port number is 80, you
can omit it and only type http:// <your IP address> )
Overview: SecuExpress Remote for PC user interface
SecuExpress Remote for PC provides you with various controls to view a remote
camera video in SecuExpress Watcher.
12
5
Preferences and options settings
Preferences and options settings
Searching video recording
Setting the preferences
To search the recorded video, click the button shown at the left on the Control bar or select Command: Search Records to bring up SecuExpress
Player to playback.
Customize the recording settings
through the Preferences dialog
box. To open the Preferences
dialog box,
select Options: Preferences.
In the Preferences dialog box,
you can specify the folder where
you want to store the recorded
data, compression scheme,
recording type, password
protection, IP address change
notification, and recording state.
Resizing the main user interface for SecuExpress Watcher
You can adjust the size of SecuExpress Watcher by dragging one of the corners
of the main user interface when the menu bar is shown.
Hiding the menu bar and status bar
To further save your desktop space, you can hide the menu bar and the status bar
by selecting View: Menu Bar and View: Status Bar to uncheck (hide) the bars.
Alternatively, you can click the arrows on the system bar to hide the menu and
status bars altogether. To display the menu bar and the status bar again, select
View: Menu Bar and View: Status Bar to check (show) the bars, or click the arrow buttons on the system bar.
Recorded storage
allocation
Before recording, a certain
space in the storage (e.g. hard
disk) of your computer should be
defined.
Select Options: Preferences to
open the dialog box.
In Record storage section,
choose the folder where you
want the recorded data to be
stored.
Check Recycle storage if you
want the storage to be reused
after the space is used up.
Set Minimum free space to
leave out some space for operating system usage.
Set Record file length to break
up the file length into the number
of minutes you specify 1 to 60
minutes.
*NOTE: Hidden cameras may not have microphones therefore audio
recording in NOT available.
Last recording and detection state at the next program
restart
You can use the same recording and detection state at the next SecuExpress
Watcher launch. Simply check Keep last recording and detection state in the
Preferences dialog box to save the recording and detection state.
6
11
Preferences and options settings continued
Preferences and options settings continued
Snapshot
Recording mode setup
Round-the-clock recording and
Event recording.
Round-the-clock recording is
to record the video continuously.
Event recording is to record the
video only if a motion event is
detected.
To take a picture of current video
frame, select Comand: Snapshot
or click the above icon on the
Control bar.
After taking a snapshot, the
Snapshot dialog box appears.
You can save the snapshot,
change the font settings of the
time stamp in the dialog box.
To set the intended recording
type,
select Options: Preferences,
and choose the appropriate recording type from Recording
Mode drop down in the Preferences dialog box.
Remote access settings
SecuExpress Watcher allows you to connect from a remote site to view live video.
To allow the remote access, select Options: Remote Access… to open the dialog box. See page 12
Check Enable Video Server checkbox.
Specify TCP port number (Note: SecuExpress Remote has to have the same
TCP port number so that you can connect to this video server).
Specify the maximum number of connections for the number of simultaneous
connections allowed from remote computers.
To view the current remote access connections, select View: Show Remote Connections.
Notification of IP address change by e-mail Some dial-up Internet connections change IP addresses periodically, If your computer running
SecuExpress Watcher has this type of Internet connections and you would like to
watch the camera video remotely, you have to enable the option of Notify IP
change by email in the Preference dialog box by selecting Options: Preference
Click the settings button to specify the related email settings
You will receive an email with a new IP address whenever the IP address is
changed. Take the new IP address and update it in the SecuExpress Remote
Connect dialog box. Please refer to SecuExpress Remote section on the provided
CD for more details
10
Before starting the video recording, first select appropriate devices from Devices menu. The devices above the menu separator bar are video devices and
the devices below the menu separator bar are audio devices, available on the
computer.
Then, click on the control bar or select Command: Record to start the recording.
To stop recording, click or select Command: Record again.
Access control
To password protected so
that anyone accessing
Secu Express Watcher or
connecting to Secu Express Watcher via Secu
Express Remote Viewer
to view the live video is
requested to enter the
password. The password
can be set in
Options: Preferences
dialog box.
7
Preferences and options settings continued
Preferences and options settings continued
To enable motion detection, select Command: Apply Motion
Detection or press
Event notification
on the Control bar. You can set the motion detection options by selecting Options: Motion Detection Options.
In the dialog box, you can drag the slider of Motion level threshold, enter the
value, or click “Detect” to adjust the sensitivity of a motion. However, make sure
there is no motion in the camera view during the detection. A motion is treated as
an event if it is beyond the value you set.
You can adjust the value of Motion volume threshold to count in the volume of
motion pixels as well.
Sometimes, a short period of motion is detected but you do not want to treat it as
an event, for example, bee flies over quickly. You can also check Ignore short
motion to
ignore a motion that is lasted within a period of time that you specify in the edit
box of the Motion Detection Options dialog box.
To select “Define a Motion Mask” see further instructions on the manual on the
enclosed CD.
To specify how to be notified when an event occurs, select
Options: Event Notification to open the dialog box.
Sound alarm: to enable the sound notification, check Sound alarm and choose a
wav file by clicking the button with … next to the play button.
If you want it continuously play, check Loop Playback.
E-mail notification: to enable the email notification, check Email Notification.
Click the settings button to specify the email settings.
Ftp event snapshots: to enable the event snapshot backup on ftp server, check
Ftp event snapshots. Click the settings button to specify ftp settings.
Execute program: to execute another program as an event notification, check
Execute program and select a program.
Show up program: to bring up SecuExpress from the minimized state when an
event is detected, check Show up program.
Log checkup
To view the action logs
select View: Logs. The Log dialog box contains all types of logs including
operation logs, event logs and options logs, with time stamp and description.
8
9