1
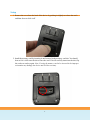
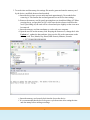
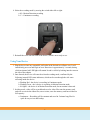
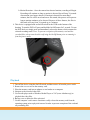
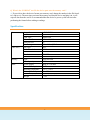
AC Adaptor DVR Manual
Table of Contents
Warnings & Precautions
2
Includes
3
Quick Setup Guide
3
Setup
4
Using Your Device
6
Playback
7
Frequently Asked Questions
8
Specifications
9
Warranty & Disclaimers
10
1
Do not open/modify the device, as it may cause damage to the unit and void the
Warranty. For internal repairs, consult your dealer or an Authorized Service Center.
Do not use any accessories or power supplies other than what comes with the device,
otherwise it could void the warranty
Protect from humidity. Do not put it in water and be careful to protect it from rain,
sea water, or high humidity environment. Do not operate the unit near a bath tub,
shower, sink, swimming pool, etc.
Protect from high temperatures. To avoid mis-operation of the device, only use in
temperature of 0 ~ +40°C(32 ~ 104°F).
Do not bring the device suddenly from a hot to a cold place, or vice versa. This may
cause damage to the inside of the unit by creating condensation.
EU Environmental Protection
The symbol of crossed-out garbage shows that this product should not be treated as
household waste, as it falls into the category of electric/electronic equipment for
recycling. This electronic device should not be disposed of in regular trash. We
strongly advise you to contact your local authority for proper disposal of this product.
2
Includes
AC Adaptor DVR
8GB Memory Card
User Manual
Introduction
The AC Adaptor crafted by SleuthGear® is a high-definition covert camera and recording device
disguised as a power supply. The AC Adaptor is created for discreet surveillance from any wall
outlet. You can use the product in two ways - continuously record or record only when the
camera detects activity(motion). The Zone Shield® AC Adaptor is designed for quick plug and
play set up so surveillance can begin right out of the box. Some best uses for this device are:
Aging parents, Parental control, know you’re Nanny, Protect your home when you have workers
or domestic help, Asset protection and much more! Simply unplug the camera to move quickly
from room to room or office to office anytime you require surveillance.
Quick Setup Guide
1. Remove the device and memory card from the packaging.
2. Remove the cover from the back of the device.
3. Properly install the memory card into the memory card slot.
4. Select the desired recording mode by moving the switch to C for Continuous or M for
Motion Detection.
5. Reinstall the cover onto the back of the device and plug it into any compatible wall outlet
to begin surveillance.
Features
High-definition camera
1280*720P HD resolution recording
Supports up to 32GB memory card storage, for up to 9 ½ hours of video recording
2 recording modes - Continuous or Motion detection
Time and Date video stamp
Easy Access On/Off switch
3
Setup
1. Remove the cover from the back of the device by pushing in slightly to release the catch
and then down to slide it off.
2. Install the memory card by inserting it until secured in the memory card slot. You should
hear or feel a click once the slot secures the card. If it will not fully insert into the slot, flip
the card over and try again. Note: Forcing the memory card to be inserted in the improper
orientation may damage the device and void the warranty.
4
3. To set the time and date stamp, the settings file must be generated onto the memory card
by the device, modified, then read and recorded:
a. Insert the device into a power outlet and wait approximately 30 seconds before
removing it. This formats the card and generates a text file for time settings.
b. Remove the memory card by gently pressing down on it and then lifting off. When
pressing down, you may hear or feel a click once the slot releases its hold on the
card. Upon lifting off, the card will be released and eject slightly so that it can now
be removed.
c. Insert the memory card into an adapter or card reader on a computer.
d. Open the text file on the memory card. Keeping the format as-is, change the 0 after
Updata to 1, update the date and time, then save the file as the same name on the
memory card: Year, Month, Day, Hour(24HR format), Minutes, Seconds
i. YYYY-MM-DD-HH:MM:SS
e. Insert the memory card securely back into the slot on the device.
f. It is recommended that the device be power cycled one time after setting the time
and date stamp before making recordings
5
4. Select the recording mode by moving the switch either left or right:
a. M = Motion Detection recording
b. C = Continuous recording
5. Reinstall the cover onto the back of the device, which is now ready to use.
Using Your Device
1. Plug the device into any compatible wall outlet in the desired surveillance area. It will
immediately power on and begin to boot. Boot time is approximately 3 seconds, during
which an internal red LED light will remain lit and is visible by looking into the vents on
the side of the adaptor.
2. Once booted, the device will enter the selected recording mode, confirmed by the
following internal LED status indicators, which can be seen through the side vents
reflecting inside the device:
a. Flashing Red - the device is recording in Continuous mode
b. Flashing Green – the is device is recording in Motion Detection mode
c. No lights – the device is in Motion Detection mode, but no motion is detected
3. In either mode, video will be recorded and saved as video files onto the memory card
and will over-write the oldest files, one at a time, once the memory card has reached its
full capacity:
a. Continuous – Recording will be constant and saved in 5-minute long files for
quick & easy review and backup.
6
b. Motion Detection – Once the camera has detected motion, recording will begin.
Recording will continue as long as motion is detected, but will stop 30 seconds
after motion is no longer detected. If motion is detected for more than 5
minutes, the file will be saved and a new file started; this process will repeat as
long as motion continues to be detected. Because of these features, the files in
this mode will vary from 30 seconds up to 5 minutes.
4. This device is equipped with an On/Off switch for the DVR on the bottom of the
housing. To turn the DVR off, press and hold the On/Off button for 5 seconds. To turn
the DVR back on, simply press and immediately release the button, which resumes the
selected recording mode. Note: To prevent corruption of the memory card and the
recorded files, always turn the device off using the On/Off button prior to removing it
from the power outlet.
Playback
1. Turn off the device using the On/Off switch, and then remove it from the power outlet.
2. Remove the cover to access the memory card.
3. Place the memory card into an adapter or card reader on a computer.
4. Navigate to the recorded video files.
5. Use a media player such as Windows Media Player or VLC(www.videolan.org/) to
playback the video files.
6. Backup, save or delete the files as desired.
7. Use the computer’s safe remove function to safely release the memory card from the
operating system prior to physical removal in order to prevent corruption of the card and
any remaining files.
7
Frequently Asked Questions
Q. Can I use this adaptor to power any devices?
A. No, this is a digital video recording device only and does not function as an actual power
supply. There is no current output through the attached cable.
Q. What size memory cards can I used in this device?
A. Most memory cards, of up to and including 32GB capacity, are supported. If a memory card
does not appear to work, try removing and formatting the memory card using a computer before
trying it in the device again.
Q. Why did I not get a recording when I know there was motion in front of the device?
A. The motion was not detected because it was too little, too quick or too far away. Make test
recordings to discover the limits of detection in your given placement and environment.
Q. Why will my video file not play or the file is corrupted?
A. If the device is not properly powered down prior to removing it from power, the files on the
memory card, or the memory card itself, may become corrupted. Make sure to always properly
power down the device according to the directions in the Using Your Device section.
Q. Why do I not have the time and date displaying on the recorded files?
A. The time and date must be setup before they will display on the recorded files prior to first
time use. This also may be required again when the device has been left unplugged for a
significant duration of time. For instructions on how to setup the video timestamp, see the Setup
section.
Q. Why do I only see part of my desired surveillance target?
A. Placement of any device is a very important step in setup. Be sure to make test recordings of
the desired area of surveillance prior to final setup to ensure the device can perform as desired in
your given environment. This should not only include what area can be captured by video, but
also testing the ability to properly trigger recording in the area if using Motion Detection mode.
Q. Why can’t I find my recorded files on my memory card?
A. Recorded files are saved inside folders on the memory card. As with almost all video and
photo devices, the files are saved inside a folder named DCIM. On this device, the files are
actually saved within folders that end in the digits for month and day, found inside the DCIM
folder. Within those dated folders, the files are saved in numerical sequence of their occurrence.
8
Q. What is the ‘FORMAT’ text file the device puts onto the memory card?
A. If you wish to have the device format your memory card, change the number in the file from 0
to 1 and save it. The next time you insert the memory card into the device and plug it in, it will
wipe all data from the card. It is recommended that the device be power cycled one time after
performing the format before making recordings.
Specifications
Camera
Video Files
Memory
Other
Image Sensor
Effective Pixels
Lens Type
Electronic Shutter
Field Of View
Lux Rating
File Type
Video Standard
1.3MP CMOS
1280*720
Pinhole lens
1/25~1/100,000s
62º
Color [email protected]
.AVI
H.264
Resolution
Frame Rate
Type
Max Capacity
Power Supply
Power Consumption
Working Temperature
Working Humidity
Dimensions(in.)
Weight
1280*720
NTSC: 1-30fps
Micro SD card
32GB
Input AC 110-240V
≤1.5W
+14ºF ~ 130ºF
10 ~ 85%
(L)2.5 * (W)2 * (H)1.75
3.2 oz
9
Manufacturer’s Limited Warranty
Manufacturer warrants all Covert Video and Sleuth Gear Hidden Video Products (Product) assembled and sold by Manufacturer to be free of defects in material and workmanship,
subject to the following conditions. The duration of Manufacturer's warranty with respect to the Product is limited to one (1) year from the date of sale to the original consumer
purchaser only for Products delivered within the fifty (50) states of the United States, District of Columbia, or the possessions and territories of the United States
No other express warranties are made with respect to any Product. All implied warranties, including warranties of merchantability and fitness for a particular purpose
are limited to the warranty period set forth above. This warranty is not transferable and applies only to the original consumer purchaser of the Product.
Manufacturer will, as its sole obligation under this warranty, replace or repair, at its option, any Product that does not conform to this warranty. Under no circumstances will the
Manufacturer issue credit or give a refund for Product covered by this warranty. Furthermore, under no circumstances will Manufacturer be liable for any incidental or
consequential damages under this warranty or any implied warranties.
What is not covered:
This limited warranty does not cover Products that in Manufacturer’s judgment have damage resulting from any (i) deviation from Manufacturer's operating instructions as printed
in Manufacturer's catalog or on any packaging, labels or other literature provided with a Product, (ii) installation of a Product in a manner which is inconsistent with Manufacturer's
written instructions, (iii) alteration, modification of or tampering with a Product, (iv) misuse, (v) neglect, (vi) abuse, (vii) accident, (viii) power surge, static electricity or other
electrical discharge, (ix) normal wear and tear, (x) commercial use, (xi) service by anyone other than a Manufacturer authorized repair facility, or (xii) other improper application,
installation or operation of the Product. Or, (xiii) have been purchased from inventory clearance or liquidation sales or other sales in which Manufacturer expressly disclaims its
warranty obligation pertaining to the Product.
How you (the Customer) can get service:
To obtain warranty service during the warranty period, you must return the defective Product with the original receipt to the original place of purchase. Contact them for return
instructions.
If warranty service is needed at any time during the warranty period, the purchaser will be required to furnish a sales receipt/proof of purchase indicating the date of purchase,
amount paid and place of purchase. Customers who fail to provide such proof of purchase will be charged for the repair of any Product.
How state law relates to the warranty:
Some states do not allow limitations on how long implied warranties last, or the exclusion or the limitation of incidental or consequential damages. So the above limitations or
exclusions may not apply to you. This warranty gives you specific legal rights. You may also have other rights that may vary from state to state.
NO PERSON IS AUTHORIZED BY MANUFACTURER TO MODIFY OR ADD TO THIS LIMITED WARRANTY.
For warranty information on Products delivered outside the United States please contact the original place of purchase.
DO NOT ATTEMPT TO RETURN PRODCUT TO ORIGINAL MANUFACTURER, AS THIS PRODUCT HAS BEEN MODIFIED AND IS NO LONGER SUBJECT TO
ORIGINAL MANUFACTURER’S WARRANTY. IN THE CASE OF A DEFECTIVE PRODUCT, CONTACT PLACE OF PURCHASE FOR RETURN PROCEDURE.
IT IS THE USER’S RESPONSIBILITY TO ENSURE THAT THIS EQUIPMENT IS USED IN ACCORDANCE WITH THE LAW(S) OF THE JURISDICTION IN WHICH
THIS EQUIPMENT IS UTILIZED.
THIS PRODUCT MAY BE SUBJECT TO THE JURISDICTION OF THE U.S. WIRE AND COMMUNICATIONS ACT (18 UNITED STATES CODE §§ 2510-2522)
(HEREINAFTER REFERRED TO AS “ACT”) REGARDING SURREPTITIOUS RECORDING DEVICES.
THE USES OF SUCH PRODUCTS ARE REGULATED BY THE
ACT. ADDITIONALLY, THE LAWS OF SOME STATES, COUNTIES, CITIES OR LOCALITIES MAY PROHIBIT THE POSSESSION AND/OR USE OF THIS OR
SIMILAR PRODUCTS. IT IS THE RESPONSIBILITY OF THE RETAIL BUYER AND/OR FINAL CONSUMER (HEREINAFTER REFERRED AS “BUYER”) TO
ASCERTAIN, UNDERSTAND, AND OBEY ANY AND ALL APPLICABLE LOCAL, STATE, AND FEDERAL LAWS REGARDING POSSESSION AND USE OF THIS
PRODUCT. BY PURCHASING THIS PRODUCT THE BUYER REPRESENTS THAT IT WILL INDEMNIFY THE MANUFACTURER AND/OR DISTRIBUTOR AND
HOLD THEM HARMLESS FOR ANY POSSESSION, USE AND/OR MISUSE THAT VIOLATE ANY FEDERAL, STATE OR LOCAL LAW OR REGULATION
REGARDING AUDIO AND/OR VIDEO DEVICES. BUYER AGREES TO CONSULT WITH AN ATTORNEY AT LAW REGARDING POSSESSION OR APPROPRIATE
USE OF A COVERT DEVICE. NOTE THAT LAWS AND REGULATIONS VARY FROM STATE TO STATE. IF BUYER EXPORTS THIS PRODUCT, THE BUYER WILL
COMPLY WITH US EXPORT CONTROL LAWS AND ANY APPLICABLE DEPARTMENT OF COMMERCE, STATE AND TREASURY REGULATIONS GOVERNING
EXPORTS AND SALES TO PROHIBITED END USERS. DIVERSION OR RE-EXPORT CONTRARY TO U.S. LAW IS PROHIBITED. BUYER SHALL COMPLY WITH
ALL APPLICABLE FEDERAL, STATE, AND LOCAL LAWS AND REGULATIONS GOVERNING THE SALE OF THIS PRODUCT, INCLUDING U.S. EXPORT
CONTROL LAWS AND THE U.S. DEPARTMENT OF COMMERCE AND TREASURY REGULATIONS GOVERNING SALES TO PROHIBITED END USERS.
PART 15 LOW POWER: ANY CHANGES OR MODIFICATIONS TO THIS EQUIPMENT WITHOUT THE EXPESS AUTHORIZATION OF THE MANUFACTURER
COULD VOID THE USER’S AUTHORITY TO OPERATE THIS EQUIPMENT(RULE 15.21 OF THE FCC).
THIS EQUIPMENT HAS BEEN TESTED AND HAS BEEN FOUND TO BE IN COMPLIANCE WITH THE LIMITS FOR A CLASS B DIGITAL DEVICE, PURSUANT TO
PART 15 OF THE FCC RULES.
THESE LIMITS ARE DESIGNED TO PROVIDE REASONABLE PROTECTIONS AGAINST HARMFUL INTERFERENCE IN A
RESIDENTIAL INSTALLATION.
THIS EQUIPMENT USES, GENERATES AND CAN RADIATE RADIO FREQUENCY ENERGY AND IF NOT INSTALLED AND
USED IN ACCORDANCE WITH INSTRUCTIONS, MAY CAUSE HARMFUL INTERFERENCE TO RADIO COMMUNICATIONS.
10