1
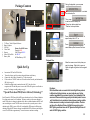
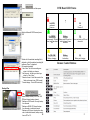
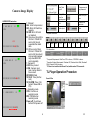
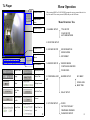
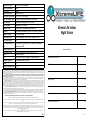
Video input format NTSC or PAL (Auto-detect) Video Compression H.264 MENU OSD English Record Resolution 720x480 (NTSC) Recording Frame Rate 2, 4, 6/8, 13/15, 25/30 fps Video Recording Mode Schedule Continuous, Schedule PIR Sensor Pre-recording Supported in standby time (PIR mode) Post recording Playback mode Supported in PIR mode Via device itself or bundled software on PC Playback Fast Forward, Backward: x2/ x4/ x8, Frame by Frame Playback Search By Time, By Event Recording Quality 4 Levels adjustable (Super, High, Standard, Low) Time/Date Stamp Yes Xtreme Life Indoor Night Vision Time Date Stamp For- (1) yy-mm-dd, (2) dd-mm-yy, (3) mm-dd-yy, 3 formats mat selectable by OSD Daylight Saving Time Yes Recording Storage Micro SD card (support SDHC) up to 64GB Control IR remote control LED Red (Power) / Green (System) / Yellow (Battery) Firmware Upgrade Yes, through Micro SD card Table Of Contents Buzzer Yes Operation temperature 0~+50℃ Manufacturer’s Limited Warranty Manufacturer warrants all Covert Video and Sleuth Gear Hidden Video Products (Product) assembled and sold by Manufacturer to be free of defects in material and workmanship, subject to the following conditions. The duration of Manufacturer's warranty with respect to the Product is limited to one (1) year from the date of sale to the original consumer purchaser only for Products delivered within the fifty (50) states of the United States, District of Columbia, or the possessions and territories of the United States No other express warranties are made with respect to any Product. All implied warranties, including warranties of merchantability and fitness for a particular purpose are limited to the warranty period set forth above. This warranty is not transferable and applies only to the original consumer purchaser of the Product. Manufacturer will, as its sole obligation under this warranty, replace or repair, at its option, any Product that does not conform to this warranty. Under no circumstances will the Manufacturer issue credit or give a refund for Product covered by this warranty. Furthermore, under no circumstances will Manufacturer be liable for any incidental or consequential damages under this warranty or any implied warranties. What Is Not Covered. This limited warranty does not cover Products that in Manufacturer’s judgment have damage resulting from any (i) deviation from Manufacturer's operating instructions as printed in Manufacturer's catalog or on any packaging, labels or other literature provided with a Product, (ii) installation of a Product in a manner which is inconsistent with Manufacturer's written instructions, (iii) alteration, modification of or tempering with a Product, (iv) misuse, (v) neglect, (vi) abuse, (vii) accident, (viii) power surge, static electricity or other electrical discharge, (ix) normal wear and tear, (x) commercial use, (xi) service by anyone other than a Manufacturer authorized repair facility, or (xii) other improper application, installation or operation of the Product. Or, (xiii) have been purchased from inventory clearance or liquidation sales or other sales in which Manufacturer expressly disclaims its warranty obligation pertaining to the Product. How you (the Customer) can get service: To obtain warranty service during the warranty period, you must return the defective Product with the original receipt to the original place of purchase. Contact them for return instructions. If warranty service is needed at any time during the warranty period, the purchaser will be required to furnish a sales receipt/proof of purchase indicating the date of purchase, amount paid and place of purchase. Customers who fail to provide such proof of purchase will be charged for the repair of any Product. How state law relates to the warranty: Some states do not allow limitations on how long implied warranties last, or the exclusion or the limitation of incidental or consequential damages. So the above limitations or exclusions may not apply to you. This warranty gives you specific legal rights. You may also have other rights that may vary from state to state. Package Contents / Quick Setup 2 DVR LED Status 3 Remote Control 3 Menu and Settings 5 Record Setup 8 Video Playback / TL Player 12 Specifications and Warranty Info 16 NO PERSON IS AUTHORIZED BY MANUFACTURER TO MODIFY OR ADD TO THIS LIMITED WARRANTY. For warranty information on Products delivered outside the United States please contact the original place of purchase. IT IS THE USER’S RESPONSIBILITY TO ENSURE THAT THIS EQUIPMENT IS USED IN ACCORDANCE WITH THE LAW(S) OF THE JURISDICTION IN WHICH THIS EQUIPMENT IS UTILIZED. DO NOT ATTEMPT TO RETURN PRODUCT TO ORIGINAL MANUFACTURER, AS THIS PRODUCT HAS BEEN MODIFIED AND IS NO LONGER SUBJECT TO ORIGINAL MANUFACTURER’S WARRANTY. IN THE CASE OF A DEFECTIVE PRODUCT, CONTACT PLACE OF PURCHASE FOR RETURN PROCEDURE. THIS EQUIPMENT HAS BEEN TESTED AND HAS BEEN FOUND TO BE IN COMPLIANCE WITH THE LIMITS FOR A CLASS B DIGITAL DEVICE, PURSUANT TO PART 15 OF THE FCC RULES. THESE LIMITS ARE DESIGNED TO PROVIDE REASONABLE PROTECTIONS AGAINST HARMFUL INTERFERENCE IN A RESIDENTIAL INSTALLATION. THIS EQUIPMENT USES, GENERATES AND CAN RADIATE RADIO FREQUENCY ENERGY AND IF NOT INSTALLED AND USED IN ACCORDANCE WITH INSTRUCTIONS, MAY CAUSE HARMFUL INTERFERENCE TO RADIO COMMUNICATIONS. Part 15 Low Power: ANY CHANGES OR MODIFICATIONS TO THIS EQUIPMENT WITHOUT THE EXPRESS AUTHORIZATION OF THE MANUFACTURER COULD VOID THE USER’S AUTHORITY TO OPERATE THIS EQUIPMENT. (RULE 15.21 OF THE FCC) 16 1 During the playback, you can press Package Contents to set start 3 time to backup file. 4 2 1 Then, press to set end time to backup file. * Green bar: backup start time * Red bar: backup end time 6 5 Press export backup file to PC, or 1. 2. 3. 4. 5. 6. 7. TL Player / Video Playback Software Battery Adaptor SD Card Battery Pack LED Status Video Cable Charging: RED Remote Fully Charged: BLUE Micro SD Card Slot On: BLUE Battery Pack Off/Dead Battery: OFF 7 to Press to cancel Backup Start time and End time Playback Files Move the mouse cursor to the place you want to enlarge. Right click to zoom in. Right click again to get back to the original scene. Quick Set Up Insert micro SD Card in SD Card slot. Turn on the battery pack by pressing the round button on the battery. Connect the video cable to a monitor or TV video input jack. If Screen shows “NO SD” make sure SD card is inserted correctly and reformat the SD Card. (see pg 8) Default Recording setting is motion detection 24x7. Once the device recognizes the SD card and power is turn on the DVR will begin to record based on motion. To change recording settings see pg 8. **Special Note about PIR (Passive Infrared) Technology** Each Xtreme Life DVR has a built in PIR sensor that detects levels of infrared radiation. Everything emits some level of radiation. The hotter an object is the more radiation it emits. When there is a change in radiation levels this is considered motion the DVR will turn on and begin to record. The PIR sensor does not need very much power to detect radiation so the DVR’s power will be off even though the PIR sensor is still detecting radiation. When the PIR detects a change in radiation the DVR will turn on and begin to record. The DVR takes approximately 3 seconds to turn on and start recording. 2 Disclaimer: While SleuthGear makes a concerted effort to test Night Vision products in different low lighting situations, we cannot replicate every lighting condition imaginable in the customers' location. Covert placement of the camera and IR sensors affect image quality in individual product forms as well. SleuthGear strives to maintain a balance between creating a reliable hidden camera and recording in extreme low light conditions. Therefore we believe Zone Shield and Xtreme Life NightVision products work in MOST lighting conditions but we do NOT guarantee that Night Vision will work in EVERY lighting condition. 15 Press DVR Board LED Status and then press . x Select a folder with DVR files and press “OK” On (RED) Off Power on Power off On (GREEN) Blinking System ready, SD card System and SD card nornormal, and has schedmal, but doesn’t have ule schedule Double click the selected recording file to playback or click the selected recording file and press “Open” to playback. File searching method: * List all time : list all the recording sessions in the folder you browse. * List file event : list the event which you select in “List all time” * Search all event : list all the events in the folder you browse (max. 1000 events) * Format storage : Format SD card easily Off System not ready or SD card abnormal On(YELLOW) Blinking Off Battery charging Low battery Battery not charging Remote Control Buttons Backup Files Press and choose backup format (DVR/ WMV/ AVI/ JPG) and choose backup channel. * Backup as DVR format: Can only backup four channels * Backup as WMV/ JPG format: backup four channels or individual channel * Backup as AVI format: backup four channels or individual channel; backup resolu14 tion as CIF or D1. 3 Cameras Image Display LIVE/RECORD Instruction 1 H4L 95% O LOCK ID LOSS 2012/39/29 10:10:25 ● CON 1 H264 95% R LOCK ID 2012/03/29 10:10:25PM ● PIR 1 H264 NO SD R ID 1: Channel 1 H4L: H.264 compression 95%: Micro SD Card free capacity NO SD: Micro SD card not inserted R: Recycle writing Micro SD card. If Micro SD card is full, the unit overwrites the oldest data O: Write once to Micro SD card. If Micro SD card is full, the unit will stop recording (appear only when Micro SD card is inserted) 1: Camera ID LOCK: Key locked LOSS: Camera input loss, it will go back to blue screen 2012/03/29: Date 10:10:25: Time (24H format) 10:10:25PM: Time (12H format if shows AM or PM) ●: Recording mode CON: Continuous recording mode PIR: PIR Detection recording mode Power off: Countdown before DVR powers off Time/ Date top left Change account and password Multiply 32 times the original speed Save JPEG picture Print Enhance the resolution Audio adjust Mute Playback control bar: Stop Pause Last -1/2X -2X -1X 1X 2X 1/2X Next File information: * Computer Requirement: Dual Core CPU or above , 1GB RAM or above * Operation System Requirement: Windows XP, Windows Vista 32bit, Windows7 32bit, Windows7 64bit or above * PC has to be installed with Sound Card, which makes PC have audio TL Player Operation Procedure Search Files Click 2012/03/29 10:10:25 ● PIR Power off: 59 4 13 TL Player Menu Operation When entering MENU or PLAY MODE if prompted to enter a password the unit is in key lock mode. Please enter password (1234) and press the OK button. Software version Player function button Menu Structure Tree Playback display I. CHANNEL SETUP TITLE SETUP COLOR SETUP AUTO BRIGHTNESS II. DATE/TIME SETUP Playback control III. SD CARD SETUP SD REC MODE Playback functional buttons SD FORMAT IV. RECORD SETUP File information SD INFORMATION RECORD MODE CONTINUOUS RECORD Search Files Backup DVR file Login Select Path Enter Backup format PIR RECORD V. PERIPHERAL SETUP BUZZER SETUP KEY BEEP VIDEO LOSS BEEP TIME Set Start Time Set End Time Export backup file Cancel RELAY SETUP VI. SYSTEM SETUP Time/ Date on Time/ Date format 12 DVR ID FACTORY DEFAULT FIRMWARE UPGRADE PASSWORD SETUP 5 Key in default value (1234) first and press MENU OPERATION Press to enter MAIN MENU Press to select item Press item Press to change cursor Press to change value to enter the selected Press to get back to live view Press PLAYBACK MODE In the Playback screen 1. Press to enter SEARCH MENU CHANNEL SETUP to select item Press It will enter “NEW PASSWORD SETUP” and please key in new password 2. Press to enter the selected item to change value Auto Brightness default as ON 3. Press Press to change value EVENT SEARCH Press to change cursor 1. Press 1 2 3 4 5 6 7 8 9 Q W E R T Y U I O P A 0 - . 2. Press to run to select item to playback the event ↵ S D F G H J K L Shift Z X C B N M ← ↓ → V to select item & ↑ + Press to select item Press to change value 6 11 SYSTEM SETUP DATE/TIME SETUP Press Press to select item to enter selected item Press to select item Press to change value * Display Format: YY/MM/DD, MM/DD/YY, or DD/MM/YY. * Time Format: 12H/ 24H Press to change cursor Press to change value Press to select item Press to change value Press to select item SD CARD SETUP Press to change value * SD CARD INFORMATION: Press to enter * SD REC MODE: Press to change mode (FULLSTOP/OVERWRITE) * SD FORMAT: Press to enter * AUTO FORMAT: Press to change Press to select item Press to change value 10 7 Press Press to change mode 2. Frame rate adjustable by users: H4L 30 (N)/25(P); H4L 15(N)/12(P); H4L 8(N)/6(P); H4L 4(N)/4(P); H4L 2(N)/2(P); JPEG 2(P)/(N); JPEG 4(P)/4(N); JPEG 6(P)/8(N); JPEG 12 (P)/15(N); JPEG 25(P)/30(N) Quality adjustable by users: Low/ STD/ High/ Super Press to run RECORD SETUP Press Press to select item Press to enter the selected item to change value to change value Frame rate adjustable by users: H4L 30(N)/25 (P); H4L 15(N)/12(P); H4L 8(N)/6(P); H4L 4(N)/4(P); H4L 2(N)/2(P); JPEG 2(P)/(N); JPEG 4(P)/4(N); JPEG 6(P)/8(N); JPEG 12(P)/15(N); JPEG 25(P)/30(N) Quality adjustable by users: Low/ STD/ High/ Super Standby time: 60/30/15 sec selectable (DVR will turn off automatically in 60/30/15 seconds after the detection of PIR sensor ends or user doesn’t operate OSD menu after a while). Press to change cursor PERIPHERAL SETUP Press Press to change value 3. Double Click in ALL Schedule and the entire schedule will be changed to the selected value automatically. Press to select item to enter selected item * Default value: Sensor (PIR) recording mode * Double Click and record mode will be automatically changed to the selected one. 8 Press to select item Press to change value 9