1
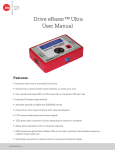
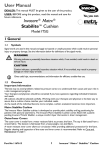
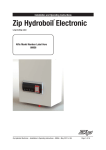
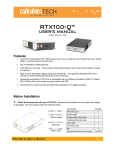
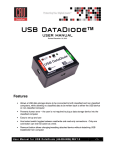
A Brand of CRU-DataPort
A Brand of CRU-DataPort
Product Models
Drive eRazer Ultra
Detects/Erases HPA & DCO
Yes
Drive Compatibility
2.5” and 3.5” SATA drives
3.5” IDE/PATA drives
Additional drives using optional adapters
Power Supply
100-240VAC +12V / 3A (included)
Power Input
+12V 3A from AC adapter via +12V DC jack
Power Output
+12V / +5V to drive
Compliance
CE, FCC, RoHS, C-Tick
Shipping Weight
2 pounds including accessories
Unit Dimensions
3.2” x 2.2” x 0.95” (81mm x 56mm x 24mm)
Support
We don’t expect anything to go wrong with your product. But if it does, Tech Support
is standing by and ready to help. Contact us through wiebetech.com/techsupport.
WiebeTech is a brand of CRU.
Drive eRazerTM Ultra Quick Start Guide
For more information and the full user manual for this product, please visit
www.wiebetech.com/techsupport.php.
Drive eRazer and DriveBox are trademarks of CRU Acquisitions Group, LLC. Other marks are the property of their respective owners. © 2008, 2011 CRU Acquisitions Group, LLC. All rights reserved.
Product Warranty: CRU-DataPort (CRU) warrants this product to be free of significant defects in material and workmanship for a period of 2 years from the original
date of purchase. CRU’s warranty is nontransferable and is limited to the original purchaser.
Limitation of Liability: The warranties set forth in this agreement replace all other warranties. CRU expressly disclaims all other warranties, including but not limited
to, the implied warranties of merchantability and fitness for a particular purpose and non-infringement of third-party rights with respect to the documentation and
hardware. No CRU dealer, agent, or employee is authorized to make any modification, extension, or addition to this warranty. In no event will CRU or its suppliers be
liable for any costs of procurement of substitute products or services, lost profits, loss of information or data, computer malfunction, or any other special, indirect,
consequential, or incidental damages arising in any way out of the sale of, use of, or inability to use any CRU product or service, even if CRU has been advised of the
possibility of such damages. In no case shall CRU’s liability exceed the actual money paid for the products at issue. CRU reserves the right to make modifications and
additions to this product without notice or taking on additional liability.
FCC Compliance Statement: “This device complies with Part 15 of the FCC rules. Operation is subject to the following two conditions: (1) This device may not cause
harmful interference, and (2) this device must accept any interference received, including interference that may cause undesired operation.”
This equipment has been tested and found to comply with the limits for a Class A digital device, pursuant to Part 15 of the FCC Rules. These limits are designed to provide
reasonable protection against harmful interference when the equipment is operated in a home or commercial environment. This equipment generates, uses, and can radiate radio frequency energy and, if not installed and used in accordance with the instruction manual, may cause harmful interference to radio communications.
In the event that you experience Radio Frequency Interference, take the following steps to resolve the problem:
1)
Ensure that the case of your attached drive is grounded.
2)
Use a data cable with RFI reducing ferrites on each end.
3)
Use a power supply with an RFI reducing ferrite approximately 5 inches from the DC plug.
4)
Reorient or relocate the receiving antenna.
1. Installation Steps
a. A
ttach protective metal drive plate to your 3.5” hard drive. (This step is optional.) The
purpose of the bottom plate is to provide protection to your drive electronics and aid heat
dissipation.
b. If erasing an IDE/PATA drive, configure the jumpers on the rear of the drive. The drive must
be set to the Master setting. Consult the instructions for your drive (some drives display
configuration information on the drive’s label). c. Ensure that the Drive eRazer’s power switch is in the OFF (0) position.
d. C onnect Drive eRazer to the drive (or adapter), using either the IDE ribbon cable for IDE
drives, or the SATA data/power cable for SATA drives. e. If using an adapter, connect the drive to the adapter.
f. Attach the power cable to Drive eRazer Ultra and to the drive. For SATA drives, the power cable and data cable are combined into a single SATA drive interface.
g. Plug the AC adapter into Drive eRazer Ultra.
h. T urn on the power switch. The connected drive will power up and Drive eRazer Ultra main menu will appear on the LCD screen.
Warning: Ensure that Drive eRazer Ultra’s power switch is in the OFF (0) position before connecting or disconnecting a drive.
FOR OFFICE OR COMMERCIAL USE
A9-000-0029-1 Rev. 1.1
A Brand of CRU-DataPort
A Brand of CRU-DataPort
2. Using the LCD Interface and Menu
Use the LCD and 4-button navigation interface to start erasing, adjust settings, view
information about the drive and dock, or check on operational status. On the 4-button
navigation interface, up and down allow scrolling through options, while right selects and left
goes back to the previous screen.
3. Menu Structure (See the full User Manual for additional details)
Drive eRazer Ultra menu consists of the following screens:
• Start Erasing: Begins the erasure process using current settings.
• R
eview Settings: The user selects the erase mode. If Custom Erase mode is selected, the
user may proceed to select the pass count number, overwrite type, overwrite pattern, and
HPA/DCO handling.
• V
iew Drive Info: Displays information about the attached drive. (manufacturer, model
number, serial number etc.)
• V
iew Dock Info: Displays information about the Drive eRazer product. (Device name,
unique I.D. number, firmware version)
• O
perational Status: During erasure, status messages are displayed on the LCD. Examples
are shown below.
STARTING ERASURE
HPA RESET
ESTIMATING
ERASE TIME
ERASING. . . 2%
39M REMAINING
• E rror Indication: If Drive eRazer Ultra encounters any errors, a brief explanatory
message will display. Examples are shown below.
VERIFY ERROR
ERASING. . . 33%
WRITE CMD ERROR
SECURE ERASE
COMMAND FAILED
4. Label Printer Output
Drive eRazer Ultra features a DB9 null-modem serial connection for the purpose of
connecting a label printer. This will allow Drive eRazer to print a label recording details of
an erase process. This occurs at the end of the process. The label can then be affixed to
the drive, or to a DriveBox™ anti-static storage case. There are two output modes, one for a 4” x 1” label and one for a 4” x 6.25” label. You may
also print a label as a test without an erasure process.
5. Erase Specifications Supported
Mode
Explanation
QUICK ERASE
Performs single pass writing all zeroes
CUSTOM ERASE
Performs 1 to 99 passes (user-selectable), overwriting with zeroes or a user-selected
pattern
SECURE ERASE N
Initiates the drive’s built-in Secure Erase (Normal) function
SECURE ERASE E
Initiates the drive’s built-in Secure Erase (Enhanced) function
DOD CLEAR
US Department of Defense “Clear” standard
DOD SANITIZE
US Department of Defense “Sanitize” standard
NIST80088 CLEAR
“Clear” standard defined by NIST special publication 800-88
NIST80088 PURGE
“Purge” standard defined by NIST special publication 800-88
CSEC ITSG-06
Canadian data sanitization standard
HMGIS5 BASELINE
Great Britain’s “Baseline” drive erasure standard
HMGIS5 ENHANCED
Great Britain’s “Enhanced” drive erasure standard
DSD ISM 6.2.92
Australian government’s data sanitization standard