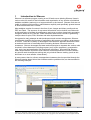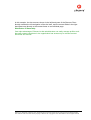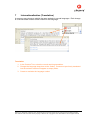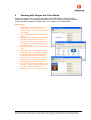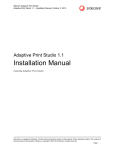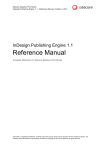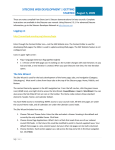
1
User Manual
Sitecore Content Manager
Author:
Sitecore A/S
Date:
October 2004
Release:
Revision 4.3.2
Language:
English
Sitecore is a trademark of Sitecore A/S. All other brand and product names are the
property of their respective holders.
The contents of this document are the property of Sitecore A/S. Copyright © 2001-2004
Sitecore A/S. All rights reserved.
Sitecore.
Content Delivery
www.sitecore.net
[email protected]
Sitecore Denmark – HQ
[email protected]
T: +45 70 23 66 60
Sitecore USA Inc.
[email protected]
T: +1 415 444 0600
Sitecore Germany
[email protected]
T: +49 (0)89 54 55 82 22
Sitecore Norway
[email protected]
T: +47 23 14 53 50
Contents:
Structure of the User Manual
3
1
Introduction to Sitecore
4
2
Getting Started with Sitecore
6
3
The HTML Editor
7
4
Content Markers
10
5
Sitecore Client
13
6
Saving Records
17
7
Internationalization (Translation)
18
8
Insert Link
19
9
Working with Images and Other Media
22
10
Uploading to the Media Library
24
11
Working with Tables
25
12
Creating Records
28
13
Publication
30
14
Content Approval
31
15
Shortcuts
32
16
Content Search
33
17
Sitecore Users
34
18
Rights
39
19
Database Administration
42
20
Sitecore User Interface Controls
43
21
Tree Structure
47
22
Status Bar
48
23
Tabs
49
24
The Tool Bar
54
25
Language Version
56
26
Context (Right-Click) Menus
57
27
Task Interfaces
61
28
HTML Editor Details
62
29
Terms and Definitions
65
Sitecore User Manual
Page 2 of 66
Sitecore is a trademark of Sitecore A/S. All other brand and product names are the property of their respective holders.
The contents of this document are the property of Sitecore A/S. Copyright © 2001-2004 Sitecore A/S. All rights reserved
Structure of the User Manual
0.1
Formatting of This Document
Orange indicates systematic instructions.
Critical information is displayed in blue.
Helpful advice is displayed in green.
0.2
Using This Document
Sections 1 through 16 of this document describe how to use the capabilities of Sitecore.
Sections 17 through 28 provide detailed explanations of the system. Section 29 provides
a glossary of terms and definitions.
This User Manual supports different Sitecore roles:
•
Content Maintenance-oriented Users typically use Sitecore’s Content Markers
which provide a highly intuitive mode of access. Sections 1 through 6 and 20
through 28 should be most relevant to this group of Users.
•
Approval- and Publish-oriented Users generally work in the Sitecore Client, a
browser-based User Interface providing a superset of the functions provided by
Content Markers. Descriptions of these utilities appear in sections 1 through 16
and 20 through 28.
•
Development- and Administration-Oriented Users should be familiar with all
functionality including Database Tasks and User access configuration.
Sitecore User Manual
Page 3 of 66
Sitecore is a trademark of Sitecore A/S. All other brand and product names are the property of their respective holders.
The contents of this document are the property of Sitecore A/S. Copyright © 2001-2004 Sitecore A/S. All rights reserved
1
Introduction to Sitecore
Sitecore is a software program running on an IIS web server allowing Sitecore Users in
various roles full control of the information and organization of any number of published
websites available (read-only) to a larger audience or the internet. Sitecore tools are not
visible to ordinary web browsers; administrators explicitly and specifically granted access
to Sitecore affect the site’s content.
Most websites consist of content in the form of text, images and binary media such as
PDF and Flash. The structure of any textual information can be broken into fields such
as title and body to facilitate its maintenance and reuse, such as dynamically generating
navigation based on the “link title” fields associated with various records or generating
multiple views for print, PDA, Wireless and other implementations.
As opposed to early attempts at web development and content management, Sitecore
considerably simplifies the process of maintaining this content, providing a great degree
of control. There are a variety of advantages to the Sitecore approach that reduce timeto-web and total cost of ownership while increasing business value and return on
investment. Sitecore leverages the latest web technologies to separate the various roles
involved in site maintenance including content (xml), layout (aspx/ascx), presentation
(xsl), style (css) and application (C#/JavaScript) developers. Non-technical Sitecore
Users should be able to perform most common content maintenance functions without
any specific web development training and only minimal Sitecore training (such as this
document or an even smaller “cheat sheet”).
In many cases, there is a direct correspondence between the view provided through the
Sitecore browser-based client User Interface and the published site, as demonstrated in
the following example:
Sitecore User Manual
Page 4 of 66
Sitecore is a trademark of Sitecore A/S. All other brand and product names are the property of their respective holders.
The contents of this document are the property of Sitecore A/S. Copyright © 2001-2004 Sitecore A/S. All rights reserved
In this example, the site structure shown in the left-hand pane of the Sitecore Client
directly matches the left-navigation of the site itself, and the content fields in the righthand pane map directly to the content items on an individual page.
Distribution of Ownership
One major advantage of Sitecore is that administrators can easily manage profiles such
that each content contributor in the organization has access only to relevant content
structures and records.
Sitecore User Manual
Page 5 of 66
Sitecore is a trademark of Sitecore A/S. All other brand and product names are the property of their respective holders.
The contents of this document are the property of Sitecore A/S. Copyright © 2001-2004 Sitecore A/S. All rights reserved
2
Getting Started with Sitecore
An administrator configures the Sitecore software which is accessed through a URL (a
web address such as http://server.domain.tld/Sitecore), then associate User IDs with
groups controlling access to specific functionality and site components. Developers may
choose to access some components using the site’s file system directly. Microsoft
Internet Explorer 6.0 (IE) or higher is required to use this interface.
Microsoft Internet Explorer 6.0 Required
To determine the browser version before logging into
Sitecore, Select “Help->About Internet Explorer”. Free
browser upgrades are available at
http://www.windowsupdate.com, or an administrator
may need to upgrade the browser.
Accessing Sitecore:
1. Start Microsoft Internet Explorer.
2. For convenience, bookmark the URL
provided by a CMS administrator.
3. Enter the User ID and password
provided by a CMS administrator.
For most convenient access to the greatest range of functionality, maximize the Sitecore
client or using F11 to toggle between full-screen and standard views.
Sitecore User Manual
Page 6 of 66
Sitecore is a trademark of Sitecore A/S. All other brand and product names are the property of their respective holders.
The contents of this document are the property of Sitecore A/S. Copyright © 2001-2004 Sitecore A/S. All rights reserved
3
The HTML Editor
First locate the record for edit, then use the editing tools provided with Sitecore. Large
sections of content generally allow an HTML Editor accessed using the blue arrow next
to one of the text fields in the record:
Working with the content of the website is quite similar to working with Word. Insert
tables and images, make bulleted lists, apply text styling such as italics and perform
various other content maintenance tasks. The HTML Editor provides a few buttons
unfamiliar to Sitecore Users who have not previously managed web sites; descriptions
appear in the last section of the User Manual. The following section explains the most
common functions.
Sitecore User Manual
Page 7 of 66
Sitecore is a trademark of Sitecore A/S. All other brand and product names are the property of their respective holders.
The contents of this document are the property of Sitecore A/S. Copyright © 2001-2004 Sitecore A/S. All rights reserved
3.1
Copying Text from Word
1. Open the document in Word.
2. Navigate to the record in Sitecore.
There is no need to close either
application before accessing the other
– open both at once and use ALT-TAB,
the Windows bask tar and other
facilities to move back and forth
between the two windows.
3. In the Word document, select the text
to copy and choose Edit->Copy.
4. In the appropriate field of the intended
Sitecore record, use the Paste function
of the HTML Editor to insert the copied
content.
5. Automatically remove Microsoft styling codes not relevant to web content using
the “Clean HTML” button. This function is typically automatic.
6. Approve or reject the code changes suggested by the system. It is generally
advisable to accept the changes.
Sitecore User Manual
Page 8 of 66
Sitecore is a trademark of Sitecore A/S. All other brand and product names are the property of their respective holders.
The contents of this document are the property of Sitecore A/S. Copyright © 2001-2004 Sitecore A/S. All rights reserved
HTML Editor Buttons
Delete text
Remove all formatting and text from the
current field.
Accept
Close the HTML Editor to complete
maintenance of a field’s content. The data
is updated but the record will not be saved
until Save is selected.
Cancel
Discard any changes made since the last
“Accept” and return to record view.
See the Sitecore Glossary & Reference for explanations of all buttons in the HTML
Editor.
Working with Media
It is not possible to copy images directly into the HTML Editor; they must be uploaded to
the server using the Media Library (see Section 10, “Uploading to the Media Library”).
Sitecore User Manual
Page 9 of 66
Sitecore is a trademark of Sitecore A/S. All other brand and product names are the property of their respective holders.
The contents of this document are the property of Sitecore A/S. Copyright © 2001-2004 Sitecore A/S. All rights reserved
4
Content Markers
Some Sitecore Users access Sitecore using Content Markers, which provide a facility for
navigating to content requiring maintenance by simply browsing the site rather than
navigating through the Sitecore Client. This is generally preferable and can reduce the
workload and learning curve for non-technical business Users. Selecting the small green
Content Markers on the page will edit the content closest to the marker. “Right-clicking”
the marker will provide a context menu providing additional actions such as the creation
of a new item. The content editor exposed using Content Markers is a greatly simplified
version of the Sitecore Client.
Starting Directly in Preview
Section 17 (User Configuration) contains information on configuring Sitecore Users to
start in Preview Mode so they do not need training on the Sitecore Client.
Sitecore User Manual
Page 10 of 66
Sitecore is a trademark of Sitecore A/S. All other brand and product names are the property of their respective holders.
The contents of this document are the property of Sitecore A/S. Copyright © 2001-2004 Sitecore A/S. All rights reserved
“Right-clicking” the Content Marker exposes a menu allowing additional functions:
Web Preview Mode (Content Markers Interface)
1. From within the Sitecore Client select “Start preview” from
the “Publishing” menu on the top menu bar, or use the
shortcut key F7.
2. Select a date to view the website as it appeared at any point
in the past, or view content scheduled for publication by
specifying a date in the future.
3. If a date is specified, it may take some time for the system to
build the preview site. Acknowledged the dialog box indicating that this process
is complete and a new browser window loads that version of the site including
Content Markers and the Preview Tool Bar.
Sitecore User Manual
Page 11 of 66
Sitecore is a trademark of Sitecore A/S. All other brand and product names are the property of their respective holders.
The contents of this document are the property of Sitecore A/S. Copyright © 2001-2004 Sitecore A/S. All rights reserved
4. After viewing the preview
site, select “End preview”
from the Preview Tool Bar to
close the window.
Sitecore User Manual
Page 12 of 66
Sitecore is a trademark of Sitecore A/S. All other brand and product names are the property of their respective holders.
The contents of this document are the property of Sitecore A/S. Copyright © 2001-2004 Sitecore A/S. All rights reserved
5
Sitecore Client
The Tree Structure pane of the User Interface shows the Sitecore Area in which the User
is working. Since most Sitecore Users work primarily with content, this is the section
shown by default after logging in. This User Manual contains an index covering all of the
Sitecore Areas.
Content Area
Sitecore Users work with content records and fields in this area.
Tree
Structure
Drop-Down
Menu Bars
Tool Bars
Tree
Structure
Version
Language
Content
Tree
Status Bar
Tabs
Records are selected by selecting in the Content Tree which appears in the Tree
Structure in the left-hand pane of the Sitecore Client, similar to that found in Windows
Explorer.
Field Area
Sitecore User Manual
Page 13 of 66
Sitecore is a trademark of Sitecore A/S. All other brand and product names are the property of their respective holders.
The contents of this document are the property of Sitecore A/S. Copyright © 2001-2004 Sitecore A/S. All rights reserved
Sitecore Templates are configured such that different fields will appear when working
with the various records. The Template that was used to create the record determines
which fields will appear. For example, a news article may have the following fields:
•
Title
•
Date
•
Content (or Text)
Most content maintenance occurs in the Content/Text field, which is typically configured
to use the HTML Editor initiated by selecting the green arrow next to the field. See
Sections 3 (The HTML Editor) and 29 (HTML Editor Details) for further documentation of
this tool.
Sitecore User Manual
Page 14 of 66
Sitecore is a trademark of Sitecore A/S. All other brand and product names are the property of their respective holders.
The contents of this document are the property of Sitecore A/S. Copyright © 2001-2004 Sitecore A/S. All rights reserved
Records
The published site generally contains navigation and/or lists based on the titles of
records in corresponding locations in the Content Tree:
Sitecore User Manual
Page 15 of 66
Sitecore is a trademark of Sitecore A/S. All other brand and product names are the property of their respective holders.
The contents of this document are the property of Sitecore A/S. Copyright © 2001-2004 Sitecore A/S. All rights reserved
Each component of each content item generally corresponds to a field in the record:
Sitecore User Manual
Page 16 of 66
Sitecore is a trademark of Sitecore A/S. All other brand and product names are the property of their respective holders.
The contents of this document are the property of Sitecore A/S. Copyright © 2001-2004 Sitecore A/S. All rights reserved
6
Saving Records
Save Content Records regularly as when working with any computer application. Use
the “Save” button or the shortcut key CTRL+S. Only the current record is saved with this
function.
A prompt confirms that the changes were intentional. To save the change, select Yes;
revert the change by selecting No; return to the User Interface for further editing by
selecting Cancel.
Modifications are only visible after publishing
When modifying content in Sitecore, changes are not visible on the published site until
publication of that record. This provides Users with a great deal of freedom, as they
need not be concerned with incomplete content and errors on the site during the editorial
process; a content approval and publication process avoids changes until they are
complete. Additional information is available in the section on “Publishing to the
Published Site”.
Save Regularly
To reduce the risk of unauthorized Sitecore access, the CMS editorial session expires if
no action is taken for an extended period, usually 20 minutes. In this case, any unsaved
changes are lost and the User must log in again. For this and other reasons, Users
should develop a habit of saving data at least every 15 minutes.
Sitecore User Manual
Page 17 of 66
Sitecore is a trademark of Sitecore A/S. All other brand and product names are the property of their respective holders.
The contents of this document are the property of Sitecore A/S. Copyright © 2001-2004 Sitecore A/S. All rights reserved
7
Internationalization (Translation)
A company may choose to publish the same website in several languages. Each change
to a record variant creates a new version for that language.
Translation
1. In the Content Tree, select the record requiring translation.
2. Change the language drop-down to the variant. Content not previously translated
into the selected variant will appear as empty fields.
3. Create or maintain the language variant.
Sitecore User Manual
Page 18 of 66
Sitecore is a trademark of Sitecore A/S. All other brand and product names are the property of their respective holders.
The contents of this document are the property of Sitecore A/S. Copyright © 2001-2004 Sitecore A/S. All rights reserved
8
Insert Link
HTML allows for a number of link types appear on a website:
•
other Sitecore records
•
binary media files within the site
•
other websites using an external URL
•
an email address
•
almost any other type of web resource
Developers may create JavaScript links, but this is best avoided as it can defeat site
crawlers such as search engines.
Working with Links
1. Highlight the text that should link to another resource, or select an existing link
to see or change the resource to which it links.
2. Select “Insert link”.
3. In the dialog, use the drop down to select the type of link to create. Most
commonly, Sitecore document is the appropriate selection. Depending on the
chosen type, different fields will appear as explained below.
4. Select OK to set the link. Select “Cancel” to avoid creating the link or changing
an existing link. “Clear” resets the fields to start the process again.
Sitecore User Manual
Page 19 of 66
Sitecore is a trademark of Sitecore A/S. All other brand and product names are the property of their respective holders.
The contents of this document are the property of Sitecore A/S. Copyright © 2001-2004 Sitecore A/S. All rights reserved
8.1
Link Types
Select the appropriate link type and specify to what resource the link will direct viewers.
Sitecore Document
Use this type to link to another record on the
website.
1. Select the “Path” field. A dialog
box appears with the tree
structure of the entire site.
2. Select the appropriate record.
3. Select “Link”.
Sitecore Media
Use this type to link to PDFs, images and
other binary media files. This is not the same
as inserting an image into a record: for clients
browsing the published site, a Sitecore Media
link will load the media resource as new
content into the current window. Set the
“Target window” to open a link in a new
browser window instead of the current
window.
1. Select the icon next to the “Path”
field. The Media Library appears.
2. Navigate to and select the appropriate media resource. Use Upload to
import a new image (navigate to the appropriate directory first). Choose
“Preview” to open a pane at the right for previewing the image.
3. Select “OK” to close the Media Library, then “Link”.
External URL
Use this type to link to another website or page.
1. Enter the web address of the page to which the link should point in the URL
field. For instance, to link to the Sitecore website, enter http://www.Sitecore.net.
JavaScript
Developers use this type to activate a JavaScript function rather than an explicit link.
Mail
Use this type to link to an email address. The link will open a new mail message
addressed to the specified address using an email client such as Microsoft Outlook.
Enter the email address in the “Mail to” field. It is generally advisable to use an alias or
other distribution list feature of the email system to route the message to a group instead
of to an individual; otherwise email links may need updating in case a recipient goes on
vacation or leaves the organization.
Sitecore User Manual
Page 20 of 66
Sitecore is a trademark of Sitecore A/S. All other brand and product names are the property of their respective holders.
The contents of this document are the property of Sitecore A/S. Copyright © 2001-2004 Sitecore A/S. All rights reserved
Anchor
1. This type creates an anchor at the current location in the current record.
Reference the anchor in links elsewhere to navigate to that specific section of the
record. Anchors are not “clickable”; they are targets of other links.
Removing Links
1. Select the linked text and select the “Remove link” button. The text will remain in
the record but will no longer link.
Link Dialog Fields
The fields presented depend on the selected “Type of link”.
Target
window
By default, most types of links load resources into the browser’s
current window. Links can optionally create new browser windows,
which can help keep visitors on the site, since when they close the
created window the first remains open. Opening a PDF in a new
window without closing the “parent” window containing the link can
also be convenient for clients, who often come to expect this type of
behaviour. Otherwise, new windows should be used sparingly to
avoid the sensation of “pop-ups” or an inconsistent client experience.
They are generally best used for external sites. Since the target
window has a name, all links specifying the target name will open in
the same window – the first link with that target name will open the
new window; any subsequent links chosen by the client will load the
resource into that existing window.
Anchor
Link to a named anchor; this feature is not widely used. Very long
pages should contain anchors, but in general these are best avoided
as clients typically read only the first screen of content, and it can be
hard to find the relevant section of a long page. Developers can also
configure the system to create anchors and links to them
automatically, for instance in a long record with a structured table of
contents.
Style Class
Alternate text
Visual style class name applied to the link text.
In addition to providing “hover/mouse-over/tool tip” text for the link,
content entered here is also visible to clients with disabilities, which
can help those clients in navigating the site.
Sitecore User Manual
Page 21 of 66
Sitecore is a trademark of Sitecore A/S. All other brand and product names are the property of their respective holders.
The contents of this document are the property of Sitecore A/S. Copyright © 2001-2004 Sitecore A/S. All rights reserved
9
Working with Images and Other Media
Images can be included in content using either the HTML Editor or fields specially
created for images. It is generally advisable to structure content as much as possible
using Templates; attempt to minimize the use of images in the HTML Editor.
Insert Image
1. Select the “Insert Image” icon in the
HTML Editor, or select “Click to
specify image” next to the image field
in a record.
2. Select “Media browser” to choose an
image.
3. Navigate to the appropriate folder and
upload any new images required.
Choose “Preview” to open a pane on
the right for previewing images within
the Media Library.
4. Select the image to insert and choose
“OK”.
5. Set properties on the image such as
height and width as needed. Always
enter Alternate text for clients with
disabilities, which is also visible to
people on slow connections until the
image loads or if image processing
has been disabled in the browser.
6. Select “OK” to embed the image in the
content. “Cancel” cancels the image
insertion. “Clear” reverses the
changes and returns to step 3 above.
Sitecore User Manual
Page 22 of 66
Sitecore is a trademark of Sitecore A/S. All other brand and product names are the property of their respective holders.
The contents of this document are the property of Sitecore A/S. Copyright © 2001-2004 Sitecore A/S. All rights reserved
Media File Properties
Alternate text
In addition to providing “hover/mouse-over/tool tip” text for the
link, content entered here is also visible to clients with
disabilities, which can help those clients in navigating the site.
Display width
Number of horizontal pixels the image should consume. Clear
this field to revert to the default image width.
Display height
Number of vertical pixels the image should consume. Clear this
field to revert to the default image height.
Horizontal space
Number of pixels creating a horizontal margin to the left and
right of the image.
Vertical space
Number of pixels creating a vertical margin above and below
the image.
Show image in
Sitecore Client
For image fields, controls whether the image appears when
Sitecore Users work with content referencing that image.
Disabling this option can increase performance and make
content easier to work with.
Display thumbnail
image
A thumbnail (preview) of the image will be displayed when
Sitecore Users work with content referencing the image. This is
generally preferable to displaying the entire image.
Sitecore User Manual
Page 23 of 66
Sitecore is a trademark of Sitecore A/S. All other brand and product names are the property of their respective holders.
The contents of this document are the property of Sitecore A/S. Copyright © 2001-2004 Sitecore A/S. All rights reserved
10
Uploading to the Media Library
Upload resources other than textual content (images, PDFs, etc.) using the Media
Library, where they are accessible to all records.
Media Upload (Import)
1. In Media Library, navigate to the
appropriate folder and select the
“Upload” button.
2. Select the “Browse” button to
locate a file for upload.
3. Select “Open” to select the file.
4. Set properties on the
image such as the name
and description.
5. Select “Upload” to import
the file.
Media Import Fields
File
Path to the file in Media Library.
Browse button
Select file to import.
Name
User-friendly name associated with the file.
Description
Alternate text and mouse-over description.
Preview button
Open a pane at the right-hand side of the media browser for
previewing assets.
Upload button
Upload the selected file to the current location in Media Library.
Close
Cancel import.
Sitecore User Manual
Page 24 of 66
Sitecore is a trademark of Sitecore A/S. All other brand and product names are the property of their respective holders.
The contents of this document are the property of Sitecore A/S. Copyright © 2001-2004 Sitecore A/S. All rights reserved
11
Working with Tables
1. Open the record.
2. In the text, set the cursor at the point
of desired table insertion.
3. Use the tasks interface to “Insert a
table”.
4. On the Tables Tool Bar, select the
“Insert table” button; use the grid to
size the table (Columns and rows can
be added or removed later)
5. Add content to the table. Note that
the left-hand pane of the user
interface provides tools for
manipulating the table, its rows and
cells.
Table, Row and Cell Properties
Table
Width
Horizontal size of the entire table in pixels or
percentage (generally a value such as 100%).
Height
Height of the entire table, generally in pixels.
Colour
Background colour for the entire table. The value is in
hexadecimal, but no # character is required.
Selecting the ellipses (“…”) activates the colour
picker.
Class
Visual style class name applied to the table.
Border
Border other than 0 will result in lines of the specified
thickness (in pixels) around the table and its cells.
Tables that control layout generally have their border
set to 0; data tables such as pricing charts generally
use other values.
Padding
Spacing, in pixels, for the margins around the text
within the cell.
Spacing
Thickness of the line between the cells, or if this is not
shown, the distance between the cell contents.
Sitecore User Manual
Page 25 of 66
Sitecore is a trademark of Sitecore A/S. All other brand and product names are the property of their respective holders.
The contents of this document are the property of Sitecore A/S. Copyright © 2001-2004 Sitecore A/S. All rights reserved
Row
Cell
Colour
Row Colour defines the background colour for an
entire row.
Class
Visual style class name applied to the row.
Colour
Cell Colour defines the background colour of the
selected cell.
Width
Cell Width defines the width of a particular cell using
either a percentage (for instance, 25%) or a number of
pixels.
Height
Height of a particular cell in pixels or percentage.
Class
Visual style class name applied to the cell.
Horizontal
Cell Horizontal alignment can be set to left, centre or
right.
Vertical
Cell Vertical alignment can be set to top, middle,
bottom or baseline.
No wrap
Selecting this option prevents the text within the cell
from wrapping, causing the cell to widen as needed
regardless of the Cell Width specification.
Column Span
Each Cell can span multiple table columns, similar to
merging cells in Word or Excel. Use this function with
Delete Cell, which removes the cell to be “spanned”.
See the graphic below for an example of Column
Span.
Row span
Each Cell can span multiple table rows, similar to
merging cells in Word or Excel. Use this function with
Delete Cell, which removes the cell to be “spanned”.
See the graphic below for an example of Row Span.
Sitecore User Manual
Page 26 of 66
Sitecore is a trademark of Sitecore A/S. All other brand and product names are the property of their respective holders.
The contents of this document are the property of Sitecore A/S. Copyright © 2001-2004 Sitecore A/S. All rights reserved
Other Table Functions
Additional table functions further customize the appearance of a table, for instance the
entire table may have a background image.
Table Background Image
1. Ensure the “Properties” Tool Bar is showing (place the cursor inside the table,
then select “Properties” from the Tree Structure Drop-Down).
2. In the Style field, select the ellipses (“…”) following “Click to set styles”.
3. Specify the background image in the “Style” box.
Sitecore User Manual
Page 27 of 66
Sitecore is a trademark of Sitecore A/S. All other brand and product names are the property of their respective holders.
The contents of this document are the property of Sitecore A/S. Copyright © 2001-2004 Sitecore A/S. All rights reserved
12
Creating Records
There are several ways to create new records:
•
Duplicate an existing record
•
Copy an existing record
•
Create an empty record
To create a new record based on an existing record, copy or duplicate the existing
record.
Duplicate Existing Record
1. Select the record which needs to
be duplicated.
2. Select “Duplicate”. A dialog box
will appear.
3. Enter the name of the new record
and select “OK”
4. The new record has been created.
When duplicating a record, the new
record will be located on the same level in
the tree structure as the one that is
duplicated.
Copy Existing Record
1. Select the record which needs to
be copied.
2. Select “Copy to...”
The following dialog box with the
content tree will appear.
3. Select where the new record
should be located in the content
tree.
4. Select “Copy”.
5. The new record has been created.
Sitecore User Manual
Page 28 of 66
Sitecore is a trademark of Sitecore A/S. All other brand and product names are the property of their respective holders.
The contents of this document are the property of Sitecore A/S. Copyright © 2001-2004 Sitecore A/S. All rights reserved
Create an Empty Record
1. Place the cursor on the location on the content tree where the new record is to be
created.
2. Select the “New” icon and a drop down menu appears if the settings allow the
creation of new records at that location.
3. Enter the name of the new record and select “OK”.
4. The new record has been created.
Sitecore User Manual
Page 29 of 66
Sitecore is a trademark of Sitecore A/S. All other brand and product names are the property of their respective holders.
The contents of this document are the property of Sitecore A/S. Copyright © 2001-2004 Sitecore A/S. All rights reserved
13
Publication
Changes made in Sitecore must be published to the published site.
Publish
1. Create new record, insert new content,
images etc. and save.
2. Select “Publish”.
3. The new changes are now visible on the
website.
See the changes before they appear on the Published website
To see how changes will look on the website, select “Start preview”. A new interface will
open where the new version of the record can be viewed before it has been published.
Sitecore User Manual
Page 30 of 66
Sitecore is a trademark of Sitecore A/S. All other brand and product names are the property of their respective holders.
The contents of this document are the property of Sitecore A/S. Copyright © 2001-2004 Sitecore A/S. All rights reserved
14
Content Approval
Depending on how the system is configured, not all Users may be authorized to publish
changes to the website. If this is the case, content must be approved before publishing.
A change made by a user without the right of approval will only be published after getting
approval from a user with such rights. This will generally be an administrator or a
webmaster.
There are two ways of seeing if there are changes or additions to the content that have
not yet been approved. The Approve button will appear on unapproved records, or
select the Approvals menu for all records ready for approval.
The Approvals menu lists changed records requiring approval.
Each document may show an Approve button.
Approval
1. Select “Approvals” in the menu bar.
2. The Tree Structure includes a menu
bar and a list of records needing
approval by the current user.
3. Select the record(s) and then
“Approve”.
4. A dialog appears to confirm
approval of the record(s).
5. To close the “Approvals” menu,
select the “X” in the upper right
corner of the menu.
Approve the Selected Record(s)
When one or more selections in the Content Tree require approval, an “Approve” button
appears to the right.
Sitecore User Manual
Page 31 of 66
Sitecore is a trademark of Sitecore A/S. All other brand and product names are the property of their respective holders.
The contents of this document are the property of Sitecore A/S. Copyright © 2001-2004 Sitecore A/S. All rights reserved
15
Shortcuts
Sitecore Favorites provide shortcuts to frequently used sections of the CMS.
Working with Favorites
1. Select “Favorites” in the menu bar.
2. To add a record to the list, select a record.
3. Select “Add” under Favorites.
4. Deleting Favorites will not delete the records.
5. Select the “X” in the upper right corner of the Favorites pane to close the menu.
Sitecore User Manual
Page 32 of 66
Sitecore is a trademark of Sitecore A/S. All other brand and product names are the property of their respective holders.
The contents of this document are the property of Sitecore A/S. Copyright © 2001-2004 Sitecore A/S. All rights reserved
16
Content Search
A search may be carried out based on various criteria in Sitecore. Search for records by
name of words in their content.
1. Open the search area by selecting
“Search” in the menu bar.
2. Enter the search text and select the
green arrow.
3. A list of records matching the specified criteria
will appear.
4. Additional options may be specified by
selecting the icon next to Search options.
5. In order to search for words occurring in
content, enter the specific word and select the
“Include fields” check box below.
6. Then select the green arrow.
7. To close the “Search” menu, select the “X” in
the upper right corner of the menu.
Search Options
Include fields
Search record content.
Exact phrase
Search for an exact phrase.
Case-sensitive
Return matches capitalized exactly as the search text
entered.
Use XPath expression
Searching records matching an XPath specification.
Sitecore User Manual
Page 33 of 66
Sitecore is a trademark of Sitecore A/S. All other brand and product names are the property of their respective holders.
The contents of this document are the property of Sitecore A/S. Copyright © 2001-2004 Sitecore A/S. All rights reserved
17
Sitecore Users
Security permissions can be configured on each section or even record in Sitecore for
read, write, approval, publication and other actions. As Sitecore supports inheritance of
security settings, an organization may specify responsibilities to any level of granularity.
Security considerations should be defined before configuring Sitecore Users; then an
administrator grants access to the system, sets Users’ options and specifies which roles
they are allowed to fulfil.
The following table provides an example of how the rights could be configured:
Members
Rights
1
Contributor
Read and update news records.
2
Editor
Create, read, update and delete any record.
3
Administrator
Full rights on all records. In this configuration, the
administrator is the only Sitecore User who can publish
updated records to the website.
Sitecore User Manual
Page 34 of 66
Sitecore is a trademark of Sitecore A/S. All other brand and product names are the property of their respective holders.
The contents of this document are the property of Sitecore A/S. Copyright © 2001-2004 Sitecore A/S. All rights reserved
17.1
Creating a User
1. Select the menu item “System”,
then “New…” A dialog box
appears.
2. Select “Sitecore User” and
select “Create”. Another dialog
box appears.
3. Enter the User ID of the new
Sitecore User.
4. Fill in the fields to set options for
the new User.
Sitecore User Manual
Page 35 of 66
Sitecore is a trademark of Sitecore A/S. All other brand and product names are the property of their respective holders.
The contents of this document are the property of Sitecore A/S. Copyright © 2001-2004 Sitecore A/S. All rights reserved
Alternatively:
1. Select “Security” from the Tree Structure Drop-Down.
2. Create and configure CMS and Extranet Users and
groups by selecting “Show manager”, green ‘tick’ icon.
3. Select “Create a new Sitecore User”.
Another dialog box appears.
4. Enter the User ID of the new User.
5. Fill in the fields to set options for the new
User.
17.2
Creating a Group
To create a new group, proceed as with the new User, but select “Create a new Sitecore
security group” instead.
Sitecore User Manual
Page 36 of 66
Sitecore is a trademark of Sitecore A/S. All other brand and product names are the property of their respective holders.
The contents of this document are the property of Sitecore A/S. Copyright © 2001-2004 Sitecore A/S. All rights reserved
17.3
The User “Data” tab
User options including roles are specified on the “Data” tab when the user’s node is
selected in the Tree Structure.
User “Data” Fields
Full name
The full name of this User, which will appear in the Status
Bar when logged in.
Password
This User’s password.
Blank Password
If selected, this User has no password.
Email
This User’s email address.
Membership
Roles are configured by associating Users with any number
of groups.
Administrator
If selected, this User can perform any task in the system.
Developer
If selected, this User can perform development tasks in the
system.
Can preview
If selected, this User can use the web previewing
environment.
Can publish
If selected, this User may publish to the website.
Can boost
If selected, this User may boost the number of allowed
simultaneous Sitecore Users for a limited period of time.
Default rights
Further information on this field is available to developers
at http://sdn.Sitecore.net.
Sitecore User Manual
Page 37 of 66
Sitecore is a trademark of Sitecore A/S. All other brand and product names are the property of their respective holders.
The contents of this document are the property of Sitecore A/S. Copyright © 2001-2004 Sitecore A/S. All rights reserved
17.4
The “Settings” Tab
User preferences are specified on the “Settings” tab when the User’s node is selected in
the Tree Structure.
User “Settings” Tab
Default language
Default content language for this User.
Client language
The User Interface client language for this Sitecore User.
Start in preview/webedit
Sitecore will open directly in preview mode for this User.
My work
Records configured for access by the current User.
Theme
Developers have the option of configuring colours and
icons for Sitecore Users. The administrator may then
select the view for each User.
Desktop
By default, all CMS Users access the CMS through the
Sitecore User Interface. An organization can develop a
custom user interface, which would be specified here.
Default item
The default selection upon login to Sitecore.
Sitecore User Manual
Page 38 of 66
Sitecore is a trademark of Sitecore A/S. All other brand and product names are the property of their respective holders.
The contents of this document are the property of Sitecore A/S. Copyright © 2001-2004 Sitecore A/S. All rights reserved
18
Rights
18.1
Sitecore Users
For flexibility, groups associated with sections and records control User rights rather than
associating Users with content directly. Groups are created in a manner similar to Users.
Before creating groups and assigning rights, determine:
How many different groups are needed?
What access do the various groups need to the various sections
and records?
After answering these questions, create the groups and associate
them with the appropriate roles on sections and records, then assign
specific members to these groups.
Assignment of rights on content
The fastest way to assign rights is to start from the top section of
Content Tree that pertains to the group and use permissions
inheritance to copy rights to all descendant records, working
down the structure.
Transfer of rights to underlying records
General rights may be applied to the home record with all the
underlying records assigned the same rights by default. More
specific rights would then be assigned to those descendants
that require special rights, which can be applied at any level in
the Content Tree. Records can either inherit rights from their
parent or set rights explicitly; rights associated with two
records at the same level do not affect each other. For
instance, rights on “Activities” in the diagrams will not be
affected by rights assigned to the “Club” folder.
Select “Apply to children” to configure new child items to inherit permissions from the
current node. The resulting dialog even allows different configurations to be applied
based on which Template is used to create the new record.
Sitecore User Manual
Page 39 of 66
Sitecore is a trademark of Sitecore A/S. All other brand and product names are the property of their respective holders.
The contents of this document are the property of Sitecore A/S. Copyright © 2001-2004 Sitecore A/S. All rights reserved
Assigning Rights
1. Select a record in the Content
Tree.
2. Select the “Security” tab.
3. Select the arrow next to the
“Security” field. A dialog box
appears.
4. Select the rights for each group
associated with the current
record.
5. To apply the same rights to
descendants, select “Apply to
children”. A new dialog box
appears in which rights can be
assigned to new records or new
records of specific types.
Explanation of Rights
Admin
View rights associated with an item.
Approve
Approve items.
Create
Create new items.
Delete
Delete items.
Publish
Publish an item and its descendants, such as a sub-site.
Read
View items.
Rename
Rename items.
Write
Edit content associated with items.
None
No permissions on items.
Sitecore User Manual
Page 40 of 66
Sitecore is a trademark of Sitecore A/S. All other brand and product names are the property of their respective holders.
The contents of this document are the property of Sitecore A/S. Copyright © 2001-2004 Sitecore A/S. All rights reserved
18.2
Extranet Users
Sitecore Users are allowed to work with content in the CMS. Sitecore also allows
Extranet Users on the published site with specific rights to view that content. Access
configuration for Extranet Users is conducted as for Sitecore Users; see the step-by-step
instructions in Section 17 (User Configuration). Extranet Users must log in to see the
generally restricted content to which only they are allowed access.
1. By default, everyone has
read access to all items.
Select the item or section
where rights must be
restricted.
2. Select the “Security” tab.
3. Select the arrow next to
the “Extranet security”
field. A dialog appears.
4. Select the groups that
need access to the item
or section.
5. To configure a section,
select “Apply to children”.
Sitecore User Manual
Page 41 of 66
Sitecore is a trademark of Sitecore A/S. All other brand and product names are the property of their respective holders.
The contents of this document are the property of Sitecore A/S. Copyright © 2001-2004 Sitecore A/S. All rights reserved
19
Database Administration
Use the “Database tasks” interface to periodically archive the Sitecore database. Small
reversions and restorations of accidentally deleted content should be performed
manually, but backups should also be available to restore the entire site to a previous
state.
Database tasks
Save database
Archive the database.
Backup database
Backup the database.
Compact database
Consolidate space in the database.
Reload database from the latest file
Restore the last saved version of the database.
Sitecore User Manual
Page 42 of 66
Sitecore is a trademark of Sitecore A/S. All other brand and product names are the property of their respective holders.
The contents of this document are the property of Sitecore A/S. Copyright © 2001-2004 Sitecore A/S. All rights reserved
20
Sitecore User Interface Controls
Sitecore attempts to provide an intuitive User Interface similar to Microsoft Word,
Windows Explorer and other common tools. The screenshot below is a view of the
Content area, which provides controls such as menus and button bars for creating and
maintaining content.
Tree
Structure
Drop-Down
Menu Bar
Tool Bars
Tree
Structure
Version
Language
Content
Tree
Status Bar
Tabs
Sitecore User Interface Controls
Menu bars
The Menu Bar provides functions for working with the entire content
of the site, such as “Backup” and “Publish to website”.
Tree Structure /
Content Tree
The Tree Structure displays the items existing beneath the current
selection, much like Windows Explorer. In the Content Area, this
will contain the hierarchy of folders and content records comprising
the site.
Status Bar
Contains informational messages from Sitecore regarding current
activity.
Tabs
The tabs allow access to different groups of data elements (fields)
in the item selected in the Content Tree.
Tool Bar
Contains action buttons relevant to the item selected in the Content
Tree, such as “Save”, “Delete” and “Create”.
Version
Displays the current version of the selected record. Use this dropdown to view previous versions of the record.
Language
The Language element displays the language of the selected
content. Use this drop-down to work with other languages of the
current record.
Each element will be explained more thoroughly in subsequent sections of this document.
Sitecore User Manual
Page 43 of 66
Sitecore is a trademark of Sitecore A/S. All other brand and product names are the property of their respective holders.
The contents of this document are the property of Sitecore A/S. Copyright © 2001-2004 Sitecore A/S. All rights reserved
20.1
Top Menu Bar
The Top Menu Bar contains various menus concerning all existing content in the
Sitecore system.
Below there are explanations to the Menu Bar items.
System Menu
New...
Opens the interface for creating
new items such as Users and
groups.
Save database
Exports the entire database to a
file, for backup or replication to
another system.
Backup database
Makes a backup copy of the
entire database.
Compact database
Condenses the space used by
the database.
Logout
Logs the User out of the CMS
system, returning to the login
screen.
View Menu
Opens the various interfaces for accomplishing
various tasks in Sitecore. More information on
different task activities will be provided in subsequent
sections of this document.
Publishing Menu
Publish
Publish modified content to the
published website.
Start preview
Opens up a browser window
with Content Markers for
validating content changes
before publication.
End preview
Closes the preview window
opened with “Start preview”.
Sitecore User Manual
Page 44 of 66
Sitecore is a trademark of Sitecore A/S. All other brand and product names are the property of their respective holders.
The contents of this document are the property of Sitecore A/S. Copyright © 2001-2004 Sitecore A/S. All rights reserved
Tools Menu
Install Package
Used mainly by administrators
to install Sitecore modules,
import content, etc.
Media library
Create folders, uploading and
renaming images and other
binary assets in the Media
Library.
Packager
Used by developers to maintain
Packages or export items from
Sitecore as a compressed
Package. Refer to developer
documentation for additional
details.
Additional functions and new menus may appear if
modules such as “InfoPath” or “LDAP” have been
implemented.
Help Menu
User manual
Opens a window with the online
User Manual.
Developer manual
Opens the Sitecore Developer
Network at
http://sdn.Sitecore.net, where
authenticated Sitecore
developers access technical
information about the product.
Sitecore on the net
Opens http://www.Sitecore.net,
Sitecore’s primary website.
Licenses
Information concerning license
agreements for Sitecore and
the various modules.
About Sitecore
Information about the Sitecore
instance.
Sitecore User Manual
Page 45 of 66
Sitecore is a trademark of Sitecore A/S. All other brand and product names are the property of their respective holders.
The contents of this document are the property of Sitecore A/S. Copyright © 2001-2004 Sitecore A/S. All rights reserved
20.2
Underlying Menu Bar
This Underlying Menu Bar provides shortcuts for various Sitecore activities such as
accessing Sitecore “Favorites” or “Search” functionality. Close items which render in the
Tree Structure by selecting the “X” icon in the upper right corner of the pane.
Underlying Menu Bar
Back/Forward
Similar to Internet Explorer but with previously
viewed Sitecore items.
Home
Similar to Internet Explorer but to the User’s
Sitecore home record.
Content
Load the Content Tree if another item has
been opened in the Tree Structure.
Search
Search Sitecore records and/or their content
for specific terms.
Favorites
Similar to Internet Explorer but with Sitecore
Favorites as defined by the user.
Approvals
Load the Content Tree with a list of the
records requiring approval before publication
to the site.
My work
An administrator or developer will typically
configure My Work for Users.
WebEdit
Will open Sitecore in WebEdit/content marker
mode
Publish
Publish content to the website.
Sitecore User Manual
Page 46 of 66
Sitecore is a trademark of Sitecore A/S. All other brand and product names are the property of their respective holders.
The contents of this document are the property of Sitecore A/S. Copyright © 2001-2004 Sitecore A/S. All rights reserved
21
Tree Structure
Select a category of Sitecore items using the
Tree Structure Drop-Down. Not all Users have
permission to view all of the item types shown,
but typically at least Content and the Media
Library appear.
Select “Content” to view all records and their
content.
Open the
Manager.
Refresh
Content
Tree.
Select “Media library” to work with images,
PDFs and other binary assets available on the
website.
Select Security to configure Users and groups.
The Manager button provides a menu of
wizards for quickly managing the tasks relevant
to the current selection in the Tree Structure.
Content Tree
The Content Tree, visible when Content is selected
in the Tree Structure Drop-Down, provides access
to content records. The structure in which these
records are saved commonly resembles the
structure and navigation of the published site.
Different types of records may be represented by
different icons. In addition to records there may
also be folders which simply contain records and
subfolders. Unlike operating system file systems,
in Sitecore it is possible to create records as
children of other records – there is not always a
need to create a folder to contain the children, and
no special file names are needed (it is best to use
letters and numbers). Use the plus (+) and minus
(-) symbols to expand and collapse the tree below
each item.
Sitecore User Manual
Page 47 of 66
Sitecore is a trademark of Sitecore A/S. All other brand and product names are the property of their respective holders.
The contents of this document are the property of Sitecore A/S. Copyright © 2001-2004 Sitecore A/S. All rights reserved
22
Status Bar
The Status Bar contains messages from the Sitecore system. This tool is divided into
four sections:
Information (or
error message)
concerning the
current action
Document
Status
User
Title
The Status Bar
Information
The Information section may indicate that the system is “Ready”
for activity, that it is busy publishing to the site or various other
status and error messages.
Document
Status
The Document Status section may be blank or “Modified” if
changes have been made to content since the record was last
saved.
Title
The name of the current record, often useful after scrolling away
from the active record in the Content Tree.
User
The User section indicates the ID of the User currently logged in to
Sitecore.
Sitecore User Manual
Page 48 of 66
Sitecore is a trademark of Sitecore A/S. All other brand and product names are the property of their respective holders.
The contents of this document are the property of Sitecore A/S. Copyright © 2001-2004 Sitecore A/S. All rights reserved
23
Tabs
In addition to the structured data fields making up the records, all items have various
control options such as specifying when the record should be published to or expired
from the site. Rather than placing these all on a single “page” of the User Interface,
these items are split across logical tabs. The list of tabs visible is limited by the User’s
configuration. For relatively complex record types, additional tabs may be used to further
subdivide the interface for maintaining records.
23.1
The “Data” Tab
To maintain the record content, such as images and text, select the “Data” tab or any of
the custom tabs implemented for your solution. The specific fields that appear depend
on the organization’s implementation of Sitecore – below is a general example:
Sitecore User Manual
Page 49 of 66
Sitecore is a trademark of Sitecore A/S. All other brand and product names are the property of their respective holders.
The contents of this document are the property of Sitecore A/S. Copyright © 2001-2004 Sitecore A/S. All rights reserved
23.2
“Publishing” Tab
Use the Publishing Tab to set publishing options for the record, such as when it should
appear on or be removed from the published site, or to indicate that a record is not to be
published.
Though an organization may choose to automate the publication process, by default
publication requires that the User select the “Publish” button before changes will take
effect on the site.
Publishing groups are used to control batches of content which are deployed
simultaneously – this will typically be configured by the Sitecore administrator. By default
there is one logical publishing group for all content.
Publishing
groups
Publishing group(s) to which the current selected record belongs.
Publish date
Date and time when the selected record is to be published to the
site. The arrow icon next to this field provides a calendar for
selection of date and time for publication.
Un-publish date
Date and time for removing the record from the published site.
Do not publish
Prevent the item from being published to the site.
Sitecore User Manual
Page 50 of 66
Sitecore is a trademark of Sitecore A/S. All other brand and product names are the property of their respective holders.
The contents of this document are the property of Sitecore A/S. Copyright © 2001-2004 Sitecore A/S. All rights reserved
23.3
“Layout” Tab
The “Layout” tab is typically for developers and can be used to control how the selected
record should be displayed on the published site. In general, it is preferable to set layout
options on a Template (described separately) rather than individual records. Further
information may be found on http://sdn.Sitecore.net.
23.4
“Masters” Tab
A Master can be used to control the default values inserted when a new record is
created. A Master Hierarchy can be used to configure any child records which should be
created automatically beneath a new record. These are typically configured by the
Sitecore administrator.
The “Masters” tab specifies which Masters can be used to create records beneath the
current item.
Sitecore User Manual
Page 51 of 66
Sitecore is a trademark of Sitecore A/S. All other brand and product names are the property of their respective holders.
The contents of this document are the property of Sitecore A/S. Copyright © 2001-2004 Sitecore A/S. All rights reserved
23.5
“Security” Tab
Use the Security tab to control access to the record.
Copy parent
rights
This item is applicable to Masters. If this item is selected, children
created below the current record will have the same security settings
as the parent record.
Security
Use the Security field to control which Sitecore Users have which
rights on the record, such as who is allowed to edit, approve or
publish the selected record. In the dialog that appears when this
item is selected, use “Apply to children”, to apply the specified
security rights to the children of the current record.
Extranet
security
The term Extranet can be somewhat confusing. This field is used to
control which clients on the published site will have permission to
view the current record when it is published. The interface for
specifying Extranet security is the same as the interface for
specifying Sitecore security.
Sitecore User Manual
Page 52 of 66
Sitecore is a trademark of Sitecore A/S. All other brand and product names are the property of their respective holders.
The contents of this document are the property of Sitecore A/S. Copyright © 2001-2004 Sitecore A/S. All rights reserved
23.6
“System” Tab
The System tab contains various options primarily relevant to developers, such as
specifying which Template is associated with the record.
Name
The name of the record. This is the same name as can be seen in the
Content Tree.
ID
All records have a unique ID, which may be viewed here.
Template
This item presents/controls the Template associated with the record,
which defines the data structure and possibly presentation options.
Navigate directly to the Template using this field (for instance, to add a
field), or to change the Template associated with the record.
Master
This field is reserved for future versions of Sitecore. The Master
associated with the record may be visible here.
Sort order
Depending on the implementation, this field can be used to control the
sorting (such as in navigation) of the records on the published site.
Icon
The Icon field can be used to override the default icon associated with
records in the Content Tree, which can make it easier to identify content
using this interface.
Style
This field can be used to control the presentation of the field in the
Content Tree, such as highlighting certain record names using red text
(“colour=red;”).
Editor
A reference to an ASP.NET URL can be placed here to use an HTML
editor other than the default shipped with Sitecore. The insertion will be
shown on an additional tab named “editor”.
Sitecore User Manual
Page 53 of 66
Sitecore is a trademark of Sitecore A/S. All other brand and product names are the property of their respective holders.
The contents of this document are the property of Sitecore A/S. Copyright © 2001-2004 Sitecore A/S. All rights reserved
24
The Tool Bar
Depending on the configuration of permissions in the Sitecore system, various buttons
from the list below are exposed in the Tool Bar. Many of these buttons open additional
dialog boxes for specifying action options, such as the new name for a record in the
“Rename” function.
Note that if record content contains links to other records, renaming, moving and deleting
can cause broken links on the site and should be handled carefully. It is best for links to
be generated dynamically.
New
Use the “New” button to create new records under the
selected record. Based on the configuration of the selected
record, a different list of the possible child record types will be
presented (the drop-down menu shown under the button).
This list is typically configured by the Sitecore administrator.
The “New item from template” option allows a Template to be
selected for creating a new record.
Save
Save changes to the current record.
Rename
Rename a record.
Duplicate
Duplicates the current record to the same level in the Content
Tree.
Move to...
Moves the selected record to another level in the Content
Tree.
Copy to...
Copies the selected record and any children to another level
in the Content Tree.
Delete
Deletes the selected record. A warning box appears before
the record is actually deleted.
Clipboard
Functionality for developers.
Copy
Paste
Use Copy and Paste to copy items, for instance to another
website.
Delete all sub-items
Deletes the current record and all descendants.
Re-sort all sub-items
Deletes the “sort order” value from all child records.
Deactivate linked
databases
Deactivates all linked databases, such as file system plug-ins.
Item tasks
Shows an interface providing wizards for the most common
actions for the selected record (see the image below for an
example). Many of the wizards duplicate functionality in the
Tool Bar.
Sitecore User Manual
Page 54 of 66
Sitecore is a trademark of Sitecore A/S. All other brand and product names are the property of their respective holders.
The contents of this document are the property of Sitecore A/S. Copyright © 2001-2004 Sitecore A/S. All rights reserved
Save any changes to
this item in the database
Save changes to the selected record.
Rename this item
Rename the selected record.
Delete this item
Delete the selected record.
View version of this item
Show previous versions of the selected record; optionally
create new versions.
Publish this item and
any sub items
Publish the selected record and its children.
Duplicate this item
Duplicate the record at the same level in the Content Tree.
Copy this item to
another location
Copy the selected record to another location in the
Content Tree.
Move this item from this
location to another
Move the selected record to another location in the
Content Tree.
Sitecore User Manual
Page 55 of 66
Sitecore is a trademark of Sitecore A/S. All other brand and product names are the property of their respective holders.
The contents of this document are the property of Sitecore A/S. Copyright © 2001-2004 Sitecore A/S. All rights reserved
25
Language Version
Depending on User permissions and Sitecore configuration, the Language item can be
used to edit content (including image and other references) in other languages. The
location in the Content Tree, record structure, name, ID, sort order and other properties
of the record remain unchanged, but a view of the translated content will appear.
Change
language
here
25.1
Versions
Keep any number of
versions of a single
record. The versions
may be viewed and new
versions created using
the Version item.
Change
version here
Select “View list” at the
bottom of the dropdown
menu to view, create and
delete versions, or if the
list of versions is so long
that it is hard to work
with.
Sitecore User Manual
Page 56 of 66
Sitecore is a trademark of Sitecore A/S. All other brand and product names are the property of their respective holders.
The contents of this document are the property of Sitecore A/S. Copyright © 2001-2004 Sitecore A/S. All rights reserved
26
Context (Right-Click) Menus
Different Context Menus appear when “right-clicking” items in Sitecore.
Record context menu
Tree structure
context menu
Field context menu
Sitecore User Manual
Page 57 of 66
Sitecore is a trademark of Sitecore A/S. All other brand and product names are the property of their respective holders.
The contents of this document are the property of Sitecore A/S. Copyright © 2001-2004 Sitecore A/S. All rights reserved
26.1
Record Context Menu
Context Menu Items for Records
Back
Forward
These function in the same manner as the back and
forward buttons of the Internet Explorer, but only within
the Sitecore User Interface.
Move first
Move the selected record to the top of the current list in
the Content Tree. In some implementations this can
affect the sorting of navigation; otherwise it can be used
to move most frequently used records to the top of the
list.
Move up
Similar to “Move first”, but only moves the record one step
up in the list.
Move down
Opposite of “Move up”, moves the selected record down
one step in the list.
Move last
Opposite of “Move first”, moves the selected record to last
place in the list.
Move to...
Move the selected record to another level in the Content
Tree.
Copy to...
Copy the selected record and any child items to another
location in the Content Tree.
Delete
Delete the selected record. A warning dialog allows
cancellation in case the menu item was selected by
accident.
Rename
Rename the selected record.
New item...
Presents a dialog which allows the User to select a
Template for creating a new item under the current
record.
Refresh
Refresh the Tree Structure.
Sitecore User Manual
Page 58 of 66
Sitecore is a trademark of Sitecore A/S. All other brand and product names are the property of their respective holders.
The contents of this document are the property of Sitecore A/S. Copyright © 2001-2004 Sitecore A/S. All rights reserved
26.2
Tree Structure Context Menu
Tree Structure Context Menu items
Back
Forward
26.3
These function in the same manner as the back and
forward buttons of the Internet Explorer, but only within
the Sitecore User Interface.
New item...
Create a new record using a Template.
Content
Show the Content Tree in the Tree Structure, in case the
User has navigated to another Sitecore location.
Media library
Show the Media Library in the Tree Structure.
Masters
Show the Masters Tree in the Tree Structure, for creating
and maintaining Masters. This is generally used by
developers.
Templates
Show the Templates Tree in the Tree Structure, for
creating and maintaining Templates. This is generally
used by developers.
Layout
Show the Layout Tree in the Tree Structure, for creating
and maintaining Layouts. This is generally used by
developers.
Security
Show the Security Tree in the Tree Structure.
Administrators typically use this to configure Sitecore
security.
System
Show the System Tree in the Tree Structure.
Administrators typically use this to configure the Sitecore
system.
Refresh
Refresh the data in the Tree Structure. This is not the
same as the browser’s refresh button, which typically is
not needed within Sitecore.
Field Context Menu
Field Context Menu Items
Save
Save the current record.
Save as a
new version
Store the current record as a new version.
Publish this
item
Publish the current record and all of its children.
Sitecore User Manual
Page 59 of 66
Sitecore is a trademark of Sitecore A/S. All other brand and product names are the property of their respective holders.
The contents of this document are the property of Sitecore A/S. Copyright © 2001-2004 Sitecore A/S. All rights reserved
Move to...
Move the selected record to another location in the Tree
Structure.
Copy to...
Copy the selected record and all children to another
location in the Tree Structure.
Tasks
Show the Tasks interface with options relevant to the
current item.
Delete
Delete the current record. A confirmation dialog is
presented to avoid accidental deletion.
Rename
Rename the record.
Add to
Favorites
Add the record to “Favorites” within Sitecore.
Refresh
Refresh the field area.
Sitecore User Manual
Page 60 of 66
Sitecore is a trademark of Sitecore A/S. All other brand and product names are the property of their respective holders.
The contents of this document are the property of Sitecore A/S. Copyright © 2001-2004 Sitecore A/S. All rights reserved
27
Task Interfaces
Task interfaces, or wizards, are provided to make it easy performing various tasks
through out the system. The tasks are related to either an area or an item. The task
interface can be opened for an area by clicking the Show manager button in the Tree
structure menu, or in the Tool bar menu for a selected item.
The task list appears with a blue background and contains a list of tasks for the selected
item or area. The list contains wizards for performing typical tasks, where the selection
opens the appropriate wizard or dialog for completing that task. E.g. this could be
creating or finding a user in the Security area or go back to the last selected item in the
content section.
The content of the task list will change depending on the position in the tree structure.
Where alternative task lists exists these will be displayed. If there are no related task lists
only the task list are presented.
Sitecore User Manual
Page 61 of 66
Sitecore is a trademark of Sitecore A/S. All other brand and product names are the property of their respective holders.
The contents of this document are the property of Sitecore A/S. Copyright © 2001-2004 Sitecore A/S. All rights reserved
28
HTML Editor Details
Because it operates in the browser, an HTML editor behaves slightly differently from
other tools such as Microsoft Word. Most icons resemble those known from Word and
work in the same way. Some functions not available in Word are available as well.
HTML Editor icons
Accept
Saves changes and close the HTML editor. This is
different from saving the record; it simply updates a
field in the record before save.
Cancel
Lose changes made in the HTML editor since it was
opened.
Save
Saves all changes to the record since the last save.
Tasks
Open additional menus (described below). Menus
may be closed using the “X” icon in the upper right
corner.
Styles
Format text using predefined text styles as configured
by a developer or administrator.
Bold
Bold font
Italic
Italic font
Underline
Underline font
Colour
By clicking on this icon, a colour palette appears from
which a colour for the text may be selected.
Sitecore User Manual
Page 62 of 66
Sitecore is a trademark of Sitecore A/S. All other brand and product names are the property of their respective holders.
The contents of this document are the property of Sitecore A/S. Copyright © 2001-2004 Sitecore A/S. All rights reserved
Justify left
Aligns the text to the left.
Justify centre
Centres the text.
Justify right
Aligns the text to the right.
Undo
Undo the last typing.
Cut
Cuts
Copy
Copies
Paste
Inserts the copied or cut section.
Show all tags
Shows the tags in the text area. This icon contains an
extra feature which needs installing by the user. This
is very simple, the only thing required is to be
especially attentive to close the Internet Explorer, and
reopen it before being able to use the newly installed
functionality.
To fully benefit from this functionality, knowledge of
HTML is necessary.
Numbered list
Creates a numbered list.
Bulleted list
Creates a bulleted list.
Increase
indent
Makes an indent in the text.
Decrease
indent
Moves back the text.
Insert table
Opens a side menu bar from where you may insert
tables. You may also select various properties for the
tables. This icon may also be used if you want to edit
an existing table.
Toggle
design
Is used by developers.
Insert image
Inserts an image. A dialogue box opens from where
you may insert an image and then select various
properties applying to the image.
Align image
left
Aligns the image to the left. If you mark an inserted
image you may then select to align the image to the
left or to the right.
Align image
right
Aligns the image to the right.
Remove
image
alignment
Ensure the selected text or image is not linked.
Sitecore User Manual
Page 63 of 66
Sitecore is a trademark of Sitecore A/S. All other brand and product names are the property of their respective holders.
The contents of this document are the property of Sitecore A/S. Copyright © 2001-2004 Sitecore A/S. All rights reserved
Insert link
Insert a link, or make the selected text or image a
link.
Remove link
Removes previous created links.
Insert anchor
Inserts an anchor. An input box appears where you
may enter the name of the anchor.
Remove
anchor
Removes a previously created anchor
Clear all
content
Deletes everything in the text field. By using this icon
you ensure that all text and previous formats have
been erased.
Remove
formatting
tags
Deletes formats to text (bold, italic and underlined).
Clean HTML
If you copy from Word, this icon may be used to
“clean” the text. It ensures that all superfluous is
deleted in order to leave a clean HTML.
Text/HTML
code tab
You may choose to view the code of the text by
changing the editor to HTML code.
Sitecore User Manual
Page 64 of 66
Sitecore is a trademark of Sitecore A/S. All other brand and product names are the property of their respective holders.
The contents of this document are the property of Sitecore A/S. Copyright © 2001-2004 Sitecore A/S. All rights reserved
29
Terms and Definitions
Approval - In many Sitecore implementations, content created or updated by one CMS
User must be approved by another User before Publication.
Content Management System (CMS) - CMS technology has a variety of intentions
including:
• Simplified website maintenance for CMS Users
• Publication checkpoints to ensure site integrity
• Consistent Published Site User experience
CMS Administrators - CMS Administrators are Developers with additional responsibility
and access such as ensuring reliable operation, creating User IDs for new CMS Users
and granting permissions.
CMS Developers - CMS Developers are Users with additional privileges to maintain
code.
CMS (Sitecore) User - CMS Users who are given rights to create, edit, approve, delete,
rename, copy, move, approve, publish and otherwise “maintain” the content comprising
the Published Site.
Content Markers - Content Markers are the coloured discs that appear over content,
which supports its maintenance in an intuitive Web Preview mode.
Content Tree - The Content Tree is the section Sitecore displays in the Tree Structure
by default. It contains the hierarchy of folders and content records comprising the site.
Current Item/Record - By selecting an icon in the Content Tree, that icon becomes the
Current or Selected Item. When a User selects a Record, the main pane will load its
content using Fields associated with the Template originally used to create that Record.
Extranet (Authenticated) Published Site User - An Authenticated User of the
Published Site provides credentials authorizing access not granted to all Published Site
Users. Sitecore refers to Authenticated Users of the Published Site as Extranet Users.
Field - Templates employ different types of Fields to collect data.
Item - Item refers to any icon appearing in the content tree, which may or may not
contain other Items.
Master - Masters specify default configurations when CMS Users create new Records.
They also control where Users can create different types of records, the default content
of those records, and whether records are created with specific children by default.
Media Library (Media Browser) - The Media Library, accessed with the Media Browser,
is used to manage media files such as images and PDFs.
Publication - Once new or changed content has been approved, it can be published,
making it available to Published Site Users.
Published Site (Live Site) - The Published Site or Live Site is an internet or intranet site
which uses content and other resources managed by the CMS.
Published Site User (Client) - A Published Site User or Client browses the Published
Site.
Sitecore User Manual
Page 65 of 66
Sitecore is a trademark of Sitecore A/S. All other brand and product names are the property of their respective holders.
The contents of this document are the property of Sitecore A/S. Copyright © 2001-2004 Sitecore A/S. All rights reserved
Record (Document) - Records are created when CMS Users save data entered into a
template. Sitecore sometimes refers to Records as Documents.
Section - A Section is typically an Item which contains other Items at a relatively high
level of the Content Tree, such as /home, /home/hr, /global, etc. A section is commonly
a Record, but may be a folder or other type with no content fields.
Template - CMS Developers create Templates to structure content into fields (e.g.
Headline, Date, Location, Body and other fields for a news article).
Tree Structure - The left-hand pane of the Sitecore User Interface is referred to as the
Tree Structure, working much like a tool palette in windows applications.
Tree Structure Drop-Down - The main Drop-Down menu at the top of the Tree
Structure controls which section of Sitecore is visible in the Tree Structure.
Selected Item/Record - See Current Item/Record.
Sitecore User Manual
Page 66 of 66
Sitecore is a trademark of Sitecore A/S. All other brand and product names are the property of their respective holders.
The contents of this document are the property of Sitecore A/S. Copyright © 2001-2004 Sitecore A/S. All rights reserved