1
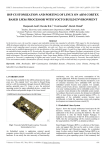
USER MANUAL
3 Evergreen Close, Iwade, Kent, ME9 8LU
T +44 (0) 1795 439656, M +44 (0) 7767 600086
E: [email protected]
Visit Our Web Site: www.aviannegreen.com
Model No FU02-090
ETSI FSK/DTMF COMPLIANT
INTRODUCTION
This Electronic Push Button Telephone is an Integrated Telephone
The FU02-090 is a feature rich telephone instrument designed to provide
a wide range of facilities and services incorporating the latest state-of-the
BATTERIES :
The batteries used on your phone are AA pencil batteries of 1.5V each.
You need 3 such batteries to run the phone functions optimally. Replace
the used batteries immediately on the "BATTERY LOW" indication that
flashes on the phone LCD display.
art technologies, All the features are user friendly.
This design brings you enhanced voice clarity, high performance and
Some Precautions:
good reliability.
ACCESSORIES:
a) Handset
While replacing batteries, make sure that the phone is disconnected.
Replace all batteries together, do not try & mix new batteries with old
batteries.
b) Coil Handset Cord
d) AA size Batteries 3 Nos
Be sure to replace the batteries within 5 minutes of their removal to
retain the phone settings. Else you would have to reset the functions
on your phone.
e) User Manual
Do not throw used batteries in any fire.
c) Telephone Line Cord
SALIENT FEATURES OF FU02-090 PHONE
Dual mode caller ID (DTMF/FSK)
To review the Missed Calls and Received Calls through Up/down Keys
Single touch "Outx" Key to view the recent dialed numbers
Multiple ring options with 8 ring tones
Real time clock, date, month and year settings
Duplex speaker phone with 4 levels of volume adjustment
Pre dialing function, to edit a wrong entry before dialing out
Ringer volume adjustment from 0 to 3 levels
4 levels of LCD contrast
Temporary ringer mute
Adjustable Flash time
Mute and redial function
One touch keys for emergency number’s.
Menu key:interface for navigating through the phone menu
Back Light facility with ON / OFF Provision
(back light works with batteries only)
Head set Feature
2
11
HEADSET SETTING
FLASH / RECALL KEY:
When the phone is connected to the EPABX ,EPABX flash key can be used to
activate additional features, e.g.transfer of a call or pick up of a call. F
flash timing can be set to 90, 100, 110, 200, 300, 400, 500,& 600ms
OUTX KEY:
Under stand by mode, press OUTX to view the dialed numbers history. Scroll
using UP or Down to review all the dialed number records. Press speaker
or pick up the handset the number will be dialed out automatically.
Insert your headset jack as specified on back of the telephone
Press Speaker key and Hear dial tone
Set the converse volume at “Level 1” in headset mode
Scroll UP & DOWN key to adjust the converse volume
or you can adjust converse through Vol+ or Vol- keys
Continue your conversation with your headset
MESSAGE WAITING:
The APAE-09 has built in message waiting indicators that are comp
-atible with most type of PABX with such a facility. By correct settings
of switch housed in the compartment on the base bottom, The
telephone can be set to detect to a number of message waiting signal.
MessageM waiting signal
MW switch
Set Indicator
Polarity normal
1
LED ON
Polarity revised
2
LED ON
off (Default)
NEON ON
FUNCTION CONTROL LOCATION
13 9 8
90V or above AC or DC
12
11
14
E1
E2
SAFETY INSTRUCTIONS:
26
10
E3
7
17
18
19
20
16
15
SOME Do's & Don't's
When using FU02-090 telephone, basic safety precautions must be
always be taken to reduce the risk of fire, electric shock & injury.
Some of these are:
Ensure that the phone cord is safely & firmly fixed, away from
constant pulls and tugs to save it from pet abuse or from being
trampled by people walking across it.
Do not place the phone in wet surrounding e.g. Near bathtub,
washbowl, kitchen sink, etc.,
Do not dissemble the phone, opening or removing covers may
expose you to dangerous voltages or other risks & nullifies the
warranty benefits.
Slots & openings in the cabinet are provided for ventilation and
better performance of some of the functions like Hands Free,
Microphone etc. Ensure that while placing the phone on bed, sofa,
rug or the similar surfaces, you are not blocking these openings.
Never place a phone in any enclosed box, proper ventilation is required.
Do not overload the wall outlet & extensions cords as this can result in
the risk of electric shock and a dead phone.
Do not insert any kind of objects through the cabinet slots these may
damage the phone. This could also result in short circuits with in the
phone, putting you at a risk of an electric shock.
10
27
21
1.
2.
3.
4.
5.
6.
7.
8.
9.
10.
Handset
Handset guide
Cradle Switch
LCD Display
E3
Menu key
Outx
Delete
Exit
E2
23
11. Enter
12. Scroll down
13. Scroll Up
14. Ringer LED
15. VOL16. VOL+
17. MI
18. M2
19. M3
20. M4
22 25 24
21. Alphanumeric
Keys
22. Speaker (HF)
23. Redial
24. Mute / Lock
25. Flash / Recall
26. E1
27. Telephone Body
3
HOW TO INSTALL YOUR FU02-090 PHONE
The unit requires 3 X 1.5V AA batteries. Open the battery
compartment cover and insert the batteries with the right polarity
and replace the cover. There should be time display on the LCD
screen after the batteries are inserted.
Insert one end of the line cord to the line jack of the base and
the other end to the wall outlet of exchange.
Connect the handset and the unit with the coil cord and line cord.
Lift the handset to confirm that you have dial tone.
HOW TO SET YOUR FU02-090 PHONE
I . SETTING DATE & TIME:
In on-hook state, press MENU key, LCD displays SET DATE
and press Enter key, the value for the year flashes.
Press Up/Down Key to Edit the year.
Press Enter key to confirm and enter the next value month setting.
Repeat the above steps for month setting.
Repeat the above steps for date and time setting.
II. SETTING RINGER MELODIES:
OTHER IMPORTANT KEYS
KEYPAD LOCK:
In on-hook state, press MUTE/LOCK key display shows
‘INPUT PASS’ , now enter the correct password using dial-pad then
press ENTER.
If you release the lock, press MUTE/LOCK key again display shows
‘INPUT PASS’ , now enter the correct password using dial-pad then
press ENTER.
MUTE KEY:
By pressing MUTE during a call, you will not allow the (called I
calling person to hear what you say. You can however hear
called I calling party. On pressing MUTE again, you can restore
the conversation to normal
REDIAL KEY:
In stand by mode, press REDIAL to view the latest dialed number.
Scroll using UP or Down to review all the dialed number records. Press
speaker or pick up the handset the number will be dialed out automatically.
Under off hook mode, if you press REDIAL the phone will dial the last
dialed number.
SINGLE TOUCH MEMORY:
Three Emergency/Permanent single touch memory are provided
.on your phone and they are designated as E1 to E3
A) Store:
In on-hook state, press MENU key
At on hook condition press *#01#
LCD displays SET DATE and Press DOWN key to scroll to
‘SET RING'
Press ENTER and scroll to choose between any one of the 8 ring
melodies
Display shows BL ON Press E1,
display shows "_ _", now enter the desired number to be stored
Press Enter key to save
III. SETTING RINGER VOLUME:
In On-Hook State, Press VOL + or VOL- Key to adjust the ringer
volume over 4 levels (0,1,2&3)
At the 0 level the LCD displays RINGER OFF.
After completing the above steps, press *#01# to lock the memory
B) Dialing Out from E1 to E3.
Lift the handset or Press SPEAKER
Press E1 to E3. as desired.
During an incoming call, the ringer can be muted temporarily by
using ’MUTE’ key
4
The number stored in this position will be displayed and dialed out.
9
VIII. PABX CODE SETTING:
HOW TO USE YOUR FU02-090 PHONE
In on-hook state, press MENU key
Press DOWN Key to Scroll to "SET P CODE" and press ENTER
LCD displays ---------------
MAKE A CALL:
From handset
Pick up the handset.
Enter the required number from the keypad
Press ENTER to Save
IX. LOCAL AREA CODE SETTING:
When you hear the dial tone, dial the desired number.
The unit will start to time the conversation after 6 seconds.
In on-hook state, press MENU key
When finished, return the handset to the base.
Press DOWN Key to Scroll to "SET L CODE" and press ENTER
From Speakerphone
LCD displays --------------Enter the required number by the pressing numeric keypad i.e. for
Example if you live in Mumbai your LOCAL AREA CODE will be
022 and not 22 and press ENTER
If you want to correct the area code, then press DELETE key to erase.
When LCD display "022"
Press ENTER to Save
X. ALARM SETTING (5 Groups)
In on-hook state, press MENU key
Press Speaker key
When you hear the dial tone, dial the desired number.
The unit will start to time the conversation after 6 seconds.
When finished, press Speaker key again.
Pre-dialing function:
When the handset is on the base, dial the desired number.
If there are mistakes, use the DELETE key to edit.
Press Speaker key or pick up the handset and the number will be
dialed automatically.
ANSWER A CALL:
Press DOWN key to scroll to "SET AL", and press ENTER
When a call comes, the telephone rings, and LCD displays the seq.
LCD displays 'AL 1 OFF’ and scroll down to choose the Groups
( 1 to 5 ) of alarms using UP/DOWN keys and press ENTER.
If the same number is received again, and the previous call has not
been reviewed, the LCD displays REP icon.
LCD start flashing OFF
Number of the call, the date, time, incoming number and the NEW icon.
Lift the handset or Press Speaker and talk to the other party.
When finished, return the handset to the base.
Press UP/ DOWN key to select ON or OFF
LCD displays "INPUT" & value "12" starts to flash and adjust the
alarm time using UP/DOWN keys.
CHANGE THE TALKING MODE:
When talking from the handset, press Speaker key
Put the handset down, the phone will transfer to Speaker talking mode.
Press ENTER to save.
While talking from Speaker mode, lift the handset, the phone will
transfer to the handset mode.
When finished, press Speaker key again.
6
7
CALL REGISTER REVIEW
(MISSED CALLS, RECEIVED CALLS & DIALED CALLS)
IV. SETTING PASSWORD ( For Dial pad Lock )
In on-hook state, press MENU key,
MISSED CALLS LIST:
In on/off-hook state, first press UP key then scroll UP/DOWN to review the
missed call list and view the icon to see if it is repeated call or a New Call.
RECEIVED CALLS LIST:
In on/off-hook state, first press DOWN key then scroll to UP/DOWN
review the received call list.
Erase the Numbers from List:
In on-hook state, when the desired number is shown, press DELETE
key twice the selected number will be deleted. Or press and hold DEL
key for 3 seconds all the incoming numbers are deleted.
LCD displays SET DATE and Press DOWN key to scroll to 'SET PASS'
Press ENTER and LCD displays INPUT PASS
Input Current Password using Key pad ( Default Password is 0000)
If entered password is wrong display shows "Error"
Then re-enter the correct password
After entering the correct password LCD displays
"INP N PASS", now enter the New Password, then Press ENTER
LCD displays 'SAVE'
Make a Call from Missed Call List or Received Call List
In on-hook state, scroll to the desired number, press Speaker key or
pickup the handset, the number is dialed out, or press REDIAL key,
the telephone will add the long distance code ahead of the number
automatically.
In off-hook state, scroll to the desired number, press REDIAL key
to dial it out.
NOTE: If the PABX code is set, the telephone will detect and add the
PABX code before the number automatically and then dial back. It will
dial the PABX code first and then after a 2 seconds pause will then
dial the number.
V. LCD CONTRAST SETTING
In on-hook state, press MENU key
Press DOWN Key to Scroll to "SET LCD" Contrast Level "1 or 2 or 3 or 4 "
Press ENTER and LCD Shows "SAVE"
VI. LCD BACK LIGHT SETTING
Setting back light function "ON or OFF"
DIALED CALLS LIST:
In on-hook state, press MENU key
In on/off -hook state, press OUTX key, then repeat pressing OUTX
to review out going numbers one by one.
Press DOWN Key to Scroll to "SET BL"
Make a Call from DIALED CALL LIST :
In the On-hook state, press OUTX key to review the desired number,
then press Speaker key or pick up the handset, and the number is
dialed out, or
In the off-hook state, review the desired number, press REDIAL
key to dial it out.
Erased:
Press ENTER and Scroll down to Enable for Back Light 'ON' or Disable
for Back light 'OFF'
Press ENTER and LCD displays "SAVE"
VII. FLASH TIME SETTING
In on-hook state, press MENU key
Press DOWN Key to scroll to "SET FLASH"
Press ENTER and Scroll down to choose from flash time 90,100,110,
200,300,400,500 and 600 ms. Note: Factory Set Flash Time is 90ms
In on-hook state, press OUTX key to scroll to the desired number.
Press ENTER to save.
Press DEL key twice and the number is deleted, or
Press and hold DEL key for 3 seconds. All numbers will be deleted.
8
5