1
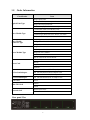
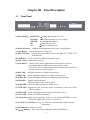
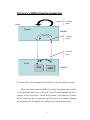
Multi-Service Fiber Optical Multiplexer FMUX01A+ User’s Manual Table of Contents Chapter I Introduction.................................................................................. 1 1-1 1-2 1-3 1-4 1-5 PRODUCT DESCRIPTION .............................................................................................. 1 APPLICATION DIAGRAM .............................................................................................. 1 PRODUCT FEATURES ................................................................................................... 2 TECHNICAL SPECIFICATIONS........................................................................................ 3 ORDER INFORMATION ................................................................................................. 6 Chapter II Installation Guide ....................................................................... 7 2-1 2-2 2-3 2-4 2-5 UNPACKING ................................................................................................................ 7 SITE REQUIREMENT .................................................................................................... 7 SITE SELECTION.......................................................................................................... 8 DC ELECTRICAL OUTLET CONNECTION ....................................................................... 8 LASER SAFETY ........................................................................................................... 8 Chapter III Panel Description ...................................................................... 9 3-1 FRONT PANEL ............................................................................................................. 9 3-2 REAR PANEL ............................................................................................................. 10 Chapter IV VT-100 Operating Instructions............................................... 12 4-1 BOOTING AND LOGIN SCREEN ................................................................................... 13 4-2 MAIN MENU ............................................................................................................. 14 4-3 SYSTEM CONFIGURATION .......................................................................................... 15 4-3-1 System Information Configuration ...................................................................... 16 4-3-2 Device Networking Configuration ....................................................................... 17 4-3-3 User Account Management ................................................................................. 18 4-3-4 SNMP Agent Configuration................................................................................. 20 4-3-5 Software Upgrade Configuration ........................................................................ 21 4-3-6 Software Upgrade and Reboot Operation............................................................ 23 4-3-7 Network Time Synchronization ............................................................................ 26 4-3-8 Scheduling Job Management............................................................................... 28 4-3-9 Networking Service Management ........................................................................ 30 4-3-10 Network TroubleShooting Operation ................................................................. 31 4-3-11 LCD Login Configuration ................................................................................. 33 4-3-12 Event Management............................................................................................ 34 4-3-13 System Profile Management .............................................................................. 37 4-4 TRIBUTARY SLOT INTERFACE SELECTION ................................................................... 39 4-4-1 E1 Interface Configuration ................................................................................. 40 4-4-2 V.35 Interface Configuration ............................................................................... 42 4-4-3 Ethernet Interface Configuration ........................................................................ 44 4-5 OPTICAL INTERFACE PARAMETERS CONFIGURATION .................................................. 45 i 4-6 TRUNK ETHERNET PARMETERS CONFIGURATION ........................................................ 47 4-7 DATA PORT PARMETERS CONFIGURATION................................................................... 48 4-8 PERFORMANCE MANAGEMENT THRESHOLD CONFIGURATION ..................................... 49 4-8-1 E1 Interface Threshold Setting ............................................................................ 50 4-8-2 Aggregate Interface Threshold Setting................................................................. 52 4-9 FAULT MANAGEMENT PARAMETERS CONFIGURATION ................................................ 53 4-9-1 Alarm Severity Config ......................................................................................... 54 4-9-2 Power Failure Monitoring Parameter Config...................................................... 55 4-10 EXTERNAL CLOCK CONFIGURATION AND MONITORING ............................................ 56 4-10-1 External Clock Config....................................................................................... 57 4-10-2 External Clock Monitoring................................................................................ 58 4-11 OE PROTECTION SWITCHING ................................................................................... 59 4-12 EQUIPMENT STATUS MONITORING ........................................................................... 61 4-13 PERFORMANCE MONITORING .................................................................................. 62 4-14 PATH ALARM MONITORING...................................................................................... 64 4-15 LOOPBACK/V.54 TESTING ....................................................................................... 65 4-16 PRBS TEST............................................................................................................. 69 4-17 EVENT BROWSING .................................................................................................. 72 Chapter V LCD Operating Instructions .................................................... 73 5-1 LCD MENU TREE ..................................................................................................... 74 Appendix......................................................................................................... 77 A-1 EXTERNAL USER ALARM INTERFACE (OPTION).......................................................... 77 A-2 RACK MOUNT INSTALLATION GUIDE..................... ERROR! BOOKMARK NOT DEFINED. ii Chapter I 1-1 Introduction Product Description The FMUX01A+ is a powerful optical multiplexer which can aggregate three types of service into a pair of fiber. Any combination of five kinds (4*E1, 4*T1, 4*V.35, 4*FXO, 4*FXS) of tributary card is allowed to plug-in the system and its maximum tributary capacity is 16 channel E1. FMUX01A+ is also with two integrated 10/100M Ethernet interfaces and 1*RS232 data port. It supports the 1+1 hot-swappable optical protection. The FMUX01A+ can be managed through SNMP, VT100 craft port or LCD/menu keys. It supports order-wire function for maintenance purpose and has the provision for two sets of external alarm inputs. It is 1U, 19” rack mountable or desktop type model. 1-2 Application Diagram 1 1-3 Product Features Channel Capacity:4, 8, 12, 16 E1 ( or datacom service) Tributary card type:E1 interface ( 75ohms or 120ohms) Datacom interface (V.35/ RS-530/ X.21) Voice interface (FXO/FXS) T1 interface ( 100 ohms) Optical module:Auto Laser shutdown, hot swappable 1+1 protection Alarm relay contact:major and minor alarms (audible and visible alarm output ) Support SNMP function, TFTP remote software upgradeable Performance monitor:E1 HDB3 CV, CRC, ES, SES. Configurations can be backup to nonvolatile memory. Provides the optical line local loopback and remote loopback function. Low speed (E1, datacom) Local and remote loopback function OE module : Class 1 Laser product. Safety Standard IEC 825 compliant. Management interface:LCD / keys button, VT100 (DB9), RJ45 (for SNMP) External clock (Optional):E1 external TTL clock or PCM data Input through RJ45 connector 10/100M, 2 Ethernet port. ( 100M full rate in total ) 1 RS-232 data port for asynchronous chnnel External alarm : 2 sets of externa; alarm detection 2 1-4 Technical Specifications Optical Interface: ⊙ ⊙ ⊙ ⊙ ⊙ Optical Source:MLM 1310/1550nm Wavelength:1310/1550 50nm System Gain:19~30dB Fiber connector types:SC,FC,ST type Bi-directional Fiber Optical Module (Option) E1 module: ⊙ ⊙ ⊙ ⊙ ⊙ ⊙ ⊙ ⊙ ⊙ Channel Capacity:4/8/12/16 channels Bit Rate:2.048Mbps 50ppm Line Code:HDB3 / AMI Frame Format:Framed or Unframed Electrical Interface:Compliant with international standards ITU-T G.703 Jitter Tolerance:Compliant with ITU-T G.823 Jitter Transfer:Compliant with ITU-T G.742, G.823 Line impedance:120Ω(DB25 Wire Wrap,RJ45)or 75Ω(BNC) Surge protection (optional): Compliance with (or better than) IEC 1000-4-5 class 2 or FCC part 68 T1 module: ⊙ ⊙ ⊙ ⊙ ⊙ ⊙ ⊙ ⊙ ⊙ Channel Capacity:4/8/12/16 channels Bit Rate:1.544Mbps 50ppm Line Code:B8ZS / AMI Frame Format:Unframed Electrical Interface:Compliant with international standards ITU-T G.703 Jitter Tolerance:Compliant with ITU-T G.823 Jitter Transfer:Compliant with ITU-T G.742, G.823 Line impedance:100Ω(RJ45) Surge protection (optional): Compliance with (or better than) IEC 1000-4-5 class 2 or FCC part 68 3 Datacom module: (Datacom module supports or four channels(V35U) on each card) ⊙ Card type:V.35, RS-530, X.21, ⊙ Data rate:n*64K, n=1~32 (64~2048kb/s) ⊙ Clock mode:Internal, DTE, Recovery. ⊙ Control signal:CTS follows RTS, DSR always ON except at test loop mode, DCD always ON except at fiber loss of signal condition. ⊙ Loop-back:local loop back, remote loop back, V.54 ⊙ Connector:HD-68 (SCSI-Ⅲ) Female with optional cables HD-68 to 4*V35(M34 female) cable HD-68 to 4*RS530(DB25 female) cable HD-68 to 4*X.21(DB15 female) cable FXO/FXS module: ⊙ Voice channel transparent to meet T.38 and Group III Fax relay at 2.4~14.4kbps Fax application ⊙ Support modem pass-through for Internet application. ⊙ Comply with G.711 A-law. ⊙ FXO unit : connected to a central office or PBX ⊙ FXS unit : connected to customer’s telephone. ⊙ Distance / bandwidth : 300m / 64K voice channel. ⊙ Connector : RJ11*4 (4 voice channel / Per unit) Physical Specifications: Alarm contact:4 relay contacts (DB-9 connector) External alarm:2 sets external alarm detection for central office monitoring 1*RS232 asynchronous clear channel. (9.6k~115.2K) Order wire:Ear phone jack Operate condition:0~60, 5%~95% without condensing EMI:Comply with CISPR 22 class A (EN55022), FCC part 15 class A 4 subpart B. MTBF:48,000 hours minimum Dimension: ⊙ W * D * H:285 x 440 x 44.5 mm Power Supply: ⊙ AC:90~240 V (47Hz~63Hz) ⊙ DC:-36~-72 V ⊙ Power consumption 20W maximum Physical Specifications: Alarm contact:4 relay contacts (DB-9 connector) --Reference Page82(A-1) Order wire:Ear phone jack Operate condition:0~60℃, 5%~95% without condensing EMI:Comply with CISPR 22 class A (EN55022), FCC part 15 class A subpart B. ⊙ MTBF:48,000 hours minimum ⊙ ⊙ ⊙ ⊙ 5 1-5 Order Information Classification Item Single Optical Link Optical Link Type Dual Optical Link (1+1 auto protection) Single Hot Swap Optical Link Dual Hot Swap Optical Link (1+1 auto protection) 1310nm Multi-Mode Laser Module, 2km Laser Module Type 1310nm Single-Mode Laser Module, 15/30/50km 1550nm Single-Mode DFB Laser Module, 80/120km Bi-directional Fiber Optical Module, 20/40/60/80km Laser Module Connector Type FC/PC Type Laser Module Connector SC Type Laser Module Connector ST Type Laser Module Connector Single AC Power Module Dual AC power Module Power Module Type Single DC Power Module Dual DC Power Module One AC and One DC Power Module USA (1.8 M) Power Cord Europe England Australia 4E1 120 Ohm Balanced, Wire Wrap Adapter E1 Card and Adaptor 4E1 120 Ohm Balanced, RJ-45 Adapter Cable 4E1 75 Ohm Un-Balanced, BNC Adapter Box T1 Card and Adaptor 4T1 100 Ohm Bananced, RJ-45 Adapter Cable 4V35 Card 4xV35 FXO/FXS Card External clock 4xFXO 4xFXS With External clock Without External clock Rear panel View 6 Chapter II Installation Guide This chapter provides the information needed to install FMUX01A+. It is important to follow the installation instruction to ensure normal operation of the system and to prevent damages due to human error. Only trained and qualified personnel should be allowed to install or replace this equipment. 2-1 Unpacking If there is a possibility for future relocation of the FMUX01A+ system, please save the cartons and protection packaging material. The following items are shipped with your FMUX01A+: One FMUX01A+ user’s manual, AC power cord and DB9 cable. One (or numerous units of) FMUX01A+ chassis system Please carefully unpack and inspect the unit and accessories for potentially damaged and missing parts. Contact our nearest sales representative or our company directly if you suspect any damaged or missing parts. Improper handling during shipment may cause early failure. 2-2 Site Requirement The F.C.C. requires telecommunication equipment to withstand electrical surge that may result from lighting strikes. This equipment has been tested and found to comply with the F.C.C. requirement. Users should follow the precautions below to insure the safety and minimize the risk of damage to the equipment: Make sure that the power outlet is properly grounded. Proper grounding should include a minimum of: 1)A grounded rod buried outside the building at least 8 feet (2.44 meters) deep. 7 2-3 Site Selection The FMUX01A+ to allow easy access to the equipment, leave at least 36 inches (90 cm) clearance in the front and at least 4 inches (10.2 cm) at the rear. To avoid overheating, leave at least 1 inch (2.5 cm) on either side of FMUX01A+. Also, do not stack other equipment on top of FMUX01A+. 2-4 DC Electrical Outlet Connection For safety and to prevent damages to FMUX01A+, make sure that the power requirement matches those of your electric outlets. Connect power to FMUX01A+ and power on the equipment. 2-5 Laser Safety Radiation emitted by laser devices can be dangerous to human eyes. Avoid eye exposure to direct or indirect radiation. 8 Chapter III 3-1 Panel Description Front Panel (1) Fiber Module: LASER LED →Yellow light when the laser is on LOS LED →Red light when there is a loss of signal WK LED → Working path indicator RX →Optical Receiver Port TX →Optical Transmitter Port (2) Order Wire Port: Earphone and Microphone jack for order wire application (3) CAL Button: Activate/deactivate the order wire (4) EXT CLK Port: External clock input which can be 2,048 MHz TTL CLOCK or E1 PCM data port (5) SNMP Port: RJ-45 connector to SNMP management system (6) LAN 1/2 port : 100M full rate in total (7) ACO Button: Alarm Cut Off; Yellow light when the ACO button is pressed to manually disable the audible alarm when a problem occurs. If any newer alarm is reported after the ACO button has been pressed, the external alarm will activate again. (8) MAJ LED: Red light when there is a Major Alarm present (9) MIN LED: Yellow LED lights when there is a Minor Alarm present (10) LBK LED:Yellow LED lights when there is a loopback function presents. (11) RDI LED: Remote Defect Indication; Indicates a failure in the remote terminal (12) PWR LED:Green LED lights when power module active. (13) LCK LED:Optical link Lock; Locks the system if switched to protect line 6 times within 10 minutes (14) RNG LED:Yellow LED lights when the order-wire function is active. (15) ACO LED:Alarm Cut Off function indicator (16) Alarm Port:DB9 female connector; connects to an external BUZZER to receive visible and audible alarm. --Reference Page82(A-1) (17) Craft /EXT_ALM Port(Option): For VT-100 screen setup using, and for external alarm input. (18) RST Button: Restart the system (18) Button: Three control and configuring buttons for FMUX01A+ 9 3-2 Rear Panel Power Switches: On/Off switch for FMUX01A+ FMUX01A+ provides five kinds of interfaces card and different power supply combinations with the DC/AC power supply. (Details reference to Order Information) (a) E1 card One DB-25 pins female connector for input/output of 4 channels E1 signal. There are two types of E1 cards for selection: 75Ωor 120Ω. (b) T1 card One DB-25 pins female connector for input/output of 4 channels T1 signal 100Ω. 10 (c) 4*V35 tributary card 4*V35 card, HD68 to 4*M34 Connectors to V.35 interface. (d) FXO card 4*FXO card with 4* RJ-11 interface. (e) FXS card 4*FXS card, with 4*RJ-11 interface. ※ Any kind of the above cards is allowed to plugged into FMUX01A+ rear panel slot 1~4. ※ FMUX01A+ Power supply can only support 3 voices in rear panel slot. 11 Chapter IV VT-100 Operating Instructions The FMUX01A+ control card provides two kinds of operation interface. One is Craft port for local provisioning; the other is LAN port for remote provisioning of the system. * Craft Port: 1. Any PC running Windows 98/2000 or NT can be used as a console. 2. Use the supplied RS-232 cable and connect the console port to the COM port of console PC. 3. Use windows Hyper Terminal program to perform the console management operations. But, we strongly recommend using the free software netterm which has some of special function key to control easily. 4. VT-100 terminal settings: Bit Rate: 57600 bps Data Bit: 8 bits Parity: No Parity Stop Bit: 1 Stop bit Flow Control: none Set the emulation mode to“VT-100” or “Auto Detect” * LAN port 1. Using RJ-45 connecting to SNMP management system 2. LAN port system configuration 12 4-1 Booting and Login Screen The system has the built in self-diagnostic function during the booting procedure. The self-diagnostic function includes system memory access test, system main clock test and tributary card access test. After power on the system, the booting test screen can be shown before the login screen seen: Enter FMUX01A+ Login Screen through Craft Port. Please key in the User Name and User Password. ※ The default user Name is admin and the password is 1234 13 4-2 Main Menu Show system name Current location Press the Function keys can access the item faster. [F3] is online help, and has definition of the function key ※ Notice : Some terminal programs could not support the function keys. After entering the main menu, select one of the nine functions: 1. System Configuration 2. Tributary Slot Parameters Configuration 3. Optical Interface Parameters Configuration 4. Trunk Ethernet Parmeters Configuration 5. Data Port Parmeters Configuration 6. Performance Management Threshold Configuration 7. Fault Management Parameters Configuration 8. External Clock Configuration and Monitoring 9. OE Protection Switching a. Equipment Status Monitoring b. Performance Monitoring c. Path Alarm Monitoring d. Loopback/V.54 Testing e. PRBS Testing f. Event Browsing 14 --(refer 4-3) --(refer 4-4) --(refer 4-5) --(refer 4-6) --(refer 4-7) --(refer 4-8) --(refer 4-9) --(refer 4-10) --(refer 4-11) --(refer 4-12) --(refer 4-13) --(refer 4-14) --(refer 4-15) --(refer 4-16) --(refer 4-17) 4-3 System Configuration ※ Notice : First of all, user need to select Local or remote units for configuration. configuration. 「System Configuration」the menu include the following selections: 1) 2) 3) 4) 5) 6) 7) 8) 9) a) b) c) d) System Information Configuration Device Networking Configuration User Account Management SNMP Agent Configuration Software Upgrade Configuration Software Upgrade and Reboot Operation Network Time Synchronization Scheduling J ob Management Networking Service Management Network Troubleshooting Operation LCD Login Configuration Event parameter Management System Profile Management Press <F1> function key to select item 1 ~ item d, and use the up or down key to shift the items. Please select the item or <ESC> to previous menu. The detail description of each item will be mentioned in the following sections. 15 4-3-1 System Information Configuration ※ Notice : Here shows the local or remote device which you selected. The system administrator can key in the System Name by less than 256 characters words, the location of the system, and the contact person. The system clock can be set by entering the correct time. This screen can show the running time of the system and the software version. After the setting of above items, please make sure to press <F2> to save them. 16 4-3-2 Device Networking Configuration The system administrator can set the system device IP in this screen. 17 4-3-3 User Account Management FMUX01A+ provides three kind of the user groups. Admin:the administrator group account can execute all functions. Control:the controller group account can execute all functions except the System Configuration. Monitor:the monitor group account only can monitor the system except that execute setting command. 18 The default Auto-Logout Seconds is 0, which means disable the auto-logout function. This account also can disable the account status. 19 4-3-4 SNMP Agent Configuration The FMUX01A+ can assign four sets of the Server IP address for sending the Traps. The default Read Community is public. The default Write Community is private. The default Trap Community is public. Enable the “Send SNMP Authentication Failure Trap” function for sending the trap when the authentication is fail. 20 4-3-5 Software Upgrade Configuration Remote Server Press the Space bar can change the selected FMUX01A+ can support two kinds of the System Software Upgrade: Remote Server and Local File For Remote server source selection: Access Protocol: select the protocol you want to use. Server IP Address: the server IP address where the new firmware saved. File Name: the file name of new firmware. Login User Name: key in the remote server’s user name. Login Password: key in the remote server’s password. 21 Local File For Local File source selection: The screen will show the available file stored in the system. 22 4-3-6 Software Upgrade and Reboot Operation This function which is upgrading the local or remote unit, or reboot the unit ,meanwhile , user needs to complete the setting of the software upgrade configuration. When user selects the [F3] Reboot commend item in local or remote side, it will show the message: "Start rebooting!", "Ongoing!", "Complete, Bye-!", "None" 23 When user execute the Upgrade commend item in local or remote side, it will show the status: "Start upgrading!", "Connecting!", "Transferring!", "Loading!", "DeCompressing!", "Flash writing!", "Sending!", "Upgrading complete!", "Error!", "None" When the software upgrade error, it will show one of the following error message: "Internal error!", "Local file not found!", "Information incomplete!", "Upgrading is running!", "Connect failed!", "Transfer failed!", "Read failed!", "Image file too large!", "Disconnect failed!", "Decompress code failed!", "Invalid image format!", "Abort by user!", "None!" 24 When the screen of entering booting, please select a profile for loading. If doesn't press any key then system will auto download the previous profile after three seconds. ※ If you want to hold the screen, please press any key. 25 4-3-7 Network Time Synchronization The system provides the network time synchronization function. Setting the clock server IP address and time zone, then execute the Start synchronizing command. The system clock will be automatically corrected via Internet. When user selects the synchronization commend item in local or remote side, and "running status" will show the following message: "Start Synchronizing!" "Synchronizing!", "Synchronizing Complete!", "Synchronizing Error!", 26 When any error of synchronize occured one of error message will show as below: "Internal Error!", "Information Incomplete!", "Synchronization is running!", "Time Get Error!", "Abort by user!", "Timeout!", "No Error" 27 4-3-8 Scheduling Job Management The Scheduling Job Management function provides the automatic timely reporting capability. The system administrator can arrange the schedule for every kind of job. The job description is following as below. 28 Job Type: Periodic / One shot / Booting Schedule Type: Every Interval / Every Day Interval/Time: Setting the interval time Job: Send Schedule Trap Send Time Sync Request Trap Software Upgrade Network Time Synchronization System Reboot ※ You can press the Space bar to change the selected item. 29 4-3-9 Networking Service Management The system can turn on or turn off the functions of the SNMP Agent, TELNET Server, and FTP Server. 30 4-3-10 Network TroubleShooting Operation This function can test the equipment whether the unit link to network or not. The system provides the Network TroubleShooting function. Setting the Target IP address, Packet Count, Length and Timeout Seconds, then first execute to Confirm[F2], and then execute Ping start[F5]. ※ Note: The system device IP is must be set up 31 When target IP ping succeed, it will show as below: When target IP no answer, it will show as below: 32 4-3-11 LCD Login Configuration User need to define the “Login Password” by the key on the front panel in sequence. From key 1 to key 4. For example, Press key Up-->Right-->Down-->Up “Up” contrast the upward key of the panel “Right” contrast key right of panel “Down” contrast the downward key of the panel 33 4-3-12 Event Management FMUX01A+ provides Event Management function, includes Event Class Processing Configuration、Event Alarm Processing Configuration 34 4-3-12.1 Event Class Processing Configuration The event class processing configuration function can set the events of the configure, alarm, and operation to save in the flash or to send the trap. “N” is not save in the flash or not to send the trap “Y” is save in the flash or to send the trap 35 4-3-12.2 Event Alarm Processing Configuration The event alarm processing configuration function can set the different severity of the events to save in the flash or to send the trap. There are four classes of the alarm severity: 1. Critical 2. Major 3. Minor 4. Warning 36 4-3-13 System Profile Management 4-3-13.1 Profile Save Parameter Config FMUX01A+ provides Auto-Saving function, and the auto saving interval. 37 4-3-13.2 Profile Operation The system provides two booting profiles: Profile1 and Profile2. If the profile had been changed before during the configuration processing, the “Profile Modification” will show “Y”. You can select either profile I or II then press <F2> function to save it, and after that the next booting process will automatically configure the system just like you save before. 38 4-4 Tributary Slot Interface Selection FMUX01A+ provide three tributary interfaces: (1) E1 Interface Configuration (2) V.35 Interface Configuration (3) Ethernet Interface Configuration The “Tributary TSA Configuration” is used for the specific applications as regard the time slot assignment of E1 and V.35 signal. 39 4-4-1 E1 Interface Configuration [F3]: Select local, remote or both site by space bar, then press the ”Enter” key to select it. [F4]: Select 1~4 slots or all by space bar. F5: Select channel ID which you want to change the configure. You can edit E1 Parameters for each channel or all channels of selected. [F6] Slot Edit- Edit the parameters of all channels in the same slot. [F7]/ [F8]- You can just press [F7] or [F8] to let the selected channels in the screen go into the In-service state or out of service ※ If the EOC connection is closed, a symbol “-“ will be shown for each configuration. [F2] Edit channel screen as below: 40 FMUX01A+ have two service mode which can select:OOS (Out of service) IS (In service) There are three types of E1 services: FAS+CRC, FAS only, Unframed There are two types of E1 Line Coding: HDB3 or AMI 41 4-4-2 V.35 Interface Configuration ※ If the EOC connection is closed, a symbol “-“ will be shown for each configuration. [F2] Edit channel screen as below: 42 You can set the polarity of Tx or Rx clock to fit the requirement of different kind of DTEs. PCM31: 64K~1984K Date Rate PCM30: 64K~1920K Unframed: 2048K To have a stable V.35 configuration performance, you must make sure to have set the correct clock mode. The following is the example of setting. (1) Internal Recovery DCE CLK DCE CLK DTE DTE FMUX0 FMUX0 EXT-DTE Recovery (2) INT DCE CLK DTE DTE FMUX0 FMUX0 43 4-4-3 Ethernet Interface Configuration ※ If the EOC connection is closed, a symbol “-“ will be shown for each configuration. [F2] Edit channel screen as below: 44 4-5 Optical Interface Parameters Configuration [F2] Edit channel screen as below: 45 ◎ [F4]ALS (Auto Laser Shutdown) : Please refer to the definition of ITU-T G.664, when FMUX01A+ detects “ LOS ” and the “ ALS ” function is enabled at the same time, then OE will shutdown the signal of Tx. It will detect the signal automatically by every 100 seconds. If the alarm of LOS doesn’t erase immediately, then it needs to wait another 100 seconds again. If the LOS status clear, the system will return to morncal state and transmit laser signal again. ◎ [F6] APS (Auto Protection Switch): While “OFF” selecting, “OE Revertive/ OeLocked/ OeLocked Rule/ OE Lock AutoRel Sec” will disappear. ◎ [F7] OE Revertive: When [F7] set to “OFF”, “OeLocked/ OeLocked Rule/ Oe Lock AutoRel Sec” will disappear. ◎ [F8] OE Locked: When [F8] set to “OFF”, “OeLocked Rule/ Oe Lock AutoRel Sec” will disappear. When [F8] set to “ON”: ◎ OE Locked Rule: Locks the optical system if switched to protect line “ m ” times with in “ n ” minutes. (“n” and “m” depends on user’s definition ) (Default: m=6 ; n=10 ) ◎ OE Locked AutoRel Sec: If the function of OE Locked has enabled, it will be auto-release after “ x ” seconds. (Default: x=3600) ※ Note: If the function of the OE Locked has activate, then it needs to be realeased as the screen of “ 4-9 OE Protection Switching “ ※ Note: User can't configure the disappeared function, when user reboot the equipment which is reload the default value. 46 4-6 Trunk Ethernet Parmeters Configuration 47 4-7 Data Port Parmeters Configuration 48 4-8 Performance Management Threshold Configuration This function means that when the PM value is equal or over the threshold’s value then it will issue the TCA alarm. If TCA alarm is enabled, the alarm of TCA will be realease after is min/day. If the value is “ 0 ” the TCA will be unabled. (1) E1 Interface Threshold Setting: Electrical interface threshold setting. (2) Aggregate Interface Threshold Setting: Optical interface threshold setting. 49 4-8-1 E1 Interface Threshold Setting You can use the function keys to modify the selected traffic link, there are two PM types for choice: the quarter (15 minutes), the day (24 hours). [F6] Disable:Unable the PM TCA alarm on the selected E1 path by high light bar. [F7] All Disable:Unable the PM TCA alarm on the all selected E1 pathes by the selection filters. 50 [F1] Line: LCV: Line Code Violation LES: Line Error Second LSES: Line Several Error Second [F3] Path: PCV: Path Code Violation PES: Path Error Second PSES: Path Several Error Second 51 4-8-2 Aggregate Interface Threshold Setting You can use the function keys to modify the selected traffic link, there are two PM types for choice: the quarter(15 minutes), the day(24 hours). 52 4-9 Fault Management Parameters Configuration FMUX01A+ provides fault management function by setting the alarm severity for each failure alarm. 53 4-9-1 Alarm Severity Config If the alarm severity configured as Critical or Major, the MAJ LED will be turned as red when alarm occurred. Otherwise, Minor and Warning alarm will make MIN LED turned on as yellow. 54 4-9-2 Power Failure Monitoring Parameter Config Provide the function of power monitoring. When “ON” is selected and the power module is failed, the alarm will be issued. 55 4-10 External Clock Configuration and Monitoring To provide more stable synchronous for the system, you can use the build-in optional external clock module. Provide the extra external clock input for the whole system’s reference. 56 4-10-1 External Clock Config User can select OOS or IS to turn on or off the external clock input. When the EOC connection is failed or the External clock module is unequipped, the configuration will disappear. ※ EXT CLK_pin_assignment (front view of RJ45 type connector of ※Pin 1 and Pin 2 of RJ45 are used for E1 PCM data or TTL Clock input 57 4-10-2 External Clock Monitoring If the External Clock Module is bounded, the EquipState will be Equipped, in other words, Unequipped will be shown while the module is absent. 58 4-11 OE Protection Switching 1 2 3 User can make the active OE module locked or released and OE module menual restart from this screen. 1.Configuration: Shown the configuration of APS (Automatic Protection Switching), ALS (Automatic Laser Shutdown), Rvt (revertive operation), LCK (lockout the active OE module) from section 4-5 “Optical Interface Parameters Configuration”. 2.OE Protection Switching Status: Shown the current status of active OE module, the status of Lock-out mechanism, the OE module switched times by automatic or manually, and the seconds left for release after locked state. The Lock-out mechanism can be activated or deactivated by command “OE Lock/Release [F2]” on the aggregate interface. Some parameters are configured at 4-5 “Optical Interface Parameters Configuration”. 3.OE Status: Shown the alarm and laser status of the OE modules. the shut down lasers can be restarted by command “OE Restart [F4]” and “OE Restart-Test [F5]” on the OE interfaces. 59 ※ Automatic laser shutdown and restart concept The ALS mechanism implemented in FMUX01A+ is refered to the ITU Recommendation ITU-T G.664. The ALS mechanism can be enabled or disabled in 4-5 Optical Interface Parameters Configuration. << Flow Chart>> Start ALS opertion enable Yes Receive signal from far end? No No Loss of received signal Yes Auto power shutdown Automatic restart Manual OE restart Manual OE restart for test Tx on for (2s) Tx on for (90s) Delay time (100s) Tx on for (2s) 60 4-12 Equipment Status Monitoring On the equipment status monitoring screen, user can take an overall view of the alarm status of the interlinked rack systems. FAN -- is fan monitor [Pwr] -- is power supply “B” is for E1 Balances (75Ω) “U” is for E1 Unbalances (120Ω) “-” is for normal “F” is for “Failure” “G” is meaning “green” LED “R” is meaning “red” LED “Y” is meaning “yellow” LED “ ” is meaning the device is absent “H” is for external alarm occurred “L” is external alarm normal 61 4-13 Performance Monitoring The performance monitoring screen will show the valid quarters and valid days had been counted for each card. Select the card and access to next screen to see the detail performance data. [F6] Reset: to clear all PM counters on the selected monitoring path [F7] Reset All: to clear all PM counters on the All monitoring pathes 62 PM Type have five kinds: 1. CurrQuart(Current Quarter) 2. HistQuart(History Quarter) 3. CurrDay(Current Day) 4. HistDay(History Day) 5. Quarter(Every 15 minutes) [F2] Reset: to clear the selected PM type [F5] Reset All: to clear all the PM type 63 4-14 Path Alarm Monitoring Path Alarm Monitoring This screen shows all of alarm status for all monitoring path. Some diagnostic testing work will cause alarm occurred, and the status of loopback(V.54) and PRBS action shown as well. The possible alarm for each interface is : OE : LOS Aggregate : LOF/RDI/AIS E1 : LOS/LOF/RDI/AIS V35 : LOS Ethernet : LINK 64 4-15 Loopback/V.54 Testing For the diagnostic purpose, low speed E1 or V.35 data channel and high speed aggregate signal can be locally loop-backed or remotely loop-backed. 65 Loopback Testing There are four types of loopback functions for the E1 Module: a. b. c. d. Tributary Local Loopback (for each E1 signal) Aggregate Local Loopback (for all multiplexed E1 signals) Aggregate Remote Loopback (for all multiplexed E1 signals) Tributary Remote Loopback. (for each E1 signal) Users can select whether to diagnose a specific channel or all channels under the loopback / V.54 Testing. Local site Remote site a. Tributary Local Loopback: In the Loopback / V.54 Testing screen, select the slot ID which is on the tributary card in the local site, then choose “LoLbk / ANA” item. b. Aggregate Local Loopback: In the Loopback / V.54 Testing screen, select the aggregate item (“Aggr/Lo”) in the local site then choose “LoLbk / ANA” item. c. Aggregate Remote Loopback: In the Loopback / V.54 Testing screen, select the aggregate item (“Aggr/Re”) in the remote site then choose “ReLbk / DIG” item. d. Tributary Remote Loopback: In the Loopback / V.54 Testing screen, select the slot ID which is on the tributary card in the remote site then choose “ReLbk / DIG” item. ※Notice: In the E1 module, the “REM” is not able to choose, because “REM” is only for V.35 module using. 66 There are three types of loopback functions for the V.35 Module: a. Analog (ANA) Loopback: b. Digital (DIG) Loopback c. Request Remote (REM) Loopback V35 card DTE a. V35 card b. c. DTE Optical Local Site Remote Site a. Analog (ANA) Loopback: In the Loopback / V.54 Testing screen, select the slot ID which is on the tributary card in the local site, then choose “LoLbk / ANA” item. b. Digital (DIG) Loopback: In the Loopback / V.54 Testing screen, select the slot ID which is on the tributary card in the local site, then choose “ReLbk / DIG” item. c. Request Remote (REM) Loopback: In the Loopback / V.54 Testing screen, select the slot ID which is on the tributary card in the local site, then choose “REM” item. 67 ※ Notice:function key [F8] If the EOC (embedded channel) had broken such as in the aggregate remote loopback state then [F8] Undo-AgReLBK can be used to re-built the EOC channel. But, if optical signal lose, this function won't enable. 68 4-16 PRBS Test Pattern Analysis Pattern Generate The pattern of PRBS is 215-1(unframing). Both E1 and V35 are able to perform this testing. In order to do the self-test, any E1 data link can be selected to have a PRBS test. The tested result will be shown in the number of error bit as well as its error ratio. Regard as the PRBS test of TSA mode, please refer to the figures of 4-4-4.a and 4-4-4.b. ※ You can only choose one channel to generate or analysis at the same time. 69 One way PRBS test step: Error! Remote Ana FMUX01 Local GEN 70 FMUX01 The round trip PRBS test function operating step. Loopback path A Error! Remote FMUX01 Loopback path B Loopback path C Local Ana GEN FMUX01 ※ Please refer to the loopback test function to verify the loopback setting. When user wants to do the PRBS test, firstly, the remote side needs to set the loopback path (loop A, Loop B, Loop C) which depends on user’s request. In the local device which will generate a test pattern to remote device, then local device’s analysis part will receive a test pattern through the loopback path. Eventually, user will get a test result on the screen. 71 4-17 Event Browsing Clear Ram Log [F4]: clear all history events after the system booted. Clear Flash Log[F5]: If the event-saving function is be enabled. F5 will clear all history events store in Flash memory. (ref: 4-3-11.1 Event Class Processing Configuration / 4-3-11.2 Event Alarm Processing Configuration) 72 Chapter V LCD Operating Instructions FMUX01A+ provides a easy way to set the configuration, maintenance, and testing by LCD and button. The default password for FMUX01A+ is a combination of the buttons as below, from left to right: Button Up Right Down Up ※Note: the password for login in LCD menu can be changed via VT100 setting as section 4-3-11. Button functions are as follows: Go back to the upper level of the menu Item select “Enter” key to go to a sub-menu or enable selected action 73 5-1 LCD Menu Tree Passward: _ _ _ _ (Modify Password refer to 4-3-10) ---Tb Config ----E1 [Site/Slot/Ch] ----FrameType (FAS+CRC/FAS/OFF) ----LineCoding (HDB3/AMI) ----Service (IS/OOS) ----V35 [Site/Slot/Ch] ----TxClkSource (ClkSrc:Internal/Ext-DTE/Recovery) ----PCM/FrameMode (PCM30/PCM31/Unframed) ----DataRate (64K/128K/192K/256K/320K/384K/448k/512k/ 576k/640k/704/768K/832K/896K/960K/1024K /1088K/1152K/1216K/1280K/1344K/1408K/ 1472K/1536K/1600K/1664K/1728K/1792K/ 1856K/1920K/1984K/2048K) ----TxClkPolarity (Normal/Invert) ----RxClkPolarity (Normal/Invert) ----Service (IS/OOS) ----Eth [Site/Slot] ----Service (IS/OOS) ----AutoNeg (ON/OFF) ----Duplex (Full/Half) ----Speed (10M/100M) ----TSA [Site] ----TSA (Normal/ 2E1+2V.35/ 7E1+1V.35/ 3E1+1V.35/ CH4<->CH5) ---Opt Config [Site] ----Working OE (1/2) ----ALS (ON/OFF) ----Standby OE (ON/OFF) ----APS (ON/OFF) ---External Clock ----Config [Site] ----Service (ON/OFF) ----Monitoring [Site] ----EquipStatus (Status:Equipped/Unequipped) ----AlarmMonitoring (Status:None/Normal/LOS) 74 ---Oe Protect Sw ----Current Status [Site] ----WorkingOe (Status:1/2) ----OELocked (Status:-/ON/OFF) ----SwitchNo (Status:1-99) ----LeftRelSec (Status:1-99999) ----OE1Tx (Status:ON/OFF) ----OE2Tx (Status:ON/OFF) ---Oe Lock/Release [Site] ----Lock OE (Status:(ON)/Release OE(DOWN)) ----Lock OE (Status:(OFF)/Lock OE(DOWN)) ---Oe Restart [Site/Oeld] ----Restart DOWN (Restart OK/ Restart fail) ---Oe Test [Site/Oeld] ----RestartTest DOWN (RestartTest OK/ RestartTest fail) ---System ----Profile Operation [Site] ----Profile Id (1/2) ---FM Config ----Pwr Fail Mon Cfg [Site/ PwrID] ----Service Config (IS/OOS) ---Alarm Monitoring ----Equipment [Site] ----Pwr1 (Status:NoAlarm/Failed) ----Pwr2 (Status:NoAlarm/Failed) ----Fan (Status:NoAlarm/Failed) ----Path [Site] ----Alarm (Next) 75 --- Loopback/V.54[Site] ---- Aggr ----LLBK (ON/OFF) ----RLBK (ON/OFF) ----RRLBK (ON/OFF) ----UndoAgReLBK (ON/OFF) ----E1 [Slot/Ch] ---LLBK (ON/OFF) ---RLBK (ON/OFF) ---- V.35 [Slot/Ch] ----ANA (ON/OFF) ----DIG (ON/OFF) ----REM (ON/OFF) --- PRBS Testing[Site] ---- E1 [Slot/Ch] ----PTGEN (ON/OFF) ----PTANA (ON/OFF) ----PTANA Result (Status:Error/BER) ----V.35 [Slot/Ch] ----PTGEN (ON/OFF) ----PTANA (ON/OFF) ----PTANA Result (Status:Error/BER) --- Logout (DOWN) 76 Appendix A-1 External User Alarm Interface (option) Usual VT-100 interface: ALARM Relay contact for the default type of shipping VT100 port CRAFT (Female) -------------------------------------------------------------------------------------------------------------- External alarm interface: ALARM Relay contact VT100 port & EXT_alm port CRAFT (Female) (1.8m) M VT100 cable F External alarm input cable (10cm) F 77 Carft & External Alarm Ports Pin Assignment 1. Craft port (VT100): 5 4 3 21 Pin No. Signal 2 TxD 3 RxD 5 GND 2. External alarm port: 5 4 3 21 Port1 9836 Port2 Pin No. Signal 1 Positive input 8 Negative input 4 Positive input 9 Negative input The voltage offset between positive and negative input: 3 ~ 60VDC Input current range: 0.5 ~ 8 mA 78