1
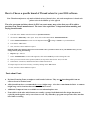
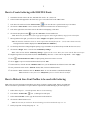
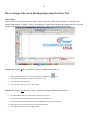
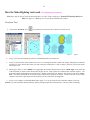
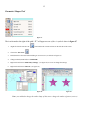
1 Quick Start Guide for EOS / TES (If you are not comfortable with the basic functions of a computer, seek local assistance before proceeding.) How to install EOS/TES Important: for Windows 2000 or XP Do not plug-in the security key (dongle or card) until instructed by the CD-ROM For Window Vista, First plug-in the security key (also referred to as a dongle or card) How to install EOS / TES software in (on computers using) Windows Vista 1. Place USB Smart Card (Key) in a USB port on the BACK of the computer 2. Place program CD in the drive 3. Click “Installation” The Installation wizard will start. Follow along closely and answer the question as they relate to your computer. 4. Select “Full Installation” and follow the default settings. 5. At the end of the installation, a message box will open. It states, “The installation of the database is optional. Would you like to install it?” Note: Database Installation is optional, typically only Pro users will find it useful. Choose your option & proceed. 6. When the installation is complete, click “Finish” then restart your computer. 7. Once the computer has restarted you will find a shortcut icon yon your desktop. Double left mouse click on the icon to start the program. 8. The program will open to a window entitled Product Key. NOW replace program CD with the installation Code CD. 9. In the Product Key window, left mouse click the “Browse” button 10. Select the CD Rom drive from the “Look In” box at the top of the window. 11. In the larger box you should see a file starting with 1234… the same serial number as your key. Click on this file, then click “Open”, this will fill the boxes on the Product Key window with numbers and characters 12. Click “OK”, the software will open and a Tip of the Day window will open. You completed the installation 13. Please save both you program CD and the Installation Code CD in a safe place (the EOS box?) for later use, Installation for computers running Windows XP or Windows 2000 1. Place the silver CD in the CD drive first 2. Open My Computer and access the CD drive; on the CD you will see 2 files. 3. Double click the file named GemPCKey_PC_SC_MSI_Installer_32_bits.msi 4. Run this installation to its completion. 5. Insert the New key; Windows should report that it has found new hardware. 6. Insert the Program CD with the key still in the computer. 7. The CD will start up and prompt you through the installation 8. When the installation is complete, you will need to restart your computer 9. After restarting, launch the TES program. You will be prompted to enter your product key 2 10. Place the Silver CD back in the CD drive and click the Browse button in the product key windows 11. Browse to the CD drive, you will see a file named 1234 etc.. Click on it, Click Open 12. The product code will fill the boxes, Click OK 13. Click OK, The software will open and a Tip of the Day window will open. 14. Please save both you program CD and the Installation Code CD in a safe place for later use, How to find more detailed instructions on the Installation of EOS / TES 1. Place the CD-ROM EOS/TES in the CD drive 2. Click the “Start” 3. Click on “My Computer” then place the cursor on the icon for the CD drive (usually the “D” drive) 4. Right click the mouse for the pop up list. Next, left click “Open” 5. Right click on the folder “Manual”. Then left click “Open” Note: At first glance, there is more than one folder with the same name. Look closer at the extended name 6. Place your cursor one of the “installation” files and look for “EN” (English) in the extended name 7. Right click on the EN (English) file then left click on “Open” 8. The installation instructions begin on page # 5 Note: If desired you can print the manuals Note: If you still encounter difficulties, please contact the company that sold you the software for assistance. Advice about you Security Key (card or dongle) Insure you security key for full replacement value against loss or theft. Only returned broken or malfunctioning keys can be replaced at a nominal charge 3 How to change the Menus to another language or convert Metric to inches Important: You can also change from metric to inches by clicking on the “mm” box at the intersection of the rulers 1. Click on the “Tools” menu and select “System Parameters”. Look for the word “English”. Click it to open the list of available languages. (Or to change to inches, click on the phrase “Metric System (1/10mm)” 2. Choose the language (or “English System (inches)” and click “OK” Note: Only, if you have changed the language, proceed to step # 3 3. Close only the EOS or TES software to complete the change of a languages. 4. Open the EOS/TES software. The change will be activated. Facts about Color The popular .DST stitch (machine) files do not retain original color information. 1.) The colors shown are the default colors that vary from software to software. 2.) Some other stitch formats will retain the original color All embroidery machines need to be informed by the operator where (which needle) the proper thread color is or will be located. Compucon software can tell some embroidery machines on which needle number a color thread should be located. Or it can just tell it to execute a change of needle without specifying which needle (the operator will later “teach” (inform) the machine before sewing on which needle the thread colors have been located. The machine operator must be provided with a list of colors in the proper sew order. The colors that appear in a design are there to inform the machine operator. The machine operator either will match the threads with the needle assignments or “teach” the embroidery machine on which needle the threads will be located. 4 How to Choose a specific brand of Thread colors for your EOS software. Note: Thread manufacturers only make a limited variety of thread colors. Also each manufacturer’s thread color palette varies in the number of colors offered. The color spectrums (rainbow charts) in EOS can create many more colors that you will be able to purchase from Thread manufacturers. The term “close equivalent” is important when matching and buying thread brands. 1. Left click on the “Tools” menu then click on “System Parameters” 2. Click on the “Embroidery” tab to open. Next, click on the button labeled “Edit Default Palette” 3. In the “Palette Information” section. Use the dropdown button to change “Custom” to your thread brand 4. Left click the “OK” button 5. Now, close the software and then reopen it. If the 20.needle colors shown in the work screen contains colors you don’t want to use as your Default colors, you can change them by doing the following. 6. Repeat steps # 1and # 2 7. In the “ Default Palette” section on the right side, click on the needle # you wish to change the color 8. Place your cursor into the color spectrum (rainbow) & stop on the desired color. Now, Left click. 9. In the narrow vertical box, find the desired tint or shade and Left click. 10. Repeat steps # 8 and # 9 as necessary. Finish by clicking on the “OK” button 11. Now, close the software and then reopen it. Facts about Fonts Keyboard Lettering Fonts are unique to each brand of software. They are not interchangeable from one software brand to another brand. All keyboard fonts have a recommended minimum height range. A few have a maximum size limit. A common height range can be from less than an inch to 8 inches or more. Additional Compucon fonts are available at www.embmarketplace.com Fonts sold in .dst & other stitch formats are actually a group of individual stitch file designs that must be copied & pasted together one by one to form a word. Any embroidery program can open these files, but these have limits on resizing. 5 How to Create Lettering with EOS/TES Fonts 1. Outside the left side of the work area, Find and Click on the “ T ” (Text) icon. 2. In the Text Box that appeared in the work area, type a word. Then click on the “OK” button 3. Look above the work area for this “Select Frame” icon. Note the icon’s symbol can be any of 30 frames. 4. Click on the “Select Frame” icon to view the other choices but return to the one shown in step # 3. 5. Look to the right of the select frame icon for the white box displaying a font name. 6. Click on the drop down button to Open the ”Font List”. Choose another font. Note: Each time you choose a new font, a pop-up box appears with a height & density range for the selected font. 7. Moving further to the right, you will see two boxes “Height” and “Space” (between letters). Note: The numbers inside these boxes are inches expressed in decimal form (0.50 = ½ inch, 0.06 is about 1/16 inch) If using metric the numbers displayed are mm/10 (tenth of a millimeter) 8. Use the drop-down list to change height & spacing or type in another size (if inches always include the first zero (0.25) 9. Click on the “Design” menu. Next click on “Embroidery Settings” Note: A blue title bar labeled “Embroidery Settings” appears on the screen. Move your cursor onto the blue area to open 10. Heights larger than 3/8 inch (95mm/10) check “Fill underlay” otherwise “Center Line or Edge Walk ”. Click “Apply” 11. Click “Advanced Character Edit” to adjust spacing between two letters or words. 12. Click “Apply” to preview results and when satisfied, Click “OK” 13. In the same box, click the next tab “Machine codes” here you can add thread cuts if desired. Now click “OK” 14. Now position the cursor on the “Stitch It” button, then, click it to build the stitches. 15. Click on the “View” menu then click on “Realistic View” to view the stitches as simulated embroidery. Note: Remember to save first as an .ERF format if you ever wish to edit the saved file. How to Make & Save Font Profiles to be used with Lettering Note: This step saver font function remembers your choice of settings, spacing, height, density, stretch & font. This is best used for special fabrics or repeat customer requirements or small lettering or part time employees. 1. Follow above steps # 1 – 10 in the previous “How to Create Lettering” 2. Left click the ”Font Profile” icon. (A dialogue box will open) 3. In the “Save as Profile” section, type the chosen title in the Name box 4. Click on the “Save” button to save. Note: the next time you wish to use the saved settings you will not need to do steps # 2 – 10 5. Finish you present work by doing steps 11 – 15. 6 How to use Three Letter Monograms Note: you will need to look up the proper keystrokes 1. Left click on the “ T ” (Text) icon 2. In the Font box (top center) click on the drop down button to open the list and next click on “Font List” 3. In the box that opened on left side of screen, locate the “3 Letter Diamond” font and Left click once to highlight. 4. At the bottom right of this box, left click the “Preview” button. The keystroke code will appear on the right side. 5. Click “OK” to select the font & close the font list. Type into text box the proper keystrokes and Click “Ok” 6. From the above paragraph “How to Create Lettering” follow steps # 3-15 . How to Edit Text 1. Left Click the “Edit” tool icon . If, you want to edit only one letter at a time, Click on the letter you wish to edit. Then click “Stitch It” button, if finished editing. Or to edit the entire text go to step # 2 2. To edit all click on located above the work screen. You’re back in the “wire frame” where you can change the Height, Embroidery Settings, etc. To change spelling (return to the text box) click on icon. 3. After completing the Editing task. Right click in work area for a Pop-up menu and choose “Stitch It” How to Save your Lettering and later be able to fully edit the Lettering file Note: What you create on screen should be first saved in the .ERF format. Otherwise, the only editing available would be Stitch Edit. It will not be possible later on to fully (Outline) edit either lettering or the designs you have created. 1. Click on the “File” menu; then click “Save Design As” 2. On the line labeled “Look In”, the name of the folder where you wish to save your work must appear this box. Note: Use the drop-down list to find and place the folder in the “Look in” box 3. On the line “ File Name”, type the desired name of the file to be saved. 4. At “File of Type” line, open the drop-down list, Click on “Embroidery Rich Format [.ERF]”. Then Click “OK” 7 How to Open an already Digitized Embroidery Design Note: You can open all popular machine (stitch) files or .ERF files if design was made in EOS or TES software. 1. Click the “File” menu the click “Open design” 2. On the line labeled “Look In”, the name of the folder where you wish to save your work must appear in this box. Note: Use the drop-down list to find and( double click) to place the folder in the “Look in” box 3. On the line “ File of Type”, from the list of formats select “ All Embroidery Files” Note: If you know the format type (for example: .FDR, .DST, .XXX, .PES, etc.) you can select the exact machine format 4. In the big white box where the file names appear, click once on the file name to preview. If correct, click “OK” Note: With a stitch (machine) file on screen you can if you wish add text or new design elements.. How to Open two separate stitched designs onto the same work screen 1. Open the first design using the instructions given in the previous paragraph. Note: the second design will share (begin with) the last color of the first design unless you perform step #2 2. At the bottom center below the work screen click on the “Stop” sign to have the 2nd design begin with a new color 3. Next, click on the “Edit” menu and choose “ Paste Design”. A new “ Open design File box appears. 4. Go back the previous exercise and follow instructions # 2, 3 and 4 5. Notice the black “Select Tool “ nodes. Use these to move, size or rotate the second design 6. Right click and choose “Apply:” Note: Leave the design open for use with the following subjects How to Change the Density of a Stitched Design 1. Open the design if not already opened (see previous instructing on opening a design) 2. Click on the “Edit” menu and choose “Select All” 3. Click on the “Modify” menu then from the list choose “Change ” From the drop down list choose “Density” 4. Decide on whether you wish to increase or decrease the density and what percentage 5. Click the “OK” button 8 How to Change the Size of a Design 1. Open the design if not already opened (see previous instructing on opening a design) 2. Click on the “Select” tool icon 3. Click on the “Modify” menu then from the list choose “Change Size” 4. Either change the “X” or “Y” value or check the box for “ %” and change the percentage Note: Although you may be able to change the size by more than 50%, don’t exceed 20% on each effort. There always needs to be a check in the box next to “active stitch processor” How to Choose a Hoop 1. Click on the “Tools” menu. Then click on “Select Hoop” 2. From the list of hoops, choose a hoop that leaves a minimum of 1 inch (2.54cm) of empty fabric between the design perimeter and the interior edge of the hoop. Click “OK” 3. Click on the ”View” menu. Then click on “Show / Hide Hoop” to close How to Center a Design Note: Always center your work before saving it 1. Click on the “Design” menu 2. Select “Center Design” then, in the next dialogue box that appears, click “Ok” How to Save Letter or a Design you made in EOS/TES (for future editing) Note: Stitch (machine) files only can be stitch edited or change its density or design size. 1. Click on the “File” menu; then click “Save Design As” 2. On the line labeled “Look In”, the name of the folder where you wish to save your work must appear this box. Note: Use the drop-down list to find and place the folder in the “Look in” box 3. 3. At the line “ File Name”, type the desired name of the file to be saved. 4. 4. At “File of Type”, open the drop-down list and click on “Embroidery Rich Format (.ERF) ” Then click “OK” 9 How to Save a Design to a floppy disk, memory stick, etc. (for sewing) 1. Click on the “File” menu; then click “Save Design As” 2. On the line labeled “Look In”, the name of the drive where you wish to save your work must appear this box. Note: Use the drop-down list to find and place the drive in the “Look in” box 3. At the line “ File Name, type the desired name of the file to be saved. 4. At “File of Type” line, open the drop-down list and click on “ .FDR, .DST, or your machine’s format” Then click “OK” How to See & Use the Object List (to reorder which block will sew 1st, 2nd,etc.) 1. Click the “Tools” menu. Then click on “Show/Hide Object List” (you will see the block list at the bottom of the screen.) 2. Click on the “Select” tool icon 3. Place the cursor in the last block on the right and click the Right mouse button 4. In the pop-up box choose ”Reorder” and then select one of the choices to reorder. How to Change color of an Existing design using the Stitch Color Tool 1. Left click on the “Tools” menu then click on “Show / Hide Stitch Colors” 2. This title bar appears. Place you cursor on it to open. 3. In the Needle code column, click to highlight the line associated with the color you wish to change 4. IF THE DESIGN WAS MADE USING “STOPS”, choose “STOP” from the drop down list to change a color. DON’T MIX Stops and Needle #’s together. 5. Next click on the associated dropdown button , then choose the correct choice (stop or needle #) 6. In the same color box, click on the “colors…” button to open the thread palette. Click on the new color choice Note: the needle numbers shown are the same 20 needle #’s /colors shown across the bottom of the work screen. The New color now appears in this group. 10 How to change Color of an Existing design using the Select Tool Observation: Figure A has two colors (note colors at upper central color boxes) blue & red. Needle #’s 1 through 20 are located at the bottom. Needles # 1 and 3 are being used. In the Object list near the bottom one can see, in this design, each color has at least two blocks for each color. Namely two reds & two blue blocks. Figure A Exercise # 1 Change all the red segments to green as displayed on needle # 2 1. With the design opened on you screen, left click on the ”Select” tool icon 2. Left click on the red color box at upper central area to active. 3. Left click on the green Needle #2 4. Left click in the work screen to see color change. Exercise # 2 Change only the green “USA” segment to the purple displayed on needle # 5 1. Open the “Select” mode only if not already opened (yours is open) 2. Position the cursor just outside the upper left corner of the word USA 3. Depress & hold down the left mouse button while dragging across only the word USA 4. With only the USA captured, Left click on the purple Needle #5 5. Left click in the work screen to see color change. 11 How the Main Digitzing tools work (For digitizing level software) Note: there may be lots of stitch variations but there are only 3 basic stitch types: Normal Fill, Running Stitch and Satin. See figure # 3 Note top two on left side and bottom left example Freeform Tool 1. Click on the “Freeform” Tool. icon found in the vertical tool bars on the left side of the screen. figure 1 figure 2 figure 3 2. In fig.# 1, the drop down button opens the list of fill methods under one flexible tool. 3. In fig.# 2, each left click creates a black circle (curve) or a prolonged left click a square node (angle). Placing these around the perimeter of a color, informs EOS where you want to have the stitches placed. Note no image is shown on screen so the nodes can easily be seen. 4. Still in fig.# 2, there’s a white “Outline” box (upper right side) Using its drop down list, choose “Stitch Angle” click on the end of the blue baton to decide on the direction the stitches will sew (only required for “Normal Fill & Variable Angles”). The arrowhead symbols facing right & left represent the 1st and last stitch for this area. Return to drop down list and choose “Entry, Exit”. Now these arrowheads can be moved to other locations on the perimeter as desired – nearest to the exit of a previously “stitched” color block or placing the exit stitch closest to the next color block to be digitized. 5. In fig.# 3, are examples of each fill method listed in figure # 1. You can switch from one method to another if you wish. Exercise: Try each fill method. Having difficulty with the prolonged angle click? Hold down the “Ctrl” Key while left clicking. 12 Column Fill Tool 1. Click on the “Column Fill” Tool. icon found in the vertical tool bars on the left side of the screen. Note: this tool allows you to make narrow but irregular or varying width satin lines. With this tool, points are to be placed across from each other (one on the left & one on the right side) figure 4 figure 5 figure 6 Figure #4 shows two sets of points. When the second set are created, lines appear to connect them to the first set 2. Without an image on screen Left click once and move to the right and click again 3. Move down and repeat step 2 until you have at least four groups of set of two points Note: No stitch direction is required since satin stitches turn with the shape of the outline. You can control entry and exist. 4. Right click and choose “Stitch It” from the pop-up menu. Note: The maximum width of a Satin Stitch that an embroidery machine can sew is ½ inch. But because of great reduction in machine speed needed to make an ½ inch stitch and the possibility that a wide stitch would snag or sag after cleaning, the practical width limits for a Satin stitch is from 3/64th to 3/8th of an inch or 1mm to 9.5mm. Column Fill is also the tool commonly used to manually digitize lettering. 13 Geometric Shapes Tool figure #7 The icon located to the right of the gold “ T ” will appear as one of the six symbols show in figure #7 1. Right Click on the current Tool. icon found in the vertical tool bars on the left side of the screen. 2. Choose the “Star Tool” 3. Hold down the Left mouse button and drag on screen to size (see left side of figure #7) 4. Change method (normal fill) to “Column Fill” 5. Right click and choose “Embroidery Settings” (see figure #8) to review or change the settings 6. Right click and choose “Stitch it” (see figure #9) figure #8 figure #9 Note: you could also change the outline shape of this star or change the number of points (vertices) 14 How to Import an image (Only applies to Creator Plus & Professional Elite levels) 1. Click on the” Image” menu. Then from the list choose “Import” 2. On the line labeled “Look In”, the name of the folder where you previously saved images must appear in this box. Note: Use the drop-down list to find and click it to place the folder in the “Look in” box 3. On the line “ File of Type”, from the list of formats select “ All Graphic Files” Note: If you know the format type ( for example: .bmp, .jpg, .wmf, .eps, etc.) you can select the exact graphic format 4. .In the big white box where the file names appear, click only once on the image name to preview the image. 5. If correct, look toward the bottom left for the line “Dimensions:" To the right appears this icon . Click it Note: Always change the size of the image to the desired final size of the embroidered design. 6. Change only the “X” (width) or the “Y” (height) as the other coordinate will adjust automatically. Click “OK” 7. Next click the “OK” button on the open image dialogue box to place the sized image on the work screen. How to Open a Practice image (images already provided by Compucon) Note: There is a folder named “Image” in your EOS / TES program. Here’s how to find it. 1. Click on the” Image” menu. Then from the list choose “Import”. A dialogue box labeled Open Image appears 2. On the line labeled “Look In”, at the right end of the white box click this dropdown button 3. From the Dropdown list click on “ Local Disk (C) “ This move the Local Disk (C) to the “Look in” box Note: All the folders in Local Disk (C) now appear below in the big white box. 4. If you are using EOS, Click on the “Compucon” folder (If you are using TES, click on the “Barudan” folder Note: Either the Compucon or Barudan folder has now moved to the “Look in” box 5. In the big white box locate and double click on the folder labeled either EOS3 or TES3. This moves to the “Look In” box 6. Again, in the big white box locate the folder “Image” and double click it. 7. Find the “File of Type” box and using the drop down button at the right end, select “all graphic files” Note: open image box now contains a variety of images. Don’t forget to size the image before opening. Refer to the prior paragraph steps 4 through 7. Leave the image open for digitizing practice 15 How to Scan an image (only applies to Creator Plus & Professional Elite levels) Note: must have a scanner (hardware) connected to your computer. 1. Click on the” Image” menu. Then, from the list choose “Scan”. 2. The dialogue box that opens will contain the actual scanning instructional steps from the installed scanner. 3. Note these instructions will vary with manufacturer. Expect to be able to Preview scan & choose the dpi level beforehand. Additional information. The website www.EOS3.com has on its Support page, further helpful information: “ FAQ”, “Trick and Tips”, “Flash Tutorial”, “PDF Tutorials” and “Glossary” These can be printed for your convenience. Other resources include the User Manual, Compucon online & telephone Tech Support. Names of backup professional digitizers are available upon request.